Ion Pumps Control Unit - Agilent
60
Ion Pumps Control Unit Model 529-5001R001 User Manual 87-900-128-01 (E) 03/2014
Transcript of Ion Pumps Control Unit - Agilent

Ion Pumps Control Unit Model
529-5001R001
User Manual 87-900-128-01 (E)
03/2014

Ion Pumps Control Unit User Manual / 87-900-128-01 (E)
Notices © Agilent Technologies, Inc. 2014
No part of this manual may be reproduced in any form or by any means (including electronic storage and retrieval or translation into a foreign language) without prior agreement and written consent from Agilent Technologies, Inc. as governed by United States and international copyright laws.
Manual Part Number Publication Number: 87-900-128-01 (E)
Edition Edition 03/2014
Printed in ITALY
Agilent Technologies Italia S.p.A.
Vacuum Products Division
Via F.lli Varian, 54
10040 Leinì (TO)
ITALY
Warranty The material contained in this document is provided “as is,” and is subject to being changed, without notice, in future editions. Further, to the maximum extent permitted by applicable law, Agilent disclaims all warranties, either express or implied, with regard to this manual and any information contained herein, including but not limited to the implied warranties of merchantability and fitness for a particular purpose. Agilent shall not be liable for errors or for incidental or consequential damages in connection with the furnishing, use, or performance of this document or of any information contained herein. Should Agilent and the user have a separate written agreement with warranty terms covering the material in this document that conflict with these terms, the warranty terms in the separate agreement shall control.
Technology Licenses The hardware and/or software described in this document are furnished under a license and may be used or copied only in accordance with the terms of such license.
Restricted Rights Legend If software is for use in the performance of a U.S. Government prime contract or subcontract, Software is delivered and licensed as “Commercial computer software” as defined in DFAR 252.227-7014 (June 1995), or as a “commercial item” as defined in FAR 2.101(a) or as “Restricted computer software” as defined in FAR 52.227-19 (June 1987) or any equivalent agency regulation or
contract clause. Use, duplication or disclosure of Software is subject to Agilent Technologies’ standard commercial license terms, and non-DOD Departments and Agencies of the U.S. Government will receive no greater than Restricted Rights as defined in FAR 52.227-19(c)(1-2) (June 1987). U.S. Government users will receive no greater than Limited Rights as defined in FAR 52.227-14 (June 1987) or DFAR 252.227-7015 (b)(2) (November 1995), as applicable in any technical data.
Trademarks Windows and MS Windows are U.S. registered trademarks of Microsoft Corporation.
Safety Notices
A CAUTION notice denotes a hazard. It calls attention to an operating procedure, practice, or the like that, if not correctly performed or adhered to, could result in damage to the product or loss of important data. Do not proceed beyond a CAUTION notice until the indicated conditions are fully understood and met.
A WARNING notice denotes a hazard. It calls attention to an operating procedure, practice, or the like that, if not correctly performed or adhered to, could result in personal injury or death. Do not proceed beyond a WARNING notice until the indicated conditions are fully understood and met.
WARNING
CAUTION

Ion Pumps Control Unit
Ion Pumps Control Unit User Manual / 87-900-128-01 (E) 3/60
Ion Pumps Control Unit

Ion Pumps Control Unit
4/60 Ion Pumps Control Unit User Manual / 87-900-128-01 (E)

Contents
Ion Pumps Control Unit User Manual / 87-900-128-01 (E) 5/60
Contents
1 Installation procedure 7
General Information 8 Symbols used 9
Controller Description 10
Storage 10
Preparation for Installation 111
Installation 13
Use 14
Usage 18
Operating modes 19
Error Messages 22
Maintenance 24
Disposal 25
2 Technical Information 26
Ion Pump Controller Description 28
PIN Functions 38

Contents
6/60 Ion Pumps Control Unit User Manual / 87-900-128-01 (E)

Ion Pumps Control Unit User Manual
7/60
1 Installation Procedure General Information 8 Symbols used 9 Controller Description 10 Storage 10 Preparation for installation 11 Installation 13 Use 14 Ion Pumps C.U. Front Panel Controls and Indicators 15 Ion Pumps C.U. Rear Panel 17 Usage 18 Operating modes 19 Power Line supply 19 LOCAL-REMOTE I/O Operation 19 SERIAL Operation 20 START/PROTECT Operation 21 Error Messages 22 On Front Panel 22 Maintenance 24 Disposal 25 Original Instructions

1 Installation Procedure General Information
8/60 Ion Pumps Control Unit User Manual / 87-900-128-01 (E)
General Information This equipment is destined for use by professionals. The user should read this instruction manual and any other additional information supplied by Agilent before operating the equipment. Agilent will not be held responsible for any events occurring due to non-compliance, even partial, with these instructions, improper use by untrained persons, non-authorised interference with the equipment or any action contrary to that provided for by specific national standards.
The following paragraphs contain all the information necessary to guarantee the safety of the operator when using the equipment. Detailed information is supplied in the appendix "Technical Information".
This manual uses the following standard protocol:
CAUTION! The caution messages are displayed before procedures which, if not followed, could cause damage to the equipment.
WARNING!
The warning messages are for attracting the attention of the operator to a particular procedure or practice which, if not followed correctly, could lead to serious injury.
NOTE The notes contain important information taken from the text.

Installation Procedure Symbols used
1
Ion Pumps Control Unit User Manual / 87-900-128-01 (E) 9/60
Symbols used The following symbols are used consistently throughout in all illustration:
Symbol Description
On (Power)
Off (Power)
Caution, risk of electric shock.
Warning “see installation/operating mode instruction”

1 Installation Procedure Controller description
10/60 Ion Pumps Control Unit User Manual / 87-900-128-01 (E)
Controller description Agilent’s controller is an ion pumps controller.
It can drive up to 2 Ion Pumps simultaneously and independently. The controller is designed to give the HV to the Ion Pumps when it is connected to the Mains supply (Max. Output Voltage = 5000 Vdc). (See the paragraph “Technical Informations” for details).
Agilent’ s Ion Pump controller can be driven in Local/Remote I/O operating mode or in the Serial mode via the RS232 port. The selection of the operating mode is done by means of the SERIAL/LOCAL-Remote I/O switch on the controller front panel.
In the LOCAL-REMOTE I/O mode, all the commands are given by the front panel or by the connections to the DB25 “REMOTE” connector on the rear panel.
The pump operating conditions data are anyway available on the serial connection. In the SERIAL mode, all the commands are given through the serial connection and all the pump operating conditions data are available on the serial connection.
Storage When transporting and storing the controller, the following environmental requirements should not be exceeded:
temperature: from -20° to +70 °C
relative humidity: 0 – 95 % (non-condensing)

Installation Procedure Preparation for installation
1
Ion Pumps Control Unit User Manual / 87-900-128-01 (E) 11/60
Preparation for installation The controller is supplied in a special protective packing. If this shows signs of damage which may have occurred during transport, contact your local sales office. When unpacking the controller, be sure not to drop it and avoid any kind of sudden impact or shock vibration to it.
Do not dispose of the packing materials in an unauthorized manner. The material is 100 % recyclable and complies with EEC Directive 85/399.

1 Installation Procedure Preparation for installation
12/60 Ion Pumps Control Unit User Manual / 87-900-128-01 (E)
Figure 1 Packing

Installation Procedure Installation
1
Ion Pumps Control Unit User Manual / 87-900-128-01 (E) 13/60
Installation
WARNING!
The controller is equipped with a 3-wire power cord without plug. Install the proper plug foreseen by the country where the controller will be used.
Note that the Yellow/Green wire of the cable is the Ground connection of the controller. Use this power cord and the installed plug in conjunction with a properly grounded power socket to avoid electrical shock. Verify that the ground connections are properly connected. High voltage developed in the controller can cause severe injury or death. Before servicing the unit, disconnect the power cable.
CAUTION! The controller can be used as a bench unit or as a rack module, but it must be positioned so that free air can flow through the holes of the top and the side cover. If the controller is used as a rack module, it MUST be inserted in a 4 unit height rack adapter chassis to avoid the controller to fall inside the rack. The Controller front panel is not designed to support the unit weight. Do not install or use the controller in an environment exposed to atmospheric agents (rain, snow, ice), dust, aggressive gases, or in explosive environments or those with a high fire risk.
NOTE If the controller is installed on a rack, remove the four feet and position it with at least 30 mm (1.2 inches) of clearance on top and bottom.

1 Installation Procedure Use
14/60 Ion Pumps Control Unit User Manual / 87-900-128-01 (E)
WARNING!
The controller must be installed in a way that allows an easy interruption of the line voltage (disconnection of the line plug or interruption on the rack general line switch).
During operation, the following environmental conditions must be respected:
temperature: from +5 °C to +40 °C
relative humidity: 0 – 95 % (non-condensing)
To connect the controller to the pump use the specific cables supplied.
See the appendix “Technical Information” for detailed information about the above mentioned and the other connections.
Use This paragraph describes the fundamental operating procedures. Detailed information and operating procedures that involve optional connections or options are supplied in the paragraph “USE” of the appendix “Technical Information”.
Make all vacuum manifold and electrical connections and refer to the connected pump instruction manual prior to operating the controller..
WARNING!
To avoid injury to personnel and damage to the equipment, if the pump is laying on a table make sure it is steady. Never operate the pump if the pump inlet is not connected to the system or blanked off.

Installation Procedure Use
1
Ion Pumps Control Unit User Manual / 87-900-128-01 (E) 15/60
Ion Pumps C.U. Front Panel Controls and Indicators
The figure and the table of the following page illustrate the Controller front panel controls and indicators with relevant description and function.
NOTE Some controls and indicators change their function and meaning according to the position of HV ON OFF switch. The table describes all function and meaning.
Figure 2 Ion Pumps C.U. Front Panel Controls and Indicators
SERIAL
LOCAL / REM I/O OFF / O OFF / O
ON / I ON / I
MODE GUN TARGET
MAINS ON
1
6
4
5
3
2

1 Installation Procedure Use
16/60 Ion Pumps Control Unit User Manual / 87-900-128-01 (E)
REF. SIGNAL DESCRIPTION 1 MAINS ON LED When On it means that the unit is connected to the Power Line and the
Line Switch on the rear panel is in ON (I) position. 2 GUN ON/OFF
SWITCH When in ON (I) position, it switches On the HV to the GUN PUMP if the controller is set for LOCAL/REMOTE I/O operation and the external and HV Cable interlocks are closed.
3 GUN LED It is On bold when the HV GUN PUMP is on and the voltage is over 1250 V (+/- 250 V hysteresys) volt. It is slow flashing (1 flash at second) when the voltage on HV GUN PUMP is lower than 1250 V (+/- 250 V hysteresys) volt. It is fast flashing in case of Fault (see paragraph “Technical Information” for details)
4 TARGET ON/OFF SWITCH
When in ON (I) position, it switches On the HV to the TARGET PUMP if the controller is set for LOCAL/REMOTE I/O operation and the external and HV Cable interlocks are closed.
5 TARGET LED It is On bold when the HV TARGET PUMP is on and the voltage is over 1250 V (+/- 250 V hysteresys). It is slow flashing (1 flash at second) when the voltage on HV TARGET PUMP is lower than 1250 V (+/- 250 V hysteresys). It is fast flashing in case of Fault (see paragraph “Technical Information” for details).
6 SERIAL/LOCAL-REM I/O SWITCH
It allows to select the operating mode: SERIAL: all the commands are given through the serial line. LOCAL-REM I/O: all the commands are given through the unit front panel or through the 25 pin REMOTE connector on the rear panel.

Installation Procedure Use
1
Ion Pumps Control Unit User Manual / 87-900-128-01 (E) 17/60
Ion Pumps C.U. Rear Panel The controller rear panel controls and connections are shown in the following figure. For detailed information about the connections see the appendix “Technical Information”.
Figure 3 Ion Pumps C.U. Rear Panel

1 Installation Procedure Usage
18/60 Ion Pumps Control Unit User Manual / 87-900-128-01 (E)
REF. SIGNAL DESCRIPTION 1 GUN Connector HV Connector for Cable to GUN Pump 2 TARGET Connector HV Connector for Cable to TARGET Pump 3 LINE INPUT Module containing the Line Input cable plug and the Line Switch 4 FUSE Protection Fuse holder (2 fuses) 5 SERIAL Connector DB9 connector for the Serial cable 6 REMOTE Connector DB25 connector for the REMOTE I/O connections 7 GUN Cable Interlock 8 TARGET Cable Interlock
Usage This paragraph gives a general information on the use of the controller. For details refer to the “Technical Information” paragraph. When the controller is plugged to the Power Line and the Line Switch on the rear panel is ON (I), it is able to operate with its full set of features:
2 independent HV channels
+5000 Vdc maximum output Voltage
40 W maximum output Power for channel 1
80 W maximum output Power for channel 2
30 mA maximum output current (short circuit condition) for gun
50 mA maximum output current (short circuit condition) for target
LOCAL-REMOTE I/O/SERIAL operating mode
START/PROTECT operation

Installation Procedure Operating modes
1
Ion Pumps Control Unit User Manual / 87-900-128-01 (E) 19/60
Operating modes
Power Line supply
LOCAL-REMOTE I/O Operation
NOTE The 2 HV switches on the front panel and the 2 HV On/Off inputs on the DB25 “Remote” connector on the rear panel are functionally in series.
HV On/Off gun by front panel: Connect together pin 8 and pin 21 of the remote I/O connector and move the gun switch on the front panel.
HV On/Off target by front panel: Connect together pin 9 and pin 22 of the Remote I/O connector and move the gun switch on the front panel.
The correspondent HV cable Interlocks must be closed.
When the HV is ON, the corresponding HV LED on the front panel, will be ON.
WARNING!
Auto – start function:ON. In case of power loss with GUN and/or TARGET ON, at next power-on the unit will switch on the HV (previously on) automatically.
Auto power-on function. With front panel switches in ON position and remote I/O jumpers, the unit will switch on both channels as soon as the mains is on.

1 Installation Procedure Operating modes
20/60 Ion Pumps Control Unit User Manual / 87-900-128-01 (E)
NOTE If the connection between the IPCU and the pump is done by means of an HV Cable with Safety Interlock, the cable must be connected to the pump F/T and the small “banana” connector on the cable controller side must be inserted in the corresponding “HV Cable Interlock” plug on the unit rear panel in order to be able to switch on the HV.
If the connection is done with a single pole HV Cable without the Safety Interlock, ensure that the jumper provided on the unit rear panel is inserted in the “HV Cable Interlock” plug.
SERIAL Operation
NOTE The SERIAL is set in order to operate by connecting the controller to an external PC that uses the “HYPER TERMINAL” or equivalent program (for example a proprietary user program) running under Windows Operating System or other. To operate in serial mode, connect the serial port to the controller “Serial” connector on the rear panel, run the Windows “HYPER TERMINAL” program on the PC with the following default settings:
COM1
9600 baud
No parity
data bits
1 stop bit
This way of operation will allow to verify the functionality of the unit in the “SERIAL” operating mode, give the commands and get all the operating data.

Installation Procedure Operating modes
1
Ion Pumps Control Unit User Manual / 87-900-128-01 (E) 21/60
NOTE In the serial operation, depending on the user environment, the O.S. used must have real time capability.
See the “Technical Information” paragraph for details.
START/PROTECT Operation The controller can operate in two modes: Start and Protect.
In Start, the 2 output channels can provide all the output power regardless of the pump condition up to the short circuit condition.
This operating mode must be used to start the pump at high pressure.
In Protect, the controller limits the output current and switches off the HV when the current exceeds the threshold value (8 mA for 40 W channel and 16 mA for 80 W channel) for more than 2 seconds.
The default mode is “Start” mode.

1 Installation Procedure Error Messages
22/60 Ion Pumps Control Unit User Manual / 87-900-128-01 (E)
Error Messages
On Front Panel During the controller operation, if an error condition is detected, the HV LEDs on the front panel will give the indication:
GUN, TARGET
LEDS ON: Normal Operation = HV ON
Led GUN, TARGET flashing: error condition:
1 flash every 4 seconds = Interlock HV cable
2 flashes every 4 seconds = remote Interlock
3 flashes every 4 seconds = HV Over voltage (This Fault doesn’ t switch-off the HV)
4 flashes every 4 seconds = error inside ADC
5 flashes every 4 seconds = overcurrent on HV (short circuit)
6 flashes every 4 seconds = the Local/Remote switch was moved with HV ON
7 flashes every 4 seconds = over temperature inside unit
8 flashes every 4 seconds = overcurrent in Protect (8 mA for 40W channel and 16 mA for 80W channel)
9 flashes every 4 seconds = HV Under voltage
In Local-Remote I/O mode, the Reset of the Fault condition is accomplished by switching to Off (0) the front panel switch of the corresponding channel.
In Serial mode, the Reset of the Fault condition is accomplished by sending the “F0n” command by the computer.

Installation Procedure Error Messages
1
Ion Pumps Control Unit User Manual / 87-900-128-01 (E) 23/60
NOTE If one of the following conditions happens while the HV of the channel is On, the output of the channel is immediately set to Off, the LED on the front panel indicates the corresponding Fault condition and the Fault information is sent to the Serial output.
Auto retries function. If an under-voltage fail occur, for instance on GUN while both channels were on the unit do:
Distinguish between a real low voltage and thermal switch (TS) intervention.
Keep the Target ON, GUN switched off, no fail condition activated (fault relay remains open), current output recorder goes to 5 V.
Start time out cont (30 min.)
If the TS is restorted before the time out the gun goes on agin and time out count resetted.
If the TS is not restorted after the time out the IPCU goes into fail and both GUN and TARGET are off.
On “Remote” connector on Rear Panel.
“Fault” output: N.C. contact (idle state) =
The contact is Open in “Fault” condition (relay Off)
The contact is Close in normal condition (relay On)
“HV 1,2” output: N.O. contact (idle state) =
The contact is Open with HV in Off state (relay Off)
The contact is Closed with HV in On state (relay On)
“HV 1,2” output current set point: N.O. contact (idle state) =
The contact is Open with output current value is below the current set point (relay Off)
The contact is Closed with output current value above the current set point (relay On)

1 Installation Procedure Maintenance
24/60 Ion Pumps Control Unit User Manual / 87-900-128-01 (E)
Maintenance The Controller does not require any maintenance. Any work performed on the controller must be carried out by authorized personnel.
When a fault has occurred it is possible to use the Agilent repair service. Replacement controllers are available on an advance exchange basis through Agilent.
WARNING!
Before carrying out any work on the controller, disconnect it from the supply.

Installation Procedure Disposal
1
Ion Pumps Control Unit User Manual / 87-900-128-01 (E) 25/60
Disposal Meaning of the "WEEE" logo found in labels The following symbol is applied in accordance with the EC WEEE (Waste Electrical and Electronic Equipment) Directive. This symbol (valid only in countries of the European Community) indicates that the product it applies to must NOT be disposed of together with ordinary domestic or industrial waste but must be sent to a differentiated waste collection system.
The end user is therefore invited to contact the supplier of the device, whether the Parent Company or a retailer, to initiate the collection and disposal process after checking the contractual terms and conditions of sale.
Ion Pumps Control Unit User Manual
26/60
2 Technical Information
Ion Pump Controller Description 28 Controller Specifications 28 Remote I/O Connector Pinout 31 Input Commands Connection 33 Output Signals Connection 33 Analog Recorder Outputs 34 Serial Operation 36 Controller RS232 Standard Serial Pin outs
(DB9 Female Connector) 37 PIN Functions 38 Procedure to Connect the Serial and I/O Ports to an External Cable 39

Technical Information Disposal
2
Ion Pumps Control Unit User Manual / 87-900-128-01 (E) 27/60
Ion Pump Control Unit - Operator / Host Serial Communication 41 Controller Report Mode 42 Controller Commands Mode 42 About Report 46 Enable – Disable Remark Lines 47 Continuous and NON Continuous Report Mode 47 Enable - Disable Input ECO Characters 48 About Commands 48 Report TYPE 0…6 49 User Operator Report Type 0 and User
Technician Report Type 1 49 User Operator Report Type 2 and User
Technician Report Type 3 50 User Operator Report Type 4 and User
Technician Report Type 5 51 Old IPCU Releases - Compatibility Report Type 6 52 Floating Point Notation 53 Cleaning 54 Original Instructions

2 Technical Information Ion Pump Controller Description
28/60 Ion Pumps Control Unit User Manual / 87-900-128-01 (E)
Ion Pump Controller Description The Ion Pump controller is composed of a number of printed circuit boards:
1 board: (Power Supply), it converts the Line Voltage to the 24 Vdc that is used to generate the HV.
1 board: (Auxiliary Power Supply), it generates the + and – 12 Vdc for the analog circuitry, the 5 Vdc for the digital circuitry.
2 boards: (HV generation), they generate the HV for the 2 output channels.
1 board: (CPU), it contains all the digital circuitry and the microprocessor.
1 internal fan (OFF if for each channel the output current is <2 mA).
Controller Specifications Tab. 1
Line: Voltage Frequency Max Power
100 - 240 Vac ± 10 % 50 / 60 Hz ± 5 % 200 VA
Operating conditions: Internal use only Max Altitude: Max Line Voltage variation:
3000 m ± 10 %
Installation category: II Pollution degree: 2

Technical Information Ion Pump Controller Description
2
Ion Pumps Control Unit User Manual / 87-900-128-01 (E) 29/60
Output for the pumps: Output Voltage (each channel) Output Current (each channel) Maximum Output Power GUN Maximum Output Power TARGET
Default value =+5000 V +1/-5 %, settable from +3000 to +5000 Vdc at steps of +/- 50 V by Serial Line command 30 mA ± 10 % for 40 W output, 50 mA +/- 10 % for 80 W output 40 W 80 W
Current Recorder Output signal 0 to 5 Vdc logarithmic, proportional to 1.0e-8 to 1.0e-1 A 1 recorder output for each pump. Minimum recorder input impedance: 1MOhm Precision: < than 1% Current Measurement Resolution: 10nA under 100μA; 1μA over 100μA
Operating Temperature 10 °C to 40 °C Relative Humidity 0 – 95 % (non-condensing) Storage Temperature -20 °C to 70 °C Compliance to Norms Radio Interference: EN55011 Class A Group 1
Harmonics: EN61000/3/2 Flickers: EN61000/3/3 ESD: EN61000/4/2 4 kV Contact 8kV AIR Burst: EN61000/4/4 Vac Signal Radiated RF Immunity: EN61000/4/3 Surge: EN61000/4/5 Conducted noise imm.: EN61000/4/6 Line supply interruptions: EN61000/4/11 Compliance Safety: EN61010-1
Line fuse Two T4AH250V High Voltage Connection 2 High Voltage Fischer connectors

2 Technical Information Ion Pump Controller Description
30/60 Ion Pumps Control Unit User Manual / 87-900-128-01 (E)
Installation according to international rules, only of the following HV cables Part No. may be used: HV Cables P/N 929-0705 HV bakeable cable, radiation resistant, 4 meter 929-0707 HV bakeable cable, radiation resistant, 7 meter 929-0708 HV bakeable cable, radiation resistant, 10 meter 929-0709 HV bakeable cable, radiation resistant, 20 meter
NOTE All connecting cables for remote I/O and serial connections, must be of the shielded type.
Figure 4 Controller Outline
MAINS
TARGET
SERIAL
/LOCAL
/
/
MODE
/
/
BATTERYF1 T4AH250V
FUSE
F2 T4AH250V
INPUTLINE
400.00400.00
201.
60
400.00
146.
80
400.00
420.00
OI
REMOTE I/O
SERIAL
CABLE INTERLOCKTARGET
TARGET
HV OUTPUT

Technical Information Ion Pump Controller Description
2
Ion Pumps Control Unit User Manual / 87-900-128-01 (E) 31/60
Remote I/O Connector Pinout
Figure 5 Remote I/ O Pinout Rear Panel D-Shell Female 25P
Installation according to international rules.
All the input/output remote signals to/from the controller must be connected at mating connector. With the provided mating connector make the connection with AWG 24 (0.25 mm2) or smaller wire to the pins indicated in the figure to obtain the desired capability. It is a 15-pins D type connector; the available signals are detailed in the table, the following paragraphs describe the signal characteristics and use.
In case there is the need to use the Remote Interlock function or to switch On and Off the HV on the 2 pumps by Remote, remove the two jumpers and follow the indications given in the above input commands connection pin out drawing.
REMOTE GUN CURRENT STATUS (N.O.)REMOTE TARGET CURRENT STATUS (N.O.)
REMOTE GUN ON/OFF COMMANDREMOTE TARGET ON/OFF COMMAND
REMOTE GUN ANALOG RECORD OUTPUT (0-5V)REMOTE TARGET ANALOG RECORD OUTPUT (0-5V)
REMOTE GUN CURRENT STATUS (COM)REMOTE TARGET CURRENT STATUS (COM)
REMOTE GUN ON/OFF COMMAND (REF GND)REMOTE TARGET ON/OFF COMMAND (REF GND)
REMOTE GUN ON/OFF STATUS (N.O.) REMOTE TARGET ON/OFF STATUS (N.O.)
REMOTE FAULT STATUS (N.O.)
REMOTE GUN ON/OFF STATUS (COM)
REMOTE TARGET ON/OFF STATUS (COM)
RESERVED

2 Technical Information Ion Pump Controller Description
32/60 Ion Pumps Control Unit User Manual / 87-900-128-01 (E)
Tab. 2 Remote I/ O connector signals
25-Pin No. IN - OUT Name Description 1-14 OUT Remote GUN current status N.O. Closed when Iout
<Iset-point (2mA) Open when Iout >Iset-point (2mA)
2-15 OUT Remote TARGET current status N.O.
Closed when Iout <Iset-point (2mA) Open when Iout >Iset-point (2mA)
4-17 OUT Remote GUN status N.O. Open: HV off Closed: HV on
5-18 OUT Remote TARGET status N.O. Open: HV off Closed: HV on
6-20 OUT Remote FAULT status N.O. Open: FAIL Closed: OK
7-20 OUT Remote FAULT status N.C. Open: OK Closed: FAIL
8-21 IN Remote GUN ON/OFF command Open: OFF Closed: ON
9-22 IN Remote TARGET ON/OFF command
Open: OFF Closed: ON
11-24 (GND)
OUT Remote GUN current analog record
0 to 5 volt (see below)
12-24 (GND)
OUT Remote TARGET current analog record
0 to 5 volt (see below)

Technical Information Ion Pump Controller Description
2
Ion Pumps Control Unit User Manual / 87-900-128-01 (E) 33/60
Input Commands Connection Input signals: Optically Insulated
Insulated 24 Vdc (+10 %, -50 %) supply for input signal: Internally generated.
Output Signals Connection Relay outputs.
Max voltage: 24 V
Max current: 200 mA
Min current: 10 μA
Bouncing Time: NO=1msec; NC=3msec

2 Technical Information Ion Pump Controller Description
34/60 Ion Pumps Control Unit User Manual / 87-900-128-01 (E)
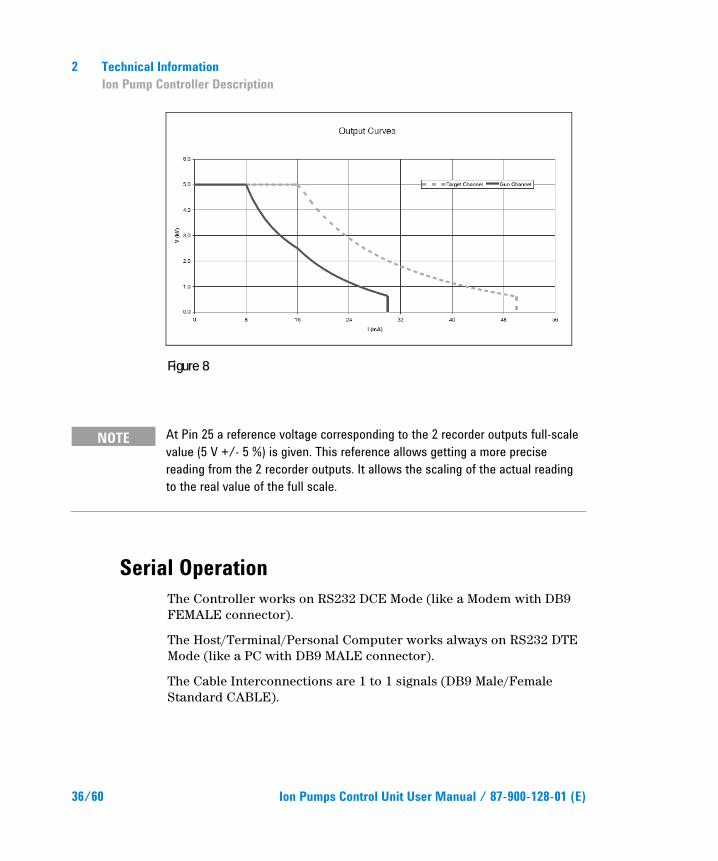
Analog Recorder Outputs The analog recorder outputs are two indipendent outputs for each channel.
The voltage is related to the log10 of the current absorbed by the pump.
The exact formula is:
Vrec-out = 1.35 • log10 Iout + 6,77
[Vrec-out] = Volt; [Iout] = A
Figure 6
Vrec-out vs Iout
0,00
0,50
1,00
1,50
2,00
2,50
3,00
3,50
4,00
4,50
5,00
1,00E-05 1,00E-04 1,00E-03 1,00E-02 1,00E-01
Iout (A)
Vrec
-out
(V)

Technical Information Ion Pump Controller Description
2
Ion Pumps Control Unit User Manual / 87-900-128-01 (E) 35/60
If the pump connected to the output is a 35l/s SEM the relation between Vrec-out and pressure is:
Figure 7
NOTE The current reading (using the analog recorder output or serial line) is fixed to the max current (30 mA for GUN, 50 mA for TARGET) untill the HV voltage cross the 1.5 KV.
Pressure - Vrec-out
1,000E-08
1,000E-07
1,000E-06
1,000E-05
1,000E-04
1,000E-03
0,0 0,5 1,0 1,5 2,0 2,5 3,0 3,5 4,0 4,5 5,0
Vrec-out (V)
P(m
bar)
2 Technical Information Ion Pump Controller Description
36/60 Ion Pumps Control Unit User Manual / 87-900-128-01 (E)
Figure 8
NOTE At Pin 25 a reference voltage corresponding to the 2 recorder outputs full-scale value (5 V +/- 5 %) is given. This reference allows getting a more precise reading from the 2 recorder outputs. It allows the scaling of the actual reading to the real value of the full scale.
Serial Operation The Controller works on RS232 DCE Mode (like a Modem with DB9 FEMALE connector).
The Host/Terminal/Personal Computer works always on RS232 DTE Mode (like a PC with DB9 MALE connector).
The Cable Interconnections are 1 to 1 signals (DB9 Male/Female Standard CABLE).
Technical Information Ion Pump Controller Description
2
Ion Pumps Control Unit User Manual / 87-900-128-01 (E) 37/60
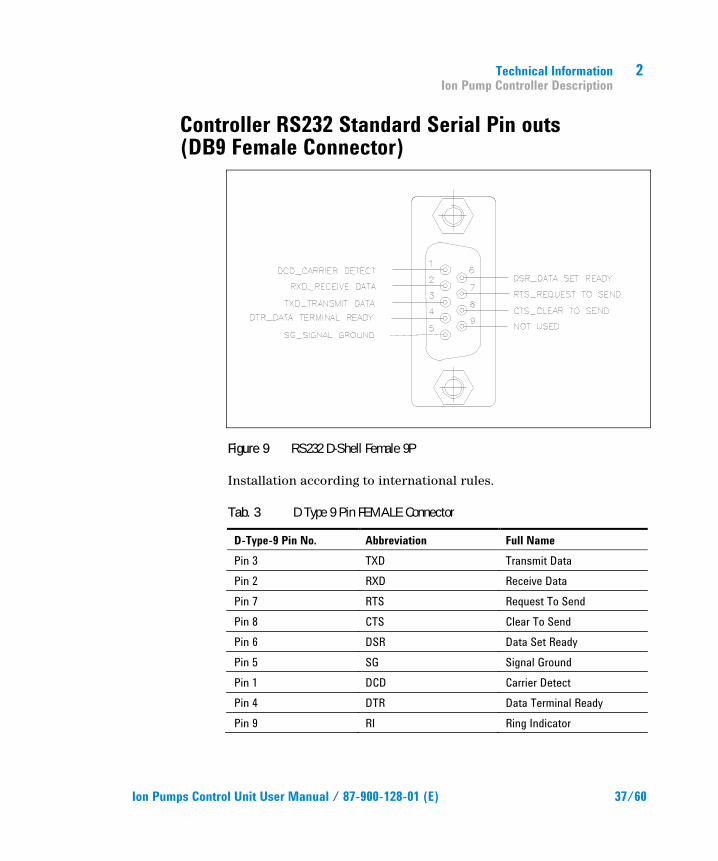
Controller RS232 Standard Serial Pin outs (DB9 Female Connector)
Figure 9 RS232 D-Shell Female 9P
Installation according to international rules.
Tab. 3 D Type 9 Pin FEMALE Connector
D-Type-9 Pin No. Abbreviation Full Name Pin 3 TXD Transmit Data Pin 2 RXD Receive Data Pin 7 RTS Request To Send Pin 8 CTS Clear To Send Pin 6 DSR Data Set Ready Pin 5 SG Signal Ground Pin 1 DCD Carrier Detect Pin 4 DTR Data Terminal Ready Pin 9 RI Ring Indicator

2 Technical Information PIN Functions
38/60 Ion Pumps Control Unit User Manual / 87-900-128-01 (E)
PIN Functions Tab. 4
Abbreviation Full Name Function TXD Transmit Data DTE Serial Data Output (TXD), IPCU Serial Data Input RXD Receive Data DTE Serial Data Input (RXD), IPCU Serial Data Output CTS Clear to Send This line indicates that the Modem (Controller) is ready to exchange
data. DCD Data Carrier
Detect When the Modem (IPCU) detects a "Carrier" from the other end of the line, this line becomes active.
DSR Data Set Ready This tells the DTE that the Modem (IPCU) is ready to establish a link.
DTR Data Terminal Ready
This is the opposite of DSR. This tells the Modem (Controller) that the DTE is ready to link.
RTS Request To Send This line informs the Modem (IPCU) is ready to exchange data. RI Ring Indicator Goes active when Modem detects a ringing signal from the PSTN.
Not used on the Controller.
RTS / CTS are jumpered together on the Controller connector and DTR is jumpered to DSR / DCD on IPCU connector. The DTE sees the IPCU like a Standard MODEM.

Technical Information Procedure to Connect the Serial and I/O Ports to an External Cable
2
Ion Pumps Control Unit User Manual / 87-900-128-01 (E) 39/60
Procedure to Connect the Serial and I/O Ports to an External Cable
The following picture shows the right procedure to connect a cable to the I/O or to the serial port connector.
A shielded cable of 30 m maximum length has to be utilized for both serial and I/O port connections.
NOTE Take care to have a good contact (soldered) between the metallic connector case and the external shield of the cable. Moreover, this connection has to be assured at least on the controller side.

2 Technical Information Procedure to Connect the Serial and I/O Ports to an External Cable
40/60 Ion Pumps Control Unit User Manual / 87-900-128-01 (E)
In this way, you will be sure to reduce the influence of the external noise and to accomplish the EMC requests. In picture d is showed the cable assembled.
Figure 10

Technical Information Procedure to Connect the Serial and I/O Ports to an External Cable
2
Ion Pumps Control Unit User Manual / 87-900-128-01 (E) 41/60
Ion Pump Control Unit - Operator / Host Serial Communication
The Controller Report and Operator/Host Command are ASCII strings CR (0D hexadecimal, 13 decimal) terminated.
Default Communication Parameters are 9600 bits/sec, no parity, 8 bits data, 1 stop bit.
Usually the human interface of the controller is a terminal emulator (Windows "HyperTerminal" communication program for example) running on Personal Computer.
Software program on PC or PLC can use the same ASCII protocol described below for human interface for doing automatic control and monitoring of the controller.
Every 100 (min) to 1000 (max) msec, if the controller is in Report mode (default), all the 2 Report strings made of 30 characters each, corresponding to the 2 HV channels are sent by the IPCU.
The string is made of different length depending on the report tipe selected for each HV channel (independently by the channel status).
A transmission from the external PC, turns the IPCU to the Command Mode.
To go back to the Report Mode complete the command string with CR (0x0D) or ESC (0x1B).
Every single received character is Echoed back in order to allow a control by the operator.

2 Technical Information Procedure to Connect the Serial and I/O Ports to an External Cable
42/60 Ion Pumps Control Unit User Manual / 87-900-128-01 (E)
Controller Report Mode Tab. 5 " HVn status fault start/ protect current voltage"
HV [HV] 2 characters 'HV' n [1, 2, 3] 1 character ' ' [0x20] 1 character SPACE status [OFF__, FAULT, ON___] 5 characters ' ' [0x20] 1 character SPACE fault [00, .., FF] 2 characters ' ' [0x20] 1 character SPACE start/protect [0, 1] 0=Start(default), 1=Protect 1 character ' ' [0x20] 1 character SPACE current [10 ... 99999 nA, 100 ... 60000 uA] 7 characters ' ' [0x20] 1 character SPACE voltage [0 ... 5999V] 6 characters 'CR' ' ' [0x0D] 1 character CR
Controller Commands Mode Tab. 6 HV Channel On/ Off Setting
"A0ns”[Enter] where : A0 HV Channel Serial Command for Status Set N HV Channel Number 1 or 2 s 0 for OFF, 1 for ON
Tab. 7 HV Channel Start/ Protect Mode Setting
"C0ns”[Enter] where : C0 HV Channel Serial Command for Start/Protect Setting
n HV Channel Number 1 or 2 s 0 for START mode, 1 for PROTECT mode
Tab. 8 Clear Fault (Reset)
“F0n”[Enter] where: F0 HV Channel Serial Command for Fault reset n HV Channel Number 1 or 2

Technical Information Procedure to Connect the Serial and I/O Ports to an External Cable
2
Ion Pumps Control Unit User Manual / 87-900-128-01 (E) 43/60
Tab. 9 Bit positional Fault table when HV ON:
Err # Description Front Panel LED 0001] Cable Interlock when HV On 1 blink of 200 ms every 4 s [0002] Remote Interlock when HV On 2 blink of 200 ms every 4 s [0004] HV Over Voltage when HV On 3 blink of 200 ms every 4 s [0008] Bad Current Offset starting HV On 4 blink of 200 ms every 4 s [0010] HV Over Power when HV On 5 blink of 200 ms every 4 s [0020] Panel Switch Moved when HV On 6 blink of 200 ms every 4 s [0040] HV Over Temperature when HV On 7 blink of 200 ms every 4 s [0080] HV Over Current – Protect=Enable 8 blink of 200 ms every 4 s [0100] HV Under Voltage when HV On 9 blink of 200 ms every 4 s
Tab. 10 Bit positional Event table when HV ON or OFF:
Err # Description Front Panel LED [0001] Cable Interlock when HV Off No blink [0002] Remote Interlock when HV Off No blink [0004] HV Over Voltage when HV On No blink [0008] Bad Current Offset when HV Off No blink [0010] HV Over Power when HV On No blink [0020] Spare No blink. [0040] Over Temperature No blink [0080] HV Over Current – Protect=Disable No blink [0100] Current Below Threshold when HV On No blink [0200] HV Under Voltage when HV On No blink
Tab. 11 Max Output Voltage setting
“H0nxxxx”[Enter] where: H0 HV Channel Serial Command for Voltage Target
n HV Channel number 1 or 2 xxxx = Voltage Target (min 3000V, max 5000V in 50 V steps)
2 Technical Information Procedure to Connect the Serial and I/O Ports to an External Cable
44/60 Ion Pumps Control Unit User Manual / 87-900-128-01 (E)
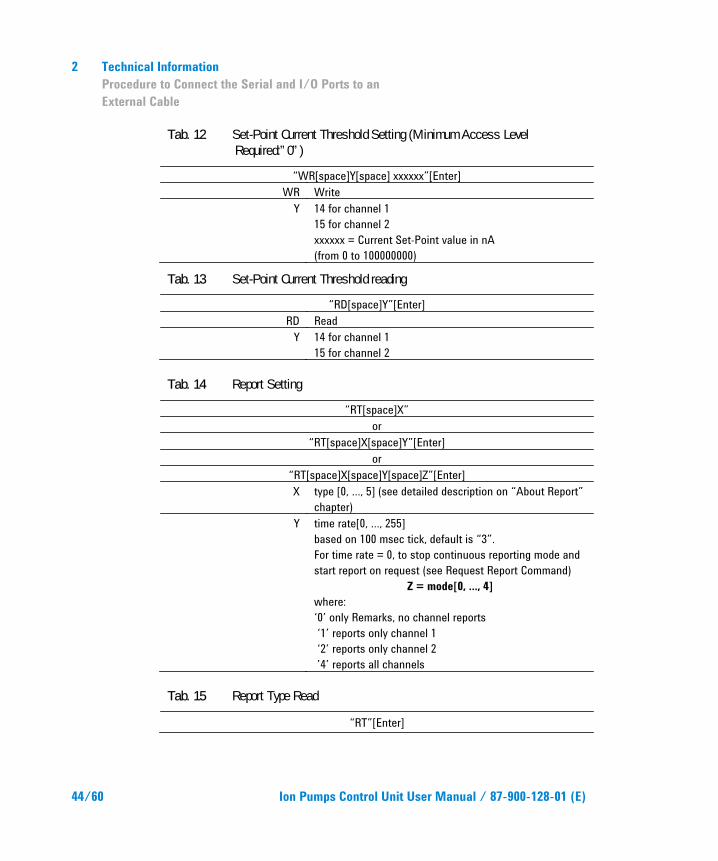
Tab. 12 Set-Point Current Threshold Setting (Minimum Access Level Required:”0”)
“WR[space]Y[space] xxxxxx”[Enter] WR Write
Y 14 for channel 1 15 for channel 2 xxxxxx = Current Set-Point value in nA (from 0 to 100000000)
Tab. 13 Set-Point Current Threshold reading
“RD[space]Y”[Enter] RD Read
Y 14 for channel 1 15 for channel 2
Tab. 14 Report Setting
“RT[space]X” or
“RT[space]X[space]Y”[Enter] or
“RT[space]X[space]Y[space]Z”[Enter] X type [0, …, 5] (see detailed description on “About Report”
chapter) Y time rate[0, …, 255]
based on 100 msec tick, default is “3”. For time rate = 0, to stop continuous reporting mode and start report on request (see Request Report Command)
Z = mode[0, …, 4] where: ‘0’ only Remarks, no channel reports ‘1’ reports only channel 1 ‘2’ reports only channel 2 ’4’ reports all channels
Tab. 15 Report Type Read
“RT”[Enter]

Technical Information Procedure to Connect the Serial and I/O Ports to an External Cable
2
Ion Pumps Control Unit User Manual / 87-900-128-01 (E) 45/60
Tab. 16 Request Report (in NON Continuous Report Mode)
“RR”[Enter]
Tab. 17 Enable, Dis able Receiving Input ECO
(Access Level 1 Required) “WR[space]Y[space]X”[Enter]
WR Write Y 29 (parameter number) X 0 for No input ECO 1 for input ECO (default value)
Tab. 18 Enable, Disable Remark Line Reporting
(Access Level 1 Required) “WR[space]Y[space]X”[Enter]
WR Write Y 30 (parameter number) X 0 for No remark lines (except the first three)1 for Remark
Line (default value)
Tab. 19 Enable, Disable Value in Floating Point Report Mode
(Access Level 1 Required) “WR[space]Y[space]X”[Enter]
WR Write Y 31 (parameter number) X 0 for Standard Report Mode (default value) 1 for Floating
Point Report Mode

2 Technical Information Procedure to Connect the Serial and I/O Ports to an External Cable
46/60 Ion Pumps Control Unit User Manual / 87-900-128-01 (E)
About Report The continuous report sent by the IPCU protocol communication is structured as follow:
At each main power on start up six remarking lines are sent.
The first line sent is the firmware release, for instance:
“* REL [20051117 ICPU]”.
The second line is the notification that the EEPROM’s parameter are wrote into RAM:
* EVT [LOAD_EEPROM_PARAMETERS_INTO_RAM]
The third line is the notification that the calibration of the Analog to Digital Convert used for the measurement of output high voltage and current are done:
* EVT [ADC_CALIBRATION]
The fourth line is reporting that the internal I/O BUS are initialized:
* EVT [IO_BUS_INIT]
The fifth line is the notification that a main power on cold system startup reset is happened:
* EVT [COLD_RESET_SYSTEM_STARTUP]
The sixth and last line reports the number “n” of Power On Cold Reset happened up to that moment:
* POR [n]
These six lines are sent also if the EEPROM’s parameter n. 30 are set to “0” = Disable Remark Lines.
After these six lines, the normal report sequence starts, accordingly to the report type chosen notifying the user about the values of voltage, current and power, faults and events status for each channel.

Technical Information Procedure to Connect the Serial and I/O Ports to an External Cable
2
Ion Pumps Control Unit User Manual / 87-900-128-01 (E) 47/60
When an ion pump discharge happens, the unit performs a warm system start reset automatically bringing to 0 V the HV to stop the discharge, then it sends again the first five remarking lines with the fifth changed to:
* EVT [WARM_RESET_SYSTEM_RESTART]
to inform that a warm reset system restart is happened and the HV output, that was in the ON state before the discharge, is automatically restarted.
After these five lines, the normal report sequence starts, accordingly to the report type chosen.
Enable – Disable Remark Lines These five lines are sent also if the EEPROM’s parameter n. 30 are set to “0” = Disable Remark Lines.
If the EEPROM’s parameter n. 30 is set to “1”, all the remark lines, the lines that begin with the symbol “*”, are sent.
For EEPROM’s parameter n. 30 = “0”, all the remark lines are NOT sent, except the first six lines at the main power on reset (cold reset) and the first five lines after an ion pump discharge reset (warm reset) sent anyway.
Continuous and NON Continuous Report Mode IPCU is able to send report only on request.
To do this, it is necessary to set the report mode with the time rate = 0.
After the “enter”, the continuous report mode stops immediately.
According to the report type and mode, the unit sends one instantaneous report each time a “Request Report” (RR) command is received.

2 Technical Information Procedure to Connect the Serial and I/O Ports to an External Cable
48/60 Ion Pumps Control Unit User Manual / 87-900-128-01 (E)
To return in the continuous report mode it is necessary to send a new “Report Setting” (RT) command with time rate ≠ 0.
After the “enter” the continuous report mode starts immediately.
Enable - Disable Input ECO Characters By default, the unit transmits the ECO of all characters received from the host.
If required, It is possible to disable this feature.
See the command “Enable, Disable Receiving Input ECO” to do this.
The ECO of input characters may be used to understand that the physical communication between the unit and host is good so, disabling the ECO this feature is lost.
About Commands When the unit receives a command, it transmits the plus symbol: “+” to confirm the command is executable.
If the command is not correct, the unit transmits the minus symbol: “-“.
When the parameter of a command is out of range, the unit sends:
“- [PARAMETER_ERROR]”.
The unit receives continuously input characters from host but they are hold only if the panel switch “Local-Remote/Serial” is on Serial.
If this switch is on Local-Remote and a character is received, the unit sends:

Technical Information Procedure to Connect the Serial and I/O Ports to an External Cable
2
Ion Pumps Control Unit User Manual / 87-900-128-01 (E) 49/60
Report TYPE 0…6 The User Operator Reports Type 0, 2, 4 and 6 display the ‘continuous average value’ for the HV Channel Current, Voltage and Power, both in normal or scientific notation and the ‘instantaneous measured or control values’ in the hexadecimal format.
Technical Reports Type 1, 3 and 5 report the ‘instantaneous measured values’ for the HV Channel Current, Voltage and Power, both in normal or scientific notation and the ‘continuous average measured values’ in the hexadecimal format.
User Operator Report Type 0 and User Technician Report Type 1
Report Format: “HVc sssss iiiiixA vvvvV F=ffff E=eeee <CR>”
Report Fields:
HVc HV Channel c= 1 or 2
sssss HV Channel Status [‘OFF__’, ‘ON___’, ‘FAULT’]
iiiii HV Channel Current in xA
xA nA or uA (nano Ampere or micro Ampere)
vvvv HV Channel Voltage in V (Volts)
ffff Hexadecimal representation of HV Channel Faults
eeee Hexadecimal representation of HV Channel Events

2 Technical Information Procedure to Connect the Serial and I/O Ports to an External Cable
50/60 Ion Pumps Control Unit User Manual / 87-900-128-01 (E)
Example: RT 0[Enter]
+
HV2 OFF 0uA 0V F=0000 E=0000
HV1 OFF 0uA 0V F=0000 E=0000
HV2 OFF 0uA 0V F=0000 E=0000
User Operator Report Type 2 and User Technician Report Type 3
Report Format:
“HVc sssss iiiiixA vvvvV F=ffff E=eeee pppppmW i=yyyy v=zzz c=www <CR>”
Report Fields:
HVc HV Channel c= 1 or 2
“- [LOCAL_MODE]”
to inform that a character is received but it is not possible to execute commands coming from the serial line.
When a command received is formally correct but can no be executed because the status of the unit does not allow this, (for instance a command: “A011” is sent but the cable interlock is not OK) the unit sends:
“- [COMMAND_UNEXECUTABLE]”
to inform that the request is not coherent with the status of the unit.
sssss HV Channel Status [‘OFF__’, ‘ON___’, ‘FAULT’]
iiiii HV Channel Current in nA or uA
vvvv HV Channel Voltage in V

Technical Information Procedure to Connect the Serial and I/O Ports to an External Cable
2
Ion Pumps Control Unit User Manual / 87-900-128-01 (E) 51/60
ffff Hexadecimal representation of HV Channel Faults
eeee Hexadecimal representation of HV Channel Events
ppppp HV Channel Power in mW
yyyy 16 Bits hexadecimal Current
zzz 10 Bits hexadecimal Voltage
www 12 Bits hexadecimal Control Output
Example: RT 2[Enter]
+
HV2 OFF 0uA 0V F=0000 E=0000 0mW i=0001 v=000 c=D80
HV1 OFF 0uA 0V F=0000 E=0000 0mW i=0003 v=000 c=D80
HV2 OFF 0uA 0V F=0000 E=0000 0mW i=0001 v=000 c=D80
User Operator Report Type 4 and User Technician Report Type 5
Report Format:
“HVc sssss iiiiixA vvvvV F=ffff E=eeee pppppmW i=yyyy v=zzz c=www in=hhhh dac=dd <CR>”
Report Fields:
HVc HV Channel c= 1 or 2
sssss HV Channel Status [‘OFF__’, ‘ON___’, ‘FAULT’]
iiiii HV Channel Current in nA or uA
vvvv HV Channel Voltage in V
ffff hexadecimal representation of HV Channel Faults
eeee hexadecimal representation of HV Channel Events
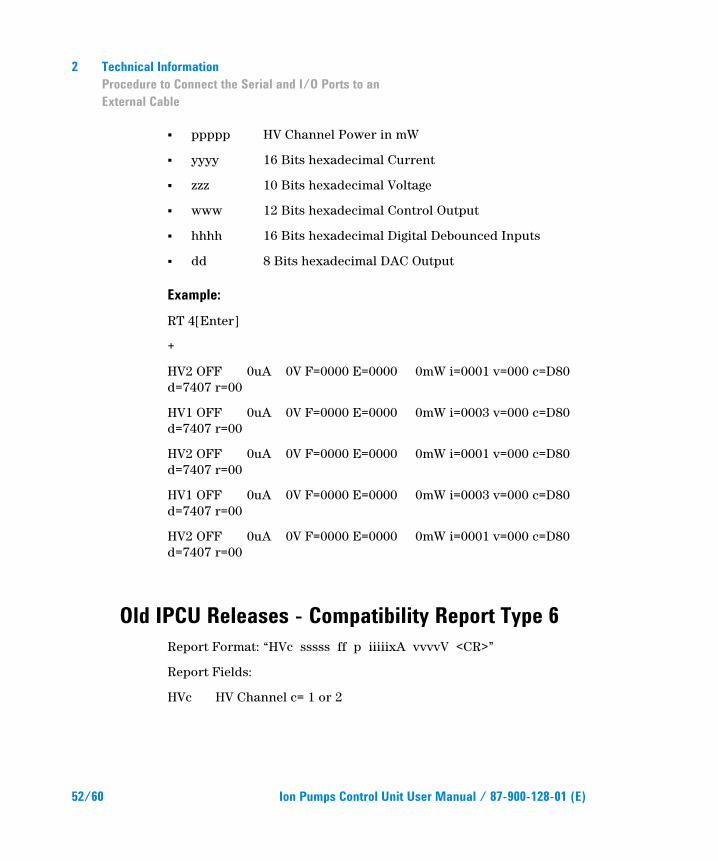
2 Technical Information Procedure to Connect the Serial and I/O Ports to an External Cable
52/60 Ion Pumps Control Unit User Manual / 87-900-128-01 (E)
ppppp HV Channel Power in mW
yyyy 16 Bits hexadecimal Current
zzz 10 Bits hexadecimal Voltage
www 12 Bits hexadecimal Control Output
hhhh 16 Bits hexadecimal Digital Debounced Inputs
dd 8 Bits hexadecimal DAC Output
Example: RT 4[Enter]
+
HV2 OFF 0uA 0V F=0000 E=0000 0mW i=0001 v=000 c=D80 d=7407 r=00
HV1 OFF 0uA 0V F=0000 E=0000 0mW i=0003 v=000 c=D80 d=7407 r=00
HV2 OFF 0uA 0V F=0000 E=0000 0mW i=0001 v=000 c=D80 d=7407 r=00
HV1 OFF 0uA 0V F=0000 E=0000 0mW i=0003 v=000 c=D80 d=7407 r=00
HV2 OFF 0uA 0V F=0000 E=0000 0mW i=0001 v=000 c=D80 d=7407 r=00
Old IPCU Releases - Compatibility Report Type 6 Report Format: “HVc sssss ff p iiiiixA vvvvV <CR>”
Report Fields:
HVc HV Channel c= 1 or 2

Technical Information Procedure to Connect the Serial and I/O Ports to an External Cable
2
Ion Pumps Control Unit User Manual / 87-900-128-01 (E) 53/60
Floating Point Notation The floating point notation follows the ANSI/IEEE Standard 754-1985, for Binary Floating Point Arithmetic.
Example: AL 1 11111111[Enter] (to grant access level 1)
1
wr 31 1[Enter] (set parameter n. 31 to 1)
+
RT 0 (select report type “0”)
+
HV2 OFF 0.0E-9A 0.0E+0V F=0000 E=0000
HV1 OFF 0.0E-9A 0.0E+0V F=0000 E=0000
HV2 OFF 0.0E-9A 0.0E+0V F=0000 E=0000
HV1 OFF 0.0E-9A 0.0E+0V F=0000 E=0000
HV2 OFF 0.0E-9A 0.0E+0V F=0000 E=0000
HV1 OFF 0.0E-9A 0.0E+0V F=0000 E=0000
HV2 OFF 0.0E-9A 0.0E+0V F=0000 E=0000
HV1 OFF 0.0E-9A 0.0E+0V F=0000 E=0000
HV2 OFF 0.0E-9A 0.0E+0V F=0000 E=0000

2 Technical Information Procedure to Connect the Serial and I/O Ports to an External Cable
54/60 Ion Pumps Control Unit User Manual / 87-900-128-01 (E)
Cleaning For safety reasons, before cleaning the controller:
1 Turn the controller off;
2 disconnect the controller power plug from the electrical outlet
3 disconnect all cables.
4 If the exterior of the controller becomes dirty, use a dry soft cloth.
The internal cleaning must be done only by Agilent operator.
sssss HV Channel Status [‘OFF__’, ‘ON___’, ‘FAULT’]
ff 8 bits HEX representation of HV Channel Faults
p ‘0’=Start, ‘1’=Protect
iiiii HV Channel Current in xA
xA nA or uA (nano Ampere or micro Ampere)
vvvv HV Channel Voltage in V (Volts)
Example: RT 6
+
HV2 OFF 00 0 0uA 0V
HV1 OFF 00 0 0uA 0V
HV2 OFF 00 0 0uA 0V
HV1 OFF 00 0 0uA 0V
HV2 OFF 00 0 0uA 0V

Vacuum Products Division
Dear Customer,
Thank you for purchasing an Agilent vacuum product. At Agilent Vacuum Products Division we make every effort to ensure that you will be satisfied with the product and/or service you have purchased.
As part of our Continuous Improvement effort, we ask that you report to us any problem you may have had with the purchase or operation of our products. On the back side you find a Corrective Action request form that you may fill out in the first part and return to us.
This form is intended to supplement normal lines of communications and to resolve problems that existing systems are not addressing in an adequate or timely manner.
Upon receipt of your Corrective Action Request we will determine the Root Cause of the problem and take the necessary actions to eliminate it. You will be contacted by one of our employees who will review the problem with you and update you, with the second part of the same form, on our actions.
Your business is very important to us. Please, take the time and let us know how we can improve.
Sincerely.
Giampaolo LEVI
Vice President and General Manager Agilent Vacuum Products Division
Note: Fax or mail the Customer Request for Action (see backside page) to Agilent Vacuum Products Division (Torino) – Quality Assurance or to your nearest Agilent representative for onward transmission to the same address.
CUSTOMER REQUEST FOR CORRECTIVE / PREVENTIVE / IMPROVEMENT ACTION
TO: AGILENT VACUUM PRODUCTS DIVISION TORINO – QUALITY ASSURANCE FAX
N°: XXXX‐011‐9979350
ADDRESS: AGILENT TECHNOLOGIES ITALIA S.p.A. – Vacuum Products Division –
Via F.lli Varian, 54 – 10040 Leinì (TO) – Italy
E‐MAIL: vpd‐qualityassurance_pdl‐[email protected]
NAME COMPANY FUNCTION
ADDRESS:
TEL. N° : FAX N° :
E‐MAIL:
PROBLEM / SUGGESTION :
REFERENCE INFORMATION (model n°, serial n°, ordering information, time to failure after installation, etc.):
DATE
CORRECTIVE ACTION PLAN / ACTUATION LOG N° (by AGILENT VPD)
XXX = Code for dialing Italy from your country (es. 01139 from USA; 00139 from Japan, etc.)

Page 1 of 3 Agilent VPD Request for Return
Vacuum Products Division Instructions for returning products
Dear Customer,
Please follow these instructions whenever one of our products needs to be returned.
Complete the attached Request for Return form and send it to Agilent Technologies (see below), taking particular care to include the completed Health and Safety declaration Section. No work can be started on your unit until we receive a completed copy of this form. After evaluating the information, Agilent Technologies will provide you with a Return Authorization (RA) number via email or fax, as requested. Note: Depending on the type of return, a Purchase Order may be required at the time the Request for Return is submitted. We will quote any necessary services (evaluation, repair, special cleaning, eg).
Product preparation o Remove all accessories from the core product (e.g. inlet screens, vent valves).o Prior to shipment and if applicable for your product, drain any oils or other liquids, purge or flush all gasses, and
wipe off any excess residue.o If ordering an Advance Exchange product, please use the packaging from the Advance Exchange to return the
defective product.o Seal the product in a plastic bag, and package product carefully to avoid damage in transit. You are responsible
for loss or damage in transit.o Include a copy of the Health and Safety Declaration in the shipping documentation on the outside of the shipping
box of your returning product.o Clearly label package with RA number. Using the shipping label provided will ensure the proper address and RA
number are on the package. Packages shipped to Agilent without a RA clearly written on the outside cannot beaccepted and will be returned.
o Return only products for which the RA was issued.
Shipping o Ship to the location specified on the printable label, which will be sent, along with the RA number, as soon as
we have received all of the required information. Customer is responsible for freight charges on returning product.
o Return shipments must comply with all applicable Shipping Regulations (IATA, DOT, ADR, etc.) and carrierrequirements.
RETURN THE COMPLETED REQUEST FOR RETURN FORM TO YOUR NEAREST LOCATION:
EUROPE: NORTH AMERICA: PACIFIC RIM:
Fax: 00 39 011 9979 330 Fax Free: 00 800 345 345 00 Toll Free: 00 800 234 234 00
Fax: 1 781 860 9252 Toll Free: 800 882 7426, Option 3
Please visit our website for individual office information
[email protected] [email protected] http://www.agilent.com

Page 2 of 3 Agilent VPD Request for Return
Vacuum Products Division Terms and conditions
TERMS AND CONDITIONS Please read the terms and conditions below as they apply to all returns and are in addition to the Agilent Technologies Vacuum Product Division – Products and Services Terms of Sale.
o Unless otherwise pre-negotiated, customer is responsible for the freight charges for the returning product.Return shipments must comply with all applicable Shipping Regulations (IATA, DOT, etc.) and carrierrequirements.
o Agilent Technologies is not responsible for returning customer provided packaging or containers.o Customers receiving an Advance Exchange product agree to return the defective, rebuildable part to Agilent
Technologies within 15 business days. Failure to do so, or returning a non-rebuildable part (crashed), will resultin an invoice for the non-returned/non-rebuildable part.
o Returns for credit toward the purchase of new or refurbished Products are subject to prior Agilent approval andmay incur a restocking fee. Please reference the original purchase order number.
o Units returned for evaluation will be evaluated, and a quote for repair will be issued. If you choose to have theunit repaired, the cost of the evaluation will be deducted from the final repair pricing. A Purchase Order for thefinal repair price should be issued within 3 weeks of quotation date. Units without a Purchase Order for repairwill be returned to the customer, and the evaluation fee will be invoiced.
o Products returned that have not been drained from oil will be disposed.o A Special Cleaning fee will apply to all exposed products.o If requesting a calibration service, units must be functionally capable of being calibrated.

Page 3 of 3 Agilent VPD Request for Return
Vacuum Products Division Request for Return Form
Customer information Company : Contact Name: Address: Tel: Fax:
Email:
Equipment
Product description Agilent PartNo Agilent Serial No Original Purchasing Reference
Failure description Type of process (for which the equipment was used)
Type of return
Non Billable Billable New PO # (hard copy must be submitted with this form): ______________________________________
Exchange Repair Upgrade Demo Calibration Evaluation Return for Credit
Health and safety
The product has been exposed to the following substances: (by selecting ‘YES’ you MUST complete the table to the right)
Substances (please refer to MSDS forms) * Agilent will not accept delivery of any product that is exposed to radioactive, biological,explosive substances or dioxins, PCB’s without written evidence of decontamination. Trade name Chemical name Chemical Symbol CAS Number
Toxic YES NO Harmful YES NO Corrosive YES NO Reactive YES NO Flammable YES NO Explosive (*) YES NO Radioactive (*) YES NO Biological (*) YES NO Oxidizing YES NO Sensitizer YES NO Other dangerous substances YES NO
Goods preparation If you have replied YES to one of the above questions. Has the product been purged? YES NO If yes, which cleaning agent/method: Has the product been drained from oil? YES NOT APPLICABLE I confirm to place this declaration on the outside of the shipping box.
I declare that the above information is true and complete to the best of my knowledge and belief. I understand and agree to the terms and conditions on page 2 of this document.
Name: Authorized Signature:
Position: Date: NOTE: If a product is received at Agilent which is contaminated with a toxic or hazardous material that was not disclosed, the customer will be held responsible for all costs incurred to ensure the safe handling of the product, and is liable for any harm or injury to Agilent employees as well as to any third party occurring as a result of exposure to toxic or hazardous materials present in the product.
Request for Return FormAgilent Vacuum Products Division/Sales and Service Offices United States Agilent Technologies 121 Hartwell Avenue Lexington, MA 02421 - USA Tel.: +1 781 861 7200 Fax: +1 781 860 5437 Toll-Free: +1 800 882 7426 [email protected]
India Agilent Technologies India Pvt. Ltd. Unit Nos 105-116 First Floor, Splendor Forum, Plot No.-3 , District Centre, Jasola New Delhi-110025 Ph: +91 11 4623 7100 Fax: +91 4623 7105 Toll Free: 18001801517
Southeast Asia Agilent Technologies Sales Sdn Bhd Unit 201, Level 2 uptown 2, 2 Jalan SS21/37, Damansara Uptown 47400 Petaling Jaya, Selangor, Malaysia Tel : +603 7712 6106 Fax: +603 6733 8121 Toll free: 1 800 880 805 [email protected]
Benelux Agilent Technologies Netherlands B.V. Groenelaan 5, 1186 AA Amstelveen The Netherlands Tel: +31 20 547 2000 Fax: +31 20 547 2093
Italy Agilent Technologies Italia S.p.A. Via F.lli Varian, 54 10040 Leini, (Torino) - Italy Tel: +39 011 9979 111 Fax: +39 011 9979 350 Toll free: 00 800 234 234 00 [email protected]
Taiwan Agilent Technologies Taiwan Limited 20 Kao-Shuang Road Ping-Chen City Tao-Yuan Hsien, 32450 Taiwan, R.O.C. Tel: +886 3 4959004 Toll free: 0800 018 768 [email protected]
Brazil Agilent Technologies Brasil Avenida Marcos Penteado de Ulhoa Rodrigues, 939 - 6° andar Castelo Branco Office Park Torre Jacarandá - Tamboré Barueri, Sao Paulo CEP: 06460-040 Toll free: 0800 728 1405
Japan Agilent Technologies Japan, Ltd. 8th Floor Sumitomo Shibaura Building 4-16-36 Shibaura Minato-ku Tokyo 108-0023 - Japan Tel.: +81 3 5232 1253 Fax: +81 3 5232 1710 Toll-Free: 0120 655 040 [email protected]
UK and Ireland Agilent Technologies UK, Ltd. 6 Mead Road Oxford Industrial Park Yarnton, Oxford OX5 1QU – UK Tel.: +44 (0) 1865 291570 Fax: +44 (0) 1865 291571
China Agilent Technologies (China) Co. Ltd No.3, Wang Jing Bei Lu, Chao Yang District Beijing, 100102, China Tel: +86 (0)10 64397888 Fax: +86 (0)10 64391318 Toll free: 800 820 3278 [email protected] [email protected]
Korea Agilent Technologies Korea, Ltd. Shinsa 2nd Bldg. 2F, 966-5 Daechi-dong Kangnam-gu, Seoul Korea 135-280 Tel: +82 (0)2 2194 9449 Fax: +82 (0)2 3452 3947 Toll free: 080 222 2452 [email protected]
Other Countries Agilent Technologies Italia S.p.A. Via F.lli Varian, 54 10040 Leini, (Torino) - Italy Tel.: +39 011 997 9111 Fax: +39 011 997 9350 Toll-Free: 00 800 234 234 00
France Agilent Technologies Parc Technopolis - Z.A. de Courtaboeuf 3, avenue du Canada - CS 90263 91978 Les Ulis cedex, France Tel: +33 (0) 1 64 53 61 15 Fax: +33 (0) 1 64 53 50 01 [email protected]
Mexico Agilent Technologies Concepcion Beistegui No 109 Col Del Valle C.P. 03100 – Mexico, D.F. Tel.: +52 5 523 9465 Fax: +52 5 523 9472
Customer Support & Service NORTH AMERICA: Toll Free: 800 882 7426 [email protected] EUROPE: Toll Free: 00 800 234 234 00 [email protected] PACIFIC RIM: please visit our website for individual office information http://www.agilent.com/chem/vacuum Worldwide Web Site, Catalog and Order On-line: www.agilent.com/chem/vacuum Representatives in most countries 12/13
Germany and Austria Agilent Technologies Sales & Services GmbH & Co. KG Lyoner Str. 20 60 528 Frankfurt am Main GERMANY Tel: +49 69 6773 43 2230 Fax: +49 69 6773 43 2250
Singapore Agilent Technologies Singapore Pte. Ltd, 1 Yishun Avenue 7, Singapore 768923 Tel : (65) 6215 8045 Fax : (65) 6754 0574 Toll free: 1 800 2762622 [email protected]
© Agilent Technologies, Inc. 2014 Printed in ITALY 03/2014 Publication Number: 87-900-128-01 (E)