Sliding Mode Control for Position Tracking of Servo System ...
Introduction · Web viewEvery servo motor has a neutral or base position Servo is put into that...
30
Generating Digital Signals Overview In this lesson we will Study the control of several different kinds of motors commonly found in embedded applications. Examine LEDs and LED displays. Briefly examine asynchronous system inputs and associated problems. Learn to measure several common time and frequency domain input signals. Introduction Are a number of different kinds of digital signals That may be required in an embedded application Applications may include Control of various kinds of motors Interface to some form of display Control for a piece of equipment such as Printer, keyboard, CDROM, or video imager Let’s examine representative examples of several more common of these applications Motors and Motor Control Ability to control different kinds of motors Important in a host of contemporary applications Ranging from Assembly robots to Remotely controlled vehicles to Precision positioning of medical instruments Motors typically found in such applications fall into three categories DC motors Servo motors Stepper motors - 1 of 20 -
-
Upload
truongtuong -
Category
Documents
-
view
217 -
download
0
Transcript of Introduction · Web viewEvery servo motor has a neutral or base position Servo is put into that...

Generating Digital SignalsOverview
In this lesson we will Study the control of several different kinds of motors commonly found in
embedded applications. Examine LEDs and LED displays. Briefly examine asynchronous system inputs and associated problems. Learn to measure several common time and frequency domain input signals.
IntroductionAre a number of different kinds of digital signals
That may be required in an embedded applicationApplications may include
Control of various kinds of motors Interface to some form of display Control for a piece of equipment such as
Printer, keyboard, CDROM, or video imager
Let’s examine representative examples of several more common of these applications
Motors and Motor ControlAbility to control different kinds of motors
Important in a host of contemporary applications Ranging from
Assembly robots to Remotely controlled vehicles to Precision positioning of medical instruments
Motors typically found in such applications fall into three categories DC motors Servo motors Stepper motors
Let’s look at each
- 1 of 20 -

DC MotorsAccompanying figure gives a high-level diagram
Basic components of a DC motor
These comprise Stationary permanent magnet called a stator Movable (rotating) electromagnetic called a rotor Moving part of electrical switch called a commutator System to connect power to the electromagnetic called brushes and
Operation of the motor proceeds as followsWhen a voltage is applied across the electromagnet
Magnetic poles of the rotor Are attracted to the opposite poles of the stator
Thereby causing the rotor to turnAs the rotor turns
The electromagnet becomes polarizedIn the opposite direction
Poles of the rotor are now Repelled by nearer polesAttracted to the opposite poles of the permanent magnet
Causing the rotor to turn once again
Observe The commutator is a split ring
Against which the brushes make physical contact
One portion of the commutatorConnected to one end of the electromagnet
Other portion Connected to the opposite end
Through the action of the commutatorDirection of the field in the electromagnet continually switched
Causing the rotor to continue to move
The actions of Commutator Brushes Electromagnet
Illustrated through the simple model in adjacent figure
- 2 of 20 -

The brushes are fixed however as the rotor rotatesCommutator - which is attached to the rotor
Acts like a switch connecting the voltage source First one way then the opposite way across the electromagnetic
Thereby changing its polarization
When power is applied DC motor has the ability to continuously turn through 360 degrees
In one direction
If the applied voltage is held constantSpeed of the motor is also held constant
Increasing or decreasing the applied voltageWill have a corresponding affect on the motor’s speed
Using scheme called pulse width modulation PWM The average magnitude of the applied voltage
Can effectively be controlledThereby so can the motor’s speed
Will learn how to do this shortly
As the speed of the motor decreases so does its torque
If the polarity of the applied voltage is reversedMotor will run in the opposite direction
Will use a circuit called an H bridge to manage the reversal
Generally a DC motor is not used for positioning tasks Unless it is incorporated into a control system
That can provide position (and possibly velocity) feedback information
Servo MotorsA servo motor is a special case of a DC motor
Position or velocity feedback circuitryAdded to implement a closed loop control system
Like the DC motorServo motor can rotate in either direction
Generally the range is less than 360 degreesIs controlled by a pulse width modulated signal
However the signal is used to control position rather than speed
- 3 of 20 -

Servo motor finds common use in systems such as Remotely controlled systems Robotics applications Numerically controlled machinery Plotters or similar systems where
Starts and stops must be made quicklyAccurate position is essential
Stepper MotorStepper motor is different from yet similar to both the DC and the servo motorsOne major difference
Each of the latter motors moves in either the forward or reverse direction With a smooth and continuous motion
Stepper motor moves in a series of increments or steps
Accompanying diagram Presents a high-level view of the essential elements of a stepper motor.
The first point to observe The rotor rather than the stator is a permanent magnet The rotor in the motor in the diagram has 2 teeth The stator has 4 poles and 4 electromagnets
In a stepper motorSize of each step
Specified in degreesVaries with the design of the motor
The step size is selected Based upon the precision of the positioning required
The simple motor given above has a step angle of 90 degreesBased upon the spacing of the poles
Connections are made to the electromagnets Through the signals marked X1, X2, Y1, and Y2
Like the DC motorThe stepper can
Rotate through 360 degrees Rotate in either direction
Speed of the motor is determined By the repetition rate of the steps
- 4 of 20 -

With this brief introduction to motorsLet’s now see how to control their operation
Controlling DC and Servo MotorsDC Motors
Both the DC motor and the servo motor Require a pulse width modulated signal to control either speed or position
Pulse Width Modulation – PWMProcess of using the width of a pulse
To convey information in a digital signalThink about using
Frequency – FMAmplitude – AM
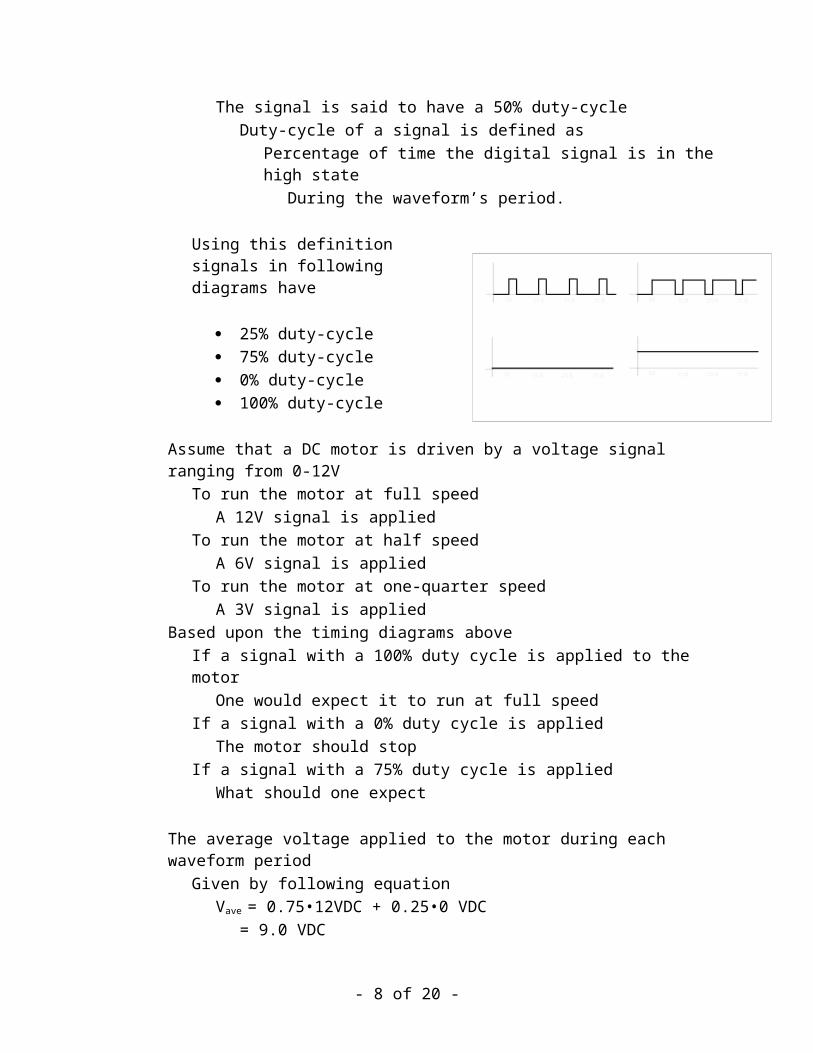
Suppose that we have the following perfect square wave
From the diagramThe period of the signal is fixed
In this case to 100 time unitsThe signal is in the high state 50 time units out of 100 possible time units
Thus, the signal is ON for half of the periodThe signal is said to have a 50% duty-cycle
Duty-cycle of a signal is defined as Percentage of time the digital signal is in the high state
During the waveform’s period.
Using this definition signals in following diagrams have
25% duty-cycle 75% duty-cycle 0% duty-cycle 100% duty-cycle
Assume that a DC motor is driven by a voltage signal ranging from 0-12V
To run the motor at full speedA 12V signal is applied
To run the motor at half speed A 6V signal is applied
To run the motor at one-quarter speed A 3V signal is applied
- 5 of 20 -

Based upon the timing diagrams aboveIf a signal with a 100% duty cycle is applied to the motor
One would expect it to run at full speedIf a signal with a 0% duty cycle is applied
The motor should stopIf a signal with a 75% duty cycle is applied
What should one expect
The average voltage applied to the motor during each waveform periodGiven by following equation
Vave = 0.75•12VDC + 0.25•0 VDC = 9.0 VDC
That is one should expect the motor to run at 75% of full speed
By using such a pulse-width modulated signalSpeed of a DC motor can be controlled
Because it is the average voltage that determines its speed
Today it’s not uncommon to find PWM capability Built in to microprocessors or microcontrollers
Under such circumstances implementing software side of PWM capability Reduces to programming the desired period and duty cycle
According to the device’s data sheet
If PWM capability is not supported If microprocessor or microcontroller has a built in timer
Generating a PWM signal to output ports is rather straightforward
For example, suppose That PWM signal with a 75% duty-cycle requiredThe signal’s period has been set to 100ms
Signal can be implemented as followsConfigure a timer to time 75 ms
Turn a digital output ONWait for the timer to expire
When the timer expiresTurn the digital output OFFTime 25ms
Process can be executed repeatedly To generate the 75% duty-cycle PWM signal
- 6 of 20 -

Observe that the frequency of the signal is not changingOnly its duty cycle.
In either caseMotor generally cannot be driven directly
From microprocessor’s digital output portsOne must ensure that the hardware motor drivers
Can support the current requirements for the intended motorSeveral alternate implementations will be discussed shortly
Servo MotorsCan use PWM signal to control the position of a servo motorEvery servo motor has a neutral or base positionServo is put into that position
By applying a continuous train of pulses With width specified by the manufacturer
An internal feedback control system Holds the servo in the commanded positionTo cause the servo to move one direction
Width of the pulse is increasedTo effect movement in the opposite direction
Width of the pulse is decreased
Change in pulse width causes the movementThe repeated sequence holds the position
These actions are illustrated in the accompanying timing diagrams
The design may place a number of requirements on the servo motorThese may include
Ability to control to very tight tolerances the Acceleration Velocity Position
Slew rateTime that it takes for the servo to change from one position to another
Often another critical parameter
- 7 of 20 -
As with so many other parts of the designConstraints must be identified and included in design specification
Not during the prototype development
Motors are mechanical devices Typically have much looser time constraints
Than one frequently finds in control of their electronic counterpartsIt’s reasonable to consider controlling them by command
Directly from a microprocessor Unless there are other overriding considerations
Controlling Stepper MotorsControlling stepper motors
Not that much more complicated than controlling DC motors It may seem a lot like juggling trying to keep all the signals straight
The earlier figure of the stepper motor repeated for reference
The polarization of the electromagnets as illustrated Requires that the indicated input signals are applied to X1, X2, Y1, and Y2
V to X1 and Y2 0 to X2 and Y1
If the input signals next set to V on X1 and Y1 0 to X2 and Y2
The polarization on the electromagnets changes as shown
The two north poles at the top of the drawing Will repel
The north pole on the rotor Will be attracted to the south pole on the right hand side of the stator
The rotor will thus move 90o in the clockwise direction
- 8 of 20 -

Changes to the input signal levels shown in the accompanying table
Produce the rotor movements shown in following figure
Extending the design to motors with greater number of poles or stator teethIs a straight forward application of the pattern illustrated
The variable will be Number of times that the pattern will have to be repeated
To achieve a full rotation Since the number of degrees per step will decrease
The timing diagram for one cycle (not full rotation) is given
Such a pattern can be generated in several waysUtilize 4 digital output lines from the microprocessor
Base the signal timing on an internal timerUtilize 2 digital output lines from the microprocessor and an external decoder
That will map the 4 possible combinations of the output lines To the necessary drive signals
The timing is based upon an internal timer.
Implement an external up/down counter (for bidirectional rotation)Counter can be based upon a 4 flip-flop design
Directly replicating the pattern in 1 aboveThereby minimizing the combinational decoding
X1 X2 Y1 Y2 PositionV 0 0 V 0o
V 0 V 0 90o
0 V V 0 180o
0 V 0 V 270o
- 9 of 20 -

Alternately the design can utilize 2 flip-flops and a decoding networkThereby replicating the design in 2 above
Motor Drive CircuitryMotors generally require more drive current
Than a typical microprocessor, TTL, or CMOS gate can provideTo provide that current - control signals being discussed connected to
Driver circuit rather than directly to the motor
Unidirectional DriveFor unidirectional drive
Any number of variations on the accompanying design can be usedThe drive transistor
Must be able to sink the required motor currentThe buffer
Is an open collector driverWhen the digital signal in is a logical 1
The base current for the transistor is supplied Through the pull-up resistor rather than from the buffer
When the digital signal in is a logical 0The buffer can sink more current than a standard gate
The diode Used to suppress the flyback voltage
Generated by the collapsing field in the coil When the motor is switched OFF
If it is not includedResulting voltage can damage other parts in the circuit
Bidirectional DriveIf the motor must support bidirectional rotation
Commonly used driver designs are H bridge Variant called a half H bridge
The circuit has acquired such an appellation Because its topology resembles an upper case H
One such design for an H bridge is given in following figure
- 10 of 20 -

All four of the gates are open collector or open drain devices
If input in1 is in the logical 0 stateOutput of the open collector device is floatingBase of Q3 is pulled to the supply voltage thereby cutting it off
If transistors Q2 and Q3 are turned ON and transistors Q1 and Q4 turned OFFCurrent will flow from left to right through the motor winding
Conversely if the states of the four transistors are reversedCurrent will flow in the opposite direction The motor will rotate in the opposite direction
The four diodes suppress the flyback voltageGenerated by collapsing field in coil when
The motor is switched OFF The direction is changed
Half H bridge design given in adjacent figure
Today there are a numerous vendors Who provide an excellent selection of
H bridgeHalf H bridgeOther types of motor drive integrated circuits
These should satisfy most design specifications
DC or Servo Motor ControlTo control a DC or servo motor
The PWM signal is connected to one pair of the input signals IN1 or IN2While the other input pair is connected to ground
To reverse the direction of rotationInput connections are reversed
Stepper Motor ControlConnections for a stepper motor follow in a similar manner
For the stepper motor, one bridge will be required for each winding
- 11 of 20 -

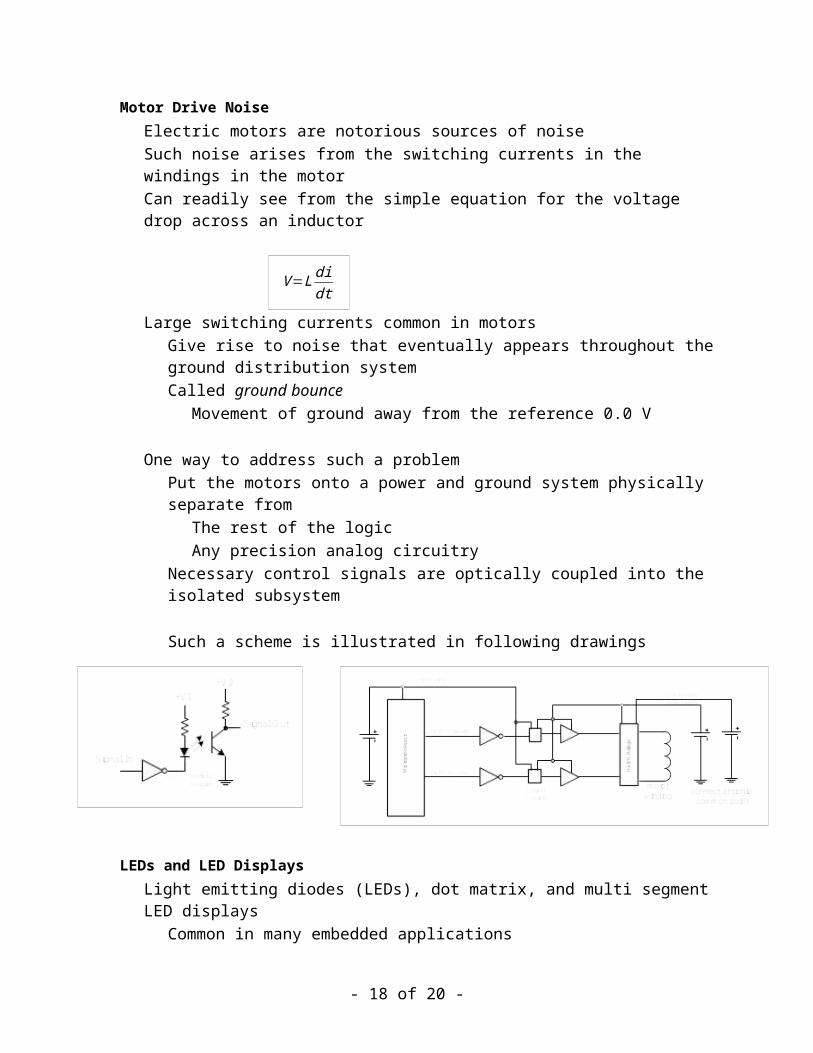
Motor Drive NoiseElectric motors are notorious sources of noiseSuch noise arises from the switching currents in the windings in the motorCan readily see from the simple equation for the voltage drop across an inductor
Large switching currents common in motors Give rise to noise that eventually appears throughout the ground distribution system Called ground bounce
Movement of ground away from the reference 0.0 V
One way to address such a problemPut the motors onto a power and ground system physically separate from
The rest of the logicAny precision analog circuitry
Necessary control signals are optically coupled into the isolated subsystem
Such a scheme is illustrated in following drawings
LEDs and LED DisplaysLight emitting diodes (LEDs), dot matrix, and multi segment LED displays
Common in many embedded applicationsAmount of necessary external hardware determined by
Current drive capabilities of the microprocessor output portsI/O space limitations in the design
Assume limited hardware support from the processor Therefore most of the design must be implemented outside of the processor
Designs can easily be migrated to software If the necessary resources are available
Individual LEDsMost TTL and CMOS devices sink current better than they source it
V=L didt
- 12 of 20 -

An open collector or open drain device works very well as a driverSuch devices are designed
To sink substantially more current than the standard gatesAre available as either inverting or non-inverting drivers
Assume an application specifies that an annunciation be given When a certain event is TRUE
Assume the event is an active HIGH or HIGH TRUE signalInverting device should be selected as a driver
Schematic in adjacent figure illustrates the design of the annunciatorThe resistor is incorporated to limit the current through the LED
Which ranges from 10-60 mA
With LEDs, as the current level is increased, the brightness does as well
Multi – LED DisplaysThe ubiquitous seven segment or numeric display
Simply combines a number of individual LEDs into a package With an appropriate lens
To enable the display of any of the 10 decimal digits (plus decimal points) When the proper LEDs are illuminated
A top view of the device and several possible digits are shown
The LEDs within the display Connected in either a common anode or common cathode configuration
All the anodes are connected togetherDrive signal is applied to the individual cathodes
All the cathodes are connected togetherDrive signal is applied to the individual anodes
- 13 of 20 -

To drive the device to display decimal digitsBCD to Seven Segment Decoder can be used
Part takes 4 input signalsEncoded as a BCD number
Produces 7 output signals
If those signals are connected to a seven segment display as shownProper LEDs will turn on to display the corresponding BCD number
Decimal points if necessary would be controlled separately
The outputs on the decoder are implemented as open collector devices
In addition to the four data inputsDecoder has three active low control inputs
1. ~LT – Lamp TestWhen active turns all seven segments ON
Remaining two support leading zero suppression in multidigit displaysWhen enabled the number 00789 would display as 7892. When the signal ~BI – Blank Input is active
All data outputs are OFF independent of the input data3. When the signal ~RBI – Ripple Blank Input is active
All data inputs are lowAll data outputs are OFFSignal ~RBO is active
When implementing a multi digit displayTo save power, weight, and the cost of parts
The decoder can be multiplexed amongst all of the display devices As illustrated in the following figure
- 14 of 20 -

The design takes advantage of the fact that the human eyeAble to integrate out short term transients in an image
So that it appears to be constant.
The operation proceeds as shown in the timing diagram
The data for each digit to be displayedSuccessively written to one of the microprocessor’s I/O ports
As the input to the BCD to seven segment decoder
A short time later a strobe is issued to turn ON the transistor In the corresponding display digit
The cycle is repeated for all digits in the display
The update rate must be high enough that interdigit flicker is not perceivableBecause each digit is only enabled for (1 / number of digits) of a display cycle
Its average current will be correspondingly reducedTo ensure the same brightness as a non-strobed implementation
The current limiting resistors will need to be modified
Working with Asynchronous SignalsWhen working with digital signals coming into the system
That are asynchronous to the internal clockMust be aware of and properly manage metastable behavior
Synchronize such signals to the internal clock Prior to trying to do any significant work with them
There are a number of different approaches to deal with the problemOne of the simpler is given in following figure
The unknown or incoming signalIs a function of some clock outside of the system
Consequently there is no way of knowing When a state change will occur with respect to internal clock1The incoming signal may or may not violate the setup time for the flip-flopIf the set up time is violated
Output of the first flip-flop may enter a metastable state for some time
- 15 of 20 -

If the unknown signal changes state in region 1It will be recognized correctly by the first clock pulse
If it changes state in region 3It will be missed by the first clock pulseRecognized by the second
A state change in region 2 creates a potential problemIn such a case the first flip-flop can enter a metastable state
The metastability Will be ‘filtered out’ by the synchronizerThe unknown signal will be recognized and synchronized properly if
The unknown signal persists longer than two cycles of the internal clockIn this case, clock1
The metastable state is shorter than Period of clock1 minus the flip-flop set up time
Measuring Digital SignalsThe most common digital signals that are measured
Those in the time and frequency domains
In the time domain, we measure any of the following The period of a periodic signal The duration of a signal The elapsed time between two events
In the frequency domain we measure, The frequency of a periodic signal The number of events per time for a periodic or aperiodic signal
We now look at a portion of the detailed design of a counter
To implement a time domain measurementKnown signal is measured for an unknown time
To implement a frequency domain measurementUnknown signal is measured for a known amount of time
These are expressed in the accompanying figure
For the measurements illustratedThere is a signal of an unknown duration
As reflected in the two regions marked as unknown timeIf that signal used to enable a second signal of known frequency into a counter
- 16 of 20 -

Actually it’s the period that’s importantThe value in the counter at the end of the unknown time
Will provide a measure of the duration of the unknown signal
The resolution of the measurement Is a direct function of the frequency of the clock to the counter
If the frequency to the counter is 1 MHz It is known ….
That 1000 counts will occur during a 1 ms intervalThat the resolution of the measurement will be 1 µsec
If at the end of the measurement654 counts have accruedThe duration must have been 654 µsec.
The following diagram simply reverses what is known The time is knownGoal is to determine frequency of the unknown signal
If the known duration is now used as an enable to a counterAt the end of the time the counter will have accumulated a number of counts
We have events per time or the frequency for a periodic signalFor an aperiodic signal count can be interpreted as
An average frequency or events per time
We will return to such measurements shortly
Measuring Frequency and Time IntervalConsider measuring the frequency of a signal in the range of 1 MHzThere are several ways to do this
Measure the period of the signal then converted to frequencyApproach gives the period or interval measurement as well
Gate the signal into a counter for a known interval
Measuring the Period If the measurement is implemented hardware outside of a microprocessor
It is possible to achieve very good accuracy and precision
- 17 of 20 -
One such implementation is shown in following figure
The high-level timing diagram for the system follows
The Start signal initiates the measurement In response the state machine enables the synchronizer
The synchronizer serves a dual roleIn addition to synchronizing the external signal to the internal clock
The second synchronizer flip-flop delimits the measurement
One to two clock1 pulses after the external signal makes a 0 to 1 transitionThe Enable signal is asserted by the state machine to start the counter
On the second 0 to 1 transition by the external signalThe Enable is deasserted and the Complete event is signaled
The state of the counter representing the period of the unknown signalCan be read at any time after that
Counting for a Known IntervalThe measurement can easily be implemented in hardware Such a design is presented in following figure
- 18 of 20 -

The high-level timing diagram is given
In this design the process commences when the Start command is issued
In turn the state machine enables Time base Synchronizer Counter
The time base generates a window – Enable CounterFor a length of time consistent with the measurement being made
When the window duration has expiredThe Complete signal is asserted
The state of the counter can be read
- 19 of 20 -

SummaryIn this lesson we
Studied the control of several different kinds of motors commonly found in embedded applications.
Examined LEDs and LED displays. Briefly examined asynchronous system inputs and associated problems. Learned to measure several common time and frequency domain input signals.
- 20 of 20 -


![Pneumatic Rotary Actuator Position Servo System Based on ... · pneumatic rotary actuator, but it is difficult to realize the pinpoint at any position [5]. The pneumatic servo control](https://static.fdocuments.net/doc/165x107/5fb406bae932fd0c5422f3bc/pneumatic-rotary-actuator-position-servo-system-based-on-pneumatic-rotary-actuator.jpg)


