Introduction - Traxxas · PDF file22 Increasing Performance 23 Index ... water,Traxxas...
24
Transcript of Introduction - Traxxas · PDF file22 Increasing Performance 23 Index ... water,Traxxas...

Introduction
2
3 Before You Proceed
4 Safety Precautions
5 Tools, Supplies and RequiredEquipment
6 Anatomy of the Villain EX
7 Quick Start: GettingUp to Speed
8 DetailingYour Villain EX
9 The Traxxas TQRadio System
19 Driving the Villain EX
20 Adjusting Your Villain EX
21 Maintainingand Storing Your Villain EX
22 IncreasingPerformance
23 Index
Traxxas Headquarters1100 Klein RoadPlano,Texas 75074Phone: 972-265-8000Toll-free: 1-888-TRAXXAS
Traxxas U.K.P.O. Box 1128, Winterbourne,Bristol BS17-2SH, EnglandPhone: 44-117-956-1002
Internet: www.Traxxas.com • www.ReadyToRun.org
E-mail: [email protected]
Entire contents ©2003 Traxxas Corporation. Other brand names and marks are the property of their respective holders and are used only for purposesof identification. No part of this manual may be reproduced or distributed in print or electronic media without the express written permission of Traxxas.
030718
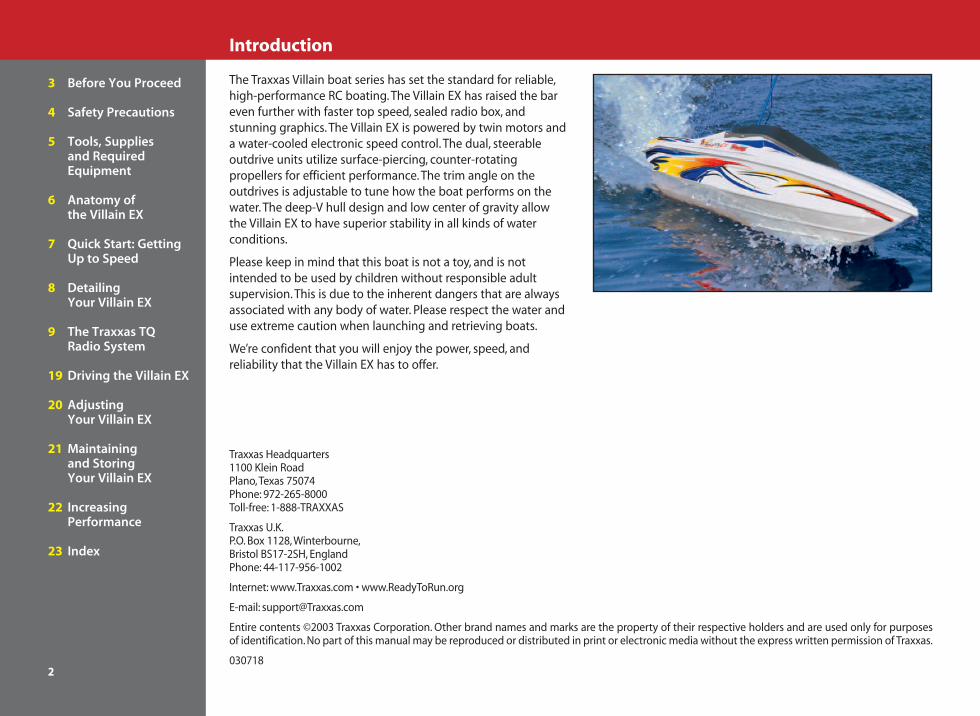
The Traxxas Villain boat series has set the standard for reliable,high-performance RC boating. The Villain EX has raised the bareven further with faster top speed, sealed radio box, andstunning graphics. The Villain EX is powered by twin motors anda water-cooled electronic speed control. The dual, steerableoutdrive units utilize surface-piercing, counter-rotatingpropellers for efficient performance. The trim angle on theoutdrives is adjustable to tune how the boat performs on thewater. The deep-V hull design and low center of gravity allowthe Villain EX to have superior stability in all kinds of waterconditions.
Please keep in mind that this boat is not a toy, and is notintended to be used by children without responsible adultsupervision. This is due to the inherent dangers that are alwaysassociated with any body of water. Please respect the water anduse extreme caution when launching and retrieving boats.
We’re confident that you will enjoy the power, speed, andreliability that the Villain EX has to offer.
3
Before You Proceed
Carefully read and follow all instructions in this and anyaccompanying materials to prevent serious damage to yourVillain EX boat. Failure to follow these instructions will beconsidered abuse and/or neglect.
Before running your Villain EX, look over this entire manual, andexamine the boat carefully. If for some reason you decide theVillain EX is not what you wanted, then do not continue anyfurther. Your hobby dealer absolutely cannot accept a Villain EX for return or exchange after it has been run.
Warnings, helpful hints, and cross-referencesThroughout this manual, you’ll notice warnings and helpfulhints, identified by the icons below. Be sure to read them!
An important warning about personal safety or avoidingdamage to your Villain EX and related components.
Special advice from Traxxas to make things easier andmore fun.
Refers you to a page with a related topic.
SupportIf you have any questions about your Villain EX or its operation,call the Traxxas Technical Support line toll-free at:1-888-TRAXXAS (1-888-872-9927)
Technical support is available Monday through Friday from8:30am to 9:00pm central time. Technical assistance is alsoavailable at www.Traxxas.com. You may also e-mail customersupport with your question at [email protected]. Jointhousands of Traxxas R/C enthusiasts in our online communityat www.ReadyToRun.org
Traxxas offers a full-service, on-site repair facility to handle anyof your Traxxas service needs. Maintenance and replacementparts may be purchased directly from Traxxas over the phone,through our website at www.BuyTraxxas.com, or you can saveshipping and handling costs by purchasing them from yourlocal hobby dealer.

All of us at Traxxas want you to safely enjoy your new Villain EX.Operate your Villain EX sensibly and with care, and it will beexciting, safe, and fun for you and those around you. Failure tooperate your Villain EX in a safe and responsible manner mayresult in property damage and serious injury. The precautionsoutlined in this manual should be strictly followed to helpensure safe operation. You alone must see that the instructionsare followed and the precautions are adhered to.
Important Points to Remember Do not drive the Villain EX at night.
Never, under any circumstances, operate the Villain EXin any water where people are swimming or wading.The Villain EX is fast and could cause injury if allowed tocollide with anyone, avoid running in areas reserved forwater fowl!
Because the Villain EX is controlled by radio, it is subject toradio interference from many sources that are beyond yourcontrol. Since radio interference can cause momentary lossof radio control, always allow a safety margin in all directionsaround the boat in order to prevent collisions.
Do not reach underneath the rear of the Villain EX.The propellers could spin unexpectedly. Always pick up the boat from the front or the side.
Because of the many dangers involved with any body ofwater, Traxxas recommends that you never try to wade orswim to retrieve the boat. Another section in this manualoutlines safer, alternative methods for boat retrieval.
Due to the high-performance nature of the electric motors,they can become extremely hot during use. Do not touchthe motors when installing and removing battery packs.
Most importantly, use good, common sense when you are around the water to avoid mishaps such as slipping on a muddy bank. Always observe water safety rules and regulations.
Where to RunSelect a body of fresh water which is calm and free of debris,tree stumps, moss, etc. Also, find a clean, stable area of shoreline to launch from. The water must be at least 10-inches deep.Be aware that some ponds restrict the use of model boats.Always choose a launch site which is downwind so that thewind and waves will drift the boat back to you if it should everbecome disabled or capsize. Running the Villain EX in saltwater is not recommended. Damage from corrosion is notcovered by the warranty. The Villain EX is too fast to run in aswimming pool.
▼▼
▼▼
▼▼
▼
All instructionsand precautionsoutlined in this
manual should be strictlyfollowed to ensure safeoperation of your model.
The Villain EX isnot intended foruse by those under
16 years of age withoutthe supervision of aresponsible andknowledgeable adult.
4
Safety Precautions

5
Tools, Supplies, and Required Equipment
Your Villain EX comes with a set of specialty tools. You’ll need topurchase other items, available from your hobby dealer, tooperate and maintain your model.
8 AA alkaline batteries for the transmitter
Two 7.2-volt NiCad battery packs
NiCad battery charger
Batteries
Required Tools and Supplies
#2 Phillips screwdriver
#1 Phillips screwdriver
Small flat-blade screwdriver (1/8 inch blade)
Hobby knife
Needlenose pliers
For more info onbatteries, see Usethe Right Batteries
on page 11.
A peak-detectingcharger isrecommended for
best performance andlongest battery life. Formore information, see Charging the Batteries onpage 11.

Anatomy of the Villain EX
6
Antenna Receiver
Radio BoxTwist-Lock“
(Thumbscrew)
Gear Cover
SteeringServo
550Motor
BatteryCompartment
Battery Hold-Down Strap
On/Off Switch
WaterCooling Tube
ElectronicSpeed Control
Water CoolingHeat Exchanger
(Heat Sink)
Top DeckMounting Post
BatteryConnector
Propeller
Outdrive
OutdriveConnecting Rod
Water Outlet
Water Pickup
Trim AdjustmentBracket

7
The following guide is an overview of theprocedures for getting your Villain EX set up and
running. Refer to the pages indicated for details on each step. Lookfor the Quick Start logo on the bottom corners of Quick Start pages.
1. Charge the battery packs • See page 11The Villain EX requires two fully charged 7.2-volt battery packs(not included). Charge your batteries now so they will beready when you finish the other setup procedures.
2. Install the antenna • See page 12Install the antenna mast in the Villain EX.
3. Install batteries in the transmitter • See page 11The transmitter requires 8 AA alkaline batteries.
4. Install battery packs in the model • See page 11
5. Turn on the radio system • See page 14Make a habit of turning the transmitter on first, and off last.
6. Check servo operation • See page 15Make sure the steering servo is working correctly.
7. Range test the radio system • See page 15Follow this procedure to make sure your radio system worksproperly at a distance and that there is no interference fromoutside sources.
8. Detail your Villain EX • See page 8
9. Drive your Villain EX • See page 19Driving tips and adjustments for your Villain EX.
10. Maintaining your Villain EX • See page 21Follow these critical steps to maintain the performance ofyour Villain EX and keep it in excellent running condition.
Quick Start: Getting up to Speed
The Quick StartGuide is notintended to
replace the full operatinginstructions available inthis manual. Please readthis entire manual forcomplete instructions on the proper use andmaintenance of your Villain EX.
8
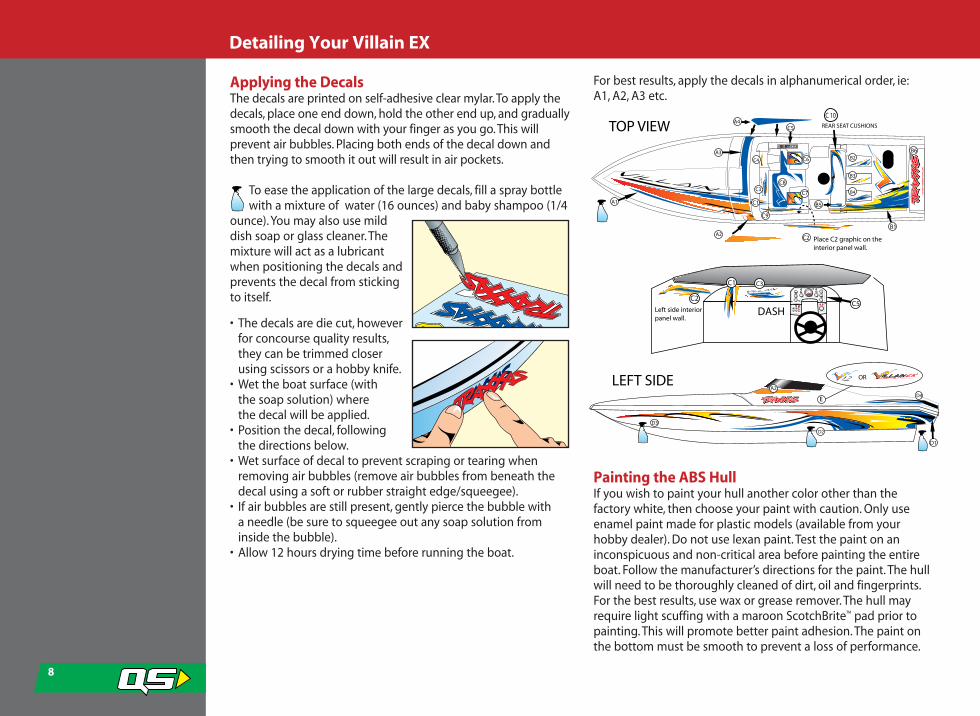
Applying the DecalsThe decals are printed on self-adhesive clear mylar. To apply thedecals, place one end down, hold the other end up, and graduallysmooth the decal down with your finger as you go. This willprevent air bubbles. Placing both ends of the decal down andthen trying to smooth it out will result in air pockets.
To ease the application of the large decals, fill a spray bottlewith a mixture of water (16 ounces) and baby shampoo (1/4
ounce). You may also use milddish soap or glass cleaner. Themixture will act as a lubricantwhen positioning the decals andprevents the decal from stickingto itself.
• The decals are die cut, howeverfor concourse quality results,they can be trimmed closerusing scissors or a hobby knife.
• Wet the boat surface (with the soap solution) where the decal will be applied.
• Position the decal, following the directions below.
• Wet surface of decal to prevent scraping or tearing whenremoving air bubbles (remove air bubbles from beneath thedecal using a soft or rubber straight edge/squeegee).
• If air bubbles are still present, gently pierce the bubble with a needle (be sure to squeegee out any soap solution frominside the bubble).
• Allow 12 hours drying time before running the boat.
For best results, apply the decals in alphanumerical order, ie:A1, A2, A3 etc.
Painting the ABS HullIf you wish to paint your hull another color other than thefactory white, then choose your paint with caution. Only useenamel paint made for plastic models (available from yourhobby dealer). Do not use lexan paint. Test the paint on aninconspicuous and non-critical area before painting the entireboat. Follow the manufacturer’s directions for the paint. The hullwill need to be thoroughly cleaned of dirt, oil and fingerprints.For the best results, use wax or grease remover. The hull mayrequire light scuffing with a maroon ScotchBrite™ pad prior topainting. This will promote better paint adhesion. The paint onthe bottom must be smooth to prevent a loss of performance.
Detailing Your Villain EX

9
The Traxxas TQ Radio System
Your Villain EX is equipped with the Traxxas TQ Radio System.The Traxxas TQ Radio System is a 2-channel system thatprovides high-power output up to a quarter mile. The Villain EXuses one servo and an electronic speed control.
Villain EX Wiring Diagram
Antenna
Receiver
Channel 1Steering
Servo
Channel2EVX ElectronicSpeed Control
Channel 1Channel 2
Battery
7.2vBattery
Connections
On/OffSwitch
CH.2
CH.1
Antenna Throttle Neutral Adjust
Steering Wheel
Throttle Trim
Steering Trim
Power SwitchPower Indicator
Battery Compartment
ServoReversingSwitches
Throttle Trigger

10
Radio System TerminologyPlease take a moment to familiarize yourself with these radio-system terms. They will be used throughout this manual.
Channel - The 27 MHz frequency band is divided into 6channels so that up to six models can be operatedsimultaneously. Each channel is referred to by its flag colorand channel number, as shown below.
Clearing your frequency - A routine, verbal check to make surenobody else in your area is operating on the same channel.Always clear your frequency by calling out your channelnumber before operating your model. Wait or move toanother area if your channel is already being used.
Crystal (X-tal) - The plug-in device that determines whichchannel the radio system will operate on. For each channel,there are two crystals, one for the receiver and one for thetransmitter. Of those two crystals, the one marked with the lower number (.455 MHz lower) must be inserted into the receiver.
ESC (Electronic Speed Control) - An electronic speed control isthe electronic motor control inside the model. The Villain EXuses MOSFET power transistors to provide precise, digitalproportional throttle control. Electronic speed controls use
power more efficiently than mechanical speed controls so thatthe batteries run longer. An electronic speed control also hascircuitry that prevents loss of steering and throttle control asthe batteries lose their charge.
Frequency band - The radio frequency used by the transmitterto send signals to your Villain EX. All Traxxas RTR modelsoperate on a 27 MHz frequency band.
Neutral position - The standing position that the servos seekwhen the transmitter controls are at the neutral setting.
NiCad - Refers to rechargeable, nickel-cadmium batteries. Themost economical choice, since they may be recharged up to500 times.
Receiver - The radio unit inside your Villain EX that receivessignals from the transmitter and relays them to the servos.
Servo - Small motor unit in your Villain EX that operate thesteering mechanism.
Transmitter - The hand-held radio unit that sends throttle andsteering instructions to your Villain EX.
Trim - The fine-tuning adjustment of the neutral position of theservos, made by adjusting the throttle and steering trim sliderson the face of the transmitter.
BEC (Battery Eliminator Circuit) - The BEC can either be in the receiver or in the ESC. This circuit allows the receiver andservos to be powered by the main battery pack in an electricmodel. This eliminates the need to carry a separate pack of 4 AA batteries to power the radio equipment.
Thermal Shutdown Protection – Temperature sensingelectronics are used in the ESC to detect overloading andoverheating of the transistor circuitry. If excessive temperatureis detected, the unit automatically shuts down to preventdamage to the electronics.
One-Touch Setup™ - Novak Electronics trademark name forcircuitry inside the EVX electronic speed control that allows itto adjust to the transmitter settings by pressing a button onthe speed control and operating the transmitter controls (seepage 16 for instructions).
Channel Frequency Band Flag Color Traxxas Part No.
1 26.995 Brown 2031
2 27.045 Red 2032
3 27.095 Orange 2033
4 27.145 Yellow 2034
5 27.195 Green 2035
6 27.255 Blue 2036�
The Traxxas TQ Radio System

11
The Traxxas TQ Radio System
If the power indicator light flashes, then the transmitterbatteries are weak, discharged or possibly installed incorrectly.Replace with new or freshly charged batteries. The powerindicator light does not indicate the charge level of the 7.2 voltbattery packs in the model.
Installing NiCd BatteriesThe Villain EX is equippedwith the EVX Marine speedcontrol. The EVX requirestwo battery packs to beconnected in order for it towork. The EVX uses a serialconnection that combinesthe two 7.2 volt battery packs for a total of 14.4 volts of input.This produces higher voltage output for the Villain EX’s larger550 size motors.
Place the battery packs into the front compartment of the boatand secure them tightly with the Velcro straps. Do not connectthe battery packs yet.
Charging The BatteriesThe Villain EX requires 8 AA batteries and two fully charged 7.2volt NiCd or NiMH battery packs. These batteries are not includedwith the model.You can use either side-by-side racing style packsor the more common stick packs. The battery compartments onthe Villain EX are designed to handle both. The Villain EX’s runtime is greatly affected by the milliamp hour (mAh) rating of thebatteries. A 3000 mAh battery pack will theoretically run twice aslong as a 1500 mAh pack. Follow the charger manufacturer’sdirections for charging and caring for your battery packs.
Any 7.2 volt battery packs (not included) must be fully chargedbefore installing them in the boat. Always remove the batteriesfrom the model before charging. For convenience, werecommend using a an AC peak-detecting charger that plugs intoan AC wall outlet. This type of charger uses special voltagedetection circuitry that automatically shuts the charger off whenthe battery is fully charged.
If you are using a 15-minute timed charger, always fully dischargethe battery pack before each charge. Some high-mAh (milliamphour) battery packs (1500 mAh or higher) may require more than the standard 15 minutes of charge time. If the battery packis cold after 15 minutes of charging, then add another 5 minutesof charge time. Closely monitor the battery pack and stopcharging when it begins to feel warm to the touch. Never leave a battery charging unattended. Always follow the chargermanufacturer’s instructions.
Battery InstallationInstalling Transmitter Batteries
1. Remove the battery compartment door by pressing the tab and lifting the door up.
2. Install 8 AA batteries in the correct orientation as indicated in the battery compartment.
3. Reinstall the battery door and snap it closed.
4. Turn on the transmitter and check the power indicator for a solid red light.
Use the Right BatteriesYour transmitter uses AAbatteries. Use new alkalinebatteries, or rechargeablebatteries such as NiCad or Ni-MH (nickel-metalhydride) batteries in yourtransmitter. Make surerechargeable batteries arefully charged according tothe manufacturer’sinstructions.
If you use rechargeable batteries in your transmitter,be aware that when theybegin to lose their charge,they lose power much morequickly than regular alkalinebatteries. Caution: Discontinuerunning your Villain EX atthe first sign of weaktransmitter batteries(flashing red light) to avoidlosing control.

12
The Traxxas TQ Radio System
Spray a little windowcleaner on theantenna wire to
make it easier to pushthrough the antenna tube.
Don’t shorten thelength of theantenna wire. Its
length is tuned to thefrequency band; cutting itcould severely shorten theradio system’s range.
Don’t push thetransmitter antennadown from the top.
Pull it down from thebottom, one segment at atime, to prevent binding andkinking the antenna mast.
Setting Up the AntennaYou must install the antenna mast (tube) before you operateyour Villain EX boat. You’ll find the plastic antenna tube and tip in the bag with your manuals and documentation.
1. Remove the top deck by turning the Twist-Lock™
counter-clockwise.
2. Locate the black antenna wire coiled on the outside of theradio box.
3. Straighten the antenna wire with your fingers and then insertthe end of the wire into one end of the antenna tube. Pushthe wire all the way through the antenna tube.
4. Pull the remaining wire through the antenna tube and theninsert the base of the antenna tube through the rubber sealin the radio box cover.
5. Push the base of the antenna tube into the post in thebottom of the radio box making sure that the antenna wireslides into the slot in the post (see illustration).
6. Fold the top of the antenna wire over the top of the antennatube. Slide the antenna sleeve over the tube to retain theantenna wire. Now slide the antenna tip onto the top of theantenna tube. Never cut or shorten the antenna wire.
7. On the transmitter, always fully extend the telescopingantenna when running your boat. Make a habit of holdingthe transmitter so that the antenna points straight up.
AntennaTip
AntennaTube
AntennaSleeve
RubberSeal
AntennaPost

13
The Traxxas TQ Radio System
TQ Radio System Controls
Other TQ Radio System AdjustmentsIn addition to the electronic throttle and steering trim controls,your radio system features throttle neutral adjustment andservo reversing switches.
Throttle NeutralAdjustmentThe throttle neutraladjustment is located on thetransmitter face and controlsthe forward/reverse travel ofthe throttle trigger. Changethe adjustment by pressing
the button and sliding it to the desired position. There are twosettings available:
50/50: Allows equal travel for both acceleration and reverse.70/30: Allows more throttle travel (70%) and less reversetravel (30%). 70/30 is the required setting for the Villain EX.
Note: If you change throttle travel, you will need to reprogramthe electronic speed control.
Electronic Throttle TrimThe electronic throttle trim located on the face of thetransmitter adjusts the neutral (center) point of the throttleservo when the servo is at rest. Your Villain EX uses an electronicspeed control instead of a throttle servo. This control has beenpreset for you at the factory.
Electronic Steering TrimThe electronic steering trim located on the face of thetransmitter adjusts the neutral (center) point of the steeringservo when the servo is at rest. Adjust this control to make themodel drive straight with no steering input at the wheel.
Servo Reversing SwitchesThe servo reversing switches are located on the front of thetransmitter, next to the on/off switch. Moving a switch reversesthe direction of the corresponding servo.
Each switch corresponds to a channel, as shown below. Forexample, if you turn the steering wheel to the right and youroutdrives turn left, you would move the channel 1 switch tocorrect the servo direction. It may be necessary to adjust thecorresponding trim control after moving a switch.
▼▼
CH.2
CH.1
ServoChannel
Steering1
Throttle2
Default Setting

14
Radio System RulesEach time you prepare to run yourmodel, you must clear your frequency tobe sure no one else in the area is usingthe same channel as you.
There are six possible channels,numbered 1 through 6. Each isrepresented by a color. Look at thecrystal plugged into the back of yourtransmitter to determine which channelyour boat is assigned to.
Always turn your transmitter on first and off last. Thisprocedure will help to prevent your Villain EX from receivingstray signals from another transmitter, or other source, andrunning out of control.
Always have the transmitter turned on before you plug inthe battery packs in the model. Also make sure that objectsand people (fingers!) are clear of the props beforeconnecting the batteries.
Always use new or freshly charged batteries for the radiosystem. Weak batteries will limit the range of the radio signalbetween the receiver and the transmitter. Loss of the radiosignal can cause you to lose control of your Villain EX.
Your model came with a colored frequency flag (located inyour documentation package). The color corresponds to thechannel number that your model uses. Attach the flag to theend (tip) of your transmitter antenna to signal to otherboaters what channel you are using.
▼▼
▼▼
▼ Channel 1Brown
Channel 2Red
Channel 3Orange
Channel 4Yellow
Channel 5Green
Channel 6Blue
CH.2
CH.1
1 2 3
Remember, alwaysturn the transmitteron first and off last to
avoid damage to your model.
Your electronicspeed control wasadjusted to the
radio from the factory. It ispossible for the throttletrim control on thetransmitter to have movedduring transit or whilehandling the transmitter. Ifthe motors run when theboat (esc) is switched on,then move the throttle trimcontrol on the transmitteruntil the motors stop. Ifanything more than a slightadjustment of the throttletrim control is required,then you should readjustyour speed control. Refer tothe Adjustments section onpages 16.
Caution: Always be sure that objects and people (hands!) are clear of the props before connecting the batteries!
The Traxxas TQ Radio System
kev
Line
This is a paragraph in older manuals... it has been removed since. It will be shown on the Traxxas Misprints page

The Traxxas TQ Radio System
Using the Radio SystemThe Radio System was pre-adjusted at the factory.The adjustment should be checked, before running the model,in case of movement during shipping. Here’s how:
1. Place the Villain EX on the boat stand.
2. Slide the transmitter switch to the “on” position. The red light should be on and not flashing. A flashing red lightindicates weak transmitter batteries. Weak batteries willcause the range of your model to be limited and you couldlose control.
3. Keep fingers and objects away from the propeller. Push theswitch on the boat to the “on” position. The steering servoshould jump and move to its idle (neutral) position.
4. Operate the steering control on the transmitter (channel 1).Check for rapid operation of the steering servo and that noneof the steering mechanism is loose or binding. If the servooperates slowly, check for weakor discharged 7.2 volt batterypacks. Adjust the “steering trim”control on the transmitter toadjust the servo so that theoutdrives are pointing straightout from the back of the boat.Also, check to be sure that theoutdrives do not turn more inone direction than in the other.If you cannot align the outdrive,refer to “Centering Your Servo”on page 21.
5. Operate the throttle control on the transmitter to ensure thatthe throttle is operating properly. If the propellers startspinning after you plug in the battery, or the boat doesn’tseem to reach full speed, then refer to the directions foradjusting the electronic speed control on page 16.
Range-Testing the Radio SystemBefore each running session with your Villain EX, you shouldrange-test your radio system to ensure that it operates properly.
1. Turn on the radio system and check its operation asdescribed in the previous section.
2. Have a friend hold the model. Make sure hands and clothingare clear of the propeller and other moving parts on theVillain EX.
3. Make sure your transmitter antenna is fully extended,and then walk away from the model with the transmitteruntil you reach the farthest distance you plan to operate the model.
4. Operate the controls on the transmitter once again to besure that the model responds correctly.
5. Do not attempt to operate the model if there is any problemwith the radio system or any external interference with yourradio signal at your location.
When rechargeablebatteries begin tolose their charge,
they will fade much fasterthan alkaline dry cells. Stopimmediately at the firstsign of weak transmitterbatteries. Never turn the transmitter off when thebattery pack is plugged in.The model could run out of control.
Don’t attempt tooperate your Villain EX if there
are any problems with your radio system or radio interference at your location.
If the powerindicator doesn’tlight red, check the
polarity of the batteries.Check rechargeablebatteries for a full charge.
If the radio systemdoesn’t appear towork when the
transmitter and modelswitches are turned on, check for correct batteryinstallation
15

16
The Traxxas TQ Radio System
Adjusting the Speed ControlYour Villain EX is equipped with the EVX Marine Speed Control.The electronic speed control installed in your Villain EX has beenfactory set and should not require any adjustments. Theseinstructions are provided for your reference.
The EVX has three user-selectable throttle profiles:Profile #1: 100% forward, 25% reverse: For applications wherereduced speed in the reverse direction is desirable. This is thedefault profile for marine use.Profile #2: 100% forward, 100% reverse: For applications wherefull power reverse is desirable. Do not use this profile withthe Villain EX.Profile #3: 100% forward, 0% reverse: This profile completelydisables reverse for racing use.
PrecautionsFollow these extra safety precautions for your protection and toensure long life for the EVX speed control.
Disconnect the batteries. Always disconnect the battery packfrom the speed control when not in use.Transmitter on first. Turn on your transmitter before thespeed control so you will have control of the radio equipment.Don’t get burned! The transistor tabs and the heat exchangercan get extremely hot, so be careful not to touch them untilthey cool.Always use the heat exchanger. The heat exchanger isfactory-installed on the speed control and must be used formaximum cooling and performance. Do not replace withmetal heat sinks!
These additional precautions apply if the stock Villain EX ismodified in the future. Please be aware that damage to the speedcontrol caused by modification of the Villain EX or EVX will not becovered by the warranty. This includes changing the connectors.
Use stock connectors. If you decide to change the batteryor motor connectors, only change one battery or motorconnector at a time. This will prevent accidentally mis-wiring the speed control. If the EVX is not wired exactly as shown in the diagram, it can be damaged!
Use neutrally timed motors. The motors installed in theVillain EX are neutrally timed. If you replace the motors, themotors must have 0° timing. Modified motors (with adjustableend bells) timed to 0° or Johnson/ Mabuchi (closed end bell)motors are recommended. Using motors with other than 0°timing will draw excess current in reverse, causing the speedcontrol to overheat and premature motor wear.Motor capacitors required! If the factory installed stockmotors are replaced, three 0.1µF (50V) ceramic capacitorsshould be properly installed on every motor to prevent radiointerference. These capacitors are available from your hobbydealer (Novak Kit #5620).No reverse voltage! The speed control is not protectedagainst reverse polarity voltage. If changing the batteryand/or motor, be sure to install the same type of connectorsto avoid damage to the speed control. Removing the batteryconnectors on the speed control or using the same-genderconnectors on the speed control will void the product’swarranty.Don’t let the transistor tabs touch! Never allow thethree separate transistor banks to touch each other or anyexposed metal. This will create a short circuit and damage thespeed control.Insulate the wires. Always insulate exposed wiring with heatshrink tubing to prevent short circuits.Don’t use electrically conductive heat sink compound on the heat exchanger. The transistor tabs must remainelectrically isolated.
▼▼
▼▼
▼▼
▼▼
▼▼
▼
EVX Wiring Diagram - Follow this diagram exactly! The pos(+) and neg(-) battery inputs are not reversible.
BATTERY
BATTERY
Right Motor(Starboard)
Left Motor(Port)

The Traxxas TQ Radio System
17
Transmitter Adjustments for the EVX (Marine)Before attempting to program your EVX, it is important to makesure that your transmitter is properly adjusted (set back to thefactory defaults). Otherwise, you may not get the bestperformance from your speed control.
The transmitter should be adjusted as follows:1. Set the Throttle Neutral switch to the 70/30 setting. This
adjusts the transmitter’s throttle trigger throw to 70% forthrottle and 30% for brake/reverse.
2. Set the Throttle Trim to the middle “0” setting. This adjusts theneutral position of the throttle servo.
3. Set the Channel 1 Servo Reversing Switch to the left position.
4. Do not change the position of any of the servo reversingswitches after programming the EVX.
Speed Control ProgrammingTo program the speed control, it should be connected to thereceiver, and the transmitter should be adjusted as described inthe previous section.
1. Be sure the props are clear.
2. Connect two fully charged battery packs to the speed control.Connect one JST plug (RED & BLACK wires) to one batterypack. Connect the other JST plug to the other battery pack.
3. Turn on the transmitter.
4. Turn on the speed control.
5. With the transmitterthrottle at neutral, pressand hold the ESC SETbutton until the statusLED turns solid red, andthen release the button. You are now in programming mode.
6. Pull the transmitterthrottle trigger to thefull throttle position.Hold it there until thestatus LED turns solidgreen. Note: The motors will not run during programmingeven if they are connected to the speed control.
7. Push the transmitterthrottle trigger to fullreverse, hold it thereuntil the status LEDblinks green.
8. Release the transmitterthrottle trigger allowingit to return to neutral.The status LED will turnsolid red, indicating thatthe throttle is at neutral and the programming has been completed.
The EVX speed control is now programmed & ready to go!If the transmitter settings are changed, it will be necessary tocomplete the programming sequence again.If the SET button is released before the LED turns solid red instep 5, the LED will blink 7 times and then return to thenormal operation mode.If you experience any problems during programming, turnoff the speed control and repeat the programming steps.
▼▼
▼
Using an AftermarketTransmitter with the EVX.The following instructionsare provided as referenceonly for those who are usingan aftermarket transmitter inplace of their factory Marine.
1. Set the High ATV or EPA to the maximumsetting. This is the amount of servo throw at full throttle.
2. Set the Low ATV, EPA, or ATL to themaximum setting. This is the amount of servothrow at full reverse.
3. Set the Exponential to the zero setting. Thisadjusts the throttlechannel linearity.
4. Set the Throttle ChannelTrim to the middlesetting. This adjusts theneutral position andincreases or decreases theamount of coast braking.
5. Set the Throttle ChannelReversing Switch to eitherposition. Do not changethe switch position afterprogramming.
6. Set the Trigger ThrowAdjustment to 70%throttle and 30% brake throw.

18
Speed Control Throttle Profile SelectionThe speed control is factory set to Profile #1 (forward with 25%reverse). To disable the reverse (Profile #3), or to allow fullreverse (Profile #2), follow these steps. The speed control shouldbe connected to the receiver and the transmitter adjusted asdescribed on page 17.
1. Connect two fully charged battery packs to the speed control.Connect one JST plug (RED & BLACK wires) to one batterypack. Connect the other JST plug to the other battery pack.
2. Turn on the transmitter.
3. Turn on the speed control.
4. Press and hold the ESCSET button until thestatus LED turns fromsolid red to solid green.Immediately release theESC SET button when it changes to green.
5. The LED will now flash red.The number of red flashesindicates the active throttle profile.
6. Press the ESC SETbutton to select thethrottle profile. Eachpress will advance thesetting to the nextprofile. Note: To change the profile you must press the ESCSET button immediately after the LED flashes the currentsetting. Once the LED flashes the desired setting number, waitand the LED will turn green and the EVX will exit theprogramming mode.
The Traxxas TQ Radio System
Profile 1 - 100% Forward / 25% Reverse
Profile 2 - 100% Forward / 100% Reverse
Profile 3 - 100% Forward / No Reverse
Default Marine Setting
▼

Now it’s time to have some fun! This section contains instructions on driving and making adjustments to your Villain EX. Before you go on,here are some important precautions to keep in mind.
Select a body of water,at least 10 inches deep,which is clear of moss and grass. Do not drive the Villain EXin extremely rough, choppy water or in high wind (morethan 15 MPH). These conditions could cause your Villain EXto flip over.
The Villain EX’s steering is very sensitive. A slight input onthe steering control will have a large effect on the boat.When the boat is out in open water, adjust the steering trimon the transmitter until the boat travels in a straight line onits own. (Note: The Villain EX will only travel in a straight lineon its own when it is heading straight into or away from thewind. Crosswinds will require constant steering input tomaintain a straight course.)
To prevent spin outs, avoid steering sharply at high speed.
Always be ready to reduce the throttle if the Villain EXappears to be unstable or “chine walking” (rocking violentlyfrom side-to-side). Always reduce the throttle when turning,especially in rough water. Jumping the Villain EX or towinganything with it should not be attempted.
Return the Villain EX to shore at the first sign of weakbatteries. The Villain EX will begin to slow and the controlswill become sluggish.
CavitationIf the Villain EX is running at full throttle but is only barelymoving forward then the propeller is cavitating. Try advancingthe throttle slowly to get the Villain EX on plane. If you arehaving trouble with cavitation, check the propellers for nicks ortangled debris. The Villain EX’s propellers are specially designedfor their application and are very sensitive to any changes ormodifications. If a prop is damaged it should be replaced.
Run TimeThe Villain EX is able to achieve long run times due to thegreater efficiency of the high voltage electrical system. A largefactor affecting run time is the type and condition of yourbatteries. The milliamp hour (mAh) rating of the batteriesdetermines how large their “fuel tank” is. A 3000 mAh batterypack will theoretically run twice as long as a 1500 mAh pack.Because of the wide variation in the types of batteries that areavailable and the methods with which they can be charged, it’simpossible for us to give you exact run times for the Villain EX. Another major factor which affects run time is howthe Villain EX is driven. Our experience has shown that the runtimes are shorter when the boat is driven continuously at top speed.
Tips for Increasing Run TimeUse batteries with the highest mAh rating you can purchase.Use a high-quality peak-detecting charger.Discharge the batteries completely after each run.Vary your speed. Continuous high speed shortens the runtime on the Villain EX.Maintain your Villain EX. Do not allow debris or damagedparts to cause binding in the drivetrain. Keep the motorsclean and the motor bushings lightly lubricated.Apply the throttle smoothly. Hard acceleration, especiallyfrom a stop, will shorten your run time.
Boat RetrievalIf the Villain EX accidentally flips over and fills with water, it isequipped with foam flotation to help prevent it from sinking.Traxxas does not recommend swimming or wading to retrieve aboat. If you have chosen your launch sight carefully (downwind),the Villain EX will probably drift back to you on its own.
If there is no wind, you will need a tennis ball and a length ofstring. Tie the tennis ball securely to one end of the string andthen throw the ball over the drifting boat. Pull the ball in and tryto entangle the boat in the string. Pull the boat back slowly toshore. If only the bow of the boat remains visible, try using afishing lure with many hooks and a fishing pole. Try to snag thelip of the upper deck or drive mechanism with the hooks.
▼▼
▼▼
▼▼
▼▼
▼▼
▼Driving the Villain EX
19
Caution! If theVillain EX suddenlystops running or
runs very slowly, releasethe throttle immediately!There could be trashwound around the props(such as a plastic bag orfishing line). If youcontinue to drive theVillain EX with boundprops, the high load couldcreate excessive heat andseriously damage thebatteries, speed control, ormotors. Retrieve yourVillain through othermeans (see Boat Retrievalon the left).
Allow the motorsto cool for 15minutes between
runs. This will extend thelife of the motors.
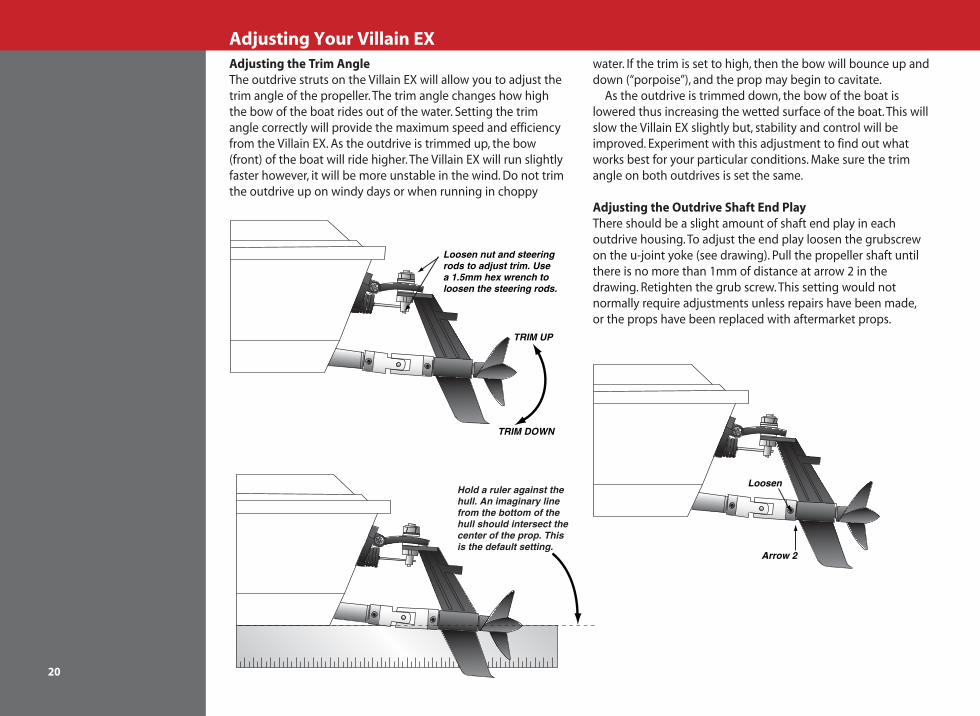
Hold a ruler against the hull. An imaginary linefrom the bottom of the hull should intersect the center of the prop. This is the default setting.
20
Adjusting Your Villain EXAdjusting the Trim AngleThe outdrive struts on the Villain EX will allow you to adjust thetrim angle of the propeller. The trim angle changes how highthe bow of the boat rides out of the water. Setting the trimangle correctly will provide the maximum speed and efficiencyfrom the Villain EX. As the outdrive is trimmed up, the bow(front) of the boat will ride higher. The Villain EX will run slightlyfaster however, it will be more unstable in the wind. Do not trimthe outdrive up on windy days or when running in choppy
water. If the trim is set to high, then the bow will bounce up anddown (“porpoise”), and the prop may begin to cavitate.
As the outdrive is trimmed down, the bow of the boat islowered thus increasing the wetted surface of the boat. This willslow the Villain EX slightly but, stability and control will beimproved. Experiment with this adjustment to find out whatworks best for your particular conditions. Make sure the trimangle on both outdrives is set the same.
Adjusting the Outdrive Shaft End PlayThere should be a slight amount of shaft end play in eachoutdrive housing. To adjust the end play loosen the grubscrewon the u-joint yoke (see drawing). Pull the propeller shaft untilthere is no more than 1mm of distance at arrow 2 in thedrawing. Retighten the grub screw. This setting would notnormally require adjustments unless repairs have been made,or the props have been replaced with aftermarket props.
Arrow 2
Loosen
TRIM UP
TRIM DOWN
Loosen nut and steering rods to adjust trim. Use a 1.5mm hex wrench toloosen the steering rods.

Maintaining and Storing Your Villain EX
Your Villain EX requires timely maintenance in order to stay in toprunning condition.The following procedures should be takenvery seriously. Form the habit of visually inspecting themechanical integrity of the Villain EX before and after each run.
Inspect the model for obvious damage or wear:Normally, some water will accumulate inside the boat. Emptyany standing water out of the boat between runs. Pour anywater out the side or front of the boat. Do not drain the waterout of the back of the boat (near the radio system).
Check the wiring for any frayed wires or loose connections.
Check the tightness of the set screws in the collars on thesteering linkages, in the propellers, and in the universal jointyokes (connecting the outdrives to the driveshafts).Thread-locking compound can be applied to these screws to preventthem from loosening.
Check the mounting of the receiver and servo.
Check the driveshaft seals for damage. Do not attempt to runthe Villain EX if these seals are damaged in any way.
Check the tightness of the propellers.Visually inspect theprops for nicks, dings, and warpage. Replace if any damage is noticed.
Check the operation of the radio system, especially thecondition of the batteries.
Visually inspect the hull for any cracks, damage,or possible leaks.
Drain all water out of the Villain EX and thoroughly dry itbefore you store it. Store the Villain EX with the top deckremoved and radio compartment cover open so that anyremaining moisture will evaporate.
Other periodic maintenance:Keep the Villain EX clean of accumulated dirt and oil.
Re-oil the motor bushings before each day of running.Use an oil made for electric motors such as 3-in-1 Oil™.
Periodically re-oil the bushings in the outdrive housings and the driveshaft tubes.There are metal oiling nipples in each drive unit to accommodate oiling the driveshaft tube bushings.
Keep all of the screws in the drive system tight.
Storage:Disconnect and remove all batteries.
Thoroughly clean and dry the Villain EX before storing it.
Always store the Villain EX with the top deck and radiocompartment cover removed.This will allow harmful moistureand condensation to evaporate.
Centering Your ServoWhenever your radio system has been removed for service orcleaning, the steering servo must be re-centered prior to installingthe radio system in the model.
1. If the radio system is already installed in the boat, disconnectthe servo horn from the servo.
2. Connect the steering servo to channel 1 on your receiver andthe electronic speed control to channel 2.The white wire onthe servo cable is positioned towards the crystal.
3. Place fresh “AA” batteries in the transmitter and turn the powerswitch on.
4. Slide the throttle and steering trim adjustments to the center position.
5. Keep fingers and objects away from the propeller. Connecttwo fresh 7.2V battery packs to the electronic speed controland turn the power switch to the on position.The servo willautomatically jump to its center position.
6. Turn off the power switch in the boat followed by thetransmitter.The servo is now ready to be installed.
7. Be careful not to move the servo shaft when installing thelinkages. Readjust the electronic speed control as described inthe previous section.
▼▼
▼▼
▼
▼▼
▼▼
▼▼
▼▼
▼▼
▼
21

22
While the Villain EX is a great performer out of the box, there aresteps you can take to increase the speed of the boat.
1. Adjust the trim angle correctly. The trim angle should betrimmed down just enough to keep the bow of the boat fromporpoising (bouncing up and down) in the current waterconditions. If the trim is set too low, then it pushes the bowlower and increases drag in the water (see page 20).
2. Maintain your boat. Your Villain EX will be faster if it is keptclean and in good working order. Replace the props if they getnicked or damaged. Keep bushings and gears lubricated. Keepthe motors clean and oiled. Make sure the drivetrain turnsfreely with no binding or excess friction. Maintain the batteriesby completely discharging the packs after each use. This willminimize the “memory” effect of NiCd batteries.
3. Use the best batteries and charger you can afford.Rechargeable batteries will lose their “punch” over time andshould be replaced when their fully charged performancedecreases significantly. Consider replacing worn-out sportpacks and a timed charger with high-performance batteriesand a good peak-detecting charger. A peak-detecting chargercharges batteries to their peak voltage and then automaticallyshuts off. This assures perfectly charged batteries every time.
4. Use aftermarket metal props. Polished and balanced metalprops can significantly increase the speed and efficiency of theVillain EX. To fit aftermarket props with 3/16 inch threads, usethe Traxxas accessory prop shaft (part #1529X). For the bestperformance, choose props that can be purchased as counter-rotating pairs, such as the Octura X447 props (available fromyour hobby dealer). When larger props are used, it may benecessary to use smaller pinion gears on the motors. Forexample, it is necessary to use 12T pinions, 32 pitch, (part#3942) with the Octura X447 props.
5. Use more-powerful aftermarket motors. Note: Do this at yourown risk! Changing the motors will void the warranty for theEVX speed control. Damage to the EVX caused by excessivecurrent flow is not covered by warranty. Changing the motorsis only recommended for experienced users who understandthe gearing needs and the increased loads and coolingrequirements placed on the electronics. The Titan 550 motorsare matched to the EVX speed control to provide the bestbalance of performance, efficiency, and run time. Higherperformance, zero-timed 550 or 540 motors may be used,however efficiency and run time will decrease (sometimes bymore than half!). Aftermarket performance motors will runmuch hotter and often require their own water-cooling systemto survive. 540 motors are not designed to operate at theVillain EX’s higher voltage so they are less efficient andgenerate much more heat. The stock gear ratio will need to bemodified by changing the pinion gears on the motors. Adjustthe gearing to control current draw, run-time, and destructiveheat build-up. Improper gearing can destroy motors,batteries, and electronics very quickly. Always start withsmall pinion gears (12-tooth) and closely monitor the motorand battery temperature, and run time. Pinion gear size maybe increased until any one of the motors, batteries, or speedcontrol become too hot, or the run time becomesunacceptably short. Both banks on the EVX water-cooled heatexchanger may need to be utilized for extra cooling. There arepractical limits to what the electronics system in the Villain EXis capable of. For example, it may not be possible to use thefastest 10-turn modified 540 motors and the largestaftermarket props without generating so much current draw and heat that expensive batteries and electronics will be immediately destroyed. Be reasonable and conservativewith your motor, gearing and prop choices to avoid expensive damage.
Increasing Performance

23
Index
Antenna (receiver) 6, 9, 12Antenna (transmitter) 9, 12
sleeve 12tip 12tube 12wire 12
Batteries 5, 10, 11, 22alkaline 11, 15charging 11compartment 6connector 6hold-down strap 6installation 11mAh 19Ni-MH (nickel-metal hydride) 11NiCad (nickel-cadmium) 5, 10, 11, 15rechargeable 11
Battery Connectors 9Battery Eliminator Circuit (BEC) 10Boat Retrieval 19Cavitation 19, 20Channel 9, 10, 14Channel number 10Charger 5, 22Clearing your frequency 10Crystal 10, 14Customer service 3Decals 8Driving 19E-mail 3Electronic Speed Control (EVX) 6, 9, 10, 14
adjusting 16heat sinks 16modification 16, 22precautions 16profiles 16programming 17transmitter adjustments 17
Flag color 10Frequency band 10, 12
Gear Cover 6Hop Ups 22Heat Exchanger 6, 16Maintenance 21Motors 6, 22Mounting Post 6Neutral position 10On/Off switch 6, 9One-Touch Setup 10, 17Outdrive 6
connecting rod 6Outdrive Shaft 20
end play 20Painting 8Performance 22Power Switch 9Propeller 6Quick Start 7, 9, 12, 13, 15, 16, 20Radio interference 15Radio System 9, 15
adjustments 13box 6controls 13range-testing 15rules 14terminology 10terms 10
Range 12, 14Receiver 6, 9, 10Required equipment 5Run Time 19
increasing 19Safety 4Salt water 4Servos 10
centering 21reversing 9steering 6, 9
Shipping 3Steering Trim 9, 10
Steering Wheel 9Storage 21Supplies 5Support 3Thermal Shutdown Protection 10Throttle Neutral Adjustment 9Throttle Trigger 9Throttle Trim 9, 10, 14Tools 5Transmitter 10, 14
aftermarket 17power indicator 9
Trim Adjustment 6bracket 6
Trim Angle 20, 22Twist-Lock 6, 12Water Cooling 6, 22Water Pickup 6Wiring diagram 9X-tal see also Crystal 10