Introduction to iProcurement (Requisitioning)
17
Introduction to iProcurement TOPICS: PAGE: How Do I Login to iProcurement?.................................................. 1 How Do I Set My Preferences?........................................................ 2 How Do I Create a Requisition?...................................................... 4-7 Creating the Requisition Header Description Rules……………… 5 Selecting My Approver……………………………………………… 6 Printing My Requisition……………………………………………. 7 Finding My Requisitions/Finding the Status of My Requisition.. 7-8 Finding My Purchase Order……………………………………….. 8 Saving a requisition to complete at another time…………………. 8 How Do I Shop for a Non-Catalogue Item? 4 How Do I Shop in HCOM from a Punchout Vendor Site?............. 10-13 How Do I Shop in HCOM from a Vendor Catalogue?................... 14-16 How Do I Exit iProcurement?......................................................... Bottom of 3
-
Upload
truonghuong -
Category
Documents
-
view
254 -
download
2
Transcript of Introduction to iProcurement (Requisitioning)
Introduction to iProcurement
TOPICS: PAGE:
How Do I Login to iProcurement?.................................................. 1 How Do I Set My Preferences?........................................................ 2 How Do I Create a Requisition?...................................................... 4-7 Creating the Requisition Header Description Rules……………… 5 Selecting My Approver……………………………………………… 6 Printing My Requisition……………………………………………. 7 Finding My Requisitions/Finding the Status of My Requisition.. 7-8 Finding My Purchase Order……………………………………….. 8 Saving a requisition to complete at another time…………………. 8 How Do I Shop for a Non-Catalogue Item? 4 How Do I Shop in HCOM from a Punchout Vendor Site?............. 10-13 How Do I Shop in HCOM from a Vendor Catalogue?................... 14-16 How Do I Exit iProcurement?......................................................... Bottom of 3
Page 1
Introduction to iProcurement
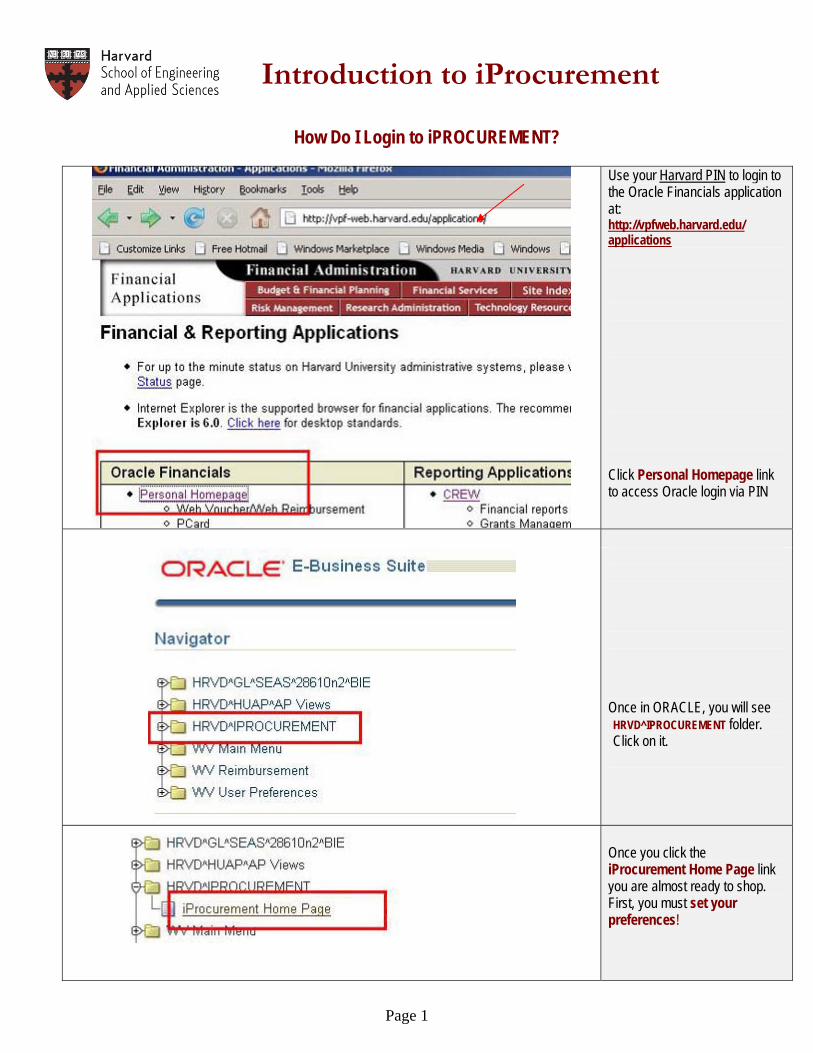
How Do I Login to iPROCUREMENT?
Use your Harvard PIN to login to the Oracle Financials application at: http://vpfweb.harvard.edu/ applications Click Personal Homepage link to access Oracle login via PIN
Once in ORACLE, you will see HRVD^IPROCUREMENT folder. Click on it.
Once you click the iProcurement Home Page link you are almost ready to shop. First, you must set your preferences!

Page 2
How Do I Set My Preferences?
Click the Preferences link in the upper right hand corner of the iProcurement Home Page.
For Need By Date Offset, enter 2 as the default for the preferred number of days between the date an order is placed and the date it is delivered. For Need By Time, enter 12:00 as the default time by which items should, by default, be received on the delivery date. Enter your name (last name, first name) for Requester. Enter H86073 code for 9 Oxford St McKay Lab Loading Dock in Deliver To Building. Check the box Receiving Required – all orders are received by SEAS Procurement into the iProcurement system. Under Favorite Charge Accounts, create Nicknames for the accounts you use most often and enter the 33 digit account numbers in the HRVD Accounting Flexfield. Click the Add Another Row button to add each new account. You must select one of the accounts to Set as your Primary account.
TIP: This Icon allows you to “Search and Select” a value to populate the field. For more on using “Search and Select” continue on to Page 3 or skip ahead one screen shot to finish Preferences.
Page 3
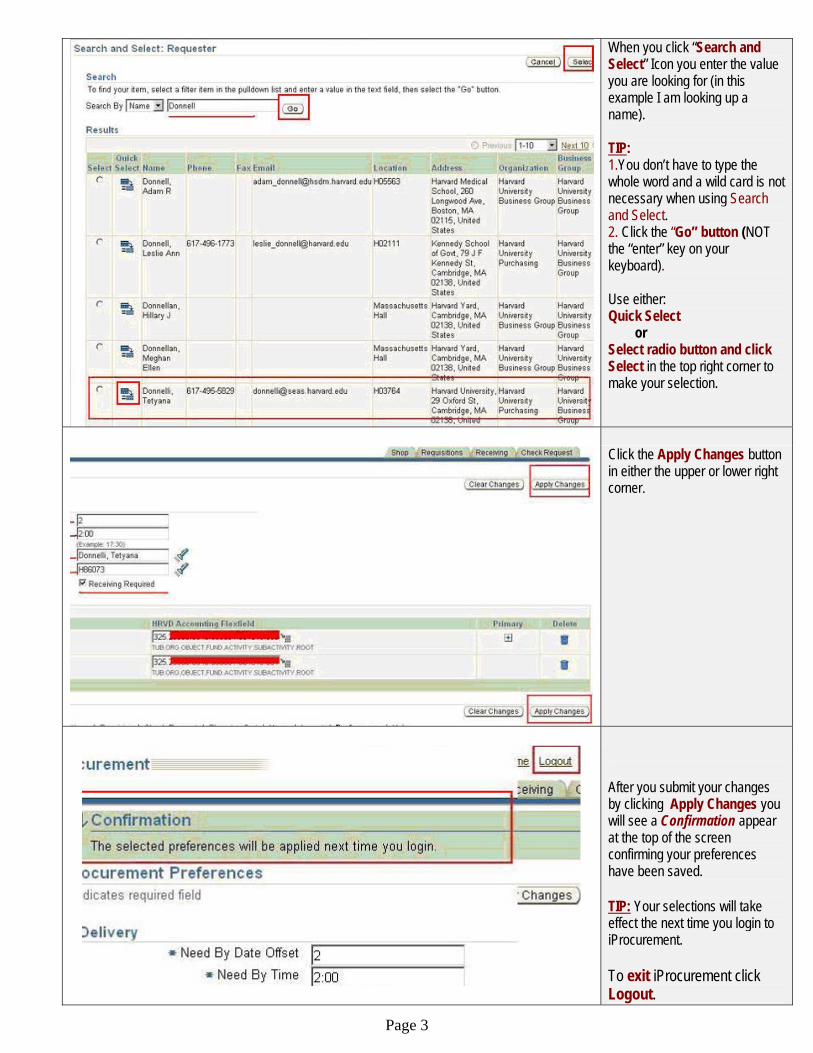
When you click “Search and Select” Icon you enter the value you are looking for (in this example I am looking up a name). TIP: 1.You don’t have to type the whole word and a wild card is not necessary when using Search and Select. 2. Click the “Go” button (NOT the “enter” key on your keyboard). Use either: Quick Select or Select radio button and click Select in the top right corner to make your selection.
Click the Apply Changes button in either the upper or lower right corner.
After you submit your changes by clicking Apply Changes you will see a Confirmation appear at the top of the screen confirming your preferences have been saved. TIP: Your selections will take effect the next time you login to iProcurement. To exit iProcurement click Logout.
Page 4
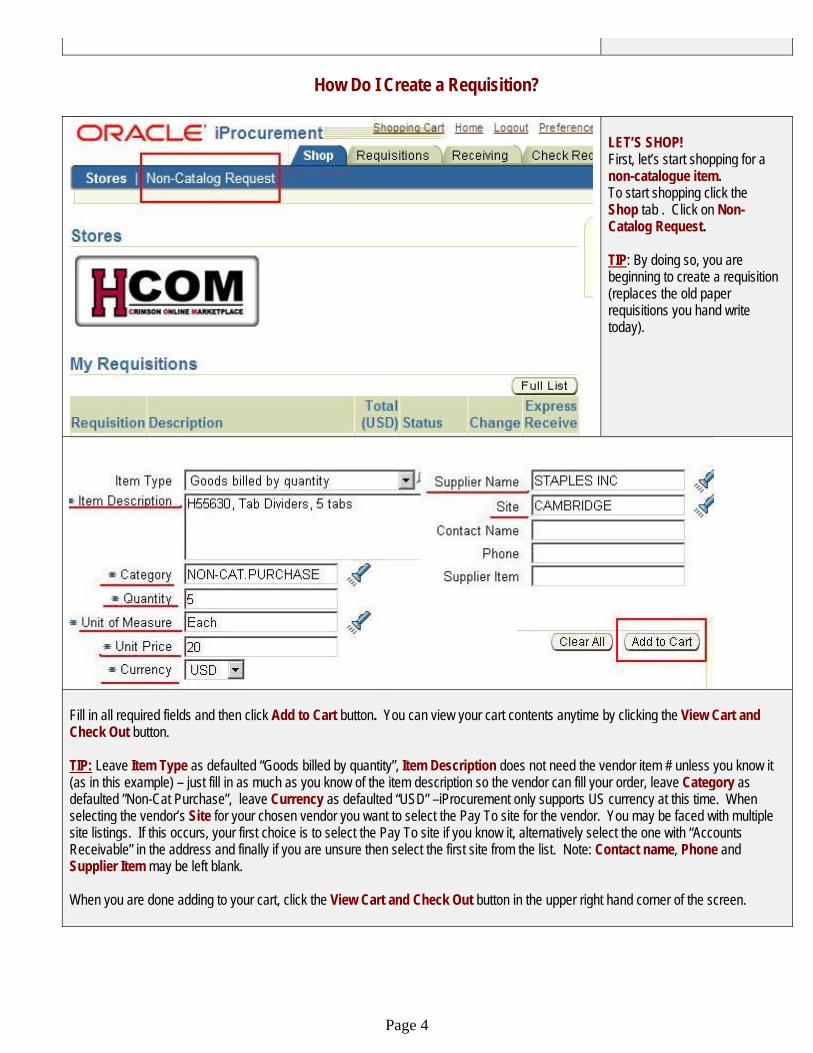
How Do I Create a Requisition?
LET’S SHOP! First, let’s start shopping for a non-catalogue item. To start shopping click the Shop tab . Click on Non-Catalog Request. TIP: By doing so, you are beginning to create a requisition (replaces the old paper requisitions you hand write today).
Fill in all required fields and then click Add to Cart button. You can view your cart contents anytime by clicking the View Cart and Check Out button. TIP: Leave Item Type as defaulted “Goods billed by quantity”, Item Description does not need the vendor item # unless you know it (as in this example) – just fill in as much as you know of the item description so the vendor can fill your order, leave Category as defaulted ”Non-Cat Purchase”, leave Currency as defaulted “USD” –iProcurement only supports US currency at this time. When selecting the vendor’s Site for your chosen vendor you want to select the Pay To site for the vendor. You may be faced with multiple site listings. If this occurs, your first choice is to select the Pay To site if you know it, alternatively select the one with “Accounts Receivable” in the address and finally if you are unsure then select the first site from the list. Note: Contact name, Phone and Supplier Item may be left blank. When you are done adding to your cart, click the View Cart and Check Out button in the upper right hand corner of the screen.
Page 5
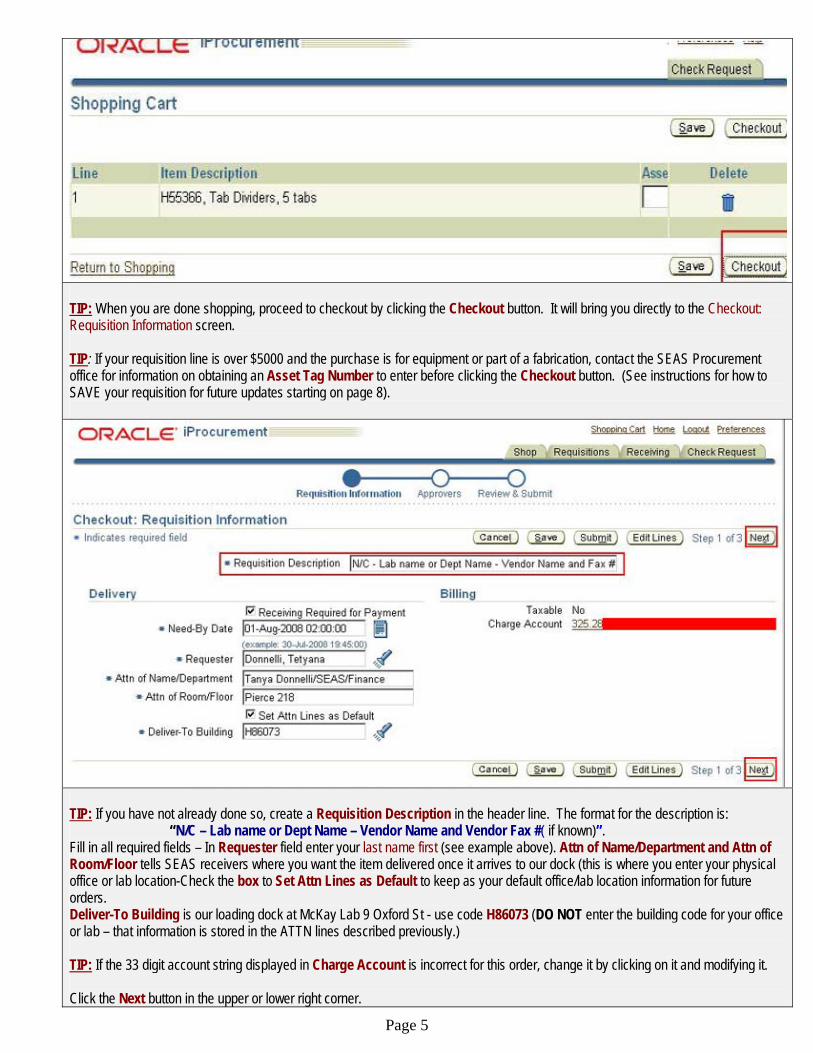
TIP: When you are done shopping, proceed to checkout by clicking the Checkout button. It will bring you directly to the Checkout: Requisition Information screen. TIP: If your requisition line is over $5000 and the purchase is for equipment or part of a fabrication, contact the SEAS Procurement office for information on obtaining an Asset Tag Number to enter before clicking the Checkout button. (See instructions for how to SAVE your requisition for future updates starting on page 8).
TIP: If you have not already done so, create a Requisition Description in the header line. The format for the description is: “N/C – Lab name or Dept Name – Vendor Name and Vendor Fax #( if known)”. Fill in all required fields – In Requester field enter your last name first (see example above). Attn of Name/Department and Attn of Room/Floor tells SEAS receivers where you want the item delivered once it arrives to our dock (this is where you enter your physical office or lab location-Check the box to Set Attn Lines as Default to keep as your default office/lab location information for future orders. Deliver-To Building is our loading dock at McKay Lab 9 Oxford St - use code H86073 (DO NOT enter the building code for your office or lab – that information is stored in the ATTN lines described previously.) TIP: If the 33 digit account string displayed in Charge Account is incorrect for this order, change it by clicking on it and modifying it. Click the Next button in the upper or lower right corner.
Page 6
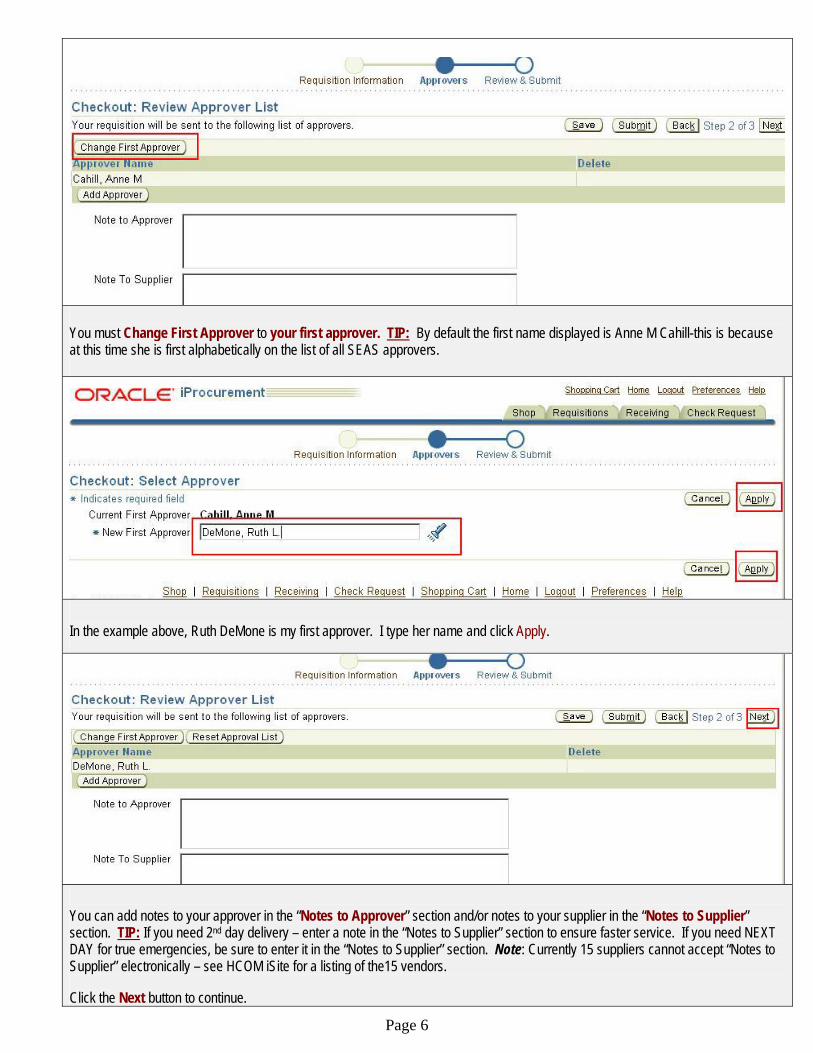
You must Change First Approver to your first approver. TIP: By default the first name displayed is Anne M Cahill-this is because at this time she is first alphabetically on the list of all SEAS approvers.
In the example above, Ruth DeMone is my first approver. I type her name and click Apply.
You can add notes to your approver in the “Notes to Approver” section and/or notes to your supplier in the “Notes to Supplier” section. TIP: If you need 2nd day delivery – enter a note in the “Notes to Supplier” section to ensure faster service. If you need NEXT DAY for true emergencies, be sure to enter it in the “Notes to Supplier” section. Note: Currently 15 suppliers cannot accept “Notes to Supplier” electronically – see HCOM iSite for a listing of the15 vendors. Click the Next button to continue.

Page 7
TIP: To print your requisition, click on Printable Page. This is the only time you will be able to print your requisition until it is fully approved. Click Submit to submit your requisition to your first approver for review and approval.
You will see a Confirmation appear at the top of the screen confirming your requisition has been submitted. TIP: To send an email to your approver click on the NAME link (see DeMone, Ruth L example above.) to launch your email application and allow you to send an email notifying your approver a requisition is on the way for approval.
TIP: To see the status of your requisition, click on the Requisitions tab and a list of all requisitions you have submitted will appear.
Various Requisition Statuses: (go on to page 8 for more statuses) Incomplete – A saved shopping cart not yet submitted for approval
Page 8
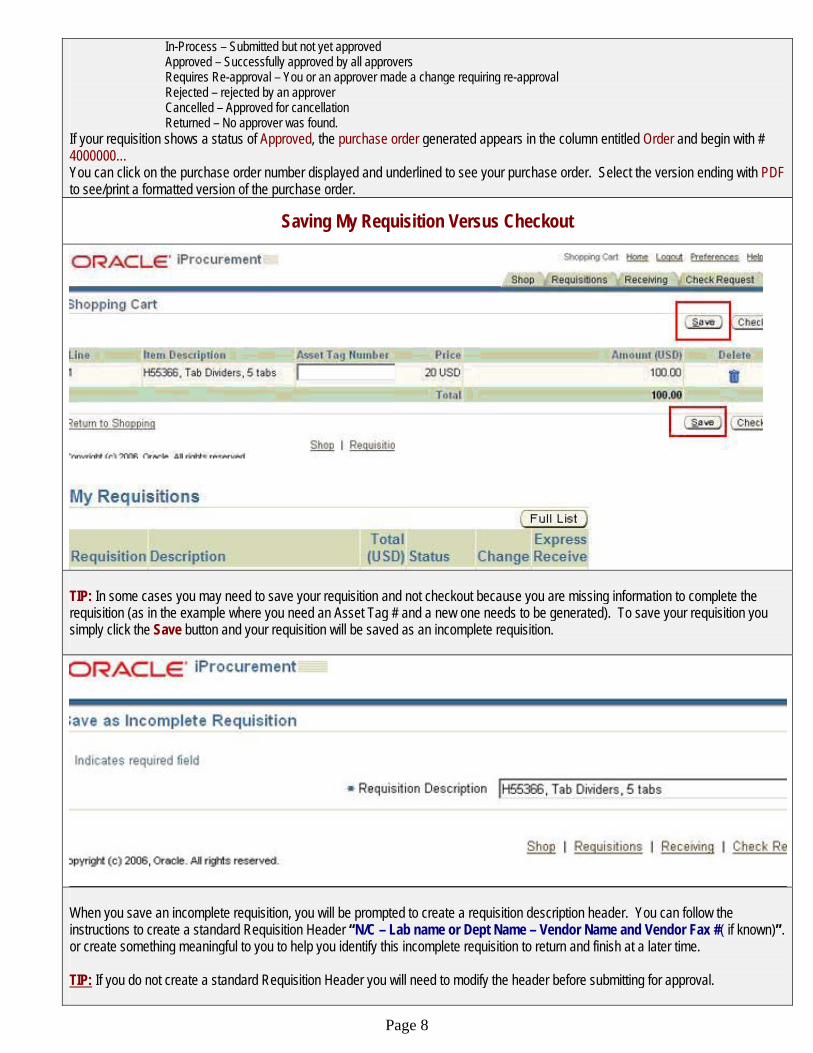
In-Process – Submitted but not yet approved Approved – Successfully approved by all approvers Requires Re-approval – You or an approver made a change requiring re-approval Rejected – rejected by an approver Cancelled – Approved for cancellation Returned – No approver was found.
If your requisition shows a status of Approved, the purchase order generated appears in the column entitled Order and begin with # 4000000… You can click on the purchase order number displayed and underlined to see your purchase order. Select the version ending with PDF to see/print a formatted version of the purchase order.
Saving My Requisition Versus Checkout
TIP: In some cases you may need to save your requisition and not checkout because you are missing information to complete the requisition (as in the example where you need an Asset Tag # and a new one needs to be generated). To save your requisition you simply click the Save button and your requisition will be saved as an incomplete requisition.
When you save an incomplete requisition, you will be prompted to create a requisition description header. You can follow the instructions to create a standard Requisition Header “N/C – Lab name or Dept Name – Vendor Name and Vendor Fax #( if known)”. or create something meaningful to you to help you identify this incomplete requisition to return and finish at a later time. TIP: If you do not create a standard Requisition Header you will need to modify the header before submitting for approval.

Page 9
Enter the Requisition Header in Requisition Description and click the Save button.
To find your incomplete requisition at a later time, return to the Requisitions tab and look for the requisitions with a status of Incomplete from your list of requisitions.
To make changes or updates to your incomplete requisition click on the Radio Button and click Complete.
Your incomplete saved requisition opens and you can fill in any missing information by following the instructions starting on page 4 to finish your requisition and send it for approval.
Page 10
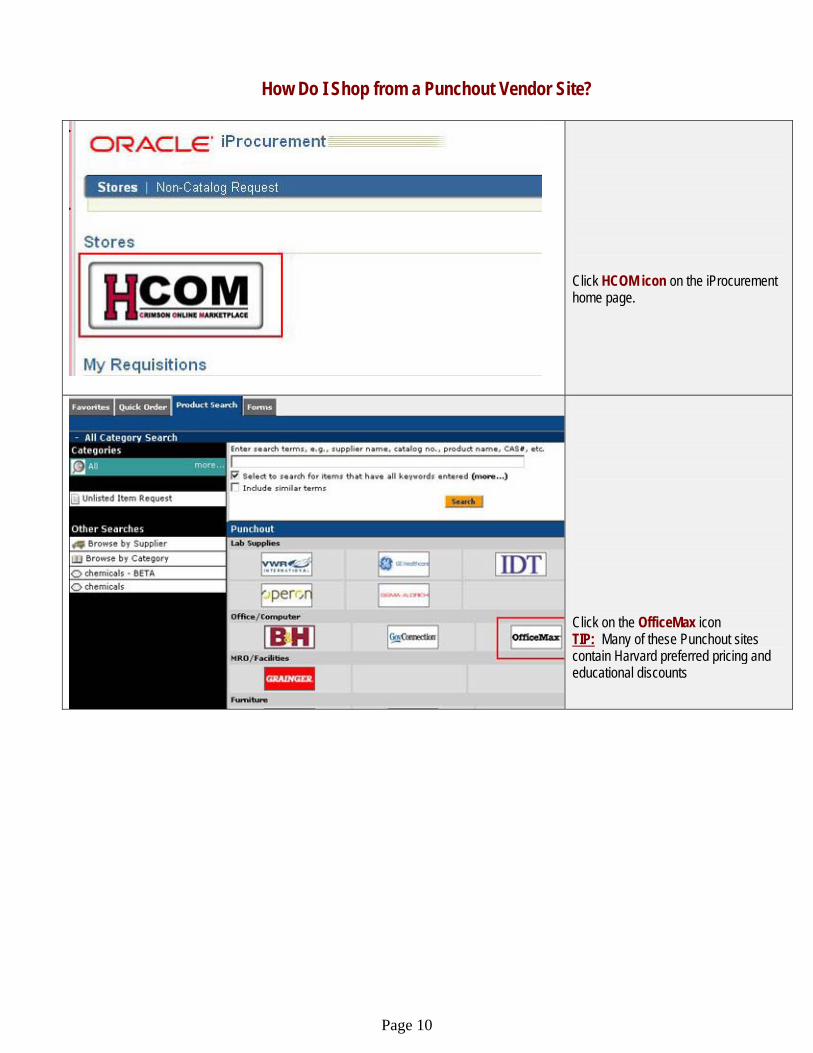
How Do I Shop from a Punchout Vendor Site?
Click HCOM icon on the iProcurement home page.
Click on the OfficeMax icon TIP: Many of these Punchout sites contain Harvard preferred pricing and educational discounts
Page 11
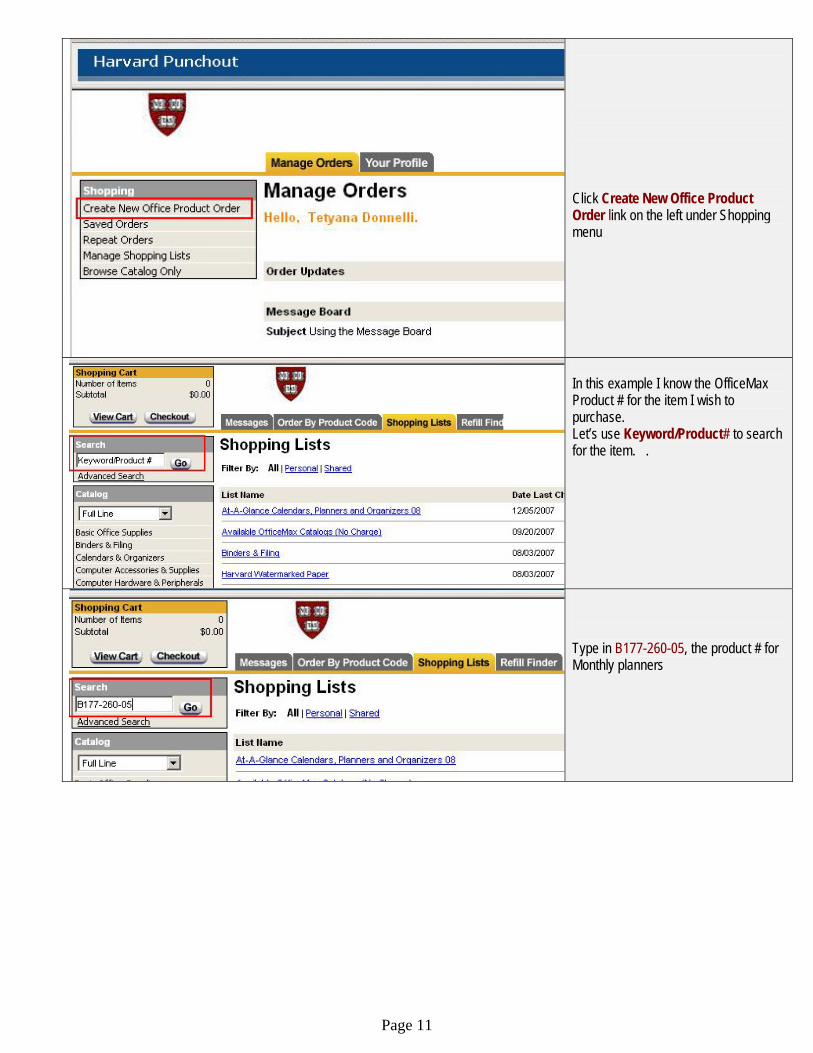
Click Create New Office Product Order link on the left under Shopping menu
In this example I know the OfficeMax Product # for the item I wish to purchase. Let’s use Keyword/Product# to search for the item. .
Type in B177-260-05, the product # for Monthly planners
Page 12
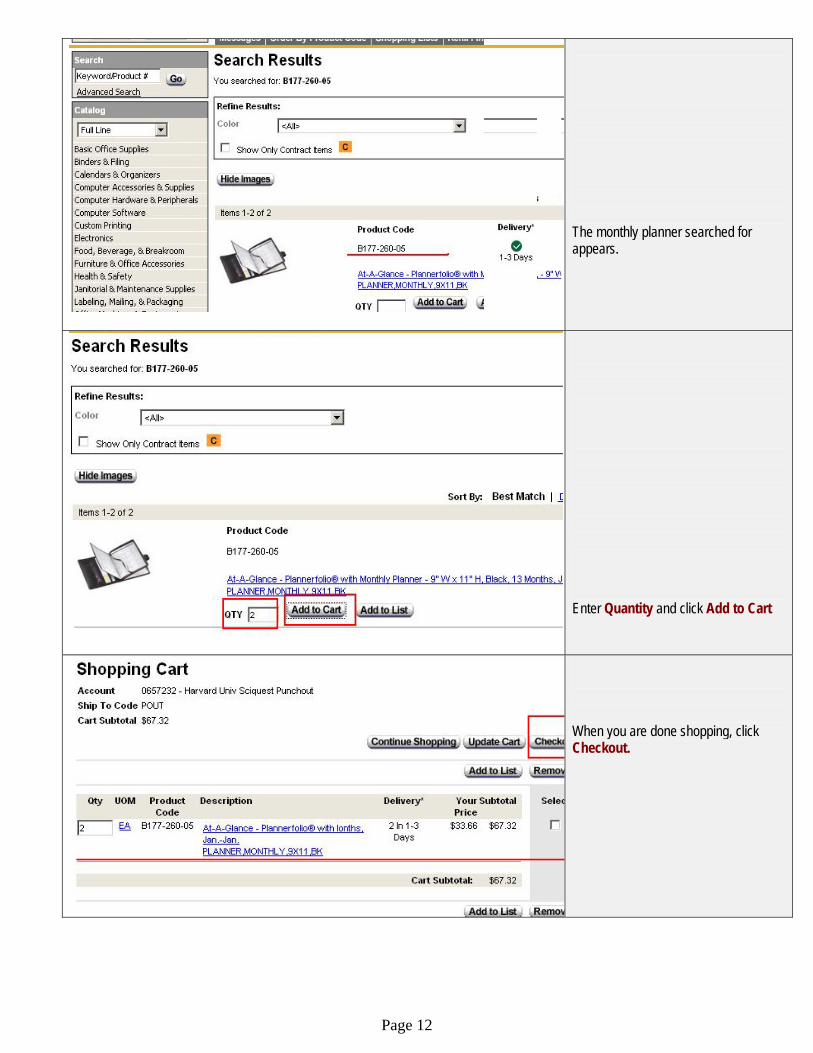
The monthly planner searched for appears.
Enter Quantity and click Add to Cart
When you are done shopping, click Checkout.
Page 13
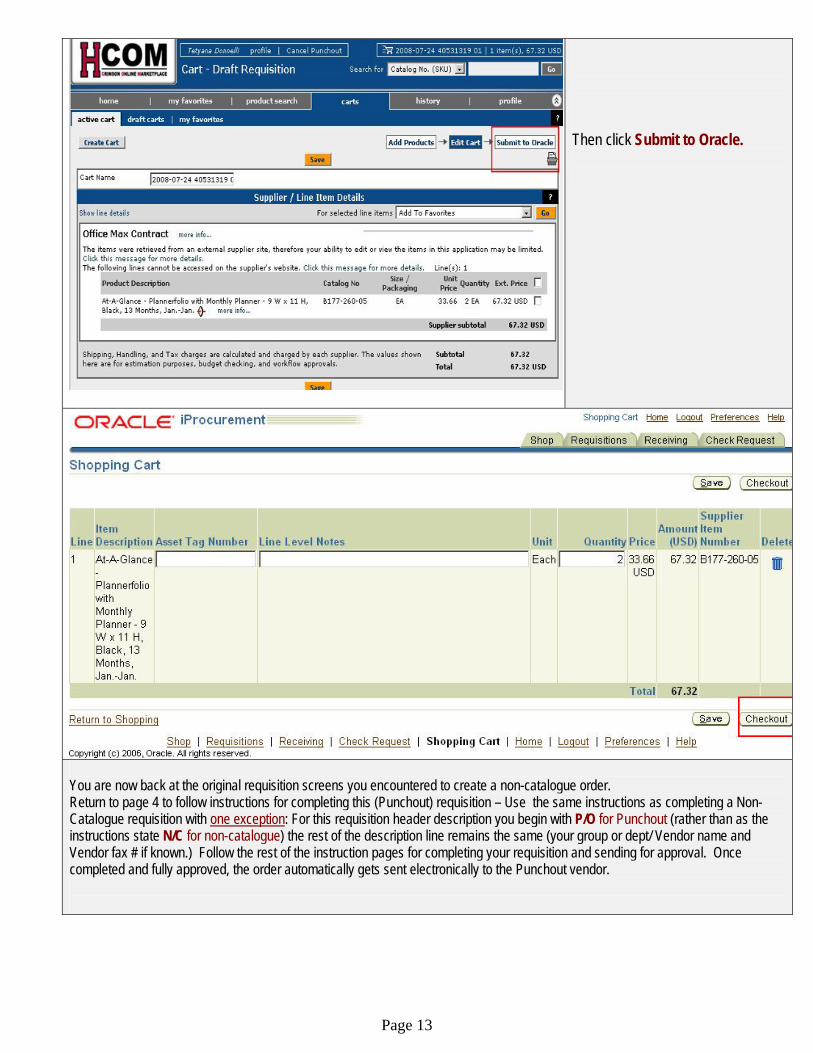
Then click Submit to Oracle.
You are now back at the original requisition screens you encountered to create a non-catalogue order. Return to page 4 to follow instructions for completing this (Punchout) requisition – Use the same instructions as completing a Non-Catalogue requisition with one exception: For this requisition header description you begin with P/O for Punchout (rather than as the instructions state N/C for non-catalogue) the rest of the description line remains the same (your group or dept/ Vendor name and Vendor fax # if known.) Follow the rest of the instruction pages for completing your requisition and sending for approval. Once completed and fully approved, the order automatically gets sent electronically to the Punchout vendor.
Page 14
How Do I Shop from a Vendor Catalogue?
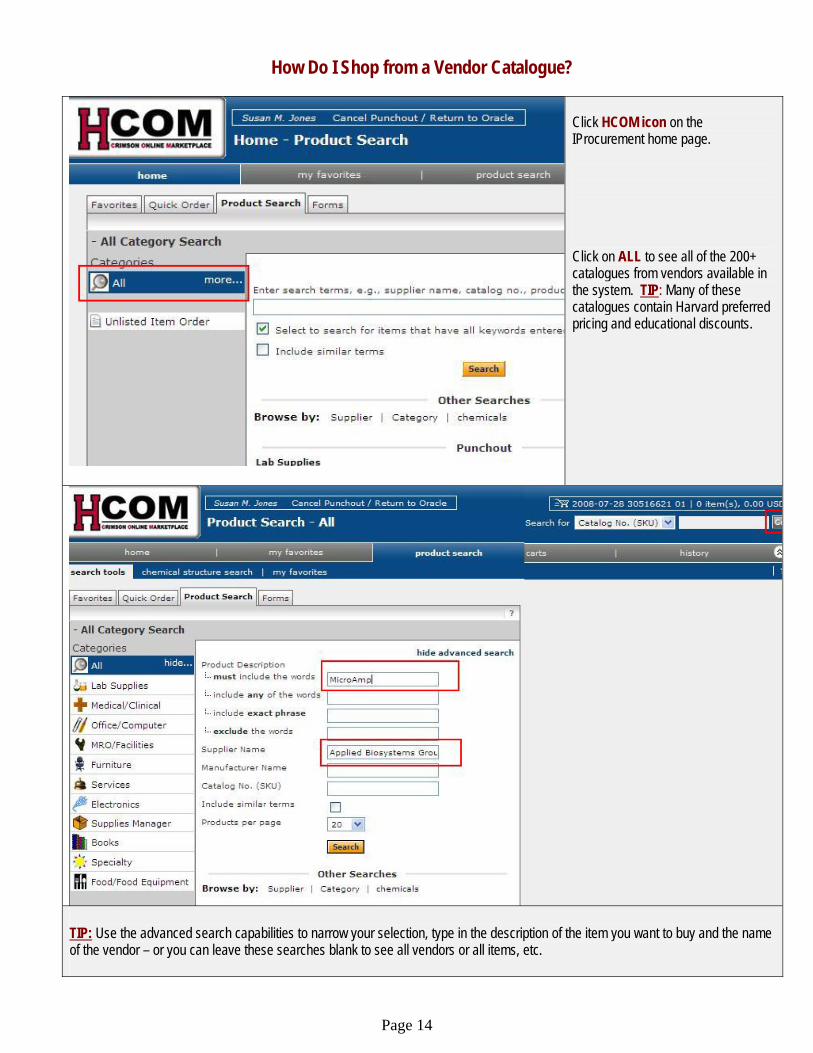
Click HCOM icon on the IProcurement home page. Click on ALL to see all of the 200+ catalogues from vendors available in the system. TIP: Many of these catalogues contain Harvard preferred pricing and educational discounts.
TIP: Use the advanced search capabilities to narrow your selection, type in the description of the item you want to buy and the name of the vendor – or you can leave these searches blank to see all vendors or all items, etc.
Page 15
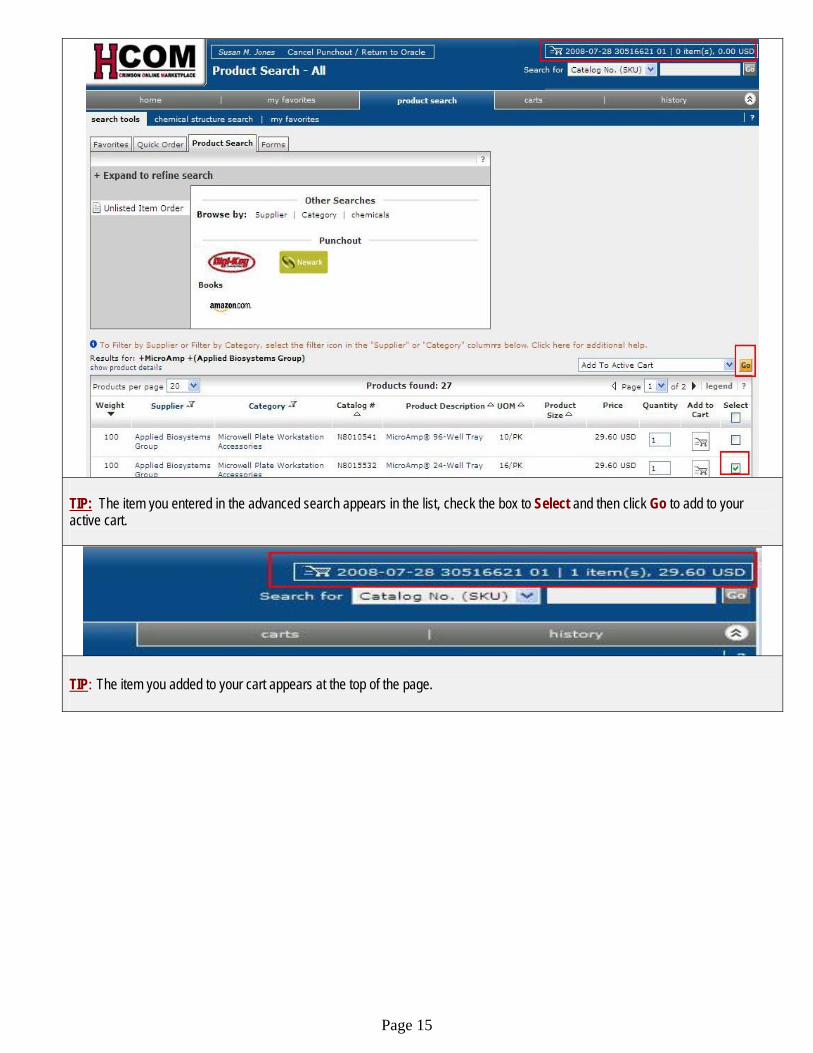
TIP: The item you entered in the advanced search appears in the list, check the box to Select and then click Go to add to your active cart.
TIP: The item you added to your cart appears at the top of the page.
Page 16
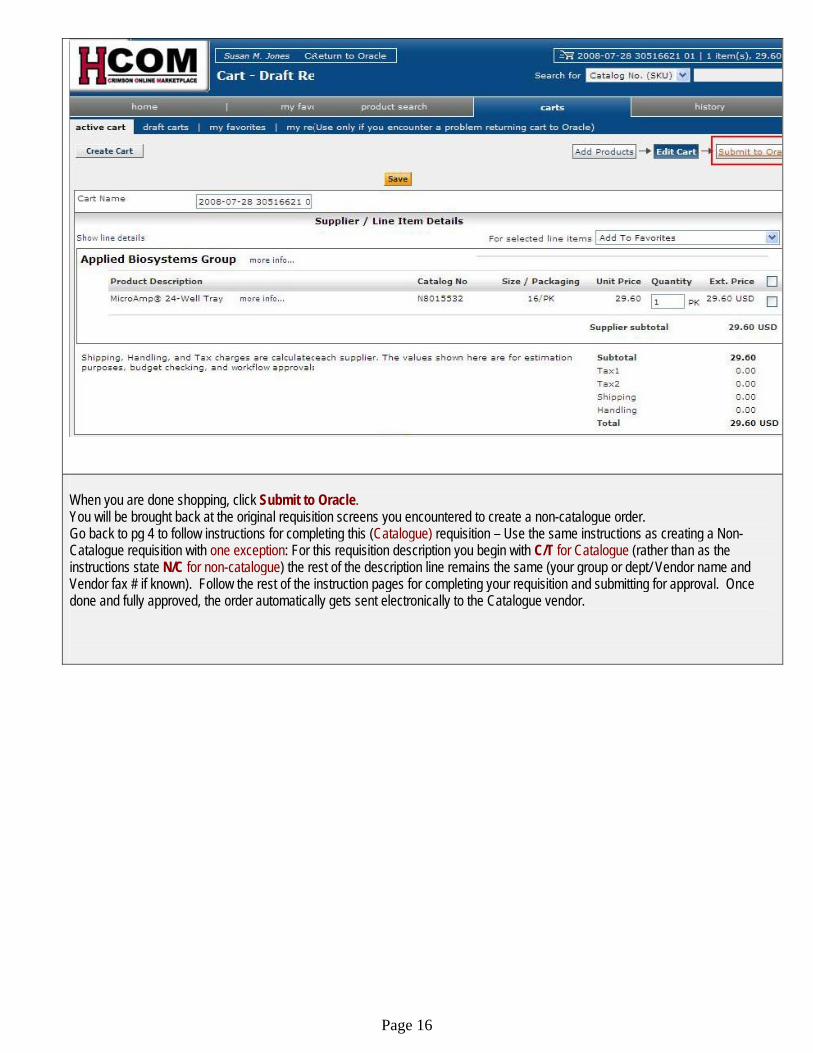
When you are done shopping, click Submit to Oracle. You will be brought back at the original requisition screens you encountered to create a non-catalogue order. Go back to pg 4 to follow instructions for completing this (Catalogue) requisition – Use the same instructions as creating a Non-Catalogue requisition with one exception: For this requisition description you begin with C/T for Catalogue (rather than as the instructions state N/C for non-catalogue) the rest of the description line remains the same (your group or dept/ Vendor name and Vendor fax # if known). Follow the rest of the instruction pages for completing your requisition and submitting for approval. Once done and fully approved, the order automatically gets sent electronically to the Catalogue vendor.
![Purchasing Services - Standard Operating Procedure · PDF filePurchasing Services - Standard Operating Procedure [S.O.P.] - Purchase Order PROCESS: iProcurement Electronic Requisitioning](https://static.fdocuments.net/doc/165x107/5a713fb37f8b9a93538cc7be/purchasing-services-standard-operating-procedure-wwwuoguelphcafinancesitesuoguelphcafinancefilessoppdf.jpg)