Introduction to PowerPointgeneva.libnet.info/images/pdfs/geneva/Class Handouts...1 * Class...
19
1 * Class Description This is an introduction to the basics of Microsoft PowerPoint: how to create, insert, delete, and reorder slides; modify layouts; create transitions; change the presentation view; work with text boxes, graphs, pictures, sounds, and charts. Class Length One and one‐half (1½) hours Introduction Microsoft PowerPoint has become the default application for making presentations, especially in the business world. Once, presentations were limited to static images, but now can include animations, videos, and sounds. Objectives Learn … how to choose a Template (Theme) and a Color Variant; and change them how to change the Slide Size what sort of Objects can be added to a PowerPoint slide and how to add them how to align and space Objects how to use the Slide Sorter how to use and configure Transitions between slides how to use and configure Animations This manual is a handout for you to keep. Please feel free to use it for taking notes. Introduction to PowerPoint
Transcript of Introduction to PowerPointgeneva.libnet.info/images/pdfs/geneva/Class Handouts...1 * Class...

1 *
ClassDescriptionThis is an introduction to the basics of Microsoft PowerPoint: how to create, insert, delete, and reorder slides; modify
layouts; create transitions; change the presentation view; work with text boxes, graphs, pictures, sounds, and charts.
ClassLengthOne and one‐half (1½) hours
IntroductionMicrosoft PowerPoint has become the default application for making presentations, especially in the business world.
Once, presentations were limited to static images, but now can include animations, videos, and sounds.
ObjectivesLearn …
how to choose a Template (Theme) and a Color Variant; and change them
how to change the Slide Size
what sort of Objects can be added to a PowerPoint slide and how to add them
how to align and space Objects
how to use the Slide Sorter
how to use and configure Transitions between slides
how to use and configure Animations
Thismanualisahandoutforyoutokeep.Pleasefeelfreetouseitfortakingnotes.
Introduction to PowerPoint

2 *
ChoosingaTemplate(Theme)Unless opening a specific PowerPoint document, PowerPoint’s default setting is to open to the New Document screen
(Start screen).
The left side will display recent
PowerPoint presentations you
have opened.
The central section has a search
window and several categories,
each of which can be clicked.
(The right section [Category] is
initially hidden.)
Lower on the screen are images
of templates (Themes) installed
with PowerPoint, plus any
templates (Themes) you may
have installed. Except for the
Blank Presentation, the pre‐
installed templates offer
different Color Variants.
Clicking on one of the categories
(in this example, ‘Business’),
changes the central section and
opens the right section of
Category as seen at left. (This
will close the list of Recent
PowerPoint files in the left
section.)
In Microsoft PowerPoint, the terms ‘template’ and ‘Theme’ are used interchangeably. They are most like templates in Microsoft Word and Microsoft Excel. In those two Microsoft Office applications, the term ‘Theme’ is used to refer to a color scheme, but PowerPoint uses the term ‘Variants’ for color schemes.

3 *
Additional categories can be
selected as seen here. Holding
the mouse pointer over one of
the items in the Category list
(hover) causes a red ✘ to be displayed. If you click on an item
in the Category list already
selected or on the red ✘ , the item will be unselected. The
images in the central section
each represent a template
(Theme) which has been tagged
with all the selected categories
and the name of the Theme will
also be shown.
Templates for other Office appli‐
cations which meet the criteria
may be displayed.
Clicking ‘Home’, will return you
to the beginning.
Upon finding a template, simply
click on it. In the example below,
‘Introspect’ has been chosen
from the New Document screen.
To the right of the Layouts, different Color Variants may be shown. When more than four Color Variants are available, a
scroll bar will appear.
Note: there is a previous arrow
and next arrow on either side of
the template windows. These will
take you to other templates which
were displayed before you clicked
on the template you selected.
The arrows on either side of ‘More
Images’ allow you to see some of
the layouts in the template.
If satisfied with the selected template (Theme) and Color Variant (if available), click the ‘Create’ button to generate a
new document/presentation.

4 *
In the screenshot below, the ‘Retrospect’ template has been chosen and the fourth Theme (shown on previous page;
dark grey background) has been selected.
Follow the directions to add a
Title and Subtitle. (If you want to
‘blank’ either, use a single
space.)
Before going any further, it is a
good idea to switch to the
DESIGN ribbon. In the Themes
and Variants sections, you can
change the Theme. But we want
to check the Slide Size in the
Customize section. Click the icon.
This opens a selector …
… from where you can choose either of the two
most common proportions, or choose ‘Custom
Slide Size…’ which will open a dialog box which
allows any desired proportions and orientation.
Having the correct proportions set before pro‐
ceeding is even more important than setting the
paper size and margins before working on a word processing document. Whereas a
word processing document will re‐flow text, it is a lot easier laying out slides with the correct horizontal‐to‐vertical ratio
than it is trying to rearrange objects after changing proportions.
The DESIGN ribbon also includes the
Themes group (shown opened at right).
This allows for switching to a different
template / Theme for a presentation
already begun (or even finished).
Tip: The ‘Standard (4:3)’ is the older proportions which were common with old-style monitors (like old televisions: cathode ray tubes). Newer displays use the ‘wide screen’. For this, you should select ‘Widescreen (16:9)’. Be aware that many overhead/digital projectors still use the four-to-three ratio.

5 *
Color Variants are shown in the Variants group. You can select
a Color Variant which is included in the Theme, or you can
drop down to the ‘Colors’ menu and choose a different set of
colors (note: there is a vertical scroll bar).
If you drop down to the ‘Fonts’ menu, you can choose a
different set of fonts (note: there is a vertical scroll bar).
If you drop down to the ‘Effects’
menu, you can choose a
different set of effects. These
mostly deal with the way shapes
appear, such as shadows and 3D
effects.
The last menu item, ‘Back‐
ground Styles’ provides a
way to format the back‐
ground color. Clicking on
the ‘Format Background’
item opens the Format
Background pane where
you can fine‐tune the
background colors and
textures. The Format
Background pane can also
be opened by clicking on
the Format Background
icon in the Customize group
of the DESIGN ribbon.

6 *
Returning to the HOME ribbon, additional slides can be added from the Slides section, by clicking on the lower portion of
the New Slide icon. This opens a choice of layouts:
You may notice, there is a keyboard
shortcut (F+M) for creating a new
slide. When the last slide was a Title
Slide, it will create a Title and Content
slide; otherwise it will create a slide
with the same layout as the previous
slide. To have control over which
layout will be used for a new slide,
either (1) use the lower portion of the
New Slide icon or (2) use either the
keyboard shortcut or the top portion of the New Slide icon to create a
slide and then either (a) right‐click on the thumbnail on the left side, choose Layout, then select the desired layout or
(b) click the Layout icon just to the right of the New Slide icon and select the desired layout.
PowerPoint offers a variety
of slide layouts, all of
which should be self‐
explanatory between the
labels and graphics (not all
layouts are available in all
Themes.) They include:
Perhaps the most common slide layout is ‘Title and
Content’ (highlighted above). In the dark ‘Retrospect’
Theme, it first appears as shown at right.
Like the Title layout, just click in one of the two text
boxes to add a title and to add content. Once you begin
entering text into the content text box, the six icons in
the middle will disappear.
Content text boxes in PowerPoint have six icons in the
center: on the top row (L to R) are Insert Table, Insert
Chart, and Insert a SmartArt Graphic; on the lower row
(L to R) are Pictures, Online Pictures, and Insert Video.
You need only click on an icon to begin the process.
1. Title Slide 2. Title and Content 3. Section Header 4. Two Content 5. Comparison 6. Title Only 7. Blank 8. Content with Caption 9. Picture with Caption
In Microsoft PowerPoint, each Ribbon is divided into Groups. Many Groups have a tiny arrow in the bottom-right corner which, when clicked, will open a dialog box for access to additional settings.
When the mouse hovers over the tiny arrow in the bottom-right corner of a Group, a pop-up will appear informing you which dialog box will be opened. The keyboard shortcut, if there is one, will be included.
10. Panoramic Picture with Caption 11. Title and Caption 12. Quote with Caption 13. Name Card 14. 3 Column 15. 3 Picture Column 16. Quote Name Card 17. True or False

7 *
Clicking on the Insert Table icon opens a
dialog box to set the size of the table:
Clicking on the Insert Chart icon opens a dialog
box (at right) from where you can choose the
type of chart. Once the OK button has been clicked, a chart will be
displayed with a small Excel window where you can manipulate data
(below).
Tip: If you want to use a chart created in Microsoft Excel, copy the entire chart from an Excel window and then paste it into the content area of a PowerPoint slide.
Tip: Ideally, Pie Charts should have no more than 4-6 slices; Bar Charts no more than 4-8 bars; Line Charts no more than 3-4 lines; the most important lines or bars or slices should have a sharp color contrast (or be exploded in a Pie Chart; or given increased weight in a Line Chart). Keep It Simple!
Clicking on the Insert SmartArt Graphic icon opens the
‘Choose a SmartArt Graphic dialog box. (Microsoft
Office’s SmartArt is covered in Word Processing
Graphics.)
Clicking on the Pictures icon opens the computer’s file
manager (Windows Explorer before Windows 8; File
Explorer beginning with Windows 8; Finder for Macs).
Clicking on the Online Pictures icon opens a Bing
Image Search window:

8 *
Clicking on the Insert Video icon opens a box from which you can insert
(1) a video saved on your computer or another computer on your local
network, (2) a YouTube video, or (3) a video (other than YouTube) from
the Internet.
To use the third option, find the video in your browser, copy the web
address, then paste the web address into the window.
To use a YouTube video, type some key words to find it. In the example
here, ‘Jimmy Kimmel passwords’ was entered and produced thousands
of results. Thumbnails of the results appear (with a scroll bar to access
more). A click on a thumbnail will cause a magnifying glass icon to appear
in the lower right of the thumbnail. If you click on it, a small window
from where you can view the video will appear, along with timings.
The ‘From a file’ option will open the computer’s file manager, from
where you can choose a video file.
Tip: Keep It Simple!
Do not cram slides with information, especially not text.
PowerPoint should never be the focus of attention, only a supplement to the speaker, a way to use visuals to enhance and reinforce the message.
Use lots of ‘white’ (empty) space. It is easier to read and doesn’t overwhelm.
To add text to a content text box, simply click inside
the box. Once you do so, the Font, Paragraph, and
Drawing sections of the HOME ribbon become
available (instead of greyed‐out; image on next page).

9 *
The Font section is very similar
to the Font section of
Microsoft Word’s Home
ribbon. The upper row icons
are (L to R) Font selector, Font
Size selector, Increase Font
Size, Decrease Font Size, and
Clear All Formatting. The
lower row icons are (L to R)
Bold, Italics, Underline,
Shadow, Strikethrough,
C h a r a c t e r S p a c i n g ,
cHANGE cASE, and Font Color
selector. Like most Ribbon
sections, there is an icon in
the lower‐right corner to open
a dialog box where all options
are available.
The Paragraph section is very similar to the
Paragraph section of Microsoft Word’s Home
ribbon.
The upper row icons are (L to R) Bullets,
Numbering, Decrease List Level, Increase List
Level, and Line Spacing. Each of these function in a way which should be familiar
to Microsoft Word users, with some exceptions: neither Bullets nor Numbering
include multiple levels, although it is possible to ‘change levels’ by using the
Decrease List Level and Increase List Level icons (or N or G+N); and paragraph
spacing options are 1.0, 1.5, 2.0, 2.5, 3.0 and custom.
The lower row icons are (L to R) Left Alignment, Center Alignment, Right Align‐
ment, and (Full) Justify. To the right of the vertical bar is the Column selector.
The three icons stacked on the right side of the section
are (top to bottom) Text Direction, Align Text, and Con‐
vert to SmartArt Graphic.
In Microsoft PowerPoint, as the Increase List Level is used, the font size is reduced. Of course, this can be overridden, but before doing so, you should question whether you really need all those levels (which fails the Keep It Simple principle).
Add or Remove Columns
Text Direction Align Text
Convert to SmartArt Graphic As you increase the amount of text in a Text content box, Microsoft PowerPoint will decrease the font size (to as small as 5 points), attempting to squeeze all the text into the available space.
(Once the font size begins to decrease, it is time to ask: do you really need all that text?)

10 *
InsertingOtherObjectsA variety of objects can be inserted into a PowerPoint slide from the INSERT ribbon which is divided into ten groups:
Slides, Tables, Images, Illustrations, Apps, Links, Comments, Text, Symbols, and Media. Most of these are found in
Microsoft Word and Microsoft Excel and work as they do in those applications.
The Media group works slightly differently. When you click on either the Video or the Audio icon, you receive some
choices.
The Video icon offers two choices: for ‘Online Video’
a dialog box (right) is opened. It is similar to the one
seen on page 8, minus the ‘From a file’ option. That
option is covered by the ‘Video on My PC’ choice,
which opens the computer’s file manager.
The Audio icon’s choices are similar. The ‘Audio on
My PC’ choice opens the computer’s file manager.
The ‘Record Audio’ option requires the computer to
be configured for making sound recordings.
Those are the basics of PowerPoint. You can add all sorts of objects, such as Shapes, WordArt, and more text boxes, but
the basics are creating slides, choosing the layout, and then inserting text, tables, charts, graphics, and media objects.
Everything else is decorative and frills.
11 *
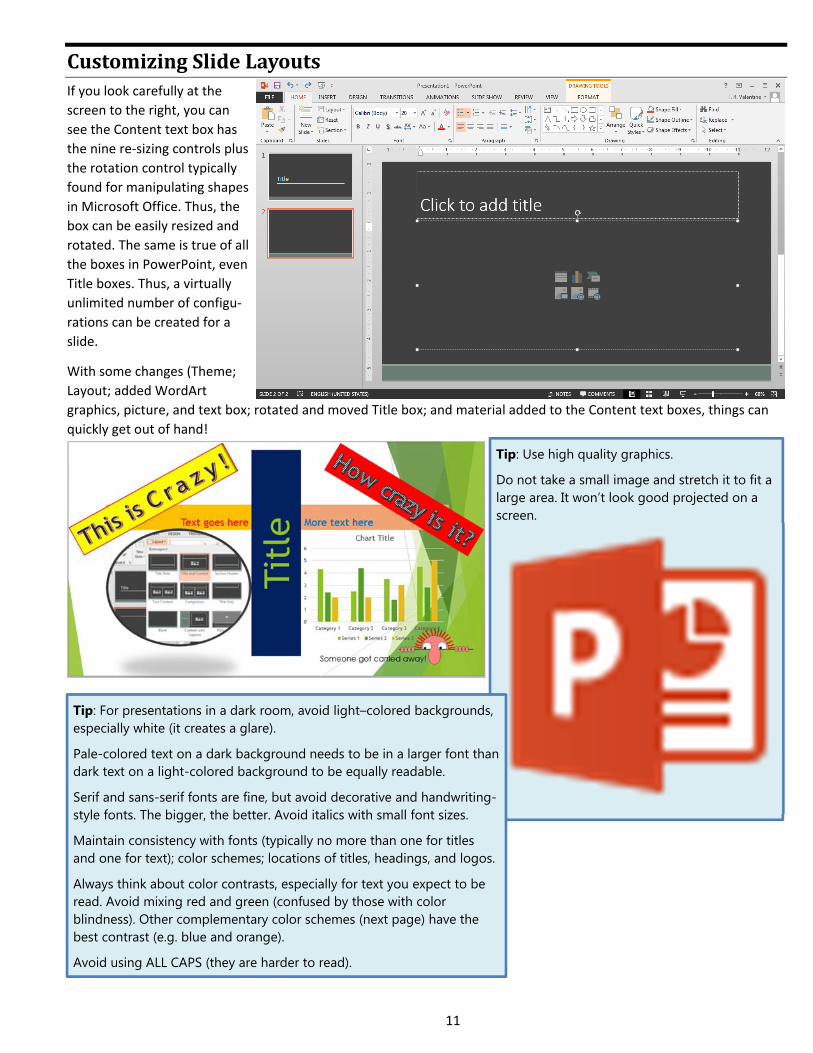
CustomizingSlideLayoutsIf you look carefully at the
screen to the right, you can
see the Content text box has
the nine re‐sizing controls plus
the rotation control typically
found for manipulating shapes
in Microsoft Office. Thus, the
box can be easily resized and
rotated. The same is true of all
the boxes in PowerPoint, even
Title boxes. Thus, a virtually
unlimited number of configu‐
rations can be created for a
slide.
With some changes (Theme;
Layout; added WordArt
graphics, picture, and text box; rotated and moved Title box; and material added to the Content text boxes, things can
quickly get out of hand!
Tip: Use high quality graphics.
Do not take a small image and stretch it to fit a large area. It won’t look good projected on a screen.
Tip: For presentations in a dark room, avoid light–colored backgrounds, especially white (it creates a glare).
Pale-colored text on a dark background needs to be in a larger font than dark text on a light-colored background to be equally readable.
Serif and sans-serif fonts are fine, but avoid decorative and handwriting-style fonts. The bigger, the better. Avoid italics with small font sizes.
Maintain consistency with fonts (typically no more than one for titles and one for text); color schemes; locations of titles, headings, and logos.
Always think about color contrasts, especially for text you expect to be read. Avoid mixing red and green (confused by those with color blindness). Other complementary color schemes (next page) have the best contrast (e.g. blue and orange).
Avoid using ALL CAPS (they are harder to read).

12 *
ColorSchemes

13 *
AligningElementsWhen dragging an element on a slide, PowerPoint provides visual indicators to ensure alignment.
In the first example, a dotted line appears when the left edges of the boxes align.
In the next example, dotted lines indicate the right edges of the lower box align with
the right edge of the title box and the top of the lower box aligns with the bottom of
the middle box.
In this example, a dotted line indicates the boxes align vertically:
In addition to dotted lines showing alignment, double‐headed arrows indicate equal spacing. Here, the three boxes are
top‐aligned and bottom aligned and the spacing between the first and second box is equal to the spacing between the
second and third box:
Alignment guides work with other objects. In the example on the next page, alignment guides indicate (1) the star is
centered on the Title box, (2) is the same distance below the three middle boxes as the three boxes are below the Title
box, and (3) the middle center and middle right boxes are top aligned.
top alignment
bottom alignment
equalspacing

14 *
UsingtheSlideSorterThe Slide Sorter is a powerful
tool for organizing slides.
To use the Slide Sorter, change
to the VIEW ribbon. In the
Presentation Views group,
change from Normal to Slide
Sorter. You will see something
like the image on the next
page.
PowerPoint will display
thumbnails of each slide. If
there are a few slides, large
thumbnails will be used. As
the number of slides
increases, the size of the
thumbnails decreases to a
minimum size and then additional slides will result in a vertical scroll bar appearing.
Slide numbers appear beneath the lower‐left corner of each slide. A star will appear beneath a slide’s lower‐right corner
when it contains one or more animations.
A single slide can be moved by clicking on it and dragging it to a new position/order. The other thumbnails will
automatically move as the slide is dragged. When the intended destination is reached, release the left mouse button.
After the move is completed, the slides will automatically renumber.
center alignment
equal spacing
top alignment

15 *
Below is an image where slide 28 has been dragged to between slide 11 and slide 12. There are several visual indicators:
First, the selected slide number is indicated in the lower‐left corner. Second, there is an unnumbered slide outlined in
red (the one which was dragged to that position) between consecutively numbered slides. Third, there is a gap in the
numbered slides (from where the slide was taken).
Multiple slides can be selected using the usual mouse,
keyboard, or mouse & keyboard selection techniques.
The image at right shows seven slides (25‐31) have
been selected and dragged to between slides 17 and
18. There are additional red outlines (limit of 3) around
the slides being moved and the number of slides is
displayed in a red rectangle. The gaps in numbering
work as when moving a single slide. The renumbering of
slides occurs after the mouse’s left button has been
released.

16 *
AddingDecorativeTouchesandOtherFrillsThe two main types of additions are Transitions (the change from one slide to the next) and Animations (moving items
on a slide). Both will draw attention to the slide or to an item – unless it is overused. When overused, the movements
become tiresome, distracting, and eviscerate the ability to draw attention to something you want to emphasize.
TransitionsTransitions are used to control how a new slide replaces the previous slide. PowerPoint devotes an entire ribbon to
these effects. The TRANSITION ribbon has three groups: Preview, Transition to This Slide, and Timing. The central group
has a tiny scroll bar squeezed above the ‘More’ icon.
In the above view, the first of three rows of Transitions are displayed. Clicking on the ‘More’ icon opens a larger view
which divides the Transitions into three types (Subtle, Exciting, and Dynamic Content):
Select the slide to which you want to have a Transition, then select the desired Transition, which will be demonstrated.
To repeat the demonstration of the Transition, click on Preview icon in the Preview group.
Immediately to the right of the Transitions (still in the Transition to This Slide group) is the Effect Options icon (not
available for all Transitions). Click on it to see the options available for the selected Transition.
To the right of the Transition to This Slide group is the Timing group. In this group, you can select the speed of the
Transition; choose a delay, if desired; and add a sound effect. There is also an option (‘Apply to All’) to add the Transition
and all its options to every slide of the presentation (a Very Bad Idea). After each change in options is made, a click on
the Preview icon will provide a demonstration with all selected effects and options.
AnimationsAnimations are applied to elements of a slide. PowerPoint devotes an entire ribbon to these effects. The ANIMATIONS
ribbon has four groups: Preview, Animation, Advanced Animation, and Timing. The Animation group has a tiny scroll bar
squeezed above the ‘More’ icon. The Advanced Animation group has an icon to toggle display of the Animation Pane.
In the above view, the first of four rows of Animations are displayed. Clicking on the ‘More’ icon opens a larger view
(next page) which divides the Animations into four types (Entrance, Emphasis, Exit, and Motion Paths).
scroll bar
scroll bar
17 *
Select the element(s) — you can select multiple elements and apply an animation to all — select the type of Animation
you want. A preview will be demonstrated. To repeat the demonstration, click the Preview icon in the Preview group.
Immediately to the right of the Animations (still in the Animation group) is the Effect Options icon. Click on it to see the
options available for the selected Animation.
To the right of the Animation group is the Advanced Animation group. Here, the Add Animation icon allows you to add
more animations to an element which already has an Animation assigned to it. (If you have an item selected and choose
a different Animation from the Animation group, it will replace the previously selected Animation.) The Animation Pane
is an on/off toggle for displaying the ‘Animation Pane’ which is shown in the above image. The Trigger icon allows a
special start condition for the Animation to start, such as clicking on a shape or when an audio or video clip reaches a
bookmark. The Animation Painter icon works something like a ‘Format Painter’ in other applications, but it copies an
Animation and applies it to other elements which are subsequently clicked.
The far right group, Timing, provides a way of changing what triggers the Animation. By default, a mouse click triggers
animations. This can be changed to start with the previous Animation or immediately after the previous Animation has
finished. The Duration of the Animation can be set as well as a delay before the Animation begins. On the right area of
the group, is a means of reordering Animations.
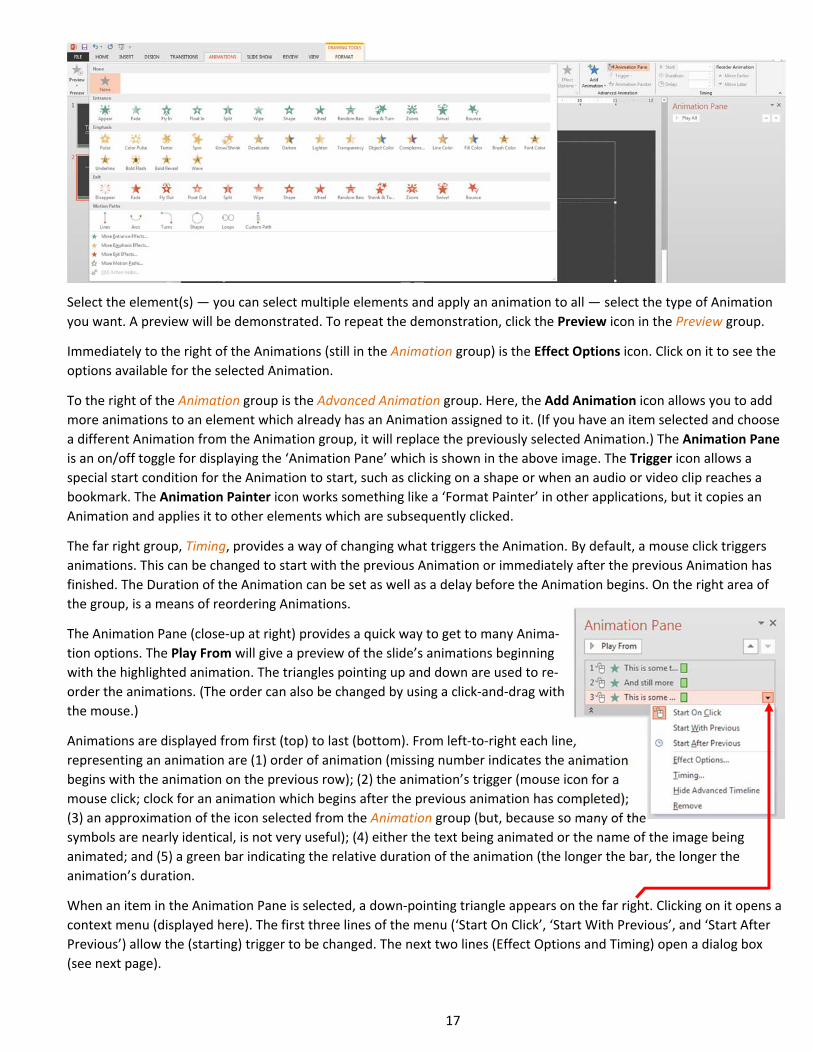
The Animation Pane (close‐up at right) provides a quick way to get to many Anima‐
tion options. The Play From will give a preview of the slide’s animations beginning
with the highlighted animation. The triangles pointing up and down are used to re‐
order the animations. (The order can also be changed by using a click‐and‐drag with
the mouse.)
Animations are displayed from first (top) to last (bottom). From left‐to‐right each line,
representing an animation are (1) order of animation (missing number indicates the animation
begins with the animation on the previous row); (2) the animation’s trigger (mouse icon for a
mouse click; clock for an animation which begins after the previous animation has completed);
(3) an approximation of the icon selected from the Animation group (but, because so many of the
symbols are nearly identical, is not very useful); (4) either the text being animated or the name of the image being
animated; and (5) a green bar indicating the relative duration of the animation (the longer the bar, the longer the
animation’s duration.
When an item in the Animation Pane is selected, a down‐pointing triangle appears on the far right. Clicking on it opens a
context menu (displayed here). The first three lines of the menu (‘Start On Click’, ‘Start With Previous’, and ‘Start After
Previous’) allow the (starting) trigger to be changed. The next two lines (Effect Options and Timing) open a dialog box
(see next page).
18 *
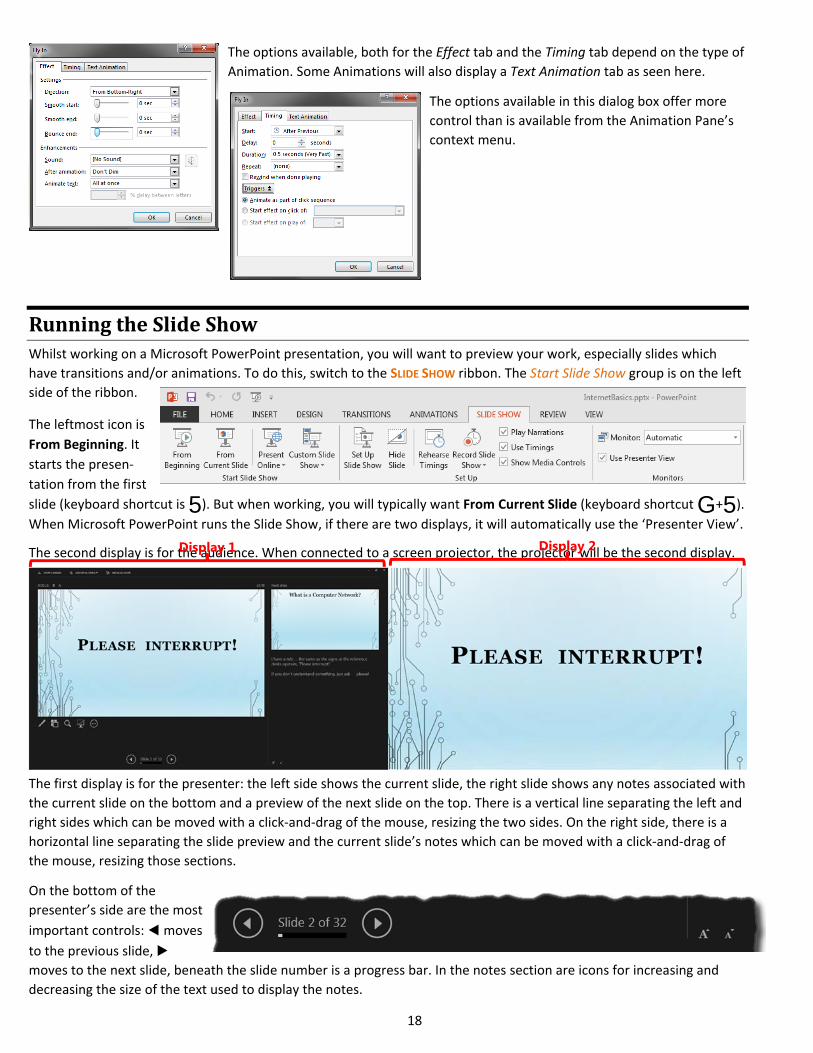
The options available, both for the Effect tab and the Timing tab depend on the type of
Animation. Some Animations will also display a Text Animation tab as seen here.
The options available in this dialog box offer more
control than is available from the Animation Pane’s
context menu.
RunningtheSlideShowWhilst working on a Microsoft PowerPoint presentation, you will want to preview your work, especially slides which
have transitions and/or animations. To do this, switch to the SLIDE SHOW ribbon. The Start Slide Show group is on the left
side of the ribbon.
The leftmost icon is
From Beginning. It
starts the presen‐
tation from the first
slide (keyboard shortcut is 5). But when working, you will typically want From Current Slide (keyboard shortcut G+5).
When Microsoft PowerPoint runs the Slide Show, if there are two displays, it will automatically use the ‘Presenter View’.
The second display is for the audience. When connected to a screen projector, the projector will be the second display.
The first display is for the presenter: the left side shows the current slide, the right slide shows any notes associated with
the current slide on the bottom and a preview of the next slide on the top. There is a vertical line separating the left and
right sides which can be moved with a click‐and‐drag of the mouse, resizing the two sides. On the right side, there is a
horizontal line separating the slide preview and the current slide’s notes which can be moved with a click‐and‐drag of
the mouse, resizing those sections.
On the bottom of the
presenter’s side are the most
important controls: ◀ moves
to the previous slide, ▶
moves to the next slide, beneath the slide number is a progress bar. In the notes section are icons for increasing and
decreasing the size of the text used to display the notes.
Exercise: Title
Details
Display 2 Display 1

19 August 2017
Most presenters will use a remote control for changing slides; they are inexpensive and widely available. Typically, the
handheld control connects to the computer running Microsoft PowerPoint via a small device (‘dongle’) which plugs into
one of the computer’s USB ports. Slides can also be changed with the Y (previous slide) and Z (next slide) keys.
To end a slide show, you can either click on End Slide Show control on the presenter’s side, at the top, or press L.
Experiment!There is a lot more available in PowerPoint, but this covers all the essentials. Remember, (1) PowerPoint presentations
are to supplement your talk, not make you replaceable, and (2) Keep It Simple.
Questions? Feel free to contact Ross Valentine at [email protected] or call the library at 630.232.0780