Introduction to Accounts Payable · Accounts Payable Overview Topics • Voucher Life Cycle •...
113
Introduction to Accounts Payable State of Connecticut Core-CT Continuing Education Initiative 1
Transcript of Introduction to Accounts Payable · Accounts Payable Overview Topics • Voucher Life Cycle •...
Introduction to
Accounts Payable
State of Connecticut Core-CT
Continuing Education Initiative
1

Course Goals
ü To give students a greater understanding of their place in Core-CT, an integrated financial system.
ü To instruct students in the Core-CT recommended approach to Accounts Payable.
ü To help students maximize the capabilities of Accounts Payable and use their work time efficiently.
2

Agenda
Core-CT FinancialsCore-CT Overview Core-CT Help Desk
Accounts Payable Overview Voucher Life CycleRoles and ResponsibilitiesVoucher Styles
Creating VouchersRegular VoucherPartial Payment VoucherNon-PO Voucher Adjustment VoucherJournal Voucher Reversal Voucher Template Voucher
Non-PO Voucher from Template
3

Agenda
Managing Vouchers Approving Vouchers Creating SpeedChartsDeleting Vouchers Understanding Match Exceptions Understanding Budget Exceptions
Payments Understanding Offsets
Inquiries and Reports Voucher Activity Report Voucher Inquiry Payment Inquiry PO/AP Interface Inquiry Month End/Fiscal Year End Reporting
4

Core-CT Financials
Topics
• Core-CT Overview • Core-CT Financials Integration • Core-CT Help Desk
Core-CT is the State’s integrated financial and administrative computer system.
5

Core-CT Financials Overview
Core-CT Financials uses PeopleSoft version 9.1.
Financial Modules: General Ledger, Purchasing, eProcurement, Catalog Management, Accounts Payable, Accounts Receivables, Billing, Asset Management, Inventory, Project Costing and Customer Contracts.
Human Resource Management System (HRMS): modules for Payroll, Time and Labor, Human Resources and Benefits.
Enterprise Performance Management (EPM): Houses the data from both the Financial and HRMS modules for integration and reporting purposes.
Core-CT office is based in Hartford and managed by the Office of the State Comptroller and Department of Administrative Services.
6

Core-CT Financials Integration
• This diagram demonstrates the integration of the modules in Core-CT.
• Connecticut is the only state (so far) that integrates its Human Resource Management System module with its Financial modules, and Enterprise Performance Management module.
• There are other PeopleSoft clients that use more modules but none are completely integrated.
• The modules are fully integrates, eProcurement works with Purchasing, Catalog Management, Accounts Payable …
7

Core-CT Help Desk
• The Core-CT Help Desk assists Core-CT users with issues or problems that occur within financial modules.
• Core-CT user create tickets in FootPrints containing information related to the issue they are having.
• Core-CT DOT users should email [email protected] with Core-CT related issues. The DOT help desk will then create a ticket in FootPrints containing the information received in the email.
• The Help Desk team uses the information in the ticket, to research the issue and give the best solution to finish the transaction.
• FootPrints is the new Help Desk Application for Core-CT. Request for services or inquiries should be completed through the following link: http://footprints.ct.gov/footprints.
8

Core-CT Help Desk
• The Help tab on the Core-CT website contains the FootPrints link.
• The Core-CT Help Desk section contains instructions on how to log in based on the users agency and other relevant information. It also contains job aids on how to submit a ticket, search and view a ticket, and update a ticket.
9
Accounts Payable Overview
Topics
• Voucher Life Cycle • Roles and Responsibilities• Voucher Styles
Accounts Payable is the process of making payments to vendors and others who provide goods and services to an agency.
Vouchers are created online or through an ‘AP Interface’ to create payments.
10

Voucher Life Cycle
Create Voucher
Vouchers are created manually in Core-CT
Review Match ExceptionsReviewing match exceptions involves viewing those vouchers that were not matched correctly to a purchase order or receiver and resolving the related errors.
Approve VoucherThe voucher is individually approved using workflow. The voucher must be approved before it is paid. Pre-approved vouchers bypass the approval sub-process.
Review Budget ExceptionsReviewing budget check exceptions involves reviewing the budget checking messages to determine whether or not the voucher needs correction.
Generate Payments -Pay Cycle
Pay Cycle is a daily process that is run by OSC APD to pick up vouchers that are ready for payment.
• Batch processes run daily around 10:00 a.m., 12:00 p.m., 2:00 p.m., and overnight. Rectangles represent user activity. The Pay Cycle is a manual process done in Core-CT by OSC Accounts Payable Division.
Match Voucher
Matching is a batch process that is used to validate voucher data against purchasing documents (purchase orders, receivers or inspections).
Budget Check Voucher
Budget checking is a batch process that confirms the availability of funds to support an expenditure
Post Voucher
Voucher posting is a batch process that creates accounting entries for vouchers.
Post Payments
Payment posting is a batch process that creates accounting entries for payments applied to vouchers. These accounting entries are then available for General Ledger journal creation using the journal generator.
11

Roles and Responsibilities
Accounts Payable: The process of making payments to vendors and others that provide goods and services to an agency.
Voucher Processor: This role is responsible for creating vouchers that pay vendors, departments, or other state agencies for goods and services. Tasks include: receives vendor invoices, copies receiver information from purchase order receipt, ensures correct payment method is selected, validates payment incentive, validates and enters asset information on voucher distribution line, resolves match exceptions from the match process, and resolves budget check errors from the budget check process.
Voucher Approver: This role is responsible for approving vouchers. Tasks include: approves, denies or holds from either voucher worklist or voucher framework, validates voucher invoice information, receipt date and voucher amounts, and ensures proper remittance information and processing options.
Voucher Viewer: This role has the ability to view voucher information.
12

Voucher Styles
Regular Vouchers: Used to pay vendors, employees, and state agencies, always for a positive amount.
Non-PO Vouchers: Used to pay postage, replenish petty cash funds, etc. Prior approval from OSC/APD Division is required.
Template Vouchers: Used to quickly populate vouchers that are created repeatedly (high volume, same information). Template vouchers never post or pay, and cannot be deleted or closed. Only used to create non-PO vouchers.
Adjustment Vouchers: Used to adjust a regular voucher after receiving debit or credit memos from vendors. Must relate to original voucher.
Reversal Vouchers: Used to reverse or “take back” a regular voucher that has been posted, but not paid, and cannot be deleted.
Journal Vouchers: Used to correct distribution coding errors on vouchers. Journal vouchers are zero dollars and never pay.
13

Creating Vouchers
Topics • Regular Voucher • Partial Payment Voucher • Non-PO Voucher • Adjustment Voucher • Journal Voucher • Reversal Voucher • Template Voucher
– Non-PO Voucher from Template
A Regular Voucher is the most common voucher style used to pay vendors for goods and services.
Regular PO Vouchers are created by copying from a Purchase Order Receipt.
These vouchers should always have a positive dollar amount on the invoice lines, distribution lines and gross amount fields.
Example: An agency orders one printer from a vendor, later the agency receives one printer.
14

Regular Voucher
15
Navigation: Main Menu > Core-CT Financials > Accounts Payable > Vouchers > Add/Update > Regular Entry
• The Add a New Value tab is used to create a new voucher. The Find an Existing Value tab is used to find an existing voucher.
• Validate that the correct Business Unit populates. The Voucher ID field defaults to NEXT. A Voucher ID will be generated by Core-CT upon saving.
• Information entered on the Add a New Value tab will carry over to the InvoiceInformation page on the voucher.
• Prepaid, Register, Single Payment, and Third Party vouchers are currently not being used by Core-CT.

Regular Voucher
16
• To create a Regular Voucher from a PO Receipt, enter the Invoice Number, the Invoice Date, and the Receipt Date on the Invoice Information page. The Invoice Date is the date the agency receives an invoice from the vendor. The Invoice Date is not the vendor invoice date and it is not the date an agency prepares the invoice.
• Receipt Date refers to the date the goods or services were received or contractually due. For payments made in arrears for a period of time, enter the ending date of the period. For payments required prior to services enter the date the payment was due.
• For additional information on Invoice Dates and Receipt Dates see OSC Memorandum No. 2007-24.
• The Copy From Source Document drop down menu displays the voucher sources used tocreate a Regular Voucher.
• In this example, the PO Receipt will be selected in the Source Document drop down menu. This means the Purchase Order has been received in Core-CT.

Regular Voucher
17
• After selecting PO Receipt, the Copy Worksheet page displays.
• (1) Enter the Receipt Business Unit and Receipt Number From in the Receiver Lookup Criteria group box.
• (2) Click Search.
• (3) The search results will display in the Select Receiver Lines group box. Select the appropriate line(s) checkbox.
• (4) Click the Copy Selected Lines button.
• IMPORTANT: Make sure any quantity/amount changes are made here before clicking the Copy Selected Lines button.
1
4
3
2

Regular Voucher
18
• After clicking the Copy Selected Lines button, the Purchase Order Receipt information will populate to the Invoice Information page.
• Chartfield coding should never be changed on vouchers created from a Purchase Order Receipt. Changing Chartfield coding in the Distribution Lines cause Purchase Order and Budget issues.
• Click the Payments tab.

Regular Voucher
19
• The State of Connecticut mandates ‘Due Now’ pay terms for all vouchers unless a voucher is created from a Purchase Order utilizing a Department of Administrative Service contract that has different pay terms.
• Pay Terms will populate differently depending on the contract information related to the Purchase Order and Voucher.
• Voucher Processors and Voucher Approvers should make every effort to process the voucher through the Accounts Payable workflow to take advantage of Known Prompt Payment Incentives.
• If an incentive pay term is displayed, the Discount due will show the amount that will be deducted from the Gross Amount at the time of payment. The discount will only be awarded if the terms of the payment are met.
• Important: Regardless of whether the discount is awarded or lost at the time of payment, the discount amounts continue to display on the voucher’s Payments page.

Regular Voucher
20
• The Invoice Date is important for Asset related vouchers. The Invoice Date on the voucher is the actual In-Service Date for the asset in the Asset Management module. This determines when asset depreciation starts.
•The Invoice Date also determines the scheduled due date for awarding pay term incentives.
• If an asset has not previously been identified on the Purchase Order or Receiver, the voucher is the last opportunity to integrate this information. Asset information can be added without updating the Purchase Order/Receiver on the Assets tab in the Distribution Lines group box.
• Select the Asset checkbox. Enter the AM Business Unit and Profile ID. The Asset ID should be left as NEXT

Regular Voucher
21
• Every vendor in Core-CT includes details of the type of company it is. Depending on the type of goods or services rendered, the vendor may be identified as a ‘Withholding’ vendor.
• Annually, withholding vendors receive a Form 1099 from the State of Connecticut. The 1099 Form shows all payments made from the State of Connecticut to the vendor. Copies of all 1099s are then forwarded to the IRS.
• The Office of the State Comptroller, Accounts Payable Division oversees the withholding process, including the annual 1099 files sent to the IRS and all the vendors.
• Withholding is applied by line. If not applicable, uncheck the Applicable checkbox and the Withholding checkbox and the line will not be reported on the 1099.

Regular Voucher
22
• Click the Save button.

Regular Voucher
23
• After the voucher is saved Core-CT will auto generate a Voucher ID and three additional tabs display: Summary, Related Documents and Error Summary.
• The Summary page displays related voucher information and the status of the voucher.
• The view related drop down menu displays voucher related pages available for viewing. Select an option, click the Go link and a new window will open.
• The Related Documents page displays PO, Receipt and Payment details related to this voucher.

Regular Voucher
24
• The Error Summary page displays voucher related error information and match exceptions that may occur (match exceptions will be discussed in detail later).

Creating Vouchers
Topics • Regular Voucher • Partial Payment Voucher• Non-PO Voucher • Adjustment Voucher • Journal Voucher • Reversal Voucher • Template Voucher
– Non-PO Voucher from Template
Partial Payment Vouchers are created when a vendor invoice is not for the full amount or quantity of the Purchase Order or Receipt.
Example: An agency orders janitorial cleaning supplies. The janitorial supplies received doesn’t match the quantity ordered on the Purchase Order.
25

Partial Payment Voucher
26
• Select Regular Voucher in the Voucher Style drop down menu.
• Click the Add Button.
Navigation: Accounts Payable > Vouchers > Add/Update > Regular Entry

Partial Payment Voucher
27
• Enter the Invoice Number, the Invoice Date, and the Receipt Date on the Invoice Information page.
• Select the PO Receipt from the Copy From Source Document dropdown menu.
• Click the ‘Go’ link.
Partial Payment Voucher
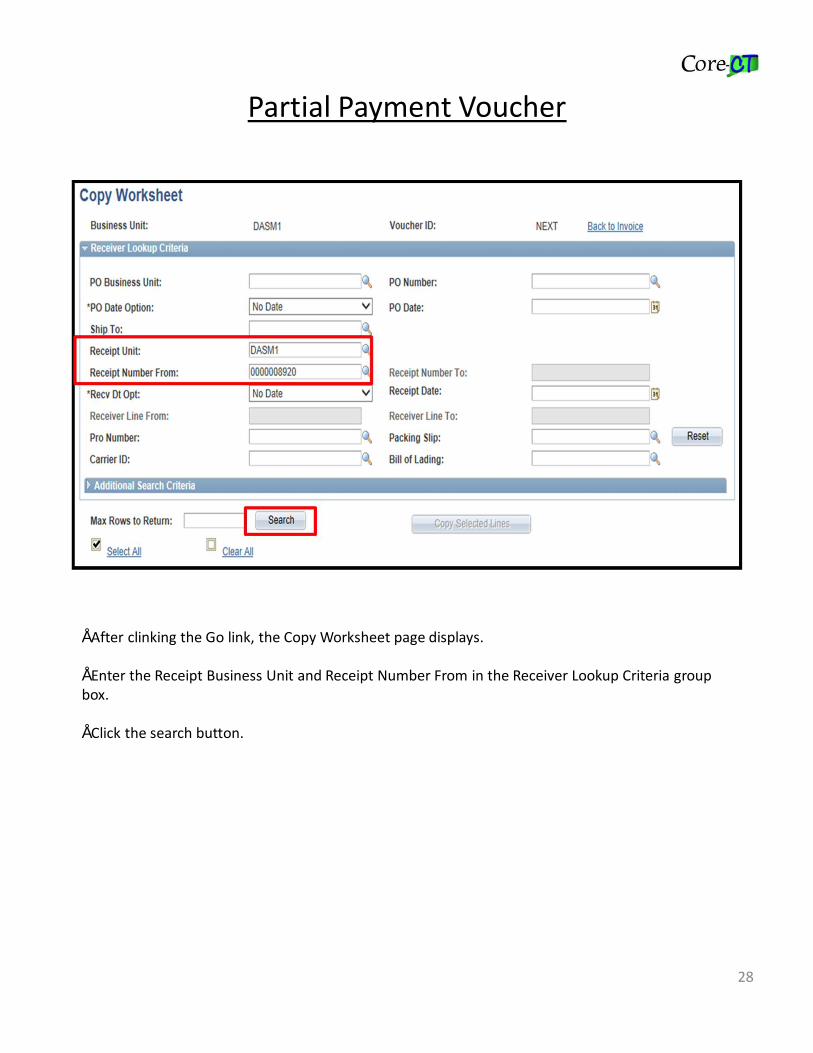
28
• After clinking the Go link, the Copy Worksheet page displays.
• Enter the Receipt Business Unit and Receipt Number From in the Receiver Lookup Criteria group box.
• Click the search button.

Partial Payment Voucher
29
• The search results display in the Select Receiver Lines group box.
• (1) Create a partial payment voucher by editing the Merchandise Amount or Quantity field on Select Receiver Line(s).
• In the example above the quantity was changed on the lines. (2) Once the change has been made, click the Select All link to select all lines or Select the checkbox(es) only for the line(s) to be vouchered. (3) Click the Copy Selected Lines button.
• IMPORTANT: Make any quantity/amount changes on the Copy Worksheet page before clicking the Copy Selected Lines button. If not, match exceptions may occur. It is possible that the PO line would have to be closed.

Partial Payment Voucher
30
• After the voucher is saved, Core-CT will auto generate a Voucher ID.
• The voucher is now ready for further processing.

Creating Vouchers
Topics • Regular Voucher • Partial Payment Voucher• Non-PO Voucher • Adjustment Voucher • Journal Voucher • Reversal Voucher • Template Voucher
– Non-PO Voucher from Template
The Office of the State Comptroller/Accounts Payable Division allows agencies to create certain vouchers in Core-CT without creating a Purchase Order. However, if a contract exists between the state and vendor a Purchase Order is required with related contract information.
For additional information on Non-PO Vouchers see OSC Memorandum No. 2008-38.
Example: A Non-PO Voucher can be created when making payments to other State Agency.
31

Non-PO Voucher
32
• Navigate to Accounts Payable > Vouchers > Add/Update > Regular Entry. On the Add a New Value page validate the correct Business Unit populates. Select Regular Voucher on the Voucher Style drop down list. Click the Add button.
• (1) To create a Non-PO Voucher, enter the Invoice Number, Invoice Date, and the Receipt Date on the Invoice Information page.
• (2) Enter the Vendor ID or select a vendor by using the Vendor look up icon. The Vendor ID is a 10 digit Core-CT generated ID. Vendor files are maintained by OSC. Vouchers can not be saved without a valid Vendor ID.

Non-PO Voucher
33
• Enter the Total on the Invoice Information page. The amount entered in the Total field populates in the Line Amount field in the Invoice Lines and the Merchandise Amount in the Distribution Lines.
• Amount changes made to the Total, Line Amount, or Merchandise Amount must be manually corrected in all fields.
• The voucher will not save unless the Total, the total of the Line Amounts and the total in the Merchandise Amounts are in balance.

Non-PO Voucher
34
• Enter a description in the Description field in the Invoice Lines group box. The Description should describe the item/service being paid for.
• OSC reviews Description fields on vouchers to ensure they relate to the item/service being paid for.
• Enter Chartfield information: Quantity, Fund, Dept, Sid, Program and Account.

Non-PO Voucher
35
• Ensure all chartfields for the distribution lines are entered.

Non-PO Voucher
36
• When saving a Non-PO Voucher the above Message displays. Click the Yes button. Another message will display. Click the Yes button.
• The voucher now has a Voucher ID
• The Non-PO Voucher is ready for approval, budget check, and voucher posting. Non-PO Vouchers do not go through the match process.

Creating Vouchers
Topics • Regular Voucher • Partial Payment Voucher• Non-PO Voucher • Adjustment Voucher • Journal Voucher • Reversal Voucher • Template Voucher
– Non-PO Voucher from Template
Adjustment Vouchers can be created at any time during the Voucher Life Cycle Process. Adjustment Vouchers are used to adjust a Regular Voucher when a credit or debit memo is received from a vendor.
Example: A agency over paid for one year of Rubbish Removal Services.
37

Adjustment Voucher
If the Regular Voucher has not been paid, place the voucher on payment hold until the Adjustment Voucher is created.
Once the Adjustment Voucher is created, place that voucher on payment hold.
The Regular Voucher and Adjustment Voucher should be taken off payment hold when both are ready for the Pay Cycle. This allows both vouchers to go through the Pay Cycle together and the vendor is paid the net amount of the regular voucher and adjustment voucher.
Important: Adjustment vouchers must go through the match process. If the original voucher was from a PO, the adjustment voucher must be within quantity/amount tolerance. The quantity/amount tolerance must be within 10% of the original voucher. Otherwise a change order is needed on the PO before additional quantities/amounts can be vouchered.
38

Adjustment Voucher
39
• Navigating to the Find an Existing Value page and enter the Voucher ID. The next step is to put the Regular Voucher on payment hold.
• Click the Payments tab. Select the Hold Payment checkbox. Select the appropriate Hold Reason. Once the voucher is on Hold it will not get picked up in the Pay Cycle.
• Click Save.
Navigation: Accounts Payable > Vouchers > Add/Update > Regular Entry

Adjustment Voucher
40
• On the Add a New Value page verify the correct Business Unit populates.
• Select Adjustments in the Voucher Style drop down menu.
• Click the Add button.

Adjustment Voucher
41
• Enter the original voucher Invoice Number and add ADJ to make it unique. Invoice numbers cannot be duplicated.
• Enter the Invoice Date: the date the agency received the credit or debit memo from the vendor.
• Enter the original voucher’s receipt date in the Receipt Date field. Enter the Vendor ID.
• Click the Copy From Worksheet link.

Adjustment Voucher
42
• (1) Enter the Voucher ID of the Regular Voucher that is being credited or debited.
• (2) Click the Search button.
• The Voucher information displays.
• Important: The Unpaid amount determines if the voucher has been paid.

Adjustment Voucher
43
• (1) Click the Select checkbox to select the voucher line. Click the Adjust Mtch Values/Encumbrances checkbox on the voucher line(s). This ensures that the money will return to the PO. More than one line can be adjusted at a time. This ensures that the money will return to the PO.
• (2) When making credit adjustments always select the Reverse Qty/Amount checkbox to create a negative amount. This will reverse the values to reflect a credit.
• Important: Do not select the Reverse Qty/Amount checkbox for debit adjustments.
• (3) Click the Copy Selected Lines button.
• The Adjust Match Values/Encumbrances and Reverse Qty/Amt must be checked in order to be able to re-use the adjustment voucher amount and quantities.
Adjustment Voucher
44
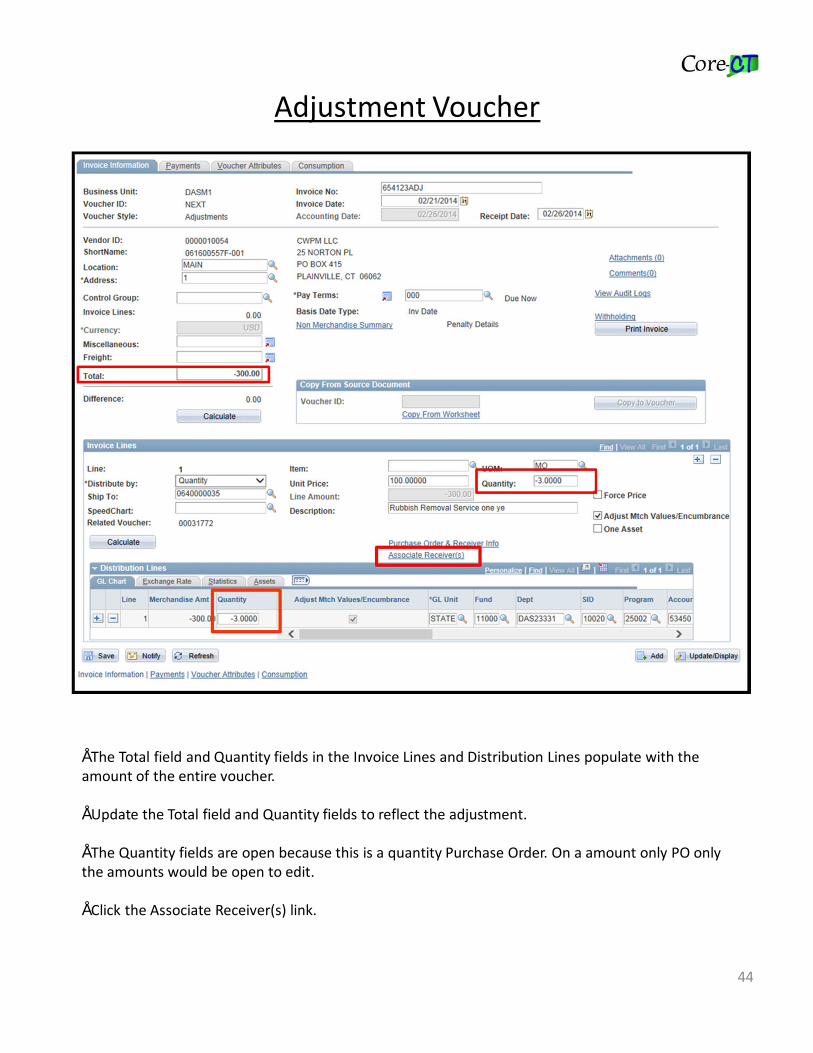
• The Total field and Quantity fields in the Invoice Lines and Distribution Lines populate with the amount of the entire voucher.
• Update the Total field and Quantity fields to reflect the adjustment.
• The Quantity fields are open because this is a quantity Purchase Order. On a amount only PO only the amounts would be open to edit.
• Click the Associate Receiver(s) link.

Adjustment Voucher
45
• Adjust the Quantity to Match (PO UOM) in the Associated Receiver(s) group box to reflect the credit/debit adjustment.
• Click OK.

Adjustment Voucher
46
• After saving Core-CT generates a Voucher ID.
• Click the Payments Tab to put the Adjustment Voucher on hold.

Adjustment Voucher
47
• Select the Hold Payment checkbox. Select the appropriate Hold Reason.
• Save the Adjustment Voucher.
• When both vouchers are all the way through voucher post, they both can then be taken off payment hold. This allows both vouchers to go through the Pay Cycle together and the vendor is paid the net amount of the regular voucher and adjustment voucher.
• To take vouchers off payment hold simply navigate to the Payments tab and uncheck the Hold Payment checkbox.

Creating Vouchers
Topics • Regular Voucher • Partial Payment Voucher• Non-PO Voucher • Adjustment Voucher • Journal Voucher • Reversal Voucher • Template Voucher
– Non-PO Voucher from Template
Journal Vouchers are created to correct distribution coding errors on vouchers that have already been processed through Accounts Payable. Distribution coding on a voucher can be changed prior to the budget check process therefore a Journal Voucher is not required.
Journal Vouchers require Budget Check and Voucher Post but never pay, therefore there is no refund returned to the Purchase Order.
Example: A Journal Voucher can be created when a voucher has been budget checked and has distribution coding errors.
48

Journal Voucher
49
• Select Journal Voucher from the Voucher Style dropdown list.
• Click the Add button.
Navigation: Accounts Payable > Vouchers > Add/Update > Journal Voucher

Journal Voucher
50
• (1) Enter the Invoice Number from the voucher with coding errors and add JV to the end to make it unique. Enter the Invoice Date and Receipt Date.
• (2) Enter the Vendor ID.
• (3) In the Related Voucher field enter the Voucher ID with distribution coding errors.

Journal Voucher
51
• A Journal Voucher is the only voucher style that does not copy from a voucher. Information from the voucher with distribution coding errors must be entered manually.
• Enter the Merchandise Amount from the voucher with the incorrect coding.
• Enter a Description in the Invoice Lines.
• Enter the incorrect coding from the voucher on the first line. This line must have a negative dollar amount.
• Click the plus sign to enter the correct coding on the 2nd line.

Journal Voucher
52
• Click OK to the script prompt message to add 1 row.
• The new line inherits the Merchandise Amt, Quantity, and GL Unit fields
• Enter the corrected values on the second line.
• Edit the Chartfield(s) in the second line where corrections are necessary.
• In this example, the Dept. field is corrected.
• Click the Save button.

Journal Voucher
53
• Answer Yes to the warning message.
• Click the Save button to generate a new Voucher ID.

Creating Vouchers
Topics • Regular Voucher • Partial Payment Voucher• Non-PO Voucher • Adjustment Voucher • Journal Voucher • Reversal Voucher • Template Voucher
– Non-PO Voucher from Template
A Reversal Voucher is created to ‘take back’ or reverse a voucher that should have never been created. A voucher can be reversed if it has been posted but not paid. Closing a voucher may be an alternative, but it can only be done by OSC/APD. When unsure which action is most appropriate, log a ticket with the Core-CT Help Desk FootPrints application.
Please Note that the voucher to ‘take back 'and the Reversal Voucher must be placed on Payment Hold until they’re both voucher posted and ready to pay together.
Example: Create a Reversal Voucher if a voucher was created in error and would result in a duplicate payment.
54
Reversal Voucher
55
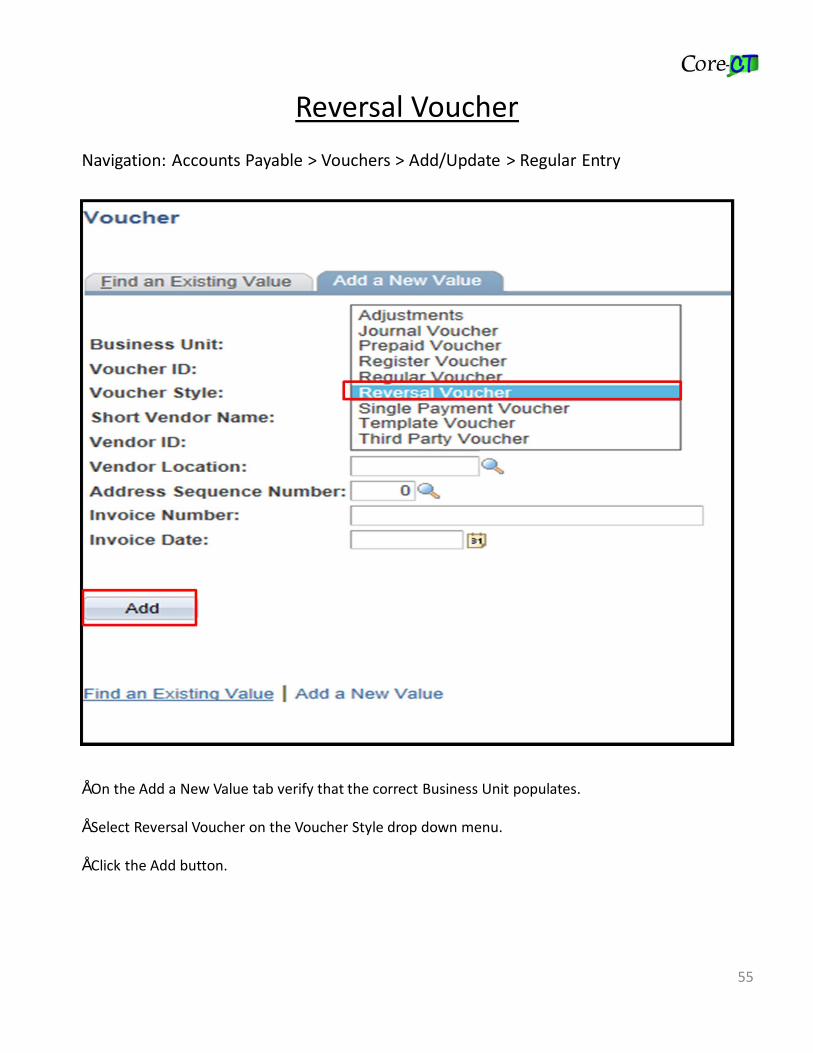
• On the Add a New Value tab verify that the correct Business Unit populates.
• Select Reversal Voucher on the Voucher Style drop down menu.
• Click the Add button.
Navigation: Accounts Payable > Vouchers > Add/Update > Regular Entry

Reversal Voucher
56
• Enter the voucher’s Invoice Number and add RV to make it unique. Invoice numbers cannot be duplicated.
• Enter the Invoice Date and Receipt Date on the Invoice Information page. The Invoice Date and Receipt Date should be the same entered on the voucher to ‘take back’.
• Enter the Vendor ID.

Reversal Voucher
57
• In the Copy from a Source Document group box enter the Voucher ID. Select the Reverse Voucher checkbox. Click the Copy to Voucher button.
• Reversal vouchers should relate to the voucher to ‘take back’ in the Voucher ID field.Entering the Voucher ID allows the updating of: previously matched quantities or amounts, encumbrances on the Purchase Order, and vouchering against the receipt if needed.

Reversal Voucher
58
• (1) Select the Adjust Match Values/Encumbrance checkboxes in the Invoice Linesgroup box and Distribution Lines. Selecting the checkboxes returns the full amount to the Purchase Order. If the checkboxes are not checked, the funds will not go back to the Purchase Order and will be unable to use in the future. If the Purchase Order is closed the checkbox will not display.
• (2) Click the Save button.
• A Voucher ID is generated.

Creating Vouchers
Topics • Regular Voucher • Partial Payment Voucher• Non-PO Voucher • Adjustment Voucher • Journal Voucher • Reversal Voucher • Template Voucher
– Non-PO Voucher from Template
Template Vouchers are useful for agencies that create a high volume of Non-PO Vouchers with the same chartfield information.
Template Vouchers never post or pay, and they cannot be deleted or closed. Non-PO vouchers must have prior approval from OSC/APD.
Example: Template Vouchers can be created if creating a voucher repeatedly with the same chartfield information that remains constant. The template voucher is then copied to the Non-PO Voucher.
59

Template Voucher
60
• On the Add a New Value tab validate that the correct Business Unit populates. The Voucher ID field defaults to NEXT.
• Select Template Voucher from the Voucher Style drop down menu.
• Click the Add button.
Navigation: Accounts Payable > Vouchers > Add/Update > Regular Entry

Template Voucher
61
• (1) To create a Template Voucher, enter the Invoice Number, the Invoice Date, and the Receipt Date on the Invoice Information page.
• (2) Enter the Vendor ID.
• (3) Enter the Template ID and Description in the Template group box. When creating a template for utilities it is recommended to use the vendor’s account number for the Invoice Number and the Template ID. Anything other than utilities, the Template ID should be something descriptive that can easily be identified.

Template Voucher
62
• Enter a Description for the Invoice Lines.
• Enter Chartfield Information that will be consistent when utilizing the template.
• Click the Save button.

Template Voucher
63
• After clicking the Save button a Message box displays. Click the Yes button.
• The Template ID and Voucher ID display. The Template ID is used to locate the template for future use.
• Template Vouchers can be updated at any time. While they cannot be deleted or cancelled, they can be inactivated by checking the Inactive checkbox on the Invoice Information page and saving the template. The Inactive checkbox can be unchecked at any time to be re-activated.
• Inactivating a Template Voucher removes it from the lookup when creating vouchers from a template.

Non-PO Voucher from Template
64
• To create a Non-PO Voucher from a template, select Regular Voucher from the Voucher Style drop down list.
Navigation: Accounts Payable > Vouchers > Add/Update > Regular Voucher

Non-PO Voucher from Template
65
• Enter the Vendor ID on the Invoice Information page.
• Select Template in the Copy From drop down menu.
• Click the Go link.

Non-PO Voucher from Template
66
• (1) On the Voucher Template page, click the Template look up icon to look up a Template.
• (2) Select the Template ID from the Search Results.
• (3) Click the Copy from template button.

Non-PO Voucher from Template
67
• The Invoice Information page inherits the values from the template.
• (1) Update the Invoice Number, Invoice Date and Receipt Date.
• (2) Update the Total Amount, Line Amount, and Merchandise Amount and verify that the amounts are balanced.
• (3) Click the Save button.
Non-PO Voucher from Template
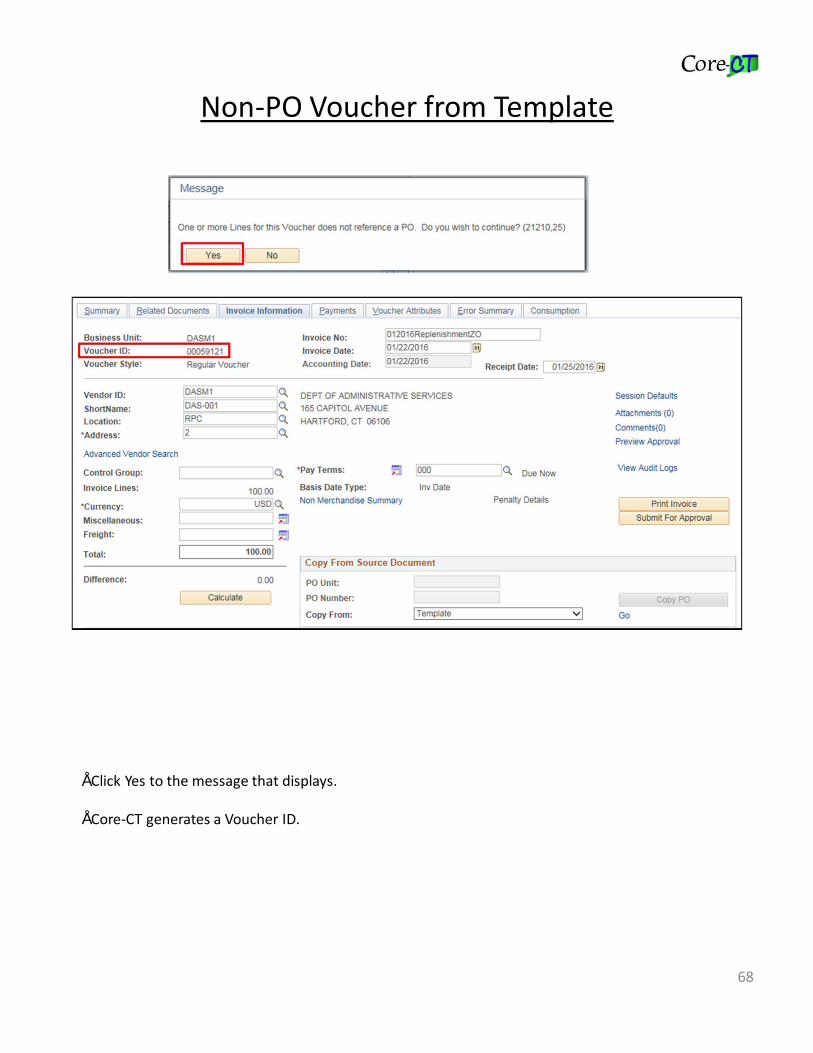
68
• Click Yes to the message that displays.
• Core-CT generates a Voucher ID.

Managing Vouchers
Topics
• Approving a Voucher• Creating SpeedCharts• Deleting Vouchers • Understanding Match Exceptions • Understanding Budget Exceptions
Once the voucher has successfully matched, it must be approved. The voucher is then routed to the worklist of the Voucher Approver. The approver’s responsibility is to verify amounts, quantities, distribution coding, dates, and payment setup details.
69

Approving Vouchers
70
• Voucher Processors can submit a voucher for approval on the Approval History page of the voucher. The voucher will then appear on the Voucher Approvers worklist.
• Voucher Approvers can submit a voucher for approval on the Approval History page of the voucher and automatically approve the voucher. Automatic approval only occurs if the Voucher Processor did not submit the voucher for approval.
• There are several ways to view Vouchers routed for approval after they are submitted: • Click the FIN Worklist link on the upper right corner of the Home page. • Navigate to Worklist > Worklist. • Navigate to Accounts Payable > Vouchers > Approve > Approval Framework- Vouchers.
Navigation: Accounts Payable > Vouchers > Approve > Approval Framework-Vouchers

Approving Vouchers
71
• Voucher Approvers have the option to Approve, Deny, Add Comments or Hold a voucher.
• Voucher Approvers are required to review the information on the voucher. If a correction is needed, the approver is to ‘Deny’ it and enter corrective instruction in the Comments area. The Voucher Processor will then make the necessary changes for review again by the approver.

Approving Vouchers
72
• Voucher Approvers may Approve, Deny, or Hold a voucher. If the voucher is denied or put on hold, the approver must enter comments.
• Once the Voucher is approved, the voucher will be ready for the next step in the AP process: AP_Budget Check.

Approving Vouchers
73
• Voucher Approvers should choose ‘Deny’ if the voucher needs immediate correction or deletion.
• If the voucher is denied, the approver must add a comment explaining why the voucher was denied. Voucher Processors receive email notification that the voucher was denied. The voucher status changes to Denied.
• Voucher Processors can modify the voucher according to the comment provided by the voucher approver. Once the voucher is modified, the voucher will be re-routed to the approvers worklist.

Approving Vouchers
74
• Approval “Hold” should be chosen if the approver does not plan to approve the voucher at the current time. This informs other possible approvers not to approve it also.
• A voucher placed on Hold will remain on the approvers’ worklist until it is approved or denied.
• Note: This step is not to be confused with the payment ‘Hold’ checkbox on the Payments page of the voucher. That hold prevents the voucher from being paid.

Managing Vouchers
Topics
• Approving Vouchers• Creating SpeedCharts • Deleting Vouchers • Understanding Match Exceptions • Understanding Budget Exceptions
SpeedCharts allow State agencies to set up chartfield coding, assign them a name, and use them repeatedly when entering chartfield information in Non-PO Vouchers. SpeedCharts save data entry time and reduce errors by saving chartfield coding.
The Agency’s business office should verify valid chartfield combinations prior to creating Speed Charts.
SpeedCharts are also used by Purchase Order (PO) staff for faster PO entry. Accounts Payable users and PO users can share them as needed.
Example: SpeedCharts are created when a Non-PO Voucher is created repeatedly with the same chartfield information.
75

Creating SpeedCharts
76
Navigation: SetUp Financials/Supply Chain > Product Related > Procurement Options > Management > SpeedChart
• Enter the SpeedChart Key name. The SpeedChart Key name should be short, but easy to identify.
• Enter the Effective Date. The effective date determines when the SpeedChart will be available for use. Core-CT recommends entering the beginning of the fiscal year.
• Click the Add button.

Creating SpeedCharts
77
• (1) Enter a Description.
• (2) Verify Active is selected in the Status drop down list. Active must be selected in order to use the SpeedChart for voucher creation.
• (3) Select a Security Option. Selecting Universal (All Users), allows all users in the business unit to have access to the SpeedChart. Selecting One User allows only the creator to use the SpeedChart. Selecting One Permission allows those listed to use the SpeedChart.
• (4) Enter the appropriate chartfield information that will remain the same.
• (5) Click the Save button.
12
3
4
5

Creating SpeedChartsNavigation: Accounts Payable > Vouchers > Add/Update > Regular Voucher
78
• SpeedCharts are only recommended for Non-PO vouchers. Do not use SpeedCharts when creating a Purchase Order Voucher because the voucher distribution is copied from the Purchase Order Receipt.
• (1) Enter the Invoice No, Invoice Date, and Receipt Date.
• (2) Enter the Vendor ID.
• (3) Enter the SpeedChart Key name or click the lookup icon to lookup the SpeedChart.
1
2
3

Creating SpeedCharts
79
• The Chartfield information from the SpeedChart has been copied to the voucher.
• Update the dollar amounts in the Total field, Line Amount field, and Distribution Line Merchandise Amount field.

Creating SpeedCharts
80
• Continue creating the voucher. Click the Save button. Core-CT will generate a Voucher ID.

Managing Vouchers
Topics
• Approving a Voucher• Creating SpeedCharts • Deleting Vouchers • Understanding Match Exceptions• Understanding Budget Exceptions
Most times it is easier to delete a voucher and create a new voucher rather than to correct a voucher in error. A voucher can be deleted at any time prior to the voucher post process. In order to delete a voucher it first must be unmatched. The Match Workbench is the only way to unmatch a voucher.
Example: A voucher can be deleted if a voucher has multiple errors. Errors may include the wrong vendor, wrong quantity, or wrong amount.
81

Deleting Vouchers
82
• (1) On the Match Workbench page enter the Business Unit. Select Matched from the Match Status drop down list. Enter the Voucher ID.
• (2) Click Search. The search results will populate with the voucher details identified in the Voucher ID field.
• (3) Select the Undo Match checkbox.
• (4) Select Undo Matching from the Action menu and then click the Run button.
Navigation: Accounts Payable > Review Accounts Payable Info > Vouchers > Match Workbench
1
2
3
4

Deleting Vouchers
83
• The Voucher Delete page displays. On the Voucher Delete page verify the correct Business Unit populates.
• Enter the Voucher ID.
• Click the Search button.
Navigation: Accounts Payable> Vouchers> Add/Update> Delete Voucher

Deleting Vouchers
84
• Click the Delete button.
• A warning message will display to confirm deletion of the voucher. Click the OK button.

Deleting Vouchers
85
• The Entry Status will display Deleted.
• If the voucher has been budget checked a budget check process will automatically initiate to create reversing entries to delete the voucher.

Managing Vouchers
Topics
• Approving a Voucher• Creating SpeedCharts • Deleting Vouchers • Understanding Match Exceptions• Understanding Budget Exceptions
The Accounts Payable Match process ensures that what was purchased is in sync with what is being vouchered.
Troubleshooting is required to resolve match exceptions. A voucher cannot proceed through Accounts Payable to payment until it has been successfully matched.
86
Understanding Match Exceptions
87
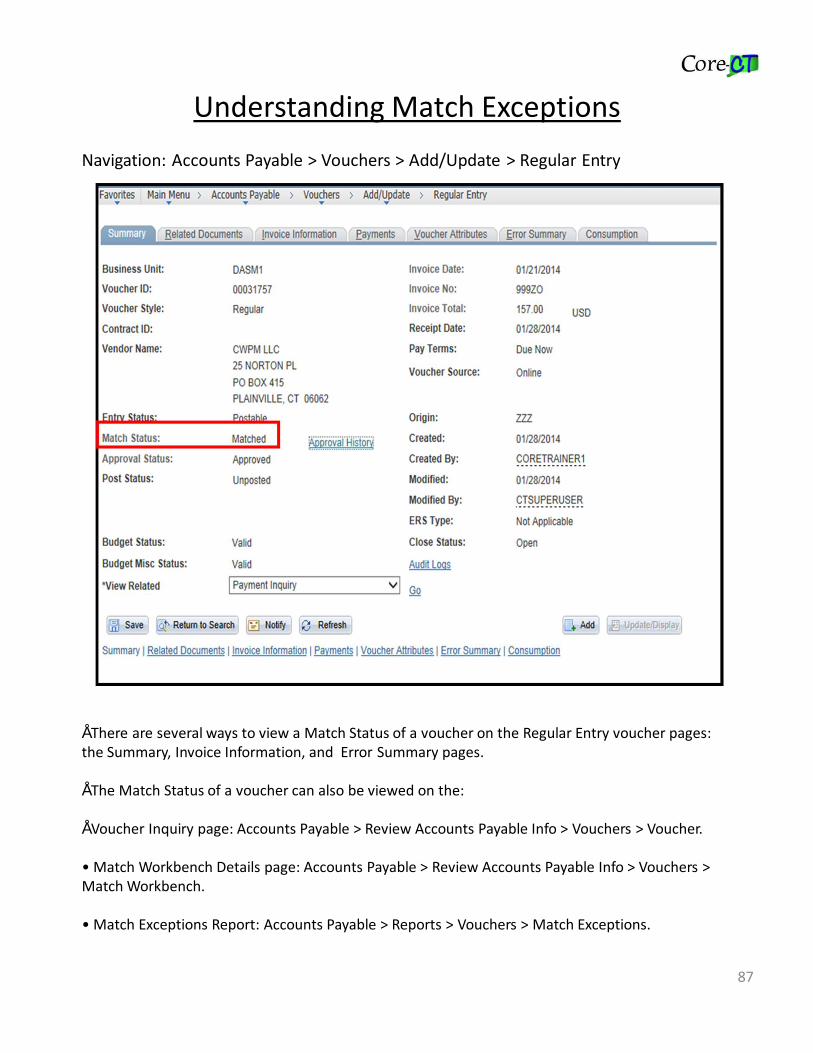
• There are several ways to view a Match Status of a voucher on the Regular Entry voucher pages: the Summary, Invoice Information, and Error Summary pages.
• The Match Status of a voucher can also be viewed on the:
• Voucher Inquiry page: Accounts Payable > Review Accounts Payable Info > Vouchers > Voucher.
• Match Workbench Details page: Accounts Payable > Review Accounts Payable Info > Vouchers > Match Workbench.
• Match Exceptions Report: Accounts Payable > Reports > Vouchers > Match Exceptions.
Navigation: Accounts Payable > Vouchers > Add/Update > Regular Entry

Understanding Match Exceptions
88
• Match Exceptions occur when vouchers do not match correctly to a purchase order, receipt, or inspection.
• Click the Match Status Exceptions link to go to the Match Workbench page.

Understanding Match Exceptions
89
• The Business Unit should populate. If not enter your agency's business unit.
• Select Match Exceptions Exist and click the Search button to display all vouchers that have match exceptions.
• The Vendor SetID should always be STATE.
• The Search Results will display all vouchers with match exceptions. Click the Match Exception Exist link to view match exceptions.
Navigation: Accounts Payable > Review Accounts Payable Info > Vouchers > Match Workbench

Understanding Match Exceptions
90
• The Match Rule identifies the type of Match Exception. The letter before the number identifies where the matching error occurred. For example: Rule_V400, the V identifies the matching error occurred on the Voucher. RULE_R950, the R identifies that the matching error occurred on the Receipt.
• Listed below are definitions of Common Match Exceptions.
• RULE_V200: The quantity on the Voucher is more than the quantity on the Purchase Order/Receipt. The voucher quantity is more than the Purchasing/Receiving quantity tolerances.
• RULE_V400: –The voucher is over the Purchase Order amount tolerance .
• RULE_R600: – The voucher created does not match any receivers.
• RULE_R900: – The voucher quantity is more than the quantity on the receipt, or the voucher is a duplicate.
• RULE_R950: – The receipt is out of sync with the voucher. The Purchase Order line may have additional receivers.

Understanding Match Exceptions
91
• Rule_450: The voucher amount was changed after saving. Voucher Processors should delete the voucher, change the receipt to the appropriate amount, and create a new voucher.
• Rule_H200: The Purchase Order and Voucher location and/or addresses are not in sync. Voucher Processors should change the Purchase Order according to the address on the voucher.
Managing Vouchers
Topics
• Approving a Voucher• Creating SpeedCharts • Deleting Vouchers • Understanding Match Exceptions• Understanding Budget Exceptions
Budget checking is a automated batch process that confirms the availability of funds to support an expenditure.
Budget Exceptions occurs when the wrong chartfield are entered or a budget has exceeded the funds available.
92

Understanding Budget Exceptions
93
• After the voucher is Budget Checked the Budget Status displays on the Summary page of the voucher.
• The Budget Status of the voucher prior to Budget Check displays Not Checked. After the voucher is successfully Budget Checked the Budget Status will display ‘Valid’.
• Note Budget Misc Status will always display as ‘Valid’ and is not applicable to Core-CT.
Navigation: Accounts Payable > Vouchers > Add/Update > Regular Entry

Understanding Budget Exceptions
94
• If the voucher fails Budget Check the Budget Status will display Exceptions. Budget Check Exceptions must be resolved before the voucher is posted and paid.
• Click the Exceptions link on the Summary page of the voucher to go to the Budget Exceptions page.

Understanding Budget Exceptions
95
• On the Find an Existing Value page enter the Business Unit. Select Errors Exist on the Process Status drop down menu.
• Click Search.
Navigation: Commitment Control > Review Budget Check Exceptions > Accounts Payable > Voucher

Understanding Budget Exceptions
96
• A voucher copied from a Receipt rarely displays Budget Exceptions, because the funds have already been encumbered from the Purchase Order. The most common Budget Exceptions are from Non-PO Vouchers are:
• No Budget Exists: No budget matches the coding entered. Voucher Processors should go back to the voucher, verify the coding, and make the necessary changes.
• Exceeds Budget Tolerance: There is not enough money in the budget for the chartfield string entered. Funds must be added to the budget, or verify the chartfield coding on the voucher is correct.
• Click the Go To… link to display more information on Budget Exception.
• Once any corrections are made, save the voucher and it will get picked up in the next AP_Budget Check batch process.

Payments
Topics
• Understanding Offsets Payments
The State of Connecticut has identified a list of collection authorities who connect with Core-CT to report vendors who owe them. The Internal Revenue Service, Department of Revenue Services, and Department of Labor are three collection authorities that report vendors in Core-CT.
These collection authorities receive money that a State agency would pay to a vendor. Until the debt owed to the State is fully satisfied, all payments to the vendor will continue to be ‘Offset’.
Example: An agency created a voucher to pay a vendor. The vendor owes federal taxes to the Internal Revenue Service. IRS sent this information to Core-CT with details of the taxes owed by the vendor. When the State Pay Cycle runs, instead of creating a payment to the vendor from the agency, it is redirected and paid to the IRS. The vendor will receive a letter stating that the payment was ‘Offset’ to the IRS.
97

Understanding Offsets
98
• The Total Amount of the services rendered by this vendor is $555.80.
• If the vendor has an open lien that is pending, all or part of the payment will be redirected to the collecting authority. In this case you will see two Payment Information group boxes. This is a clue that an offset payment has occurred.
• In Payment Information group box the Gross Amount is $0. This is the amount paid to the vendor. The Handling code is “OF”, for Offset.
Navigation: Accounts Payable > Vouchers > Add/Update > Regular Entry

Understanding Offsets
99
• In the Scheduled Payment group box, the Payment Date and Reference information displays.
• Click the next page button to view the second Payment Information group box.

Understanding Offsets
100
• On the second Payment Information group box the Gross Amount displays $555.80. DEPT OF REVENUE SERVICES will receive the Gross Amount of $555.80.
• The Handling code is “OC”, for Offset Complete. This means that the offset is complete for this payment. The Method is GIRO because DRS is another state agency.
• Note: There are two payment references for this voucher. One is for $0 to the vendor and one is for $555.80 to the collection authority, DRS. Remember, even though the vendor’s payment was fully offset, there is a payment reference for $0.

Inquiries and Reports
Topics
• Voucher Activity Report • Voucher Inquiry • Payment Inquiry • PO/AP Interface Inquiry • Month End/Fiscal Year End Reporting
Inquiries extract information in Core-CT modules for viewing purposes. Accounts Payable inquiries allow users to view vendor, voucher, payment and interface information.
Catalog of Online Reports are delivered or custom reports designed to provide real time access to financial data.
Enterprise Performance Management (EPM) is a data repository for Core-CT. Data stored in reporting tables are extracted by creating queries. EPM data is refreshed from the Core-CT system as of close of business the previous day. Therefore, EPM is not ‘Real Time.’ It will not include today’s data.
101

Voucher Activity Report
102
• The Voucher Activity Report displays a detailed listing of posted or un-posted vouchers for specific date(s) or date range. The run control page is used to specify agency AP Business Unit, Account and Department.
• In this example the Business Unit, Department, and Fund are entered as parameters.
Navigation: Accounts Payable > Reports > Vouchers > Voucher Activity

Voucher Activity Report
103
• The Voucher Activity Report is ideal for grouping vouchers by Business Unit, in a date range, or a fiscal year.
• The Report displays an Expended Amount (By Criteria) and Total Paid Amount (All Codes) for each voucher.
• The Report is used to investigate potential issues and problems when running summary level reports (e.g. Trial Balance).

Voucher Inquiry
104
• Voucher Inquiry is for users with a Voucher Reviewer role that do not have access to the Voucher entry page to view the matched, approved, and posting status of vouchers. Voucher processors and approvers use Voucher Inquiry as a tool for daily management, identifying vouchers that are not processing through to payment.
• The Business Unit must be entered in the From and To fields. Search criteria can be entered to narrow down the search results.
• Important: Enter a date range unless searching for a specific voucher, otherwise performance issues will occur.
Navigation: Accounts Payable > Review Accounts Payable Info > Vouchers > Voucher

Voucher Inquiry
105
• The search results display in the Voucher Inquiry Results group box.
• A Payment Information icon will appear if the voucher has been paid.
Navigation: Accounts Payable > Review Accounts Payable Info > Payments > Payment

Voucher Inquiry
106
• After clicking the Payment Information icon, the payment details page displays.
• In this example there is only one Payment Reference ID. The Payment Status displays Paid.
• Click the Payment Reference ID.

Payment Inquiry
107
• After clicking the Payment Reference ID, the Payment Inquiry page displays.
• The Payment Inquiry is used to view: specific payment reference information, payments made to a vendor, and payments from a specific bank account, payment method, or handling code.
• Important: The Bank SetID is always ‘OTTM1’ when searching for payments.
• Clicking the Payment Reference ID will display further payment information.
Navigation: Accounts Payable > Review Accounts Payable Info > Payments > Payment

PO/AP Interface Inquiry
108
• The PO Inquiry page is used to view voucher and receiver information for each line of a purchase order.
• Enter the PO Number.
• Click the Search button.
Navigation: Accounts Payable > Review Accounts Payable Info > Interfaces > Purchase Order

PO/AP Interface Inquiry
109
• The PO/AP Interface Inquiry displays all vouchers created against this PO along with receiver details.

PO/AP Interface Inquiry
110
• The Vendor Current Balance Inquiry displays the Gross Amount of that an agency owes to a vendor. In this example, the Gross Amount is 215.00 for Vendor 0000000064.
• If the Gross Amount is negative, the vendor owes the agency for one or more credit amounts. The agency should ensure that all credits are applied to any voucher being created. If no future vouchers are to be created, the agency should demand a refund from the vendor.

Month End/Fiscal Year End Reporting
OSC and Core-CT Production Support periodically check for vouchers that are not progressing through to payment. Agencies should manage their vouchers on a monthly basis. This will prevent excessive cleanup at fiscal year-end.
The FY End Job Aid on the Core-CT website provides a checklist and corresponding reports and queries to help resolve voucher payment issues.
111

Month End/Fiscal Year End Reporting
• Agencies should use this list to manage their vouchers on a monthly basis; this will prevent excessive cleanup at fiscal year end.
112
Cleanup Checklist

113
Questions?
More Information?
Contact: Zakiah Owusu
Email: [email protected]
Want to Register for another class?
Contact your Training Registration Contact
Agency Training Registration Contacts