Intro Lab - Eritrosit Summon and Osmotic Fragility
14
Intro Lab - Eritrosit Summon and Osmotic fragility
-
Upload
rizal-ekaputra -
Category
Documents
-
view
7 -
download
1
description
Intro lab
Transcript of Intro Lab - Eritrosit Summon and Osmotic Fragility

Intro Lab - Eritrosit Summon and Osmotic fragility

051211
Intro Lab - Eritrosit Summon and Osmotic Fragility TestBu Lelly
Blood smear preparation
Specimen
EDTA anticoagulated blood/capillary blood
Equipment
Glass slide
Blood lancet
Reagents
Methanol
Giemsa Solution
Cotton wall soaked with alcohol 70%
Procedure
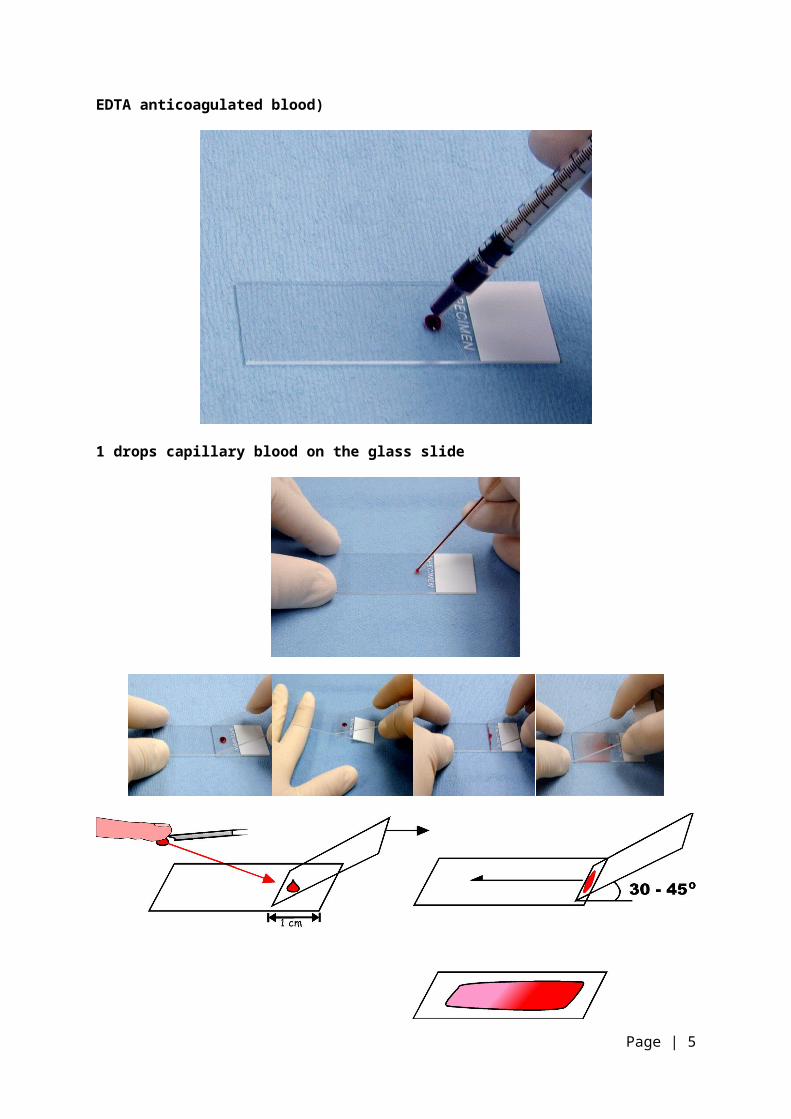
1. Identify sample’s ID (Name, Medical Record, Age, Sex).2. Wash your hand thoroughly by using antiseptic hand soap, put on gloves. 3. Put a small drop of blood on an object glass, about 2 cm from the end of the slide.4. Place the slide on the table and immediately place the end of another slide (spreader slide)
against the surface of the first slide, holding it at an angle 450.5. Draw the spreader slide back against the drop of blood which will spread across the surface
between the two slides.6. Push the spreader slide slowly and steadily across the first slide and the blood will follow
making an even film. 7. The thickness of the film can be varied by the rapidity of the spreader. The slower the
motion, the thinner the smear.8. Dry the slide in the air.9. Fix the smear with methanol for 5 minutes10. Pour Giemsa solution on the slide.11. Let stand for 30 min.12. Remove Giemsa stain13. Clean the slide from the excess stain with tap water.14. Dry the slide in the air.
Page | 2

Page | 3

EDTA anticoagulated blood)
1 drops capillary blood on the glass slide
Page | 4
1. Put the slide on the rack
2. 2. Fix the slide with methanol for 5 minutes
3. Stain the slide with Giemsa solution for 30 minutes
Page | 5

How to Use the Microscope
General Procedure
1. Make sure all backpacks and junk are out of the aisles.2. Plug your microscope in to the extension cords. Each row of desks uses the same cord.3. Always start and end with the Scanning Objective. Do not remove slides with the high power
objective into place - this will scratch the lens!4. Always wrap electric cords and cover microscopes before returning them to the cabinet.
Microscopes should be stored with the Scanning Objective clicked into place.5. Always carry microscopes by the arm and set them flat on your desk.6. Set your microscope on a tabletop or other flat sturdy surface where you will have plenty of
room to work. 7. Plug the microscope’s power cord into an outlet.8. Note: some compound microscopes do not use electric lighting, but have a mirror to focus
natural light instead.9. Switch on your microscope's light source and then adjust the disc diaphragm to the largest
hole diameter, allowing the greatest amount of light through.10. If you have an iris diaphragm, slide the lever till the most light comes through. 11. Rotate the nosepiece to the lowest-power objective (usually 4x for 40x magnification). 12. It is easiest to scan a slide at a low setting, as you have a wider field of view at low power.
Page | 6

13. Place a microscope slide on the stage, either under the stage clips or clipped onto the mechanical stage if your microscope has one.
14. A prepared slide works best when you do this for the first time. (If you do not have a prepared slide, place a strand of colored yarn or thread on a blank slide and place a coverslip over it.)
15. Move the slide until the specimen is under the objective lens.16. Adjust the large coarse focus knob until the specimen is in focus17. Slowly move the slide to center the specimen under the lens, if necessary. 18. Do this by nudging it gently with your fingers or by turning the slide control knobs if you
have a mechanical stage.19. Adjust the small fine focus knob until the specimen is clearly in focus 20. Then adjust the diaphragm to get the best lighting. 21. Start with the most light and gradually lessen it until the specimen image has clear, sharp
contrast. 22. Scan the slide (right to left and top to bottom) at low power to get an overview of the
specimen. Then center the part of the specimen you want to view at higher power23. Rotate the nosepiece to the 10x for 100x magnification. 24. Refocus and view your specimen carefully. Adjust the lighting again until the image is most
clear (you will need more light for higher powers). 25. Repeat with the 40x objective for 400x magnification, which will enable you to see all of the
specimen detail that's necessary for high school biology lab work. 26. If your microscope has a 100x 27. you'll need to put 1-2 drops of immersion oil over the slide cover slip 28. (the piece of glass over the middle of the slide) before viewing it at highest power.29. Move the 100x objective lens into position, and then slowly move the stage up until the lens
makes contact with the oil. 30. Continue focusing with the coarse focus knob until the color or blurred outline of the
specimen appears. 31. Finish focusing with the fine focus knob.32. With the 100x lens, you will be able to see additional cell detail, but you will need to take
extra care with focus and contrast for a clear image.33. When you are done using the slide, clean the oil off of the slide and the lens with lens
cleaning paper and solution.
Page | 7

Peripheral blood smear from a patient with a microangiopathic hemolytic anemia with marked red cell fragmentation. The smear shows multiple helmet cells (small black arrows), other fragmented red cells (large black arrow); microspherocytes are also seen (blue arrows). The platelet number is reduced; the large platelet in the center (red arrow) suggests that the thrombocytopenia is due to enhanced destruction. Courtesy of Carola von Kapff, SH (ASCP).
High power view of a normal peripheral blood smear. Several platelets (black arrows) and a normal lymphocyte (blue arrow) can also be seen. The red cells are of relatively uniform size and shape. The diameter of the normal red cell should approximate that of the nucleus of the small lymphocyte; central pallor (red arrow) should equal one-third of its diameter. Courtesy of Carola von Kapff, SH (ASCP).
Page | 8

Normal Blood Cell
Progress stage in the discocyte to echinocyte
Page | 9

Two stages of stomatocyte - spherocyte transformation
a knizocyte ("pinched" cell) and the lower one is a codocyte with a very deep depression
Leptocytes (flattened cells). The lower photograph also contains a microstomatocyte
spherocytes are almost spherical in shape.
Page | 10

microspherocytes hereditary spherocytosis
Diffusion
Diffusion is an important process where substances are moved without use of energy.
It is the movement of particles (or molecules; or ions) from a region where they are in a higher concentration to a region of lower concentration
Thus the movement is down a concentration gradient.
Page | 11

Osmosis
Osmosis is the movement of water molecules from a region of their higher concentration to a region of their lower concentration, through a partially permeable membrane.
Page | 12
7. Monocytes
4. Lymphocytes
3. Neutrophils
2. Basophils
1. Eosinophils
12 3
36
54
7
5. The blood platelets
6. Erythrocytes