Internship in android development-no appendix
95
Android Development VPorto Around Knowledge 2012 / 2013 1101007 Diogo Merino da Rocha Barroca Pereira
-
Upload
diogo-pereira -
Category
Technology
-
view
779 -
download
0
description
My internship final report in android development
Transcript of Internship in android development-no appendix

Android Development -‐ VPorto Around Knowledge
2012 / 2013
1101007 Diogo Merino da Rocha Barroca Pereira


Android Development -‐ VPorto Around Knowledge
2012 / 2013
1101007 Diogo Merino da Rocha Barroca Pereira
Bachelors in Informatics Engineering
July 2013
ISEP Coordinator: Alberto Sampaio (PhD)
External Supervisor: Rui Silva (M.Sc.)


v
To my parents, Albina Sousa and Abilio Pereira, to my brother,
Gonçalo, and to my girlfriend Joana Lobo, for all the support they
gave me and make me who I am today.


Android development - VPorto
vii
Acknowledgements During my internship, I had the help of many people, some more directly than
others.
First of all, I want to thank my supervisor, Rui Oliveira, Android Developer, for all the
patience, time and help he gave me. It was the first time I started programming in
Android and without his help I wouldn’t be able to reach the required knowledge to
successfully finish the internship.
My great thanks to my ISEP coordinator, Dr. Alberto Sampaio, for his availability to
help and for being one of the most motivating teachers.
I also want to thank to the company, Around Knowledge, for giving me the
opportunity to work on their installations and letting me experience a great work
group and environment.
Another thanks to my colleague, Ricardo Sousa, which worked on the same project
and faced with me all the challenges that a new programming language can offer.
To my colleagues in ISEP, Carla Nunes and Rui Barros, I thank them for being
excellent co-‐workers in this journey through my three years of college.
A big thanks to my teacher, Dr Paulo Ferreira, for being a great help on solving some
questions out of the classes context.
All of this would be impossible without my family, brother, mother and father, being
a part of my life and teaching me how to face the problems and surpass them.
For last, but not least, I thank my girlfriend for being a big help in the making of this
report, and for helping me believe I could do this internship with the best results.
To all, my gratitude.
Porto, July 2013
Diogo Pereira


Android development - VPorto
ix
Abstract The VPorto is an application, designed by Control S developed by Around Knowledge,
to be used as a Porto city guide with the information of points of interest and events.
This project is about developing the application VPorto to the Android Operating
System (OS).
The features developed included:
• Recommended and personal routes
• Image-‐sampling decoders
• Innovating 3D rotation animations between screens
• Simple navigation system
This project was concluded with success, with all the goals achieved and an
opportunity to stay in the company.
Key Words (Background): Tourism, Guide and Porto.
Key Words (Technologies): Java, Android, XML e JSON

x
Resumo A VPorto é uma aplicação, desenhada pela Control S e desenvolvida pela Around
Knowledge, para ser usada como um guia turístico da cidade do Porto com
informações de pontos de interesse e de eventos.
Este projeto é sobre o desenvolvimento da aplicação VPorto para a plataforma
móvel, Android.
A mesma apresenta as seguintes funcionalidade:
• Rotas recomendadas e pessoais
• Navegação simples e consistente
• Rotações tridimensionais entre transições de ecrã
Este projeto foi concluído com sucesso com todos os objectivos foram atingidos e
com a oportunidade de ficar na empresa após a conclusão do estágio.
Palavras Chave (Tema): Turismo, Guia e Porto.
Palavras Chave (Tecnologias): Java, Android, XML e JSON
Android development - VPorto
xi
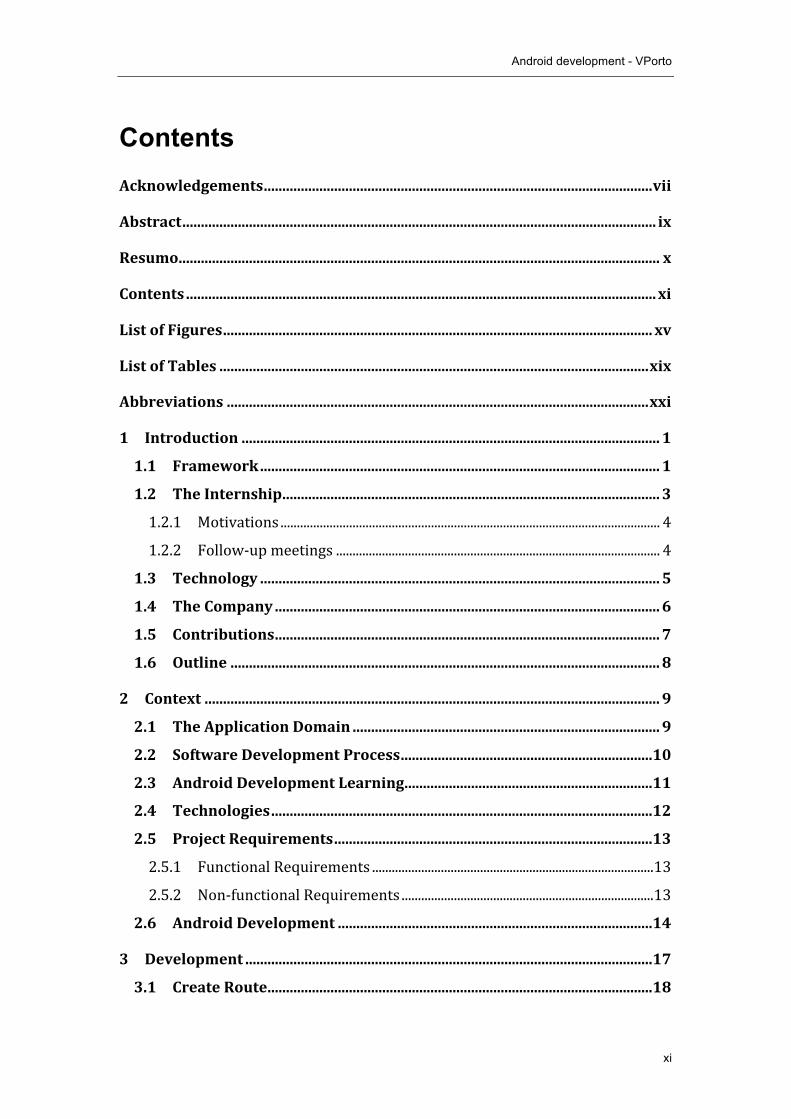
Contents Acknowledgements ......................................................................................................... vii
Abstract ................................................................................................................................ ix
Resumo .................................................................................................................................. x
Contents ............................................................................................................................... xi
List of Figures .................................................................................................................... xv
List of Tables .................................................................................................................... xix
Abbreviations .................................................................................................................. xxi
1 Introduction ................................................................................................................. 1
1.1 Framework ............................................................................................................ 1
1.2 The Internship ...................................................................................................... 3
1.2.1 Motivations .................................................................................................................... 4
1.2.2 Follow-‐up meetings ................................................................................................... 4
1.3 Technology ............................................................................................................ 5
1.4 The Company ........................................................................................................ 6
1.5 Contributions ........................................................................................................ 7
1.6 Outline .................................................................................................................... 8
2 Context ........................................................................................................................... 9
2.1 The Application Domain ................................................................................... 9
2.2 Software Development Process .................................................................... 10
2.3 Android Development Learning ................................................................... 11
2.4 Technologies ....................................................................................................... 12
2.5 Project Requirements ...................................................................................... 13
2.5.1 Functional Requirements ...................................................................................... 13
2.5.2 Non-‐functional Requirements ............................................................................. 13
2.6 Android Development ..................................................................................... 14
3 Development .............................................................................................................. 17
3.1 Create Route ........................................................................................................ 18

Android development - VPorto
xii
3.1.1 Create Route feature analysis .............................................................................. 18
3.1.2 Create Route feature development ................................................................... 20
3.1.3 Create Route features tests ................................................................................... 22
3.2 List Routes ........................................................................................................... 23
3.2.1 List Routes feature analysis .................................................................................. 23
3.2.2 List Routes feature development ....................................................................... 24
3.2.3 List Routes feature tests ......................................................................................... 26
3.3 List Route POI ..................................................................................................... 27
3.3.1 List Route POI feature analysis ........................................................................... 27
3.3.2 List Route POI feature development ................................................................. 28
3.3.3 List Routes feature tests ......................................................................................... 29
3.4 Route Mapping ................................................................................................... 29
3.4.1 Route Mapping feature analysis ......................................................................... 29
3.4.2 Route Mapping feature development ............................................................... 30
3.4.3 Route Mapping feature tests ................................................................................ 33
3.5 GetLocation tool ................................................................................................. 33
3.5.1 GetLocation tool analysis ....................................................................................... 33
3.5.2 GetLocation tool development ............................................................................ 34
3.5.3 GetLocation tool tests .............................................................................................. 36
3.6 Memory Management ...................................................................................... 37
3.6.1 Memory Management analysis ........................................................................... 37
3.6.2 Memory Management development ................................................................. 38
3.6.3 Memory Management tests .................................................................................. 40
3.7 Rotation Effect and Navigation ..................................................................... 40
3.7.1 Rotation Effect and Navigation analysis ......................................................... 40
3.7.2 Rotation Effect and Navigation development ............................................... 44
3.7.3 Rotation Effect and Navigation tests ................................................................ 52
3.8 Game ...................................................................................................................... 52
3.8.1 Game analysis ............................................................................................................. 52
3.8.2 Game development ................................................................................................... 54
3.8.3 Game tests .................................................................................................................... 57
3.9 Horizontal Pager ............................................................................................... 58
3.9.1 Horizontal Pager analysis ...................................................................................... 58

Android development - VPorto
xiii
3.9.2 Horizontal Page development ............................................................................. 59
3.9.3 Horizontal Pager Tests ........................................................................................... 62
3.10 Map Sliding Drawer ....................................................................................... 62
3.10.1 Map Sliding Drawer analysis ............................................................................. 62
3.10.2 Map Sliding Drawer development .................................................................. 64
3.10.3 Map Sliding Drawer tests .................................................................................... 67
4 Conclusions ................................................................................................................. 69
4.1 Goals achieved .................................................................................................... 69
4.2 Limitations and future work ......................................................................... 70
4.3 Final Balance ....................................................................................................... 71
References .......................................................................................................................... 73
Appendix A: Diagrams ................................................................................................ 75
Appendix B: Developed methods ............................................................................ 77


Android development - VPorto
xv
List of Figures Figure 1 -‐ List of the assigned development issues and their properties in the company
Redmine dashboard. ................................................................................................................. 6
Figure 2 -‐ Around Knowledge logo ............................................................................................ 7
Figure 3 -‐ Activity lifecycle Source: (Google, Activities, 2007) ................................................ 15
Figure 4 -‐ Different UI behaviours in different devices Source: (Google, Fragments, 2007) ... 15
Figure 5 -‐ Fragment lifecycle Source: (Google, Fragments, 2007) .......................................... 16
Figure 6 -‐ Project architecture ................................................................................................. 18
Figure 7 -‐ Use case diagram with the features related with routes ........................................ 19
Figure 8 -‐ Illustration of the UI of the feature create route ..................................................... 20
Figure 9 -‐ Class diagram demonstrating the structure of the route’s system ......................... 21
Figure 10 -‐ FragCreateRoute class diagram ............................................................................ 21
Figure 11 -‐ Layout final aspect of the List Routes feature ....................................................... 23
Figure 12 -‐ Use case diagram of the List Routes feature ......................................................... 23
Figure 13 -‐ FragRoutes class diagram, class used to list personal routes ................................ 24
Figure 14 -‐ Example of View Holder and List View Adapter Pattern application ..................... 25
Figure 15 -‐ POI detail with the option to add the POI to a route ............................................. 26
Figure 16 -‐ Use case diagram depicting the List Route POI feature ........................................ 27
Figure 17 -‐ Final aspect of the List Route POI feature ............................................................. 27
Figure 18 -‐ FragRoutePois class diagram, class used to list POI in selected route ................... 28
Figure 19 -‐ Final aspect of the Route Mapping feature ........................................................... 30
Figure 20 -‐ Use case diagram of the route mapping feature .................................................. 30
Figure 21 -‐ FragRoutesMap class diagram .............................................................................. 31
Figure 22 -‐ Sequence diagram demonstrating route calculation ............................................ 32
Figure 23 -‐ Flowchart describing the process of getting the user current location ................. 34
Figure 24 -‐ getLocation method implementation .................................................................... 35

Android development - VPorto
xvi
Figure 25 -‐ Sequence diagram of the method getLocation ..................................................... 36
Figure 26 -‐ Image decoder ....................................................................................................... 38
Figure 27 -‐ decodeFile method implementation ...................................................................... 39
Figure 28 -‐ decodeStream method implementation ................................................................ 40
Figure 29 -‐ New Layouts of Map, Suggestions and Menu ....................................................... 41
Figure 30 -‐ Screen transition with a cube rotation effect ........................................................ 41
Figure 31 -‐ Use case diagram with the navigation effects functionalities ............................... 43
Figure 32 -‐ Flow chart with two different possibilities to see a POI detail .............................. 44
Figure 33 -‐ Example of a custom animation ............................................................................ 45
Figure 34 -‐ Example of an animation file using objectAnimator ............................................. 45
Figure 35 -‐ FragAbout layout ................................................................................................... 46
Figure 36 -‐ Example of methods called when applying a rotation .......................................... 47
Figure 37 -‐ Level difference inside the application .................................................................. 48
Figure 38 -‐ Sequence diagram showing how to change the animation .................................. 49
Figure 39 -‐ popNoAnimation() and popChangeAnimation() methods ..................................... 49
Figure 40 -‐ Demonstration of different levels with the same fragment .................................. 50
Figure 41 -‐ Fling initialization .................................................................................................. 52
Figure 42 -‐ Use case diagram illustrating the game functionalities ........................................ 53
Figure 43 -‐ Game final layout and transitions ......................................................................... 54
Figure 44 -‐ Game already finished validation .......................................................................... 55
Figure 45 – Diagram showing the game container and its fragments .................................... 55
Figure 46 -‐ Sequence diagram of changing game page from one to two ............................... 56
Figure 47 -‐ Game changing view flowchart ............................................................................. 57
Figure 48 -‐ View Pager example .............................................................................................. 59
Figure 49 -‐ Horizontal pager utilization in the XML ................................................................. 59
Figure 50 -‐ Sequence diagram of adding an image to the horizontal pager and page indicator
................................................................................................................................................ 61

Android development - VPorto
xvii
Figure 51 -‐ Horizontal pager listener implementation ............................................................ 62
Figure 52 -‐ Sliding drawer ilustration ...................................................................................... 63
Figure 53 -‐ Use case diagram illustrating the sliding drawer options ..................................... 64
Figure 54 -‐ TouchDrwaerLinearLayout main methods ............................................................ 65
Figure 55 -‐ Map container and sliding drawer layout ............................................................. 67

Android development - VPorto
xix
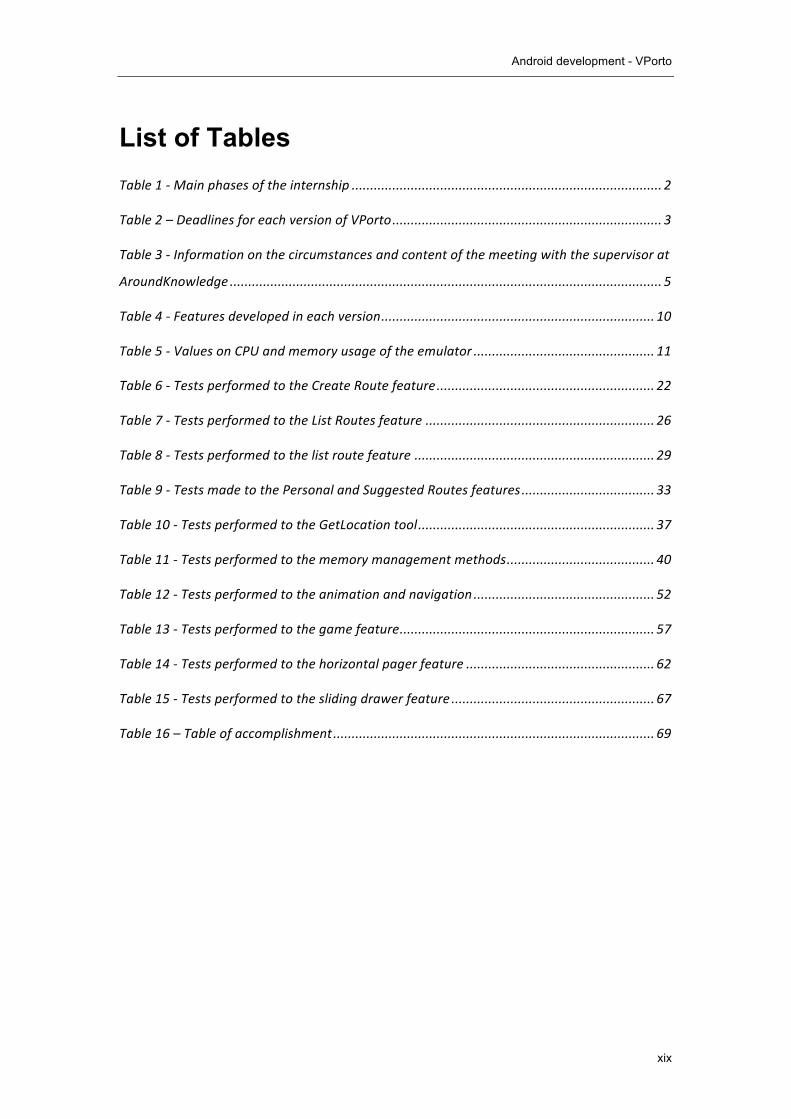
List of Tables Table 1 -‐ Main phases of the internship .................................................................................... 2
Table 2 – Deadlines for each version of VPorto ......................................................................... 3
Table 3 -‐ Information on the circumstances and content of the meeting with the supervisor at
AroundKnowledge ..................................................................................................................... 5
Table 4 -‐ Features developed in each version .......................................................................... 10
Table 5 -‐ Values on CPU and memory usage of the emulator ................................................. 11
Table 6 -‐ Tests performed to the Create Route feature ........................................................... 22
Table 7 -‐ Tests performed to the List Routes feature .............................................................. 26
Table 8 -‐ Tests performed to the list route feature ................................................................. 29
Table 9 -‐ Tests made to the Personal and Suggested Routes features .................................... 33
Table 10 -‐ Tests performed to the GetLocation tool ................................................................ 37
Table 11 -‐ Tests performed to the memory management methods ........................................ 40
Table 12 -‐ Tests performed to the animation and navigation ................................................. 52
Table 13 -‐ Tests performed to the game feature ..................................................................... 57
Table 14 -‐ Tests performed to the horizontal pager feature ................................................... 62
Table 15 -‐ Tests performed to the sliding drawer feature ....................................................... 67
Table 16 – Table of accomplishment ....................................................................................... 69

Android development - VPorto
xxi
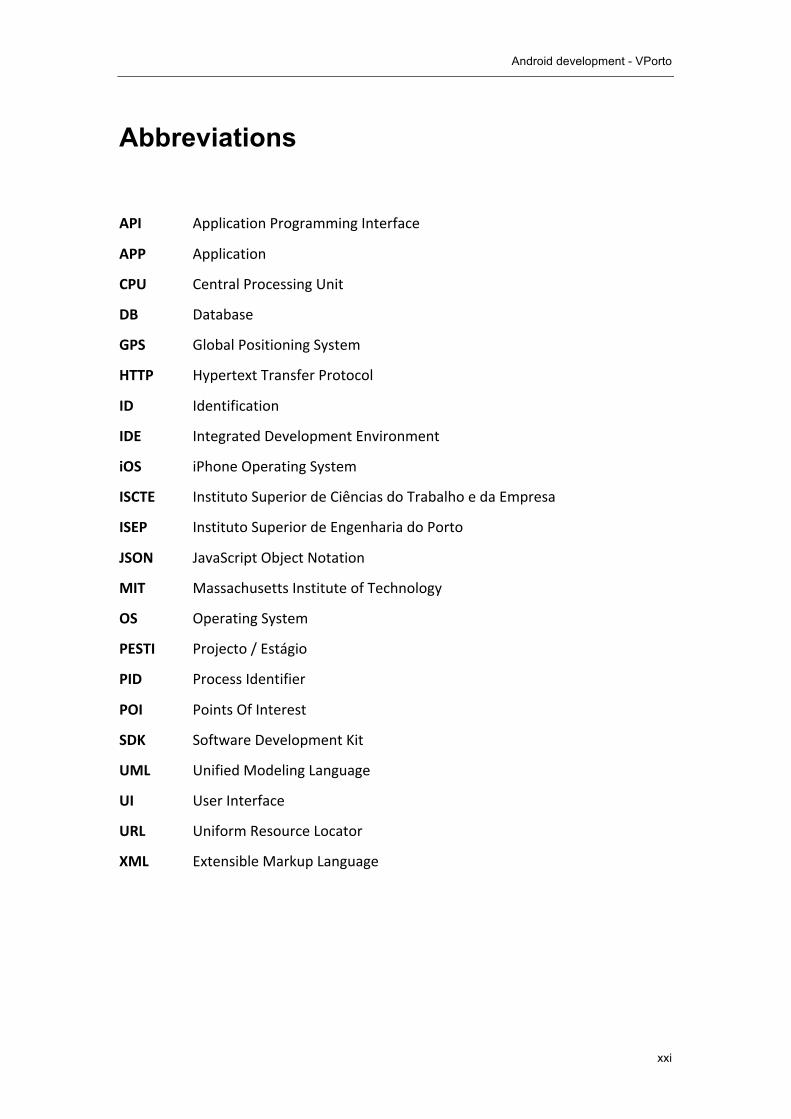
Abbreviations
API Application Programming Interface
APP Application
CPU Central Processing Unit
DB Database
GPS Global Positioning System
HTTP Hypertext Transfer Protocol
ID Identification
IDE Integrated Development Environment
iOS iPhone Operating System
ISCTE Instituto Superior de Ciências do Trabalho e da Empresa
ISEP Instituto Superior de Engenharia do Porto
JSON JavaScript Object Notation
MIT Massachusetts Institute of Technology
OS Operating System
PESTI Projecto / Estágio
PID Process Identifier
POI Points Of Interest
SDK Software Development Kit
UML Unified Modeling Language
UI User Interface
URL Uniform Resource Locator
XML Extensible Markup Language

Android development - VPorto
Diogo Pereira - 1101007 1
1 Introduction This document aims to present and discuss all the work developed during the four
months of my internship. The current chapter starts by introducing this internship,
from its circumstances to its objectives and motivations. A detailed plan of the work
developed, along with the required tools and resources, is also described.
Furthermore, I make some considerations about the contributions of this internship.
An outline of this document is presented at the end of this chapter.
1.1 Framework
This internship was integrated on the Project/Internship subject for the final year of
my degree in Informatics Engineering at Instituto Superior de Engenharia do Porto
(ISEP). The aim of this course is to make the student apply the knowledge acquired
during his degree on a real work environment. An internship in an actual company
allows students to experience new work methodologies and face unseen challenges.
I think this integration within a professional environment is very important for
students and makes the door to the business world easier to open.
My internship took place on a company called Around Knowledge during a period of
four months. This company started its activity in 2009 and it is currently working
with another company, Control S, to design the application that I was assigned to
help developing: VPorto (Control S, 2013). This application aims to provide to the
user a full guide of Porto city. It intends to give information about events, their
location and dates, along with points of interest and routes to visit requested places
using Global Positioning System (GPS).
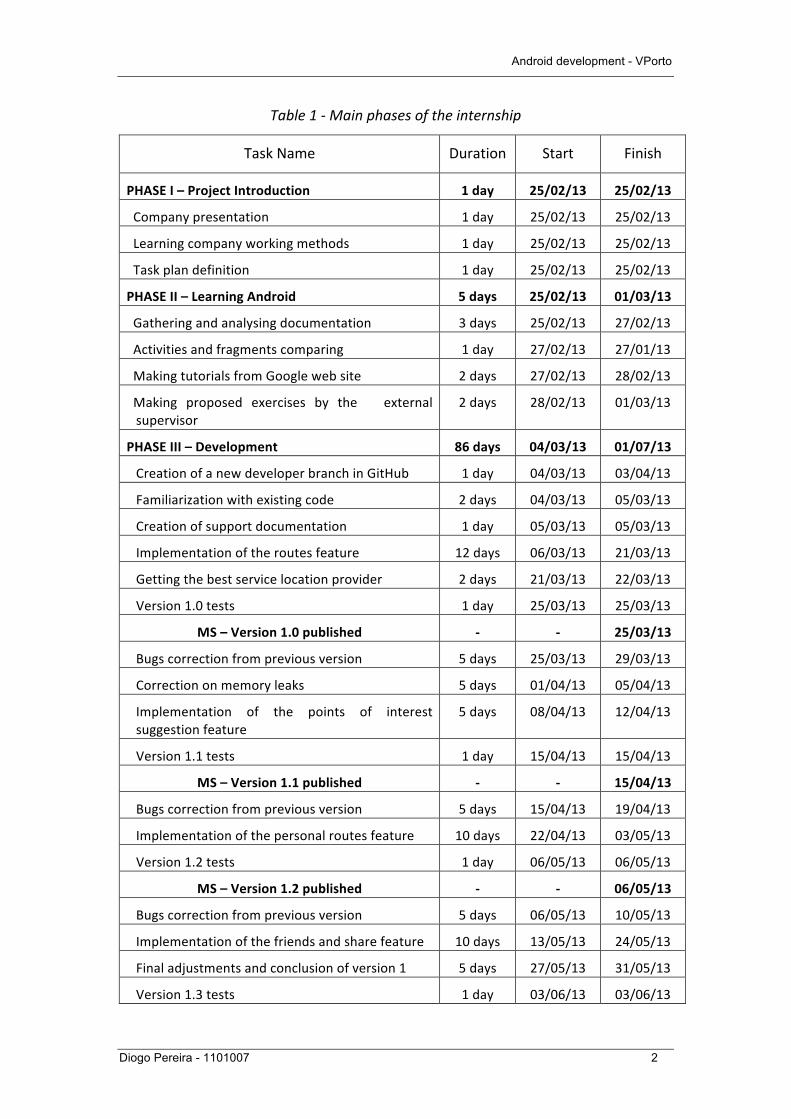
To better understand the different stages of this work, a plan containing the main
phases, tasks, milestones and time-‐spans along the four months of internship is
presented on Table 1. A complementary Gantt diagram that guided me during these
four months is also available on Appendix A.1. This plan was established at the
beginning of the internship and was readily started as deadlines were strict and all
the versions had to be delivered on time.
Android development - VPorto
Diogo Pereira - 1101007 2
Table 1 -‐ Main phases of the internship
Task Name Duration Start Finish
PHASE I – Project Introduction 1 day 25/02/13 25/02/13
Company presentation 1 day 25/02/13 25/02/13
Learning company working methods 1 day 25/02/13 25/02/13
Task plan definition 1 day 25/02/13 25/02/13
PHASE II – Learning Android 5 days 25/02/13 01/03/13
Gathering and analysing documentation 3 days 25/02/13 27/02/13
Activities and fragments comparing 1 day 27/02/13 27/01/13
Making tutorials from Google web site 2 days 27/02/13 28/02/13
Making proposed exercises by the external supervisor
2 days 28/02/13 01/03/13
PHASE III – Development 86 days 04/03/13 01/07/13
Creation of a new developer branch in GitHub 1 day 04/03/13 03/04/13
Familiarization with existing code 2 days 04/03/13 05/03/13
Creation of support documentation 1 day 05/03/13 05/03/13
Implementation of the routes feature 12 days 06/03/13 21/03/13
Getting the best service location provider 2 days 21/03/13 22/03/13
Version 1.0 tests 1 day 25/03/13 25/03/13
MS – Version 1.0 published -‐ -‐ 25/03/13
Bugs correction from previous version 5 days 25/03/13 29/03/13
Correction on memory leaks 5 days 01/04/13 05/04/13
Implementation of the points of interest suggestion feature
5 days 08/04/13 12/04/13
Version 1.1 tests 1 day 15/04/13 15/04/13
MS – Version 1.1 published -‐ -‐ 15/04/13
Bugs correction from previous version 5 days 15/04/13 19/04/13
Implementation of the personal routes feature 10 days 22/04/13 03/05/13
Version 1.2 tests 1 day 06/05/13 06/05/13
MS – Version 1.2 published -‐ -‐ 06/05/13
Bugs correction from previous version 5 days 06/05/13 10/05/13
Implementation of the friends and share feature 10 days 13/05/13 24/05/13
Final adjustments and conclusion of version 1 5 days 27/05/13 31/05/13
Version 1.3 tests 1 day 03/06/13 03/06/13

Android development - VPorto
Diogo Pereira - 1101007 3
MS – Version 1.3 published -‐ -‐ 03/06/13
New layouts implementation 8 days 03/06/13 12/06/13
Weather feature implementation 6 days 13/06/13 20/06/13
Game feature implementation 6 days 21/06/13 28/06/13
Version 2.0 tests 1 day 28/06/13 28/06/13
MS – Version 2.0 published -‐ -‐ 28/06/13
PHASE IV – Finalization 19 days 01/07/13 19/07/13
Review of final report 15 days 01/07/13 15/07/13
Prepare presentation 4 days 16/07/13 19/07/13
MS -‐ Final manuscript and presentation -‐ -‐ 19/07/13
1.2 The Internship
The development of the application I worked on, VPorto, was already taking place
when I started my internship, although it was in an early stage of development. It
was requested that I should get familiarized with the new development environment
and technology as fast as possible. As I had to meet the company strict deadlines, I
readily started working on the project that Around Knowledge assigned to me. These
deadlines can be observed below, in the Table 2.
Table 2 – Deadlines for each version of VPorto
Versions to be published Publish date
1.0 25/03/13
1.1 15/04/13
1.2 06/05/13
1.3 03/06/13
1.4 28/06/13
2.0 19/07/13
This application was being developed for both iPhone Operating System (iOS) and
Android platforms. I was assigned to develop VPorto for the Android Operating
System (OS).

Android development - VPorto
Diogo Pereira - 1101007 4
From activities lifecycles to layouts and their properties or even Android versions,
there were a lot of new concepts to assimilate. The application to be developed
aimed to have different functionalities and to be compatible with different Android
versions, namely Android OS version 4.0 and above. Besides learning these new
concepts and new work methodologies, another objective was to make use of the
techniques that I learned during my degree and to know how they can be used in a
real-‐context and multidisciplinary project. These techniques include, among others,
project planning and how to find the best approach to the problem.
This application was designed so a user could easily have access to touristic
information around the city of Porto. There were strict deadlines and features to be
implemented. For this project, I was integrated in a team of two more elements so
we could develop the application that Control S designed.
1.2.1 Motivations
I have chosen to make my internship in a company developing an Android (Google,
Android, 2007) application because I believe that mobile applications will have a big
impact in future technologies. Furthermore, since it is based on a language, Java,
that I am comfortable with, I knew I would like to learn how to program to Android.
Overall, my main objective was to learn how to properly work with the Android OS,
gaining experience while working in a real enterprise.
1.2.2 Follow-up meetings
As I worked in the same workspace as my AroundKnowledge supervisor, no weekly
meetings were necessary and there was a constant update on the project progress.
Nonetheless, we had some meetings to discuss major problems encountered during
the development. These meetings were brief brainstorming sessions so it would be
possible to find the most suitable solution for each problem. The circumstances and
contents of these meetings are described on Table 3.
Android development - VPorto
Diogo Pereira - 1101007 5
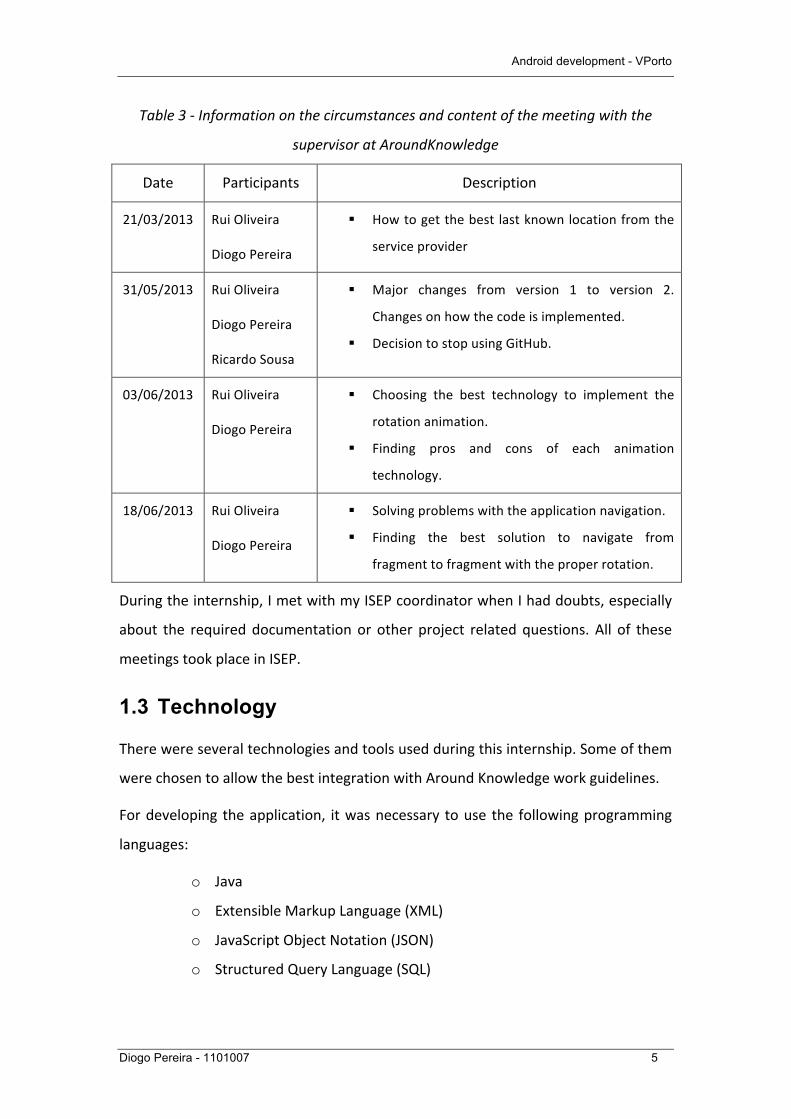
Table 3 -‐ Information on the circumstances and content of the meeting with the
supervisor at AroundKnowledge
Date Participants Description
21/03/2013 Rui Oliveira
Diogo Pereira
§ How to get the best last known location from the
service provider
31/05/2013 Rui Oliveira
Diogo Pereira
Ricardo Sousa
§ Major changes from version 1 to version 2.
Changes on how the code is implemented.
§ Decision to stop using GitHub.
03/06/2013 Rui Oliveira
Diogo Pereira
§ Choosing the best technology to implement the
rotation animation.
§ Finding pros and cons of each animation
technology.
18/06/2013 Rui Oliveira
Diogo Pereira
§ Solving problems with the application navigation.
§ Finding the best solution to navigate from
fragment to fragment with the proper rotation.
During the internship, I met with my ISEP coordinator when I had doubts, especially
about the required documentation or other project related questions. All of these
meetings took place in ISEP.
1.3 Technology
There were several technologies and tools used during this internship. Some of them
were chosen to allow the best integration with Around Knowledge work guidelines.
For developing the application, it was necessary to use the following programming
languages:
o Java
o Extensible Markup Language (XML)
o JavaScript Object Notation (JSON)
o Structured Query Language (SQL)
Android development - VPorto
Diogo Pereira - 1101007 6
The company suggested Eclipse (Foundation, Eclipse - The Eclipse Foundation,
2013), bundled with the Android software development toolkit (SDK) plugin, as the
development environment I should use. I also had to include Facebook SDK and
Google Play Services SDK (Google, Google Play Services, 2013) tools to implement
some of the required functionalities.
Initially, for project management I had to use SourceTree, by Atlassian (Atlassian,
2013), to work in the company repository. There was a develop branch from the
repository created for me where I could develop and commit my work. The
repository was later abandoned due to some associated problems that made the
company stop using it temporarily. During all the work, I chose to use my personal
computer since it already used Mac OS X and it was required in order to work with
SourceTree.
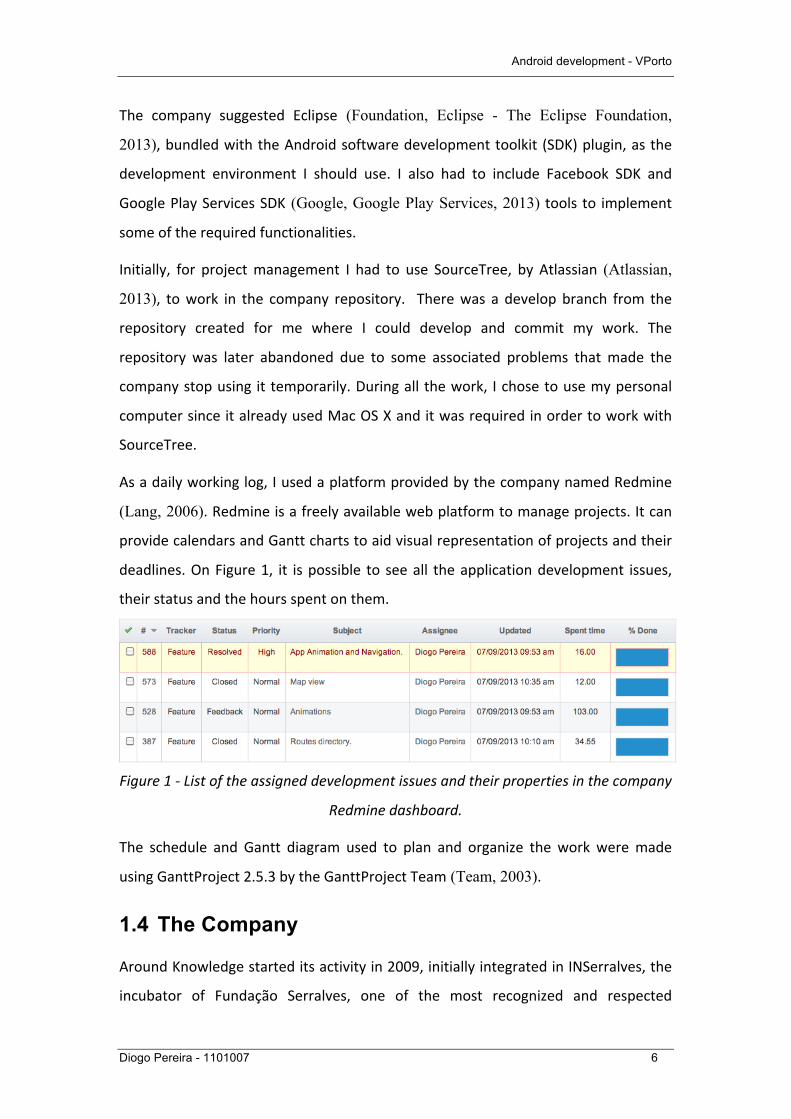
As a daily working log, I used a platform provided by the company named Redmine
(Lang, 2006). Redmine is a freely available web platform to manage projects. It can
provide calendars and Gantt charts to aid visual representation of projects and their
deadlines. On Figure 1, it is possible to see all the application development issues,
their status and the hours spent on them.
Figure 1 -‐ List of the assigned development issues and their properties in the company
Redmine dashboard.
The schedule and Gantt diagram used to plan and organize the work were made
using GanttProject 2.5.3 by the GanttProject Team (Team, 2003).
1.4 The Company
Around Knowledge started its activity in 2009, initially integrated in INSerralves, the
incubator of Fundação Serralves, one of the most recognized and respected

Android development - VPorto
Diogo Pereira - 1101007 7
institutions of arts and culture in Portugal and across borders. Subsequently, and due
to its high expansion and growing, Around Knowledge began to develop its work in
other areas of Porto, moving to its own office.
Around Knowledge has won several awards and recognitions since its formation. The
most notable prize was achieved with the BIPS project in the ISCTE/MIT Portugal
Venture Competition, sponsored by Instituto Superior de Ciências do Trabalho e da
Empresa (ISCTE) in partnership with the Massashusetts Institute of Technology (MIT)
Deshpande Center for Innovation, the Sloan Business School and Caixa Capital.
Around Knowledge also won the GSI -‐ Accelerators Start-‐up Challenge 2011, allowing
access to the Plug & Play Tech Center in Silicon Valley, USA.
In 2012, Around Knowledge was finalist in the Creative Industries National Prize and
in 2013, the most recent accomplishment was winning the Start Me Up contest with
a prize of 12500$ and hosted by the Universidade Nova of Lisbon and the United
States of America embassy.
Figure 2 -‐ Around Knowledge logo
1.5 Contributions
VPorto will be offering a new way to get to know and explore the city of Porto. With
its innovating system for creating personal routes and by consulting the city map, its
events and points of interest, the users can easily and quickly consult any
information that he needs.
One of the features that I have developed is the option to visualize the route from
the current location of the user (using the GPS or the network provider) to the
desired POI or event. The user can create a list of POI and events to calculate a route,
which he will be able to travel through.
Android development - VPorto
Diogo Pereira - 1101007 8
There is also an image decoder developed that could sample an image to a certain
value reducing its dimension at the cost of quality reduction. This tool was very
important to reduce, in more than fifty per cent, both space and memory
consumption.
In version 2.0 of the application, animations for screen transitions had to be fully
implemented by myself, and the result was a smooth cube effect with a simple
navigation system. More tools were developed and will be explained on Chapter 3.
1.6 Outline
After presenting the aim, context and intents of the project in this chapter, the
report continues with the Context chapter, presenting the problem, motivation and
background behind my internship. The information presented is needed so that
project context and design can be fully understood. The subsequent chapter,
Development, is feature oriented, starting by describing the functional and non-‐
functional requirements. All the development procedure is explained, from the
requirement analysis to the implementation. This information is clarified using
resources as UML and code extracts. Consequently, a final balance of the project can
be seen in the chapter Conclusions, with special focus on the difficulties and
challenges encountered. At the Appendix, the first section has two diagrams, being
the first a complete Gantt diagram, and the second a class diagram of a feature
developed. The second section has the source code of a class created and used.

Android development - VPorto
Diogo Pereira - 1101007 9
2 Context In this chapter, a global appreciation about the context that supported this
internship is presented. Besides the description of the business field and a brief
introduction of the application are also made.
2.1 The Application Domain
The application VPorto is focused in the tourism domain. There are many events and
points of interest in the city of Porto, and, without the majority of this information
being gathered in one place, it is difficult to attend or be aware of the events of
interest, specially to a tourist who may find hard to know when and where these
events will take place.
VPorto is a city guide created for people who visit or live in Porto. With the
information available in Portuguese and English, the application has all the data
needed to attend the events and locate the points of interest around the city. The
uniqueness of this application is the capability to create personal routes for a
designated user account, so that each user can create an itinerary that will allow the
user to navigate to the desired places. It also gives the user the option to see a map
of Porto with all the POI listed.
The application was already being developed when I first started working on the
project. Its body was already created and its 1.0 version was close to be published on
the Android Market. However, there were still features that needed to be developed
and added. This project was divided in versions, each one with a deadline set by the
partner company, Control S. The application design was the responsibility of the
company Control S and, consequently, the final product design was defined before
the implementation. All the application layouts were delivered in a document and
the developers could not change their final aspect, even if the presented layout
would imply more memory consumption.
For version 1.0, I implemented the Recommended and Personal Routes feature. For
the following version, 1.1, I implemented a Java class to find the best service

Android development - VPorto
Diogo Pereira - 1101007 10
provider. In version 1.2, it was necessary to fix the memory leaks occurring in the
application. In the last update of version 1, version 1.3, it was necessary to
implement an image decoder to minimize the usage of the internal storage. Finally,
in the version 2.0, a complete layout change was requested by the client including a
full redesign and animations between screens. It was also added a game feature to
collect data and create a more accurate user profile. The last implementation fixed
some navigation problems since the partner company desired a specific behaviour
for the navigation on the application while performing some tasks.
2.2 Software Development Process
For this iterative and incremental project, the development process used was based
on the agile software development framework, Scrum. (Schwaber & Sutherland,
2011)
The Scrum methodology can predict the common changes that the client may want
to introduce on advanced states of implementation. Knowing that a development
team works as one, these obstacles can be more easily overcome. The methodology
used in the process of software development for this project was based on Scrum
because there were Sprints that did not have the same temporal length. A Sprint is a
“time-‐box” of one month or less. For this project, one Sprint unit was defined as
each one of the versions to be delivered. Usually, these versions, including
intermediate versions, had to be implemented in three weeks (fifteen working days),
with the exception of the last versions (version 1.3 and 2.0) that took four weeks
(twenty working days). Before each Sprint, a quick overview of the previous version
delivered was made, noting each correction that would be necessary and deciding
what would be the best approach to the next implementation. On each version (or
Sprint), the following features were developed:
Table 4 -‐ Features developed in each version
Version Feature
Version 1
Version 1.0 Personal and Suggested Routes

Android development - VPorto
Diogo Pereira - 1101007 11
Version 1.1 Determining the Optimal Location Provider
Version 1.2 Memory Leaks
Version 1.3 Image Decoders
Version 2
Version 2.0 Navigation and Rotation Animation
Version 2.0 Game
Version 2.0 Horizontal Pager
Version 2.0 Map Sliding Drawer
2.3 Android Development Learning
During the process of familiarization with the Android application development,
there are some important aspects that require special attention. These aspects
include application lifecycles, layout behaviours, unnecessary memory consumption
and, since Android is in constant update, compatibility problems between versions
that may appear during application development.
Another important aspect is the memory consumption of the application. All the
Android devices have different hardware configurations. Memory leaks can be
frequent if the developer is not careful. Even the integrated Android device
simulator from the Android SDK uses excessive resources. The Table 5 demonstrates
the resources consumed by the simulator without running the application (in
standby). This table demonstrates that it is not feasible to test the application on the
simulator because of its complexity.
Table 5 -‐ Values on CPU and memory usage of the emulator
PID Process Name % CPU Threads Real Memory
2072 emulator64-‐x86 70,8 4 414,1 MB
Android development - VPorto
Diogo Pereira - 1101007 12
Another relevant concept is related to layouts and their properties. It is very
important to know the key attributes that make an application suitable for the
different screen dimensions available.
One last aspect is the Android OS version that we need to target when developing.
Since Android OS is under constant update, some tools may become deprecated
making impossible to a complex application, as the one developed in this project, to
be compatible with all the Android versions. In this case, I have developed for
Android OS version 4.0 and above.
The first steps taken to learn the required programming language consisted in doing
some tutorials from Android Developers (Google, Getting Started | Android
Developers, 2007) as well as in implementing some exercises that were proposed by
the external supervisor.
2.4 Technologies
During the project, many different technologies were used. For the Android
application, it was used Java and XML. The technologies used were listed before in
section 1.3 and will now be detailed.
The XML, which can be found in the resources folder of the Eclipse project, was used
to create layouts, animations and hold values such as integers. By using XML,
development for Android allows a clear distinction between interface and
implementation.
For feature implementation it was used Java. Android applications can be created
using several languages but, for this project, only Java was used.
At the beginning, before the web service was ready to be used, direct access to the
database was performed consequently using SQL to get the necessary information.
After the company finished implementing the necessary web services, it was
necessary to use JSON with Hypertext Transfer Protocol (HTTP) GET and POST
requests to get the desired data from the server.
A JSON Array or Object was used often to transport data between the server and the
application. The JSON results were further treated and used by the application.
Android development - VPorto
Diogo Pereira - 1101007 13
2.5 Project Requirements
For a better analysis of the requirements of the project, this section was divided in
two sub-‐sections containing the functional and non-‐functional requirements.
2.5.1 Functional Requirements
After analysing what was already developed, the company assigned me some
features to implement. These features are listed below.
• Create Routes
• List Routes
• List Route POI
• Route Mapping
• GetLocation tool
• Game
• Rotation animation
• Horizontal Pager
• Map Sliding drawer
These nine features were implemented and integrated in the VPorto application
along the different versions. The company Control S defined these versions and its
content. The features to be implemented by me were assigned by the external
supervisor.
2.5.2 Non-functional Requirements
These requirements are needed to ensure a good quality of software, improving the
application usability, performance and error prevention.
• Bitmap decoders
• Memory consumption reduction
• Smooth rotation animations
• Intuitive navigation
• Test possible crash and server errors
Android development - VPorto
Diogo Pereira - 1101007 14
2.6 Android Development
In the process of Android development, there are two important concepts that are
necessary to be aware of. These concepts are the Activity and the Fragment.
The Activity is the class that will hold the UI. It is possible to create simple
applications using only Activities. The Activity lifecycle is a set of methods that an
Activity executes from its creation to its destruction. The lifecycles of Activities
determine how the application is created and managed. By knowing these lifecycles,
it is possible to control the whole application state, including when the screen locked
or resumed, when the Android back key pressed, and even when the application is
being terminated. The Activity lifecycle diagram from the Android Developers web
site can be seen in the following Figure 3.
Another solution to present the UI to the user is by using Fragments. Fragments
were introduced to Android in Android 3.0 (API level 11) with the objective to make
the Android applications more flexible between screen sizes like in handsets and
tablets.
By simplifying the UI management, Fragments allow the application appearance to
be changed while in runtime and keep those changes in a back stack. This is one of
the advantages of using Fragments and it is represented on the Figure 4.
Another advantage of the Fragment utilization is the capability to reuse the same
layout in different situations and needs. Since a Fragment is called and added in a
stack, multiples Fragments of the same type can be instantiated and used without
any conflicts between them. With this, the code becomes reusable.

Android development - VPorto
Diogo Pereira - 1101007 15
Figure 3 -‐ Activity lifecycle Source: (Google, Activities, 2007)
Figure 4 -‐ Different UI behaviours in different devices Source: (Google, Fragments,
2007)

Android development - VPorto
Diogo Pereira - 1101007 16
Fragments and Activities have a similar lifecycle. The Fragment lifecycle can be seen
in Figure 5.
Figure 5 -‐ Fragment lifecycle Source: (Google, Fragments, 2007)

Android development - VPorto
Diogo Pereira - 1101007 17
3 Development This chapter explains in detail all the work done during the internship. Each section
of this chapter will describe the development process of the corresponding feature.
These features of VPorto that were assigned to me are listed below.
• Create Route
• List Routes
• List Route POI
• Route Mapping
• GetLocation tool
• Memory Management
• Rotation Effect and Navigation
• Game
• Horizontal Pager
• Map Sliding Drawer
The company was responsible for defining the tasks assigned to me. These tasks
were meant to create the features requested by the company Control S.
This project was conducted in partnership with a student from ISEP. The division of
our work was made with the objective of maximizing the productivity. The sections
below will only describe the features implemented by the author of this report.
The decisions about the user interface (UI) are not from the responsibility of the
developers involved. Control S was responsible for designing the final appearance of
the UI as well as all of its components providing to Around Knowledge a set of
pictures with a depiction of the desired layout.
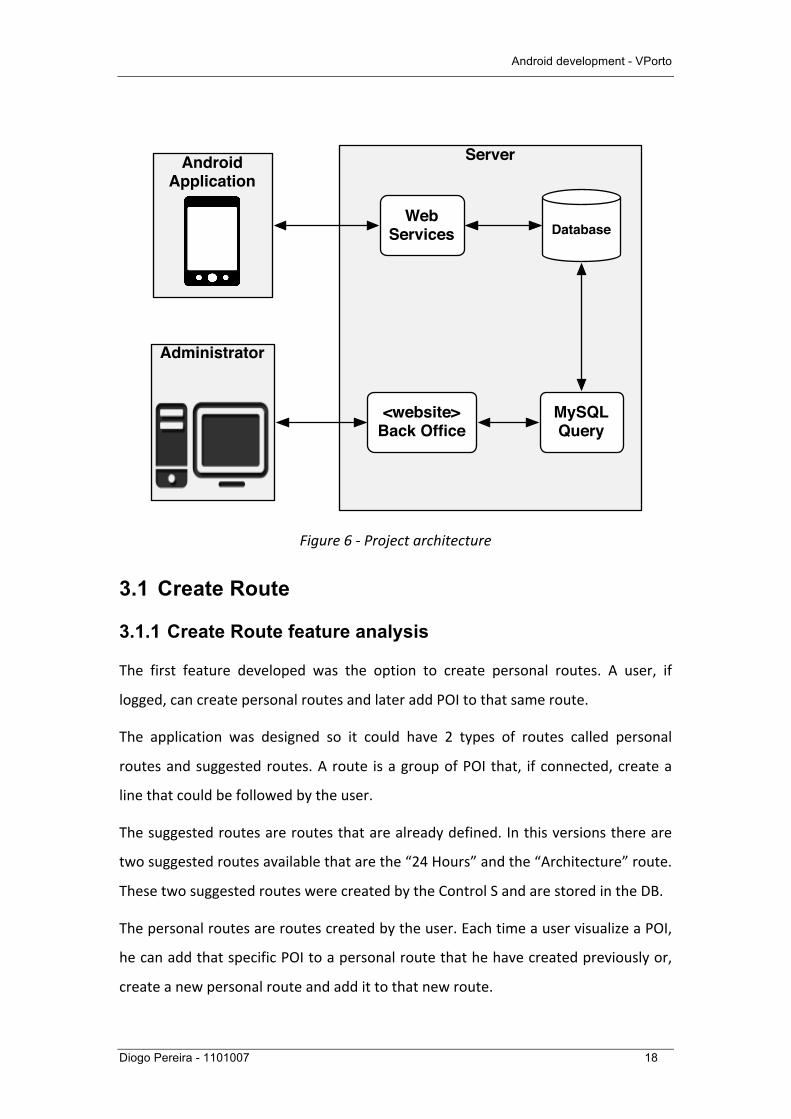
The Figure 6 portrays the project architecture. The figure defines the application
architecture, which was already defined by the company when I started the
internship. As the figure depicts, the Android application communicates with the
database using web services while the administrator manages the database using a
web site denominated Back Office that works with MySQL queries.
Android development - VPorto
Diogo Pereira - 1101007 18
Figure 6 -‐ Project architecture
3.1 Create Route
3.1.1 Create Route feature analysis
The first feature developed was the option to create personal routes. A user, if
logged, can create personal routes and later add POI to that same route.
The application was designed so it could have 2 types of routes called personal
routes and suggested routes. A route is a group of POI that, if connected, create a
line that could be followed by the user.
The suggested routes are routes that are already defined. In this versions there are
two suggested routes available that are the “24 Hours” and the “Architecture” route.
These two suggested routes were created by the Control S and are stored in the DB.
The personal routes are routes created by the user. Each time a user visualize a POI,
he can add that specific POI to a personal route that he have created previously or,
create a new personal route and add it to that new route.
Server
Database
Android Application
Web Services
MySQLQuery
Administrator
<website>Back Office
Android development - VPorto
Diogo Pereira - 1101007 19
There is an option to visualize the personal and suggested routes. The difference
between the POI lists of a suggested route and a personal route is that the personal
list would have a delete button next to the POI making possible to remove it from
the selected list.
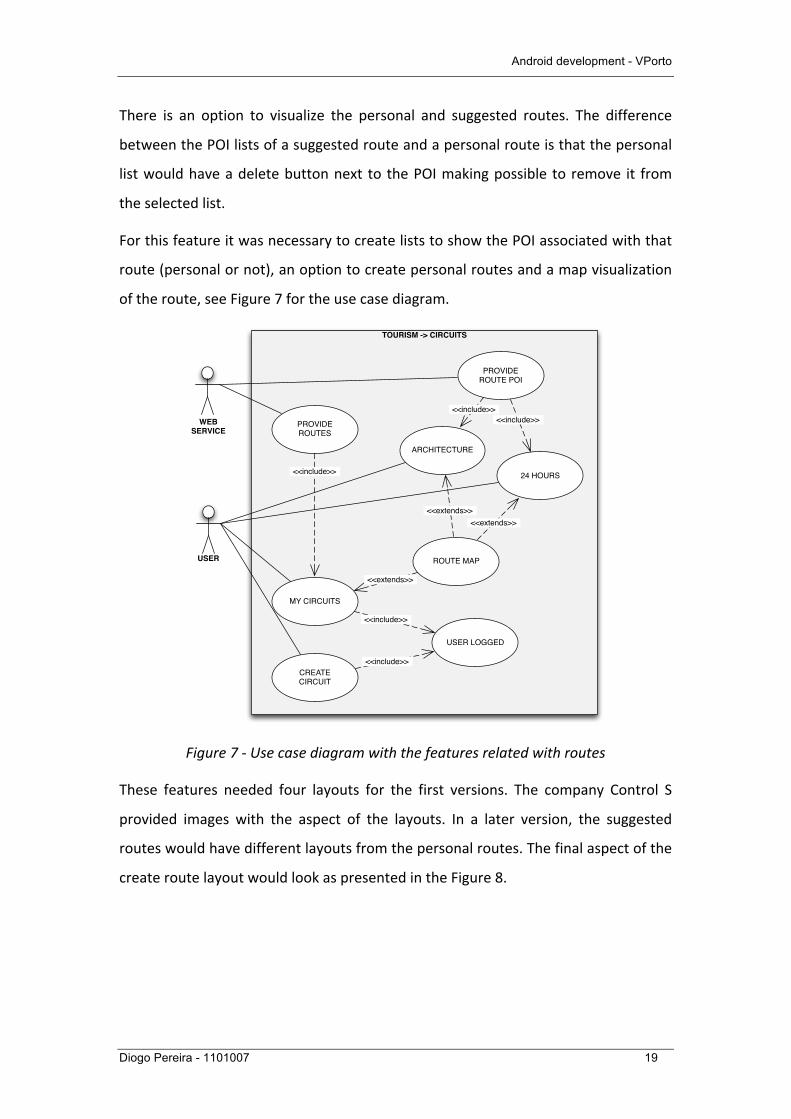
For this feature it was necessary to create lists to show the POI associated with that
route (personal or not), an option to create personal routes and a map visualization
of the route, see Figure 7 for the use case diagram.
Figure 7 -‐ Use case diagram with the features related with routes
These features needed four layouts for the first versions. The company Control S
provided images with the aspect of the layouts. In a later version, the suggested
routes would have different layouts from the personal routes. The final aspect of the
create route layout would look as presented in the Figure 8.
TOURISM -> CIRCUITS
USER
ARCHITECTURE
MY CIRCUITS
CREATECIRCUIT
24 HOURS
ROUTE MAP
<<extends>><<extends>>
<<extends>>
<<include>>
USER LOGGED
<<include>>
WEB SERVICE
PROVIDE ROUTES
PROVIDE ROUTE POI
<<include>><<include>>
<<include>>

Android development - VPorto
Diogo Pereira - 1101007 20
Figure 8 -‐ Illustration of the UI of the feature create route
3.1.2 Create Route feature development
To successfully implement the feature described above, it was necessary to create
nine classes. The Figure 9 demonstrates how they are related between them. The
main classes are the ones that inherit the class Fragment.
The first step to implement the features was to create appropriated layouts based on
the images provided by the company Control S. For the FragCreateRoute, the layout
needed an edit text, a button and an image view with a specific icon. The classes that
would be necessary to create were called FragCreateRoute, AddPoi and
ExecuteHttpPostRequest. These last two, AddPoi and ExecuteHttpPostRequest
would be classes declared inside the main class of this feature, the FragCreateRoute.
The AddPoi would be used in the case that, if the user was trying to add a POI to a
new route. This action would require the layout to create new routes and after the
route creation being completed by the user, the POI would be added to that same
route.

Android development - VPorto
Diogo Pereira - 1101007 21
Figure 9 -‐ Class diagram demonstrating the structure of the route’s system
The ExecuteHttpPostRequest is used to make a POST request, to the web service, to
add the new route to the user personal routes in the DB. The Figure 10 shows the
classes used to implement this feature.
Figure 10 -‐ FragCreateRoute class diagram

Android development - VPorto
Diogo Pereira - 1101007 22
After the layout implementation, it was necessary to implement the fragment that
would inflate the layout. First, it would be necessary to get and work with all the
elements from the layout. This was always done in the override method of the
Fragment class, onCreateView(). After the view creation, we would need to
implement the item listeners in the override method onResume(). In here, we would
need to check if the create button was pressed and, if it was, a method would be
called to create the route in the database (DB). This operation would be performed
using a web service provided by the company.
To use the web service, we need to create an AsyncTask that would work in parallel
with the activity. This AsyncTask is called ExecuteHttpPostRequest and in the
doInBackground(…) method, a first operation with a get request to the web service
would check if the desired route name already existed for that specific user and, if
not, a post request would be done sending the desired route name and making the
web service insert the desired route in the DB.
The AddPoi object is also an AsyncTask created to, when trying to create a new route
to add a specific POI, execute the needed web service requests to insert the POI
after the route creation.
3.1.3 Create Route features tests
The Table 6 demonstrates the tests made to the features described above.
Table 6 -‐ Tests performed to the Create Route feature
Test Result Result After Correction
New route creation Success -‐
Prevention of existing name route creation Unsuccessful Success
Empty name route creation Success -‐
The table display the test results and, in case it was unsuccessful, the result after the
correction. If the first result is successful, no values were displayed in the “Result
After Correction” column.

Android development - VPorto
Diogo Pereira - 1101007 23
3.2 List Routes
3.2.1 List Routes feature analysis
As referred above, the user can list it personal routes. This information is stored in
the DB. The final aspect designed for this screen is as demonstrated in the figure
below.
Figure 11 -‐ Layout final aspect of the List Routes feature
A use case diagram was also created to demonstrate this feature. This use case is
displayed in Figure 12.
Figure 12 -‐ Use case diagram of the List Routes feature
List Routes
User List Personal Routes
Add POI to Route
User is logged
<<include>>
Android development - VPorto
Diogo Pereira - 1101007 24
3.2.2 List Routes feature development
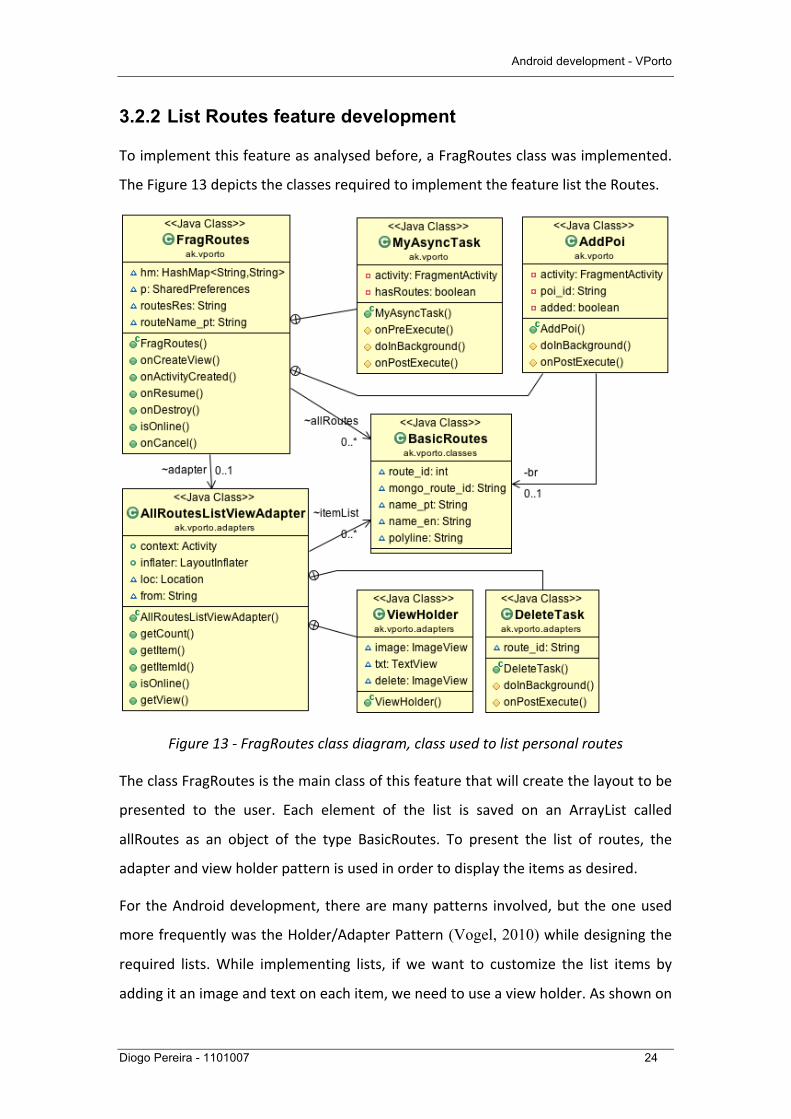
To implement this feature as analysed before, a FragRoutes class was implemented.
The Figure 13 depicts the classes required to implement the feature list the Routes.
Figure 13 -‐ FragRoutes class diagram, class used to list personal routes
The class FragRoutes is the main class of this feature that will create the layout to be
presented to the user. Each element of the list is saved on an ArrayList called
allRoutes as an object of the type BasicRoutes. To present the list of routes, the
adapter and view holder pattern is used in order to display the items as desired.
For the Android development, there are many patterns involved, but the one used
more frequently was the Holder/Adapter Pattern (Vogel, 2010) while designing the
required lists. While implementing lists, if we want to customize the list items by
adding it an image and text on each item, we need to use a view holder. As shown on

Android development - VPorto
Diogo Pereira - 1101007 25
the Figure 14, to apply a view holder to each line of the list, we need to use this
Holder/Adapter Pattern.
Figure 14 -‐ Example of View Holder and List View Adapter Pattern application
To get the routes from a specific user, the AsyncTask called MyAsyncTask will make
a web service request to get data from the DB and treat it filling the ArrayList called
allRoutes. Each element of this list will have a delete button displayed after the route
name. To delete a route it is necessary to make a web service request and, to do
that, an AsyncTask is required. This AsyncTask, as it is possible to observe in the
Figure 13, is called DeleteTask.
To reuse the code, the AsyncTask called AddPoi was created inside the FragRoutes.
With this, is possible to use the class FragRoutes each time a user wants to add the
POI, from a specific POI detail, to a personal route. The Figure 15 demonstrates an
example of a screen with that option displayed.
By doing this, the user personal routes will be displayed, without the delete button,
and when the user select a route, the FragRoutes will be closed, returning to the POI
detail and adding the POI to the selected route.

Android development - VPorto
Diogo Pereira - 1101007 26
Figure 15 -‐ POI detail with the option to add the POI to a route
3.2.3 List Routes feature tests
The Table 7 demonstrates the tests made to the list routes feature.
Table 7 -‐ Tests performed to the List Routes feature
Test Result Result After Correction
Route list visualization Success -‐
Route list visualization with no personal
routes created Unsuccessful Success
The table display the test results and, in case it was unsuccessful, the result after the
correction. If the first result is successful, no values were displayed in the “Result
After Correction” column.

Android development - VPorto
Diogo Pereira - 1101007 27
3.3 List Route POI
3.3.1 List Route POI feature analysis
This feature was created so a user could see the POI associated with a specific route
(personal or not). As said before, if the route is a personal route, a delete button
would be displayed next to the POI name. A use case diagram of this feature is
displayed in Figure 16.
Figure 16 -‐ Use case diagram depicting the List Route POI feature
The final aspect of the layout is as displayed in the figure below.
Figure 17 -‐ Final aspect of the List Route POI feature
List Route POI
User List POI in Personal
Route
List POI in Suggested
RouteUser is logged
<<include>>
Delete POI from Route
<<extends>>
Android development - VPorto
Diogo Pereira - 1101007 28
3.3.2 List Route POI feature development
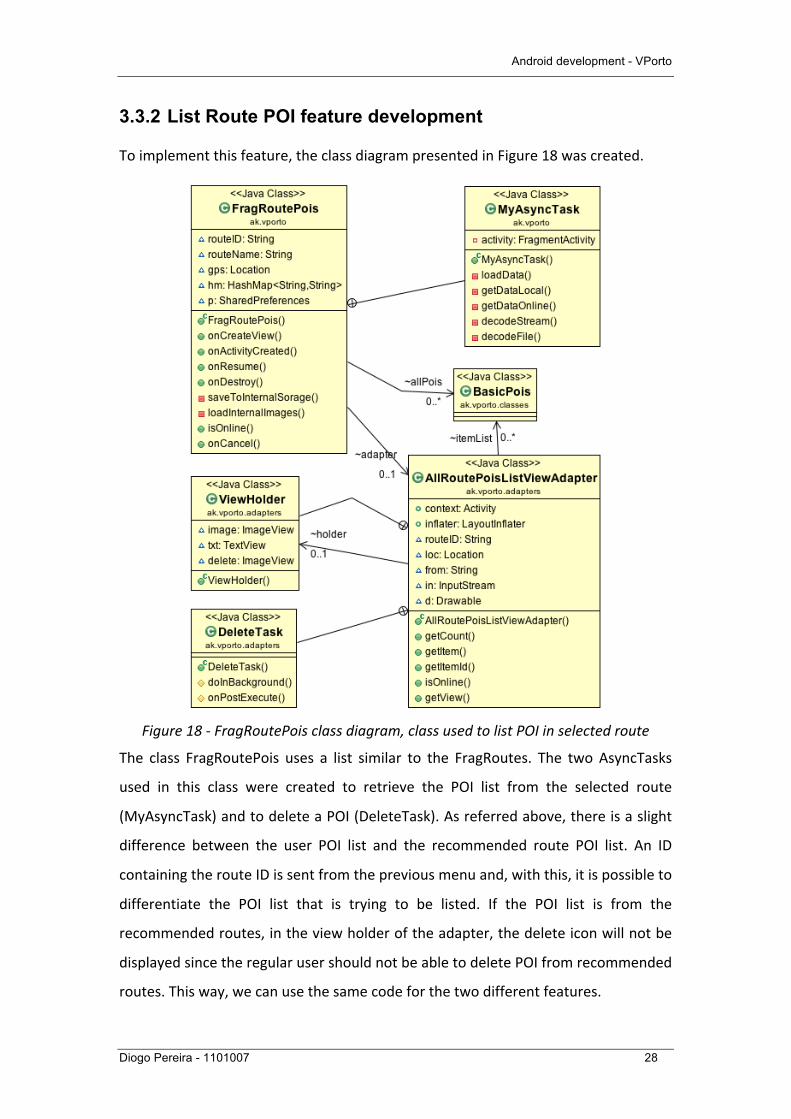
To implement this feature, the class diagram presented in Figure 18 was created.
Figure 18 -‐ FragRoutePois class diagram, class used to list POI in selected route
The class FragRoutePois uses a list similar to the FragRoutes. The two AsyncTasks
used in this class were created to retrieve the POI list from the selected route
(MyAsyncTask) and to delete a POI (DeleteTask). As referred above, there is a slight
difference between the user POI list and the recommended route POI list. An ID
containing the route ID is sent from the previous menu and, with this, it is possible to
differentiate the POI list that is trying to be listed. If the POI list is from the
recommended routes, in the view holder of the adapter, the delete icon will not be
displayed since the regular user should not be able to delete POI from recommended
routes. This way, we can use the same code for the two different features.

Android development - VPorto
Diogo Pereira - 1101007 29
The final feature of this implementation group was the ability to mark in the map the
desired route.
3.3.3 List Routes feature tests
The Table 8 demonstrates the tests made to the list routes feature.
Table 8 -‐ Tests performed to the list route feature
Test Result Result After Correction
View of POI list from recommended route Success -‐
View of POI list from the user routes Success -‐
POI insert in personal route Success -‐
Prevention of duplicated POI in personal
route Unsuccessful Success
POI removal from personal route Unsuccessful Success
The table display the test results and, in case it was unsuccessful, the result after the
correction. If the first result is successful, no values were displayed in the “Result
After Correction” column.
3.4 Route Mapping
3.4.1 Route Mapping feature analysis
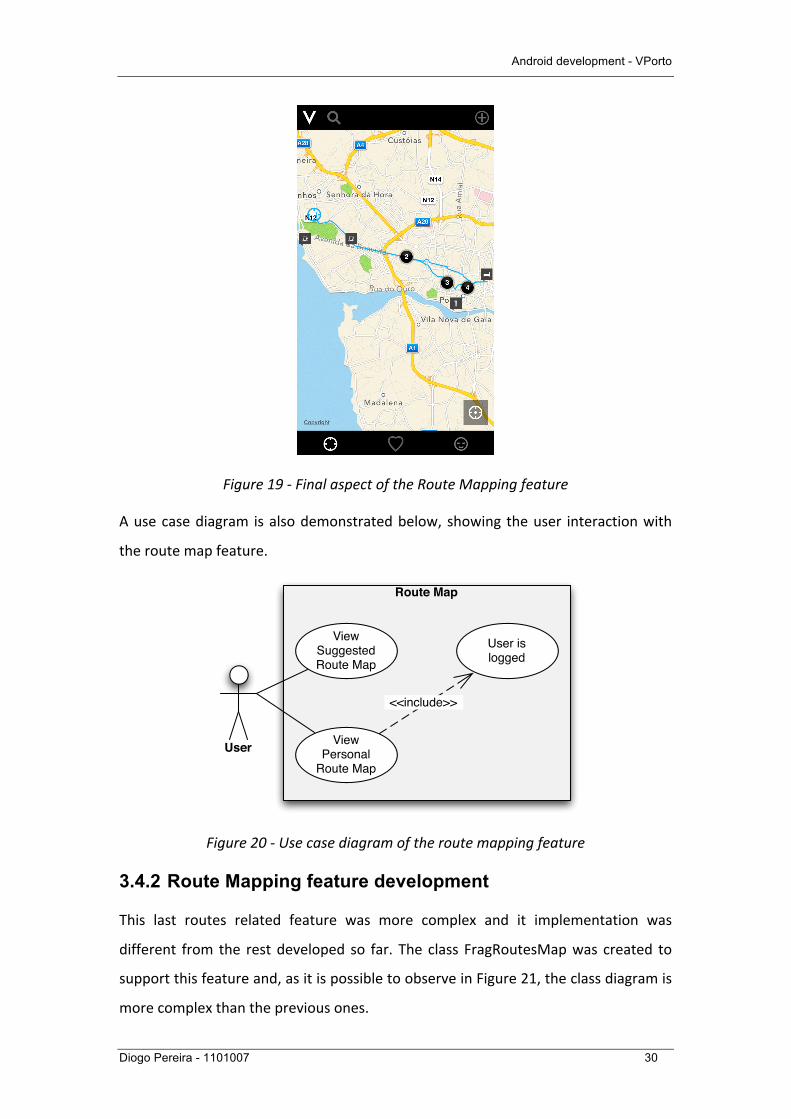
If the user wants, he can observe the route in the map. This route is designed using
blue lines by visiting the POI list of that route. The Figure 19 shows how the route
would look like in the map.
Android development - VPorto
Diogo Pereira - 1101007 30
Figure 19 -‐ Final aspect of the Route Mapping feature
A use case diagram is also demonstrated below, showing the user interaction with
the route map feature.
Figure 20 -‐ Use case diagram of the route mapping feature
3.4.2 Route Mapping feature development
This last routes related feature was more complex and it implementation was
different from the rest developed so far. The class FragRoutesMap was created to
support this feature and, as it is possible to observe in Figure 21, the class diagram is
more complex than the previous ones.
Route Map
User View Personal
Route Map
View Suggested Route Map
User is logged
<<include>>

Android development - VPorto
Diogo Pereira - 1101007 31
Figure 21 -‐ FragRoutesMap class diagram
This main class, FragRoutesMap, is a class that will display a map with a route. Again,
there is an AsyncTask that would retrieve the information needed (POI list and
calculated route) from the web service, MyAsyncTask. Another AsyncTask is created
to add markers to the map. These markers are the POI from the selected route.
The route was possible to obtain by sending the route POI, in an AsyncTask, to a class
called DirectionsByPoisArray.java that would obtain the route polyline. The Figure 22
demonstrates how the route is calculated:

Android development - VPorto
Diogo Pereira - 1101007 32
Figure 22 -‐ Sequence diagram demonstrating route calculation
To create a polyline containing the route trajectory, it is necessary to use a web
service provided by Google. The request follows the subsequent structure:
http://maps.googleapis.com/maps/api/directions/json?origin=A&destination=B
&waypoints=C|D&sensor=false
Where A stands for the origin, B stands for the destiny and C and D stands for the
waypoints. It was possible to use either city names in the link or coordinates
separating the latitude and the longitude by the use of a coma (“,”).
Since the company was using a free licence of the Google Application Programming
Interface (API), there was a limit of eight waypoints that we could use. To avoid
problems with this limitation, if the route has more than ten POI associated (origin +
waypoints + destiny), a new polyline would be calculated using the previous destiny
as a new origin since the map could handle multiple polylines.
Android development - VPorto
Diogo Pereira - 1101007 33
3.4.3 Route Mapping feature tests
The Table 9 demonstrates the tests made to the features described above.
Table 9 -‐ Tests made to the Personal and Suggested Routes features
Test Result Result After Correction
Map visualization from suggested routes Success -‐
Map visualization from personal routes Success -‐
The table display the test results and, in case it was unsuccessful, the result after the
correction. If the first result is successful, no values were displayed in the “Result
After Correction” column.
3.5 GetLocation tool
3.5.1 GetLocation tool analysis
After implementing the routes features described above, the company supervisor
suggested the development of a feature corresponding to a tool to find what was the
best location provider. This tool would not be used directly by the application user,
but is used when there is a need to get the user current location. An example of this
need is when the application is trying to get the user current distance from a specific
POI.
This problem was simple to develop but took some time because of the different
possibilities studied. The best solution found is by using the GPS and network
location providers. (Google, LocationProvider, 2007)
There are two possible location providers, the GPS and the network. If the user has
both of the providers turned off, the tool will try to get the last known location. If
one of the providers is working, then we should use the location he returns. If both
of them are working, the GPS provider will be used since it has a lower margin error.
This system described above is illustrated by the diagram at Figure 23.

Android development - VPorto
Diogo Pereira - 1101007 34
Figure 23 -‐ Flowchart describing the process of getting the user current location
3.5.2 GetLocation tool development
The GetLocation tool would be used to provide the user current location. This would
be necessary to do each time a map was opened or a POI list was requested, since
the POI had to display the distance from the user to the POI location. When calling
the constructor it is necessary to send the activity so, when calling the method
getLocation(), it is possible to get the LocationManager object and finally get the
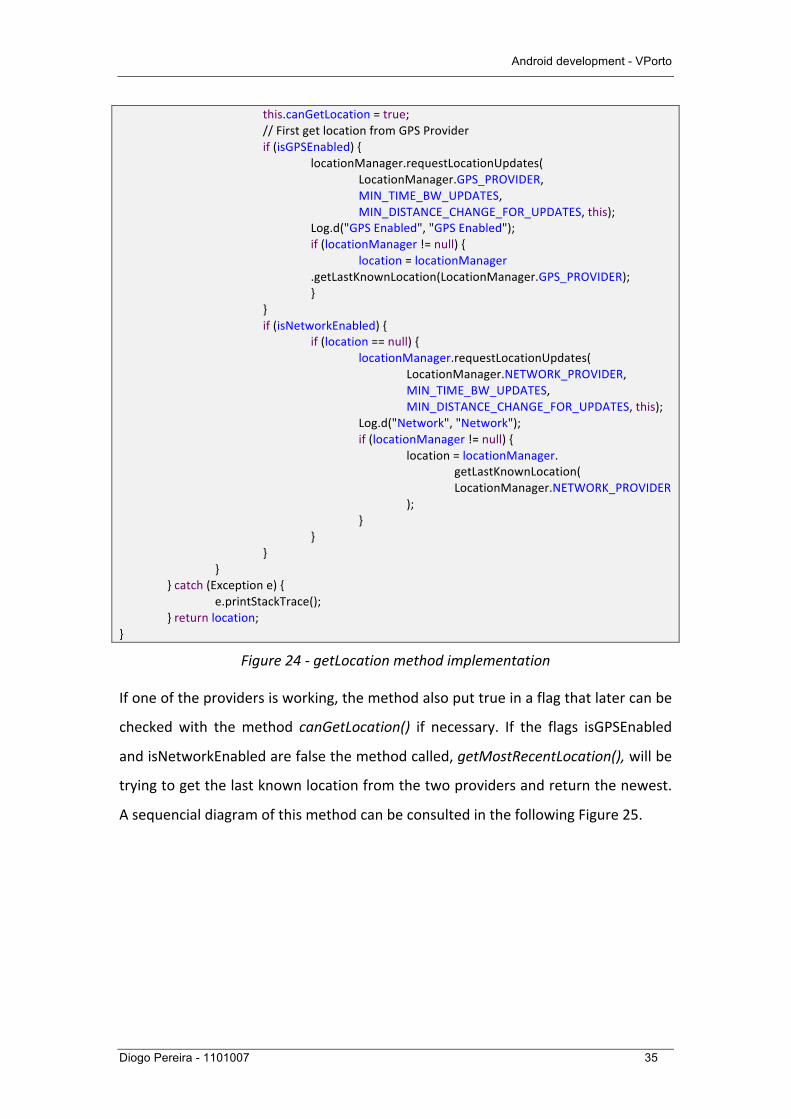
user location. The code developed is displayed in Figure 24.
public Location getLocation() { try {
location = null; locationManager = (LocationManager) act.getSystemService(
Context.LOCATION_SERVICE); // getting GPS status isGPSEnabled = locationManager .isProviderEnabled(LocationManager.GPS_PROVIDER); // getting network status isNetworkEnabled = locationManager
.isProviderEnabled(LocationManager.NETWORK_PROVIDER); if (!isGPSEnabled && !isNetworkEnabled) { Location lastKnownLocation = getMostRecentLocation(); return lastKnownLocation; } else {
Both providers offline?
Both providers available?
Yes
No
No
Yes
Get Location fom GPS provider
Get Last Known
Location
Get Location from available
provider
Android development - VPorto
Diogo Pereira - 1101007 35
this.canGetLocation = true; // First get location from GPS Provider if (isGPSEnabled) { locationManager.requestLocationUpdates(
LocationManager.GPS_PROVIDER, MIN_TIME_BW_UPDATES,
MIN_DISTANCE_CHANGE_FOR_UPDATES, this); Log.d("GPS Enabled", "GPS Enabled"); if (locationManager != null) { location = locationManager .getLastKnownLocation(LocationManager.GPS_PROVIDER); } } if (isNetworkEnabled) { if (location == null) { locationManager.requestLocationUpdates( LocationManager.NETWORK_PROVIDER,
MIN_TIME_BW_UPDATES, MIN_DISTANCE_CHANGE_FOR_UPDATES, this); Log.d("Network", "Network"); if (locationManager != null) { location = locationManager.
getLastKnownLocation( LocationManager.NETWORK_PROVIDER
); } } } } } catch (Exception e) { e.printStackTrace(); } return location; }
Figure 24 -‐ getLocation method implementation
If one of the providers is working, the method also put true in a flag that later can be
checked with the method canGetLocation() if necessary. If the flags isGPSEnabled
and isNetworkEnabled are false the method called, getMostRecentLocation(), will be
trying to get the last known location from the two providers and return the newest.
A sequencial diagram of this method can be consulted in the following Figure 25.

Android development - VPorto
Diogo Pereira - 1101007 36
Figure 25 -‐ Sequence diagram of the method getLocation
3.5.3 GetLocation tool tests
The Table 10 demonstrates the tests made to the features described above.

Android development - VPorto
Diogo Pereira - 1101007 37
Table 10 -‐ Tests performed to the GetLocation tool
Test Result Result After Correction
Get current location with all providers active Success -‐
Get current location with one provider active Unsuccessful Success
Get current location with all providers
deactivated Success -‐
The table display the test results and, in case it was unsuccessful, the result after the
correction. If the first result is successful, no values were displayed in the “Result
After Correction” column.
3.6 Memory Management
3.6.1 Memory Management analysis
The following task was performed because of excessive memory problems. While
testing the previous state of the application, the devices with less capacity were
starting to crash because of the insufficient storage available. While loading all the
POI information and photos, the saved memory could easily reach three hundred
megabytes of data. This storage requirement was not even available on my personal
phone. Beside this problem, the allocated memory for the tasks processing keeps
increasing while downloading the pictures from the server and was never freed, not
even when the fragment was destroyed. Because each device had a different size for
the available memory to allocate, the less capable devices could crash.
These two problems led to the following task, making it necessary to solve the
memory allocation problem and internal memory required space.
To the memory allocation (memory leaks) problem, I have found that image views
may not free the memory they have reserved to save the image and, to solve this, a
tool called Garbage Collector from the Java was used and it solved some cases of the
memory not being freed. With this, the amount of memory being allocated dropped
but not enough. The next step was to analyse the dimension of the pictures being
used. The amount of space that each picture had was too big to be saved “raw”. The

Android development - VPorto
Diogo Pereira - 1101007 38
solution we found was to create a decoder that would sample the image only the
necessary that, with a small quality lost, the memory could be freed more easily.
After studying this option carefully, the solution implemented has the structure
represented in the Figure 26:
Figure 26 -‐ Image decoder
This decoder would receive 2 objects, a image to be decoded and the bitmap options
to be applied. The Bitmap Option class work as a bundle of properties that define the
bitmap. This object as an example, defines the width, the weight and the resolution.
When creating a Bitmap from an Image source, the bitmap option is created with the
original values of the image. By forcing a different bitmap option, the image will be
transformed accordingly with the provided bitmap option.
3.6.2 Memory Management development
For this problem, part of the solution was to add the System.gc() in some parts of the
code. This did not solve the problem but gave some free spaced and added free
space to the allocated memory. A better solution for the problem was to develop the
following methods:
• decodeFile(File f);
o This method receives a bitmap file and decodes it sampling and
reducing the file size without losing most of the image quality.
The method was developed as presented bellow:
private Bitmap decodeFile(File f){ try { //Decode image size BitmapFactory.Options o = new BitmapFactory.Options(); o.inJustDecodeBounds = true; BitmapFactory.decodeStream(new FileInputStream(f),null,o);

Android development - VPorto
Diogo Pereira - 1101007 39
//Find the correct scale value. It should be the power of 2. int scale=1; while(
o.outWidth/scale/2>=REQUIRED_SIZE_highlight1 && o.outHeight/scale/2>=REQUIRED_SIZE_highlight1
) scale*=2;
//Decode with inSampleSize BitmapFactory.Options o2 = new BitmapFactory.Options(); o2.inSampleSize=scale; return BitmapFactory.decodeStream(new FileInputStream(f), null, o2);
} catch (FileNotFoundException e) {} return null; }
Figure 27 -‐ decodeFile method implementation
• decodeStream(URL url);
o This method receives a URL containing a picture, it will fetch and
decode that picture, reducing the memory consumption and required
space to save the image in the internal storage.
private Bitmap decodeStream(URL ulrn) throws IOException { //Decode image size BitmapFactory.Options o = new BitmapFactory.Options(); o.inJustDecodeBounds = true; HttpURLConnection con = (HttpURLConnection)ulrn.openConnection(); InputStream in = con.getInputStream(); BitmapFactory.decodeStream(in,null,o); //The new size we want to scale to //Find the correct scale value. It should be the power of 2. int scale=1; while(
o.outWidth/scale/2>=REQUIRED_SIZE_highlight1 && o.outHeight/scale/2>=REQUIRED_SIZE_highlight1
) scale*=2; //Decode with inSampleSize BitmapFactory.Options o2 = new BitmapFactory.Options(); o2.inSampleSize=scale; try { in.close(); } catch (IOException e) { e.printStackTrace(); } con = (HttpURLConnection)ulrn.openConnection(); in = con.getInputStream(); Bitmap bm = BitmapFactory.decodeStream(in, null, o2); con.disconnect();

Android development - VPorto
Diogo Pereira - 1101007 40
return bm; }
Figure 28 -‐ decodeStream method implementation
These 2 methods were created to reduce the image dimensions by sampling it.
3.6.3 Memory Management tests
The tests performed to these tools had the following result.
Table 11 -‐ Tests performed to the memory management methods
Test Result Result After Correction
Memory allocated with the “RESTAURANTS”
gallery opened
64 MB
(Unsuccessful)
24 MB
(Success)
Total memory of internal storage used by the
application after visiting some galleries
400 MB
(Unsuccessful)
200MB
(Success)
The values of the memory allocation used above in the table were obtained using
the logcat window. The logcat is a window from the Eclipse IDE with the Android SDK
environment used to view the system debug output. One of the outputs is the
amount of memory being allocated by the application. (Google, logcat, 2007)
3.7 Rotation Effect and Navigation
This feature and the features detailed below this were developed for the version 2.0
of the application.
3.7.1 Rotation Effect and Navigation analysis
This new version will have a complete redesign of the application layout. There will
be the same features from the previous version and will be added new ones. One of
the major changes in the application layout is the navigation system. There will still
be three buttons on the bottom that will serve as navigation. These three buttons
will be used to open the map, open the suggestions menu and the last button will be
to open the main menu.

Android development - VPorto
Diogo Pereira - 1101007 41
Figure 29 -‐ New Layouts of Map, Suggestions and Menu
Another major change is the animation between screens. Control S wanted to add an
effect like a cube rotation between screens. The image below demonstrates a
transition from the suggestions menu to the POI detail and how the animation will
look like.
Figure 30 -‐ Screen transition with a cube rotation effect

Android development - VPorto
Diogo Pereira - 1101007 42
To implement this cube rotation effect, the ObjectAnimator class had to be used.
There were two possible technologies tested to implement this feature, the View
Animation and the Property Animation. The first tested was the View Animation.
The View Animation is works with the Tween animation and with the Frame
animation. These two options have native animation but are less customizable. They
are enough if a simple animation is required, like a fade in, a fade out, a two
dimensions rotation or a slide. To apply a three dimensional rotation effect with a
slide, it is necessary to have more control on the animation.
The Property Animation is a more configurable animation and it can perform custom
operation, like the ones required.
Each animation that we needed to implement had to be applied to a single screen.
As an example, to the figure above, the suggestions menu had an animation that
made the fragment rotate from zero degrees to minus ninety (0º -‐> -‐90º) around a
vertical line located on the right side of the fragment. The POI detail, the other face
of the cube that is appearing, had to make a rotation from ninety to zero (90º -‐> 0º)
around a vertical line located at the left side of the fragment. This transition has the
duration of three hundred milliseconds (the animation length is easily configurable).
To implement this animation, as said before, the ObjectAnimatior class had to be
used. The use case diagram in Figure 31 illustrates the different navigation option
from the suggestion menu. This diagram is displayed below.

Android development - VPorto
Diogo Pereira - 1101007 43
Figure 31 -‐ Use case diagram with the navigation effects functionalities
The rotation effect was almost solved until a problem appeared. This
ObjectAnimatior class was only available to devices with the Android version 11 or
superior. This would make the application version requirement superior and reduce
the range of compatible devices. This also would make us change all the structure of
the application.
The application was created using fragments from the class
android.support.v4.app.Fragment. This library, android.support.v4, was created so
old versions of Android could handle fragments. The problem is that object animator
is not compatible with this type of fragment, being only compatible with
android.app.Fragment. But by changing one fragment from the support.v4 to the
one without support, all the other fragments would cause incompatibilities and the
only solution was to replace all the fragments from the support.v4 to the normal and
more updated fragment class.
To solve this problem, a custom layout had also to be implemented. Its
implementation will be detailed on section 3.7.2.
Navigation System from Suggestion Menu
Open Main Menu
Open Map
Open POI Detail
Open Event Detail
USER
OBJECT ANIMATOR
Rotate current view from
Down to Up
Rotate current view from
Up to Down
Rotate current view from
Right to Left
<<include>>
<<include>>
<<include>>
<<include>>

Android development - VPorto
Diogo Pereira - 1101007 44
With the View Pager problem solved, there was a small detail that was still not
solved. The navigation had to be corrected. For example, switching to the
suggestions menu from a POI detail that was called from the first menu, had a
specific transition, while a transition to the suggestions menu from the POI detail
called from the gallery, had a different transition. The Figure 32 demonstrates how a
POI detail can be accessed from different places.
Figure 32 -‐ Flow chart with two different possibilities to see a POI detail
3.7.2 Rotation Effect and Navigation development
To implement the rotation effect, it was necessary to create XML files that would
have the animation and then, when making the transition from one fragment to
another, add that custom animation. To add an animation to a transition, it is
necessary to use the method FragmentTransaction.setCustomAnimations. The Figure
33 demonstrates how we can apply a rotation on a transition from a fragment to
another.
FragAbout about = new FragAbout(); FragmentTransaction transaction = getFragmentManager().beginTransaction();
POI Detail pressed
Main Menu pressed
No
Yes
SuggestionsMenu
Going OutOption
Category Choosen
POI Selection
Show POI Detail
Yes
No
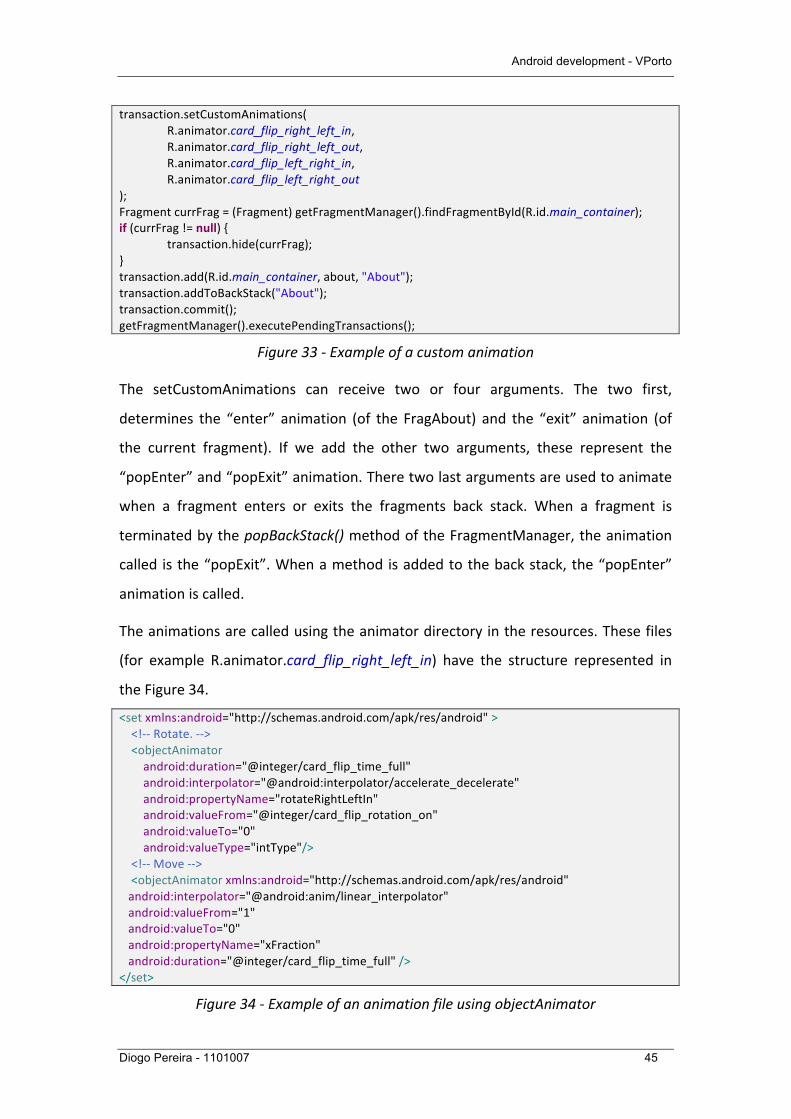
Android development - VPorto
Diogo Pereira - 1101007 45
transaction.setCustomAnimations( R.animator.card_flip_right_left_in, R.animator.card_flip_right_left_out, R.animator.card_flip_left_right_in, R.animator.card_flip_left_right_out ); Fragment currFrag = (Fragment) getFragmentManager().findFragmentById(R.id.main_container); if (currFrag != null) { transaction.hide(currFrag); } transaction.add(R.id.main_container, about, "About"); transaction.addToBackStack("About"); transaction.commit(); getFragmentManager().executePendingTransactions();
Figure 33 -‐ Example of a custom animation
The setCustomAnimations can receive two or four arguments. The two first,
determines the “enter” animation (of the FragAbout) and the “exit” animation (of
the current fragment). If we add the other two arguments, these represent the
“popEnter” and “popExit” animation. There two last arguments are used to animate
when a fragment enters or exits the fragments back stack. When a fragment is
terminated by the popBackStack() method of the FragmentManager, the animation
called is the “popExit”. When a method is added to the back stack, the “popEnter”
animation is called.
The animations are called using the animator directory in the resources. These files
(for example R.animator.card_flip_right_left_in) have the structure represented in
the Figure 34.
<set xmlns:android="http://schemas.android.com/apk/res/android" > <!-‐-‐ Rotate. -‐-‐> <objectAnimator android:duration="@integer/card_flip_time_full" android:interpolator="@android:interpolator/accelerate_decelerate" android:propertyName="rotateRightLeftIn" android:valueFrom="@integer/card_flip_rotation_on" android:valueTo="0" android:valueType="intType"/> <!-‐-‐ Move -‐-‐> <objectAnimator xmlns:android="http://schemas.android.com/apk/res/android" android:interpolator="@android:anim/linear_interpolator" android:valueFrom="1" android:valueTo="0" android:propertyName="xFraction" android:duration="@integer/card_flip_time_full" /> </set>
Figure 34 -‐ Example of an animation file using objectAnimator

Android development - VPorto
Diogo Pereira - 1101007 46
As seen above, to the objectAnimator is possible to add properties. These properties
are methods located in the layout container of the fragment. In the Figure 35, we
can see the FragAbout layout XML.
<?xml version="1.0" encoding="utf-‐8"?> <ak.vporto.classes.NoFlingRotationLayout xmlns:android="http://schemas.android.com/apk/res/android" android:layout_width="match_parent" android:layout_height="match_parent" android:orientation="vertical" android:weightSum="14" > <ScrollView android:layout_width="match_parent" android:layout_height="0dp" android:layout_weight="11" android:orientation="vertical" android:scrollbars="none" > (…) </ScrollView> <LinearLayout android:id="@+id/suporte_about" android:layout_width="match_parent" android:layout_height="0dp" android:layout_margin="3dp" android:layout_weight="2" android:background="#5d5d5d" android:orientation="horizontal" android:weightSum="9" > (…) </LinearLayout> <include android:id="@+id/about_v_layout" android:layout_width="match_parent" android:layout_height="0dp" android:layout_weight="1" layout="@layout/v" /> </ak.vporto.classes.NoFlingRotationLayout>
Figure 35 -‐ FragAbout layout
After analysing the FragAbout layout, we can see that the root element is a class
called NoFlingRotationLayout. The code of this class can be consulted in the
appendix B.1. This implemented class extends the Linear Layout class and it has
methods that are called by the properties rotateRightLeftIn and xFraction used in the
objectAnimator Figure 34. The Figure 36 has the methods called by these two
properties.
//Rotate from Right to Left turning visible public float getRotateRightLeftIn(){ return getRotationY();

Android development - VPorto
Diogo Pereira - 1101007 47
} public void setRotateRightLeftIn(int rotateRightLeftIn){ touch_disabled=true; setPivotX(0); setPivotY(getHeight()/2); setRotationY(rotateRightLeftIn); if(rotateRightLeftIn==0 || rotateRightLeftIn==90 || rotateRightLeftIn==-‐90) touch_disabled=false; } public float getXFraction() { final int width = getWidth(); if(width != 0) return getX() / getWidth(); else return getX(); } public void setXFraction(float xFraction) { final int width = getWidth(); setX((width > 0) ? (xFraction * width) : -‐9999); }
Figure 36 -‐ Example of methods called when applying a rotation
After these implementations, the task of implementing the cube rotation was
complete and now the navigation had to be fixed.
When the application had no animation between the fragments transitions, the
navigation was easy because it was not necessary to control what animation to do
when a certain key is pressed. To better explain the problem, the Figure 37 will
present a diagram demonstrating the rotations required from the POI Gallery to the
suggestions menu. In the figure we assume that, each time an animation from up to
down is made, a level of the application is increased and, each time a animation from
down to up is made, a level is decreased. For example, assuming that the suggestions
menu is in level 1, to go from the Suggestion menu to the Main menu, an animation
from up to down is made changing the current level to 2.

Android development - VPorto
Diogo Pereira - 1101007 48
Figure 37 -‐ Level difference inside the application
The desired behaviour was to do a rotation from down to up directly from the About
to the Suggestions Menu, although it is not possible to change the animation of the
fragments in the stack (while doing the popBackStack() to navigate to the
Suggestions Menu). Because there was a animation between the About and the
Main Menu and between the Main Menu and the Suggestions Menu, it was possible
to watch the fragment rotation from left to right, and the rotation from down to up
at the same time.
The solution to this was found by controlling if the user was “skipping” fragment by
pressing the Suggestions, the Menu or the Map Button. The Figure 38 shows a
sequence diagram of the methods called when the user press the Suggestions Menu
button while in the About fragment.
AboutMain Menu
SuggestionsMenu
Rotate Left->Right
Rotate Down->Up
Level 2
Level 1
Level 0
Map

Android development - VPorto
Diogo Pereira - 1101007 49
Figure 38 -‐ Sequence diagram showing how to change the animation
The methods popNoAnimation() and popChangeAnimation() now appears on almost
every class. And it does as demonstrated in the Figure 39.
@Override public Animator onCreateAnimator(int transit, boolean enter, int nextAnim) { if (changeAnimationFlag){ changeAnimationFlag=false; final Animator anim = AnimatorInflater. loadAnimator(getActivity(), R.animator.card_flip_down_up_out); //anim.setDuration(0); return anim; } if (noAnimationFlag) { noAnimationFlag=false; final Animator anim = AnimatorInflater .loadAnimator(getActivity(), R.animator.card_flip_down_up_out); anim.setDuration(0); return anim; } else{ return super.onCreateAnimator(transit, enter, nextAnim); } } public void popNoAnimation() { noAnimationFlag = true; } public void popChangeAnimation() { changeAnimationFlag = true; }
Figure 39 -‐ popNoAnimation() and popChangeAnimation() methods

Android development - VPorto
Diogo Pereira - 1101007 50
The method onCreateAnimation is called every time a fragment needs to do an
animation and, by having a flag changeAnimationFlag with true, when the animation
is created, instead of doing the left to right animation, the desired down to up
animation is done. The Main Menu still needs to call the popNoAnimation() method
to set the duration of the animation, to zero, making it too quick to see. Now the
only animation that are possible to watch is the down to up animations of the About
and the Suggestions.
While testing, the problem about having the same fragment in different levels
appeared again. It was necessary to check if, for example, when the user was in the
POI Detail and clicked in the Suggestions Menu button if he was on the same level as
the Suggestions Menu or in the level of the Main Menu. These two situations can be
observed in the Figure 40.
Figure 40 -‐ Demonstration of different levels with the same fragment
Going OutMain Menu
SuggestionsMenu
Rotate Left->Right
Rotate Down->Up
Level 2
Level 1
Level 0
Map
Restaurants POI Detail
Rotate Left->Right Rotate Left->Right
Main Menu
SuggestionsMenu
Level 2
Level 1
Level 0
Map
POI Detail
Rotate Left->Right
Situation 1
Situation 2

Android development - VPorto
Diogo Pereira - 1101007 51
To solve this, the easiest solution was to check how many fragments were in the
back stack when the button was pressed. As we can observe in the Situation 1, there
are five fragments opened (POI Detail, Restaurants, Going Out, Main Menu and
Suggestions Menu) and in the Situation 2, there are only two fragments opened (the
POI Detail and the Suggestions Menu). By knowing this, we can control in what point
of the application we are and what we need to do to create the desired animation.
For the navigation, fling detection was also added. To detect if the user is trying to
navigate by swiping the fragment, a gesture detector has to be implemented. To this,
it was used the class that would be used as the root element. One screen that has
the fling detector implemented is the Suggestions Menu. The Suggestions Menu uses
a class called SimpleSlidingFrameLayout that has the same methods as the
NoFlingRotationLayout but also uses the override method
onInterceptTouchEvent(MotionEvent ev) to call the gesture detector object in case
this listener is called. The gesture know what to do because, when the
SimpleSlidingFrameLayout constructor is called, the initGesture() defines the gesture
detector behavior when a fling is detected. The Figure 41 shows how the fling is
initialized.
@Override public boolean onFling(MotionEvent e1, MotionEvent e2, float velocityX, float velocityY) { final int SWIPE_MIN_DISTANCE = 120; final int SWIPE_THRESHOLD_VELOCITY = 200; Fragment currFrag = (Fragment) fragmentManager.findFragmentById(R.id.main_container); String classTag =""; if (currFrag != null) { classTag = currFrag.getTag(); System.out.println("Current: "+classTag); if (e1.getX() -‐ e2.getX() > SWIPE_MIN_DISTANCE){ System.out.println("Right to Left"); }else if (e2.getX() -‐ e1.getX() > SWIPE_MIN_DISTANCE){ System.out.println("Left to Right"); }else if (e1.getY() -‐ e2.getY() > SWIPE_MIN_DISTANCE &&Math.abs(velocityY)>SWIPE_THRESHOLD_VELOCITY){ System.out.println("Down to Up"); if(classTag.equals("Menu") || classTag.equals("Suggestion")){ ((MainFragmentActivity)getContext()).MapClick(); } } else if (e2.getY() -‐ e1.getY() > SWIPE_MIN_DISTANCE &&Math.abs(velocityY)>SWIPE_THRESHOLD_VELOCITY) { System.out.println("Up to Down"); if (classTag.equals("Suggestion")){

Android development - VPorto
Diogo Pereira - 1101007 52
((MainFragmentActivity)getContext()).MenuClick(); } } } return super.onFling(e1, e2, velocityX, velocityY); }
Figure 41 -‐ Fling initialization
3.7.3 Rotation Effect and Navigation tests
The tests made to the navigation and the animations are represented in the Table
12.
Table 12 -‐ Tests performed to the animation and navigation
Table Result Result After Correction
Navigation from Suggestions Menu to Main
Menu Success -‐
Navigation from Suggestions Menu to Map Success -‐
Navigation from Restaurants to POI Detail Success -‐
Navigation from Suggestions Menu to POI
Detail Unsuccessful Success
The table display the test results and, in case it was unsuccessful, the result after the
correction. If the first result is successful, no values were displayed in the “Result
After Correction” column.
3.8 Game
3.8.1 Game analysis
There was a game that had to be developed with the objective of collecting the user
personal interests to provide him the information that he would appreciate in the
Suggestions Menu. The game would only run once and if the user had never finished
it. This game had six questions and the user could choose, in each question, from
zero to two options. After the sixth question, the user would be redirected to the
application. The Figure 42 depicts the use case diagram for this feature.

Android development - VPorto
Diogo Pereira - 1101007 53
Figure 42 -‐ Use case diagram illustrating the game functionalities
For this game, the task assigned to me was to get the game structure that was
already developed and add some details. The rotation had to be implemented in the
game also. A class diagram of the game can be consulted in the appendix A.2. Beside
the game being completely implemented the partner company decided to delay the
game due its complexity on building the user profile. The final aspect of the game
would be as represented in Figure 43.
Game System
USER
WEB SERVICE
Save user option
Next page
Play later
Finish Game
Continue with the
application
<<include>>
<<include>>
Select option
Deselect option

Android development - VPorto
Diogo Pereira - 1101007 54
Figure 43 -‐ Game final layout and transitions
3.8.2 Game development
To develop the game and make it ready to use, a bundle of values with the user
choices had to be created. A solution to save values assigned to a specific key is by
using the class SharedPreferences. The object associated with the activity could be
accessed by using the method Activity.getSharedPreferences(file, node).
After getting access to the shared preferences when the application was starting, we
needed to check if the user already completed the game. To do this, we could ask
the shared preferences for a value of a certain key and, if the key didn’t exist, a
defined value would be returned. The Figure 44 demonstrates how to do the
validation if the user already completed the game.
String f = this.getSharedPreferences("USERSDEFAULT", 0).getString("game_finished", "no"); if(f.equals("yes")){ suggestion = new FragSuggestions(); FragmentTransaction transaction = getFragmentManager().beginTransaction(); transaction.add(R.id.main_container, suggestion, "Suggestion"); transaction.addToBackStack("Suggestion"); // Commit the transaction transaction.commit(); getFragmentManager().executePendingTransactions(); } else { // Create new fragment and transaction and put above the menu on the stack game = new Game(); FragmentTransaction transaction = getFragmentManager().beginTransaction(); transaction.setCustomAnimations( 0, R.animator.card_flip_left_right_out, 0, R.animator.card_flip_right_left_out );

Android development - VPorto
Diogo Pereira - 1101007 55
transaction.add( R.id.main_container, game, "Game"); transaction.addToBackStack("Game"); // Commit the transaction transaction.commit(); getFragmentManager().executePendingTransactions(); }
Figure 44 -‐ Game already finished validation
If the user, at the application launch, previously did not finish the game, the game
fragment would be called.
The game fragment work as a fragment container and the game (from one to six) are
different fragments. The diagram at Figure 45 illustrates how the game fragments
are managed and what actually changes on the view.
Figure 45 – Diagram showing the game container and its fragments
To change the game page there are two possibilities, a button and using finger slide
(fling). To implements the fling, the same technique was used as in the features
explained above. The button and the fling would call a method called ChangeView()
but it would be called from different places. The fling is implemented on the layout
of each game fragment (not in the container) while the button is on the container. In
the Figure 46, a sequence diagram will illustrate the procedure from changing the
game page from 1 to 2 when clicking on the ok button.
Game.java
Game.java
GameFragment2.javaGameFragment1.java GameFragment3.java

Android development - VPorto
Diogo Pereira - 1101007 56
Figure 46 -‐ Sequence diagram of changing game page from one to two
The other game fragments have the same structure only changing the content.
To explain the sequence diagram above, the checkFinished() is a method that will
check if the user is clicking ok while on the sixth page and, if it is, the game will finish
and this information will be saved in the shared preferences and this will only
happens by using the ok button. The finger slide movement does not make this
check since the game cannot be terminated using the fling to avoid accidental
irreversible commands (remember that the game won’t appear again if the user
already finished it).
The ChangeView() method, similar in the container and in the
TouchSlidingFrameLayout layout used in the game fragments. This class if similar to
the one used in the rest of the application so a rotation animation could be applies.
It is necessary to use a different one so we could control what the fling animation
would do in the different situations. The Figure 47 illustrates the flowchart of the
method that launches the next fragment.

Android development - VPorto
Diogo Pereira - 1101007 57
Figure 47 -‐ Game changing view flowchart
Before changing the view, the selected option had to be saved in the shared
preferences. To do this, and since its possible to identify the current fragment, a
method from the current fragment called okPressedSaveOptions() would be
executed saving in the shared preferences the user options. If no options were
selected, the values saved are zero for the key gameX_option1 and gameX_option2
where the “X” stands for the game page number. If only one option is selected, the
key gameX_option1 in the shared preferences would receive the square number
(from one to nine) and the gameX_option2 would get zero. If two options were
selected, both of the options selected would be saved. At the end of the game, these
values would be saved in the DB.
3.8.3 Game tests
The tests made to the game are represented in the Table 13.
Table 13 -‐ Tests performed to the game feature
Table Result Result After Correction
Get game number
Launch game 2
ChangeView() - Start
Launch game 3
Launch game 6

Android development - VPorto
Diogo Pereira - 1101007 58
Later button test Success -‐
Lock option selection if two other options are
selected. Success -‐
Two options selected, ok pressed and fling
from left to right to view previous page to
check is options were saved
Success -‐
Ok until last page to change the ok button
colour Success -‐
Options selected, later pressed, application
restart to check if option were saved correctly Unsuccessful Success
Fling until last page to change the ok button
colour Unsuccessful -‐
The table display the test results and, in case it was unsuccessful, the result after the
correction. If the first result is successful, no values were displayed in the “Result
After Correction” column.
The last Unsuccessful test did not got corrected, decision made by the company,
because there were more important tasks to be made.
3.9 Horizontal Pager
3.9.1 Horizontal Pager analysis
By removing the support.v4, some classes start sending errors because of tools that
were only compatible with the support.v4. One of these tools was the View Pager. A
View Pager is a view that supports multiple items. The Figure 48 demonstrates View
Pager holding images on the same element with a pager (circles) showing the
selected page.

Android development - VPorto
Diogo Pereira - 1101007 59
Figure 48 -‐ View Pager example
As referred above, some compatibility errors appeared after the changes on the
application fragments because of the animation implementation. After converting all
the android.support.v4.app.Fragment objects to android.app.Fragment, the object
called ViewPager, used in the class FragPois of the version 1 to hold multiple images,
started to crash the application because of deprecated items. To solve this, a custom
class should be implemented. The solution used to this problem was implemented
by a GitHub user called Yoni Samlan (Samlan, 2009). After analysing the available
code, it was necessary to implement a pager to display the current page.
3.9.2 Horizontal Page development
To use the provided horizontal pager in the class FragPois and FragEventDetail it was
necessary to adapt the current layout and replace the old ViewPager for the new
HorizontalPager code as listed below in the Figure 49 and add a page indicator
showing the current and available pages using a linear layout.
<ak.vporto.classes.HorizontalPager android:id="@+id/horizontal_pager" android:layout_width="match_parent" android:layout_height="0dp" > </ak.vporto.classes.HorizontalPager>
Figure 49 -‐ Horizontal pager utilization in the XML
Because we had to change in the layout, it was necessary to change the class. This
changes included the declaration, the AsyncTask that would load the images and the
listeners actions.

Android development - VPorto
Diogo Pereira - 1101007 60
The GetData AsyncTask that was created to get the POI/Event detail called the
AsyncTask referred above. This AsyncTask is called DownloadBitmapTask and it is
used to, after having an ArrayList filled n times (where n stands for the number of
images), download the images associated with each POI image link in the list. Each
time an image is downloaded (and suffer the proper decode), it was added to the
horizontal pager and then the page indicator would receive an icon indicating the
new page available. This constant update of the pager makes possible to change the
image between those who were already downloaded while the downloading process
is not finished. If no images were available for that POI, the category icon would be
used as image. If there were only one image available, the page indicator would not
be used.
The sequence diagram presented in the Figure 50 demonstrates the process of
adding an image to a HorizontalPager and adding a page icon to the LinearLayout
being used as page indicator.

Android development - VPorto
Diogo Pereira - 1101007 61
Figure 50 -‐ Sequence diagram of adding an image to the horizontal pager and page
indicator
To know when the user changed the image and the update of the current page was
needed, a listener was added to the horizontal pager. This listener was implemented
using the code on Figure 51.
@Override public View onCreateView(LayoutInflater inflater, ViewGroup container, Bundle savedInstanceState) { (…) hPager.setOnScreenSwitchListener(onScreenSwitchListener); (…) } private final HorizontalPager.OnScreenSwitchListener onScreenSwitchListener = new HorizontalPager.OnScreenSwitchListener() { @Override public void onScreenSwitched(final int screen) { if(alIv!=null){ currentPage=screen; for(int i=0;i<alIv.size();i++){ if(i==currentPage)

Android development - VPorto
Diogo Pereira - 1101007 62
alIv.get(i).setImageResource(R.drawable.selected_page); else alIv.get(i).setImageResource(R.drawable.unselected_page); } } } };
Figure 51 -‐ Horizontal pager listener implementation
3.9.3 Horizontal Pager Tests
The tests made to the horizontal pager are represented in the Table 14.
Table 14 -‐ Tests performed to the horizontal pager feature
Table Result Result After Correction
Visualization of a POI detail with multiple
images Success -‐
Visualization of a POI detail with one image Unsuccessful Success
Visualization of a POI detail with no image Unsuccessful Success
Change between image after complete
download Success -‐
Change between image while still
downloading Unsuccessful Success
The table display the test results and, in case it was unsuccessful, the result after the
correction. If the first result is successful, no values were displayed in the “Result
After Correction” column.
3.10 Map Sliding Drawer
3.10.1 Map Sliding Drawer analysis
By finishing the game implementation sooner than expected, the company assigned
me the task to implement a sliding drawer on the map. The Figure 52 demonstrates
how this sliding drawer looks closed, while opening and wide open.

Android development - VPorto
Diogo Pereira - 1101007 63
Figure 52 -‐ Sliding drawer ilustration
To open sliding drawer it is possible to drag the arrow shaped button and to close a
horizontal fling movement should be done over the opened bar. The three buttons
available should have the following actions:
• Change the map view (between normal view and satellite view)
• In the map, show VPorto associated POI only
• In the map, show OPORTONITY associated POI only
The functionalities of this sliding drawer can also be observed in the use case
diagram in the Figure 53.

Android development - VPorto
Diogo Pereira - 1101007 64
Figure 53 -‐ Use case diagram illustrating the sliding drawer options
3.10.2 Map Sliding Drawer development
The button actions were easy to implement. The challenge in this task is to create
the sliding drawer. To do this, it was used the SlidingDrawer class from the Google
API (Google, Android Developers SlidingDrawer, 2007). This class worked as a
container with two elements inside. One element called handle and the other called
content. These two elements references would be added on the proper
SlidingDrawer propriety. Because it was required that the arrow would disappear if
the SlidingDrawer was fully opened, no handle would be available to close the
SlidingDrawer and it was necessary to create a class that would be used as a
container for the three buttons and could detect the fling motion. This class is called
TouchDrawerLinearLayout and besides extending a LinearLayout, it would
implement a gesture detector that, if the fling from the right to the left was called,
would close the SlidingDrawer. To have access to the SlidingDrawer and the arrow
button to unhide it, a method called setDrawer(…) would be called to instantiate the
fields. These main methods of this class are illustrated in the Figure 54.
Map Sliding Drawer
USER
WEB SERVICE
Send POI list
Change map view type
Mark VPorto suggestions
only
Mark OPORTONITY suggestions
only<<include>>
<<include>>
Mark all POI in map
<<include>>
Open/Close Sliding Drawer

Android development - VPorto
Diogo Pereira - 1101007 65
private GestureDetector gesture; private View imageButton; SlidingDrawer slide; private DisplayMetrics dm; private void initGesture() { gesture = new GestureDetector(getContext(), new GestureDetector.SimpleOnGestureListener() { @Override public boolean onDown(MotionEvent e) { return true; } @Override public boolean onFling(MotionEvent e1, MotionEvent e2, float velocityX, float velocityY) { final int SWIPE_MIN_DISTANCE = 120; // final int SWIPE_MAX_OFF_PATH = 250; final int SWIPE_THRESHOLD_VELOCITY = 200; if (e1.getX() -‐ e2.getX() > SWIPE_MIN_DISTANCE) { System.out.println("Right to Left"); android.widget.LinearLayout.LayoutParams lpImage = new LinearLayout.LayoutParams( (int) (dm.widthPixels * (1 / 16f)), (int) (dm.heightPixels * (1 / 8f))); imageButton.setLayoutParams(lpImage); slide.animateClose(); } else if (e2.getX() -‐ e1.getX() > SWIPE_MIN_DISTANCE) { System.out.println("Left to Right"); } else if (e1.getY() -‐ e2.getY() > SWIPE_MIN_DISTANCE && Math.abs(velocityY) > SWIPE_THRESHOLD_VELOCITY) { System.out.println("Down to Up"); } else if (e2.getY() -‐ e1.getY() > SWIPE_MIN_DISTANCE && Math.abs(velocityY) > SWIPE_THRESHOLD_VELOCITY) { System.out.println("Up to Down"); } return super.onFling(e1, e2, velocityX, velocityY); } }); } public void setDrawer(SlidingDrawer slide, ImageButton imageButton, DisplayMetrics dm) { this.slide=slide; this.imageButton=imageButton; this.dm=dm; }
Figure 54 -‐ TouchDrawerLinearLayout main methods
But this class have some limitations. One example is the position of the sliding
drawer that, by default, works vertically from up to down. This option was far from
acceptable and it was used a property from the component called
android:orientation. By setting this property to horizontal the sliding drawer was set
to the correct orientation but in the wrong side, the hidden components were on the
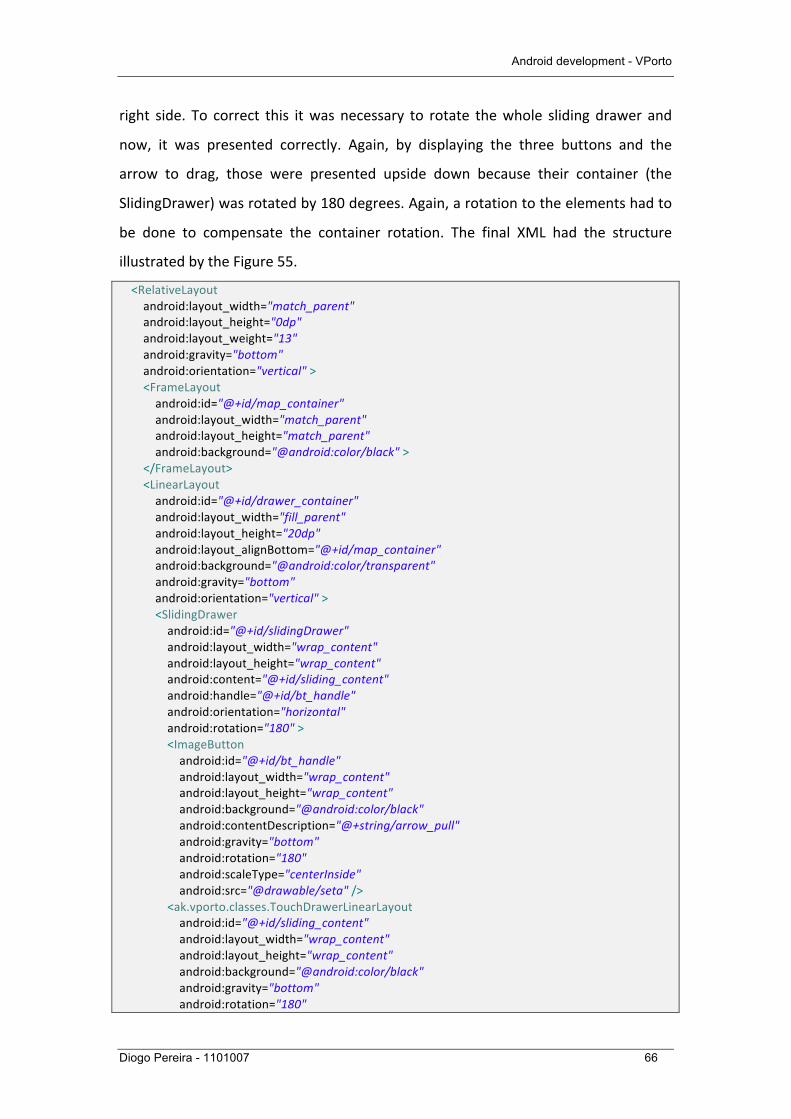
Android development - VPorto
Diogo Pereira - 1101007 66
right side. To correct this it was necessary to rotate the whole sliding drawer and
now, it was presented correctly. Again, by displaying the three buttons and the
arrow to drag, those were presented upside down because their container (the
SlidingDrawer) was rotated by 180 degrees. Again, a rotation to the elements had to
be done to compensate the container rotation. The final XML had the structure
illustrated by the Figure 55.
<RelativeLayout android:layout_width="match_parent" android:layout_height="0dp" android:layout_weight="13" android:gravity="bottom" android:orientation="vertical" > <FrameLayout android:id="@+id/map_container" android:layout_width="match_parent" android:layout_height="match_parent" android:background="@android:color/black" > </FrameLayout> <LinearLayout android:id="@+id/drawer_container" android:layout_width="fill_parent" android:layout_height="20dp" android:layout_alignBottom="@+id/map_container" android:background="@android:color/transparent" android:gravity="bottom" android:orientation="vertical" > <SlidingDrawer android:id="@+id/slidingDrawer" android:layout_width="wrap_content" android:layout_height="wrap_content" android:content="@+id/sliding_content" android:handle="@+id/bt_handle" android:orientation="horizontal" android:rotation="180" > <ImageButton android:id="@+id/bt_handle" android:layout_width="wrap_content" android:layout_height="wrap_content" android:background="@android:color/black" android:contentDescription="@+string/arrow_pull" android:gravity="bottom" android:rotation="180" android:scaleType="centerInside" android:src="@drawable/seta" /> <ak.vporto.classes.TouchDrawerLinearLayout android:id="@+id/sliding_content" android:layout_width="wrap_content" android:layout_height="wrap_content" android:background="@android:color/black" android:gravity="bottom" android:rotation="180"

Android development - VPorto
Diogo Pereira - 1101007 67
android:weightSum="9" > <ImageButton android:id="@+id/map_slide_map" android:layout_width="0dp" android:layout_height="match_parent" android:layout_weight="3" android:background="@android:color/black" android:contentDescription="@+string/map_slide" android:scaleType="centerInside" android:src="@drawable/mapa" /> <ImageButton android:id="@+id/map_slide_v" android:layout_width="0dp" android:layout_height="match_parent" android:layout_weight="3" android:background="@android:color/black" android:contentDescription="@+string/V" android:scaleType="centerInside" android:src="@drawable/v" /> <ImageButton android:id="@+id/map_slide_oportonity" android:layout_width="0dp" android:layout_height="match_parent" android:layout_weight="3" android:background="@android:color/black" android:contentDescription="@+string/oport" android:scaleType="centerInside" android:src="@drawable/oportunity" /> </ak.vporto.classes.TouchDrawerLinearLayout> </SlidingDrawer> </LinearLayout> </RelativeLayout>
Figure 55 -‐ Map container and sliding drawer layout
The button implementation, with the exception of the change map view button, was
not my responsibility since the navigation bugs correction was my responsibility.
3.10.3 Map Sliding Drawer tests
The tests made to the implemented sliding drawer are represented in the Table 15.
Table 15 -‐ Tests performed to the sliding drawer feature
Table Result Result After Correction
Sliding drawer orientation Unsuccessful Successful
Sliding drawer opening and closing Unsuccessful Success
Sliding drawer buttons test Success -‐

Android development - VPorto
Diogo Pereira - 1101007 68
The table display the test results and, in case it was unsuccessful, the result after the
correction. If the first result is successful, no values were displayed in the “Result
After Correction” column.

Android development - VPorto
Diogo Pereira - 1101007 69
4 Conclusions To conclude my report, I will make a global appreciation on the work developed and
its phases. This chapter reviews the goals achieved and the limitations of the project.
4.1 Goals achieved
At the close of the internship, all the tasks assigned were successfully terminated.
Task achievement is summarized in Table 16.
Table 16 – Table of accomplishment
Functional requirements Accomplishment
Routes features implementation 100%
Game 100%
Rotation animation 100%
Navigation correction 100%
Horizontal Pager 100%
Sliding drawer 100%
Non-‐functional requirements Accomplishment
Bitmap decoders 100%
Memory consumption reduction 100%
Smooth rotation animations 100%
Test possible crash and server errors 100%
The issue of high memory consumption is considered concluded. However, there are
more features where the solution found for the POI galleries, by decoding the
images and using the garbage collector, could be applied. This solution was not
implemented in all the possible places because, if we want to reduce memory
consumption, the increase on the number of operations will affect the application

Android development - VPorto
Diogo Pereira - 1101007 70
performance. With this, it was decided by the company to apply the solution only in
the POI galleries.
The features that presented the biggest challenge were the animations effects and
the navigation. Having to implement and control the fragment behaviour was not an
easy task for someone inexperienced in this technology.
Since the big change from version 1 to version 2 was the change in layout design,
navigation and animations, being assigned with the task to implement both
navigation and animations within a short time was a big responsibility. These were
the tasks that involved more research, tests and the biggest decisions. The solution
found made the company change the full structure of the application by changing
the Fragments being used. The difference between the previous Fragment class and
the new one was precisely the navigation between Fragments.
4.2 Limitations and future work
Since the beginning of the project, the VPorto had deadlines that needed to be
accomplished. The amount of work developed in the first versions was less than the
work done in version 2.0 as I was gradually getting used to the programming
language and the Android environment.
For future work, the application still needs some corrections but new features are
not being added since this project will be terminated in a near time.
There are some limitations in the navigation system and it cannot be considered
complete because of the problems that it brings. The navigation system is very
fragile and even a simple change on the application structure may require a full
redefinition of the navigation methods. If, in the future, a new fragment is added,
the navigation will have to be carefully treated and to keep that alert, it was not
considered complete.
It was a challenge to have a company partner demanding to implement features
that, in my opinion, would not make the application user friendly. All the attempts of
explaining what problems could occur by implementing the features as, the company
partner, wanted to were unsuccessful, making the application navigation difficult

Android development - VPorto
Diogo Pereira - 1101007 71
and very slow, not bringing a good user experience. The first critic on the Google Play
platform where the application is available for download said that the application
caused the user “motion sickness”. Another critic said that the application has a
strong error proof but, in user experience, it is very disappointing.
Even so, after successfully implement all the features, the Around Knowledge
Android development team was able to achieve all the requirements that the
partner Control S had imposed.
4.3 Final Balance
This internship experience was very gratifying. It let me know a great team, not
referring just to the Android developers but to the whole company. Having the
experience of working in a company that has a very strong union policy makes the
worker feel more safe, stable and confident. Since it is a small company, every
personal from the different departments (marketing, development) worked on the
same workspace and, because of the low range of ages, there were almost no
conflicts at all. Around Knowledge is a fast growing company and, even if it is starting
to grow now, they gave me a chance of staying in the company after the internship.
The software development process was also not as expected or how it was “learned”
during the degree. In the degree, it was required that we made an exhaustive
analysis of the functional and non-‐functional requirements and it was imperative
that the documentation was done (mainly) before and during the implementation.
There was no documentation created before the implementation because the strict
deadlines and because the application architecture was dependable of a, very
frequently, changing mind company, Control S. The documentation used in this
project, was all created to use in this report.
With this experience, I have also notice that the iOS and Android development are
very different. As an example, the iOS team is composed by one element only and
the Android team is composed by three elements. Even so, the Application for iOS
would frequently finish its tasks earlier. The conclusion I retrieved is that, the iOS
environment is easier but more limited, while in Android, because of the capability

Android development - VPorto
Diogo Pereira - 1101007 72
to control the whole behaviour of the application, is more complex an have a full
control of the device capacities.
At the end, I am satisfied with my performance, experience and the achieved results.
I have managed to learn the language I wanted in a short period of time with the
constant assist of the company supervisor.

Android development - VPorto
Diogo Pereira - 1101007 73
References Atlassian. (2013). Free Git & Mercurial client for Windows or Mac. Retrieved July 07,
2013 from Atlassian SourceTree Web site: http://www.sourcetreeapp.com/
Control S. (2013). Homepage: V Porto. Retrieved July 7, 2013 from V Porto Web site:
http://www.vporto.com/
Foundation, T. E. (2013). Eclipse -‐ The Eclipse Foundation. Retrieved February 2013
from Eclipse Web site: http://www.eclipse.org/
Google. (2007). Activities. Retrieved March 2013 from Android Developers:
http://developer.android.com/reference/android/app/Activity.html
Google. (2007, November). Android. Retrieved February 2013 from Android web site:
http://www.android.com/
Google. (2007). Android Developers SlidingDrawer. Retrieved June 2013 from
Android Developers:
http://developer.android.com/reference/android/widget/SlidingDrawer.html
Google. (2007). Fragments. Retrieved March 2013 from Android Developers:
http://developer.android.com/guide/components/fragments.html
Google. (2007). Getting Started | Android Developers. Retrieved 7 9, 2013 from
Android Developers Training Web site: http://developer.android.com/training
Google. (2013). Google Play Services. Retrieved March 2013 from Android
Developers Web site: http://developer.android.com/google/play-‐services
Google. (2007). LocationProvider. Retrieved April 2013 from Android Developers
Web site:
http://developer.android.com/reference/android/location/LocationProvider.html
Google. (2007). logcat. Retrieved March 2013 from Android Developers:
http://developer.android.com/tools/help/logcat.html
Lang, J.-‐P. (2006). Redmine. Retrieved July 8, 213 from Redmine Web site:
http://www.redmine.org/

Android development - VPorto
Diogo Pereira - 1101007 74
Samlan, Y. (2009). GitHub. Retrieved May 2013 from ysamlan, GitHub:
https://github.com/ysamlan
Schwaber, K., & Sutherland, J. (2011, October). Scrum.org. Retrieved June 2013 from
Improving the Profession of Software Development:
http://www.scrum.org/Portals/0/Documents/Scrum%20Guides/Scrum_Guide.pdf
Team, G. (2003). Free project scheduling and management. Retrieved july 8, 2013
from GanttProject Web site: http://www.ganttproject.biz/
Vogel, L. (2010). Android ListView -‐ Tutorial. Retrieved April 2013 from Vogella
Articles Web site: http://www.vogella.com/articles/AndroidListView


![[ ] [ iOS/Android ] 5 aH 2020 WINTER INTERNSHIP KYOTO ......IT • amos / Android / 12 2 Swift (iOS) , Kotlin (Android) , PHP, Ruby F530- 0011 7141 -0031 F690- 0826 Sleipnir 99-B 14F](https://static.fdocuments.net/doc/165x107/6101c8573ad8891bda723df9/-iosandroid-5-ah-2020-winter-internship-kyoto-it-a-amos-android.jpg)