Interactive System Productivity Facility (ISPF) - Freetesta.roberta.free.fr/My Books/Mainframe/jcl...
58
Interactive System Productivity Facility (ISPF) June 1998 TITLE VI Systems Access Manual CHAPTER 2 Remote Site Usage SECTION 2 Interactive System Productivity Facility (ISPF) National Finance Center Office of the Chief Financial Officer U.S. Department of Agriculture Procedures
Transcript of Interactive System Productivity Facility (ISPF) - Freetesta.roberta.free.fr/My Books/Mainframe/jcl...

InteractiveSystemProductivityFacility (ISPF)
June 1998
TITLE VISystems Access Manual
CHAPTER 2Remote Site Usage
SECTION 2Interactive System Productivity Facility (ISPF)
National Finance CenterOffice of the Chief Financial OfficerU.S. Department of Agriculture
Procedures
Title VI, Chapter 2, Section 2Interactive System Productivity Facility (ISPF)
iTable Of Contents
Table Of Contents
About This Procedure iii. . . . . . . . . . . . . . . . . . . . . . . . . . . . . . . . . . . . . . . . . . . . How The Procedure Is Organized iii. . . . . . . . . . . . . . . . . . . . . . . . . . . . . . . . . . What Conventions Are Used iii. . . . . . . . . . . . . . . . . . . . . . . . . . . . . . . . . . . . . . Who To Contact For Help iv. . . . . . . . . . . . . . . . . . . . . . . . . . . . . . . . . . . . . . . .
Introduction 1. . . . . . . . . . . . . . . . . . . . . . . . . . . . . . . . . . . . . . . . . . . . . . . . . . . . . System Overview 1. . . . . . . . . . . . . . . . . . . . . . . . . . . . . . . . . . . . . . . . . . . . . . .
System Capabilities And Interface 1. . . . . . . . . . . . . . . . . . . . . . . . . . . . . . . Responsibilities 1. . . . . . . . . . . . . . . . . . . . . . . . . . . . . . . . . . . . . . . . . . . . .
System Access 2. . . . . . . . . . . . . . . . . . . . . . . . . . . . . . . . . . . . . . . . . . . . . . . . . Security And Remote Terminal Usage 2. . . . . . . . . . . . . . . . . . . . . . . . . . . . Sign-On 2. . . . . . . . . . . . . . . . . . . . . . . . . . . . . . . . . . . . . . . . . . . . . . . . . . . Sign-Off 3. . . . . . . . . . . . . . . . . . . . . . . . . . . . . . . . . . . . . . . . . . . . . . . . . . .
Operating Features 4. . . . . . . . . . . . . . . . . . . . . . . . . . . . . . . . . . . . . . . . . . . . . . System Design 4. . . . . . . . . . . . . . . . . . . . . . . . . . . . . . . . . . . . . . . . . . . . . . Help Screens 4. . . . . . . . . . . . . . . . . . . . . . . . . . . . . . . . . . . . . . . . . . . . . . . System Edits 4. . . . . . . . . . . . . . . . . . . . . . . . . . . . . . . . . . . . . . . . . . . . . . . . Function Keys 5. . . . . . . . . . . . . . . . . . . . . . . . . . . . . . . . . . . . . . . . . . . . . .
ISPF Primary Option Menu 7. . . . . . . . . . . . . . . . . . . . . . . . . . . . . . . . . . . . . . . Description of The Action Bar Menu Options 7. . . . . . . . . . . . . . . . . . . . . . . . .
Using The Menu Option on the Action Bar Menu 8. . . . . . . . . . . . . . . . . . Description of The ISPF Primary Option Menu 9. . . . . . . . . . . . . . . . . . . . . . . .
Establishing Terminal and User Parameters 11. . . . . . . . . . . . . . . . . . . . . . . . Using The Settings Options 11. . . . . . . . . . . . . . . . . . . . . . . . . . . . . . . . . . . . . . .
Using Terminal Characteristics 13. . . . . . . . . . . . . . . . . . . . . . . . . . . . . . . . . Print Graphics Parms 14. . . . . . . . . . . . . . . . . . . . . . . . . . . . . . . . . . . . . . . . . General 14. . . . . . . . . . . . . . . . . . . . . . . . . . . . . . . . . . . . . . . . . . . . . . . . . . . .
Specifying Settings On the Panel Action Bar 15. . . . . . . . . . . . . . . . . . . . . . . Using The Log/List Option 16. . . . . . . . . . . . . . . . . . . . . . . . . . . . . . . . . . . . . . . Establishing Settings on the Log Data Set Defaults Panel 16. . . . . . . . . . . . . . . . Settings for the List Data Set Defaults Panel 18. . . . . . . . . . . . . . . . . . . . . . . . . . Settings for the List Data Set Characteristics Panel 20. . . . . . . . . . . . . . . . . . . . . Settings for the JCL Panel 21. . . . . . . . . . . . . . . . . . . . . . . . . . . . . . . . . . . . . . . .
Viewing/Browsing Data 23. . . . . . . . . . . . . . . . . . . . . . . . . . . . . . . . . . . . . . . . . . . Using the View Entry Panel 23. . . . . . . . . . . . . . . . . . . . . . . . . . . . . . . . . . . . . . .
Settings for the ISPF Library 23. . . . . . . . . . . . . . . . . . . . . . . . . . . . . . . . . . . Other Partitioned or Sequential Data Set Names 24. . . . . . . . . . . . . . . . . . . .
Using the View Panel Action Bar 25. . . . . . . . . . . . . . . . . . . . . . . . . . . . . . . . . . . Browsing A Data Set 25. . . . . . . . . . . . . . . . . . . . . . . . . . . . . . . . . . . . . . . . . . . .
Editing A Data Set 27. . . . . . . . . . . . . . . . . . . . . . . . . . . . . . . . . . . . . . . . . . . . . . . Using the Edit Entry Panel 27. . . . . . . . . . . . . . . . . . . . . . . . . . . . . . . . . . . . . . . .
Title VI, Chapter 2, Section 2Interactive System Productivity Facility (ISPF)
ii Table Of Contents
Settings for the ISPF Library 27. . . . . . . . . . . . . . . . . . . . . . . . . . . . . . . . . . . Other Partitioned or Sequential Data Set Names 28. . . . . . . . . . . . . . . . . . . . Editing A Host Data Set on the Workstation 28. . . . . . . . . . . . . . . . . . . . . . . Editing A Workstation File on the Host 28. . . . . . . . . . . . . . . . . . . . . . . . . . . Editing A Workstation File on the Workstation 28. . . . . . . . . . . . . . . . . . . . . Workstation File 28. . . . . . . . . . . . . . . . . . . . . . . . . . . . . . . . . . . . . . . . . . . . Initial Macro 28. . . . . . . . . . . . . . . . . . . . . . . . . . . . . . . . . . . . . . . . . . . . . . . . Profile Name 28. . . . . . . . . . . . . . . . . . . . . . . . . . . . . . . . . . . . . . . . . . . . . . . Format Name 28. . . . . . . . . . . . . . . . . . . . . . . . . . . . . . . . . . . . . . . . . . . . . . . Using Options 29. . . . . . . . . . . . . . . . . . . . . . . . . . . . . . . . . . . . . . . . . . . . . .
Using the Edit Panel Action Bar 29. . . . . . . . . . . . . . . . . . . . . . . . . . . . . . . . . . .
Using Utilities 31. . . . . . . . . . . . . . . . . . . . . . . . . . . . . . . . . . . . . . . . . . . . . . . . . . . Using Options on the Utility Selection Panel Action Bar 31. . . . . . . . . . . . . . . . Using Library Utility Options 32. . . . . . . . . . . . . . . . . . . . . . . . . . . . . . . . . . . . .
Using the ISPF Library Fields 33. . . . . . . . . . . . . . . . . . . . . . . . . . . . . . . . . . Using Utilities on the Panel Action Bar 33. . . . . . . . . . . . . . . . . . . . . . . . . . . . . . Using the Data Set Utility Options 34. . . . . . . . . . . . . . . . . . . . . . . . . . . . . . . . . . Using Move/Copy Utility 35. . . . . . . . . . . . . . . . . . . . . . . . . . . . . . . . . . . . . . . . . Using the Data Set List Utility 37. . . . . . . . . . . . . . . . . . . . . . . . . . . . . . . . . . . . . Reset ISPF Statistics Utility 38. . . . . . . . . . . . . . . . . . . . . . . . . . . . . . . . . . . . . . . Initiating Hardcopy Output 39. . . . . . . . . . . . . . . . . . . . . . . . . . . . . . . . . . . . . . . .
Creating and Submitting JCL 40. . . . . . . . . . . . . . . . . . . . . . . . . . . . . . . . . . .
Setup/Invoke JES-Master 41. . . . . . . . . . . . . . . . . . . . . . . . . . . . . . . . . . . . . . . . Setting Default Selection Criteria 41. . . . . . . . . . . . . . . . . . . . . . . . . . . . . . . . . . . Display Job List 43. . . . . . . . . . . . . . . . . . . . . . . . . . . . . . . . . . . . . . . . . . . . . . . . JES-Master Commands 43. . . . . . . . . . . . . . . . . . . . . . . . . . . . . . . . . . . . . . . . . .
Primary Commands 43. . . . . . . . . . . . . . . . . . . . . . . . . . . . . . . . . . . . . . . . . . Line Commands 44. . . . . . . . . . . . . . . . . . . . . . . . . . . . . . . . . . . . . . . . . . . . .
VPS Monitor and Control Facility 45. . . . . . . . . . . . . . . . . . . . . . . . . . . . . . . . . VMCF Primary Option Menu 45. . . . . . . . . . . . . . . . . . . . . . . . . . . . . . . . . . VPS Printer Command Menu 46. . . . . . . . . . . . . . . . . . . . . . . . . . . . . . . . . . VPS Printer Selection Menu 47. . . . . . . . . . . . . . . . . . . . . . . . . . . . . . . . . . .
Glossary 49. . . . . . . . . . . . . . . . . . . . . . . . . . . . . . . . . . . . . . . . . . . . . . . . . . . . . . . .
Heading Index Index - 1. . . . . . . . . . . . . . . . . . . . . . . . . . . . . . . . . . . . . . . . . . . . . . . . . .
Title VI, Chapter 2, Section 2Interactive System Productivity Facility (ISPF)
iiiAbout This Procedure
About This Procedure
This procedure provides instructions for accessing and operating the Interactive SystemProductivity Facility (ISPF). The following information will help you to use theprocedure more effectively and to locate further assistance if needed.
How The Procedure Is Organized
The major sections of this procedure are described below:
System Overview describes the system and provides background information.
System Access provides security information and instructions for accessing thesystem.
Operating Features describes the system’s design and how to use the operatingfeatures.
Main Menu gives instructions for selecting the main options.
Glossary contains a definition of terms used in the procedure.
To keep you informed about new or changed information related to this system, NFCissues short publications called bulletins or amendments. This procedure and all relatedbulletins and amendments are listed in the NFC External Publications Index, issuedsemiannually.
Pages are numbered consecutively at the bottom of each page. If the procedure isamended, point pages (e.g., 3.2, 3.3, etc.) are used as needed to accommodate additionalpages. All amended pages are marked at the bottom with the amendment number anddate.
If you begin receiving this procedure after it has been amended, you will receive thepublications with all amendments and bulletins. Remove and insert amended pagesaccording to the accompanying page control chart so that your procedure is current.
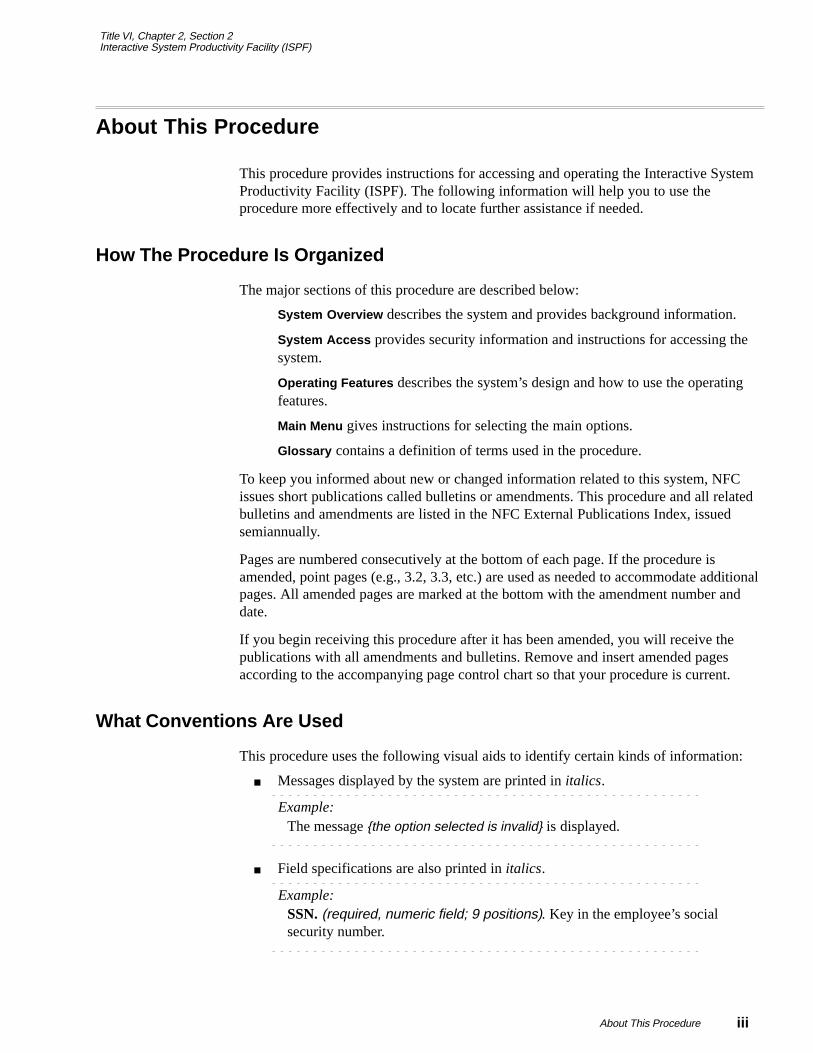
What Conventions Are Used
This procedure uses the following visual aids to identify certain kinds of information:
� Messages displayed by the system are printed in italics.
Example:The message {the option selected is invalid} is displayed.
� Field specifications are also printed in italics.
Example:SSN. (required, numeric field; 9 positions). Key in the employee’s socialsecurity number.
Title VI, Chapter 2, Section 2Interactive System Productivity Facility (ISPF)
iv About This Procedure
� Emphasized text within a paragraph is printed in bold.
� Figure and appendix references link figures and appendixes with the text. Thesereferences are printed in the bold sans serif font shown below.
Example:(see Figure 23 )
� References to sections within the procedure are printed in the same font as figurereferences.
Example:see Introduction
� References to menu options are printed in bold italics.
� References to keys on the keyboard are printed in brackets.
Example:To return to the main menu, press [PF1].
� At the end of instructions for each processing function, optional actions that theuser may take are identified by leaderdots.
Example:To perform another function, select the applicable menu option or toolbutton.
� Important extra information is identified by a note icon in the left margin.
Example:
Window and Help appear on all menu bars and display the same pull-downmenus. Instructions for using Window are provided under Arranging AndViewing Multiple Windows. Instructions for using Help are provided underUsing Help.
Who To Contact For Help
For questions about the system (including help with unusual conditions), contactInformation Center personnel at 504-255-5230.
For access to ISPF, contact your agency’s ADP security officer.
For questions about this procedure, contact the Directives and Analysis Branch at504-255-5322.
Note
Title VI, Chapter 2, Section 2Interactive System Productivity Facility (ISPF)
1Introduction
Introduction
The Interactive System Productivity Facility (ISPF) is a programming tool whichprovides access to partitioned and sequential data sets. The current version of ISPFprovides an action bar-driven interface. The panels look different from the previousversion and most have action bars at the top.
System Overview
ISPF is an application on the OS/390 mainframe operating system used by the U.S.Department of Agriculture (USDA). ISPF helps programmers develop interactiveapplications, called dialogs, which are used to communicate with terminal users.Through a series of panels, users gain access to ISPF functions (menus); requestinformation (data entry panels); and provide information (scrollable data displays).
System Capabilities And Interface
ISPF can be used in the following ways:
� Users can employ ISPF Edit, SCRIPT/VS, and the Hardcopy utility or anotherprint utility provided by their installation to prepare memos and other writtendocuments.
� Data processing administrators and system programmers can use ISPF tomonitor and control program libraries and communicate with MVS throughTSO commands, CLISTs, or REXX EXECS. Programmers can use ISPF todevelop a batch, interactive, or any other type of program and documentation.
� Terminal users can access dialogs that use the Dialog Manager (DM) componentand Program Development Facility (PDF) component dialog services to do thework of the application.
� The View, Browse, and Edit functions, a wide range of utilities, foreground andbatch compilers, program library control, and other facilities are available toassist in developing ISPF dialogs.
Responsibilities
Listed below are the responsibilities of the primary organizations involved in dataprocessing and system maintenance for ISPF.
The National Finance Center (NFC):
� Installs, operates, and maintains the ISPF system.
� Allows developers to program in an interactive environment.
� Provides limited technical support to client agencies.
Title VI, Chapter 2, Section 2Interactive System Productivity Facility (ISPF)
2 Introduction
� Trains agency personnel in the limited use of ISPF.
� Develops and issues ISPF procedures.
The agency:
Uses ISPF to view, edit, move, copy, print, and delete data.
System Access
This section provides access security information and gives specific sign-on/sign-offinstructions.
Security And Remote Terminal Usage
Access security is designed to prevent unauthorized use of systems and data bases. Forinformation about access security, including user identification numbers (user ID’s),passwords, and obtaining access to a specific system, see the Remote Terminal Usageprocedure, Title VI, Chapter 2, Section 1.
To access ISPF, you must (1) have authorized security clearance and (2) use a terminalor personal computer that is connected through your telecommunications network tothe mainframe computer located at OCFO/NFC. For information about connecting anddisconnecting from your telecommunications network, see the instructions that areprovided with your specific network.
Sign-On
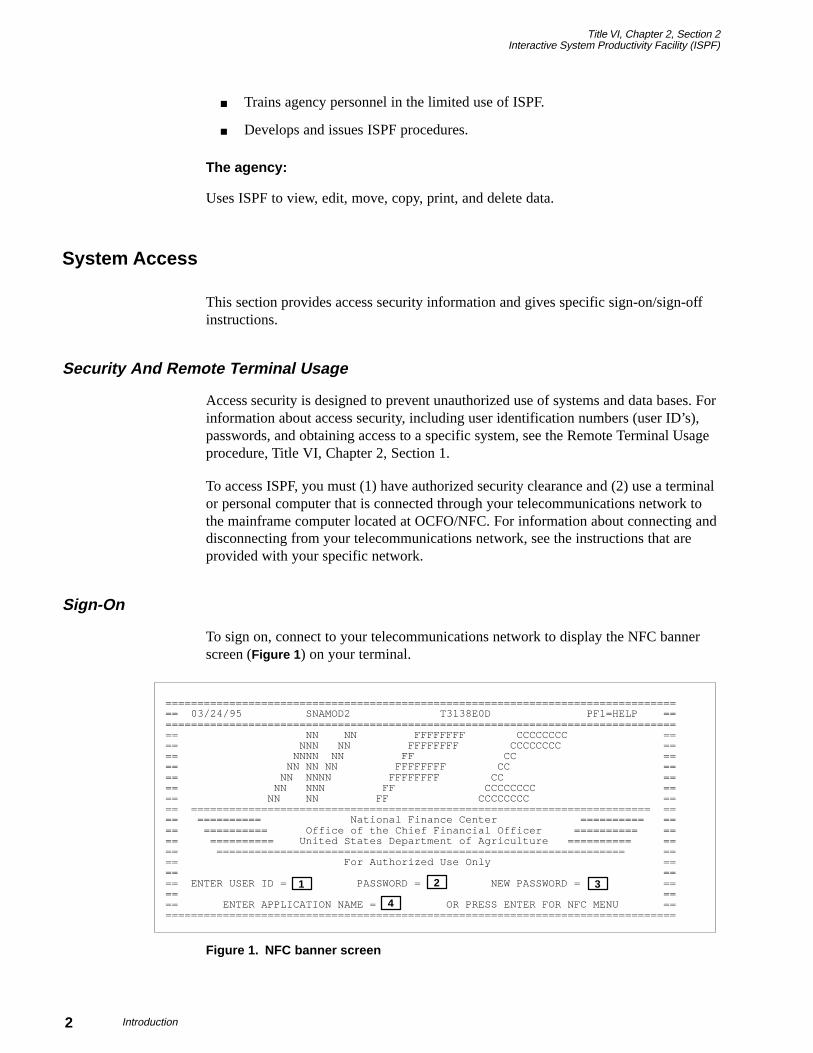
To sign on, connect to your telecommunications network to display the NFC bannerscreen (Figure 1 ) on your terminal.
================================================================================== 03/24/95 SNAMOD2 T3138E0D PF1=HELP ==================================================================================== NN NN FFFFFFFF CCCCCCCC ==== NNN NN FFFFFFFF CCCCCCCC ==== NNNN NN FF CC ==== NN NN NN FFFFFFFF CC ==== NN NNNN FFFFFFFF CC ==== NN NNN FF CCCCCCCC ==== NN NN FF CCCCCCCC ==== ======================================================================== ==== ========== National Finance Center ========== ==== ========== Office of the Chief Financial Officer ========== ==== ========== United States Department of Agriculture ========== ==== ================================================================ ==== For Authorized Use Only ==== ==== ENTER USER ID = PASSWORD = NEW PASSWORD = ==== ==== ENTER APPLICATION NAME = OR PRESS ENTER FOR NFC MENU ==================================================================================
1 2 3
4
Figure 1. NFC banner screen
1 Enter User IDRequired, alphanumeric9 positions max.
2 PasswordRequired, alphanumeric6 to 8 positions
3 New PasswordRequired, alphanumeric6 to 8 positions
4 Enter Application NameRequired, alphanumeric9 positions max.
Title VI, Chapter 2, Section 2Interactive System Productivity Facility (ISPF)
3Introduction
Then respond to the prompts as follows:
Key in your assigned user ID (e.g., NF999). Press [Tab] .
Key in your password. Your password is not displayed on the screen. Thepassword will expire approximately every 35 days. At that time, you areprompted to enter a new password. Press [Tab] .
If your current password expires, key in a new password. Press [Tab] . Youmay change your password any time but not more than once a day.
Key in ISPF and press [Enter] .
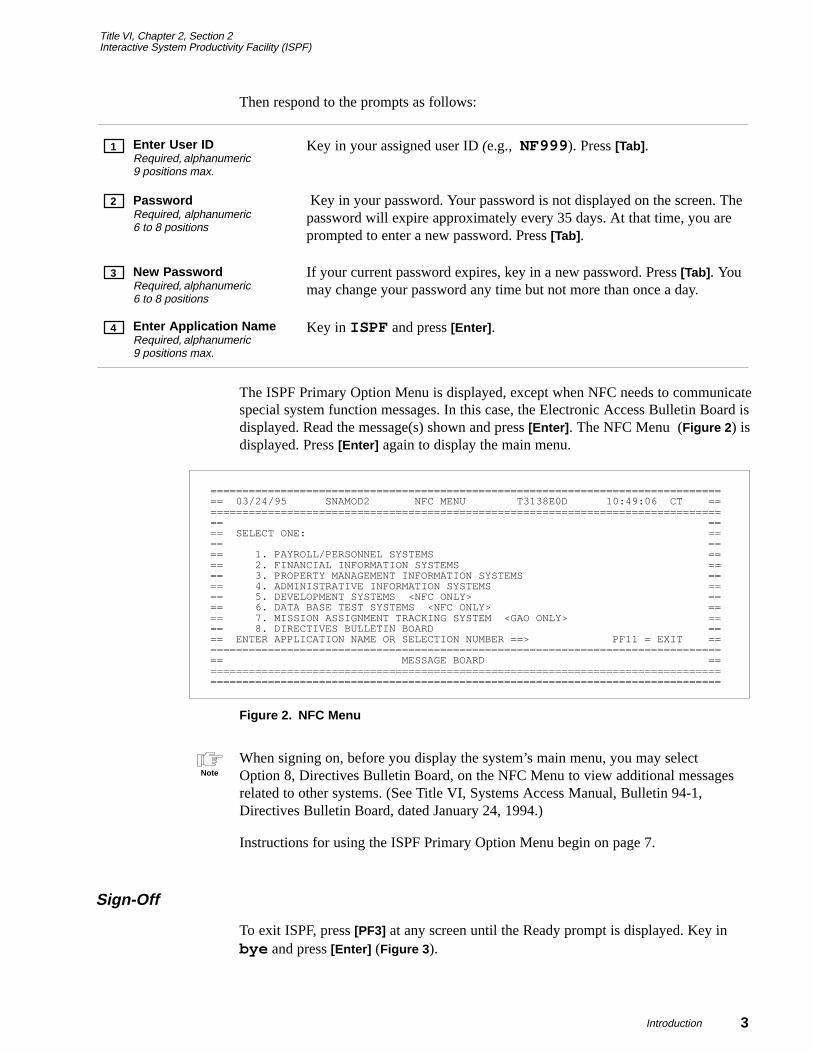
The ISPF Primary Option Menu is displayed, except when NFC needs to communicatespecial system function messages. In this case, the Electronic Access Bulletin Board isdisplayed. Read the message(s) shown and press [Enter] . The NFC Menu (Figure 2 ) isdisplayed. Press [Enter] again to display the main menu.
================================================================================== 03/24/95 SNAMOD2 NFC MENU T3138E0D 10:49:06 CT ==================================================================================== ==== SELECT ONE: ==== ==== 1. PAYROLL/PERSONNEL SYSTEMS ==== 2. FINANCIAL INFORMATION SYSTEMS ==== 3. PROPERTY MANAGEMENT INFORMATION SYSTEMS ==== 4. ADMINISTRATIVE INFORMATION SYSTEMS ==== 5. DEVELOPMENT SYSTEMS <NFC ONLY> ==== 6. DATA BASE TEST SYSTEMS <NFC ONLY> ==== 7. MISSION ASSIGNMENT TRACKING SYSTEM <GAO ONLY> ==== 8. DIRECTIVES BULLETIN BOARD ==== ENTER APPLICATION NAME OR SELECTION NUMBER ==> PF11 = EXIT ==================================================================================== MESSAGE BOARD ==================================================================================================================================================================
Figure 2. NFC Menu
When signing on, before you display the system’s main menu, you may selectOption 8, Directives Bulletin Board, on the NFC Menu to view additional messagesrelated to other systems. (See Title VI, Systems Access Manual, Bulletin 94-1,Directives Bulletin Board, dated January 24, 1994.)
Instructions for using the ISPF Primary Option Menu begin on page 7.
Sign-Off
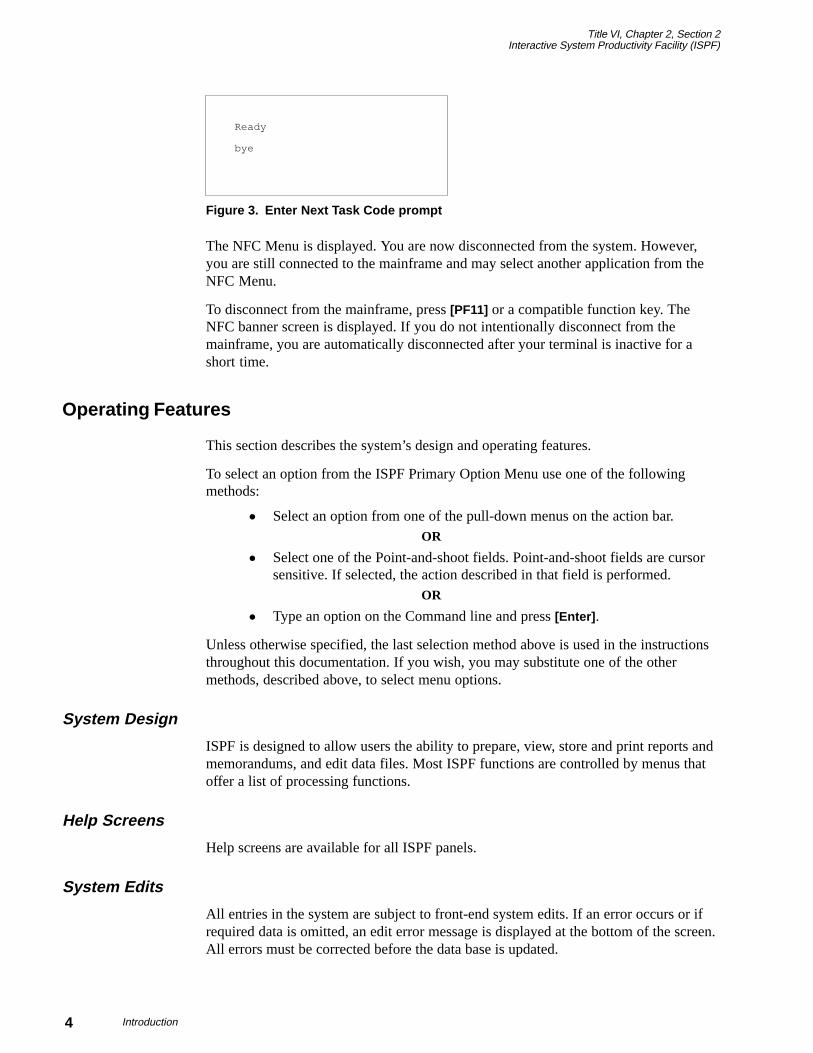
To exit ISPF, press [PF3] at any screen until the Ready prompt is displayed. Key inbye and press [Enter] (Figure 3 ).
Note
Title VI, Chapter 2, Section 2Interactive System Productivity Facility (ISPF)
4 Introduction
Ready
bye
Figure 3. Enter Next Task Code prompt
The NFC Menu is displayed. You are now disconnected from the system. However,you are still connected to the mainframe and may select another application from theNFC Menu.
To disconnect from the mainframe, press [PF11] or a compatible function key. TheNFC banner screen is displayed. If you do not intentionally disconnect from themainframe, you are automatically disconnected after your terminal is inactive for ashort time.
Operating Features
This section describes the system’s design and operating features.
To select an option from the ISPF Primary Option Menu use one of the followingmethods:
� Select an option from one of the pull-down menus on the action bar.OR
� Select one of the Point-and-shoot fields. Point-and-shoot fields are cursorsensitive. If selected, the action described in that field is performed.
OR
� Type an option on the Command line and press [Enter] .
Unless otherwise specified, the last selection method above is used in the instructionsthroughout this documentation. If you wish, you may substitute one of the othermethods, described above, to select menu options.
System Design
ISPF is designed to allow users the ability to prepare, view, store and print reports andmemorandums, and edit data files. Most ISPF functions are controlled by menus thatoffer a list of processing functions.
Help Screens
Help screens are available for all ISPF panels.
System Edits
All entries in the system are subject to front-end system edits. If an error occurs or ifrequired data is omitted, an edit error message is displayed at the bottom of the screen.All errors must be corrected before the data base is updated.
PF1
PF2
PF3
PF9
PF10
PF12
Clear
Enter
Tab
Home
Title VI, Chapter 2, Section 2Interactive System Productivity Facility (ISPF)
5Introduction
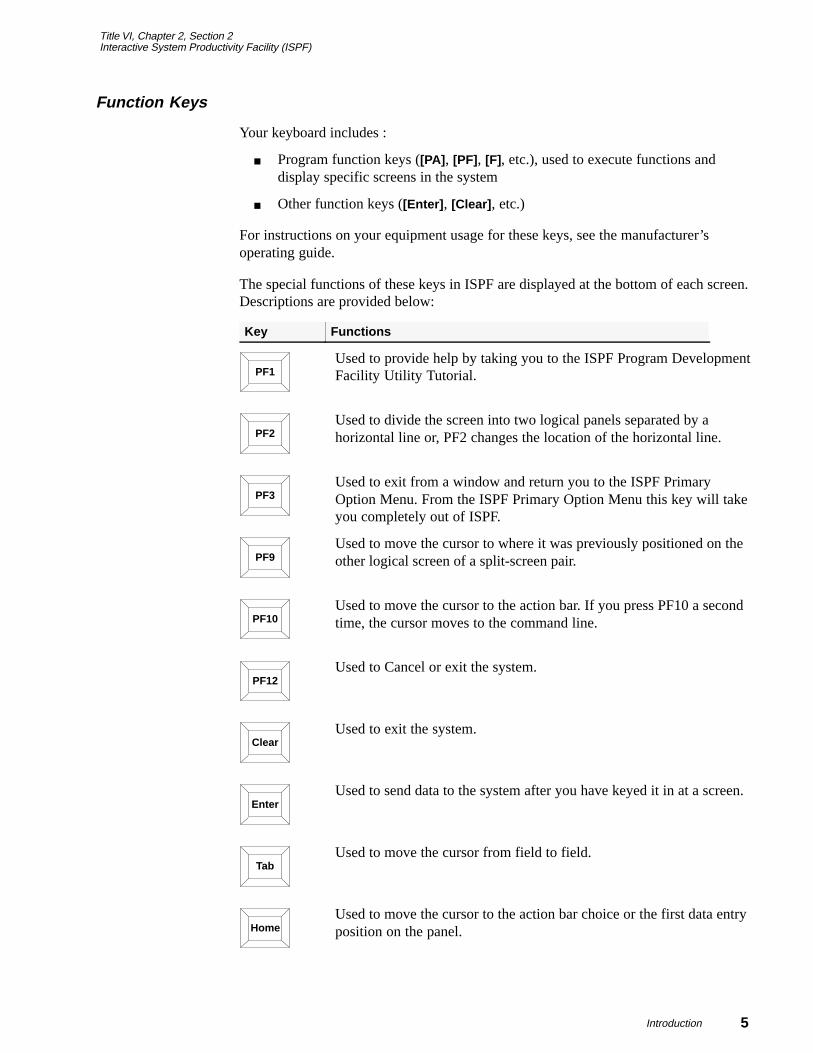
Function Keys
Your keyboard includes :
� Program function keys ([PA] , [PF] , [F] , etc.), used to execute functions anddisplay specific screens in the system
� Other function keys ([Enter] , [Clear] , etc.)
For instructions on your equipment usage for these keys, see the manufacturer’soperating guide.
The special functions of these keys in ISPF are displayed at the bottom of each screen.Descriptions are provided below:
Key Functions
Used to provide help by taking you to the ISPF Program DevelopmentFacility Utility Tutorial.
Used to divide the screen into two logical panels separated by ahorizontal line or, PF2 changes the location of the horizontal line.
Used to exit from a window and return you to the ISPF PrimaryOption Menu. From the ISPF Primary Option Menu this key will takeyou completely out of ISPF.
Used to move the cursor to where it was previously positioned on theother logical screen of a split-screen pair.
Used to move the cursor to the action bar. If you press PF10 a secondtime, the cursor moves to the command line.
Used to Cancel or exit the system.
Used to exit the system.
Used to send data to the system after you have keyed it in at a screen.
Used to move the cursor from field to field.
Used to move the cursor to the action bar choice or the first data entryposition on the panel.
Title VI, Chapter 2, Section 2Interactive System Productivity Facility (ISPF)
6 Introduction
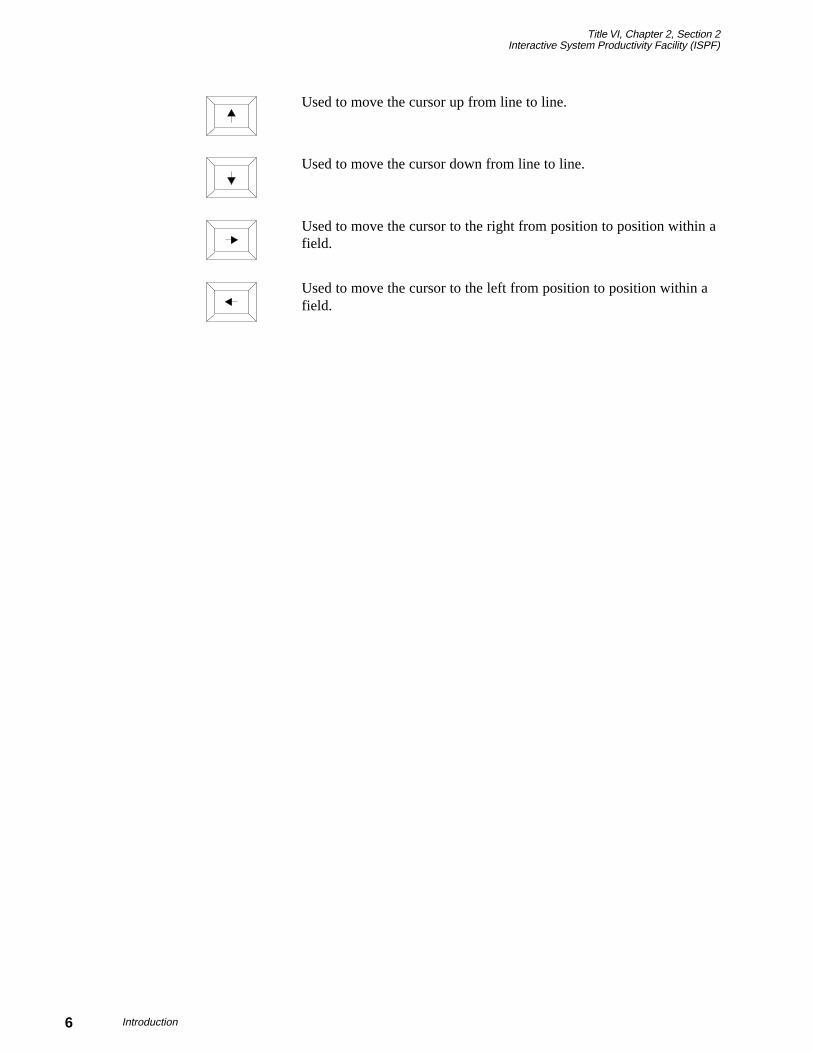
Used to move the cursor up from line to line.
Used to move the cursor down from line to line.
Used to move the cursor to the right from position to position within afield.
Used to move the cursor to the left from position to position within afield.
Title VI, Chapter 2, Section 2Interactive System Productivity Facility (ISPF)
7ISPF Primary Option Menu
ISPF Primary Option Menu
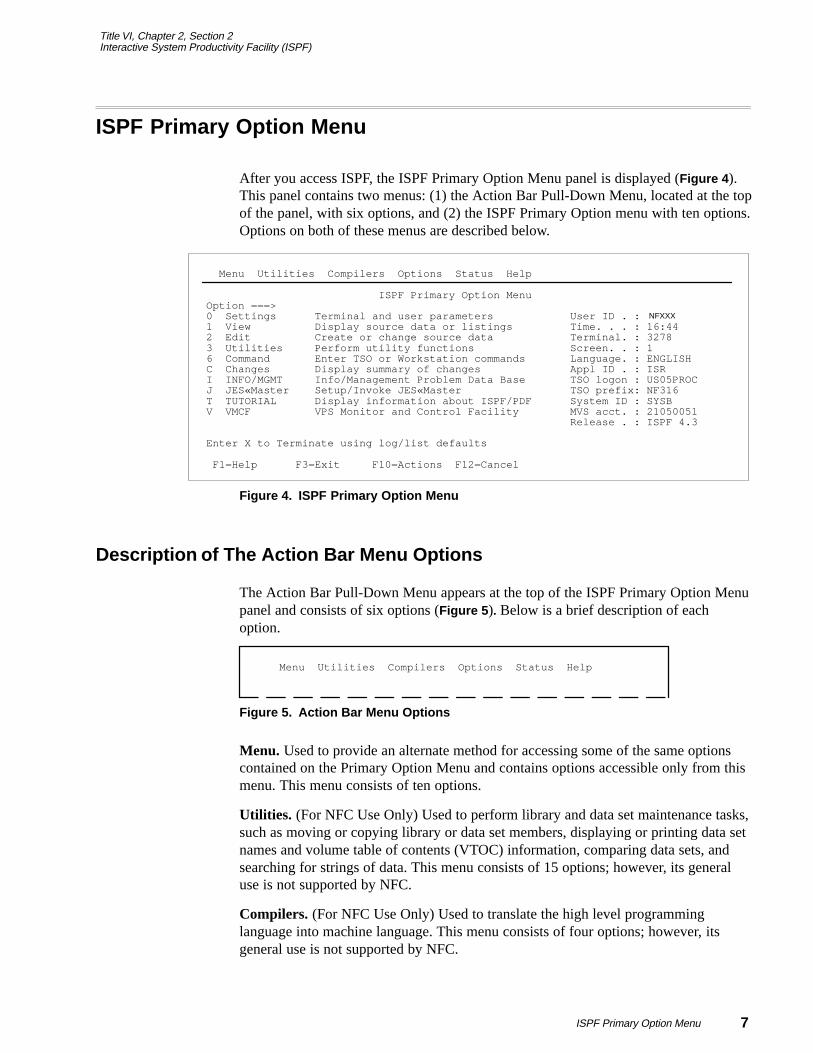
After you access ISPF, the ISPF Primary Option Menu panel is displayed (Figure 4 ).This panel contains two menus: (1) the Action Bar Pull-Down Menu, located at the topof the panel, with six options, and (2) the ISPF Primary Option menu with ten options.Options on both of these menus are described below.
Menu Utilities Compilers Options Status Help
ISPF Primary Option Menu Option ===> 0 Settings Terminal and user parameters User ID . : 1 View Display source data or listings Time. . . : 16:44 2 Edit Create or change source data Terminal. : 3278 3 Utilities Perform utility functions Screen. . : 1 6 Command Enter TSO or Workstation commands Language. : ENGLISH C Changes Display summary of changes Appl ID . : ISR I INFO/MGMT Info/Management Problem Data Base TSO logon : US05PROC J JES«Master Setup/Invoke JES«Master TSO prefix: NF316 T TUTORIAL Display information about ISPF/PDF System ID : SYSB V VMCF VPS Monitor and Control Facility MVS acct. : 21050051 Release . : ISPF 4.3
Enter X to Terminate using log/list defaults
F1=Help F3=Exit F10=Actions F12=Cancel
NFXXX
Figure 4. ISPF Primary Option Menu
Description of The Action Bar Menu Options
The Action Bar Pull-Down Menu appears at the top of the ISPF Primary Option Menupanel and consists of six options (Figure 5 ). Below is a brief description of eachoption.
Menu Utilities Compilers Options Status Help
Figure 5. Action Bar Menu Options
Menu. Used to provide an alternate method for accessing some of the same optionscontained on the Primary Option Menu and contains options accessible only from thismenu. This menu consists of ten options.
Utilities. (For NFC Use Only) Used to perform library and data set maintenance tasks,such as moving or copying library or data set members, displaying or printing data setnames and volume table of contents (VTOC) information, comparing data sets, andsearching for strings of data. This menu consists of 15 options; however, its generaluse is not supported by NFC.
Compilers. (For NFC Use Only) Used to translate the high level programminglanguage into machine language. This menu consists of four options; however, itsgeneral use is not supported by NFC.
Title VI, Chapter 2, Section 2Interactive System Productivity Facility (ISPF)
8 ISPF Primary Option Menu
Options. (For NFC Use Only) Used to display the ISPF Settings panel, the CUAAttribute Change utility, the Keylist Utility panel, Global Color Change Utility panel,and the Dialog Test Application ID pop-up. This menu has six options; however, itsgeneral use is not supported by NFC.
Status. (For NFC Use Only) Used to specify what you want to display in the statusarea. The Status menu consists of six options; however, its general use is not supportedby NFC.
Help. Used to provide assistance in using ISPF.
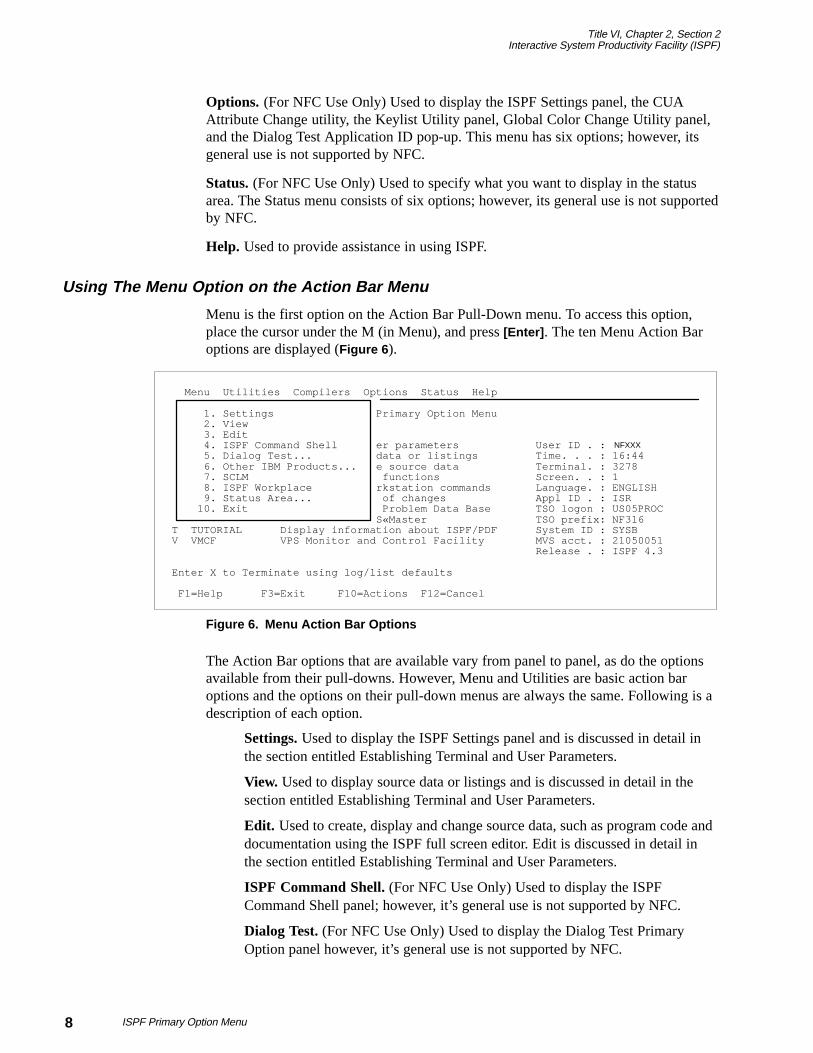
Using The Menu Option on the Action Bar Menu
Menu is the first option on the Action Bar Pull-Down menu. To access this option,place the cursor under the M (in Menu), and press [Enter] . The ten Menu Action Baroptions are displayed (Figure 6 ).
Menu Utilities Compilers Options Status Help 1. Settings Primary Option Menu 2. View 3. Edit 4. ISPF Command Shell er parameters User ID . : 5. Dialog Test... data or listings Time. . . : 16:44 6. Other IBM Products... e source data Terminal. : 3278 7. SCLM functions Screen. . : 1 8. ISPF Workplace rkstation commands Language. : ENGLISH 9. Status Area... of changes Appl ID . : ISR 10. Exit Problem Data Base TSO logon : US05PROC S«Master TSO prefix: NF316 T TUTORIAL Display information about ISPF/PDF System ID : SYSB V VMCF VPS Monitor and Control Facility MVS acct. : 21050051 Release . : ISPF 4.3
Enter X to Terminate using log/list defaults
F1=Help F3=Exit F10=Actions F12=Cancel
NFXXX
Figure 6. Menu Action Bar Options
The Action Bar options that are available vary from panel to panel, as do the optionsavailable from their pull-downs. However, Menu and Utilities are basic action baroptions and the options on their pull-down menus are always the same. Following is adescription of each option.
Settings. Used to display the ISPF Settings panel and is discussed in detail inthe section entitled Establishing Terminal and User Parameters.
View. Used to display source data or listings and is discussed in detail in thesection entitled Establishing Terminal and User Parameters.
Edit. Used to create, display and change source data, such as program code anddocumentation using the ISPF full screen editor. Edit is discussed in detail inthe section entitled Establishing Terminal and User Parameters.
ISPF Command Shell. (For NFC Use Only) Used to display the ISPFCommand Shell panel; however, it’s general use is not supported by NFC.
Dialog Test. (For NFC Use Only) Used to display the Dialog Test PrimaryOption panel however, it’s general use is not supported by NFC.
Title VI, Chapter 2, Section 2Interactive System Productivity Facility (ISPF)
9ISPF Primary Option Menu
Other IBM Products. (For NFC Use Only) Used to display the AdditionalIBM Program Development Products panel however, it’s general use is notsupported by NFC.
SCLM. (For NFC Use Only) Used to display the SCLM Main Menu; however,it’s general use is not supported by NFC.
ISPF Workplace. (For NFC Use Only) Used to display the Workplace entrypanel; however, it’s general use is not supported by NFC.
Status Area. (For NFC Use Only) Used to display the ISPF Status panel;however, it’s general use is not supported by NFC.
Exit. Used to exit ISPF.
Description of The ISPF Primary Option Menu
The ISPF Primary Option menu consists of 10 options (Figure 4 ). Option O, whichwas previously referred to as ISPF Parms, is now referred to as Settings, and optionson the ISPF Primary Option Menu remain the same. Their functionality also remainsthe same. Below is a brief description of each option.
0 Settings. Used to display and change selected ISPF parameters, such asterminal characteristics and function keys at any time during the ISPF session.This option can also be accessed from the Action Bar.
1 View. Used to allow you to view or browse source data and lists stored inISPF libraries or other partitioned or single-volume or multivolume sequentialdata sets. Use View or Browse to look at large data sets, such as compiler lists.You can scroll the data up, down, left, or right. If you are using Browse, a FINDcommand, entered on the command line, allows you to search the data and finda character string. If you are using View, you can use all the commands andmacros available to you in the Edit function.
2 Edit. Used to create, display and change source data, such as program codeand documentation using the ISPF full screen editor. You can scroll the data up,down, left, or right. You can change the data by using Edit line commands,which are entered on the command line.
3 Utilities. Used to perform library and data set maintenance tasks, such asmoving or copying library or data set members, displaying or printing data setnames and volume table of contents (VTOC) information, comparing data sets,and searching for strings of data.
6 Command. (For NFC Use Only). Used to enter TSO commands, CLIST, orREXX EXECs on the Command line of any panel and in the Line Commandfield on data set list displayed; however, it’s general use is not supported byNFC.
C Changes. (For NFC Use Only). Used to provide a summary of changes;however, it’s general use is not supported by NFC.

Title VI, Chapter 2, Section 2Interactive System Productivity Facility (ISPF)
10 ISPF Primary Option Menu
I INFO/MGMT. (For NFC Use Only). Used to provide an organizedframework to manage data processing problems and changes and to maintaininventories and configurations; however, it’s general use is not supported byNFC.
J JES-Master. Used to view and print output data from remote terminals.
T TUTORIAL. Used to provide help and other information about ISPF.
V VMCF. Used for VPS and Control Facility
Instructions follow for using the system options that are supported by NFC.

Title VI, Chapter 2, Section 2Interactive System Productivity Facility (ISPF)
11Establishing Terminal and User Parameters
Establishing Terminal and User Parameters
Terminal and User parameters are established by using the Settings option, on thePrimary Option Menu or the Action Bar Pull-down menu. You are able to display andchange a variety of ISPF parameters at any time during an ISPF session. This facilitycan be started from any command line with the Settings command.
Using The Settings Options
To access the Settings option, type Settings at the command line and press[Enter] . The ISPF Settings panel (Figure 7 ) is displayed showing 10 options.
Log/List Function keys Colors Environ Workstation Identifier Help ISPF Settings Command ===> More: + Options Print Graphics Enter ÿ/ÿ to select option Family printer type 2 Command line at bottom Device name . . . . / Panel display CUA mode Aspect ratio . . . 0 Long message in pop«up Tab to action bar choices Tab to point«and«shoot fields General / Restore TEST/TRACE options Input field pad . . N Session Manager mode Command delimiter . ; / Jump from leader dots Edit PRINTDS Command / Always show split line Terminal Characteristics Screen format 1 1. Data 2. Std 3. Max 4. Part Terminal Type 3 1. 3277 2. 3277A 3. 3278 4. 3278A 5. 3290A 6. 3278T 7. 3278CF 8. 3277KN F1=Help F3=Exit F10=Actions F12=Cancel
Figure 7. ISPF Settings Panel
Below is a description of each option:
� Command Line At Bottom. Used to specify that the command line is to appearat the bottom of each screen. Line commands are valid only when you call themwithin the PDF component. Exceptions are the primary and line commands forEDIT, which are defined in ISPF EDIT and Edit Macros and those defined forOption 8. The ISPF primary option that you are using determines whichcommands are valid.
PDF component primary commands can affect a complete data set or PDSmember, but the line commands can affect only one or more specified lineswithin a data set.
� Panel Display CUA Mode. Used to specify that panels are displayed inCommon User Access (CUA) mode. This selection affects how the longmessage line, command line, and function keys are displayed.
A panel is a predefined display image that you see on a display screen. ISPFformats all panels to fit on a 24-line by 80-character screen. On a 3278 Model 3
Title VI, Chapter 2, Section 2Interactive System Productivity Facility (ISPF)
12 Establishing Terminal and User Parameters
or 4, data that you can scroll occupies the full length of the screen. On a 3278Model 5, ISPF displays information in default mode. Browse and edit data thatis wider than 80 characters is displayed with the smaller native mode characters.Use the Settings option to override the automatic modes.
The Panel display CUA mode field determines where the Command or Optionline and long messages are displayed on the bottom of the panel. The defaultsetting also selects Long message in pop-up, which causes long messages to bedisplayed in a pop-up window directly above Command or Option line. Todisplay the command or option line and long messages at the top of the panel,select option 0, deselect the Panel display CUA mode field, and deselect theCommand line at bottom field.
� Long Message In Pop-up. Used to specify that long messages will bedisplayed in a pop-up window, regardless of the .WINDOW setting in themessage source.
� Tab To Action Bar Choice. Used to specify that you want to use the Tab key tomove the cursor among the action bar choices.
� Tab To Point-and-shoot Fields. Used to specify that you want to use the Tabkey to move the cursor through point-and-shoot fields on a panel. Thepoint-and-shoot fields are cursor-sensitive. If you select a field, the action isperformed.
If you have a command on the command line, this command is processed beforeany point-and-shoot command.
The cursor-sensitive portion of a field often extends past the field name. Youcan use the Tab key to position the cursor to point-and-shoot fields by selectingthe Tab down-and-shoot fields option of the ISPF Settings panel.
� Restore TEST/TRACE Options. Used to specify the restoration of the TESTand TRACE values to the ISPF call values when you exit dialog test.
When you select Dialog Test facility, certain TEST and TRACE options areestablished that can be different than those specified during ISPF start up.
� Session Manager Mode. Used to enter a slash to indicate that the SessionManager should handle any line mode output from the processing program.
To invoke the session manager mode, select it from the Settings panel. If youselect this option, any display output is displayed in the Session ManagerTSOOUT stream.
The function key definitions are not transferred to the Session Manager fromISPF. When the command ends, the Session Manager prompts you to enter anempty line to return to ISPF control and displays the TSO Command Processorpanel again when you do so.
If you do not select Session Manager mode, terminal I/O occurs as though theSession Manager were not installed. The terminal operates in normal TSOfashion. Any communication with the commands is in line-I/O mode. When thecommand ends, three asterisks(***) are displayed. Press [Enter] to display theTSO Command Processor panel again in full screen mode.
Note
Note
Title VI, Chapter 2, Section 2Interactive System Productivity Facility (ISPF)
13Establishing Terminal and User Parameters
To interrupt a TSO command, CLIST, or REXX EXEC, press [PA1] . The TSOcommand ends and the TSO Command Processor panel is displayed again. Ifterminal input is inhibited, press the Reset key before pressing [PA1] . If you arein Session Manager mode, enter a null line to return to ISPF full screen mode.
When the TSO Command Processor panel is displayed again, the command thatwas just processed is displayed to the right of the arrow. Enter anothercommand or the END command to return to the ISPF Primary Option Menu.
� Jump From Leader Dots. Used to enable the ISPF jump function from fieldprompts that have leader dots (. . or ...). Field prompts that have the ==> willalways have the jump function enabled. Enter a slash to enable the function.
� Edit PRINTDS Command. Used to intercept the local print request to allowyou to modify the statement before the PRINTDS command begins. Enter aslash to invoke the function.
If you have selected the Edit PRINTDS command on the ISPF Settings panel andyou specify a local printer ID on either the Log and List Data Set TerminationOptions panel or the Hardcover Utility panel, ISPF displays the Local PrintCommand Edit panel to allow you to edit the PRINTDS command before itprocesses.
� Always Show Split Line. Used to specify that the split line in split screenmode, as seen on a 3270 display, should always be shown. The default for theoption is selected. By deselecting this option, the split line does not displaywhen the screen is split at the top or the bottom of the screen.
Using Terminal Characteristics
The Terminal Characteristics portion of the ISPF Settings panel allows you to specifyvalues for the following terminal characteristics:
Screen Format 1
Specification of screen format applies to 3278 Model 5 (or 3180 set to a modethat emulates the 3278 Model 5) and 3290 terminals only. ISPF ignores screenformat for other types of terminals.
Following are explanations for the terminal types:
� Data. Format is based on data width (for 3278 Model 5 only).
� Std. Format is always 24 x 80 characters.
� Max. Format is always 27 x 132 characters.
� Part. Format uses hardware partitions (3279 only).
If you are in an Edit session or you are using the EDIT service, ISPF will not allowyou to change the screen format.
Terminal Type 3
You must specify a valid terminal type. If you are using a terminal emulator, select thetype that is being emulated (more than likely, a 3278 or 3278x).
Note

Title VI, Chapter 2, Section 2Interactive System Productivity Facility (ISPF)
14 Establishing Terminal and User Parameters
Specification of a terminal type allows ISPF to recognize valid characters. Theterminal type value that you specify to ISPF might not be the actual terminal type. Forexample, if your terminal is a 3279, you specify 3278 because a 3279 terminal has thesame character set as a 3278. The keyboard character sets for the specified terminaland the actual terminal are always compatible. For specific information about the typevalue to specify to ISPF for each supported terminal, refer to Help form the ISPFSettings panel.
Print Graphics Parms
The Print Graphics Parms portion of the ISPF Settings panel allows you to specify thefamily printer type, device name, and aspect ratio. They are described below.
� Family Printer Type . This parameter has a default value of 2, which cannot bechanged.
� Device Name. VTAM node name of the physical printer to which graphicdisplay output is to be routed.
� Aspect Ratio. The manner in which the graphics aspect ratio (relationship todisplayed screen image) is to appear on the printed output. Aspect ratio can beeither of the following:
� 0 Preserves the aspect ratio of the graphic area.
� 1 Preserves the positional relationship between the graphic and thealphanumeric characters outside the graphics area.
General
The General portion of the ISPF Settings panel allows you to specify values forthe input field pad and the command delimiter. They are described below.
� Input Field Pad. Specifies a pad character that controls the initial padding ofblank (unfilled) panel fields, including the selection panels, but not the dataportion, of an Edit display. Within Edit, you control null or blank padding withEdit commands. The pad character specified can be a B (for Blank), N (forNulls), or any special (non-alphanumeric) character.
� Command Delimiter. You can stack commands on the command line byseparating them with a delimiter. The default delimiter, the semicolon, can bechanged using this option. Alphanumeric characters, the period (. ), and theequal sign (=) are not valid command delimiters.
Title VI, Chapter 2, Section 2Interactive System Productivity Facility (ISPF)
15Specifying Settings On the Panel Action Bar
Specifying Settings On the Panel Action Bar
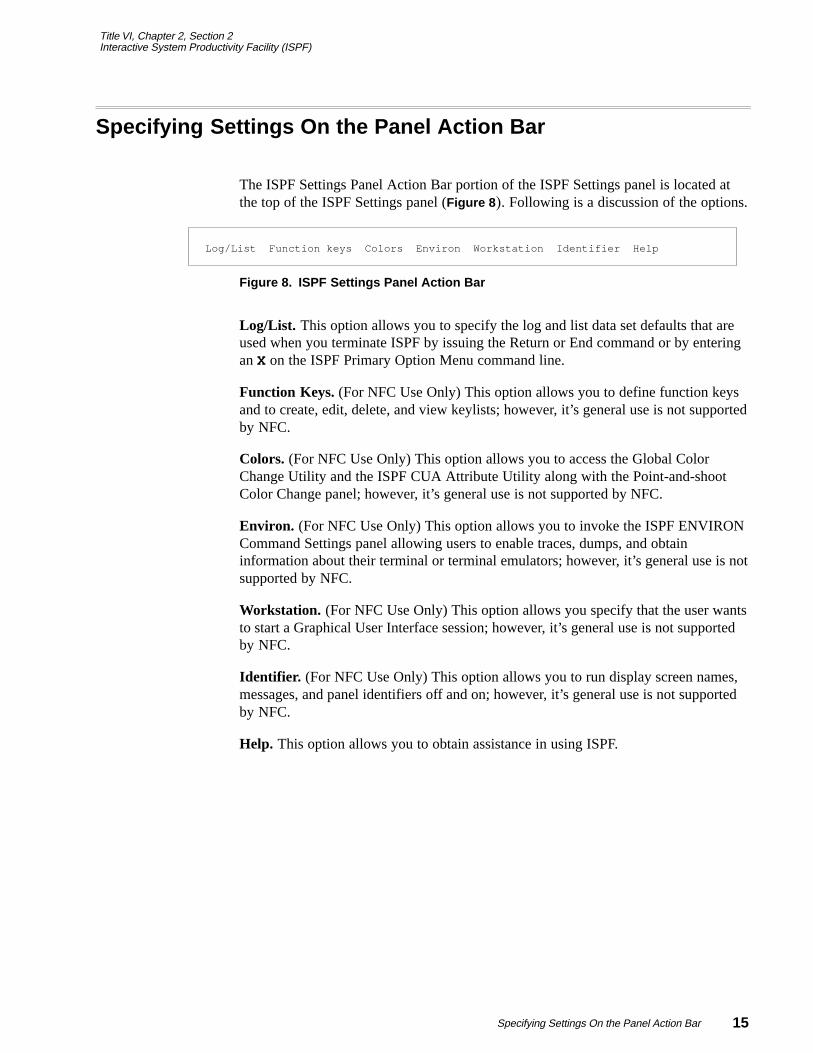
The ISPF Settings Panel Action Bar portion of the ISPF Settings panel is located atthe top of the ISPF Settings panel (Figure 8 ). Following is a discussion of the options.
Log/List Function keys Colors Environ Workstation Identifier Help
Figure 8. ISPF Settings Panel Action Bar
Log/List. This option allows you to specify the log and list data set defaults that areused when you terminate ISPF by issuing the Return or End command or by enteringan X on the ISPF Primary Option Menu command line.
Function Keys. (For NFC Use Only) This option allows you to define function keysand to create, edit, delete, and view keylists; however, it’s general use is not supportedby NFC.
Colors. (For NFC Use Only) This option allows you to access the Global ColorChange Utility and the ISPF CUA Attribute Utility along with the Point-and-shootColor Change panel; however, it’s general use is not supported by NFC.
Environ. (For NFC Use Only) This option allows you to invoke the ISPF ENVIRONCommand Settings panel allowing users to enable traces, dumps, and obtaininformation about their terminal or terminal emulators; however, it’s general use is notsupported by NFC.
Workstation. (For NFC Use Only) This option allows you specify that the user wantsto start a Graphical User Interface session; however, it’s general use is not supportedby NFC.
Identifier. (For NFC Use Only) This option allows you to run display screen names,messages, and panel identifiers off and on; however, it’s general use is not supportedby NFC.
Help. This option allows you to obtain assistance in using ISPF.
Title VI, Chapter 2, Section 2Interactive System Productivity Facility (ISPF)
16 Specifying Settings On the Panel Action Bar
Using The Log/List Option
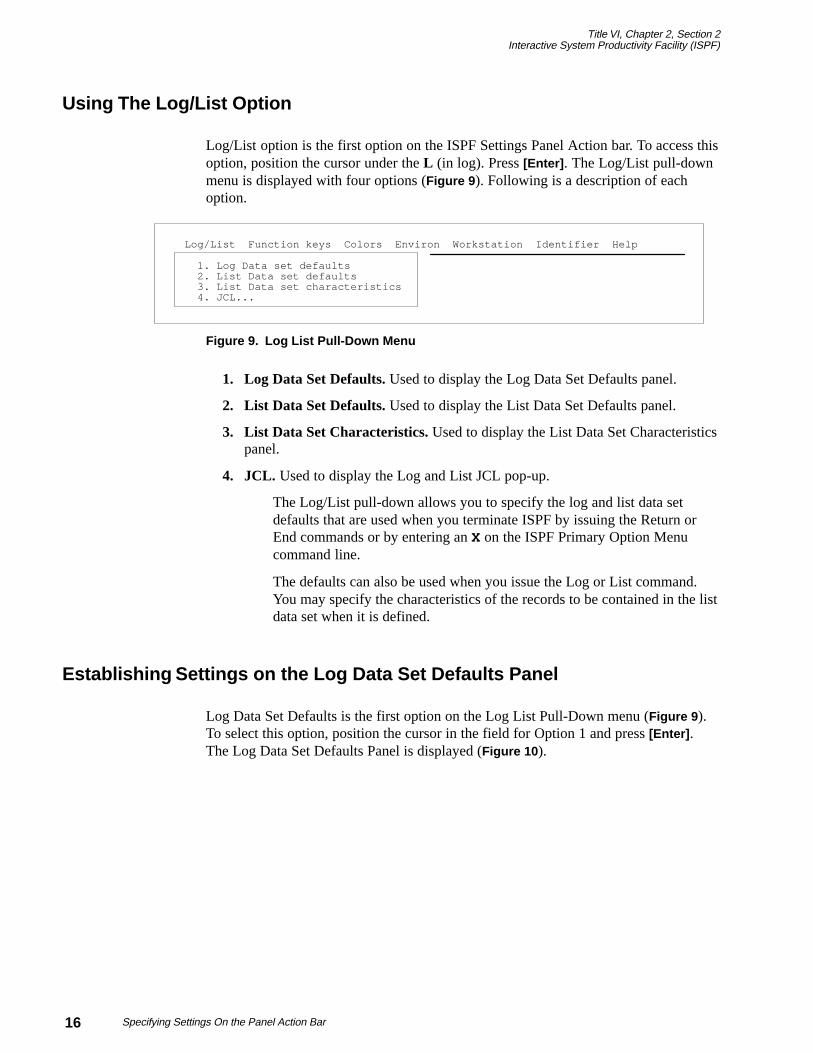
Log/List option is the first option on the ISPF Settings Panel Action bar. To access thisoption, position the cursor under the L (in log). Press [Enter] . The Log/List pull-downmenu is displayed with four options (Figure 9 ). Following is a description of eachoption.
Log/List Function keys Colors Environ Workstation Identifier Help 1. Log Data set defaults 2. List Data set defaults 3. List Data set characteristics 4. JCL...
Figure 9. Log List Pull-Down Menu
1. Log Data Set Defaults. Used to display the Log Data Set Defaults panel.
2. List Data Set Defaults. Used to display the List Data Set Defaults panel.
3. List Data Set Characteristics. Used to display the List Data Set Characteristicspanel.
4. JCL. Used to display the Log and List JCL pop-up.
The Log/List pull-down allows you to specify the log and list data setdefaults that are used when you terminate ISPF by issuing the Return orEnd commands or by entering an X on the ISPF Primary Option Menucommand line.
The defaults can also be used when you issue the Log or List command.You may specify the characteristics of the records to be contained in the listdata set when it is defined.
Establishing Settings on the Log Data Set Defaults Panel
Log Data Set Defaults is the first option on the Log List Pull-Down menu (Figure 9 ).To select this option, position the cursor in the field for Option 1 and press [Enter] .The Log Data Set Defaults Panel is displayed (Figure 10 ).

Title VI, Chapter 2, Section 2Interactive System Productivity Facility (ISPF)
17Specifying Settings On the Panel Action Bar
Log/List Function keys Colors Environ Workstation Identifier Help ISPF Settings Log Data Set Defaults C Process option . . . 2 1. Print data set and delete : +O 2. Delete data set (without printing) 3. Keep data set (append subsequent information to same data set) 4. Keep data set and allocate new data set SYSOUT class . . . . . . A Local printer ID or writer«name . . . . . . Lines per page . . . . . 60 Primary pages . . . . . 10 Secondary pages . . . . 10 Log Message ID . . . . . (/ = Yes) T F1=Help F3=Exit F12=Cancel Terminal Type 3 1. 3277 2. 3277A 3. 3278 4. 3278A 5. 3290A 6. 3278T 7. 3278CF 8. 3277KN F1=Help F3=Exit F10=Actions F12=Cancel
Figure 10. Log Data Set Defaults Panel
The initial defaults are displayed. Following is a description of each setting:
� Process Option. Used to provide four process options.
� Print the data set and delete it. With this option you must also specify aSYSOUT class and job statement information.
� Delete the data set without printing it.
� Keep the data set. ISPF appends new information to the same data set.
� Keep the data set and allocate a new data set for subsequent information.
� SYSOUT Class. Used to enter the SYSOUT class assigned to your systemoutput data set. For example, entering A causes ISPF to use the DD Statement“DD SYSOUT=A” when printing the log data set.
� Local Printer ID. Used to enter the name that your installation has assigned toan IBM 328x type of printer. The default is blank. If you enter a name in thisfield, you must leave the SYSOUT class field empty.
� Lines Per Page. Used to enter the number of lines per page. Normal values are:
� 60 When printing 6 lines per inch
� 80 When printing 8 lines per inch
The number of lines per page can range from 1-999. ISPF uses this value todetermine when to cause a page eject if the eject control is not provided by thedialog.
� Primary/Secondary Pages. Used to allocate primary/secondary parameterswhich are specified in terms of the anticipated number of pages of printout.These values are automatically converted by ISPF to the appropriate number ofblocks prior to allocating space for the log data set.
Title VI, Chapter 2, Section 2Interactive System Productivity Facility (ISPF)
18 Specifying Settings On the Panel Action Bar
If you modify the primary/secondary allocation parameters after the data set has beenallocated, the new values take effect the next time you start ISPF. The log data set isallocated the first time you perform some action that results in a log message, such assaving edited data or submitting a batch job.
Allocate a value of 0 to prevent allocation and generation of the log.
� Log Message ID. If you select the Log Message ID option, the message ID isautomatically added to the long message text written in the LOG data set.
If you request default processing options for the log data set, the following rules apply:
� If you specify Print data set and delete: you must also specify SYSOUTclass and job statement information. If you specify Print data set and deletefor both log and list, you can specify different SYSOUT classes, but onlyone job is submitted for printing both data sets.
� If you specify routing to a local printer, you must specify a printer ID andSYSOUT must be blank.
If you do not follow the aforementioned rules or do not specify default options,primary option X or the Return command causes the final termination panel to bedisplayed.
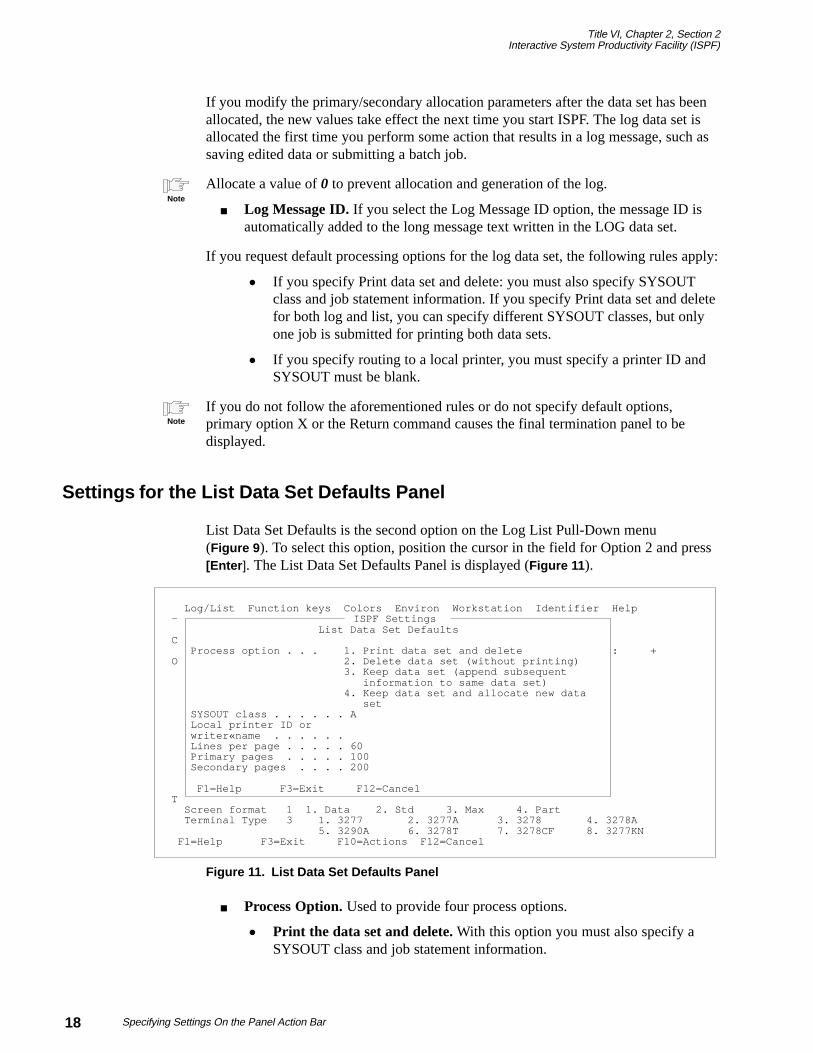
Settings for the List Data Set Defaults Panel
List Data Set Defaults is the second option on the Log List Pull-Down menu(Figure 9 ). To select this option, position the cursor in the field for Option 2 and press[Enter ]. The List Data Set Defaults Panel is displayed (Figure 11 ).
Log/List Function keys Colors Environ Workstation Identifier Help - ISPF Settings List Data Set Defaults C Process option . . . 1. Print data set and delete : + O 2. Delete data set (without printing) 3. Keep data set (append subsequent information to same data set) 4. Keep data set and allocate new data set SYSOUT class . . . . . . A Local printer ID or writer«name . . . . . . Lines per page . . . . . 60 Primary pages . . . . . 100 Secondary pages . . . . 200 F1=Help F3=Exit F12=Cancel T Screen format 1 1. Data 2. Std 3. Max 4. Part Terminal Type 3 1. 3277 2. 3277A 3. 3278 4. 3278A 5. 3290A 6. 3278T 7. 3278CF 8. 3277KN F1=Help F3=Exit F10=Actions F12=Cancel
Figure 11. List Data Set Defaults Panel
� Process Option. Used to provide four process options.
� Print the data set and delete. With this option you must also specify aSYSOUT class and job statement information.
Note
Note
Title VI, Chapter 2, Section 2Interactive System Productivity Facility (ISPF)
19Specifying Settings On the Panel Action Bar
� Delete the data set (without printing).
� Keep the data set (append subsequent information to same data set).ISPF appends new information to the same data set.
� Keep the data set and allocate a new data set. ISPF will keep the dataset and allocate space for subsequent information.
� SYSOUT Class. Used to enter the SYSOUT class assigned to your systemoutput data set. For example, entering A causes ISPF to use the DD Statement“DD SYSOUT=A” when printing the log data set.
� Local Printer ID. Used to enter the name that your installation has assigned toan IBM 328x type of printer. The default is blank. If you enter a name in thisfield, you must leave the SYSOUT class field empty.
� Lines Per Page. Used to enter the number of lines per page. Normal values are:
� 60 When printing 6 lines per inch
� 80 When printing 8 lines per inch
The number of lines per page can range from 1-999. ISPF uses this value todetermine when to cause a page eject if the eject control is not provided by thedialog.
� Primary/Secondary Pages. Used to allocate primary/secondary parameterswhich are specified in terms of the anticipated number of pages of printout.These values are automatically converted by ISPF to the appropriate number ofblocks prior to allocating space for the log data set.
If you modify the primary/secondary allocation parameters after the data set has beenallocated, the new values take effect the next time you start ISPF. The log data set isallocated the first time you perform some action that results in a log message, such assaving edited data or submitting a batch job.
Allocate a value of 0 to prevent allocation and generation of the log.
� Log Message ID. If you select the Log Message ID option, the message ID isautomatically added to the long message text written in the LOG data set.
If you request default processing options for the log data set, the following rules apply:
� If you specify Print data set and delete: you must also specify SYSOUTclass and job statement information. If you specify Print data set and deletefor both log and list, you can specify different SYSOUT classes, but onlyone job is submitted for printing both data sets.
� If you specify routing to a local printer, you must specify a printer ID andSYSOUT must be blank.
If you do not follow the aforementioned rules or do not specify default options,primary option X or the Return command causes the final termination panel to bedisplayed.
After reviewing or changing the parameters on this panel, enter the End command toreturn to the previous menu.
Note
Note
Title VI, Chapter 2, Section 2Interactive System Productivity Facility (ISPF)
20 Specifying Settings On the Panel Action Bar
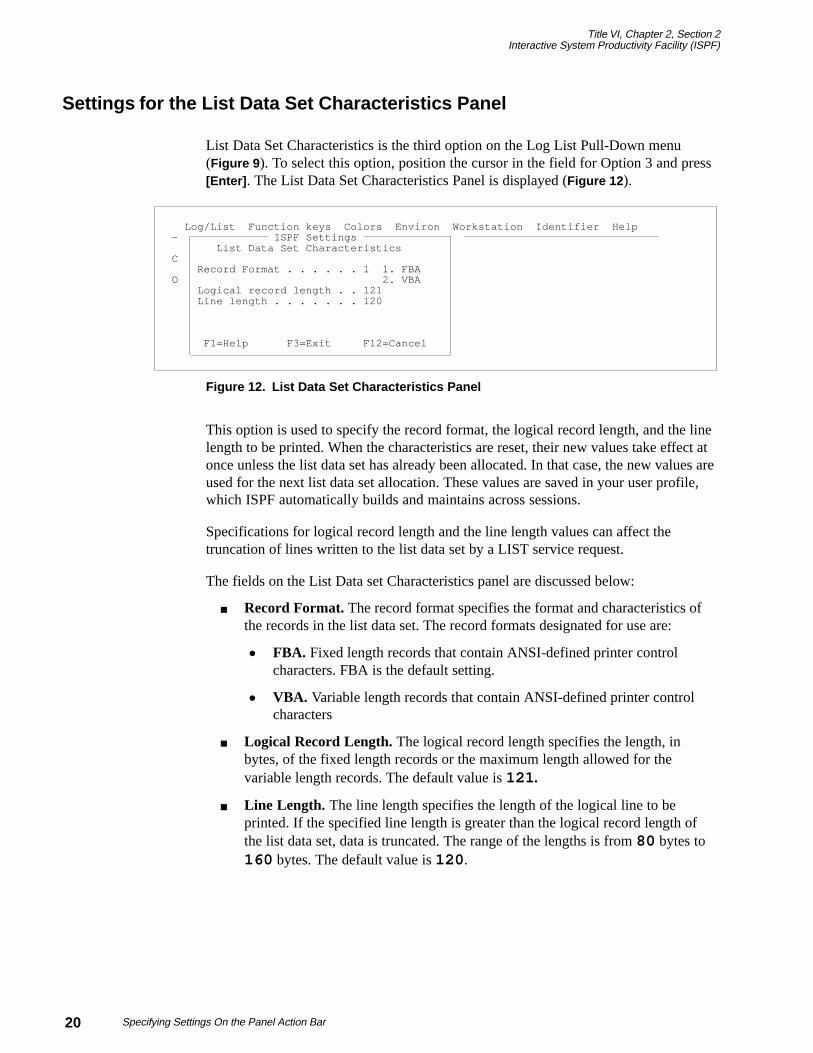
Settings for the List Data Set Characteristics Panel
List Data Set Characteristics is the third option on the Log List Pull-Down menu(Figure 9 ). To select this option, position the cursor in the field for Option 3 and press[Enter] . The List Data Set Characteristics Panel is displayed (Figure 12 ).
Log/List Function keys Colors Environ Workstation Identifier Help - ISPF Settings List Data Set Characteristics C Record Format . . . . . . 1 1. FBA O 2. VBA Logical record length . . 121 Line length . . . . . . . 120 F1=Help F3=Exit F12=Cancel
Figure 12. List Data Set Characteristics Panel
This option is used to specify the record format, the logical record length, and the linelength to be printed. When the characteristics are reset, their new values take effect atonce unless the list data set has already been allocated. In that case, the new values areused for the next list data set allocation. These values are saved in your user profile,which ISPF automatically builds and maintains across sessions.
Specifications for logical record length and the line length values can affect thetruncation of lines written to the list data set by a LIST service request.
The fields on the List Data set Characteristics panel are discussed below:
� Record Format. The record format specifies the format and characteristics ofthe records in the list data set. The record formats designated for use are:
� FBA. Fixed length records that contain ANSI-defined printer controlcharacters. FBA is the default setting.
� VBA. Variable length records that contain ANSI-defined printer controlcharacters
� Logical Record Length. The logical record length specifies the length, inbytes, of the fixed length records or the maximum length allowed for thevariable length records. The default value is 121 .
� Line Length. The line length specifies the length of the logical line to beprinted. If the specified line length is greater than the logical record length ofthe list data set, data is truncated. The range of the lengths is from 80 bytes to160 bytes. The default value is 120 .
Title VI, Chapter 2, Section 2Interactive System Productivity Facility (ISPF)
21Specifying Settings On the Panel Action Bar
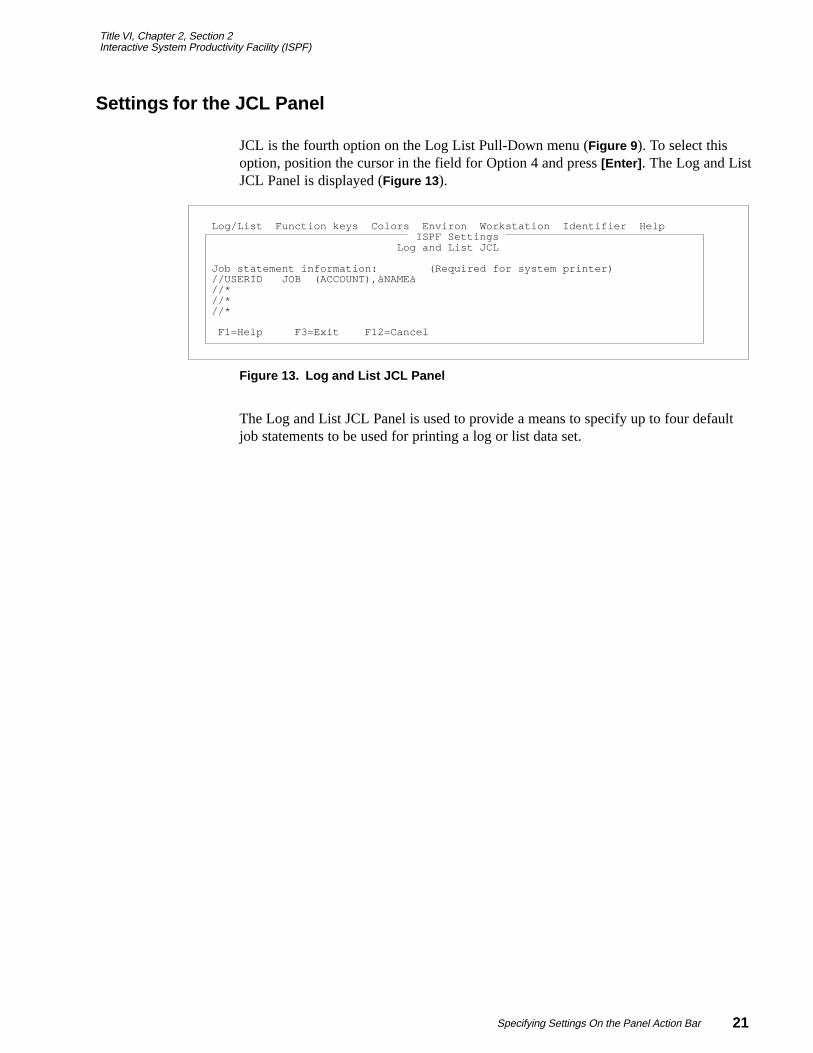
Settings for the JCL Panel
JCL is the fourth option on the Log List Pull-Down menu (Figure 9 ). To select thisoption, position the cursor in the field for Option 4 and press [Enter] . The Log and ListJCL Panel is displayed (Figure 13 ).
Log/List Function keys Colors Environ Workstation Identifier Help ISPF Settings Log and List JCL Job statement information: (Required for system printer) //USERID JOB (ACCOUNT),àNAMEà //* //* //* F1=Help F3=Exit F12=Cancel
Figure 13. Log and List JCL Panel
The Log and List JCL Panel is used to provide a means to specify up to four defaultjob statements to be used for printing a log or list data set.

Title VI, Chapter 2, Section 2Interactive System Productivity Facility (ISPF)
22 Specifying Settings On the Panel Action Bar
Title VI, Chapter 2, Section 2Interactive System Productivity Facility (ISPF)
23Viewing/Browsing Data
Viewing/Browsing Data
Viewing and browsing listings and source data stored in ISPF libraries or otherpartitioned or single-volume or multi-volume sequential data sets are accomplishedthrough the use of the View option. View allows you to use all Edit line commands,primary commands and macros to manipulate the data. Browse allows you to use theBrowse primary commands to manipulate the data.
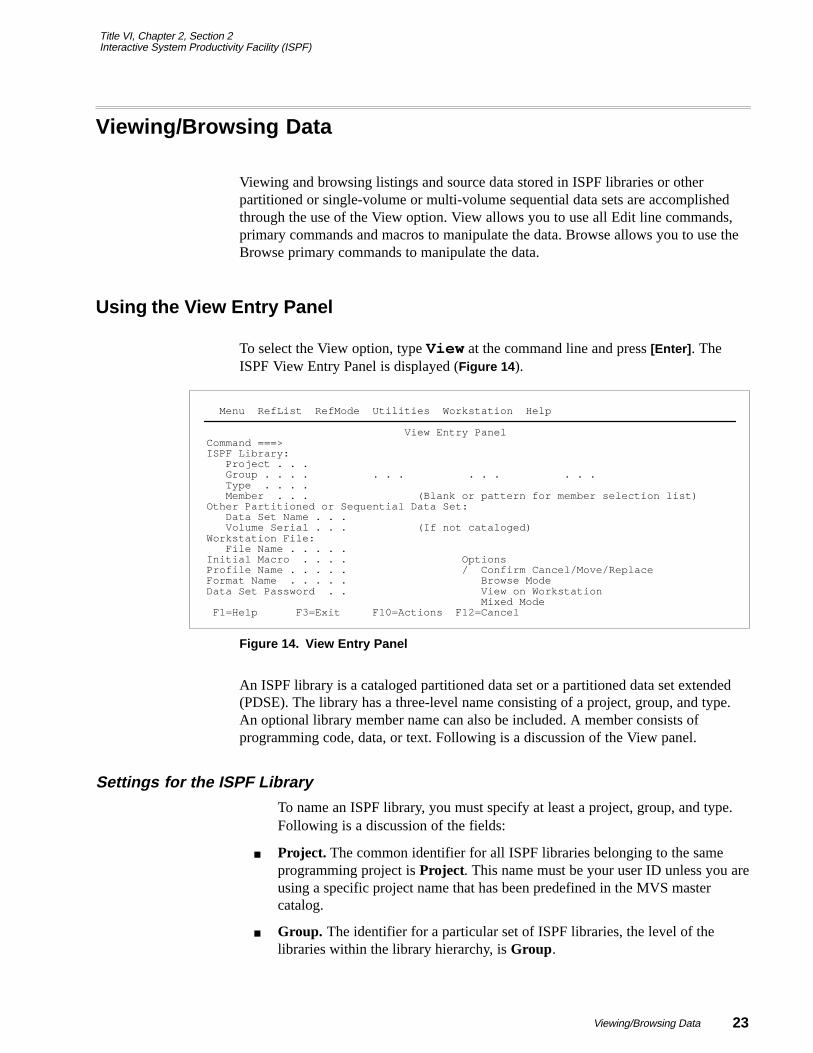
Using the View Entry Panel
To select the View option, type View at the command line and press [Enter] . TheISPF View Entry Panel is displayed (Figure 14 ).
Menu RefList RefMode Utilities Workstation Help
View Entry Panel Command ===> ISPF Library: Project . . . Group . . . . . . . . . . . . . Type . . . . Member . . . (Blank or pattern for member selection list) Other Partitioned or Sequential Data Set: Data Set Name . . . Volume Serial . . . (If not cataloged) Workstation File: File Name . . . . . Initial Macro . . . . Options Profile Name . . . . . / Confirm Cancel/Move/Replace Format Name . . . . . Browse Mode Data Set Password . . View on Workstation Mixed Mode F1=Help F3=Exit F10=Actions F12=Cancel
Figure 14. View Entry Panel
An ISPF library is a cataloged partitioned data set or a partitioned data set extended(PDSE). The library has a three-level name consisting of a project, group, and type.An optional library member name can also be included. A member consists ofprogramming code, data, or text. Following is a discussion of the View panel.
Settings for the ISPF Library
To name an ISPF library, you must specify at least a project, group, and type.Following is a discussion of the fields:
� Project. The common identifier for all ISPF libraries belonging to the sameprogramming project is Project. This name must be your user ID unless you areusing a specific project name that has been predefined in the MVS mastercatalog.
� Group. The identifier for a particular set of ISPF libraries, the level of thelibraries within the library hierarchy, is Group.
Title VI, Chapter 2, Section 2Interactive System Productivity Facility (ISPF)
24 Viewing/Browsing Data
� Type. The identifier for the type of information in the ISPF library, such asPL/1, SCRIPT, or PANELS is Type.
� Member. A member selection list, also called a member list, is initially analphabetic list of the members of an ISPF library or TSO partitioned data set.
Each component of the library name can be up to 8 alphanumeric or nationalcharacters. The first one must be alphabetic.
Other Partitioned or Sequential Data Set Names
You can use the following field to specify any partitioned or sequential data set:
� Data Set Name. You can include either a TSO user prefix or user ID as the firstlevel qualifier of the data set name. If you omit the single quotes and if youhave created a TSO user prefix, that prefix is automatically added to thebeginning of the data set name. If you omit the single quotes and if you do nothave a TSO user prefix, a prefix cannot be added, and the name is used exactlyas it appears.
If you include your user prefix or ID, enclose the data set name withapostrophes. If you include the apostrophe at the beginning of the data set namebut omit the one at the end, ISPF inserts it for you.
� Volume Serial. Along with a data set name, you can optionally specify avolume serial. If you do, the system catalog is not used.
� Initial Macro. You can specify an Edit macro to be processed before you beginviewing your sequential data set or any member of a partitioned data set. Theinitial macro enables you to set up a particular environment for the View sessionyou are beginning. If you leave the Initial Macro field blank and your Editprofile includes an initial macro specification, the initial macro from your Editprofile is processed. To suppress the processing of an initial macro in your Editprofile, enter None in the Initial Macro field.
� Profile Name. You can specify a profile name to override the default Editprofile.
� Format Name. Contains the name of a format definition, which is used to viewor browse a formatted data set.
� Browse Mode. Specifies that you want to browse the data set using the Browsefunction. This function is useful for large data sets and data sets that areformatted RECFM=U.
� Confirm Cancel/Move/Replace. Specifies that you want ISPF to display aconfirmation panel whenever you issue a Cancel, Move, or Replace command.
� Mixed Mode. Specifies that you want to view or browse unformatted data thatcontains both EBCDIC and DBCS characters.
Title VI, Chapter 2, Section 2Interactive System Productivity Facility (ISPF)
25Viewing/Browsing Data
Using the View Panel Action Bar
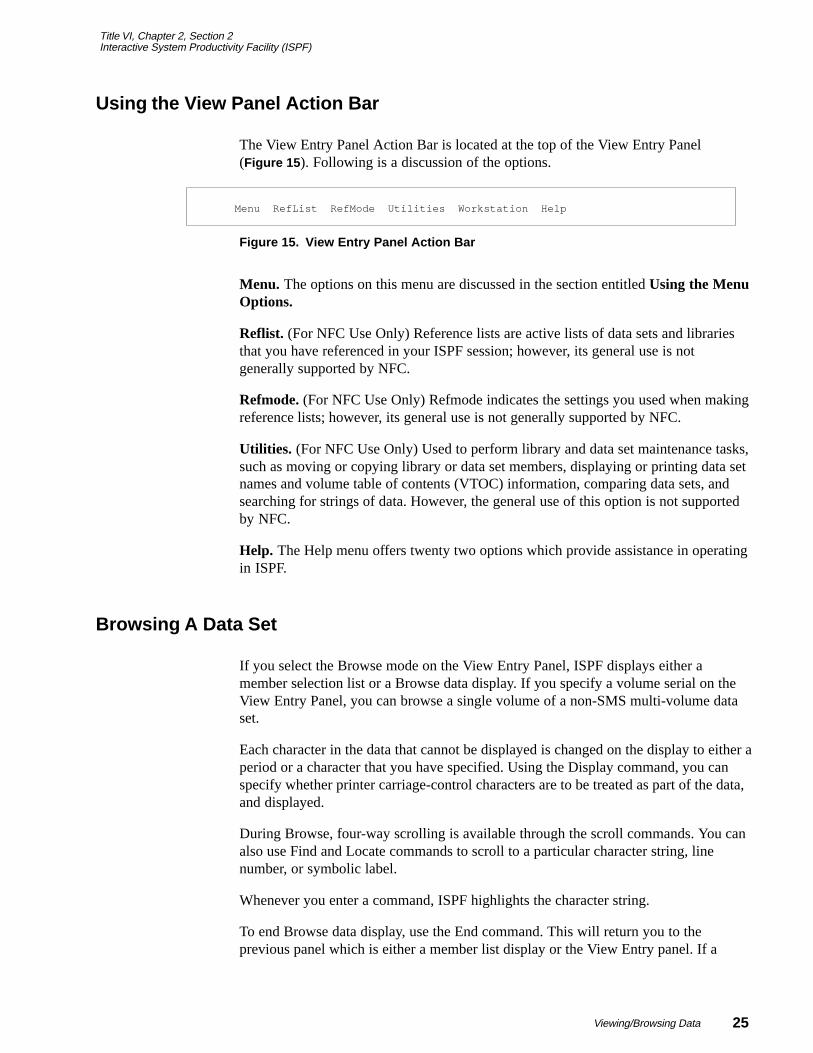
The View Entry Panel Action Bar is located at the top of the View Entry Panel(Figure 15 ). Following is a discussion of the options.
Menu RefList RefMode Utilities Workstation Help
Figure 15. View Entry Panel Action Bar
Menu. The options on this menu are discussed in the section entitled Using the MenuOptions.
Reflist. (For NFC Use Only) Reference lists are active lists of data sets and librariesthat you have referenced in your ISPF session; however, its general use is notgenerally supported by NFC.
Refmode. (For NFC Use Only) Refmode indicates the settings you used when makingreference lists; however, its general use is not generally supported by NFC.
Utilities. (For NFC Use Only) Used to perform library and data set maintenance tasks,such as moving or copying library or data set members, displaying or printing data setnames and volume table of contents (VTOC) information, comparing data sets, andsearching for strings of data. However, the general use of this option is not supportedby NFC.
Help. The Help menu offers twenty two options which provide assistance in operatingin ISPF.
Browsing A Data Set
If you select the Browse mode on the View Entry Panel, ISPF displays either amember selection list or a Browse data display. If you specify a volume serial on theView Entry Panel, you can browse a single volume of a non-SMS multi-volume dataset.
Each character in the data that cannot be displayed is changed on the display to either aperiod or a character that you have specified. Using the Display command, you canspecify whether printer carriage-control characters are to be treated as part of the data,and displayed.
During Browse, four-way scrolling is available through the scroll commands. You canalso use Find and Locate commands to scroll to a particular character string, linenumber, or symbolic label.
Whenever you enter a command, ISPF highlights the character string.
To end Browse data display, use the End command. This will return you to theprevious panel which is either a member list display or the View Entry panel. If a

Title VI, Chapter 2, Section 2Interactive System Productivity Facility (ISPF)
26 Viewing/Browsing Data
member list is displayed, the name of the member you just browsed is at the top of thelist. You can select another member from the list or enter the End command again toreturn to the View Entry panel.
Title VI, Chapter 2, Section 2Interactive System Productivity Facility (ISPF)
27Editing A Data Set
Editing A Data Set
The Edit option allows you to create, display, and change data stored in ISPF librariesor other partitioned or single-volume or multi volume sequential data sets with thefollowing characteristics:
� Record Format (RECFM):
� Fixed or variable (non-spanned)
� Blocked or unblocked
� With or without printer control characters
� Logical Record Length (LRECL):
� From 10 to 32760, inclusive, for fixed length records
� From 14 to 32756, inclusive, for variable length records
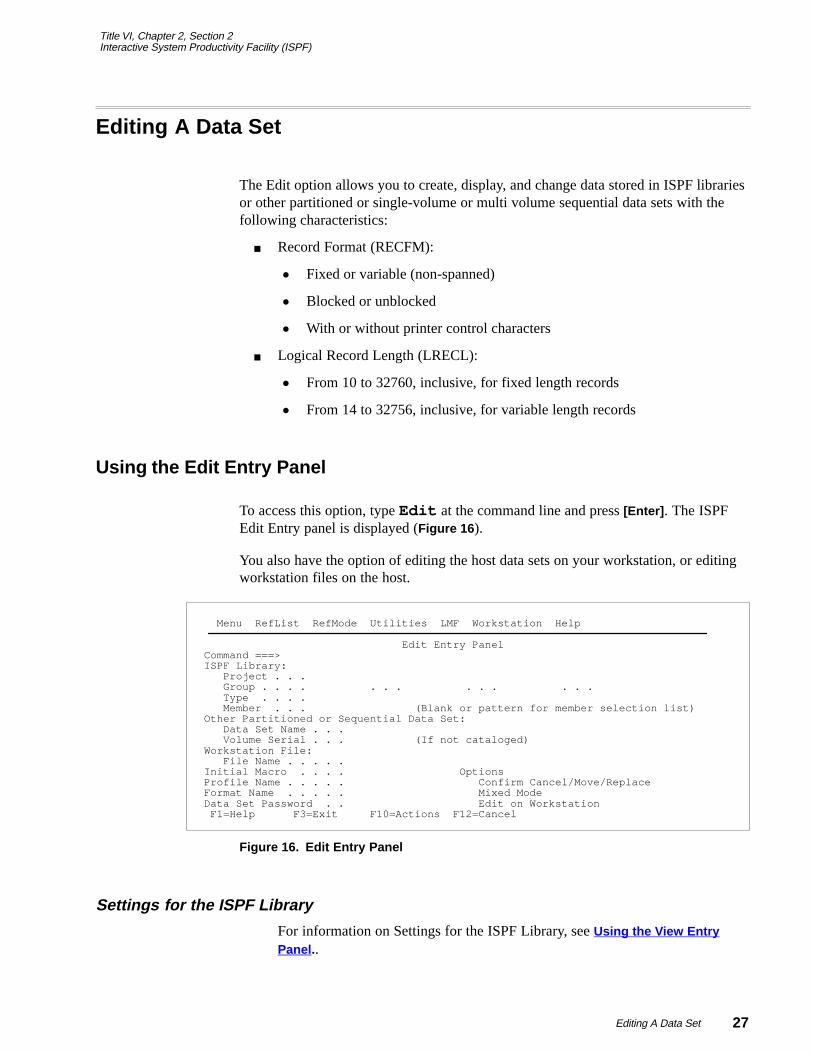
Using the Edit Entry Panel
To access this option, type Edit at the command line and press [Enter] . The ISPFEdit Entry panel is displayed (Figure 16 ).
You also have the option of editing the host data sets on your workstation, or editingworkstation files on the host.
Menu RefList RefMode Utilities LMF Workstation Help Edit Entry Panel Command ===> ISPF Library: Project . . . Group . . . . . . . . . . . . . Type . . . . Member . . . (Blank or pattern for member selection list) Other Partitioned or Sequential Data Set: Data Set Name . . . Volume Serial . . . (If not cataloged) Workstation File: File Name . . . . . Initial Macro . . . . Options Profile Name . . . . . Confirm Cancel/Move/Replace Format Name . . . . . Mixed Mode Data Set Password . . Edit on Workstation F1=Help F3=Exit F10=Actions F12=Cancel
Figure 16. Edit Entry Panel
Settings for the ISPF Library
For information on Settings for the ISPF Library, see Using the View EntryPanel ..
Title VI, Chapter 2, Section 2Interactive System Productivity Facility (ISPF)
28 Editing A Data Set
Other Partitioned or Sequential Data Set Names
For information on settings for the Other Partitioned or Sequential Data SetNames see Using the View Entry Panel .
Editing A Host Data Set on the Workstation
The editor searches the ISPF libraries in the designated order to find themember and copy it to the workstation. The data set name is converted to theworkstation file name, and that name is appended to the workstation’s currentworking directory. The host data set is transferred to the workstation, and theworking file is then passed to the user’s chosen edit program.
Editing A Workstation File on the Host
The editor searches the workstation files to find the appropriate file and copy itinto working storage. The workstation file name is converted to a host data setname, and if greater than 44 characters, it is truncated to be 44 characters. Theworkstation file is then transferred to the host where it can be edited.
Editing A Workstation File on the Workstation
This type of edit proceeds as it normally does on the workstation.
Workstation File
The name of a file on your workstation that you want to edit.
Initial Macro
You can specify a macro to be processed before you begin editing yoursequential data set or any member of a partitioned data set. This initial macroallows you to set up a particular editing environment for the Edit session youare beginning.
If you leave the Initial Macro field blank and your edit profile includes an initialmacro specification, the initial macro from your edit profile is processed.
If you want to suppress the processing of an initial macro in your edit profile,type NONE in the Initial Macro field.
Profile Name
You can specify a profile name to override the default Edit profile.
Format Name
The format name contains the name of a format definition which is used to edita formatted data set.
Title VI, Chapter 2, Section 2Interactive System Productivity Facility (ISPF)
29Editing A Data Set
Using Options
� Confirm Cancel/Move/Replace. Specifies that you want ISPF to display aconfirmation panel whenever you issue a Cancel, Move, or Replace command.
� Mixed Mode. Specifies that you want to edit unformatted data that containsboth EBCDIC and DBCS characters.
Using the Edit Panel Action Bar
Options on the Edit Panel Action Bar are found at the top of the Edit Entry panel andare the same as on the View Edit Panel Action Bar (Figure 15 ). The Menu, Reflist,Refmode, and Utilities options were previously discussed in the View option.Following is a discussion of the remaining options.
� LMF. Used to edit-lock the member if a controlled library that is part of aconcatenation sequence, but only if the member does not exist in your privatelibrary. Specify one of the following values for LMF:
� Lock-Never. Tells ISPF not to edit-lock the member and to retain thisvalue for the future Edit sessions.
� Lock-No. Tells ISPF not to edit-lock the member, but to change this valueto Yes for the next Edit session.
� Lock-Yes. Tells ISPF to edit-lock the member. The member is lockedunder your user ID.
Edit-locking is important for two reasons:
� Keeping other users from accessing that member while you are editing it.
� Promoting the member back to the controlled library when you havefinished editing it. If you do not edit-lock the member, you cannot promoteit.
If you save any changes you made while editing the member, it remains locked in yourprivate library. The version of the member stored in the controlled library remainsunchanged until you promote the one in your private library. If you leave Edit withoutsaving the changes, they are lost.
� Workstation. This option is discussed in the section entitled Using the EditEntry Panel.

Title VI, Chapter 2, Section 2Interactive System Productivity Facility (ISPF)
30 Editing A Data Set
Title VI, Chapter 2, Section 2Interactive System Productivity Facility (ISPF)
31Using Utilities
Using Utilities
The Utilities option provides a variety of functions for library, data set and catalogmaintenance.
Using Options on the Utility Selection Panel Action Bar
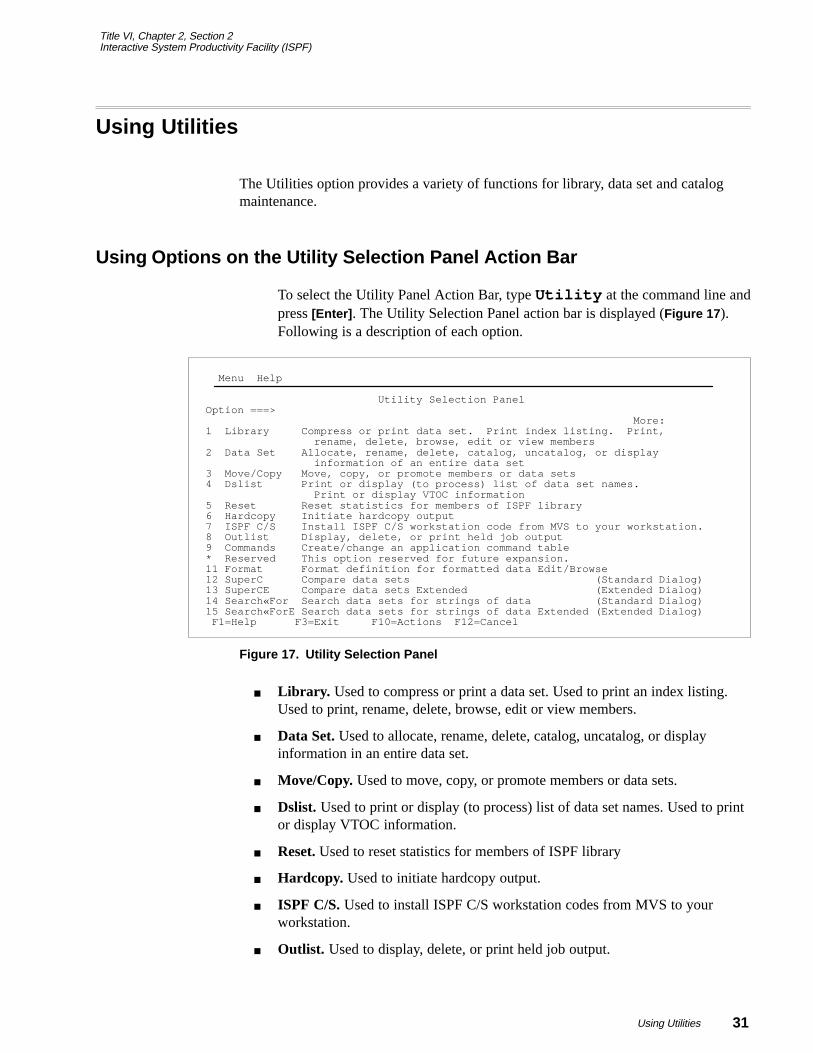
To select the Utility Panel Action Bar, type Utility at the command line andpress [Enter] . The Utility Selection Panel action bar is displayed (Figure 17 ).Following is a description of each option.
Menu Help Utility Selection Panel Option ===> More: 1 Library Compress or print data set. Print index listing. Print, rename, delete, browse, edit or view members 2 Data Set Allocate, rename, delete, catalog, uncatalog, or display information of an entire data set 3 Move/Copy Move, copy, or promote members or data sets 4 Dslist Print or display (to process) list of data set names. Print or display VTOC information 5 Reset Reset statistics for members of ISPF library 6 Hardcopy Initiate hardcopy output 7 ISPF C/S Install ISPF C/S workstation code from MVS to your workstation. 8 Outlist Display, delete, or print held job output 9 Commands Create/change an application command table * Reserved This option reserved for future expansion. 11 Format Format definition for formatted data Edit/Browse 12 SuperC Compare data sets (Standard Dialog) 13 SuperCE Compare data sets Extended (Extended Dialog) 14 Search«For Search data sets for strings of data (Standard Dialog) 15 Search«ForE Search data sets for strings of data Extended (Extended Dialog) F1=Help F3=Exit F10=Actions F12=Cancel
Figure 17. Utility Selection Panel
� Library. Used to compress or print a data set. Used to print an index listing.Used to print, rename, delete, browse, edit or view members.
� Data Set. Used to allocate, rename, delete, catalog, uncatalog, or displayinformation in an entire data set.
� Move/Copy. Used to move, copy, or promote members or data sets.
� Dslist. Used to print or display (to process) list of data set names. Used to printor display VTOC information.
� Reset. Used to reset statistics for members of ISPF library
� Hardcopy. Used to initiate hardcopy output.
� ISPF C/S. Used to install ISPF C/S workstation codes from MVS to yourworkstation.
� Outlist. Used to display, delete, or print held job output.
Title VI, Chapter 2, Section 2Interactive System Productivity Facility (ISPF)
32 Using Utilities
� Commands. Used to create/change an application command table.
� Reserved.
� Format. Used to format definition for formatted data Edit/Browse
� SuperC. Used to compare data sets. (Standard Dialog)
� SuperCE. Used to compare data sets and Search-for strings. (Extended Dialog)
� Search-For. Used to search data sets for strings of data. (Standard Dialog)
Using Library Utility Options
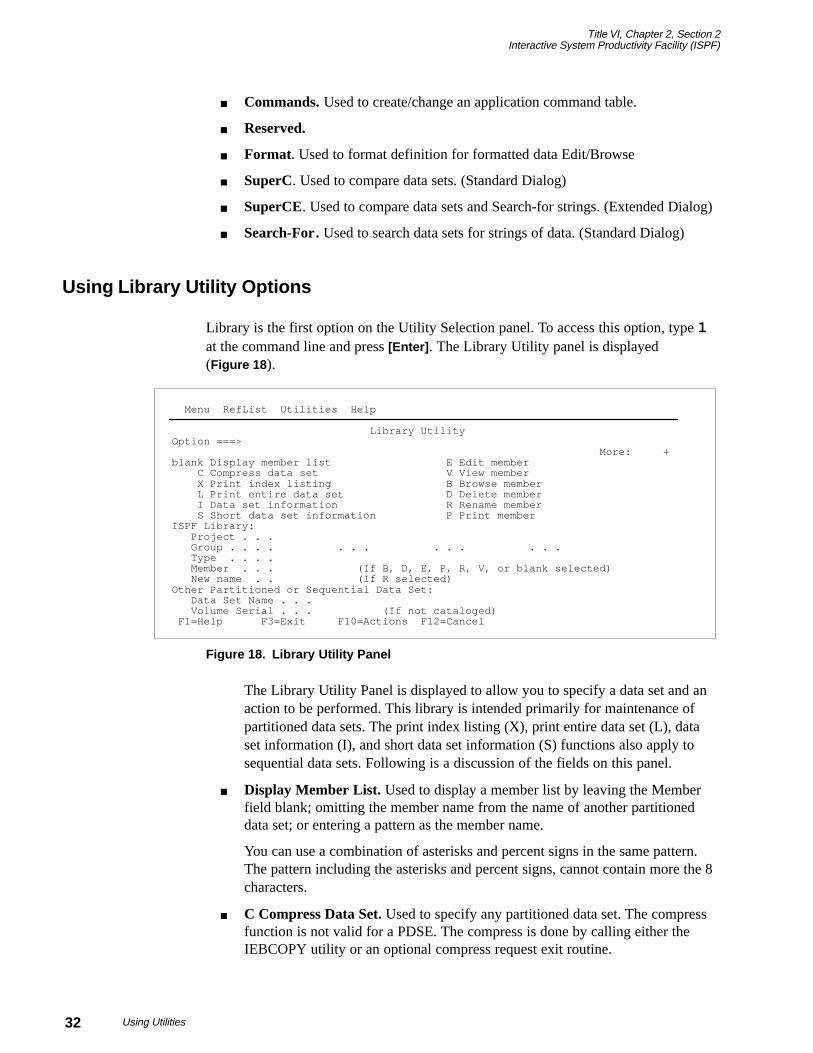
Library is the first option on the Utility Selection panel. To access this option, type 1at the command line and press [Enter] . The Library Utility panel is displayed(Figure 18 ).
Menu RefList Utilities Help Library Utility Option ===> More: + blank Display member list E Edit member C Compress data set V View member X Print index listing B Browse member L Print entire data set D Delete member I Data set information R Rename member S Short data set information P Print member ISPF Library: Project . . . Group . . . . . . . . . . . . . Type . . . . Member . . . (If B, D, E, P, R, V, or blank selected) New name . . (If R selected) Other Partitioned or Sequential Data Set: Data Set Name . . . Volume Serial . . . (If not cataloged) F1=Help F3=Exit F10=Actions F12=Cancel
Figure 18. Library Utility Panel
The Library Utility Panel is displayed to allow you to specify a data set and anaction to be performed. This library is intended primarily for maintenance ofpartitioned data sets. The print index listing (X), print entire data set (L), dataset information (I), and short data set information (S) functions also apply tosequential data sets. Following is a discussion of the fields on this panel.
� Display Member List. Used to display a member list by leaving the Memberfield blank; omitting the member name from the name of another partitioneddata set; or entering a pattern as the member name.
You can use a combination of asterisks and percent signs in the same pattern.The pattern including the asterisks and percent signs, cannot contain more the 8characters.
� C Compress Data Set. Used to specify any partitioned data set. The compressfunction is not valid for a PDSE. The compress is done by calling either theIEBCOPY utility or an optional compress request exit routine.
Title VI, Chapter 2, Section 2Interactive System Productivity Facility (ISPF)
33Using Utilities
� X Print Index Listing. Used to specify either a DASD-resident sequential orpartitioned data set. The index listing is recorded in the ISPF list data set. For apartitioned data set, the index listing includes general information about the dataset followed by a member list. For a sequential data set, the index listingincludes general information.
� L Print Entire Data Set. Used to specify either a DASD-resident sequential orpartitioned data set. The allowable data set characteristics are the same as forBrowse, except that data sets with a logical record length greater than 300characters are not printed. The data should not contain any printer controlcharacters. Use the Hardcopy utility (Option 3.6) to print data sets that containprinter control characters. A source listing of the complete data set (including allmembers of a partitioned data set), preceded by an index listing, is recorded inthe ISPF list data set.
� I Data Set Information. Used to display the location, characteristics, andcurrent space utilization of the specified data set. For sequential data sets,options I and S display current allocation and utilization values that representtotals from all volumes used. Do not enter a volume serial when you arerequesting information on a multivolume data set.
� S Short Data Set Information. Used to display information about the selecteddata set. The information displayed is the same information displayed by OptionS of the Data Set utility, but differs from Option I. Information for partitioneddata sets, when displayed by Option S, lacks the number of maximum and useddirectory blocks, and the number of members. You may not enter a volumeserial when you requisition information on multivolume data sets.
The space for data sets allocated in blocks is calculated as if all of the tracksincluding the last one, contain only full blocks of data. Partial or short blocksare ignored.
Using the ISPF Library Fields
All except one of the fields under ISPF Library on the Library Utility Panel(Figure 18 ) have been explained in the section entitled Settings for the ISPFLibrary (View Entry Panel). The exception is the New Name field, which isdiscussed below.
� New Name. Used to enter a new member name, which is used in conjunctionwith R Rename Member. However, if you are editing a member, you cannotrename the member.
Using Utilities on the Panel Action Bar
The options on the Panel Action Bar are displayed at the top of the LibraryUtility Panel (Figure 18 ). Following is a description of each option.
� Menu. Described in the section entitled Using The Menu Options on the MenuAction Bar.
Title VI, Chapter 2, Section 2Interactive System Productivity Facility (ISPF)
34 Using Utilities
� RefList. Described in the section entitled Using The View Panel Action Bar.
� Utilities. Described in the section entitled Action Bar Pull-Down Menu.
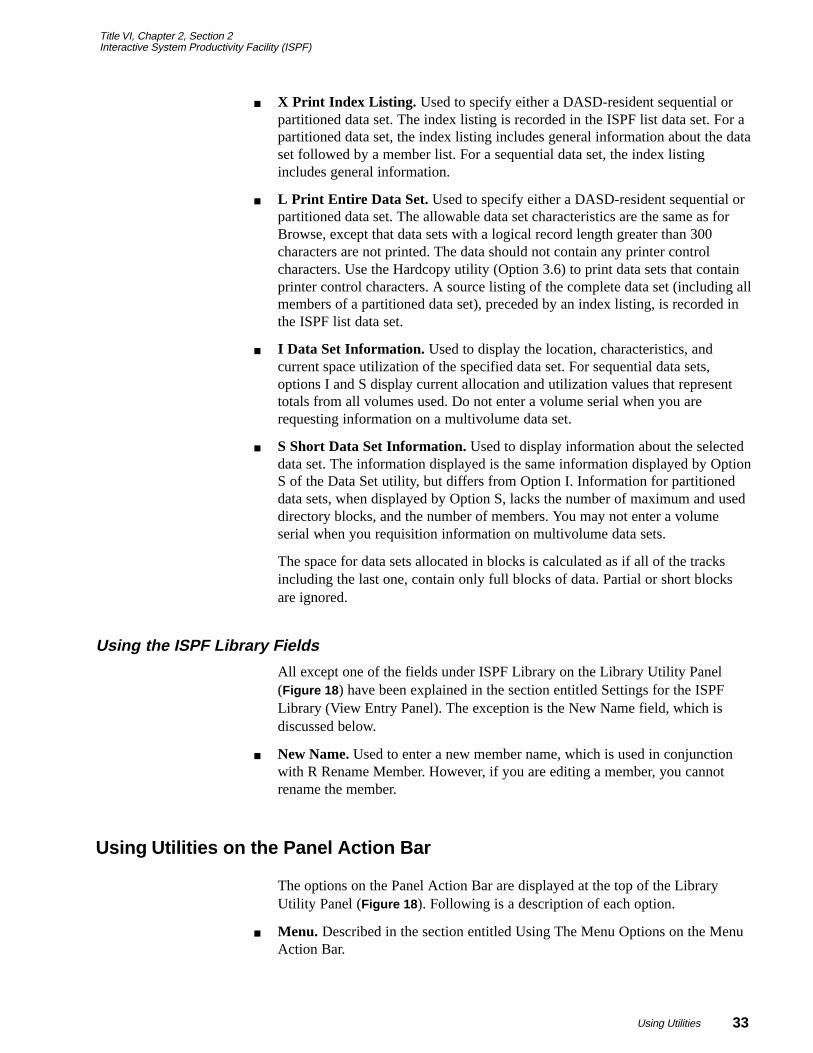
Using the Data Set Utility Options
Data Set is the second option on the Utility Selection panel. To access thisoption, type 2 at the command line and press [Enter] . The Data Set Utility panelis displayed (Figure 19 ).
Menu RefList Utilities Help Data Set Utility Option ===> A Allocate new data set C Catalog data set R Rename entire data set U Uncatalog data set D Delete entire data set S Short data set information blank Data set information V VSAM Utilities ISPF Library: Project . . Group . . . Type . . . . Other Partitioned, Sequential or VSAM Data Set: Data Set Name . . Volume Serial . . (If not cataloged, required for option ÿCÿ) Data Set Password . . (If password protected)
F1=Help F3=Exit F10=Actions F12=Cancel
Figure 19. Data Set Utility Panel
Following is a description of the fields.
The fields are read left to right.
� A Allocate New Data Set. Used to allocate a new data set. You must do thefollowing:
� Enter an ISPF library name in the Project, Group and Type fields. Thevolume in the Volume Serial field is ignored. If you entered another dataset name, you can specify the volume on which to allocate the data set inthe Volume Serial field. If you want to use the authorized default volume orenter a generic unit address in the Generic Unit field on the allocate NewData Set panel, do not enter a volume serial.
� Enter a partitioned or sequential data set name in the Data Set Name field.
� If your ISPF libraries and data sets are password-protected, enter thepassword in the Data Set Password field.
� Press Enter.
The new data set is allocated and cataloged. To return to the previous panelwithout allocating the data set, type END.
� C Catalog Data Set. Used to specify that a particular data set is cataloged. Youmust specify the volume serial on which the data set resides, regardless ofwhether the the data set is specified as project, library, and type, or as anotherdata set name. The data set must reside on the specified volume.
Note

Title VI, Chapter 2, Section 2Interactive System Productivity Facility (ISPF)
35Using Utilities
� R Rename Entire Data Set. Used to provide a new name to the entire data set.If you specify a volume serial for a data set to be renamed, ISPF checks to seewhether the data set is cataloged on that volume. If it is, the rename panelprompts you to specify whether to recatalog the data set. The displayed defaultfor the field is Yes . If you specify a volume serial and the data set is notcataloged, it remains uncataloged after you rename it. If a volume serial is notspecified, the data set is recataloged to the new data set name and the old dataset name is uncataloged.
� U Uncatalog Data Set. Used to uncatalog a specific data set. There is no needfor the specified data set to be allocated or for the volume on which it resides tobe mounted. If the catalog entry being removed contains an expiration date, aconfirmation panel is displayed.
� D Delete Entire Data Set. Used to delete a data set. A confirmation panel isdisplayed when you select D (for delete). ISPF checks to see whether the dataset is cataloged on that volume. If it is, the confirm panel prompts you tospecify whether to uncatalog the data set. It defaults to Yes. If a volume serial isnot specified, and the data set does not have an expiration data, the data set isdeleted and uncataloged.
� S Data Set Information (Short). Used to display information that resides onStorage Management Subsystem volumes when DFP is installed and availableand the Storage Management Subsystem is active.
� Blank Data Set Information. Used to display information about the selecteddata set. The information is the same as found on the topic of data sets in thesection entitled Using Library Utility Options. For multivolume data sets,options I and S display current allocation and utilization values that representtotals from all volumes used. When requesting information on a multivolumedata set, you cannot enter a volume serial.
� M Enhanced Data Set Allocation. Used to allocate a new data set by using theStorage Management Subsystem classes (management class, storage class, anddata class). A data set that is allocated on a volume that is managed by theStorage Management Subsystem is referred to as a managed data set.Conversely, a data set that is allocated on a volume that is not managed by theStorage Management Subsystem is called a non-managed data set.
� V VSAM Utilities. Used to create the IDCAMS commands to define, delete,and list catalog information for VSAM data sets.
Using Move/Copy Utility
Move/Copy is the third option on the Utility Selection panel. To access this option,type 3 at the command line and press [Enter] . The Move/Copy Utility panel isdisplayed (Figure 20 ). Following is a description of the fields.
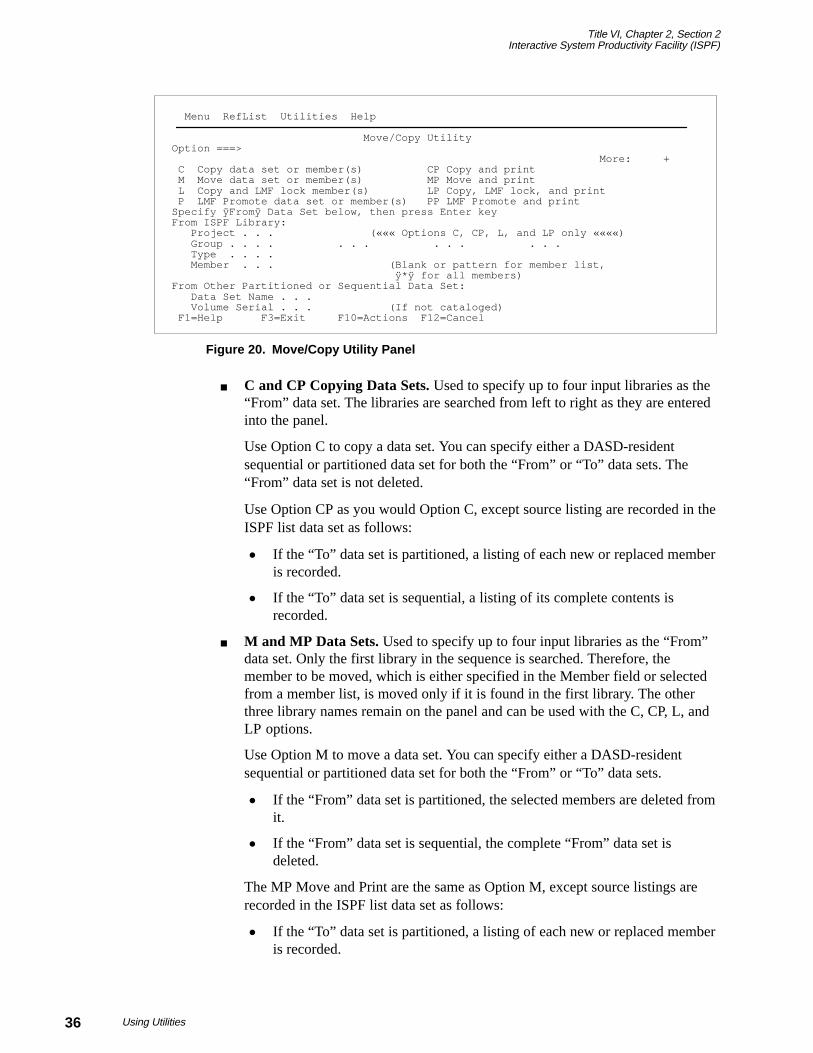
Title VI, Chapter 2, Section 2Interactive System Productivity Facility (ISPF)
36 Using Utilities
Menu RefList Utilities Help Move/Copy Utility Option ===> More: + C Copy data set or member(s) CP Copy and print M Move data set or member(s) MP Move and print L Copy and LMF lock member(s) LP Copy, LMF lock, and print P LMF Promote data set or member(s) PP LMF Promote and print Specify ÿFromÿ Data Set below, then press Enter key From ISPF Library: Project . . . (««« Options C, CP, L, and LP only ««««) Group . . . . . . . . . . . . . Type . . . . Member . . . (Blank or pattern for member list, ÿ*ÿ for all members) From Other Partitioned or Sequential Data Set: Data Set Name . . . Volume Serial . . . (If not cataloged) F1=Help F3=Exit F10=Actions F12=Cancel
Figure 20. Move/Copy Utility Panel
� C and CP Copying Data Sets. Used to specify up to four input libraries as the“From” data set. The libraries are searched from left to right as they are enteredinto the panel.
Use Option C to copy a data set. You can specify either a DASD-residentsequential or partitioned data set for both the “From” or “To” data sets. The“From” data set is not deleted.
Use Option CP as you would Option C, except source listing are recorded in theISPF list data set as follows:
� If the “To” data set is partitioned, a listing of each new or replaced memberis recorded.
� If the “To” data set is sequential, a listing of its complete contents isrecorded.
� M and MP Data Sets. Used to specify up to four input libraries as the “From”data set. Only the first library in the sequence is searched. Therefore, themember to be moved, which is either specified in the Member field or selectedfrom a member list, is moved only if it is found in the first library. The otherthree library names remain on the panel and can be used with the C, CP, L, andLP options.
Use Option M to move a data set. You can specify either a DASD-residentsequential or partitioned data set for both the “From” or “To” data sets.
� If the “From” data set is partitioned, the selected members are deleted fromit.
� If the “From” data set is sequential, the complete “From” data set isdeleted.
The MP Move and Print are the same as Option M, except source listings arerecorded in the ISPF list data set as follows:
� If the “To” data set is partitioned, a listing of each new or replaced memberis recorded.
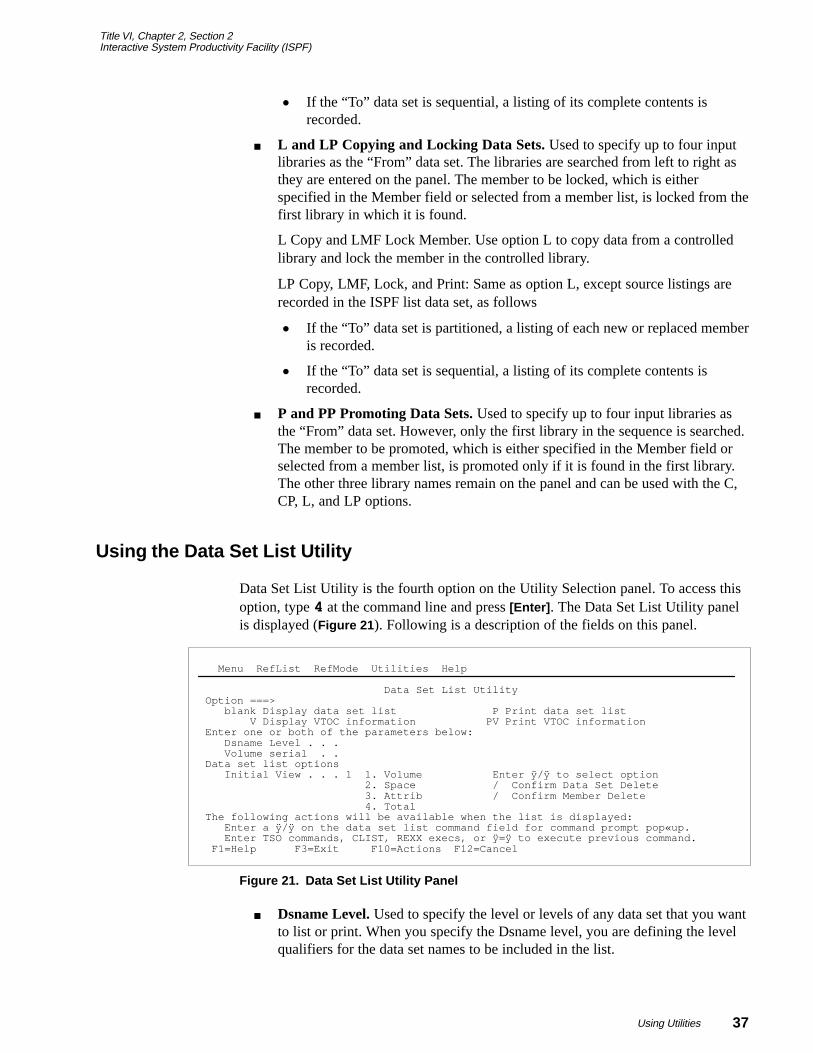
Title VI, Chapter 2, Section 2Interactive System Productivity Facility (ISPF)
37Using Utilities
� If the “To” data set is sequential, a listing of its complete contents isrecorded.
� L and LP Copying and Locking Data Sets. Used to specify up to four inputlibraries as the “From” data set. The libraries are searched from left to right asthey are entered on the panel. The member to be locked, which is eitherspecified in the Member field or selected from a member list, is locked from thefirst library in which it is found.
L Copy and LMF Lock Member. Use option L to copy data from a controlledlibrary and lock the member in the controlled library.
LP Copy, LMF, Lock, and Print: Same as option L, except source listings arerecorded in the ISPF list data set, as follows
� If the “To” data set is partitioned, a listing of each new or replaced memberis recorded.
� If the “To” data set is sequential, a listing of its complete contents isrecorded.
� P and PP Promoting Data Sets. Used to specify up to four input libraries asthe “From” data set. However, only the first library in the sequence is searched.The member to be promoted, which is either specified in the Member field orselected from a member list, is promoted only if it is found in the first library.The other three library names remain on the panel and can be used with the C,CP, L, and LP options.
Using the Data Set List Utility
Data Set List Utility is the fourth option on the Utility Selection panel. To access thisoption, type 4 at the command line and press [Enter] . The Data Set List Utility panelis displayed (Figure 21 ). Following is a description of the fields on this panel.
Menu RefList RefMode Utilities Help Data Set List Utility Option ===> blank Display data set list P Print data set list V Display VTOC information PV Print VTOC information Enter one or both of the parameters below: Dsname Level . . . Volume serial . . Data set list options Initial View . . . 1 1. Volume Enter ÿ/ÿ to select option 2. Space / Confirm Data Set Delete 3. Attrib / Confirm Member Delete 4. Total The following actions will be available when the list is displayed: Enter a ÿ/ÿ on the data set list command field for command prompt pop«up. Enter TSO commands, CLIST, REXX execs, or ÿ=ÿ to execute previous command. F1=Help F3=Exit F10=Actions F12=Cancel
Figure 21. Data Set List Utility Panel
� Dsname Level. Used to specify the level or levels of any data set that you wantto list or print. When you specify the Dsname level, you are defining the levelqualifiers for the data set names to be included in the list.
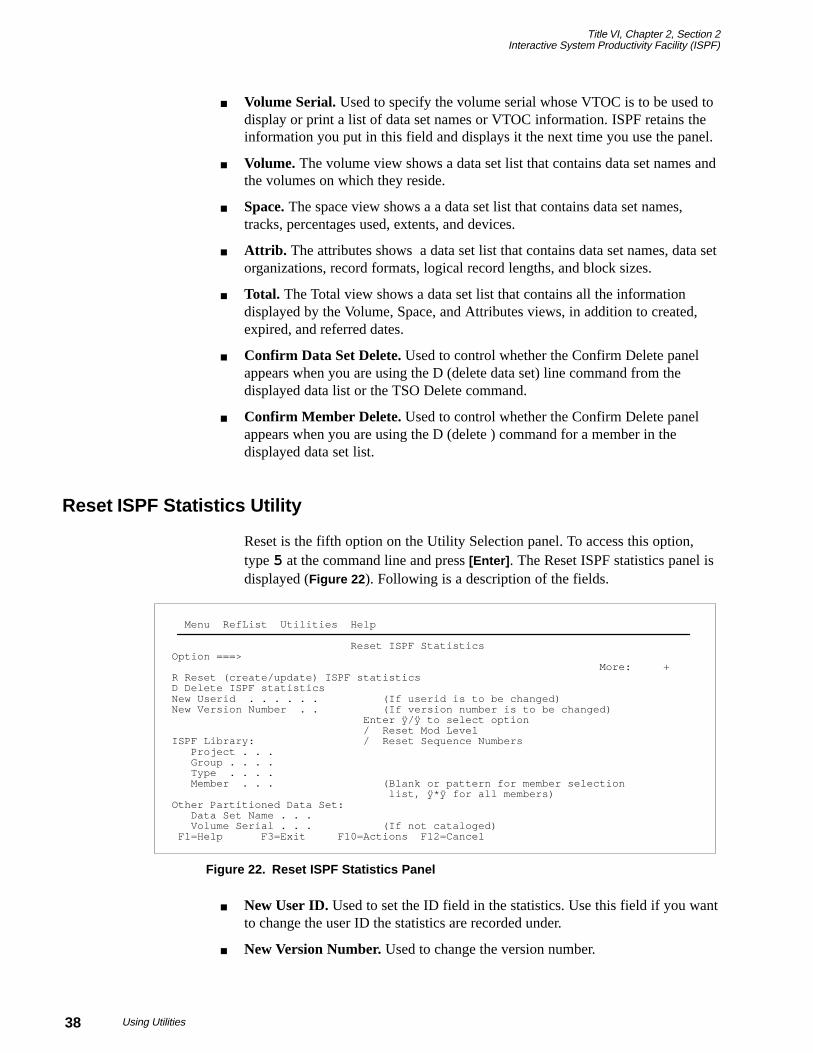
Title VI, Chapter 2, Section 2Interactive System Productivity Facility (ISPF)
38 Using Utilities
� Volume Serial. Used to specify the volume serial whose VTOC is to be used todisplay or print a list of data set names or VTOC information. ISPF retains theinformation you put in this field and displays it the next time you use the panel.
� Volume. The volume view shows a data set list that contains data set names andthe volumes on which they reside.
� Space. The space view shows a a data set list that contains data set names,tracks, percentages used, extents, and devices.
� Attrib. The attributes shows a data set list that contains data set names, data setorganizations, record formats, logical record lengths, and block sizes.
� Total. The Total view shows a data set list that contains all the informationdisplayed by the Volume, Space, and Attributes views, in addition to created,expired, and referred dates.
� Confirm Data Set Delete. Used to control whether the Confirm Delete panelappears when you are using the D (delete data set) line command from thedisplayed data list or the TSO Delete command.
� Confirm Member Delete. Used to control whether the Confirm Delete panelappears when you are using the D (delete ) command for a member in thedisplayed data set list.
Reset ISPF Statistics Utility
Reset is the fifth option on the Utility Selection panel. To access this option,type 5 at the command line and press [Enter] . The Reset ISPF statistics panel isdisplayed (Figure 22 ). Following is a description of the fields.
Menu RefList Utilities Help Reset ISPF Statistics Option ===> More: + R Reset (create/update) ISPF statistics D Delete ISPF statistics New Userid . . . . . . (If userid is to be changed) New Version Number . . (If version number is to be changed) Enter ÿ/ÿ to select option / Reset Mod Level ISPF Library: / Reset Sequence Numbers Project . . . Group . . . . Type . . . . Member . . . (Blank or pattern for member selection list, ÿ*ÿ for all members) Other Partitioned Data Set: Data Set Name . . . Volume Serial . . . (If not cataloged) F1=Help F3=Exit F10=Actions F12=Cancel
Figure 22. Reset ISPF Statistics Panel
� New User ID. Used to set the ID field in the statistics. Use this field if you wantto change the user ID the statistics are recorded under.
� New Version Number. Used to change the version number.

Title VI, Chapter 2, Section 2Interactive System Productivity Facility (ISPF)
39Using Utilities
� Reset Mod Level. Used to reset the modification level. This field is selected bytyping in a slash.
� Reset Sequence Numbers. Used to reset the sequence numbers. This field isselected by typing in a slash.
� SCLM Settings. Used to determine the last type of edit the file had performedon it.
Following is an explanation of the settings:
� SCLM. Used to specify that the last edit of this file was under SCLMcontrol if the bit is On.
� Non-SCLM. Used to specify that the last edit of this file was under controlof other than the SCLM, if the bit is on.
� As-is. Used to specify that this copy operation transfers the current settingof this as it already is, if the bit is on.
� Reset Date/Time. Used to determine whether or not to reset the Last ModifiedDate or Time and the Creation Date of the file.
� Reset Number of Lines. Used to determine whether or not to reset the theCurrent Number of Lines, the Initial Number of Lines, and the Number ofModified Line settings.
Initiating Hardcopy Output
Hardcopy is the sixth option on the Utility Selection panel. To access thisoption, type 6 at the command line and press [Enter] . The Hardcopy Utilitypanel is displayed (Figure 23 ). Following is a description of the fields that havenot been previously described:
Menu RefList Utilities Help Hardcopy Utility Command ===> More: + Process option 1. Print and keep data set or member 2. Print and delete sequential data sets Data Set Name . . Volume Serial . . . . (If not cataloged) Data Set Password . . (If password protected data set) Print Mode . . . . . . . BATCH (BATCH or LOCAL) Sysout class . . . . . . (BATCH only) Local printer ID or writer«name . . . . . . (LOCAL only) Job statement information: (If not to local printer/external writer, verify before proceeding) ===> ===> ===> F1=Help F3=Exit F10=Actions F12=Cancel
Figure 23. Hardcopy Utility Panel
� Print Mode. Used to specify the print mode, either Batch, which submits yourprint request as a background job; or Local which routes the data to a localprinter that may be connected to your terminal group.
Title VI, Chapter 2, Section 2Interactive System Productivity Facility (ISPF)
40 Using Utilities
� Sysout Class. Used to specify the destination of the printed data set. This is tobe used when the data set to be printed and SYSOUT class is specified.
� Local Printer ID. Used to specify the destination of the printed data set. This isto be used when the data set is to be printed and the local printer ID is specified.
Creating and Submitting JCL
To generate and submit JCL for print jobs, follow these steps:
1. Choose one of the options listed in the Process Option section of the panel.choice 1 (PK) for print and keep, or choice 2 (PD) for print and delete.
2. Type in a fully qualified data set name and member name.
3. If the data set is not cataloged, specify the volume serial.
4. If your data set is password protected, type the password in the Data SetPassword field.
5. Type in either Batch or Local in the Print Mode field.
If you choose Batch, type a SYSOUT class and any job statement informationyou need. If you choose Local, type the name of a local printer in the LocalPrinter ID field.
6. Press [Enter] .
If you chose Batch, ISPF generates the JCL and displays the message JCLGenerated. You can either cancel the job by typing Cancel in the Option fieldand pressing [Enter] , or submit the job by typing End and pressing [Enter] .
If you chose Local, ISPF calls the PRINTDS TSO command processor to printthe data set on the specified local printer.
Note
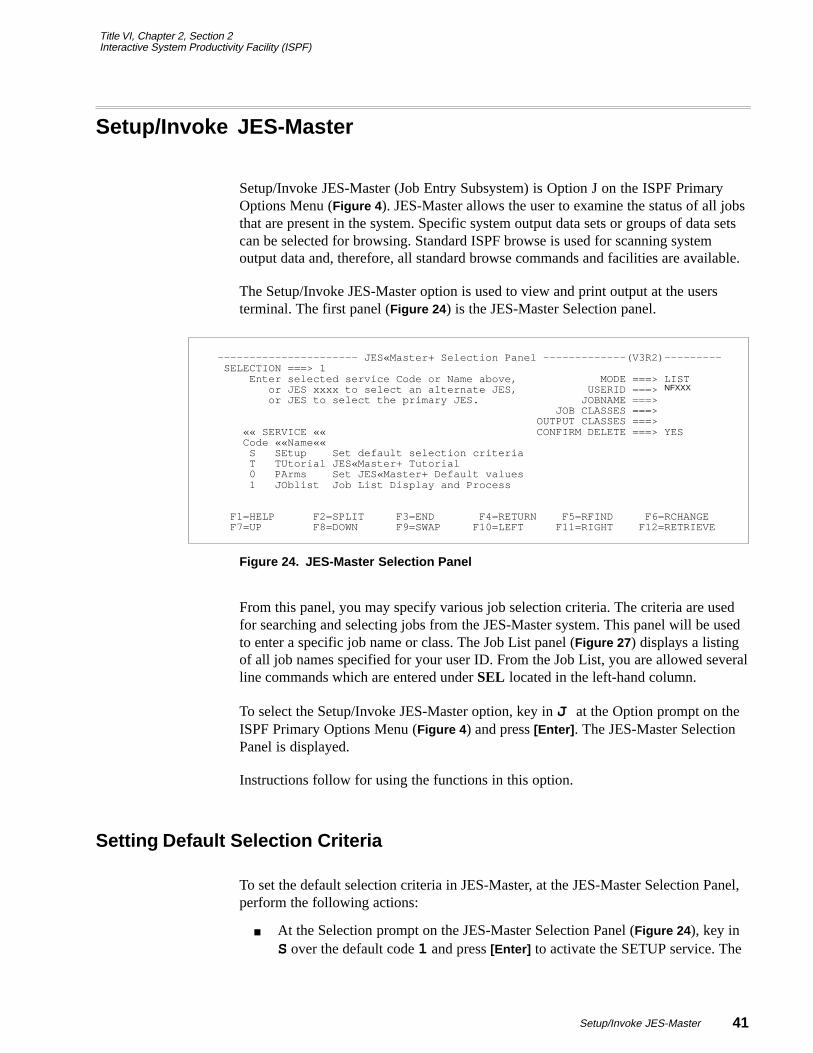
Title VI, Chapter 2, Section 2Interactive System Productivity Facility (ISPF)
41Setup/Invoke JES-Master
Setup/Invoke JES-Master
Setup/Invoke JES-Master (Job Entry Subsystem) is Option J on the ISPF PrimaryOptions Menu (Figure 4 ). JES-Master allows the user to examine the status of all jobsthat are present in the system. Specific system output data sets or groups of data setscan be selected for browsing. Standard ISPF browse is used for scanning systemoutput data and, therefore, all standard browse commands and facilities are available.
The Setup/Invoke JES-Master option is used to view and print output at the usersterminal. The first panel (Figure 24 ) is the JES-Master Selection panel.
---------------------- JES«Master+ Selection Panel -------------(V3R2)--------- SELECTION ===> 1 Enter selected service Code or Name above, MODE ===> LIST or JES xxxx to select an alternate JES, USERID ===> or JES to select the primary JES. JOBNAME ===> JOB CLASSES ===> OUTPUT CLASSES ===> «« SERVICE «« CONFIRM DELETE ===> YES Code ««Name«« S SEtup Set default selection criteria T TUtorial JES«Master+ Tutorial 0 PArms Set JES«Master+ Default values 1 JOblist Job List Display and Process
F1=HELP F2=SPLIT F3=END F4=RETURN F5=RFIND F6=RCHANGE F7=UP F8=DOWN F9=SWAP F10=LEFT F11=RIGHT F12=RETRIEVE
NFXXX
Figure 24. JES-Master Selection Panel
From this panel, you may specify various job selection criteria. The criteria are usedfor searching and selecting jobs from the JES-Master system. This panel will be usedto enter a specific job name or class. The Job List panel (Figure 27 ) displays a listingof all job names specified for your user ID. From the Job List, you are allowed severalline commands which are entered under SEL located in the left-hand column.
To select the Setup/Invoke JES-Master option, key in J at the Option prompt on theISPF Primary Options Menu (Figure 4 ) and press [Enter] . The JES-Master SelectionPanel is displayed.
Instructions follow for using the functions in this option.
Setting Default Selection Criteria
To set the default selection criteria in JES-Master, at the JES-Master Selection Panel,perform the following actions:
� At the Selection prompt on the JES-Master Selection Panel (Figure 24 ), key inS over the default code 1 and press [Enter] to activate the SETUP service. The
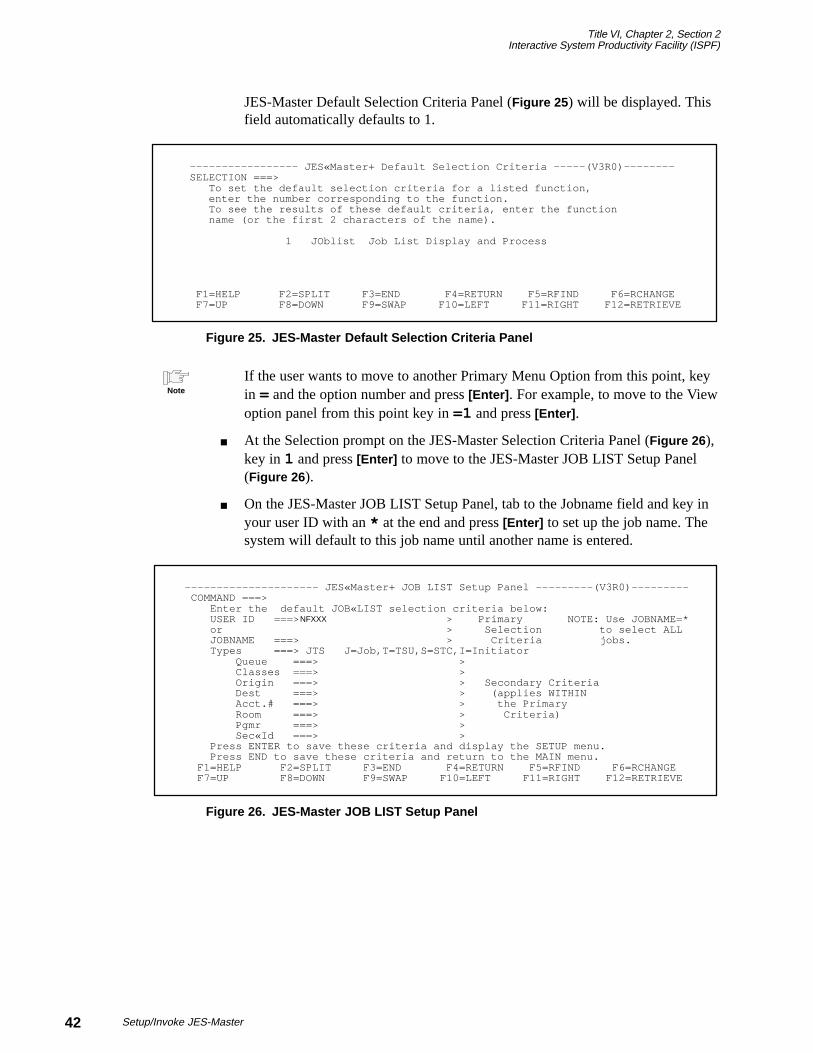
Title VI, Chapter 2, Section 2Interactive System Productivity Facility (ISPF)
42 Setup/Invoke JES-Master
JES-Master Default Selection Criteria Panel (Figure 25 ) will be displayed. Thisfield automatically defaults to 1.
----------------- JES«Master+ Default Selection Criteria -----(V3R0)-------- SELECTION ===> To set the default selection criteria for a listed function, enter the number corresponding to the function. To see the results of these default criteria, enter the function name (or the first 2 characters of the name).
1 JOblist Job List Display and Process
F1=HELP F2=SPLIT F3=END F4=RETURN F5=RFIND F6=RCHANGE F7=UP F8=DOWN F9=SWAP F10=LEFT F11=RIGHT F12=RETRIEVE
Figure 25. JES-Master Default Selection Criteria Panel
If the user wants to move to another Primary Menu Option from this point, keyin = and the option number and press [Enter] . For example, to move to the Viewoption panel from this point key in =1 and press [Enter] .
� At the Selection prompt on the JES-Master Selection Criteria Panel (Figure 26 ),key in 1 and press [Enter] to move to the JES-Master JOB LIST Setup Panel(Figure 26 ).
� On the JES-Master JOB LIST Setup Panel, tab to the Jobname field and key inyour user ID with an * at the end and press [Enter] to set up the job name. Thesystem will default to this job name until another name is entered.
--------------------- JES«Master+ JOB LIST Setup Panel ---------(V3R0)--------- COMMAND ===> Enter the default JOB«LIST selection criteria below: USER ID ===> > Primary NOTE: Use JOBNAME=* or > Selection to select ALL JOBNAME ===> > Criteria jobs. Types ===> JTS J=Job,T=TSU,S=STC,I=Initiator Queue ===> > Classes ===> > Origin ===> > Secondary Criteria Dest ===> > (applies WITHIN Acct.# ===> > the Primary Room ===> > Criteria) Pgmr ===> > Sec«Id ===> > Press ENTER to save these criteria and display the SETUP menu. Press END to save these criteria and return to the MAIN menu. F1=HELP F2=SPLIT F3=END F4=RETURN F5=RFIND F6=RCHANGE F7=UP F8=DOWN F9=SWAP F10=LEFT F11=RIGHT F12=RETRIEVE
NFXXX
Figure 26. JES-Master JOB LIST Setup Panel
Note
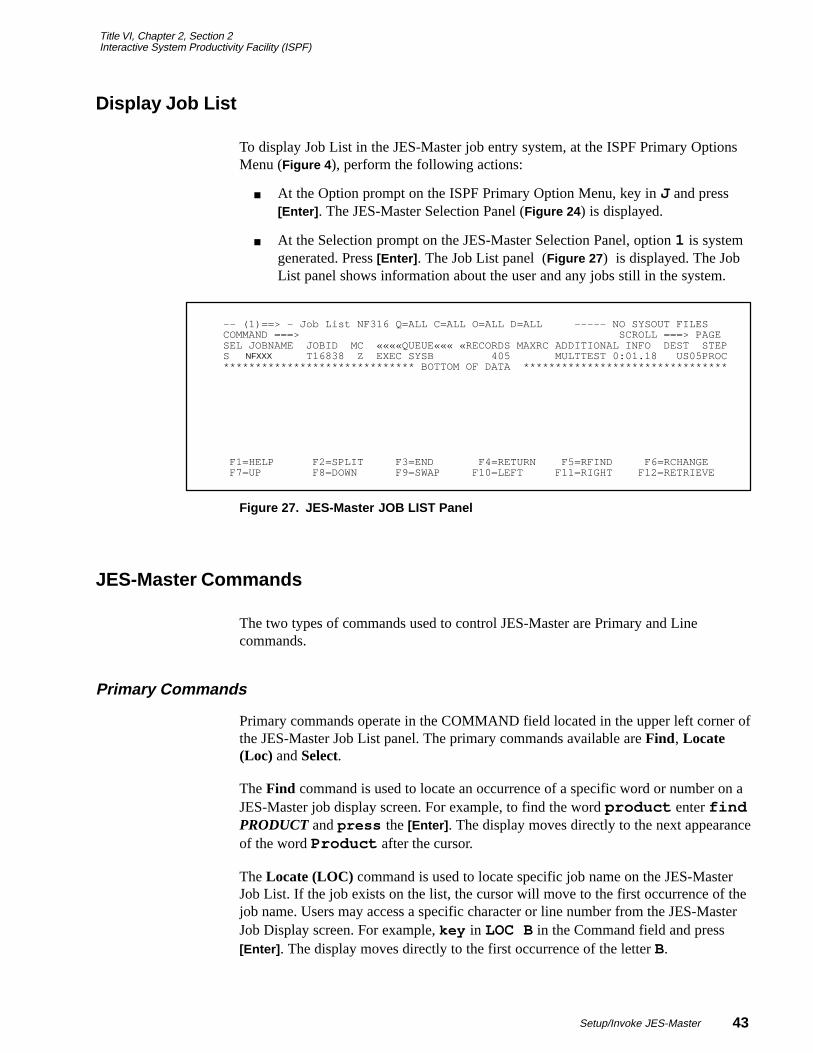
Title VI, Chapter 2, Section 2Interactive System Productivity Facility (ISPF)
43Setup/Invoke JES-Master
Display Job List
To display Job List in the JES-Master job entry system, at the ISPF Primary OptionsMenu (Figure 4 ), perform the following actions:
� At the Option prompt on the ISPF Primary Option Menu, key in J and press[Enter] . The JES-Master Selection Panel (Figure 24 ) is displayed.
� At the Selection prompt on the JES-Master Selection Panel, option 1 is systemgenerated. Press [Enter] . The Job List panel (Figure 27 ) is displayed. The JobList panel shows information about the user and any jobs still in the system.
-- (1)==> - Job List NF316 Q=ALL C=ALL O=ALL D=ALL ----- NO SYSOUT FILES COMMAND ===> SCROLL ===> PAGE SEL JOBNAME JOBID MC ««««QUEUE««« «RECORDS MAXRC ADDITIONAL INFO DEST STEP S T16838 Z EXEC SYSB 405 MULTTEST 0:01.18 US05PROC ****************************** BOTTOM OF DATA ********************************
F1=HELP F2=SPLIT F3=END F4=RETURN F5=RFIND F6=RCHANGE F7=UP F8=DOWN F9=SWAP F10=LEFT F11=RIGHT F12=RETRIEVE
NFXXX
Figure 27. JES-Master JOB LIST Panel
JES-Master Commands
The two types of commands used to control JES-Master are Primary and Linecommands.
Primary Commands
Primary commands operate in the COMMAND field located in the upper left corner ofthe JES-Master Job List panel. The primary commands available are Find , Locate(Loc) and Select.
The Find command is used to locate an occurrence of a specific word or number on aJES-Master job display screen. For example, to find the word product enter findPRODUCT and press the [Enter] . The display moves directly to the next appearanceof the word Product after the cursor.
The Locate (LOC) command is used to locate specific job name on the JES-MasterJob List. If the job exists on the list, the cursor will move to the first occurrence of thejob name. Users may access a specific character or line number from the JES-MasterJob Display screen. For example, key in LOC B in the Command field and press[Enter] . The display moves directly to the first occurrence of the letter B.
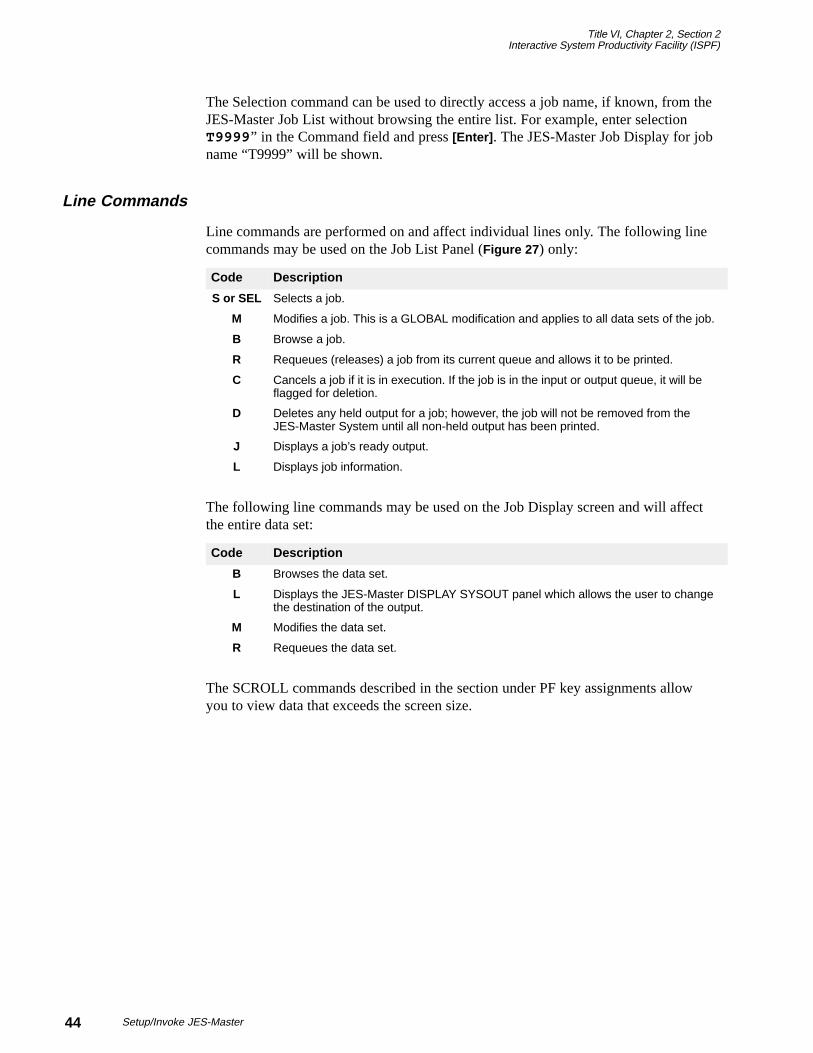
Title VI, Chapter 2, Section 2Interactive System Productivity Facility (ISPF)
44 Setup/Invoke JES-Master
The Selection command can be used to directly access a job name, if known, from theJES-Master Job List without browsing the entire list. For example, enter selectionT9999 ” in the Command field and press [Enter] . The JES-Master Job Display for jobname “T9999” will be shown.
Line Commands
Line commands are performed on and affect individual lines only. The following linecommands may be used on the Job List Panel (Figure 27 ) only:
Code Description
S or SEL Selects a job.
M Modifies a job. This is a GLOBAL modification and applies to all data sets of the job.
B Browse a job.
R Requeues (releases) a job from its current queue and allows it to be printed.
C Cancels a job if it is in execution. If the job is in the input or output queue, it will beflagged for deletion.
D Deletes any held output for a job; however, the job will not be removed from theJES-Master System until all non-held output has been printed.
J Displays a job’s ready output.
L Displays job information.
The following line commands may be used on the Job Display screen and will affectthe entire data set:
Code Description
B Browses the data set.
L Displays the JES-Master DISPLAY SYSOUT panel which allows the user to changethe destination of the output.
M Modifies the data set.
R Requeues the data set.
The SCROLL commands described in the section under PF key assignments allowyou to view data that exceeds the screen size.

Title VI, Chapter 2, Section 2Interactive System Productivity Facility (ISPF)
45 VPS Monitor and Control Facility
VPS Monitor and Control Facility
VPS Monitor and Control Facility is Option V on the ISPF Primary Options Menu(Figure 4 ). VPS is a part of the Time Sharing Option (TSO) software package and isused for printer control. VPS has an interface VPS Monitor and Control Facility(VMCF). With VMCF you can monitor and control VPS specifically defined 3270type printers.
To access the VPS Monitor and Control Facility from the Primary ISPF Menu, selectOption V and press [Enter] . The VMCF Primary Option Menu (Figure 28 ) isdisplayed.
--------------------------- VMCF PRIMARY OPTION MENU ------ VPS62 NOT ACTIVE COMMAND ===> USERID « PRINTER ===> TERMINAL «T3039E10 NAME « VPS62 1 - Enter VPS printer command PROFILE « 2 - Display VPS printer list S - Display VPS printer summary T - VMCF Tutorial X - Terminate VMCF Enter END command to terminate VMCF.
F1=RETRIEVE F2=VERSION F3=END F4=RETURN F5=*/START, F6=*/STOP,& F7=UP F8=DOWN F9=*/CANCEL F10=*/REPEAT F11=*/RESTAR F12=CSR
NFXXX
NFXXX
Figure 28. VMCF Primary Option Menu
VMCF Primary Option Menu
The VMCF Primary Option Menu (Figure 28 ) contains 5 options. Below is a briefdescription of each option.
Enter VPS printer command (Option 1). Used to control the operation of a specificVPS printer or a group of VPS printers. This panel lists 7 commands that can be usedto control VPS printers. (See Figure 29 .)
Display VPS printer list (Option 2). Used to specify which printer is to be includedin the VPS printer selection list. (See Figure 30 .)
Display VPS printer summary (Option S). Used to display printer parameters andstatistics for a printer.
VMCF Tutorial (Option T). Used to provide online information about the featuresand operations of VPS and VMCF.
Terminate VMCF (Option X). Used to terminate the VMCF session.

Title VI, Chapter 2, Section 2Interactive System Productivity Facility (ISPF)
46 VPS Monitor and Control Facility
VPS Printer Command Menu
The VPS Printer Command Menu (Figure 29 ) allows the authorized user to control theoperation of a specific VPS printer or a grout of VPS printers. A command is selectedby entering the number, representing the command, in the Option field and pressing[Enter] . The message area will be used to indicate whether or not the command wasactually issued.
-------------------------- VPS PRINTER COMMAND MENU ------------------------COMMAND ===> USERID « PRINTER ===> U1 TERMINAL « MULTTEST VPS NAME « VPS62 PROFILE « 3 - START (Remove drain status) 4 - STOP (Set drain status) TYPE ===> (Blank«Normal, I«Immediate, F«Force) 5 - CANCEL (Cancel dataset|job currently printing) TYPE ===> (D«Dataset, J«Job, Default is dataset) 6 - REPEAT (Repeat dataset currently printing) 7 - RESTART (Restart dataset currently printing) 8 - REPOSITION (Reposition dataset currently printing) 9 - SELECT (Alter printer selection criteria)
F1=RETRIEVE F2=VERSION F3=END F4=RETURN F5=*/START, F6=*/STOP,& F7=UP F8=DOWN F9=*/CANCEL F10=*/REPEAT F11=*/RESTAR F12=CSR
NFXXX
NFXXX
Figure 29. VPS Printer Command Menu
To access the VPS Printer Command Menu from the VMCF Primary Option Menu(Figure 28 ). select Option 1 and press [Enter] . The VPS Printer Command Menu isdisplayed with 7 options. Below is a brief description of each option.
Start (Option 3). Used to remove the DRAINED or EDRAINED status from one ormore printers. It can also be used to notify VPS of a form mount.
Stop (Option 4). Used to put a printer into DRAINED status and stop further sysoutselection for the printer. Specifying I after the printer id will cause the printer to stopprinting immediately. Specifying F after the printer id will cause the printer to stopprinting immediately, even if waiting for an event to occur, such as a printer readycondition after an intervention required. If neither I of F is specified, the printer willdrain after completing the current job.
Cancel (Options 5). Used to remove one or more printers from the VPS system.
Repeat (Option 6). Used to print additional copies of the sysout dataset that VPS iscurrently printing on the specified printer.
Restart (Option 7). Used to restart printing of the sysout dataset currently beingprinted on the specified printer.
Reposition (Option 8). Used to reposition the sysout dataset that VPS is currentlyprinting on the specified printer. Any request that would cause positioning to be priorto the start of the dataset will have the same effect as repositioning to line 1. Anyrequest that would cause positioning to be past the end of the dataset will have thesame effect as cancelling the dataset.
This command must be used for a specific VPS Printer.Note
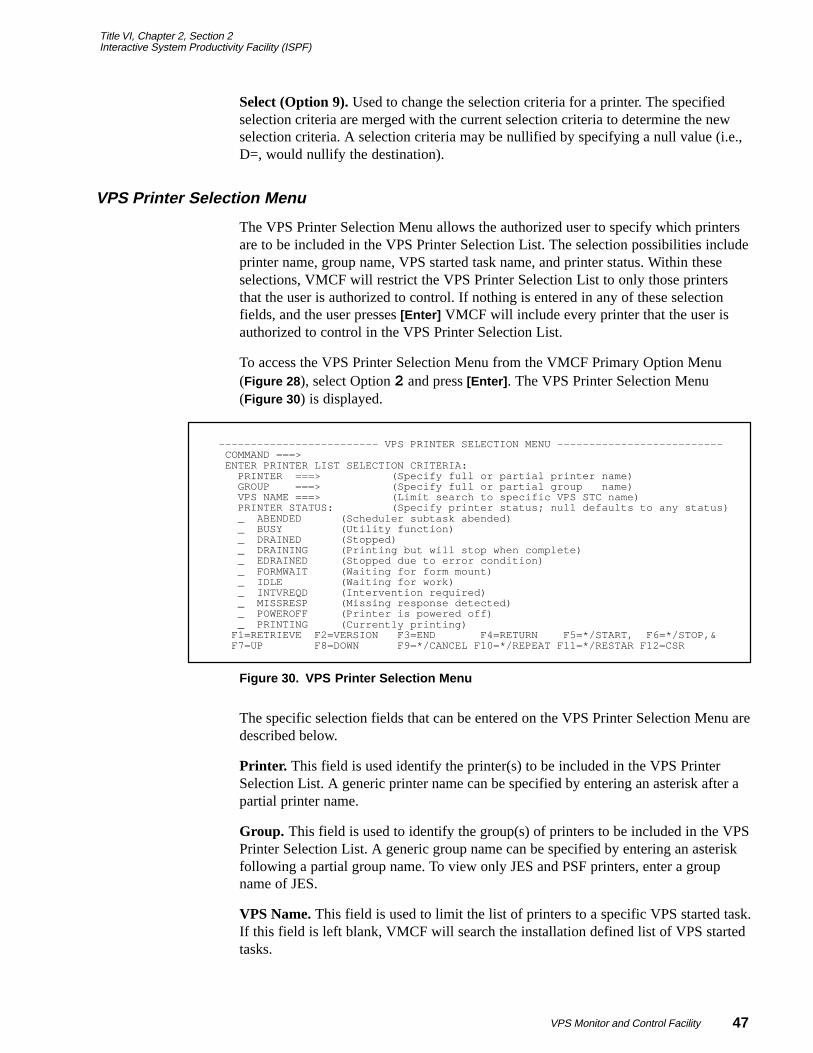
Title VI, Chapter 2, Section 2Interactive System Productivity Facility (ISPF)
47 VPS Monitor and Control Facility
Select (Option 9). Used to change the selection criteria for a printer. The specifiedselection criteria are merged with the current selection criteria to determine the newselection criteria. A selection criteria may be nullified by specifying a null value (i.e.,D=, would nullify the destination).
VPS Printer Selection Menu
The VPS Printer Selection Menu allows the authorized user to specify which printersare to be included in the VPS Printer Selection List. The selection possibilities includeprinter name, group name, VPS started task name, and printer status. Within theseselections, VMCF will restrict the VPS Printer Selection List to only those printersthat the user is authorized to control. If nothing is entered in any of these selectionfields, and the user presses [Enter] VMCF will include every printer that the user isauthorized to control in the VPS Printer Selection List.
To access the VPS Printer Selection Menu from the VMCF Primary Option Menu(Figure 28 ), select Option 2 and press [Enter] . The VPS Printer Selection Menu(Figure 30 ) is displayed.
------------------------- VPS PRINTER SELECTION MENU -------------------------- COMMAND ===> ENTER PRINTER LIST SELECTION CRITERIA: PRINTER ===> (Specify full or partial printer name) GROUP ===> (Specify full or partial group name) VPS NAME ===> (Limit search to specific VPS STC name) PRINTER STATUS: (Specify printer status; null defaults to any status) _ ABENDED (Scheduler subtask abended) _ BUSY (Utility function) _ DRAINED (Stopped) _ DRAINING (Printing but will stop when complete) _ EDRAINED (Stopped due to error condition) _ FORMWAIT (Waiting for form mount) _ IDLE (Waiting for work) _ INTVREQD (Intervention required) _ MISSRESP (Missing response detected) _ POWEROFF (Printer is powered off) _ PRINTING (Currently printing) F1=RETRIEVE F2=VERSION F3=END F4=RETURN F5=*/START, F6=*/STOP,& F7=UP F8=DOWN F9=*/CANCEL F10=*/REPEAT F11=*/RESTAR F12=CSR
Figure 30. VPS Printer Selection Menu
The specific selection fields that can be entered on the VPS Printer Selection Menu aredescribed below.
Printer. This field is used identify the printer(s) to be included in the VPS PrinterSelection List. A generic printer name can be specified by entering an asterisk after apartial printer name.
Group. This field is used to identify the group(s) of printers to be included in the VPSPrinter Selection List. A generic group name can be specified by entering an asteriskfollowing a partial group name. To view only JES and PSF printers, enter a groupname of JES.
VPS Name. This field is used to limit the list of printers to a specific VPS started task.If this field is left blank, VMCF will search the installation defined list of VPS startedtasks.

Title VI, Chapter 2, Section 2Interactive System Productivity Facility (ISPF)
48 VPS Monitor and Control Facility
Printer Status. This field is used to limit the list of printers to those in a specific state.A status is selected by entering any non-blank character (other then an underscore)next to the states to be selected.
Title VI, Chapter 2, Section 2Interactive System Productivity Facility (ISPF)
49Glossary
Glossary
Action Bar. The area at the top of an ISPF panel that contains choices that give youaccess to actions available on the panel. When you select an action bar choice, ISPFdisplays a pull-down menu.
Browse. To look at a data set member without changing it. In JES-Master, this queuerepresents jobs that have completed executing.
Data Set. The major unit of data storage and retrieval, consisting of a collection ofdata in one of several prescribed arrangements and described by control information towhich the system has access.
Data Set Name. The term or phrase used to identify a data set.
Default Printer. A printer which has been specified during the creation of your data.Printing will automatically activate to this printer when printing has been requested.
Destination. Any point or location, (e.g. node, station, terminal) to which data is tobe sent. The routed location for the member, data set, or job.
Ellipsis. Three dots that follow a pull-down choice. When you select a choice thatcontains an ellipsis, ISPF displays a pop-up window.
Exec. Jobs on the execution queue. This queue has jobs that are awaiting execution aswell as those that are currently executing.
File. A set of related records treated as a unit.
Group. A set of related records that have the same value for a particular field in all ofthe records, or a series of records logically joined together.
Hold. Jobs to be held in the print queue and later directed to a printer.
ISPF. Interactive System Productivity Facility is a programming tool which providesaccess to partitioned and sequential data sets.
JC. Job’s execution class.
JCL. Job Control Language is a command language for mini and mainframe operatingsystems that launches applications. It specifies priority, program size and runningsequence, as well as the files and data base used.
JES. Job Entry Subsystem is software that provides batch communications for IBM’sMVS operating system. It accepts data from remote batch terminals, executes them ona priority basis and transmits the results back to the terminals.
Library. A collection of related files.
Macro. A series of selections, keystrokes and commands that have been recorded andassigned a name or key combination. When the macro is called or the key combinationis pressed, the steps in the macro are executed from beginning to end.
Title VI, Chapter 2, Section 2Interactive System Productivity Facility (ISPF)
50 Glossary
Members. A collection of data units that are stored in a library.
Operating System. The master control program that runs the computer. It is the firstprogram loaded when the computer is turned on, and its main part, called the kernel,resides in memory at all times. The operating system provides the user interface andcontrols multitasking. It handles the input and output to the disk and all peripheraldevices. It also handles job scheduling.
Output. Data being delivered or to be delivered from a device or from a computerprogram.
Parameter. Any value passed to a program by the user or by another program in orderto customize the program for a particular purpose. A parameter may be anything; forexample, a file name, a coordinate, a range of values, a money amount or a code ofsome kind.
Partition. A reserved part of disk or memory that is set aside for some purpose.
Partitioned Data Set (PDS). A data set in direct access storage that is divided intopartitions, called members, each of which can contain a program, part of a program, ordata.
Point-and-shoot Text. Words on a screen that are cursor sensitive.
Pop-up Window. A bordered temporary window that displays over another panel.
Pull-down menu. A list of numbered choices extending from the selection you madeon the action bar. The action bar selection is highlighted. You can select an actioneither by typing in its number and pressing Enter or by selecting the action with yourcursor. ISPF displays the requested panel. If your choice contains an ellipsis (...), ISPFdisplays a pop-up window. When you exit this panel or pop-up, ISP closes thepull-down and returns you to the panel from which you made the initial action barselection.
Push Button. A rectangle with text inside. Push buttons are used in windows foractions that occur immediately when the push button is selected (available only whenrunning in GUI mode).
Queue. A line or list formed by items in a system waiting for service. A list of jobswaiting to be executed.
Remote Printer. A printer that is connected to a computer by a telecommunicationline.
Requeue. A command that releases the data set from a HOLD status.
Sequential Data Set. A data set whose records are organized on the basis of theirsuccessive physical positions, such as on magnetic tape.
Software. Programs, procedures, rules, and any associated documentation pertainingto the operation of a computer system.
Source Data. The data contained in a source program or source module. Data thatincludes program codes, test data, documentation, or data used in reports.

Title VI, Chapter 2, Section 2Interactive System Productivity Facility (ISPF)
51Glossary
Sysout Class. The two types of SYSOUT (system output) classes are A and X. ClassA directs the output to a designated printer and a hard copy computer printout will begenerated. Class X directs the output to be held in the SYSOUT queue to be viewed onthe CRT screen.
TSO. Time Share Option is software that provides interactive communications forIBM’s MVS operating system. It allows a user or programmer to launch an applicationfrom a terminal and interactively work with it.
Utility Program. A program that supports using the computer. Utility programs, or“utilities” provide file management capabilities, such as sorting, copying, comparing,listing and searching, as well as diagnostic and measurement routines that check thehealth and performance of the system.
Title VI, Chapter 2, Section 2Interactive System Productivity Facility (ISPF)
Index - 1
Heading Index
This index provides an alphabetical list of all headings in the procedure. When a heading is referenced, youcan use this index to locate the page number.
AAbout This Procedure, iii
BBrowsing A Data Set, 25
CCreating and Submitting JCL, 40
DDescription of The Action Bar Menu Options, 7
Description of The ISPF Primary Option Menu, 9
Display Job List, 43
EEditing A Data Set , 27
Editing A Host Data Set on the Workstation, 28
Editing A Workstation File on the Host, 28
Editing A Workstation File on the Workstation, 28
Establishing Settings on the Log Data Set DefaultsPanel, 16
Establishing Terminal and User Parameters, 11
FFormat Name, 28
Function Keys, 5
GGeneral, 14
Glossary, 49
HHelp Screens, 4
How The Procedure Is Organized, iii
IInitial Macro, 28
Initiating Hardcopy Output, 39
Introduction, 1
ISPF Primary Option Menu, 7
JJES-Master Commands, 43
LLine Commands, 44
OOperating Features, 4
Other Partitioned or Sequential Data Set Names, 24
PPrimary Commands, 43
Print Graphics Parms, 14
Profile Name, 28
RReset ISPF Statistics Utility, 38
Title VI, Chapter 2, Section 2Interactive System Productivity Facility (ISPF)
Index - 2
Responsibilities, 1
SSecurity And Remote Terminal Usage, 2
Setting Default Selection Criteria, 41
Settings for the ISPF Library, 23
Settings for the JCL Panel, 21
Settings for the List Data Set Characteristics Panel, 20
Settings for the List Data Set Defaults Panel, 18
Setup/Invoke JES-Master , 41
Sign-Of f , 3
Sign-On, 2
Specifying Settings On the Panel Action Bar, 15
System Access, 2
System Capabilities And Interface, 1
System Design, 4
System Edits, 4
System Overview, 1
UUsing Library Utility Options, 32
Using Move/Copy Utility, 35
Using Options, 29
Using Options on the Utility Selection Panel ActionBar, 31
Using Terminal Characteristics, 13
Using the Data Set List Utility, 37
Using the Data Set Utility Options, 34
Using the Edit Entry Panel, 27
Using the Edit Panel Action Bar, 29
Using the ISPF Library Fields, 33
Using The Log/List Option, 16
Using The Menu Option on the Action Bar Menu, 8
Using The Settings Options, 11
Using the View Entry Panel, 23
Using the View Panel Action Bar, 25
Using Utilities , 31
Using Utilities on the Panel Action Bar, 33
VViewing/Browsing Data, 23
VMCF Primary Option Menu, 45
VPS Monitor and Control Facility, 45
VPS Printer Command Menu, 46
VPS Printer Selection Menu, 47
WWhat Conventions Are Used, iii
Who To Contact For Help, iv
Workstation File, 28