
INTELLIGENT MOTION CONTROLLER FOR ETHERNETpro-dex.com/media/32506/maxnetmane.pdf · user’s manual...
67
USER’S MANUAL INTELLIGENT MOTION CONTROLLER FOR ETHERNET MAXnet PRO-DEX, INC. OREGON MICRO SYSTEMS 15201 NW GREENBRIER PARKWAY B-1 RIDGEVIEW BEAVERTON, OR 97006 PHONE 503-629-8081 FAX 503-629-0688 mailto:[email protected] http://www.pro-dexOMS.com
Transcript of INTELLIGENT MOTION CONTROLLER FOR ETHERNETpro-dex.com/media/32506/maxnetmane.pdf · user’s manual...

USER’S MANUAL
INTELLIGENT MOTION CONTROLLER
FOR ETHERNET
MAXnet
PRO-DEX, INC. OREGON MICRO SYSTEMS
15201 NW GREENBRIER PARKWAY B-1 RIDGEVIEW
BEAVERTON, OR 97006 PHONE 503-629-8081
FAX 503-629-0688 mailto:[email protected] http://www.pro-dexOMS.com

COPYRIGHT NOTICE
© 2013 Pro-Dex, Inc. - Oregon Micro Systems ALL RIGHTS RESERVED
This document is copyrighted by Pro-Dex, Inc. - Oregon Micro Systems. You may not reproduce, transmit, transcribe, store in a retrieval system, or translate into any language in any form or by any means, electronic, mechanical, magnetic, optical, chemical, manual, or otherwise, any part of this publication without the express written permission of Pro-Dex, Inc. - Oregon Micro Systems.
TRADEMARKS
IBM, IBM PC, IBM PC/XT, IBM PC/AT, IBM PS/2 and IBM PC DOS are registered trademarks of International Business Machines Corporation. CompactPCI, PICMG-PCI, PICMG are registered trademarks of the PCI Special Interest Group. LabView is a registered trademark of National Instruments. Windows, 7, Vista, XP, 2000, & Win NT are registered trademarks of Microsoft Corporation.
DISCLAIMER
Pro-Dex, Inc. - Oregon Micro Systems makes no representations or warranties regarding the contents of this document. We reserve the right to revise this document, or make changes to the specifications of the product described within it at any time without notice and without obligation to notify any person of such revision or change.
3301-1800000
Rev. E

TABLE OF CONTENTS
MAXnet User’s Manual i
TABLE OF CONTENTS
1. GENERAL DESCRIPTION..........................................................................1-1
1.1. INTRODUCTION ...................................................................................1-1 1.2. SYSTEM OVERVIEW............................................................................1-1
2. GETTING STARTED ..................................................................................2-1 2.1. INSTALLATION .....................................................................................2-1 2.2. CONFIGURING COMMUNICATION.....................................................2-1 2.3. CONFIGURING THE CARD FOR USE WITH ENCODERS.................2-3 2.4. SOFTWARE INSTALLATION................................................................2-6 2.5. CONNECT TO STEPPER MOTOR SYSTEM.......................................2-6 2.6. CONNECT AND CHECKOUT THE SERVO SYSTEM .........................2-9 2.7. CONNECT AND CONFIGURE THE MOTOR/AMPLIFIER...................2-9 2.8. TUNE THE SYSTEM ...........................................................................2-11 2.9. SETTING THE USER DEFAULT CONFIGURATION .........................2-17 2.10. POWER SUPPLY REQUIREMENTS..................................................2-18
3. COMMUNICATION INTERFACE................................................................3-1 3.1. INTRODUCTION ...................................................................................3-1 3.2. RS-232 AND TCP/IP FLAG NOTIFICATION PROTOCOL ...................3-2 3.3. ASCII COMMAND RING BUFFER ........................................................3-3 3.4. ASCII RESPONSE RING BUFFER .......................................................3-3 3.5. DYNAMIC LINK LIBRARY.....................................................................3-3 3.6. MAXnet COMMUNICATION ARCHITECTURE ....................................3-4 3.7. REAL-TIME POSITION CAPTURE .......................................................3-5
4. CONTROL SIGNAL INTERFACE ...............................................................4-1 4.1. INTRODUCTION ...................................................................................4-1 4.2. LIMIT INPUTS........................................................................................4-3 4.3. HOME INPUTS ......................................................................................4-3 4.4. GENERAL PURPOSE DIGITAL I/O ......................................................4-3 4.5. ANALOG I/O ..........................................................................................4-3 4.6. MOTOR CONTROL OUTPUT...............................................................4-4 4.7. ENCODER FEEDBACK.........................................................................4-6 4.8. HOME PROCEDURES..........................................................................4-6 4.9. ABSOLUTE ENCODERS WITH SSI .....................................................4-8 4.10. IOMAXnet ADAPTER MODULE..........................................................4-10
5. HOST SOFTWARE.....................................................................................5-1 5.1. INTRODUCTION TO MAXnet SUPPORT SOFTWARE .......................5-1
6. STAND ALONE COMMANDS.....................................................................6-1 7. SERVICE 7-1
7.1. USER SERVICE ....................................................................................7-1 7.2. THEORY OF OPERATION....................................................................7-1
8. FIRMWARE UPGRADE..............................................................................8-1 8.1. MAXnet ETHERNET MODE FIRMWARE UPGRADE ..........................8-1 8.2. MAXnet SERIAL MODE FIRMWARE UPGRADE.................................8-5
A. LIMITED WARRANTY B. TECHNICAL INFORMATION / RETURN FOR REPAIR PROCEDURES C. SPECIFICATIONS INDEX

TABLE OF CONTENTS
MAXnet User’s Manual ii
This page is intentionally left blank

INTRODUCTION GENERAL DESCRIPTION
MAXnet User’s Manual 1-1
1. GENERAL DESCRIPTION
1.1. INTRODUCTION The Pro-Dex, Inc. - Oregon Micro Systems MAXnet family of motion controllers are high performance Ethernet products. The MAXnet motion controller can manage up to 10 axes of open loop stepper, closed loop stepper or servo systems, in any combination. The OMS MAXnet controller synchronizes all independent or coordinated motion of up to 10 axes, while incorporating other critical signals, such as hard or soft limits, home, and other digital and/or analog I/O signals, to provide the motion solutions to perform virtually any task. With high level functionality, such as circular and linear interpolation, multi-tasking, custom profiling, etc., the MAXnet can satisfy the needs of most any motion control application. See Appendix C “Ordering Information” for specific MAXnet family models.
The MAXnet communicates as a “slave only” device and functions as a motion co-processor to the Ethernet host. It utilizes patented and proprietary technology to control the trajectory profile, acceleration, velocity, deceleration and direction of selected axes. In response to commands from the host computer the MAXnet controller will calculate the optimum velocity profile to reach the desired destination in the minimum time, while conforming to the programmed acceleration and velocity parameters. In addition, the MAXnet can provide motion control information such as axis and encoder position as well as the state of over-travel limits, home switch inputs, and done notification flags. The MAXnet motion controllers utilize a PowerPC processor, configured to operate as an efficient and powerful co-processor with the PC host via the Ethernet or RS-232.
The stepper control of the MAXnet produces a 50% duty cycle square wave step pulse at velocities of 0 to 4,194,176 pulses per second and an acceleration of 0 to 8,000,000 pulses per second per second. The servo control utilizes a 16-bit DAC and outputs either +/- 10V or 0 to +10V. The encoder feedback control can be used as feedback for the servo PID, position maintenance for the stepper axes or as strictly a position feedback of any axis. The incremental encoder input supports differential or single ended quadrature TTL signals at a rate of up to 16 MHz. The absolute encoder using SSI (Synchronous Serial Interface) technology also supports differential or single ended inputs at a rate up to 4MHz. The MAXnet motion controller has 2 general purpose analog inputs that utilize a 16-bit ADC, with a DC range of –10 to +10 VDC*. There are six analog outputs that utilize a 16-bit DAC with a range of -10 to +10 VDC. Complete specifications for MAXnet can be found in Appendix C.
The MAXnet command set employs two or three ASCII character commands which can be combined into character strings. Using virtually any programming language, these ASCII command strings can be sent to the MAXnet Motion Controller over the Ethernet or RS-232. Refer to the Command Reference Manual: MAX Family for the complete command reference.
1.2. SYSTEM OVERVIEW The MAXnet motion controller can manage up to 10 axes of motion. For 1 through 5 axes, the MAXnet is a single board motion controller, and measures 6.5” x 4” x 0.75”. For 6 to 10 axes of motion, the MAXnet utilizes a stackable expansion board, and when combined, measures 6.5” x 4” x 1.78”. The communication interface is accessed through either the Ethernet or RS-232. The MAXnet receives power (5V, +/-12VDC) from an external power supply and can be applied to either the MAXnet board (1 – 5 axes) or the MAXnet expansion board (6 – 10 axes).
The MAXnet utilizes an optimally configured PowerPC RISC based 32-bit micro-controller and FPGA technology for extensive logic integration and flexibility. The firmware, which resides in flash memory (2MB), can be upgraded through the communication interface without having to remove the controller from the system. 32MB of system RAM is used for firmware and data storage.

GENERAL DESCRIPTION SYSTEM OVERVIEW
1-2 MAXnet User’s Manual
All general purpose digital and analog I/O and all motor control signals are available on the 100-pin connector (J1). Each digital I/O bit can be set as an input or output and is controlled by firmware commands, so there are no jumpers to set.
Aside from extending MAXnet for 6 through 10 axes of motion, the optional expansion board is available for extending I/O capabilites and for custom solutions.
Data communication is performed by sending and receiving strings of data (ASCII characters) via standard Ethernet communication protocol or RS-232.
While not strictly required, DLLs are provided to allow applications written in high level languages to communicate with the controller. Software provided by Pro-Dex, Inc. - Oregon Micro Systems directly supports the use of Microsoft C, C++ or Visual Basic. In addition, any language that has a mechanism for utilizing a standard Microsoft DLL Library can be used for application development.
The MAXnet I/O Breakout Module, the IOMAXnet, provides an efficient means of connecting the MAXnet signals to external devices.
More details on the functionality of the controller are included in the following chapter.

INSTALLATION GETTING STARTED
MAXnet User’s Manual 2-1
2. GETTING STARTED
2.1. INSTALLATION For installation of the MAXnet you will need a computer with either an Ethernet or RS-232 connection or both.
Read through the following two sections before beginning the installation. Do not turn on the power to the MAXnet until you have properly configured the controller per the following instructions. Note that the header at location J2 is used to choose the mode of communication (Ethernet or RS-232). The MAXnet is set for RS-232 communication mode from the factory.
Though the MAXnet is a low power device, there should be ventilation, including forced air, around the circuit board.
2.2. CONFIGURING COMMUNICATION
The first requirement for communication through the RS-232 interface is to ensure that the MAXnet is securely and safely mounted where damage is unlikely. This includes the exposure to possible static discharge, moisture, debris, etc. Special mounting efforts may be required to protect the extended pins on the bottom of the MAXnet.
CAUTION:
The RS-232 communication port is a DTE com device so that straight connection can be used for communication; RxD to TxD, TxD to RxD. Two handshake signals are supported, CTS and RTS, that can also be connected straight through, baud rates of 9600, 19200, 38400, 57600 and 115200 are supported. Any terminal device that supports these signals and baud rates, be it a computer, dumb-terminal, etc., can be used to communicate to the MAXnet.
TABLE 2-1 MAXNET DEFAULT SERIAL COMMUNICATION PARAMETERS
Default Baud Rate 115200 Data Length 8
Stop Bits 1 Parity Bit None
Select an unused COM-Port, COM1, COM2, etc., on the computer or terminal to be used. Set the baud rate and other communication parameters on the PC to match the default settings of the MAXnet. Connect a straight-through 9-pin RS-232 cable between the host terminal and the MAXnet. To prevent motors, switches or other devices from unexpected activation do not connect the cable to output connector J1 at this time.
The MAXnet is a static sensitive device and standard Electro Static Discharge (ESD) techniques are required when handling and installing the MAXnet.

GETTING STARTED CONFIGURING COMMUNICATION
2-2 MAXnet User’s Manual
FIGURE 2-1
LED AND COMMUNICATION JUMPER SETTINGS
Ensure that J2 is set for RS-232 communication mode.
Connect a +5VDC, 1 Amp power source to the power connector at J5.
NOTE: +/- 12VDC is required only for servo operation.
Caution
When power is applied to the MAXnet and the firmware has booted, there should be two solid green LEDs lit. The LED labeled D100 located by the J5 power connector indicates the FPGA successfully configured. The LED labeled D3 on the opposite edge of the card from the J1 connector indicates a successful boot of the firmware. If both of these LEDs are on solid, and all other LEDs are off, the MAXnet is ready to communicate. With the MAXnet expansion board for 6 – 10 axes of motion the green LED D1 next to the J5 power connector is lit when power is applied.
If the red LED labeled D101 located by the J5 power connector is ON, this indicates a power problem. Check power supply and all power connections.
MAXnet E
TH
ER
NE
T
RS232
PWR
100-
pin
conn
ecto
r
J2
D5
D4
D3
D2
J2
1
2
3
4
5
6
7
8
Default setting
J2
1
2
3
4
5
6
7
8
RS232 setting
J2
1
2
3
4
5
6
7
8
Ethernet setting
D100D101

CONFIGURING THE CARD FOR USE WITH ENCODERS GETTING STARTED
MAXnet User’s Manual 2-3
Using your communication terminal send the characters “WY” to the MAXnet (Windows Hyperterminal program can be used). If communication and power are configured properly the MAXnet will respond in ASCII with its model, version and serial number.
The default IP address of the MAXnet is 10.40.30.60 and the port is 23. To configure the MAXnet IP address for use in your network, the IP and port addresses must be set with the appropriate commands and the settings should be archived to flash. Use the #NI command to set the IP address and the #NP command to set the network port number. Use the APP command to archive the settings to flash so that these settings will be the default after each power-up. See Command Reference Manual: MAX Family for further details on these commands.
Set J2 for Ethernet communication and cycle the power on the MAXnet. You may now connect an Ethernet-capable terminal to the IP address previously programmed into the MAXnet. If the communication interface is properly configured, sending the characters “WY” to the MAXnet will produce the same model, version and serial number as it did in the prior RS-232 test. However, when using Ethernet communications for each packet sent to the MAXnet controller, the controller responds with an acknowledgement packet that contains data consisting of a single ACK character.
TABLE 2-2 ETHERNET CONNECTOR
J8 – Pin-out Pin # Signal Function
1 BI_DA+ Bi-directional pair +A 2 BI_DA- Bi-directional pair –A 3 BI_DB+ Bi-directional pair +B 4 BI_DC+ Bi-directional pair +C 5 BI_DC- Bi-directional pair –C 6 BI_DB- Bi-directional pair –B 7 BI_DD+ Bi-directional pair +D 8 BI_DD- Bi-directional pair –D
TABLE 2-3 RS232 CONNECTOR
J6 – Pin-out Pin # Signal Function
1 No Connect - 2 RXD Receive Data 3 TXD Transmit Data 4 No Connect - 5 Ground Ground 6 No Connect - 7 RTS Request to Send 8 CTS Clear to Send 9 No Connect -
2.3. CONFIGURING THE CARD FOR USE WITH ENCODERS
Quadrature encoder with TTL level outputs can be connected directly to the appropriate axis (via the J2 connector on IOMAXnet). The MAXnet has biasing to allow single ended encoders for each axis on board. This biasing is automatic. Single-ended encoders should be wired to the positive (+) connections of each signal. The negative (-) side of the differential signal should be connected to ground.

GETTING STARTED CONFIGURING THE CARD FOR USE WITH ENCODERS
2-4 MAXnet User’s Manual
FIGURE 2-2 MAXNET DIAGRAM
FIGURE 2-3 CONNECTOR LOCATIONS
0.34
0.34
0.06" overhang
0.35
Tyco/Amp5787169-9J1
0.20
1.55
0.29
0.64
Tyco/Amp5788797-2
J6
0.05" overhang
0.40
1.01
Bel-Stewart Connector08B0-1X1T-36-F
J8
0.05" overhang
0.50
0.48
Molex43045-0600
J50.35 Ethernet/Serial
3.05
All dimensions are in inches +/- 1%, unless otherwise specified
J9 - Expansion Connection
0.05
0.62
6.50in.
4.00
0.140
0.140
Ø 0.1255
0.140
Ø 0.1255
0.140 0.120Ø 0.1255
0.120
Ø 0.1255
0.140
Ø 0.1255
Ø 0.1255
Ø 0.12550.140
3.125
Ø 0.1255
0.390
0.140
0.72
1.841.84
0.140
All dimensions are in inches +/-1%, unless otherwise specified
2.12

CONFIGURING THE CARD FOR USE WITH ENCODERS GETTING STARTED
MAXnet User’s Manual 2-5
All dimensions are in inches +/- 1%, unless
2.12”
0.72”
1.84” 1.84”
0.120”
0.390”
0.140”
0.140”
All hole diameters are 0.1
3.125”
0.120” 0.140”
0.140”
0.140”
0.140” 0.140”
0.140”
6.50”
4.00”
FIGURE 2-4 MAXNET EXPANSION BOARD DIAGRAM
FIGURE 2-5 MAXNET EXPANSION BOARD CONNECTOR LOCATIONS
0.48”
0.05” overhang
0.50”
3.05”
0.62”
0.05”0.34”
0.05” overhang
0.34”
0.35”
0.25”
J1
All dimensions are in inches +/- 1% unless
6.5”
4.0”
J
J4 - Expansion Connection
Molex 4305-0600
Tyco/Amp 5787169-9

GETTING STARTED CONNECT TO STEPPER MOTOR SYSTEM
2-6 MAXnet User’s Manual
2.4. SOFTWARE INSTALLATION OMS provides Windows DLL’s. For other operating systems please contact Pro-Dex, Inc, - Oregon Micro Systems, refer to Appendix B.
For Windows NT, XP & 2000
After applying power and communication connections to the MAXnet controller, apply power to the host PC and insert the software support disk or CD-ROM supplied by OMS or download the software from the OMS website (http://www.pro-dexOMS.com/). Follow the installation instructions found in README.TXT or README.DOC. The instructions will show you how to properly install the appropriate DLL.
To begin communicating with the MAXnet, systems that require console application can run the MAXnEcom.exe (Ethernet) or MAXnScom.exe (RS-232) utility. Systems that prefer GUI applications can run OMSuite.exe. You can begin interactively sending commands and receiving responses immediately if all has been properly installed. If the board has been configured with something other than the default communication parameters, then the appropriate command line switches need to be entered along with the command. For example:
MAXnEcom /I:<IP Address> /P:<port number>
or
MAXnScom /b:<baud rate> /P:<comm port>
or
OMSuite.exe (Select the communication parameters from the “Boards” drop-down menu.)
Type WY and observe the response from the MAXnet. If you are communicating to the MAXnet it would return its version number, number of axes, FPGA version number, etc. You should receive a reply similar to “MAXn-5000, Ver: x.xx, S/N: 000001, FPGA:20” from the MAXnet. If you receive nothing, double check that the MAXnet communication and power cables are firmly seated and that communications have been properly configured (see Section 2.2). For technical support, refer to Appendix B for contact information.
2.5. CONNECT TO STEPPER MOTOR SYSTEM The MAXnet control signals are located on the J1 connector. This section will explain how to connect a stepper motor driver to the controller board.
Begin this procedure with a MAXnet controller board connected to your system. Be sure that communication to the board has been established. This can be checked by issuing a WY command to the board and verifying that the board responds with its model type and revision levels (i.e. MAXnet-4000 ver 1.00 S/N 0000).
NOTE: Reference section 2.4 SOFTWARE INSTALLATION
Once communication has been established with the controller, shut down the system and turn power off to the controller board.
NOTE: It is not recommended to continue with the hardware connection if communication has not been established.
CONNECT TO STEPPER MOTOR SYSTEM GETTING STARTED
MAXnet User’s Manual 2-7
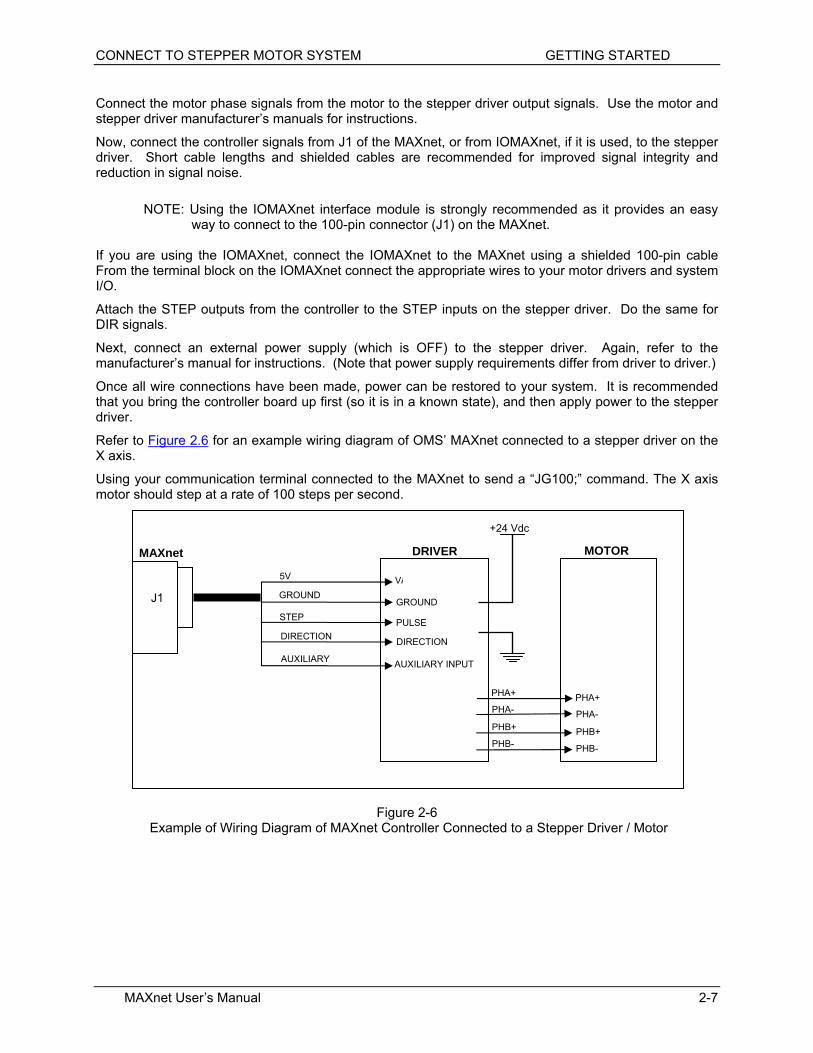
Connect the motor phase signals from the motor to the stepper driver output signals. Use the motor and stepper driver manufacturer’s manuals for instructions.
Now, connect the controller signals from J1 of the MAXnet, or from IOMAXnet, if it is used, to the stepper driver. Short cable lengths and shielded cables are recommended for improved signal integrity and reduction in signal noise.
NOTE: Using the IOMAXnet interface module is strongly recommended as it provides an easy way to connect to the 100-pin connector (J1) on the MAXnet.
If you are using the IOMAXnet, connect the IOMAXnet to the MAXnet using a shielded 100-pin cable From the terminal block on the IOMAXnet connect the appropriate wires to your motor drivers and system I/O.
Attach the STEP outputs from the controller to the STEP inputs on the stepper driver. Do the same for DIR signals.
Next, connect an external power supply (which is OFF) to the stepper driver. Again, refer to the manufacturer’s manual for instructions. (Note that power supply requirements differ from driver to driver.)
Once all wire connections have been made, power can be restored to your system. It is recommended that you bring the controller board up first (so it is in a known state), and then apply power to the stepper driver.
Refer to Figure 2.6 for an example wiring diagram of OMS’ MAXnet connected to a stepper driver on the X axis.
Using your communication terminal connected to the MAXnet to send a “JG100;” command. The X axis motor should step at a rate of 100 steps per second.
Figure 2-6 Example of Wiring Diagram of MAXnet Controller Connected to a Stepper Driver / Motor
MAXnet
J1
DRIVER MOTOR
GROUND
GROUND
5V
DIRECTION
STEP
AUXILIARY
PHA-
AUXILIARY INPUT
PULSE
DIRECTION
Vi
PHB-
PHB+
PHA+
PHA-
PHB-
PHB+
PHA+
+24 Vdc

GETTING STARTED CONNECT AND CHECKOUT THE SERVO SYSTEM
2-8 MAXnet User’s Manual
Figure 2-7 Example of Wiring Diagram of MAXnet Controller via the IOMAXnet Interface Module
Figure 2-8 Example of Wiring Diagram of MAXnet Controller via the IOMAXnet Interface Module to Servo Motor
MAXnet
J1
IOMAXnet
TE
RM
INA
L B
LO
CK
DRIVER MOTOR
GROUND
GROUND
5V
DIRECTION
STEP
AUXILIARY
PHA-
AUXILIARY INPUT
PULSE
DIRECTION
Vi
PHB-
PHB+
PHA+
PHA-
PHB-
PHB+
PHA+
+24 Vdc
MAXnet
J1
IOMAXnet
TE
RM
INA
L B
LO
CK
DC SERVO AMPLIFIER
SERVO MOTOR
ENCODER
X SERVO
Analog Ground
Analog Input
Ground
Ground
5V
X PHASE +A X PHASE -A X PHASE +B X PHASE -B X INDEX + X INDEX -
SE
E M
AN
UF
AC
TU
RE
R
DO
CU
ME
NT
AT
ION

CONNECT AND CHECKOUT THE SERVO SYSTEM GETTING STARTED
MAXnet User’s Manual 2-9
2.6. CONNECT AND CHECKOUT THE SERVO SYSTEM
Servo systems tend not to respond gracefully to connection errors. You can reduce the chance of making connection errors by following a step-by-step procedure:
Caution
2.7. CONNECT AND CONFIGURE THE MOTOR/AMPLIFIER
1) Connect and configure your amplifier per the manufacturer’s instructions for “Torque” or “Open-Loop” mode.
2) With the motor and amplifier power turned off, connect the MAXnet to the amplifier.
3) Balance your motor:
a) Configure the axis as a servo axis by sending the “PSM” command.
b) Using a voltage meter, verify that the command signal from the MAXnet is less than 500mV. If it is not, send the command “KO0;” to the MAXnet and recheck the voltage. If the voltage is still too high, contact Pro-Dex - Oregon Micro Systems’ Technical Support department for guidance.
c) Turn on power to the amplifier and then to the motor.
d) Adjust the balance setting of your amplifier (if equipped) until the motor stops moving.
e) If the motor continues to revolve or your amplifier has no balance adjustment:
i) Send the command “KO100;” to the MAXnet.
ii) If the motor spins faster, reduce the command parameter and resend the command, e.g. “KO50;”
iii) If the motor spins slower but does not stop, increase the command parameter and resend the command, e.g. “KO150;”
iv) Continue adjusting and resending the KO command until the motor comes to rest. Write down the final KO value for later reference as your “zero” setting.
4) Maximize your system’s usage of the MAXnet’s DAC (this method works only with incremental encoders, skip it if you use absolute encoder only on that axis):
The servo motor may jump or spin at a very high velocity during connection and configuration. The motor should be restrained by some means before beginning this procedure. Keep hands and clothing clear of the motor and any mechanical assemblies while performing this procedure. It is recommended that the motor shaft not be connected to the physical system until you are sure you have control over the motor.

GETTING STARTED TUNE THE SYSTEM
2-10 MAXnet User’s Manual
a) Connect the servo encoder to the MAXnet. (See section 4.4 on incremental encoder feedback)
b) Set the signal/command gain of your amplifier to its minimum setting.
c) Send the “KO3277;” command to the MAXnet and observe the velocity of the motor. The output of MAXnet will be near 1VDC.
d) If the motor does not move at all, your amplifier does not work well at a low velocity. In this case, adjust the signal/command gain of the amplifier to approximately 20% of maximum or until the motor begins to move.
e) Using a frequency meter, measure the pulse rate of Phase A of the encoder. The frequency measured is ¼ of the actual pulse rate.
f) Adjust the signal/command gain of the amplifier until the pulse rate of Phase A is approximately 10% of your desired peak operational velocity. If the pulse rate is already greater than 10% of peak, your amplifier is not designed for low velocity motion and you will likely have some difficulty tuning your motors.
g) Send the “KO-3277;” command to the MAXnet and recheck the velocity. You may need to readjust your amplifier. If so, do not reduce the signal/command gain – only increase the setting as needed. Increasing the gain will not impair the forward peak velocity but reduction will.
h) Send the KO command with the “zero” value to the MAXnet.
5) Verify the direction of your servo encoder:
a) Send the “LP0; KO2000;” command to the MAXnet.
b) Send the “RE;” command to the MAXnet and observe the response.
c) If the response is positive, no further action need be taken; go to step 6.
i) If the response is negative, your encoder or analog output must be reversed use one of the methods below.
ii) Use EDI/EDN to invert/normalize encoder direction or
iii) Use SVP-/SVP+ to invert/normalize PID analog output (inverts values of KO and KOD) or
iv) if your incremental encoder produces a differential signal, swap Phase B+ with Phase B- and repeat from step (a.) above.
v) If your incremental encoder produces a single-ended (or TTL) signal, swap Phase A with Phase B and repeat from step (a.) above.
d) If the RE response is still negative, contact OMS Technical Support for assistance.
6) Repeat from step 1 for the other servo axes.
7) Remember to set KO for each axis at every power-up unless you store the values in Flash.
NOTE: Most encoder problems are caused by lack of power or incorrect connections. If the encoder position changes by only 1 count, this is an indication that one of the phases is not connected.
Do not proceed until you perform all the steps in this procedure, ensure that the outputs of the MAXnet are as described, and ensure that the encoder is operating correctly. Do not proceed until you perform all the steps in this procedure, ensure that the outputs of the MAXnet are as described, and ensure that the encoder is operating correctly.

TUNE THE SYSTEM GETTING STARTED
MAXnet User’s Manual 2-11
2.8. TUNE THE SYSTEM
2.8.1. INTRODUCTION The following is an introduction to the basics of tuning a servo motor. Tuning a servo system is the process of balancing three primary gain values Proportional, Integral, and Derivative in order to achieve optimum system performance.
In a closed loop system, an error signal is derived from the command position and actual position, amplified, and then supplied to the motor to correct any error. If a system is to compensate for infinitely small errors, the gain of the amplifier needs to be infinite. Real world amplifiers do not possess infinite gain; therefore, there is some minimal error which cannot be corrected.
The three primary gain values used in servo systems are P (proportional), I (integral) and D (derivative). The "P" term is used as a straight gain factor to get the system response "in the ballpark." The "I" term defines how quickly the system will respond to change. The "D" term is a dampening term. This term defines how quickly the system settles at its desired position without oscillating.
The effects of these parameters can be seen when looking at the system’s response to a step change at the input. The shape of the step response falls into one of three categories: under damped, critically damped or over damped. Over damped systems are slow to reach their final value and produce little or no oscillation. Critically damped systems reach final value quickly, without overshoot. Under damped systems reach final value quickly, but have various degrees of “ringing” or oscillation, that decay to zero over time. Ideally, a system should be critically damped, allowing for the fastest response time with the least amount of oscillation.
2.8.2. TUNING ASSISTANT MAXTune.exe is a tuning assistant utility that is provided to assist the user in finding the right combination of parameters. This utility plots the motor’s response. The user can analyze this data to arrive at the right servo parameters for their servo system. The application and documentation can be found on the CD-ROM supplied with the MAXnet and on OMS’ web site found at www.pro-dexOMS.com.
2.8.3. MANUAL TUNING In most motion control applications the optimum tuning of the servo system is achieved through a manual tuning process. Auto-tuning algorithms typically can only get the system parameters close and require manual steps to fine tune the parameters. An empirical trial and error approach will be discussed first.
There are some system parameters that need to be determined before attempting to tune a motor. The encoder resolution (counts per revolution) is one element to be determined. Another is the system's maximum velocity. Note that a motor should never exceed 90% of the motor’s maximum rate rpm. If the system requirement is for a velocity higher than 90% of the motors top rpm, then another motor with higher rpm capability should be used.
The system’s maximum acceleration is determined several different ways. The best method is to determine the system time constant, which includes “hitting” or “bumping” the motor under system load and measuring the time from 0 rpm to maximum rpm and divide this value by 5. The maximum acceleration is either 2.5 times this value or is based on the system requirements for handling the load as defined in the operating specifications of the system. This value is always lower than the calculated value and if this acceleration value is not high enough then a different motor/amplifier with more power or bandwidth should be utilized.
The MAXnet can control either current mode or voltage mode amplifiers. The servo update rate of the MAXnet is user selectable: 976.6s, 488.3s, 244.1s, 122.1s. High "Following Error" can be

GETTING STARTED TUNE THE SYSTEM
2-12 MAXnet User’s Manual
compensated for using the feedforward coefficients explained later in this section. There are some general formulas that have been developed to determine acceptable “Following Error” for both current and velocity mode systems:
Current mode "Following Error" for:
KP = (3/360) (counts per revolution)
Voltage mode "Following Error" for:
KP = (90/360) (counts per revolution)
It is obvious that the voltage mode allows for much greater “Following Errors” than the current mode. This value is the “Following Error” when the motor is at peak velocity and will be used when determining the proportional gain (KP).
The "Following Error" for the integral term (KI) or long-term gain value will follow the guidelines below:
Current Mode “Following Error” for:
KI = 0 counts
Voltage Mode “Following Error” for:
KI = 80 of 360 (expressed in motor counts)
While still in open-loop mode (CL0;) use the KO command to zero the motor. This variable is used to provide a constant output that will compensate for torque offset from the load. So, when the system should be stationary, the necessary voltage will be sent to the amplifier to cause the motor to maintain position. With the correct KO value, the motor should successfully maintain a zero position.
KO is the offset coefficient used while in closed-loop or open loop mode, hold on (HN). You should have determined the correct value the KO variable before beginning to tune the PID filter.
The values for KO range from –32640 to 32640.
Set the known values for velocity, acceleration and the move distance for a trapezoidal profile with at least a 20% flat spot at peak velocity. Formula:
Profile distance = ((peak velocity)^2/(2acceleration))2.4
Example: ((50,000)^2/(2500,000))2.4 = 6,000
Execute the move by sending the move commands to the MAXnet.
Example: MR6000; GO;
Adjust the KP term while repeating step 3 until the “Following Error” at the flat spot of the profile is acceptable. If the motor becomes unstable prior to obtaining the optimum KP term, then increase the KD term until the motor stabilizes.
Example: LP0; KP3;
CL1; MR6000; GO; LP0; KP10;

TUNE THE SYSTEM GETTING STARTED
MAXnet User’s Manual 2-13
CL1; MR6000; GO; LP0; KP25; HN; MR6000; GO; LP0; KD100; CL1; LP0; KP35; CL1; MR6000; GO; LP0; KD125; CL1;
The values in the above example are totally arbitrary and may vary drastically with different systems. The LP0 command is used to set the position error to 0.
The values for KP range from 10-500.
Once the KP term has been obtained, continue executing the motion while rising the KI term until the long-term “Following Error” is acceptable. This error can be measured at the two knees of the motion profile. Increasing the KI term, increases the response time of your system. The motion profile should also have a steeper slope as KI increases. (See Figure 2-9 and 2-10 below.)
However, as KI increases the system can also become unstable. When the instability becomes unacceptable increase the 2KD parameter. This will increase the dampening on the system’s motion profile (therefore reducing oscillation or “ringing”.) Continue adjusting the KI and 2KD terms until the proper response time is obtained.
The values for KI range from 0.1 to 20.
FIGURE 2-09
If you are getting too much “ringing” in the motion profile, then increase KD to help dampen the system’s response. If, instead, the system is over-damped and is reaching the final velocity too
Desired Step Response
Too Little KI
GETTING STARTED TUNE THE SYSTEM
2-14 MAXnet User’s Manual
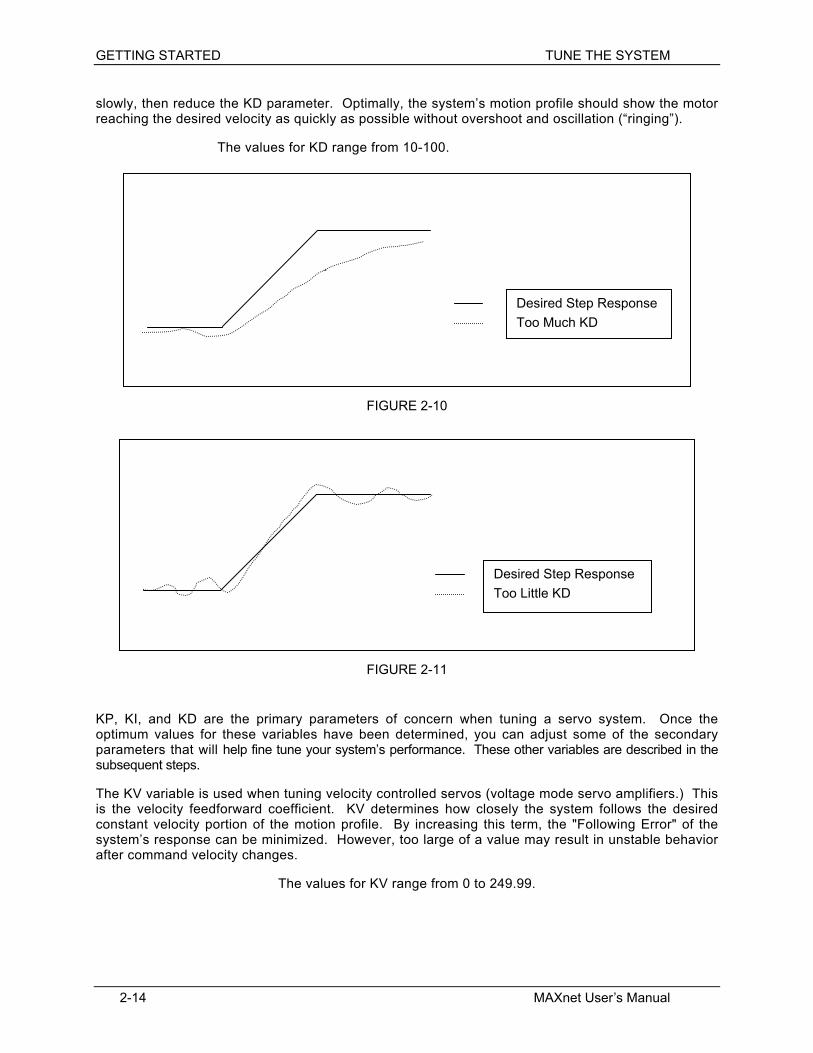
slowly, then reduce the KD parameter. Optimally, the system’s motion profile should show the motor reaching the desired velocity as quickly as possible without overshoot and oscillation (“ringing”).
The values for KD range from 10-100.
FIGURE 2-10
FIGURE 2-11
KP, KI, and KD are the primary parameters of concern when tuning a servo system. Once the optimum values for these variables have been determined, you can adjust some of the secondary parameters that will help fine tune your system’s performance. These other variables are described in the subsequent steps.
The KV variable is used when tuning velocity controlled servos (voltage mode servo amplifiers.) This is the velocity feedforward coefficient. KV determines how closely the system follows the desired constant velocity portion of the motion profile. By increasing this term, the "Following Error" of the system’s response can be minimized. However, too large of a value may result in unstable behavior after command velocity changes.
The values for KV range from 0 to 249.99.
Desired Step Response
Too Much KD
Desired Step Response
Too Little KD

TUNE THE SYSTEM GETTING STARTED
MAXnet User’s Manual 2-15
FIGURE 2-12
The KA variable is used when tuning torque controlled servos (current mode servo amplifiers.) This is the acceleration feedforward coefficient. Systems with high inertial loads may require additional torque during acceleration or deceleration to achieve optimum performance. KA determines how closely the system follows the desired acceleration and deceleration portions of the motion profile. Increasing this term reduces the following error occurring during acceleration and deceleration of the system. Although, if KA is too large, instability may occur.
The values for KA range from 0 to 249.99.
FIGURE 2-13
The block diagram below describes the feedback loop that is taking place in the servo system:
Desired Step Response
Actual Step Response
Velocity Following Error
Desired Step Response
Actual Step Response
Acceleration/Deceleration Following Error
PID Algorithm/ Amplifier
Motor and Encoder
Error (i.e. Position)
Input
FIGURE 2-14 FEEDBACK LOOP

GETTING STARTED SETTING THE USER DEFAULT CONFIGURATION
2-16 MAXnet User’s Manual
You may want to save the values for KP, KI, KD, etc., for future reference. These values can be saved in the board’s flash memory, so they can be accessed easily on reset or power-up. This can be done by using the APP command. These saved parameters will then be used as the power up default set of values.
To verify that your motor is tuned properly after you have completed the first 10 steps perform the following test to test the holding torque: Send the commands LP0;CL1; and check the shaft of the motor to make sure it is stiff. If there is play in the motor shaft when you turn it then you may have to re-adjust your PID filter.
Once you are satisfied with the static holding torque you could check for position error. Send the command "AC100000;VL5000;MR64000;GO;". With a 2000 line encoder this move would be equivalent to 8 revolutions of the motor. After the move is complete check the position error by sending the RE and RP commands for the specific axis you are moving. Compare the difference in the two responses. If they are the same then you are on the right track, if the error is greater than 32768, the controller will disable the PID so that you don’t have a runaway motor. In this case major changes to the PID parameters may be required. For minor differences in the encoder and the position reading you can fine-tune your PID filter according to the earlier steps.

SETTING THE USER DEFAULT CONFIGURATION GETTING STARTED
MAXnet User’s Manual 2-17
2.9. SETTING THE USER DEFAULT CONFIGURATION
There are many parameters that can be defined by the user as default. These parameter values can supersede the factory default values and be stored in flash memory for power-up configuration. Most of these parameters consist of axis specific values; i.e. velocity, acceleration, limit switch, logic sense, etc.
The MAXnet comes from the factory with default values for all parameters. For instance, the default value for the velocity of all axes is 200,000 counts per second. (A count is equivalent to a step pulse or one count of an encoder.) In a typical application, when the system is powered up, the main host computer would initialize all of the peripherals, such as the MAXnet, sending each of the axes the peak velocity. When the User Definable Default Parameter value is defined, then the velocities of the defined axes will be set accordingly. This feature can greatly simplify the software and initialization process.
Once the values for all of the associated parameters are defined; i.e. velocity, acceleration, PID values, etc. then the APP command is executed to place the values into flash memory. From this point forward these defined values will be used after reset or power-up. The individual parameters can be over-written at anytime by using the associated command; i.e. VL#, AC#, etc. To restore the factory defaults the command RDF is executed. The RDF command does not restore communication parameters (IP address, port number, and serial baud rate) to factory default. To restore the User Defined Default Parameters the command RDP is executed. The following is a partial list of parameters that can be defined as part of the User Definable Power-Up Default Parameters.
Over-travel limit (soft limit or hard limit); Factory Default = Hard limit
Over-travel limit (enabled or disabled); Factory Default = Enabled
Over-travel limit polarity (active high or active low); Factory Default = active low
Software based over-travel for each axis; Factory Default = disabled
Direction Bit polarity; Factory Default = non-inverted (normal)
Acceleration value for each axis; Factory Default = 2,000,000
Trajectory profile for each axis (linear, parabolic, S-curve, custom); Factory Default = Linear
Velocity Peak; Factory Default = 200,000
Velocity Base; Factory Default = 0
User Unit values for each axis; Factory Default = Off
Auxiliary output settle time for each axis; Factory Default = 0
Automatic auxiliary control axis by axis; Factory Default = Off
Encoder Ratio for each axis; Factory Default = 1:1
Encoder Slip tolerance for each axis. (Used for stepper motors); Factory Default = 0
Home Active; Factory Default = Low
Position Maintenance Dead-Band, Hold Gain and Hold Velocity. (Used for stepper systems); Factory Default = 0,0,0
Servo axis unipolar/bipolar output; Factory Default = bipolar
Servo PID values: KP, KD, KI, KO, KV, KA; Factory Default = KP 10, KD 160, KI 1.00, KO 0, KV 0, KA 0
Servo zero value: KO; Factory Default = 0
RS-232 baud rate; Factory Default = 115200
IP address; Factory Default = 10.40.30.60
Network port address; Factory Default = 23

GETTING STARTED POWER SUPPLY REQUIREMENTS
2-18 MAXnet User’s Manual
2.10. POWER SUPPLY REQUIREMENTS
Minimum Recommended Max. Power Requirements: 20 Watt 25 Watt 30 Watt
Volts Minimum Typical Recommended
Current requirements: 5 V, ± 5% 1.0 Amp 1.4 Amp 3 Amp + 12 V, ± 10% 50 mA 100 mA 250 mA -12 V, ± 10% 50 mA 100 mA 250 mA
CAUTION
TABLE 2-4 POWER CONNECTOR
J5 – 6-Pin Power Connector Signal Pin Signal Pin Signal Pin
Ground 6 5 Volts 4 Ground 2 5 Volts 5 -12 Volts 3 +12 Volts 1
FIGURE 2-15 J5 POWER CONNECTOR ON MAXNET
Maximum +5VDC power supply is 5.5 Volts. If +5VDC power supply is higher than 5.5 Volts, the MAXnet controller could be damaged.
(J6) RS-232
Pin 1 Pin 1
(J5) POWER
1
2
3
4
5
6

POWER SUPPLY REQUIREMENTS GETTING STARTED
MAXnet User’s Manual 2-19
FIGURE 2-16 J5 POWER CONNECTOR ON MAXNET EXPANSION BOARD
Pin 1
(J5) POWER
1
2
3
4
5
6

GETTING STARTED POWER SUPPLY REQUIREMENTS
2-20 MAXnet User’s Manual
This page is intentionally left blank.

INTRODUCTION COMMUNICATION INTERFACE
MAXnet User’s Manual 3-1
3. COMMUNICATION INTERFACE
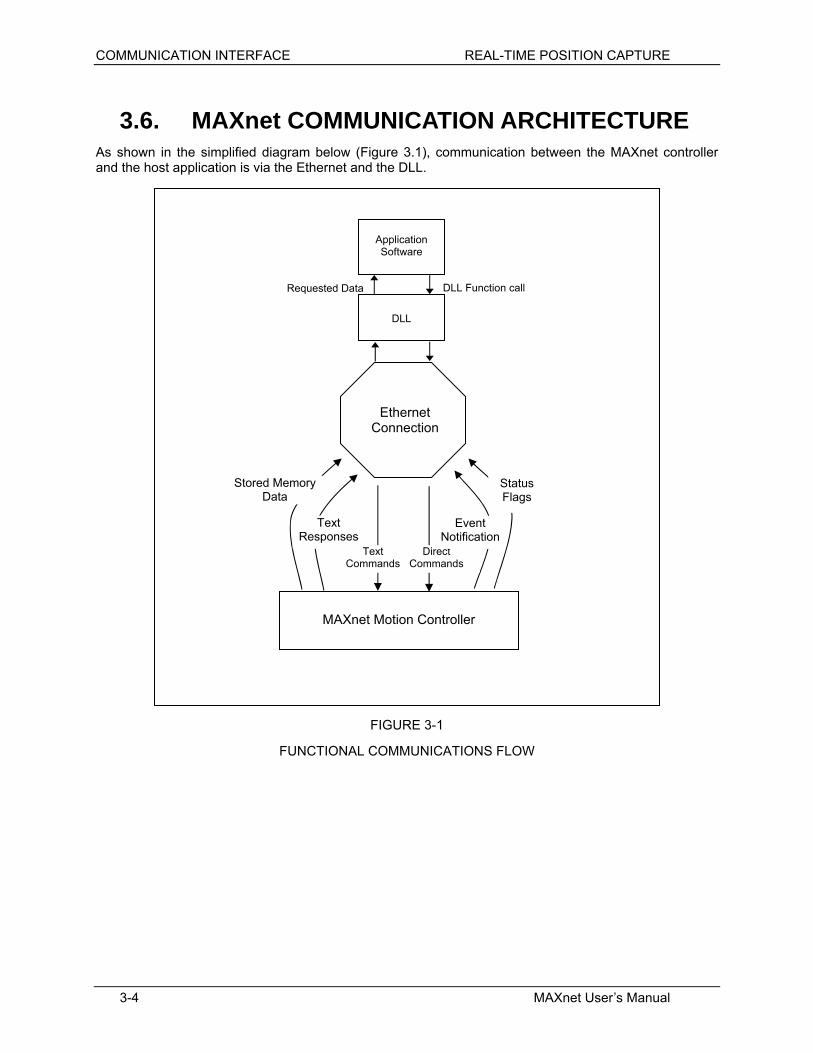
3.1. INTRODUCTION The MAXnet can be considered a motion co-processor to the host computer where it can execute the motion process independent of the host CPU. The application software issues DLL function calls and receives requested data from the support DLL. All communication is done between the motion controller and the host PC via the DLL and the communication interface (Ethernet or RS-232). (See also Functional and Data Flow Info Diagrams Figure 3-1.)
Simplified Data Dictionary of Figure 3.1.
Event Notification = New status flag data available, Query command text response available
Direct Commands = Kill all motion
Text Commands = ASCII controller command strings
Status Flags =
Axis done flags = X, Y, Z, T, U, V, R, S, W, K,
Axis over-travel limit flags = X, Y, Z, T, U, V, R, S, W, K,
Axis encoder slip flags = X, Y, Z, T, U, V, R, S, W, K,
Command error flag
Text Responses = Query command (RP, RE…) ASCII response strings
Shared Memory Data = Axis motor position data, axis encoder position data, velocity profile data, and servo tuning data,
Requested Data = Null terminated ASCII text response string, velocity profile data, servo tuning data, axis done flags, axis over-travel limit flags, axis encoder slip flags, command error status

COMMUNICATION INTERFACE RS-232 AND TCP/IP FLAG NOTIFICATION PROTOCOL
3-2 MAXnet User’s Manual
3.2. RS-232 AND TCP/IP FLAG NOTIFICATION PROTOCOL
To permit flag notification, while in TCP/IP and RS-232 modes, MAXnet will asynchronously send text strings to notify the host when status flags are set. The flag notification string will consist of an ASCII string of the form “%000 SSSSSSSS”. Where:
- The “%” character indicates that numeric data follows.
- The “000 “ code indicates that the following numeric data contains status flag information.
- The SSSSSSSS represents 8 ASCII characters that present the contents of the MAXnet style status flag word as hexadecimal digits. Status flag information is bit encoded as follows:
Axis done notification flags: - X_DONE_FLAG 0x00000001 - Y_DONE_FLAG 0x00000002 - Z_DONE_FLAG 0x00000004 - T_DONE_FLAG 0x00000008 - U_DONE_FLAG 0x00000010 - V_DONE_FLAG 0x00000020 - R_DONE_FLAG 0x00000040 - S_DONE_FLAG 0x00000080 - W_DONE_FLAG 0x02000000 - K_DONE_FLAG 0x04000000 Axis over-travel limit notification flags: - X_LIMIT_FLAG 0x00000100 - Y_LIMIT_FLAG 0x00000200 - Z_LIMIT_FLAG 0x00000400 - T_LIMIT_FLAG 0x00000800 - U_LIMIT_FLAG 0x00001000 - V_LIMIT_FLAG 0x00002000 - R_LIMIT_FLAG 0x00004000 - S_LIMIT_FLAG 0x00008000 - W_LIMIT_FLAG 0x08000000 - K_LIMIT_FLAG 0x10000000 Axis encoder slip notification flags: - X_SLIP_FLAG 0x00010000 - Y_SLIP_FLAG 0x00020000 - Z_SLIP_FLAG 0x00040000 - T_SLIP_FLAG 0x00080000 - U_SLIP_FLAG 0x00100000 - V_SLIP_FLAG 0x00200000 - R_SLIP_FLAG 0x00400000 - S_SLIP_FLAG 0x00800000 - W_SLIP_FLAG 0x20000000 - K_SLIP_FLAG 0x40000000 Command error flag: - CMD_ERR_FLAG 0x01000000

ASCII COMMAND RING BUFFER COMMUNICATION INTERFACE
MAXnet User’s Manual 3-3
3.3. ASCII COMMAND RING BUFFER (PREVIOUSLY OUTPUT SIDE OF DATA REGISTER)
Command characters strings from the host are transferred to the controller by placing it in the ASCII Command Ring Buffer and updating the buffer insert pointer.
3.4. ASCII RESPONSE RING BUFFER (PREVIOUSLY INPUT SIDE OF DATA REGISTER)
This ring buffer is resident in the Common Memory area region and the Message Unit’s Outbound Message Register 0 (OMR). Data is sent from the controller to the host by placing data into the ring buffer and then sending data over the communications channel (Ethernet or RS-232) being used.
3.5. DYNAMIC LINK LIBRARY The OmsMAXnet.dll is the Motion Control Dynamic Link Library (DLL) that provides the means to create C, C++, MFC or Visual Basic applications, running under Windows NT, 2000 or XP. The DLL supports communicating to MAXnet via Ethernet or Serial port and supplies a set of wrapper APIs round the more commonly used motion controller commands. From the basic Send and Query to issuing multiple axes moves can be achieved using the DLL with minimal lines of code. The API manual “MAXnet API Manual.doc” describes each function calling parameters, return types and function description. The software and documentation are available on the support software CD-ROM or on our web site (www.pro-dexOMS.com).
COMMUNICATION INTERFACE REAL-TIME POSITION CAPTURE
3-4 MAXnet User’s Manual
3.6. MAXnet COMMUNICATION ARCHITECTURE As shown in the simplified diagram below (Figure 3.1), communication between the MAXnet controller and the host application is via the Ethernet and the DLL.
FIGURE 3-1
FUNCTIONAL COMMUNICATIONS FLOW
MAXnet Motion Controller
Application Software
DLL
DLL Function call Requested Data
Ethernet Connection
Stored Memory Data
Text Responses
Direct Commands
Text Commands
Event Notification
Status Flags

REAL-TIME POSITION CAPTURE COMMUNICATION INTERFACE
MAXnet User’s Manual 3-5
3.7. REAL-TIME POSITION CAPTURE The position capture commands control the real-time recording of axis position data and the management of the captured position data. The captured position data includes the axis, the positive edge I/O bits, the negative edge I/O bits, the home and encoder home events, and the encoder position of the axis. The position data is captured when the conditions specified for the input bit are met. The capture conditions for the home switch and general purpose input bits can be a rising/positive edge, a falling/negative edge, or the event can be both the rising/positive and the falling/negative edge so data is captured on any transition of the input bit. The real-time position capture feature is only available on an axis with incremental encoders. See the MAX family command reference manual for more details on the real-time position capture feature.
The MAXnet controller has a ring buffer in VME shared memory, which is used to transfer the real-time position capture data to the host. When a capture event is recorded by the motor update cycle routine, it transfers the capture table entry to the shared VME memory. The host is signaled that the data is available via bit number 8, or hexadecimal value 0x00000100, in the controller status word 2 register at offset address 0x00000FC8. The data available bit is also available at byte offset 0x00000FCA, and bit number 0 or 0x01. The shared memory for the capture data is implemented as a ring buffer with an insert index that the controller uses to insert data into the shared memory region, and a removal index that the host uses to remove data from shared memory region. The controller places the capture data into the ring buffer at the location specified by the insert index, and advances the insert index. If after being advanced, the insert index equals the removal index, then the controller also advances the removal index. If the controller has to advance the removal index, this means that the host is not removing data fast enough, and capture data was lost by the host. The capture data is available in the shared VME memory at offset addresses 0xD94 through 0xFBB. The format of the capture table data in shared VME memory is defined in table 1-5 below.
TABLE 3-1 Real-Time Position Capture VME Shared Memory (Word Access Offset 0xD94)
Byte Offset Byte Offset (Hex) Byte length Description
3476 0xD94 1 Controller insert index 3477 0xD95 1 Host removal index 3478 0xD96 550 Table entries (10 bytes per entry, and 55 entries)
The number of entries can be greater than one for each axis, if capture events occur on back to back motor
update cycles, and if the host does not collect the data fast enough. The format of each table entry is defined in table 3-2 below.
TABLE 3-2 Real-Time Position Capture Table Entry
Byte Offset Byte Offset (Hex) Byte length Description
0 0x00 4 Encoder position, offset 0x00 contains MSBs, offset 0x03
contains LSBs 4 0x04 1 Axis (X = 0, Y = 1, etc.)
5 0x05 1
Home event bits: 0x01 = Positive edge home switch 0x02 = Encoder home event 0x04 = Negative edge home switch
6 0x06 2 Positive edge I/O bits, offset 0x06 contains MSBs, and offset 0x07 contains LSBs
8 0x08 2 Negative edge I/O bits, offset 0x08 contains MSBs, and offset 0x09 contains LSBs

COMMUNICATION INTERFACE REAL-TIME POSITION CAPTURE
3-6 MAXnet User’s Manual
A value of 1 for a given bit indicates that it triggered the capture event. A value of 0 for a given bit means it did not trigger the capture event. The motion controller contains a PowerPC processor, which writes the data in the shared memory in big endian format. If the host processor is not a big endian processor, then appropriate byte swapping to correct for endian differences must be performed by the host processor when accessing the shared memory data.

INTRODUCTION CONTROL SIGNAL INTERFACE
MAXnet User’s Manual 4-1
4. CONTROL SIGNAL INTERFACE
4.1. INTRODUCTION The MAXnet family of motion controllers is available in configurations from one to ten axes to manage combinations of servo and step motor systems. The 100-pin MAXnet connector incorporates all of the signals of the MAXnet. The MAXnet default configuration is as an open loop stepper controller for the number of axes ordered.

CONTROL SIGNAL INTERFACE INTRODUCTION
MAXnet User’s Manual 4-2
TABLE 4-1 OUTPUT CONNECTOR PIN LIST (J1) (MAXNET AND EXPANSION BOARD)
J1 – 100-pin connector Pin Signal Pin Signal 1 X / V Phase +A 51 Y / R Phase +A 2 X / V Phase -A 52 Y / R Phase –A 3 X / V Phase +B 53 Y / R Phase +B 4 X / V Phase -B 54 Y / R Phase -B 5 X / V Index + 55 Y / R Index + 6 X / V Index - 56 Y / R Index - 7 Z / S Phase +A 57 GROUND 8 Z / S Phase -A 58 GROUND 9 Z / S Phase +B 59 T / W Phase +A
10 Z / S Phase -B 60 T / W Phase –A 11 Z / S Index + 61 T / W Phase +B 12 Z / S Index - 62 T / W Phase –B 13 U / K Phase +A 63 T / W Index + 14 U / K Phase -A 64 T / W Index - 15 U / K Phase +B 65 U / K Index + 16 U / K Phase -B 66 U / K Index - 17 GROUND 67 GROUND 18 X / V Positive Limit 68 X / V Negative Limit 19 Y / R Positive Limit 69 Y / R Negative Limit 20 Z / S Positive Limit 70 Z / S Negative Limit 21 T / W Positive Limit 71 T / W Negative Limit 22 U / K Positive Limit 72 U / K Negative Limit 23 GROUND 73 GROUND 24 X / V Home 74 X / V Direction 25 Y / R Home 75 Y / R Direction 26 Z / S Home 76 Z / S Direction 27 GROUND 77 GROUND 28 T / W Home 78 T / W Direction 29 U / K Home 79 U / K Direction 30 GROUND 80 GROUND 31 X / V Aux 81 X / V Step 32 Y / R Aux 82 Y / R Step 33 Z / S Aux 83 Z / S Step 34 5 Volts 84 GROUND 35 T / W Aux 85 T / W Step 36 U / K Aux 86 U / K Step 37 GROUND 87 GROUND 38 IO0 / IO8 88 IO1 / IO9 39 IO2 / IO10 89 IO3 / IO11 40 IO4 / IO12 90 IO5 / IO13 41 IO6 / IO14 91 IO7 / IO15 42 GROUND 92 GROUND 43 ADC 0 / ADC 2 93 ADC 1 / ADC 3 44 GROUND 94 GROUND 45 X / V Servo 95 Y / R Servo 46 GROUND 96 GROUND 47 Z / S Servo 97 T / W Servo 48 GROUND 98 GROUND 49 U / K Servo 99 DAC 0 / DAC 1 50 GROUND 100 GROUND
Legend
X / V axis U / K axis Y / R axis Ground Z / S axis Voltage T / W axis

LIMIT INPUTS CONTROL SIGNAL INTERFACE
MAXnet User’s Manual 4-3
4.2. LIMIT INPUTS To facilitate system safety, TTL inputs for +/- limit conditions are provided for each axis. Limits may be activated by mechanical switches using contact closures or other suitable active switches, such as a Hall Effect switch or opto-isolator that connects to ground.
If the motor travels beyond its allowable limits and trips the switch, the limit condition removes any further excitation in the limit direction from the affected axis. (Servo Motor systems should be designed for safety, i.e. to have electrical braking to stop them). The limit switch active signal state can be selected with the LT command on an axis by axis basis. The behavior of the limit functionality can be set for the axis to decelerate to a stop or to stop without deceleration when a limit condition occurs.
See Command Reference Manual: MAX Family (www.pro-dexOMS.com): LM and LT commands.
4.3. HOME INPUTS To facilitate positioning of an axis to a known reference position, a TTL home input is provided for each axis. For axes using an encoder, the home input can be used in conjunction with the index signal of the encoder. The logic of the encoder signals Phase A/Phase B/Index that constitute a true home condition is programmable. Refer to Figure 4-3.
Reference Command Reference Manual: MAX Family l (www.pro-dexOMS.com): EH, HM, HR, HT, KM, and KR commands.
4.4. GENERAL PURPOSE DIGITAL I/O There are up to 16 general purpose digital lines that can be individually configured as either a TTL input or an active drive TTL output. Commands are provided for setting the I/O direction of the lines, setting the state of the outputs and reading the current state of the I/O lines. Inputs can be used to control loops, qualify motion or signal an event.
Reference Command Reference Manual: MAX Family l (www.pro-dexOMS.com): BD, BH, BL, BW, BX, IOK, and SW commands.
4.5. ANALOG I/O
4.5.1. ANALOG INPUTS Up to 4* general purpose analog inputs are available to read +/-10V values via 16-bit analog to digital converters. These can be used to provide input from analog sensors to application software. Analog inputs can also be configured to provide a velocity override input.
See Command Reference Manual: MAX Family (www.pro-dexOMS.com): AI, AO and VOA commands.
The MAXnet controller has 8 GPIO and 2 GP analog inputs. With the MAXnet expansion board used for 6 - 10 axes of motion, MAXnet has 16 GPIO and 4 GP analog inputs. MAXnet can also be customized for other I/O solutions with the MAXnet expansion board.

CONTROL SIGNAL INTERFACE MOTOR CONTROL OUTPUT
MAXnet User’s Manual 4-4
4.5.2. ANALOG OUTPUTS Up to 12* analog outputs provide +/- 10V outputs via the 16-bit digital to analog converters (DAC). Each servo axis requires a dedicated DAC. There are six DACs and a maximum of five axes on the MAXnet controller and another six DACs and up to five axes on the MAXnet expansion board. So there is always at least one general purpose analog output available. For every available axis that is not being used as a servo motor, there is a general purpose analog output available. Each DAC has a +/- 15mA maximum output current.
4.6. MOTOR CONTROL OUTPUT The MAXnet is configured at the factory to control open loop stepper motors. Upon installation, axes can be configured for servo motors, open loop steppers, stepper motors with encoder feedback or a combination thereof. The servo output may be either unipolar analog (0/+10V) or bipolar analog (-10/+10 V). Each axis configured as a servo motor uses one analog output.
Step pulse and direction outputs are active drive TTL level ouput signals which will wire directly into most driver inputs.
Auxiliary outputs are active drive TTL outputs.
Each step, direction, and auxiliary output has a +/- 20mA maximum output current.
FIGURE 4-1 CONNECTION TO STEP DRIVES WITH OR WITHOUT INTERNAL PULL-UP RESISTORS
* The MAXnet controller has 6 analog outputs. With the MAXnet expansion board used for 6 - 10 axes of motion, MAXnet has 6 additional analog outputs. MAXnet can also be customized for other I/O solutions with the expansion board.
Aux
Step
Direction
+5V
Ground
Enable
Step/Clock
Direction
Opto +5V Supply
Ground (Opto)
MAXnet Drive

MOTOR CONTROL OUTPUT CONTROL SIGNAL INTERFACE
MAXnet User’s Manual 4-5
FIGURE 4-2 CONNECTION TO STEP DRIVES WITH DIFFERENTIAL
FIGURE 4-3 HOME LIMIT INPUT WIRING DIAGRAM
FIGURE 4-4 DIGITAL I/O WIRING DIAGRAM
2.2K
MAXnet
Home/+Limit/-Limit Switch Input
+5V
Step
Direction
Aux
+5V
Ground
Enable
Step/Clock -
Direction -
Step/Clock +
Direction +
Opto +5VDC Supply
Opto Ground
2.2 K Ω
1 K Ω
MAXnet Drive
2.2K
MAXnet
+5V
TTL input
TTL output
Digital Input/Output
CONTROL SIGNAL INTERFACE HOME PROCEDURES
MAXnet User’s Manual 4-6
4.7. ENCODER FEEDBACK Incremental encoder feedback is provided for all axes. Encoder feedback is required for each servo axis. Its use is optional for stepper axes. The MAXnet encoder feedback accepts quadrature pulse inputs from high resolution encoders at rates up to 16 MHz (after quadrature detection). When used with stepper motors, the encoder monitors the actual position through the encoder pulse train. On servo axes it continuously provides input to calculate the position error, adjust for it through the PID filter, and change the output accordingly. The stepper axes can monitor the error and correct and maintain the position after the move is finished.
The encoder input can also be used as an independent feedback source or, in the encoder tracking mode, to mimic an activity. All modes are capable of slip or stall detection and encoder tracking with electronic gearing. These options are selectable by the user through software commands.
The MAXnet is compatible with virtually any incremental encoder which provides quadrature outputs. Times four quadrature detection is used to increase resolution. This means that an encoder rated for 1000 counts (or lines) per revolution will result in 4000 counts of quadrature encoded input for each encoder shaft revolution. The inputs are compatible with encoders, that have single ended or differential TTL outputs. The MAXnet has differential line receivers to accommodate encoders with differential outputs. Encoders with single-ended outputs can wire the signals to the plus(+) side of the differential line receiver and ground the minus(-) side (see Figure 4.6).
4.8. HOME PROCEDURES Two logical input functionalities are provided to synchronize the physical hardware with the MAXnet controller; i.e. put the controlled motor in the home position.
The home switch input is a TTL level input signal. If current limiting is required, it should be done externally to the board. Contact Pro-Dex, Inc. - Oregon Micro Systems technical support for assistance.
The MAXnet home switch input can be used to physically home a mechanical stage. When this functionality is used the axis position counter will be reset to a selected value when the switch is activated. At this point the MAXnet can either ramp the axis to a stop or stop the axis immediately. The control of the direction of travel, the logic active state and the response to the active switch are controlled through commands.
The other homing method on the MAXnet uses the home switch and the encoder signals to home a motor. When using the Home Encoder Index (HI) mode, the homing logic is used with these input signals. The home position consists of the logical AND of the encoder index pulse, the home switch input, and a single quadrant from the encoder logic. The home switch and encoder should be positioned relative to each other in such a way that there is only a single location in the entire travel of the axis that creates a true condition for the defined home logic. The HT and EH commands can be used to create different patterns for the home logic, including the option to ignore an encoder phase signal. The default home logic expressed in Boolean terms is:
Home = Phase +A * Phase -B * Index * Home Switch (Default)
It is necessary that the above quadrant occur within the index pulse as provided by the encoder for this logic to function properly. It may be necessary with some encoders to shift the phase of this quadrant by inverting one or both of the phases. Inverting one phase or swapping Phase A for Phase B will also reverse the direction. The encoder counter (read by a RE/PE commands) must increase for positive moves or the system will oscillate due to positive feedback. For other options, please contact OMS Technical Support.

HOME PROCEDURES CONTROL SIGNAL INTERFACE
MAXnet User’s Manual 4-7
FIGURE 4-5 ENCODER HOMING STATE DETECTION
FIGURE 4-6 ENCODER WIRING DIAGRAM FOR SINGLE-ENDED INPUT SIGNALS
Phase A
Phase B
Index
Home Switch
PHA+
PHB+
PHA-
PHB- INDX+
INDX -
Ground
Phase A
Phase B
Index
MAXnet Encoder

CONTROL SIGNAL INTERFACE ABSOLUTE ENCODERS WITH SSI
MAXnet User’s Manual 4-8
4.9. ABSOLUTE ENCODERS WITH SSI The MAXnet comes with two axes of configurable absolute encoders with SSI (Synchronous Serial Interface) technology. By default the X and Y axes will have up to 12 bits of resolution of absolute encoding. The MAXnet can have up to 10 axes of absolute encoders and up to 32 bits of resolution per axis. The MAXnet provides a differential clock output through the I/0 port on the MAXnet board to deliver clocking to an absolute encoder. With the MAXnet expansion board for 6 - 10 axes of absolute encoding, the differential clocking is provided out of the index signal outputs. The clocking can be configured for the following frequencies: 31,250Hz, 62,500Hz, 125,000Hz, 250,000HGz, 500,000Hz, 1MHz, 2MHz, and 4MHz.
On the MAXnet board with I/O 0-7 available, typical use of absolute encoders require that clock+ and clock- be configured from the X-Axis through I/O 0-1, Y-Axis through I/O 2-3, Z-Axis through I/O 4-5, and T-Axis through I/O 6-7. For the U-axis, clocking would also be configured from a clock signal set through I/O 0-7. This requires that the clocking be shared between the U-axis and another axis if more than four axes of absolute encoding are needed. Absolute encoders sharing the same I/O output clocks have the requirement that the clock frequency is the same and the bits resolution is the same.
On the MAXnet expansion board, the clock+ and clock- signals are provided via the index+ and index- signals for each axis, not the I/O ports. Thus, there is no sharing of clocks needed or a same frequency requirement between absolute encoders.
4.9.1. CONFIGURATION EXAMPLES The following are two examples on how to configure the MAXnet for absolute encoding. The first case is the standard MAXnet with two absolute encoders with up to 12 bits resolution. For this example, the X axis is 12 bits resolution with a clock frequency at 125,000Hz, and the Y axis is 9 bits resolution with a clock frequency of 250,000Hz.
AX; PSE; ECA12,125000; AY; PSE; ECA9,250000;
The second example calls for five absolute encoders, two axes at 16 bits resolution with a clock frequency of 125,000Hz, one axis at 24 bits resolution with a clock frequency of 500,000Hz, and two axes at 32 bits resolution at 250000Hz. This example also shows the use of clock sharing with other absolute encoders with the same clock frequency and bits resolution.
AX; PSE; ECA16,125000; AY; PSE; ECA16,125000; AZ; PSE; ECA24,500000; AT; PSE; ECA32,250000; AU; PSE: ECA32,250000; Shares clocks with T-axis (I/O 6-7)
ABSOLUTE ENCODERS WITH SSI CONTROL SIGNAL INTERFACE
MAXnet User’s Manual 4-9
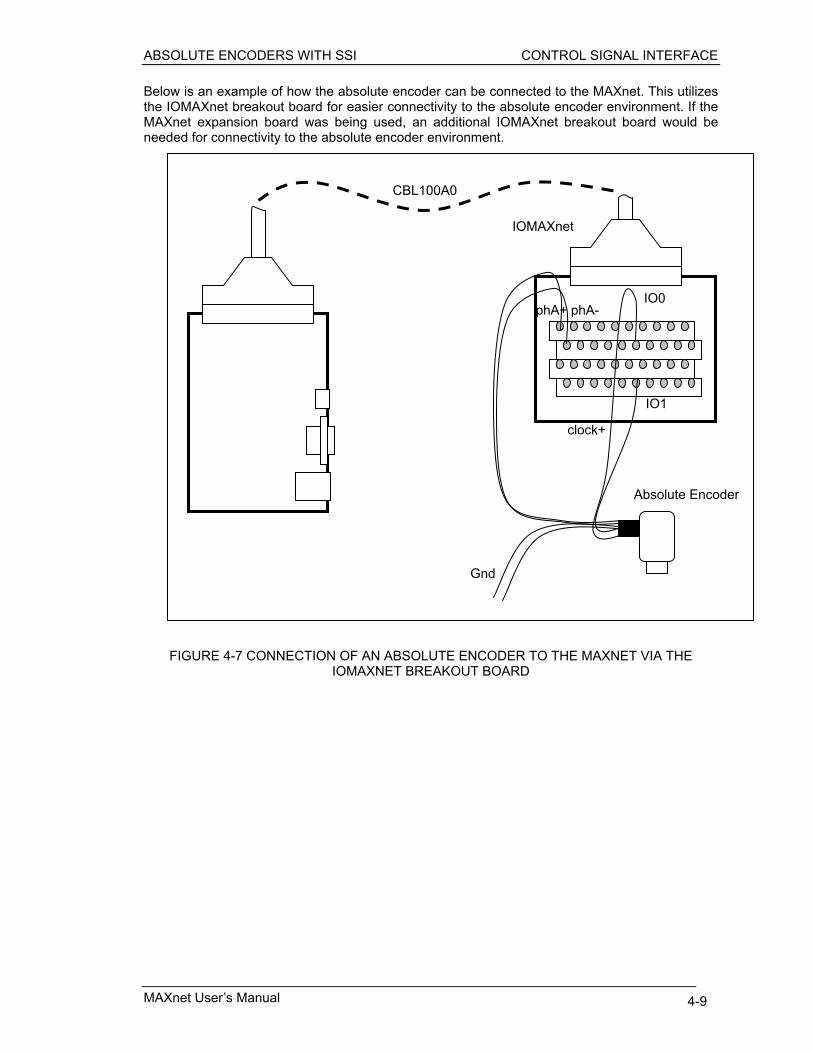
Below is an example of how the absolute encoder can be connected to the MAXnet. This utilizes the IOMAXnet breakout board for easier connectivity to the absolute encoder environment. If the MAXnet expansion board was being used, an additional IOMAXnet breakout board would be needed for connectivity to the absolute encoder environment.
FIGURE 4-7 CONNECTION OF AN ABSOLUTE ENCODER TO THE MAXNET VIA THE IOMAXNET BREAKOUT BOARD
IOMAXnet
phA+ phA- IO0
IO1
Gnd
clock+
CBL100A0
Absolute Encoder

CONTROL SIGNAL INTERFACE IOMAXnet ADAPTER MODULE
MAXnet User’s Manual 4-10
4.10. IOMAXnet ADAPTER MODULE The optional IOMAXnet is an adapter module designed to provide easy connection for each signal of the MAXnet. It incorporates two-row terminal block. It is used with a 10 foot shielded cable to connect to the MAXnet via the 100-pin connector. The +5VDC on the IOMAX is supplied by the MAXnet.
This supply voltage is intended to be utilized with accessories used in conjunction with the MAXnet such as sensors, motor driver modules, etc. and supports a maximum current of 0.5 amps for these purposes.
TABLE 4-2
IOMAXnet – Terminal Block Pin-Out Pin Signal Pin Signal Pin Signal 1 X / V Phase +A 35 T / W Aux 69 Y / R Negative Limit 2 X / V Phase -A 36 U / K Aux 70 Z / S Negative Limit 3 X / V Phase +B 37 GROUND 71 T / W Negative Limit 4 X / V Phase -B 38 IO0 / IO8 72 U / K Negative Limit 5 X / V Index + 39 IO2 / IO10 73 GROUND 6 X / V Index - 40 IO4 / IO12 74 X / V Direction 7 Z / S Phase +A 41 IO6 / IO14 75 Y / R Direction 8 Z / S Phase –A 42 GROUND 76 Z / S Direction 9 Z / S Phase +B 43 ADC 0 / ADC 2 77 GROUND 10 Z / S Phase –B 44 GROUND 78 T / W Direction 11 Z / S Index + 45 X / V Servo 79 U / K Direction 12 Z / S Index - 46 GROUND 80 GROUND 13 U / K Phase +A 47 Z / S Servo 81 X / V Step 14 U / K Phase –A 48 GROUND 82 Y / R Step 15 U / K Phase +B 49 U / K Servo 83 Z / S Step 16 U / K Phase –B 50 GROUND 84 GROUND 17 GROUND 51 Y / R Phase +A 85 T / W Step 18 X / V Positive Limit 52 Y / R Phase –A 86 U / K Step 19 Y / R Positive Limit 53 Y / R Phase +B 87 GROUND 20 Z / S Positive Limit 54 Y / R Phase -B 88 IO1 / IO9 21 T / W Positive Limit 55 Y / R Index + 89 IO3 / IO11 22 U / K Positive Limit 56 Y / R Index - 90 IO5 / IO13 23 GROUND 57 GROUND 91 IO7 / IO15 24 X / V Home 58 GROUND 92 GROUND 25 Y / R Home 59 T / W Phase +A 93 ADC 1 / ADC 3 26 Z / S Home 60 T / W Phase –A 94 GROUND 27 GROUND 61 T / W Phase +B 95 Y / R Servo 28 T / W Home 62 T / W Phase –B 96 GROUND 29 U / K Home 63 T / W Index + 97 T / W Servo 30 GROUND 64 T / W Index - 98 GROUND 31 X / V Aux 65 U / K Index + 99 DAC 0 / DAC 1 32 Y / R Aux 66 U / K Index - 100 GROUND 33 Z / S Aux 67 GROUND 34 5 Volts 68 X / V Negative Limit
Legend X / V axis U / K axis Y / R axis Ground Z / S axis Voltage T / W axis
For a black and white version of this table, click here

INTRODUCTION TO MAXnet SUPPORT SOFTWARE HOST SOFTWARE
MAXnet User’s Manual 5-1
5. HOST SOFTWARE
5.1. INTRODUCTION TO MAXnet SUPPORT SOFTWARE
A disk containing Dlls, libraries, application software, and example code for Pro-Dex-Oregon Micro Systems MAXnet family controllers is supplied with the purchase of a MAXnet controller. Refer to the text files on the disk for installation instructions and other information.
Some programs on the demo disk that include source code may be adapted for use in application programs that use OMS motion controls. No license is required.
The software is also available on the Pro-Dex - Oregon Micro Systems’ web page: http:\\www.pro-dexOMS.com.

HOST SOFTWARE INTRODUCTION TO MAXnet SUPPORT SOFTWARE
MAXnet User’s Manual 5-2
This page intentionally left blank
STAND ALONE COMMANDS
MAXnet User’s Manual 6-1
6. STAND ALONE COMMANDS The stand-alone mode allows a MAXnet Motion Controller to run in a completely independent operation mode when powered by a separate +5 VDC power supply and ±12 VDC (for servos). This mode has several commands that can establish links to macros. When set up properly in this mode, the MAXnet can scan for a predefined I/O Input bit until it changes to the specified state. Upon sensing that this condition has been met, it will execute the permanent Macro from Non-volatile flash memory that had been previously associated or linked with this I/O bit and its state. See Command Reference Manual: MAX Family for details about macro programming.
A common application the stand-alone mode is to incorporate the KILL (KL) function. Reference the SXK command. This will allow the user to stop motion of the device.
All of these selections are temporary. They can be made permanent by executing the APP command, which assigns the current parameter values as the Power Up defaults.
Note: The APP command should be used sparingly as it causes a write to the on board Flash Memory and there is a finite amount of times that it can be re-written to (i.e. less than 1,000,000 times, typical).
Application Overview:
The setup of the stand-alone mode is performed through the communication interface by the use of the commands. The user would define the required motion and/or processes and store them in a macro. Once all of the setup is completed, the macro has been defined and stored in flash, the controller would be put in the stand-alone mode (SXM1;) and the execution of the macros is then controlled by the defined input bits.
There are no queue requirements for these commands.

STAND ALONE COMMANDS
MAXnet User’s Manual 6-2
This page intentionally left blank

SERVICE
MAXnet User’s Manual 7-1
7. SERVICE
7.1. USER SERVICE The MAXnet family of controllers contain no user serviceable parts.
7.2. THEORY OF OPERATION The MAXnet controller uses a PowerPC microprocessor for the core of its design. The highest priority process calculates the desired velocity at the selected update rate with a proprietary algorithm (patent number 4,734,847). This frequency is written to logic on board which generates the pulses for stepper motor control and/or the appropriate voltage levels for Servo Control. The velocity profile and synchronization of each axis is also handled by the PowerPC.
The commands from the host computer are temporarily stored in a character buffer until the MAXnet can parse them. The command is then executed immediately or routed to separate command queues for each axis. The command queue contains a list of addresses to execute. The argument queue stores the parameters (as applicable) supplied with each command for the axis. A command from the host may be expanded into several commands to the appropriate axis. The GO command, for example, will expand into start, ramp up, constant velocity and ramp down commands. The LS command will save its parameter in the argument queue, the loop count, on a loop stack along with the address of the LS command to be used by the next LE command as a target for a jump command are stored in the command queue. The LE command will decrement the loop count and jump to the most recent LS command providing the loop count has not reached zero. If the loop count has reached zero and it is not nested inside another loop, the queue space will be flagged as available and the next instruction in the queue will be executed.
The communication interface is performed by the MAXnet microprocessor.

SERVICE
MAXnet User’s Manual 7-2
This page intentionally left blank

MAXnet ETHERNET MODE FIRMWARE UPGRADE FIRMWARE UPGRADE
MAXnet User’s Manual 8-1
8. FIRMWARE UPGRADE CAUTION:
8.1. MAXnet ETHERNET MODE FIRMWARE UPGRADE
Files Required:
MAXnEupg.EXE Host executable that does the firmware upgrade via Ethernet.
MAXn.BIN The default new controller firmware file
MAXnEupg command line parameters:
/i=n.n.n.n n.n.n.n specifies the controller's IP address.
(default is 10.40.30.61)
/p=n n specifies the controller's TCP/IP port number.
(default is 23) (valid is 1-65535)
/f=n n specifies controller firmware filename
(default is maxn.bin)
/h for help - display an usage line (no default)
Description of operation:
- MAXnEupg will verify the existence and the validity of the firmware upgrade file prior to sending any commands to the controller to erase or program flash.
- MAXnEupg determines whether there is firmware currently executing on the MAXnet controller.
If firmware is currently executing then MAXnEupg proceeds to the next step of the upgrade process. Otherwise, MAXnEupg will report the error and exit.
- The flash code blocks are erased. If a failure occurs erasing flash, the program is aborted.
- The firmware file is sent to the controller and the controller programs the flash to the flash code blocks. Firmware is sent in packets. If any single packet has a transmission error, it will be resent until the transmission is successful or the user aborts the upgrade program.
The firmware upgrade utility erases the flash memory of the controller during the upgrade process. While every precaution has been taken to recover from any failures, the customer should also take every precaution to provide a stable environment for the upgrade process in order to minimize the chance of an irrecoverable error that would
require the board to be sent back to the factory.

FIRMWARE UPGRADE MAXnet ETHERNET MODE FIRMWARE UPGRADE
MAXnet User’s Manual 8-2
- The first code block is re-written with a valid MAXnet signature so that the boot block will recognize that valid firmware is loaded in the flash.
- A restart command is sent to the controller, causing the controller to re-boot with the new firmware.
Verify that the controller is running the new firmware by running the MAXnEcom utility and sending a WY command to the controller. The WY response should indicate the version number of the upgraded firmware.
If MAXnEupg encounters an error that will not allow it continue, it will either abort the program or continuously retry until the error no longer occurs. In the case of a continuous error that does not clear, the user can abort by entering Control-C (holding down the 'Ctrl' key and pressing 'C').
Unless specified via a command line option:
- The default upgrade file name is maxn.bin.
- The default IP address is 10.40.30.61.
- The default TCP/IP port selection number is 23.
- Examples: Description:
MAXnEupg upgrades flash of the controller using maxn.bin. MAXnEupg /I=10.40.30.62 upgrades flash of the controller using an IP address of 10.40.30.62MAXnEupg /f=newmaxn.bin upgrades using newmaxn.bin file MAXnEupg /p=22 upgrades flash using port 22 MAXnEupg /h will display a help message
Error messages:
A connection could not be established with IP address nn and port number pp
The specified IP address or port number would not allow a connection to the controller.
Cannot get file handle: filename
A problem occurred trying to open the upgrade file named filename.
Controller ID query failed
The controller did not respond to a WY query. The upgrade will be aborted.
Controller is not responding
The controller did not respond to a WY query. The upgrade will be aborted.
Could not read serial number!
An error occurred trying to read the serial number from the upgrade file.

MAXnet ETHERNET MODE FIRMWARE UPGRADE FIRMWARE UPGRADE
MAXnet User’s Manual 8-3
CRC failure on packet: ppp
The controller did not accept the upgrade packet number ppp due to a failure to pass the crc checksum test. The controller does not attempt to write to flash until the crc checksum is successful for the packet.
Flash upgrade failed
Some failure occurred during the erasing of the flash or the writing of the upgrade file to the flash.
Flash verify failure on packet: ppp
The controller did not accept the upgrade packet number ppp due to a flash verify failure.
Flash write failure on packet: ppp
The controller did not accept the upgrade packet number ppp due to a flash write failure.
Invalid command line option
The character following a / character on the command line was not one of the valid command line options. Valid options are /B /P, /F.
Invalid upgrade file for MAXnet serial number nnnnnn
An upgrade file with a serial number lock installed did not match the MAXnet controller found.
Invalid upgrade file signature!
The upgrade file did not have the required signature of a valid upgrade file.
Unknown failure on packet: ppp
The controller did not accept the upgrade packet number ppp due to some unknown failure.
Upgrade File Seek Error!
An error occurred trying to access the upgrade file.
WAIT message:
(NOTE: messages proceeded with "WAIT:" will be displayed continuously until the condition indicated is met.)
Waiting for Controller to enter Upgrade Mode!
This message indicates that MAXnEupg has requested that the controller enter upgrade mode, but the controller has not yet indicated that is in upgrade mode.

FIRMWARE UPGRADE MAXnet ETHERNET MODE FIRMWARE UPGRADE
MAXnet User’s Manual 8-4
INFO messages:
Application Running.
MAXnSupg has determined that an application is running on the MAXnet controller.
Erasing flash...success
This message indicates that flash code area has successfully been erased.
Invalid upgrade file for MAXnet serial number.
This message indicates that the upgrade file's serial number entry did not match the controller's serial number or a CRC error was detected.
MAXnEupg Version: n.nn
Displays the current version of the MAXnet firmware upgrade utility.
RESTARTING with new firmware.
This message indicates that the firmware upgrade was successful and MAXnEupg has sent a command to the controller to restart. This will start the controller running with the new upgraded firmware.
Sending nnn packets
This message indicates how many packets are going to be sent to the controller flash when sending the new firmware to the controller.
Serial Number verified!
This message indicates that the upgrade file had a Serial Number lock installed and it was successfully verified that the specified upgrade file was valid for the MAXnet controller specified.
Signature packet re-sent successfully.
This message indicates the last packet with a valid firmware signature has been successfully sent to the controller flash memory.
Upgrading flash with filename.
MAXnSupg has determined that the controller is ready to start the upgrade.

MAXnet SERIAL MODE FIRMWARE UPGRADE FIRMWARE UPGRADE
MAXnet User’s Manual 8-5
8.2. MAXnet SERIAL MODE FIRMWARE UPGRADE
Files Required:
MAXnSupg.EXE Host executable that does the firmware upgrade via RS232
MAXn.BIN The default new controller firmware file
maxn_uldr.hex Controller firmware for assisting MAXnSupg. This file is only required if no firmware is running on controller when maxnsupg is executed. This can occur when an attempt to do a firmware upgrade has failed or has been interrupted before completion.
MAXnSupg command line parameters:
/b=n n specifies the RS232 baud rate.
(default is 115200) (valid is 9600, 19200, 38400, 57600 or 115200)
/p=n n specifies the number of the RS232 Comm port the controller is connected to.
(default is 1) (valid is 1-32)
/f=n n specifies controller firmware filename (default is maxn.bin)
/h for help - display a usage line (no default)
Description of operation:
- MAXnSupg will verify the existence and the validity of the firmware upgrade file prior to sending any commands to the controller to erase or program flash.
- MAXnSupg determines whether there is firmware currently executing on the MAXnet controller.
If firmware is currently executing then MAXnSupg proceeds to the next step of the upgrade process. Otherwise, MAXnSupg will upload the maxn_uldr.hex file to the controller ram and attempt to execute the uploaded code. If a valid response is returned from the maxn_uldr application then MAXnSupg proceeds to the next step, otherwise MAXnSupg exits.
- The flash code blocks are erased. If a failure occurs erasing flash, the program is aborted.
- The firmware file is sent to the controller and the controller programs the flash to the flash code blocks. Firmware is sent in packets. If any single packet has a transmission error, it will be resent until the transmission is successful or the user aborts the upgrade program.
- The first code block is re-written with a valid MAXnet signature so that the boot block will recognize that valid firmware is loaded in the flash.
- A restart command is sent to the controller, causing the controller to re-boot with the new firmware.
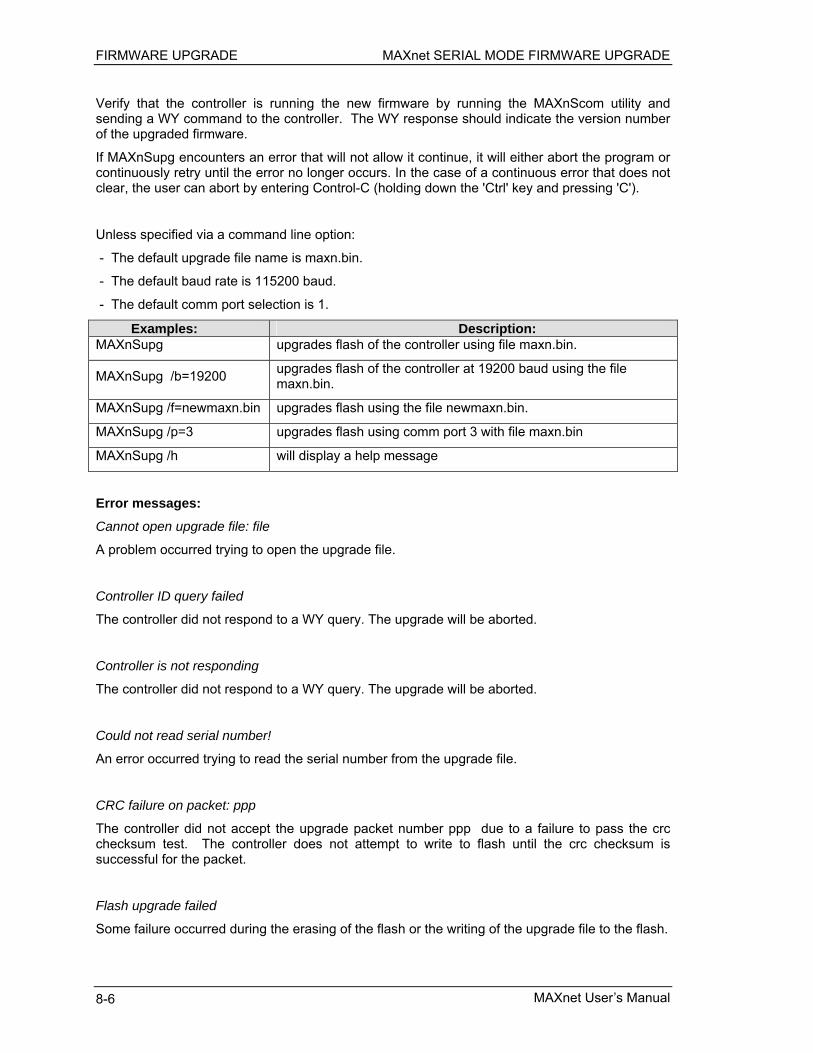
FIRMWARE UPGRADE MAXnet SERIAL MODE FIRMWARE UPGRADE
MAXnet User’s Manual 8-6
Verify that the controller is running the new firmware by running the MAXnScom utility and sending a WY command to the controller. The WY response should indicate the version number of the upgraded firmware.
If MAXnSupg encounters an error that will not allow it continue, it will either abort the program or continuously retry until the error no longer occurs. In the case of a continuous error that does not clear, the user can abort by entering Control-C (holding down the 'Ctrl' key and pressing 'C').
Unless specified via a command line option:
- The default upgrade file name is maxn.bin.
- The default baud rate is 115200 baud.
- The default comm port selection is 1.
Examples: Description: MAXnSupg upgrades flash of the controller using file maxn.bin.
MAXnSupg /b=19200 upgrades flash of the controller at 19200 baud using the file maxn.bin.
MAXnSupg /f=newmaxn.bin upgrades flash using the file newmaxn.bin.
MAXnSupg /p=3 upgrades flash using comm port 3 with file maxn.bin
MAXnSupg /h will display a help message
Error messages:
Cannot open upgrade file: file
A problem occurred trying to open the upgrade file.
Controller ID query failed
The controller did not respond to a WY query. The upgrade will be aborted.
Controller is not responding
The controller did not respond to a WY query. The upgrade will be aborted.
Could not read serial number!
An error occurred trying to read the serial number from the upgrade file.
CRC failure on packet: ppp
The controller did not accept the upgrade packet number ppp due to a failure to pass the crc checksum test. The controller does not attempt to write to flash until the crc checksum is successful for the packet.
Flash upgrade failed
Some failure occurred during the erasing of the flash or the writing of the upgrade file to the flash.

MAXnet SERIAL MODE FIRMWARE UPGRADE FIRMWARE UPGRADE
MAXnet User’s Manual 8-7
Flash verify failure on packet: ppp
The controller did not accept the upgrade packet number ppp due to a flash verify failure.
Flash write failure on packet: ppp
The controller did not accept the upgrade packet number ppp due to a flash write failure.
Invalid baud rate selection
The parameter supplied with the /B command line option was not valid.
The valid baud rates are 9600, 19200, 38400, 57600 or 115200.
Invalid command line option
The character following a / character on the command line was not one of the valid command line options. Valid options are /B, /E, /F, /H, or /P.
Invalid serial comm port selection
The parameter supplied with the /P command line option was not valid. The valid range is 1-32.
Invalid upgrade file for MAXnet serial number nnnnnn
An upgrade file with a serial number lock installed did not match the MAXnet controller found.
Invalid upgrade file signature!
The upgrade file did not have the required signature of a valid upgrade file.
Unknown failure on packet: ppp
The controller did not accept the upgrade packet number ppp due to some unknown failure.
Upgrade File Seek Error!
An error occurred trying to access the upgrade file.
WAIT message:
(NOTE: messages preceded with "WAIT:" will be displayed continuously until the condition indicated is met.)
Waiting for Controller to enter Upgrade Mode!
This message indicates that MAXnSupg has requested that the controller enter upgrade mode, but the controller has not yet indicated that is in upgrade mode.

FIRMWARE UPGRADE MAXnet SERIAL MODE FIRMWARE UPGRADE
MAXnet User’s Manual 8-8
INFO messages:
Application Running.
Maxnsupg has determined that an application is running on the MAXnet controller.
Erasing n flash bytes...success
This message indicates that n flash bytes has successfully been erased.
Invalid upgrade file for MAXnet serial number.
This message indicates that the upgrade file's serial number entry did not match the controller's serial number or a CRC error was detected.
MAXnSupg Version: n.nn
Displays the current version of the MAXnet firmware upgrade utility.
RESTARTING with new firmware.
This message indicates that the firmware upgrade was successful and MAXnSupg has sent a command to the controller to restart. This will start the controller running with the new upgraded firmware.
Sending nnn packets
This message indicates how many packets are going to be sent to the controller
flash when sending the new firmware to the controller.
Serial Number verified!
This message indicates that the upgrade file had a Serial Number lock installed and it was successfully verified that the specified upgrade file was valid for the MAXnet controller specified.
Signature packet re-sent successfully.
This message indicates the last packet with a valid firmware signature has been
successfully sent to the controller flash memory.
Upgrading flash with filename.
Maxnsupg has determined that the controller is ready to start the upgrade.

APPENDIX A. LIMITED WARRANTY
MAXnet User’s Manual
A. APPENDIX A. LIMITED WARRANTY
The Seller warrants that the articles furnished are free from defect in material and workmanship and perform to applicable, published Pro-Dex, Inc. - Oregon Micro Systems specifications for one year from date of shipment. This warranty is in lieu of any other warranty express or implied. In no event will Seller be liable for incidental or consequential damages as a result of an alleged breach of the warranty. The liability of Seller hereunder shall be limited to replacing or repairing, at its option, any defective units which are returned f.o.b. Seller’s plant. Equipment or parts which have been subject to abuse, misuse, accident, alteration, neglect or unauthorized repair are not covered by warranty. Seller shall have the right of final determination as to the existence and cause of defect. As to items repaired or replaced, the warranty shall continue in effect for the remainder of the warranty period, or for 90 days following date of shipment by Seller of the repaired or replaced part whichever period is longer. No liability is assumed for expendable items such as lamps and fuses. No warranty is made with respect to custom equipment or products produced to Buyer’s specifications except as specifically stated in writing by Seller and contained in the contract.

LIMITED WARRANTY APPENDIX A.
MAXnet User’s Manual
This page intentionally left blank

B. APPENDIX B
TECHNICAL SUPPORT Pro-Dex, Inc - Oregon Micro Systems can be reached for technical support by any of the following methods:
1. Internet E-Mail: mailto:[email protected]
2. World Wide Web: http://www.pro-dexOMS.com
3. Telephone: 8:00 a.m. - 5:00 p.m. Pacific Standard Time
(503) 629-8081 or (800) 707-8111
4. Facsimile: 24 Hours
(503) 629-0688
5. USPS: Pro-Dex, Inc – Oregon Micro Systems
15201 NW Greenbrier Parkway
B-1 Ridgeview
Beaverton OR 97006
RETURN FOR REPAIRS Call Pro-Dex, Inc - Oregon Micro Systems Customer Service at (503) 629-8081 or (800) 707-8111 or E-Mail to mailto:[email protected].
Explain the problem and we may be able to solve it on the phone. If not, we will give you a Return Materials Authorization (RMA) number.
Mark the RMA number on the shipping label, packing slip and other paper work accompanying the return. We cannot accept returns without an RMA number.
Please be sure to enclose a packing slip with the RMA number, serial number of the equipment, reason for return, and the name and telephone number of the person we should contact if we have further questions.
Pack the equipment in a solid cardboard box secured with packing material.
Ship prepaid and insured to:
PRO-DEX, INC. - OREGON MICRO SYSTEMS 15201 NW Greenbrier Parkway B-1 Ridgeview Beaverton, OR 97006

RETURN FOR REPAIRS APPENDIX B
MAXnet User’s Manual
This page intentionally left blank

APPENDIX C SPECIFICATIONS
MAXnet User’s Manual
C. APPENDIX C SPECIFICATIONS
DESCRIPTION The MAXnet is an Ethernet/RS-232 controller that is capable of up 10 axes of control. Each axis can be configured as an open loop stepper, a closed loop stepper, or a servo axis. The MAXnet is available in several different models that support a different number of axes.
The MAXnet is powered by a PowerPC processor. This high performance processor provides a 64-bit Floating Point processor and is clocked at 266MHz. This provides the MAX with the pure processing power to update every signal of the controller, i.e. I/O bits, direction, limits, etc., at rates up to 122μs.
Every axis includes dedicated +/- over-travel limit inputs, a home input, and an auxiliary output. The home and over-travel limit inputs are TTL level inputs. The MAXnet supports 8 general purpose digital I/O signals on the MAXnet controller and 8 general purpose digital I/O signals on the MAXnet expansion controller. In addition it has up to 4 general purpose analog inputs (2 on the MAxnet controller and 2 on the MAXnet expansion controller) that can be used to sense Pressure Transducers, Dial Switches, etc. Analog inputs can also be used to control velocity override. These analog inputs have 16-bit of resolution with +/-10 VDC input. There is one general purpose analog output that uses a 16-bit resolution DAC with +/- 10 VDC output.
Each axis has servo output signal capability; configured as a +/- 10V or 0-10V signal and is driven by a 16-bit DAC. The servo control loop is a PID filter with feedforward coefficients and an update rate up to 122μs. The servo output of axes not configured as a servo axis is available as a general purpose analog output. The step pulse is a TTL level, 50% duty cycle square wave that supports velocities of 0 through 4,194,176 pulses per second. Encoder feedback functionality supports quadrature encoders up to 16 MHz and is used as the servo feedback, as feedback for the stepper axes
or as independent position feedback. Encoder feedback is also used to provide slip and or stall detection.
The MAXnet has many user-definable parameters that can customize the controller’s behavior. These parameters can be conveniently stored in Flash so that the user-defined behavior will be automatically preset at each power-up.
PROGRAMMING MAXnet motion controllers are easily programmed with ASCII character commands through an extensive command structure. These commands are combined into character strings to create sophisticated motion profiles with features of I/O and other functionality. A separate FIFO command queue for each axis is used to store the commands once they are parsed by the MAXnet. The commands are executed sequentially, allowing the host to send a complex command sequence and attend to other tasks while the MAXnet manages the motion process. These command queues store 2559 command values and include a command loop counter which allows multiple executions of any queued commands.
All commands are sent to the controller as two or three character ASCII strings. Some of these commands expect one or more numerical operands to follow. These commands are identified with a ‘#’ after the command. The ‘#’ indicates a signed integer input parameter or a signed fixed point number of the format ##.# when user units are enabled. User Units define, distances, velocity and acceleration parameters and may be inputted in inches, millimeters, revolutions, etc. Synchronized moves may be made by entering the AA or AM command mode. This form of the command performs a context switch that allows entering commands of the format MR#,#,#,#,#; The order of axes is always X, Y, Z, T, U, V, R, S, W, and K.

SPECIFICATIONS APPENDIX C
MAXnet User’s Manual
Numbers are entered for each axis commanded to move. An axis may be skipped by entering the comma with no parameter. The command may be prematurely terminated with a “;”, i.e. a move requiring only the X and Y axes would use the command MR#,#; followed by the GO command. Each axis programmed to move will start together upon executing the GO command. The MAXnet can be switched back to the single-axis mode by entering the desired single axis command such as AX.
PROGRAMMING EXAMPLES In a typical move requirement where it is desired to home the stage then move to a specified position, the following will demonstrate the programming for a single axis: Initialize the velocity and acceleration
parameters to a suitable value. Set a PID filter gain values. Enable the PID hold mode. Perform the home operation initializing the position counter to zero. Perform a motion to an absolute position of 10,000 and set the done flag for that axis when the move is finished.
The following would be input from the host computer:
AX; VL5000; AC50000; KP20; KI1; KD45; CL1; HM0; MA10000; GO; ID;
In a move requiring a three axis coordinated move to a select position the following commands could be used:
AM; VL5000,5000,5000; AC50000,50000,50000; MT1000,2000,3000; GO; ID;
The controller would calculate the relative velocities required to perform a straight line
move from the current position to the desired absolute position so that all axes arrive at their destinations at the same time.
The following demonstrates cutting a hole with a 10,000 count radius using variable velocity contouring with circular interpolation:
The vector velocity is set to 1000 counts per second. A contour is defined beginning at coordinates 0,0 on the X and Y axes.
General purpose I/O7 is turned on, which could turn on the cutting torch or laser starting the cut at the center of the circle.
A half circle is cut from the center to the outside of the hole positioning the cutting tool at the start of the hole.
The hole is then cut, the torch turned off, the stage stopped and the contour definition completed.
The following would be input from the host computer:
AA; VOA0,5; VV1000,1000; VP0,0; VIO0100,,0100; VC0,5000,-180; VC0,0,-360; VIO0,,0100; VV1000,0;
VP-1000,0; VE; During this sequence the VO command or an analog input may be used to vary the vector velocity from 0-200% of the program vector velocity.
SPECIFICATIONS
Velocity 0 to 4,194,176 pulses per second Acceleration 0 to 8,000,000 pulses per second Position range 4,294,967,295 pulses (+/- 2,147,487,647)

APPENDIX C SPECIFICATIONS
MAXnet User’s Manual
Accuracy Position accuracy and repeatability ± 0 counts for point to point moves
Environmental Operating temperature range: 0 to 50 C°
Storage temperature range: -20 to 85 C°
Humidity: 0 to 90% non-condensing
Power +5VDC +/-5% at 1 amp typical +12VDC at 0.1 amp typical = +/-5% -12VDC at 0.1 amp typical = +/-5%
Dimensions 6.5” x 4” x 0.75”
Limit switch inputs TTL input levels. Active low or high true selectable by command input for each axis. (active low is default)
Connector One shielded 100-Pin SCSI type connector for all control signals (motor control, I/O, Lmits, etc). Breakout board available for ease of cabling.
Home switch inputs TTL input levels. Input sense (low or high true) selectable by command input for each axis. Accuracy to 1 encoder count.
User definable I/O Up to 16 bits of user definable digital I/O. The 16 bits are user configurable and are configured as 4 inputs and 4 outputs on
Analog inputs Two independent analog inputs, 16 bit resolution +/-10V
Analog outputs (servo) +/-10V and 0 to +10v, max. One per axis plus two general purpose, all are 16 bit resolution. Step pulse output Pulse width 50% duty cycle. Open collector TTL level signal.
Direction output Open collector level signal (TTL)
Encoder Feedback Maximum 16 MHz after 4x quadrature detection Differential or single-ended signals.
Two channels of 12-bit Absolute (SSI) encoder channels by default (optional 32-bit absolute encoders available for each axis). Ethernet TCP/IP, Standard RJ45 connector
RS-232 Baud rate: 9600-155.2K
Standard 9-pin D-Sub connector
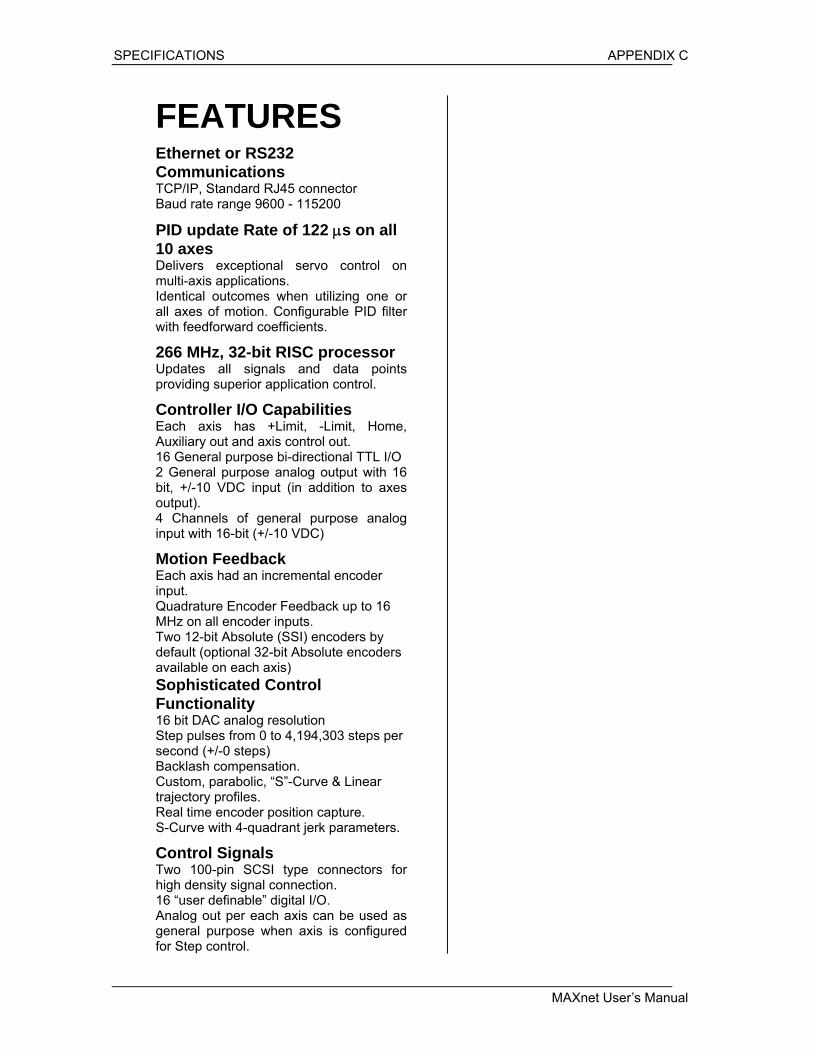
SPECIFICATIONS APPENDIX C
MAXnet User’s Manual
FEATURES Ethernet or RS232 Communications TCP/IP, Standard RJ45 connector Baud rate range 9600 - 115200
PID update Rate of 122 s on all 10 axes Delivers exceptional servo control on multi-axis applications. Identical outcomes when utilizing one or all axes of motion. Configurable PID filter with feedforward coefficients.
266 MHz, 32-bit RISC processor Updates all signals and data points providing superior application control.
Controller I/O Capabilities Each axis has +Limit, -Limit, Home, Auxiliary out and axis control out. 16 General purpose bi-directional TTL I/O 2 General purpose analog output with 16 bit, +/-10 VDC input (in addition to axes output). 4 Channels of general purpose analog input with 16-bit (+/-10 VDC)
Motion Feedback Each axis had an incremental encoder input. Quadrature Encoder Feedback up to 16 MHz on all encoder inputs. Two 12-bit Absolute (SSI) encoders by default (optional 32-bit Absolute encoders available on each axis) Sophisticated Control Functionality 16 bit DAC analog resolution Step pulses from 0 to 4,194,303 steps per second (+/-0 steps) Backlash compensation. Custom, parabolic, “S”-Curve & Linear trajectory profiles. Real time encoder position capture. S-Curve with 4-quadrant jerk parameters.
Control Signals Two 100-pin SCSI type connectors for high density signal connection. 16 “user definable” digital I/O. Analog out per each axis can be used as general purpose when axis is configured for Step control.

APPENDIX C SPECIFICATIONS
MAXnet User’s Manual
TABLE 8-1
100-PIN CONNECTOR (MAXNET) AND TERMINAL BLOCK
Pin-Out (IOMAXnet) Pin Signal Pin Signal Pin Signal 1 X / V Phase +A 35 T / W Aux 69 Y / R Negative Limit 2 X / V Phase -A 36 U / K Aux 70 Z / S Negative Limit 3 X / V Phase +B 37 GROUND 71 T / W Negative Limit 4 X / V Phase -B 38 IO0 / IO8 72 U / K Negative Limit 5 X / V Index + 39 IO2 / IO10 73 GROUND 6 X / V Index - 40 IO4 / IO12 74 X / V Direction 7 Z / S Phase +A 41 IO6 / IO14 75 Y / R Direction 8 Z / S Phase -A 42 GROUND 76 Z / S Direction 9 Z / S Phase +B 43 ADC 0 / ADC 2 77 GROUND 10 Z / S Phase -B 44 GROUND 78 T / W Direction 11 Z / S Index + 45 X / V Servo 79 U / K Direction 12 Z / S Index - 46 GROUND 80 GROUND 13 U / K Phase +A 47 Z / S Servo 81 X / V Step 14 U / K Phase -A 48 GROUND 82 Y / R Step 15 U / K Phase +B 49 U / K Servo 83 Z / S Step 16 U / K Phase -B 50 GROUND 84 GROUND 17 GROUND 51 Y / R Phase +A 85 T / W Step 18 X / V Positive Limit 52 Y / R Phase –A 86 U / K Step 19 Y / R Positive Limit 53 Y / R Phase +B 87 GROUND 20 Z / S Positive Limit 54 Y / R Phase -B 88 IO1 / IO9 21 T / W Positive Limit 55 Y / R Index + 89 IO3 / IO11 22 U / K Positive Limit 56 Y / R Index - 90 IO5 / IO13 23 GROUND 57 GROUND 91 IO7 / IO15 24 X / V Home 58 GROUND 92 GROUND 25 Y / R Home 59 T / W Phase +A 93 ADC 1 / ADC 3 26 Z / S Home 60 T / W Phase –A 94 GROUND 27 GROUND 61 T / W Phase +B 95 Y / R Servo 28 T / W Home 62 T / W Phase –B 96 GROUND 29 U / V Home 63 T / W Index + 97 T / W Servo 30 GROUND 64 T / W Index - 98 GROUND 31 X / V Aux 65 U / K Index + 99 DAC 0 / DAC 1 32 Y / R Aux 66 U / K Index - 100 GROUND 33 Z / S Aux 67 GROUND 34 5 Volts 68 X / V Negative Limit

SPECIFICATIONS APPENDIX C
MAXnet User’s Manual
ORDERING INFORMATION I/O
Analog Digital Model Computer Interface
Axes Servo / Stepper
In OutEncoder Channel
Limit Auxiliary Home General Purpose
MAXnet-1000 1 User Definable 2 2 1 2 1 1 8
MAXnet-2000 2 User Definable 2 3 2 4 2 2 8
MAXnet-3000 3 User Definable 2 4 3 6 3 3 8
MAXnet-4000 4 User Definable 2 5 4 8 4 4 8
MAXnet-5000 5 User Definable 2 6 5 10 5 5 8
MAXnet-6000 6 User Definable 4 8 6 12 6 6 16
MAXnet-7000 7 User Definable 4 9 7 14 7 7 16
MAXnet-8000 8 User Definable 4 10 8 16 8 8 16
MAXnet-9000 9 User Definable 4 11 9 18 9 9 16
MAXnet-A000
Ethernet / RS-232
10 User Definable 4 12 10 20 10 10 16
CBL58-3M 100-Pin, 12 ft. cable
IODnet Terminal block Breakout Module – can be stacked on MAXnet
IOMAXnet 100-Pin Connector Breakout Module

INDEX
MAXnet User’s Manual
INDEX
A ABSOLUTE ENCODER............................................................................................................................... 4-8
B BAUD RATE, FACTORY DEFAULT............................................................................................................ 2-1
C CURRENT MODE ..................................................................................................................................... 2-12
H HALL EFFECT............................................................................................................................................. 4-3
I IOMAXnet .................................................................................................................................................. 4-10
M MOTOR WIRING DIAGRAMS..................................................................................................................... 2-7
Q QUADRATURE ENCODER WITH TTL LEVEL OUTPUTS ......................................................................... 2-3
S SERIAL COMMUNICATION PARAMETERS .............................................................................................. 2-1 SERVO UPDATE RATE ............................................................................................................................ 2-11 STAND ALONE COMMANDS ..................................................................................................................... 6-1 STATUS WORD 1 FLAG REGISTER
WORD ACCESS OFFSET (0xfc0)........................................................................................................... 3-5
V VOLTAGE MODE ...................................................................................................................................... 2-12
W WIRING DIAGRAMS ................................................................................................................................... 4-4 WORD ACCESS OFFSET
(0xfc0) STATUS WORD 1 FLAG REGISTER.......................................................................................... 3-5