Integrating Windows 7 Taskbar Functionality into VFP...
65
Integrating Windows 7 Taskbar Functionality (Win7TLIB) – Steve Ellenoff Page 1 of 65 Integrating Windows 7 Taskbar Functionality into VFP Applications Win7TLib VFPX Project Steve Ellenoff SJE Consulting 2310 Fenhurst Pl. Atlanta, GA 30338 Voice: 770-573-4045 Email: [email protected] Windows 7 is arguably the best looking version of Windows ever! Although Microsoft's new OS offers many improvements such as improved stability, speed, power management, and support for the latest hardware technologies, most people will notice the User Interface more
-
Upload
truongkhanh -
Category
Documents
-
view
225 -
download
1
Transcript of Integrating Windows 7 Taskbar Functionality into VFP...

Integrating Windows 7 Taskbar Functionality (Win7TLIB) – Steve Ellenoff
Page 1 of 65
Integrating Windows 7
Taskbar Functionality into
VFP Applications Win7TLib VFPX Project
Steve Ellenoff
SJE Consulting
2310 Fenhurst Pl.
Atlanta, GA 30338
Voice: 770-573-4045
Email: [email protected]
Windows 7 is arguably the best looking version of Windows ever! Although Microsoft's new
OS offers many improvements such as improved stability, speed, power management, and
support for the latest hardware technologies, most people will notice the User Interface more

Integrating Windows 7 Taskbar Functionality (Win7TLIB) – Steve Ellenoff
Page 2 of 65
than anything else. Windows 7's newly designed Taskbar and its many cool features are no
doubt the most obvious, and perhaps most praised improvements to the UI. As VFP
developers, we have no built-in support to enable us to access most of this great new
functionality. In this paper we review much of the new functionality offered by the Windows 7
Taskbar such as Jump Lists, Taskbar Toolbars, Custom & Live Thumbnail Previews, Taskbar
Progress Meters, and more. We will then explore how to use a newly accepted VFPX project,
the Windows 7 Taskbar Library (Win7TLib) to allow full integration of these features into
your VFP applications with minimal effort. By taking advantage of this functionality, you can
really enhance your users' experience in Windows 7.
Introduction In case you haven’t heard (you no doubt have), Windows 7 is Microsoft’s latest and greatest
new operating system for PCs. Unlike its predecessor, Vista, which suffered considerable
(but well deserved) negative publicity due to the many issues at release, Windows 7 has
been a smashing success for Microsoft. The operating system builds on what Vista was
supposed to accomplish, and does it admirably. It is faster, sleeker, and far more stable
than Vista.
Of more importance to the developer, it comes with some slick new features, the most
notable of which include new Taskbar User Interface functionality and behavior. Designed
to streamline working with various applications at the same time, you’ll find that once you
get comfortable with the new functionality, you’ll wonder how you ever lived with out it.
To tap into these great new features, and integrate them into your VFP applications, we will
examine my newly accepted VFPX project, the Windows 7 Taskbar Library (Win7TLib).
You’ll soon discover that the library makes using these new features a breeze, and can help
make your VFP application look like it was designed for Windows 7. Better still, it adds
great usability to your applications without making you break a sweat.
Since many developers may not yet be familiar with Windows 7, we will cover the new
features here since there’s no point in talking about integrating new features into your VFP
applications if you don’t know what those features are. Developers already familiar with
Windows 7 can feel free to skip ahead to the Win7TLib section (Page 10) and dive into the
fun head first.
Windows 7 Taskbar Features Overview There are numerous new enhancements to the Taskbar. I find it easier to get a grasp of
them by grouping them into logical categories. These are:
• Taskbar Button
• Taskbar Thumbnails & Live Preview ( Aero Peek )
• Thumbnail Toolbars

Integrating Windows 7 Taskbar Functionality (Win7TLIB) – Steve Ellenoff
Page 3 of 65
• Jump Lists
Each category may contain several new features that are related in some fashion.
Taskbar Button
The first thing new users to Windows 7 will surely notice is the redesigned Taskbar, and
contained within it, Taskbar Buttons. The taskbar was redesigned to be more streamlined,
cleaner, and easier to access a user’s favorite applications. To that extent, Windows 7
seamlessly combines the Windows XP Quick Launch toolbar area, with typical Taskbar
buttons that appear when an application is running.
Figure 1. The Windows 7 Taskbar seamlessly combines Quick Launch and Running Applications buttons.
As you can see from figure 1, the entire Taskbar can be thought of as a Quick Launch area.
Users can pin their favorite application shortcuts to this area. When not running (see far
right picture), the icon is there, but there is no visual enhancements to the button. Once a
user clicks on the button, it is now running, and a white colored visual effect is added to the
button along with a border drawn around the button to help distinguish it from non-
running applications.
If multiple instances of an application are running, the taskbar creates a stacked button
look as shown in figure 1 on the left side in this case the IE and Explorer icons. The Active
application is drawn with an even stronger white colored visual effect to help identify
which application is the one that current is active, i.e., has the focus. In addition to the
automatic grouping of application instances provided by Windows 7, your applications can
also control taskbar button grouping as we’ll see later.
Windows 7 offers the user far greater control in determining how the notifications area
operates (figure 2). In the past, applications could clutter up this area and pop up very
annoying messages at any given time. The developers of Windows 7 realized this
functionality should really be dictated by the user, not the developer. As a result the user
can turn off notifications completely for a given application. Therefore, your application
can no longer rely on this mechanism to inform a user that something has happened if the
application does not have the focus.

Integrating Windows 7 Taskbar Functionality (Win7TLIB) – Steve Ellenoff
Page 4 of 65
Figure 2. The User has far more control on what can appear in the Notification Area.
To rectify this limitation for application developers, the team added the ability to control
several new features of the taskbar button itself.
Overlay Icons
The first new way developers can grab the attention of a user is by setting the Taskbar
button to have an overlay icon. A great example of this new functionality is Windows Live
Messenger (figure 3). The application changes the icon that is “overlaid” in the taskbar
button depending on the status of the application.
Figure 3. Windows Live Messenger uses a red colored X icon overlay to indicate “not connected” status.
For example, if the user is not connected to the network, as shown above, a red X icon is
displayed so that a user can get a quick visual of this fact at anytime while the application is
running. Similarly, once the application is connected, a different icon is displayed to reflect
the new status (figure 4).
Figure 4. Windows Live Messenger uses a green square icon overlay to indicate “connected” status.
Progress Meter
Another new technique developers can use to get a user’s attention or to deliver status
information is to take advantage of the Progress State & Status functionality. In a nutshell,
the taskbar button becomes a progress meter which easily shows the user how much
progress has been made for a given task, even when the application is not currently visible.
Internet Explorer 8 uses this technique (figure 5) to show how far a download has
progressed.

Integrating Windows 7 Taskbar Functionality (Win7TLIB) – Steve Ellenoff
Page 5 of 65
Figure 5. Notice the IE8 taskbar button mirrors the download progress meter it displays.
The progress meter functionality also supports several other states and styles which we’ll
cover later.
Thumbnails & Live Preview
The new Thumbnail & Live Preview functionality built into the Windows 7 Taskbar is one
of those “wow, look at that” features which you can’t help but notice immediately once you
begin working with Windows 7 (figure 6).

Integrating Windows 7 Taskbar Functionality (Win7TLIB) – Steve Ellenoff
Page 6 of 65
Figure 6. Internet Explorer 8 displaying 3 Thumbnail Preview Windows and its Live Preview window.
For every running application, when the user hovers the mouse over the taskbar button,
Windows 7 will generate a Thumbnail Preview window (or multiple windows in some
situations). This gives the user a quick look at what is going on with the application without
forcing them to switch to the application and leave the one they are working with. Although
not named this way, the thumbnail preview is “live” in that all screen updates can be seen
as they occur. This is very obvious if you are playing a movie clip for example.
If the user wishes to see even more detail, they can hover over the Thumbnail Preview
Window, and cause the Live Preview window to appear. This handy feature will hide all
open windows except the application you are trying to see. I find this incredibly
convenient when I am trying to look at information in one application in order to compare
it to another.

Integrating Windows 7 Taskbar Functionality (Win7TLIB) – Steve Ellenoff
Page 7 of 65
The best news is that the functionality is provided free of charge for all running
applications, even legacy applications. Better still, though, we can also customize these
preview windows in several cool ways as we’ll explore later.
Taskbar Toolbar
What would a new version of Windows be without a new toolbar? In this case though,
you’ll find the developers of Windows 7 have created an incredibly useful resource for
application developers. The toolbar lives underneath the Thumbnail Preview Window and
can contain up to seven (7) buttons. These buttons offer the user the convenience of
accessing specific functionality without switching away from the application they are
currently working with. Perhaps the best example of this is Windows Media Player (figure
7).
Figure 7. Windows Media Player adds play, rewind, and forward toolbar buttons for incredible convenience.
Taking note of the most popular functions a user typically performs, the Windows Media
Team added Play, Rewind, and Forward buttons to the taskbar so that users could easily
click these buttons while remaining in another application. I think I use this feature
(specifically with WMP) more than any other new feature in Windows 7 (although Jump
Lists are a close second).
Application developers have a ton of control over the buttons: they can change icons, tool
tips, hide/show buttons, and enable/disable buttons. There’s even a way to create a spacer
button which helps to separate buttons into groups. Last but not least, the developer can
also set a Toolbar Title which appears above the Thumbnail Preview Window. I’m not sure
why this feature is a function of the Toolbar, rather than of the Thumbnail window itself,
but hey, that’s just me. Once you remember that it’s the toolbar that set’s this feature, you’ll
be fine!

Integrating Windows 7 Taskbar Functionality (Win7TLIB) – Steve Ellenoff
Page 8 of 65
Jump Lists
More than any other new feature of the Windows 7 Taskbar, the Jump List is a feature that
literally “jumps out” at you! Wow, that was a lame joke! Then again, this wouldn’t be a
technical paper without some really bad humor, right? Think of the Jump List as your
application’s own private little Start Menu. It can provide lots of helpful functionality in an
organized and quick fashion.
A nice example of a custom Jump List is the one used in Skype (figure 8) in which you can
change your online status easily (all without having to click over to the Skype window).
Figure 8. Skype makes great use of the Jump List feature, providing lots of common tasks a user can perform.
What’s really cool about the Jump List is that you can access it even when the application is
not running! Therefore, you might consider having an installer application create a Jump
List for you first, and then have your application create a “running” version later.
Alternatively, it’s just as easy to skip that step, and simply have your app create a Jump List
when it runs the first time, and then create a “non-running” version when it shuts down.
Windows Live Messenger serves as a great example of providing “running” and “non-
running” versions of the Jump List (figure 9). When the application is not running, the Jump
List has the option to “Sign In”, and of course, when the application is running and you are
signed in, the option changes to “Sign Out”. I was surprised to learn while writing this

Integrating Windows 7 Taskbar Functionality (Win7TLIB) – Steve Ellenoff
Page 9 of 65
paper, that Skype has not yet included similar functionality; in fact, it doesn’t offer a “non-
running” Jump List at all.
Figure 9. Windows Live Messenger slightly alters its Jump List when signed out (left) and signed in (right).
To access an application’s Jump List, simply right click the mouse when your mouse is
hovering over the application’s taskbar button. The Jump List is also available from an
Application’s Icon when it’s in the Start Menu (figure 10).
Windows 7 provides a default Jump List for all applications, even legacy applications, much
in the way it provides the Thumbnail & Live Preview functionality. Of course, this Jump List
is extremely limited. Fortunately, we can create our own customized Jump List fairly easily.
Items found in the Jump List are either “Items”, “Links”, or “Separators”, which we’ll cover
in greater detail later.

Integrating Windows 7 Taskbar Functionality (Win7TLIB) – Steve Ellenoff
Page 10 of 65
Figure 10. An application’s Jump List is available from the Start menu in addition to its taskbar button.
In Summary
This concludes our introduction to the numerous cool new features of the Windows 7
Taskbar. I hope you are as excited about integrating these features into your applications
as I am!
Win7TLib Project Overview After experiencing some of the cool new Windows 7 Taskbar features first hand (shortly
after having to replace an old laptop), I was convinced that I needed to tap into this new
functionality with my VFP applications. I also realized that even if I didn’t need some of the
functionality in all cases, I had to offer it anyway to make my applications look “current.”
With the Windows 7 taskbar, it becomes very obvious, very quickly, which applications
were not designed to support Windows 7!
Of course, VFP 9.0, and Sedna were created before Windows 7 came along, so I knew that
accessing the functionality was not going to be possible directly, or easily for that matter.
After winning a copy of the Windows 7 Developer’s Book from my local AFUG (Atlanta
FoxPro User Group) meeting during the raffle, I realized I could create a bridge application
Integrating Windows 7 Taskbar Functionality (Win7TLIB) – Steve Ellenoff
Page 11 of 65
to serve the functionality to our VFP applications. Of course, realizing this, I knew the
community at large would also be interested in such a thing. Thus, the Windows 7 Taskbar
Library (Win7TLib) was born.
Goals & Limits of the Project
• Enable Full Integration of Windows 7 Taskbar functionality for VFP apps
• Design the library to be as simple as possible to use for VFP developers
• Design the library to be as lightweight as possible
• Design the library to handle older OS gracefully
• Full functionality is obviously only supported in Windows 7
• VFP 9 is required to use due to its great Windows API Messaging integration
Of course, the first priority was to enable access to all the features, since leaving any out
would just make me so sad <grin>! More important though, I wanted the library to be super
simple to use, since the library is supposed to make your life easier, not harder. Of great
importance to me as well was that it be lightweight, i.e., small package, not bloated, not rely
on other packages / libraries, and most importantly, not rely on .NET! I think you’ll find
that even at this early Alpha stage, I’ve succeeded in meeting these goals.
Win7TLib on previous versions of Windows
As mentioned in the list above, it was a major goal to allow the library to safely integrate
with your application even when not running on Windows 7. The library was carefully
designed to ensure nothing happens when your code tries to use the library on older
operating systems. The result of this design is that it’s 100% completely safe to start adding
Windows 7 Taskbar functionality to your applications today, even if you don’t plan on
deploying to Windows 7 in the near future.
In other words, you can add the functionality now, and once your application is run on a
Windows 7 machine, it will “magically” start using all the new Taskbar features. Of course,
this doesn’t make sense if you don’t have access to a Windows 7 development machine to
test on. But aside from that, there’s no other reason not to start programming for your
future today. Ok, I can think of some other good reasons, like lack of time, higher priority
deadlines, but forget all that rubbish, and have fun today <grin>!!
IMPORTANT NOTE:
Before going further, I wanted to point out that the goal of this paper is not to document the
Win7TLib project in its entirety. That is something which is reserved for the “yet to be
written” documentation. Instead, regard this paper as an excellent starting point which will
cover 90% of what you need to know about working with the library. In other words, there
will likely be a lot of “little” details that may be omitted, either intentionally or not. For

Integrating Windows 7 Taskbar Functionality (Win7TLIB) – Steve Ellenoff
Page 12 of 65
example, I won’t cover every single property of each class, and we’ll only look at the most
important classes themselves (for example, the ones you’ll work with directly, rather than
all the helper classes).
Components of the Win7TLib Project
The project consists of three key components (although the 3rd is optional, so perhaps
saying it is “key” is misleading). These are:
• Win7TLib.DLL
• Win7TLib.PRG
• Win7TLib_Visual.VCX
Win7TLib.DLL
This small, lightweight .DLL (48K) is the bridge that enables VFP to tap into the Windows 7
Taskbar API and its array of functionality. You might be wondering why I did not create it
as an .FLL? Well, simply because I missed Craig Boyd’s session last year on how to create
FLL files <grin>! The real reason of course, is that there’s no benefit to making it an FLL in
this situation.
Despite its huge importance to the library, you will never need to access it directly or need
to know anything much about it if you care not to. All you need to do is make sure you
distribute a copy of it with your VFP application. We’ll cover deployment later.
Win7TLib.PRG
This is the core library code written in VFP which wraps the .DLL functionality into a rich,
yet simple set of OOP classes for your application to interact with. Believe me, if you had to
interact with the .DLL directly, you’d cry! Ok, it’s really not “that” bad, but I think you’ll find
using the classes extremely intuitive.
You may be wondering why there is only one (1) PRG rather than a large number of PRG
files for each class? Two reasons, in no-particular order: 1) I always tend to write the
classes in one bunch when initially coding, since it makes redesigning much easier. 2)
Distributing the library in a single file is far more manageable for, you, the end user, in my
opinion.
Win7TLib_Visual.VCX
This optional component of the library offers some class objects that are visual and cannot
be distributed via the PRG. Specifically, it contains a visual version of the Taskbar_Helper
object (more about it later), which can be dropped onto your forms. It also contains visual
classes to help create TDI applications (which we won’t be covering in this paper).

Integrating Windows 7 Taskbar Functionality (Win7TLIB) – Steve Ellenoff
Page 13 of 65
Figure 11 shows a simple overview of the interaction between the VFP classes, the DLL,
and the Windows 7 Taskbar API.
Figure 11. Your code works with the Win7TLib classes, which use the DLL to access the Taskbar API.
Installation of the Win7TLib Project Installing the project is super easy (as is the motto for the library). Simply download the
package from the VFPx home page, located at: www.CodePlex.Com/VFPx.
Unzip the download to any folder of your choice. Next, simply add the Win7TLib.PRG file to
your VFP project, and optionally include the Win7TLib_Visual.VCX if you think you’ll want
to use it.
We’ll be demonstrating using it in this paper, but some developers prefer to be VCX free
when possible. Best of all, there’s no DLL registration needed, or any of those nasty .NET
assembly registration hacks! You simply need to make sure your VFP code can find the
.DLL. To do this, you can either: 1) set the DLL location in the library settings (we’ll see this
later), 2) copy the DLL to your application folder, or 3) SET PATH to the library’s location.
Working with the Library There are a few easy steps you’ll need to take when integrating the library into your
application. These are summarized below in the order you need to take them:

Integrating Windows 7 Taskbar Functionality (Win7TLIB) – Steve Ellenoff
Page 14 of 65
• Set Library Settings
• Initialize the Library
• Add a Helper Object (optional, but recommended)
• Obtain a reference to the Taskbar Object
• Call various methods of the Taskbar Object and it’s member objects
• UnInitialize the Library when finished
Set Library Settings
To add convenience and flexibility to the library, there are a few important settings you can
adjust when first integrating the library into your application. These are on a per-
application basis, not global (those are not covered in this paper).
To do this, you must create a subclass of the Taskbar_Library_Settings class in your
code somewhere. I tend to add it to the bottom of my main.prg, for convenience, but any
application specific PRG is fine (just don’t put it in the Win7TLib.PRG itself).
The name of this application specific subclass MUST BE:
Win7TLib_Appication_Settings.
I hate forcing a convention on users, and I’ve tried not to lock you into anything when
creating this library, but this is the one exception which, thus far I have not found a
workaround for without sacrificing other conveniences I want to offer you. Perhaps in the
future, I, or someone else, will find a way to lift this restriction (although, really, it’s not that
big a deal, right?).
Here’s an example of creating the library settings class for your application with some
typical settings you might use:
********************************************************************** DEFINE CLASS Win7TLib_Application_Settings AS TaskBar_Library_Settings cAppID = "Win7TLib.DemoApp.FormType.MDI" cDLLPath = "C:\Users\Steve\Win7TLib\" cDefaultFormMode = "MDI" ENDDEFINE
The two most likely settings you will want to set for your application are cAppID and
cDefaultFormMode which we’ll cover later.
Hopefully, the cDLLPath property is fairly obvious? Although I doubt you’d want to do this,
you can use all default library settings by creating an empty class definition like this:
********************************************************************** DEFINE CLASS Win7TLib_Application_Settings AS TaskBar_Library_Settings ENDDEFINE

Integrating Windows 7 Taskbar Functionality (Win7TLIB) – Steve Ellenoff
Page 15 of 65
Regardless of what you do, creating the subclass is not optional, the library will fail to
initialize if you don’t do this simple step.
Initialize the Library
Before you can begin to work with the library, you must first initialize it. Doing this
involves two simple steps. First, make sure you’ve told VFP to use the PRG library:
*Set up the Win7TLib library of classes SET PROCEDURE TO TO win7tlib ADDITIVE
Next you initialize the library by calling a single function, Initialize_Win7TLib(),
somewhere early on in your main.prg:
**************************** *** INITIALIZE Win7TLIB *** **************************** IF !Initialize_Win7TLib() RETURN .F. ENDIF
IMPORTANT NOTE:
I want to mention here that if you plan on customizing the AppID (which we’ll discuss
soon), you’ll need to ensure your application WAS NEVER, AND IS NOT VISIBLE when
calling the Initialize_Win7TLib() function. This is a requirement of the Win7 API
relating to AppID, not some devious machination I’ve designed to drive you mad, although
the thought did cross my mind <grin>!
Making sure your Application is invisible at startup is easily accomplished by:
1) Using a CONFIG.FPW file and adding SCREEN=OFF,
2) Calling Initialize_Win7TLib() very early in your main.prg
After you’ve called the Initialize_Win7TLib() function, you can then at any time, use
_SCREEN.Visible = .T., or _VFP.Visible = .T. to make the VFP Main Window
visible again. Of course, that step is not required in situations where you are providing your
own Top Level Form (ShowWindow = 2).
Add a Helper Object ( “Not so” Optional )
During the final weeks of creating the library, I realized that several key tasks involved in
working with the library, while simple enough, were highly repetitive. As a result, I created
the (brilliantly named) Taskbar_Helper class to make working with the library even
easier. So, although this step is optional, I highly recommend it. Furthermore, if you plan on
working with any of the callback behavior, you’ll need this class as it contains the callback
methods. I know we didn’t discuss those yet, but just keep it in mind.
Integrating Windows 7 Taskbar Functionality (Win7TLIB) – Steve Ellenoff
Page 16 of 65
There are two flavors of the helper object, both named exactly the same. One is defined in
the Win7TLib.PRG, the other in the Win7TLib_Visual.VCX. They both do the same thing. So
why two? As stated before, some developers don’t like working with VCX classes if they can
avoid them, so I wanted to offer the flexibility for each style of developer to be able to
choose which each likes best.
Regardless of which version you decide to use, in order to actually help, the object must be
added to either a form or the _VFP system object if you don’t plan on using any forms in
your app.
If you take the VCX approach, just drag an instance of it onto the form from the Class
toolbar. Be sure to place it directly on the form, and not in some container. If you wish to
customize the Callback Handler methods, simply place your code in those methods
(described later).
If you take the PRG approach use THISFORM.AddObject() in the Load() method of the
Form:
*Add our demo specific helper class THIS.AddObject("oHelper","demoapp_tbhelper")
You can optionally specify a different form mode when creating this object by passing the
mode string as part of the Init() parameter. We’ll see modes a bit later on.
Note that in the example code above, the named class is demoapp_tbhelper. This is used
because it is an application specific subclass of the Taskbar_Helper class. Subclassing the
helper has the benefit of letting you customize the callback handler methods, and is a
common thing to do when working with the PRG version of this class.
If you plan to add the helper object to the _VFP system object, i.e., you are not working with
any form at all, you will need to use ADDPROPERTY() since _VFP doesn’t support the
AddObject() method. In that case, you’ll need to pass the property name you added as part
of the call to the helper object’s Init() method. Here’s an example which sets the default
mode to VFP (i.e. the 2nd parameter passed to the CREATEOBJ() call:
*Create helper: set VFP form mode and pass the property name we're using lcPropName = "oHelper" loH = CREATEOBJECT("demoapp_tbhelper","VFP",lcPropName) *Add to _VFP ADDPROPERTY(_VFP,lcPropName,loH)
Get a Reference to the Taskbar Object
The Taskbar Object is the main class you will work with to access and control Taskbar
functionality. We’ll discuss it in detail a bit later. For now, realize, to do anything at all with

Integrating Windows 7 Taskbar Functionality (Win7TLIB) – Steve Ellenoff
Page 17 of 65
the library, you must have a Taskbar Object. There are several ways to get this object, listed
below in order of recommendation:
• Use the Helper Object’s oTaskbar property
• Use the Taskbar Manager object’s GetTaskbar() method
• Manually register a form using the Taskbar Manager object’s Register_Form()
method
The Helper Object we discussed previously will provide an object reference for you. If (for
some crazy) reason you are not using a helper object, you can obtain a reference using the
other two methods listed above. I won’t cover those here, but I wanted to list them for the
sake of being thorough.
Use the Taskbar Object
As stated above, the Taskbar Object does everything in the library. Since there are so many
things you can do with it, we’ll devote the majority of the remaining pages of this paper to
discussing it. For now we won’t cover those details yet, but this heading is listed here so
you can get an idea of the flow of working with this library from start to finish.
UnInitialize The Library
Once your application is closing down, you’ll want to “uninitialize” the library (did I just
make up that word?) so that all resources can be freed. Issue the following somewhere
after your READ EVENTS call (preferably right after it):
*Start the Event Loop READ EVENTS ******************************* *** UNINITIALIZE Win7TLIB *** *******************************
UnInitialize_Win7TLib()
IMPORTANT NOTE:
DO NOT issue CLEAR ALL until after you’ve called the UnInitialize_Win7TLib()
function, since that may cause objects to destruct in an order that is not predictable. In
reality, I think I tried this a few times and it was ok, but when stability is at stake, always
better to be safe!
Integrating Windows 7 Taskbar Functionality (Win7TLIB) – Steve Ellenoff
Page 18 of 65
The Taskbar Application ID You’ll recall that part of the Library settings is a property called cAppID which allows you
to specify an Application ID string. This is a 128 character string which you can create to
identify your application to the Windows 7 Taskbar.
If you don’t specify one, Windows 7 will automatically generate and use one internally.
However, there are benefits to specifying your own string. First, you can’t access the
internal name Windows gives you. More importantly, the AppID controls how applications
are grouped in the taskbar. If you don’t control the AppID yourself, you won’t be able to
control the grouping.
An application must specify its AppID when the application first starts up, i.e., before any
windows/forms become visible as required by the Win7 API. This means, VFP itself cannot
be visible at all before you attempt to set this string. How to resolve this is discussed in the
Library Settings section discussed earlier.
The AppID is also required for File Type Registration for Jump Lists and for Custom
Category Items in Jump Lists. In short, you’ll want to specify your own. You can use any 128
character string you like, but make sure it’s going to be unique. You don’t have to stick to an
AppID forever, you can change it each time you launch your app, although this is not
recommended since Jump Lists are tied to it which would force you to recreate them and
re-register file types with the new ID. So don’t make it a habit to change the AppID, just
realize you are not stuck forever with the one you first decide upon.
The Taskbar Window ID The Windows 7 API also operates with Window ID strings. These work identically to
Application ID strings, except they can be specified for each Window (Form as we call them
in VFP). Furthermore, you can specify them at any time, even after the Form is visible. Like
the AppID, the Window ID changes groupings for the Form in the taskbar. This may or may
not make sense to do depending on the Form mode you are using which we’ll discuss next.
Taskbar Form Modes When working with the Windows 7 Taskbar, there are several different Modes your form
can operate in. Although this term is not mentioned anywhere in the Win7 Taskbar
literature, it makes sense when discussing VFP. The mode you choose will affect how your
application and its forms interact with the taskbar. Although the library allows mixing
different modes, we’ll only discuss using the Default Form Mode (as specified by your
Library Settings Class), since that is far more common and easier to describe. If you do
want to mix modes, simply pass the form mode string as part of your Helper Object’s Init(),
which we saw mentioned earlier.
Just to make sure I am not misleading anyone, setting the taskbar mode does not alleviate
your requirement to setup the way your forms behave. This is something you still manually
Integrating Windows 7 Taskbar Functionality (Win7TLIB) – Steve Ellenoff
Page 19 of 65
set as you would in any other VFP application, i.e., specifying the ShowWindow property, as
well as other Form properties.
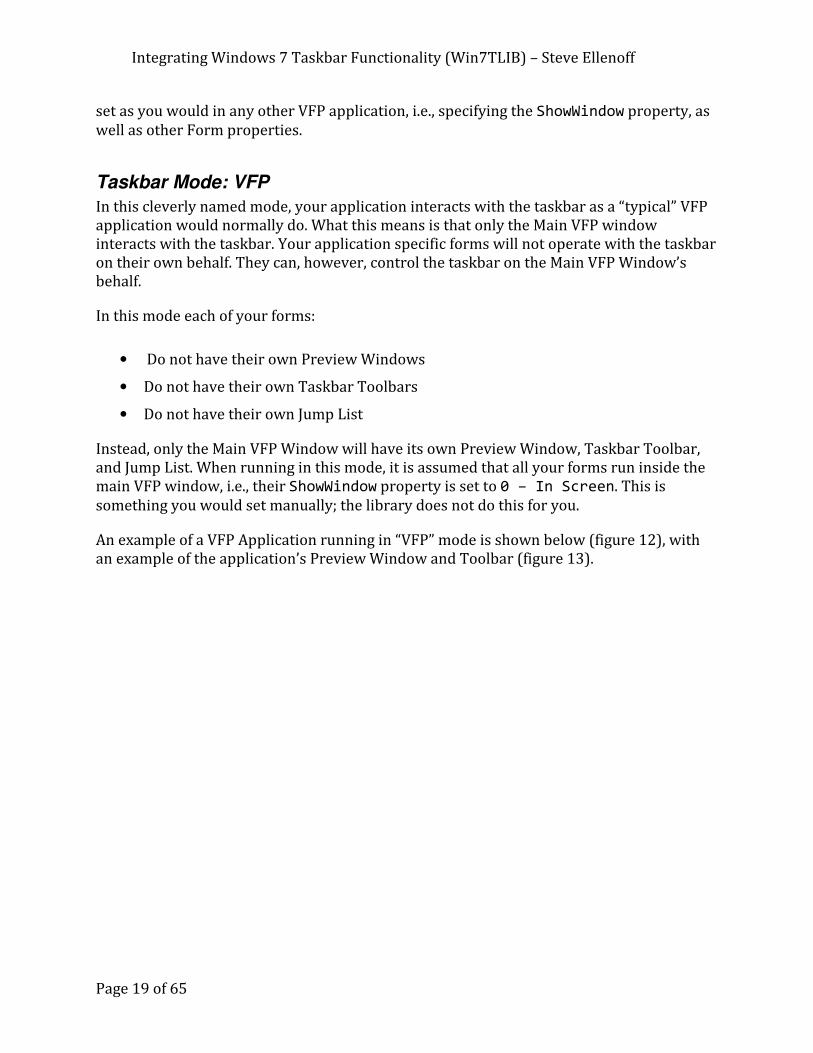
Taskbar Mode: VFP
In this cleverly named mode, your application interacts with the taskbar as a “typical” VFP
application would normally do. What this means is that only the Main VFP window
interacts with the taskbar. Your application specific forms will not operate with the taskbar
on their own behalf. They can, however, control the taskbar on the Main VFP Window’s
behalf.
In this mode each of your forms:
• Do not have their own Preview Windows
• Do not have their own Taskbar Toolbars
• Do not have their own Jump List
Instead, only the Main VFP Window will have its own Preview Window, Taskbar Toolbar,
and Jump List. When running in this mode, it is assumed that all your forms run inside the
main VFP window, i.e., their ShowWindow property is set to 0 – In Screen. This is
something you would set manually; the library does not do this for you.
An example of a VFP Application running in “VFP” mode is shown below (figure 12), with
an example of the application’s Preview Window and Toolbar (figure 13).

Integrating Windows 7 Taskbar Functionality (Win7TLIB) – Steve Ellenoff
Page 20 of 65
Figure 12. A “typical” VFP application running in Taskbar Form Mode: VFP.
Figure 13. The Preview Window and Taskbar Toolbar for the application shown in figure 12 above.

Integrating Windows 7 Taskbar Functionality (Win7TLIB) – Steve Ellenoff
Page 21 of 65
Taskbar Mode: MDI
In MDI (Multiple Document Interface) mode, your application looks and operates a lot like
the VFP mode example discussed above (figure 14). That is to say that you set up each of
your forms to live inside the VFP Main Window just the same way as described in VFP
mode.
When it comes to Taskbar integration, however, things are considerably different (figure
15). First, the Main VFP Window is no longer involved with the taskbar directly. Instead,
each form will operate with the taskbar. As a result, each form will be registered with a
Taskbar class instance.
In this mode each of your forms:
• Has it’s own Preview Window
• Has it’s own Taskbar Toolbars
• Does not have it’s own Jump List
You will also notice from figure 15 that the taskbar button shows multiple groupings,
indicating to the user that there’s more than one Preview Window available. This also
would occur if your application was launched more than one time, i.e., multiple instances of
the same application.
One final thing to note is that VFP Forms have an MDIForm property. Your forms do not
have to set this property for the Taskbar MDI mode to work properly. The library can
handle this mode regardless of this setting.
IMPORTANT NOTE:
Achieving Taskbar MDI mode in VFP is a rather tricky accomplishment. This is due to a
limitation of the Windows 7 Taskbar API, which cannot operate on non-top level forms
(ShowWindow <> 2). To create the effect, the Win7TLib library internally creates invisible
top-level proxy forms and registers them with the Taskbar. This, in and of itself, is not a
problem. The issue arises when drawing the Thumbnail & Live Preview images. Because
the Win7 API cannot draw these for you automatically, the Win7TLib library must
manually do this on behalf of your forms. This is fine since we already discussed that the
Win7API allows for custom image generation. The problem comes from generating the
image. In certain situations, the image generated is distorted or all-together black. This
occurs when the form is clipped or minimized. The reason is due to the way VFP internally
processes the PrintWindow() API call to generate a screen capture. Currently Win7TLib
does not have a work around for this, but I’m hoping we’ll come up with one in the future.

Integrating Windows 7 Taskbar Functionality (Win7TLIB) – Steve Ellenoff
Page 22 of 65
Figure 14. A VFP application running in Taskbar Form Mode: MDI. So far it looks identical to VFP mode.
Figure 15. The MDI mode displays Preview Window & Toolbar for each of your VFP forms, unlike VFP mode.

Integrating Windows 7 Taskbar Functionality (Win7TLIB) – Steve Ellenoff
Page 23 of 65
Taskbar Mode: TOP
In TOP mode, your application interacts with the Taskbar almost identically to the way it
does in MDI mode mentioned above. The application itself, though, looks a bit different
(figure 16).
In this mode, you would create Top Level forms (ShowWindow = 2) as your main User
Interface. The Main VFP window would be hidden completely as described earlier using the
SCREEN=OFF technique. Alternatively, you could mix modes and keep the Main VFP
window visible if you want, but I won’t discuss it further here.
In this mode each of your forms:
• Has it’s own Preview Window
• Has it’s own Taskbar Toolbars
• Can have it’s own Jump List by using different WindowID
There are two advantages this mode has over the MDI mode. First, as just listed, each form
can have its own Jump List. This is achieved by programmatically changing the form’s
WindowID to a different value than the other forms or the AppID. There may be situations
where you really want / need different Jump List content depending on the Form, and this
is the way to achieve that effect.
The second advantage is that because these are Top Level forms, the Thumbnail & Live
Preview images are generated automatically for your forms. If you haven’t already done so,
read the “important note” in the MDI section to understand why having Windows do this
automatically is an advantage.
Integrating Windows 7 Taskbar Functionality (Win7TLIB) – Steve Ellenoff
Page 24 of 65
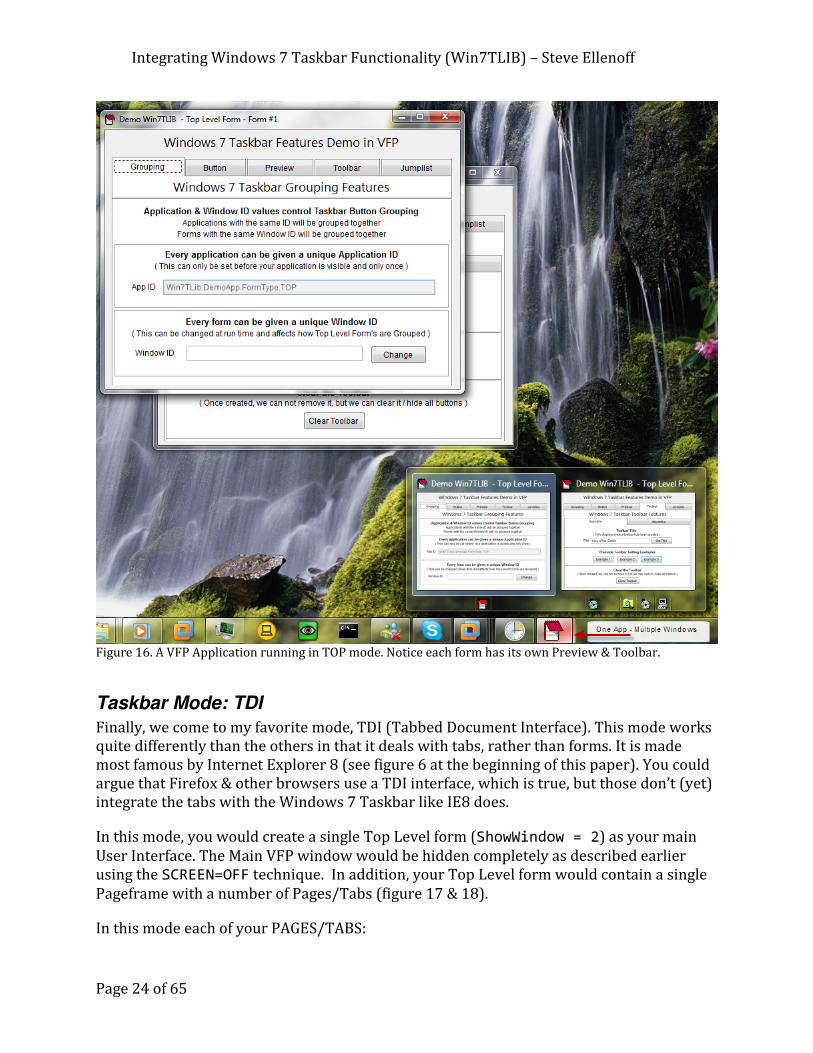
Figure 16. A VFP Application running in TOP mode. Notice each form has its own Preview & Toolbar.
Taskbar Mode: TDI
Finally, we come to my favorite mode, TDI (Tabbed Document Interface). This mode works
quite differently than the others in that it deals with tabs, rather than forms. It is made
most famous by Internet Explorer 8 (see figure 6 at the beginning of this paper). You could
argue that Firefox & other browsers use a TDI interface, which is true, but those don’t (yet)
integrate the tabs with the Windows 7 Taskbar like IE8 does.
In this mode, you would create a single Top Level form (ShowWindow = 2) as your main
User Interface. The Main VFP window would be hidden completely as described earlier
using the SCREEN=OFF technique. In addition, your Top Level form would contain a single
Pageframe with a number of Pages/Tabs (figure 17 & 18).
In this mode each of your PAGES/TABS:
Integrating Windows 7 Taskbar Functionality (Win7TLIB) – Steve Ellenoff
Page 25 of 65
• Has it’s own Preview Window
• Has it’s own Taskbar Toolbars
• Does not have it’s own Jump List
Although this is my favorite mode, it is also the most complex (see note below). Therefore,
this paper won’t discuss the details of setting up your application to use TDI mode.
However, I will certainly be covering it in the future.
IMPORTANT NOTE:
Achieving Taskbar TDI mode in VFP is an extremely tricky accomplishment. This is due to
both a limitation of VFP, and the aforementioned limitation of the Windows 7 Taskbar API,
which cannot operate on non-top level forms (ShowWindow <> 2). The VFP limitation has
to do with the way Pageframe Tabs are created internally. In most other development
environments, they are created as “real windows” windows. In VFP they are drawn
internally by VFP and are not windows at all in that they do not have their own HWND
property.
As a result, our previous MDI trick of creating invisible proxy windows has a serious
problem. There is no way at all for user code to generate a screen capture of each page
(especially if that page is not visible, i.e., the active tab).
To solve this major obstacle, the Win7TLib library creates and manages its own Pageframe
Tabs. The library has a TDI Tab class (found in the VCX) which you must subclass to place
each tab’s content. The key is that this TDI Tab class is a real form, so the library can pass
the HWND to the DLL and generate screen captures, even when the Tab is not
active/visible. The library does all the work of faking the Pageframe effect. Your form still
uses a real VFP Pageframe for the tab headers, just the Page content is managed by the
library.
Because the Tabs themselves cannot be moved, the clipping issue is not a problem as it is in
the MDI mode. However, minimizing the Top Level form, still causes each tab preview to be
drawn black, again, due to how VFP is not processing the PrintWindow() API properly to
capture a screenshot. Like the MDI mode, it is hoped that a workaround or solution will be
found to resolve this.

Integrating Windows 7 Taskbar Functionality (Win7TLIB) – Steve Ellenoff
Page 26 of 65
Figure 17: A VFP application running in TDI Mode. The real fun is in the Preview Windows shown below.
Figure 18: In TDI Mode, each page/tab of a Pageframe has its own Preview Window & Toolbar – COOL!
The Taskbar Class – “The Big Kahuna” As I mentioned earlier, the entire library is based on this class. Everything you do will
involve working with this class, its properties, methods, and more importantly, its member
objects and their associated properties and methods. While the class may seem daunting at
first, it is really simple once you get to know it.
The number one concept to understand is that each VFP Form that wishes to work with the
toolbar will require an instance of this class to communicate to the Taskbar API on its

Integrating Windows 7 Taskbar Functionality (Win7TLIB) – Steve Ellenoff
Page 27 of 65
behalf. Said another way, you will need a separate Taskbar class instance for each VFP form
that you want to have its own Preview Window, Toolbar, and Jump List (when possible). If
your form does not require this, it can simply operate with the Taskbar instance that is
registered by the Library for the Main VFP window.
The good news is that the Helper object manages all this stuff for you, as well as setting the
mode. In other words, simply use the helper to get a reference to a taskbar object and it will
create a taskbar class for your form, or pass you the VFP taskbar instance automatically
depending on the mode you’ve set. This relationship is demonstrated in figure 19 along
with showing how the Taskbar Manager works and where it lives by default. Ironically,
since the creation of the Helper object, it is almost unnecessary to even talk about the
Taskbar Manager (so I won’t).
Figure 19. Each VFP form interacts with the helper to work with its own Taskbar Instance.
The Taskbar Class has a number of primary objects which perform specialized taskbar
functions on your behalf (figure 20).
These primary objects are:

Integrating Windows 7 Taskbar Functionality (Win7TLIB) – Steve Ellenoff
Page 28 of 65
• Taskbar Button Object
• Preview Object
• Toolbar Object
• JumpList Object
Figure 20. The Taskbar Class in all its glory! Notice all the contained objects and their contained objects.
As you can see each primary object may contain other objects as well. We’ll cover each one
in more detail later.
Taskbar Button Perhaps the most fundamental of all Taskbar objects, the TaskbarButton object is
responsible for managing aspects of your application’s Windows 7 Taskbar button (duh!).
There are several features you can integrate using this object. It also happens to be one of
the simplest classes, as it does not contain any other objects. The four (4) main features it
controls are:

Integrating Windows 7 Taskbar Functionality (Win7TLIB) – Steve Ellenoff
Page 29 of 65
• Button Grouping
• Button Flashing
• Overlay Icons
• Progress State
Taskbar Button Grouping
As mentioned previously, the Taskbar button displays groupings when either several
instances of the same application are running simultaneously, or when an application’s
forms have separate Thumbnail Preview Windows. These “groupings”, visually look like
“stacked buttons” (figure 21).
Figure 21. Three instances of VFP are running, grouped automatically by the Windows 7 Taskbar.
We also discussed briefly that your application can control how grouping works. There are
two ways you can control grouping. You can cause items that normally do not group
together, to group together. Alternatively, you can cause items that normally group
together to group separately.
Grouping Separate Items Together
Normally, if you launch an application (.exe), Windows 7 will automatically create separate
taskbar buttons for each separate application (i.e., different .exe filename). In other words,
if you have demo1.exe and demo2.exe, they will each get separate taskbar buttons, and thus
they are not “grouped”.
In some cases you might want to group these separate applications together (figure 22).
For example, if the executable files are related processes of a bigger application. A good
example would be a loader application which the user launches that then launches a
different executable for the application’s real functionality. The user may pin the shortcut
to the loader on his taskbar, but when he runs it, a separate icon would appear for the
application itself. This is confusing to the user, and adds clutter to the taskbar thus
defeating the whole purpose of the streamlined Windows 7 taskbar functionality. As a user
myself, I work with several applications daily that have this quirky behavior and it drives
me mad. Alternatively, your application may consist of several different modules that might
exist as separate .exe files. A large modularized application suite comes to mind as an
example.
Regardless of the scenario, grouping the separate .exe files together in the taskbar is
trivially simple. When creating your application simply assign the same exact Application
ID to both executables. Recall that this is done via the Library Settings (see page 14).
Integrating Windows 7 Taskbar Functionality (Win7TLIB) – Steve Ellenoff
Page 30 of 65
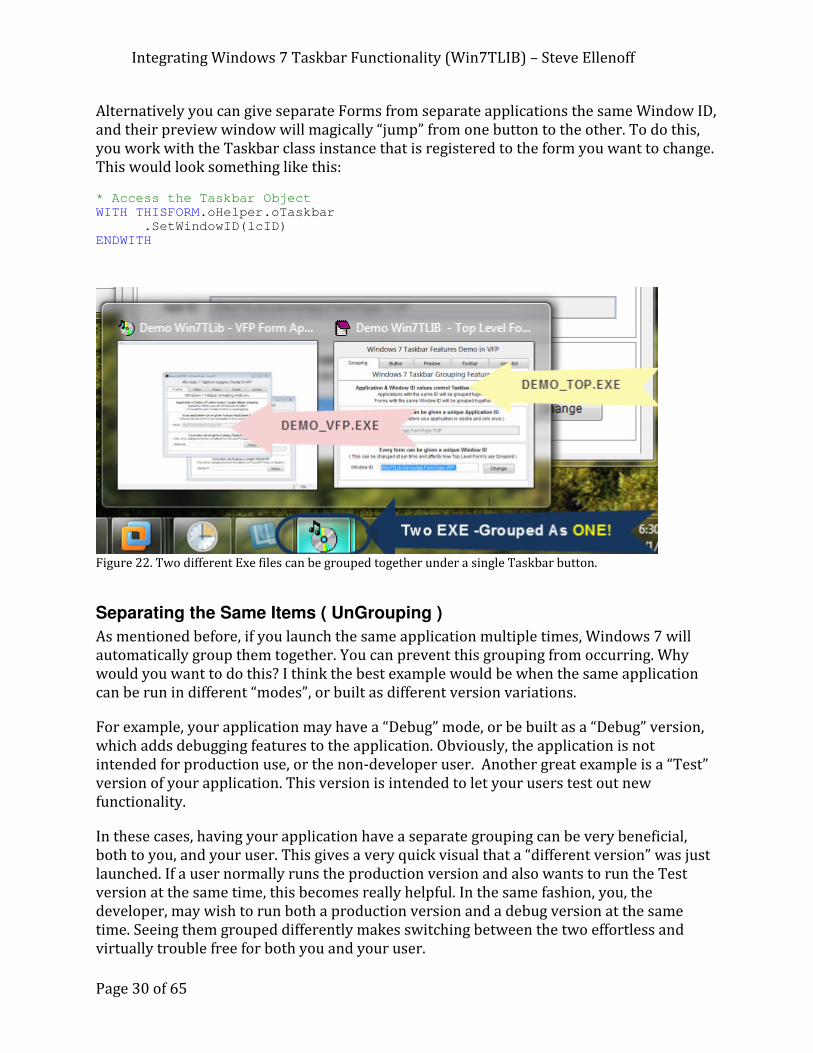
Alternatively you can give separate Forms from separate applications the same Window ID,
and their preview window will magically “jump” from one button to the other. To do this,
you work with the Taskbar class instance that is registered to the form you want to change.
This would look something like this:
* Access the Taskbar Object WITH THISFORM.oHelper.oTaskbar .SetWindowID(lcID) ENDWITH
Figure 22. Two different Exe files can be grouped together under a single Taskbar button.
Separating the Same Items ( UnGrouping )
As mentioned before, if you launch the same application multiple times, Windows 7 will
automatically group them together. You can prevent this grouping from occurring. Why
would you want to do this? I think the best example would be when the same application
can be run in different “modes”, or built as different version variations.
For example, your application may have a “Debug” mode, or be built as a “Debug” version,
which adds debugging features to the application. Obviously, the application is not
intended for production use, or the non-developer user. Another great example is a “Test”
version of your application. This version is intended to let your users test out new
functionality.
In these cases, having your application have a separate grouping can be very beneficial,
both to you, and your user. This gives a very quick visual that a “different version” was just
launched. If a user normally runs the production version and also wants to run the Test
version at the same time, this becomes really helpful. In the same fashion, you, the
developer, may wish to run both a production version and a debug version at the same
time. Seeing them grouped differently makes switching between the two effortless and
virtually trouble free for both you and your user.

Integrating Windows 7 Taskbar Functionality (Win7TLIB) – Steve Ellenoff
Page 31 of 65
To ungroup your application you simply use a different Application ID for each “version” of
the application to un-group, either at compile time, or at run time. To do this, you cannot
use the normal Library Settings approach, since that class cannot be changed once
compiled, and the name is static so you can’t define different versions of the class as
needed.
Instead, you need to work with the Taskbar Manager (and here I was hoping we didn’t need
to talk about it!). First you need to get an object reference to the Taskbar Manager. Next
you call its SetApplicationID() method passing the new AppID string. All of this would
need to be done before making your application Visible (as mentioned in the AppID
section), but for (I hope) obvious reasons, after you call the Initialize_Win7TLib()
function. Here’s code demonstrating this:
*Get an object reference to the Taskbar Manager stored to loTBM LOCAL loTBM IF Get_Win7TLib_TaskBar_Manager(@loTBM,.T.) && .T. = suppress error msg *Set the new Application ID loTBM.SetApplicationID(lcAppID) ENDIF
Forms are automatically “un-grouped” when you select a Form Mode for the library that
supports this, such as MDI, TOP, and TDI modes. Therefore, you don’t need to do anything
special to get this effect for forms.
Taskbar Button Flashing
No, I don’t mean pulling down your pants and mooning someone! Flashing in this context
refers to getting your user’s attention by causing the taskbar button to flash (figure 23 &
24). This functionality has been around long before Windows 7, but I thought it would
make sense to add it to the library since it logically fits into the Taskbar Button class.
Figure 23. The VFP Taskbar Button being Flashed.

Integrating Windows 7 Taskbar Functionality (Win7TLIB) – Steve Ellenoff
Page 32 of 65
Figure 24. The Preview Window will also flash when the button is flashing.
You can use flashing to draw your user’s attention, for example if an error occurred, or
perhaps a long running process has completed. Just remember not to go overboard, or your
user will learn to just ignore it, just like those “annoying messageboxes that I just click
through without reading”, as one of my users put it so eloquently!
To flash the button, grab a reference to the Taskbar’s TaskbarButton object, and call its
Flash() method passing the # of times to flash, like this:
* Access the Taskbar's TaskBarButton Object WITH THISFORM.oHelper.oTaskbar.TaskBarButton *Flash Taskbar Button specified # times .Flash(lnTimes) ENDWITH
Unfortunately I don’t know of a way to change the color used to flash the button. It seems to
always use Orange for me. Perhaps there’s a windows theme setting to change this, but
even if I find it, I don’t think it can be programmatically changed regardless.
Taskbar Button Icon Overlay
You’ll recall from the Windows 7 Features Review earlier in this paper that your
application can overlay an icon onto the Taskbar button to inform the user of different
status information. This is easily accomplished by using the Taskbar’s TaskbarButton
object, and calling the SetIconOverlay() method. You simply pass the name of the .ICO
file to use, and an optional description string, and the class takes care of the rest as shown
in this example:
*Set File Name lcIcon = "audio.ico" *Set Description lcDesc = "Hello!"
Integrating Windows 7 Taskbar Functionality (Win7TLIB) – Steve Ellenoff
Page 33 of 65
* Access the Taskbar's TaskBarButton Object WITH THISFORM.oHelper.oTaskbar.TaskBarButton *Set the Overlay Icon .SetOverlayIcon(lcIcon, lcDesc) ENDWITH
The library supports specifying both an external file (full path is required if your
application doesn’t know how to find it), and an embedded file included in your project.
As for the description, the funny thing is, I can’t seem to figure out where / when the
description string appears, but its part of the Windows 7 Taskbar API, so I included it.
Maybe you can help me figure it out? I think it may be used when (for whatever reason) the
icon cannot be displayed, but I’ve never witnessed it.
To remove the icon overlay is just as simple:
* Access the Taskbar's TaskBarButton Object WITH THISFORM.oHelper.oTaskbar.TaskBarButton *Remove the Overlay Icon .ClearOverlayIcon() ENDWITH
Taskbar Button Progress State
As we saw earlier the Taskbar button can be used like a mini-progress bar/meter. This is
one of those features I think many of us VFP developers will find immediately useful. I
know in my applications I have several reports that take a long time to run and crunch tons
of data. Of course my apps already provide a progress bar on screen, but supplementing it
with a taskbar version is even better!
Adding the Taskbar button version is not only incredibly easy, it will also really enhance
the user experience. Why? Most users (at least mine) will switch to some other application
while waiting for the long process to finish (email and solitaire seem to be a favorite).
Previously, they would need to interrupt their “work” and switch back to my application to
see if it was finished. Using the Taskbar Button progress, they can see it immediately
without leaving their game (uh, I mean “work”).
The progress state has four (4) variations you can choose from:
• Indeterminate
• Normal
• Paused
• Error
Integrating Windows 7 Taskbar Functionality (Win7TLIB) – Steve Ellenoff
Page 34 of 65
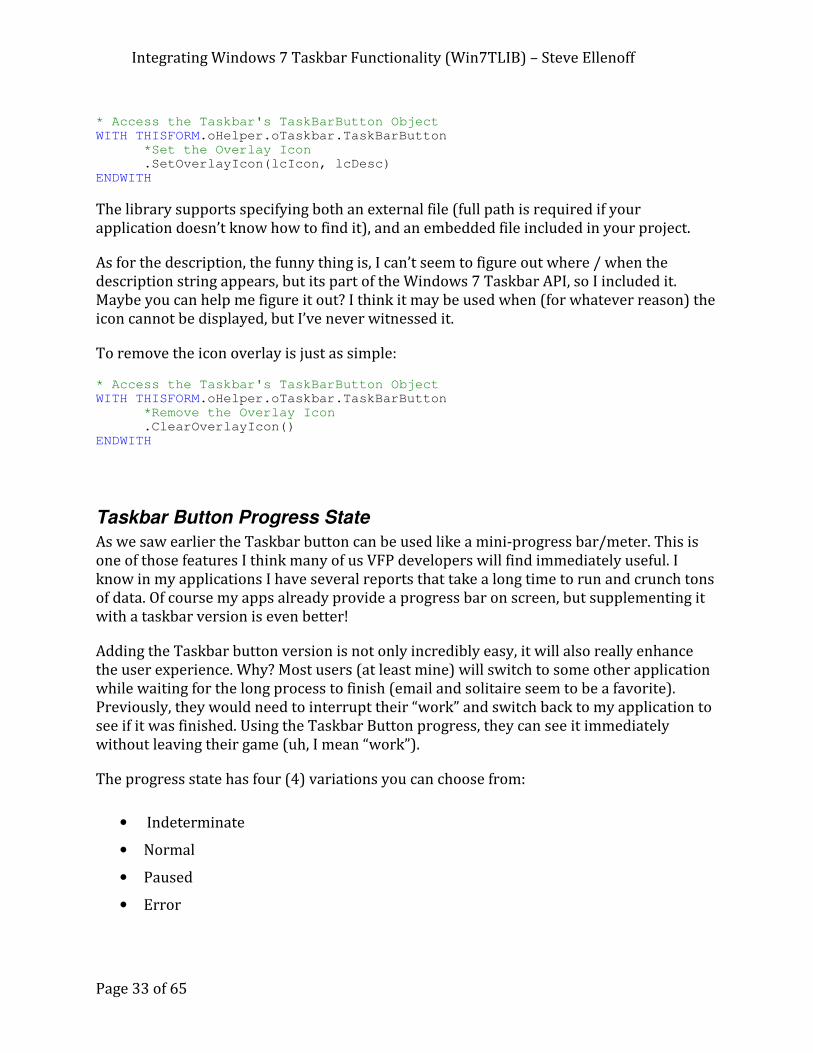
Indeterminate
The first state, “Indeterminate” (figure 25) is different then the others. It was created to
handle a process that takes an “indeterminate” amount of time to finish (clever, yes?). For
us VFP developers, the perfect example would be when running an SQL select statement.
We have no way to know when it will finish, nor any way to provide a progress bar. This is
precisely what this progress state was created for.
Figure 25. Indeterminate progress state scrolls a green block across the button.
Here’s the code to set this state:
* Access the Taskbar's TaskBarButton Object WITH THISFORM.oHelper.oTaskbar.TaskBarButton .SetProgressStyle("Indeterminate") ENDWITH
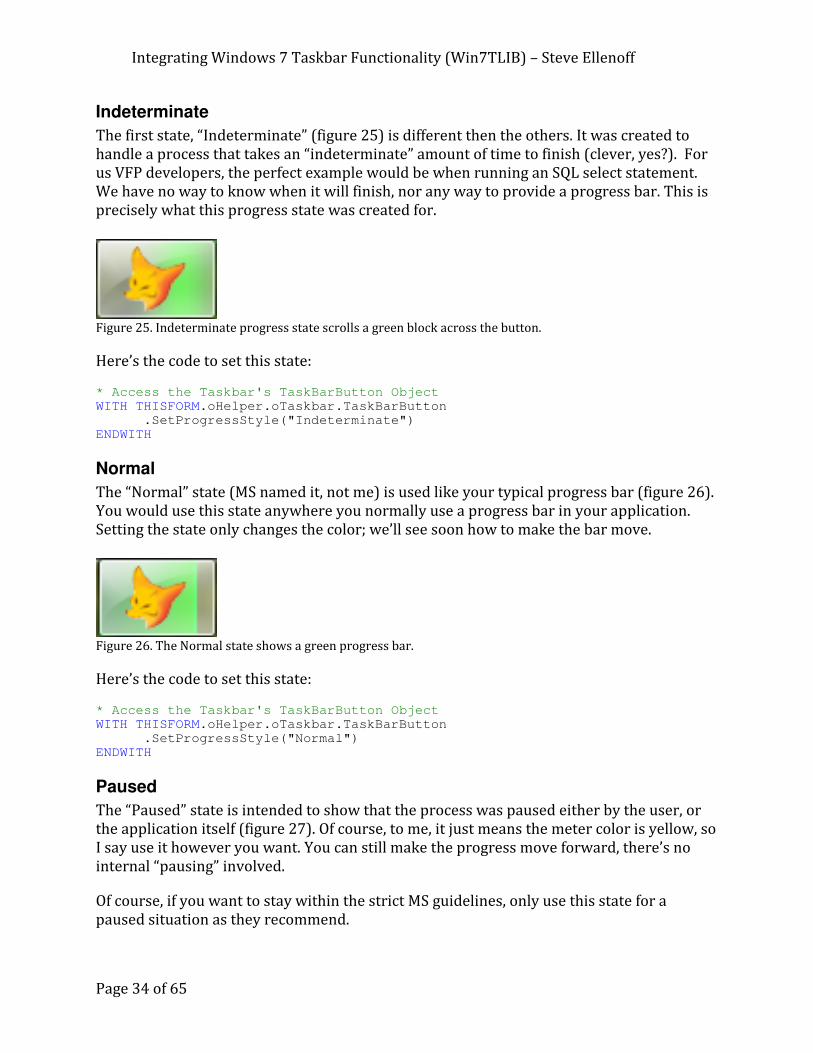
Normal
The “Normal” state (MS named it, not me) is used like your typical progress bar (figure 26).
You would use this state anywhere you normally use a progress bar in your application.
Setting the state only changes the color; we’ll see soon how to make the bar move.
Figure 26. The Normal state shows a green progress bar.
Here’s the code to set this state:
* Access the Taskbar's TaskBarButton Object WITH THISFORM.oHelper.oTaskbar.TaskBarButton .SetProgressStyle("Normal") ENDWITH
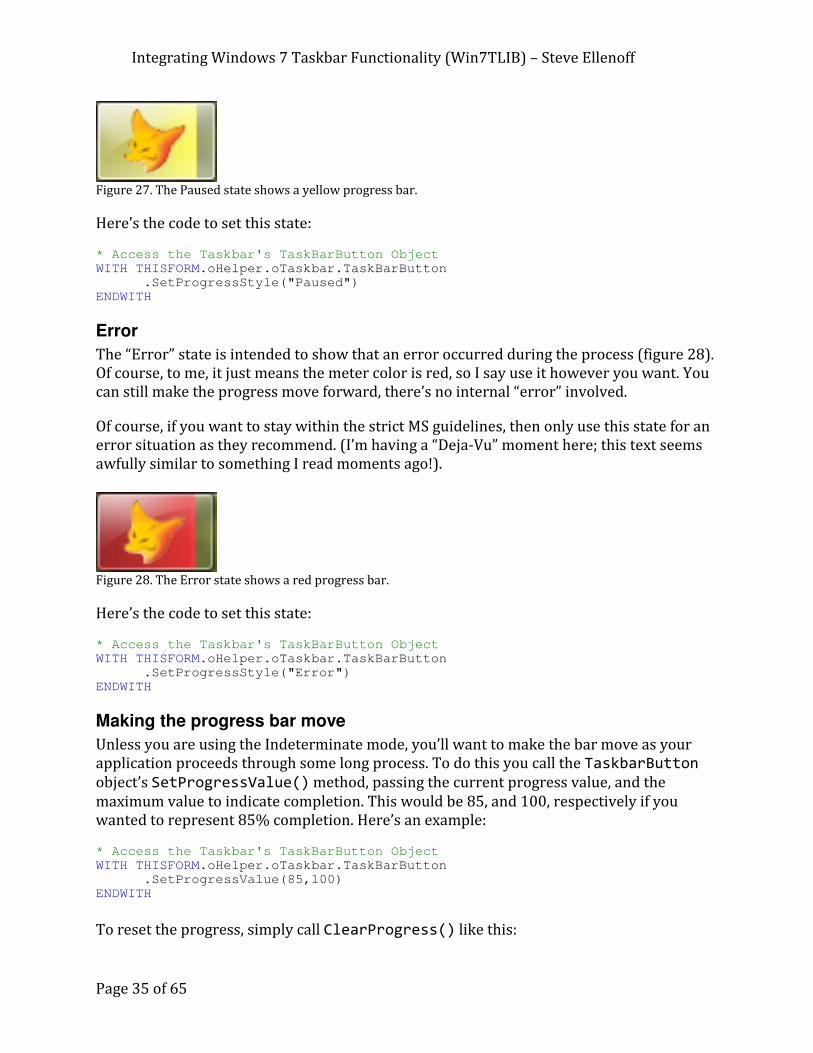
Paused
The “Paused” state is intended to show that the process was paused either by the user, or
the application itself (figure 27). Of course, to me, it just means the meter color is yellow, so
I say use it however you want. You can still make the progress move forward, there’s no
internal “pausing” involved.
Of course, if you want to stay within the strict MS guidelines, only use this state for a
paused situation as they recommend.
Integrating Windows 7 Taskbar Functionality (Win7TLIB) – Steve Ellenoff
Page 35 of 65
Figure 27. The Paused state shows a yellow progress bar.
Here’s the code to set this state:
* Access the Taskbar's TaskBarButton Object WITH THISFORM.oHelper.oTaskbar.TaskBarButton .SetProgressStyle("Paused") ENDWITH
Error
The “Error” state is intended to show that an error occurred during the process (figure 28).
Of course, to me, it just means the meter color is red, so I say use it however you want. You
can still make the progress move forward, there’s no internal “error” involved.
Of course, if you want to stay within the strict MS guidelines, then only use this state for an
error situation as they recommend. (I’m having a “Deja-Vu” moment here; this text seems
awfully similar to something I read moments ago!).
Figure 28. The Error state shows a red progress bar.
Here’s the code to set this state:
* Access the Taskbar's TaskBarButton Object WITH THISFORM.oHelper.oTaskbar.TaskBarButton .SetProgressStyle("Error") ENDWITH
Making the progress bar move
Unless you are using the Indeterminate mode, you’ll want to make the bar move as your
application proceeds through some long process. To do this you call the TaskbarButton
object’s SetProgressValue() method, passing the current progress value, and the
maximum value to indicate completion. This would be 85, and 100, respectively if you
wanted to represent 85% completion. Here’s an example:
* Access the Taskbar's TaskBarButton Object WITH THISFORM.oHelper.oTaskbar.TaskBarButton .SetProgressValue(85,100) ENDWITH
To reset the progress, simply call ClearProgress() like this:

Integrating Windows 7 Taskbar Functionality (Win7TLIB) – Steve Ellenoff
Page 36 of 65
* Access the Taskbar's TaskBarButton Object WITH THISFORM.oHelper.oTaskbar.TaskBarButton .ClearProgress() ENDWITH
Taskbar Preview The Taskbar class’ Preview object is another simple, yet powerful class to help customize
your application’s Thumbnail & Live Preview windows. Recall that Windows 7
automatically provides your application with a Thumbnail Preview Image and a Live
Preview Image (at least for Top Level Forms).
The first way to customize these images is through clipping. Instead of using the entire
image Windows creates for your Thumbnail image, you can clip it so that only a portion of
the image is used. This only applies to the Thumbnail, there’s no way to clip the Live
Preview Window.
The second way to customize the Preview functionality is to supply your own custom
images for the Thumbnail and Live Preview windows. An interesting, but rather annoying
limitation is that if you choose to customize one, you must customize both! Perhaps future
versions of the library will work around this by automatically creating the image for you
that you are not customizing yourself. Or perhaps, someone can help me figure out if this is
in fact supported and I am just doing something wrong (those API docs are sometimes
opaque).
Thumbnail Clipping
So you want to clip, eh? Try some coupons in the Sunday paper <grin>! Actually, you may
be wondering “why would I want to clip?” There are two examples I can think of where this
comes in really handy.
Clipping to a Form
First, when you are running in VFP mode, the Thumbnail window shows all open forms in
your application (figure 29). This makes the thumbnail image rather useless as it’s nearly
impossible to see what’s going on. Using clipping you can make a specific form show in the
Thumbnail Preview window instead (figure 30). We’ll see how to clip in a moment.

Integrating Windows 7 Taskbar Functionality (Win7TLIB) – Steve Ellenoff
Page 37 of 65
Figure 29. Thumbnail preview shows all open forms when running in VFP mode.
Figure 30. Thumbnail preview is clipped to show just a single form when running in VFP mode.
The Preview Utils Object
The Preview object contains a Utils object which you can use to assist with preview
related functions. The most helpful (at this time) is the GetForm_ClippingData()
method. This helpful utility (see why the object is named Utils?) will calculate the clipping
values needed for a given form so that just the form will appear in the Thumbnail Preview
window, as we just showed above. Be sure to pass the parameter values by reference so
you can get data back from the method, as shown in this example:
* Access the Taskbar's Preview Utils Object WITH THISFORM.oHelper.oTaskbar.Preview.Utils *Get the Clipping Data for the form .GetForm_ClippingData(loForm, @lnLeft, @lnTop, @lnWidth, @lnHeight) ENDWITH

Integrating Windows 7 Taskbar Functionality (Win7TLIB) – Steve Ellenoff
Page 38 of 65
Clipping to Form Controls
Clipping to a form is useful in situations where you can’t run in the other modes that
automatically provide your forms their own Preview windows. What is even more
beneficial to all modes, however, is clipping to form controls. Even when your form is the
only thing displayed in the Preview window, it’s often still difficult to see what’s happening
since the image is just too small.
Clipping to Form Controls helps this situation by allowing you to highlight specific
information on your form, like a few key controls and their values. Figure 31 below shows
an example form with lots of information and screen real estate being used (primarily by
the multiple Pageframe tabs). This form would be hard to read in a Thumbnail Preview
Window. By clipping to the Name and Bio controls (figure 32), the user can immediately
see the critical pieces of information for that form.
Figure 31. A fairly busy form with lots of information will be hard to read in the Thumbnail Preview Window.

Integrating Windows 7 Taskbar Functionality (Win7TLIB) – Steve Ellenoff
Page 39 of 65
Figure 32. Form controls clipped to enable easy reading in the Thumbnail Preview Window from figure 31.
How to Clip the Thumbnail Image
Regardless of whether you want to clip to a form, to form controls, or some other arbitrary
location, doing so is incredibly easy. You will need to provide the left, top, width, and height
values of the image to clip. Then you simply call the SetClipping() method of the
Preview object, like this:
* Access the Taskbar's Preview Object WITH THISFORM.oHelper.oTaskbar.Preview .SetClipping(lnLeft,lnTop,lnWidth,lnHeight) ENDWITH
When you wish to clear the clipping information, just call ClearClipping() like this:
* Access the Taskbar's Preview Object WITH THISFORM.oHelper.oTaskbar.Preview .ClearClipping() ENDWITH
Custom Images for Thumbnail & Live Preview
Perhaps one of the coolest customizations you can make is to provide your own images for
both Thumbnail & Live Preview for your application (figure 33). As before, this involves
working with the Taskbar’s Preview object. You can supply both embedded images from
your project and external image files located on the hard drive.

Integrating Windows 7 Taskbar Functionality (Win7TLIB) – Steve Ellenoff
Page 40 of 65
Figure 33. Custom Thumbnail & Live Preview images for Visual FoxPro (look at the application caption).
Customizing the images takes 3 easy steps. First you must inform Windows 7 that you wish
to customize the drawing of the preview images yourself. Second you set two (hopefully)
self explanatory properties of the Preview object. Last you inform Windows 7 to request
new images from your application. The following example demonstrates these simple
steps:
* Access the Taskbar's Preview Object WITH THISFORM.oHelper.oTaskbar.Preview *Register for Custom Drawing Register_Custom_Drawing() *Set file names .cThumbnailImage = "BONNIE.JPG" .cLivePreviewImage = "STEVE.BMP"

Integrating Windows 7 Taskbar Functionality (Win7TLIB) – Steve Ellenoff
Page 41 of 65
*Refresh Preview Windows .RefreshPreviews() ENDWITH
Once you are no longer wish to customize the images, you can return to the default
Windows 7 handling by calling UnRegister_Custom_Drawing() like this:
* Access the Taskbar's Preview Object WITH THISFORM.oHelper.oTaskbar.Preview
* No more custom drawing .UnRegister_Custom_Drawing() ENDWITH
It’s probably not obvious from the example above, but the call to
Register_Custom_Drawing() only needs to be done once. After calling it, you can change
images and call RefreshPreviews() any number of times without needing to call it
again. The only other time you would call it again is if you wanted to customize the drawing
again, after having already called UnRegister_Custom_Drawing().
Customizing even further for Thumbnail & Live Preview
If supplying an image file isn’t enough power for you, the library allows you to control the
process even more. When Windows 7 wishes to draw the Thumbnail or Live Preview
images, it asks your application to provide an image (assuming the application had already
told Windows 7 it would be doing custom drawing).
This internal request from Windows 7 is handled by the Win7TLib library and default code
is executed to allow supplying the files by virtue of the properties we saw above. This
process can be overridden by your application to gain further control.
To hook into this communication, you can use the Taskbar_Helper object’s event
methods: On_Thumbnail_Draw() and On_LivePreview_Draw(), shown in figure 34.
These methods are fired anytime Windows 7 requests the images to be drawn. Each
method passes an object reference to the Preview Object and the Form Object which
registered for custom drawing. Keep in mind the form object passed may actually be the
_VFP object if your app is running in VFP mode.
In the method you can do whatever custom image creation you like. This would be a
fantastic place to use the wonderful VFPx project, GDIPLUSx to add all kinds of cool effects.
Showing you how to do this, of course, is beyond the scope of this paper.
Once you’ve got the image data you want, you can then either save it to a file, set the
Preview object’s image properties as shown earlier, and call DODEFAULT() to let the
library handle the rest. If you’d prefer to avoid this step, and you can get a valid windows
image handle to your image data, you can call the Preview object’s

Integrating Windows 7 Taskbar Functionality (Win7TLIB) – Steve Ellenoff
Page 42 of 65
SetThumbnailImage() or SetLivePreviewImage() methods and pass each the handle
to your image data. This is why the preview object is passed to the method to make it easy
for you to call its methods.
Figure 34. Adding your own code to the Helper object’s On_Live_Preview_Draw() event method.
I haven’t had much of an opportunity to really play with this level of customization yet, but
I am hoping you will, and that you’ll show me all the cool things you are doing with it.
Taskbar Toolbars Nothing spices up an application like an extra toolbar with buttons, right? All joking aside,
as I mentioned early on, adding toolbar buttons to your Preview Window can add
tremendous productivity to your applications and make your users scream in delight. Ok,
maybe not that far, but I do still get a smile on my face when I click the play button from the
Windows Media Preview Window when my play list ends and I want to start again.
Setting up your Preview Window Toolbar is an easy and straightforward process since
Win7TLib hides all the nastiness from you. There are two objects you will work with when
creating your toolbar. The first is the Taskbar’s Toolbar object. This object manages the
toolbar and all 7 buttons. The second is a reference to a button you wish to control.
Here’s an overview of the process for working with the toolbar in order:
• Set the # of buttons you want to use
• Set the Tool Tip Text you want to display (optional)
• Grab an object reference for the button you want to create/modify
• Set the properties of the button
• When you’re done, commit your changes.
Working with the Toolbar Buttons
Let’s look at working with each toolbar button, and then we’ll see how to tie it all together
afterwards to create the toolbar you want. As you know there are only seven (7) buttons

Integrating Windows 7 Taskbar Functionality (Win7TLIB) – Steve Ellenoff
Page 43 of 65
that can be placed in the Toolbar. Likewise, the Toolbar object only contains 7 instances of
the Taskbar_Toolbar_Button class. To access a button, you simply call the Toolbar
object’s GetButton() method passing the number of the button to retrieve, like this:
* Access the Taskbar's Toolbar Object WITH THISFORM.oHelper.oTaskbar.Toolbar *Grab Button #1 loB = .GetButton(1) ENDWITH
Once you have a reference to a button object, you can set its properties (table 1). Nearly all
of these properties are optional, although in most cases you’ll want to at least set an icon
and tool tip text.
Table 1. Properties of the Taskbar_Toolbar_Button Class.
Property Description
lSpacer Set to .T. if the button should act as a spacer object
cIcon The name of the .ICO file to display for the button ( embedded or external )
cTooltip The text of the Tool Tip to display for the button.
lVisible Set to .T. to make the button visible, .F. to hide the button
lEnabled Set to .T. to enable the button, .F. to disable it
lCloseOnClick If .T. the Preview Window closes when the button clicks, .F. keeps the Preview window open after the button is clicked.
Here’s an example of setting these properties to create a spacer button and a regular
button:
*Button #4 ( Spacer ) loB = .GetButton(4) WITH loB .lSpacer = .T. ENDWITH *Button #5 loB = .GetButton(5) WITH loB .cIcon = "mycomp.ico" .cToolTip = "Windows 7" .lEnabled = .T. .lCloseOnClick = .T. ENDWITH
It’s important to remind you here, that we’re doing this out of order, and that before
accessing the buttons, you would first set the # of buttons as we’ll see in a moment. I’m
reminding you here to point out that calling GetButton() without first setting the button
count, or referring to a button # higher than you set, will not work.
In case you’re wondering what a “Spacer” button is, see figure 35 below. Unlike simply
creating a button with no icon, a spacer does not draw a border around the button so it
looks like a real space or gap. This is useful to help separate buttons into sections.

Integrating Windows 7 Taskbar Functionality (Win7TLIB) – Steve Ellenoff
Page 44 of 65
Figure 35. The space between the left most CD button and the Explorer button is created with a Spacer button.
Making your Toolbar
Now that you understand how to work with the buttons, let’s see the whole process start to
finish. First, you must set the # of buttons to work with by setting the nButtonCount
property of the Toolbar object to a value between 1 and 7. Next you can (optionally) set
the Tool Tip Text for the Preview Window, by setting the Toolbar object’s cToolbarText
property. Next you would pull button objects and set their properties as you desire. Last,
but not least, you would call the Toolbar object’s UpdateToolbar() method. This is called
even when first creating the toolbar, i.e., there’s no CreateToolbar() method. I thought it
would be easier if you didn’t have to remember two methods, when one would suffice.
Here’s an example of the entire process which creates 5 buttons:
* Access the Taskbar's Toolbar Object WITH THISFORM.oHelper.oTaskbar.Toolbar *Set # of buttons to use .nButtonCount = 5 *Set the Tooltip Text .cToolbarText = "My Custom Toolbar" *********************** *** SET EACH BUTTON *** *********************** *Button #1 loB = .GetButton(1) WITH loB .cIcon = "audio.ico" .cToolTip = "Go West" .lCloseOnClick = .F. ENDWITH *Button #2 ( Spacer ) loB = .GetButton(2) WITH loB .lSpacer = .T.

Integrating Windows 7 Taskbar Functionality (Win7TLIB) – Steve Ellenoff
Page 45 of 65
ENDWITH *Button #3 loB = .GetButton(3) WITH loB .cIcon = "explorer.ico" .cToolTip = "Explorer" .lCloseOnClick = .F. ENDWITH *Button #4 ( Disabled ) loB = .GetButton(4) WITH loB .cIcon = "audio.ico" .cToolTip = "Music" .lEnabled = .F. ENDWITH *Button #5 loB = .GetButton(5) WITH loB .cIcon = "mycomp.ico" .cToolTip = "Win7" .lEnabled = .T. .lCloseOnClick = .T. ENDWITH ************************** *** UPDATE THE TOOLBAR *** ************************** .UpdateToolbar() ENDWITH
The Interactive Toolbar Builder
One of the coolest features I was able to whip together for the Win7TLib demo application
is called the Interactive Toolbar Builder. Although I personally think building the toolbar is
really easy as demonstrated above, nothing beats having a snappy visual tool to help out
(figure 36). To use it, simply set the # of buttons you want to have, and click each box which
represents a button. Then select the properties of that button and repeat for each button
you want to work with. You can click the Update button to see what the toolbar will look
like in the demo application’s preview window. Best of all, once you’re done, click the Show
Code button and a window will open giving you all the code you need to generate the
toolbar and buttons you created. Sweet, no?

Integrating Windows 7 Taskbar Functionality (Win7TLIB) – Steve Ellenoff
Page 46 of 65
Figure 36. Build your toolbar buttons interactively and get the code generated automatically, COOL!
Toolbar Button Callback ( Hello? I was Pressed, Did You Notice?)
When a user clicks a toolbar button, Windows 7 will send a message to your application.
The Win7TLib library manages this process automatically for you and calls a method of the
Helper Object, named On_Toolbar_Button_Click() to allow your application to respond
to this event. You can place any code you like in this method (figure 37)
Figure 37. Add code to the On_Toolbar_Button_Click() method to respond to button clicks from the toolbar.
The parameters sent to this method are: 1) An object reference to the Toolbar object 2) An
object reference to the Form associated with the toolbar ( could also be the _VFP object if
running in VFP mode), and 3) the ID # of the button clicked, which will be a value from 1-7.
Jump Lists Don’t worry, I’m not going to use another “Jump Out” at you lame joke, like last time. What I
will say is that creating Jump Lists can really add tremendous productivity and the obvious
“cool” factor to your VFP applications. There’s a lot of stuff you can do with it. A draw back
of this flexibility is that working with the Jump List is, by far, the most complex process
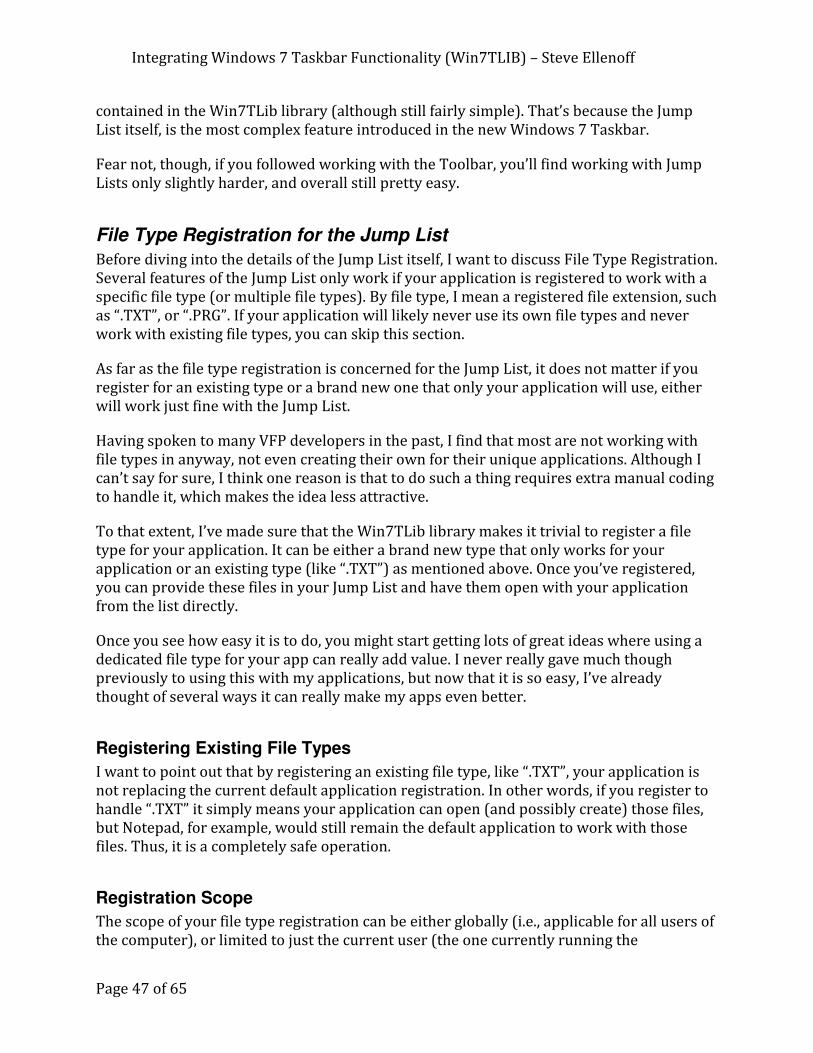
Integrating Windows 7 Taskbar Functionality (Win7TLIB) – Steve Ellenoff
Page 47 of 65
contained in the Win7TLib library (although still fairly simple). That’s because the Jump
List itself, is the most complex feature introduced in the new Windows 7 Taskbar.
Fear not, though, if you followed working with the Toolbar, you’ll find working with Jump
Lists only slightly harder, and overall still pretty easy.
File Type Registration for the Jump List
Before diving into the details of the Jump List itself, I want to discuss File Type Registration.
Several features of the Jump List only work if your application is registered to work with a
specific file type (or multiple file types). By file type, I mean a registered file extension, such
as “.TXT”, or “.PRG”. If your application will likely never use its own file types and never
work with existing file types, you can skip this section.
As far as the file type registration is concerned for the Jump List, it does not matter if you
register for an existing type or a brand new one that only your application will use, either
will work just fine with the Jump List.
Having spoken to many VFP developers in the past, I find that most are not working with
file types in anyway, not even creating their own for their unique applications. Although I
can’t say for sure, I think one reason is that to do such a thing requires extra manual coding
to handle it, which makes the idea less attractive.
To that extent, I’ve made sure that the Win7TLib library makes it trivial to register a file
type for your application. It can be either a brand new type that only works for your
application or an existing type (like “.TXT”) as mentioned above. Once you’ve registered,
you can provide these files in your Jump List and have them open with your application
from the list directly.
Once you see how easy it is to do, you might start getting lots of great ideas where using a
dedicated file type for your app can really add value. I never really gave much though
previously to using this with my applications, but now that it is so easy, I’ve already
thought of several ways it can really make my apps even better.
Registering Existing File Types
I want to point out that by registering an existing file type, like “.TXT”, your application is
not replacing the current default application registration. In other words, if you register to
handle “.TXT” it simply means your application can open (and possibly create) those files,
but Notepad, for example, would still remain the default application to work with those
files. Thus, it is a completely safe operation.
Registration Scope
The scope of your file type registration can be either globally (i.e., applicable for all users of
the computer), or limited to just the current user (the one currently running the

Integrating Windows 7 Taskbar Functionality (Win7TLIB) – Steve Ellenoff
Page 48 of 65
application). While a global registration might seem more attractive, in Windows 7 it comes
with the restriction that your application must be running with administrator privileges to
do so. This requires the user to manually select “Run as Administrator” when opening your
application.
Registering for the current user, on the other hand, does not require this elevated security,
and is a much easier process to have your application perform in an automated way. In my
opinion, the best approach is to have your application simply check if the current user has
registration data yet, and if not, simply create it when the application first launches. This
seems much easier to me than having to deal with the elevated security issue, and
ultimately allows all users running your app to get the registration anyway.
Checking & Creating the File Type Registration
To create a file type registration, you will use the JumpList Object’s FileTypeReg object.
The JumpList object is itself a member of the now “infamous” Taskbar Class. With a
reference to the FileTypeReg object, you can check if the registration data already exists
for your application by calling IsFileTypeRegistered() and pass it the file type
extension to check and a logical flag indicating if the scope is for the current user (.T.), or
globally (.F.). Here is an example showing how to check if the “.TXT” file is registered for the
current user:
****************************************************************** * Access the Taskbar's JumpList’s FileType Reg Object WITH THISFORM.oHelper.oTaskbar.JumpList.FileTypeReg llReg = .IsFileTypeRegistered(".TXT",.T.) ENDWITH
Once you’ve decided you need to create the registration, you will call the
RegisterFileType() method of the FileTypeReg object. The parameters to the method
are:
• File Type (“.TXT” for example)
• Current User Scope ( .T. = Yes, .F. = Global )
• Description for the file association
• Icon File to display for the file type
Here’s a complete example integrating the above check with the registration call:
*************************************************** * Access the Taskbar's JumpList's FileType Reg Obj WITH THISFORM.oHelper.oTaskbar.JumpList.FileTypeReg LOCAL lcType, llUser lcType = ".TXT" llUser = .T. *Is our file type reg for current user?

Integrating Windows 7 Taskbar Functionality (Win7TLIB) – Steve Ellenoff
Page 49 of 65
IF !.IsFileTypeRegistered(lcType,llUser) LOCAL lcDesc, lcIcon lcDesc = "Open a Text File with My App" lcIcon = "MYCOMP.ICO" *Register It Now for current user .RegisterFileType(lcType,llUser,lcDesc,lcIcon) ENDIF ENDWITH
If for some reason, you need to remove the file type registration (as part of an uninstaller
for example), you can simply call the UnRegisterFileType() method passing the file
type and user scope logical flag, as demonstrated here:
*************************************************** * Access the Taskbar's JumpList's FileType Reg Obj WITH THISFORM.oHelper.oTaskbar.JumpList.FileTypeReg LOCAL lcType, llUser lcType = ".TXT" llUser = .T. *Remove registration for current user .UnRegisterFileType(lcType,llUser) ENDWITH
Content in a Jump List
A Jump List is made up of sections. We’ll look at the specifics of each section soon. First,
though, we need to discuss the different types of content that can be contained in those
sections.
There are three (3) types of content that can be included in each of the sections, although
not each section can hold all 3 types. These are:
• A Jump List Item
• A Jump List Link
• A Jump List Separator
Jump List Item
I wish the Windows 7 team had used a different term, since Jump List Item sounds like it
could refer to any thing found in the list, but in fact, it refers to a very specific thing. The
name actually comes from the fact that the Jump List Item is, in reality, a IShellItem. See the
MSDN documentation or Google for what this really means.

Integrating Windows 7 Taskbar Functionality (Win7TLIB) – Steve Ellenoff
Page 50 of 65
In simple terms, think of this item as referring to a specific file on a hard drive in the
majority of cases. This could be a Word Document (.DOC), a VFP program file (.PRG), or any
other file that has a registered file type. It normally does not refer to application executable
files (unless your application can open those in some meaningful way such as a Hex Editor).
When an item is included in a section of the Jump List, your application will open a new
instance and load this file automatically when the user clicks the item from the Jump List.
As a result of this behavior, your application must be registered to handle the file type
(whether it is an existing type or a new one which you created exclusively for your app).
See the FileTypeReg section listed earlier on how to do this with the Win7TLib library.
If your application has not registered to handle the specific file type of a Jump List Item you
are attempting to include in your list, it will not include it. Furthermore, it will not include
any other items in that same section, thus considering the entire section invalid (sorry
that’s a Windows 7 API thing, not another one of those devious plots I am sometimes
accused of conjuring up).
Jump List items are the most prevalent type of content found in the Jump List. They are
found in the Recent, Frequent, and Custom Category sections. Jump List items cannot be
added to the User Tasks section. (I know we didn’t talk about the sections yet, patient
young Jedi).
Working with Items is very simple. You first create an instance of a JumpList_Item class.
You then populate its properties (table 2). You can either set them manually or pass them
as parameters to Init() when you create the object. If you do not specify the cTitle
property, it will default to the filename specified in cAppPath.
Table 2. Properties of the JumpList_Item Class.
Property Description
cAppPath Full path & file name of the file to use as an Item
cTitle The Title to display for this item in the Jump List ( defaults to the file name )
Here’s an example of creating a Jump List Item which refers to the file “test2.txt” located in
the user’s temp directory:
*Create Item Object loJI = CREATEOBJECT("JumpList_Item") *Get path to the file lcApp = ADDBS(lcTempPath) + "test2.txt" *Assign the property loJI.cAppPath = lcApp
Jump List Link
The Jump List Link is really just your typical windows shortcut; you know, the one you
create by right-clicking a file and selecting create shortcut. Usually this would refer to an
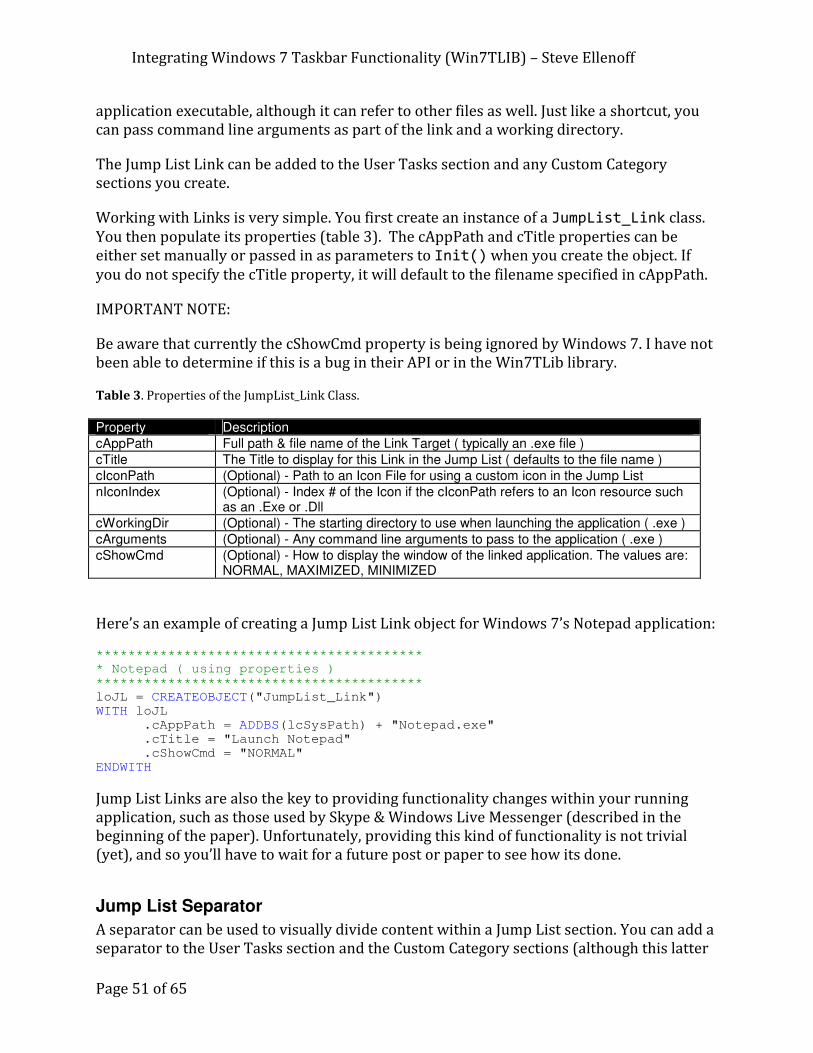
Integrating Windows 7 Taskbar Functionality (Win7TLIB) – Steve Ellenoff
Page 51 of 65
application executable, although it can refer to other files as well. Just like a shortcut, you
can pass command line arguments as part of the link and a working directory.
The Jump List Link can be added to the User Tasks section and any Custom Category
sections you create.
Working with Links is very simple. You first create an instance of a JumpList_Link class.
You then populate its properties (table 3). The cAppPath and cTitle properties can be
either set manually or passed in as parameters to Init() when you create the object. If
you do not specify the cTitle property, it will default to the filename specified in cAppPath.
IMPORTANT NOTE:
Be aware that currently the cShowCmd property is being ignored by Windows 7. I have not
been able to determine if this is a bug in their API or in the Win7TLib library.
Table 3. Properties of the JumpList_Link Class.
Property Description
cAppPath Full path & file name of the Link Target ( typically an .exe file )
cTitle The Title to display for this Link in the Jump List ( defaults to the file name )
cIconPath (Optional) - Path to an Icon File for using a custom icon in the Jump List
nIconIndex (Optional) - Index # of the Icon if the cIconPath refers to an Icon resource such as an .Exe or .Dll
cWorkingDir (Optional) - The starting directory to use when launching the application ( .exe )
cArguments (Optional) - Any command line arguments to pass to the application ( .exe )
cShowCmd (Optional) - How to display the window of the linked application. The values are: NORMAL, MAXIMIZED, MINIMIZED
Here’s an example of creating a Jump List Link object for Windows 7’s Notepad application:
***************************************** * Notepad ( using properties ) ***************************************** loJL = CREATEOBJECT("JumpList_Link") WITH loJL .cAppPath = ADDBS(lcSysPath) + "Notepad.exe" .cTitle = "Launch Notepad" .cShowCmd = "NORMAL" ENDWITH
Jump List Links are also the key to providing functionality changes within your running
application, such as those used by Skype & Windows Live Messenger (described in the
beginning of the paper). Unfortunately, providing this kind of functionality is not trivial
(yet), and so you’ll have to wait for a future post or paper to see how its done.
Jump List Separator
A separator can be used to visually divide content within a Jump List section. You can add a
separator to the User Tasks section and the Custom Category sections (although this latter

Integrating Windows 7 Taskbar Functionality (Win7TLIB) – Steve Ellenoff
Page 52 of 65
capability is an enhancement introduced by the Win7TLib library as the Win7 API does not
support this directly).
As you have little control over the Recent, Frequent, and Pinned sections, you can not add
separators there.
Working with a Separator does not get any easier since there are no properties to set. Just
create the object:
***************************************** * Separator ***************************************** loJS = CREATEOBJECT("JumpList_Separator")
Anatomy of a Jump List
Now that we’ve seen what can be contained in a section of a Jump List, let’s examine the
anatomy of a Jump List, i.e. the different sections it may contain. These are:
• Default Section
• User Tasks Section
• Custom Category Section(s)
• Frequent Section
• Recent Section
• Pinned Section
Note that many lists only utilize a fraction of all the possible sections, and going overboard
with these lists will defeat the intended purpose of making the user’s life easier. Figure 38
shows how these sections visually appear and table 4 summarizes each section and the
degree of control you have over each.
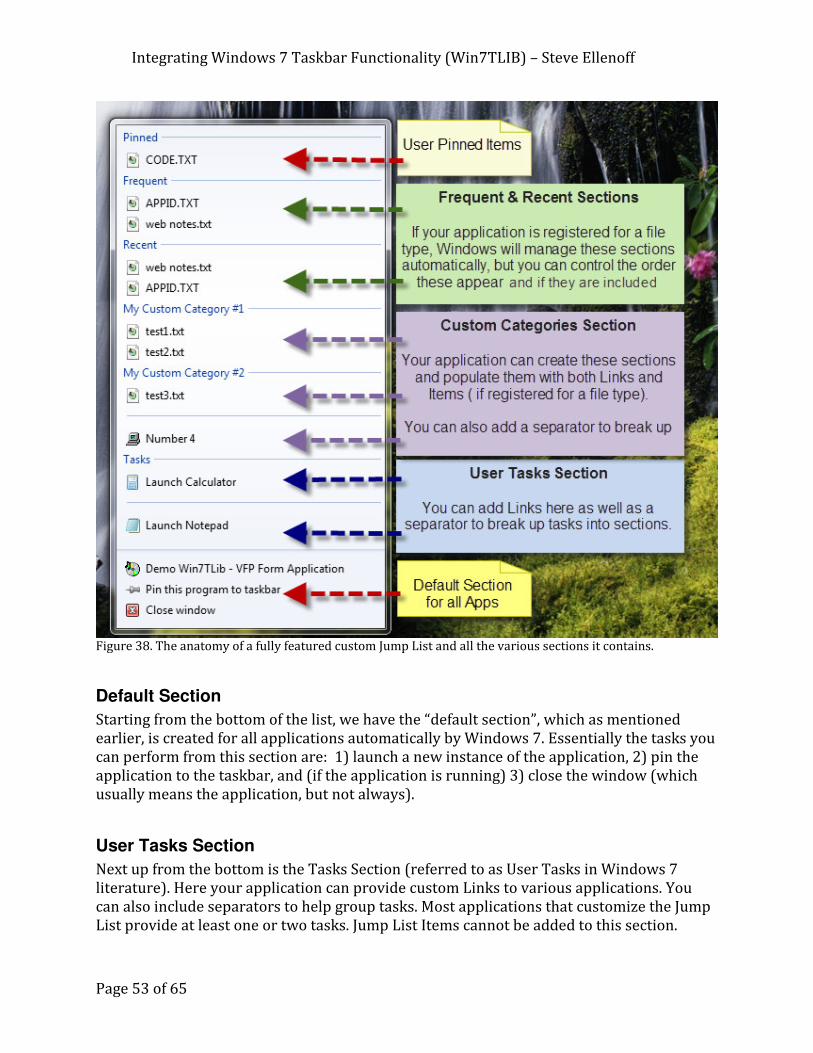
Integrating Windows 7 Taskbar Functionality (Win7TLIB) – Steve Ellenoff
Page 53 of 65
Figure 38. The anatomy of a fully featured custom Jump List and all the various sections it contains.
Default Section
Starting from the bottom of the list, we have the “default section”, which as mentioned
earlier, is created for all applications automatically by Windows 7. Essentially the tasks you
can perform from this section are: 1) launch a new instance of the application, 2) pin the
application to the taskbar, and (if the application is running) 3) close the window (which
usually means the application, but not always).
User Tasks Section
Next up from the bottom is the Tasks Section (referred to as User Tasks in Windows 7
literature). Here your application can provide custom Links to various applications. You
can also include separators to help group tasks. Most applications that customize the Jump
List provide at least one or two tasks. Jump List Items cannot be added to this section.

Integrating Windows 7 Taskbar Functionality (Win7TLIB) – Steve Ellenoff
Page 54 of 65
Custom Category Section(s)
Moving up further, we have the Custom Category sections. In the example above there are
two different custom categories. Applications can create these categories and populate
them with Links and Items as needed. Separators in custom categories are not officially
supported by Windows 7, but Win7TLib works around this limitation and is able to offer
the functionality despite that fact.
Recent Section
Moving on up we come to the “Recent” section. For applications that are registered to work
with a certain file type, like “PRG” for VFP, Windows 7 automatically provides the “Recent”
section in the application’s Jump List and populates it with files that have been recently
opened in your application. This is true even if you do not programmatically customize
your application’s Jump List at all. VFP9 is a good example of this, since it shows files in the
Recent section of its Jump List, yet does not contain any Jump List creation code internally.
Frequent Section
The Frequent section works nearly the same as the Recent section. It is automatically
managed by Windows 7 which populates the Jump List Items for your application’s
registered file types. Unlike the Recent section, however, it must be manually added by the
application developer to the Jump List. In other words, you must manually inform Windows
7 that you wish to include the section in your Jump List.
If your application does not work with a specific (or set of specific) file types (or more
accurately did not register for them), these two sections are not available to your
application’s Jump List. I also need to point out that all the Windows 7 Taskbar literature
recommends that your application only include one of the two of these sections due to the
fact they operate so similarly. I only show both of them here so that you know they both
exist.
Pinned Section
Last but not least, the Pinned section appears automatically when a user pins a Jump List
Item or a Jump List Link by right-clicking the selected content and selecting “Pin” from the
context menu. Your application has no control of pinning nor the Pinned section.
Table 4. Information about each section of the Jump List.
Section Notes
Default These 3 items are not under your control and are provided automatically for all applications, even legacy ones.
User Tasks You have full control of this section and can populate Link Items & Separators

Integrating Windows 7 Taskbar Functionality (Win7TLIB) – Steve Ellenoff
Page 55 of 65
Section Notes
Custom Category You have full control and can add multiple categories. Each category can contain Items, Links, and Separators.
Frequent Windows 7 manages this section for registered file types but you can control if the section is included and whether it is listed either before or after the Recent section. Only Jump List Items are included in the list.
Recent Windows 7 manages this section for registered file types but you can control if the section is included and whether it is listed either before or after the Frequent section. Only Jump List Items are included in the list. Your application can add an Item to the Recent list programmatically.
Pinned Windows 7 manages this section automatically when the user pins Jump List Items or Links from the other sections
Adding Items to the Recent Section
Although I mentioned earlier that Windows 7 fully controls the contents of the Recent
section (as well as the Frequent Section), there are three (3) ways these items get added to
the Recent List, two of which you have some control over. They are:
• User opens the file from Explorer which launches your application
• User opens the file in your application from a Windows Common Dialog
• Programmatically adding the file to the recent list
According to my Windows 7 Developers book, if a user uses the Explorer to open a file,
either by double clicking (if your app is the default viewer), or by using the “Open With”
menu option, Windows 7 will add the file to your application’s recent list. I did not see this
action work properly, but then again, I didn’t have time to test it more than a few minutes,
so we’ll need to investigate further if it’s a bug or what.
When a user opens the file in your application through a Windows Common Dialog, the file
will get added to your recent list. Fortunately for us this works as advertised in VFP when
you use the GETFILE() command and select a file that you’ve registered to handle.
The third way is to programmatically add a file to the Recent list. This is accomplished by
calling the AddToRecentList() method of the Taskbar’s JumpList object. Here’s an
example:
* Access the Taskbar's JumpList object WITH THISFORM.oHelper.oTaskbar.JumpList
* Add the file to the Recent List .AddToRecentList(lcFile) ENDWITH
Remember that adding the list will only work if you’ve registered your application to
handle the file type, otherwise you won’t even see the Recent section at all.

Integrating Windows 7 Taskbar Functionality (Win7TLIB) – Steve Ellenoff
Page 56 of 65
Creating your own Custom Jump List
Ok, we’re finally ready to see how to create a custom Jump List for your application. You
already know how to create Jump List Items, Links, and Separators. You also just learned
about the various sections the list can contain and what the restrictions of some of them
are. Putting it all together requires working with the Taskbar’s JumpList object. Here are
the steps to create a custom list:
• If including Jump List Items, register for your file types
• Set the properties of the JumpList Object
• Create the links, items, and separators you want to include
• Add your links & separators to the User Task section if including it
• Create any custom categories you wish to include
• Add your items, links, & separators to each category
• Add each Category to the Jump List
• Call the CreateJumpList() method to finalize everything
We’ve already seen registering for the file type, but I wanted to remind you that it must be
done first, before actually creating your Jump List if you plan on including Jump List Items.
Table 5 lists the properties of the JumpList class that you will work with when creating
your custom Jump List.
Table 5. Properties of the JumpList Class.
Property Description
lInclude_Recent Set to .T. to include the Recent section, .F. to omit it
lInclude_Frequent Set to .T. to include the Frequent section, .F. to omit it
lFrequent_First Set to .T. to list the Frequent section before Recent, .F. for Recent first.
lInclude_CustomCategories Set to .T. if you plan to include at least 1 custom category
lInclude_UserTasks Set to .T. to include the User Tasks section, .F. to omit it.
Adding User Tasks
Adding Jump List Links to the User Tasks section is super simple. Once you create a
JumpList_Link object you call the JumpList object’s AddUserTask() method and pass
the link object. Here’s an example:
* Access the Taskbar's JumpList Object WITH THISFORM.oHelper.oTaskbar.JumpList * Create Link Object loJL = CREATEOBJECT("JumpList_Link",lcApp,lcTitle) *Add it to the Jumplist’s User Task Section .AddUserTask(loJL)

Integrating Windows 7 Taskbar Functionality (Win7TLIB) – Steve Ellenoff
Page 57 of 65
ENDWITH
Adding Custom Categories
Creating and adding a custom category is a two step process. First you must create the
category itself and populate it with content, and then you must add the category to the
jump list.
To create a category, you instantiate a JumpList_Custom_Category class and pass it the
title of the category to the Init() method. After you have your new category object, you
call the AddJumpListItem() method of the category object (not the JumpList object), and
pass the JumpList Item, Link, or Separator object you wish to add. Here’s an example:
***************************************** * Custom Category #1 ***************************************** * Create the category object loJLC = CREATEOBJECT("JumpList_Custom_Category","My Custom Category #1") WITH loJLC ************************************ * Test Item #1 ( using constructor ) ************************************ *Create the file lcApp = ADDBS(lcTempPath) + "test1.txt" =STRTOFILE("Hello #1",lcApp) *Create Item Object loJL = CREATEOBJECT("JumpList_Item",lcApp) *Add item to the Category .AddJumpListItem(loJL) ENDWITH
Once you have the category object, you call the JumpList objects’ AddCustomCategory()
method and pass the category object to it, like this:
*************************************************** * Access the Taskbar's JumpList Object WITH THISFORM.oHelper.oTaskbar.JumpList *Add Category to the JumpList .AddCustomCategory(loJLC) ENDWITH

Integrating Windows 7 Taskbar Functionality (Win7TLIB) – Steve Ellenoff
Page 58 of 65
A Full Jump List Example
Here is a full example of how to create a Jump List in code using the Win7TLib library to
help you visualize the entire process. Refer to figure 38 above to see the Jump List that is
created as a result of executing this code.
The example does not include the code where the application registered to handle the
“.TXT” file extension which was shown earlier. Also realize that although the picture shows
content in the Frequent, Recent, and Pinned sections, those were done by the user(me), not
as a result of the code, which as I’ve said before is not really under application control.
*Get path to the C:\Windows\System32 LOCAL lcTempPath, lcSysPath, loWsh loWsh = CreateObject("Scripting.FileSystemObject") lcSysPath = loWsh.GetSpecialFolder(1).Name lcSysPath = ADDBS(GETENV("windir"))+lcSysPath lcTempPath = GETENV("TEMP") *************************************************** * Access the Taskbar's JumpList Object WITH THISFORM.oHelper.oTaskbar.JumpList
* Include Recent Section
.lInclude_Recent = .T.
* Include Frequent Section .lInclude_Frequent = .T.
* Frequent comes first .lFrequent_First = .T.
* Include Custom Category Section .lInclude_CustomCategories = .T.
* Include User Task Section .lInclude_UserTasks = .T. LOCAL loJL, lcApp, lcTitle ****************************** *** CREATE USER TASK ITEMS *** ****************************** ***************************************** * Calculator ( using constructor ) ***************************************** lcApp = ADDBS(lcSysPath) + "Calc.exe" lcTitle = "Launch Calculator" loJL = CREATEOBJECT("JumpList_Link",lcApp,lcTitle) *Add item to the Jumplist .AddUserTask(loJL) ***************************************** * Separator ***************************************** loJL = CREATEOBJECT("JumpList_Separator") *Add item to the Jumplist
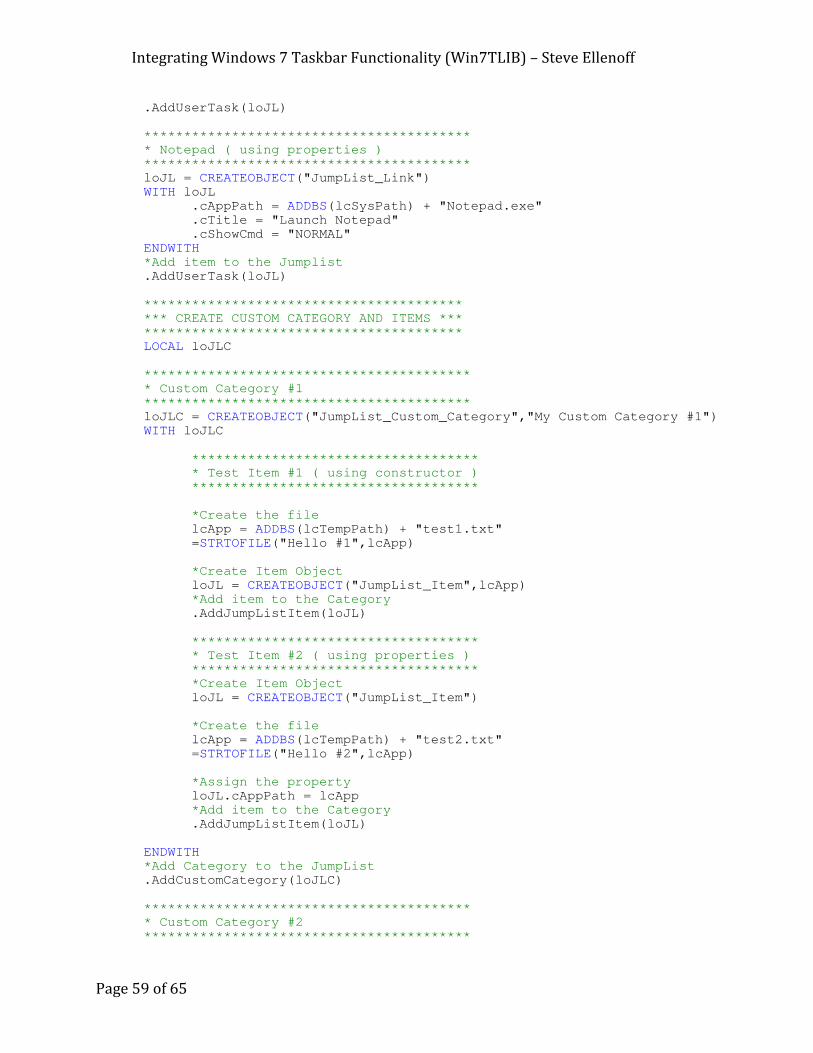
Integrating Windows 7 Taskbar Functionality (Win7TLIB) – Steve Ellenoff
Page 59 of 65
.AddUserTask(loJL) ***************************************** * Notepad ( using properties ) ***************************************** loJL = CREATEOBJECT("JumpList_Link") WITH loJL .cAppPath = ADDBS(lcSysPath) + "Notepad.exe" .cTitle = "Launch Notepad" .cShowCmd = "NORMAL" ENDWITH *Add item to the Jumplist .AddUserTask(loJL) **************************************** *** CREATE CUSTOM CATEGORY AND ITEMS *** **************************************** LOCAL loJLC ***************************************** * Custom Category #1 ***************************************** loJLC = CREATEOBJECT("JumpList_Custom_Category","My Custom Category #1") WITH loJLC ************************************ * Test Item #1 ( using constructor ) ************************************ *Create the file lcApp = ADDBS(lcTempPath) + "test1.txt" =STRTOFILE("Hello #1",lcApp) *Create Item Object loJL = CREATEOBJECT("JumpList_Item",lcApp) *Add item to the Category .AddJumpListItem(loJL) ************************************ * Test Item #2 ( using properties ) ************************************ *Create Item Object loJL = CREATEOBJECT("JumpList_Item") *Create the file lcApp = ADDBS(lcTempPath) + "test2.txt" =STRTOFILE("Hello #2",lcApp) *Assign the property loJL.cAppPath = lcApp *Add item to the Category .AddJumpListItem(loJL) ENDWITH *Add Category to the JumpList .AddCustomCategory(loJLC) ***************************************** * Custom Category #2 *****************************************
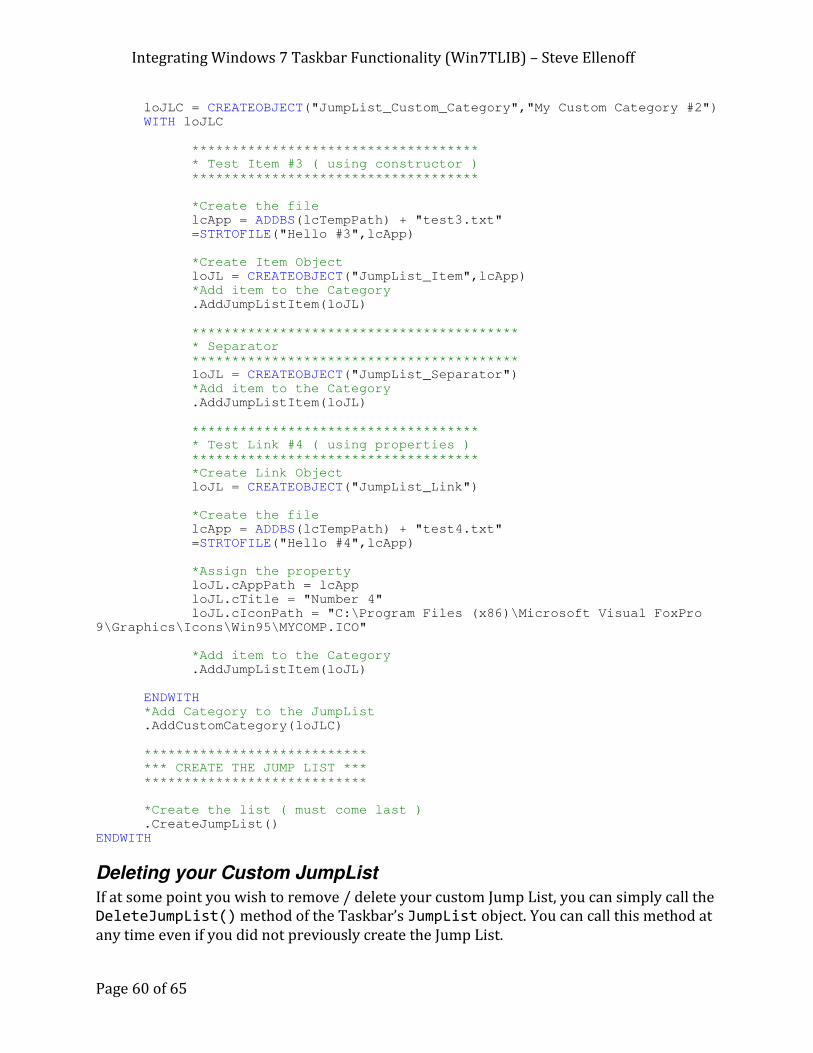
Integrating Windows 7 Taskbar Functionality (Win7TLIB) – Steve Ellenoff
Page 60 of 65
loJLC = CREATEOBJECT("JumpList_Custom_Category","My Custom Category #2") WITH loJLC ************************************ * Test Item #3 ( using constructor ) ************************************ *Create the file lcApp = ADDBS(lcTempPath) + "test3.txt" =STRTOFILE("Hello #3",lcApp) *Create Item Object loJL = CREATEOBJECT("JumpList_Item",lcApp) *Add item to the Category .AddJumpListItem(loJL) ***************************************** * Separator ***************************************** loJL = CREATEOBJECT("JumpList_Separator") *Add item to the Category .AddJumpListItem(loJL) ************************************ * Test Link #4 ( using properties ) ************************************ *Create Link Object loJL = CREATEOBJECT("JumpList_Link") *Create the file lcApp = ADDBS(lcTempPath) + "test4.txt" =STRTOFILE("Hello #4",lcApp) *Assign the property loJL.cAppPath = lcApp loJL.cTitle = "Number 4" loJL.cIconPath = "C:\Program Files (x86)\Microsoft Visual FoxPro 9\Graphics\Icons\Win95\MYCOMP.ICO" *Add item to the Category .AddJumpListItem(loJL) ENDWITH *Add Category to the JumpList .AddCustomCategory(loJLC) **************************** *** CREATE THE JUMP LIST *** **************************** *Create the list ( must come last ) .CreateJumpList() ENDWITH
Deleting your Custom JumpList
If at some point you wish to remove / delete your custom Jump List, you can simply call the
DeleteJumpList() method of the Taskbar’s JumpList object. You can call this method at
any time even if you did not previously create the Jump List.

Integrating Windows 7 Taskbar Functionality (Win7TLIB) – Steve Ellenoff
Page 61 of 65
In order to change your Jump List, you do not need to call this method, you can simply call
CreateJumpList() each time you wish to make a change. This method is really only
necessary when you want to restore the “default” Jump List for your application. I’m not
sure when it makes sense to do that except when uninstalling your application, but you
have the option anyway. Here’s an example:
*************************************************** * Access the Taskbar's JumpList Object WITH THISFORM.oHelper.oTaskbar.JumpList *Delete List so we can start over .DeleteJumpList() ENDWITH
Handling a Jump List Item being opened
If your application has registered for a file type as demonstrated earlier and will be
including Jump List Items in your application’s Jump List you will need to handle the
request generated from Windows 7 when the user clicks on an Item. Recall that the
Microsoft recommended/expected behavior is that your application will open this file.
When the user clicks an Item, your application will be launched even if it is already opened.
There is no way to change this behavior. Your application must be prepared to receive the
filename of the requested item. The way to do that is to use the LPARAMETERS keyword as
the FIRST line of executable code in your application. This way, the file name can be passed
to your application from Windows 7 and you can take action accordingly. Here’s a simple
example:
***************************************************** **** OPEN FILE HANDLING FROM THE JUMP LIST ITEMS **** ***************************************************** *NOTE: LPARAMETERS line MUST BE THE FIRST LINE OF EXECUTABLE CODE LPARAMETERS tcOpenFile *Specify an Icon for the Application Window _SCREEN.Icon = "mycomp.ico" *Handle File opening IF VARTYPE(tcOpenFile)="C" AND !EMPTY(tcOpenFile) *Show VFP _VFP.Visible = .T. *Message to User =MESSAGEBOX("You requested to open: " + tcOpenFile,64,"Notice!") *DONE CLOSE APP! RETURN ENDIF
What your application does once it receives the file name is up to you and depends on the
type of file you were sent and the means by which your application can deal with such a
file.
Integrating Windows 7 Taskbar Functionality (Win7TLIB) – Steve Ellenoff
Page 62 of 65
Deploying Win7TLib with your Application The process is so easy I deliberated not even talking about it. Then again, if I didn’t, I
wouldn’t be able to refer to my favorite figure in this whole paper (figure 39). All joking
aside, here’s what you need to do to deploy your application with the Win7TLib library.
First, remember to include the Win7TLib.PRG file in your project so that it is compiled into
your application. Second, add the Win7TLib_Visual.VCX to your project if you are using it
(although I think VFP will do this for you anyway if the class is on any of your forms when
you build). Third, compile your application in VFP. Fourth, simply include the DLL in the
same location you will distribute your application executable (or somewhere it will find it
in the path).
That’s it! No need to use installers, no need for administrative rights - simply copy the files
to their final destination. Of course if you are trying to copy your application to a location
Windows 7 considers privileged, you will need administrative rights, but that has nothing
to do with Win7TLib. Likewise, you are free to use an installer / setup program, but I
wanted to point out its not required by the library.
Figure 39. Deploying Win7TLib – “So Easy a Caveman can do it!”
What’s Next? Get Involved! So now that you’ve seen the Win7TLib VFPx library, it’s time to get involved! There’s lots
more that needs to be done, since this is just the Alpha stage at this point. Don’t get me
wrong, most of the functionality works, and seems to work pretty well. However, until now,
I’m the only one who’s tested it and worked with it, so it’s officially Alpha until more people
start playing with it. So get involved and help make this project even better.
In particular I could really use help with:
• Testing the software
• Documenting bugs
• Posting suggestions and constructive criticisms
• Fixing bugs
• Finishing off partial or missing functionality
• Creating documentation (this paper is a decent starting point)

Integrating Windows 7 Taskbar Functionality (Win7TLIB) – Steve Ellenoff
Page 63 of 65
• Creating more samples (or at least better ones)
The first two are the most important items obviously, since I’d like to get the software to
Beta stage as soon as possible to help encourage even more people to look at it.
In Conclusion / Summary We looked at many of the cool new features that were introduced with the Windows 7
taskbar. Taking advantage of Taskbar Progress Bars, Icon Overlays, Custom Thumbnail and
Live Preview images, Taskbar Toolbars, and Jump Lists in your applications will really help
increase your user’s productivity. More importantly for you the developer, your VFP apps
will look “current”, and will stand way out from those that were not “made for Windows 7”.
I hope you agree that integrating these cool features is extremely easy using the Win7TLib
VFPx project. Furthermore, deployment doesn’t get much easier. Since the library can
safely exist in your apps even on versions prior to Windows 7, there’s no reason to delay in
adding the library to your apps today even if your application is not yet expected to run on
Windows 7 anytime soon.
I hope you are as excited about the Win7TLib VFPx project as I am!! It was a lot of work, but
I think the end result is well worth the effort. There’s still a lot to do, so please join in and
help out in any small way you can. Feel free to contact me anytime about the project,
although it might take awhile to get a response since I’m usually extremely busy, but keep
trying!
I look forward to your feedback! And remember… VFP ROCKS!
Biography
Steve Ellenoff is the president of SJE Consulting / Custom Technology Solutions (http://www.sjects.com) founded in 1999. With over 20 years of programming experience,
he and his company continue to use Visual FoxPro and other technologies to deliver cost
effective, feature rich, database intensive desktop and web solutions for companies small
and large. Steve has been working with FoxPro since version 2.6 for Windows, although he
considers his many years using Dbase and Clipper to be his unofficial start with FoxPro.
Steve has presented topics on FoxPro at several conferences and user groups, and had
numerous tips published by FoxPro Advisor magazine. Steve is the author of a recently
accepted VFPX project (www.codeplex.com/vfpx), Win7TLib which allows VFP developers
to tap into the new functionality of the Windows 7 Taskbar.

Integrating Windows 7 Taskbar Functionality (Win7TLIB) – Steve Ellenoff
Page 64 of 65
Steve also has a background in C and C++ development and headed the popular open
source pinball project PinMAME (www.pinmame.com) for many years. Additionally he
made many contributions to the even more popular open source video game project,
MAME (http://mamedev.org). Both projects rely heavily on virtualization and emulation
which have long been one of Steve's favorite areas of technology.
In 2008 Steve became one of the founding members of Big Guys Pinball, LLC
(http://www.bigguyspinball.com). The company has used his software emulation and
reverse engineering skill set to create a product that allows pinball owners to replace their
"proprietary / no longer available" pinball hardware systems with common, off the shelf PC
components.
Steve fulfilled a childhood dream in 2009 when he was hired to do contract work to help
develop the video game: Williams Pinball Hall of Fame for XBOX360 and Sony Playstation 3
(http://xbox360.ign.com/objects/143/14307127.html). As a kid growing up in the 80's
video game craze, Steve taught himself how to program computers at a young age for the
sole purpose of creating a video game some day. Along the way, the dream got put on hold
as the more practical business side of software development took center stage. When video
gaming console developer Farsight Studios contacted Steve in 2008, the long forgotten
dream suddenly became a reality. The game was released in September 2009 and was met
with rave reviews from critics and players alike.

Integrating Windows 7 Taskbar Functionality (Win7TLIB) – Steve Ellenoff
Page 65 of 65
Steve’s latest hobby involves fulfilling another childhood dream, learning to play the drums.
Although already a decent guitar player, bass player, and singer from his teen years, Steve
always dreamed of making tons of noise on the drums. Prompted by the fun he had playing
the “toy” drums for the Xbox360 game Guitar Hero: World Tour, Steve decided to purchase
a real set of drums in July 2009, a vintage red Tama “Rock Star” kit. Armed with some great
instructional drumming videos, Steve’s been banging away ever since and loving every
minute of it!
Copyright, 2010, Steve Ellenoff (SJE Consulting / Custom Technology Solutions)