Integrating TME 10 on the RS/6000 SP September 1997 -...
260
SG24-2071-00 Integrating TME 10 on the RS/6000 SP September 1997
Transcript of Integrating TME 10 on the RS/6000 SP September 1997 -...
SG24-2071-00
Integrating TME 10 on the RS/6000 SP
September 1997


International Technical Support Organization
Integrating TME 10 on the RS/6000 SP
September 1997
SG24-2071-00
IBML

Take Note!
Before using this information and the product it supports, be sure to read the general information inAppendix I, “Special Notices” on page 229.
First Edition (September 1997)
This edition applies to PSSP Version 2, Release 2 for use with the AIX Version 4 Operating System and TME 10Version 3.1.
Comments may be addressed to:IBM Corporation, International Technical Support OrganizationDept. HYJ Mail Station P099522 South RoadPoughkeepsie, New York 12601-5400
When you send information to IBM, you grant IBM a non-exclusive right to use or distribute the information in anyway it believes appropriate without incurring any obligation to you.
Copyright International Business Machines Corporation 1997. All rights reserved.Note to U.S. Government Users — Documentation related to restricted rights — Use, duplication or disclosure issubject to restrictions set forth in GSA ADP Schedule Contract with IBM Corp.
Contents
Figures . . . . . . . . . . . . . . . . . . . . . . . . . . . . . . . . . . . . . . . . . . . vii
Tables . . . . . . . . . . . . . . . . . . . . . . . . . . . . . . . . . . . . . . . . . . . ix
Preface . . . . . . . . . . . . . . . . . . . . . . . . . . . . . . . . . . . . . . . . . . xiThe Team That Wrote This Redbook . . . . . . . . . . . . . . . . . . . . . . . . . xiSoftware Levels . . . . . . . . . . . . . . . . . . . . . . . . . . . . . . . . . . . . xii iDeliverables . . . . . . . . . . . . . . . . . . . . . . . . . . . . . . . . . . . . . . xii iComments Welcome . . . . . . . . . . . . . . . . . . . . . . . . . . . . . . . . . xiv
Chapter 1. Introduction . . . . . . . . . . . . . . . . . . . . . . . . . . . . . . . . . 1
Chapter 2. Planning and Design . . . . . . . . . . . . . . . . . . . . . . . . . . . 32.1 Basic Tivoli Terminology . . . . . . . . . . . . . . . . . . . . . . . . . . . . . 32.2 Planning the Integration of Your SP with Tivoli . . . . . . . . . . . . . . . . 4
2.2.1 Security . . . . . . . . . . . . . . . . . . . . . . . . . . . . . . . . . . . . . 52.2.2 System Installation and Maintenance . . . . . . . . . . . . . . . . . . . 52.2.3 File Distribution . . . . . . . . . . . . . . . . . . . . . . . . . . . . . . . . 52.2.4 User Management . . . . . . . . . . . . . . . . . . . . . . . . . . . . . . 62.2.5 System Monitoring and Event Handling . . . . . . . . . . . . . . . . . . 62.2.6 Distributed Task and Command Execution . . . . . . . . . . . . . . . . 7
2.3 Planning the Deployment of Tivoli on Your RS/6000 SP . . . . . . . . . . . 82.3.1 TMR Configuration . . . . . . . . . . . . . . . . . . . . . . . . . . . . . . 82.3.2 TME 10 Framework Configuration . . . . . . . . . . . . . . . . . . . . . 122.3.3 Planning for RS/6000 SP Changes . . . . . . . . . . . . . . . . . . . . . 14
2.4 Planning Applied to a Practical Example . . . . . . . . . . . . . . . . . . . . 152.4.1 Environment at the ITSO SP Lab . . . . . . . . . . . . . . . . . . . . . . 152.4.2 Integration Planning . . . . . . . . . . . . . . . . . . . . . . . . . . . . . 162.4.3 Deployment Planning . . . . . . . . . . . . . . . . . . . . . . . . . . . . . 17
Chapter 3. Installation . . . . . . . . . . . . . . . . . . . . . . . . . . . . . . . . . 193.1 Installing Tivoli Using the SP Switch . . . . . . . . . . . . . . . . . . . . . . 193.2 Tivoli Object Database Consistency . . . . . . . . . . . . . . . . . . . . . . . 21
3.2.1 Database Backup . . . . . . . . . . . . . . . . . . . . . . . . . . . . . . . 223.2.2 Database Restore . . . . . . . . . . . . . . . . . . . . . . . . . . . . . . . 223.2.3 Database Consistency Check . . . . . . . . . . . . . . . . . . . . . . . . 233.2.4 Synchronizing Databases across TMRs . . . . . . . . . . . . . . . . . . 23
Chapter 4. Event Management Integration . . . . . . . . . . . . . . . . . . . . . 254.1 Defining the TME 10 Enterprise Console . . . . . . . . . . . . . . . . . . . . 264.2 The PSSP T/EC Adapter . . . . . . . . . . . . . . . . . . . . . . . . . . . . . . 27
4.2.1 How the PSSP T/EC Adapter Forwards Events . . . . . . . . . . . . . . 274.2.2 Using the PSSP T/EC Adapter . . . . . . . . . . . . . . . . . . . . . . . . 294.2.3 Event Classes Defined for PSSP Events . . . . . . . . . . . . . . . . . . 294.2.4 Installing the PSSP T/EC Adapter Classes in the T/EC Server . . . . 304.2.5 Configuring the T/EC Server to Receive PSSP Events . . . . . . . . . 314.2.6 Compiling the PSSP T/EC Adapter in the RS/6000 SP . . . . . . . . . 314.2.7 Installing the PSSP T/EC Adapter in the RS/6000 SP . . . . . . . . . . 324.2.8 Using the tecad_pssp Command . . . . . . . . . . . . . . . . . . . . . . 334.2.9 Making Event Subscriptions in the RS/6000 SP . . . . . . . . . . . . . 344.2.10 Extending the PSSP Event Classes . . . . . . . . . . . . . . . . . . . . 35
Copyright IBM Corp. 1997 iii

4.2.11 An Example: Using the PSSP T/EC Adapter . . . . . . . . . . . . . . . 374.2.12 Debugging the Event Generation and Reception . . . . . . . . . . . . 45
4.3 Using the TME 10 T/EC SNMP Adapter . . . . . . . . . . . . . . . . . . . . . 454.3.1 Adapter Installation . . . . . . . . . . . . . . . . . . . . . . . . . . . . . . 464.3.2 SNMP Configuration . . . . . . . . . . . . . . . . . . . . . . . . . . . . . 474.3.3 Adapter Configuration . . . . . . . . . . . . . . . . . . . . . . . . . . . . 474.3.4 Starting and Testing the Event Adapter . . . . . . . . . . . . . . . . . . 534.3.5 SNMP Adapter Value . . . . . . . . . . . . . . . . . . . . . . . . . . . . . 58
4.4 Using the TME 10 T/EC Logfile Adapter . . . . . . . . . . . . . . . . . . . . 584.4.1 How to Forward Events from a Log File . . . . . . . . . . . . . . . . . . 594.4.2 How to Assign Severities Using a Log File . . . . . . . . . . . . . . . . 694.4.3 Summary of Using the Logfile Adapter . . . . . . . . . . . . . . . . . . 75
4.5 Using NetView/6000 for AIX and TME 10 Enterprise Console . . . . . . . . 754.5.1 Environment Introduction . . . . . . . . . . . . . . . . . . . . . . . . . . 754.5.2 Setup procedure in NetView/6000 for AIX . . . . . . . . . . . . . . . . . 764.5.3 Setup procedure in T/EC . . . . . . . . . . . . . . . . . . . . . . . . . . . 834.5.4 Implement Event Adapter, Event Source, and Group . . . . . . . . . . 844.5.5 Event correlation with NetView/6000 for AIX and T/EC . . . . . . . . . 844.5.6 Discussion on Event Adapter Implementation Options . . . . . . . . . 86
4.6 Integration of TME 10 Distributed Monitoring and Event Management . . 874.6.1 Using the wasync command directly . . . . . . . . . . . . . . . . . . . . 884.6.2 How to integrate the SP Log File with TME 10 Distributed Monitoring 90
Chapter 5. Task Libraries, Tasks, and Jobs . . . . . . . . . . . . . . . . . . . . . 955.1 General Procedure for Creating Tasks . . . . . . . . . . . . . . . . . . . . . 955.2 SP Task Libraries . . . . . . . . . . . . . . . . . . . . . . . . . . . . . . . . . . 965.3 Using the Task Library Language . . . . . . . . . . . . . . . . . . . . . . . . 97
5.3.1 Creating Customized Tasks . . . . . . . . . . . . . . . . . . . . . . . . 100
Chapter 6. AEF Customizations for the RS/6000 SP . . . . . . . . . . . . . . . 1056.1 High Level Overview of a Sample Set of Customizations . . . . . . . . . 1076.2 Installation of the Sample Customizations . . . . . . . . . . . . . . . . . . 1136.3 What is AEF? . . . . . . . . . . . . . . . . . . . . . . . . . . . . . . . . . . . 115
6.3.1 Strengths and Weaknesses of AEF/DSL . . . . . . . . . . . . . . . . . 1186.4 Anatomy of an AEF/DSL Customization . . . . . . . . . . . . . . . . . . . 119
6.4.1 Removing AEF/DSL Customizations . . . . . . . . . . . . . . . . . . . 1236.5 TME 10 Desktop Dialogs . . . . . . . . . . . . . . . . . . . . . . . . . . . . . 123
6.5.1 Basic Structure of a DSL File . . . . . . . . . . . . . . . . . . . . . . . 1266.5.2 Variables and Variable Blocks . . . . . . . . . . . . . . . . . . . . . . 1266.5.3 Attribute Blocks . . . . . . . . . . . . . . . . . . . . . . . . . . . . . . . 1276.5.4 Gadget Blocks . . . . . . . . . . . . . . . . . . . . . . . . . . . . . . . . 128
6.6 Methods for Customized Objects . . . . . . . . . . . . . . . . . . . . . . . 1296.6.1 Desktop Callbacks . . . . . . . . . . . . . . . . . . . . . . . . . . . . . 1306.6.2 Legacy Callbacks . . . . . . . . . . . . . . . . . . . . . . . . . . . . . . 1306.6.3 Callback Method Utilities . . . . . . . . . . . . . . . . . . . . . . . . . 132
6.7 Bitmaps . . . . . . . . . . . . . . . . . . . . . . . . . . . . . . . . . . . . . . 1336.7.1 Icons . . . . . . . . . . . . . . . . . . . . . . . . . . . . . . . . . . . . . . 134
6.8 Messages and Message Catalogs . . . . . . . . . . . . . . . . . . . . . . . 136
Appendix A. Event Management Resource Variables . . . . . . . . . . . . . . 139A.1.1 A List of All Resource Variables . . . . . . . . . . . . . . . . . . . . . 139A.1.2 The Resource Class Definitions . . . . . . . . . . . . . . . . . . . . . 145A.1.3 The Default Resource Monitors . . . . . . . . . . . . . . . . . . . . . 146
Appendix B. The SP MIBs . . . . . . . . . . . . . . . . . . . . . . . . . . . . . . 147
iv Integrating TME 10 on the RS/6000 SP

Appendix C. Contents of the Attached Diskette . . . . . . . . . . . . . . . . . 151
Appendix D. Source files for the PSSP T/EC Adapter . . . . . . . . . . . . . . 153D.1.1 The makeit file . . . . . . . . . . . . . . . . . . . . . . . . . . . . . . . 153D.1.2 The PSSP T/EC Adapter BAROC File . . . . . . . . . . . . . . . . . . 154D.1.3 The tecad_pssp.c File . . . . . . . . . . . . . . . . . . . . . . . . . . . 157D.1.4 The rvclasses.cfg file . . . . . . . . . . . . . . . . . . . . . . . . . . . . 175
Appendix E. Contents of SNMP Adapter Class Definition Statements . . . . 183
Appendix F. Logfile CDS . . . . . . . . . . . . . . . . . . . . . . . . . . . . . . . 189
Appendix G. Sample Task Library Listings . . . . . . . . . . . . . . . . . . . . 193G.1 SP Task Library Source Listing . . . . . . . . . . . . . . . . . . . . . . . . 193
G.1.1 SPTasks.tll . . . . . . . . . . . . . . . . . . . . . . . . . . . . . . . . . . 193G.2 Switch Task Library Source Listing . . . . . . . . . . . . . . . . . . . . . . 196
G.2.1 SwitchTasks.tll . . . . . . . . . . . . . . . . . . . . . . . . . . . . . . . 197
Appendix H. Contents of AEF Customization Scripts . . . . . . . . . . . . . . 201H.1 Dialog Listings . . . . . . . . . . . . . . . . . . . . . . . . . . . . . . . . . . 201
H.1.1 sp.run_command.ksh . . . . . . . . . . . . . . . . . . . . . . . . . . . . 202H.1.2 sp.run_command_driver.ksh . . . . . . . . . . . . . . . . . . . . . . . 202H.1.3 sp_cws.check_node_response.ksh . . . . . . . . . . . . . . . . . . . . 203H.1.4 sp_cws.efence_nodes.ksh . . . . . . . . . . . . . . . . . . . . . . . . . 205H.1.5 sp_cws.eunfence_nodes.ksh . . . . . . . . . . . . . . . . . . . . . . . 205H.1.6 sp_cws.get_all_cw_attributes.ksh . . . . . . . . . . . . . . . . . . . . 206H.1.7 sp_cws.get_node_numbers.ksh . . . . . . . . . . . . . . . . . . . . . . 207H.1.8 sp_cws.launch_applications_driver.ksh . . . . . . . . . . . . . . . . . 208H.1.9 sp_cws.launch_perspectives.ksh . . . . . . . . . . . . . . . . . . . . . 208H.1.10 sp_cws.modify_attribute.ksh . . . . . . . . . . . . . . . . . . . . . . . 209H.1.11 sp_cws.modify_attribute_driver.ksh . . . . . . . . . . . . . . . . . . 210H.1.12 sp_cws.power_nodes_off.ksh . . . . . . . . . . . . . . . . . . . . . . 210H.1.13 sp_cws.power_nodes_on.ksh . . . . . . . . . . . . . . . . . . . . . . 211H.1.14 sp_cws.run_command_driver_nodes.ksh . . . . . . . . . . . . . . . 212H.1.15 sp_cws.run_command_nodes.ksh . . . . . . . . . . . . . . . . . . . 213H.1.16 sp_cws.spmon.ksh . . . . . . . . . . . . . . . . . . . . . . . . . . . . 214H.1.17 sp_node.get_all_attributes.ksh . . . . . . . . . . . . . . . . . . . . . 214H.1.18 sp_node.get_frame_number.ksh . . . . . . . . . . . . . . . . . . . . 216H.1.19 sp_node.get_node_number.ksh . . . . . . . . . . . . . . . . . . . . . 216H.1.20 sp_node.get_slot_number.ksh . . . . . . . . . . . . . . . . . . . . . . 216H.1.21 sp_node.modify_attribute.ksh . . . . . . . . . . . . . . . . . . . . . . 217H.1.22 sp_node.modify_attribute_driver.ksh . . . . . . . . . . . . . . . . . . 218
H.2 Examples of AEF Customization Dialogs . . . . . . . . . . . . . . . . . . . 218
Appendix I. Special Notices . . . . . . . . . . . . . . . . . . . . . . . . . . . . . 229
Appendix J. Related Publications . . . . . . . . . . . . . . . . . . . . . . . . . 231J.1 International Technical Support Organization Publications . . . . . . . . 231J.2 Redbooks on CD-ROMs . . . . . . . . . . . . . . . . . . . . . . . . . . . . . 231J.3 Other Publications . . . . . . . . . . . . . . . . . . . . . . . . . . . . . . . . 231
How to Get ITSO Redbooks . . . . . . . . . . . . . . . . . . . . . . . . . . . . . 233How IBM Employees Can Get ITSO Redbooks . . . . . . . . . . . . . . . . . . 233How Customers Can Get ITSO Redbooks . . . . . . . . . . . . . . . . . . . . . 234IBM Redbook Order Form . . . . . . . . . . . . . . . . . . . . . . . . . . . . . . 235
Contents v

ITSO Redbook Evaluation . . . . . . . . . . . . . . . . . . . . . . . . . . . . . . . 237
List of Abbreviations . . . . . . . . . . . . . . . . . . . . . . . . . . . . . . . . . 239
Index . . . . . . . . . . . . . . . . . . . . . . . . . . . . . . . . . . . . . . . . . . . 241
vi Integrating TME 10 on the RS/6000 SP

Figures
1. Tivoli and SP integration . . . . . . . . . . . . . . . . . . . . . . . . . . . . . 2 2. Available Integration Methods . . . . . . . . . . . . . . . . . . . . . . . . . 26 3. PSSP T/EC Adapter Control Flow . . . . . . . . . . . . . . . . . . . . . . . 28 4. PSSP T/EC Adapter Class Hierarchy . . . . . . . . . . . . . . . . . . . . . 30 5. The test script test_agent . . . . . . . . . . . . . . . . . . . . . . . . . . . . 34 6. Event Perspective Event Definitions Window . . . . . . . . . . . . . . . . . 39 7. Event Perspective Create Condition Window . . . . . . . . . . . . . . . . . 40 8. Event Perspective Response Options Window . . . . . . . . . . . . . . . . 41 9. Arm Event Received from the PSSP Source . . . . . . . . . . . . . . . . . 4310. Rearm Event Received from the PSSP Source . . . . . . . . . . . . . . . 4411. SNMP Connections . . . . . . . . . . . . . . . . . . . . . . . . . . . . . . . . 4612. The tecad_snmp.cds file . . . . . . . . . . . . . . . . . . . . . . . . . . . . . 4913. The tecad_snmp.baroc file, SP-related entries . . . . . . . . . . . . . . . . 5214. Perspective Event Definition: Example of a WARNING SNMP Trap for
T/EC . . . . . . . . . . . . . . . . . . . . . . . . . . . . . . . . . . . . . . . . . 5515. T/EC SNMP Event Console: SNMP trap WARNING message . . . . . . . 5616. T/EC Message Viewer Window . . . . . . . . . . . . . . . . . . . . . . . . . 5717. Event Definition . . . . . . . . . . . . . . . . . . . . . . . . . . . . . . . . . . 6018. Using the Logfile Configuration Facility . . . . . . . . . . . . . . . . . . . . 6319. The Logfile Configuration Facility Dialog . . . . . . . . . . . . . . . . . . . 6420. Selecting the Class with the Logfile Configuration Facility . . . . . . . . 6521. Mapping the Structure into the BAROC File . . . . . . . . . . . . . . . . . 6622. CPU Events Captured in T/EC . . . . . . . . . . . . . . . . . . . . . . . . . . 6823. Problem Management Information . . . . . . . . . . . . . . . . . . . . . . . 6924. T/EC LOGFILE Source . . . . . . . . . . . . . . . . . . . . . . . . . . . . . . 7425. Event Consoles . . . . . . . . . . . . . . . . . . . . . . . . . . . . . . . . . . 7626. SP MIBS -- Loading the SP MIB . . . . . . . . . . . . . . . . . . . . . . . . 7727. The NetView MIB Browser -- Viewing the SP MIB . . . . . . . . . . . . . 7828. Event Configuration -- Register the SP-specific Traps . . . . . . . . . . . 7929. Register Traps -- Configuration of Trap Characteristics . . . . . . . . . . 8030. Using SMIT to Configure NetView . . . . . . . . . . . . . . . . . . . . . . . 8131. Event Perspectives -- Define an event that generates a trap . . . . . . . 8432. The NetView Event Window -- Receiving SP Traps . . . . . . . . . . . . . 8533. The T/EC Event Console -- Receiving Forwarded Events from NetView . 8534. Detailed T/EC View -- Information from NetView Events . . . . . . . . . . 8635. Usage of the wasync command . . . . . . . . . . . . . . . . . . . . . . . . 8836. Defining a wasync event using Event Persectives . . . . . . . . . . . . . . 8937. Defining a Log File Event Using Event Perspectives . . . . . . . . . . . . 9138. TME 10 Distributed Monitoring Pop-Up for CPU busy . . . . . . . . . . . . 9438. TME 10 Distributed Monitoring Pop-Up for CPU idle . . . . . . . . . . . . 9439. SP Task Libraries . . . . . . . . . . . . . . . . . . . . . . . . . . . . . . . . . 9840. Tasks in the SPTasks Library . . . . . . . . . . . . . . . . . . . . . . . . . . 9941. Tasks in the SwitchTask Library . . . . . . . . . . . . . . . . . . . . . . . . 9942. A Managed Node customized as an SP Control Workstation . . . . . . 10743. A Managed Node customized as an SP Node . . . . . . . . . . . . . . . 10844. Extended Managed Node Properties . . . . . . . . . . . . . . . . . . . . 10945. SDR Attributes Displayed for an SP Node . . . . . . . . . . . . . . . . . 11046. Running a Command in an SP Node . . . . . . . . . . . . . . . . . . . . 11047. Control Workstation Properties List . . . . . . . . . . . . . . . . . . . . . 11148. Node Responds Information . . . . . . . . . . . . . . . . . . . . . . . . . . 11249. Launch Pad for SP Applications . . . . . . . . . . . . . . . . . . . . . . . 113
Copyright IBM Corp. 1997 vii

50. The Framework Object . . . . . . . . . . . . . . . . . . . . . . . . . . . . . 11651. An Icon with its Associated Bitmap . . . . . . . . . . . . . . . . . . . . . 11852. SP Applications for the Control Workstation . . . . . . . . . . . . . . . . 12453. The Control Workstation Icon, which is a bitmap . . . . . . . . . . . . . 13554. PSSP T/EC Adapter makeit file . . . . . . . . . . . . . . . . . . . . . . . . 153
viii Integrating TME 10 on the RS/6000 SP

Tables
1. Software Levels . . . . . . . . . . . . . . . . . . . . . . . . . . . . . . . . . xii i 2. Event Integration Methods . . . . . . . . . . . . . . . . . . . . . . . . . . . . 27
Copyright IBM Corp. 1997 ix

x Integrating TME 10 on the RS/6000 SP

Preface
This redbook provides practical experiences and suggestions on integrating theIBM Parallel System Support Programs for AIX (PSSP) 2.2 system managementand administration tools which run on the RS/6000 Scalable POWERparallelSystems (RS/6000 SP) into the Tivoli Management Environment 10 (TME 10).
This redbook requires indepth knowledge and understanding of TME 10 andintermediate knowledge of the PSSP 2.2 functionality.
This redbook provides help to SP system administrators, SP technicalprofessionals and software engineers to provide them with hints and tips tomanage certain PSSP-specific system management aspects in TME 10.
Several practical examples are presented to demonstrate how individualcomponents of TME 10 can be used to interface with PSSP 2.2 specificcharacteristics.
This redbook covers the following subjects in more detail:
1. Planning for RS/6000 SP and TME 10
2. TME 10 installation considerations
3. SP event management integration with TME 10
4. Task libraries with PSSP commands
5. AEF customizations
Also, attached to this redbook is a diskette containing the code used in thisredbook for the PSSP T/EC Adapter code, sample task libraries, and the AEFCustomization code. This code can also be found on the World Wide Web at thefollowing URL:
ftp://www.redbooks.ibm.com/redbooks/SG242071 .
Knowledge of the following products and disciplines are assumed and notcovered in this redbook:
TME 10 product installation
Understanding of the TME 10 products
PSSP 2.2 installation and administration
Understanding of the PSSP 2.2 High Availability Infrastructure
AIX 4 system administration
The Team That Wrote This RedbookThis redbook was produced by a team of specialists from around the worldworking at the International Technical Support Organization PoughkeepsieCenter.
Peter Kes is a project manager in the International Technical SupportOrganization, Poughkeepsie Center. Before joining the ITSO in 1996, Peterworked for the RS/6000 Product Division in the Netherlands as an SP Specialist.
Copyright IBM Corp. 1997 xi

Marcos Novaes is a system engineer in France. He holds a PhD degree inComputer Science and graduated in 1982 from the University of Paris. After hisstudy, he joined the IBM La Gaude Laboratory in France where he was involvedin RAS of Communication Controller Products. In 1989 he joined the Toulousebranch office to work in the scientific and technical IBM solutions. In 1996 hemoved to Paris to work as a service and support engineer in the ANSS AIXdepartment.
Rosario Uceda-Sosa is the product manager at the Software and Networkingbrand team in IBM Taiwan. He is responsible for planning, consultant, andtechnical support for networking software products since 1996. He has six yearsof experience in networking software. Before joining IBM in 1995, he worked forthe CCL/ITRI National Lab for four years. He holds a master degree in computerscience at the Illinois Institute of Technology in 1990.
Ron Goering is a RS/6000 IT specialist at the Availability Services department ofIBM Taiwan. He is the team leader of RS/6000 professional services team andalso responsible for RS/6000 SP support in Taiwan. He is a certified Tivoliconsultant and holds nine years of experience in UNIX operating systems.Before joining IBM Taiwan in 1995, he worked for Cray Research Inc., as a fieldsystem analyst. His areas of expertise include performance tuning, kerneldebugging, parallel programming, and TCP/IP networking.
David Chiu is a system management architect for the RS/6000 SP system. Hehas been involved in the SP system since its inception.
George Versmissen is a software developer for the RS/6000 SP system withdesign and development responsibilities in the system management area. Shehas worked on a number of development projects within IBM over the past 14years.
Neerav Shah is a software engineer with the RS/6000 division. He is currentlyinvolved in the development of the High Availability Infrastructure for the RS/6000SP system. Before joining IBM in 1995, he was a research scientist at CIS Inc.,where he worked in the design of a system for the parallel processing andanalysis of sonar signals. He holds a PhD degree from the University of NorthTexas, and his dissertation proposes a parallel implementation of the DiscreteWavelet Transform for analyzing multidimensional signals.
Eric Chin is a software engineer working for the RS/6000 SP Software Lab since1995. She holds a PhD degree in Computer Science and Engineering (1995) anda master degree in mathematics (1994) from the University of Michigan. Herareas of expertise are concurrent and distributed systems and OO softwarearchitecture. She has been involved in the design of various software projectsfor the RS/6000 SP system architecture, including the OO framework, and theintegration of Tivoli and the SP.
Linda Mellor is member of the Seismic Infrastructure and Support Team at ShellInternational Exploration and Production B.V, Research and Technical Services,Rijswijk, The Netherlands. His areas of expertise include system management ofSP systems and RS/6000 workstations in a seismic processing environment.
Thanks to the following people for their invaluable contributions to this project:
IBM PPS Lab Poughkeepsie:Steve Champagne
xii Integrating TME 10 on the RS/6000 SP

International Technical Support Organization, Poughkeepsie Center:Marcello BariosEndy Chiakpo
International Technical Support Organization, Raleigh Center:Barry NusbaumDave Shogren
IBM Global Services:Neerav Shah
Software LevelsThe following software levels were used during the development of this redbook.The names and versions are listed as they appeared on the distribution media.
Table 1. Software Levels
Software Level
AIX Version 4.1.4
PSSP Version 2.2
Tivoli/Framework Version 3.1 Revision C
Tivoli/User Administration Version 3.1 Revision A
Tivoli/Enterprise Console Version 2.6 Revision B
Tivoli/Sentry Version 3.0.2 Revision A
TME 10 Distributed Monitoring Version 2.3.1
TME 10 Software Distribution Manager Version 3.1
Tivoli/Inventory Version 3.0 Revision A
NetView/6000 for AIX Version 4.1.2 PTF U443133
DeliverablesThis redbook contains example code and scripts. Most of the examples andscripts are listed in the appendix of this book. A complete copy of the scriptsand code is attached to this redbook as a diskette.
Also, a copy will be available on the World Wide Web. The URL for this web siteis:
ftp://www.redbooks.ibm.com/redbooks/SG242071
You can download the contents of this directory using an Internet browser.
All code and scripts are provided on an as is basis. Support for the PSSP T/ECAdapter is available through a Programming Request for Price Quotation (PRPQ)from the Poughkeepsie Laboratory.
Preface xiii

Comments WelcomeYour comments are important to us!
We want our redbooks to be as helpful as possible. Please send us yourcomments about this or other redbooks in one of the following ways:
• Fax the evaluation form found in “ITSO Redbook Evaluation” on page 237 tothe fax number shown on the form.
• Use the electronic evaluation form found on the Redbooks Web sites:
For Internet users http://www.redbooks.ibm.comFor IBM Intranet users http://w3.itso.ibm.com
• Send us a note at the following address:
xiv Integrating TME 10 on the RS/6000 SP

Chapter 1. Introduction
This book explores how to integrate an RS/6000 SP system with the TivoliManagement Environment. It is intended for customers, system providers, andsoftware engineers who have to perform such an integration.
The Tivoli Management Environment provides a management platform andapplications to manage an enterprise computing environment. The RS/6000 SPconsists of a number of processing nodes, each running the AIX operatingsystem and connected by an administrative LAN, and an optional highperformance switch. The Parallel System Support Program (PSSP) is softwarethat provides administrative and management support for the RS/6000 SPsystem.
Tivoli applications focus on supporting a broad range of platforms providing aconsistent interface to commonly used administrative functions. The main focusof Tivoli applications is managing in the enterprise environment.
The PSSP provides system-specific system management for the RS/6000 SP.The software provided in PSSP provides tools for managing the SP platform, andincludes platform-specific management tools. One of the challenges whenintegrating an SP into a Tivoli environment is to analyze which tasks should beperformed through the Tivoli environment, and which should be done using thePSSP tools. Factors such as the frequency of the task, the domain ofadministration, and the skills of the administrators should be considered.
Figure 1 on page 2 shows the main integration points for integrating SP into theTivoli environment. These areas are:
• Tivoli applications acting on nodes of the RS/6000 SP system• Monitoring the state of applications, subsystems, and SP nodes• Making RS/6000 SP-specific management tasks available to the administrator
in the Tivoli environment
There are a number of possible integration scenarios that are discussed morecompletely in the following chapters. Tivoli applications can be used againstindividual SP nodes. They treat each node as a standalone RS/6000 system.The full power of Tivoli applications can be used to manage each individual SPnode. Tivoli constructs, such as policy regions and profile managers, can beused to group the nodes of the RS/6000 into appropriate groupings. Forexample, this integration point might be appropriate for managing users usingthe TME 10 User Administration product.
Copyright IBM Corp. 1997 1
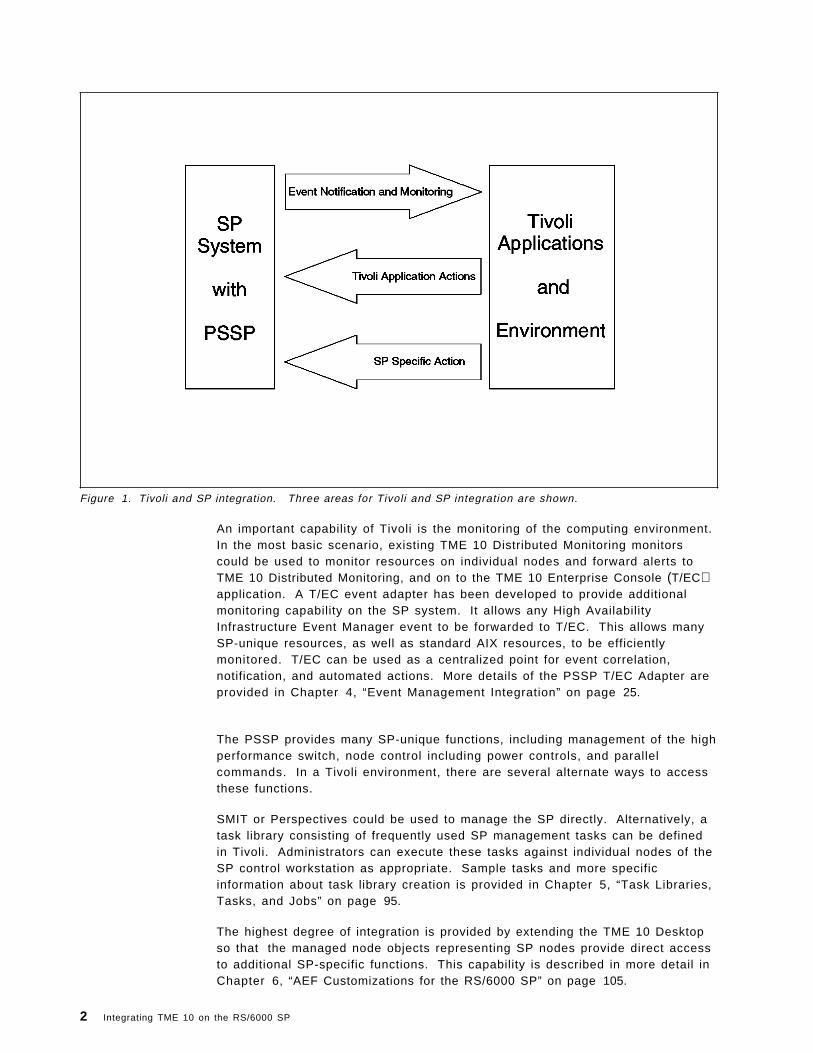
Figure 1. Tivoli and SP integration. Three areas for Tivoli and SP integration are shown.
An important capability of Tivoli is the monitoring of the computing environment.In the most basic scenario, existing TME 10 Distributed Monitoring monitorscould be used to monitor resources on individual nodes and forward alerts toTME 10 Distributed Monitoring, and on to the TME 10 Enterprise Console (T/EC)application. A T/EC event adapter has been developed to provide additionalmonitoring capability on the SP system. It allows any High AvailabilityInfrastructure Event Manager event to be forwarded to T/EC. This allows manySP-unique resources, as well as standard AIX resources, to be efficientlymonitored. T/EC can be used as a centralized point for event correlation,notification, and automated actions. More details of the PSSP T/EC Adapter areprovided in Chapter 4, “Event Management Integration” on page 25.
The PSSP provides many SP-unique functions, including management of the highperformance switch, node control including power controls, and parallelcommands. In a Tivoli environment, there are several alternate ways to accessthese functions.
SMIT or Perspectives could be used to manage the SP directly. Alternatively, atask library consisting of frequently used SP management tasks can be definedin Tivoli. Administrators can execute these tasks against individual nodes of theSP control workstation as appropriate. Sample tasks and more specificinformation about task library creation is provided in Chapter 5, “Task Libraries,Tasks, and Jobs” on page 95.
The highest degree of integration is provided by extending the TME 10 Desktopso that the managed node objects representing SP nodes provide direct accessto additional SP-specific functions. This capability is described in more detail inChapter 6, “AEF Customizations for the RS/6000 SP” on page 105.
2 Integrating TME 10 on the RS/6000 SP

Chapter 2. Planning and Design
Before installing Tivoli on your RS/6000 SP, careful positioning and planning ofyour administrative tasks, applications, and physical resources is required. Thischapter introduces some basic Tivoli concepts, and then discusses positioningyour administrative tasks and applications within your Tivoli enterprise andreviews the planning issues required to deploy Tivoli across your resources andconfigure your enterprise appropriately.
2.1 Basic Tivoli TerminologyThis redbook assumes the reader has full knowledge of Tivoli terminology,concepts, and applications. This section provides a brief overview of the majorconcepts that are discussed in this book. For in-depth discussions of theseitems and other Tivoli terms not included in this list, refer to the TME 10Framework Planning and Installation Guide, TME 10 Framework User′s Guide,and individual Tivoli application manuals.
Tivoli Management Environment (TME)
The combination of the base TME 10 Framework, the distributedobject databases, graphical user interface (GUI), command lineinterface (CLI), and all Tivoli toolkits and applications required withinthe enterprise that is managed by Tivoli.
TME 10 Framework
The base set of Tivoli software that is required to run any of the Tivolimanagement applications. The Framework provides basic systemadministration capabilities, and services for the managementapplications, including an administrator facility, scheduler facility, andnotice facility. The TME 10 Framework is often referred to as theTivoli Management Platform (TMP).
Tivoli Management Region (TMR)
The basic physical unit of Tivoli functionality. It consists of one TMEserver and the clients that server is managing.
Policy Regions, Policies
A policy region is a collection of TME resources that are controlled bya common set of policies or rules. Typically, policy regions define theboundaries of the authority of Tivoli administrators, as well as providea mechanism for organizing and managing system resources in ahierarchical structure.
Profiles, Profile Managers
A profile contains a collection of application-specific information. Theinformation in a profile is specific to a particular profile type (forexample, a user profile will contain user names, login ids, and so on).
A profile manager contains profiles and a list of subscribers to whichthe profile data can be distributed. Subscribers can be managednodes, PC managed nodes, NIS Domains, and other profile managers.
Copyright IBM Corp. 1997 3
Administrators
A Tivoli administrator is a user that has been given authorization toperform management tasks in the TME. The administrator′sauthorization roles determine what tasks that administrator canperform against a particular set of resources.
Resources
A TME resource is a general term used to define systems, devices,services, and facilities in a distributed system. A managed resourcecan be owned by only one policy region.
TME 10 Application Extension Facility (AEF)
An interface to dynamically customize the Tivoli applications byadding site-specific behavior or values to standard applications.
TME 10 Event Integration Facility (EIF)
A facility to build event adapters to map events from any application,resource, or component into a format compatible with the TME 10Enterprise Console.
TME 10 Application Developers Environment (ADE)
Programming tools for creating new custom management applicationson top of the TME 10 Framework.
2.2 Planning the Integration of Your SP with TivoliTo integrate an SP system into a Tivoli environment, there is interaction andoverlap between TME and the PSSP in several areas that must be considered.In general, you must examine the domain of administration for different tasks,and pick the technology that is appropriate for the task. For example, if usersare being managed across the SP, other servers, and client machines, thenTivoli user management would be an appropriate choice. If a Tivoli applicationis chosen to handle a particular task or requirement, you must also design howit integrates with the SP. Among the areas to consider are:
• Security• System Installation and Maintenance• File Distribution• User Management and Administration• System Monitoring and Event Handling• Distributed Task and Command Execution
When planning for SP and Tivoli integration in various areas, you shouldconsider the following factors:
• What are the administrative tasks frequently performed in your environment?• Who performs these tasks and what platform are they familiar with?• Is the scope of a particular task limited to the SP platform, or does it operate
across many platforms in the environment?
Tasks that are performed across many platforms or need centralized data, suchas user administration, are good candidates to perform through Tivoli.Infrequently performed, platform-specific tasks, such as setting the switchclocking parameters, probably make sense to have accessible only throughplatform-specific management tools such as the SP GUI Perspectives, or AIXmanagement tools such as SMIT. Tasks that are platform-specific, but which
4 Integrating TME 10 on the RS/6000 SP

may be needed during general operations by personnel who are not specificallytrained on platform-specific interfaces are good candidates for integrationthrough Tivoli task libraries, or extensions to the TME 10 Desktop.
2.2.1 SecurityTivoli and SP administration have completely separate and unrelated securitydomains. SP uses Kerberos V4 as the basis of authentication and authorizationof administrative users. Tivoli has several possible security implementationsincluding Kerberos as an option. Even in an environment where both Tivoli andSP are using Kerberos, it is not possible to use only a single Kerberos database.Tivoli and SP security realms must be administered separately.
One possible advantage of Tivoli/SP integration is that operations personnelcould be enabled through Tivoli tasks, or Tivoli applications, to performoperations on the SP without being in the SP Kerberos database. Tivoli′sauthorization structure for tasks using the super, senior, admin, and user roles iseasier to manage than the SP mechanisms of having separate access controllists (ACLs) for each resource.
2.2.2 System Installation and MaintenanceThe PSSP provides facilities for the initial installation of the operating system,AIX, and the basic PSSP software. It exploits the AIX Network InstallationManager (NIM) to provide this capability. Tivoli does not have equivalentfunction, and it is recommended that the PSSP and AIX facilities be used for SPinstallation, migration, PTF application, and other software maintenance.
There are also many platform-specific administrative tasks that Tivoli does notprovide. Generally these tasks are infrequently performed, and are quiteoperating system- or hardware-specific. We generally recommend that they beperformed by experienced personnel using SMIT, Perspectives, or the commandline. However, Tivoli tasks could be defined for the more common of thesetasks, and the Tivoli role structure used to allow operators to perform thesetasks from the TME 10 Desktop. For more details on invoking SP-specific tasksfrom Tivoli, see Chapter 5, “Task Libraries, Tasks, and Jobs” on page 95. TME10 Desktop customizations could be used to allow the launching of SMIT orPerspectives, or running a specific command. See Chapter 6, “AEFCustomizations for the RS/6000 SP” on page 105.
2.2.3 File DistributionBoth the SP and Tivoli provide mechanisms for distribution and update of groupsof files. These files could be application binaries, application data, or systemfiles.
The SP provides the file collections technology. It is specific to the SP, andallows groups of related files to be defined into file collections. Files which havebeen changed in a file collection are automatically updated periodically, or whena node reboots. It is reasonably easy to add new files to an existing filecollection, although there is no SMIT or GUI interface to do so. Defining a newfile collection can be difficult.
The SP predefines file collections used for user management files (/etc/passwd,/etc/group, /etc/security/*, and related files), and another for system files suchas /etc/services.
Chapter 2. Planning and Design 5

TME 10 Software Distribution is a Tivoli application that is appropriate when filesynchronization is managed at a domain larger than the SP. It provides a richset of facilities for distributing and updating files. TME 10 Software Distributionoperates against individual SP nodes exactly as it would against any othermanaged nodes. Profile managers and policy regions can be used to group SPnodes to make file distribution management easier.
2.2.4 User ManagementBoth Tivoli and the PSSP provide tools for user administration. The PSSPsolution provides a simple mechanism for managing users only on the SPplatform, and optionally integrates support for automounting user′s homedirectories. TME 10 User Administration is an enterprise user administrationapplication that can provide user management across many platforms withconfigurable levels of local control or centralization.
The decision on which user management solution to deploy depends primarilyon the scope of user administration in your enterprise. Among the reasons youmight want to choose TME 10 User Administration are:
• To enforce a common userid space for a domain larger than the SP• To manage different sets of users on different SP nodes• To provide different administrators with administrative control on different
nodes or sets of nodes• To integrate your SP user management into the enterprise• To eliminate the SP restriction that requires users to change their passwords
on the control workstation
TME 10 User Administration allows you to manage your users at the enterpriselevel, or across a number of machines, something that PSSP management byitself clearly does not do. Using the wpasswd command, you can have your userschange their passwords from any SP node, and TME 10 User Administration willkeep those passwords synchronized across SP nodes and other systems. Byusing profile managers you can enforce a common userid space, and restrictaccess of certain users to certain nodes. You can also allow administratorslocal control over users on a node or group of nodes while enforcing commonpolicies at the enterprise level. TME 10 User Administration does not handlebuilding automounter maps as SP user management does.
2.2.5 System Monitoring and Event HandlingMonitoring key system resources is probably the first and most importantintegration point to be considered. It is also the area where there are the mostchoices for a solution.
The first task is to identify the key resources you wish to monitor. Theseresources might include node availability, adapter or network availability, stateof file systems, processor load, and other states of computing resources, as wellas the state of key applications.
There are a number of monitors available including the following:
• TME 10 Distributed Monitoring provides simple monitoring for commoncomputing resources. TME 10 Distributed Monitoring alerts can beforwarded to TME 10 Enterprise Console, or converted into SNMP traps andforwarded to NetView/6000 for AIX.
6 Integrating TME 10 on the RS/6000 SP
• TME 10 Enterprise Console logfile adapter can monitor SP logs and beconfigured to generate events from log entries.
• Several solutions for using Event Management and Problem Managementfrom the PSSP software exist. These solutions involve invoking a programthrough Problem Management as a response to an Event Managementdetected event. Using the SP event manager allows a large number ofSP-specific subsystems, as well as basic AIX resources, to be efficientlymonitored. This combination can be set up using the SP Perspectives GUI.These Problem Management actions in response to an event include:
− Using the Tivoli wasync command to forward a string to T/EC
− Generating an SNMP trap that is forwarded to NetView
− Invoking the new tecad_pssp which will parse the event manager eventand forward it to T/EC for handling
You should also identify the destination of any monitoring or alerts and thetransport for the events. The primary event transport mechanisms are T/ECevents, TME 10 Distributed Monitoring monitoring, or SNMP traps. Possibleevent destinations might be the Tivoli Enterprise Console (T/EC), TME 10Distributed Monitoring application on a TME 10 Desktop, or NetView or othernetwork manager. The combination of resources to be monitored, and thedestination of the monitoring, will help you choose an appropriate monitoringsolution. Chapter 4, “Event Management Integration” on page 25 providesdetailed discussions of monitoring integration choices and scenarios.
2.2.6 Distributed Task and Command ExecutionBoth the PSSP and Tivoli provide capabilities for distributed task and commandexecution. The PSSP provides dsh, built on rsh with enhancements for parallelexecution and formatting, and sysctl, a generalized remote task executionbackend.
sysctl allows adminstrators to define procedures written in any language (Perl,ksh, or C are popular choices), and give selected users access to that procedurethrough access control lists. The defined procedure executes as root, but theuser never needs to know the root password. This capability allowsadministrators to delegate portions of root access to users without compromisingthe root password. The authentication for sysctl procedures is based onKerberos, and users of these procedures must be defined in the Kerberosdatabase, and currently have Kerberos credentials (typically acquired by thekinit command.)
Tivoli provides a similar capability using the Tivoli tasks and a Tivoli task library.Tivoli tasks are scripts defined to Tivoli to perform specific tasks on the targethost. The execution environment (userid, groupid, working directory, and so on)are specified during task definition. A role is given to a task such that a usermust have that role to execute the task.
The main decision point is probably the overall administrative environment. Ifyour administrators are primarily using Tivoli, defining a Tivoli task is the logicalway to proceed. Your security environment is also a consideration. sysctlrequires the user to be defined in the SP Kerberos database. sysctl and dshare more efficient mechanisms for executing tasks directed specifically at SPnodes. Chapter 5, “Task Libraries, Tasks, and Jobs” on page 95 provides
Chapter 2. Planning and Design 7

additional detail on a number of candidates for Tivoli tasks to help manage theSP.
A hybrid approach that uses dsh or sysctl as commands within a Tivoli task isalso possible. This approach combines the benefits of the efficient taskexecution environment on the SP with the centralized management provided byTivoli.
Chapter 6, “AEF Customizations for the RS/6000 SP” on page 105 describesTME 10 Desktop customizations that allow execution of a command on a node orset of nodes. These customizations can also be used to provide direct accessfrom the TME 10 Desktop to SP-specific tasks such as node and switch control.
2.3 Planning the Deployment of Tivoli on Your RS/6000 SPA computing enterprise can include many different types of machines, operatingsystems, applications, and communication networks. To manage theseresources, a Tivoli Management Environment may contain any number ofphysical TMRs, logical policy regions with possibly many levels of hierarchy, andmanaged resources which are to be controlled from Tivoli. Tivoli provides youwith the framework to manage everything in a consistent manner.
If your operations environment contains one or more RS/6000 SP machines, youmay wish to manage these machines as part of your larger Tivoli enterprise.Before introducing your RS/6000 SP into your Tivoli enterprise, there arenumerous deployment planning issues that must first be considered. Many ofthese issues are general considerations that apply to any resources added to aTivoli enterprise. These considerations will not be discussed in this book sincethey are fully covered in Tivoli publications and other redbooks.
This chapter will focus on the planning issues that are unique to dealing with anRS/6000 SP in a Tivoli enterprise.
2.3.1 TMR ConfigurationThe TME 10 Framework Planning and Installation Guide contains detailedinformation on planning your Tivoli Management Region (TMR) configuration. Itdiscusses issues such as:
• If and when you need multiple TMRs
• The location of TME 10 databases and whether to share library and binaryfiles
• Resource updates between TMRs
• Server load
• Number of clients
• Network limitations
• Local versus central administration
• Network communications
Our redbook assumes that the reader is completely familiar with the concepts inthis area. However, we will address some considerations specific to the RS/6000SP.
8 Integrating TME 10 on the RS/6000 SP
2.3.1.1 Representing an RS/6000 SP in TMRsA Tivoli Management Region (TMR) is a physical representation consisting of aTME server and some number of TME clients. There are many ways torepresent your RS/6000 SP within TMRs:
• As a single TMR
The most obvious approach is to represent the entire RS/6000 SP in its ownTMR. The TME server would be located on the control workstation or one ofthe SP nodes, and all other nodes would be TME clients. This provides asimple mapping of your TMR to your physical environment for moderatelysized RS/6000 SPs. However, if your RS/6000 SP has a large number ofnodes, or if the Tivoli installation stresses other server load characteristics,you may need to divide the RS/6000 SP into multiple TMRs to reduce theimpact to a single TME server.
• As a subset of a TMR
The RS/6000 SP may be represented as a collection of TME clients within alarger TMR that contains other workstations or RS/6000 SPs. This isespecially useful if you have smaller RS/6000 SPs. You may also wish toinclude related print servers, file servers, and other resources that are usedduring the operation of the RS/6000 SP(s). The TME server may or may notreside within the RS/6000 SP. This is not a feasible representation for largerRS/6000 SPs, where the number of nodes would exceed the TME servercapacity.
• As multiple TMRs
Due to the size of your RS/6000 SP or other physical or organizationalconsiderations, you may wish to represent the RS/6000 SP within Tivoli usingmultiple TMRs. The location of the TME servers and the distribution of thenodes among the TMRs must be planned. If your RS/6000 SP has multiplepartitions, you may consider separating your TMRs on partition boundaries.When dealing with multiple TMRs, it is important to remember that not allTME resources are shared across connected TMRs.
• Only represent the control workstation within a TMR
If you want to administer and monitor the RS/6000 SP through the controlworkstation, you may wish to represent only the control workstation in anexisting TMR and not represent the nodes at all. With this approach, you willnot be able to apply special administration to individual nodes and you mayneed to develop customized interfaces to meet your needs. However, thisapproach may greatly reduce the complexity of your Tivoli installation andlimit the impact Tivoli has on your SP.
• As a collection of RS/6000 workstations
Although other configurations will most likely be more appropriate, you couldsimply represent your RS/6000 SP as an unrelated collection of RS/6000workstations with no regard to the fact that they are part of an RS/6000 SP.This method does not require any special SP considerations, and you wouldfollow all documented Tivoli procedures for planning this approach. You canhave your TME servers reside anywhere in your installation, and have the SPcontrol workstation and nodes be members of whatever TMRs areappropriate. Note, however, that you may not be able to do specific SPadministration from Tivoli when managing your environment in this way.
• Have no direct representation within a TMR
Chapter 2. Planning and Design 9
You may choose not to represent your RS/6000 SP within a TMR at all. Withthis approach, you would not install Tivoli on the control workstation or anynodes and you would not be able to manage the RS/6000 SP directly fromTivoli. However, you would still be able to monitor events on the RS/6000 SPthrough a TME 10 Enterprise Console installed on an external system usingan unsecure communications channel to the RS/6000 SP.
The particular representation that you choose for your RS/6000 SP is dependenton many factors, such as the number of nodes on the RS/6000 SP, itsorganizational structure and use, communication links, size of TME servers, TMRconnections, and so on. You must be familiar with the details discussed in theTME 10 Framework Planning and Installation Guide to plan the TMRrepresentation of your RS/6000 SP.
2.3.1.2 Communication ConsiderationsTME distributed architecture is designed to work across a wide variety of LANsand network topologies. The TME server and TME clients within a TMR mustcommunicate with each other. TME servers in connected TMRs must also beable to exchange information and services. The minimal Tivoli requirement isfor a bi-directional, full-time, interactive TCP/IP line. The amount ofTivoli-generated network traffic is determined by the type of administration, datadistribution, and resource monitoring you plan on performing within your Tivoliinstallation.
The system topology of your RS/6000 SP with regard to the SP Ethernet, SPswitch (if any), outside network connections, routers, and gateways must becarefully considered when planning the location of the TME servers and clients.You must also consider the current traffic on these connections and the impactadditional Tivoli communications will have on them. See the TME 10 FrameworkPlanning and Installation Guide for a discussion of network limitations and howthey affect your TMR configuration.
The SP switch provides a high performance communication link which is uniqueto the RS/6000 SP. Installations typically reserve this communication path forproduction applications and critical data access. For most installations, use ofthe SP switch is not recommended for distributing Tivoli administrative datawhen other paths exist that would provide adequate network throughput.However, you may find that your production SP environment can tolerate theadditional overhead of the Tivoli communications on the SP switch. In this caseyou will see improved Tivoli performance by installing and managing your TMRacross the switch. 3.1, “Installing Tivoli Using the SP Switch” on page 19contains instructions on how you can do this.
2.3.1.3 TME Server LoadTME server load is one of the most critical factors in determining the size of aTMR. The server load is dependent on the number of file descriptors needed tomaintain contact with clients, the network traffic, and the CPU and memorydemands Tivoli places on the server.
The server load and network connectivity will also determine where you decideto locate the TME server with regard to your RS/6000 SP. The possible locationsare:
• On the SP control workstation
10 Integrating TME 10 on the RS/6000 SP

If the TME server is to be located on the control workstation, you mustconsider the impact TME operations will have on the performance of othercontrol workstation operations that are critical to the functioning of yourRS/6000 SP.
• On an SP node
There are no special SP considerations when placing the TME server on anSP node other than the impact to non-Tivoli processing planned for thatnode. Appropriate network connections and IP connectivity to all managednodes must exist. These connections should not be limited by SP partitionboundaries.
• On an independent RS/6000 workstation
Locating the TME server on an independent RS/6000 workstation that is notpart of your RS/6000 SP will eliminate the server load impact to your RS/6000SP. This is only possible if you have an external network connection to yourRS/6000 SP and its nodes.
2.3.1.4 Number of TME ClientsThe number of remote connections within a single TMR is limited toapproximately 200 TME clients. The TME server maintains an open connectionwith each client and thus is limited by the number of file descriptors that may beopen at one time. Realistically, the server load and network impacts will mostlikely limit the number of clients in your TMR long before this limit of 200 clientsis reached.
This limitation on the number of clients impacts how you can represent yourRS/6000 SP within a TMR. Smaller RS/6000 SPs with one or two frames can becontained within a TMR. However, larger RS/6000 SPs with multiple frames andlarge numbers of nodes may need to be divided into multiple TMRs. The actualnumber of SP nodes that can be supported within a single TMR is dependent onthe server load issues discussed in the previous section with relation to the sizeof the processor chosen for the server.
2.3.1.5 TMR ConnectionsIndividual TMRs can be linked together with either one-way or two-wayconnections, allowing administrators to manage resources in other TMRs.Restrictions exist as to the types of resources that can be shared across TMRs.See the TME 10 Framework Planning and Installation Guide for discussions onconnecting TMRs and updating resources between them.
There are no special SP considerations when connecting TMRs. However, youwill want to consider the limitations of performing administrative activities acrossconnected TMRs when you decide whether your RS/6000 SP should be containedwithin a single TMR or divided into multiple TMRs. Some important resourcesthat are not shared across TMRs are the user and group name databases andgroup profiles. You may, however, overcome some of these limitations throughcareful implementation and administration of profiles and profile managerswhich can span TMRs.
Chapter 2. Planning and Design 11
2.3.1.6 Location of TME 10 FilesThe TME 10 Framework Planning and Installation Guide discusses what toconsider when deciding where to store the TME 10 databases and library andbinary files. There are no special considerations for the RS/6000 SP. To reducethe storage requirements on individual nodes, you can use a common datarepository such as NFS or some other shared file system to contain the Tivolilibrary and binary files.
2.3.1.7 Sizing ConsiderationsProcessor, memory, and disk space recommendations for the TME server andclients are detailed in the TME 10 Framework Release Notes. When reviewingthese recommendations in relation to the RS/6000 SP, consider theserecommendations as additional requirements to those required by the RS/6000SP that are specified in the IBM RS/6000 SP Systems Planning Guide.
2.3.1.8 Application ConsiderationsEach Tivoli application has its own planning issues that must be considered. Forexample, if you are installing TME 10 Enterprise Console and/or NetView/6000 forAIX to monitor and respond to problems on your RS/6000 SP, you will need todetermine where those servers should reside, their server loads, networkconnections, and so on. Review the documentation for each application todetermine if there are additional requirements to your overall Tivoli plan.
2.3.2 TME 10 Framework ConfigurationWhile the TMR planning focuses on the physical configuration issues, the TME 10Framework planning deals with the logical configuration of the Tivoli enterprise.The TME 10 Framework configuration should be developed to match your currentorganizational and administrative structure. The TME 10 Framework providesthe basis for managing resources in a distributed environment. The planningconsiderations for the TME 10 Framework configuration include:
• Policy regions and subregions
• Managed nodes
• Profile managers and subscribers
• Administrator roles
The basic discussions for planning your TME 10 Framework configuration iscovered in the TME 10 Framework User′s Guide. Some SP-specificconsiderations are included in the following sections.
2.3.2.1 Policy Regions and SubregionsPolicy regions are used to organize the resources managed in your Tivolienvironment. A policy region is not limited to the local TMR -- it can containmanaged resources from connected TMRs. Therefore, you can eliminate someof the physical boundaries that may have been imposed with TME serverlimitations by using policy regions to generate a logical view of theorganizational structure of your resources.
A managed resource such as a managed node may only be resident within asingle policy region. However, you may have a hierarchy of policy sub-regionsto match the hierarchical view of your resource administration.
12 Integrating TME 10 on the RS/6000 SP

There are many ways to organize the managed nodes representing your RS/6000SP control workstation and nodes in policy regions. A few possibilities mayinclude (but are certainly not limited to) any combinations of the following:
• A top-level policy region for the entire RS/6000 SP
Typically, there is one governing policy region for all the managed resourceswithin a TMR. If your RS/6000 SP is represented by a single TMR or asubset of a larger TMR, and you have a simple administrative organization, asingle policy region containing the control workstation and all of the nodes ofyour RS/6000 SP as managed nodes may be the simplest approach.
If your RS/6000 SP spans multiple TMRs, you may find it useful to have ahigher-level policy region that includes all of the managed nodes from all ofthe TMRs representing the SP. This policy region may either contain themanaged nodes directly, or indirectly through nested policy sub-regions.This top-level policy region could then be used for generic management ofthe entire RS/6000 SP, consistent monitoring and administration across all ofthe SP nodes, and so on.
• Policy sub-regions to match SP partitions
If your RS/6000 SP contains multiple partitions, you may find it useful torepresent the nodes of a partition within separate policy sub-regions. Thiswill allow you to manage the partitions independently. These sub-regionsmay or may not be hierarchically part of a governing policy region thatrepresents the entire RS/6000 SP.
An alternative way to represent partitions would be through profilemanagers. See 2.3.2.3, “Profile Managers and Subscribers” on page 14.
• Policy sub-regions to match disjoint groups of SP nodes
If you have many SP nodes that are similar to each other or used in acommon manner, you may wish to organize such a group into its own policysub-region for common administration. For example, in a LAN-consolidationenvironment, you may wish to group the SP nodes into disjoint sets based onorganizational or operational characteristics and represent each set as apolicy sub-region. As with partitions, these sub-regions may or may not behierarchically part of a governing policy region that represents the entireRS/6000 SP.
Using policy sub-regions for groups of SP nodes is most appropriate whenthe grouping will remain stable over time. For more dynamic grouping, or asanother grouping alternative, profile managers can be used.
2.3.2.2 Managed NodesEach SP control workstation and node that is installed as a TME server or clientis logically represented as a managed node within one (and only one) policyregion. You may wish to customize these managed nodes to provide unique SPfunctions to your administrators from within the TME 10 Desktop. You candevelop customizations using Tivoli facilities such as ADE or AEF. SeeChapter 6, “AEF Customizations for the RS/6000 SP” on page 105 for informationon how you might provide your own TME 10 Desktop customizations and forexamples of modifying your managed nodes to invoke functions unique to an SPcontrol workstation and nodes. Also, you can load a set of sample TME 10Desktop customizations from the diskette provided with this redbook. See 6.2,“Installation of the Sample Customizations” on page 113 for installationinstructions.
Chapter 2. Planning and Design 13

2.3.2.3 Profile Managers and SubscribersProfile managers contain profiles to manage the administrative data on yoursystems. More importantly, however, they contain a list of subscribers that caneither be managed nodes or other profile managers. These subscription listscan be a useful organizational construct in representing groups of resourcesrequiring common administration, especially since a managed node or profilemanager may be included in any number of subscription lists.
With regard to the RS/6000 SP, you will probably find it useful to create profilemanagers to represent the following:
• All nodes on your RS/6000 SP
• The control workstation and all nodes on your RS/6000 SP
• All nodes within an SP partition
• All nodes within an SP node group
• All nodes with a common set of operational or organizational characteristics
These profile managers can then become subscribers for task execution, datadistribution, profile distribution, and so on. In SP terms, a profile manager thatcontains only a subscription list can be thought of as an SP node group.Therefore, any SP node groups that have been created for commonadministrative purposes would be a good candidate for a profile manager.
2.3.2.4 Administrator RolesBy assigning appropriate authorizations and copying and moving policy regionsto the correct TME 10 Desktops, you can control the administrative roles of theadministrators managing subsets of the Tivoli enterprise. With regard to theRS/6000 SP, you can restrict SP resources and tasks to only those administratorsthat will be managing the RS/6000 SP from Tivoli. You would do this using thenormal procedures for configuring TME 10 administrators as described in theTME 10 Framework User′s Guide.
2.3.3 Planning for RS/6000 SP ChangesOnce a RS/6000 SP has become part of a Tivoli enterprise, planning RS/6000 SPchanges also requires planning corresponding TME changes. Some examples ofRS/6000 SP changes that may affect your Tivoli installation include:
• Adding new nodes to your RS/6000 SP
After you have added new nodes to your RS/6000 SP and have verified thatthey are operating properly within your system, you will want to include themin your Tivoli Management Environment. This will require you to install all ofthe necessary TME framework and application binaries, libraries, anddatabases to create the new managed nodes. You will need to add theseresources to the appropriate policy regions and profile managers and anyspecific application resource managers to make them a part of yourmanaged environment.
If the number of new nodes is significant, you may need to consider creatinga new TMR if the new nodes will exceed the limits of your current TMEserver or reduce its performance to unacceptable levels. You will then needto evaluate how to connect this new TMR to your current Tivoli ManagementRegions, and how it will be administered within your organization.
• Removing nodes from your RS/6000 SP
14 Integrating TME 10 on the RS/6000 SP
Before you remove nodes from your RS/6000 SP, you will want to delete themanaged nodes from your TMR and from all policy regions and resourcemanagers within your Tivoli enterprise.
• Re-partitioning your RS/6000 SP
If you have made TMR and TME 10 Framework configuration decisions basedon the system partition layout of your RS/6000 SP, you will need to considerthe impact to these configurations if you change the SP partitioning. Youmay need to move managed nodes from one TMR to another (which requiresdeleting them from the old TMR and creating them in the new TMR), movethe managed nodes from one policy region to another, or change thesubscription lists in various profile managers to reflect the new organization.
• Changing IP address and host names
If you change the IP address or host name for the SP nodes or the controlworkstation that the TME uses to communicate with, you will need to updatethe TME server and client databases.
• Migrating your RS/6000 SP to new levels of AIX or PSSP
When planning to migrate your RS/6000 SP to a new level of AIX or PSSP,you will need to consider how you will migrate your Tivoli installation onthose managed nodes. If your TME server is resident on the controlworkstation or one of the SP nodes, you will have additional migration issuesto consider. You will need to decide if you must migrate to new levels of theTME 10 Framework or any other TME applications. You will need to preserveall databases, binaries, libraries, and other files associated with the TME 10Framework and applications.
Tivoli procedures for all of these changes are described in the TME 10Framework Planning and Installation Guide, the TME 10 Framework User′s Guide,the TME 10 Framework Release Notes, and the individual TME applicationdocuments.
2.4 Planning Applied to a Practical ExampleTo illustrate some of the planning issues that have been discussed in thischapter, we will take a sample SP environment and describe some of theplanning choices that can be made to incorporate it into a larger Tivolienterprise. The example is for discussion purposes only and is not meant torepresent any existing Tivoli enterprise or corporate environment.
2.4.1 Environment at the ITSO SP LabThis redbook was written based upon our experiences while working at theInternational Technical Support Organization (ITSO) Poughkeepsie Center.Therefore, we will use the ITSO lab as the example environment that we want tomanage. The following hardware was available at the ITSO lab for our work:
• A 16-node RS/6000 SP containing:
− One frame
− 16 thin nodes
− A High Performance Switch
− An SP Ethernet connection to all nodes
− A control workstation
Chapter 2. Planning and Design 15
This RS/6000 SP is referred to as SP2, with the control workstation hostnamesp2cw0, and node hostnames sp2n01 through sp2n16 for Ethernet access andsp2sw01 through sp2sw16 for switch access. There is only one partition onthis RS/6000 SP.
• A 12-node RS/6000 SP containing:
− One frame
− 4 thin nodes
− 4 wide nodes
− 1 SMP node
− An SP Switch
− An SP Ethernet connection to all nodes
− A control workstation
This RS/6000 SP is referred to as SP21, with the control workstationhostname sp21cw0, and node hostnames sp21n01 through sp21n16 forEthernet access and sp21sw01 through sp21sw16 for switch access. There isonly one partition on this RS/6000 SP.
• Several RS/6000 workstations
• Local Token Ring connection between the control workstations and theRS/6000 workstations
2.4.2 Integration PlanningWe will make the assumption that administration of the lab machines isself-contained with very little interaction with a more global corporateadministrative organization. However, to reduce personnel costs, we will saythat the administrators in charge of this lab are also responsible for other labswithin the region. The entire region is using Tivoli to manage their systems.The administrators responsible for the lab have complete management controlover all machines.
Since the administrators must manage several labs, they would prefer to handleas much SP system management from their TME 10 Desktops as possible. Theywill install all SP customizations provided with this redbook, and create theirown task libraries and tasks for commonly performed operations not included inthe customizations.
The users in the lab require access to all available SP nodes and RS/6000workstations, and would like to have a common userid and password imageacross these machines. TME 10 User Administration will be installed to managegroups, userids, and passwords. The SP User Management Services will beturned off.
An automounter will be used to provide access to all user home directories.TME 10 Software Distribution will be installed and used to distribute automountermap files. The SP Automounter Support and SP File Collection Services will beturned off.
Since the lab is mainly used as a test environment, applications are continuouslyinstalled and upgraded. TME 10 Software Distribution will be used to distributeapplication files to the appropriate workstations and SP nodes.
16 Integrating TME 10 on the RS/6000 SP
All systems will be monitored using the TME 10 Enterprise Console. The newPSSP T/EC Adapter will be installed on all SP nodes and control workstations tocapture and forward events generated by the SP Event Manager to T/EC.
2.4.3 Deployment PlanningPlanning to install Tivoli in this example environment, we decided on thefollowing configuration:
• One TMR for the entire lab
Since both RS/6000 SPs are small, we decided that one Tivoli ManagementRegion for the entire lab would be sufficient. This TMR would include theRS/6000 SPs, as well as all of the standalone RS/6000 workstations. We donot plan to have a rapid growth rate of new nodes on the RS/6000 SPs oradditional RS/6000 workstations, so we do not need to worry aboutoutgrowing our TME server in the near future.
• TME server on RS/6000 workstation
Since this is mainly an SP lab and the RS/6000 workstations are onlyminimally used during application testing, we will dedicate one of theRS/6000s to be our TME server. We will use this same server as our T/ECserver.
The current Local Token ring is not heavily used and can easily withstandthe additional network traffic required by the Tivoli distributed database andmanagement functions. We will access the SP nodes through the SPEthernet adapters.
• TMR connections
At this time, there is no advantage to connecting this TMR with other TMRsin the enterprise. The lab would like to maintain its autonomy. However, ifregional procedures change such that a more global administrative policy isinstituted, there may later be a need to connect this TMR with other TMRs inthe region.
• Location of files
The Tivoli library and binary files will be installed on each RS/6000 and oneach SP control workstation. The SP nodes will NFS mount the Tivolidirectories from their respective control workstation over the SP Ethernetconnection. This will provide quick access to the data without compromisingthe local disk space on the SP nodes. As required by Tivoli, all databasefiles will reside locally on each node.
• One top-level policy region for the TMR
We will have one top-level policy region to govern the entire TMR. This willbe used for lab-wide administration. For example, all user and groupmanagement will be done from this policy region.
• Policy sub-regions for each RS/6000 SP
There will be one policy sub-region for each RS/6000 SP and one sub-regionfor all of the RS/6000 workstations. These policy sub-regions will contain theactual managed nodes representing the individual workstations and SPnodes. Although users have access to all machines in the lab, they typicallylimit their work to one of the RS/6000 SPs.
• Profile managers
Chapter 2. Planning and Design 17
The following profile managers will be created as our initial working set.Additional profile managers will be defined to support individual applicationsor groups of resources as the system administration evolves.
− One profile manager for each RS/6000 SP that contains as its subscribersall of the managed nodes representing the SP nodes of that system.
− One profile manager for each RS/6000 SP that contains two subscribers:the control workstation managed node and the profile managercontaining the SP nodes.
− One profile manager that contains two subscribers: the profile managerscontaining each set of SP nodes. This profile manager will be used todistribute data common to all SP nodes or to perform common tasks oneach node.
− One profile manager that contains all of the RS/6000 managed nodes asits subscribers.
− One profile manager that has three subscribers: the two profilemanagers representing the RS/6000 SPs and the profile manager withthe RS/6000 workstations. This profile manager will be used to distributecommon system and user management data.
The hierarchy of using profile managers as subscribers to other profilemanagers makes administration much easier when new managed nodes areadded to the system. They need to only be added to the lowest level profilemanagers as managed endpoints.
18 Integrating TME 10 on the RS/6000 SP
Chapter 3. Installation
Before installing Tivoli products on your RS/6000 SP system, you should developa TME installation plan to determine how the system will be managed withinyour Tivoli enterprise.
You will need to:
• Decide the location of TME servers
• Decide the distribution of SP nodes across TMRs
• Decide which Tivoli products you will be installing and whether they will beinstalled on selected managed nodes or on all nodes in the TMR
• Develop a topology of policy regions and profile managers so that your TME10 Framework configuration reflects your administrative and organizationalstructure.
The importance of proper planning must be stressed in order to make your Tivoliinstallation more efficient and to avoid time-consuming and costly mistakes. SeeChapter 2, “Planning and Design” on page 3 for planning information.
This chapter includes information on how to use your RS/6000 SP switch to doyour initial Tivoli installation. The TME 10 Framework Planning and InstallationGuide should be followed for detailed installation instructions. This chapter alsoincludes information on maintaining Tivoli database consistency. Even thoughthis information is not specific to the RS/6000 SP, it is included here to stress itsimportance in maintaining your Tivoli environment.
3.1 Installing Tivoli Using the SP SwitchThis section contains instructions for installing a TME server on an RS/6000 SPnode using the SP switch to transfer the installation image from a CD-ROMmounted on the control workstation.
Using the SP switch to install and manage the TME 10 Framework and otherTivoli applications is an alternative to using an Ethernet or other externalnetwork connection to distribute the data. You must consider the impact to yourcurrent production SP environment before using this approach. The switch istypically reserved for critical data and application communication where a highperformance communication link is essential. However, if your productionenvironment can tolerate the additional impact on the SP switch of the Tivolicommunications, you will gain performance improvements by using the switch.
The following procedure was developed by Neerav Shah of IBM Global Servicesand was used in customer sites to install a TME server on an SP nodetransferring the installation image across the SP switch.
Use the following steps to install the TME server on an SP node over the highspeed switch network:
1. Mount the TME 10 Framework CD on /cdrom on the control workstation:
mount -rv cdrfs /dev/cd0 /cdrom
2. Export the NFS mount for /cdrom to the chosen TME server node (this can bedone via the SMIT interface).
Copyright IBM Corp. 1997 19
3. Mount the NFS filesystem on the TME server node:
mount <CWS_hostname>:/cdrom /mnt
4. Edit the /etc/wlocalhost file to reflect the TME server ′s high speed switchhostname.
5. Export the DISPLAY variable on the TME server node to reflect the controlworkstation:
export DISPLAY=<CWS_ip_address>:0.0
6. Enable the control workstation display. On the control workstation, enter:
xhost +
7. Set the hostname and uname to be the high speed switch hostname on theTME server node:
hostname <hps_hostname>uname -S <hps_hostname>
8. Create the following directory:
/usr/local/Tivoli/install_dir
and enter a cd command to change to this directory.
9. Ensure that there is enough disk space on the required filesystems:
/usr/local/Tivoli 42860 KB/etc/Tivoli 36 KB/var/spool/Tivoli 11558 KB
Note: Verify the current space requirements by reviewing the TME 10Framework Release Notes packaged with your TME 10 software.
10. Run the preinstall script:
/mnt/wpreinst.sh
11. Run the actual install script:
./wserver -c /mnt
12. From the TME 10 Desktop generated on the control workstation, make sureall the install options are correct (that is, the locations for all Tivoli libraries,binaries, and so on). Select the option to create directories on install.
13. Specify the following:
• License key in the specified text gadget.
• Encryption level to be NONE.
• TMR policy region name (for example, SP).
• The TME server hostname (high speed switch hostname).
14. Click on Install & Close .
15. When the install is complete, revert the hostname and uname of the TMEserver to their original values.
16. Edit the /etc/wlocalhost file and reflect the high speed switch hostname, ifyou have not already done so.
17. From the command line run the following command:
odadmin environ get > /tmp/<any_filename>
Edit /tmp/<any_filename> to reflect the following variable definit ion:
20 Integrating TME 10 on the RS/6000 SP
ALI_HOST_NAME=<high_speed_switch_hostname>
From the command line, run the following command:
odadmin environ set < /tmp/<any_filename>
18. Shutdown the TME 10 Desktop
19. Run:
. /etc/Tivoli/setup_env.sh
20. Shutdown the oserv daemon:
/etc/Tivoli/oserv.rc stop
21. Restart the oserv daemon:
/etc/Tivoli/oserv.rc start
22. Start the TME 10 Desktop. From command line, type:
tivoli
23. Perform backup of the Tivoli database. Refer to the TME 10 FrameworkPlanning and Installation Guide for instructions on how to do this.
After completing these steps, you will have an SP node installed as your TMEserver. You can install the other SP nodes as managed nodes by following thenormal installation procedures described in the TME 10 Framework Planning andInstallation Guide. You must specify the switch host name of the SP node as thename of the node to be installed to force the installation across the switch. Thiswill also cause all future TMR database communications, profile and datadistributions, and so on, to occur across the switch.
If you decide at a later time that you do not wish to use the SP switch for yourTivoli communications, you can follow the directions for changing IP names andaddresses described in the “TME 10 Maintenance and Troubleshooting” chapterof the TME 10 Framework Planning and Installation Guide.
3.2 Tivoli Object Database ConsistencyThe information in this section is not specific to executing Tivoli on the RS/6000SP. However, the importance of maintaining Tivoli Object Database consistencyand correctness is so critical to your Tivoli operation, that we felt it wasnecessary to emphasize the information here.
It is important to make regular backups of the Tivoli Object Database. The firstreason for doing this is a common-sense one: the TME database containsimportant system management information that you want to protect fromhardware or software failures.
The second reason is less obvious. When you install Tivoli products, theinstallation process is in fact performing a sequence of actions:
1. Installing code on the managed nodes
2. Executing local configuration programs
3. Updating configuration entries in the Tivoli Object Database
If there are any problems during installation, or if you need to reinstall a product,the easiest way to reverse the process is to restore the Tivoli Object Databasefrom a backup prior to the installation.
Chapter 3. Installation 21

3.2.1 Database BackupThere are several ways to backup your Tivoli Object Database. The following listdescribes some methods you can use:
Method 1 Use the CLI command wbkupdb directly. This command backs up andrestores TME 10 databases:
wbkupdb -d /tmp/Tivoli_DB.bk sp2en0
where /tmp/Tivoli_DB.bk is the name of the backup file and sp2en0 isthe name of the TME server.
Method 2 Issue the backup operation from the pull-down menu of the TME 10Desktop. For details of this procedure, refer to the ITSO redbook TME10 Cookbook for AIX Systems Management and NetworkingApplications.
Method 3 Use the Tivoli Task Library function to create a task to execute theCLI command wbkupdb, once or regularly. For details of thisprocedure, refer to the ITSO redbook TME 10 Cookbook for AIXSystems Management and Networking Applications.
Method 4 Use the cron utility to execute the CLI command wbkupdb regularly.
3.2.2 Database RestoreThe following list describes two methods you can use to restore your TivoliObject Database:
Method 1 Use the CLI command wbkupdb directly:
wbkupdb -r -d /tmp/Tivoli_DB.bk sp2en0
where /tmp/Tivoli_DB.bk is the name of the backup file and sp2en0 isthe name of the TME server.
Method 2 If you encounter a situation where you cannot use the wbkupdbcommand, or if the object dispatcher that is to be restored is notrunning (and presumably cannot be run because its database iscorrupted or missing), or if you lost your root administrator, you canextract the database manually and put the files in the correct locationin the database directory. The following is an example of how torescue a TME server using the previously saved /tmp/Tivoli_DB.bk filefor server sp2en0.
Note:
Before testing this example, make sure that the object dispatcherhas been stopped.
. /etc/Tivoli/setup_env.shcd /worktmp/tivolitar xvf /tmp/Tivoli_DB.bk sp2en0uncompress -c <sp2en0 | tar tvf -cp imdb.bdb.restore $DBDIR/imdb.bdbcp odb.bdb.restore $DBDIR/odb.bdbcp odb.log.restore $DBDIR/odb.logcp odlist.dat.restore $DBDIR/odlist.dat
22 Integrating TME 10 on the RS/6000 SP

3.2.3 Database Consistency CheckTo check the consistency of the Tivoli Object Database, use the CLI commandwchkdb. This command verifies and repairs problems in the TME 10 database. Itdoes not affect system files; it only modifies resources in the TME 10environment.
The first example checks and, if needed, repairs the TME 10 database. Objectreferences are checked across TMR boundaries:
wchkdb -u -x
The second example checks object references in the current TMR only. Nochanges are made to the TME 10 database. Problems are, however, displayedto stdout and written to a binary output file, /tmp/check.out.
wchkdb -o /tmp/check.out
The third example reads the results from a previous run of wchkdb(/tmp/check.out) and updates the TME 10 database as needed:
wchkdb -u -f /tmp/check.out
3.2.4 Synchronizing Databases across TMRsIf you have a TME with multiple TMRs connected to each other, you mustsynchronize the Tivoli Object Database of each TME server after you havechanged the configuration of TME, or at regular intervals.
The reason for doing this is that the name registry (Tivoli Object Database) isused as an intra-TMR name service, and when TMRs are connected, as aninter-TMR name service. To reduce the number of cross-TMR messages thatmust be sent during name lookups, the resource information of one TMR ismaintained in the name registry of all connected TMRs.
During the initial connection process, the administrator is asked whether aresource update should be performed immediately upon connection. This is theonly time that an update takes place automatically. To keep information onremote resources current in the local name registry, updates must be scheduledregularly.
TMR updates are always pull operations. This means that one TMR requestsinformation from one or more connected TMRs, but it cannot push its currentname registry to another connected TMR.
There are several ways to perform a TMR database update:
Method 1 Use the CLI command wupdate. The following example updates thelocal name registry with the all resource type from all other TMRs.
wupdate -r All All
Method 2 Issue the update operation from the pull-down menu of the TME 10Desktop. For details of this procedure, refer to the ITSO redbook TME10 Cookbook for AIX Systems Management and NetworkingApplications.
Method 3 Use the Tivoli Task Library function to create a task to execute theCLI command wupdate, once or regularly. For details of thisprocedure, refer to the ITSO redbook TME 10 Cookbook for AIXSystems Management and Networking Applications.
Chapter 3. Installation 23

Method 4 Use the cron utility to execute the CLI command wupdate regularly.
24 Integrating TME 10 on the RS/6000 SP
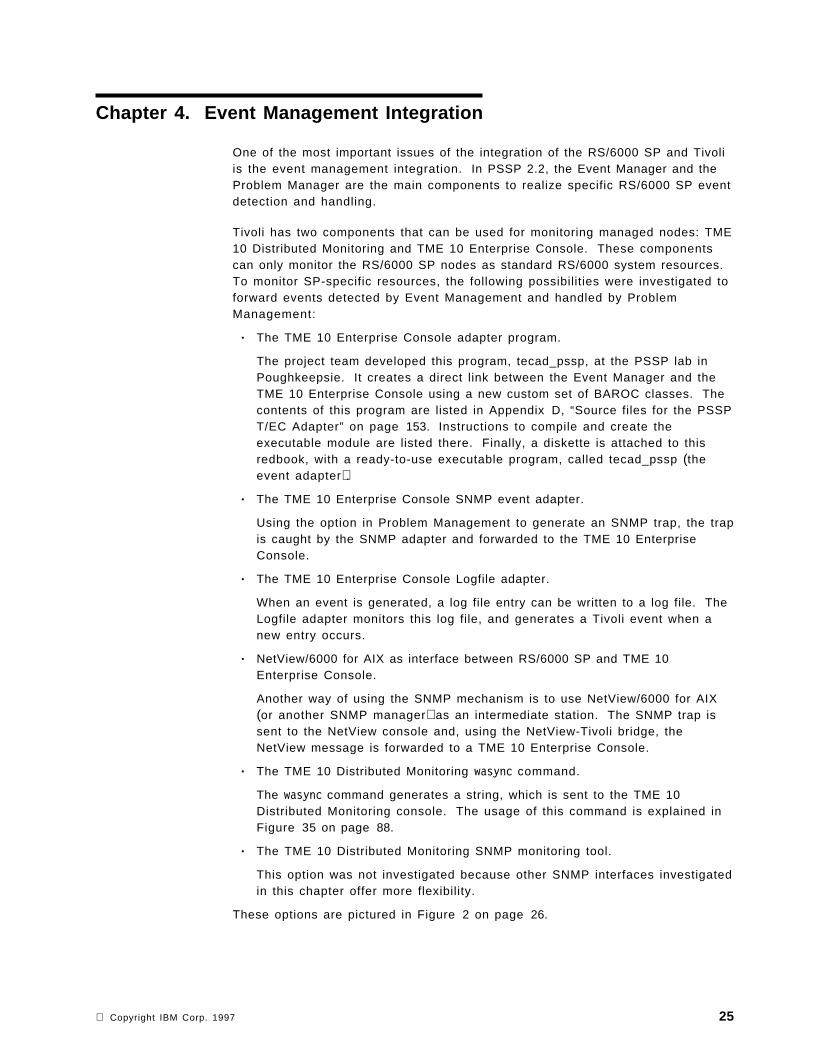
Chapter 4. Event Management Integration
One of the most important issues of the integration of the RS/6000 SP and Tivoliis the event management integration. In PSSP 2.2, the Event Manager and theProblem Manager are the main components to realize specific RS/6000 SP eventdetection and handling.
Tivoli has two components that can be used for monitoring managed nodes: TME10 Distributed Monitoring and TME 10 Enterprise Console. These componentscan only monitor the RS/6000 SP nodes as standard RS/6000 system resources.To monitor SP-specific resources, the following possibilities were investigated toforward events detected by Event Management and handled by ProblemManagement:
• The TME 10 Enterprise Console adapter program.
The project team developed this program, tecad_pssp, at the PSSP lab inPoughkeepsie. It creates a direct link between the Event Manager and theTME 10 Enterprise Console using a new custom set of BAROC classes. Thecontents of this program are listed in Appendix D, “Source files for the PSSPT/EC Adapter” on page 153. Instructions to compile and create theexecutable module are listed there. Finally, a diskette is attached to thisredbook, with a ready-to-use executable program, called tecad_pssp (theevent adapter).
• The TME 10 Enterprise Console SNMP event adapter.
Using the option in Problem Management to generate an SNMP trap, the trapis caught by the SNMP adapter and forwarded to the TME 10 EnterpriseConsole.
• The TME 10 Enterprise Console Logfile adapter.
When an event is generated, a log file entry can be written to a log file. TheLogfile adapter monitors this log file, and generates a Tivoli event when anew entry occurs.
• NetView/6000 for AIX as interface between RS/6000 SP and TME 10Enterprise Console.
Another way of using the SNMP mechanism is to use NetView/6000 for AIX(or another SNMP manager) as an intermediate station. The SNMP trap issent to the NetView console and, using the NetView-Tivoli bridge, theNetView message is forwarded to a TME 10 Enterprise Console.
• The TME 10 Distributed Monitoring wasync command.
The wasync command generates a string, which is sent to the TME 10Distributed Monitoring console. The usage of this command is explained inFigure 35 on page 88.
• The TME 10 Distributed Monitoring SNMP monitoring tool.
This option was not investigated because other SNMP interfaces investigatedin this chapter offer more flexibility.
These options are pictured in Figure 2 on page 26.
Copyright IBM Corp. 1997 25
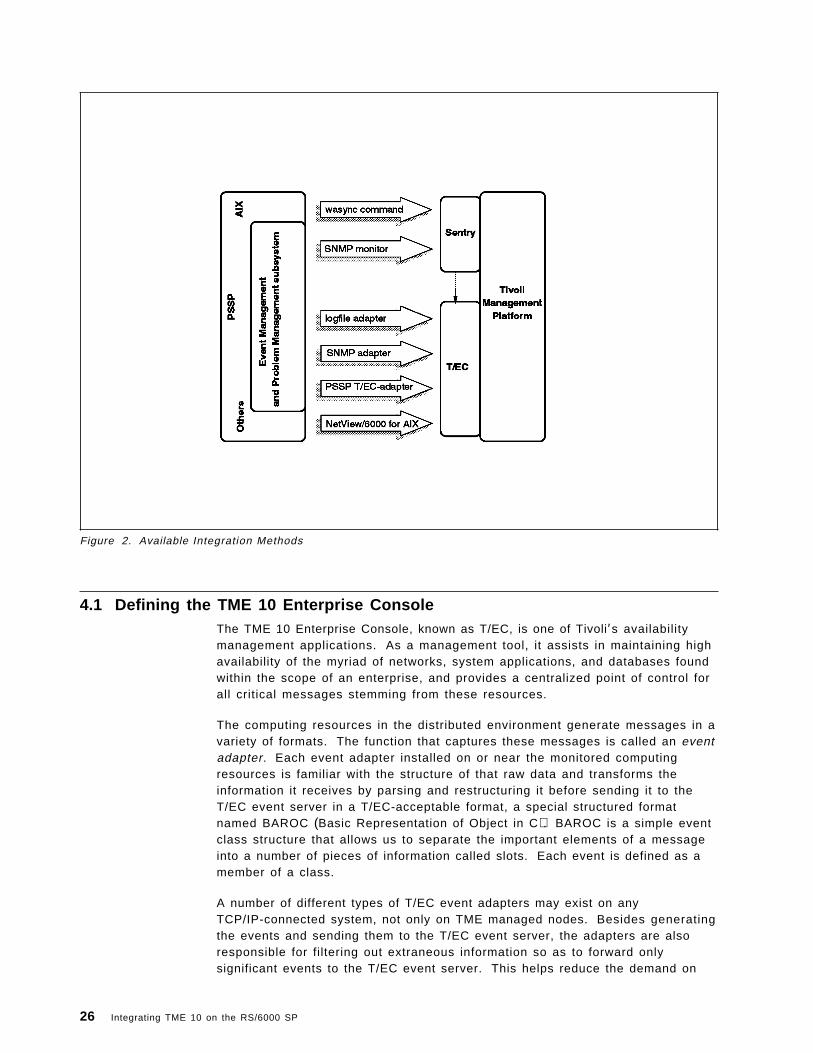
Figure 2. Available Integration Methods
4.1 Defining the TME 10 Enterprise ConsoleThe TME 10 Enterprise Console, known as T/EC, is one of Tivoli′s availabilitymanagement applications. As a management tool, it assists in maintaining highavailability of the myriad of networks, system applications, and databases foundwithin the scope of an enterprise, and provides a centralized point of control forall critical messages stemming from these resources.
The computing resources in the distributed environment generate messages in avariety of formats. The function that captures these messages is called an eventadapter. Each event adapter installed on or near the monitored computingresources is familiar with the structure of that raw data and transforms theinformation it receives by parsing and restructuring it before sending it to theT/EC event server in a T/EC-acceptable format, a special structured formatnamed BAROC (Basic Representation of Object in C). BAROC is a simple eventclass structure that allows us to separate the important elements of a messageinto a number of pieces of information called slots. Each event is defined as amember of a class.
A number of different types of T/EC event adapters may exist on anyTCP/IP-connected system, not only on TME managed nodes. Besides generatingthe events and sending them to the T/EC event server, the adapters are alsoresponsible for filtering out extraneous information so as to forward onlysignificant events to the T/EC event server. This helps reduce the demand on
26 Integrating TME 10 on the RS/6000 SP
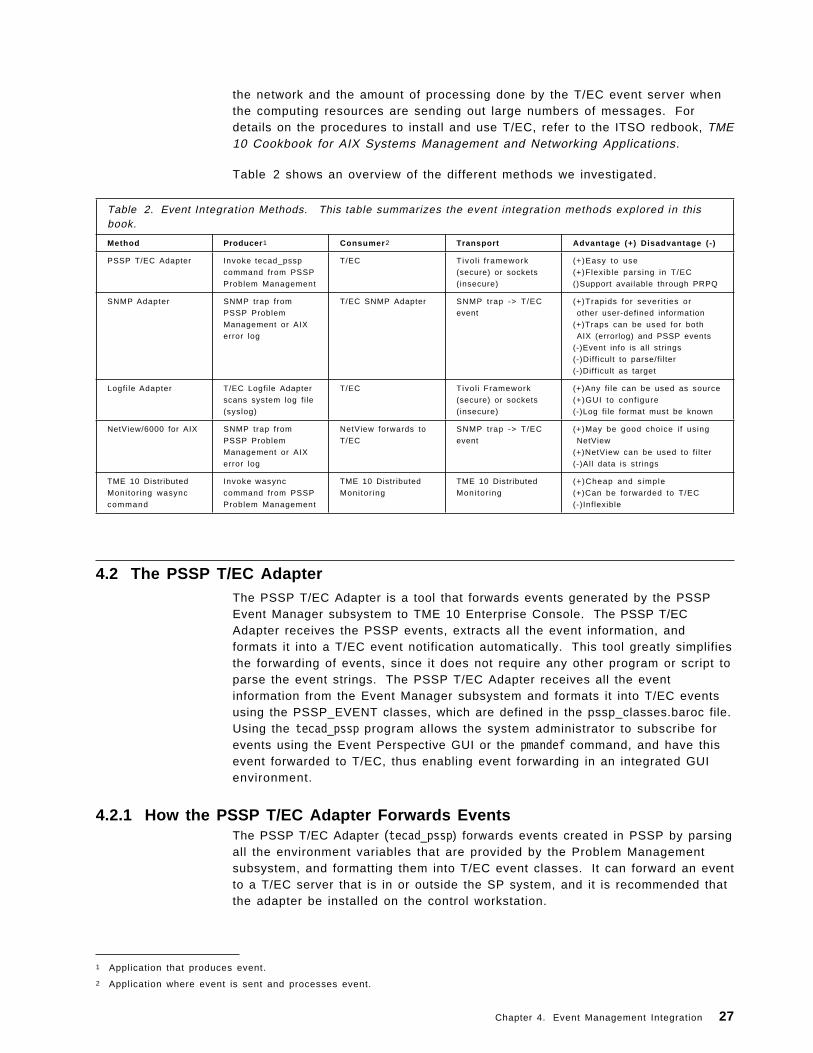
the network and the amount of processing done by the T/EC event server whenthe computing resources are sending out large numbers of messages. Fordetails on the procedures to install and use T/EC, refer to the ITSO redbook, TME10 Cookbook for AIX Systems Management and Networking Applications.
Table 2 shows an overview of the different methods we investigated.
Table 2. Event Integration Methods. This table summarizes the event integration methods explored in thisbook.
Method Producer 1 Consumer 2 Transport Advantage (+) Disadvantage (-)
PSSP T/EC Adapter Invoke tecad_pssp
command from PSSP
Problem Management
T/EC Tivo l i f ramework
(secure) or sockets
(insecure)
(+)Easy to use
(+)Flexible parsing in T/EC
()Support available through PRPQ
SNMP Adapter SNMP trap from
PSSP Problem
Management or AIX
error log
T/EC SNMP Adapter SNMP trap -> T/EC
event
(+)Trapids for sever i t ies or
other user-defined information
(+)Traps can be used for both
AIX (errorlog) and PSSP events
(-)Event info is all strings
(-)Diff icult to parse/f i l ter
(-)Diff icult as target
Logfi le Adapter T/EC Logfi le Adapter
scans system log f i le
(syslog)
T/EC Tivo l i Framework
(secure) or sockets
(insecure)
(+)Any f i le can be used as source
(+)GUI to conf igure
(-)Log fi le format must be known
NetView/6000 for AIX SNMP trap from
PSSP Problem
Management or AIX
error log
NetView forwards to
T/EC
SNMP trap -> T/EC
event
(+)May be good choice i f using
NetView
(+)NetView can be used to f i l ter
(-)All data is str ings
TME 10 Distributed
Moni tor ing wasync
command
Invoke wasync
command from PSSP
Problem Management
TME 10 Distributed
Moni tor ing
TME 10 Distributed
Moni tor ing
(+)Cheap and s imple
(+)Can be forwarded to T/EC
(-)Inf lexible
4.2 The PSSP T/EC AdapterThe PSSP T/EC Adapter is a tool that forwards events generated by the PSSPEvent Manager subsystem to TME 10 Enterprise Console. The PSSP T/ECAdapter receives the PSSP events, extracts all the event information, andformats it into a T/EC event notification automatically. This tool greatly simplifiesthe forwarding of events, since it does not require any other program or script toparse the event strings. The PSSP T/EC Adapter receives all the eventinformation from the Event Manager subsystem and formats it into T/EC eventsusing the PSSP_EVENT classes, which are defined in the pssp_classes.baroc file.Using the tecad_pssp program allows the system administrator to subscribe forevents using the Event Perspective GUI or the pmandef command, and have thisevent forwarded to T/EC, thus enabling event forwarding in an integrated GUIenvironment.
4.2.1 How the PSSP T/EC Adapter Forwards EventsThe PSSP T/EC Adapter (tecad_pssp) forwards events created in PSSP by parsingall the environment variables that are provided by the Problem Managementsubsystem, and formatting them into T/EC event classes. It can forward an eventto a T/EC server that is in or outside the SP system, and it is recommended thatthe adapter be installed on the control workstation.
1 Application that produces event.
2 Application where event is sent and processes event.
Chapter 4. Event Management Integration 27

The recommendation to install the tecad_pssp command only in the controlworkstation is made for the following two reasons:
1. The tecad_pssp command utilizes a configuration file (tecad_pssp.cfg), whichcontains information about the T/EC server to which the event is to beforwarded. By restricting the installation to the control workstation weensure the consistency of the communication settings throughout the SPsystem.
2. The tecad_pssp command can utilize a secure transport to forward the eventto the T/EC server (utilizing TME communications). If this mode ofcommunication is desired, the node where tecad_pssp runs must beconfigured as a Tivoli Managed Node. A savings in disk space and a gain inperformance can be achieved by restricting the forwarding of events to thecontrol workstation, requiring only one node in the SP system to beconfigured as a managed node.
The event subscription can be done using the PSSP Event Perspective or thePSSP Problem Management Subsystem. The event forwarding process isillustrated in Figure 3.
Figure 3. PSSP T/EC Adapter Control Flow
28 Integrating TME 10 on the RS/6000 SP
4.2.2 Using the PSSP T/EC AdapterThe PSSP T/EC Adapter was built using the standard Tivoli Event IntegrationFacility (EIF). The procedure for forwarding PSSP events to the TME 10Enterprise Console is as follows:
1. Install the pssp_classes.baroc file in the T/EC server.
2. Make an event source, group and filter for the PSSP events in the T/ECserver.
3. Install the tecad_pssp program in the control workstation of the SP system.
4. Make an event subscription using the PSSP Event Perspective GUI.
The last step is repeated for every event that is to be forwarded to the TivoliEnterprise Console.
4.2.3 Event Classes Defined for PSSP EventsThe event classes defined in the pssp_classes.baroc file accommodate all thestandard PSSP Event Manager events into 20 classes. The primary objective inthe design of these classes was to group the PSSP Event Manager Events thatshare common attributes, so as to produce a minimal set of classes that couldaccommodate all events. It is quite possible to extend these classes toaccommodate user-defined events and user-defined resource variables. A userinterested in extending these classes should refer to 4.2.10, “Extending the PSSPEvent Classes” on page 35. The rvclasses.cfg file also contains comments thatshow how the Event Management resource variables were mapped into T/ECclasses. The following illustration shows the class hierarchy defined for thePSSP Events:
Chapter 4. Event Management Integration 29
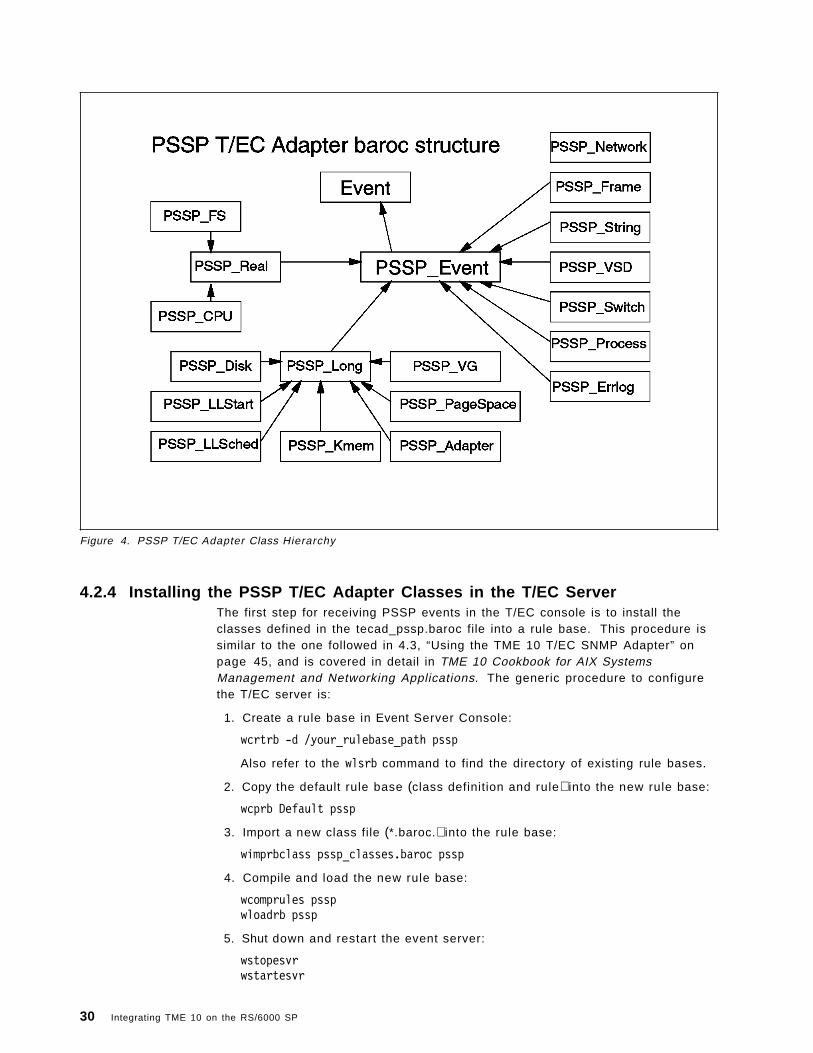
Figure 4. PSSP T/EC Adapter Class Hierarchy
4.2.4 Installing the PSSP T/EC Adapter Classes in the T/EC ServerThe first step for receiving PSSP events in the T/EC console is to install theclasses defined in the tecad_pssp.baroc file into a rule base. This procedure issimilar to the one followed in 4.3, “Using the TME 10 T/EC SNMP Adapter” onpage 45, and is covered in detail in TME 10 Cookbook for AIX SystemsManagement and Networking Applications. The generic procedure to configurethe T/EC server is:
1. Create a rule base in Event Server Console:
wcrtrb -d /your_rulebase_path pssp
Also refer to the wlsrb command to find the directory of existing rule bases.
2. Copy the default rule base (class definition and rule) into the new rule base:
wcprb Default pssp
3. Import a new class file (*.baroc.) into the rule base:
wimprbclass pssp_classes.baroc pssp
4. Compile and load the new rule base:
wcomprules psspwloadrb pssp
5. Shut down and restart the event server:
wstopesvrwstartesvr
30 Integrating TME 10 on the RS/6000 SP

4.2.5 Configuring the T/EC Server to Receive PSSP EventsIn this step, create an event source named “PSSP” and create an event groupthat you will use to monitor SP events.
Then add an event filter to your event group. Utilize the superclassPSSP_EVENT as the filtering class for all PSSP events. You will then receive allthe events generated by the SP system with this event filter.
If you would like to process only a subset of the PSSP events, it is recommendedthat you utilize rules that match the resource_variable slot to the EM resourcevariables which you are interested in. You cannot filter the SP events utilizingthe PSSP class names, because they are grouped by type (for example, integer,real, string), and not by event nature (for example, network, file system, processdeath, and so on). The grouping of the PSSP events according to event nature isdone in the resource variable name space, in order to be consistent with theEvent Manager event hierarchy. Consult the IBM PSSP for AIX EventManagement Programming Guide and Reference for information on the resourcevariable hierarchy. A listing of the PSSP 2.2 resource variables is included inAppendix A, “Event Management Resource Variables” on page 139.
An alternative way of filtering the events in the T/EC server is by applying rulesto the administrator slot or the subscription_handle slots, and filtering for thesubscription you made in the SP system.
In order to configure the T/EC server to receive PSSP events, you must:
1. Create a new event source of type “PSSP.”
2. Create a new event group that you wil l use to monitor SP events.
3. Add a new event filter to this event group, selecting the PSSP_EVENT classas the class to filter, and “PSSP” as the event source.
4. Assign the new group to your event console.
You can test if the classes for PSSP events were correctly loaded, and thesource and event filters were properly defined, by using the wpostemsg command:
wpostemsg -m ″test″ PSSP_EVENT PSSP
This should create an event in your T/EC console.
4.2.6 Compiling the PSSP T/EC Adapter in the RS/6000 SPThe PSSP T/EC Adapter can reside anywhere in the SP system, but it isrecommended that it be installed at the control workstation, since the controlworkstation has access to all partitions in the system. The distribution diskattached to this book contains the source code for the PSSP T/EC Adapter, whichis written in C (tecad_pssp.c), as well as a precompiled executable version of theadapter.
It is only necessary to compile this code and link it with the appropriate EIFlibraries if you are using a different version of TME 10 Enterprise Console, or ifyou have made changes to the original source. The libraries that you usedepend on which communication model you want the adapter to use. Forunsecure communications, for example, communications that are not transmittedusing the T/EC channel, you will need to have the EIF libraries installed.Compile the source code with the following command:
Chapter 4. Event Management Integration 31

gcc -g tecad_pssp.c -o tecad_pssp-I/usr/include/local/Tivoli/include-L/usr/local/Tivoli/lib/aix4-r1-lteceif -lg++ -lm
To compile the PSSP T/EC Adapter code for secure communications (forexample, using the T/EC channels for transmitting the events), your controlworkstation needs to be installed with T/EC at least as a managed node. Youwill need to have the ADE libraries installed. Compile the source code with thefollowing command:
gcc -g tec_adapter.c -o tecad_pssp-I/usr/local/Tivoli/include/aix4-r1-L/usr/local/Tivoli/lib/aix4-r1-ltec -las -las_imp -ltds -lui -ltas -ldes-ltmfimp -ltmf -lthreads -lg++ -lm
Note:
The command used to compile the tecad_pssp code was gcc, the GNUC-Compiler. The gcc command is not available with AIX, but can bedownloaded from the internet. A suitable site to refer to for getting the GNUC-Compiler is: http://www.fsf.org, the home page of the Free SoftwareFoundation.
The PSSP T/EC Adapter package contains a script for compiling the tecad_psspprogram, called makeit. You can build a secure or unsecure tecad_pssp bytyping:
makeit secure
or:
makeit unsecure
If you don′ t specify the channel option, unsecure is assumed.
4.2.7 Installing the PSSP T/EC Adapter in the RS/6000 SPOnce you have an executable version of the tecad_pssp command, you shouldmove the command and the tecad_pssp.cfg file to some directory in the controlworkstation. If the control workstation is a managed node that has otheradapters, you should put both files in the /etc/Tivoli/tecad/bin directory. If not,we recommend putting the tecad_pssp command in /usr/lpp/ssp/bin, and thetecad_pssp.cfg file in /usr/lpp/ssp/config.
The next step in the installation process is to run the install_agent command.This puts the mapping of the Event Management resource variables to T/ECclasses in the System Data Repository (SDR). The usage of install_agent is:
install_agent config_filename
where config_filename is a configuration file that contains the mapping. Theconfiguration file rvclasses.cfg is part of the PSSP T/EC Adapter package and isavailable on the diskette attached to this redbook. You must first run theinstall_agent command with this file:
install_agent rvclasses.cfg
You can also use the install_agent command to extend the classes defined byrvclasses.cfg with your own configuration file. See 4.2.10, “Extending the PSSPEvent Classes” on page 35 for details on how to do this.
32 Integrating TME 10 on the RS/6000 SP
4.2.8 Using the tecad_pssp CommandThe tecad_pssp command was designed to be executed by the PSSP ProblemManagement subsystem. It should not be executed by any other subsystem,since it depends on environment variables that are exported by the ProblemManagement daemon, pmand. Therefore, to forward PSSP events using thetecad_pssp command, you need to make a Problem Management subscriptionusing either the PSSP Event Perspective GUI (the procedure is outlined in 4.2.9.1,“Making Subscriptions Using Event Perspectives” on page 34), or using ProblemManagement directly (see 4.2.9.2, “Making subscriptions with the pmandefcommand” on page 35). In either case, you should select tecad_pssp as thecommand to run for that subscription, and provide the appropriate parameters.
The tecad_pssp syntax is:
tecad_pssp [-l path/filename][-Cc][-m text][-a tiv_admin_name][-s severity][-p port]
The flags of the command have the following meaning:
-l is the path/filename of the configuration file. The default value is/usr/lpp/ssp/config/tecad_pssp.cfg. The only required value in thisfile is the ServerLocation parameter. It should be one of thefollowing:
• ServerLocation=hostname.domain, for secure communications
• ServerLocation=@ServerName, for a managed node over a TMEchannel
• ServerLocation=@ServerName#RegionName, for securetransport in connected TMRs
You should consult TME 10 EIF User′s Guide for the correct values ofthe other configuration parameters.
-C for connection-oriented protocol
-c for connectionless protocol (default)
-m adds text to the message field of the event
-a adds admin in the T/EC_administrator field of the event
-s sets the severity of the event to severity. The legal values for theseverity are the following strings:
FATAL
CRITICAL
WARNING
MINOR
HARMLESS
INDETERMINATE
If an illegal value is used, the default UNKNOWN is utilized.
-p sets the communication port number to port . Note that you can alsoset the port number in the configuration file.
Chapter 4. Event Management Integration 33
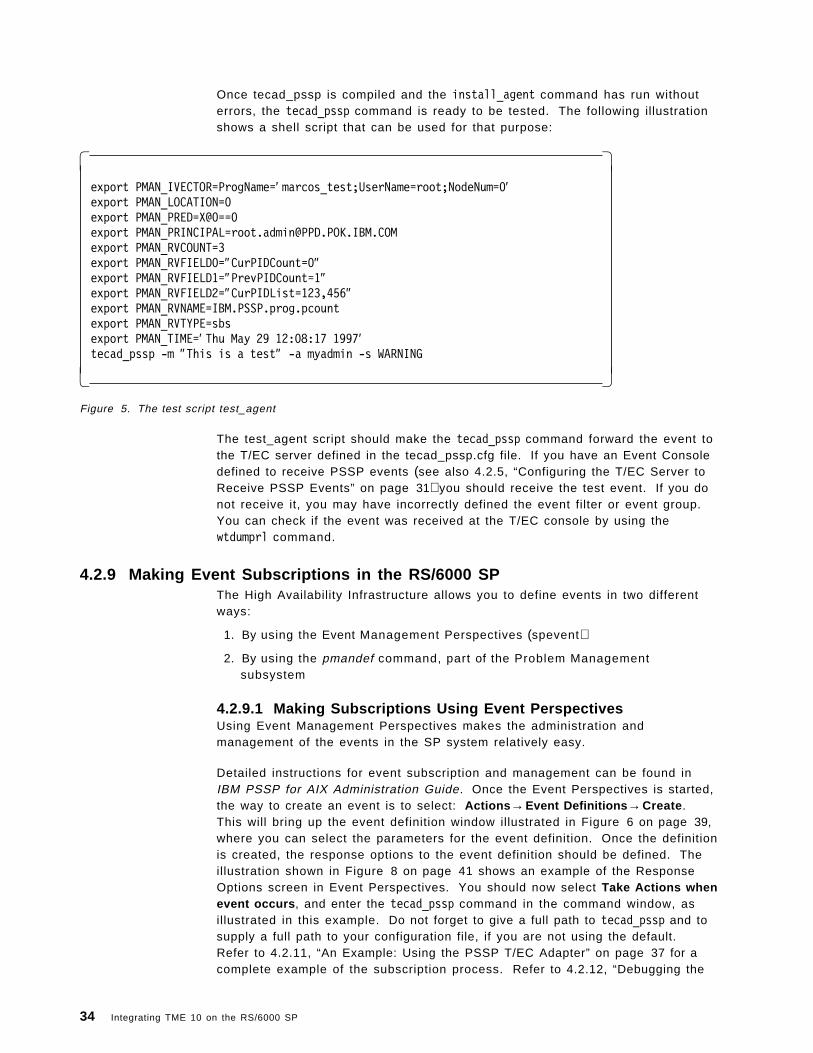
Once tecad_pssp is compiled and the install_agent command has run withouterrors, the tecad_pssp command is ready to be tested. The following illustrationshows a shell script that can be used for that purpose:
� �export PMAN_IVECTOR=ProgName=′ marcos_test;UserName=root;NodeNum=0′export PMAN_LOCATION=0export PMAN_PRED=X@0==0export [email protected] PMAN_RVCOUNT=3export PMAN_RVFIELD0=″CurPIDCount=0″export PMAN_RVFIELD1=″PrevPIDCount=1″export PMAN_RVFIELD2=″CurPIDList=123,456″export PMAN_RVNAME=IBM.PSSP.prog.pcountexport PMAN_RVTYPE=sbsexport PMAN_TIME=′ Thu May 29 12:08:17 1997′tecad_pssp -m ″This is a test″ -a myadmin -s WARNING
� �Figure 5. The test script test_agent
The test_agent script should make the tecad_pssp command forward the event tothe T/EC server defined in the tecad_pssp.cfg file. If you have an Event Consoledefined to receive PSSP events (see also 4.2.5, “Configuring the T/EC Server toReceive PSSP Events” on page 31) you should receive the test event. If you donot receive it, you may have incorrectly defined the event filter or event group.You can check if the event was received at the T/EC console by using thewtdumprl command.
4.2.9 Making Event Subscriptions in the RS/6000 SPThe High Availability Infrastructure allows you to define events in two differentways:
1. By using the Event Management Perspectives (spevent)
2. By using the pmandef command, part of the Problem Managementsubsystem
4.2.9.1 Making Subscriptions Using Event PerspectivesUsing Event Management Perspectives makes the administration andmanagement of the events in the SP system relatively easy.
Detailed instructions for event subscription and management can be found inIBM PSSP for AIX Administration Guide. Once the Event Perspectives is started,the way to create an event is to select: Actions →Event Definitions →Create .This will bring up the event definition window illustrated in Figure 6 on page 39,where you can select the parameters for the event definition. Once the definitionis created, the response options to the event definition should be defined. Theillustration shown in Figure 8 on page 41 shows an example of the ResponseOptions screen in Event Perspectives. You should now select Take Actions whenevent occurs , and enter the tecad_pssp command in the command window, asillustrated in this example. Do not forget to give a full path to tecad_pssp and tosupply a full path to your configuration file, if you are not using the default.Refer to 4.2.11, “An Example: Using the PSSP T/EC Adapter” on page 37 for acomplete example of the subscription process. Refer to 4.2.12, “Debugging the
34 Integrating TME 10 on the RS/6000 SP
Event Generation and Reception” on page 45 for information on debuggingsubscription problems.
You should repeat the same thing for the rearm command if you wish. On thelower part, you should select the control workstation (Node 0) as the node whereto run the command. Again, you could install the tecad_pssp command on allnodes, but our recommendation is to utilize the control workstation as a centralpoint for event forwarding, since it is accessible by all partitions.
4.2.9.2 Making subscriptions with the pmandef commandThe second way to create event subscriptions is by directly using the PSSPpmandef command. Consult the pmandef command description in IBM PSSP forAIX Administration Guide. A general example could be as follows:
pmandef -s example1-e ″AnyResourceVariable;Any InstanceVector;AnyPredicate″-c ″$AGENT_PATH/tecad_pssp -l $CONF_PATH/tecad_pssp.cfg″-r ″AnyRearmPredicate″-C ″$AGENT_PATH/tecad_pssp -l $CONF_PATH/tecad_pssp.cfg″-n 0
Note
It is recommended to run the event response command from the controlworkstation. This saves installation efforts and keeps the management ofyour environment easier. This results in the flag -n 0, indicating that thecommand needs to be run on Node 0, the control workstation.
4.2.10 Extending the PSSP Event ClassesIf you want to extend the tecad_pssp command to handle user-defined events, dothe following:
1. Create the new resource variable and make it known to the EventManagement subsystem (see details in the IBM PSSP for AIX EventManagement Programming Guide and Reference).
2. Map this new resource variable into some T/EC event class You can use oneof the T/EC classes created in the pssp_classes.baroc file, or create a newone. If you create a new T/EC class, you will need to load it in the T/ECserver.
3. Make the new class known to the tecad_pssp command, if you decide tocreate one. To do this:
a. Create a new configuration file with a line that maps your new resourcevariable to the new class name and the new class number. The classnumbers are defined by the enum statement in the tecad_pssp.c file, (thenumbers 0-17 are already taken).
b. You need to make the new class number known to the tecad_psspcommand. You should include it in enum class_names_t. You can usethe = operator to define your class number. For instance, if you aregoing to define the class name PSSP_YOURCLASS, and you want theclass number to be 20, add the following to enum class_names_t:
Chapter 4. Event Management Integration 35
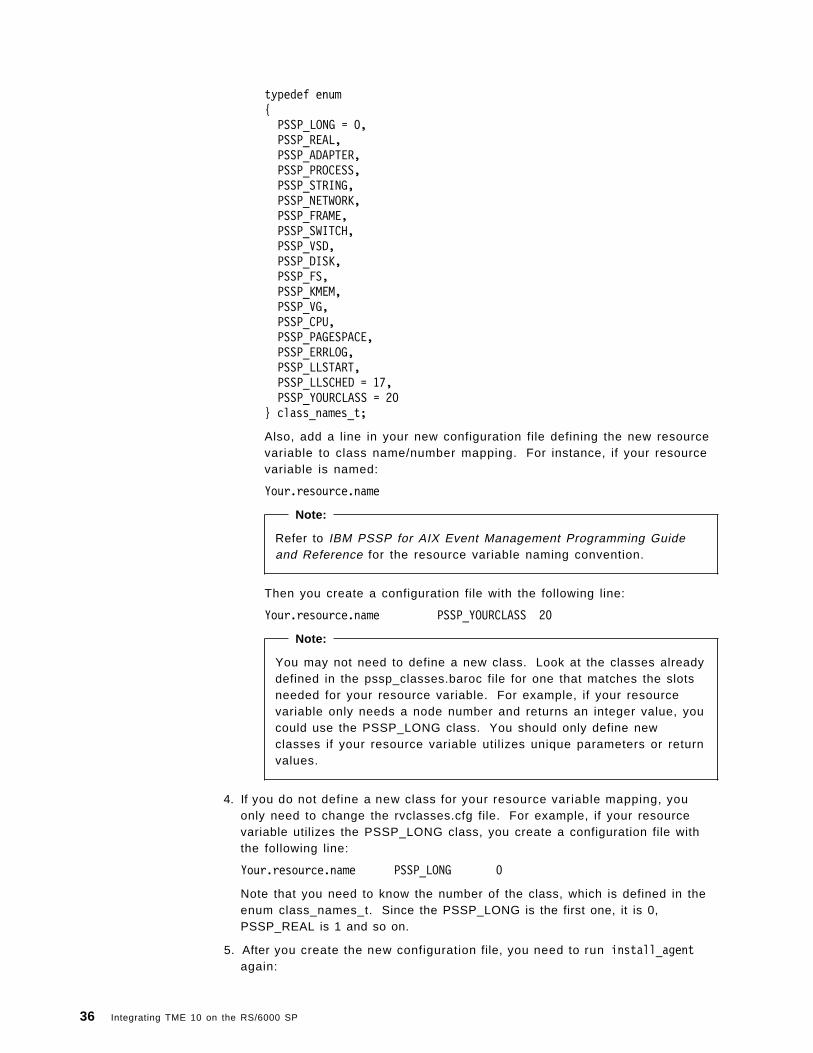
typedef enum{PSSP_LONG = 0,PSSP_REAL,PSSP_ADAPTER,PSSP_PROCESS,PSSP_STRING,PSSP_NETWORK,PSSP_FRAME,PSSP_SWITCH,PSSP_VSD,PSSP_DISK,PSSP_FS,PSSP_KMEM,PSSP_VG,PSSP_CPU,PSSP_PAGESPACE,PSSP_ERRLOG,PSSP_LLSTART,PSSP_LLSCHED = 17,PSSP_YOURCLASS = 20
} class_names_t;
Also, add a line in your new configuration file defining the new resourcevariable to class name/number mapping. For instance, if your resourcevariable is named:
Your.resource.name
Note:
Refer to IBM PSSP for AIX Event Management Programming Guideand Reference for the resource variable naming convention.
Then you create a configuration file with the following line:
Your.resource.name PSSP_YOURCLASS 20
Note:
You may not need to define a new class. Look at the classes alreadydefined in the pssp_classes.baroc file for one that matches the slotsneeded for your resource variable. For example, if your resourcevariable only needs a node number and returns an integer value, youcould use the PSSP_LONG class. You should only define newclasses if your resource variable utilizes unique parameters or returnvalues.
4. If you do not define a new class for your resource variable mapping, youonly need to change the rvclasses.cfg file. For example, if your resourcevariable utilizes the PSSP_LONG class, you create a configuration file withthe following line:
Your.resource.name PSSP_LONG 0
Note that you need to know the number of the class, which is defined in theenum class_names_t. Since the PSSP_LONG is the first one, it is 0,PSSP_REAL is 1 and so on.
5. After you create the new configuration file, you need to run install_agentagain:
36 Integrating TME 10 on the RS/6000 SP
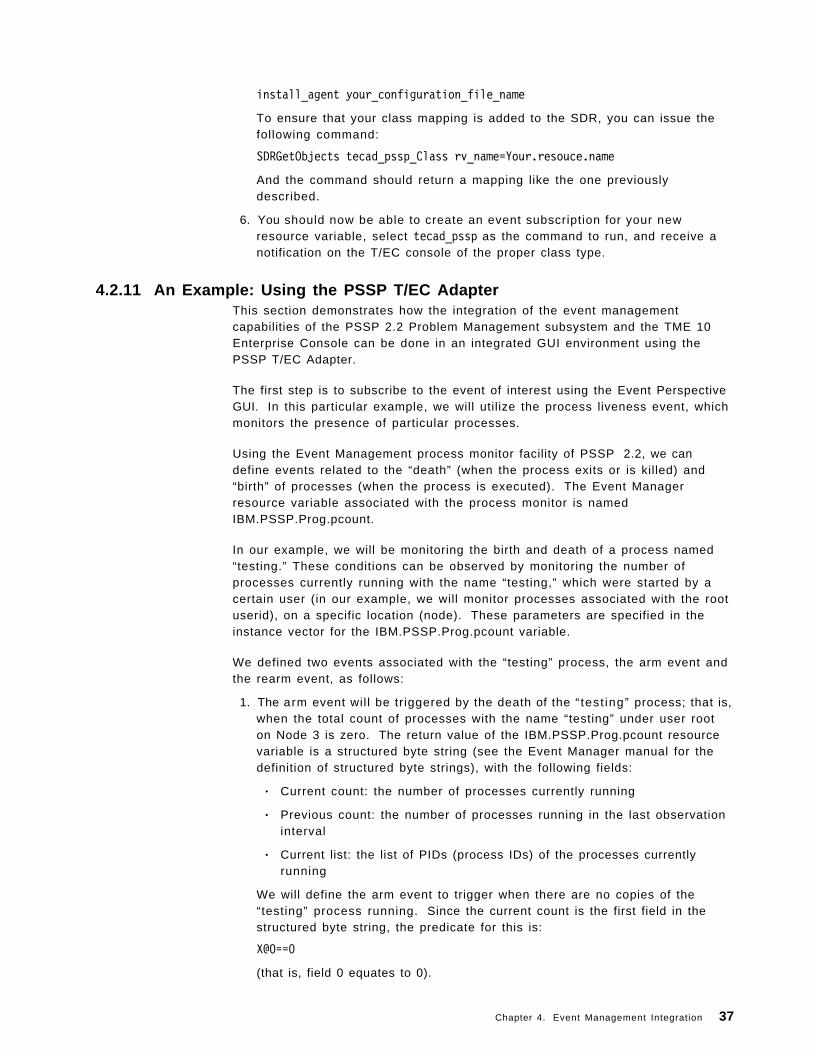
install_agent your_configuration_file_name
To ensure that your class mapping is added to the SDR, you can issue thefollowing command:
SDRGetObjects tecad_pssp_Class rv_name=Your.resouce.name
And the command should return a mapping like the one previouslydescribed.
6. You should now be able to create an event subscription for your newresource variable, select tecad_pssp as the command to run, and receive anotification on the T/EC console of the proper class type.
4.2.11 An Example: Using the PSSP T/EC AdapterThis section demonstrates how the integration of the event managementcapabilities of the PSSP 2.2 Problem Management subsystem and the TME 10Enterprise Console can be done in an integrated GUI environment using thePSSP T/EC Adapter.
The first step is to subscribe to the event of interest using the Event PerspectiveGUI. In this particular example, we will utilize the process liveness event, whichmonitors the presence of particular processes.
Using the Event Management process monitor facility of PSSP 2.2, we candefine events related to the “death” (when the process exits or is killed) and“birth” of processes (when the process is executed). The Event Managerresource variable associated with the process monitor is namedIBM.PSSP.Prog.pcount.
In our example, we will be monitoring the birth and death of a process named“testing.” These conditions can be observed by monitoring the number ofprocesses currently running with the name “testing,” which were started by acertain user (in our example, we will monitor processes associated with the rootuserid), on a specific location (node). These parameters are specified in theinstance vector for the IBM.PSSP.Prog.pcount variable.
We defined two events associated with the “testing” process, the arm event andthe rearm event, as follows:
1. The arm event wil l be triggered by the death of the “ test ing” process; that is,when the total count of processes with the name “testing” under user rooton Node 3 is zero. The return value of the IBM.PSSP.Prog.pcount resourcevariable is a structured byte string (see the Event Manager manual for thedefinition of structured byte strings), with the following fields:
• Current count: the number of processes currently running
• Previous count: the number of processes running in the last observationinterval
• Current list: the list of PIDs (process IDs) of the processes currentlyrunning
We will define the arm event to trigger when there are no copies of the“testing” process running. Since the current count is the first field in thestructured byte string, the predicate for this is:
X@0==0
(that is, field 0 equates to 0).
Chapter 4. Event Management Integration 37
2. The rearm event wil l be triggered when we have exactly one instance of the“testing” process running. The predicate for this is:
X@0==1
With these definitions, one arm event will be issued every time that there are noinstances of “testing” running, and one rearm event will be issued every timeexactly one copy of “testing” is started. This example is very useful formonitoring critical processes in your system. By making this kind of subscriptionand receiving such events in your TE/C console, you could then define rules andtasks which could re-start the critical processes.
The steps for making the subscription just described are as follows:
Step 1 Bring up the Event Perspective GUI. Then select the lower panel,Event Definitions , to enable the proper menus for event creation.Then select Actions →Event Definitons →Create . You will get a blankevent definition window.
Step 2 Fill the event definition as illustrated in Figure 6 on page 39.
38 Integrating TME 10 on the RS/6000 SP

Figure 6. Event Perspective Event Definitions Window
Step 3 Now click on the Create Condition button, fill in the condition page asillustrated in Figure 7 on page 40, then click Ok .
Chapter 4. Event Management Integration 39

Figure 7. Event Perspective Create Condit ion Window
Step 4 After you click Ok in the Condition Page, you get back to the EventDefinition page. You should then select the Response Options markerin the note book, and fill the reponse option as shown in Figure 8 onpage 41.
40 Integrating TME 10 on the RS/6000 SP

Figure 8. Event Perspective Response Options Window
Step 5 Now click on the Create button, and the subscription will be made tothe Event Management System.
You are now ready to test your subscription. Note that in ourexample we are monitoring node number 3, and running thetecad_pspp, as a result of the condition, on Node 0 (the controlworkstation). To test the subscription you will have to write a littleprogram which basically just hangs on a loop, and call it “testing.”
Step 6 Test the event generation by starting the “testing” program with thesame userid which you have subscribed for, in the node which yousubscribed for. (In our case, we subscribed for user root running the“testing” process on node 3. You can change the subscription to fityour environment.)
Chapter 4. Event Management Integration 41

To test the subscription, you run the “testing” command for a coupleseconds, and then kill it. This should create an arm and a rearmevent.
Important: You should verify that the event was really generated andproperly subscribed for. One effective way to make this check is togo to the control workstation and type the command:
#lssrc -ls pman.your_partition_name
where your_partition_name is the partition name for the node forwhich you subscribed. In our case, this command shows thefollowing information:
� �[k21s] [/usr/lpp/ssp/bin]> lssrc -ls pman.k21s
Subsystem Group PID Status pman.k21s pman 21720 active
pmand started at: Wed May 28 19:13:12 1997 pmand last refreshed at: Tracing is off ========================================================= Events for which registrations are as yet unacknowledged: ========================================================= ========================================================= Events for which actions are currently being taken: ========================================================= ========================================================= Events currently ready to be acted on by this daemon: ========================================================= ------------------ test1 ---------------- Currently ACTIVE Client root [email protected] at k21s.ppd.pok.ibm.com Resource Variable: IBM.PSSP.Prog.pcount Instance: NodeNum=3;ProgName=testing;UserName=root Predicate: X@0==0 Command to run: /usr/lpp/ssp/bin/tecad_pssp -s CRITICAL -a ″my_a dmin_ID″ -m ″the testing process died″ > /tmp/tecad.log Has run 1 times Last status: normal termination, exit status = 0 Last run at: Wed Jun 4 14:53:28 1997 Rearm predicate: X@0==1 Command to run on rearm event: /usr/lpp/ssp/bin/tecad_pssp -s WA RNING -a ″my_admin_ID″ -m ″the testing process is back″ > /tmp/tecad.log Has run 1 times Last status: normal termination, exit status = 0 Last run at: Wed Jun 4 15:36:07 1997� �
As you can see, the output of this command contains all theinformation about our subscription, and also tells how many timeseach arm/rearm event was triggered. It is essential that you verifythat the event is being properly triggered at this point. If it is not, youmust check your subscription. After you ensure that the event isbeing triggered, you can launch your T/EC console and verify that theevents are being received.
Step 7 If you have not yet done so, define the PSSP event source and anevent group which utilizes the PSSP_EVENT class as a filter. Thenassign this event group to your Event Console.
Step 8 Repeat the event generation procedure in Step 5 . Use the lssrccommand to verify that the tecad_pssp command was run.
Step 9 You should now receive events from the PSSP source. In our case,the arm and rearm events will appear as shown in Figure 9 onpage 43 and Figure 10 on page 44.
42 Integrating TME 10 on the RS/6000 SP

Figure 9. Arm Event Received from the PSSP Source
Chapter 4. Event Management Integration 43

Figure 10. Rearm Event Received from the PSSP Source
44 Integrating TME 10 on the RS/6000 SP

4.2.12 Debugging the Event Generation and ReceptionIf you fail to receive events, check the following:
• Check your event subscription and test the event generation by forcing theevent. Then use the lssrc command (as in Step 6 in 4.2.11, “An Example:Using the PSSP T/EC Adapter” on page 37) to verify that the tecad_psspcommand is being run.
• Use the wtdumprl command in the T/EC side to see if you are getting anyevent notifications from the PSSP source. If you are, the problem is not inthe SP system. You should then check your event source, event group, andevent filter definitions, as well as the event group assignments in yourconsole. If you are not getting anything, the problem may be in the SPsystem side.
• If you suspect that the tecad_pssp command is being run, but nothing is beinggenerated at the T/EC side, check if you have the proper configuration fileinstalled (tecad_pssp.cfg), and that it points to your T/EC server. Use thetest_agent command to force the execution of the tecad_pssp command (seeFigure 5 on page 34). Also, you may want to check for network connectivity.
4.3 Using the TME 10 T/EC SNMP AdapterPSSP 2.2 includes the Problem Management subsystem that provides aninfrastructure for acting on problem events within the SP system. The ProblemManagement subsystem lets you subscribe to Event Management events, and tospecify an SNMP trap as a response to an event.
The ability to issue an SNMP trap in response to an event allows you to reportproblem events occurring in your SP system directly to TME 10 EnterpriseConsole, or indirectly to an existing SNMP network manager such asNetView/6000 for AIX.
There are several ways to forward SNMP events from AIX to the TME 10Enterprise Console. In Figure 11 on page 46, an overview is displayed of thepossible ways to forward SNMP traps to the TME 10 Enterprise Console.
Chapter 4. Event Management Integration 45

Figure 11. SNMP Connections
In this chapter, the connection to T/EC with TME 10 T/EC SNMP Adapter isexplained. For an explanation of the connection using NetView/6000 for AIX,refer to 4.5, “Using NetView/6000 for AIX and TME 10 Enterprise Console” onpage 75.
The TME 10 Distributed Monitoring SNMP Monitor connection and the SystemMonitor (MLM/SIA) were not investigated during the writing of this redbook.
4.3.1 Adapter InstallationThe Tivoli documentation recommends that, by default, event adapters should beinstalled on the host that generates the SNMP traps.
In our situation, this is Event Perspectives on the control workstation. Therefore,the adapter was installed on the control workstation to receive SNMP trapsgenerated by Event Perspectives. The adapter software is distributed with T/ECand can be installed following the directions in the TME 10 Enterprise ConsoleEvent Adapter Guide: SNMP. The contents of this guide should be read andunderstood before proceeding with this section.
Since the SNMP trap adapter listens on UDP socket 162 for incoming SNMPtraps, you should check that the following entries exist in the /etc/services file:
46 Integrating TME 10 on the RS/6000 SP
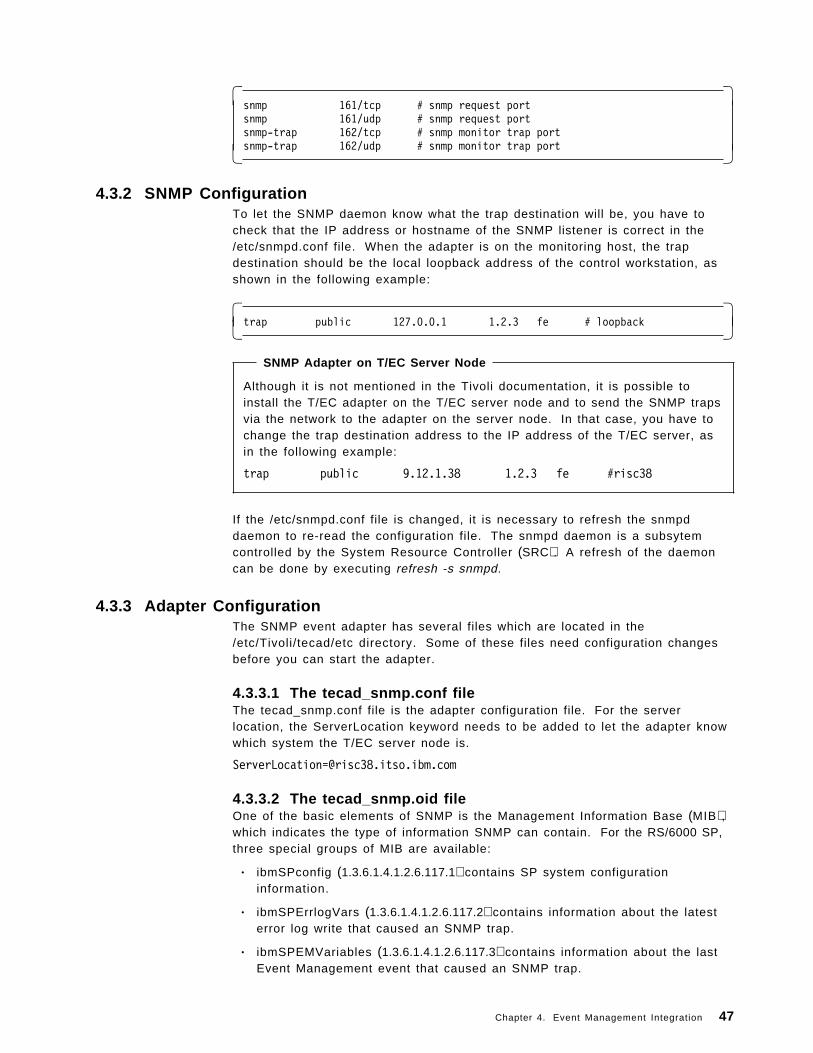
� �snmp 161/tcp # snmp request portsnmp 161/udp # snmp request portsnmp-trap 162/tcp # snmp monitor trap portsnmp-trap 162/udp # snmp monitor trap port� �
4.3.2 SNMP ConfigurationTo let the SNMP daemon know what the trap destination will be, you have tocheck that the IP address or hostname of the SNMP listener is correct in the/etc/snmpd.conf file. When the adapter is on the monitoring host, the trapdestination should be the local loopback address of the control workstation, asshown in the following example:
� �trap public 127.0.0.1 1.2.3 fe # loopback� �
SNMP Adapter on T/EC Server Node
Although it is not mentioned in the Tivoli documentation, it is possible toinstall the T/EC adapter on the T/EC server node and to send the SNMP trapsvia the network to the adapter on the server node. In that case, you have tochange the trap destination address to the IP address of the T/EC server, asin the following example:
trap public 9.12.1.38 1.2.3 fe #risc38
If the /etc/snmpd.conf file is changed, it is necessary to refresh the snmpddaemon to re-read the configuration file. The snmpd daemon is a subsytemcontrolled by the System Resource Controller (SRC). A refresh of the daemoncan be done by executing refresh -s snmpd.
4.3.3 Adapter ConfigurationThe SNMP event adapter has several files which are located in the/etc/Tivoli/tecad/etc directory. Some of these files need configuration changesbefore you can start the adapter.
4.3.3.1 The tecad_snmp.conf fileThe tecad_snmp.conf file is the adapter configuration file. For the serverlocation, the ServerLocation keyword needs to be added to let the adapter knowwhich system the T/EC server node is.
4.3.3.2 The tecad_snmp.oid fileOne of the basic elements of SNMP is the Management Information Base (MIB),which indicates the type of information SNMP can contain. For the RS/6000 SP,three special groups of MIB are available:
• ibmSPconfig (1.3.6.1.4.1.2.6.117.1) contains SP system configurationinformation.
• ibmSPErrlogVars (1.3.6.1.4.1.2.6.117.2) contains information about the latesterror log write that caused an SNMP trap.
• ibmSPEMVariables (1.3.6.1.4.1.2.6.117.3) contains information about the lastEvent Management event that caused an SNMP trap.
Chapter 4. Event Management Integration 47

For more information about SNMP SP MIB, see RS/6000 SP High AvailabilityInfrastructure or the IBM PSSP for AIX Administration Guide. A listing of theMIBs provided with PSSP 2.2 is included in Appendix B, “The SP MIBs” onpage 147.
The tecad_snmp.oid file contains a mapping of MIB values to variable nameswhich can be referenced in the tecad_snmp.cds file. In the example used, theSNMP traps generated for Event Management events are forwarded. We haveadded the object identifiers contained in Event Management traps to thistecad_snmp.oid file. The tecad_snmp.oid file contains a mapping of MIB valuesto variable names. These variables can be referenced in the tecad_snmp.cdsfile.
# IBM SP#″ibmSPEMEventID″ ″1.3.6.1.4.1.2.6.117.3.1.1″″ibmSPEMEventFlags″ ″1.3.6.1.4.1.2.6.117.3.1.2″″ibmSPEMEventTime″ ″1.3.6.1.4.1.2.6.117.3.1.3″″ibmSPEMEventLocation″ ″1.3.6.1.4.1.2.6.117.3.1.4″″ibmSPEMEventPartitionAddress″ ″1.3.6.1.4.1.2.6.117.3.1.5″″ibmSPEMEventVarsTableName″ ″1.3.6.1.4.1.2.6.117.3.1.6″″ibmSPEMEventVarsTableInstanceID″ ″1.3.6.1.4.1.2.6.117.3.1.7″″ibmSPEMEventVarName″ ″1.3.6.1.4.1.2.6.117.3.1.8″″ibmSPEMEventVarValueInstanceVector″ ″1.3.6.1.4.1.2.6.117.3.1.9″″ibmSPEMEventVarValuesTableInstanceID″ ″1.3.6.1.4.1.2.6.117.3.1.10″″ibmSPEMEventVarValue″ ″1.3.6.1.4.1.2.6.117.3.1.11″″ibmSPEMEventPredicate″ ″1.3.6.1.4.1.2.6.117.3.1.12″
4.3.3.3 The tecad_snmp.cds fileThe T/EC server is using an event class structure to recognize events. Theseevent classes are described in the tecad_snmp.cds file for the adapter and thetecad_snmp.baroc file for the T/EC server.
Both files are related to each other. The file tecad_snmp.cds defines how eventsare constructed from information contained in the SNMP trap. Normally, onlydefault SNMP traps are defined in these files. Therefore, SP events generatedby Event Perspectives are not recognized by the adapter and will not beforwarded or even recognized by the T/EC server. To make this all work, thespecific SP event definitions need to be defined in these files.
For each event class the SNMP adapter supports, one or more class definitionstatements (CDS) have to be added to the configuration file to define whichincoming events map to that class and how the slots of the outgoing eventinstance are to be filled. Figure 12 on page 49 shows an example of the classentry for one type of SP event.
A complete example of a Class Definition Statement file used with our SNMPadapter is listed in Appendix E, “Contents of SNMP Adapter Class DefinitionStatements” on page 183. Each trapid listed in the following description list ismatched with a Class Definition in the TME 10 Enterprise Console.
In our example we used the convention of setting the trapid to indicate theseverity level of the event. The following mapping was used:
trapid=1 SP_SNMP_FATAL_TRAP
trapid=2 SP_SNMP_CRITICAL_TRAP
48 Integrating TME 10 on the RS/6000 SP

trapid=3 SP_SNMP_MINOR_TRAP
trapid=4 SP_SNMP_WARNING_TRAP
trapid=5 SP_SNMP_HARMLESS_TRAP
trapid=?? SP_SNMP_UNKNOWN_TRAP
All ibmSPEM* values in the MIB are set and passed to T/EC. The correspondingBAROC file contains the same classes and variables.
You can add your own specific definitions to this example by copying one of theexisting classes and placing it before the SP_SNMP_UNKNOWN_TRAP class.
Change the $SPECIFIC selection test to contain the value of your unique trapidas set in the PSSP event. Make the required changes to the BAROC file that isloaded into T/EC. Refer to Figure 12 as an example.
� �CLASS SP_SNMP_FATAL_TRAPSELECT1: ATTR(=,$ENTERPRISE),
VALUE(PREFIX, ″1.3.6.1.4.1.2.6.117″) ;2: $SPECIFIC = 1;3: ATTR(=, ″ibmSPEMEventID″ ) ;4: ATTR(=, ″ibmSPEMEventFlags″ ) ;5: ATTR(=, ″ibmSPEMEventTime″ ) ;6: ATTR(=, ″ibmSPEMEventLocation″ ) ;7: ATTR(=, ″ibmSPEMEventPartitionAddress″ ) ;8: ATTR(=, ″ibmSPEMEventVarsTableName″ ) ;9: ATTR(=, ″ibmSPEMEventVarsTableInstanceID″ ) ;10: ATTR(=, ″ibmSPEMEventVarName″ ) ;11: ATTR(=, ″ibmSPEMEventVarValueInstanceVector″ ) ;12: ATTR(=, ″ibmSPEMEventVarValuesTableInstanceID″ ) ;13: ATTR(=, ″ibmSPEMEventVarValue″ ) ;14: ATTR(=, ″ibmSPEMEventPredicate″ ) ;FETCH1: IPNAME($SOURCE_ADDR) ;
MAPhostname = $F1 ;enterprise = $ENTERPRISE ;pssp_EMEventID = $V3 ;pssp_EMEventFlags = $V4 ;pssp_EMEventTime = $V5 ;pssp_EMEventLocation = $V6 ;pssp_EMEventPartitionAddress = $V7 ;pssp_EMEventVarsTableName = $V8 ;pssp_EMEventVarsTableInstanceID = $V9 ;pssp_EMEventVarName = $V10 ;pssp_EMEventVarValueInstanceVector = $V11 ;pssp_EMEventVarValuesTableInstanceID = $V12 ;pssp_EMEventVarValue = $V13 ;pssp_EMEventPredicate = $V14 ;
END� �Figure 12. The tecad_snmp.cds file. Class Definit ion Example for FATAL Traps.
The SELECT code segment of the class definition must contain one or more teststatements that an incoming event must satisfy to match this specific class.
Chapter 4. Event Management Integration 49

In this example, the $ENTERPRISE needs to map with the specific SP MIB, andthe $SPECIFIC (that is, the trapid) needs to have the value 1. The event is thenrecognized as FATAL based on the trapid convention used when creating theSNMP event.
$SPECIFIC is the specific trapid which can be configured on the SP in EventPerspectives. This trapid is now used to forward the severity of the event thatwas sent by the SNMP trap. In this example six class definition entries weredefined, to map to the six severity levels supported by T/EC.
1 FATAL
2 CRITICAL
3 MINOR
4 WARNING
5 HARMLESS
other UNKNOWN (For errors that did not match with this field)
The MAP code segment contains map statements to place the SNMP variablevalues in to corresponding BAROC variables defined in the tec_snmp.baroc file.These variables will be set to the values which are described in the SELECTfield.
A complete listing of the SP-specific entries is shown in Appendix E, “Contentsof SNMP Adapter Class Definition Statements” on page 183.
4.3.3.4 The tecad_snmp.baroc fileFor every event definition added or changed in the tecad_snmp.cds file, thecorresponding event class definition in the tecad_snmp.baroc file also needs tobe added or changed to recognize the forwarded SNMP trap information of theadapter. Event definition content and syntax are described in the TME 10 EIFUser′s Guide.
Figure 13 on page 52 shows the event definitions added to thetecad_snmp.baroc file which was installed in /etc/Tivoli/tecad/etc on the TivoliT/EC server.
The following classes have been defined to recognize SNMP traps that havebeen generated by the PSSP Event Manager and forwarded by your SNMPadapter. All ibmSPEM* data values set in the MIB have been translated tovariables. These values appear in the message displayed on the T/EC console.
SP_SNMP_TRAP a base class containing all of the BAROCvariable definitions for the MIB values
SP_SNMP_FATAL_TRAP flags trap as FATAL
SP_SNMP_CRITICAL_TRAP flags trap as CRITICAL
SP_SNMP_MINOR_TRAP flags trap as MINOR
SP_SNMP_WARNING_TRAP flags trap as WARNING
SP_SNMP_HARMLESS_TRAP flags trap as HARMLESS
SP_SNMP_UNKNOWN_TRAP flags trap as UNKNOWN
These classes have corresponding definitions in the SNMP adaptertecad_snmp.cds file previously described in 4.3.3.3, “The tecad_snmp.cds file” onpage 48. The SP_SNMP_TRAP class is the base class for SNMP events. This
50 Integrating TME 10 on the RS/6000 SP

means that the characteristics of this class are inherited by the underlyingclasses.
Chapter 4. Event Management Integration 51

� �TEC_CLASS :
SP_SNMP_TRAP ISA Specific_SNMP_TrapDEFINES {
origin: dup_detect = yes;pssp_EMEventID: INT32;pssp_EMEventFlags: INT32;pssp_EMEventTime: INT32;pssp_EMEventLocation: INT32;pssp_EMEventPartitionAddress: STRING;pssp_EMEventVarsTableName: STRING;pssp_EMEventVarsTableInstanceID: STRING;pssp_EMEventVarName: STRING;pssp_EMEventVarValueInstanceVector: STRING;pssp_EMEventVarValuesTableInstanceID: STRING;pssp_EMEventVarValue: STRING;pssp_EMEventPredicate: STRING;};
ENDTEC_CLASS :
SP_SNMP_FATAL_TRAP ISA SP_SNMP_TRAPDEFINES {
severity: default = FATAL;};
ENDTEC_CLASS :
SP_SNMP_CRITICAL_TRAP ISA SP_SNMP_TRAPDEFINES {
severity: default = CRITICAL;};
ENDTEC_CLASS :
SP_SNMP_MINOR_TRAP ISA SP_SNMP_TRAPDEFINES {
severity: default = MINOR;};
ENDTEC_CLASS :
SP_SNMP_WARNING_TRAP ISA SP_SNMP_TRAPDEFINES {
severity: default = WARNING;};
ENDTEC_CLASS :
SP_SNMP_HARMLESS_TRAP ISA SP_SNMP_TRAPDEFINES {
severity: default = HARMLESS;};
ENDTEC_CLASS :
SP_SNMP_UNKNOWN_TRAP ISA SP_SNMP_TRAPDEFINES {
severity: default = UNKNOWN;};
END� �Figure 13. The tecad_snmp.baroc file, SP-related entries
52 Integrating TME 10 on the RS/6000 SP

The T/EC server needs to be prepared to receive the SNMP traps. You have tocreate a new source on the T/EC server with the name of SNMP. This process iswell described in TME 10 Cookbook for AIX Systems Management andNetworking Applications and TME 10 Enterprise Console User ′s Guide.
In summary, the steps involved are as follows:
1. Create a new rule base that wil l be your working rule base.
2. Copy the default rule base into your working rule base.
3. Copy the special T/EC class definition file (the BAROC file) from thedistribution disk (for example on the control workstation) to the T/EC server.The class definition file is called tecad_snmp.baroc and it is installed in thedirectory /etc/Tivoli/tecad/etc.
4. Update the BAROC file with SP_SNMP adapter customizations.
5. Compile the rule base.
6. Load the rule base.
7. Stop and restart the event server.
After any change to the BAROC file, it has to be re-loaded into the rule base.Compile the rule base and load it into the server. Then stop and restart theserver again.
In order to receive events in a T/EC console, an event group needs to bedefined. Also, to receive events in that event group, a filter has to be specifiedas to what events should be directed to the event group.
There is a command available to simulate an event to test if the BAROC file isloaded correctly. To test the SP-specific entries the following example can beused:
wpostemsg -m ″test from wpostemsg″ SP_SNMP_FATAL_TRAP SNMP
4.3.4 Starting and Testing the Event AdapterBy default, the event adapter is always started when the control workstation isbooting up. When you start the adapter for the first time, it is called a cold start.This can be done manually with the following command:
� �tecad_snmp -c /etc/Tivoli/tecad/etc/tecad_snmp.conf
� �
Restarting a running adapter due to changes in the tecad_snmp.cds file is calleda warm start. This can be done by using the kill command, as follows:
� �kill -HUP <process_id>
or
kill -1 <process_id>� �
During adapter testing, it can be very useful to have extra information about thefunctioning of the adapter. You can adjust the tracing options in the/etc/Tivoli/tecad/etc/tecad_snmp.err file. By default all trace information is sent
Chapter 4. Event Management Integration 53
to /dev/null. Change /dev/null to a filename and you can follow the functioningof the adapter on the control workstation. For more information about thestartup of the adapter, see TME 10 Enterprise Console Event Adapter Guide:SNMP.
The wtdumprl command can be used to investigate all incoming T/EC events. Itwill generate a report of events received.
The adapter and T/EC server are now ready to receive SNMP traps generated byPSSP Event Perspectives. Figure 14 on page 55 shows the Event PerspectivesDefinition window. For the event action, the SNMP trapid was defined with avalue of 4. This will result in a warning event on the T/EC console window whenthis SNMP trap is generated.
54 Integrating TME 10 on the RS/6000 SP
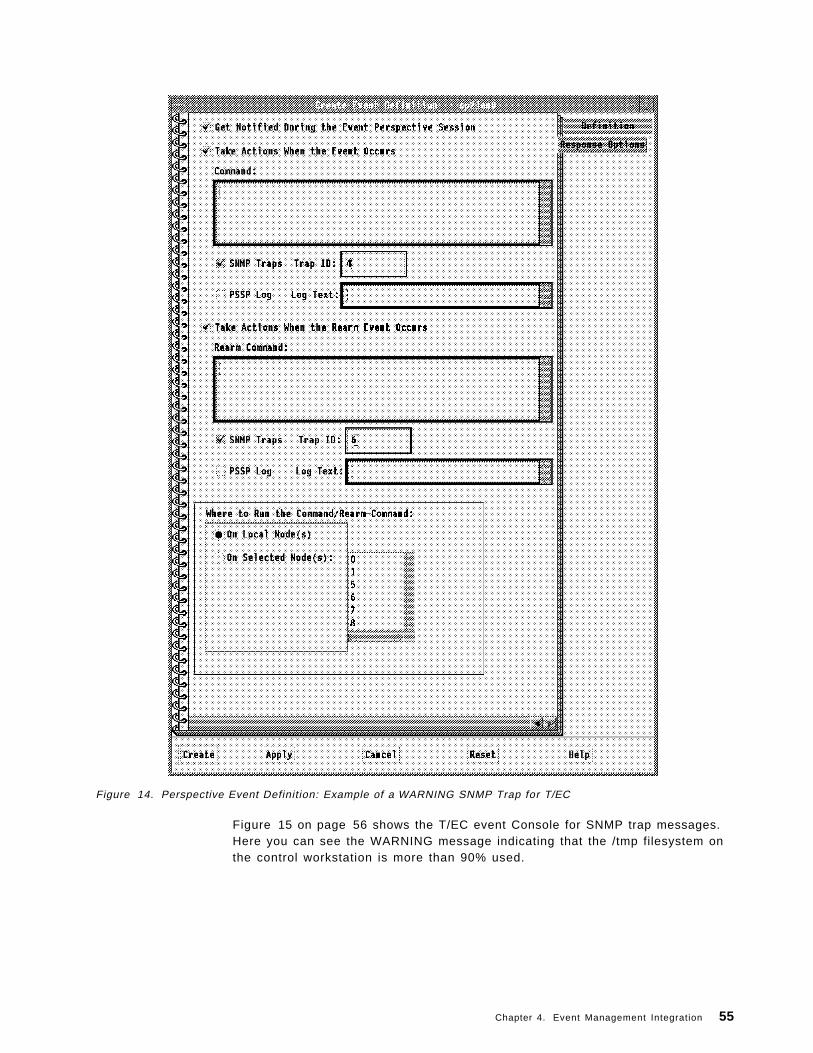
Figure 14. Perspective Event Definition: Example of a WARNING SNMP Trap for T/EC
Figure 15 on page 56 shows the T/EC event Console for SNMP trap messages.Here you can see the WARNING message indicating that the /tmp filesystem onthe control workstation is more than 90% used.
Chapter 4. Event Management Integration 55

Figure 15. T/EC SNMP Event Console: SNMP trap WARNING message
Figure 16 on page 57 shows the T/EC Event Group Message Viewer with amessage containing all available event information. You can see that all PSSPevent variables are forwarded to T/EC.
56 Integrating TME 10 on the RS/6000 SP

Figure 16. T/EC Message Viewer Window. T/EC message information describing the PSSP event that wasforwarded by the SNMP trap. (Note that this is an incomplete view. More data values are scrolled off the bottom.)
With this information, it is possible to take corrective actions on the RS/6000 SPsystem. These corrective actions can be either automatically generated by T/ECor by manual intervention.
Chapter 4. Event Management Integration 57

4.3.5 SNMP Adapter ValueThe real advantage of using the SNMP adapter for forwarding SP events to theTME 10 Enterprise Console is that the administrator is able to use differenttrapid′s to assign severity levels, or any other distinguishing value, to an event.The severity levels or other values can be used to filter the way the events willappear in the TME 10 Enterprise Console, and what actions should be performed,when an event is generated.
In this chapter, the granularity is limited to six levels, where each levelrepresents a severity level. Of course, a finer-grained level hierarchy could beimplemented to reflect certain system aspects in the SP in the trapid. Forexample, the following method could be used:
trapid 10001 to 10005 can be used for switch-related traps.
trapid 11001 to 11005 can be used for SP hardware-related traps.
trapid 12001 to 12005 can be used for control workstation-related traps.
Moreover, this list could be extended in many directions. Of course when a finergranularity is implemented, the Class Definitions Statement and the BAROC filemust be updated accordingly.
4.4 Using the TME 10 T/EC Logfile AdapterOne kind of general computing resource in the distributed environment is the logfile, which documents the running of programs and processes. Each entry in thelog file represents a confirmation of an activity, whether it was successful or not.
Log files are sometimes the only way to diagnose errors. However, it is noteasy to get the necessary information from them. First you have to determinethe location and filename of the log file. Also, the quantity of the information thatsystems and applications place in log files varies enormously. You may findyourself looking at a sequence of plain text messages, written one after anotherwith no consideration for severity or meaning.
Some operating systems provide a general purpose logging mechanism thatsystem components and applications can use. An example is the AIX syslogddaemon. With the T/EC logfile event adapter it is possible to generate T/ECevents based on messages from syslogd, as well as from any log files on thesystem. The T/EC logfile event adapter (the default) provides a set of BAROCclasses, imported into the rule base of the T/EC event server, to represent thesemessages. For details on the procedures to install and use the T/EC logfileevent adapter, refer to the ITSO redbook, TME 10 Cookbook for AIX SystemsManagement and Networking Applications.
The sequence of actions is as follows:
1. The T/EC logfile event adapter analyzes the messages in the log file usingpattern matching predefined in the Class Definition Statements configurationfile, tecad_logfile.cds.
2. If the message matches a specific pattern/class entry, the event adaptertransforms the message into an event and sends it to the T/EC event server.The default filters in the tecad_logfile.conf file are:
• Logfile_Base
• Logfile_Sendmail
58 Integrating TME 10 on the RS/6000 SP
• Amd_Unmounted
• Amd_Mounted
3. The T/EC event server then uses the BAROC file logfile.baroc with the T/EClogfile event adapter to process the event.
Most of the classes in the configuration files tecad_logfile.cds andtecad_logfile.baroc are predefined for general purpose solutions of systemmanagement. It may be necessary to create a customized solution for using theT/EC logfile event adapter to analyze the messages from specific applications,and then construct them into an event that can be processed by the T/EC eventadapter.
The following sections describe an example of how to incorporate T/EC and theT/EC logfile event adapter with the SP PSSP Problem Management subsystem toperform system monitoring tasks. The basic concept of this example is that thePSSP Problem Management subsystem client code, which is run where adefined event occurs, uses the system syslog facility to pass a log file entrycontaining an SP-specific message to the T/EC logfile event adapter. The logfileadapter uses the customized logfile tecad_logfile.cds to match the message to aspecific class and send it as an event to the T/EC Event Server, which uses acustomized BAROC file to process the event and display it on the event console.
4.4.1 How to Forward Events from a Log FileThe following steps document how an event defined by a client of the ProblemManagement subsystem on the control workstation can be translated to the T/ECconsole, using the logfile adapter. In this example, the SP-specific message inthe log file entry contains either the word busy or idle. Based on the differencein the message, the logfile adapter is configured accordingly, such that the ClassDefinition Statements file (xyz.cdf file) filters the description field of theSP-specific log file entry.
The following steps were excecuted on the control workstation. Steps one to sixrepresent the steps to define the parsing method and the format of the log fileentry.
Step 1 Alter the configuration file of the system syslog daemon to saveSP-specific messages generated by the PSSP Problem Managementsubsystem in a log file:
cat >> /etc/syslog.conf <<EOFdaemon.notice /tmp/log_pssp.logEOF
Step 2 Create the log file that will contain the SP-specific messages:
/usr/bin/touch /tmp/log_pssp.log
Step 3 Notify the system syslog daemon that the configuration file has beenchanged:
/usr/bin/refresh -s syslogd
Step 4 Use the PSSP Event Perspectives GUI or the pmandef command todefine an event to monitor the CPU utilization (for this example) onthe control workstation. In this example, an event will be generatedwhen the CPU utilization on the control workstation falls below apredefined condition. The event definitions are shown in Figure 17 on
Chapter 4. Event Management Integration 59
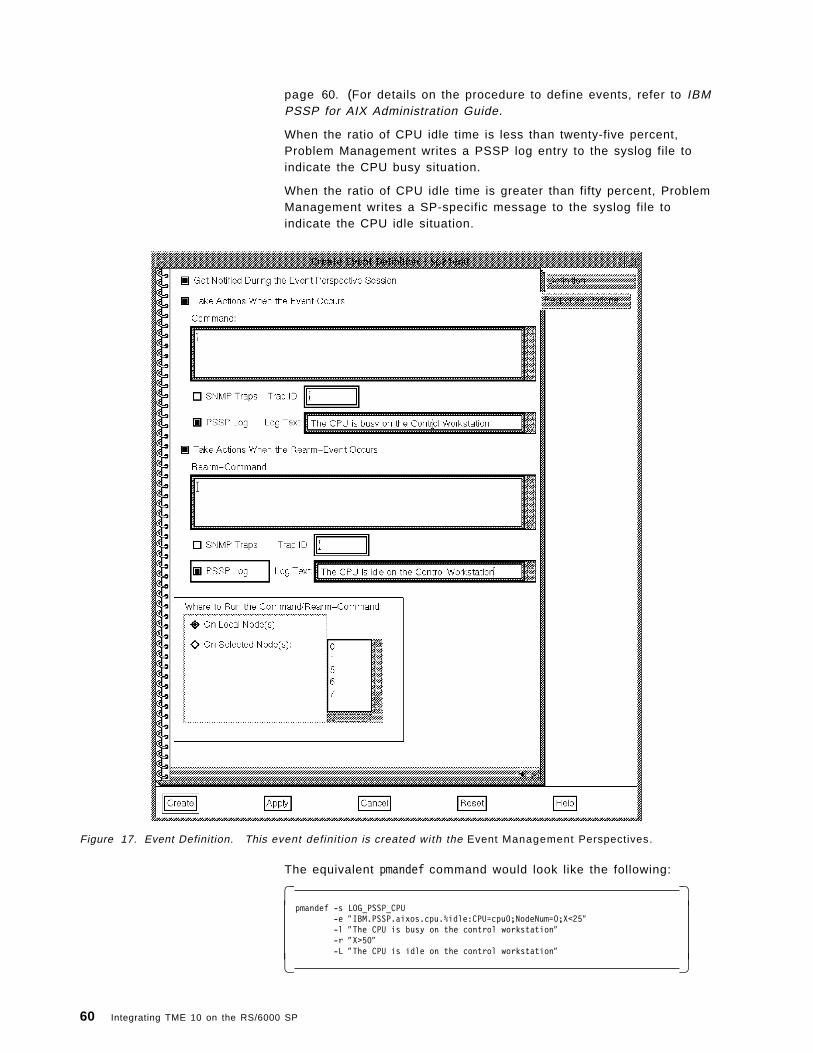
page 60. (For details on the procedure to define events, refer to IBMPSSP for AIX Administration Guide.
When the ratio of CPU idle time is less than twenty-five percent,Problem Management writes a PSSP log entry to the syslog file toindicate the CPU busy situation.
When the ratio of CPU idle time is greater than fifty percent, ProblemManagement writes a SP-specific message to the syslog file toindicate the CPU idle situation.
Figure 17. Event Definition. This event definit ion is created with the Event Management Perspectives.
The equivalent pmandef command would look like the following:
� �pmandef -s LOG_PSSP_CPU
-e ″IBM.PSSP.aixos.cpu.%idle:CPU=cpu0;NodeNum=0;X<25″-l ″The CPU is busy on the control workstation″-r ″X>50″-L ″The CPU is idle on the control workstation″
� �
60 Integrating TME 10 on the RS/6000 SP
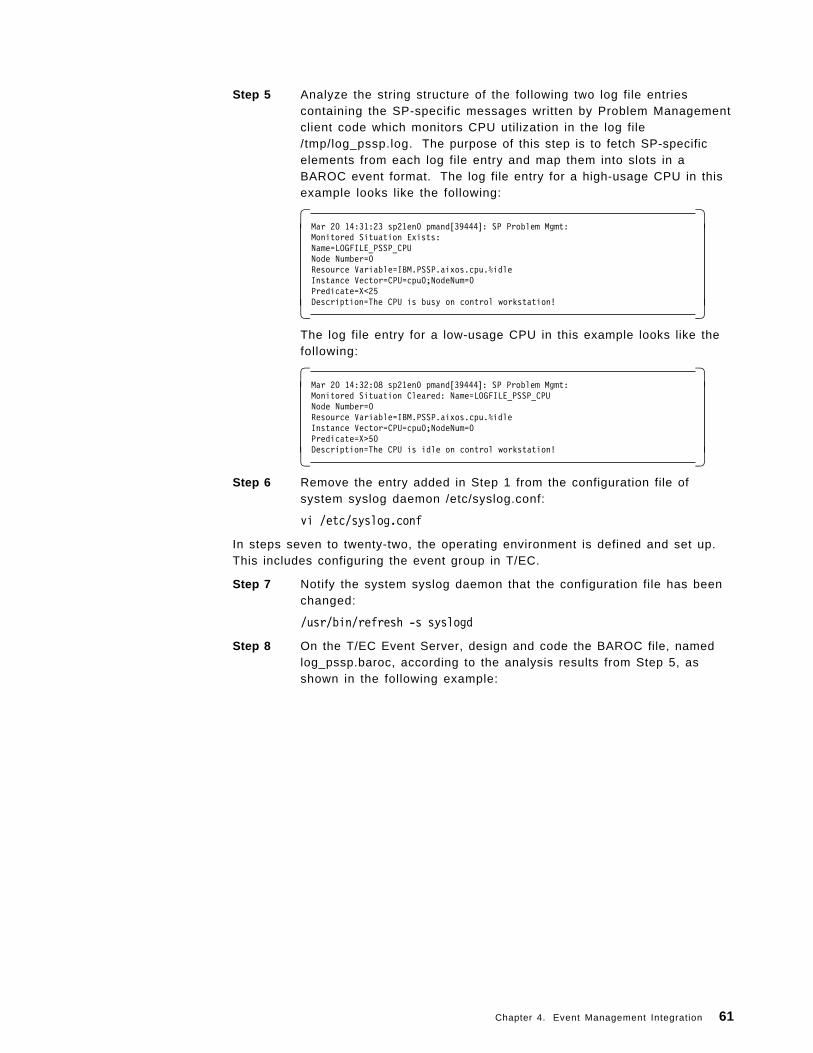
Step 5 Analyze the string structure of the following two log file entriescontaining the SP-specific messages written by Problem Managementclient code which monitors CPU utilization in the log file/tmp/log_pssp.log. The purpose of this step is to fetch SP-specificelements from each log file entry and map them into slots in aBAROC event format. The log file entry for a high-usage CPU in thisexample looks like the following:
� �Mar 20 14:31:23 sp21en0 pmand[39444]: SP Problem Mgmt:Monitored Situation Exists:Name=LOGFILE_PSSP_CPUNode Number=0Resource Variable=IBM.PSSP.aixos.cpu.%idleInstance Vector=CPU=cpu0;NodeNum=0Predicate=X<25Description=The CPU is busy on control workstation!� �
The log file entry for a low-usage CPU in this example looks like thefollowing:
� �Mar 20 14:32:08 sp21en0 pmand[39444]: SP Problem Mgmt:Monitored Situation Cleared: Name=LOGFILE_PSSP_CPUNode Number=0Resource Variable=IBM.PSSP.aixos.cpu.%idleInstance Vector=CPU=cpu0;NodeNum=0Predicate=X>50Description=The CPU is idle on control workstation!� �
Step 6 Remove the entry added in Step 1 from the configuration file ofsystem syslog daemon /etc/syslog.conf:
vi /etc/syslog.conf
In steps seven to twenty-two, the operating environment is defined and set up.This includes configuring the event group in T/EC.
Step 7 Notify the system syslog daemon that the configuration file has beenchanged:
/usr/bin/refresh -s syslogd
Step 8 On the T/EC Event Server, design and code the BAROC file, namedlog_pssp.baroc, according to the analysis results from Step 5, asshown in the following example:
Chapter 4. Event Management Integration 61

� �cat > log_pssp.baroc <<EOF# Component : log_pssp.baroc#
TEC_CLASS :Log_PSSP ISA Logfile_BaseDEFINES {
pssp_daemon: STRING, default=″pmand″ ;};END
TEC_CLASS :Log_PSSP_CPU ISA Log_PSSPDEFINES {
pssp_EM_event_name: STRING, default=″N/A″ ;pssp_node_number: STRING, default=″N/A″ ;pssp_EM_resource_variable: STRING, default=″N/A″ ;pssp_EM_IV_cpu: STRING, default=″N/A″ ;pssp_EM_IV_node: STRING, default=″N/A″ ;pssp_EM_predicate: STRING, default=″N/A″ ;pssp_EM_discription: STRING, default=″N/A″ ;
};END
TEC_CLASS :Log_PSSP_CPU_High ISA Log_PSSP_CPUDEFINES {severity: default = CRITICAL;};END
TEC_CLASS :Log_PSSP_CPU_Low ISA Log_PSSP_CPUDEFINES {severity: default = HARMLESS;};ENDEOF
� �Step 9 Define a new T/EC event source type, a log file labeled syslog, for the
log file events.
Note:
It is recommended that the TME 10 Enterprise Console desktop beused to perform all steps relative to T/EC.
Step 10 Create a new T/EC event group that selects log file events to bedisplayed.
Step 11 Assign the T/EC event group to the event console of the appropriateadministrator.
Step 12 Create a new T/EC rule base. Copy all rules and classes of thedefault rule base into the new rule base.
Step 13 Import log_pssp.baroc into this rule base. Its position in the class listmust be behind tecad_logfile.baroc.
Step 14 Compile and reload the rule base.
Step 15 Stop and start the T/EC event server.
Step 16 Copy tecad_logfile.fmt into the /tmp directory:
cd /tmpcp /etc/Tivoli/tecad/etc/tecad_logfile.fmt tecad_logfile.fmt
Step 17 Copy /tmp/log_pssp.log from the control workstation into the local/tmp directory:
62 Integrating TME 10 on the RS/6000 SP

cd /tmprcp sp21en0:/tmp/log_pssp.log /tmp/log_pssp.log
Step 18 Use the T/EC log file configuration facility to translate and add the twoSP-specific messages to /tmp/tecad_logfile.fmt, as follows:
Note:
For details on the procedures to install and use the T/EC logfileconfiguration facility, refer to the TME 10 Enterprise Console User′sGuide.
• Click on the event server icon with the right button to start thelogfile configuration facility, as shown in Figure 18.
Figure 18. Using the Logfi le Configuration Facility. Starting the LCF.
Chapter 4. Event Management Integration 63

• Select File→Open Format and select /tmp/tecad_logfile.fmt .
• Select File→Open Classes and select Rule Base as your rulebase.
• Select File→Open Logfile and select /tmp/log_pssp.log .
Now the dialog of the logfile configuration facility will look likeFigure 19.
Figure 19. The Logfi le Configuration Facility Dialog
• Click on the first SP-specific message in the dialog and look at itscurrent mapping.
• Click Clear to start a new mapping. When finished, click Commit .
• Click Select Class... , then choose the Log_PSSP_CPU_High class,as shown in Figure 20 on page 65.
64 Integrating TME 10 on the RS/6000 SP
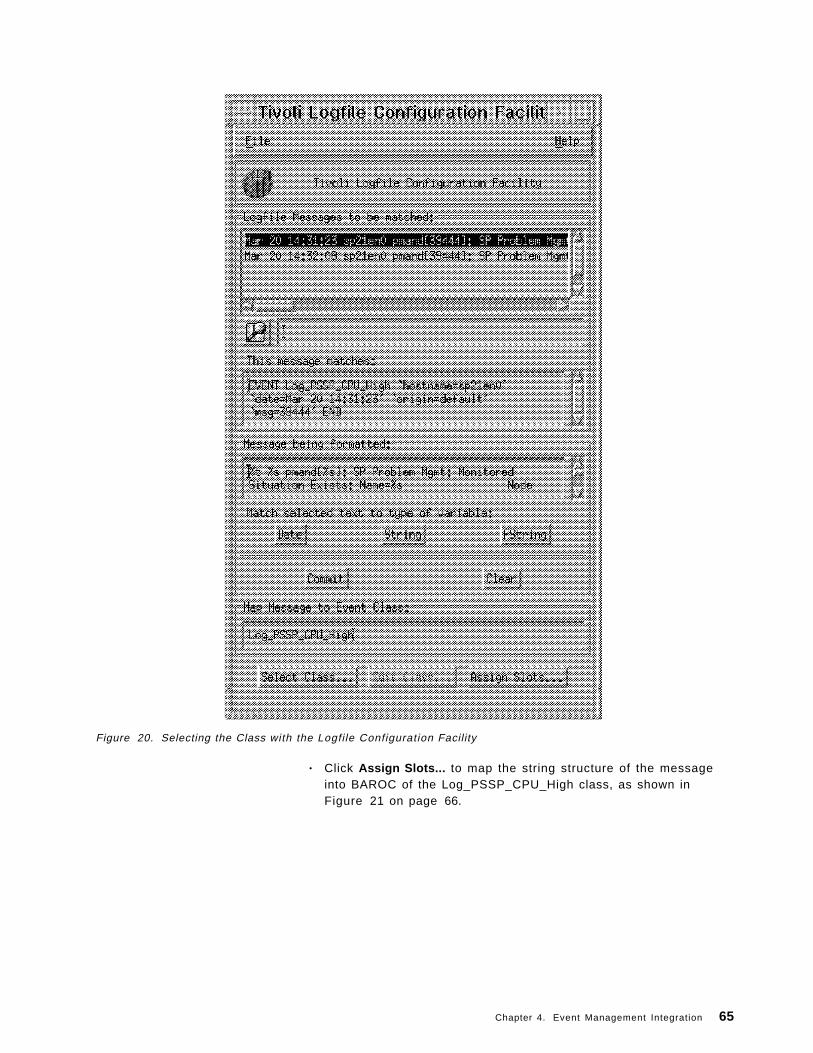
Figure 20. Selecting the Class with the Logfi le Configuration Facility
• Click Assign Slots... to map the string structure of the messageinto BAROC of the Log_PSSP_CPU_High class, as shown inFigure 21 on page 66.
Chapter 4. Event Management Integration 65

Figure 21. Mapping the Structure into the BAROC File
• Click Set & Close to save the results. Repeat for the secondmessage, but map it to the Log_PSSP_CPU_Low class.
The following lines are added to /tmp/tecad_logfile.fmt by the T/EClogfile configuration facility after you have finished this step.
66 Integrating TME 10 on the RS/6000 SP

� �FORMAT Log_PSSP_CPU_High FOLLOWS Logfile_Base%t %s pmand[%s]: SP Problem Mgmt: Monitored Situation Exists:Name=%s Node Number=%s Resource Variable=%s Instance Vector=CPU=%s;NodeNum=%s Predicate=%s Description=%s+ busy %s+pid $3pssp_EM_event_name $4pssp_node_number $5pssp_EM_resource_variable $6pssp_EM_IV_cpu $7pssp_EM_IV_node $8pssp_EM_predicate $9END
FORMAT Log_PSSP_CPU_Low FOLLOWS Logfile_Base%t %s pmand[%s]: SP Problem Mgmt: Monitored Situation Exists:Name=%s Node Number=%s Resource Variable=%s Instance Vector=CPU=%s;NodeNum=%s Predicate=%s Description=%s+ idle %s+pid $3pssp_EM_event_name $4pssp_node_number $5pssp_EM_resource_variable $6pssp_EM_IV_cpu $7pssp_EM_IV_node $8pssp_EM_predicate $9END� �
Step 19 On the control workstation, copy /tmp/tecad_logfile.fmt from the T/ECserver into the local /etc/Tivoli/tecad/etc directory:
cd /etc/Tivoli/tecad/etccp tecad_logfile.fmt tecad_logfile.fmt.origrcp risc38:/tmp/tecad_logfile.fmt tecad_logfile.fmt
Step 20 Generate a new Class Definition Statement configuration file for theT/EC logfile event adapter:
cp tecad_logfile.cds tecad_logfile.cds.orig../bin/logfile_gencds tecad_logfile.fmt > tecad_logfile.cds
Step 21 Notify the T/EC logfile event adapter that the configuration file hasbeen changed:
../bin/init.tecad_logfile stop
../bin/init.tecad_logfile start
Step 22 On the T/EC server, start up the event console of appropriateadministrator.
Later you will see the two major log file events with the twoSP-specific messages displayed in the event console, as shown inFigure 22 on page 68.
Chapter 4. Event Management Integration 67
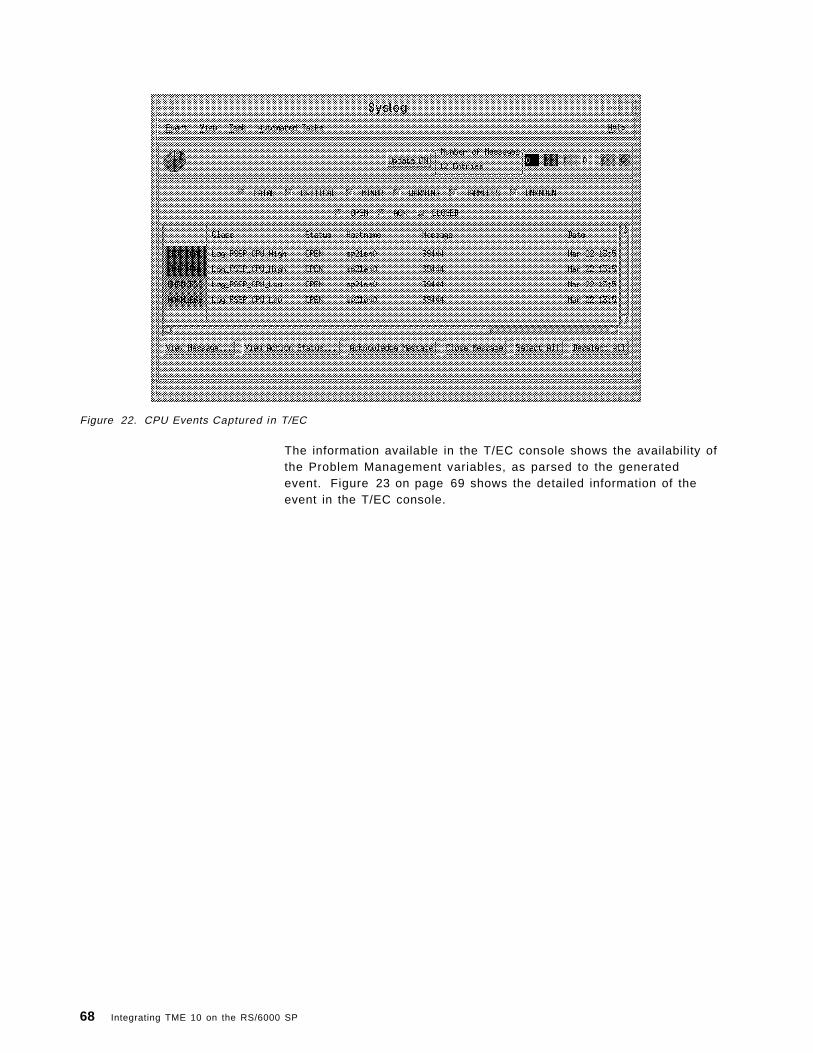
Figure 22. CPU Events Captured in T/EC
The information available in the T/EC console shows the availability ofthe Problem Management variables, as parsed to the generatedevent. Figure 23 on page 69 shows the detailed information of theevent in the T/EC console.
68 Integrating TME 10 on the RS/6000 SP
Figure 23. Problem Management Information. Available information in the detailed view.
4.4.2 How to Assign Severities Using a Log FileThere is another, similar way to use the T/EC logfile event adapter, which is torepeat all the steps of 4.4.1, “How to Forward Events from a Log File” onpage 59, except for the use of the Event Management class definitions as filtersin the logfile adapter.
In this example, the classes of the Event Management infrastructure are used toassign a different severity level when an event from that class is generated.This means that for the classes listed and defined in the SDR
Chapter 4. Event Management Integration 69
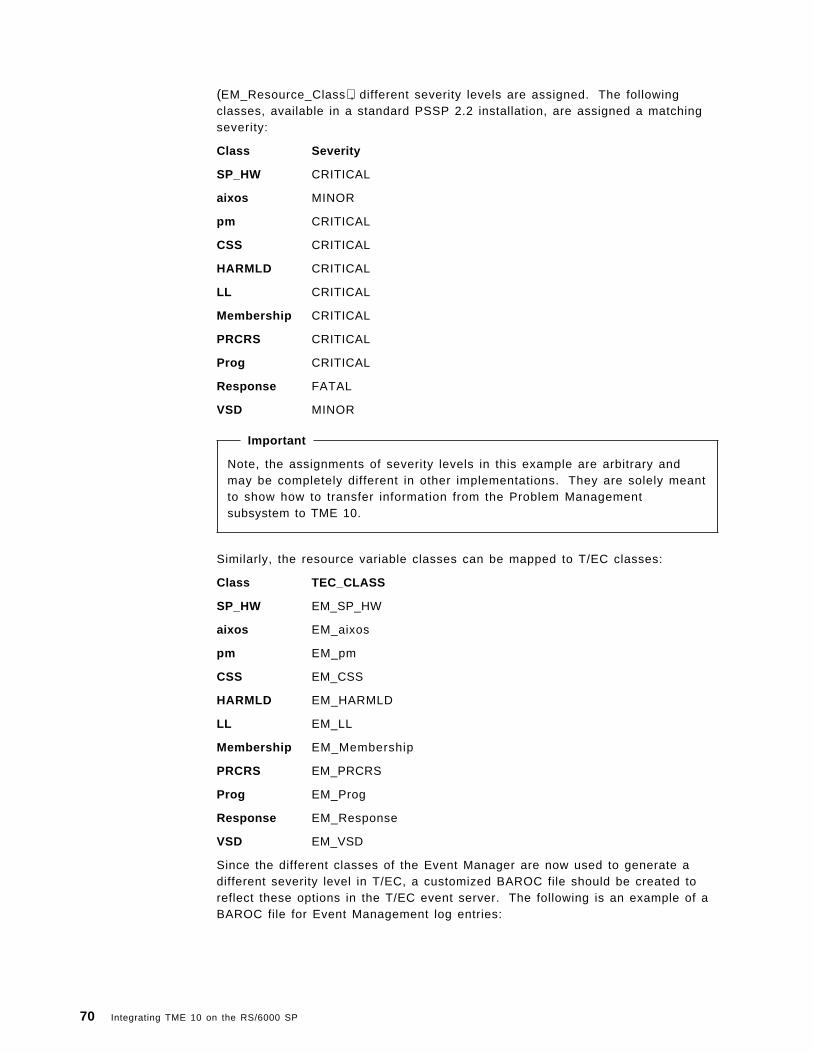
(EM_Resource_Class), different severity levels are assigned. The followingclasses, available in a standard PSSP 2.2 installation, are assigned a matchingseverity:
Class Severity
SP_HW CRITICAL
aixos MINOR
pm CRITICAL
CSS CRITICAL
HARMLD CRITICAL
LL CRITICAL
Membership CRITICAL
PRCRS CRITICAL
Prog CRITICAL
Response FATAL
VSD MINOR
Important
Note, the assignments of severity levels in this example are arbitrary andmay be completely different in other implementations. They are solely meantto show how to transfer information from the Problem Managementsubsystem to TME 10.
Similarly, the resource variable classes can be mapped to T/EC classes:
Class TEC_CLASS
SP_HW EM_SP_HW
aixos EM_aixos
pm EM_pm
CSS EM_CSS
HARMLD EM_HARMLD
LL EM_LL
Membership EM_Membership
PRCRS EM_PRCRS
Prog EM_Prog
Response EM_Response
VSD EM_VSD
Since the different classes of the Event Manager are now used to generate adifferent severity level in T/EC, a customized BAROC file should be created toreflect these options in the T/EC event server. The following is an example of aBAROC file for Event Management log entries:
70 Integrating TME 10 on the RS/6000 SP
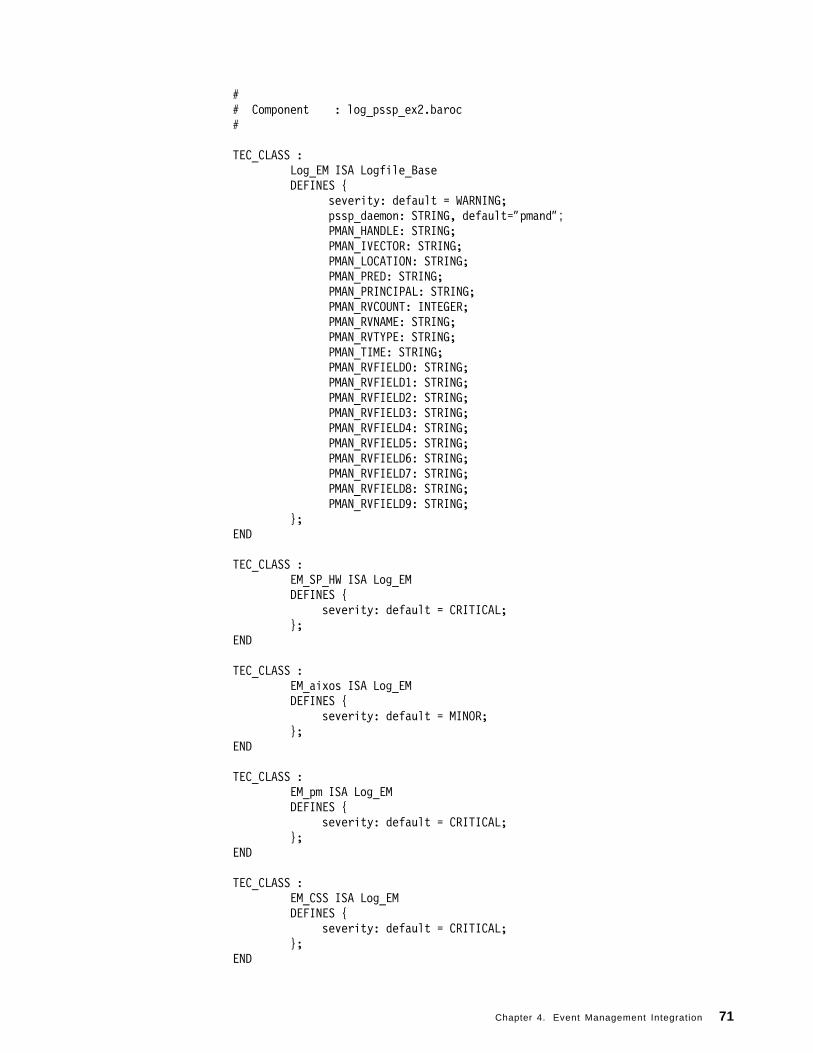
## Component : log_pssp_ex2.baroc#
TEC_CLASS :Log_EM ISA Logfile_BaseDEFINES {
severity: default = WARNING;pssp_daemon: STRING, default=″pmand″ ;PMAN_HANDLE: STRING;PMAN_IVECTOR: STRING;PMAN_LOCATION: STRING;PMAN_PRED: STRING;PMAN_PRINCIPAL: STRING;PMAN_RVCOUNT: INTEGER;PMAN_RVNAME: STRING;PMAN_RVTYPE: STRING;PMAN_TIME: STRING;PMAN_RVFIELD0: STRING;PMAN_RVFIELD1: STRING;PMAN_RVFIELD2: STRING;PMAN_RVFIELD3: STRING;PMAN_RVFIELD4: STRING;PMAN_RVFIELD5: STRING;PMAN_RVFIELD6: STRING;PMAN_RVFIELD7: STRING;PMAN_RVFIELD8: STRING;PMAN_RVFIELD9: STRING;
};END
TEC_CLASS :EM_SP_HW ISA Log_EMDEFINES {
severity: default = CRITICAL;};
END
TEC_CLASS :EM_aixos ISA Log_EMDEFINES {
severity: default = MINOR;};
END
TEC_CLASS :EM_pm ISA Log_EMDEFINES {
severity: default = CRITICAL;};
END
TEC_CLASS :EM_CSS ISA Log_EMDEFINES {
severity: default = CRITICAL;};
END
Chapter 4. Event Management Integration 71
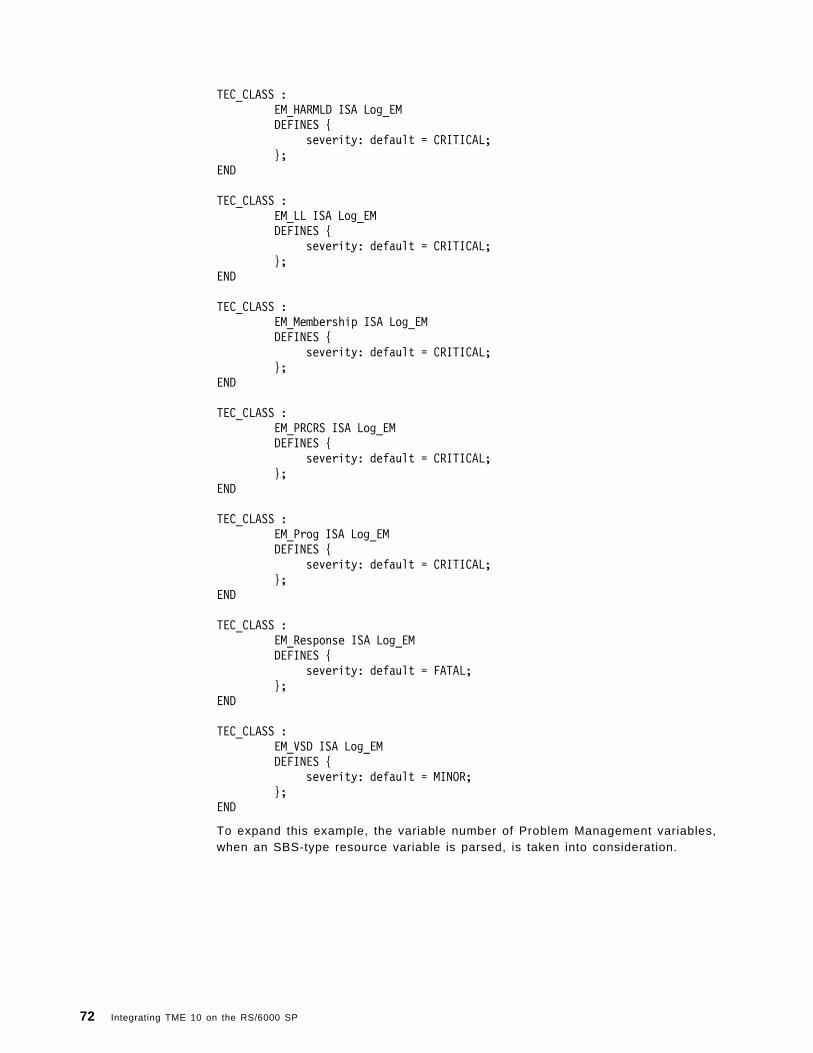
TEC_CLASS :EM_HARMLD ISA Log_EMDEFINES {
severity: default = CRITICAL;};
END
TEC_CLASS :EM_LL ISA Log_EMDEFINES {
severity: default = CRITICAL;};
END
TEC_CLASS :EM_Membership ISA Log_EMDEFINES {
severity: default = CRITICAL;};
END
TEC_CLASS :EM_PRCRS ISA Log_EMDEFINES {
severity: default = CRITICAL;};
END
TEC_CLASS :EM_Prog ISA Log_EMDEFINES {
severity: default = CRITICAL;};
END
TEC_CLASS :EM_Response ISA Log_EMDEFINES {
severity: default = FATAL;};
END
TEC_CLASS :EM_VSD ISA Log_EMDEFINES {
severity: default = MINOR;};
END
To expand this example, the variable number of Problem Management variables,when an SBS-type resource variable is parsed, is taken into consideration.
72 Integrating TME 10 on the RS/6000 SP

Note:
An SBS-type resource variable is part of the resource variable types definedin the Event Management infrastructure.
SBS stands for Structured Byte String and represents a one-dimensionalarray containing variables. These variables can have one or more fields.The number of fields is dependent on the resource monitor feeding thespecific SBS.
For example, the resource variable IBM.PSSP.Prog.xpcount is a SBS-typeresource variable, where a number of fields are provided. The first fieldcontains the current program count, and the second field contains theprevious program count. The variable type in each field can be of any type.
An SBS variable can have many entries. The T/EC console is not aware of this,so to prepare the T/EC, the format file for the logfile adapter should beconfigured such that all possibilities of messages are reflected.
In this example, we limited the number of SBS fields to one big field, containingall the PMAN_RVFIELD variables. Also note that each class in the BAROCdefinition should have a class definition statement. As an example, the followingentry represents the class deinition statement for EM_Prog. Similar definitionsshould be made for all classes defined in the log_pssp_ex2.baroc file.
� �FORMAT EM_Prog FOLLOWS Log_EM%t %s %s: PMAN_HANDLE=%s PMAN_IVECTOR=%s PMAN_LOCATION=%s PMAN_PRED=%sPMAN_PRINCIPAL=%s PMAN_RVCOUNT=%s PMAN_RVNAME=IBM.PSSP.Prog.%sPMAN_RVTYPE=%s PMAN_TIME=%s+ PMAN_RVFIELD0=%s+PMAN_HANDLE $4PMAN_IVECTOR $5PMAN_LOCATION $6PMAN_PRED $7PMAN_PRINCIPAL $8PMAN_RVCOUNT $9PMAN_RVNAME $10PMAN_RVTYPE $11PMAN_TIME $12PMAN_RVFIELD0 $13END� �
A complete class definition statement file as used in this example can be foundin Appendix F, “Logfile CDS” on page 189.
In order to get all PMAN_RVFIELD variables at the end of the log file messagestring, the Problem Management variables must be sorted before they are sentto the syslog daemon. At the writing of this document, a practical rather thanelegant solution was developed to make that possible. The command to sort theProblem Management environment variables looks like this:
/usr/bin/env | /usr/bin/grep PMAN | sed ′ s/_RVFIELD/zzzz/′| sort | sed ′ s/zzzz/_RVFIELD′
To reflect this, the filter should be added to the command in the event responseof the event definition. The event definition executes the logger command tosend a log entry to the syslog daemon with all the Problem Managementenvironment variables attached, as shown in the following example:
Chapter 4. Event Management Integration 73

� �pmandef -s example2
-e ″AnyReourceVariable;AnyInstanceVector;AnyPredicate″-c ″ / usr/bin/env | /usr/bin/grep PMAN |
sed ′ s/_RVFIELD/zzzz/′ | sort | sed ′ s/zzzz/_RVFIELD′ |/usr/bin/xargs /usr/bin/logger −pdaemon.notice″
-r ″AnyReArmPredicate″-C ″ / usr/bin/env | /usr/bin/grep PMAN |
sed ′ s/_RVFIELD/zzzz/′ | sort | sed ′ s/zzzz/_RVFIELD′ |/usr/bin/xargs /usr/bin/logger −pdaemon.notice″
� �
After successful configuration of the log file source and the event group, theevent console is able to receive messages from the log file source. An exampleof such a window is displayed in Figure 24.
Figure 24. T/EC LOGFILE Source. Display of Events from Problem Management.
The advantage of the second example is the ability to get more of the ProblemManagement environment variables than the first one does. But through thecustomization capability of the T/EC logfile, the event adapter operates onnon-pipe log files written by the syslog daemon. The first example is easilymodified to perform SP system management tasks based on the other SP systemlog files, for example /var/adm/SPlogs/SPdaemon.log.
74 Integrating TME 10 on the RS/6000 SP

4.4.3 Summary of Using the Logfile AdapterA large number of events can be captured with the logfile adapter.
The RS/6000 SP uses a variety of log files, which can be consolidated to the TME10 Enterprise Console using the logfile adapter. As described in 4.4.1, “How toForward Events from a Log File” on page 59 and 4.4.2, “How to AssignSeverities Using a Log File” on page 69, there are a number of ways to interpretthe contents of a log file entry. In both examples, the TME 10 Enterprise Consolefor log file events reads the contents of fields and, depending on the fieldcharacteristics, a certain event with a certain severity will be generated.
Of course the best solution for assigning severity levels to typical events is tomake sure that the description field contains a string determining the severity ofthe event. So, the most flexible implementation of using the logfile adapter is togenerate events from the Problem Management subsystem, where the log fileentry contains a message indicating the severity of the event. This case was notinvestigated specifically for this residency, but would be easy to determine fromthe contents of this chapter. Obviously, the format file (tecad_logfile.fmt) fileshould be recreated and loaded in the TME 10 Enterprise Console, to reflect thechanged implementation.
4.5 Using NetView/6000 for AIX and TME 10 Enterprise ConsoleThe objective of this section is to send the SNMP traps from NetView/6000 forAIX to the TME 10 Enterprise Console. We created SP-specific events from PSSP2.2, using the Problem Management component. These events will first go intoNetView/6000 for AIX and be displayed on the Event Console. The eventintegration could possibly stop by using the NetView/6000 for AIX software only.In this section, we extended the possibilities and also forwarded the events tothe T/EC. The T/EC rule engine will process the incoming event, display it on theEvent Console, and initiate actions defined to respond to that type of event.
4.5.1 Environment IntroductionThe versions used in this example are NetView/6000 for AIX (Ver. 4.1.2) and T/EC(Ver. 2.6) server running on systems named sp2en0 and risc38, respectively. Weused the SP2 control workstation named sp21en0 to generate the SNMP trapsfrom PSSP 2.2. Figure 25 on page 76 describes the different components thatprocessed the events used in our lab.
Chapter 4. Event Management Integration 75

Figure 25. Event Consoles. The forward function of NetView/6000 for AIX.
4.5.2 Setup procedure in NetView/6000 for AIXThis section describes the procedure to configure NetView/6000 for AIX to beused as a forwarding mechanism to send messages to the T/EC.
Step 1 Load the SP MIBs.
The SP MIB located in /usr/lpp/ssp/config/snmp_proxy/ibmSPMIB.myfile must be copied into the NetView running station under/usr/OV/snmp_mibs directory. The purpose of loading a MIB is todefine the MIB objects so that NetView/6000 for AIX can understandthose SP-specific MIB definitions.
The MIB must be loaded into NetView/6000 for AIX, usingOptions →Load/Unload →SNMP... from the NetView window.
Once the MIB is loaded, as shown in Figure 26 on page 77, you cantraverse the MIB tree and select objects from the SP-specific MIB(Enterprise ID 1.3.6.1.4.1.2.6.117) by selecting MIB Browser in theTools function menu to get or set the MIB values.
76 Integrating TME 10 on the RS/6000 SP

Figure 26. SP MIBS -- Loading the SP MIB
Figure 27 on page 78 shows the MIB browser as accessed from theNetView console.
Chapter 4. Event Management Integration 77
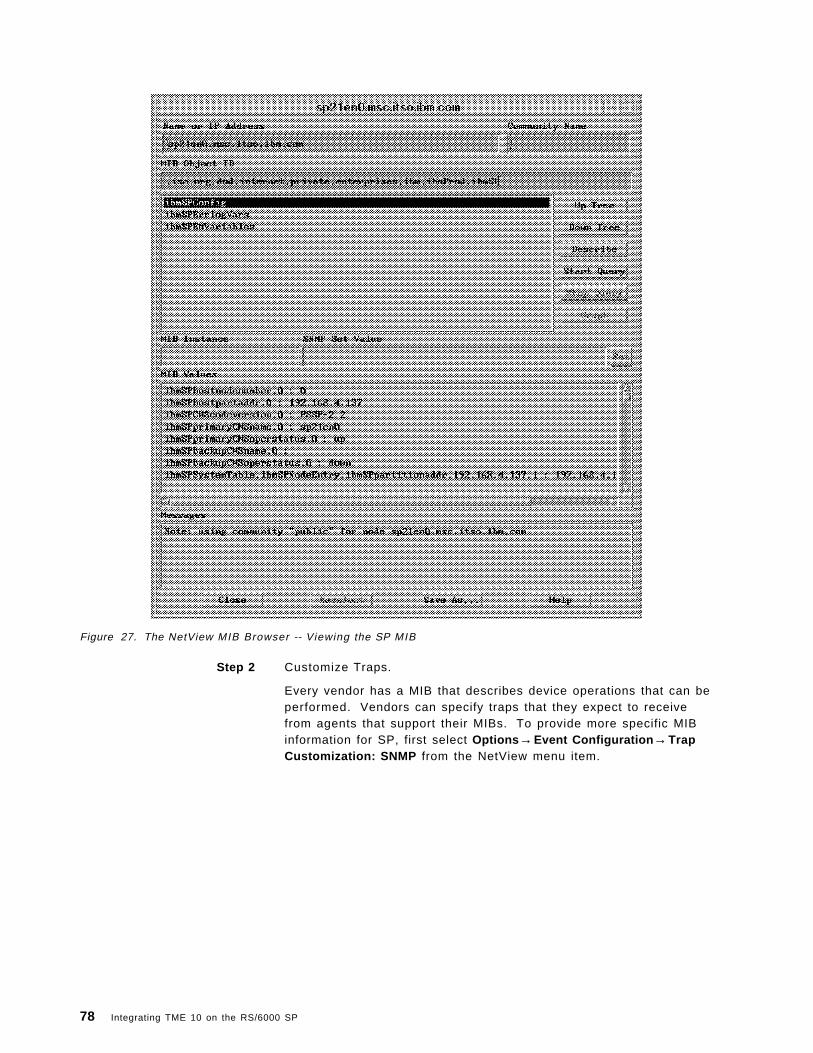
Figure 27. The NetView MIB Browser -- Viewing the SP MIB
Step 2 Customize Traps.
Every vendor has a MIB that describes device operations that can beperformed. Vendors can specify traps that they expect to receivefrom agents that support their MIBs. To provide more specific MIBinformation for SP, first select Options →Event Configuration →TrapCustomization: SNMP from the NetView menu item.
78 Integrating TME 10 on the RS/6000 SP
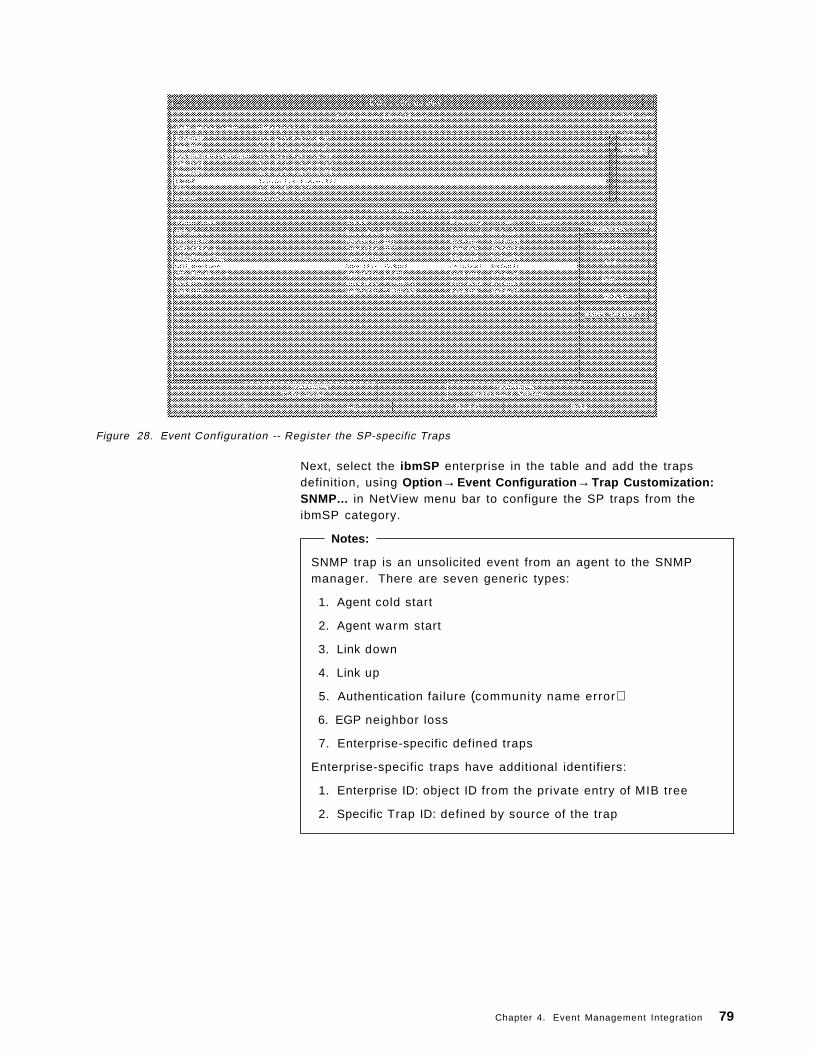
Figure 28. Event Configuration -- Register the SP-specific Traps
Next, select the ibmSP enterprise in the table and add the trapsdefinition, using Option →Event Configuration →Trap Customization:SNMP... in NetView menu bar to configure the SP traps from theibmSP category.
Notes:
SNMP trap is an unsolicited event from an agent to the SNMPmanager. There are seven generic types:
1. Agent cold start
2. Agent warm start
3. Link down
4. Link up
5. Authentication failure (community name error)
6. EGP neighbor loss
7. Enterprise-specific defined traps
Enterprise-specific traps have additional identifiers:
1. Enterprise ID: object ID from the private entry of MIB tree
2. Specific Trap ID: defined by source of the trap
Chapter 4. Event Management Integration 79

Figure 29. Register Traps -- Configuration of Trap Characteristics
When an event is configured, it is added to the/usr/OV/conf/C/trapd.conf file. The configuration file is used by theSNMP manager to activate the traps received.
Step 3 Set up NetView/6000 for AIX to send the event to T/EC.
On the command line, invoke:
smitty nv6000
then select Configure →Configure for Tivoli .
80 Integrating TME 10 on the RS/6000 SP

Figure 30. Using SMIT to Configure NetView. Forwarding NetView events to TME 10 Enterprise Console.
Set the Forward Events... option to yes and specify the name of theT/EC server. Select the ruleset name from /usr/OV/conf/rulesets/entry, then select forwardall.rs as the ruleset to use for forwarding allNetView events to the T/EC event console. Note that NetView/6000 forAIX must have the PTF U443133 installed to allow forwarding eventsto T/EC directly, without having the NetView Adapter installed.
Step 4 To cause these changes to take effect, stop and restart the nvserverddaemon by using the following commands:
ovstop nvserverdovstart nvserverd
To prepare the T/EC server to receive the events, you need to import the eventclass definitions. There is only one BAROC file containing the single event classused by this adapter: /usr/OV/conf/nvserverd.baroc.
The contents of our sample nvserverd.baroc file is shown in the followingexample:
Chapter 4. Event Management Integration 81

� �#!/bin/ksh############################################################################## ## NetView generic trap ## ##############################################################################TEC_CLASS :
Nvserverd_Event ISA EVENTDEFINES {
source: default = nvserverd;nv_enterprise: STRING;nv_generic: INT32;nv_specific: INT32;nv_var1: STRING;nv_var2: STRING;nv_var3: STRING;nv_var4: STRING;nv_var5: STRING;nv_var6: STRING;nv_var7: STRING;nv_var8: STRING;nv_var9: STRING;nv_var10: STRING;nv_var11: STRING;nv_var12: STRING;nv_var13: STRING;nv_var14: STRING;nv_var15: STRING;};
END� �
The slot defined in the class has the following meaning:
source Set to nvserverd.
nv_enterprise The enterprise ID (MIB object) from the trap. This is theNetView Enterprise ID for internally generated events.
nv_generic The generic trap number.
nv_specific The specific trap number.
nv_varn The values of the variables within the trap or event. Fifteenvariables are defined in the BAROC file. Most traps only have afew variables, so having a limit of 15 is not generally a problem.
The adapter also sets the event severity and the event messagetext (severity and msg are slots inherited from the base eventclass, so they are not redefined in the nvserverd.baroc file).These values are translated from the values defined when theevent is configured in NetView/6000 for AIX. You perform theconfiguration by selecting Options →Event Configuration →TrapCustomization from the NetView menu bar. The followingsection is the step to import the event class into the T/ECserver, compile the rule base, load it, and restart the eventserver.
82 Integrating TME 10 on the RS/6000 SP
4.5.3 Setup procedure in T/ECThis section describes the procedure to configure the T/EC event server forreceiving NetView events. The steps listed here describe a process similar tothe process described in 4.4.1, “How to Forward Events from a Log File” onpage 59. However, in these steps we use the equivalent command lineapproach instead of the TME 10 Desktop.
A rule base contains two types information:
• Event class which defines the structure of an arriving event. The definitionsare provided in *.baroc file by the event adapter.
• Event rules which define the actions to be performed when an event isreceived.
To load the rule base, do the following:
Step 1 Create a rule base in the Event Server Console (rulebase.gif):
wcrtrb -d /full/path/name RBname
Also refer to the lwlsrrb command to find the directory of existing rulebases.
Step 2 Copy the default rule base (class definition and rule) so that it can beimported into the new rule base:
wcprb -cr sourceRB destinationRB
Step 3 Import a new class file (*.baroc) into the rule base:
wimprbclass nvserverd.baroc RBname
The import of classes must be done in this order to make sure thatthe class hierarchy can be resolved.
Step 4 Load and compile the new rule base.
Check the BAROC file class definition:
wchkclass nvserverd.baroc RBname
Import the BAROC file into rule base:
wimprbrules RBname
Compile the new rule base:
wcomprules RBname
Load the new rule base:
wloadrb RBname
Step 5 Shut down and restart the Event Server.
Shut down the Event server:
wstopesvr
Restart the Event server:
wstartesvr
The file /usr/OV/conf/nvserverd.baroc is generated, which can beloaded in the active rule base.
Chapter 4. Event Management Integration 83

4.5.4 Implement Event Adapter, Event Source, and GroupThe event server depends on events being received. The basic behavior of theevent server is that no events are processed until the event source is defined.Event adapters send events to the reception engine of the event server. Anevent source is simply a tag given to an event by the event adapter to assignwhat type of event adapter sent the event. The value of the event source isdefined by the senior administrator. An event group is a collection of eventfilters. An event group is used to logically represent a collection of hostsrunning a particular application from a given event adapter source.
Create Event Source Select the New event sources menu item from the pop-upmenu on the event server icon.
wcrtsrc [-S server] [-b bitmap] [-l label] source
Event sources must be created by a senior administrator.
Create Event Group Select the New event group menu item from the pop-upmenu on the event server icon. Then, create the event group filter.
# wcrteg [-s server] [-b bitmap] [event_group]
Assign Event Groups Select the Assign Event Group menu item from the pop-upmenu on the administrator ′s event console.
# wassigneg console event_group [role ...]
4.5.5 Event correlation with NetView/6000 for AIX and T/ECFrom PSSP, create a CPU monitor event, then select the SNMP trap options toforward it to NetView, as shown in Figure 31
Figure 31. Event Perspectives -- Define an event that generates a trap
84 Integrating TME 10 on the RS/6000 SP
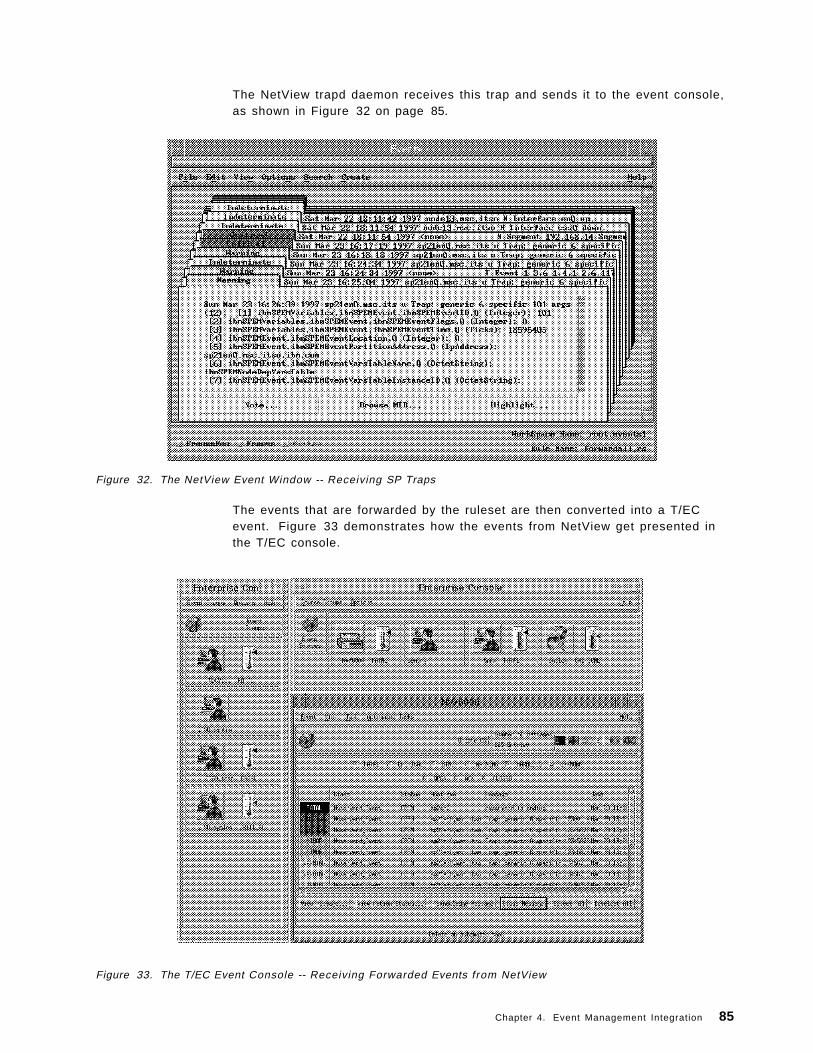
The NetView trapd daemon receives this trap and sends it to the event console,as shown in Figure 32 on page 85.
Figure 32. The NetView Event Window -- Receiving SP Traps
The events that are forwarded by the ruleset are then converted into a T/ECevent. Figure 33 demonstrates how the events from NetView get presented inthe T/EC console.
Figure 33. The T/EC Event Console -- Receiving Forwarded Events from NetView
Chapter 4. Event Management Integration 85

The detailed view, derived from clicking on the event in the T/EC console, showsall detailed information associated with the generated T/EC event. Figure 34 onpage 86 shows all the relevant information that was forwarded by NetView andgenerated by the Problem Management subsystem.
Figure 34. Detailed T/EC View -- Information from NetView Events
4.5.6 Discussion on Event Adapter Implementation OptionsThere are two ways to get events from NetView/6000 for AIX:
1. By using the NetView V4.1.2 (PTF U443133 installed) built-in ruleset adapter.The NetView/6000 for AIX ruleset adapter uses a NetView event ruleset todecide which events to pass to the T/EC. Furthermore, the event conversionis a generic process, so there is no need to have specific mappingdefinitions for each event type.
The ruleset adapter code is embedded in the nvserverd (which is thedaemon that passes events to NetView event display). It registers a NetViewruleset to be executed by nvcorrd, the rule processing daemon. Any eventthat is forwarded by the ruleset is then converted into a T/EC event.
Note: This is the recommended way to automate forwarding events to T/EC.
2. By using the T/EC NetView Event Adapter. The T/EC NetView Event Adapteruses the OvSNMP API (provided by NetView) to receive raw trap informationthrough registration with the NetView trapd daemon, and then generates
86 Integrating TME 10 on the RS/6000 SP
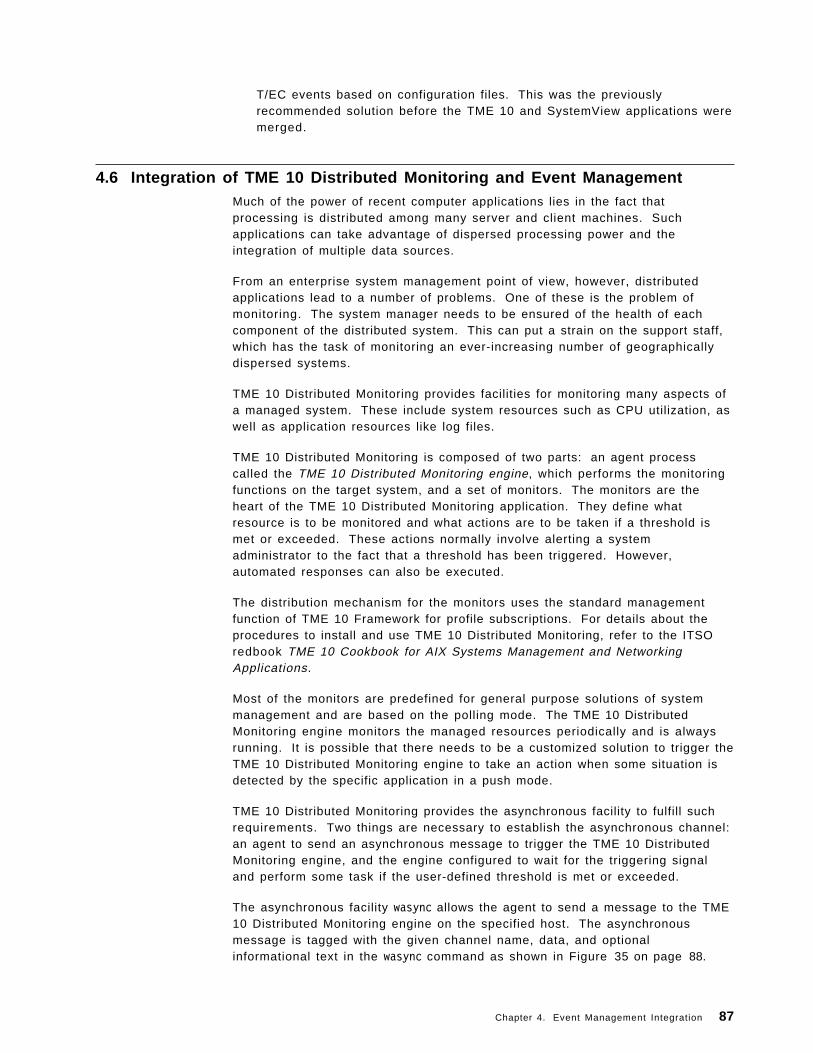
T/EC events based on configuration files. This was the previouslyrecommended solution before the TME 10 and SystemView applications weremerged.
4.6 Integration of TME 10 Distributed Monitoring and Event ManagementMuch of the power of recent computer applications lies in the fact thatprocessing is distributed among many server and client machines. Suchapplications can take advantage of dispersed processing power and theintegration of multiple data sources.
From an enterprise system management point of view, however, distributedapplications lead to a number of problems. One of these is the problem ofmonitoring. The system manager needs to be ensured of the health of eachcomponent of the distributed system. This can put a strain on the support staff,which has the task of monitoring an ever-increasing number of geographicallydispersed systems.
TME 10 Distributed Monitoring provides facilities for monitoring many aspects ofa managed system. These include system resources such as CPU utilization, aswell as application resources like log files.
TME 10 Distributed Monitoring is composed of two parts: an agent processcalled the TME 10 Distributed Monitoring engine, which performs the monitoringfunctions on the target system, and a set of monitors. The monitors are theheart of the TME 10 Distributed Monitoring application. They define whatresource is to be monitored and what actions are to be taken if a threshold ismet or exceeded. These actions normally involve alerting a systemadministrator to the fact that a threshold has been triggered. However,automated responses can also be executed.
The distribution mechanism for the monitors uses the standard managementfunction of TME 10 Framework for profile subscriptions. For details about theprocedures to install and use TME 10 Distributed Monitoring, refer to the ITSOredbook TME 10 Cookbook for AIX Systems Management and NetworkingApplications.
Most of the monitors are predefined for general purpose solutions of systemmanagement and are based on the polling mode. The TME 10 DistributedMonitoring engine monitors the managed resources periodically and is alwaysrunning. It is possible that there needs to be a customized solution to trigger theTME 10 Distributed Monitoring engine to take an action when some situation isdetected by the specific application in a push mode.
TME 10 Distributed Monitoring provides the asynchronous facility to fulfill suchrequirements. Two things are necessary to establish the asynchronous channel:an agent to send an asynchronous message to trigger the TME 10 DistributedMonitoring engine, and the engine configured to wait for the triggering signaland perform some task if the user-defined threshold is met or exceeded.
The asynchronous facility wasync allows the agent to send a message to the TME10 Distributed Monitoring engine on the specified host. The asynchronousmessage is tagged with the given channel name, data, and optionalinformational text in the wasync command as shown in Figure 35 on page 88.
Chapter 4. Event Management Integration 87

� �wasync -c channel [-f] [-i info]
-s data [host]
-channel Specifies the name of the asynchronous channelon which transmission takes place.
-f Retries the command when the TME 10 Distributed Monitoringengine does not respond, until it succeeds.
-i info Specifies text to be sent with the message.The text is passed by TME 10 Distributed Monitoringthrough any textual notification mechanisms(Tivoli notice, e-mail, file log),and placed in the environment of responseprograms.
-s data Specifies data on which the monitor makes itsdecisions.
host Specifies the name of the host (ManagedNode)whose engine is signalled.
� �Figure 35. Usage of the wasync command
The wasync command will work when the machine from which the command isinvoked is a Tivoli managed node.
Two examples are provided in the following sections to illustrate how to combinethe asynchronous facility of TME 10 Distributed Monitoring with the PSSP Version2 Release 2 Problem Management subsystem to perform SP system monitoringtasks.
The first example simply uses the wasync command directly from the ProblemManagement subsystem to post an event to the TME 10 Distributed Monitoringwhen a specified threshold is exceeded.
The second example is more complex, but also more robust and flexible. It usesan agent script that receives SP event messages through a named pipe file,analyzes and filters the information, and then uses the wasync command togenerate a detailed TME 10 Distributed Monitoring event.
4.6.1 Using the wasync command directlyA simple way to use the TME 10 Distributed Monitoring asynchronous facility isto choose to execute the wasync command directly from the ProblemManagement subsystem, as shown in Figure 36 on page 89.
88 Integrating TME 10 on the RS/6000 SP
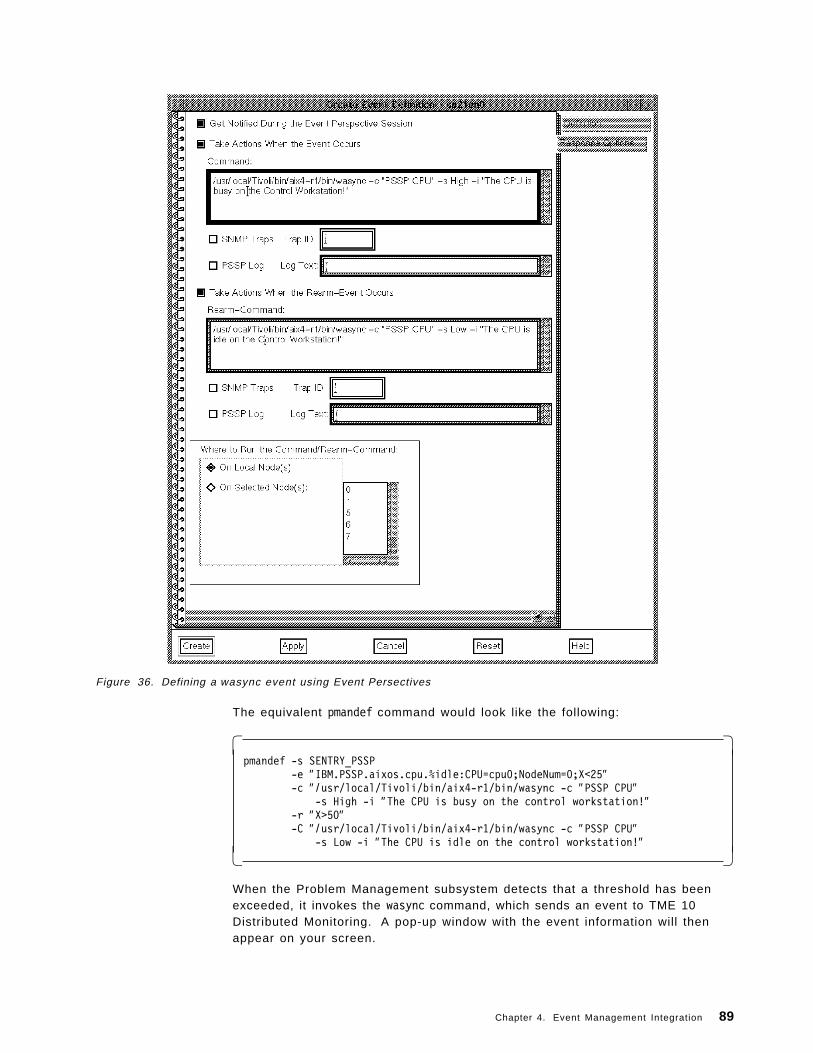
Figure 36. Defining a wasync event using Event Persectives
The equivalent pmandef command would look like the following:
� �pmandef -s SENTRY_PSSP
-e ″IBM.PSSP.aixos.cpu.%idle:CPU=cpu0;NodeNum=0;X<25″-c ″ / usr/local/Tivoli/bin/aix4-r1/bin/wasync -c ″PSSP CPU″
-s High -i ″The CPU is busy on the control workstation!″-r ″X>50″-C ″ / usr/local/Tivoli/bin/aix4-r1/bin/wasync -c ″PSSP CPU″
-s Low -i ″The CPU is idle on the control workstation!″� �
When the Problem Management subsystem detects that a threshold has beenexceeded, it invokes the wasync command, which sends an event to TME 10Distributed Monitoring. A pop-up window with the event information will thenappear on your screen.
Chapter 4. Event Management Integration 89
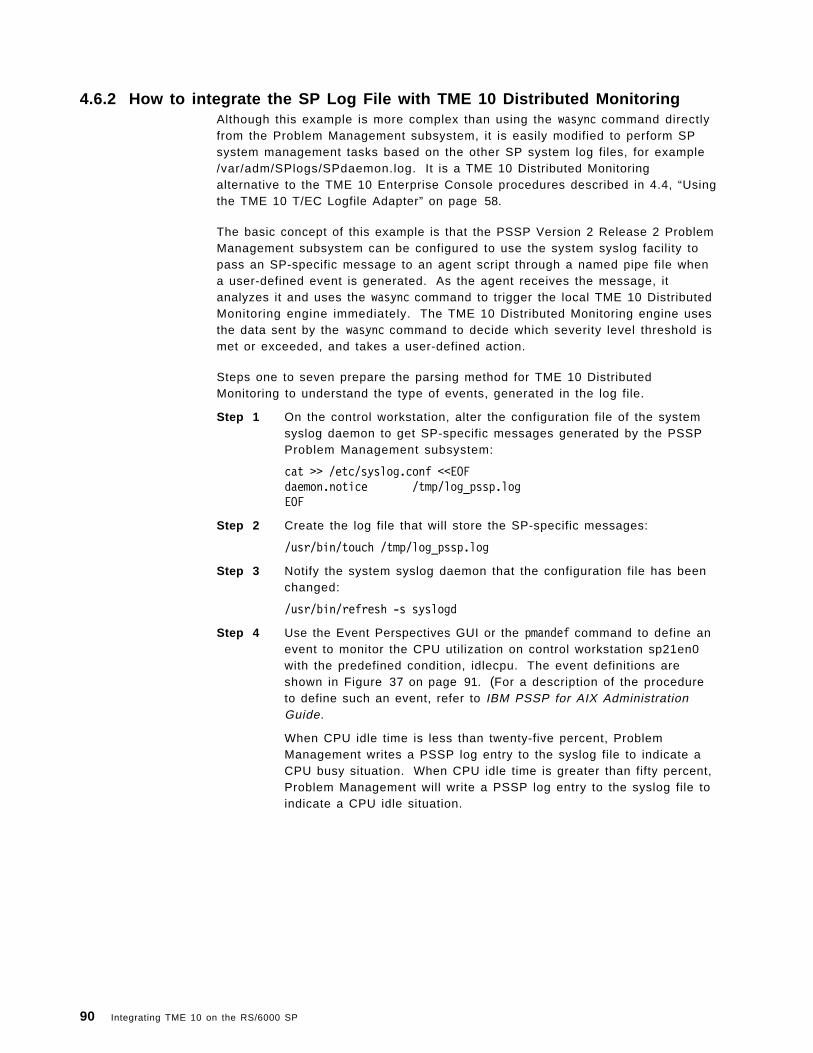
4.6.2 How to integrate the SP Log File with TME 10 Distributed MonitoringAlthough this example is more complex than using the wasync command directlyfrom the Problem Management subsystem, it is easily modified to perform SPsystem management tasks based on the other SP system log files, for example/var/adm/SPlogs/SPdaemon.log. It is a TME 10 Distributed Monitoringalternative to the TME 10 Enterprise Console procedures described in 4.4, “Usingthe TME 10 T/EC Logfile Adapter” on page 58.
The basic concept of this example is that the PSSP Version 2 Release 2 ProblemManagement subsystem can be configured to use the system syslog facility topass an SP-specific message to an agent script through a named pipe file whena user-defined event is generated. As the agent receives the message, itanalyzes it and uses the wasync command to trigger the local TME 10 DistributedMonitoring engine immediately. The TME 10 Distributed Monitoring engine usesthe data sent by the wasync command to decide which severity level threshold ismet or exceeded, and takes a user-defined action.
Steps one to seven prepare the parsing method for TME 10 DistributedMonitoring to understand the type of events, generated in the log file.
Step 1 On the control workstation, alter the configuration file of the systemsyslog daemon to get SP-specific messages generated by the PSSPProblem Management subsystem:
cat >> /etc/syslog.conf <<EOFdaemon.notice /tmp/log_pssp.logEOF
Step 2 Create the log file that will store the SP-specific messages:
/usr/bin/touch /tmp/log_pssp.log
Step 3 Notify the system syslog daemon that the configuration file has beenchanged:
/usr/bin/refresh -s syslogd
Step 4 Use the Event Perspectives GUI or the pmandef command to define anevent to monitor the CPU utilization on control workstation sp21en0with the predefined condition, idlecpu. The event definitions areshown in Figure 37 on page 91. (For a description of the procedureto define such an event, refer to IBM PSSP for AIX AdministrationGuide.
When CPU idle time is less than twenty-five percent, ProblemManagement writes a PSSP log entry to the syslog file to indicate aCPU busy situation. When CPU idle time is greater than fifty percent,Problem Management will write a PSSP log entry to the syslog file toindicate a CPU idle situation.
90 Integrating TME 10 on the RS/6000 SP
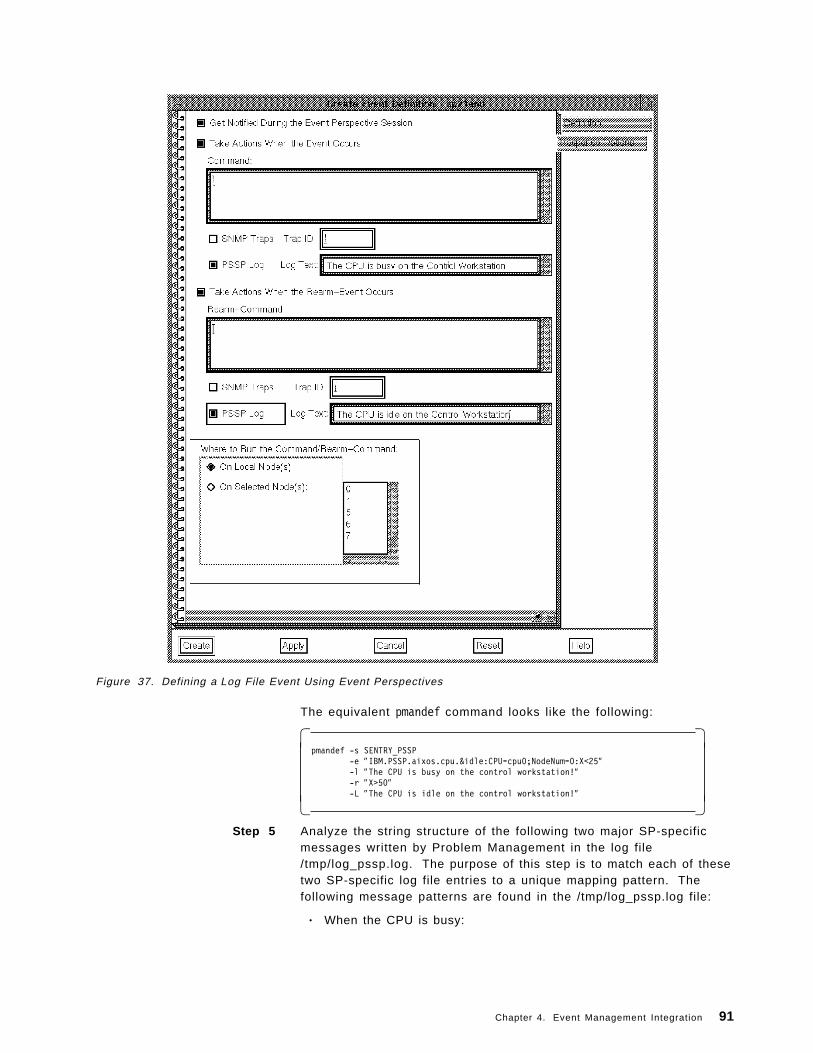
Figure 37. Defining a Log File Event Using Event Perspectives
The equivalent pmandef command looks like the following:
� �pmandef -s SENTRY_PSSP
-e ″IBM.PSSP.aixos.cpu.&idle:CPU=cpu0;NodeNum=0:X<25″-l ″The CPU is busy on the control workstation!″-r ″X>50″-L ″The CPU is idle on the control workstation!″
� �Step 5 Analyze the string structure of the following two major SP-specific
messages written by Problem Management in the log file/tmp/log_pssp.log. The purpose of this step is to match each of thesetwo SP-specific log file entries to a unique mapping pattern. Thefollowing message patterns are found in the /tmp/log_pssp.log file:
• When the CPU is busy:
Chapter 4. Event Management Integration 91

� �Mar 20 14:31:23 sp21en0 pmand[39444]: SP Problem Mgmt:Monitored Situation Exists:Name=LOGFILE_PSSP_CPUNode Number=0Resource Variable=IBM.PSSP.aixos.cpu.idleInstance Vector=CPU=cpu0;NodeNum=0Predicate=X<25Description=The CPU is busy on the control workstation!� �
• The following entry is found in the /tmp/log_pssp.log file when theCPU is idle:
� �Mar 20 14:32:08 sp21en0 pmand[39444]: SP Problem Mgmt:Monitored Situation Cleared:Name=LOGFILE_PSSP_CPUNode Number=0Resource Variable=IBM.PSSP.aixos.cpu.idleInstance Vector=CPU=cpu0;NodeNum=0Predicate=X>50Description=The CPU is idle on the control workstation!� �
Step 6 Design and code the agent script according to the results from Step 5:
� �# cat > log_pssp.ksh <<EOF#!/bin/ksh
# Open the named pipe as standard inputexec < /tmp/log_pssp.fifowhile read line; do
case ″$line″ in*pmand*LOGFILE_PSSP_CPU*Predicate=X>50*(
/usr/local/Tivoli/bin/aix4-r1/bin/wasync-c ″PSSP CPU″-s Low-i ″The CPU is idle on control workstation!″
logger ″The LOGFILE_PSSP_CPU_Low has been processed!″
*pmand*LOGFILE_PSSP_CPU*Predicate=X<25*(/usr/local/Tivoli/bin/aix4-r1/bin/wasync \
-c ″PSSP CPU″-s Low-i ″The CPU is busy on control workstation!″
logger ″The LOGFILE_PSSP_CPU_High has been processed!″
*(
esacdoneEOF#
� �Step 7 Create a TME 10 Distributed Monitoring profile and a subscription of
type asynchronous string that looks for messages from channel PSSPCPU:
• Open a profile manager, LOGFILE_Sentry, and create the TME 10Distributed Monitoring profile, LOGFILE_SENTRY.
• Open the profile and click Add Monitor .
• Select Asynchronous (string ) (Monitoring Sources) from thechoice list of Unix_Sentry or Sentry 2.0 (Monitoring Collections)and give the channel name (PSSP CPU), then click Add Empty... .
• In the Edit Sentry Monitor dialog, select Matches for the criticalresponse level, and enter High in the text field. Choose thePop-Up response action.
92 Integrating TME 10 on the RS/6000 SP

• In the Edit Sentry Monitor dialog, select the relation Matches forthe warning response level, and type Low in the text field. Choosethe Pop-Up response action.
• Click Change & Close . Note that there is no Schedule buttonbecause this is an asynchronous criterion.
• Save the profile and distribute it to the subscriber, which is thecontrol workstation.
The following steps install and define the operating environment for TME 10Distributed Monitoring, to start monitoring the log file entries.
Step 8 Remove the entry added in Step 1 from the configuration file of thesystem syslog daemon, /etc/syslog.conf:
vi /etc/syslog.conf
Step 9 Alter the configuration file of the system syslog daemon to getSP-specific messages generated by the PSSP Problem Managementsubsystem.
cat >> /etc/syslog.conf <<EOFdaemon.notice /tmp/log_pssp.fifoEOF
Step 10 Create the named pipe file that will receive the SP-specific messages:
/etc/mknod /tmp/log_pssp.log p
Step 11 Run the agent script in the background to receive SP-specificmessages from the predefined named pipe file:
./log_pssp.ksh &
Step 12 Notify the system syslog daemon that the configuration file has beenchanged:
/usr/bin/refresh -s syslogd
Note:
Make sure that the agent script is running before executing thisstep, or the syslogd daemon may be hung by writing a log entry toa pipe file that does not have a reading process.
Step 13 Start up the administrator′s TME 10 Desktop:
. /etc/Tivoli/setup_env.shtivoli
When the CPU thresholds are exceeded, one of the two pop-up windows shownin Figure 38 on page 94 will appear on your screen to reflect the CPU utilizationon the control workstation.
Chapter 4. Event Management Integration 93

Figure 38. TME 10 Distributed Monitor ing Pop-Up for CPU idle
94 Integrating TME 10 on the RS/6000 SP

Chapter 5. Task Libraries, Tasks, and Jobs
The TME 10 Framework task libraries can be used to provide a simple interfaceto executing common RS/6000 SP commands. A task library is a collection oftasks that have been defined to the system. A task is simply a command orscript that Tivoli can execute on behalf of the administrator. Execution roles anduserids can be assigned to a task, allowing you to control who can execute thetask and how that task is to be executed.
To support your RS/6000 SP from Tivoli, tasks can be defined to execute localscripts that invoke a specific SP command or a set of commands to performroutine SP administrative operations. A task can query system data, powernodes on or off, launch Perspectives and other applications, manage the switch,or perform just about any function that is routinely executed by an SPadministrator.
Once you have created a set of tasks in a task library, you can bind an instanceof one of those tasks to a set of managed nodes or profile managers to create ajob. Jobs contain execution-specific information and can be copied directly to anadministrator ′s TME 10 Desktop. This allows another level of control over whichadministrators are authorized to perform specific SP tasks.
5.1 General Procedure for Creating TasksThe simplest way to create a task is to use the TME 10 Desktop. The GUI allowsyou to create simple tasks that do not require input parameters. If you have atask that does require additional input to execute, you must develop the taskusing the Task Library Language. In addition to the information provided in theTME 10 Task Library Language Developer′s Guide, the TME 10 Cookbook for AIXSystems Management and Networking Applications provides excellent detaileddescriptions on the process of creating task libraries, tasks and jobs. TheCookbook also contains a very thorough explanation of using the Task LibraryLanguage and implementing tasks requiring input as a way of adding function tothe TME 10 Desktop. It is highly recommended that the information in thatreference is understood before proceeding with the process outlined in thischapter.
The general process of creating a task using the TME 10 Desktop is as follows:
1. Create a policy region to contain your task libraries, or use an existing policyregion.
Since many SP commands require root authority to execute, it isrecommended that you create a separate policy region for SP task libraries.You will need to modify the Managed Resource Policies for the TaskLibraryresource such that the Validation Policy allows setting the root userid fortask execution.
2. Within the policy region, create a task library.
3. Within the task library, create a task specifying the script to execute.
Note: When creating a task, Tivoli will make a complete copy of theexecutable that you specify when defining the task. If you specify a binaryexecutable, not only will making this copy use unnecessary disk space, it willslow down execution time since Tivoli ships the executable to the target
Copyright IBM Corp. 1997 95

machine to be executed. Also, since Tivoli maintains a copy of theexecutable at the time the task was defined, you will need to delete andrecreate the task any time the executable is updated. Therefore, werecommend that you write simple scripts as wrappers to the SP commandsthat you wish to execute, and do not specify the SP command directly whendefining a task.
5.2 SP Task LibrariesCreating tasks to execute a script on the SP is a simple process. You can buildyour own set of tasks tailored to the SP work your administrators perform mostoften. This redbook includes two simple task libraries that you can use asexamples for creating your own tasks.
The first task library, called SPTasks, includes general tasks to perform thefollowing:
• List data for the SP using the splstdata command.
• List data for the SP node the task is run on using the splstdata command.
• Run any specified command.
• Launch the Perspectives application as a separate process.
• Launch a specified application as a separate process. This might be usefulfor starting applications such as SMIT on your SP control workstation.
• Run the cstartup command on the control workstation using specifiedparameters. This can be used to power on one or more nodes.
• Run the cshutdown command on the control workstation using specifiedparameters. This can be used to power off one or more nodes.
The second task library, called SwitchTasks, includes tasks that are specific tomanaging your SP switch:
• List data for the SP switch using the splstdata command.
• List the switch responds information using the SDRGetObjects command.
• List the primary node information returned by the Eprimary command.
• Set the specified oncoming primary and backup nodes using the Eprimarycommand.
• Quiesce the switch for the specified partition.
• Start the switch for the specified partition.
• Fence the specified nodes.
• Unfence the specified nodes.
The source listings for these task libraries are included in Appendix G, “SampleTask Library Listings” on page 193. They are also included with the softwaredistributed with this redbook. You may use these listings as examples to createyour own tasks. To load the task libraries and use them directly in yourenvironment, see 5.3, “Using the Task Library Language” on page 97.
There are many other tasks that you may wish to create. For example, if youradministrators are often invoking SMIT to do their work, you may wish to write atask to invoke SMIT directly, similar to the one that invokes Perspectives, instead
96 Integrating TME 10 on the RS/6000 SP
of using the task that launches any application. If you often check to see whichdaemons are active, you can write a task to invoke the lssrc -a command. Thepossibilities here are endless.
5.3 Using the Task Library LanguageThe Task Library Language is described in the TME 10 Task Library LanguageDeveloper′s Guide. While this guide provides a description of the language, it isdifficult to understand the process for creating and loading your own tasks.Refer to the TME 10 Cookbook for AIX Systems Management and NetworkingApplications for an excellent review of this process. We will only provide ahigh-level overview of the process here.
You can load the task libraries distributed with our redbook by using thefollowing steps:
1. Load the SPTasks.tll and SwitchTasks.tll files from the diskette onto a localfilesystem.
2. Import the task libraries into Tivoli by using the following commands fromthat local filesystem directory:
wtll -p PolicyRegion -P /bin/cat SPTasks.tllwtll -p PolicyRegion -P /bin/cat SwitchTasks.tll
where PolicyRegion is the name of the existing policy region where you wantto place the task libraries.
You can then start the TME 10 Desktop and open your policy region. You shouldsee two new task libraries similar to those shown in Figure 39 on page 98.
Chapter 5. Task Libraries, Tasks, and Jobs 97
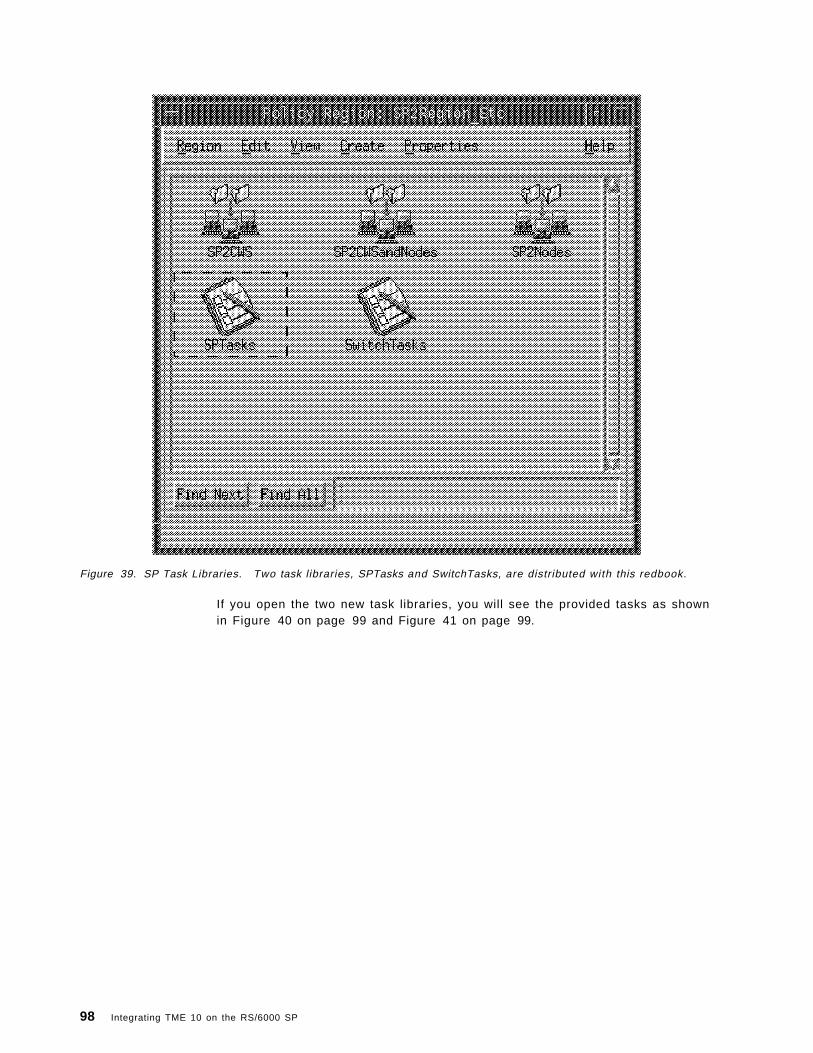
Figure 39. SP Task Libraries. Two task libraries, SPTasks and SwitchTasks, are distributed with this redbook.
If you open the two new task libraries, you will see the provided tasks as shownin Figure 40 on page 99 and Figure 41 on page 99.
98 Integrating TME 10 on the RS/6000 SP

Figure 40. Tasks in the SPTasks Library. These tasks are examples of some general SP tasks you may wish toinvoke from Tivoli.
Figure 41. Tasks in the SwitchTask Library. These tasks are examples of some common SP switch tasks that youmay wish to invoke from Tivoli.
Chapter 5. Task Libraries, Tasks, and Jobs 99
5.3.1 Creating Customized TasksThere are two ways to create your own customized tasks:
• You can use the task libraries distributed with this redbook as a startingpoint, and modify them to include your own customized tasks.
• You can create your own new task library with only the tasks you need.
To customize the distributed task libraries, do the following:
1. Install the task libraries following the directions in 5.3, “Using the TaskLibrary Language” on page 97.
2. Edit the SPTasks.tll and SwitchTasks.tll files and add your own tasks. Youcan use the existing tasks in those files as examples. Also, review thechapter on “Adding Function to the Tivoli Desktop.” in the TME 10 Cookbookfor AIX Systems Management and Networking Applications to help with thisstep.
You can create a new task library by copying one of those tll files to a newfile, changing the name of the task library, and replacing the existing taskswith your own.
3. After your source file is updated, import the task library into Tivoli. If you arereplacing an existing task library, use the following command:
wtll -r -p PolicyRegion -P /bin/cat tll
If you have changed the name of the task library and are creating a new one,omit the -r option.
If you get errors while loading your task library, look carefully at the syntaxof your source file. The diagnostic messages are not very helpful. See theTME 10 Cookbook for AIX Systems Management and Networking Applicationsfor some pointers.
4. Test your new tasks by trying to execute them. If you find problems in yourexecutable scripts, you will need to edit the original tll file and reload thetask library.
The easiest way to create a new task library with the Task Library Language isto export an existing task library from the TME 10 Framework and modify it:
1. Using the TME 10 Desktop, create a new task library in your policy region.
2. Create a simple task in that task library.
3. From the AIX command line, export the task library using the command:
wtll -F TargetFile -l TaskLibrary
where TargetFile is the file name of a tar file that will be created containingthe exported task library, and TaskLibrary is the name of the task library tobe exported.
4. Extract the files from the exported TargetFile:
tar -xvf TargetFile
5. Continue with the previous steps to modify an existing task library andreload it into your framework.
You must use the Task Library Language to create a task that requires inputfrom the user. The task libraries distributed with this redbook and listed in
100 Integrating TME 10 on the RS/6000 SP

Appendix G, “Sample Task Library Listings” on page 193 contain severalexamples of these types of tasks.
For example, to execute the RunCommand task, the user must specify thecommand to run. The listing for this task shows how to specify simple text input.Here is an excerpt of this task:
� �TaskLibrary ″SPTasks″ {
...
ArgLayout inputText {Text;
};
...
Task RunCommand {Description = (″_!_″,″Execute any command″ , 1 ) ;HelpMessage = (″_!_″,″Input the command and any parameters″ , 1 ) ;Uid = (″_!_″,″*″ , 1 ) ;Comments = (″_!_″ ,″ ″ ,1) ;Roles = (″_!_″,″admin″ , 1 ) ;Argument (″_!_″,″Command to run: ″,1) {
Layout = (″ ″ , ″inputText″ , 1 ) ;};Implementation (″default″ )
.#!/bin/ksh
.export PATH=/usr/lpp/ssp/bin:/tivoli/bin/aix4-r1/CUSTOM:$PATH
. . /etc/Tivoli/setup_env.sh
.export DISPLAY=$WD_DISPLAY
.$1;
};
...� �
The Argument and ArgLayout constructs are one way to specify input textparameters.
Another good example to look at, as shown in the following screen, is theStartSwitch task in the SwitchTasks library. This shows an example of how youcan create a choice selection list of all the SP partitions and then how to executean SP command for the partition selected by the user.
Chapter 5. Task Libraries, Tasks, and Jobs 101
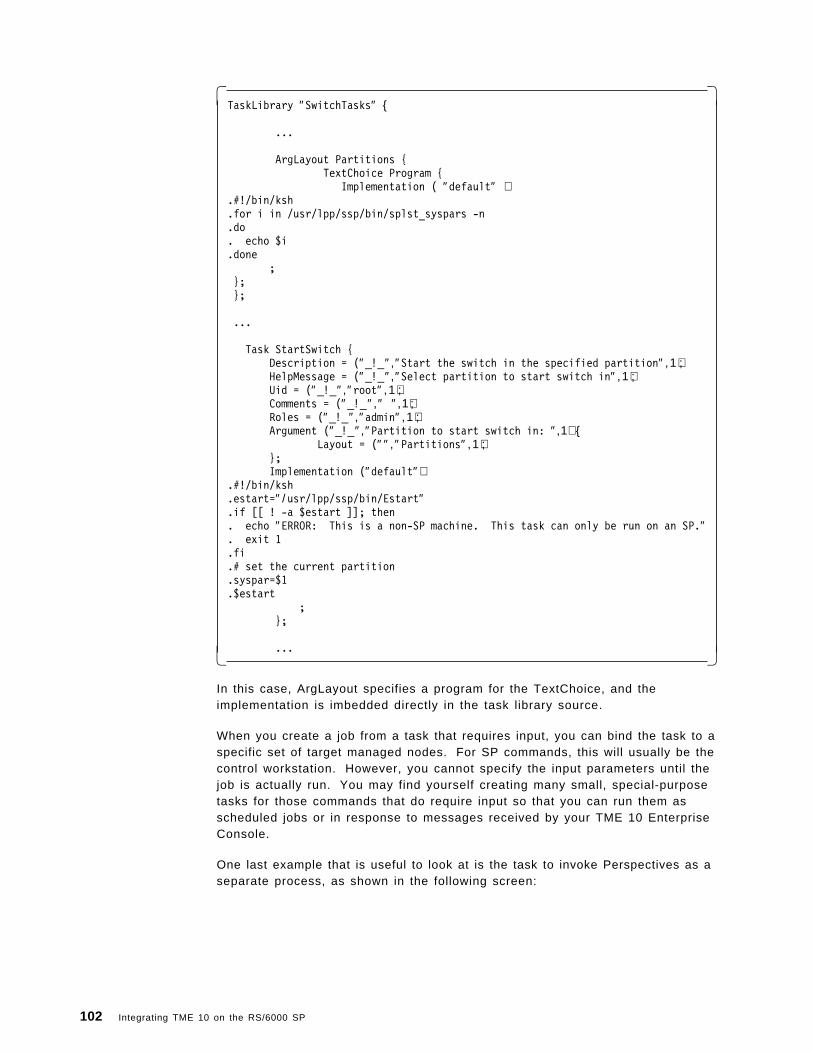
� �TaskLibrary ″SwitchTasks″ {
...
ArgLayout Partitions {TextChoice Program {
Implementation ( ″default″ ).#!/bin/ksh.for i in /usr/lpp/ssp/bin/splst_syspars -n.do. echo $i.done
; }; };
...
Task StartSwitch {Description = (″_!_″,″Start the switch in the specified partition″ , 1 ) ;HelpMessage = (″_!_″,″Select partition to start switch in″ , 1 ) ;Uid = (″_!_″,″root″ , 1 ) ;Comments = (″_!_″ ,″ ″ ,1) ;Roles = (″_!_″,″admin″ , 1 ) ;Argument (″_!_″,″Partition to start switch in: ″,1) {
Layout = (″ ″ , ″Partitions″ , 1 ) ;};Implementation (″default″ )
.#!/bin/ksh
.estart=″ / usr/lpp/ssp/bin/Estart″
.if [[ ! -a $estart ]]; then
. echo ″ERROR: This is a non-SP machine. This task can only be run on an SP.″
. exit 1
.fi
.# set the current partition
.syspar=$1
.$estart;
};
...� �
In this case, ArgLayout specifies a program for the TextChoice, and theimplementation is imbedded directly in the task library source.
When you create a job from a task that requires input, you can bind the task to aspecific set of target managed nodes. For SP commands, this will usually be thecontrol workstation. However, you cannot specify the input parameters until thejob is actually run. You may find yourself creating many small, special-purposetasks for those commands that do require input so that you can run them asscheduled jobs or in response to messages received by your TME 10 EnterpriseConsole.
One last example that is useful to look at is the task to invoke Perspectives as aseparate process, as shown in the following screen:
102 Integrating TME 10 on the RS/6000 SP
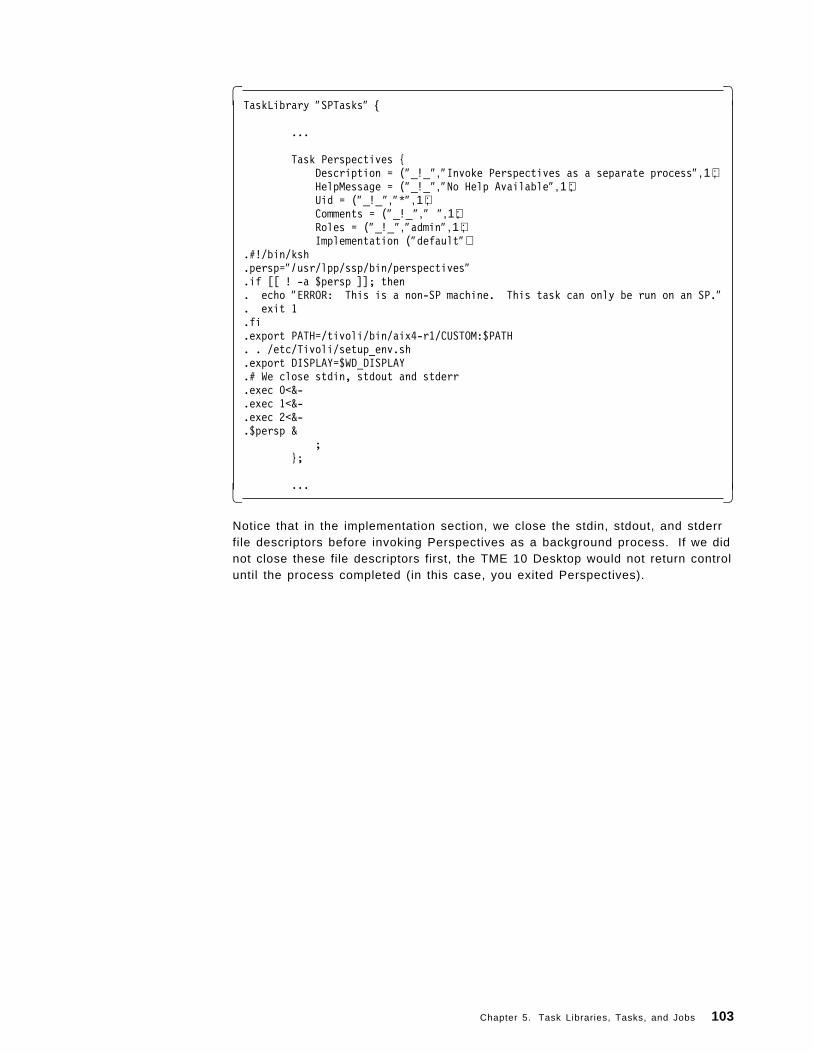
� �TaskLibrary ″SPTasks″ {
...
Task Perspectives {Description = (″_!_″,″Invoke Perspectives as a separate process″ , 1 ) ;HelpMessage = (″_!_″,″No Help Available″ , 1 ) ;Uid = (″_!_″,″*″ , 1 ) ;Comments = (″_!_″ ,″ ″ ,1) ;Roles = (″_!_″,″admin″ , 1 ) ;Implementation (″default″ )
.#!/bin/ksh
.persp=″ / usr/lpp/ssp/bin/perspectives″
.if [[ ! -a $persp ]]; then
. echo ″ERROR: This is a non-SP machine. This task can only be run on an SP.″
. exit 1
.fi
.export PATH=/tivoli/bin/aix4-r1/CUSTOM:$PATH
. . /etc/Tivoli/setup_env.sh
.export DISPLAY=$WD_DISPLAY
.# We close stdin, stdout and stderr
.exec 0<&-
.exec 1<&-
.exec 2<&-
.$persp &;
};
...� �
Notice that in the implementation section, we close the stdin, stdout, and stderrfile descriptors before invoking Perspectives as a background process. If we didnot close these file descriptors first, the TME 10 Desktop would not return controluntil the process completed (in this case, you exited Perspectives).
Chapter 5. Task Libraries, Tasks, and Jobs 103

104 Integrating TME 10 on the RS/6000 SP

Chapter 6. AEF Customizations for the RS/6000 SP
Tivoli′s current technology permits the management of RS/6000 SP nodes as aset of AIX workstations. User and group management, host management,software distribution, job scheduling and other basic system management taskscan be effectively implemented for the SP without the need of any modificationsto the TME 10.
When Tivoli′s client software has been loaded on SP nodes and the controlworkstation, these appear in the TME 10 Desktop as AIX managed nodes.Hence, the standard informational dialogs (windows) and capabilities of anymanaged node (l ike subscribing to profile managers) are available.
However, system management capabilities specific to the SP, like hardwaremonitoring, are not available in a standard Tivoli installation. In order to capturethe specific characteristics of the RS/6000 SP hardware and software, we havecustomized the managed node resource to behave as either an SP node or asan SP control workstation.
With these customizations, managed nodes appear in the TME 10 Desktop asSP-specific objects, with extended dialogs and menus. Their standard dialogsare not overridden, but merely extended. Hence, customized nodes are treatedas AIX managed nodes for all Tivoli standard system management functions.
With our customizations, the SP control workstation object has extended dialogsto:
• List (and modify when the administrator has the appropriate permissions) itsSDR data.
• List all SP nodes it controls.
• Run commands against any number of nodes (regardless of whether or notthey are managed nodes).
• Power on/off any set of nodes.
• Fence and unfence any set of nodes.
• Launch SP applications, like Perspectives or the System Monitor GUI.
The SP node object has new dialogs to:
• List (and modify with the appropriate permissions) the SDR data.
• Run commands against the node.
These customizations are easy to modify to suit your system managementenvironment ′s needs. Furthermore, the user is at liberty to install thesecustomizations in any number of SP nodes or SP control workstations that aremanaged nodes in a Tivoli environment. The customization of a managed nodeas either an SP node or an SP control workstation is self-contained and is notaffected by the customization of other nodes or control workstations. Forexample, you can install the customizations only for the SP control workstationand you should still be able to power on/off nodes and perform the othermanagement functions provided for the control workstation object, even whenthe SP nodes are not customized as such, or even when they have not beendefined as Tivoli managed nodes.
Copyright IBM Corp. 1997 105

We have used the Application Extension Facility (AEF) to perform thesecustomizations. AEF is a Tivoli application toolkit that allows for the easyextension of the behavior of the TME 10 Desktop resources. This chaptercontains a basic introduction to AEF development. The code for thesecustomizations, as well as installation and uninstallation scripts are listed inAppendix H, “Contents of AEF Customization Scripts” on page 201 and providedon the attached diskette. This code is free, provided on an “as is” basis.
The main goal of this chapter is to discuss this sample set of customizations:how they were made, how to install them, and how you can easily modify themor add your own customizations. We believe that the integration they providewith the TME 10 Desktop will be very beneficial to customers who wish to fullymanage the SP as part of their TME.
Since the main topic of this chapter is the integration of the SP systemmanagement functions and the TME 10 Desktop, basic familiarity with both isassumed. For more information on these topics consult the TME 10 manuals, aswell as the IBM PSSP for AIX Administration Guide.
The material in this chapter is organized as follows:
• 6.1, “High Level Overview of a Sample Set of Customizations” on page 107.
This section provides a high-level overview of a sample set of AEFcustomizations that extend managed nodes as either SP nodes or as the SPcontrol workstation.
• 6.2, “Installation of the Sample Customizations” on page 113.
This section provides the installation procedures for thepreviously-mentioned set of customizations.
Users that are interested in understanding how these customizations were madeand in how to produce their own, should review the rest of the chapter, whichprovides an overview of the TME 10 Application Extension Facility.
• 6.3, “What is AEF?” on page 115.
This section provides an introduction to AEF, followed by a discussion of itsstrengths and weaknesses.
• 6.4, “Anatomy of an AEF/DSL Customization” on page 119.
This section provides a description of the basic steps of installing anduninstalling customizations.
• 6.5, “TME 10 Desktop Dialogs” on page 123.
This section provides instructions on how to modify existing dialogs, or howto design your own, using the Dialog Specification Language (DSL).
• 6.6, “Methods for Customized Objects” on page 129.
Every gadget in a dialog is associated with a method, which can be userdefined. This section provides a description of how to implement your ownmethods, or how to use those provided by TME 10 method libraries.
• 6.7, “Bitmaps” on page 133.
Every TME 10 resource has a set of bitmaps associated with it. This sectionprovides an explanation of how these bitmaps can be customized.
• 6.7.1, “Icons” on page 134.
106 Integrating TME 10 on the RS/6000 SP
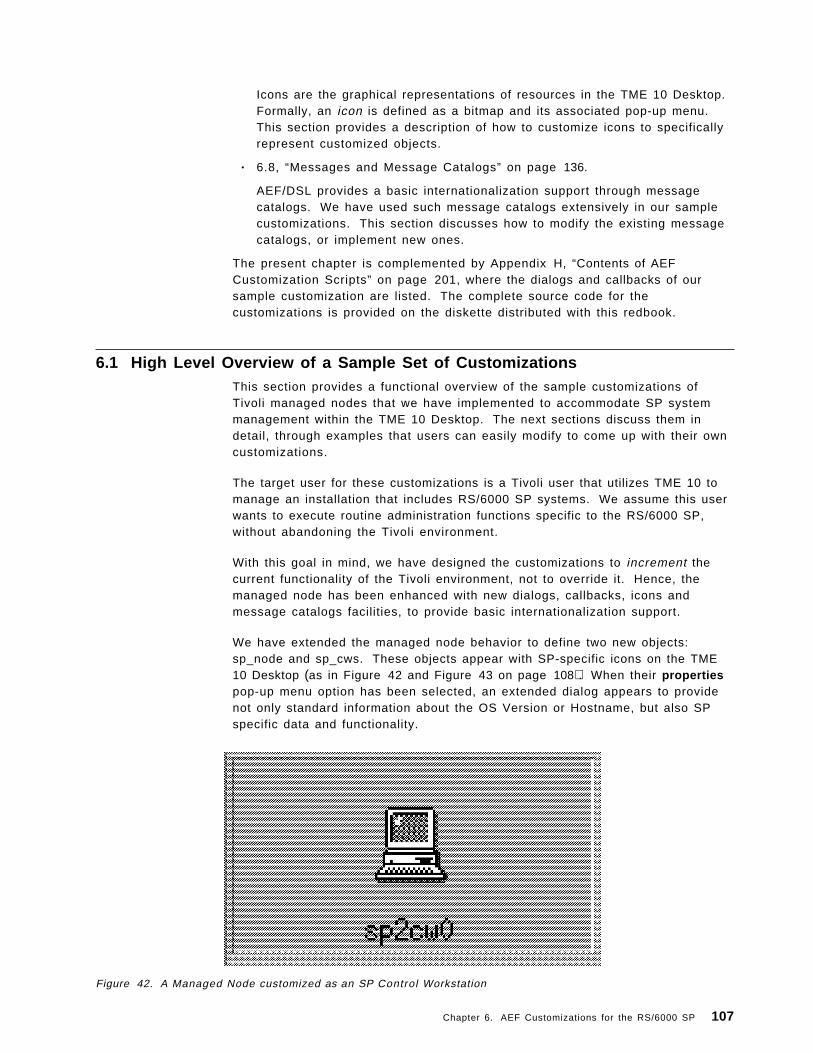
Icons are the graphical representations of resources in the TME 10 Desktop.Formally, an icon is defined as a bitmap and its associated pop-up menu.This section provides a description of how to customize icons to specificallyrepresent customized objects.
• 6.8, “Messages and Message Catalogs” on page 136.
AEF/DSL provides a basic internationalization support through messagecatalogs. We have used such message catalogs extensively in our samplecustomizations. This section discusses how to modify the existing messagecatalogs, or implement new ones.
The present chapter is complemented by Appendix H, “Contents of AEFCustomization Scripts” on page 201, where the dialogs and callbacks of oursample customization are listed. The complete source code for thecustomizations is provided on the diskette distributed with this redbook.
6.1 High Level Overview of a Sample Set of CustomizationsThis section provides a functional overview of the sample customizations ofTivoli managed nodes that we have implemented to accommodate SP systemmanagement within the TME 10 Desktop. The next sections discuss them indetail, through examples that users can easily modify to come up with their owncustomizations.
The target user for these customizations is a Tivoli user that utilizes TME 10 tomanage an installation that includes RS/6000 SP systems. We assume this userwants to execute routine administration functions specific to the RS/6000 SP,without abandoning the Tivoli environment.
With this goal in mind, we have designed the customizations to increment thecurrent functionality of the Tivoli environment, not to override it. Hence, themanaged node has been enhanced with new dialogs, callbacks, icons andmessage catalogs facilities, to provide basic internationalization support.
We have extended the managed node behavior to define two new objects:sp_node and sp_cws. These objects appear with SP-specific icons on the TME10 Desktop (as in Figure 42 and Figure 43 on page 108). When their propertiespop-up menu option has been selected, an extended dialog appears to providenot only standard information about the OS Version or Hostname, but also SPspecific data and functionality.
Figure 42. A Managed Node customized as an SP Control Workstation
Chapter 6. AEF Customizations for the RS/6000 SP 107

Figure 43. A Managed Node customized as an SP Node
Specifically, when a managed node has been defined as an sp_node, itsproperties dialog appears with extended capabilities (as indicated in the SPProperties frame in Figure 44 on page 109).
108 Integrating TME 10 on the RS/6000 SP

Figure 44. Extended Managed Node Properties
In addition to the standard functionality of the properties dialog, the followingcapabilities are provided for the sp_node object:
1. System Repository Data associated with the node can be displayed andchanged (provided the administrator has the authorization role of super). Anew dialog displaying the SDR attributes appears when the user clicks onthe All Attributes button, as shown in Figure 45 on page 110.
Chapter 6. AEF Customizations for the RS/6000 SP 109
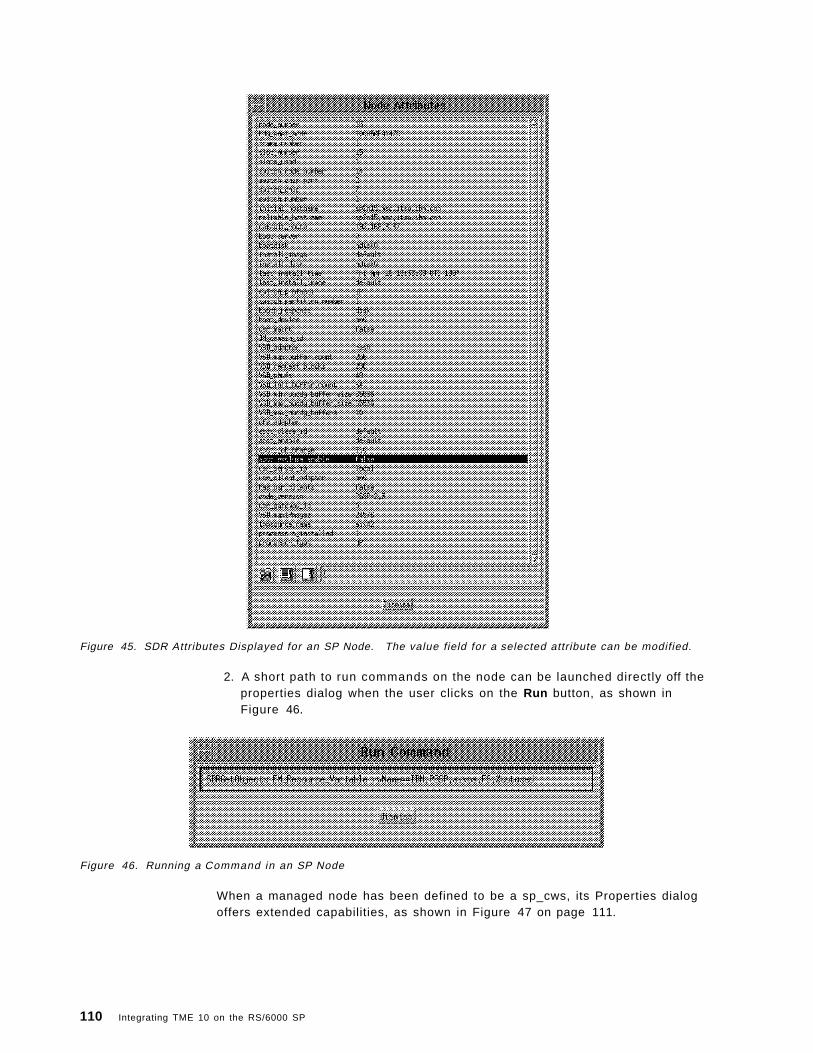
Figure 45. SDR Attributes Displayed for an SP Node. The value field for a selected attribute can be modified.
2. A short path to run commands on the node can be launched directly off theproperties dialog when the user clicks on the Run button, as shown inFigure 46.
Figure 46. Running a Command in an SP Node
When a managed node has been defined to be a sp_cws, its Properties dialogoffers extended capabilities, as shown in Figure 47 on page 111.
110 Integrating TME 10 on the RS/6000 SP

Figure 47. Control Workstation Properties List
The following behavior is available for the control workstation objects:
1. Its System Repository data can be displayed and changed (provided theadministrator has the authorization role of super). This is accomplishedthrough the All Attributes button. This dialog is similar to the dialog shownin Figure 45 on page 110.
Chapter 6. AEF Customizations for the RS/6000 SP 111

2. A short path to run commands on the control workstation can be launcheddirectly off the Properties dialog (in the Run CW button).
3. A node control panel is displayed to perform basic management operationson any of the SP nodes that depend on the control workstation (seeFigure 48). Note that all SP nodes are displayed, whether they are alsoTivoli managed nodes or not. Once some nodes are selected, the Responsebutton provides an extended list that indicates whether each selected noderesponds and whether they are Tivoli managed nodes.
Figure 48. Node Responds Information
4. Any set of nodes from the Node Control list can be selected to performpower on/off operations or to run a command concurrently against suchnodes (through the corresponding power on and power off buttons).Similarly, fence and unfence operations can be performed against the set ofselected nodes.
5. A new dialog is provided to serve as a launch pad for RS/6000 SPapplications. In the sample customization, the main panels of Perspectivesand the System Monitor GUI can be reached directly from Tivoli. This panel,shown in Figure 49 on page 113, appears when the user clicks on the SPApplications button in the properties dialog of the SP control workstation.The launch pad can be easily modified by the customer to add or delete newapplications.
112 Integrating TME 10 on the RS/6000 SP

Figure 49. Launch Pad for SP Applications
Unless mentioned otherwise, all the customized SP system managementcapabilities can be utilized by administrators with authorization roles of super orsenior. These permissions can be easily changed by editing the installationscripts that we describe in the following sections.
Our proposed set of customizations are provided with this book. Users that arenot interested in providing their own customizations can simply install ourcustomizations, as explained in the next section, and can safely skip the rest ofthis chapter.
Those interested in understanding how our AEF customizations were made, andwishing to customize their TME 10 Desktop quickly, should read the entirechapter, whose second part provides a basic primer on AEF development.
First, we will go through the installation procedure.
6.2 Installation of the Sample CustomizationsOur sample customizations can be installed or uninstalled following the simpleprocedures that we list in this section. We have provided several Korn shellscripts to perform the basic installation of our customizations, and they can betaken as a model for users who want to install their own.
Chapter 6. AEF Customizations for the RS/6000 SP 113

Before proceeding to the installation, the software has to be downloaded and theappropriate environment variables set. We assume that the user has a Kornshell available to do the following:
1. Login to the Tivoli server machine as root.
2. Create a /.netrc file which allows root access to the Tivoli server machine. Itshould be owned by root, with file permissions of 600, and contain thefollowing stanza:
machine <tivoli server ipaddress> login root password <root′ s password>
so if the server ip address is tivserver.domain.widgetco.com, and rootpassword is mypasswd we would have:
machine tivserver.domain.widgetco.com login root password mypasswd
3. Establish the customization directory. For example:
mkdir /tivoli/spcust
Note: The following steps assume that the customization directory is/tivoli/spcust.
4. Copy the SPCustomizations.tar file from the diskette distributed with thisredbook to the customization directory.
5. Extract the customization environment:
cd /tivoli/spcusttar -xvf SPCustomizations.tar
This creates a directory called Resource in the current working directory(/t ivoli/spcust).
6. Customize the Resource/bin/tivoliPaths file (under /tivoli/spcust):
• SPAEF_TOP should point to the customization directory. For example:
export SPAEF_TOP=/tivoli/spcust
• SPAEF_SERVER should be the IP address of the server machine. Thisvalue must be identical to the value of the Tivoli server ip addresspreviously set in the /.netrc file. For example:
SPAEF_SERVER=tivserver.domain.widgetco.com
• Alter, delete, or create command line aliases as desired.
7. Execute the script tivoliPaths in the current shell.
. Resource/bin/tivoliPaths
Now everything is ready for the installation of the customizations. You haveto make sure that both the TME server and the managed nodes to becustomized are up and running correctly.
8. Edit $SPAEF_TOP/Resource/ManagedNode/LIST and add the list of managednodes that you want to customize as SP objects. The format of the file is:
[#]<sp_cws|sp_node> <ManagedNode Instance Name>
The pound sign (#) indicates a comment. That line will be ignored by theinstallation script.
Suppose that we want to customize the node sp2cw0.msc.itso.ibm.com as ansp_cws, and nodes sp2n15.msc.itso.ibm.com and sp2n16.msc.itso.ibm.com assp_nodes. These are the names of the managed nodes as listed in Tivoli.
The file would look like the following:
114 Integrating TME 10 on the RS/6000 SP
sp_cws sp2cw0.msc.itso.ibm.comsp_node sp2n15.msc.itso.ibm.comsp_node sp2n16.msc.itso.ibm.com
9. Execute either spcustomFastInstall or spcustomCustomInstall to install all thecustomization items. Each script performs essentially the same function.The scripts install all the customization items (callback scripts, dialogs,icons, message catalog) for the managed nodes indicated in the$SPAEF_TOP/Resource/ManagedNode/LIST file. This is accomplished byinvoking Tivoli AEF commands described in the following sections.
The difference between the two scripts is that spcustomFastInstall installsthe source files (dialogs, callbacks, and so on) that we have provided. Thisoption is used in those installations running TME 10. However, thespcustomCustomInstall script first extracts the properties_dialog and the iconbitmap and menu for the aix4-r1 managed node from the current Tivoliinstallation. This script then directs the user to manually insert ourcustomization block into those source files.
Users with a standard TME 10 installation should use spcustomFastInstall,since it is quick and simple.
Users who have already customized dialogs for managed nodes should usespcustomCustomInstall. Users with other versions of the Tivoli environmentmay have a properties_dialog of the managed node does not look like theone in TME 10, and they should also use spcustomCustomInstall. Thecustomization of parent_dialog comes in a block of code that the user canmanually insert in their version of parent_dialog following the instructions ofthe script. All the other dialogs are created for our customization, and canbe installed as provided. Once the parent_dialog is modified, thecustomization process proceeds as in spcustomFastInstall.
The spcustomCustomInstall script can be used as a model for futurecustomizations in your environment.
To uninstall the sample AEF/DSL customizations for the SP, simply executethe script spcustomUninstall in the distribution directory.
6.3 What is AEF?Application Extension Facility (AEF) is a development toolkit provided by Tivolifor the extension of the behavior and data attributes of the TME 10 Desktopobjects. These modifications can be taken advantage of from the Tivoli GUI byincluding references to these methods in the TME 10 Desktop dialogs, which canalso be modified by the user.
In order to understand the scope and characteristics of an AEF customization,we need to briefly discuss the basic architecture of an object in the TME 10framework.
Classes, and instances of those classes (or in Tivoli′s terminology, resourcetypes and resource instances) are represented in a similar way: as objects, thatis, entities with data attributes and methods (operations).
Objects representing classes contain references to their class instances. Forexample, there is an object that represents the managed node resource andprovides all services that are common to all managed nodes. This object also
Chapter 6. AEF Customizations for the RS/6000 SP 115
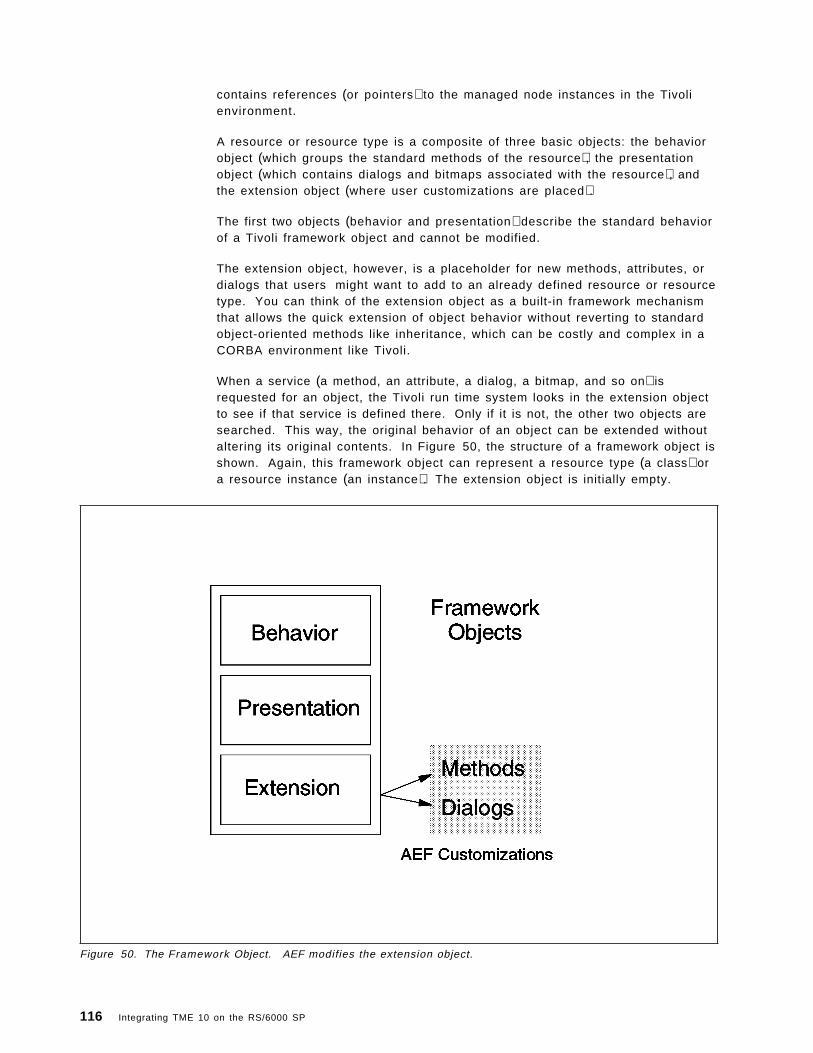
contains references (or pointers) to the managed node instances in the Tivolienvironment.
A resource or resource type is a composite of three basic objects: the behaviorobject (which groups the standard methods of the resource), the presentationobject (which contains dialogs and bitmaps associated with the resource), andthe extension object (where user customizations are placed).
The first two objects (behavior and presentation) describe the standard behaviorof a Tivoli framework object and cannot be modified.
The extension object, however, is a placeholder for new methods, attributes, ordialogs that users might want to add to an already defined resource or resourcetype. You can think of the extension object as a built-in framework mechanismthat allows the quick extension of object behavior without reverting to standardobject-oriented methods like inheritance, which can be costly and complex in aCORBA environment like Tivoli.
When a service (a method, an attribute, a dialog, a bitmap, and so on) isrequested for an object, the Tivoli run time system looks in the extension objectto see if that service is defined there. Only if it is not, the other two objects aresearched. This way, the original behavior of an object can be extended withoutaltering its original contents. In Figure 50, the structure of a framework object isshown. Again, this framework object can represent a resource type (a class) ora resource instance (an instance). The extension object is initially empty.
Figure 50. The Framework Object. AEF modifies the extension object.
116 Integrating TME 10 on the RS/6000 SP

Methods can be added and deleted from the extension object freely, withoutaffecting the original behavior of the resource type or resource instance. That is,AEF customizations can be made both at the class level or at the instance leveland do not erase the original contents of an object.
Once objects have been extended, the TME 10 Desktop dialogs can be modifiedto take advantage of the new methods and attributes.
Tivoli dialogs are written in the Dialog Specification Language (DSL) and theyare installed in the objects as if they were attributes.
• Dialogs installed at the class level can be used by any instance of the class.
• Dialogs installed at the instance level, override the global dialogs.
For example, in our sample customizations, we have customized the Propertiesdialog (in Figure 44 on page 109 and Figure 47 on page 111) just for certaininstances of the managed nodes. Hence, these dialogs are installed at theinstance level.
It is worth noting that DSL development (which only affects the TME 10 Desktopdialogs) is not, strictly speaking, part of AEF development. However, thecustomization of dialogs is an integral part of AEF development. Hence, they arealways discussed together.
AEF/DSL development can be used in general for many purposes:
• Addition of methods (callbacks in AEF terminology) to both resource typesand resource instances.
• Addition of attributes to resource instances.
• Modification of the existing dialogs in the TME 10 Desktop.
• Addition of new dialogs to the TME 10 Desktop.
• Customization of bitmaps and icons, which are the representation ofresources in the TME 10 Desktop (an icon is defined as a pair consisting ofan icon and its associated pop-up menu). See Figure 51 on page 118.
Chapter 6. AEF Customizations for the RS/6000 SP 117

Figure 51. An Icon with its Associated Bitmap
• Definition and installation of message catalogs associated to a set of dialogs.
All these customizations are done at run time, through the command lineinterface, without the need to reload the database or restart the TME server.
6.3.1 Strengths and Weaknesses of AEF/DSLIt is worth noting that modifying the behavior of the TME 10 Desktop throughAEF/DSL is considerably simpler than using the Advanced DevelopmentEnvironment provided by Tivoli (ADE/Tivoli).
ADE/Tivoli requires proficiency in Interface Definition Language (IDL), which isthe language used to define objects in a standard CORBA system, and TEIDL(Tivoli Extension IDL).
TEIDL is an extension of IDL including, among other features, exceptions (similarto those of C+ + ) and object-naming facilities. All Tivoli resources are defined inTEIDL, and ADE development extends the original framework seamlessly.However, ADE development is complex and requires a substantial investment indevelopment resources.
Since AEF/DSL provides a simple, yet powerful, mechanism to extend thebehavior of objects in the TME 10, we believe that most users can benefit fromthis type of development in order to obtain an integrated managementenvironment for the SP. As we saw in the previous section, the behavior of
118 Integrating TME 10 on the RS/6000 SP

managed nodes can be easily extended to provide virtually any functionalitydesired by the user.
However, it is important to remember that even though AEF/DSL facilitates thecustomization of the TME 10 Desktop, it is not intended to be a completedevelopment facility for the TME 10. Only the ADE fulfills this role. Thus, thereader should also be aware of the inherent limitations of AEF/DSLcustomizations:
• Preexisting object methods and attributes cannot be edited or modified.
• Objects and dialogs are updated through commands issued at run time.These changes are permanently registered in the TME database, and onlytake effect when the TME 10 Desktop is restarted.
• In the TME 10 Desktop, object methods are invoked as callbacks associatedwith gadgets in the context of the object who owns the dialog. Other objects′methods cannot be directly called (this type of call can only be issuedthrough ADE).
• Drag-and-drop operations, as defined in the TME 10 Desktop, cannot bemodified.
• Strictly speaking, not all dialogs can be effectively modified. For example,the create dialogs (dialogs used to create new instances of a resource fromthe TME 10 Desktop) cannot be modified in the case of a managed node.The reason for this is that when a managed node is created, its clientsoftware has to be installed. This is a complex process and it should not betampered with.
For a complete list of the capabilities of AEF, refer to the TME 10 AEF User′sGuide.
6.4 Anatomy of an AEF/DSL CustomizationAn AEF/DSL customization involves the addition of methods or attributes to anobject and the modification or creation of its dialogs in order to take advantageof the new behavior. This section discusses the basic mechanism of thecustomizations. The reader not interested in AEF development can safely skipthe rest of this chapter.
Even though the customization process is not complex, it does involve severalsteps, which can be better illustrated if we go through an example. Throughoutthe rest of the chapter we will refer to the customization of a managed node asan SP control workstation (the customization of SP nodes is even simpler). Inour environment, the control workstation′s name is sp2cw0.
As we saw in Figure 47 on page 111, the Properties dialog (namedproperties_dialog) of the managed node has to be modified to produce theextended dialog shown there. This dialog contains buttons (Run CW , SPApplications ) that open new dialogs, specific to our sample customizations.These dialogs were newly created and installed in the managed node resource.
Usually, the first step is to look at the dialogs that are currently installed in aresource by issuing the wlsdialog command. An example of the results of thiscommand for a managed node is shown in the following screen:
Chapter 6. AEF Customizations for the RS/6000 SP 119
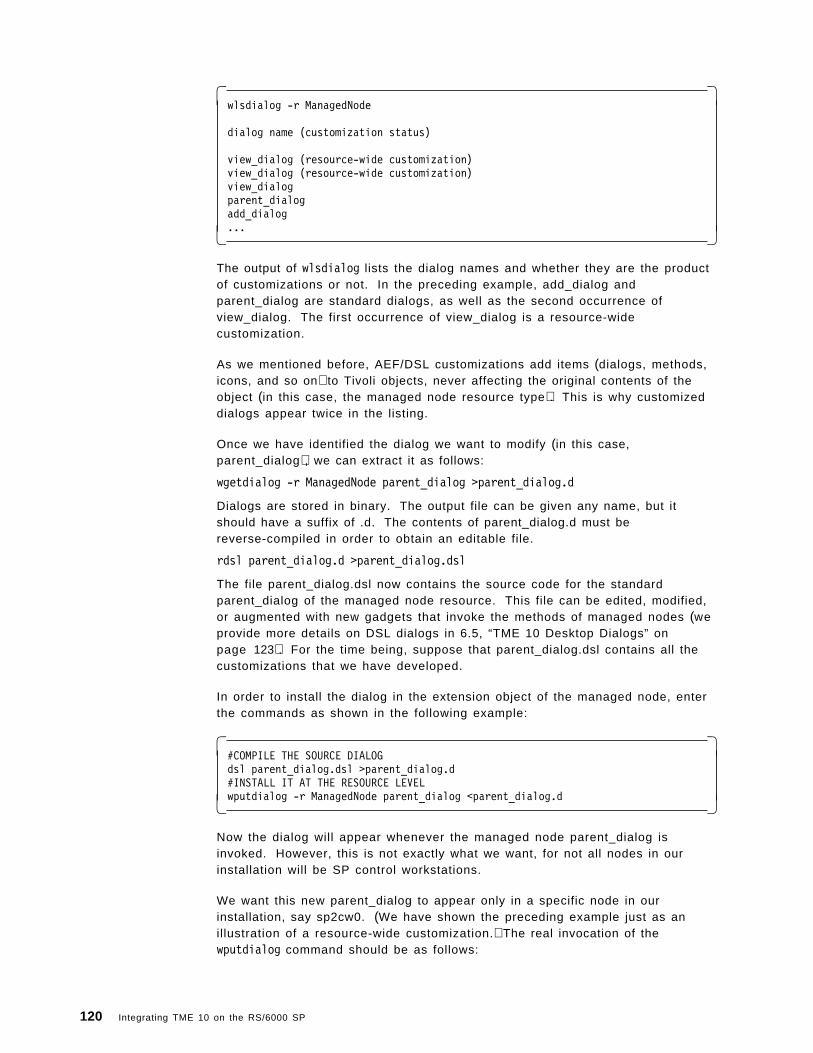
� �wlsdialog -r ManagedNode
dialog name (customization status)
view_dialog (resource-wide customization)view_dialog (resource-wide customization)view_dialogparent_dialogadd_dialog...� �
The output of wlsdialog lists the dialog names and whether they are the productof customizations or not. In the preceding example, add_dialog andparent_dialog are standard dialogs, as well as the second occurrence ofview_dialog. The first occurrence of view_dialog is a resource-widecustomization.
As we mentioned before, AEF/DSL customizations add items (dialogs, methods,icons, and so on) to Tivoli objects, never affecting the original contents of theobject (in this case, the managed node resource type). This is why customizeddialogs appear twice in the listing.
Once we have identified the dialog we want to modify (in this case,parent_dialog), we can extract it as follows:
wgetdialog -r ManagedNode parent_dialog >parent_dialog.d
Dialogs are stored in binary. The output file can be given any name, but itshould have a suffix of .d. The contents of parent_dialog.d must bereverse-compiled in order to obtain an editable file.
rdsl parent_dialog.d >parent_dialog.dsl
The file parent_dialog.dsl now contains the source code for the standardparent_dialog of the managed node resource. This file can be edited, modified,or augmented with new gadgets that invoke the methods of managed nodes (weprovide more details on DSL dialogs in 6.5, “TME 10 Desktop Dialogs” onpage 123). For the time being, suppose that parent_dialog.dsl contains all thecustomizations that we have developed.
In order to install the dialog in the extension object of the managed node, enterthe commands as shown in the following example:
� �#COMPILE THE SOURCE DIALOGdsl parent_dialog.dsl >parent_dialog.d#INSTALL IT AT THE RESOURCE LEVELwputdialog -r ManagedNode parent_dialog <parent_dialog.d� �
Now the dialog will appear whenever the managed node parent_dialog isinvoked. However, this is not exactly what we want, for not all nodes in ourinstallation will be SP control workstations.
We want this new parent_dialog to appear only in a specific node in ourinstallation, say sp2cw0. (We have shown the preceding example just as anillustration of a resource-wide customization.) The real invocation of thewputdialog command should be as follows:
120 Integrating TME 10 on the RS/6000 SP
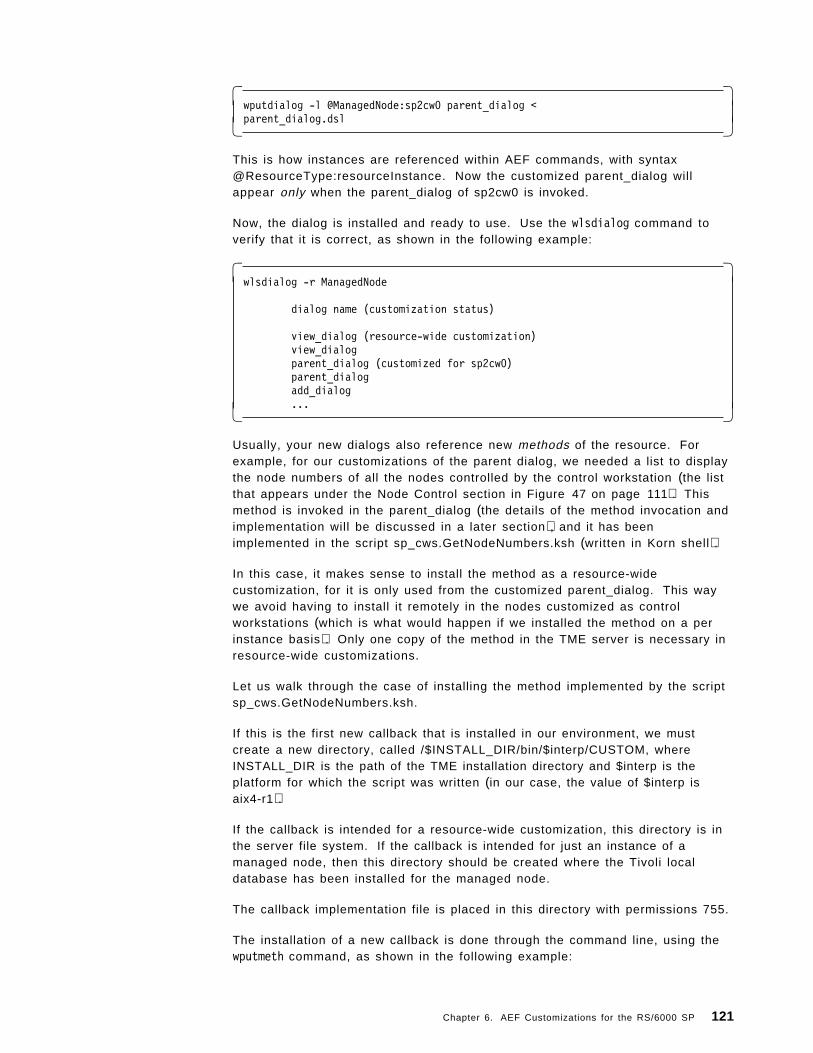
� �wputdialog -l @ManagedNode:sp2cw0 parent_dialog <parent_dialog.dsl� �
This is how instances are referenced within AEF commands, with syntax@ResourceType:resourceInstance. Now the customized parent_dialog willappear only when the parent_dialog of sp2cw0 is invoked.
Now, the dialog is installed and ready to use. Use the wlsdialog command toverify that it is correct, as shown in the following example:
� �wlsdialog -r ManagedNode
dialog name (customization status)
view_dialog (resource-wide customization)view_dialogparent_dialog (customized for sp2cw0)parent_dialogadd_dialog...� �
Usually, your new dialogs also reference new methods of the resource. Forexample, for our customizations of the parent dialog, we needed a list to displaythe node numbers of all the nodes controlled by the control workstation (the listthat appears under the Node Control section in Figure 47 on page 111). Thismethod is invoked in the parent_dialog (the details of the method invocation andimplementation will be discussed in a later section), and it has beenimplemented in the script sp_cws.GetNodeNumbers.ksh (written in Korn shell).
In this case, it makes sense to install the method as a resource-widecustomization, for it is only used from the customized parent_dialog. This waywe avoid having to install it remotely in the nodes customized as controlworkstations (which is what would happen if we installed the method on a perinstance basis). Only one copy of the method in the TME server is necessary inresource-wide customizations.
Let us walk through the case of installing the method implemented by the scriptsp_cws.GetNodeNumbers.ksh.
If this is the first new callback that is installed in our environment, we mustcreate a new directory, called /$INSTALL_DIR/bin/$interp/CUSTOM, whereINSTALL_DIR is the path of the TME installation directory and $interp is theplatform for which the script was written (in our case, the value of $interp isaix4-r1).
If the callback is intended for a resource-wide customization, this directory is inthe server file system. If the callback is intended for just an instance of amanaged node, then this directory should be created where the Tivoli localdatabase has been installed for the managed node.
The callback implementation file is placed in this directory with permissions 755.
The installation of a new callback is done through the command line, using thewputmeth command, as shown in the following example:
Chapter 6. AEF Customizations for the RS/6000 SP 121

� �wputmeth -i aix4-r1 -a user -a super -a senior -a admin -r ManagedNodesp_cws.GetNodeNumbers /aix4-r1/CUSTOM/sp_cws.GetNodeNumbers.ksh� �
Note that the name of the method and the script that implements it do not needto match, though we have used the name of the callback with a suffix of .ksh forour scripts, for the sake of simplicity.
We need to say a few words about this wputmeth call. The method has beeninstalled for the aix4-r1 platform (Tivoli does not yet support AIX 4.2) as aresource-wide customization of the managed node. The -a flag specifiesauthorization roles for the method.
In the preceding example, all user roles are granted privileges to run thismethod, since any user that can access this dialog should be able to display it(otherwise, the parent_dialog would give an error indicating the method was notfound). In this case, the access control information is not necessary, for if noaccess privileges are specified, any Tivoli user with access to the resource canexecute the method. If you wish to change the access privileges to a custommethod, you must uninstall it first (using wrmmeth) and reinstall it with the newprivileges.
Note finally that the method path (/aix4-r1/CUSTOM/sp_cws.spmon.ksh) is arelative path with respect to $INSTALL_DIR/BIN.
Furthermore, we could have installed this method as part of an instance, saysp2cw0, by using -l @ManagedNode:sp2cw0 instead of -r ManagedNode.
Once wputmeth has completed successfully, the sp_cws.GetNodeNumbers methodbecomes part of the behavior of managed node resources. We need to repeatthe process for each new callback that our customized parent_dialog uses.
Once the new version of parent_dialog and its associated callbacks have beeninstalled, the customization can be tested. After restarting the TME 10 Desktop,whenever the parent dialog of sp2cw0 is invoked, we should see the newcustomized dialog, seamlessly integrated with the rest of the Tivoli environment.
This is how a basic AEF/DSL customization takes place. Of course, we have leftout many important details. More information about the commands used here isavailable in the TME 10 AEF User′s Guide or in the Tivoli man pages. Also, weneed to know how to modify dialogs and how to construct the callbacks. Thiswill be covered in the next sections.
The reader has probably noticed from the figures in 6.1, “High Level Overview ofa Sample Set of Customizations” on page 107 that, in addition to the newdialogs, we have also introduced new bitmaps for our customized nodes. Tivoliicons can be modified so that managed nodes (or any other resources, likepolicy regions or profile managers) can be visually distinguished in the TME 10Desktop.
Before going into more details on AEF/DSL, we need to know how to remove anunwanted customization.
122 Integrating TME 10 on the RS/6000 SP
6.4.1 Removing AEF/DSL CustomizationsAEF/DSL customizations can be easily removed from your environment withoutaffecting the standard behavior of the Tivoli resources. Suppose we were notsatisfied with the customization of the parent_dialog and its associated methodsp_cws.GetNodeNumbers in the previous section. We can remove the dialog byissuing:
wrmdialog -l @ManagedNode:sp2cw0 parent_dialog
If the dialog was installed as a resource-wide customization, then we would haveused, instead of the instance name, -r ManagedNode.
It is equally easy to remove a callback. Again, we use the -l flag to removeinstance customizations and -r to remove resource-wide customizations. In thecase of sp_cws.sp_applications, we issue:
wrmmeth -r ManagedNode sp_cws.sp_applications.
The customizations no longer exists and sp2cw0 should now behave like astandard AIX managed node.
6.5 TME 10 Desktop DialogsSince AEF customizations are tailored to alter the behavior of the TME 10Desktop, it is necessary to get aquainted with the Dialog Specification Language(DSL), as an integral part of the customization process.
A full discussion of DSL is given in TME 10 AEF User′s Guide. We aim, in thissection, to provide enough background to carry out simple, yet meaningful,customizations to the existing TME 10 Desktop dialogs.
In order to illustrate the process, we will work with the simplest of our dialogs.This dialog offers a set of buttons to launch several SP applications, like SPPerspectives and the SP System Monitor GUI, from an SP control workstationobject. This is illustrated in Figure 52 on page 124.
Chapter 6. AEF Customizations for the RS/6000 SP 123
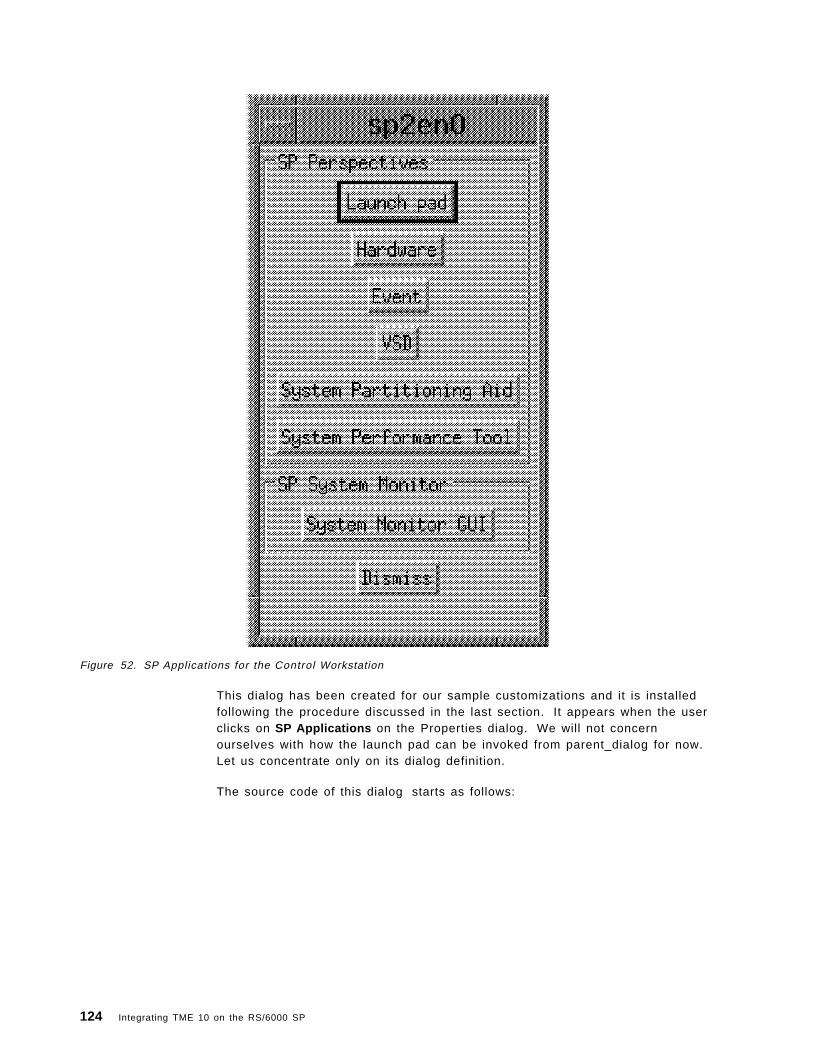
Figure 52. SP Applications for the Control Workstation
This dialog has been created for our sample customizations and it is installedfollowing the procedure discussed in the last section. It appears when the userclicks on SP Applications on the Properties dialog. We will not concernourselves with how the launch pad can be invoked from parent_dialog for now.Let us concentrate only on its dialog definition.
The source code of this dialog starts as follows:
124 Integrating TME 10 on the RS/6000 SP

� �Command Dialog{
Variables{
CString man_node_name;}
Attributes{
Name = sp_launch_applications;Title = Msg(SpManagedNode, $man_node_name, 1, $man_node_name);
}
Group{
Attributes{
Name = g1;Title = Msg(SpManagedNode, ″SP Perspectives″ , 2 ) ;TitlePos = TOP;Border = YES;Layout = VERTICAL;ChildColumnAlignment = STRETCH;
}Gadgets{
Button{
Name = launch_pad;Title = Msg(SpManagedNode, ″Launch Pad″ , 3 ) ;Commands = sp_cws.LaunchPerspectives@(″perspectives″ ) ;
}
...}
...}
...}
� �
This definition covers up to the first button (Launch Pad ). The rest of the dialogis a set of similar button definitions, and is provided in Appendix H, “Contents ofAEF Customization Scripts” on page 201. Here we will use these lines toanalyze the structure of a dialog.
A DSL specification consists essentially of a list of the gadgets (buttons, in thecase of the sp_cws.sp_applications dialog) of a dialog. Furthermore, eachgadget is associated to one or more actions that allow the administrator to sendmessages from the dialog to its corresponding resource. In our example, thecommand sp_cws.LaunchPerspectives (the last code line in the example) is amethod (a callback) of the control workstation object that launches the SPPerspectives GUI. For the installation process of a callback, see 6.4.1,“Removing AEF/DSL Customizations” on page 123.
Chapter 6. AEF Customizations for the RS/6000 SP 125

6.5.1 Basic Structure of a DSL FileA DSL dialog has a very simple structure. It is made up of blocks, which aresets of statements enclosed within curly braces enclosed in turn in a main dialogblock (starting with the keywords Command Dialog). Every statement in a blockis terminated by a semicolon. Blocks can appear in any order in the file, andcan occur any number of times within the same file.
There are three types of blocks in DSL, each with a defining keyword: Attributes,Variables, and Gadgets.
There are also group blocks. These group blocks can contain attribute, variable,or gadget blocks, as in the case of the sp_cws.sp_applications dialog previouslylisted.
We will take a brief look at these three types of blocks in the next sections.
6.5.2 Variables and Variable BlocksVariables and variable blocks contain a set of variable declarations. DSLsupports three data types:
String Similar to a char* in C.
CString A data type encoded within a string.
CMsg A data type encoded as a message.
A variable is declared with the following syntax:
type variable_name = variable_value;
The variable value could be either a constant or a method invocation (in otherwords, a callback).
When a variable is not assigned any value from the dialog itself, its value isassumed to proceed from the calling dialog, as a parameter of the dialoginvocation. We will call these variables dialog parameters. We cover the detailsof dialog invocation in the section 6.6, “Methods for Customized Objects” onpage 129.
In our preceding example, we have defined the variable man_node_name, whichis a CString. That is, when the dialog is invoked from a callback, the value forthis variable is provided (more details on this later). Note that when wereference this variable, we prefix it with the dollar sign ($), as in the followingfunction call:
Title = Msg(SpManagedNode, $man_node_name, 1, $man_node_name);
There are also some predefined variables, called desktop variables, which areavailable in any dialog. The most important desktop variables are:
$owner The object reference of the dialog owner; that is, the object that thedialog belongs to (used as a callback argument).
$selects The object references of the objects that have been selected in acollection of icons in the dialog.
$icon The object reference of the resource represented by an icon.
$self The identifier of the dialog (each dialog instance has associated withit an instance ID, which is stored in this variable).
126 Integrating TME 10 on the RS/6000 SP
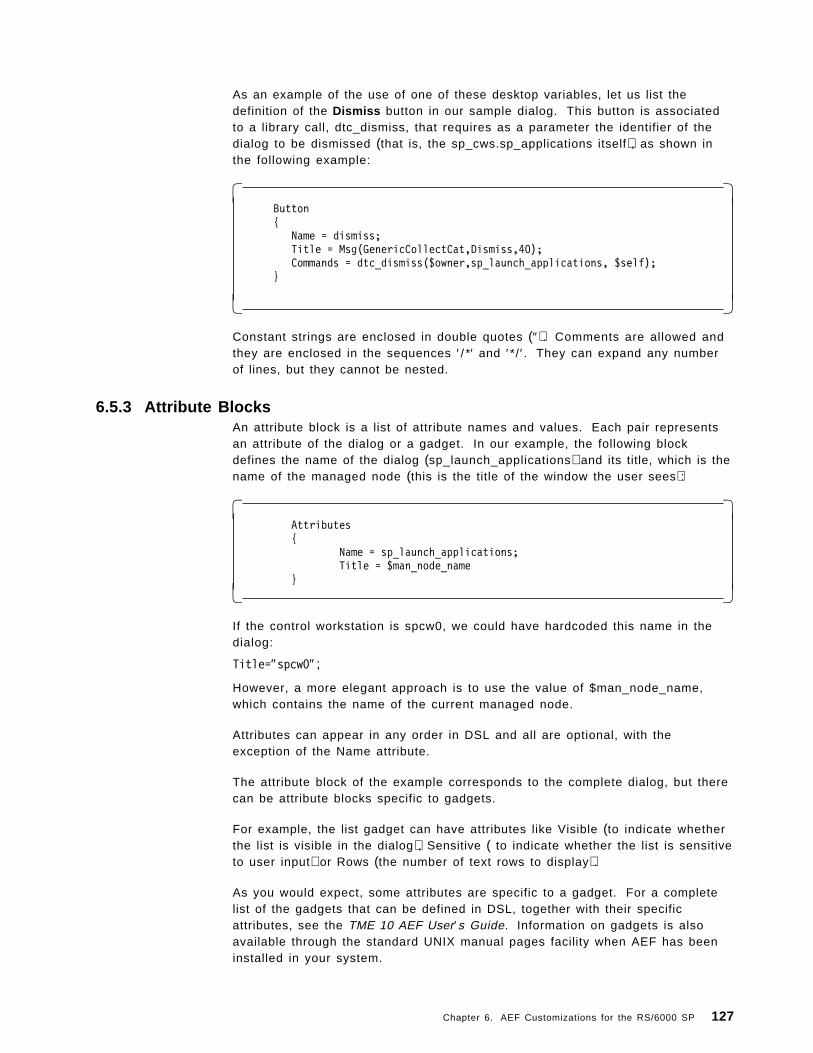
As an example of the use of one of these desktop variables, let us list thedefinition of the Dismiss button in our sample dialog. This button is associatedto a library call, dtc_dismiss, that requires as a parameter the identifier of thedialog to be dismissed (that is, the sp_cws.sp_applications itself), as shown inthe following example:
� �Button{
Name = dismiss;Title = Msg(GenericCollectCat,Dismiss,40);Commands = dtc_dismiss($owner,sp_launch_applications, $self);
}
� �
Constant strings are enclosed in double quotes (″). Comments are allowed andthey are enclosed in the sequences ′ / *′ and ′*/ ′. They can expand any numberof lines, but they cannot be nested.
6.5.3 Attribute BlocksAn attribute block is a list of attribute names and values. Each pair representsan attribute of the dialog or a gadget. In our example, the following blockdefines the name of the dialog (sp_launch_applications) and its title, which is thename of the managed node (this is the title of the window the user sees):
� �Attributes{
Name = sp_launch_applications;Title = $man_node_name
}� �
If the control workstation is spcw0, we could have hardcoded this name in thedialog:
Title=″spcw0″ ;
However, a more elegant approach is to use the value of $man_node_name,which contains the name of the current managed node.
Attributes can appear in any order in DSL and all are optional, with theexception of the Name attribute.
The attribute block of the example corresponds to the complete dialog, but therecan be attribute blocks specific to gadgets.
For example, the list gadget can have attributes like Visible (to indicate whetherthe list is visible in the dialog), Sensitive ( to indicate whether the list is sensitiveto user input) or Rows (the number of text rows to display).
As you would expect, some attributes are specific to a gadget. For a completelist of the gadgets that can be defined in DSL, together with their specificattributes, see the TME 10 AEF User′s Guide. Information on gadgets is alsoavailable through the standard UNIX manual pages facility when AEF has beeninstalled in your system.
Chapter 6. AEF Customizations for the RS/6000 SP 127
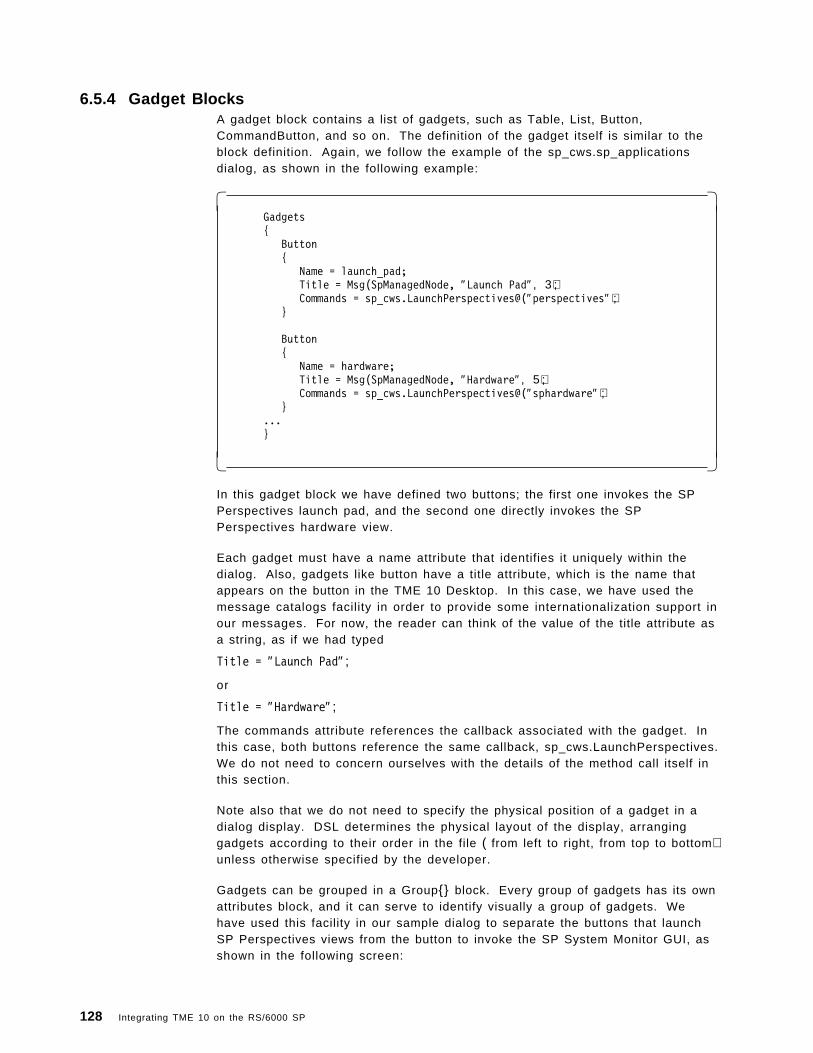
6.5.4 Gadget BlocksA gadget block contains a list of gadgets, such as Table, List, Button,CommandButton, and so on. The definition of the gadget itself is similar to theblock definition. Again, we follow the example of the sp_cws.sp_applicationsdialog, as shown in the following example:
� �Gadgets{
Button{
Name = launch_pad;Title = Msg(SpManagedNode, ″Launch Pad″ , 3 ) ;Commands = sp_cws.LaunchPerspectives@(″perspectives″ ) ;
}
Button{
Name = hardware;Title = Msg(SpManagedNode, ″Hardware″ , 5 ) ;Commands = sp_cws.LaunchPerspectives@(″sphardware″ ) ;
}...}
� �
In this gadget block we have defined two buttons; the first one invokes the SPPerspectives launch pad, and the second one directly invokes the SPPerspectives hardware view.
Each gadget must have a name attribute that identifies it uniquely within thedialog. Also, gadgets like button have a title attribute, which is the name thatappears on the button in the TME 10 Desktop. In this case, we have used themessage catalogs facility in order to provide some internationalization support inour messages. For now, the reader can think of the value of the title attribute asa string, as if we had typed
Title = ″Launch Pad″ ;
or
Title = ″Hardware″ ;
The commands attribute references the callback associated with the gadget. Inthis case, both buttons reference the same callback, sp_cws.LaunchPerspectives.We do not need to concern ourselves with the details of the method call itself inthis section.
Note also that we do not need to specify the physical position of a gadget in adialog display. DSL determines the physical layout of the display, arranginggadgets according to their order in the file ( from left to right, from top to bottom)unless otherwise specified by the developer.
Gadgets can be grouped in a Group{} block. Every group of gadgets has its ownattributes block, and it can serve to identify visually a group of gadgets. Wehave used this facility in our sample dialog to separate the buttons that launchSP Perspectives views from the button to invoke the SP System Monitor GUI, asshown in the following screen:
128 Integrating TME 10 on the RS/6000 SP
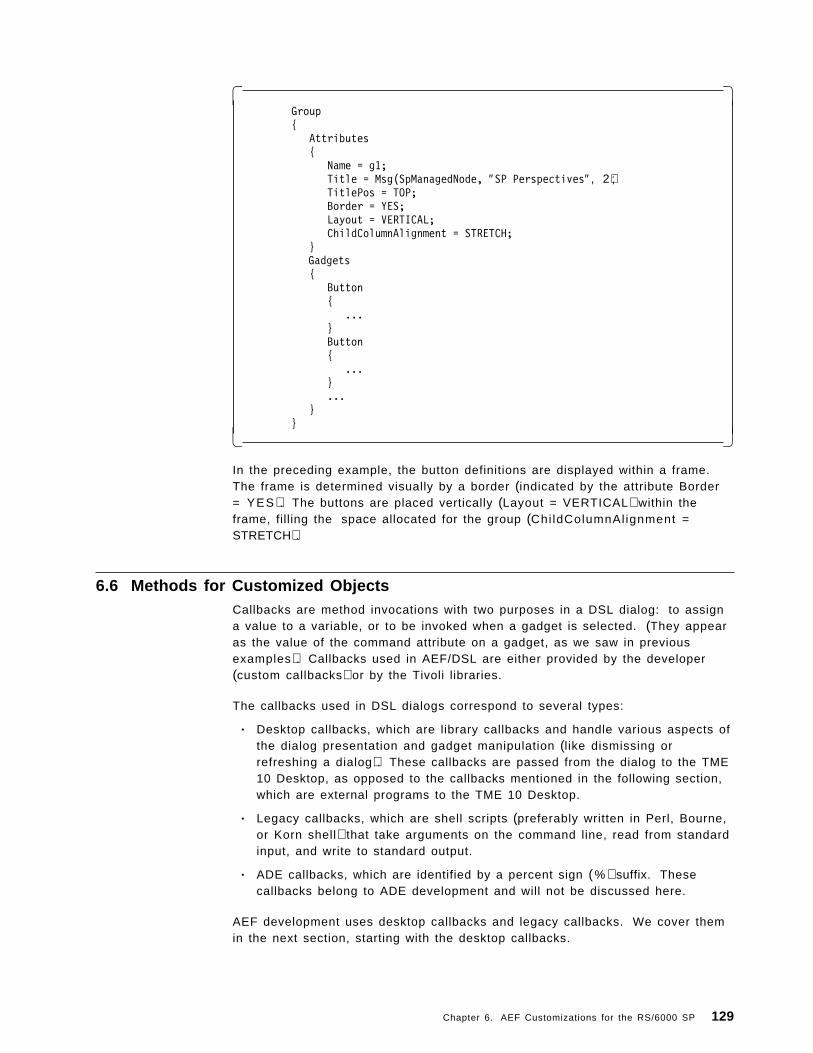
� �Group{
Attributes{
Name = g1;Title = Msg(SpManagedNode, ″SP Perspectives″ , 2 ) ;TitlePos = TOP;Border = YES;Layout = VERTICAL;ChildColumnAlignment = STRETCH;
}Gadgets{
Button{
...}Button{
...}...
}}
� �
In the preceding example, the button definitions are displayed within a frame.The frame is determined visually by a border (indicated by the attribute Border= YES ). The buttons are placed vertically (Layout = VERTICAL) within theframe, filling the space allocated for the group (Chi ldColumnAl ignment =STRETCH).
6.6 Methods for Customized ObjectsCallbacks are method invocations with two purposes in a DSL dialog: to assigna value to a variable, or to be invoked when a gadget is selected. (They appearas the value of the command attribute on a gadget, as we saw in previousexamples). Callbacks used in AEF/DSL are either provided by the developer(custom callbacks) or by the Tivoli libraries.
The callbacks used in DSL dialogs correspond to several types:
• Desktop callbacks, which are library callbacks and handle various aspects ofthe dialog presentation and gadget manipulation (l ike dismissing orrefreshing a dialog). These callbacks are passed from the dialog to the TME10 Desktop, as opposed to the callbacks mentioned in the following section,which are external programs to the TME 10 Desktop.
• Legacy callbacks, which are shell scripts (preferably written in Perl, Bourne,or Korn shell) that take arguments on the command line, read from standardinput, and write to standard output.
• ADE callbacks, which are identified by a percent sign (% ) suffix. Thesecallbacks belong to ADE development and will not be discussed here.
AEF development uses desktop callbacks and legacy callbacks. We cover themin the next section, starting with the desktop callbacks.
Chapter 6. AEF Customizations for the RS/6000 SP 129
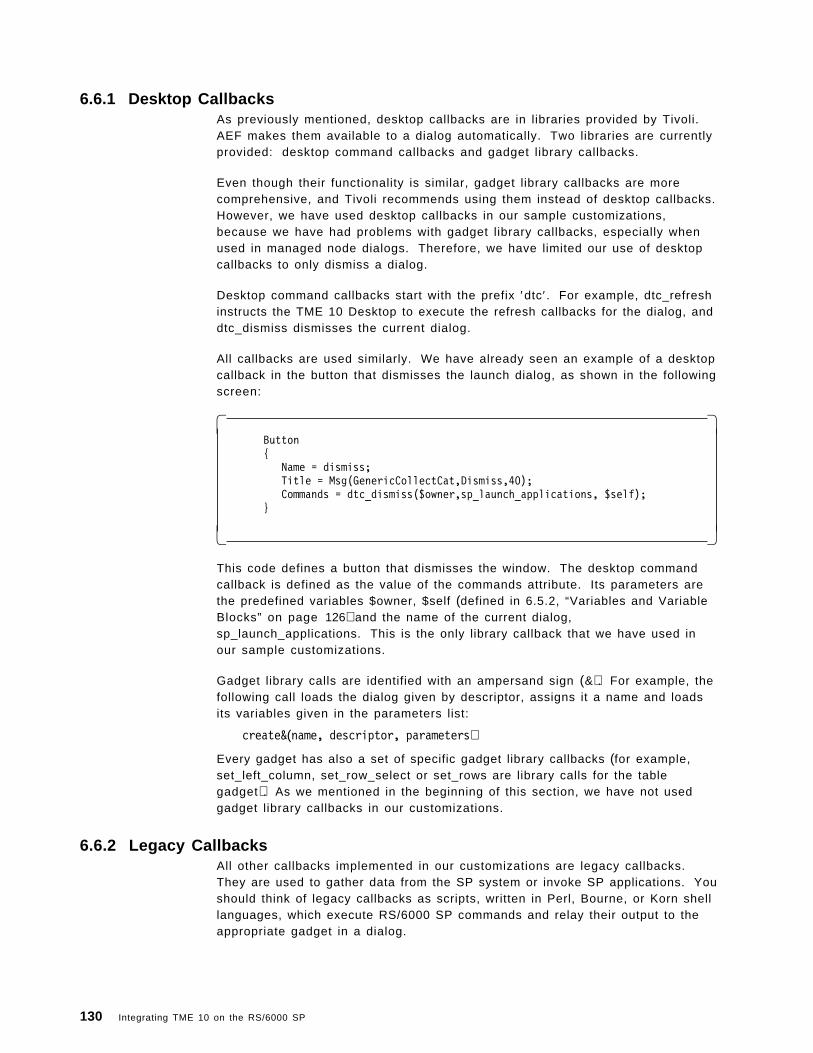
6.6.1 Desktop CallbacksAs previously mentioned, desktop callbacks are in libraries provided by Tivoli.AEF makes them available to a dialog automatically. Two libraries are currentlyprovided: desktop command callbacks and gadget library callbacks.
Even though their functionality is similar, gadget library callbacks are morecomprehensive, and Tivoli recommends using them instead of desktop callbacks.However, we have used desktop callbacks in our sample customizations,because we have had problems with gadget library callbacks, especially whenused in managed node dialogs. Therefore, we have limited our use of desktopcallbacks to only dismiss a dialog.
Desktop command callbacks start with the prefix ′dtc′. For example, dtc_refreshinstructs the TME 10 Desktop to execute the refresh callbacks for the dialog, anddtc_dismiss dismisses the current dialog.
All callbacks are used similarly. We have already seen an example of a desktopcallback in the button that dismisses the launch dialog, as shown in the followingscreen:
� �Button{
Name = dismiss;Title = Msg(GenericCollectCat,Dismiss,40);Commands = dtc_dismiss($owner,sp_launch_applications, $self);
}
� �
This code defines a button that dismisses the window. The desktop commandcallback is defined as the value of the commands attribute. Its parameters arethe predefined variables $owner, $self (defined in 6.5.2, “Variables and VariableBlocks” on page 126) and the name of the current dialog,sp_launch_applications. This is the only library callback that we have used inour sample customizations.
Gadget library calls are identified with an ampersand sign (&). For example, thefollowing call loads the dialog given by descriptor, assigns it a name and loadsits variables given in the parameters list:
create&(name, descriptor, parameters)
Every gadget has also a set of specific gadget library callbacks (for example,set_left_column, set_row_select or set_rows are library calls for the tablegadget). As we mentioned in the beginning of this section, we have not usedgadget library callbacks in our customizations.
6.6.2 Legacy CallbacksAll other callbacks implemented in our customizations are legacy callbacks.They are used to gather data from the SP system or invoke SP applications. Youshould think of legacy callbacks as scripts, written in Perl, Bourne, or Korn shelllanguages, which execute RS/6000 SP commands and relay their output to theappropriate gadget in a dialog.
130 Integrating TME 10 on the RS/6000 SP
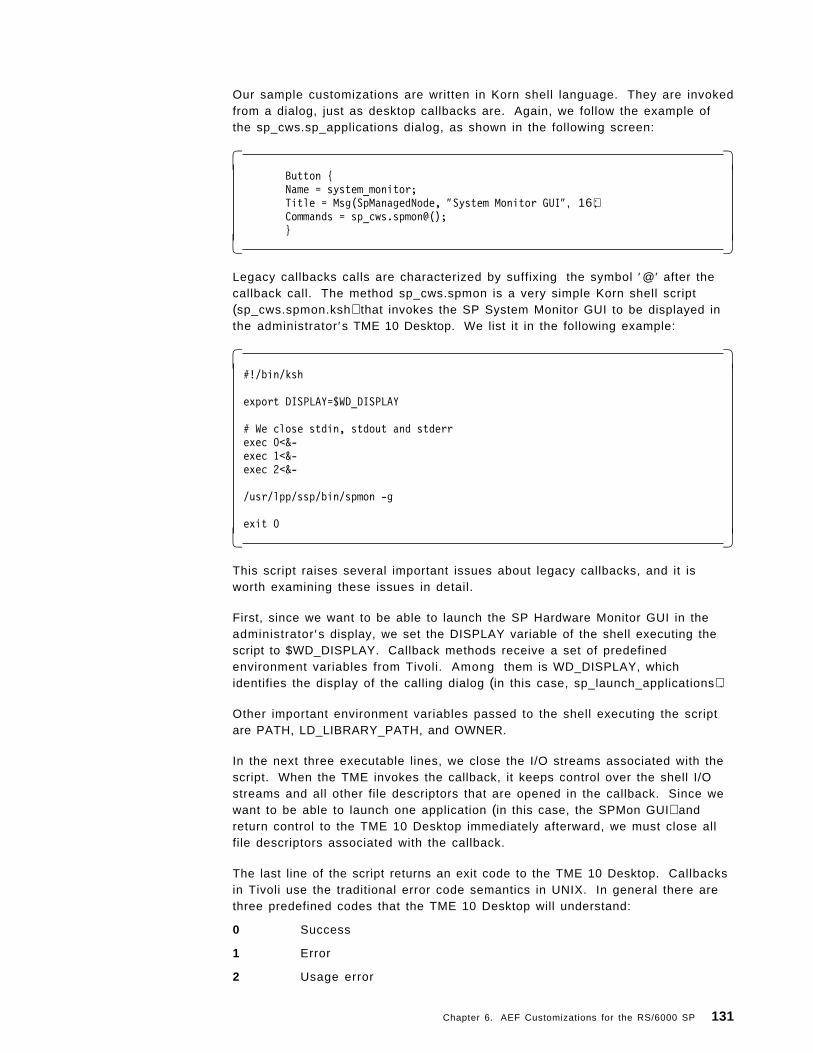
Our sample customizations are written in Korn shell language. They are invokedfrom a dialog, just as desktop callbacks are. Again, we follow the example ofthe sp_cws.sp_applications dialog, as shown in the following screen:
� �Button {Name = system_monitor;Title = Msg(SpManagedNode, ″System Monitor GUI″ , 16) ;Commands = sp_cws.spmon@();}
� �
Legacy callbacks calls are characterized by suffixing the symbol ′@′ after thecallback call. The method sp_cws.spmon is a very simple Korn shell script(sp_cws.spmon.ksh) that invokes the SP System Monitor GUI to be displayed inthe administrator ′s TME 10 Desktop. We list it in the following example:
� �#!/bin/ksh
export DISPLAY=$WD_DISPLAY
# We close stdin, stdout and stderrexec 0<&-exec 1<&-exec 2<&-
/usr/lpp/ssp/bin/spmon -g
exit 0� �
This script raises several important issues about legacy callbacks, and it isworth examining these issues in detail.
First, since we want to be able to launch the SP Hardware Monitor GUI in theadministrator ′s display, we set the DISPLAY variable of the shell executing thescript to $WD_DISPLAY. Callback methods receive a set of predefinedenvironment variables from Tivoli. Among them is WD_DISPLAY, whichidentifies the display of the calling dialog (in this case, sp_launch_applications).
Other important environment variables passed to the shell executing the scriptare PATH, LD_LIBRARY_PATH, and OWNER.
In the next three executable lines, we close the I/O streams associated with thescript. When the TME invokes the callback, it keeps control over the shell I/Ostreams and all other file descriptors that are opened in the callback. Since wewant to be able to launch one application (in this case, the SPMon GUI) andreturn control to the TME 10 Desktop immediately afterward, we must close allfile descriptors associated with the callback.
The last line of the script returns an exit code to the TME 10 Desktop. Callbacksin Tivoli use the traditional error code semantics in UNIX. In general there arethree predefined codes that the TME 10 Desktop will understand:
0 Success
1 Error
2 Usage error
Chapter 6. AEF Customizations for the RS/6000 SP 131

As mentioned before, legacy callbacks can be used to perform multiplefunctions. In our prespecified customizations, we can access (read and/or write)the SP System Data Repository, execute commands against a set of SP nodes orcontrol workstations, or launch specific SP applications.
We also use callbacks to manipulate the TME 10 Desktop itself: posting newdialogs, posting messages, or updating information on a visible dialog. All theseTME 10 Desktop management functions are performed through special callbackutilities provided by Tivoli which are described in 6.6.3, “Callback MethodUtil it ies.”
6.6.3 Callback Method UtilitiesBefore returning control to the TME, a legacy callback might need to manipulatethe TME 10 Desktop by posting a new dialog or a message. In order to managedesktop dialogs and messages, several CLI commands are provided in AEF. Thefollowing list represents those commands that we have found helpful in ourdevelopment.
• wpostdialog
This command posts a new dialog from a callback and is part of the AEFCommand Line Interface. Its syntax is very simple:
wpostdialog dialog_name name1 ... nameN param1 ... paramN
where name1...nameN are the names of the dialog parameters (without thepreceding dollar sign) and param1...paramN are their corresponding values.As a more concrete example, consider the call:
wpostdialog sp_cws.sp_applications man_node_name ″$1″
This call appears in the method sp_cws.LaunchApplicationsDriver which isassociated with the SP Applications button in the parent_dialog of the controlworkstation. When this button is selected, the method posts the dialogsp_cws.sp_applications, giving as the value of the variable man_node_name,the first argument received by the script. That is, in the parent_dialog, wehave the following:
� �Button
{Name = launch_applications_driver;Title = Msg(SpManagedNode, ″SP applications″, 23);Commands = sp_cws.LaunchApplicationsDriver@($man_node_name);
}� �This is how we can invoke one new dialog (sp_cws.sp_applications) from amodified one (parent_dialog) and pass variables from one to the other (seethe previous examples to find out how the variable man_node_name isdeclared within the sp_cws.sp_applications dialog). Note that the variableman_node_name is passed in quotes to the new dialog.
The new dialog is made a child of the dialog that invoked the callback, andtherefore it becomes a dialog that belongs to the same object (indicated by$owner). The option -t could be used in the wpostdialog call to make the newdialog independent of the current dialog.
• wdispmsg
This command displays a new window with a message in the TME 10Desktop. For example:
132 Integrating TME 10 on the RS/6000 SP

wdispmsg ″$result″
We have used it when running a command against a node or the controlworkstation on the SP in order to display the result of the computation($result is a variable local to the script).
• wdisperr
This command is very similar to wdipsmsg, but it presents the window as anerror. Consider the example:
wdisperr ″Operation could not be completed″
• wdispconf
This command displays a confirmation window, asking the user to make surethat critical operations should indeed be executed. We have used thiscommand to display a confirmation message after the user has issued apower off request against a set of nodes:
ANSWER=wdispconf ″Are you sure you want to power off nodes $* ?″
The user will be prompted to enter YES or NO at the new window where themessage is displayed. The return value of wdispconf is this answer. There isalso a more general form of the wdispconf command where the user canindicate the labels of the YES or NO buttons:
ANSWER=wdispconf -y ″Cancel″ -n ″Continue″″Do you want to continue the operation?″
• wstatusline
This command displays a message on the status area of the main window inthe administrator ′s TME 10 Desktop. For example:
wstatusline ″nodes $* have been powered off″
• wgetvalue and wsetvalue
These commands get and set the values of a dialog gadget. The followingexample is a simplification of the actual use of wgetvalue in ourcustomizations:
wgetvalue -o $OWNER -d $DIALOG -i $INSTANCE$GADGET ″new_value″
6.7 BitmapsBitmaps are a very effective way to present information in a GUI. Tivoliassociates bitmaps with all its managed resources. These bitmaps appear oftenin the dialogs belonging to the resource. When a bitmap represents a resourceinstance in the TME 10 Desktop (that is, it appears in the TME 10 Desktop and itspop-up menu is available), then it is called an icon. We will cover icons in thenext section.
Bitmaps are stored in the X pixmap (XPM) format. There is a public domainXPM editor included with the Tivoli Productivity package.
To list the bitmaps currently associated with a resource, issue:
wlsbitmap -r ResourceType
Suppose that we have already created our own bitmap, or modified any of thebitmaps already available in the resource. The bitmap can now be installed atthe instance level, or as a resource-wide bitmap.
Chapter 6. AEF Customizations for the RS/6000 SP 133
In our sample customizations, we have created a new icon for managed nodesto be represented as SP nodes. The bitmap name is sp_node.xpm, and we haveinstalled it using:
wputbitmap -r ManagedNode sp_node <sp_node.xpm
That is, the name of the bitmap is sp_node. This bitmap can be now used inmanaged node dialogs. Also, a bitmap can be installed for a specific instance ofa managed node using the -l flag, as in the commands wputdialog and wputmeth,explained in 6.4, “Anatomy of an AEF/DSL Customization” on page 119.
A bitmap can be removed using wrmbitmap. If we want to delete our previouscustomization, we would issue:
wrmbitmap -r ManagedNode sp_node
6.7.1 IconsYou can think of an icon as a pair made up of a bitmap and a pop-up menu,which is defined as a DSL dialog. Icons are treated as special entities thatidentify a resource. In this sense, the icon can be viewed as a state for aresource. Icons are installed at the resource level, and each instance is in agiven state when it appears in the TME 10 Desktop.
The idea of the state of a resource makes sense when thinking about managednodes and their different platforms. For example, in the standard Tivoliinstallation, these are some of the states for a managed node resource:
sunos4-clientsunos4-serversolaris2-clientsolaris2-serveraix4-r1-clientaix4-r1-server
Most other resources (policy region, profile manager, and so on) have only onestate: normal.
In order to list all the states of a resource, say, a managed node, we use thecommand wlsicon, as follows:
wlsicon -r ManagedNode
134 Integrating TME 10 on the RS/6000 SP
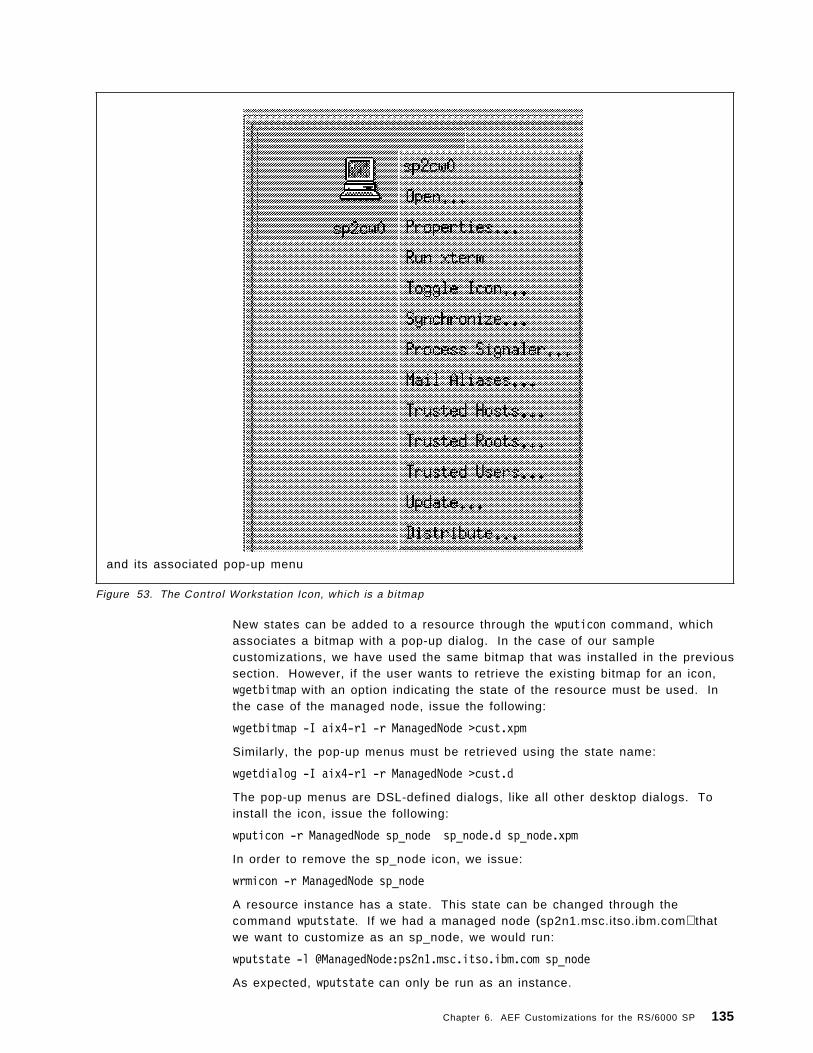
and its associated pop-up menu
Figure 53. The Control Workstation Icon, which is a bitmap
New states can be added to a resource through the wputicon command, whichassociates a bitmap with a pop-up dialog. In the case of our samplecustomizations, we have used the same bitmap that was installed in the previoussection. However, if the user wants to retrieve the existing bitmap for an icon,wgetbitmap with an option indicating the state of the resource must be used. Inthe case of the managed node, issue the following:
wgetbitmap -I aix4-r1 -r ManagedNode >cust.xpm
Similarly, the pop-up menus must be retrieved using the state name:
wgetdialog -I aix4-r1 -r ManagedNode >cust.d
The pop-up menus are DSL-defined dialogs, like all other desktop dialogs. Toinstall the icon, issue the following:
wputicon -r ManagedNode sp_node sp_node.d sp_node.xpm
In order to remove the sp_node icon, we issue:
wrmicon -r ManagedNode sp_node
A resource instance has a state. This state can be changed through thecommand wputstate. If we had a managed node (sp2n1.msc.itso.ibm.com) thatwe want to customize as an sp_node, we would run:
wputstate -l @ManagedNode:ps2n1.msc.itso.ibm.com sp_node
As expected, wputstate can only be run as an instance.
Chapter 6. AEF Customizations for the RS/6000 SP 135

Note: States are only used when referring to icons. They cannot be used wheninstalling other dialogs.
The reader has probably noticed that customizations of the parent_dialog for thecontrol workstation (see 6.4, “Anatomy of an AEF/DSL Customization” onpage 119) were made at the instance level or at the resource type level, not atthe state level.
6.8 Messages and Message CatalogsTivoli offers a message catalog facility, where the text appearing in the dialogcan be separated from the dialog definition itself and stored in a message file.This provides basic internationalization support.
In our experience, message catalogs are cumbersome to use. They should onlybe taken advantage of in extensive customizations, or when internationalizationsupport becomes critical. Readers who are not interested in providinginternationalization support can safely skip this section.
Continuing the approach used in this chapter, we discuss message catalogsthrough an example taken from our customizations. We have included the textof our customized dialogs in a new message catalog called SpManagedNode.To build the message catalog, we create the file SpManagedNode.msg thatcontains all the text messages that users see in dialogs, using the followingformat:
� �$set 2$ g1_Title1 SP Perspectives$ launch_pad_Title2 Launch Pad...
� �
This catalog is compiled using the gencat facility provided with the AEF/DSLpackage:
gencat SpManagedNode.cat SpManagedNode.msg
The binary file (SpManagedNode.cat) has to be moved to the$TIVOLIDIR/msg_cat/C directory (note that all directories under msg_cat are justlinks to the C directory). Make sure that root bin owns the file and thatpermissions are set to 755. SpManagedNode is now ready to be referencedfrom any dialog.
In our sp_cws.sp_applications dialog, we have used liberally our messagecatalog facility. Consider the attributes block for the group of all buttons tolaunch SP Perspectives views (which was also discussed in section 6.5, “TME 10Desktop Dialogs” on page 123), as shown in the following example:
136 Integrating TME 10 on the RS/6000 SP

� �attributes
{Name = g1;Title = Msg(SpManagedNode, ″SP Perspectives″ , 2 ) ;TitlePos = TOP;Border = YES;Layout = VERTICAL;ChildColumnAlignment = STRETCH;}
� �
The title attribute is the value of the msg call. This call returns message number2 of catalog SpManagedNode. In the case of any errors (for example, themessage catalog was not found), it also returns the string “SP Perspectives.”That is, “SP Perspectives” is the default message and the message inSpManagedNode is the standard message.
Changing the standard messages of SpManagedNode to a language other thanEnglish is easy. After SpManagedNode.msg has been edited, the user shouldfollow the preceding procedure to build and install the new SpManagedNode.Dialogs that reference this catalog do not need to be recompiled.
Note that there is another way to implement message catalogs, this is by usingthe key facility, where each message is preceded by a string that serves as akey to the message, thus eliminating the need to reference the number of themessage in the catalog.
However, using the key facility is more cumbersome and may havedisadvantages. It requires not only building the catalog (gencat), but alsorunning a preprocessor (cpp-dsl) to insert in the source dialog file the defaultmessages. This preprocessor only comes with the ADE package, which may notbe available in some installations. Furthermore, whenever the dialog isextracted (by using wgetdialog) the preprocessed source file is what is obtained,not the original source file. That is, the unprocessed file is lost for futurecustomizations.
For these reasons, we did not use the key facility, but limited ourselves toreferencing the integer keys of the messages. For more information on how touse keyed message catalogs, refer to TME 10 AEF User′s Guide.
Chapter 6. AEF Customizations for the RS/6000 SP 137

138 Integrating TME 10 on the RS/6000 SP
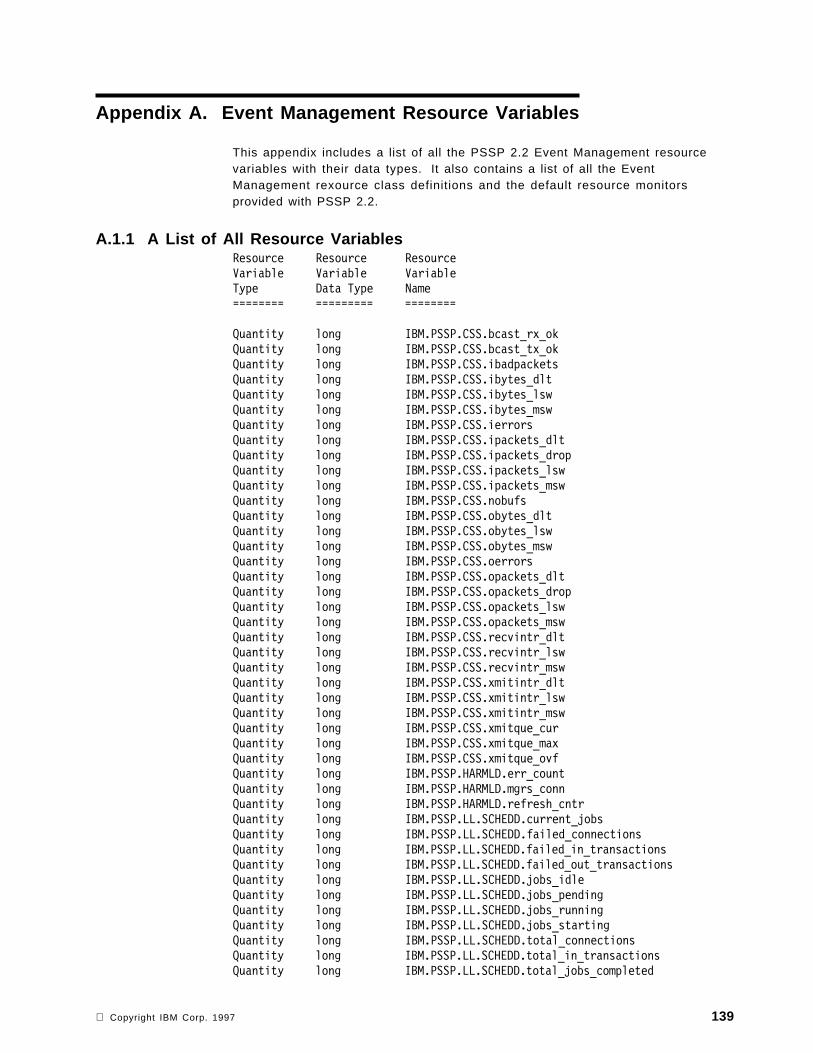
Appendix A. Event Management Resource Variables
This appendix includes a list of all the PSSP 2.2 Event Management resourcevariables with their data types. It also contains a list of all the EventManagement rexource class definitions and the default resource monitorsprovided with PSSP 2.2.
A.1.1 A List of All Resource VariablesResource Resource ResourceVariable Variable VariableType Data Type Name======== ========= ========
Quantity long IBM.PSSP.CSS.bcast_rx_okQuantity long IBM.PSSP.CSS.bcast_tx_okQuantity long IBM.PSSP.CSS.ibadpacketsQuantity long IBM.PSSP.CSS.ibytes_dltQuantity long IBM.PSSP.CSS.ibytes_lswQuantity long IBM.PSSP.CSS.ibytes_mswQuantity long IBM.PSSP.CSS.ierrorsQuantity long IBM.PSSP.CSS.ipackets_dltQuantity long IBM.PSSP.CSS.ipackets_dropQuantity long IBM.PSSP.CSS.ipackets_lswQuantity long IBM.PSSP.CSS.ipackets_mswQuantity long IBM.PSSP.CSS.nobufsQuantity long IBM.PSSP.CSS.obytes_dltQuantity long IBM.PSSP.CSS.obytes_lswQuantity long IBM.PSSP.CSS.obytes_mswQuantity long IBM.PSSP.CSS.oerrorsQuantity long IBM.PSSP.CSS.opackets_dltQuantity long IBM.PSSP.CSS.opackets_dropQuantity long IBM.PSSP.CSS.opackets_lswQuantity long IBM.PSSP.CSS.opackets_mswQuantity long IBM.PSSP.CSS.recvintr_dltQuantity long IBM.PSSP.CSS.recvintr_lswQuantity long IBM.PSSP.CSS.recvintr_mswQuantity long IBM.PSSP.CSS.xmitintr_dltQuantity long IBM.PSSP.CSS.xmitintr_lswQuantity long IBM.PSSP.CSS.xmitintr_mswQuantity long IBM.PSSP.CSS.xmitque_curQuantity long IBM.PSSP.CSS.xmitque_maxQuantity long IBM.PSSP.CSS.xmitque_ovfQuantity long IBM.PSSP.HARMLD.err_countQuantity long IBM.PSSP.HARMLD.mgrs_connQuantity long IBM.PSSP.HARMLD.refresh_cntrQuantity long IBM.PSSP.LL.SCHEDD.current_jobsQuantity long IBM.PSSP.LL.SCHEDD.failed_connectionsQuantity long IBM.PSSP.LL.SCHEDD.failed_in_transactionsQuantity long IBM.PSSP.LL.SCHEDD.failed_out_transactionsQuantity long IBM.PSSP.LL.SCHEDD.jobs_idleQuantity long IBM.PSSP.LL.SCHEDD.jobs_pendingQuantity long IBM.PSSP.LL.SCHEDD.jobs_runningQuantity long IBM.PSSP.LL.SCHEDD.jobs_startingQuantity long IBM.PSSP.LL.SCHEDD.total_connectionsQuantity long IBM.PSSP.LL.SCHEDD.total_in_transactionsQuantity long IBM.PSSP.LL.SCHEDD.total_jobs_completed
Copyright IBM Corp. 1997 139

Quantity long IBM.PSSP.LL.SCHEDD.total_jobs_rejectedQuantity long IBM.PSSP.LL.SCHEDD.total_jobs_removedQuantity long IBM.PSSP.LL.SCHEDD.total_jobs_submittedQuantity long IBM.PSSP.LL.SCHEDD.total_jobs_vacatedQuantity long IBM.PSSP.LL.SCHEDD.total_out_transactionsQuantity long IBM.PSSP.LL.STARTD.current_jobsQuantity long IBM.PSSP.LL.STARTD.failed_connectionsQuantity long IBM.PSSP.LL.STARTD.failed_in_transactionsQuantity long IBM.PSSP.LL.STARTD.failed_out_transactionsQuantity long IBM.PSSP.LL.STARTD.jobs_pendingQuantity long IBM.PSSP.LL.STARTD.jobs_runningQuantity long IBM.PSSP.LL.STARTD.jobs_suspendedQuantity long IBM.PSSP.LL.STARTD.total_connectionsQuantity long IBM.PSSP.LL.STARTD.total_in_transactionsQuantity long IBM.PSSP.LL.STARTD.total_jobs_completedQuantity long IBM.PSSP.LL.STARTD.total_jobs_receivedQuantity long IBM.PSSP.LL.STARTD.total_jobs_rejectedQuantity long IBM.PSSP.LL.STARTD.total_jobs_removedQuantity long IBM.PSSP.LL.STARTD.total_jobs_suspendedQuantity long IBM.PSSP.LL.STARTD.total_jobs_vacatedQuantity long IBM.PSSP.LL.STARTD.total_out_transactionsState long IBM.PSSP.Membership.LANAdapter.stateState long IBM.PSSP.Membership.Node.stateQuantity long IBM.PSSP.PRCRS.procs_onlineState SBS IBM.PSSP.Prog.pcountState SBS IBM.PSSP.Prog.xpcountState long IBM.PSSP.Response.Host.stateState long IBM.PSSP.Response.Switch.stateState long IBM.PSSP.SP_HW.Frame.amp_ARangeState long IBM.PSSP.SP_HW.Frame.amp_BRangeState long IBM.PSSP.SP_HW.Frame.amp_CRangeState long IBM.PSSP.SP_HW.Frame.amp_DRangeState long IBM.PSSP.SP_HW.Frame.applicationLevelState long IBM.PSSP.SP_HW.Frame.codeVersionState long IBM.PSSP.SP_HW.Frame.controllerIDMismatchState long IBM.PSSP.SP_HW.Frame.controllerRespondsState long IBM.PSSP.SP_HW.Frame.controllerTailState long IBM.PSSP.SP_HW.Frame.controllerTail1LEDState long IBM.PSSP.SP_HW.Frame.controllerTail2LEDState long IBM.PSSP.SP_HW.Frame.controllerTailActiveState long IBM.PSSP.SP_HW.Frame.daemonPollRateState long IBM.PSSP.SP_HW.Frame.feepromEmptyState long IBM.PSSP.SP_HW.Frame.feepromEraseCountState long IBM.PSSP.SP_HW.Frame.frACLEDState long IBM.PSSP.SP_HW.Frame.frDCLEDState long IBM.PSSP.SP_HW.Frame.frNoPowerModAState long IBM.PSSP.SP_HW.Frame.frNoPowerModBState long IBM.PSSP.SP_HW.Frame.frNoPowerModCState long IBM.PSSP.SP_HW.Frame.frNoPowerModDState long IBM.PSSP.SP_HW.Frame.frNodeCommState long IBM.PSSP.SP_HW.Frame.frPowerDC_AState long IBM.PSSP.SP_HW.Frame.frPowerDC_BState long IBM.PSSP.SP_HW.Frame.frPowerDC_CState long IBM.PSSP.SP_HW.Frame.frPowerDC_DState long IBM.PSSP.SP_HW.Frame.frPowerLEDState long IBM.PSSP.SP_HW.Frame.frPowerModAbadState long IBM.PSSP.SP_HW.Frame.frPowerModBbadState long IBM.PSSP.SP_HW.Frame.frPowerModCbadState long IBM.PSSP.SP_HW.Frame.frPowerModDbad
140 Integrating TME 10 on the RS/6000 SP

State long IBM.PSSP.SP_HW.Frame.frPowerModsState long IBM.PSSP.SP_HW.Frame.frPowerOffState long IBM.PSSP.SP_HW.Frame.frPowerOff_AState long IBM.PSSP.SP_HW.Frame.frPowerOff_BState long IBM.PSSP.SP_HW.Frame.frPowerOff_CState long IBM.PSSP.SP_HW.Frame.frPowerOff_DState long IBM.PSSP.SP_HW.Frame.frRS232ActiveState long IBM.PSSP.SP_HW.Frame.frRS232Active1State long IBM.PSSP.SP_HW.Frame.frRS232Active2State long IBM.PSSP.SP_HW.Frame.frTTNodeCommState long IBM.PSSP.SP_HW.Frame.nodeLinkOpen1State long IBM.PSSP.SP_HW.Frame.nodeLinkOpen2State long IBM.PSSP.SP_HW.Frame.nodeLinkOpen3State long IBM.PSSP.SP_HW.Frame.nodeLinkOpen4State long IBM.PSSP.SP_HW.Frame.nodeLinkOpen5State long IBM.PSSP.SP_HW.Frame.nodeLinkOpen6State long IBM.PSSP.SP_HW.Frame.nodeLinkOpen7State long IBM.PSSP.SP_HW.Frame.nodeLinkOpen8State long IBM.PSSP.SP_HW.Frame.nodeLinkOpen9State long IBM.PSSP.SP_HW.Frame.nodeLinkOpen10State long IBM.PSSP.SP_HW.Frame.nodeLinkOpen11State long IBM.PSSP.SP_HW.Frame.nodeLinkOpen12State long IBM.PSSP.SP_HW.Frame.nodeLinkOpen13State long IBM.PSSP.SP_HW.Frame.nodeLinkOpen14State long IBM.PSSP.SP_HW.Frame.nodeLinkOpen15State long IBM.PSSP.SP_HW.Frame.nodeLinkOpen16State long IBM.PSSP.SP_HW.Frame.nodefail1State long IBM.PSSP.SP_HW.Frame.nodefail2State long IBM.PSSP.SP_HW.Frame.nodefail3State long IBM.PSSP.SP_HW.Frame.nodefail4State long IBM.PSSP.SP_HW.Frame.nodefail5State long IBM.PSSP.SP_HW.Frame.nodefail6State long IBM.PSSP.SP_HW.Frame.nodefail7State long IBM.PSSP.SP_HW.Frame.nodefail8State long IBM.PSSP.SP_HW.Frame.nodefail9State long IBM.PSSP.SP_HW.Frame.nodefail10State long IBM.PSSP.SP_HW.Frame.nodefail11State long IBM.PSSP.SP_HW.Frame.nodefail12State long IBM.PSSP.SP_HW.Frame.nodefail13State long IBM.PSSP.SP_HW.Frame.nodefail14State long IBM.PSSP.SP_HW.Frame.nodefail15State long IBM.PSSP.SP_HW.Frame.nodefail16State long IBM.PSSP.SP_HW.Frame.nodefail17State long IBM.PSSP.SP_HW.Frame.rs232CTSState long IBM.PSSP.SP_HW.Frame.rs232DCDState long IBM.PSSP.SP_HW.Frame.serialNumState long IBM.PSSP.SP_HW.Frame.supFailureState long IBM.PSSP.SP_HW.Frame.tempRangeState long IBM.PSSP.SP_HW.Frame.typeState long IBM.PSSP.SP_HW.Frame.voltP48RangeState long IBM.PSSP.SP_HW.Node.P2_5dPresentState long IBM.PSSP.SP_HW.Node.P48OKState long IBM.PSSP.SP_HW.Node.P48Off10SecState long IBM.PSSP.SP_HW.Node.P4dPresentState long IBM.PSSP.SP_HW.Node.P5DCokState long IBM.PSSP.SP_HW.Node.codeVersionState long IBM.PSSP.SP_HW.Node.currentShutdownState long IBM.PSSP.SP_HW.Node.envLEDState long IBM.PSSP.SP_HW.Node.fanfail1
Appendix A. Event Management Resource Variables 141

State long IBM.PSSP.SP_HW.Node.fanfail1dState long IBM.PSSP.SP_HW.Node.fanfail2State long IBM.PSSP.SP_HW.Node.fanfail2dState long IBM.PSSP.SP_HW.Node.fanfail3State long IBM.PSSP.SP_HW.Node.fanfail3dState long IBM.PSSP.SP_HW.Node.fanfail4State long IBM.PSSP.SP_HW.Node.fanfail4dState long IBM.PSSP.SP_HW.Node.fanfail5dState long IBM.PSSP.SP_HW.Node.keyModeSwitchState SBS IBM.PSSP.SP_HW.Node.lcd1State long IBM.PSSP.SP_HW.Node.lcd1flashState SBS IBM.PSSP.SP_HW.Node.lcd2State long IBM.PSSP.SP_HW.Node.lcd2flashState long IBM.PSSP.SP_HW.Node.memoryProtectState long IBM.PSSP.SP_HW.Node.nodePowerState long IBM.PSSP.SP_HW.Node.nodePowerOn10SecState long IBM.PSSP.SP_HW.Node.powerLEDState long IBM.PSSP.SP_HW.Node.s1PortDTRState long IBM.PSSP.SP_HW.Node.serialLinkOpenState long IBM.PSSP.SP_HW.Node.serialNumState long IBM.PSSP.SP_HW.Node.shutdownN12HighState long IBM.PSSP.SP_HW.Node.shutdownN12LowState long IBM.PSSP.SP_HW.Node.shutdownP12HighState long IBM.PSSP.SP_HW.Node.shutdownP12LowState long IBM.PSSP.SP_HW.Node.shutdownP2_5dHighState long IBM.PSSP.SP_HW.Node.shutdownP2_5dLowState long IBM.PSSP.SP_HW.Node.shutdownP48LowState long IBM.PSSP.SP_HW.Node.shutdownP4HighState long IBM.PSSP.SP_HW.Node.shutdownP4LowState long IBM.PSSP.SP_HW.Node.shutdownP4dHighState long IBM.PSSP.SP_HW.Node.shutdownP4dLowState long IBM.PSSP.SP_HW.Node.shutdownP5HighState long IBM.PSSP.SP_HW.Node.shutdownP5LowState long IBM.PSSP.SP_HW.Node.shutdownP5iHighState long IBM.PSSP.SP_HW.Node.shutdownP5iLowState long IBM.PSSP.SP_HW.Node.shutdownP5mHighState long IBM.PSSP.SP_HW.Node.shutdownP5mLowState long IBM.PSSP.SP_HW.Node.shutdownTempState long IBM.PSSP.SP_HW.Node.smpDiagLEDoffState long IBM.PSSP.SP_HW.Node.smpPowerLEDoffState long IBM.PSSP.SP_HW.Node.tempRangeState long IBM.PSSP.SP_HW.Node.typeState long IBM.PSSP.SP_HW.Node.voltN12RangeState long IBM.PSSP.SP_HW.Node.voltP12RangeState long IBM.PSSP.SP_HW.Node.voltP2_5dRangeState long IBM.PSSP.SP_HW.Node.voltP48RangeState long IBM.PSSP.SP_HW.Node.voltP4RangeState long IBM.PSSP.SP_HW.Node.voltP4dRangeState long IBM.PSSP.SP_HW.Node.voltP5RangeState long IBM.PSSP.SP_HW.Node.voltP5iRangeState long IBM.PSSP.SP_HW.Node.voltP5mRangeState long IBM.PSSP.SP_HW.Switch.P48OKState long IBM.PSSP.SP_HW.Switch.P48Off10SecState long IBM.PSSP.SP_HW.Switch.applicationLevelState long IBM.PSSP.SP_HW.Switch.chipState long IBM.PSSP.SP_HW.Switch.chipClkMissingState long IBM.PSSP.SP_HW.Switch.chipReceivedInitState long IBM.PSSP.SP_HW.Switch.chipSelftestState long IBM.PSSP.SP_HW.Switch.clockSource
142 Integrating TME 10 on the RS/6000 SP

State long IBM.PSSP.SP_HW.Switch.codeVersionState long IBM.PSSP.SP_HW.Switch.envLEDState long IBM.PSSP.SP_HW.Switch.epromEraseState long IBM.PSSP.SP_HW.Switch.epromProgramState long IBM.PSSP.SP_HW.Switch.fanfail1State long IBM.PSSP.SP_HW.Switch.fanfail2State long IBM.PSSP.SP_HW.Switch.fanfail3State long IBM.PSSP.SP_HW.Switch.fanfail4State long IBM.PSSP.SP_HW.Switch.fanfail5State long IBM.PSSP.SP_HW.Switch.feepromEmptyState long IBM.PSSP.SP_HW.Switch.feepromEraseCountState long IBM.PSSP.SP_HW.Switch.muxState long IBM.PSSP.SP_HW.Switch.nodePowerState long IBM.PSSP.SP_HW.Switch.nodePowerOn10SecState long IBM.PSSP.SP_HW.Switch.oscState long IBM.PSSP.SP_HW.Switch.pllState long IBM.PSSP.SP_HW.Switch.portState long IBM.PSSP.SP_HW.Switch.portClkMissingState long IBM.PSSP.SP_HW.Switch.powerLEDState long IBM.PSSP.SP_HW.Switch.powerOnResetState long IBM.PSSP.SP_HW.Switch.powerS1State long IBM.PSSP.SP_HW.Switch.powerS2State long IBM.PSSP.SP_HW.Switch.ps1FailState long IBM.PSSP.SP_HW.Switch.ps1FuseGoodRangeState long IBM.PSSP.SP_HW.Switch.ps1PowerGoodRangeState long IBM.PSSP.SP_HW.Switch.ps2FailState long IBM.PSSP.SP_HW.Switch.ps2FuseGoodRangeState long IBM.PSSP.SP_HW.Switch.ps2PowerGoodRangeState long IBM.PSSP.SP_HW.Switch.psParallelFailState long IBM.PSSP.SP_HW.Switch.psParallelRangeState long IBM.PSSP.SP_HW.Switch.recPortNotTunedState long IBM.PSSP.SP_HW.Switch.sendPortNotTunedState long IBM.PSSP.SP_HW.Switch.serialNumState long IBM.PSSP.SP_HW.Switch.shutdownN5HighState long IBM.PSSP.SP_HW.Switch.shutdownN5LowState long IBM.PSSP.SP_HW.Switch.shutdownOCState long IBM.PSSP.SP_HW.Switch.shutdownP12HighState long IBM.PSSP.SP_HW.Switch.shutdownP12LowState long IBM.PSSP.SP_HW.Switch.shutdownP3_3HighState long IBM.PSSP.SP_HW.Switch.shutdownP3_3LowState long IBM.PSSP.SP_HW.Switch.shutdownP48LowState long IBM.PSSP.SP_HW.Switch.shutdownP5HighState long IBM.PSSP.SP_HW.Switch.shutdownP5LowState long IBM.PSSP.SP_HW.Switch.shutdownTempState long IBM.PSSP.SP_HW.Switch.subtypeState long IBM.PSSP.SP_HW.Switch.supFailureState long IBM.PSSP.SP_HW.Switch.synchResetState long IBM.PSSP.SP_HW.Switch.tempRangeState long IBM.PSSP.SP_HW.Switch.typeState long IBM.PSSP.SP_HW.Switch.voltN5RangeState long IBM.PSSP.SP_HW.Switch.voltP12RangeState long IBM.PSSP.SP_HW.Switch.voltP3_3RangeState long IBM.PSSP.SP_HW.Switch.voltP48RangeState long IBM.PSSP.SP_HW.Switch.voltP5RangeCounter long IBM.PSSP.VSD.bytes_readCounter long IBM.PSSP.VSD.bytes_writeCounter long IBM.PSSP.VSD.cache_hitsCounter long IBM.PSSP.VSD.client_req_readCounter long IBM.PSSP.VSD.client_req_write
Appendix A. Event Management Resource Variables 143

Counter long IBM.PSSP.VSD.local_req_readCounter long IBM.PSSP.VSD.local_req_writeCounter long IBM.PSSP.VSD.physical_req_readCounter long IBM.PSSP.VSD.physical_req_writeCounter long IBM.PSSP.VSD.remote_req_readCounter long IBM.PSSP.VSD.remote_req_writeQuantity long IBM.PSSP.VSD.serverQuantity long IBM.PSSP.VSD.stateCounter long IBM.PSSP.VSDdrv.1_retry_countCounter long IBM.PSSP.VSDdrv.2_retry_countCounter long IBM.PSSP.VSDdrv.3_retry_countCounter long IBM.PSSP.VSDdrv.4_retry_countCounter long IBM.PSSP.VSDdrv.5_retry_countCounter long IBM.PSSP.VSDdrv.6_retry_countCounter long IBM.PSSP.VSDdrv.7_retry_countCounter long IBM.PSSP.VSDdrv.8_retry_countCounter long IBM.PSSP.VSDdrv.9_retry_countQuantity float IBM.PSSP.VSDdrv.avg_buddy_waitCounter long IBM.PSSP.VSDdrv.buddy_buffer_shortageCounter long IBM.PSSP.VSDdrv.cache_shortageCounter long IBM.PSSP.VSDdrv.comm_buf_shortageCounter long IBM.PSSP.VSDdrv.indirect_ioCounter long IBM.PSSP.VSDdrv.pbuf_shortageCounter long IBM.PSSP.VSDdrv.rejected_no_buddy_bufferCounter long IBM.PSSP.VSDdrv.rejected_requestsCounter long IBM.PSSP.VSDdrv.rejected_respondsCounter long IBM.PSSP.VSDdrv.request_block_shortageCounter long IBM.PSSP.VSDdrv.request_reworkCounter long IBM.PSSP.VSDdrv.timeout_errorQuantity float IBM.PSSP.aixos.CPU.glidleQuantity float IBM.PSSP.aixos.CPU.glkernQuantity float IBM.PSSP.aixos.CPU.gluserQuantity float IBM.PSSP.aixos.CPU.glwaitCounter long IBM.PSSP.aixos.Disk.busyCounter long IBM.PSSP.aixos.Disk.rblkCounter long IBM.PSSP.aixos.Disk.wblkCounter long IBM.PSSP.aixos.Disk.xferQuantity float IBM.PSSP.aixos.FS.%nodesusedQuantity float IBM.PSSP.aixos.FS.%totusedCounter long IBM.PSSP.aixos.LAN.rcverrorsCounter long IBM.PSSP.aixos.LAN.recvdropsCounter long IBM.PSSP.aixos.LAN.xmitdropsCounter long IBM.PSSP.aixos.LAN.xmiterrorsCounter long IBM.PSSP.aixos.LAN.xmitovflCounter long IBM.PSSP.aixos.Mem.Kmem.callsCounter long IBM.PSSP.aixos.Mem.Kmem.failuresQuantity long IBM.PSSP.aixos.Mem.Kmem.inuseQuantity long IBM.PSSP.aixos.Mem.Kmem.memuseQuantity long IBM.PSSP.aixos.Mem.Real.%freeQuantity long IBM.PSSP.aixos.Mem.Real.%pinnedQuantity long IBM.PSSP.aixos.Mem.Real.numfrbQuantity long IBM.PSSP.aixos.Mem.Real.sizeCounter long IBM.PSSP.aixos.Mem.Virt.pageinCounter long IBM.PSSP.aixos.Mem.Virt.pageoutCounter long IBM.PSSP.aixos.Mem.Virt.pagexctCounter long IBM.PSSP.aixos.Mem.Virt.pgspginCounter long IBM.PSSP.aixos.Mem.Virt.pgspgoutQuantity float IBM.PSSP.aixos.PagSp.%totalfreeQuantity float IBM.PSSP.aixos.PagSp.%totalused
144 Integrating TME 10 on the RS/6000 SP
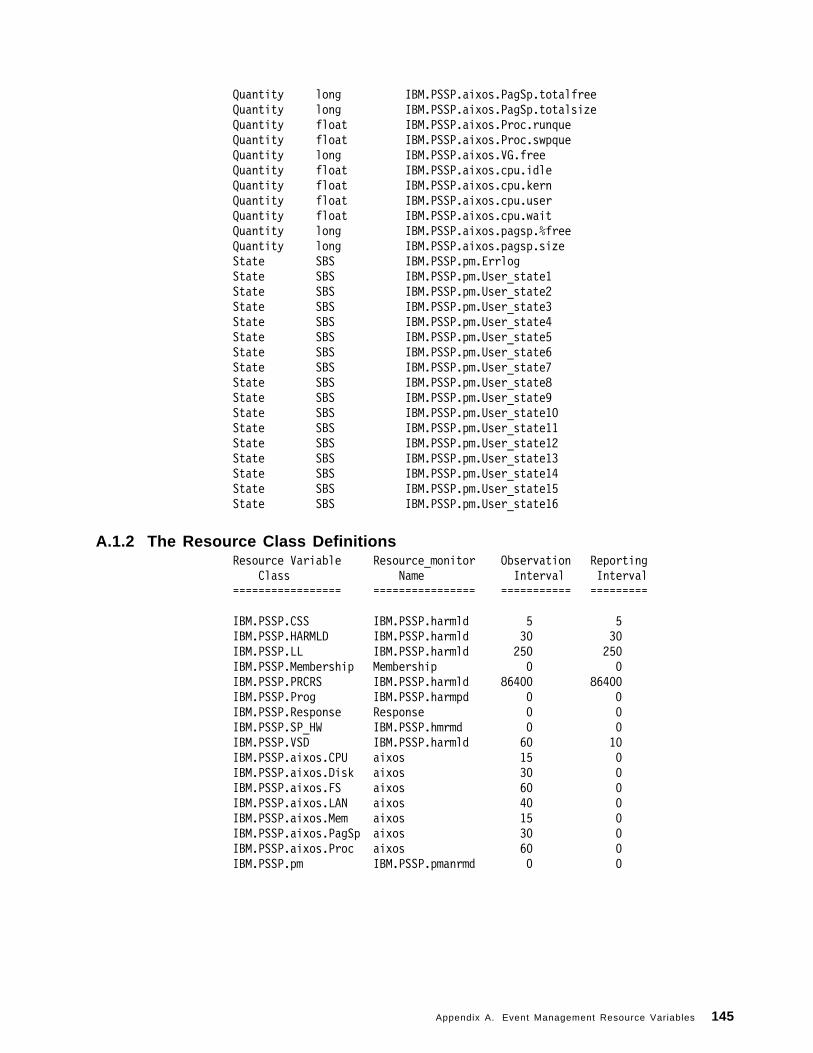
Quantity long IBM.PSSP.aixos.PagSp.totalfreeQuantity long IBM.PSSP.aixos.PagSp.totalsizeQuantity float IBM.PSSP.aixos.Proc.runqueQuantity float IBM.PSSP.aixos.Proc.swpqueQuantity long IBM.PSSP.aixos.VG.freeQuantity float IBM.PSSP.aixos.cpu.idleQuantity float IBM.PSSP.aixos.cpu.kernQuantity float IBM.PSSP.aixos.cpu.userQuantity float IBM.PSSP.aixos.cpu.waitQuantity long IBM.PSSP.aixos.pagsp.%freeQuantity long IBM.PSSP.aixos.pagsp.sizeState SBS IBM.PSSP.pm.ErrlogState SBS IBM.PSSP.pm.User_state1State SBS IBM.PSSP.pm.User_state2State SBS IBM.PSSP.pm.User_state3State SBS IBM.PSSP.pm.User_state4State SBS IBM.PSSP.pm.User_state5State SBS IBM.PSSP.pm.User_state6State SBS IBM.PSSP.pm.User_state7State SBS IBM.PSSP.pm.User_state8State SBS IBM.PSSP.pm.User_state9State SBS IBM.PSSP.pm.User_state10State SBS IBM.PSSP.pm.User_state11State SBS IBM.PSSP.pm.User_state12State SBS IBM.PSSP.pm.User_state13State SBS IBM.PSSP.pm.User_state14State SBS IBM.PSSP.pm.User_state15State SBS IBM.PSSP.pm.User_state16
A.1.2 The Resource Class DefinitionsResource Variable Resource_monitor Observation Reporting
Class Name Interval Interval================= ================ =========== =========
IBM.PSSP.CSS IBM.PSSP.harmld 5 5IBM.PSSP.HARMLD IBM.PSSP.harmld 30 30IBM.PSSP.LL IBM.PSSP.harmld 250 250IBM.PSSP.Membership Membership 0 0IBM.PSSP.PRCRS IBM.PSSP.harmld 86400 86400IBM.PSSP.Prog IBM.PSSP.harmpd 0 0IBM.PSSP.Response Response 0 0IBM.PSSP.SP_HW IBM.PSSP.hmrmd 0 0IBM.PSSP.VSD IBM.PSSP.harmld 60 10IBM.PSSP.aixos.CPU aixos 15 0IBM.PSSP.aixos.Disk aixos 30 0IBM.PSSP.aixos.FS aixos 60 0IBM.PSSP.aixos.LAN aixos 40 0IBM.PSSP.aixos.Mem aixos 15 0IBM.PSSP.aixos.PagSp aixos 30 0IBM.PSSP.aixos.Proc aixos 60 0IBM.PSSP.pm IBM.PSSP.pmanrmd 0 0
Appendix A. Event Management Resource Variables 145

A.1.3 The Default Resource MonitorsResource Monitor Resource Monitor Resource Monitor
Name Path Arguments================ ================ ================
IBM.PSSP.harmld /usr/lpp/ssp/bin/haemRM/harmld -fIBM.PSSP.harmpd /usr/lpp/ssp/bin/haemRM/harmpdIBM.PSSP.hmrmd /usr/lpp/ssp/bin/haemRM/hmrmd IBM.PSSP.hmrmdIBM.PSSP.pmanrmd /usr/lpp/ssp/bin/pmandMembership (internal)Response (internal)aixos (internal)
146 Integrating TME 10 on the RS/6000 SP

Appendix B. The SP MIBs
This appendix lists the SP MIBs distributed with PSSP 2.2.
The following list was extracted from the /etc/mib.defs file:
-- object definitions compiled from RFC1155-SMI { iso 3 6 1 }
internet iso.3.6.1directory internet.1mgmt internet.2experimental internet.3private internet.4enterprises private.1
-- object definitions compiled from IBMSP-MIB { iso 3 6 1 }
ibm enterprises.2ibmProd ibm.6ibmSP ibmProd.117ibmSPConfig ibmSP.1ibmSPEMVariables ibmSP.3
ibmSPhostnodenumber ibmSPConfig.1 INTEGERibmSPhostpartaddr ibmSPConfig.2 IpAddressibmSPCWScodeversion ibmSPConfig.3 DisplayStringibmSPprimaryCWSname ibmSPConfig.4 DisplayStringibmSPprimaryCWSoperstatus ibmSPConfig.5 INTEGERibmSPbackupCWSname ibmSPConfig.6 DisplayStringibmSPbackupCWSoperstatus ibmSPConfig.7 INTEGERibmSPSystemTable ibmSPConfig.8 AggregateibmSPNodeEntry ibmSPSystemTable.1 AggregateibmSPpartitionaddr ibmSPNodeEntry.1 IpAddressibmSPnodenumber ibmSPNodeEntry.2 INTEGERibmSPframenumber ibmSPNodeEntry.3 INTEGERibmSPslotnumber ibmSPNodeEntry.4 INTEGERibmSPslotsused ibmSPNodeEntry.5 INTEGERibmSPinitialhostname ibmSPNodeEntry.6 DisplayStringibmSPreliablehostname ibmSPNodeEntry.7 DisplayStringibmSPsysparname ibmSPNodeEntry.8 DisplayStringibmSPcodeversion ibmSPNodeEntry.9 DisplayStringibmSPErrlogVars ibmSP.2 AggregateibmSPellabel ibmSPErrlogVars.1 DisplayStringibmSPelidentifier ibmSPErrlogVars.2 DisplayStringibmSPeldatetime ibmSPErrlogVars.3 DisplayStringibmSPelsequencenum ibmSPErrlogVars.4 DisplayStringibmSPelmachineid ibmSPErrlogVars.5 DisplayStringibmSPelnodeid ibmSPErrlogVars.6 DisplayStringibmSPelclass ibmSPErrlogVars.7 DisplayStringibmSPeltype ibmSPErrlogVars.8 DisplayStringibmSPelresource ibmSPErrlogVars.9 DisplayStringibmSPelrscclass ibmSPErrlogVars.10 DisplayStringibmSPelrsctype ibmSPErrlogVars.11 DisplayStringibmSPellocation ibmSPErrlogVars.12 DisplayStringibmSPelvpd ibmSPErrlogVars.13 DisplayStringibmSPetdescription ibmSPErrlogVars.14 DisplayStringibmSPetprobcauses ibmSPErrlogVars.15 DisplayString
Copyright IBM Corp. 1997 147
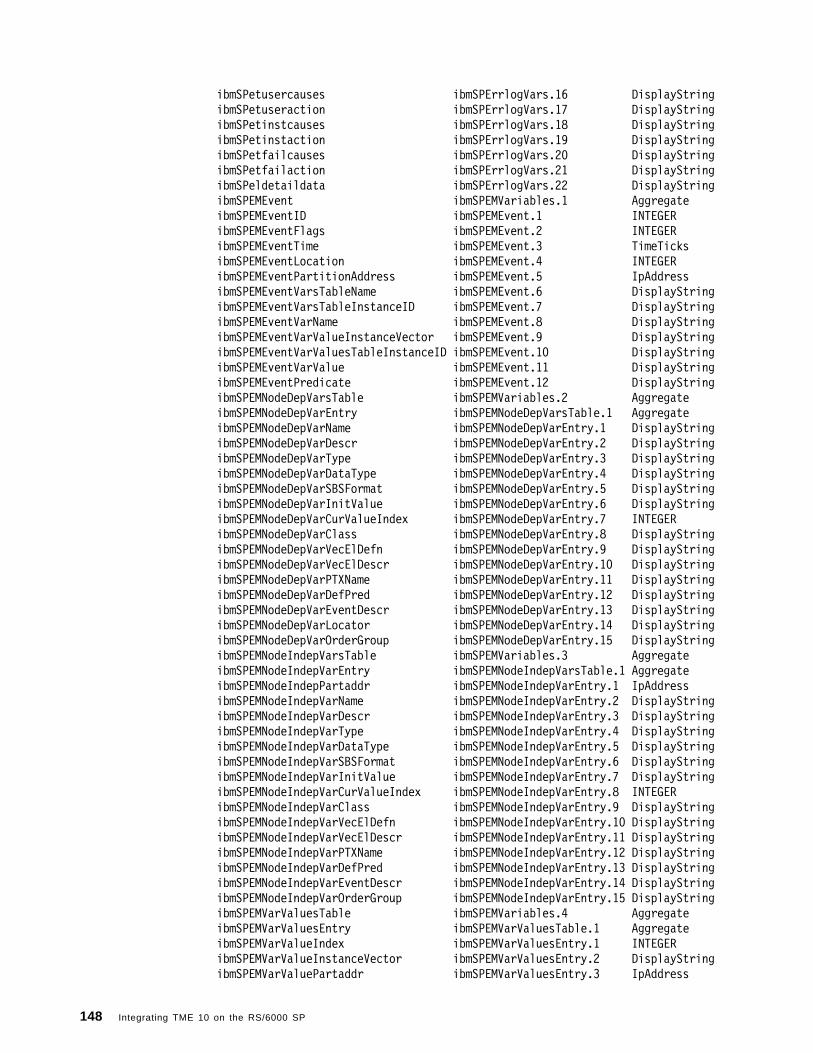
ibmSPetusercauses ibmSPErrlogVars.16 DisplayStringibmSPetuseraction ibmSPErrlogVars.17 DisplayStringibmSPetinstcauses ibmSPErrlogVars.18 DisplayStringibmSPetinstaction ibmSPErrlogVars.19 DisplayStringibmSPetfailcauses ibmSPErrlogVars.20 DisplayStringibmSPetfailaction ibmSPErrlogVars.21 DisplayStringibmSPeldetaildata ibmSPErrlogVars.22 DisplayStringibmSPEMEvent ibmSPEMVariables.1 AggregateibmSPEMEventID ibmSPEMEvent.1 INTEGERibmSPEMEventFlags ibmSPEMEvent.2 INTEGERibmSPEMEventTime ibmSPEMEvent.3 TimeTicksibmSPEMEventLocation ibmSPEMEvent.4 INTEGERibmSPEMEventPartitionAddress ibmSPEMEvent.5 IpAddressibmSPEMEventVarsTableName ibmSPEMEvent.6 DisplayStringibmSPEMEventVarsTableInstanceID ibmSPEMEvent.7 DisplayStringibmSPEMEventVarName ibmSPEMEvent.8 DisplayStringibmSPEMEventVarValueInstanceVector ibmSPEMEvent.9 DisplayStringibmSPEMEventVarValuesTableInstanceID ibmSPEMEvent.10 DisplayStringibmSPEMEventVarValue ibmSPEMEvent.11 DisplayStringibmSPEMEventPredicate ibmSPEMEvent.12 DisplayStringibmSPEMNodeDepVarsTable ibmSPEMVariables.2 AggregateibmSPEMNodeDepVarEntry ibmSPEMNodeDepVarsTable.1 AggregateibmSPEMNodeDepVarName ibmSPEMNodeDepVarEntry.1 DisplayStringibmSPEMNodeDepVarDescr ibmSPEMNodeDepVarEntry.2 DisplayStringibmSPEMNodeDepVarType ibmSPEMNodeDepVarEntry.3 DisplayStringibmSPEMNodeDepVarDataType ibmSPEMNodeDepVarEntry.4 DisplayStringibmSPEMNodeDepVarSBSFormat ibmSPEMNodeDepVarEntry.5 DisplayStringibmSPEMNodeDepVarInitValue ibmSPEMNodeDepVarEntry.6 DisplayStringibmSPEMNodeDepVarCurValueIndex ibmSPEMNodeDepVarEntry.7 INTEGERibmSPEMNodeDepVarClass ibmSPEMNodeDepVarEntry.8 DisplayStringibmSPEMNodeDepVarVecElDefn ibmSPEMNodeDepVarEntry.9 DisplayStringibmSPEMNodeDepVarVecElDescr ibmSPEMNodeDepVarEntry.10 DisplayStringibmSPEMNodeDepVarPTXName ibmSPEMNodeDepVarEntry.11 DisplayStringibmSPEMNodeDepVarDefPred ibmSPEMNodeDepVarEntry.12 DisplayStringibmSPEMNodeDepVarEventDescr ibmSPEMNodeDepVarEntry.13 DisplayStringibmSPEMNodeDepVarLocator ibmSPEMNodeDepVarEntry.14 DisplayStringibmSPEMNodeDepVarOrderGroup ibmSPEMNodeDepVarEntry.15 DisplayStringibmSPEMNodeIndepVarsTable ibmSPEMVariables.3 AggregateibmSPEMNodeIndepVarEntry ibmSPEMNodeIndepVarsTable.1 AggregateibmSPEMNodeIndepPartaddr ibmSPEMNodeIndepVarEntry.1 IpAddressibmSPEMNodeIndepVarName ibmSPEMNodeIndepVarEntry.2 DisplayStringibmSPEMNodeIndepVarDescr ibmSPEMNodeIndepVarEntry.3 DisplayStringibmSPEMNodeIndepVarType ibmSPEMNodeIndepVarEntry.4 DisplayStringibmSPEMNodeIndepVarDataType ibmSPEMNodeIndepVarEntry.5 DisplayStringibmSPEMNodeIndepVarSBSFormat ibmSPEMNodeIndepVarEntry.6 DisplayStringibmSPEMNodeIndepVarInitValue ibmSPEMNodeIndepVarEntry.7 DisplayStringibmSPEMNodeIndepVarCurValueIndex ibmSPEMNodeIndepVarEntry.8 INTEGERibmSPEMNodeIndepVarClass ibmSPEMNodeIndepVarEntry.9 DisplayStringibmSPEMNodeIndepVarVecElDefn ibmSPEMNodeIndepVarEntry.10 DisplayStringibmSPEMNodeIndepVarVecElDescr ibmSPEMNodeIndepVarEntry.11 DisplayStringibmSPEMNodeIndepVarPTXName ibmSPEMNodeIndepVarEntry.12 DisplayStringibmSPEMNodeIndepVarDefPred ibmSPEMNodeIndepVarEntry.13 DisplayStringibmSPEMNodeIndepVarEventDescr ibmSPEMNodeIndepVarEntry.14 DisplayStringibmSPEMNodeIndepVarOrderGroup ibmSPEMNodeIndepVarEntry.15 DisplayStringibmSPEMVarValuesTable ibmSPEMVariables.4 AggregateibmSPEMVarValuesEntry ibmSPEMVarValuesTable.1 AggregateibmSPEMVarValueIndex ibmSPEMVarValuesEntry.1 INTEGERibmSPEMVarValueInstanceVector ibmSPEMVarValuesEntry.2 DisplayStringibmSPEMVarValuePartaddr ibmSPEMVarValuesEntry.3 IpAddress
148 Integrating TME 10 on the RS/6000 SP

ibmSPEMVarValueName ibmSPEMVarValuesEntry.4 DisplayStringibmSPEMVarValue ibmSPEMVarValuesEntry.5 DisplayString
Appendix B. The SP MIBs 149

150 Integrating TME 10 on the RS/6000 SP

Appendix C. Contents of the Attached Diskette
This appendix contains a listing of the contents of the diskette distributed withthis redbook.
This is a copy of the README file that has been placed on the diskette:
(C) Copyright IBM Corp. 1997All rights reserved.
This diskette is distributed with the IBM publication″Integrating TME 10 on the RS/6000 SP″ , SG24-2071-00
A copy of the files provided on this diskette is also available on theWorld Wide Web at the following URL:
ftp://www.redbooks.ibm.com/redbooks/SG242071The latest version of these files can be found at that location.
This diskette contains 4 files:README -- This filetecad_pssp.tar -- A tar file containing all of the necessary files to
install and execute the PSSP T/EC Adapter.SPCustomizations.tar -- A tar file containing all of the necessary files
to install and customize your TME 10 Desktop with SP-specificcustomizations.
tasklibs.tar -- A tar file containing 2 sample task libraries to beloaded into your TME 10 Framework to perform some common RS/6000 SPadministrative functions.
For details on using each set of files, refer to the ″IntegratingTivoli on the RS/6000 SP″ redbook. Each tar file contains its own READMEwith instructions on loading and using the files.
To view the table of contents for one of the tar files, issue thefollowing AIX command:
/usr/bin/tar -tvf tar_filewhere ″tar_file″ is the name of the tar file of interest.
To extract the files from one of the tar files, do the following:1. Create a working directory to contain the files.2. Make the working directory your current directory.3. Copy the tar file from the diskette to the current directory.4. Extract the files with the following command:
/usr/bin/tar -xvf tar_file .
The following is the table of contents for the tecad_pssp.tar file:-rw-r----- 18018 1 7704 Jun 16 10:16:44 1997 README-rwxr----- 18018 1 1253 Jun 16 10:16:44 1997 install_agent-rwxr----- 18018 1 590 Jun 16 10:16:45 1997 makeit-rw-r----- 18018 1 2532 Jun 16 10:16:44 1997 pssp_classes.baroc-rw-r----- 18018 1 16374 Jun 16 10:16:44 1997 rvclasses.cfg-rwxr-xr-x 18018 1 130265 Jun 16 13:23:20 1997 tecad_pssp-rw-r----- 18018 1 28107 Jun 16 10:16:45 1997 tecad_pssp.c-rw-r----- 18018 1 39 Jun 16 10:16:41 1997 tecad_pssp.cfg-rwxr----- 18018 1 511 Jun 16 13:22:31 1997 test_agent
The following is the table of contents for the tasklibs.tar file:-rw------- 19768 1 971 Jun 17 13:50:22 1997 README-rw-r----- 19768 1 6116 Jun 02 07:51:23 1997 SPTasks.tll-rw-r----- 19768 1 6556 Jun 02 07:51:37 1997 SwitchTasks.tll
The following is the table of contents for the SPCustomizations.tar file:drwx--s--- 204 1 0 Jun 03 16:51:02 1997 Resource/-rw------- 204 1 267 Jun 03 16:23:38 1997 Resource/Makefiledrwxr-sr-x 204 1 0 May 15 00:19:36 1997 Resource/Makefiles/-rw------- 204 1 266 Feb 25 14:12:58 1997 Resource/Makefiles/Makefile.Bitmap-rw------- 204 1 347 Feb 25 14:13:03 1997 Resource/Makefiles/Makefile.Callback-rw------- 204 1 328 Mar 18 09:44:52 1997 Resource/Makefiles/Makefile.Common-rw------- 204 1 266 Feb 25 14:13:18 1997 Resource/Makefiles/Makefile.Dialog-rw------- 204 1 248 Feb 21 14:13:32 1997 Resource/Makefiles/Makefile.Icon-rw------- 204 1 271 Jun 03 16:53:12 1997 Resource/Makefiles/Makefile.MsgCat-rw------- 204 1 251 May 14 21:53:20 1997 Resource/Makefiles/Makefile.State-rw------- 204 1 120 May 15 00:13:55 1997 Resource/READMEdrwxr-sr-x 204 1 0 Jun 03 17:10:10 1997 Resource/ManagedNode/-rw-r--r-- 0 1 1274 Jun 03 17:10:10 1997 Resource/ManagedNode/Makefiledrwxr-sr-x 204 1 0 Jun 03 17:11:31 1997 Resource/ManagedNode/Bitmap/-rw-r--r-- 0 0 4101 May 22 14:41:18 1997 Resource/ManagedNode/Bitmap/sp_cws.xpm-rw-r--r-- 0 0 1701 May 22 14:41:18 1997 Resource/ManagedNode/Bitmap/sp_node.xpm-rw------- 204 1 476 Feb 25 13:26:32 1997 Resource/ManagedNode/Bitmap/Makefile-rw------- 204 1 2827 Feb 25 13:26:33 1997 Resource/ManagedNode/Bitmap/sp_cws.xpm.non_perspectives-rw------- 204 1 2828 Feb 25 13:26:33 1997 Resource/ManagedNode/Bitmap/sp_node.xpm.non_perspectivesdrwxr-sr-x 204 1 0 Jun 03 17:12:03 1997 Resource/ManagedNode/Callback/-rw------- 204 1 1305 May 29 11:02:07 1997 Resource/ManagedNode/Callback/sp_cws.get_all_cw_attributes.ksh-rw------- 204 1 919 May 29 12:22:16 1997 Resource/ManagedNode/Callback/sp_cws.get_node_numbers.ksh-rw------- 204 1 566 May 29 12:22:31 1997 Resource/ManagedNode/Callback/sp_cws.launch_applications_driver.ksh-rw------- 204 1 855 May 29 11:13:31 1997 Resource/ManagedNode/Callback/sp_cws.launch_perspectives.ksh
Copyright IBM Corp. 1997 151
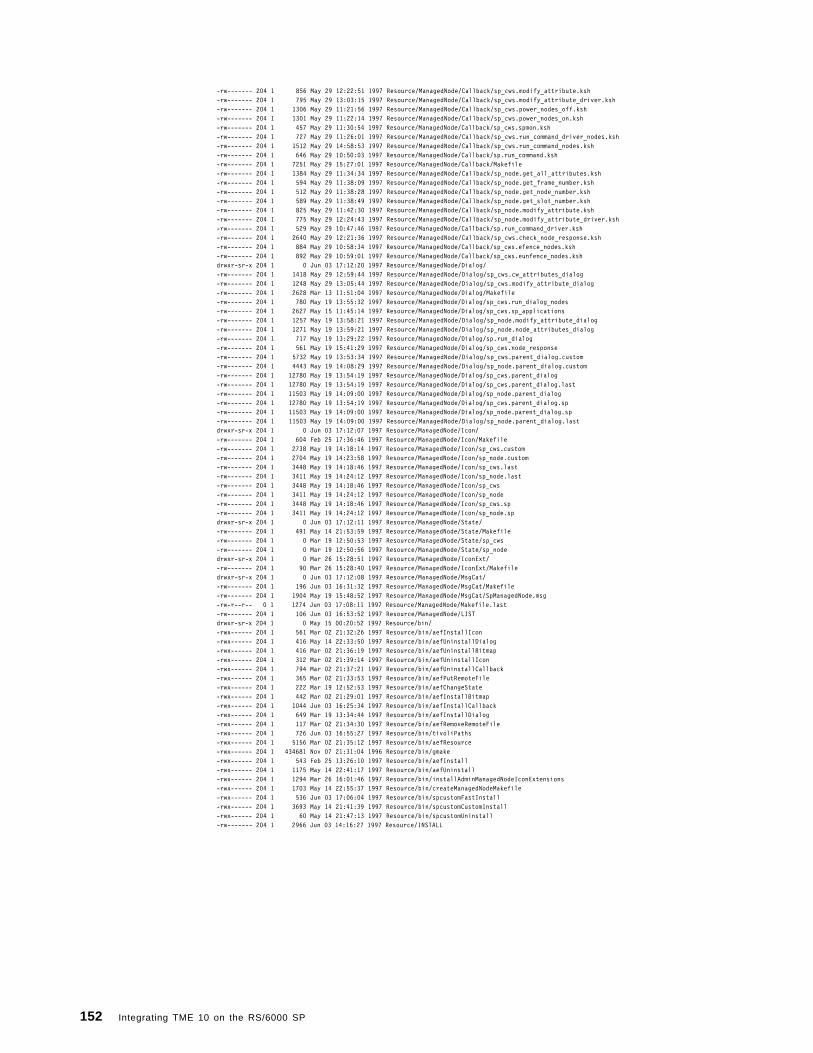
-rw------- 204 1 856 May 29 12:22:51 1997 Resource/ManagedNode/Callback/sp_cws.modify_attribute.ksh-rw------- 204 1 795 May 29 13:03:15 1997 Resource/ManagedNode/Callback/sp_cws.modify_attribute_driver.ksh-rw------- 204 1 1306 May 29 11:21:56 1997 Resource/ManagedNode/Callback/sp_cws.power_nodes_off.ksh-rw------- 204 1 1301 May 29 11:22:14 1997 Resource/ManagedNode/Callback/sp_cws.power_nodes_on.ksh-rw------- 204 1 457 May 29 11:30:54 1997 Resource/ManagedNode/Callback/sp_cws.spmon.ksh-rw------- 204 1 727 May 29 11:26:01 1997 Resource/ManagedNode/Callback/sp_cws.run_command_driver_nodes.ksh-rw------- 204 1 1512 May 29 14:58:53 1997 Resource/ManagedNode/Callback/sp_cws.run_command_nodes.ksh-rw------- 204 1 646 May 29 10:50:03 1997 Resource/ManagedNode/Callback/sp.run_command.ksh-rw------- 204 1 7251 May 29 15:27:01 1997 Resource/ManagedNode/Callback/Makefile-rw------- 204 1 1384 May 29 11:34:34 1997 Resource/ManagedNode/Callback/sp_node.get_all_attributes.ksh-rw------- 204 1 594 May 29 11:38:09 1997 Resource/ManagedNode/Callback/sp_node.get_frame_number.ksh-rw------- 204 1 512 May 29 11:38:28 1997 Resource/ManagedNode/Callback/sp_node.get_node_number.ksh-rw------- 204 1 589 May 29 11:38:49 1997 Resource/ManagedNode/Callback/sp_node.get_slot_number.ksh-rw------- 204 1 825 May 29 11:42:30 1997 Resource/ManagedNode/Callback/sp_node.modify_attribute.ksh-rw------- 204 1 775 May 29 12:24:43 1997 Resource/ManagedNode/Callback/sp_node.modify_attribute_driver.ksh-rw------- 204 1 529 May 29 10:47:46 1997 Resource/ManagedNode/Callback/sp.run_command_driver.ksh-rw------- 204 1 2640 May 29 12:21:36 1997 Resource/ManagedNode/Callback/sp_cws.check_node_response.ksh-rw------- 204 1 884 May 29 10:58:34 1997 Resource/ManagedNode/Callback/sp_cws.efence_nodes.ksh-rw------- 204 1 892 May 29 10:59:01 1997 Resource/ManagedNode/Callback/sp_cws.eunfence_nodes.kshdrwxr-sr-x 204 1 0 Jun 03 17:12:20 1997 Resource/ManagedNode/Dialog/-rw------- 204 1 1418 May 29 12:59:44 1997 Resource/ManagedNode/Dialog/sp_cws.cw_attributes_dialog-rw------- 204 1 1248 May 29 13:05:44 1997 Resource/ManagedNode/Dialog/sp_cws.modify_attribute_dialog-rw------- 204 1 2628 Mar 13 11:51:04 1997 Resource/ManagedNode/Dialog/Makefile-rw------- 204 1 780 May 19 13:55:32 1997 Resource/ManagedNode/Dialog/sp_cws.run_dialog_nodes-rw------- 204 1 2627 May 15 11:45:14 1997 Resource/ManagedNode/Dialog/sp_cws.sp_applications-rw------- 204 1 1257 May 19 13:58:21 1997 Resource/ManagedNode/Dialog/sp_node.modify_attribute_dialog-rw------- 204 1 1271 May 19 13:59:21 1997 Resource/ManagedNode/Dialog/sp_node.node_attributes_dialog-rw------- 204 1 717 May 19 13:29:22 1997 Resource/ManagedNode/Dialog/sp.run_dialog-rw------- 204 1 561 May 19 15:41:29 1997 Resource/ManagedNode/Dialog/sp_cws.node_response-rw------- 204 1 5732 May 19 13:53:34 1997 Resource/ManagedNode/Dialog/sp_cws.parent_dialog.custom-rw------- 204 1 4443 May 19 14:08:29 1997 Resource/ManagedNode/Dialog/sp_node.parent_dialog.custom-rw------- 204 1 12780 May 19 13:54:19 1997 Resource/ManagedNode/Dialog/sp_cws.parent_dialog-rw------- 204 1 12780 May 19 13:54:19 1997 Resource/ManagedNode/Dialog/sp_cws.parent_dialog.last-rw------- 204 1 11503 May 19 14:09:00 1997 Resource/ManagedNode/Dialog/sp_node.parent_dialog-rw------- 204 1 12780 May 19 13:54:19 1997 Resource/ManagedNode/Dialog/sp_cws.parent_dialog.sp-rw------- 204 1 11503 May 19 14:09:00 1997 Resource/ManagedNode/Dialog/sp_node.parent_dialog.sp-rw------- 204 1 11503 May 19 14:09:00 1997 Resource/ManagedNode/Dialog/sp_node.parent_dialog.lastdrwxr-sr-x 204 1 0 Jun 03 17:12:07 1997 Resource/ManagedNode/Icon/-rw------- 204 1 604 Feb 25 17:36:46 1997 Resource/ManagedNode/Icon/Makefile-rw------- 204 1 2738 May 19 14:18:14 1997 Resource/ManagedNode/Icon/sp_cws.custom-rw------- 204 1 2704 May 19 14:23:58 1997 Resource/ManagedNode/Icon/sp_node.custom-rw------- 204 1 3448 May 19 14:18:46 1997 Resource/ManagedNode/Icon/sp_cws.last-rw------- 204 1 3411 May 19 14:24:12 1997 Resource/ManagedNode/Icon/sp_node.last-rw------- 204 1 3448 May 19 14:18:46 1997 Resource/ManagedNode/Icon/sp_cws-rw------- 204 1 3411 May 19 14:24:12 1997 Resource/ManagedNode/Icon/sp_node-rw------- 204 1 3448 May 19 14:18:46 1997 Resource/ManagedNode/Icon/sp_cws.sp-rw------- 204 1 3411 May 19 14:24:12 1997 Resource/ManagedNode/Icon/sp_node.spdrwxr-sr-x 204 1 0 Jun 03 17:12:11 1997 Resource/ManagedNode/State/-rw------- 204 1 491 May 14 21:53:59 1997 Resource/ManagedNode/State/Makefile-rw------- 204 1 0 Mar 19 12:50:53 1997 Resource/ManagedNode/State/sp_cws-rw------- 204 1 0 Mar 19 12:50:56 1997 Resource/ManagedNode/State/sp_nodedrwxr-sr-x 204 1 0 Mar 26 15:28:51 1997 Resource/ManagedNode/IconExt/-rw------- 204 1 90 Mar 26 15:28:40 1997 Resource/ManagedNode/IconExt/Makefiledrwxr-sr-x 204 1 0 Jun 03 17:12:08 1997 Resource/ManagedNode/MsgCat/-rw------- 204 1 196 Jun 03 16:31:32 1997 Resource/ManagedNode/MsgCat/Makefile-rw------- 204 1 1904 May 19 15:48:52 1997 Resource/ManagedNode/MsgCat/SpManagedNode.msg-rw-r--r-- 0 1 1274 Jun 03 17:08:11 1997 Resource/ManagedNode/Makefile.last-rw------- 204 1 106 Jun 03 16:53:52 1997 Resource/ManagedNode/LISTdrwxr-sr-x 204 1 0 May 15 00:20:52 1997 Resource/bin/-rwx------ 204 1 561 Mar 02 21:32:26 1997 Resource/bin/aefInstallIcon-rwx------ 204 1 416 May 14 22:33:50 1997 Resource/bin/aefUninstallDialog-rwx------ 204 1 416 Mar 02 21:36:19 1997 Resource/bin/aefUninstallBitmap-rwx------ 204 1 312 Mar 02 21:39:14 1997 Resource/bin/aefUninstallIcon-rwx------ 204 1 794 Mar 02 21:37:21 1997 Resource/bin/aefUninstallCallback-rwx------ 204 1 365 Mar 02 21:33:53 1997 Resource/bin/aefPutRemoteFile-rwx------ 204 1 222 Mar 19 12:52:53 1997 Resource/bin/aefChangeState-rwx------ 204 1 442 Mar 02 21:29:01 1997 Resource/bin/aefInstallBitmap-rwx------ 204 1 1044 Jun 03 16:25:34 1997 Resource/bin/aefInstallCallback-rwx------ 204 1 649 Mar 19 13:34:44 1997 Resource/bin/aefInstallDialog-rwx------ 204 1 117 Mar 02 21:34:30 1997 Resource/bin/aefRemoveRemoteFile-rwx------ 204 1 726 Jun 03 16:55:27 1997 Resource/bin/tivoliPaths-rwx------ 204 1 5156 Mar 02 21:35:12 1997 Resource/bin/aefResource-rwx------ 204 1 434681 Nov 07 21:31:04 1996 Resource/bin/gmake-rwx------ 204 1 543 Feb 25 13:26:10 1997 Resource/bin/aefInstall-rwx------ 204 1 1175 May 14 22:41:17 1997 Resource/bin/aefUninstall-rwx------ 204 1 1294 Mar 26 16:01:46 1997 Resource/bin/installAdminManagedNodeIconExtensions-rwx------ 204 1 1703 May 14 22:55:37 1997 Resource/bin/createManagedNodeMakefile-rwx------ 204 1 536 Jun 03 17:06:04 1997 Resource/bin/spcustomFastInstall-rwx------ 204 1 3693 May 14 21:41:39 1997 Resource/bin/spcustomCustomInstall-rwx------ 204 1 60 May 14 21:47:13 1997 Resource/bin/spcustomUninstall-rw------- 204 1 2966 Jun 03 14:16:27 1997 Resource/INSTALL
152 Integrating TME 10 on the RS/6000 SP
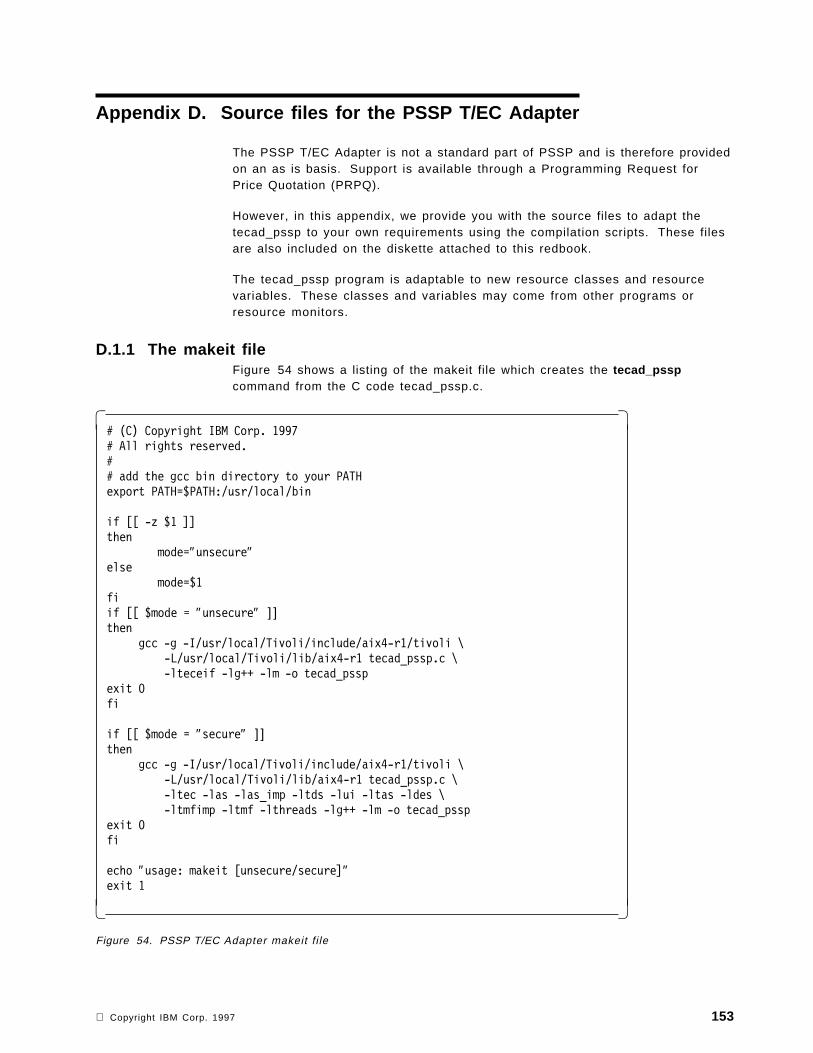
Appendix D. Source files for the PSSP T/EC Adapter
The PSSP T/EC Adapter is not a standard part of PSSP and is therefore providedon an as is basis. Support is available through a Programming Request forPrice Quotation (PRPQ).
However, in this appendix, we provide you with the source files to adapt thetecad_pssp to your own requirements using the compilation scripts. These filesare also included on the diskette attached to this redbook.
The tecad_pssp program is adaptable to new resource classes and resourcevariables. These classes and variables may come from other programs orresource monitors.
D.1.1 The makeit fileFigure 54 shows a listing of the makeit file which creates the tecad_psspcommand from the C code tecad_pssp.c.
� �# (C) Copyright IBM Corp. 1997# All rights reserved.## add the gcc bin directory to your PATHexport PATH=$PATH:/usr/local/bin
if [[ -z $1 ]]then
mode=″unsecure″else
mode=$1fiif [[ $mode = ″unsecure″ ]]then
gcc -g -I/usr/local/Tivoli/include/aix4-r1/tivoli \-L/usr/local/Tivoli/lib/aix4-r1 tecad_pssp.c \-lteceif -lg++ -lm -o tecad_pssp
exit 0fi
if [[ $mode = ″secure″ ]]then
gcc -g -I/usr/local/Tivoli/include/aix4-r1/tivoli \-L/usr/local/Tivoli/lib/aix4-r1 tecad_pssp.c \-ltec -las -las_imp -ltds -lui -ltas -ldes \-ltmfimp -ltmf -lthreads -lg++ -lm -o tecad_pssp
exit 0fi
echo ″usage: makeit [unsecure/secure]″exit 1
� �Figure 54. PSSP T/EC Adapter makeit f i le
Copyright IBM Corp. 1997 153
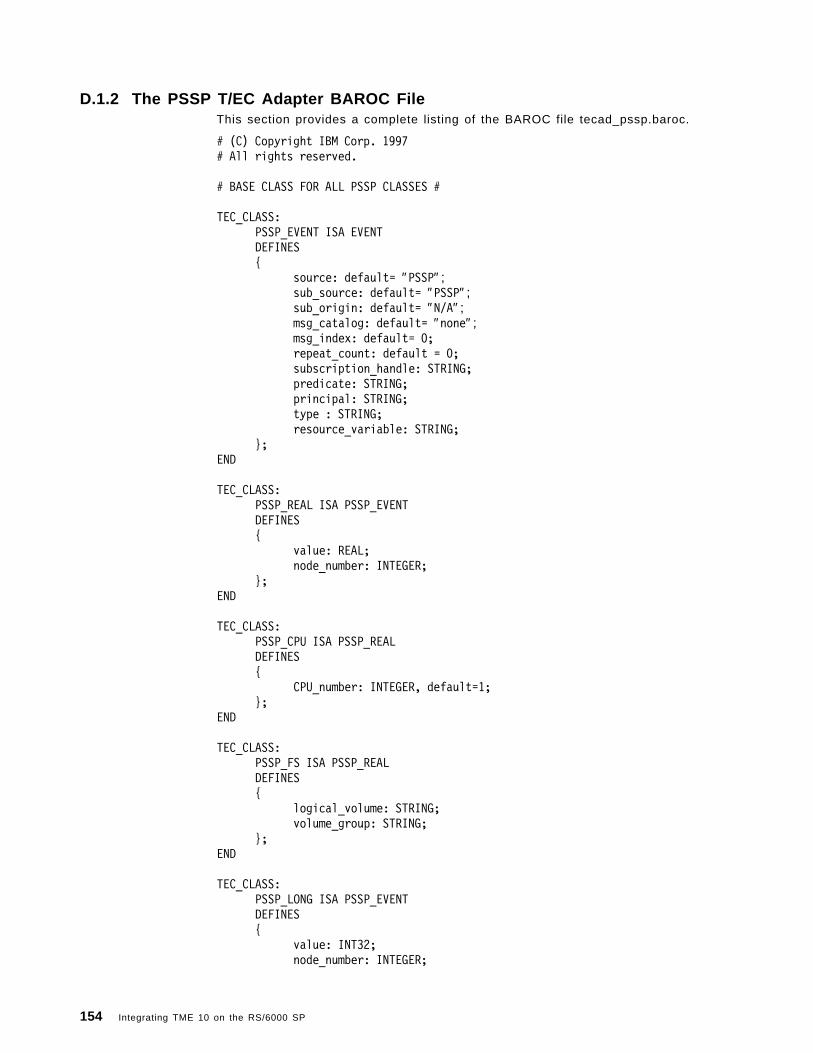
D.1.2 The PSSP T/EC Adapter BAROC FileThis section provides a complete listing of the BAROC file tecad_pssp.baroc.
# (C) Copyright IBM Corp. 1997# All rights reserved.
# BASE CLASS FOR ALL PSSP CLASSES #
TEC_CLASS:PSSP_EVENT ISA EVENTDEFINES{
source: default= ″PSSP″ ;sub_source: default= ″PSSP″ ;sub_origin: default= ″N/A″ ;msg_catalog: default= ″none″ ;msg_index: default= 0;repeat_count: default = 0;subscription_handle: STRING;predicate: STRING;principal: STRING;type : STRING;resource_variable: STRING;
};END
TEC_CLASS:PSSP_REAL ISA PSSP_EVENTDEFINES{
value: REAL;node_number: INTEGER;
};END
TEC_CLASS:PSSP_CPU ISA PSSP_REALDEFINES{
CPU_number: INTEGER, default=1;};
END
TEC_CLASS:PSSP_FS ISA PSSP_REALDEFINES{
logical_volume: STRING;volume_group: STRING;
};END
TEC_CLASS:PSSP_LONG ISA PSSP_EVENTDEFINES{
value: INT32;node_number: INTEGER;
154 Integrating TME 10 on the RS/6000 SP

};END
TEC_CLASS:PSSP_LLSTART ISA PSSP_LONGDEFINES{
STARTD: STRING;};
END
TEC_CLASS:PSSP_LLSCHED ISA PSSP_LONGDEFINES{
SCHEDD: STRING;};
END
TEC_CLASS:PSSP_PAGESPACE ISA PSSP_LONGDEFINES{
name: STRING;};
END
TEC_CLASS:PSSP_VG ISA PSSP_LONGDEFINES{
volume_group: STRING;};
END
TEC_CLASS:PSSP_KMEM ISA PSSP_LONGDEFINES{
memory_type: STRING;};
END
TEC_CLASS:PSSP_DISK ISA PSSP_LONGDEFINES{
disk_name: STRING;};
END
TEC_CLASS:PSSP_ADAPTER ISA PSSP_LONGDEFINES{
adapter_type: STRING;adapter_number: INT32;
};END
Appendix D. Source files for the PSSP T/EC Adapter 155
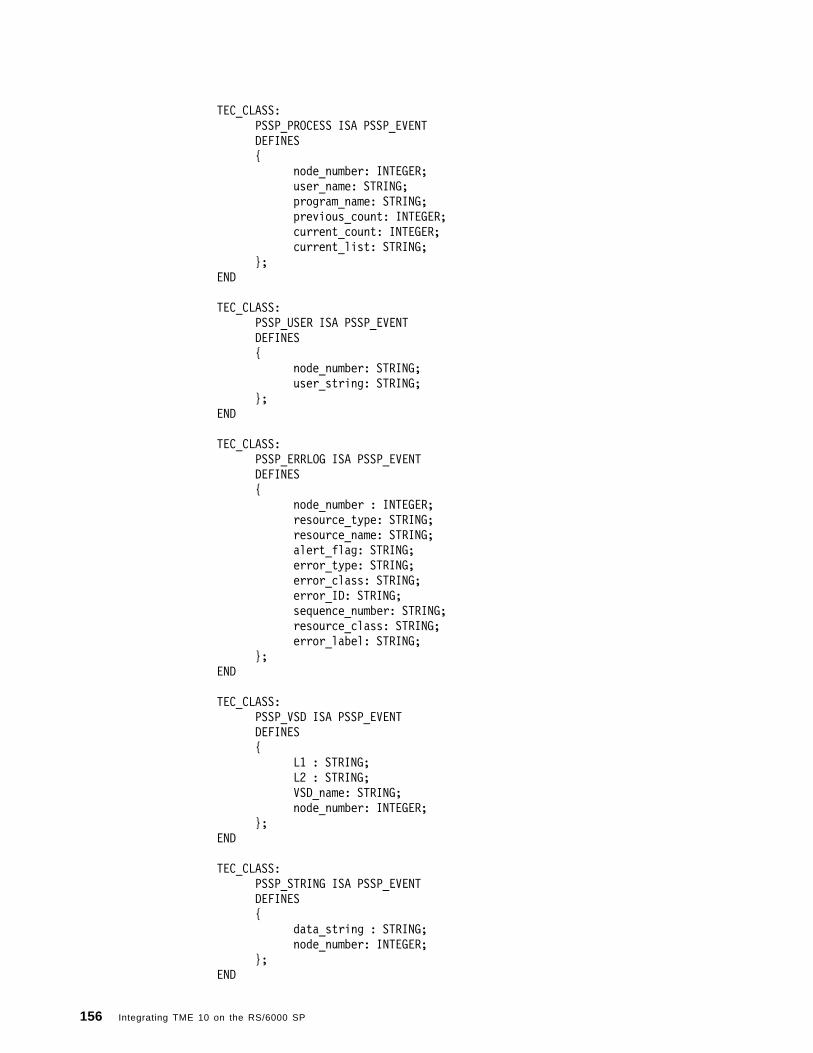
TEC_CLASS:PSSP_PROCESS ISA PSSP_EVENTDEFINES{
node_number: INTEGER;user_name: STRING;program_name: STRING;previous_count: INTEGER;current_count: INTEGER;current_list: STRING;
};END
TEC_CLASS:PSSP_USER ISA PSSP_EVENTDEFINES{
node_number: STRING;user_string: STRING;
};END
TEC_CLASS:PSSP_ERRLOG ISA PSSP_EVENTDEFINES{
node_number : INTEGER;resource_type: STRING;resource_name: STRING;alert_flag: STRING;error_type: STRING;error_class: STRING;error_ID: STRING;sequence_number: STRING;resource_class: STRING;error_label: STRING;
};END
TEC_CLASS:PSSP_VSD ISA PSSP_EVENTDEFINES{
L1 : STRING;L2 : STRING;VSD_name: STRING;node_number: INTEGER;
};END
TEC_CLASS:PSSP_STRING ISA PSSP_EVENTDEFINES{
data_string : STRING;node_number: INTEGER;
};END
156 Integrating TME 10 on the RS/6000 SP

TEC_CLASS:PSSP_NETWORK ISA PSSP_LONGDEFINES{
adapter: STRING;};
END
TEC_CLASS:PSSP_SWITCH ISA PSSP_EVENTDEFINES{
switch_number: INTEGER;value: INT32;
};END
TEC_CLASS:PSSP_FRAME ISA PSSP_EVENTDEFINES{
frame_number: INTEGER;value: INT32;
};END
D.1.3 The tecad_pssp.c FileThis section lists the tecad_pssp.c file. You can adapt this file to match yourown requirements and compile it using the makeit script listed in Figure 54 onpage 153.
/* * (C) Copyright IBM Corp. 1997 * All Rights Reserved. */
/* test ″agent″ for either a TME or non-TME connection. Link with the * appropriate libraries to build a TME version or non-TME version */
#include <stdlib.h>#include <stdio.h>#include <ctype.h>#include <assert.h>#include <memory.h>#include <sys/types.h>#include <sys/time.h>#include <sys/stat.h>
#include ″agent_comm.h″
#define NAME_SIZE 256#define PREFIX_SIZE 64#define NUM_VAR 4#define NUM_PREFIX 5
Appendix D. Source files for the PSSP T/EC Adapter 157

typedef enum{PSSP_LONG,PSSP_REAL,PSSP_ADAPTER,PSSP_PROCESS,PSSP_STRING,PSSP_NETWORK,PSSP_FRAME,PSSP_SWITCH,PSSP_VSD,PSSP_DISK,PSSP_FS,PSSP_KMEM,PSSP_VG,PSSP_CPU,PSSP_PAGESPACE,PSSP_ERRLOG,PSSP_LLSTART,PSSP_LLSCHED
} class_names_t;
void DoLong(void);void DoReal(void);void DoAdapter(void);void DoProcess(void);void DoString(void);void DoNetwork(void);void DoFrame(void);void DoSwitch(void);void DoVSD(void);void DoDisk(void);void DoFS(void);void DoKmem(void);void DoVG(void);void DoCPU(void);void DoPageSpace(void);void DoErrLog(void);void DoLLStart(void);void DoLLSched(void);void ValidateSeverity(void);
voidprint_usage_and_exit(char **argv){
fprintf(stderr, ″Usage: agent [-f cfgfile] [-c] [-p port] \[server_host]\n″ ) ;
exit(1);}
/* Global Variables */int rc, i, n, theClassNumber;char *theHandle, *theIVector, *theLocation, *thePredicate,*thePrincipal, *theRVCount,*theRVName, *theRVType, *theRVTime;
int theRVCountValue;char theSeverity[256];char *theRVArray[NUM_VAR];
158 Integrating TME 10 on the RS/6000 SP
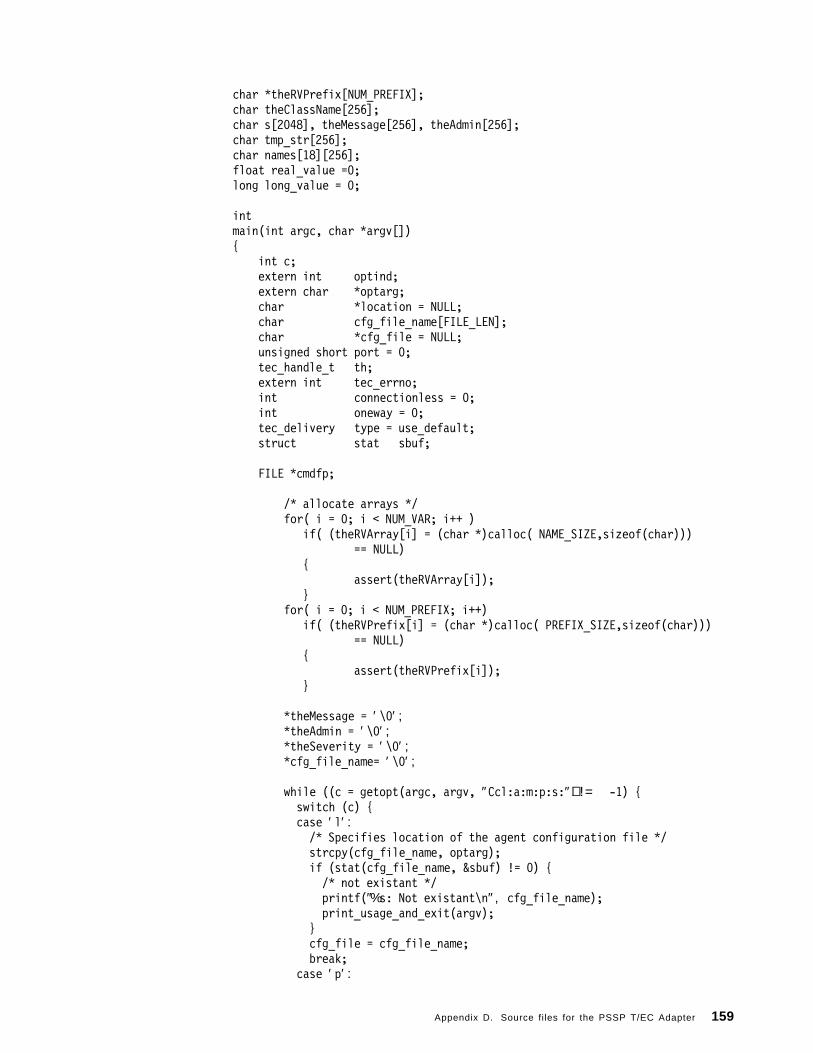
char *theRVPrefix[NUM_PREFIX];char theClassName[256];char s[2048], theMessage[256], theAdmin[256];char tmp_str[256];char names[18][256];float real_value =0;long long_value = 0;
intmain(int argc, char *argv[]){
int c;extern int optind;extern char *optarg;char *location = NULL;char cfg_file_name[FILE_LEN];char *cfg_file = NULL;unsigned short port = 0;tec_handle_t th;extern int tec_errno;int connectionless = 0;int oneway = 0;tec_delivery type = use_default;struct stat sbuf;
FILE *cmdfp;
/* allocate arrays */for( i = 0; i < NUM_VAR; i++ )
if( (theRVArray[i] = (char *)calloc( NAME_SIZE,sizeof(char)))== NULL)
{assert(theRVArray[i]);
}for( i = 0; i < NUM_PREFIX; i++)
if( (theRVPrefix[i] = (char *)calloc( PREFIX_SIZE,sizeof(char)))== NULL)
{assert(theRVPrefix[i]);
}
*theMessage = ′ \0′ ;*theAdmin = ′ \0′ ;*theSeverity = ′ \0′ ;*cfg_file_name= ′ \0′ ;
while ((c = getopt(argc, argv, ″Ccl:a:m:p:s:″)) != -1) {switch (c) {case ′ l′ :/* Specifies location of the agent configuration file */strcpy(cfg_file_name, optarg);if (stat(cfg_file_name, &sbuf) != 0) {/* not existant */printf(″%s: Not existant\n″ , cfg_file_name);print_usage_and_exit(argv);
}cfg_file = cfg_file_name;break;
case ′ p′ :
Appendix D. Source files for the PSSP T/EC Adapter 159

/* Specifies the port to connect to on the Server */if (!isdigit(*optarg)) {print_usage_and_exit(argv);
}port = atol(optarg);break;
case ′ C′ :oneway++;
case ′ c′ :connectionless++;type = connection_less;break;
case ′ m′ :strcpy(theMessage, optarg);break;
case ′ s′ :strcpy(theSeverity, optarg);ValidateSeverity();break;
case ′ a′ :strcpy(theAdmin,optarg);break;
default:print_usage_and_exit(argv);break;
}}
if (optind + 1 == argc) {location = argv[optind];
}
/* If cfg_file is NULL, the agent_init will look for/etc/Tivoli/tecad_eif.conf, if this is unavailable, allparameters to tec_create_handle must be provided */if( *cfg_file_name == ′ \0′ ){if (stat(″ . / tecad_pssp.cfg″, &sbuf) != 0){/* not existant */printf(″%s: Not existant\n″ , ″ . /tecad_pssp.cfg″ ) ;print_usage_and_exit(argv);
}elsestrcpy(cfg_file_name,″ . / tecad_pssp.cfg″ ) ;
}
tecad_pssp_init(cfg_file_name);
if ((th = tec_create_handle(location, port, oneway, type)) == NULL){fprintf(stderr, ″tec_create_handle failed, errno = %d\n″ , tec_errno);exit(1);
}
/*
160 Integrating TME 10 on the RS/6000 SP

* Try to flush any buffered events before processing new ones.* Note: If the TEC Server or Network is down all buffered* events will still try to be sent; there is no abort - yet.*/tec_flush_events(th);
/* Grab all environment variables, and format the event accordingly */
theHandle = getenv( ″PMAN_HANDLE″ ) ;theIVector = getenv( ″PMAN_IVECTOR″ ) ;theLocation = getenv( ″PMAN_LOCATION″ ) ;thePredicate = getenv( ″PMAN_PRED″ ) ;thePrincipal = getenv( ″PMAN_PRINCIPAL″ ) ;theRVCount = getenv( ″PMAN_RVCOUNT″ ) ;theRVCountValue = atoi( theRVCount );theRVArray[0] = getenv( ″PMAN_RVFIELD0″ ) ;if( theRVCountValue >= 2 )
theRVArray[1] = getenv( ″PMAN_RVFIELD1″ ) ;else
*theRVArray[1] = ′ \0′ ;if( theRVCountValue == 3 )
theRVArray[2] = getenv( ″PMAN_RVFIELD2″ ) ;else
*theRVArray[2] = ′ \0′ ;theRVName = getenv( ″PMAN_RVNAME″ ) ;theRVType = getenv( ″PMAN_RVTYPE″ ) ;theRVTime = getenv( ″PMAN_TIME″ ) ; theHandle = getenv( ″PMAN_HANDLE″ ) ;theIVector = getenv( ″PMAN_IVECTOR″ ) ;theLocation = getenv( ″PMAN_LOCATION″ ) ;thePredicate = getenv( ″PMAN_PRED″ ) ;thePrincipal = getenv( ″PMAN_PRINCIPAL″ ) ;theRVCount = getenv( ″PMAN_RVCOUNT″ ) ;theRVCountValue = atoi( theRVCount );theRVArray[0] = getenv( ″PMAN_RVFIELD0″ ) ;if( theRVCountValue >= 2 )
theRVArray[1] = getenv( ″PMAN_RVFIELD1″ ) ;else
*theRVArray[1] = ′ \0′ ;if( theRVCountValue == 3 )
theRVArray[2] = getenv( ″PMAN_RVFIELD2″ ) ;else
*theRVArray[2] = ′ \0′ ;theRVName = getenv( ″PMAN_RVNAME″ ) ;theRVType = getenv( ″PMAN_RVTYPE″ ) ;theRVTime = getenv( ″PMAN_TIME″ ) ;
/* We need to classify what type of event to generate */
sscanf(theRVName, \″%[̂ .].%[^.].%[^.].%[^.].%[^.]″ , \theRVPrefix[0],theRVPrefix[1],theRVPrefix[2], \theRVPrefix[3],theRVPrefix[4]);
/* initiate the message string */*s = ′ \0′ ;
/* The SDRGetObjects command is used to retrieve the classtype from the SDR */
Appendix D. Source files for the PSSP T/EC Adapter 161

sprintf(tmp_str,″ /usr/lpp/ssp/bin/SDRGetObjects tecad_pssp_Class rv_name==%s class_number″ ,theRVName);
if( (cmdfp = popen(tmp_str,″r″)) == NULL){fprintf(stderr,″The SDRGetObjects command failed\n″ ) ;exit(1);
}fscanf(cmdfp,″%s″ ,tmp_str); /* get rid of the header */if( (n = fscanf(cmdfp,″%d″,&theClassNumber)) != 1){fprintf(stderr,″The SDRGetObjects command failed\n″ ) ;exit(2);
}pclose(cmdfp);
switch( theClassNumber ){case PSSP_LONG:DoLong();break;
case PSSP_REAL:DoReal();break;
case PSSP_ADAPTER:DoAdapter();break;
case PSSP_PROCESS:DoProcess();break;
case PSSP_STRING:DoString();break;
case PSSP_NETWORK:DoNetwork();break;
case PSSP_FRAME:DoFrame();break;
case PSSP_SWITCH:DoSwitch();break;
case PSSP_VSD:DoVSD();break;
case PSSP_DISK:DoDisk();break;
case PSSP_FS:DoFS();break;
case PSSP_KMEM:DoKmem();break;
case PSSP_VG:DoVG();break;
162 Integrating TME 10 on the RS/6000 SP
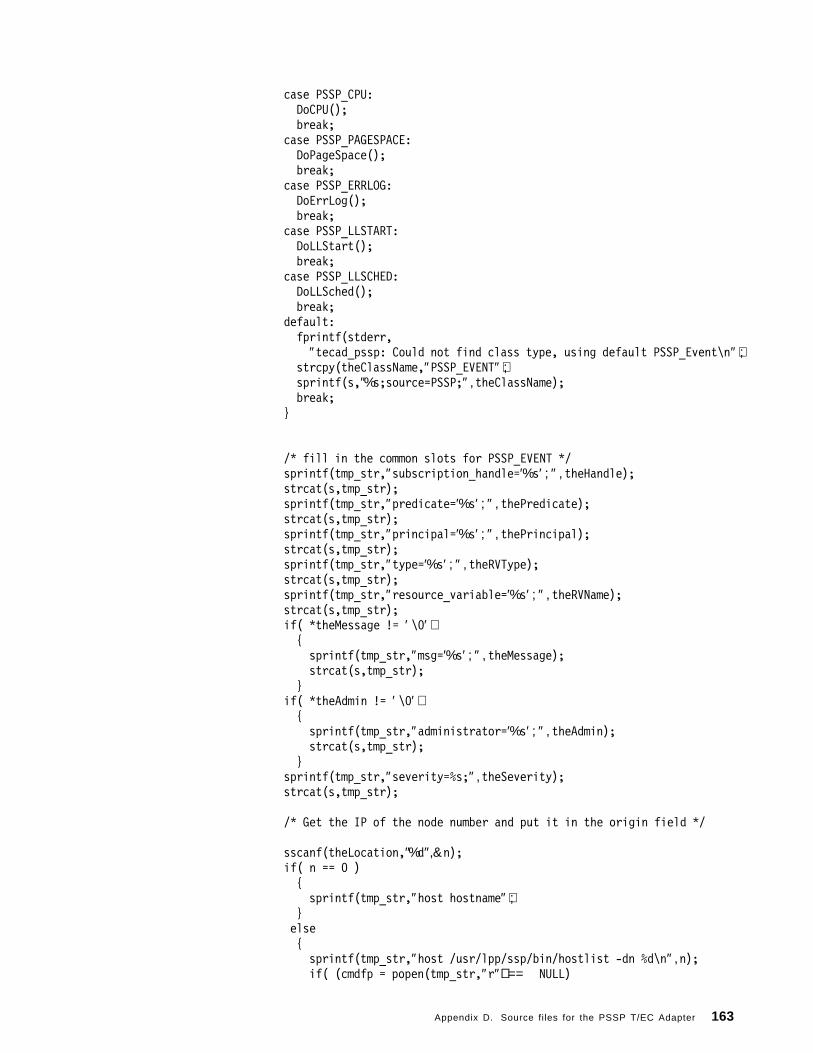
case PSSP_CPU:DoCPU();break;
case PSSP_PAGESPACE:DoPageSpace();break;
case PSSP_ERRLOG:DoErrLog();break;
case PSSP_LLSTART:DoLLStart();break;
case PSSP_LLSCHED:DoLLSched();break;
default:fprintf(stderr,
″tecad_pssp: Could not find class type, using default PSSP_Event\n″ ) ;strcpy(theClassName,″PSSP_EVENT″ ) ;sprintf(s,″%s;source=PSSP;″ ,theClassName);break;
}
/* fill in the common slots for PSSP_EVENT */sprintf(tmp_str,″subscription_handle=′%s′ ; ″ , theHandle);strcat(s,tmp_str);sprintf(tmp_str,″predicate=′%s′ ; ″ , thePredicate);strcat(s,tmp_str);sprintf(tmp_str,″principal=′%s′ ; ″ , thePrincipal);strcat(s,tmp_str);sprintf(tmp_str,″type=′%s′ ; ″ , theRVType);strcat(s,tmp_str);sprintf(tmp_str,″resource_variable=′%s′ ; ″ , theRVName);strcat(s,tmp_str);if( *theMessage != ′ \0′ ){sprintf(tmp_str,″msg=′%s′ ; ″ , theMessage);strcat(s,tmp_str);
}if( *theAdmin != ′ \0′ ){sprintf(tmp_str,″administrator=′%s′ ; ″ , theAdmin);strcat(s,tmp_str);
}sprintf(tmp_str,″severity=%s;″ ,theSeverity);strcat(s,tmp_str);
/* Get the IP of the node number and put it in the origin field */
sscanf(theLocation,″%d″,&n);if( n == 0 ){sprintf(tmp_str,″host hostname″ ) ;
}else{sprintf(tmp_str,″host /usr/lpp/ssp/bin/hostlist -dn %d\n″ ,n);if( (cmdfp = popen(tmp_str,″r″)) == NULL)
Appendix D. Source files for the PSSP T/EC Adapter 163

{fprintf(stderr,″The hostlist command failed\n″ ) ;exit(1);
}}
if( (cmdfp = popen(tmp_str,″r″)) == NULL){fprintf(stderr,″The hostname command failed\n″ ) ;exit(1);
}
fscanf(cmdfp,″%s″ ,tmp_str); /* get the hostname */strcat(s,″hostname=′ ″ ) ;strcat(s,tmp_str);strcat(s,″ ′ ; ″ ) ;fscanf(cmdfp,″%s″ ,tmp_str); /* get the word ′ is′ */fscanf(cmdfp,″%s″ ,tmp_str); /* get the IP address */strcat(s,″origin=′ ″ ) ;strcat(s,tmp_str);strcat(s,″ ′ ; ″ ) ;
pclose(cmdfp);
strcat(s,″END\n″ ) ;
/* keep the newline and adda ^A to the end, this makesthe message ″<msg>\n\001″ */
s[strlen(s)] = ′ \001′ ;s[strlen(s)+1] = ′ \0′ ;
/* tec_put_event will send the event to the selected server */rc = tec_put_event(th, s);
/* you may want to print out the event string to check itprintf(″%s″ ,s); */
if (rc == -1) {fprintf(stderr, ″tec_put_event failed, errno = %d\n″ , tec_errno);exit(1);
}
/* eof - close the connection and exit */tec_destroy_handle(th);exit(0);
}
void DoLong(){strcpy(theClassName,″PSSP_LONG″ ) ;sprintf(s,″%s;source=PSSP;″ ,theClassName);if( theRVCountValue > 1 ){/* there should not be more than one value here */fprintf(stderr,″tec_adapter: wrong argument count for variable PSSP_LONG\n″ ) ;
}else{strcat(s,″value=″ ) ;strcat(s,theRVArray[0]);
164 Integrating TME 10 on the RS/6000 SP

strcat(s,″ ; ″ ) ;}
strcat(s,″node_number=″ ) ;strcat(s,theLocation);strcat(s,″ ; ″ ) ;
}
void DoReal(){strcpy(theClassName,″PSSP_REAL″ ) ;sprintf(s,″%s;source=PSSP;″ ,theClassName);if( theRVCountValue > 1 ){/* there should not be more than one value here */fprintf(stderr,″tec_adapter: wrong argument count for variable PSSP_LONG\n″ ) ;
}else{sprintf(tmp_str,″value=%s;″ ,theRVArray[0]);strcat(s,tmp_str);
}sprintf(tmp_str,″node_number=%s″ ,theLocation);strcat(s,tmp_str);
}
void DoAdapter(){strcpy(theClassName,″PSSP_ADAPTER″ ) ;sprintf(s,″%s;source=PSSP;″ ,theClassName);n = sscanf(theIVector, \
″%[̂ =]=%[^;];%[^=]=%[^;];%[^=]=%[^;]″ , \names[0],names[1],names[2], \names[3],names[4],names[5]);
if (n != 6 ){fprintf(stderr,
″tecad_pssp: the parsing of the IVEC string failed for variable PSSP_ADAPTER″ ) ;exit(1);
}for(i = 0; i < 5; i++){if( !strcmp(names[i],″AdapterType″) )sprintf(tmp_str,″adapter_type=%s;″ ,names[i+1]);
else if( !strcmp(names[i],″NodeNum″ ) )sprintf(tmp_str,″node_number=%s;″ ,names[i+1]);
else if( !strcmp(names[i],″AdapterNum″ ) )sprintf(tmp_str,″adapter_number=%s;″ ,names[i+1]);
else continue;strcat(s,tmp_str);
}}void DoProcess(){strcpy(theClassName,″PSSP_PROCESS″ ) ;sprintf(s,″%s;source=PSSP;″ ,theClassName);n = sscanf(theIVector, \
″%[̂ =]=%[^;];%[^=]=%[^;];%[^=]=%s″ , \names[0],names[1],names[2], \names[3],names[4],names[5]);
Appendix D. Source files for the PSSP T/EC Adapter 165
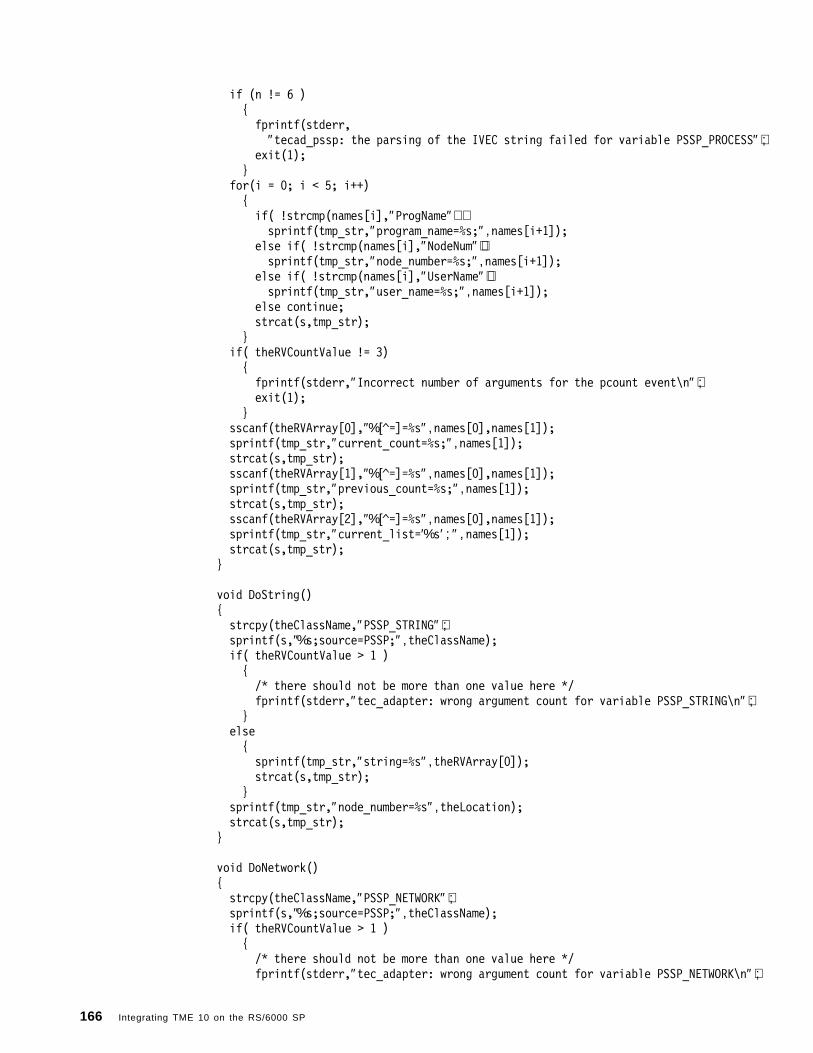
if (n != 6 ){fprintf(stderr,
″tecad_pssp: the parsing of the IVEC string failed for variable PSSP_PROCESS″ ) ;exit(1);
}for(i = 0; i < 5; i++){if( !strcmp(names[i],″ProgName″) )sprintf(tmp_str,″program_name=%s;″ ,names[i+1]);
else if( !strcmp(names[i],″NodeNum″ ) )sprintf(tmp_str,″node_number=%s;″ ,names[i+1]);
else if( !strcmp(names[i],″UserName″ ) )sprintf(tmp_str,″user_name=%s;″ ,names[i+1]);
else continue;strcat(s,tmp_str);
}if( theRVCountValue != 3){fprintf(stderr,″Incorrect number of arguments for the pcount event\n″ ) ;exit(1);
}sscanf(theRVArray[0],″%[̂ =]=%s″ ,names[0],names[1]);sprintf(tmp_str,″current_count=%s;″ ,names[1]);strcat(s,tmp_str);sscanf(theRVArray[1],″%[̂ =]=%s″ ,names[0],names[1]);sprintf(tmp_str,″previous_count=%s;″ ,names[1]);strcat(s,tmp_str);sscanf(theRVArray[2],″%[̂ =]=%s″ ,names[0],names[1]);sprintf(tmp_str,″current_list=′%s′ ; ″ , names[1]);strcat(s,tmp_str);
}
void DoString(){strcpy(theClassName,″PSSP_STRING″ ) ;sprintf(s,″%s;source=PSSP;″ ,theClassName);if( theRVCountValue > 1 ){/* there should not be more than one value here */fprintf(stderr,″tec_adapter: wrong argument count for variable PSSP_STRING\n″ ) ;
}else{sprintf(tmp_str,″string=%s″ ,theRVArray[0]);strcat(s,tmp_str);
}sprintf(tmp_str,″node_number=%s″ ,theLocation);strcat(s,tmp_str);
}
void DoNetwork(){strcpy(theClassName,″PSSP_NETWORK″ ) ;sprintf(s,″%s;source=PSSP;″ ,theClassName);if( theRVCountValue > 1 ){/* there should not be more than one value here */fprintf(stderr,″tec_adapter: wrong argument count for variable PSSP_NETWORK\n″ ) ;
166 Integrating TME 10 on the RS/6000 SP

}else{sprintf(tmp_str,″value=%s″ ,theRVArray[0]);strcat(s,tmp_str);
}sprintf(tmp_str,″node_number=%s″ ,theLocation);strcat(s,tmp_str);n = sscanf(theIVector,″%[̂ =]=%s″ ,names[0],names[1]);if (n != 2 ){fprintf(stderr,
″tecad_pssp: the parsing of the IVEC string failed for variable PSSP_Network″ ) ;exit(1);
}
if( !strcmp(names[0],″Adapter″) ){sprintf(tmp_str,″adapter=%s;″ ,names[1]);strcat(s,tmp_str);
}else{fprintf(stderr,
″tecad_pssp: wrong variable in instantiation vector \for variable PSSP_Network\n″ ) ;
exit(1);}
}
void DoFrame(){strcpy(theClassName,″PSSP_Frame″ ) ;sprintf(s,″%s;source=PSSP;″ ,theClassName);if( theRVCountValue > 1 ){/* there should not be more than one value here */fprintf(stderr,″tec_adapter: wrong argument count for variable PSSP_FRAME\n″ ) ;
}else{sprintf(tmp_str,″value=%s;″ ,theRVArray[0]);strcat(s,tmp_str);
}n = sscanf(theIVector,″%[̂ =]=%s″ ,names[0],names[1]);if (n != 2 ){fprintf(stderr,
″tecad_pssp: the parsing of the IVEC string failed for variable PSSP_Frame″ ) ;exit(1);
}
if( !strcmp(names[0],″FrameNum″) ){sprintf(tmp_str,″frame_number=%s;″ ,names[1]);strcat(s,tmp_str);
}else{
Appendix D. Source files for the PSSP T/EC Adapter 167

fprintf(stderr,″tecad_pssp: wrong variable in instantiation vector for variable PSSP_Frame\n″ ) ;
exit(1);}
}
void DoSwitch(){strcpy(theClassName,″PSSP_Switch″ ) ;sprintf(s,″%s;source=PSSP;″ ,theClassName);if( theRVCountValue > 1 ){/* there should not be more than one value here */fprintf(stderr,″tec_adapter: wrong argument count for variable PSSP_SWITCH\n″ ) ;
}else{sprintf(tmp_str,″value=%s;″ ,theRVArray[0]);strcat(s,tmp_str);
}n = sscanf(theIVector,″%[̂ =]=%s″ ,names[0],names[1]);if (n != 2 ){fprintf(stderr,
″tecad_pssp: the parsing of the IVEC string failed for variable PSSP_Frame″ ) ;exit(1);
}
if( !strcmp(names[0],″SwitchNum″) ){sprintf(tmp_str,″switch_number=%s;″ ,names[1]);strcat(s,tmp_str);
}else{fprintf(stderr,
″tecad_pssp: wrong variable in instantiation vector for variable PSSP_Frame\n″ ) ;exit(1);
}}
void DoVSD(){strcpy(theClassName,″PSSP_VSD″ ) ;sprintf(s,″%s;source=PSSP;″ ,theClassName);if( theRVCountValue > 1 ){/* there should not be more than one value here */fprintf(stderr,″tec_adapter: wrong argument count for variable PSSP_VSD\n″ ) ;
}else{sprintf(tmp_str,″value=%s;″ ,theRVArray[0]);strcat(s,tmp_str);
}n = sscanf(theIVector, \
″%[̂ =]=%[^;];%[^=]=%[^;]; \%[^=]=%[^;];%[^=]=%s″ , \names[0],names[1],names[2],names[3], \
168 Integrating TME 10 on the RS/6000 SP
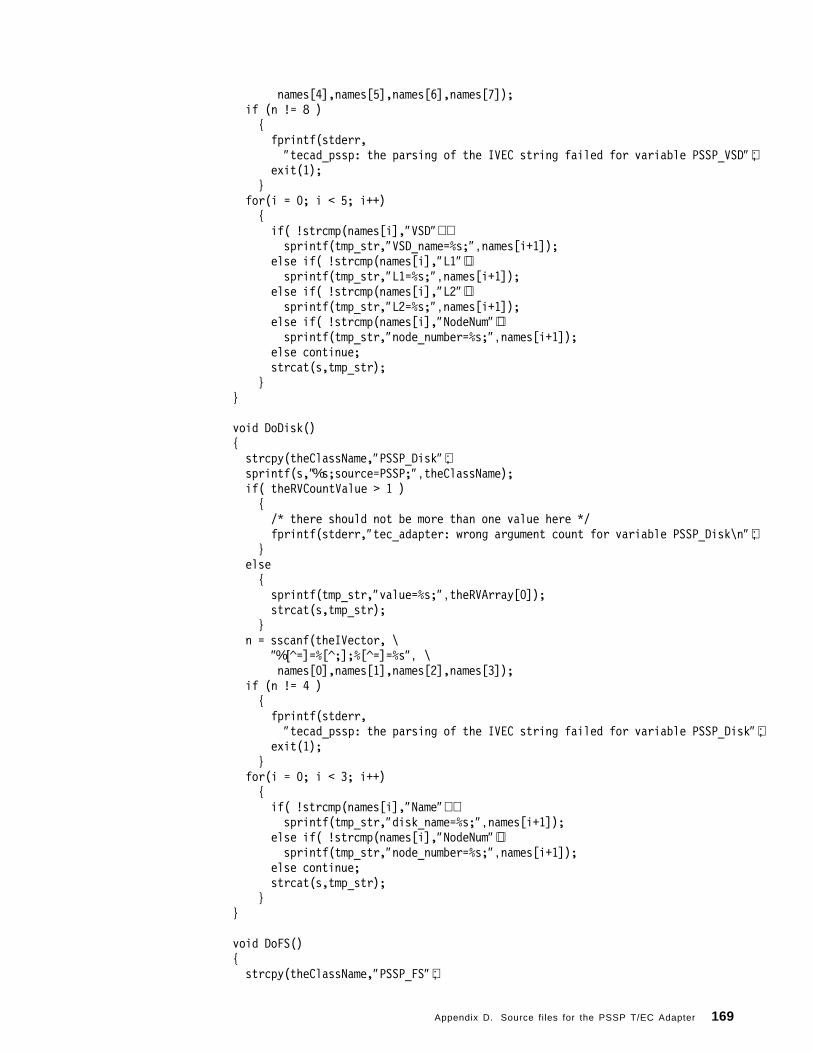
names[4],names[5],names[6],names[7]);if (n != 8 ){fprintf(stderr,
″tecad_pssp: the parsing of the IVEC string failed for variable PSSP_VSD″ ) ;exit(1);
}for(i = 0; i < 5; i++){if( !strcmp(names[i],″VSD″) )sprintf(tmp_str,″VSD_name=%s;″ ,names[i+1]);
else if( !strcmp(names[i],″L1″ ) )sprintf(tmp_str,″L1=%s;″ ,names[i+1]);
else if( !strcmp(names[i],″L2″ ) )sprintf(tmp_str,″L2=%s;″ ,names[i+1]);
else if( !strcmp(names[i],″NodeNum″ ) )sprintf(tmp_str,″node_number=%s;″ ,names[i+1]);
else continue;strcat(s,tmp_str);
}}
void DoDisk(){strcpy(theClassName,″PSSP_Disk″ ) ;sprintf(s,″%s;source=PSSP;″ ,theClassName);if( theRVCountValue > 1 ){/* there should not be more than one value here */fprintf(stderr,″tec_adapter: wrong argument count for variable PSSP_Disk\n″ ) ;
}else{sprintf(tmp_str,″value=%s;″ ,theRVArray[0]);strcat(s,tmp_str);
}n = sscanf(theIVector, \
″%[̂ =]=%[^;];%[^=]=%s″ , \names[0],names[1],names[2],names[3]);
if (n != 4 ){fprintf(stderr,
″tecad_pssp: the parsing of the IVEC string failed for variable PSSP_Disk″ ) ;exit(1);
}for(i = 0; i < 3; i++){if( !strcmp(names[i],″Name″) )sprintf(tmp_str,″disk_name=%s;″ ,names[i+1]);
else if( !strcmp(names[i],″NodeNum″ ) )sprintf(tmp_str,″node_number=%s;″ ,names[i+1]);
else continue;strcat(s,tmp_str);
}}
void DoFS(){strcpy(theClassName,″PSSP_FS″ ) ;
Appendix D. Source files for the PSSP T/EC Adapter 169
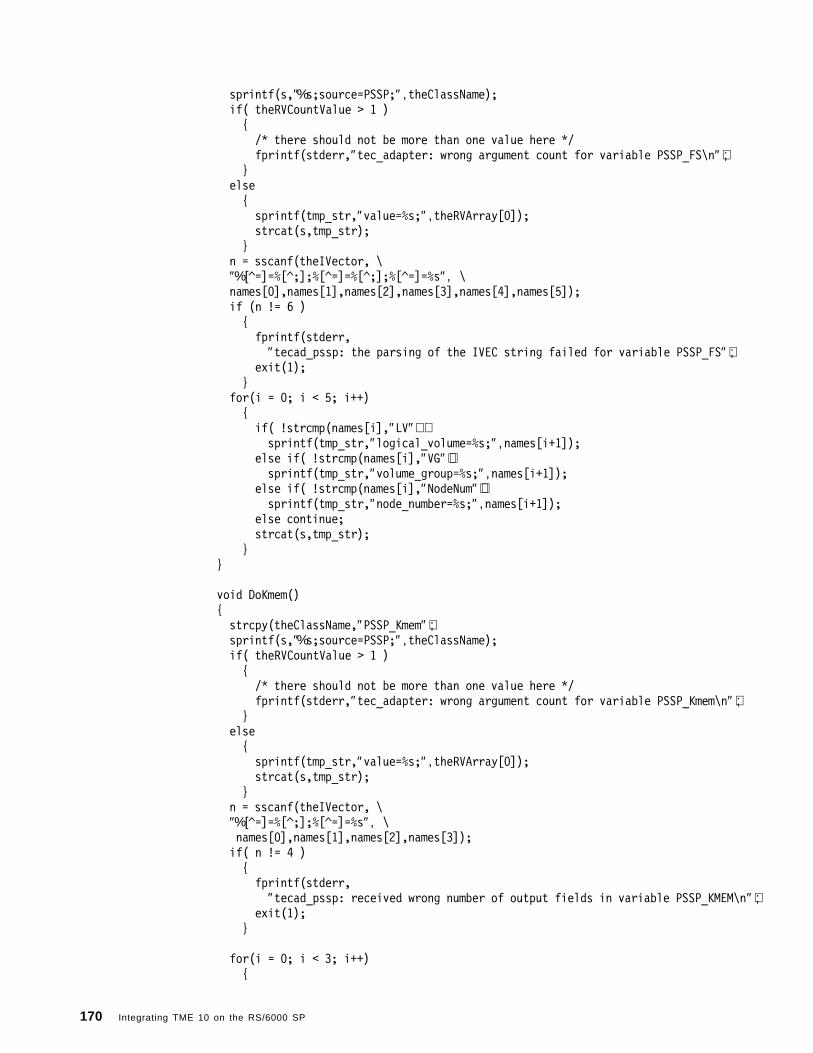
sprintf(s,″%s;source=PSSP;″ ,theClassName);if( theRVCountValue > 1 ){/* there should not be more than one value here */fprintf(stderr,″tec_adapter: wrong argument count for variable PSSP_FS\n″ ) ;
}else{sprintf(tmp_str,″value=%s;″ ,theRVArray[0]);strcat(s,tmp_str);
}n = sscanf(theIVector, \″%[̂ =]=%[^;];%[^=]=%[^;];%[^=]=%s″ , \names[0],names[1],names[2],names[3],names[4],names[5]);if (n != 6 ){fprintf(stderr,
″tecad_pssp: the parsing of the IVEC string failed for variable PSSP_FS″ ) ;exit(1);
}for(i = 0; i < 5; i++){if( !strcmp(names[i],″LV″) )sprintf(tmp_str,″logical_volume=%s;″ ,names[i+1]);
else if( !strcmp(names[i],″VG″ ) )sprintf(tmp_str,″volume_group=%s;″ ,names[i+1]);
else if( !strcmp(names[i],″NodeNum″ ) )sprintf(tmp_str,″node_number=%s;″ ,names[i+1]);
else continue;strcat(s,tmp_str);
}}
void DoKmem(){strcpy(theClassName,″PSSP_Kmem″ ) ;sprintf(s,″%s;source=PSSP;″ ,theClassName);if( theRVCountValue > 1 ){/* there should not be more than one value here */fprintf(stderr,″tec_adapter: wrong argument count for variable PSSP_Kmem\n″ ) ;
}else{sprintf(tmp_str,″value=%s;″ ,theRVArray[0]);strcat(s,tmp_str);
}n = sscanf(theIVector, \″%[̂ =]=%[^;];%[^=]=%s″ , \names[0],names[1],names[2],names[3]);if( n != 4 ){fprintf(stderr,
″tecad_pssp: received wrong number of output fields in variable PSSP_KMEM\n″ ) ;exit(1);
}
for(i = 0; i < 3; i++){
170 Integrating TME 10 on the RS/6000 SP

if( !strcmp(names[i],″Type″) )sprintf(tmp_str,″memory_type=%s;″ ,names[i+1]);
else if( !strcmp(names[i],″NodeNum″ ) )sprintf(tmp_str,″node_number=%s;″ ,names[i+1]);
else continue;strcat(s,tmp_str);
}}
void DoVG(){strcpy(theClassName,″PSSP_VG″ ) ;sprintf(s,″%s;source=PSSP;″ ,theClassName);if( theRVCountValue > 1 ){/* there should not be more than one value here */fprintf(stderr,″tec_adapter: wrong argument count for variable PSSP_VG\n″ ) ;
}else{sprintf(tmp_str,″value=%s;″ ,theRVArray[0]);strcat(s,tmp_str);
}n = sscanf(theIVector, \″%[̂ =]=%[^;];%[^=]=%s″ , \names[0],names[1],names[2],names[3]);if (n != 4 ){fprintf(stderr,
″tecad_pssp: the parsing of the IVEC string failed for variable PSSP_VG″ ) ;exit(1);
}for(i = 0; i < 3; i++){if( !strcmp(names[i],″VG″) )sprintf(tmp_str,″volume_group=%s;″ ,names[i+1]);
else if( !strcmp(names[i],″NodeNum″ ) )sprintf(tmp_str,″node_number=%s;″ ,names[i+1]);
else continue;strcat(s,tmp_str);
}}
void DoCPU(){strcpy(theClassName,″PSSP_CPU″ ) ;sprintf(s,″%s;source=PSSP;″ ,theClassName);if( theRVCountValue > 1 ){/* there should not be more than one value here */fprintf(stderr,″tec_adapter: wrong argument count for variable PSSP_CPU\n″ ) ;
}else{sprintf(tmp_str,″value=%s;″ ,theRVArray[0]);strcat(s,tmp_str);
}n = sscanf(theIVector, \
Appendix D. Source files for the PSSP T/EC Adapter 171

″%[̂ =]=%[^;];%[^=]=%s″ , \names[0],names[1],names[2],names[3]);if (n != 4 ){fprintf(stderr,
″tecad_pssp: the parsing of the IVEC string failed for variable PSSP_CPU″ ) ;exit(1);
}for(i = 0; i < 3; i++){if( !strcmp(names[i],″CPU″) )sprintf(tmp_str,″cpu_number=%s;″ ,names[i+1]);
else if( !strcmp(names[i],″NodeNum″ ) )sprintf(tmp_str,″node_number=%s;″ ,names[i+1]);
else continue;strcat(s,tmp_str);
}}
void DoPageSpace(){strcpy(theClassName,″PSSP_PageSpace″ ) ;sprintf(s,″%s;source=PSSP;″ ,theClassName);if( theRVCountValue > 1 ){/* there should not be more than one value here */fprintf(stderr,″tec_adapter: wrong argument count for variable PSSP_PageSpace\n″ ) ;
}else{sprintf(tmp_str,″value=%s;″ ,theRVArray[0]);
strcat(s,tmp_str);}
n = sscanf(theIVector, \″%[̂ =]=%[^;];%[^=]=%s″ , \names[0],names[1],names[2],names[3]);if (n != 4 ){fprintf(stderr,
″tecad_pssp: the parsing of the IVEC string failed for variable PSSP_PageSpace″ ) ;exit(1);
}for(i = 0; i < 3; i++){if( !strcmp(names[i],″Name″) )sprintf(tmp_str,″name=%s;″ ,names[i+1]);
else if( !strcmp(names[i],″NodeNum″ ) )sprintf(tmp_str,″node_number=%s;″ ,names[i+1]);
else continue;strcat(s,tmp_str);
}}
void DoErrLog(){strcpy(theClassName,″PSSP_Errlog″ ) ;sprintf(s,″%s;source=PSSP;″ ,theClassName);if( theRVCountValue > 1 ){
172 Integrating TME 10 on the RS/6000 SP
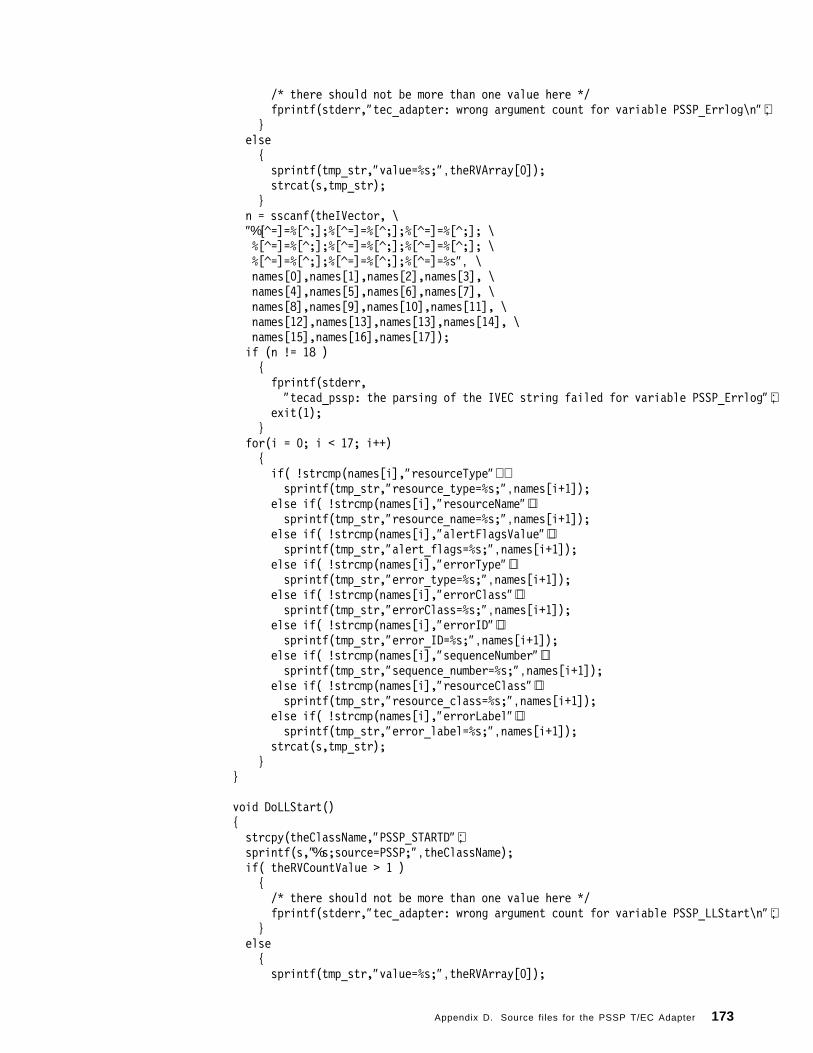
/* there should not be more than one value here */fprintf(stderr,″tec_adapter: wrong argument count for variable PSSP_Errlog\n″ ) ;
}else{sprintf(tmp_str,″value=%s;″ ,theRVArray[0]);strcat(s,tmp_str);
}n = sscanf(theIVector, \″%[̂ =]=%[^;];%[^=]=%[^;];%[^=]=%[^;]; \%[^=]=%[^;];%[^=]=%[^;];%[^=]=%[^;]; \%[^=]=%[^;];%[^=]=%[^;];%[^=]=%s″ , \names[0],names[1],names[2],names[3], \names[4],names[5],names[6],names[7], \names[8],names[9],names[10],names[11], \names[12],names[13],names[13],names[14], \names[15],names[16],names[17]);if (n != 18 ){fprintf(stderr,
″tecad_pssp: the parsing of the IVEC string failed for variable PSSP_Errlog″ ) ;exit(1);
}for(i = 0; i < 17; i++){if( !strcmp(names[i],″resourceType″) )sprintf(tmp_str,″resource_type=%s;″ ,names[i+1]);
else if( !strcmp(names[i],″resourceName″ ) )sprintf(tmp_str,″resource_name=%s;″ ,names[i+1]);
else if( !strcmp(names[i],″alertFlagsValue″ ) )sprintf(tmp_str,″alert_flags=%s;″ ,names[i+1]);
else if( !strcmp(names[i],″errorType″ ) )sprintf(tmp_str,″error_type=%s;″ ,names[i+1]);
else if( !strcmp(names[i],″errorClass″ ) )sprintf(tmp_str,″errorClass=%s;″ ,names[i+1]);
else if( !strcmp(names[i],″errorID″ ) )sprintf(tmp_str,″error_ID=%s;″ ,names[i+1]);
else if( !strcmp(names[i],″sequenceNumber″ ) )sprintf(tmp_str,″sequence_number=%s;″ ,names[i+1]);
else if( !strcmp(names[i],″resourceClass″ ) )sprintf(tmp_str,″resource_class=%s;″ ,names[i+1]);
else if( !strcmp(names[i],″errorLabel″ ) )sprintf(tmp_str,″error_label=%s;″ ,names[i+1]);
strcat(s,tmp_str);}
}
void DoLLStart(){strcpy(theClassName,″PSSP_STARTD″ ) ;sprintf(s,″%s;source=PSSP;″ ,theClassName);if( theRVCountValue > 1 ){/* there should not be more than one value here */fprintf(stderr,″tec_adapter: wrong argument count for variable PSSP_LLStart\n″ ) ;
}else{sprintf(tmp_str,″value=%s;″ ,theRVArray[0]);
Appendix D. Source files for the PSSP T/EC Adapter 173

strcat(s,tmp_str);}
n = sscanf(theIVector, \″%[̂ =]=%[^;];%[^=]=%s″ , \names[0],names[1],names[2],names[3]);if (n != 4 ){fprintf(stderr,
″tecad_pssp: the parsing of the IVEC string failed for variable PSSP_LLStart″ ) ;exit(1);
}for(i = 0; i < 3; i++){if( !strcmp(names[i],″STARTD″) )sprintf(tmp_str,″STARTD=%s;″ ,names[i+1]);
else if( !strcmp(names[i],″NodeNum″ ) )sprintf(tmp_str,″node_number=%s;″ ,names[i+1]);
else continue;strcat(s,tmp_str);
}}
void DoLLSched(){strcpy(theClassName,″PSSP_SCHEDD″ ) ;sprintf(s,″%s;source=PSSP;″ ,theClassName);if( theRVCountValue > 1 ){/* there should not be more than one value here */fprintf(stderr,″tec_adapter: wrong argument count for variable PSSP_SCHEDD\n″ ) ;
}else{sprintf(tmp_str,″value=%s;″ ,theRVArray[0]);strcat(s,tmp_str);
}n = sscanf(theIVector, \
″%[̂ =]=%[^;];%[^=]=%s″ , \names[0],names[1],names[2],names[3]);
if (n != 4 ){fprintf(stderr,
″tecad_pssp: the parsing of the IVEC string failed for variable PSSP_SCHEDD″ ) ;exit(1);
}for(i = 0; i < 3; i++){if( !strcmp(names[i],″SCHEDD″) )sprintf(tmp_str,″SCHEDD=%s;″ ,names[i+1]);
else if( !strcmp(names[i],″NodeNum″ ) )sprintf(tmp_str,″node_number=%s;″ ,names[i+1]);
else continue;strcat(s,tmp_str);
}}
void ValidateSeverity(){if( strcmp(theSeverity,″FATAL″) &&
174 Integrating TME 10 on the RS/6000 SP
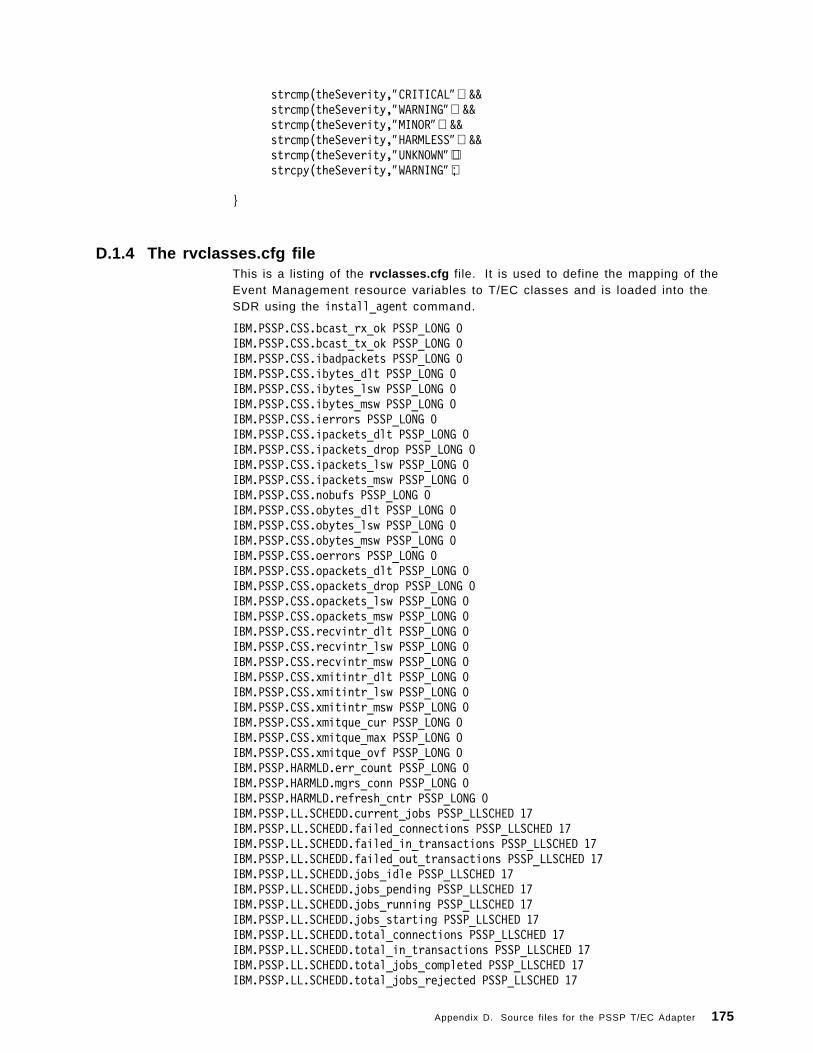
strcmp(theSeverity,″CRITICAL″) &&strcmp(theSeverity,″WARNING″) &&strcmp(theSeverity,″MINOR″) &&strcmp(theSeverity,″HARMLESS″) &&strcmp(theSeverity,″UNKNOWN″ ) )strcpy(theSeverity,″WARNING″ ) ;
}
D.1.4 The rvclasses.cfg fileThis is a listing of the rvclasses.cfg file. It is used to define the mapping of theEvent Management resource variables to T/EC classes and is loaded into theSDR using the install_agent command.
IBM.PSSP.CSS.bcast_rx_ok PSSP_LONG 0IBM.PSSP.CSS.bcast_tx_ok PSSP_LONG 0IBM.PSSP.CSS.ibadpackets PSSP_LONG 0IBM.PSSP.CSS.ibytes_dlt PSSP_LONG 0IBM.PSSP.CSS.ibytes_lsw PSSP_LONG 0IBM.PSSP.CSS.ibytes_msw PSSP_LONG 0IBM.PSSP.CSS.ierrors PSSP_LONG 0IBM.PSSP.CSS.ipackets_dlt PSSP_LONG 0IBM.PSSP.CSS.ipackets_drop PSSP_LONG 0IBM.PSSP.CSS.ipackets_lsw PSSP_LONG 0IBM.PSSP.CSS.ipackets_msw PSSP_LONG 0IBM.PSSP.CSS.nobufs PSSP_LONG 0IBM.PSSP.CSS.obytes_dlt PSSP_LONG 0IBM.PSSP.CSS.obytes_lsw PSSP_LONG 0IBM.PSSP.CSS.obytes_msw PSSP_LONG 0IBM.PSSP.CSS.oerrors PSSP_LONG 0IBM.PSSP.CSS.opackets_dlt PSSP_LONG 0IBM.PSSP.CSS.opackets_drop PSSP_LONG 0IBM.PSSP.CSS.opackets_lsw PSSP_LONG 0IBM.PSSP.CSS.opackets_msw PSSP_LONG 0IBM.PSSP.CSS.recvintr_dlt PSSP_LONG 0IBM.PSSP.CSS.recvintr_lsw PSSP_LONG 0IBM.PSSP.CSS.recvintr_msw PSSP_LONG 0IBM.PSSP.CSS.xmitintr_dlt PSSP_LONG 0IBM.PSSP.CSS.xmitintr_lsw PSSP_LONG 0IBM.PSSP.CSS.xmitintr_msw PSSP_LONG 0IBM.PSSP.CSS.xmitque_cur PSSP_LONG 0IBM.PSSP.CSS.xmitque_max PSSP_LONG 0IBM.PSSP.CSS.xmitque_ovf PSSP_LONG 0IBM.PSSP.HARMLD.err_count PSSP_LONG 0IBM.PSSP.HARMLD.mgrs_conn PSSP_LONG 0IBM.PSSP.HARMLD.refresh_cntr PSSP_LONG 0IBM.PSSP.LL.SCHEDD.current_jobs PSSP_LLSCHED 17IBM.PSSP.LL.SCHEDD.failed_connections PSSP_LLSCHED 17IBM.PSSP.LL.SCHEDD.failed_in_transactions PSSP_LLSCHED 17IBM.PSSP.LL.SCHEDD.failed_out_transactions PSSP_LLSCHED 17IBM.PSSP.LL.SCHEDD.jobs_idle PSSP_LLSCHED 17IBM.PSSP.LL.SCHEDD.jobs_pending PSSP_LLSCHED 17IBM.PSSP.LL.SCHEDD.jobs_running PSSP_LLSCHED 17IBM.PSSP.LL.SCHEDD.jobs_starting PSSP_LLSCHED 17IBM.PSSP.LL.SCHEDD.total_connections PSSP_LLSCHED 17IBM.PSSP.LL.SCHEDD.total_in_transactions PSSP_LLSCHED 17IBM.PSSP.LL.SCHEDD.total_jobs_completed PSSP_LLSCHED 17IBM.PSSP.LL.SCHEDD.total_jobs_rejected PSSP_LLSCHED 17
Appendix D. Source files for the PSSP T/EC Adapter 175
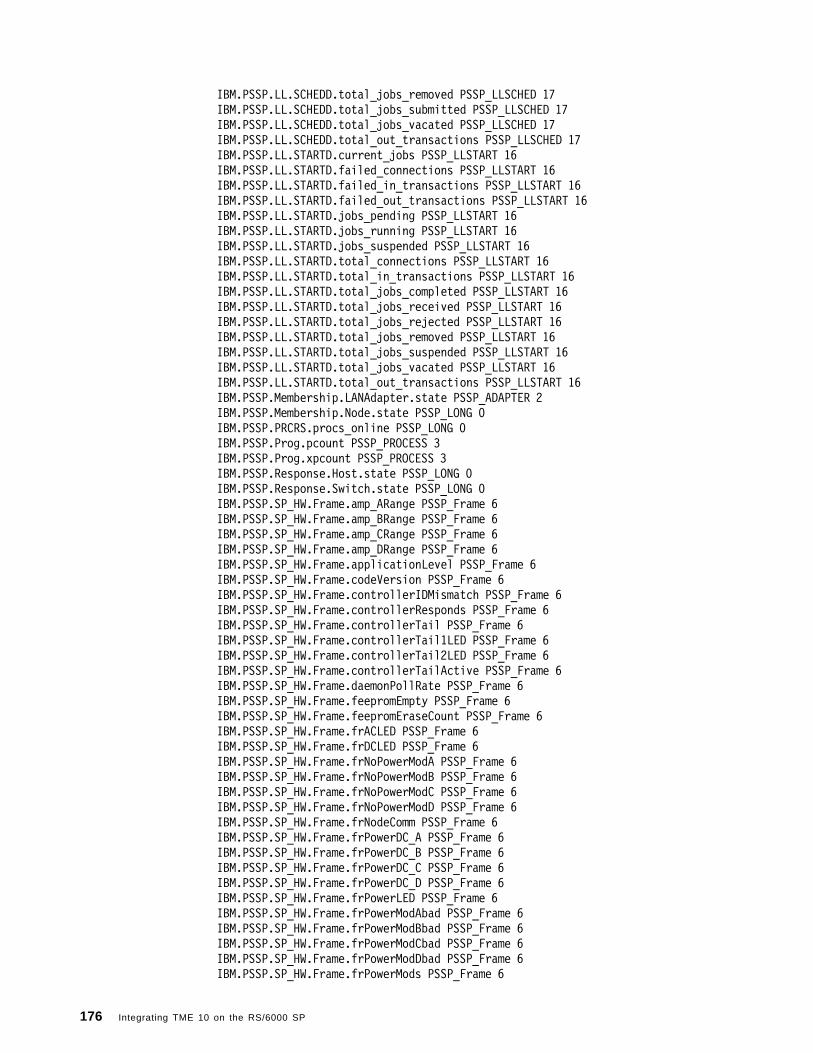
IBM.PSSP.LL.SCHEDD.total_jobs_removed PSSP_LLSCHED 17IBM.PSSP.LL.SCHEDD.total_jobs_submitted PSSP_LLSCHED 17IBM.PSSP.LL.SCHEDD.total_jobs_vacated PSSP_LLSCHED 17IBM.PSSP.LL.SCHEDD.total_out_transactions PSSP_LLSCHED 17IBM.PSSP.LL.STARTD.current_jobs PSSP_LLSTART 16IBM.PSSP.LL.STARTD.failed_connections PSSP_LLSTART 16IBM.PSSP.LL.STARTD.failed_in_transactions PSSP_LLSTART 16IBM.PSSP.LL.STARTD.failed_out_transactions PSSP_LLSTART 16IBM.PSSP.LL.STARTD.jobs_pending PSSP_LLSTART 16IBM.PSSP.LL.STARTD.jobs_running PSSP_LLSTART 16IBM.PSSP.LL.STARTD.jobs_suspended PSSP_LLSTART 16IBM.PSSP.LL.STARTD.total_connections PSSP_LLSTART 16IBM.PSSP.LL.STARTD.total_in_transactions PSSP_LLSTART 16IBM.PSSP.LL.STARTD.total_jobs_completed PSSP_LLSTART 16IBM.PSSP.LL.STARTD.total_jobs_received PSSP_LLSTART 16IBM.PSSP.LL.STARTD.total_jobs_rejected PSSP_LLSTART 16IBM.PSSP.LL.STARTD.total_jobs_removed PSSP_LLSTART 16IBM.PSSP.LL.STARTD.total_jobs_suspended PSSP_LLSTART 16IBM.PSSP.LL.STARTD.total_jobs_vacated PSSP_LLSTART 16IBM.PSSP.LL.STARTD.total_out_transactions PSSP_LLSTART 16IBM.PSSP.Membership.LANAdapter.state PSSP_ADAPTER 2IBM.PSSP.Membership.Node.state PSSP_LONG 0IBM.PSSP.PRCRS.procs_online PSSP_LONG 0IBM.PSSP.Prog.pcount PSSP_PROCESS 3IBM.PSSP.Prog.xpcount PSSP_PROCESS 3IBM.PSSP.Response.Host.state PSSP_LONG 0IBM.PSSP.Response.Switch.state PSSP_LONG 0IBM.PSSP.SP_HW.Frame.amp_ARange PSSP_Frame 6IBM.PSSP.SP_HW.Frame.amp_BRange PSSP_Frame 6IBM.PSSP.SP_HW.Frame.amp_CRange PSSP_Frame 6IBM.PSSP.SP_HW.Frame.amp_DRange PSSP_Frame 6IBM.PSSP.SP_HW.Frame.applicationLevel PSSP_Frame 6IBM.PSSP.SP_HW.Frame.codeVersion PSSP_Frame 6IBM.PSSP.SP_HW.Frame.controllerIDMismatch PSSP_Frame 6IBM.PSSP.SP_HW.Frame.controllerResponds PSSP_Frame 6IBM.PSSP.SP_HW.Frame.controllerTail PSSP_Frame 6IBM.PSSP.SP_HW.Frame.controllerTail1LED PSSP_Frame 6IBM.PSSP.SP_HW.Frame.controllerTail2LED PSSP_Frame 6IBM.PSSP.SP_HW.Frame.controllerTailActive PSSP_Frame 6IBM.PSSP.SP_HW.Frame.daemonPollRate PSSP_Frame 6IBM.PSSP.SP_HW.Frame.feepromEmpty PSSP_Frame 6IBM.PSSP.SP_HW.Frame.feepromEraseCount PSSP_Frame 6IBM.PSSP.SP_HW.Frame.frACLED PSSP_Frame 6IBM.PSSP.SP_HW.Frame.frDCLED PSSP_Frame 6IBM.PSSP.SP_HW.Frame.frNoPowerModA PSSP_Frame 6IBM.PSSP.SP_HW.Frame.frNoPowerModB PSSP_Frame 6IBM.PSSP.SP_HW.Frame.frNoPowerModC PSSP_Frame 6IBM.PSSP.SP_HW.Frame.frNoPowerModD PSSP_Frame 6IBM.PSSP.SP_HW.Frame.frNodeComm PSSP_Frame 6IBM.PSSP.SP_HW.Frame.frPowerDC_A PSSP_Frame 6IBM.PSSP.SP_HW.Frame.frPowerDC_B PSSP_Frame 6IBM.PSSP.SP_HW.Frame.frPowerDC_C PSSP_Frame 6IBM.PSSP.SP_HW.Frame.frPowerDC_D PSSP_Frame 6IBM.PSSP.SP_HW.Frame.frPowerLED PSSP_Frame 6IBM.PSSP.SP_HW.Frame.frPowerModAbad PSSP_Frame 6IBM.PSSP.SP_HW.Frame.frPowerModBbad PSSP_Frame 6IBM.PSSP.SP_HW.Frame.frPowerModCbad PSSP_Frame 6IBM.PSSP.SP_HW.Frame.frPowerModDbad PSSP_Frame 6IBM.PSSP.SP_HW.Frame.frPowerMods PSSP_Frame 6
176 Integrating TME 10 on the RS/6000 SP
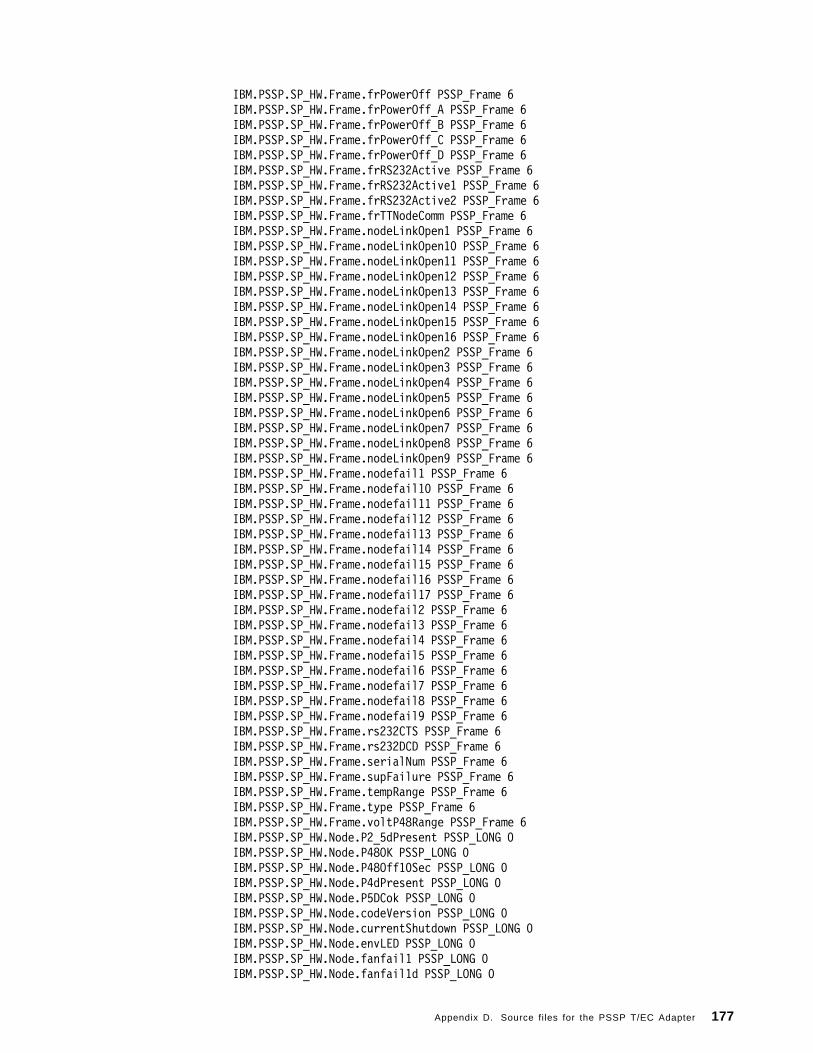
IBM.PSSP.SP_HW.Frame.frPowerOff PSSP_Frame 6IBM.PSSP.SP_HW.Frame.frPowerOff_A PSSP_Frame 6IBM.PSSP.SP_HW.Frame.frPowerOff_B PSSP_Frame 6IBM.PSSP.SP_HW.Frame.frPowerOff_C PSSP_Frame 6IBM.PSSP.SP_HW.Frame.frPowerOff_D PSSP_Frame 6IBM.PSSP.SP_HW.Frame.frRS232Active PSSP_Frame 6IBM.PSSP.SP_HW.Frame.frRS232Active1 PSSP_Frame 6IBM.PSSP.SP_HW.Frame.frRS232Active2 PSSP_Frame 6IBM.PSSP.SP_HW.Frame.frTTNodeComm PSSP_Frame 6IBM.PSSP.SP_HW.Frame.nodeLinkOpen1 PSSP_Frame 6IBM.PSSP.SP_HW.Frame.nodeLinkOpen10 PSSP_Frame 6IBM.PSSP.SP_HW.Frame.nodeLinkOpen11 PSSP_Frame 6IBM.PSSP.SP_HW.Frame.nodeLinkOpen12 PSSP_Frame 6IBM.PSSP.SP_HW.Frame.nodeLinkOpen13 PSSP_Frame 6IBM.PSSP.SP_HW.Frame.nodeLinkOpen14 PSSP_Frame 6IBM.PSSP.SP_HW.Frame.nodeLinkOpen15 PSSP_Frame 6IBM.PSSP.SP_HW.Frame.nodeLinkOpen16 PSSP_Frame 6IBM.PSSP.SP_HW.Frame.nodeLinkOpen2 PSSP_Frame 6IBM.PSSP.SP_HW.Frame.nodeLinkOpen3 PSSP_Frame 6IBM.PSSP.SP_HW.Frame.nodeLinkOpen4 PSSP_Frame 6IBM.PSSP.SP_HW.Frame.nodeLinkOpen5 PSSP_Frame 6IBM.PSSP.SP_HW.Frame.nodeLinkOpen6 PSSP_Frame 6IBM.PSSP.SP_HW.Frame.nodeLinkOpen7 PSSP_Frame 6IBM.PSSP.SP_HW.Frame.nodeLinkOpen8 PSSP_Frame 6IBM.PSSP.SP_HW.Frame.nodeLinkOpen9 PSSP_Frame 6IBM.PSSP.SP_HW.Frame.nodefail1 PSSP_Frame 6IBM.PSSP.SP_HW.Frame.nodefail10 PSSP_Frame 6IBM.PSSP.SP_HW.Frame.nodefail11 PSSP_Frame 6IBM.PSSP.SP_HW.Frame.nodefail12 PSSP_Frame 6IBM.PSSP.SP_HW.Frame.nodefail13 PSSP_Frame 6IBM.PSSP.SP_HW.Frame.nodefail14 PSSP_Frame 6IBM.PSSP.SP_HW.Frame.nodefail15 PSSP_Frame 6IBM.PSSP.SP_HW.Frame.nodefail16 PSSP_Frame 6IBM.PSSP.SP_HW.Frame.nodefail17 PSSP_Frame 6IBM.PSSP.SP_HW.Frame.nodefail2 PSSP_Frame 6IBM.PSSP.SP_HW.Frame.nodefail3 PSSP_Frame 6IBM.PSSP.SP_HW.Frame.nodefail4 PSSP_Frame 6IBM.PSSP.SP_HW.Frame.nodefail5 PSSP_Frame 6IBM.PSSP.SP_HW.Frame.nodefail6 PSSP_Frame 6IBM.PSSP.SP_HW.Frame.nodefail7 PSSP_Frame 6IBM.PSSP.SP_HW.Frame.nodefail8 PSSP_Frame 6IBM.PSSP.SP_HW.Frame.nodefail9 PSSP_Frame 6IBM.PSSP.SP_HW.Frame.rs232CTS PSSP_Frame 6IBM.PSSP.SP_HW.Frame.rs232DCD PSSP_Frame 6IBM.PSSP.SP_HW.Frame.serialNum PSSP_Frame 6IBM.PSSP.SP_HW.Frame.supFailure PSSP_Frame 6IBM.PSSP.SP_HW.Frame.tempRange PSSP_Frame 6IBM.PSSP.SP_HW.Frame.type PSSP_Frame 6IBM.PSSP.SP_HW.Frame.voltP48Range PSSP_Frame 6IBM.PSSP.SP_HW.Node.P2_5dPresent PSSP_LONG 0IBM.PSSP.SP_HW.Node.P48OK PSSP_LONG 0IBM.PSSP.SP_HW.Node.P48Off10Sec PSSP_LONG 0IBM.PSSP.SP_HW.Node.P4dPresent PSSP_LONG 0IBM.PSSP.SP_HW.Node.P5DCok PSSP_LONG 0IBM.PSSP.SP_HW.Node.codeVersion PSSP_LONG 0IBM.PSSP.SP_HW.Node.currentShutdown PSSP_LONG 0IBM.PSSP.SP_HW.Node.envLED PSSP_LONG 0IBM.PSSP.SP_HW.Node.fanfail1 PSSP_LONG 0IBM.PSSP.SP_HW.Node.fanfail1d PSSP_LONG 0
Appendix D. Source files for the PSSP T/EC Adapter 177
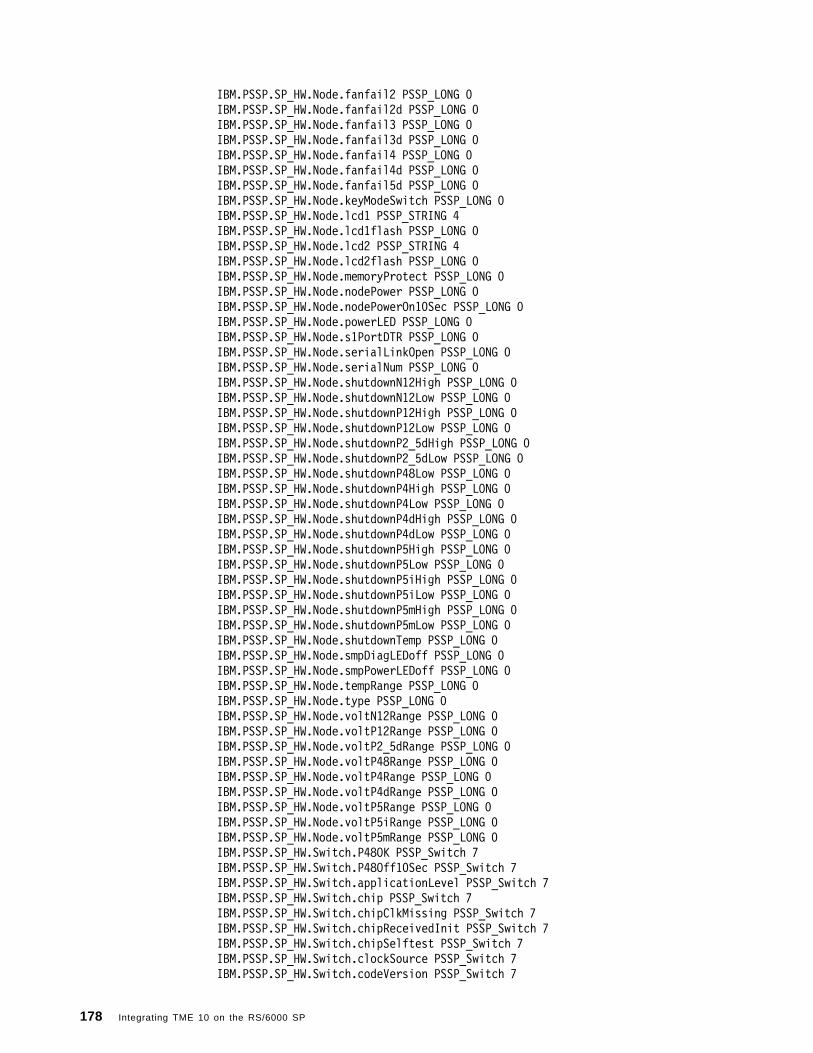
IBM.PSSP.SP_HW.Node.fanfail2 PSSP_LONG 0IBM.PSSP.SP_HW.Node.fanfail2d PSSP_LONG 0IBM.PSSP.SP_HW.Node.fanfail3 PSSP_LONG 0IBM.PSSP.SP_HW.Node.fanfail3d PSSP_LONG 0IBM.PSSP.SP_HW.Node.fanfail4 PSSP_LONG 0IBM.PSSP.SP_HW.Node.fanfail4d PSSP_LONG 0IBM.PSSP.SP_HW.Node.fanfail5d PSSP_LONG 0IBM.PSSP.SP_HW.Node.keyModeSwitch PSSP_LONG 0IBM.PSSP.SP_HW.Node.lcd1 PSSP_STRING 4IBM.PSSP.SP_HW.Node.lcd1flash PSSP_LONG 0IBM.PSSP.SP_HW.Node.lcd2 PSSP_STRING 4IBM.PSSP.SP_HW.Node.lcd2flash PSSP_LONG 0IBM.PSSP.SP_HW.Node.memoryProtect PSSP_LONG 0IBM.PSSP.SP_HW.Node.nodePower PSSP_LONG 0IBM.PSSP.SP_HW.Node.nodePowerOn10Sec PSSP_LONG 0IBM.PSSP.SP_HW.Node.powerLED PSSP_LONG 0IBM.PSSP.SP_HW.Node.s1PortDTR PSSP_LONG 0IBM.PSSP.SP_HW.Node.serialLinkOpen PSSP_LONG 0IBM.PSSP.SP_HW.Node.serialNum PSSP_LONG 0IBM.PSSP.SP_HW.Node.shutdownN12High PSSP_LONG 0IBM.PSSP.SP_HW.Node.shutdownN12Low PSSP_LONG 0IBM.PSSP.SP_HW.Node.shutdownP12High PSSP_LONG 0IBM.PSSP.SP_HW.Node.shutdownP12Low PSSP_LONG 0IBM.PSSP.SP_HW.Node.shutdownP2_5dHigh PSSP_LONG 0IBM.PSSP.SP_HW.Node.shutdownP2_5dLow PSSP_LONG 0IBM.PSSP.SP_HW.Node.shutdownP48Low PSSP_LONG 0IBM.PSSP.SP_HW.Node.shutdownP4High PSSP_LONG 0IBM.PSSP.SP_HW.Node.shutdownP4Low PSSP_LONG 0IBM.PSSP.SP_HW.Node.shutdownP4dHigh PSSP_LONG 0IBM.PSSP.SP_HW.Node.shutdownP4dLow PSSP_LONG 0IBM.PSSP.SP_HW.Node.shutdownP5High PSSP_LONG 0IBM.PSSP.SP_HW.Node.shutdownP5Low PSSP_LONG 0IBM.PSSP.SP_HW.Node.shutdownP5iHigh PSSP_LONG 0IBM.PSSP.SP_HW.Node.shutdownP5iLow PSSP_LONG 0IBM.PSSP.SP_HW.Node.shutdownP5mHigh PSSP_LONG 0IBM.PSSP.SP_HW.Node.shutdownP5mLow PSSP_LONG 0IBM.PSSP.SP_HW.Node.shutdownTemp PSSP_LONG 0IBM.PSSP.SP_HW.Node.smpDiagLEDoff PSSP_LONG 0IBM.PSSP.SP_HW.Node.smpPowerLEDoff PSSP_LONG 0IBM.PSSP.SP_HW.Node.tempRange PSSP_LONG 0IBM.PSSP.SP_HW.Node.type PSSP_LONG 0IBM.PSSP.SP_HW.Node.voltN12Range PSSP_LONG 0IBM.PSSP.SP_HW.Node.voltP12Range PSSP_LONG 0IBM.PSSP.SP_HW.Node.voltP2_5dRange PSSP_LONG 0IBM.PSSP.SP_HW.Node.voltP48Range PSSP_LONG 0IBM.PSSP.SP_HW.Node.voltP4Range PSSP_LONG 0IBM.PSSP.SP_HW.Node.voltP4dRange PSSP_LONG 0IBM.PSSP.SP_HW.Node.voltP5Range PSSP_LONG 0IBM.PSSP.SP_HW.Node.voltP5iRange PSSP_LONG 0IBM.PSSP.SP_HW.Node.voltP5mRange PSSP_LONG 0IBM.PSSP.SP_HW.Switch.P48OK PSSP_Switch 7IBM.PSSP.SP_HW.Switch.P48Off10Sec PSSP_Switch 7IBM.PSSP.SP_HW.Switch.applicationLevel PSSP_Switch 7IBM.PSSP.SP_HW.Switch.chip PSSP_Switch 7IBM.PSSP.SP_HW.Switch.chipClkMissing PSSP_Switch 7IBM.PSSP.SP_HW.Switch.chipReceivedInit PSSP_Switch 7IBM.PSSP.SP_HW.Switch.chipSelftest PSSP_Switch 7IBM.PSSP.SP_HW.Switch.clockSource PSSP_Switch 7IBM.PSSP.SP_HW.Switch.codeVersion PSSP_Switch 7
178 Integrating TME 10 on the RS/6000 SP
IBM.PSSP.SP_HW.Switch.envLED PSSP_Switch 7IBM.PSSP.SP_HW.Switch.epromErase PSSP_Switch 7IBM.PSSP.SP_HW.Switch.epromProgram PSSP_Switch 7IBM.PSSP.SP_HW.Switch.fanfail1 PSSP_Switch 7IBM.PSSP.SP_HW.Switch.fanfail2 PSSP_Switch 7IBM.PSSP.SP_HW.Switch.fanfail3 PSSP_Switch 7IBM.PSSP.SP_HW.Switch.fanfail4 PSSP_Switch 7IBM.PSSP.SP_HW.Switch.fanfail5 PSSP_Switch 7IBM.PSSP.SP_HW.Switch.feepromEmpty PSSP_Switch 7IBM.PSSP.SP_HW.Switch.feepromEraseCount PSSP_Switch 7IBM.PSSP.SP_HW.Switch.mux PSSP_Switch 7IBM.PSSP.SP_HW.Switch.nodePower PSSP_Switch 7IBM.PSSP.SP_HW.Switch.nodePowerOn10Sec PSSP_Switch 7IBM.PSSP.SP_HW.Switch.osc PSSP_Switch 7IBM.PSSP.SP_HW.Switch.pll PSSP_Switch 7IBM.PSSP.SP_HW.Switch.port PSSP_Switch 7IBM.PSSP.SP_HW.Switch.portClkMissing PSSP_Switch 7IBM.PSSP.SP_HW.Switch.powerLED PSSP_Switch 7IBM.PSSP.SP_HW.Switch.powerOnReset PSSP_Switch 7IBM.PSSP.SP_HW.Switch.powerS1 PSSP_Switch 7IBM.PSSP.SP_HW.Switch.powerS2 PSSP_Switch 7IBM.PSSP.SP_HW.Switch.ps1Fail PSSP_Switch 7IBM.PSSP.SP_HW.Switch.ps1FuseGoodRange PSSP_Switch 7IBM.PSSP.SP_HW.Switch.ps1PowerGoodRange PSSP_Switch 7IBM.PSSP.SP_HW.Switch.ps2Fail PSSP_Switch 7IBM.PSSP.SP_HW.Switch.ps2FuseGoodRange PSSP_Switch 7IBM.PSSP.SP_HW.Switch.ps2PowerGoodRange PSSP_Switch 7IBM.PSSP.SP_HW.Switch.psParallelFail PSSP_Switch 7IBM.PSSP.SP_HW.Switch.psParallelRange PSSP_Switch 7IBM.PSSP.SP_HW.Switch.recPortNotTuned PSSP_Switch 7IBM.PSSP.SP_HW.Switch.sendPortNotTuned PSSP_Switch 7IBM.PSSP.SP_HW.Switch.serialNum PSSP_Switch 7IBM.PSSP.SP_HW.Switch.shutdownN5High PSSP_Switch 7IBM.PSSP.SP_HW.Switch.shutdownN5Low PSSP_Switch 7IBM.PSSP.SP_HW.Switch.shutdownOC PSSP_Switch 7IBM.PSSP.SP_HW.Switch.shutdownP12High PSSP_Switch 7IBM.PSSP.SP_HW.Switch.shutdownP12Low PSSP_Switch 7IBM.PSSP.SP_HW.Switch.shutdownP3_3High PSSP_Switch 7IBM.PSSP.SP_HW.Switch.shutdownP3_3Low PSSP_Switch 7IBM.PSSP.SP_HW.Switch.shutdownP48Low PSSP_Switch 7IBM.PSSP.SP_HW.Switch.shutdownP5High PSSP_Switch 7IBM.PSSP.SP_HW.Switch.shutdownP5Low PSSP_Switch 7IBM.PSSP.SP_HW.Switch.shutdownTemp PSSP_Switch 7IBM.PSSP.SP_HW.Switch.subtype PSSP_Switch 7IBM.PSSP.SP_HW.Switch.supFailure PSSP_Switch 7IBM.PSSP.SP_HW.Switch.synchReset PSSP_Switch 7IBM.PSSP.SP_HW.Switch.tempRange PSSP_Switch 7IBM.PSSP.SP_HW.Switch.type PSSP_Switch 7IBM.PSSP.SP_HW.Switch.voltN5Range PSSP_Switch 7IBM.PSSP.SP_HW.Switch.voltP12Range PSSP_Switch 7IBM.PSSP.SP_HW.Switch.voltP3_3Range PSSP_Switch 7IBM.PSSP.SP_HW.Switch.voltP48Range PSSP_Switch 7IBM.PSSP.SP_HW.Switch.voltP5Range PSSP_Switch 7IBM.PSSP.VSD.bytes_read PSSP_VSD 8IBM.PSSP.VSD.bytes_write PSSP_VSD 8IBM.PSSP.VSD.cache_hits PSSP_VSD 8IBM.PSSP.VSD.client_req_read PSSP_VSD 8IBM.PSSP.VSD.client_req_write PSSP_VSD 8IBM.PSSP.VSD.local_req_read PSSP_VSD 8
Appendix D. Source files for the PSSP T/EC Adapter 179
IBM.PSSP.VSD.local_req_write PSSP_VSD 8IBM.PSSP.VSD.physical_req_read PSSP_VSD 8IBM.PSSP.VSD.physical_req_write PSSP_VSD 8IBM.PSSP.VSD.remote_req_read PSSP_VSD 8IBM.PSSP.VSD.remote_req_write PSSP_VSD 8IBM.PSSP.VSD.server PSSP_VSD 8IBM.PSSP.VSD.state PSSP_VSD 8IBM.PSSP.VSDdrv.1_retry_count PSSP_LONG 0IBM.PSSP.VSDdrv.2_retry_count PSSP_LONG 0IBM.PSSP.VSDdrv.3_retry_count PSSP_LONG 0IBM.PSSP.VSDdrv.4_retry_count PSSP_LONG 0IBM.PSSP.VSDdrv.5_retry_count PSSP_LONG 0IBM.PSSP.VSDdrv.6_retry_count PSSP_LONG 0IBM.PSSP.VSDdrv.7_retry_count PSSP_LONG 0IBM.PSSP.VSDdrv.8_retry_count PSSP_LONG 0IBM.PSSP.VSDdrv.9_retry_count PSSP_LONG 0IBM.PSSP.VSDdrv.avg_buddy_wait PSSP_REAL 1IBM.PSSP.VSDdrv.buddy_buffer_shortage PSSP_LONG 0IBM.PSSP.VSDdrv.cache_shortage PSSP_LONG 0IBM.PSSP.VSDdrv.comm_buf_shortage PSSP_LONG 0IBM.PSSP.VSDdrv.indirect_io PSSP_LONG 0IBM.PSSP.VSDdrv.pbuf_shortage PSSP_LONG 0IBM.PSSP.VSDdrv.rejected_no_buddy_buffer PSSP_LONG 0IBM.PSSP.VSDdrv.rejected_requests PSSP_LONG 0IBM.PSSP.VSDdrv.rejected_responds PSSP_LONG 0IBM.PSSP.VSDdrv.request_block_shortage PSSP_LONG 0IBM.PSSP.VSDdrv.request_rework PSSP_LONG 0IBM.PSSP.VSDdrv.timeout_error PSSP_LONG 0IBM.PSSP.aixos.CPU.glidle PSSP_REAL 1IBM.PSSP.aixos.CPU.glkern PSSP_REAL 1IBM.PSSP.aixos.CPU.gluser PSSP_REAL 1IBM.PSSP.aixos.CPU.glwait PSSP_REAL 1IBM.PSSP.aixos.Disk.busy PSSP_Disk 9IBM.PSSP.aixos.Disk.rblk PSSP_Disk 9IBM.PSSP.aixos.Disk.wblk PSSP_Disk 9IBM.PSSP.aixos.Disk.xfer PSSP_Disk 9IBM.PSSP.aixos.FS.%nodesused PSSP_FS 10IBM.PSSP.aixos.FS.%totused PSSP_FS 10IBM.PSSP.aixos.LAN.rcverrors PSSP_Network 5IBM.PSSP.aixos.LAN.recvdrops PSSP_Network 5IBM.PSSP.aixos.LAN.xmitdrops PSSP_Network 5IBM.PSSP.aixos.LAN.xmiterrors PSSP_Network 5IBM.PSSP.aixos.LAN.xmitovfl PSSP_Network 5IBM.PSSP.aixos.Mem.Kmem.calls PSSP_Kmem 11IBM.PSSP.aixos.Mem.Kmem.failures PSSP_Kmem 11IBM.PSSP.aixos.Mem.Kmem.inuse PSSP_Kmem 11IBM.PSSP.aixos.Mem.Kmem.memuse PSSP_Kmem 11IBM.PSSP.aixos.Mem.Real.%free PSSP_LONG 0IBM.PSSP.aixos.Mem.Real.%pinned PSSP_LONG 0IBM.PSSP.aixos.Mem.Real.numfrb PSSP_LONG 0IBM.PSSP.aixos.Mem.Real.size PSSP_LONG 0IBM.PSSP.aixos.Mem.Virt.pagein PSSP_LONG 0IBM.PSSP.aixos.Mem.Virt.pageout PSSP_LONG 0IBM.PSSP.aixos.Mem.Virt.pagexct PSSP_LONG 0IBM.PSSP.aixos.Mem.Virt.pgspgin PSSP_LONG 0IBM.PSSP.aixos.Mem.Virt.pgspgout PSSP_LONG 0IBM.PSSP.aixos.PagSp.%totalfree PSSP_REAL 1IBM.PSSP.aixos.PagSp.%totalused PSSP_REAL 1IBM.PSSP.aixos.PagSp.totalfree PSSP_LONG 0
180 Integrating TME 10 on the RS/6000 SP

IBM.PSSP.aixos.PagSp.totalsize PSSP_LONG 0IBM.PSSP.aixos.Proc.runque PSSP_REAL 1IBM.PSSP.aixos.Proc.swpque PSSP_REAL 1IBM.PSSP.aixos.VG.free PSSP_VG 12IBM.PSSP.aixos.cpu.idle PSSP_REAL 1IBM.PSSP.aixos.cpu.kern PSSP_REAL 1IBM.PSSP.aixos.cpu.user PSSP_REAL 1IBM.PSSP.aixos.cpu.wait PSSP_REAL 1IBM.PSSP.aixos.pagsp.%free PSSP_PageSpace 14IBM.PSSP.aixos.pagsp.size PSSP_PageSpace 14IBM.PSSP.pm.Errlog PSSP_Errlog 15IBM.PSSP.pm.User_state1 PSSP_STRING 4IBM.PSSP.pm.User_state10 PSSP_STRING 4IBM.PSSP.pm.User_state11 PSSP_STRING 4IBM.PSSP.pm.User_state12 PSSP_STRING 4IBM.PSSP.pm.User_state13 PSSP_STRING 4IBM.PSSP.pm.User_state14 PSSP_STRING 4IBM.PSSP.pm.User_state15 PSSP_STRING 4IBM.PSSP.pm.User_state16 PSSP_STRING 4IBM.PSSP.pm.User_state2 PSSP_STRING 4IBM.PSSP.pm.User_state3 PSSP_STRING 4IBM.PSSP.pm.User_state4 PSSP_STRING 4IBM.PSSP.pm.User_state5 PSSP_STRING 4IBM.PSSP.pm.User_state6 PSSP_STRING 4IBM.PSSP.pm.User_state7 PSSP_STRING 4IBM.PSSP.pm.User_state8 PSSP_STRING 4IBM.PSSP.pm.User_state9 PSSP_STRING 4
Appendix D. Source files for the PSSP T/EC Adapter 181

182 Integrating TME 10 on the RS/6000 SP

Appendix E. Contents of SNMP Adapter Class Definition Statements
This appendix contains a listing of the Class Definition Statement file used in theexample described in 4.3, “Using the TME 10 T/EC SNMP Adapter” on page 45.
############################ SP Traps#### The following classes are defined to recognize SNMP traps## with the trapid (ibmSPEMEventID or SNMP specific trap)## set as follows:## trapid=1 SP_SNMP_FATAL_TRAP## trapid=2 SP_SNMP_CRITICAL_TRAP## trapid=3 SP_SNMP_MINOR_TRAP## trapid=4 SP_SNMP_WARNING_TRAP## trapid=5 SP_SNMP_HARMLESS_TRAP## trapid=?? SP_SNMP_UNKNOWN_TRAP## All ibmSPEM* values in the MIB are set and passed to TEC## The corresponding baroc file contains the same classes and## variables.#### To add your own specific definitions, copy one of the existing## classes and place it BEFORE the SP_SNMP_UNKNOWN_TRAP class.## Change the $SPECIFIC selection test to contain the value of## your unique trapid as set in the PSSP event. Make the required## changes to the baroc file that is loaded into TEC.##########################CLASS SP_SNMP_FATAL_TRAPSELECT1: ATTR(=,$ENTERPRISE), VALUE(PREFIX, ″1.3.6.1.4.1.2.6.117″) ;2: $SPECIFIC = 1;3: ATTR(=, ″ibmSPEMEventID″ ) ;4: ATTR(=, ″ibmSPEMEventFlags″ ) ;5: ATTR(=, ″ibmSPEMEventTime″ ) ;6: ATTR(=, ″ibmSPEMEventLocation″ ) ;7: ATTR(=, ″ibmSPEMEventPartitionAddress″ ) ;8: ATTR(=, ″ibmSPEMEventVarsTableName″ ) ;9: ATTR(=, ″ibmSPEMEventVarsTableInstanceID″ ) ;10: ATTR(=, ″ibmSPEMEventVarName″ ) ;11: ATTR(=, ″ibmSPEMEventVarValueInstanceVector″ ) ;12: ATTR(=, ″ibmSPEMEventVarValuesTableInstanceID″ ) ;13: ATTR(=, ″ibmSPEMEventVarValue″ ) ;14: ATTR(=, ″ibmSPEMEventPredicate″ ) ;FETCH1: IPNAME($SOURCE_ADDR) ;
MAPhostname = $F1 ;enterprise = $ENTERPRISE ;pssp_EMEventID = $V3 ;pssp_EMEventFlags = $V4 ;pssp_EMEventTime = $V5 ;pssp_EMEventLocation = $V6 ;pssp_EMEventPartitionAddress = $V7 ;pssp_EMEventVarsTableName = $V8 ;pssp_EMEventVarsTableInstanceID = $V9 ;pssp_EMEventVarName = $V10 ;pssp_EMEventVarValueInstanceVector = $V11 ;pssp_EMEventVarValuesTableInstanceID = $V12 ;
Copyright IBM Corp. 1997 183
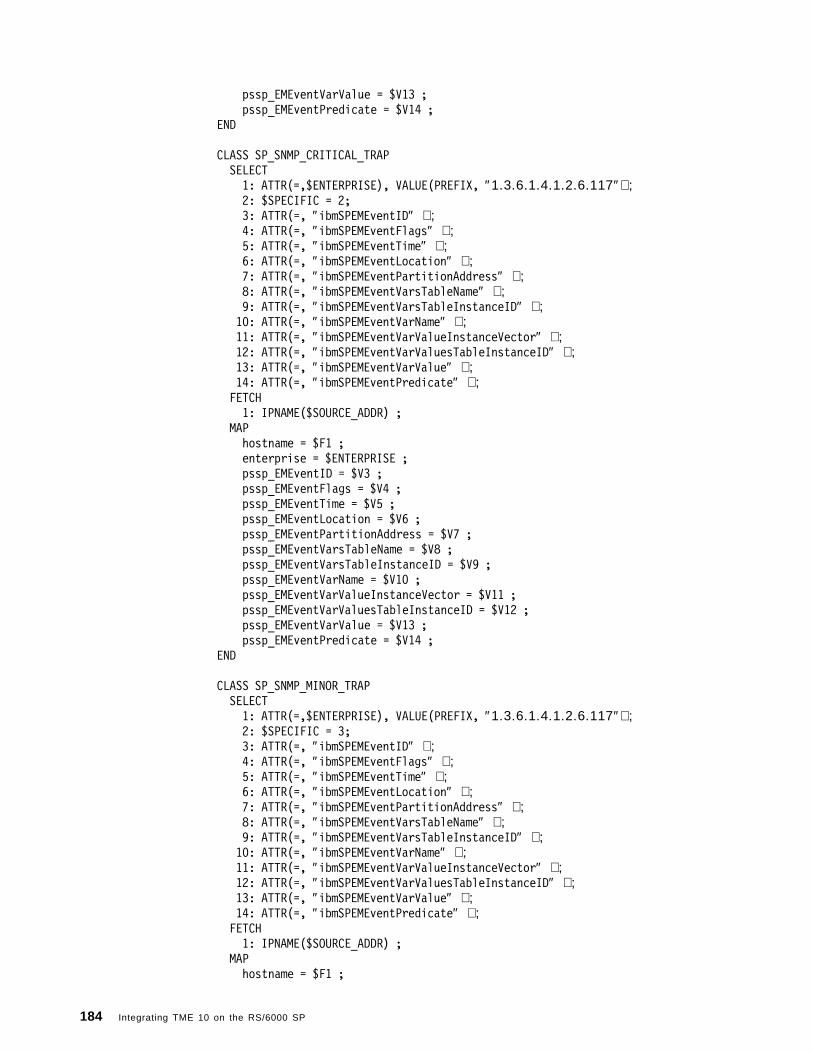
pssp_EMEventVarValue = $V13 ;pssp_EMEventPredicate = $V14 ;
END
CLASS SP_SNMP_CRITICAL_TRAPSELECT1: ATTR(=,$ENTERPRISE), VALUE(PREFIX, ″1.3.6.1.4.1.2.6.117″) ;2: $SPECIFIC = 2;3: ATTR(=, ″ibmSPEMEventID″ ) ;4: ATTR(=, ″ibmSPEMEventFlags″ ) ;5: ATTR(=, ″ibmSPEMEventTime″ ) ;6: ATTR(=, ″ibmSPEMEventLocation″ ) ;7: ATTR(=, ″ibmSPEMEventPartitionAddress″ ) ;8: ATTR(=, ″ibmSPEMEventVarsTableName″ ) ;9: ATTR(=, ″ibmSPEMEventVarsTableInstanceID″ ) ;10: ATTR(=, ″ibmSPEMEventVarName″ ) ;11: ATTR(=, ″ibmSPEMEventVarValueInstanceVector″ ) ;12: ATTR(=, ″ibmSPEMEventVarValuesTableInstanceID″ ) ;13: ATTR(=, ″ibmSPEMEventVarValue″ ) ;14: ATTR(=, ″ibmSPEMEventPredicate″ ) ;FETCH1: IPNAME($SOURCE_ADDR) ;
MAPhostname = $F1 ;enterprise = $ENTERPRISE ;pssp_EMEventID = $V3 ;pssp_EMEventFlags = $V4 ;pssp_EMEventTime = $V5 ;pssp_EMEventLocation = $V6 ;pssp_EMEventPartitionAddress = $V7 ;pssp_EMEventVarsTableName = $V8 ;pssp_EMEventVarsTableInstanceID = $V9 ;pssp_EMEventVarName = $V10 ;pssp_EMEventVarValueInstanceVector = $V11 ;pssp_EMEventVarValuesTableInstanceID = $V12 ;pssp_EMEventVarValue = $V13 ;pssp_EMEventPredicate = $V14 ;
END
CLASS SP_SNMP_MINOR_TRAPSELECT1: ATTR(=,$ENTERPRISE), VALUE(PREFIX, ″1.3.6.1.4.1.2.6.117″) ;2: $SPECIFIC = 3;3: ATTR(=, ″ibmSPEMEventID″ ) ;4: ATTR(=, ″ibmSPEMEventFlags″ ) ;5: ATTR(=, ″ibmSPEMEventTime″ ) ;6: ATTR(=, ″ibmSPEMEventLocation″ ) ;7: ATTR(=, ″ibmSPEMEventPartitionAddress″ ) ;8: ATTR(=, ″ibmSPEMEventVarsTableName″ ) ;9: ATTR(=, ″ibmSPEMEventVarsTableInstanceID″ ) ;10: ATTR(=, ″ibmSPEMEventVarName″ ) ;11: ATTR(=, ″ibmSPEMEventVarValueInstanceVector″ ) ;12: ATTR(=, ″ibmSPEMEventVarValuesTableInstanceID″ ) ;13: ATTR(=, ″ibmSPEMEventVarValue″ ) ;14: ATTR(=, ″ibmSPEMEventPredicate″ ) ;FETCH1: IPNAME($SOURCE_ADDR) ;
MAPhostname = $F1 ;
184 Integrating TME 10 on the RS/6000 SP

enterprise = $ENTERPRISE ;pssp_EMEventID = $V3 ;pssp_EMEventFlags = $V4 ;pssp_EMEventTime = $V5 ;pssp_EMEventLocation = $V6 ;pssp_EMEventPartitionAddress = $V7 ;pssp_EMEventVarsTableName = $V8 ;pssp_EMEventVarsTableInstanceID = $V9 ;pssp_EMEventVarName = $V10 ;pssp_EMEventVarValueInstanceVector = $V11 ;pssp_EMEventVarValuesTableInstanceID = $V12 ;pssp_EMEventVarValue = $V13 ;pssp_EMEventPredicate = $V14 ;
END
CLASS SP_SNMP_WARNING_TRAPSELECT1: ATTR(=,$ENTERPRISE), VALUE(PREFIX, ″1.3.6.1.4.1.2.6.117″) ;2: $SPECIFIC = 4;3: ATTR(=, ″ibmSPEMEventID″ ) ;4: ATTR(=, ″ibmSPEMEventFlags″ ) ;5: ATTR(=, ″ibmSPEMEventTime″ ) ;6: ATTR(=, ″ibmSPEMEventLocation″ ) ;7: ATTR(=, ″ibmSPEMEventPartitionAddress″ ) ;8: ATTR(=, ″ibmSPEMEventVarsTableName″ ) ;9: ATTR(=, ″ibmSPEMEventVarsTableInstanceID″ ) ;10: ATTR(=, ″ibmSPEMEventVarName″ ) ;11: ATTR(=, ″ibmSPEMEventVarValueInstanceVector″ ) ;12: ATTR(=, ″ibmSPEMEventVarValuesTableInstanceID″ ) ;13: ATTR(=, ″ibmSPEMEventVarValue″ ) ;14: ATTR(=, ″ibmSPEMEventPredicate″ ) ;FETCH1: IPNAME($SOURCE_ADDR) ;
MAPhostname = $F1 ;enterprise = $ENTERPRISE ;pssp_EMEventID = $V3 ;pssp_EMEventFlags = $V4 ;pssp_EMEventTime = $V5 ;pssp_EMEventLocation = $V6 ;pssp_EMEventPartitionAddress = $V7 ;pssp_EMEventVarsTableName = $V8 ;pssp_EMEventVarsTableInstanceID = $V9 ;pssp_EMEventVarName = $V10 ;pssp_EMEventVarValueInstanceVector = $V11 ;pssp_EMEventVarValuesTableInstanceID = $V12 ;pssp_EMEventVarValue = $V13 ;pssp_EMEventPredicate = $V14 ;
END
CLASS SP_SNMP_HARMLESS_TRAPSELECT1: ATTR(=,$ENTERPRISE), VALUE(PREFIX, ″1.3.6.1.4.1.2.6.117″) ;2: $SPECIFIC = 5;3: ATTR(=, ″ibmSPEMEventID″ ) ;4: ATTR(=, ″ibmSPEMEventFlags″ ) ;5: ATTR(=, ″ibmSPEMEventTime″ ) ;6: ATTR(=, ″ibmSPEMEventLocation″ ) ;7: ATTR(=, ″ibmSPEMEventPartitionAddress″ ) ;
Appendix E. Contents of SNMP Adapter Class Definition Statements 185
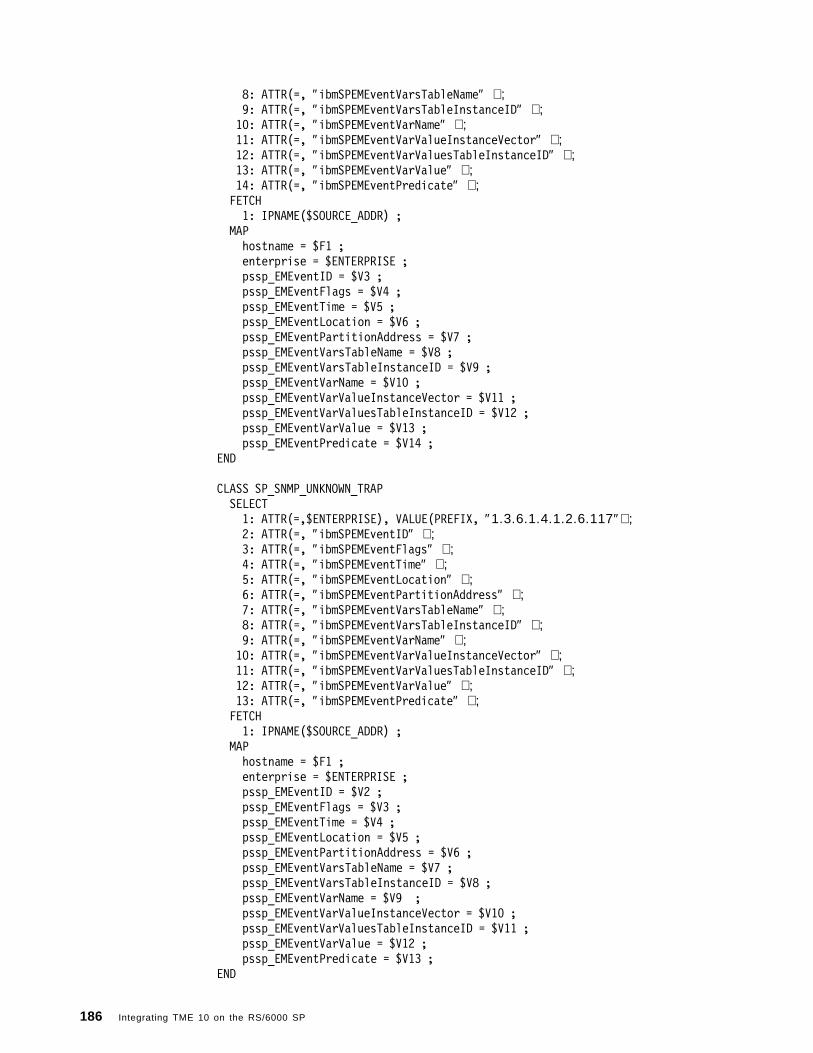
8: ATTR(=, ″ibmSPEMEventVarsTableName″ ) ;9: ATTR(=, ″ibmSPEMEventVarsTableInstanceID″ ) ;10: ATTR(=, ″ibmSPEMEventVarName″ ) ;11: ATTR(=, ″ibmSPEMEventVarValueInstanceVector″ ) ;12: ATTR(=, ″ibmSPEMEventVarValuesTableInstanceID″ ) ;13: ATTR(=, ″ibmSPEMEventVarValue″ ) ;14: ATTR(=, ″ibmSPEMEventPredicate″ ) ;FETCH1: IPNAME($SOURCE_ADDR) ;
MAPhostname = $F1 ;enterprise = $ENTERPRISE ;pssp_EMEventID = $V3 ;pssp_EMEventFlags = $V4 ;pssp_EMEventTime = $V5 ;pssp_EMEventLocation = $V6 ;pssp_EMEventPartitionAddress = $V7 ;pssp_EMEventVarsTableName = $V8 ;pssp_EMEventVarsTableInstanceID = $V9 ;pssp_EMEventVarName = $V10 ;pssp_EMEventVarValueInstanceVector = $V11 ;pssp_EMEventVarValuesTableInstanceID = $V12 ;pssp_EMEventVarValue = $V13 ;pssp_EMEventPredicate = $V14 ;
END
CLASS SP_SNMP_UNKNOWN_TRAPSELECT1: ATTR(=,$ENTERPRISE), VALUE(PREFIX, ″1.3.6.1.4.1.2.6.117″) ;2: ATTR(=, ″ibmSPEMEventID″ ) ;3: ATTR(=, ″ibmSPEMEventFlags″ ) ;4: ATTR(=, ″ibmSPEMEventTime″ ) ;5: ATTR(=, ″ibmSPEMEventLocation″ ) ;6: ATTR(=, ″ibmSPEMEventPartitionAddress″ ) ;7: ATTR(=, ″ibmSPEMEventVarsTableName″ ) ;8: ATTR(=, ″ibmSPEMEventVarsTableInstanceID″ ) ;9: ATTR(=, ″ibmSPEMEventVarName″ ) ;10: ATTR(=, ″ibmSPEMEventVarValueInstanceVector″ ) ;11: ATTR(=, ″ibmSPEMEventVarValuesTableInstanceID″ ) ;12: ATTR(=, ″ibmSPEMEventVarValue″ ) ;13: ATTR(=, ″ibmSPEMEventPredicate″ ) ;FETCH1: IPNAME($SOURCE_ADDR) ;
MAPhostname = $F1 ;enterprise = $ENTERPRISE ;pssp_EMEventID = $V2 ;pssp_EMEventFlags = $V3 ;pssp_EMEventTime = $V4 ;pssp_EMEventLocation = $V5 ;pssp_EMEventPartitionAddress = $V6 ;pssp_EMEventVarsTableName = $V7 ;pssp_EMEventVarsTableInstanceID = $V8 ;pssp_EMEventVarName = $V9 ;pssp_EMEventVarValueInstanceVector = $V10 ;pssp_EMEventVarValuesTableInstanceID = $V11 ;pssp_EMEventVarValue = $V12 ;pssp_EMEventPredicate = $V13 ;
END
186 Integrating TME 10 on the RS/6000 SP

Appendix E. Contents of SNMP Adapter Class Definition Statements 187

188 Integrating TME 10 on the RS/6000 SP

Appendix F. Logfile CDS
This appendix contains an example of a class definition statement as used in theexample in 4.4, “Using the TME 10 T/EC Logfile Adapter” on page 58.
FORMAT EM_Prog FOLLOWS Log_EM%t %s %s: PMAN_HANDLE=%s PMAN_IVECTOR=%s PMAN_LOCATION=%s PMAN_PRED=%sPMAN_PRINCIPAL=%s PMAN_RVCOUNT=%s PMAN_RVNAME=IBM.PSSP.Prog.%sPMAN_RVTYPE=%s PMAN_TIME=%s+ PMAN_RVFIELD0=%s+PMAN_HANDLE $4PMAN_IVECTOR $5PMAN_LOCATION $6PMAN_PRED $7PMAN_PRINCIPAL $8PMAN_RVCOUNT $9PMAN_RVNAME $10PMAN_RVTYPE $11PMAN_TIME $12PMAN_RVFIELD0 $13END
FORMAT EM_PRCRS FOLLOWS Log_EM%t %s %s: PMAN_HANDLE=%s PMAN_IVECTOR=%s PMAN_LOCATION=%s PMAN_PRED=%sPMAN_PRINCIPAL=%s PMAN_RVCOUNT=%s PMAN_RVNAME=IBM.PSSP.PRCRS.%sPMAN_RVTYPE=%s PMAN_TIME=%s+ PMAN_RVFIELD0=%s+PMAN_HANDLE $4PMAN_IVECTOR $5PMAN_LOCATION $6PMAN_PRED $7PMAN_PRINCIPAL $8PMAN_RVCOUNT $9PMAN_RVNAME $10PMAN_RVTYPE $11PMAN_TIME $12PMAN_RVFIELD0 $13END
FORMAT EM_CSS FOLLOWS Log_EM%t %s %s: PMAN_HANDLE=%s PMAN_IVECTOR=%s PMAN_LOCATION=%s PMAN_PRED=%sPMAN_PRINCIPAL=%s PMAN_RVCOUNT=%s PMAN_RVNAME=IBM.PSSP.CSS.%sPMAN_RVTYPE=%s PMAN_TIME=%s+ PMAN_RVFIELD0=%s+PMAN_HANDLE $4PMAN_IVECTOR $5PMAN_LOCATION $6PMAN_PRED $7PMAN_PRINCIPAL $8PMAN_RVCOUNT $9PMAN_RVNAME $10PMAN_RVTYPE $11PMAN_TIME $12PMAN_RVFIELD0 $13END
FORMAT EM_HARMLD FOLLOWS Log_EM%t %s %s: PMAN_HANDLE=%s PMAN_IVECTOR=%s PMAN_LOCATION=%s PMAN_PRED=%sPMAN_PRINCIPAL=%s PMAN_RVCOUNT=%s PMAN_RVNAME=IBM.PSSP.HARMLD.%sPMAN_RVTYPE=%s PMAN_TIME=%s+ PMAN_RVFIELD0=%s+PMAN_HANDLE $4
Copyright IBM Corp. 1997 189

PMAN_IVECTOR $5PMAN_LOCATION $6PMAN_PRED $7PMAN_PRINCIPAL $8PMAN_RVCOUNT $9PMAN_RVNAME $10PMAN_RVTYPE $11PMAN_TIME $12PMAN_RVFIELD0 $13END
FORMAT EM_LL FOLLOWS Log_EM%t %s %s: PMAN_HANDLE=%s PMAN_IVECTOR=%s PMAN_LOCATION=%s PMAN_PRED=%sPMAN_PRINCIPAL=%s PMAN_RVCOUNT=%s PMAN_RVNAME=IBM.PSSP.LL.%sPMAN_RVTYPE=%s PMAN_TIME=%s+ PMAN_RVFIELD0=%s+PMAN_HANDLE $4PMAN_IVECTOR $5PMAN_LOCATION $6PMAN_PRED $7PMAN_PRINCIPAL $8PMAN_RVCOUNT $9PMAN_RVNAME $10PMAN_RVTYPE $11PMAN_TIME $12PMAN_RVFIELD0 $13END
FORMAT EM_Membership FOLLOWS Log_EM%t %s %s: PMAN_HANDLE=%s PMAN_IVECTOR=%s PMAN_LOCATION=%s PMAN_PRED=%sPMAN_PRINCIPAL=%s PMAN_RVCOUNT=%s PMAN_RVNAME=IBM.PSSP.Membership.%sPMAN_RVTYPE=%s PMAN_TIME=%s+ PMAN_RVFIELD0=%s+PMAN_HANDLE $4PMAN_IVECTOR $5PMAN_LOCATION $6PMAN_PRED $7PMAN_PRINCIPAL $8PMAN_RVCOUNT $9PMAN_RVNAME $10PMAN_RVTYPE $11PMAN_TIME $12PMAN_RVFIELD0 $13END
FORMAT EM_Response FOLLOWS Log_EM%t %s %s: PMAN_HANDLE=%s PMAN_IVECTOR=%s PMAN_LOCATION=%s PMAN_PRED=%sPMAN_PRINCIPAL=%s PMAN_RVCOUNT=%s PMAN_RVNAME=IBM.PSSP.Response.%sPMAN_RVTYPE=%s PMAN_TIME=%s+ PMAN_RVFIELD0=%s+PMAN_HANDLE $4PMAN_IVECTOR $5PMAN_LOCATION $6PMAN_PRED $7PMAN_PRINCIPAL $8PMAN_RVCOUNT $9PMAN_RVNAME $10PMAN_RVTYPE $11PMAN_TIME $12PMAN_RVFIELD0 $13END
190 Integrating TME 10 on the RS/6000 SP
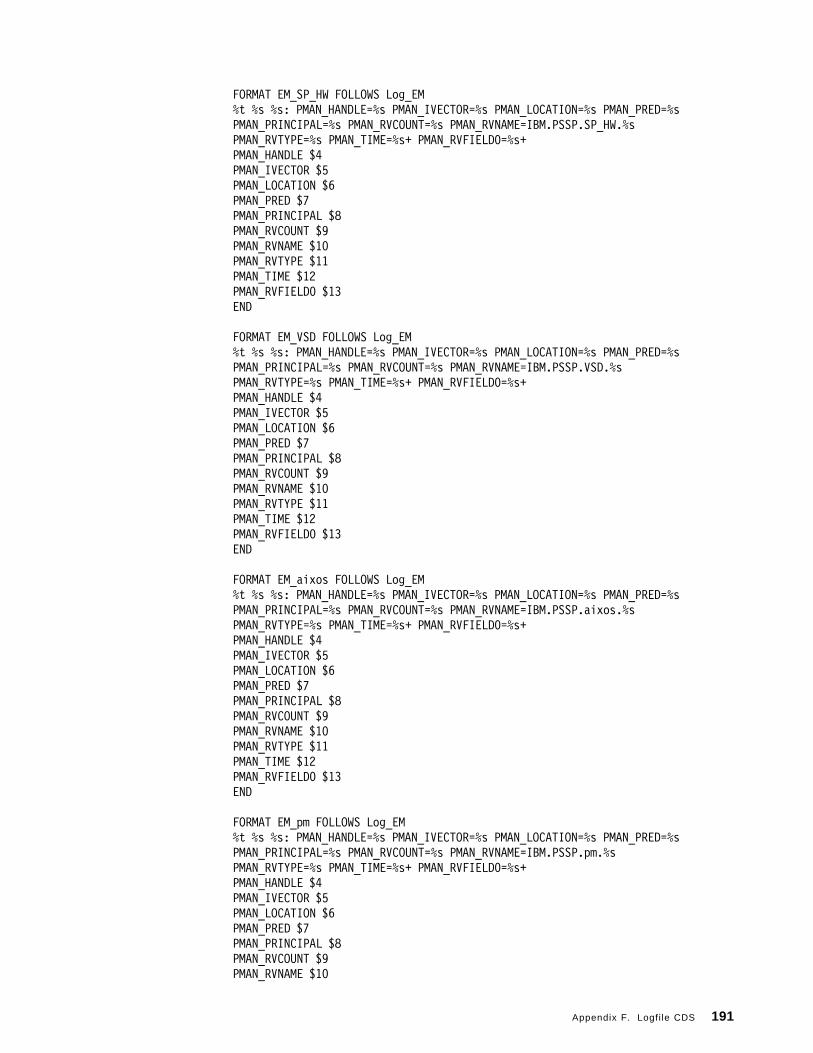
FORMAT EM_SP_HW FOLLOWS Log_EM%t %s %s: PMAN_HANDLE=%s PMAN_IVECTOR=%s PMAN_LOCATION=%s PMAN_PRED=%sPMAN_PRINCIPAL=%s PMAN_RVCOUNT=%s PMAN_RVNAME=IBM.PSSP.SP_HW.%sPMAN_RVTYPE=%s PMAN_TIME=%s+ PMAN_RVFIELD0=%s+PMAN_HANDLE $4PMAN_IVECTOR $5PMAN_LOCATION $6PMAN_PRED $7PMAN_PRINCIPAL $8PMAN_RVCOUNT $9PMAN_RVNAME $10PMAN_RVTYPE $11PMAN_TIME $12PMAN_RVFIELD0 $13END
FORMAT EM_VSD FOLLOWS Log_EM%t %s %s: PMAN_HANDLE=%s PMAN_IVECTOR=%s PMAN_LOCATION=%s PMAN_PRED=%sPMAN_PRINCIPAL=%s PMAN_RVCOUNT=%s PMAN_RVNAME=IBM.PSSP.VSD.%sPMAN_RVTYPE=%s PMAN_TIME=%s+ PMAN_RVFIELD0=%s+PMAN_HANDLE $4PMAN_IVECTOR $5PMAN_LOCATION $6PMAN_PRED $7PMAN_PRINCIPAL $8PMAN_RVCOUNT $9PMAN_RVNAME $10PMAN_RVTYPE $11PMAN_TIME $12PMAN_RVFIELD0 $13END
FORMAT EM_aixos FOLLOWS Log_EM%t %s %s: PMAN_HANDLE=%s PMAN_IVECTOR=%s PMAN_LOCATION=%s PMAN_PRED=%sPMAN_PRINCIPAL=%s PMAN_RVCOUNT=%s PMAN_RVNAME=IBM.PSSP.aixos.%sPMAN_RVTYPE=%s PMAN_TIME=%s+ PMAN_RVFIELD0=%s+PMAN_HANDLE $4PMAN_IVECTOR $5PMAN_LOCATION $6PMAN_PRED $7PMAN_PRINCIPAL $8PMAN_RVCOUNT $9PMAN_RVNAME $10PMAN_RVTYPE $11PMAN_TIME $12PMAN_RVFIELD0 $13END
FORMAT EM_pm FOLLOWS Log_EM%t %s %s: PMAN_HANDLE=%s PMAN_IVECTOR=%s PMAN_LOCATION=%s PMAN_PRED=%sPMAN_PRINCIPAL=%s PMAN_RVCOUNT=%s PMAN_RVNAME=IBM.PSSP.pm.%sPMAN_RVTYPE=%s PMAN_TIME=%s+ PMAN_RVFIELD0=%s+PMAN_HANDLE $4PMAN_IVECTOR $5PMAN_LOCATION $6PMAN_PRED $7PMAN_PRINCIPAL $8PMAN_RVCOUNT $9PMAN_RVNAME $10
Appendix F. Logfi le CDS 191

PMAN_RVTYPE $11PMAN_TIME $12PMAN_RVFIELD0 $13END
192 Integrating TME 10 on the RS/6000 SP
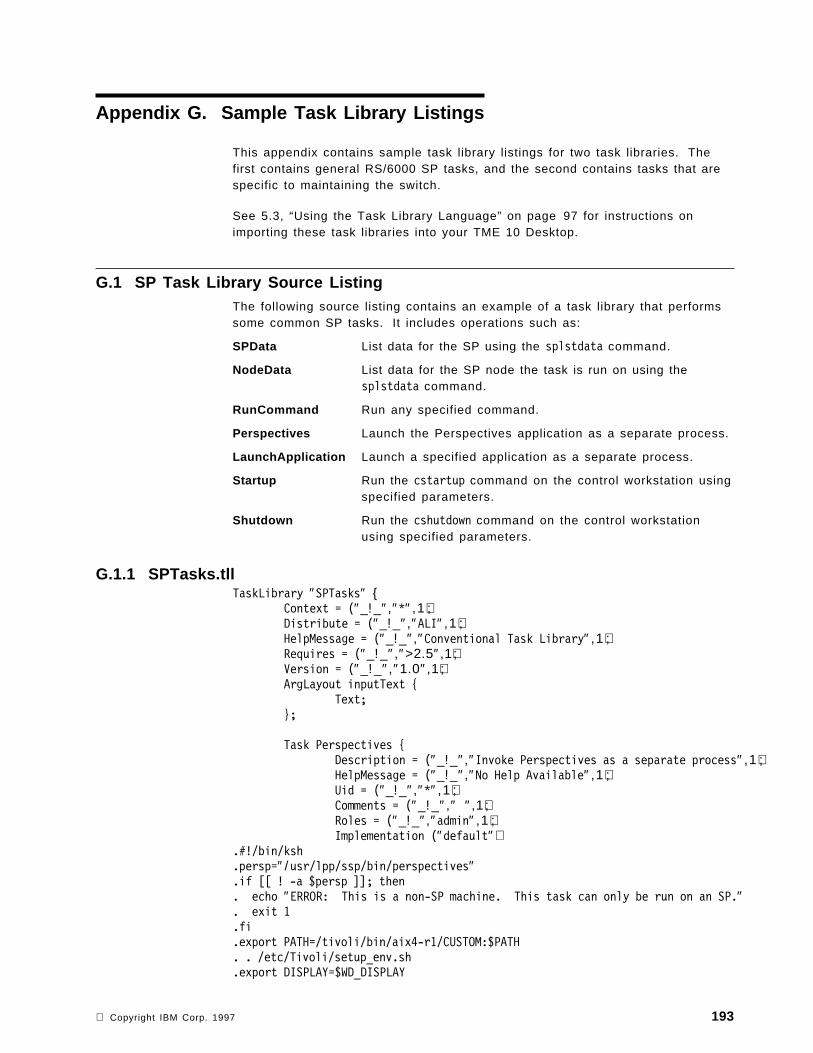
Appendix G. Sample Task Library Listings
This appendix contains sample task library listings for two task libraries. Thefirst contains general RS/6000 SP tasks, and the second contains tasks that arespecific to maintaining the switch.
See 5.3, “Using the Task Library Language” on page 97 for instructions onimporting these task libraries into your TME 10 Desktop.
G.1 SP Task Library Source ListingThe following source listing contains an example of a task library that performssome common SP tasks. It includes operations such as:
SPData List data for the SP using the splstdata command.
NodeData List data for the SP node the task is run on using thesplstdata command.
RunCommand Run any specified command.
Perspectives Launch the Perspectives application as a separate process.
LaunchApplication Launch a specified application as a separate process.
Startup Run the cstartup command on the control workstation usingspecified parameters.
Shutdown Run the cshutdown command on the control workstationusing specified parameters.
G.1.1 SPTasks.tllTaskLibrary ″SPTasks″ {
Context = (″_!_″,″*″ , 1 ) ;Distribute = (″_!_″,″ALI″ , 1 ) ;HelpMessage = (″_!_″,″Conventional Task Library″ , 1 ) ;Requires = (″_!_″,″>2.5″,1);Version = (″_!_″,″1.0″,1);ArgLayout inputText {
Text;};
Task Perspectives {Description = (″_!_″,″Invoke Perspectives as a separate process″ , 1 ) ;HelpMessage = (″_!_″,″No Help Available″ , 1 ) ;Uid = (″_!_″,″*″ , 1 ) ;Comments = (″_!_″,″ ″,1);Roles = (″_!_″,″admin″ , 1 ) ;Implementation (″default″)
.#!/bin/ksh
.persp=″ /usr/lpp/ssp/bin/perspectives″
.if [[ ! -a $persp ]]; then
. echo ″ERROR: This is a non-SP machine. This task can only be run on an SP.″
. exit 1
.fi
.export PATH=/tivoli/bin/aix4-r1/CUSTOM:$PATH
. . /etc/Tivoli/setup_env.sh
.export DISPLAY=$WD_DISPLAY
Copyright IBM Corp. 1997 193

.# We close stdin, stdout and stderr
.exec 0<&-
.exec 1<&-
.exec 2<&-
.$persp &;
};
Task NodeData {Description = (″_!_″,″List node data using splstdata command″ , 1 ) ;HelpMessage = (″_!_″,″No Help Available″ , 1 ) ;Uid = (″_!_″,″*″ , 1 ) ;Comments = (″_!_″,″ ″,1);Roles = (″_!_″,″admin″ , 1 ) ;Implementation (″default″)
.#!/bin/ksh
.# Get the SDR attributes for a node
.node_number=″ /usr/lpp/ssp/install/bin/node_number″
.lstdata=″ /usr/lpp/ssp/bin/splstdata″
.if [[ ! -a $node_number ]]; then
. echo ″ERROR: This is a non-SP machine. This task can only be run on an SP.″
. exit 1
.fi
.this_node=$node_number
.if [[ $this_node = 0 ]] then
. echo ″ERROR: This is a CWS. This task can only be run on a node.″
. exit 1
.fi
.$lstdata -G -n -l $this_node
.echo ″\n\n″
.$lstdata -G -A -l $this_node
.echo ″\n\n″
.$lstdata -G -b -l $this_node
.echo ″\n\n″
.$lstdata -G -a -l $this_node
.echo ″\n\n″
.$lstdata -G -u -l $this_node
.echo ″\n\n″
.$lstdata -G -h -l $this_node
.echo ″\n\n″
.$lstdata -G -i -l $this_node
.echo ″\n\n″
.$lstdata -G -d -l $this_node;
};
Task SPData {Description = (″_!_″,″List SP data using splstdata command″ , 1 ) ;HelpMessage = (″_!_″,″No Help Available″ , 1 ) ;Uid = (″_!_″,″*″ , 1 ) ;Comments = (″_!_″,″ ″,1);Roles = (″_!_″,″admin″ , 1 ) ;Implementation (″default″)
.#!/bin/ksh
.# Get the SP data for this machine
.lstdata=″ /usr/lpp/ssp/bin/splstdata″
.if [[ ! -a $lstdata ]]; then
. echo ″ERROR: This is a non-SP machine. This task can only be run on an SP.″
. exit 1
194 Integrating TME 10 on the RS/6000 SP

.fi
.$lstdata -e
.echo ″\n\n″
.$lstdata -f
.echo ″\n\n″
.$lstdata -p
.echo ″\n\n″
.$lstdata -G -n
.echo ″\n\n″
.$lstdata -G -s;
};
Task RunCommand {Description = (″_!_″,″Execute any command″ , 1 ) ;HelpMessage = (″_!_″,″Input the command and any parameters″ , 1 ) ;Uid = (″_!_″,″*″ , 1 ) ;Comments = (″_!_″,″ ″,1);Roles = (″_!_″,″admin″ , 1 ) ;Argument (″_!_″,″Command to run: ″,1) {
Layout = (″″ ,″inputText″ , 1 ) ;};Implementation (″default″)
.#!/bin/ksh
.export PATH=/usr/lpp/ssp/bin:/tivoli/bin/aix4-r1/CUSTOM:$PATH
. . /etc/Tivoli/setup_env.sh
.export DISPLAY=$WD_DISPLAY
.$1;
};
Task LaunchApplication {Description = (″_!_″,″Launch an application as a separate process″ , 1 ) ;HelpMessage = (″_!_″,″Input the application and parameters.″ , 1 ) ;Uid = (″_!_″,″*″ , 1 ) ;Comments = (″_!_″,″ ″,1);Roles = (″_!_″,″admin″ , 1 ) ;Argument (″_!_″,″Application to launch: ″,1) {
Layout = (″″ ,″inputText″ , 1 ) ;};Implementation (″default″)
.#!/bin/ksh
.export PATH=/usr/lpp/ssp/bin:/tivoli/bin/aix4-r1/CUSTOM:$PATH
. . /etc/Tivoli/setup_env.sh
.export DISPLAY=$WD_DISPLAY
.# We close stdin, stdout and stderr
.exec 0<&-
.exec 1<&-
.exec 2<&-
.$1 &;
};
Task Startup {Description = (″_!_″,″Run cstartup command″ , 1 ) ;HelpMessage = (″_!_″,″Input parameters to cstartup command″ , 1 ) ;Uid = (″_!_″,″root″ , 1 ) ;Comments = (″_!_″,″ ″,1);Roles = (″_!_″,″admin″ , 1 ) ;
Appendix G. Sample Task Library Listings 195
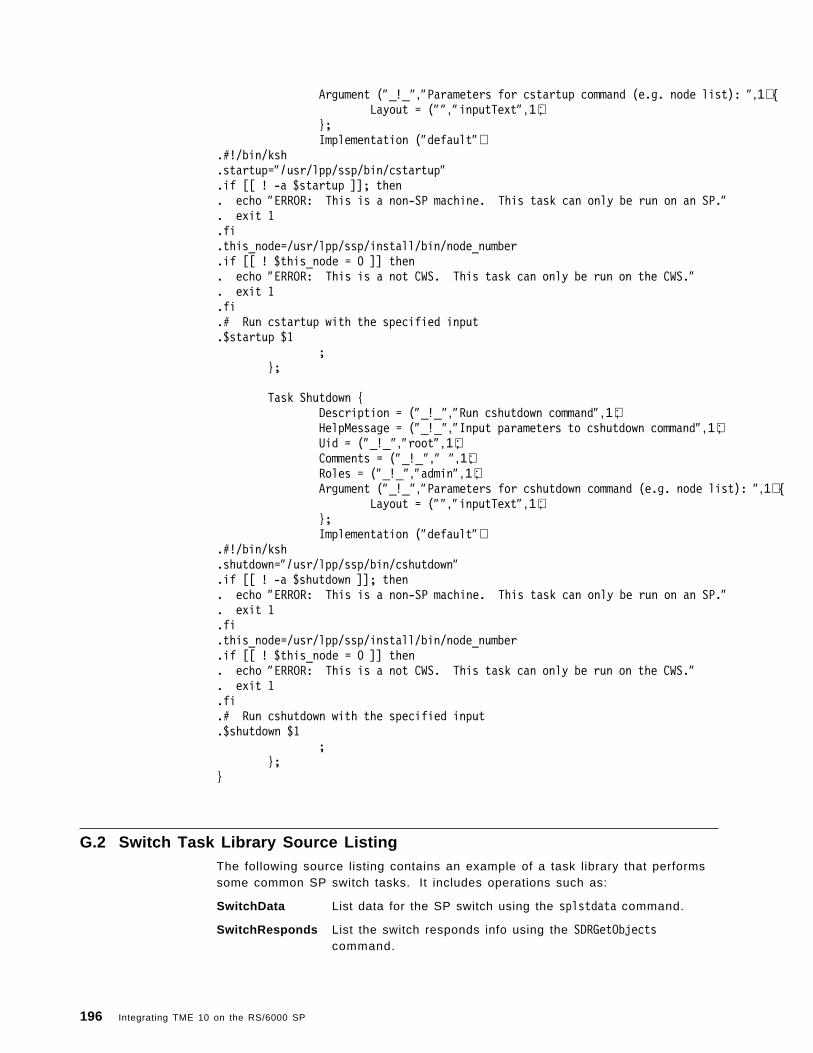
Argument (″_!_″,″Parameters for cstartup command (e.g. node list): ″,1) {Layout = (″″ ,″inputText″ , 1 ) ;
};Implementation (″default″)
.#!/bin/ksh
.startup=″ /usr/lpp/ssp/bin/cstartup″
.if [[ ! -a $startup ]]; then
. echo ″ERROR: This is a non-SP machine. This task can only be run on an SP.″
. exit 1
.fi
.this_node=/usr/lpp/ssp/install/bin/node_number
.if [[ ! $this_node = 0 ]] then
. echo ″ERROR: This is a not CWS. This task can only be run on the CWS.″
. exit 1
.fi
.# Run cstartup with the specified input
.$startup $1;
};
Task Shutdown {Description = (″_!_″,″Run cshutdown command″ , 1 ) ;HelpMessage = (″_!_″,″Input parameters to cshutdown command″ , 1 ) ;Uid = (″_!_″,″root″ , 1 ) ;Comments = (″_!_″,″ ″,1);Roles = (″_!_″,″admin″ , 1 ) ;Argument (″_!_″,″Parameters for cshutdown command (e.g. node list): ″,1) {
Layout = (″″ ,″inputText″ , 1 ) ;};Implementation (″default″)
.#!/bin/ksh
.shutdown=″ /usr/lpp/ssp/bin/cshutdown″
.if [[ ! -a $shutdown ]]; then
. echo ″ERROR: This is a non-SP machine. This task can only be run on an SP.″
. exit 1
.fi
.this_node=/usr/lpp/ssp/install/bin/node_number
.if [[ ! $this_node = 0 ]] then
. echo ″ERROR: This is a not CWS. This task can only be run on the CWS.″
. exit 1
.fi
.# Run cshutdown with the specified input
.$shutdown $1;
};}
G.2 Switch Task Library Source ListingThe following source listing contains an example of a task library that performssome common SP switch tasks. It includes operations such as:
SwitchData List data for the SP switch using the splstdata command.
SwitchResponds List the switch responds info using the SDRGetObjectscommand.
196 Integrating TME 10 on the RS/6000 SP

ListPrimaryNode List the primary node information returned by the Eprimarycommand.
SetPrimaryNode Set the specified oncoming primary and backup nodes usingthe Eprimary command.
QuiesceSwitch Quiesce the switch for the specified partition.
StartSwitch Start the switch for the specified partition.
FenceNode Fence the specified nodes.
UnfenceNode Unfence the specified nodes.
G.2.1 SwitchTasks.tllTaskLibrary ″SwitchTasks″ {
Context = (″_!_″,″*″ , 1 ) ;Distribute = (″_!_″,″ALI″ , 1 ) ;HelpMessage = (″_!_″,″Conventional Task Library″ , 1 ) ;Requires = (″_!_″,″>2.5″,1);Version = (″_!_″,″1.0″,1);ArgLayout inputText {
Text;};
ArgLayout Partitions {TextChoice Program {
Implementation ( ″default″ ).#!/bin/ksh.for i in /usr/lpp/ssp/bin/splst_syspars -n.do. echo $i.done
;};
};
Task SwitchResponds {Description = (″_!_″,″List switch responds using SDRGetObjects″ , 1 ) ;HelpMessage = (″_!_″,″No Help Available″ , 1 ) ;Uid = (″_!_″,″*″ , 1 ) ;Comments = (″_!_″,″ ″,1);Roles = (″_!_″,″admin″ , 1 ) ;Implementation (″default″)
.#!/bin/ksh
.# get the switch responds info from the SDR
.getobjs=″ /usr/lpp/ssp/bin/SDRGetObjects″
.if [[ ! -a $getobjs ]]; then
. echo ″ERROR: This is a non-SP machine. This task can only be run on an SP.″
. exit 1
.fi
.$getobjs switch_responds;
};
Task SwitchData {Description = (″_!_″,″List switch info using splstdata″ , 1 ) ;HelpMessage = (″_!_″,″No Help Available″ , 1 ) ;Uid = (″_!_″,″*″ , 1 ) ;Comments = (″_!_″,″ ″,1);
Appendix G. Sample Task Library Listings 197

Roles = (″_!_″,″admin″ , 1 ) ;Implementation (″default″)
.#!/bin/ksh
.# Get the SP data for this machine
.lstdata=″ /usr/lpp/ssp/bin/splstdata″
.if [[ ! -a $lstdata ]]; then
. echo ″ERROR: This is a non-SP machine. This task can only be run on an SP.″
. exit 1
.fi
.$lstdata -G -s;
};
Task ListPrimaryNode {Description = (″_!_″,″List the switch primary node″ , 1 ) ;HelpMessage = (″_!_″,″No Help Available″ , 1 ) ;Uid = (″_!_″,″root″ , 1 ) ;Comments = (″_!_″,″ ″,1);Roles = (″_!_″,″admin″ , 1 ) ;Implementation (″default″)
.#!/bin/ksh
.# get the Primary switch node number
.eprimary=″ /usr/lpp/ssp/bin/Eprimary″
.if [[ ! -a $eprimary ]]; then
. echo ″ERROR: This is a non-SP machine. This task can only be run on an SP.″
. exit 1
.fi
.# if this is a TB3 switch (SP switch), will return backup also
.echo ″Switch Primary Node:″
.$eprimary;
};
Task SetPrimaryNode {Description = (″_!_″,″Set the switch primary node″ , 1 ) ;HelpMessage = (″_!_″,″Input primary node and optional backup node″ , 1 ) ;Uid = (″_!_″,″root″ , 1 ) ;Comments = (″_!_″,″ ″,1);Roles = (″_!_″,″admin″ , 1 ) ;Argument (″_!_″,″New Primary Node: ″,1) {
Layout = (″″ ,″inputText″ , 1 ) ;};Argument (″_!_″,″New Backup Node: ″,1) {
Layout = (″″ ,″inputText″ , 1 ) ;};Implementation (″default″)
.#!/bin/ksh
.eprimary=″ /usr/lpp/ssp/bin/Eprimary″
.if [[ ! -a $eprimary ]]; then
. echo ″ERROR: This is a non-SP machine. This task can only be run on an SP.″
. exit 1
.fi
.# set the Primary switch node number
.# if this is a TB3 switch (SP switch), can set backup also
.if [[ ! -z $2 ]]
.then
. backup=″-backup $2″
.else
. backup=″″
198 Integrating TME 10 on the RS/6000 SP

.fi
.$eprimary $1 $backup;
};
Task FenceNode {Description = (″_!_″,″Fence the specified nodes″ , 1 ) ;HelpMessage = (″_!_″,″Input node list to be fenced.″ , 1 ) ;Uid = (″_!_″,″root″ , 1 ) ;Comments = (″_!_″,″ ″,1);Roles = (″_!_″,″admin″ , 1 ) ;Argument (″_!_″,″Fence node list: ″,1) {
Layout = (″″ ,″inputText″ , 1 ) ;};Implementation (″default″)
.#!/bin/ksh
.efence=″ /usr/lpp/ssp/bin/Efence″
.if [[ ! -a $efence ]]; then
. echo ″ERROR: This is a non-SP machine. This task can only be run on an SP.″
. exit 1
.fi
.# Fence the specified node regardless of partition
.$efence -G $1;
};
Task UnfenceNode {Description = (″_!_″,″Unfence the specified nodes″ , 1 ) ;HelpMessage = (″_!_″,″Input node list to be unfenced.″ , 1 ) ;Uid = (″_!_″,″root″ , 1 ) ;Comments = (″_!_″,″ ″,1);Roles = (″_!_″,″admin″ , 1 ) ;Argument (″_!_″,″Unfence node list: ″,1) {
Layout = (″″ ,″inputText″ , 1 ) ;};Implementation (″default″)
.#!/bin/ksh
.eunfence=″ /usr/lpp/ssp/bin/Eunfence″
.if [[ ! -a $eunfence ]]; then
. echo ″ERROR: This is a non-SP machine. This task can only be run on an SP.″
. exit 1
.fi
.# Unfence the specified node regardless of partition
.$eunfence -G $1;
};
Task QuiesceSwitch {Description = (″_!_″,″Quiesce the switch in the specified partition″ , 1 ) ;HelpMessage = (″_!_″,″Select partition to quiesce switch in″ , 1 ) ;Uid = (″_!_″,″root″ , 1 ) ;Comments = (″_!_″,″ ″,1);Roles = (″_!_″,″admin″ , 1 ) ;Argument (″_!_″,″Partition to quiesce switch in: ″,1) {
Layout = (″″ ,″Partitions″ , 1 ) ;};Implementation (″default″)
.#!/bin/ksh
.equiesce=″ /usr/lpp/ssp/bin/Equiesce″
Appendix G. Sample Task Library Listings 199
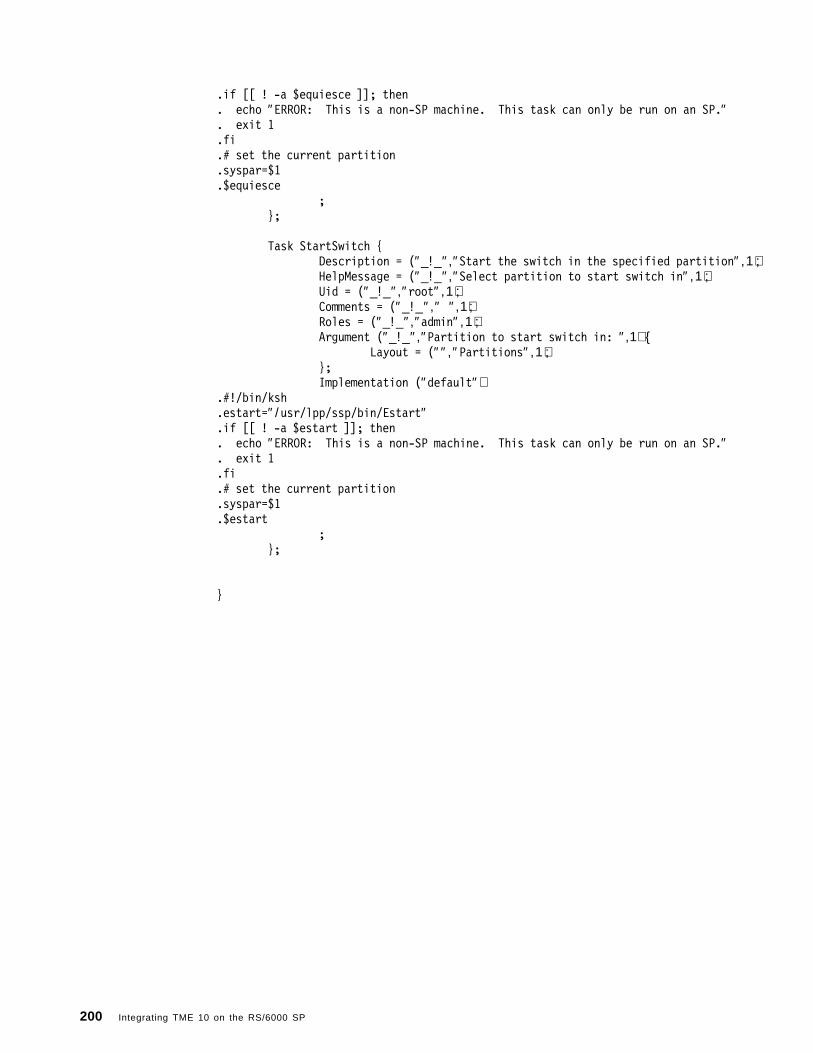
.if [[ ! -a $equiesce ]]; then
. echo ″ERROR: This is a non-SP machine. This task can only be run on an SP.″
. exit 1
.fi
.# set the current partition
.syspar=$1
.$equiesce;
};
Task StartSwitch {Description = (″_!_″,″Start the switch in the specified partition″ , 1 ) ;HelpMessage = (″_!_″,″Select partition to start switch in″ , 1 ) ;Uid = (″_!_″,″root″ , 1 ) ;Comments = (″_!_″,″ ″,1);Roles = (″_!_″,″admin″ , 1 ) ;Argument (″_!_″,″Partition to start switch in: ″,1) {
Layout = (″″ ,″Partitions″ , 1 ) ;};Implementation (″default″)
.#!/bin/ksh
.estart=″ /usr/lpp/ssp/bin/Estart″
.if [[ ! -a $estart ]]; then
. echo ″ERROR: This is a non-SP machine. This task can only be run on an SP.″
. exit 1
.fi
.# set the current partition
.syspar=$1
.$estart;
};
}
200 Integrating TME 10 on the RS/6000 SP
Appendix H. Contents of AEF Customization Scripts
This appendix contains all AEF customization source files.
H.1 Dialog ListingsThe dialog source files are listed in the following sections. Note that dialogsspecific to the SP nodes are prefixed with sp_node, and the dialogs specific tothe control workstation are prefixed by sp_cws.
• sp.run_dialog. This dialog is used both by the control workstation and spnode objects when the user clicks on the run button on the propertieswindow.
• sp_cws.cw_attributes_dialog. This dialog displays the SDR attributes of thecontrol workstation.
• sp_cws.modify_attribute_dialog. This dialog appears when the user doubleclicks in one of the attributes displayed in sp_cws.cw_attributes_dialog inorder to modify them. This operation is only allowed to an administrator withthe role of super.
• sp_cws.node_response. This dialog lists all the SP nodes controlled by thecontrol workstation objects, indicating whether they are managed by Tivoli(wping) and whether they are responding.
• sp_cws.parent_dialog. This is the customized parent dialog.
• sp_cws.parent_dialog.custom. This dialog is similar to the customizedparent dialog, but it indicates customizations were made. The user shouldutilize this version when updating a parent_dialog with her owncustomizations.
• sp_cws.run_dialog_nodes. This dialog is similar to sp.run_dialog, but it takesas target nodes a list of selected nodes from the parent_dialog of the controlworkstation.
• sp_cws.sp_applications. This dialog displays a set of buttons to launchSP-specific applications, SP Perspectives and the SP System Monitor GUI.
• sp_node.modify_attribute_dialog. This dialog is similar tosp_cws.modify_attribute_dialog, but is used for the SP node object.
• sp_node.node_attributes_dialog. This dialog is similar tosp_cws.cw_attributes_dialog, but it is specific to the SP node object.
• sp_node.parent_dialog. This dialog is a customized version of the parentdialog of the managed node and is used to accommodate the specifics of anSP node.
• sp_node.parent_dialog.custom. This dialog is similar tosp_node.parent.dialog, but it indicates where the customizations were made.The user should utilize this version when updating a parent dialog with herown customizations.
Copyright IBM Corp. 1997 201

H.1.1 sp.run_command.ksh#!/bin/ksh######################################################################### (C) Copyright IBM Corp. 1997# All rights reserved.## Sample Tivoli customizations for the SP.## CALLBACK: sp.run_command.ksh# CALLED FROM DIALOG(S): sp.run_dialog# INPUT: Command (with arguments) to be executed.# COMMENTS: Executes command (with arguments) and displays resulting# standard output, standard error, and exit status in a# ′ wdispmsg′ dialog.#########################################################################
export PATH=/tivoli/bin/aix4-r1/CUSTOM:$PATH
. /etc/Tivoli/setup_env.sh
output=/usr/lpp/ssp/install/bin/spcmdrc $* 2>&1
wdispmsg ″$output″
exit $?
H.1.2 sp.run_command_driver.ksh#!/bin/ksh######################################################################### (C) Copyright IBM Corp. 1997# All rights reserved.## Sample Tivoli customizations for the SP.## CALLBACK: sp.run_command_driver.ksh# CALLED FROM DIALOG(S): sp_cws.parent_dialog, sp_node.parent_dialog# INPUT: none# COMMENTS: Posts dialog which accepts command (with arguments) to be# executed.#########################################################################
export PATH=/tivoli/bin/aix4-r1/CUSTOM:$PATH
. /etc/Tivoli/setup_env.sh
wpostdialog sp.run_dialog
exit $?
202 Integrating TME 10 on the RS/6000 SP
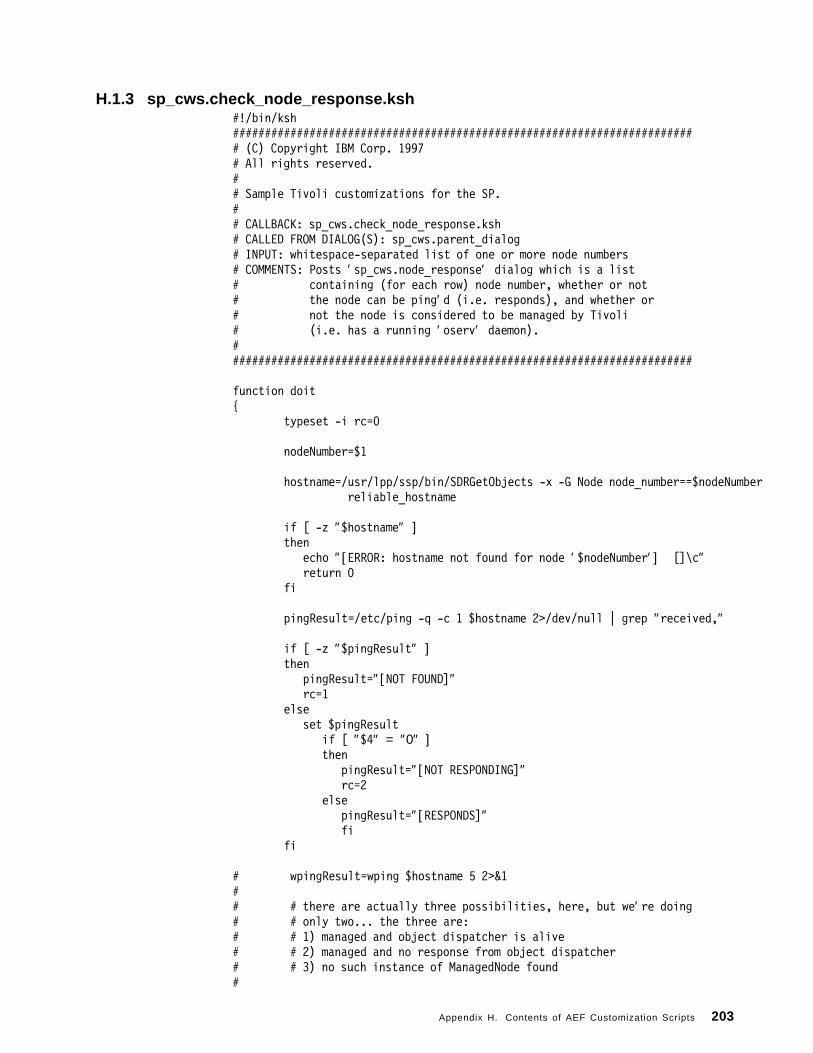
H.1.3 sp_cws.check_node_response.ksh#!/bin/ksh######################################################################### (C) Copyright IBM Corp. 1997# All rights reserved.## Sample Tivoli customizations for the SP.## CALLBACK: sp_cws.check_node_response.ksh# CALLED FROM DIALOG(S): sp_cws.parent_dialog# INPUT: whitespace-separated list of one or more node numbers# COMMENTS: Posts ′ sp_cws.node_response′ dialog which is a list# containing (for each row) node number, whether or not# the node can be ping′ d (i.e. responds), and whether or# not the node is considered to be managed by Tivoli# (i.e. has a running ′ oserv′ daemon).#########################################################################
function doit{
typeset -i rc=0
nodeNumber=$1
hostname=/usr/lpp/ssp/bin/SDRGetObjects -x -G Node node_number==$nodeNumberreliable_hostname
if [ -z ″$hostname″ ]then
echo ″[ERROR: hostname not found for node ′ $nodeNumber′ ] []\c″return 0
fi
pingResult=/etc/ping -q -c 1 $hostname 2>/dev/null | grep ″received,″
if [ -z ″$pingResult″ ]then
pingResult=″[NOT FOUND]″rc=1
elseset $pingResult
if [ ″$4″ = ″0″ ]then
pingResult=″[NOT RESPONDING]″rc=2
elsepingResult=″[RESPONDS]″fi
fi
# wpingResult=wping $hostname 5 2>&1## # there are actually three possibilities, here, but we′ re doing# # only two... the three are:# # 1) managed and object dispatcher is alive# # 2) managed and no response from object dispatcher# # 3) no such instance of ManagedNode found#
Appendix H. Contents of AEF Customization Scripts 203

# wresult=echo ″$wpingResult″ | grep ″ alive″## if [ -n ″$wresult″ ]# then wpingResult=″[MANAGED]″# else wpingResult=″[NOT MANAGED]″# fi
# Do the following instead of ′ wping′ (see code commented out, above)# because ′ wping′ only seems to work if executed on the TME server machine
if [ ″$pingResult″ = ″[RESPONDS]″ ]then
wresult=/usr/lpp/ssp/bin/dsh -w $hostname ps -u root \| grep oservif [ -n ″$wresult″ ]then
wpingResult=″[MANAGED]″else
wpingResult=″[NOT MANAGED]″fi
elsewpingResult=″[UNKNOWN]″
fi
awk -v nodeNumber=$nodeNumber -v hostname=$hostname \-v pingResult=″$pingResult″ -v wpingResult=″$wpingResult″ ′
BEGIN {printf(″\″%5s %-28s%-19s%s\″{\″\″}″, nodeNumber, hostname, pingResult,
wpingResult);}
{}′ </dev/null
return $rc}
. /etc/Tivoli/setup_env.sh
if [ -z ″$*″ -o ″$*″ = ″__unchanged__″ ]then
wdispmsg ″You must first select one or more nodes...″exit 0
fi
typeset -i num=$#
while [[ $num != 0 ]]do
result=$resultdoit $1if [[ $num != 1 ]]
then result=″$result,″ fi num=$num-1 shiftdone
wpostdialog sp_cws.node_response node_list ″$result″
204 Integrating TME 10 on the RS/6000 SP

exit 0
H.1.4 sp_cws.efence_nodes.ksh#!/bin/ksh######################################################################### (C) Copyright IBM Corp. 1997# All rights reserved.## Sample Tivoli customizations for the SP.## CALLBACK: sp_cws.efence_nodes.ksh# CALLED FROM DIALOG(S): sp_cws.parent_dialog# INPUT: whitespace-separated list of one or more node numbers# COMMENTS: Executes the ssp ′ Efence′ command for all specified# node numbers and displays the resulting standard output# and standard error in a ′ wdispmsg′ dialog.#########################################################################
. /etc/Tivoli/setup_env.sh
if [ -z ″$*″ -o ″$*″ = ″__unchanged__″ ]then
wdispmsg ″You must first select one or more nodes...″exit 0
fi
ANSWER=wdispconf ″Are you sure you want to fence nodes $* ?″
if [ ″$ANSWER″ = ″NO″ ]then
exit 0fi
result=/usr/lpp/ssp/bin/Efence -G $* 2>&1
if [ -n ″$result″ ]then
wdispmsg ″$result″fi
exit 0
H.1.5 sp_cws.eunfence_nodes.ksh#!/bin/ksh######################################################################### (C) Copyright IBM Corp. 1997# All rights reserved.## Sample Tivoli customizations for the SP.## CALLBACK: sp_cws.eunfence_nodes.ksh# CALLED FROM DIALOG(S): sp_cws.parent_dialog# INPUT: whitespace-separated list of one or more node numbers# COMMENTS: Executes the ssp ′ Eunfence′ command for all specified# node numbers and displays the resulting standard output# and standard error in a ′ wdispmsg′ dialog.
Appendix H. Contents of AEF Customization Scripts 205
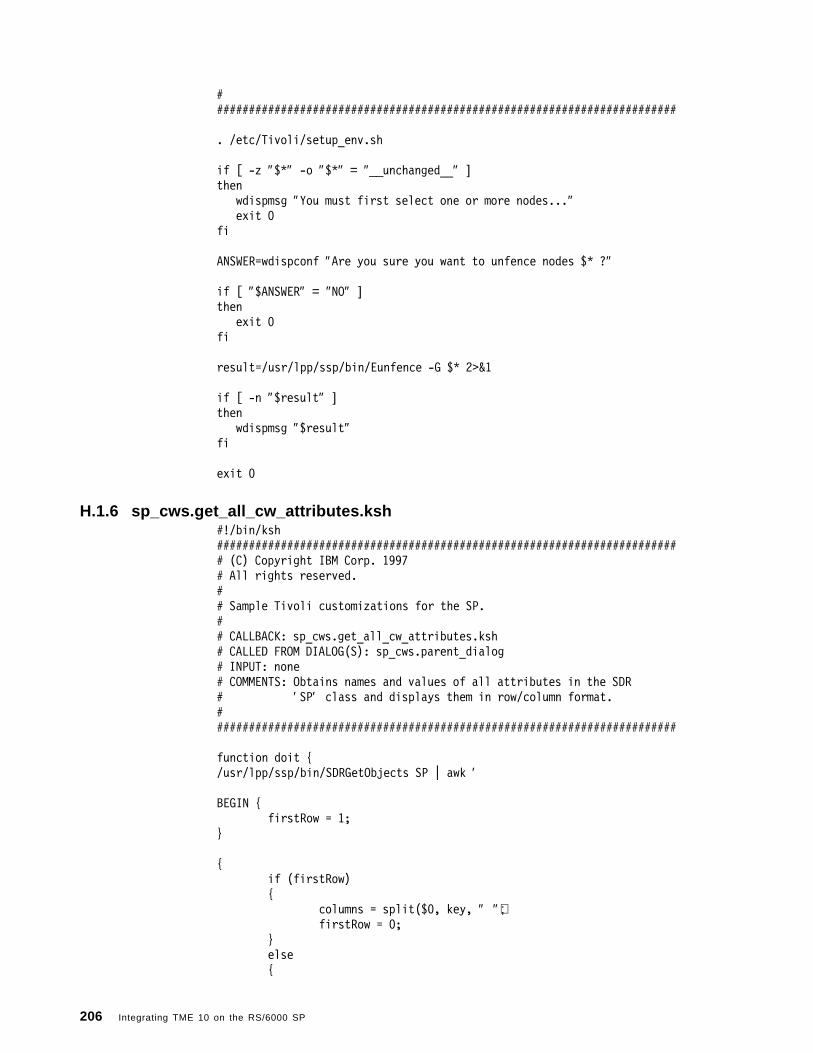
#########################################################################
. /etc/Tivoli/setup_env.sh
if [ -z ″$*″ -o ″$*″ = ″__unchanged__″ ]then
wdispmsg ″You must first select one or more nodes...″exit 0
fi
ANSWER=wdispconf ″Are you sure you want to unfence nodes $* ?″
if [ ″$ANSWER″ = ″NO″ ]then
exit 0fi
result=/usr/lpp/ssp/bin/Eunfence -G $* 2>&1
if [ -n ″$result″ ]then
wdispmsg ″$result″fi
exit 0
H.1.6 sp_cws.get_all_cw_attributes.ksh#!/bin/ksh######################################################################### (C) Copyright IBM Corp. 1997# All rights reserved.## Sample Tivoli customizations for the SP.## CALLBACK: sp_cws.get_all_cw_attributes.ksh# CALLED FROM DIALOG(S): sp_cws.parent_dialog# INPUT: none# COMMENTS: Obtains names and values of all attributes in the SDR# ′ SP′ class and displays them in row/column format.#########################################################################
function doit {/usr/lpp/ssp/bin/SDRGetObjects SP | awk ′
BEGIN {firstRow = 1;
}
{if (firstRow){
columns = split($0, key, ″ ″) ;firstRow = 0;
}else{
206 Integrating TME 10 on the RS/6000 SP

split($0, value, ″ ″) ;}
}
END {maxKeyLength = 0;for (i=1; i<=columns; i++){
if ((currentKeyLength = length(key[i])) > maxKeyLength)maxKeyLength = currentKeyLength;
}maxKeyLength += 2;for (i=1; i<=columns; i++){
printf(″\″%s″ , key[i]);padding = maxKeyLength - length(key[i]);for (j=1; j<padding; j++) printf(″ ″) ;if (value[i] == ″\″\″″) value[i] = ″″ ;printf(″%s\″{″, value[i]);printf(″\″%s″ , key[i]);for (j=1; j<padding; j++) printf(″ ″) ;printf(″%s\″}″, value[i]);if (i < columns) printf(″ , ″ ) ;
}}′}
export PATH=/tivoli/bin/aix4-r1/CUSTOM:$PATH
. /etc/Tivoli/setup_env.sh
wpostdialog sp_cws.cw_attributes_dialog cw_attributes ″doit″
exit $?
H.1.7 sp_cws.get_node_numbers.ksh#!/bin/ksh######################################################################### (C) Copyright IBM Corp. 1997# All rights reserved.## Sample Tivoli customizations for the SP.## CALLBACK: sp_cws.get_node_numbers.ksh# CALLED FROM DIALOG(S): sp_cws.parent_dialog# INPUT: none# COMMENTS: Obtains list of all node numbers (with their respective# reliable hostnames) in all system partitions. The list# is formatted to be displayed by an DSL List gadget.#########################################################################
. /etc/Tivoli/setup_env.sh
export PATH=/etc:/tivoli/bin/aix4-r1/CUSTOM:$PATH
nodes=/usr/lpp/ssp/bin/SDRGetObjects -x -G Node node_number reliable_hostname
Appendix H. Contents of AEF Customization Scripts 207
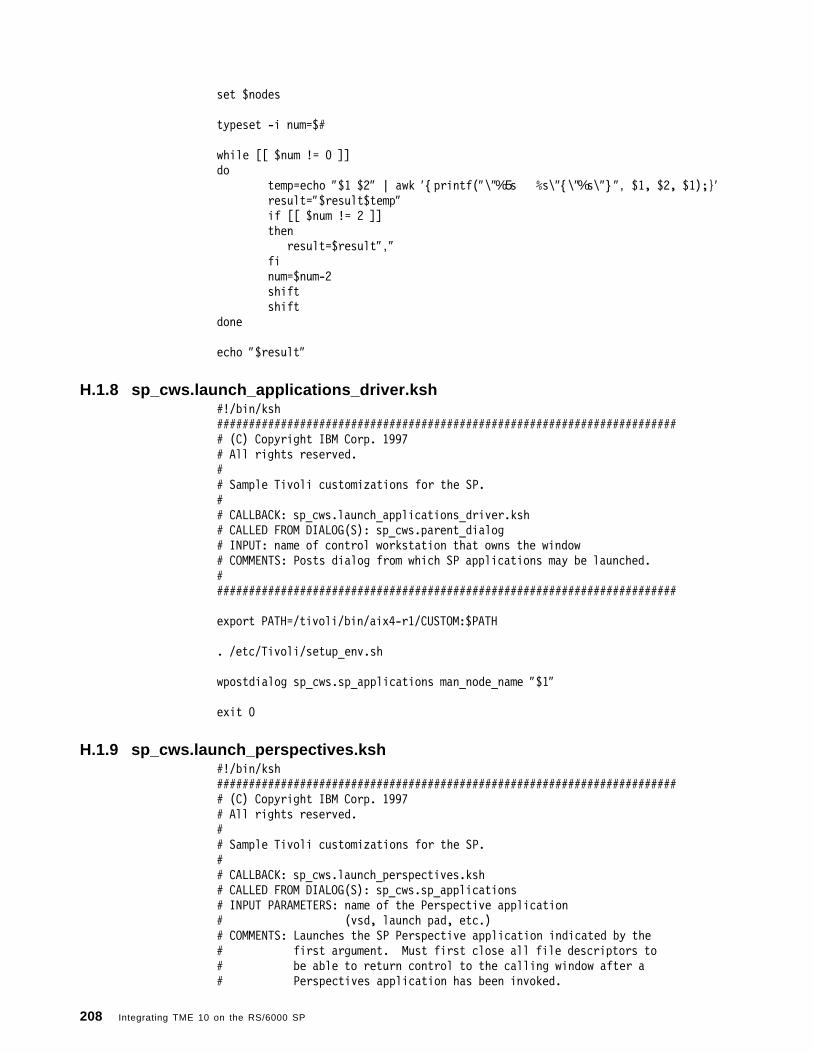
set $nodes
typeset -i num=$#
while [[ $num != 0 ]]do
temp=echo ″$1 $2″ | awk ′ {printf(″\″%5s %s\″{\″%s\″}″, $1, $2, $1);}′result=″$result$temp″if [[ $num != 2 ]]then
result=$result″ , ″finum=$num-2shiftshift
done
echo ″$result″
H.1.8 sp_cws.launch_applications_driver.ksh#!/bin/ksh######################################################################### (C) Copyright IBM Corp. 1997# All rights reserved.## Sample Tivoli customizations for the SP.## CALLBACK: sp_cws.launch_applications_driver.ksh# CALLED FROM DIALOG(S): sp_cws.parent_dialog# INPUT: name of control workstation that owns the window# COMMENTS: Posts dialog from which SP applications may be launched.#########################################################################
export PATH=/tivoli/bin/aix4-r1/CUSTOM:$PATH
. /etc/Tivoli/setup_env.sh
wpostdialog sp_cws.sp_applications man_node_name ″$1″
exit 0
H.1.9 sp_cws.launch_perspectives.ksh#!/bin/ksh######################################################################### (C) Copyright IBM Corp. 1997# All rights reserved.## Sample Tivoli customizations for the SP.## CALLBACK: sp_cws.launch_perspectives.ksh# CALLED FROM DIALOG(S): sp_cws.sp_applications# INPUT PARAMETERS: name of the Perspective application# (vsd, launch pad, etc.)# COMMENTS: Launches the SP Perspective application indicated by the# first argument. Must first close all file descriptors to# be able to return control to the calling window after a# Perspectives application has been invoked.
208 Integrating TME 10 on the RS/6000 SP
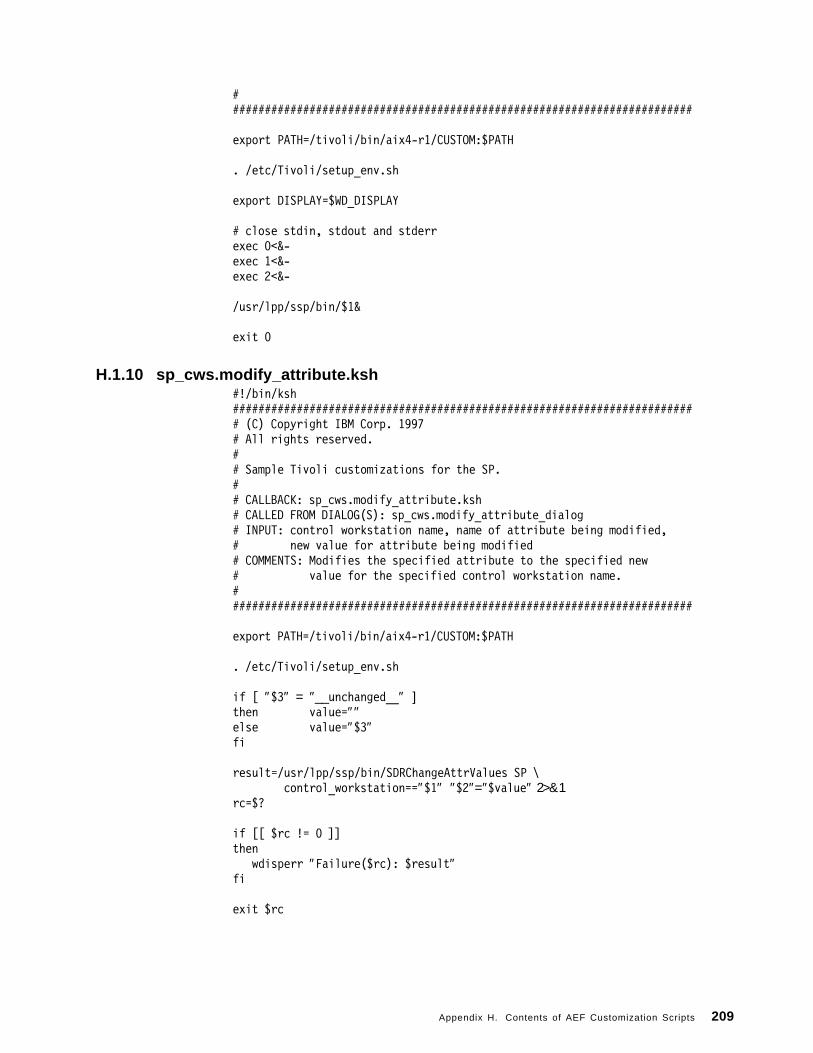
#########################################################################
export PATH=/tivoli/bin/aix4-r1/CUSTOM:$PATH
. /etc/Tivoli/setup_env.sh
export DISPLAY=$WD_DISPLAY
# close stdin, stdout and stderrexec 0<&-exec 1<&-exec 2<&-
/usr/lpp/ssp/bin/$1&
exit 0
H.1.10 sp_cws.modify_attribute.ksh#!/bin/ksh######################################################################### (C) Copyright IBM Corp. 1997# All rights reserved.## Sample Tivoli customizations for the SP.## CALLBACK: sp_cws.modify_attribute.ksh# CALLED FROM DIALOG(S): sp_cws.modify_attribute_dialog# INPUT: control workstation name, name of attribute being modified,# new value for attribute being modified# COMMENTS: Modifies the specified attribute to the specified new# value for the specified control workstation name.#########################################################################
export PATH=/tivoli/bin/aix4-r1/CUSTOM:$PATH
. /etc/Tivoli/setup_env.sh
if [ ″$3″ = ″__unchanged__″ ]then value=″″else value=″$3″fi
result=/usr/lpp/ssp/bin/SDRChangeAttrValues SP \control_workstation==″$1″ ″$2″=″$value″ 2>&1
rc=$?
if [[ $rc != 0 ]]then
wdisperr ″Failure($rc): $result″fi
exit $rc
Appendix H. Contents of AEF Customization Scripts 209

H.1.11 sp_cws.modify_attribute_driver.ksh#!/bin/ksh######################################################################### (C) Copyright IBM Corp. 1997# All rights reserved.## Sample Tivoli customizations for the SP.## CALLBACK: sp_cws.modify_attribute_driver.ksh# CALLED FROM DIALOG(S): sp_cws.cw_attributes_dialog# INPUT: name of attribute being modified, current value of attribute# being modified# COMMENTS: Posts dialog which accepts new value of attribute being# modified.#########################################################################
export PATH=/tivoli/bin/aix4-r1/CUSTOM:$PATH
. /etc/Tivoli/setup_env.sh
echo ″$*″ >/tmp/BUBJUNK
set $*name=$1shift
sp_name=/usr/lpp/ssp/bin/SDRGetObjects SP -x control_workstation
wpostdialog sp_cws.modify_attribute_dialog sp_name \″$sp_name″ attribute_name ″$name″ attribute_value ″$*″
exit $?
H.1.12 sp_cws.power_nodes_off.ksh#!/bin/ksh######################################################################### (C) Copyright IBM Corp. 1997# All rights reserved.## Sample Tivoli customizations for the SP.## CALLBACK: sp_cws.power_nodes_off.ksh# CALLED FROM DIALOG(S): sp_cws.parent_dialog# INPUT: whitespace-separate list of one or more node numbers# COMMENTS: Powers off specified nodes via the ssp ′ hmcmds′ command.# If there is any standard output or standard error, it# is displayed in a wdispmsg dialog.#########################################################################
. /etc/Tivoli/setup_env.sh
if [ -z ″$*″ -o ″$*″ = ″__unchanged__″ ]then
wdispmsg ″You must first select one or more nodes...″exit 0
fi
210 Integrating TME 10 on the RS/6000 SP

ANSWER=wdispconf ″Are you sure you want to power off nodes $* ?″
if [ ″$ANSWER″ = ″NO″ ]then
exit 0fi
typeset -i num=$#typeset -i frameNumbertypeset -i slotNumber
while [[ $num != 0 ]]do
frameNumber=/usr/lpp/ssp/bin/SDRGetObjects -x -G Node \node_number==$1 frame_number
slotNumber=/usr/lpp/ssp/bin/SDRGetObjects -x -G Node \node_number==$1 slot_number
allCommands=″$allCommands /usr/lpp/ssp/bin/hmcmds -G off \$frameNumber:$slotNumber″
result=/usr/lpp/ssp/bin/hmcmds -G off \$frameNumber:$slotNumber 2>&1
if [ -n ″$result″ ]then
wdispmsg ″$result″finum=$num-1shift
done
wdispmsg ″$allCommands″
exit 0
H.1.13 sp_cws.power_nodes_on.ksh#!/bin/ksh######################################################################### (C) Copyright IBM Corp. 1997# All rights reserved.## Sample Tivoli customizations for the SP.## CALLBACK: sp_cws.power_nodes_on.ksh# CALLED FROM DIALOG(S): sp_cws.parent_dialog# INPUT: whitespace-separate list of one or more node numbers# COMMENTS: Powers on specified nodes via the ssp ′ hmcmds′ command.# If there is any standard output or standard error, it# is displayed in a wdispmsg dialog.#########################################################################
. /etc/Tivoli/setup_env.sh
if [ -z ″$*″ -o ″$*″ = ″__unchanged__″ ]then
wdispmsg ″You must first select one or more nodes...″exit 0
fi
Appendix H. Contents of AEF Customization Scripts 211
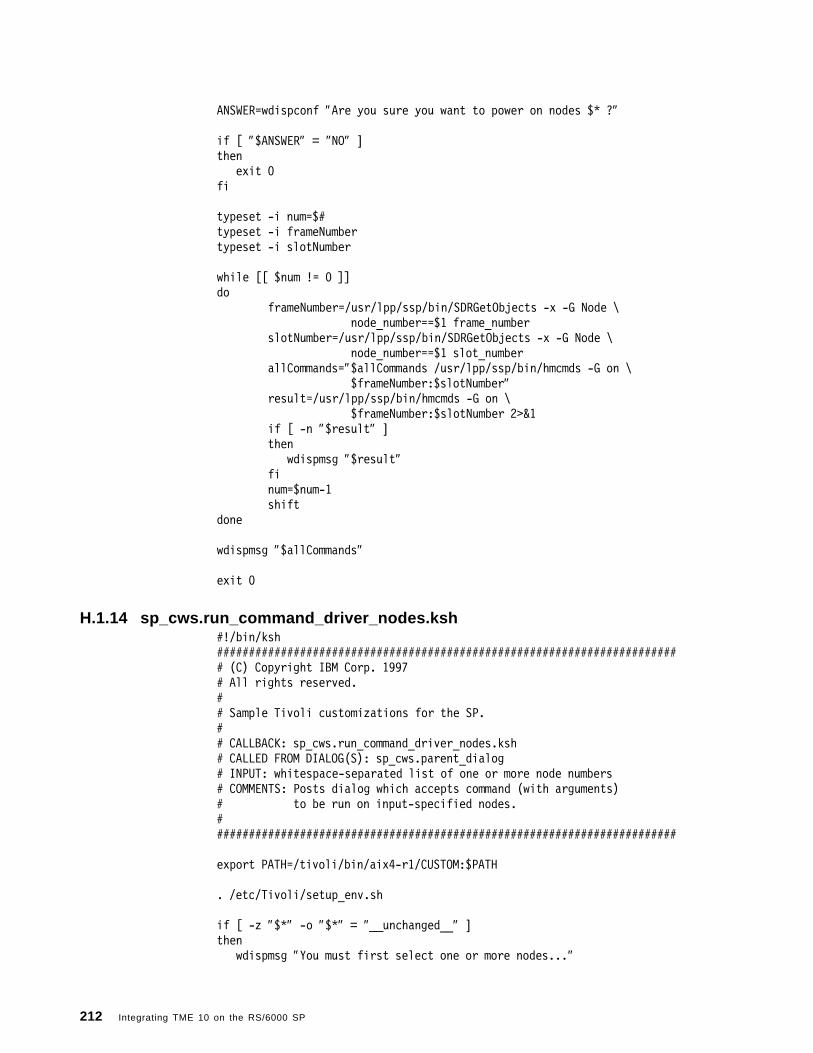
ANSWER=wdispconf ″Are you sure you want to power on nodes $* ?″
if [ ″$ANSWER″ = ″NO″ ]then
exit 0fi
typeset -i num=$#typeset -i frameNumbertypeset -i slotNumber
while [[ $num != 0 ]]do
frameNumber=/usr/lpp/ssp/bin/SDRGetObjects -x -G Node \node_number==$1 frame_number
slotNumber=/usr/lpp/ssp/bin/SDRGetObjects -x -G Node \node_number==$1 slot_number
allCommands=″$allCommands /usr/lpp/ssp/bin/hmcmds -G on \$frameNumber:$slotNumber″
result=/usr/lpp/ssp/bin/hmcmds -G on \$frameNumber:$slotNumber 2>&1
if [ -n ″$result″ ]then
wdispmsg ″$result″finum=$num-1shift
done
wdispmsg ″$allCommands″
exit 0
H.1.14 sp_cws.run_command_driver_nodes.ksh#!/bin/ksh######################################################################### (C) Copyright IBM Corp. 1997# All rights reserved.## Sample Tivoli customizations for the SP.## CALLBACK: sp_cws.run_command_driver_nodes.ksh# CALLED FROM DIALOG(S): sp_cws.parent_dialog# INPUT: whitespace-separated list of one or more node numbers# COMMENTS: Posts dialog which accepts command (with arguments)# to be run on input-specified nodes.#########################################################################
export PATH=/tivoli/bin/aix4-r1/CUSTOM:$PATH
. /etc/Tivoli/setup_env.sh
if [ -z ″$*″ -o ″$*″ = ″__unchanged__″ ]then
wdispmsg ″You must first select one or more nodes...″
212 Integrating TME 10 on the RS/6000 SP

exit 0fi
wpostdialog sp_cws.run_dialog_nodes node_list ″\″$*\″″
exit $?
H.1.15 sp_cws.run_command_nodes.ksh#!/bin/ksh######################################################################### (C) Copyright IBM Corp. 1997# All rights reserved.## Sample Tivoli customizations for the SP.## CALLBACK: sp_cws.run_command_nodes.ksh# CALLED FROM DIALOG(S): sp_cws.run_dialog_nodes# INPUT: whitespace-separated list of nodes and command (with arguments)# to run on specified nodes# COMMENTS: Executes specified command (with arguments) on specified# nodes via ′ dsh′ . All resulting standard output, standard# error, and exit statuses are displayed in a wdispmsg dialog.#########################################################################
export PATH=/tivoli/bin/aix4-r1/CUSTOM:$PATH
. /etc/Tivoli/setup_env.sh
# the following breaks up incoming args so all whitespace is used as separator# otherwise the list of nodes comes in as ONE argument (instead of many)set $*
typeset -i num=$#typeset -i maxNum=$#
while [[ $num != 0 ]]do
if [ ″$num″ = ″$maxNum″ ]then
nodes=$1else
nodes=″$nodes $1″fi
reliableHostname=/usr/lpp/ssp/bin/SDRGetObjects -x -G Node \node_number==$1 reliable_hostname
if [ ″$num″ = ″$maxNum″ ]then
hosts=${reliableHostname%% *}else
hosts=$hosts,${reliableHostname%% *}fi
num=$num-1shiftif [ ″$1″ = ″ArGuMeNtSePaRaToR″ ]then
Appendix H. Contents of AEF Customization Scripts 213

shiftbreak
fidone
ANSWER=wdispconf ″Are you sure you want to run the command on nodes $nodes ?″
if [ ″$ANSWER″ = ″NO″ ]then
exit 0fi
result=/usr/lpp/ssp/bin/dsh -w $hosts \″ /usr/lpp/ssp/install/bin/spcmdrc $* 2>&1″
wdispmsg ″$result″
exit $?
H.1.16 sp_cws.spmon.ksh#!/bin/ksh######################################################################### (C) Copyright IBM Corp. 1997# All rights reserved.## Sample Tivoli customizations for the SP.## CALLBACK: sp_cws.spmon.ksh# CALLED FROM DIALOG(S): sp_cws.sp_applications# INPUT: none# COMMENTS: Executes ″spmon -g″ .#########################################################################
export DISPLAY=$WD_DISPLAY
# close stdin, stdout and stderrexec 0<&-exec 1<&-exec 2<&-
/usr/lpp/ssp/bin/spmon -g
exit 0
H.1.17 sp_node.get_all_attributes.ksh#!/bin/ksh######################################################################### (C) Copyright IBM Corp. 1997# All rights reserved.## Sample Tivoli customizations for the SP.## CALLBACK: sp_node.get_all_attributes.ksh# CALLED FROM DIALOG(S): sp_node.parent_dialog# INPUT: node number# COMMENTS: Obtains names and values of all attributes in the SDR# ′ Node′ class for the specified node number and displays
214 Integrating TME 10 on the RS/6000 SP

# them in row/column format.#########################################################################
function doit{/usr/lpp/ssp/bin/SDRGetObjects -G Node node_number==$1 | awk ′
BEGIN {firstRow = 1;
}
{if (firstRow){
columns = split($0, key, ″ ″) ;firstRow = 0;
}else{
split($0, value, ″ ″) ;}
}
END {maxKeyLength = 0;for (i=1; i<=columns; i++){
if ((currentKeyLength = length(key[i])) > maxKeyLength)maxKeyLength = currentKeyLength;
}maxKeyLength += 2;for (i=1; i<=columns; i++){
printf(″\″%s″ , key[i]);padding = maxKeyLength - length(key[i]);for (j=1; j<padding; j++) printf(″ ″) ;if (value[i] == ″\″\″″) value[i] = ″″ ;printf(″%s\″{″, value[i]);printf(″\″%s″ , key[i]);for (j=1; j<padding; j++) printf(″ ″) ;printf(″%s\″}″, value[i]);if (i < columns) printf(″ , ″ ) ;
}}′}
export PATH=/tivoli/bin/aix4-r1/CUSTOM:$PATH
. /etc/Tivoli/setup_env.sh
wpostdialog sp_node.node_attributes_dialog node_attributes ″doit $1″
exit $?
Appendix H. Contents of AEF Customization Scripts 215
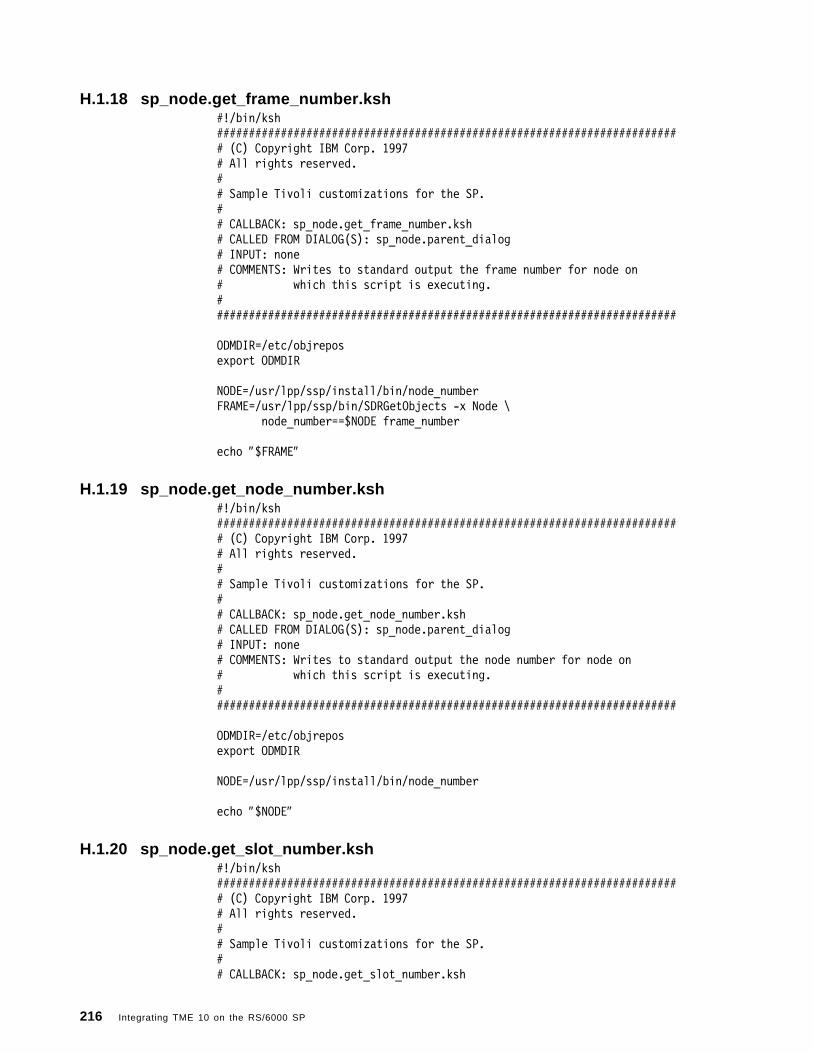
H.1.18 sp_node.get_frame_number.ksh#!/bin/ksh######################################################################### (C) Copyright IBM Corp. 1997# All rights reserved.## Sample Tivoli customizations for the SP.## CALLBACK: sp_node.get_frame_number.ksh# CALLED FROM DIALOG(S): sp_node.parent_dialog# INPUT: none# COMMENTS: Writes to standard output the frame number for node on# which this script is executing.#########################################################################
ODMDIR=/etc/objreposexport ODMDIR
NODE=/usr/lpp/ssp/install/bin/node_numberFRAME=/usr/lpp/ssp/bin/SDRGetObjects -x Node \
node_number==$NODE frame_number
echo ″$FRAME″
H.1.19 sp_node.get_node_number.ksh#!/bin/ksh######################################################################### (C) Copyright IBM Corp. 1997# All rights reserved.## Sample Tivoli customizations for the SP.## CALLBACK: sp_node.get_node_number.ksh# CALLED FROM DIALOG(S): sp_node.parent_dialog# INPUT: none# COMMENTS: Writes to standard output the node number for node on# which this script is executing.#########################################################################
ODMDIR=/etc/objreposexport ODMDIR
NODE=/usr/lpp/ssp/install/bin/node_number
echo ″$NODE″
H.1.20 sp_node.get_slot_number.ksh#!/bin/ksh######################################################################### (C) Copyright IBM Corp. 1997# All rights reserved.## Sample Tivoli customizations for the SP.## CALLBACK: sp_node.get_slot_number.ksh
216 Integrating TME 10 on the RS/6000 SP
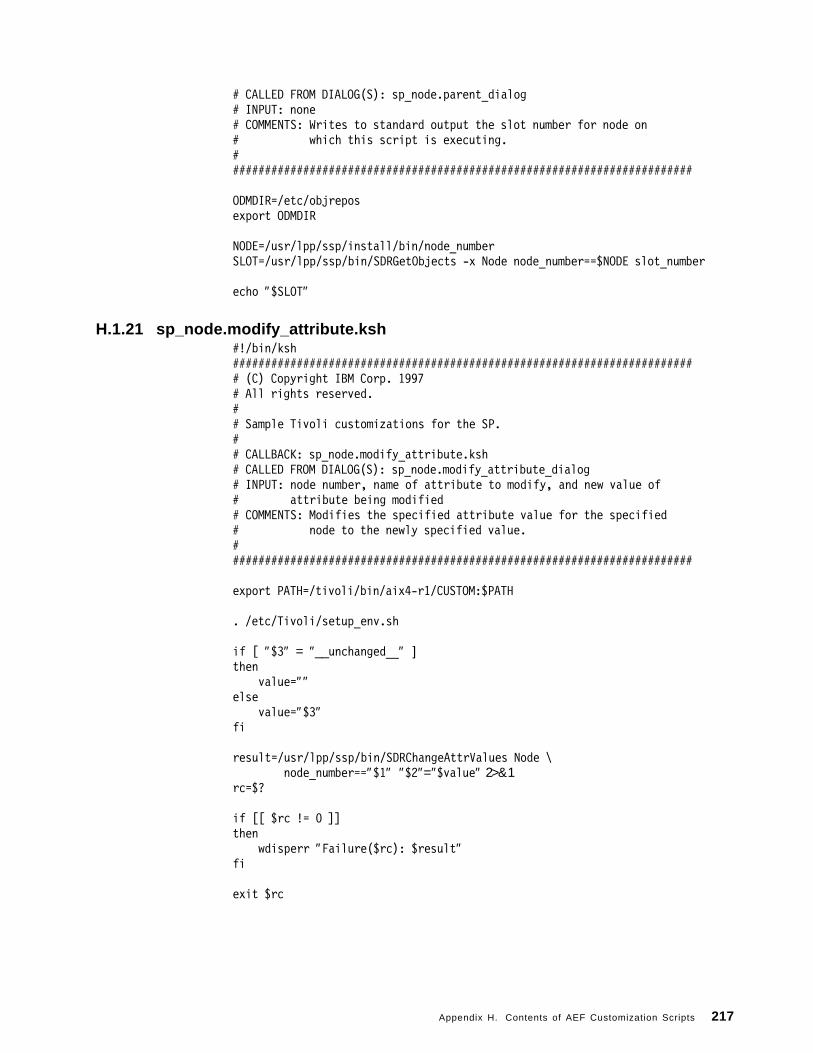
# CALLED FROM DIALOG(S): sp_node.parent_dialog# INPUT: none# COMMENTS: Writes to standard output the slot number for node on# which this script is executing.#########################################################################
ODMDIR=/etc/objreposexport ODMDIR
NODE=/usr/lpp/ssp/install/bin/node_numberSLOT=/usr/lpp/ssp/bin/SDRGetObjects -x Node node_number==$NODE slot_number
echo ″$SLOT″
H.1.21 sp_node.modify_attribute.ksh#!/bin/ksh######################################################################### (C) Copyright IBM Corp. 1997# All rights reserved.## Sample Tivoli customizations for the SP.## CALLBACK: sp_node.modify_attribute.ksh# CALLED FROM DIALOG(S): sp_node.modify_attribute_dialog# INPUT: node number, name of attribute to modify, and new value of# attribute being modified# COMMENTS: Modifies the specified attribute value for the specified# node to the newly specified value.#########################################################################
export PATH=/tivoli/bin/aix4-r1/CUSTOM:$PATH
. /etc/Tivoli/setup_env.sh
if [ ″$3″ = ″__unchanged__″ ]then
value=″″else
value=″$3″fi
result=/usr/lpp/ssp/bin/SDRChangeAttrValues Node \node_number==″$1″ ″$2″=″$value″ 2>&1
rc=$?
if [[ $rc != 0 ]]then
wdisperr ″Failure($rc): $result″fi
exit $rc
Appendix H. Contents of AEF Customization Scripts 217
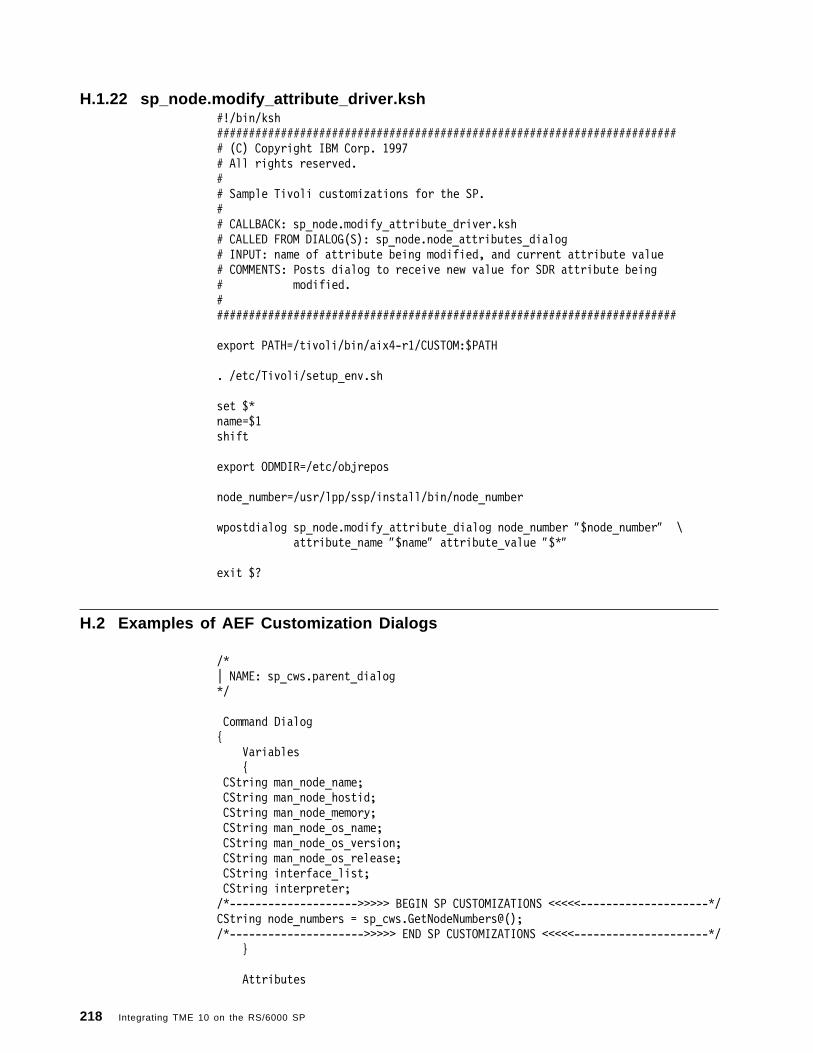
H.1.22 sp_node.modify_attribute_driver.ksh#!/bin/ksh######################################################################### (C) Copyright IBM Corp. 1997# All rights reserved.## Sample Tivoli customizations for the SP.## CALLBACK: sp_node.modify_attribute_driver.ksh# CALLED FROM DIALOG(S): sp_node.node_attributes_dialog# INPUT: name of attribute being modified, and current attribute value# COMMENTS: Posts dialog to receive new value for SDR attribute being# modified.#########################################################################
export PATH=/tivoli/bin/aix4-r1/CUSTOM:$PATH
. /etc/Tivoli/setup_env.sh
set $*name=$1shift
export ODMDIR=/etc/objrepos
node_number=/usr/lpp/ssp/install/bin/node_number
wpostdialog sp_node.modify_attribute_dialog node_number ″$node_number″ \attribute_name ″$name″ attribute_value ″$*″
exit $?
H.2 Examples of AEF Customization Dialogs
/*| NAME: sp_cws.parent_dialog*/
Command Dialog{
Variables{
CString man_node_name; CString man_node_hostid; CString man_node_memory; CString man_node_os_name; CString man_node_os_version; CString man_node_os_release; CString interface_list; CString interpreter;/*-------------------->>>>> BEGIN SP CUSTOMIZATIONS <<<<<--------------------*/CString node_numbers = sp_cws.GetNodeNumbers@();/*--------------------->>>>> END SP CUSTOMIZATIONS <<<<<---------------------*/
}
Attributes
218 Integrating TME 10 on the RS/6000 SP

{ BitmapTitle = $interpreter; Iconic = NO; Default = ok; HelpMessage = Msg(ManagedNodeHelp,
″Message catalog not found.Consult your system administrator for assistance.If the message catalog cannot be found in the NLSPATH,contact your Tivoli support provider.″ , 2 ) ;
Name = managed_node_properties; PopDown =
cancel¬$owner(); Purpose = ICONIFY;/*-------------------->>>>> BEGIN SP CUSTOMIZATIONS <<<<<--------------------*/Title = Msg(SpManagedNode, ″SP Control Workstation″, 24);/*--------------------->>>>> END SP CUSTOMIZATIONS <<<<<---------------------*/
}
Gadgets{
Group {
Attributes{
Border = YES;Layout = HORIZONTAL;Name = g3;ChildColumnAlignment = STRETCH;
}
Gadgets{
Message{
BitmapTitle = $interpreter;Name = managed_node_icon;ChildColumnAlignment = LEFT;ChildRowAlignment = CENTER;
}
Message{
Name = node_name;/*-------------------->>>>> BEGIN SP CUSTOMIZATIONS <<<<<--------------------*/Title = Msg(SpManagedNode, ″SP Control Workstation:″, 25);/*--------------------->>>>> END SP CUSTOMIZATIONS <<<<<---------------------*/
Value = $man_node_name;ChildColumnAlignment = LEFT;ChildRowAlignment = CENTER;
}
} }
Group {
Attributes{
Border = YES;
Appendix H. Contents of AEF Customization Scripts 219

Layout = GRID;Name = g0;Title = Msg(ManagedNodeCatalog,″Properties:″ ,19) ;TitlePos = TOP;
}
Gadgets{
Message{
Name = node_name_label;Title = Msg(ManagedNodeCatalog,″SystemName:″ ,20) ;GridHorizontal = 2;GridVertical = 1;ChildColumnAlignment = LEFT;
}
Message{
Name = node_name;Title = ″″ ;Value = $man_node_name;GridHorizontal = 4;GridVertical = 1;ChildColumnAlignment = LEFT;
}
Message{
Name = host_id_label;Title = Msg(ManagedNodeCatalog,″Host ID:″ ,21) ;GridHorizontal = 2;GridVertical = 2;ChildColumnAlignment = LEFT;
}
Message{
Name = host_id;Title = ″″ ;Value = $man_node_hostid;GridHorizontal = 4;GridVertical = 2;ChildColumnAlignment = LEFT;
}
Message{
Name = memory_label;Title = Msg(ManagedNodeCatalog,″Physical Memory (Mb):″ ,22) ;GridHorizontal = 2;GridVertical = 3;ChildColumnAlignment = LEFT;
}
Message{
Name = memory;Title = ″″ ;
220 Integrating TME 10 on the RS/6000 SP
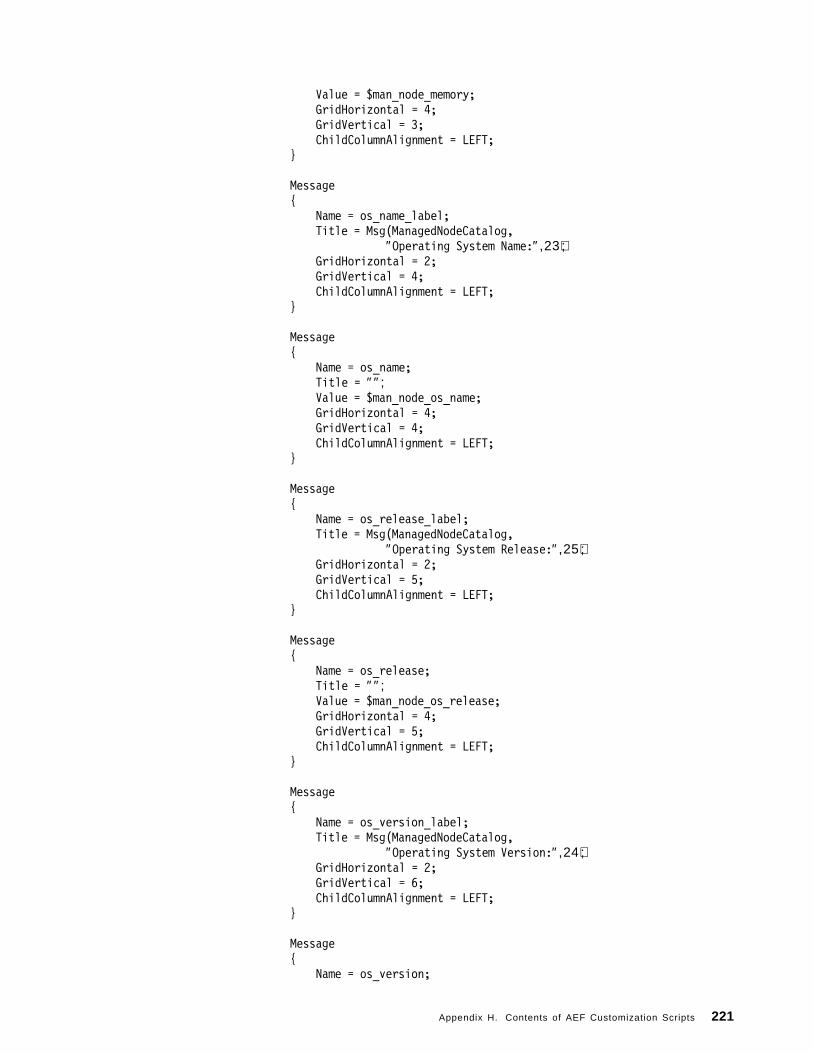
Value = $man_node_memory;GridHorizontal = 4;GridVertical = 3;ChildColumnAlignment = LEFT;
}
Message{
Name = os_name_label;Title = Msg(ManagedNodeCatalog,
″Operating System Name:″ ,23) ;GridHorizontal = 2;GridVertical = 4;ChildColumnAlignment = LEFT;
}
Message{
Name = os_name;Title = ″″ ;Value = $man_node_os_name;GridHorizontal = 4;GridVertical = 4;ChildColumnAlignment = LEFT;
}
Message{
Name = os_release_label;Title = Msg(ManagedNodeCatalog,
″Operating System Release:″ ,25) ;GridHorizontal = 2;GridVertical = 5;ChildColumnAlignment = LEFT;
}
Message{
Name = os_release;Title = ″″ ;Value = $man_node_os_release;GridHorizontal = 4;GridVertical = 5;ChildColumnAlignment = LEFT;
}
Message{
Name = os_version_label;Title = Msg(ManagedNodeCatalog,
″Operating System Version:″ ,24) ;GridHorizontal = 2;GridVertical = 6;ChildColumnAlignment = LEFT;
}
Message{
Name = os_version;
Appendix H. Contents of AEF Customization Scripts 221
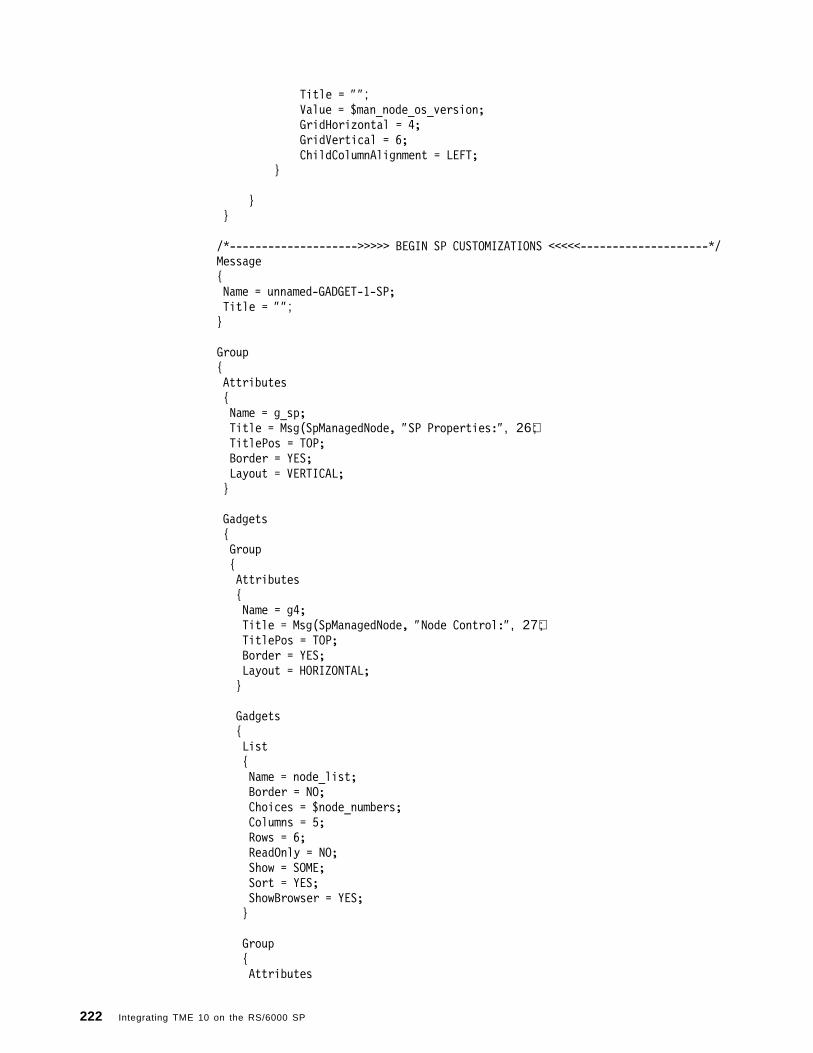
Title = ″″ ;Value = $man_node_os_version;GridHorizontal = 4;GridVertical = 6;ChildColumnAlignment = LEFT;
}
} }
/*-------------------->>>>> BEGIN SP CUSTOMIZATIONS <<<<<--------------------*/Message{ Name = unnamed-GADGET-1-SP; Title = ″″ ;}
Group{ Attributes {Name = g_sp;Title = Msg(SpManagedNode, ″SP Properties:″, 26);TitlePos = TOP;Border = YES;Layout = VERTICAL;
}
Gadgets {Group{Attributes{Name = g4;Title = Msg(SpManagedNode, ″Node Control:″, 27);TitlePos = TOP;Border = YES;Layout = HORIZONTAL;}
Gadgets{List{Name = node_list;Border = NO;Choices = $node_numbers;Columns = 5;Rows = 6;ReadOnly = NO;Show = SOME;Sort = YES;ShowBrowser = YES;}
Group{Attributes
222 Integrating TME 10 on the RS/6000 SP
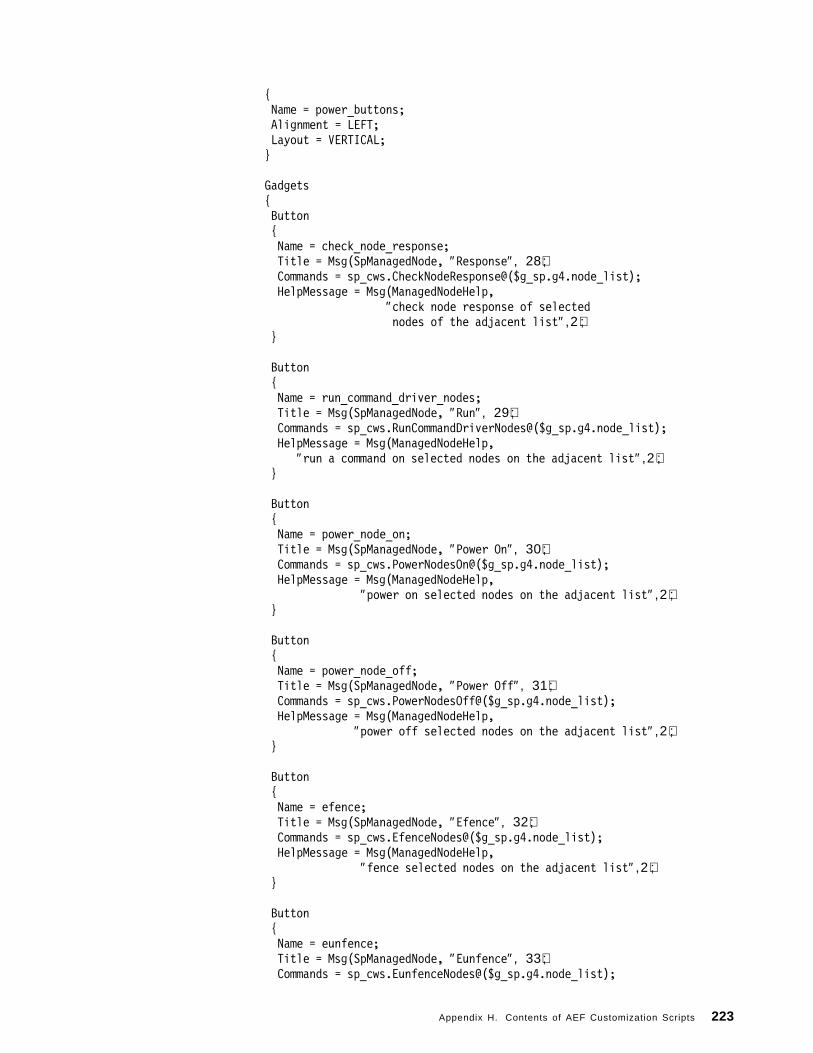
{Name = power_buttons;Alignment = LEFT;Layout = VERTICAL;}
Gadgets{Button{Name = check_node_response;Title = Msg(SpManagedNode, ″Response″, 28);Commands = sp_cws.CheckNodeResponse@($g_sp.g4.node_list);HelpMessage = Msg(ManagedNodeHelp,
″check node response of selectednodes of the adjacent list″ , 2 ) ;
}
Button{Name = run_command_driver_nodes;Title = Msg(SpManagedNode, ″Run″, 29);Commands = sp_cws.RunCommandDriverNodes@($g_sp.g4.node_list);HelpMessage = Msg(ManagedNodeHelp,
″run a command on selected nodes on the adjacent list″ , 2 ) ;}
Button{Name = power_node_on;Title = Msg(SpManagedNode, ″Power On″, 30);Commands = sp_cws.PowerNodesOn@($g_sp.g4.node_list);HelpMessage = Msg(ManagedNodeHelp,
″power on selected nodes on the adjacent list″ , 2 ) ;}
Button{Name = power_node_off;Title = Msg(SpManagedNode, ″Power Off″, 31);Commands = sp_cws.PowerNodesOff@($g_sp.g4.node_list);HelpMessage = Msg(ManagedNodeHelp,
″power off selected nodes on the adjacent list″ , 2 ) ;}
Button{Name = efence;Title = Msg(SpManagedNode, ″Efence″, 32);Commands = sp_cws.EfenceNodes@($g_sp.g4.node_list);HelpMessage = Msg(ManagedNodeHelp,
″fence selected nodes on the adjacent list″ , 2 ) ;}
Button{Name = eunfence;Title = Msg(SpManagedNode, ″Eunfence″, 33);Commands = sp_cws.EunfenceNodes@($g_sp.g4.node_list);
Appendix H. Contents of AEF Customization Scripts 223

HelpMessage = Msg(ManagedNodeHelp,″unfence selected nodes on the adjacent list″ , 2 ) ;
}}}}}
Message{Name = unnamed-GADGET-2-SP;Title = ″″ ;}
Group{Attributes{Name = attribute_buttons;Alignment = LEFT;Layout = HORIZONTAL;}
Gadgets{Button{Name = cw_attributes;Title = Msg(SpManagedNode, ″All Attributes″, 34);
/* Commands = sp_cws.GetAllCwAttributes@(); */Commands = sp_cws.GetAllCwAttributes@();HelpMessage = Msg(ManagedNodeHelp,
″Read/Write all SDR information aboutthis control workstation″ , 2 ) ;
}
Button{Name = run_command_driver;Title = Msg(SpManagedNode, ″Run CW″, 35);Commands = sp.RunCommandDriver@();HelpMessage = Msg(ManagedNodeHelp,
″Command line interface to the control workstation″ , 2 ) ;}
Button{Name = launch_applications_driver;Title = Msg(SpManagedNode, ″SP Applications″, 36);Commands = sp_cws.LaunchApplicationsDriver@($man_node_name);HelpMessage = Msg(ManagedNodeHelp,
″Launch SP applications (Perspectives and System Monitor)″ , 2 ) ;}}}
}}/*--------------------->>>>> END SP CUSTOMIZATIONS <<<<<---------------------*/
224 Integrating TME 10 on the RS/6000 SP

Message{
Name = unnamed-GADGET-2;Title = ″″ ;
}
Group {
Attributes{
Border = YES;Layout = HORIZONTAL;Name = g2;Title = Msg(ManagedNodeCatalog,″IP Interfaces:″ ,26) ;TitlePos = TOP;
}
Gadgets{
Choice{
Border = NO;Choices = $interface_list;Name = ip_list;ShowBrowser = NO;
}
Group{
Attributes{
Alignment = LEFT;Layout = VERTICAL;Name = ip_buttons;ChildRowAlignment = STRETCH;
}
Gadgets{
Button{
Commands =add_interface¬$owner();
Name = add_interface;Title = Msg(ManagedNodeCatalog,
″Add Interface...″ ,27) ;ChildColumnAlignment = STRETCH;
}
Button{
Commands =remove_interface¬$owner($g2.ip_list);
Name = remove_interface;Title = Msg(ManagedNodeCatalog,
″Remove Interface″ ,28) ;ChildColumnAlignment = STRETCH;
}
Appendix H. Contents of AEF Customization Scripts 225

Button{
Commands =edit_interface¬$owner($g2.ip_list);
Name = edit_interface;Title = Msg(ManagedNodeCatalog,
″Edit Interface″ ,29) ;ChildColumnAlignment = STRETCH;
}
Button{
Commands =reset¬$owner();
Name = reset_interfaces;Title = Msg(ManagedNodeCatalog,Reset,30);ChildColumnAlignment = STRETCH;
}
}}
} }
Message {
Name = unnamed-GADGET-4;Title = ″″ ;
}
CommandButton {
Commands =ok¬$owner();
Name = ok;Title = Msg(ManagedNodeCatalog,″Update & Close″ ,14) ;
}
CommandButton {
Commands =cancel¬$owner();
Name = cancel;Title = Msg(GenericCollectCat,Close,40);
}
} }/*==============================================================================| Dialog which launches various pre-existing SP applications.| NAME: sp_cws.sp_applications==============================================================================*/
Command Dialog{ Variables {CString man_node_name;
226 Integrating TME 10 on the RS/6000 SP

}
Attributes{Name = sp_launch_applications;Title = $man_node_name;
}
Group {Attributes{Name = g1;Title = Msg(SpManagedNode, ″SP Perspectives″ , 1) ;TitlePos = TOP;Border = YES;Layout = VERTICAL;ChildColumnAlignment = STRETCH;}
Gadgets{Button{Name = launch_pad;Title = Msg(SpManagedNode, ″Launch Pad″ , 2) ;Commands = sp_cws.LaunchPerspectives@(″perspectives″ ) ;HelpMessage = Msg(SpManagedNode,
″Start the SP Perspectives Launch Pad″ , 3) ;}
Button{Name = hardware;Title = Msg(SpManagedNode, ″Hardware″ , 4) ;Commands = sp_cws.LaunchPerspectives@(″sphardware″ ) ;HelpMessage = Msg(SpManagedNode,
″Launch the SP Perspectives Hardware view″ , 5) ;}
Button{Name = event;Title = Msg(SpManagedNode, ″Event″ , 6) ;Commands = sp_cws.LaunchPerspectives@(″spevent″ ) ;HelpMessage = Msg(SpManagedNode,
″Launch the SP Perspectives Event view″ , 7) ;}
Button{Name = vsd;Title = Msg(SpManagedNode, ″VSD″ , 8) ;Commands = sp_cws.LaunchPerspectives@(″spvsd″ ) ;HelpMessage = Msg(SpManagedNode,
″Launch the SP Perspectives Virtual Share Disk view″ , 9) ;}
Button
Appendix H. Contents of AEF Customization Scripts 227

{Name = syspar;Title = Msg(SpManagedNode, ″System Partitioning Aid″, 10);Commands = sp_cws.LaunchPerspectives@(″spsyspar″ ) ;HelpMessage = Msg(SpManagedNode,
″Launch the SP Perspectives System Partitioning Aid view″, 11);}
Button{Name = perfmon;Title = Msg(SpManagedNode, ″System Performance Tool″, 12);Commands = sp_cws.LaunchPerspectives@(″spperfmon″ ) ;HelpMessage = Msg(SpManagedNode,
″Launch the SP Perspectives System Performance Tool view″, 13);}}
}
Group {Attributes{Name = g2;Title = Msg(SpManagedNode, ″SP System Monitor″, 14);Border = YES;Layout = VERTICAL;ChildColumnAlignment = STRETCH;TitlePos = TOP;}
Gadgets{Button{Name = system_monitor;Title = Msg(SpManagedNode, ″System Monitor GUI″, 15);Commands = sp_cws.spmon@();HelpMessage = Msg(SpManagedNode,
″Launch the SP Hardware Monitor GUI″, 16);TitlePos = TOP;}}
}
Group {Button{Name = dismiss;Title = Msg(GenericCollectCat,Dismiss,40);Commands = dtc_dismiss($owner,sp_launch_applications, $self);}
}}
228 Integrating TME 10 on the RS/6000 SP

Appendix I. Special Notices
This publication is intended to help customers, business partners and IBMpersonnel to integrate the RS/6000 SP-specific system management data into aTivoli management environment. The information in this publication is notintended as the specification of any programming interfaces that are provided byTivoli Management Environment 10 and Parallel System Support Program. Seethe PUBLICATIONS section of the IBM Programming Announcement for TivoliManagement Environment 10 and Parallel System Support Program for moreinformation about what publications are considered to be product documentation.
References in this publication to IBM products, programs or services do notimply that IBM intends to make these available in all countries in which IBMoperates. Any reference to an IBM product, program, or service is not intendedto state or imply that only IBM′s product, program, or service may be used. Anyfunctionally equivalent program that does not infringe any of IBM′s intellectualproperty rights may be used instead of the IBM product, program or service.
Information in this book was developed in conjunction with use of the equipmentspecified, and is limited in application to those specific hardware and softwareproducts and levels.
IBM may have patents or pending patent applications covering subject matter inthis document. The furnishing of this document does not give you any license tothese patents. You can send license inquiries, in writing, to the IBM Director ofLicensing, IBM Corporation, 500 Columbus Avenue, Thornwood, NY 10594 USA.
Licensees of this program who wish to have information about it for the purposeof enabling: (i) the exchange of information between independently createdprograms and other programs (including this one) and (ii) the mutual use of theinformation which has been exchanged, should contact IBM Corporation, Dept.600A, Mail Drop 1329, Somers, NY 10589 USA.
Such information may be available, subject to appropriate terms and conditions,including in some cases, payment of a fee.
The information contained in this document has not been submitted to anyformal IBM test and is distributed AS IS. The information about non-IBM(″vendor″) products in this manual has been supplied by the vendor and IBMassumes no responsibility for its accuracy or completeness. The use of thisinformation or the implementation of any of these techniques is a customerresponsibility and depends on the customer′s ability to evaluate and integratethem into the customer′s operational environment. While each item may havebeen reviewed by IBM for accuracy in a specific situation, there is no guaranteethat the same or similar results will be obtained elsewhere. Customersattempting to adapt these techniques to their own environments do so at theirown risk.
Any performance data contained in this document was determined in acontrolled environment, and therefore, the results that may be obtained in otheroperating environments may vary significantly. Users of this document shouldverify the applicable data for their specific environment.
Copyright IBM Corp. 1997 229

The following document contains examples of data and reports used in dailybusiness operations. To illustrate them as completely as possible, the examplescontain the names of individuals, companies, brands, and products. All of thesenames are fictitious and any similarity to the names and addresses used by anactual business enterprise is entirely coincidental.
Reference to PTF numbers that have not been released through the normaldistribution process does not imply general availability. The purpose ofincluding these reference numbers is to alert IBM customers to specificinformation relative to the implementation of the PTF when it becomes availableto each customer according to the normal IBM PTF distribution process.
You can reproduce a page in this document as a transparency, if that page hasthe copyright notice on it. The copyright notice must appear on each page beingreproduced.
The following terms are trademarks of the International Business MachinesCorporation in the United States and/or other countries:
The following terms are trademarks of other companies:
Tivoli, Tivoli/Enterprise Console, TME 10 are trademarksof Tivoli Systems, an IBM Company.
UNIX is a registered trademark in the United States and othercountries licensed exclusively through X/Open Company Limited.
Other company, product, and service names may be trademarks or servicemarks of others.
AIX AIX/6000AS/400 BookManagerIBM NetViewPOWERparallel RS/6000Scalable POWERparallel Systems SPSystem/390 SystemView
230 Integrating TME 10 on the RS/6000 SP

Appendix J. Related Publications
The publications listed in this section are considered particularly suitable for amore detailed discussion of the topics covered in this redbook.
J.1 International Technical Support Organization PublicationsFor information on ordering these ITSO publications see “How to Get ITSORedbooks” on page 233.
• RS/6000 SP High Availability Infrastructure, SG24-4838
• RS/6000 SP: Problem Determination Guide, SG24-4778
• RS/6000 SP Monitoring: Keeping It Alive, SG24-4873
• Understanding Tivoli′s TME 3.0 and TME 10, SG24-4948
• TME 10 Cookbook for AIX Systems Management and NetworkingApplications, SG24-4867
J.2 Redbooks on CD-ROMsRedbooks are also available on CD-ROMs. Order a subscription and receiveupdates 2-4 times a year at significant savings.
CD-ROM Title SubscriptionNumber
Collection KitNumber
System/390 Redbooks Collection SBOF-7201 SK2T-2177Networking and Systems Management Redbooks Collection SBOF-7370 SK2T-6022Transaction Processing and Data Management Redbook SBOF-7240 SK2T-8038AS/400 Redbooks Collection SBOF-7270 SK2T-2849RS/6000 Redbooks Collection (HTML, BkMgr) SBOF-7230 SK2T-8040RS/6000 Redbooks Collection (PostScript) SBOF-7205 SK2T-8041Application Development Redbooks Collection SBOF-7290 SK2T-8037Personal Systems Redbooks Collection SBOF-7250 SK2T-8042
J.3 Other PublicationsThese publications are also relevant as further information sources:
• IBM Parallel System Support Programs for AIX: Administration Guide,GC23-3897
• IBM Parallel System Support Programs for AIX: Command and TechnicalReference, GC23-3900
• IBM Parallel System Support Programs for AIX: Event ManagementProgramming Guide and Reference, SC23-3996
• IBM Parallel System Support Programs for AIX, SBOF-8587
• Tivoli Courier User′s Guide, GC31-8330
• TME 10 Inventory User′s Guide, GC31-8381
• Tivoli Enterprise Console Event Integration Facility Guide, GC31-8337
• Tivoli AEF User′s Guide, GC31-8345
These publications are distributed with the TME 10 products:
Copyright IBM Corp. 1997 231

• TME 10 Framework Reference Manual, SC31-8434
• TME 10 Framework Planning and Installation Guide, SC31-8432
• TME 10 Framework Release Notes Version 3.1, Revision C, GI10-3082
• TME 10 Framework User′s Guide, GC31-8433
• TME 10 User Administration Installation Guide, SC31-8389
• Tivoli User Administration User and Group Management Guide, SC31-8391
• TME 10 Task Library Language Developer′s Guide, SC31-8436
• Tivoli Sentry User′s Guide, GC31-8382
• Tivoli Enterprise Console User′s Guide Volume I, GC31-8334
• Tivoli Enterprise Console User′s Guide Volume II, GC31-8335
• Tivoli Enterprise Console Rule Builder′s Guide, GC31-8336
• Tivoli Enterprise Console Event Adapter Guide: SNMP, SC31-8342
• Tivoli Enterprise Console Event Adapter Guide: LogFile, SC31-8343
• Tivoli Enterprise Console Event Adapter Guide: IBM NetView, SC31-8339
232 Integrating TME 10 on the RS/6000 SP
How to Get ITSO Redbooks
This section explains how both customers and IBM employees can find out about ITSO redbooks, CD-ROMs,workshops, and residencies. A form for ordering books and CD-ROMs is also provided.
This information was current at the time of publication, but is continually subject to change. The latestinformation may be found at http://www.redbooks.ibm.com.
How IBM Employees Can Get ITSO Redbooks
Employees may request ITSO deliverables (redbooks, BookManager BOOKs, and CD-ROMs) and information aboutredbooks, workshops, and residencies in the following ways:
• PUBORDER — to order hardcopies in United States
• GOPHER link to the Internet - type GOPHER.WTSCPOK.ITSO.IBM.COM
• Tools disks
To get LIST3820s of redbooks, type one of the following commands:
TOOLS SENDTO EHONE4 TOOLS2 REDPRINT GET SG24xxxx PACKAGETOOLS SENDTO CANVM2 TOOLS REDPRINT GET SG24xxxx PACKAGE (Canadian users only)
To get BookManager BOOKs of redbooks, type the following command:
TOOLCAT REDBOOKS
To get lists of redbooks, type one of the following commands:
TOOLS SENDTO USDIST MKTTOOLS MKTTOOLS GET ITSOCAT TXTTOOLS SENDTO USDIST MKTTOOLS MKTTOOLS GET LISTSERV PACKAGE
To register for information on workshops, residencies, and redbooks, type the following command:
TOOLS SENDTO WTSCPOK TOOLS ZDISK GET ITSOREGI 1996
For a list of product area specialists in the ITSO: type the following command:
TOOLS SENDTO WTSCPOK TOOLS ZDISK GET ORGCARD PACKAGE
• Redbooks Web Site on the World Wide Web
http://w3.itso.ibm.com/redbooks
• IBM Direct Publications Catalog on the World Wide Web
http://www.elink.ibmlink.ibm.com/pbl/pbl
IBM employees may obtain LIST3820s of redbooks from this page.
• REDBOOKS category on INEWS
• Online — send orders to: USIB6FPL at IBMMAIL or DKIBMBSH at IBMMAIL
• Internet Listserver
With an Internet e-mail address, anyone can subscribe to an IBM Announcement Listserver. To initiate theservice, send an e-mail note to [email protected] with the keyword subscribe in the body ofthe note (leave the subject line blank). A category form and detailed instructions will be sent to you.
Redpieces
For information so current it is still in the process of being written, look at ″Redpieces″ on the Redbooks WebSite (http://www.redbooks.ibm.com/redpieces.htm). Redpieces are redbooks in progress; not all redbooksbecome redpieces, and sometimes just a few chapters will be published this way. The intent is to get theinformation out much quicker than the formal publishing process allows.
Copyright IBM Corp. 1997 233

How Customers Can Get ITSO Redbooks
Customers may request ITSO deliverables (redbooks, BookManager BOOKs, and CD-ROMs) and information aboutredbooks, workshops, and residencies in the following ways:
• Online Orders — send orders to:
• Telephone orders
• Mail Orders — send orders to:
• Fax — send orders to:
• 1-800-IBM-4FAX (United States) or (+1)001-408-256-5422 (Outside USA) — ask for:
Index # 4421 Abstracts of new redbooksIndex # 4422 IBM redbooksIndex # 4420 Redbooks for last six months
• Direct Services - send note to [email protected]
• On the World Wide Web
Redbooks Web Site http://www.redbooks.ibm.comIBM Direct Publications Catalog http://www.elink.ibmlink.ibm.com/pbl/pbl
• Internet Listserver
With an Internet e-mail address, anyone can subscribe to an IBM Announcement Listserver. To initiate theservice, send an e-mail note to [email protected] with the keyword subscribe in the body ofthe note (leave the subject line blank).
Redpieces
For information so current it is still in the process of being written, look at ″Redpieces″ on the Redbooks WebSite (http://www.redbooks.ibm.com/redpieces.htm). Redpieces are redbooks in progress; not all redbooksbecome redpieces, and sometimes just a few chapters will be published this way. The intent is to get theinformation out much quicker than the formal publishing process allows.
IBMMAIL InternetIn United States: usib6fpl at ibmmail [email protected] Canada: caibmbkz at ibmmail [email protected] North America: dkibmbsh at ibmmail [email protected]
United States (toll free) 1-800-879-2755Canada (toll free) 1-800-IBM-4YOU
Outside North America (long distance charges apply)(+45) 4810-1320 - Danish(+45) 4810-1420 - Dutch(+45) 4810-1540 - English(+45) 4810-1670 - Finnish(+45) 4810-1220 - French
(+45) 4810-1020 - German(+45) 4810-1620 - Italian(+45) 4810-1270 - Norwegian(+45) 4810-1120 - Spanish(+45) 4810-1170 - Swedish
IBM PublicationsPublications Customer SupportP.O. Box 29570Raleigh, NC 27626-0570USA
IBM Publications144-4th Avenue, S.W.Calgary, Alberta T2P 3N5Canada
IBM Direct ServicesSortemosevej 21DK-3450 AllerødDenmark
United States (toll free) 1-800-445-9269Canada 1-403-267-4455Outside North America (+45) 48 14 2207 (long distance charge)
234 Integrating TME 10 on the RS/6000 SP

IBM Redbook Order Form
Please send me the following:
Title Order Number Quantity
First name Last name
Company
Address
City Postal code Country
Telephone number Telefax number VAT number
• Invoice to customer number
• Credit card number
Credit card expiration date Card issued to Signature
We accept American Express, Diners, Eurocard, Master Card, and Visa. Payment by credit card notavailable in all countries. Signature mandatory for credit card payment.
How to Get ITSO Redbooks 235

236 Integrating TME 10 on the RS/6000 SP

ITSO Redbook Evaluation
Integrating TME 10 on the RS/6000 SPSG24-2071-00
Your feedback is very important to help us maintain the quality of ITSO redbooks. Please complete thisquestionnaire and return it using one of the following methods:
• Use the online evaluation form found at http://www.redbooks.com• Fax this form to: USA International Access Code + 1 914 432 8264• Send your comments in an Internet note to [email protected]
Please rate your overall satisfaction with this book using the scale:(1 = very good, 2 = good, 3 = average, 4 = poor, 5 = very poor)
Overall Satisfaction ____________
Please answer the following questions:
Was this redbook published in time for your needs? Yes____ No____
If no, please explain:_____________________________________________________________________________________________________
_____________________________________________________________________________________________________
_____________________________________________________________________________________________________
_____________________________________________________________________________________________________
What other redbooks would you like to see published?_____________________________________________________________________________________________________
_____________________________________________________________________________________________________
_____________________________________________________________________________________________________
Comments/Suggestions: ( THANK YOU FOR YOUR FEEDBACK! )_____________________________________________________________________________________________________
_____________________________________________________________________________________________________
_____________________________________________________________________________________________________
_____________________________________________________________________________________________________
_____________________________________________________________________________________________________
Copyright IBM Corp. 1997 237

238 Integrating TME 10 on the RS/6000 SP

List of Abbreviations
ADE TME 10 ApplicationDevelopers Environment
AEF TME 10 Application ExtensionFacility
AIX Advanced InteractiveExecutive
API Application ProgrammingInterface
BAROC Basic Representation ofObject in C
EIF TME 10 Event IntegrationFacility
IBM International BusinessMachines Corporation
ITSO International TechnicalSupport Organization
PSSP Parallel Systems SupportProgram
SBS Structured Byte String
SDR System Data Repository
SMIT System ManagementInterface Tool
SNMP Simple Network ManagementProtocol
TCP/IP Transmission ControlProtocol/Internet Protocol
TME Tivoli ManagementEnvironment
Copyright IBM Corp. 1997 239

240 Integrating TME 10 on the RS/6000 SP
Index
Special Characters/etc/snmpd.conf 47
Aabbreviations 239acronyms 239ADE 4administrator 4administrator roles 14AEF 4AEF Customizationalert ing 87authorization roles 5, 14
Bbackup 22backups 21BAROC definit ion 26BAROC file 27, 70bibliography 231
Cclass definition statement 48, 58, 67clients 11control workstation 9, 11, 19, 27
Ddatabase 21diskette 25
EEIF 4, 29event adapter 2
BAROC file 27, 29description 27installing the BAROC file 30tecad_pssp command 27, 33testing the tecad_pssp command 34
event adapter BAROC file 29event correlation 84event definit ion 29event f i l ter 31event f i l ters 84event integration
distributed monitoring 91using 58
event integration facil i ty 31event management
assigning severity levels 69event management 69
Event Manager 2
Ff i le collections 5file distr ibution 5forwarding log fi le events 59
Ggcc compiler 32
Iinstall_adapter command 32install_agent command 32, 37installation 19
backups 21planning 19restore 22system installation 5TMR 8
Jjobs 95
KKerberos 5, 7
Llog file 25log files 74, 90logfile adapter 25
BAROC file 61, 70class definition statement 67forwarding events 59log file integration 88log_pssp.baroc 61recommendations 75severity levels 69using 58
logfile BAROC file 61logging 58
Mmakeit script 32managed node 12, 13, 21managed resource 4MIB 47monitor ing 87
Copyright IBM Corp. 1997 241
Nnamed pipe 92, 93NetView adapter 81NetView/6000 for AIX
BAROC file 81customizing traps 78forwarding events 75, 81loading MIB objects 76setup procedure 76setup procedure in T/EC 83
network 10, 11
Pparti t ions 9, 13, 15, 31passwords 6Perspectives 2
defining events 34, 90log file event definition 60sentry event definit ion 89
planning 4pmandef 27, 34, 35, 59, 60, 74, 89, 91policy 3policy region 3, 6, 12, 97policy subregion 12Problem Management
generating log fi le events 59tecad_pssp 33trap generation 86
profi le 3, 11profi le manager 3, 6, 11, 13, 14PSSP 1PSSP T/EC Adapter 2
Rresource variable 29, 61, 66, 73response option 35restore 22rule base 30, 53, 62, 83
SSBS 73SDR 37, 69security 5, 8severi ty 58, 70sizing 12SNMP adapter
/etc/snmpd.conf 47adapter value 58BAROC file 50, 53class definition statement 48installation 46rule base 53severity definit ion 48severity levels 50, 58tecad_snmpd.conf file 47
SNMP adapter (continued)testing the adapter 53
SNMP traps 45socket 46software levels xii iSP Ethernet 10SP switch 10, 19SP-MIBS 47structured byte string 73subscribers 14switch 10, 19sysctl 7syslog 58, 59, 73, 74, 90
TT/EC 2, 26T/EC Event Server 59task libraries 5, 7, 95, 96task l ibrary 2Task Library Language 95, 97tasks 5, 7, 95tecad_pssp 25tecad_pssp command 27, 33terminology 3Tivoli Enterprise Console 26Tivoli Management Environment, see TMETivoli Management Platform 3Tivoli Object Database 21TME 1, 3, 4, 8TME 10 Application Developers Environment, see ADETME 10 Application Extension Facility, see AEFTME 10 Distributed Monitoring 2
asynchronous 87log file integration 88monitoring function 87wasync command 87
TME 10 Enterprise Console, see T/ECassigning severity levels 70
TME 10 Event Integration Facility, see EIFTME 10 Framework 3, 12TME 10 Software Distribution 6TME client 9, 10, 11TME server 9, 10, 12TME server load 10, 11TMP 3TMR 3, 8TMR configuration 8TMR connections 11, 12, 23traps 45, 48, 58
BAROC file 49class definition statement file 49
UURL xi, xiiiuser administration
planning 6
242 Integrating TME 10 on the RS/6000 SP

Wwasync command 25, 87, 88wbkupdb command 22wchkdb command 23World Wide Web xi, xiiiwpasswd command 6wpostemsg command 31wtdumprl command 34, 45wtl l command 97
Index 243

IBML
Printed in U.S.A.
SG24-2071-00