
Instructions on how to open & import ED Facts data files
8
Instructions on how to open & import EDFacts data files Using Excel 2016/Office 365 or Excel 2013/prior versions Excel allows you to directly open a comma-separated values (.csv) or text (.txt) files however, Excel may apply a format for the data that drops leading zeroes (as shown below), change the date format, and display phone numbers and other data with special formatting incorrectly. This guide will walk you through the process to use Excel’s power query to control the import of EDFacts data. Example of an EDFacts .csv file opened in Excel Excel 2016 or Office 365 If you prefer, the Excel legacy import wizards can be used by clicking on File > Options > Data and choosing the wizards you’d like to use. When using the legacy wizards, follow the instructions for importing data using Excel 2013/prior versions. To use Excel Power Query to import a .csv or .txt file to a new workbook, follow these steps: 1. Open Excel and navigate to the Data tab; in the Get & Transform Data section, click on the Get Data icon. Figure 1: Data tab contents
Transcript of Instructions on how to open & import ED Facts data files

Instructions on how to open & import EDFacts data files
Using Excel 2016/Office 365 or Excel 2013/prior versions
Excel allows you to directly open a comma-separated values (.csv) or text (.txt) files however, Excel may
apply a format for the data that drops leading zeroes (as shown below), change the date format, and display
phone numbers and other data with special formatting incorrectly. This guide will walk you through the
process to use Excel’s power query to control the import of EDFacts data.
Example of an EDFacts .csv file opened in Excel
Excel 2016 or Office 365
If you prefer, the Excel legacy import wizards can be used by clicking on File > Options > Data and
choosing the wizards you’d like to use. When using the legacy wizards, follow the instructions for
importing data using Excel 2013/prior versions.
To use Excel Power Query to import a .csv or .txt file to a new workbook, follow these steps:
1. Open Excel and navigate to the Data tab; in the Get & Transform Data section, click on the Get
Data icon.
Figure 1: Data tab contents

2
Instructions on how to open & import EDFacts data files
Using Excel 2016/Office 365 or Excel 2013/prior versions
2. Select the file type of the file to be imported. From Get Data, click From File > From Text/CSV.
Figure 2: Data import options
3. Select the file to be imported; note that the file contents are displayed in the right side of the window if
the preview option is selected.
Figure 3: File Explorer pop up window with file preview option circled
4. From the Get & Transform feature, choose Transform Data to adjust the data type for each column.
− The default settings for “Data Type Detection” use the first row for column headers and assigns the
data type (as text, number, integer, etc.) based on the first 200 rows in the file.
Figure 4: Get & Transform window

3
Instructions on how to open & import EDFacts data files
Using Excel 2016/Office 365 or Excel 2013/prior versions
5. Data in the file will be displayed in the Power Query Editor.
− Columns FIPST and State Agency No have a data type integer in the example below and will be
changed to text because they contain leading zeros.
− In the Applied Steps side bar, “Changed Type” will be applied by default.
Figure 5: Power Query Editor
6. Delete the “Changed Type” step (click on the � next to the step) and choose the columns to change.
− Hold the shift key and use your left mouse button to select highlight a continuous block of
columns, or hold the control key and use your left mouse button to select multiple, non-
continuous columns in the data set.
Figure 6: Selecting columns to set the data type.

4
Instructions on how to open & import EDFacts data files
Using Excel 2016/Office 365 or Excel 2013/prior versions
7. From the Transform tab, choose the appropriate Data Type from the drop list.
− In this example, Student Count was set to a Whole Number.
Figure 7: Choose the Data Type
8. Complete the import by clicking on Home or File > Close & Load.
Figure 8: Close & Load
9. Alternatively, choose Close & Load to…
− Load to a table: A pop up box allows data to be loaded to a “Table,” which produces the same
result as Close & Load. Data can also be loaded to a “PivotTable” or “PivotChart,” or a data
connection can be created.
− Create a connection: If “Create Connection” is chosen, the data does not load but is accessible
through the Query Editor and can be used in other Excel Queries.
− Tip: The default setting for power pivot adds the table to Excel’s Data Model.
Figure 9: Options for Close & Load to…

5
Instructions on how to open & import EDFacts data files
Using Excel 2016/Office 365 or Excel 2013/prior versions
10. Data will load to a table in the workbook.
− The import query appears in the side bar on the right and shows the total row count for the file.
− If you close the side bar and want to see it again, select Data > Queries and Connections.
Figure 10: Data imported to a Table
11. Columns can be added to the table and formulas entered in those columns. A formula in a table column
can use the structured reference for the column name, such as [@FIPST], or a range like B:B.
Figure 11: Data imported to a Table
12. Save the file as an Excel workbook to retain the data connections and table format.
Figure 12: Save File As

6
Instructions on how to open & import EDFacts data files
Using Excel 2016/Office 365 or Excel 2013/prior versions
Excel 2013
Excel 2013 and earlier versions use a simple and straightforward process for opening and importing text
files. When transferring files from .csv format to .xlsx format, some of the values displayed as ranges are
read as a date if the file is opened directly into Excel. To prevent this, save the flat file (.csv) before
opening it. Once the file is saved, follow the steps below to import the data into Excel.
1. In the Data tab, click From Text in the Get External Data section of the tool bar.
Figure 13: Data tab contents
2. From the pop-up file explorer window, select Text Files (*.prn, *.txt or *.csv) from the lower right
hand side drop-down; click Open.
Figure 14: Select Data file

7
Instructions on how to open & import EDFacts data files
Using Excel 2016/Office 365 or Excel 2013/prior versions
3. The settings Delimited and Start import at row 1 are selected by default; click Next.
Figure 15: Text Import Wizard Step 1
4. Select Comma for the delimiter type; Quote (“) for the Qualifier; click Next.
− Note: Tab is the default selection when opened. It can either be unchecked or left as is.
Figure 16: Text Import Wizard Step 2
8
Instructions on how to open & import EDFacts data files
Using Excel 2016/Office 365 or Excel 2013/prior versions
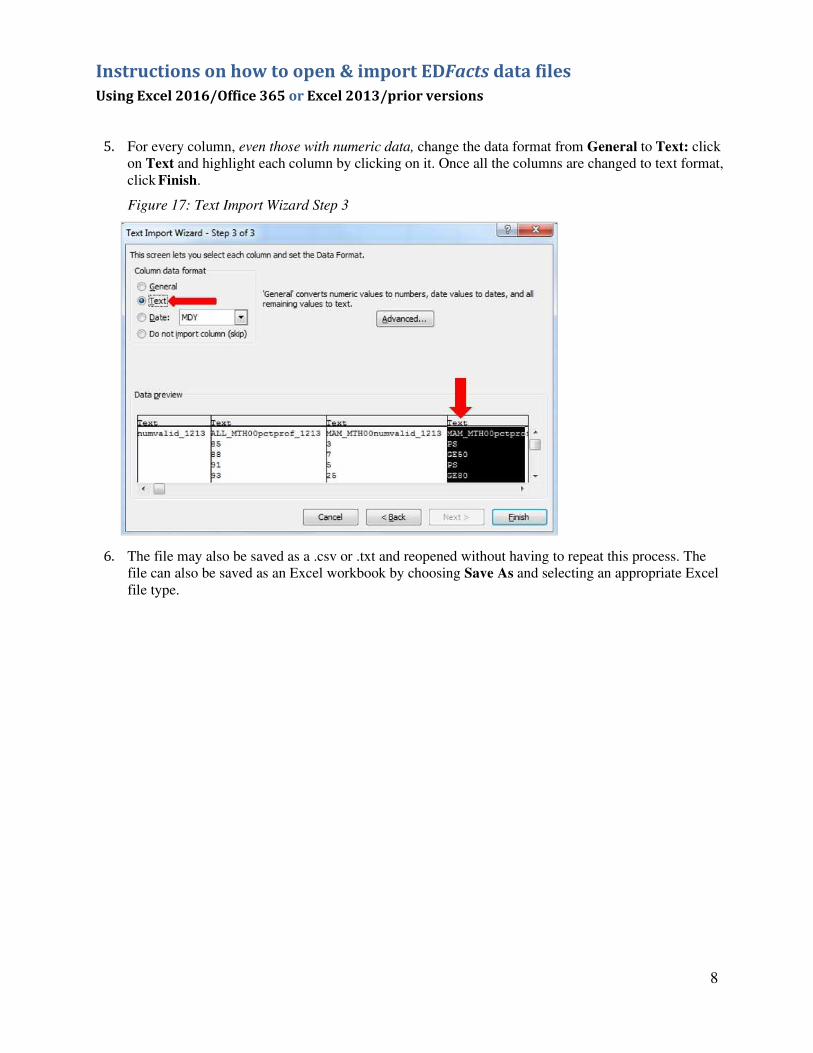
5. For every column, even those with numeric data, change the data format from General to Text: click
on Text and highlight each column by clicking on it. Once all the columns are changed to text format,
click Finish.
Figure 17: Text Import Wizard Step 3
6. The file may also be saved as a .csv or .txt and reopened without having to repeat this process. The
file can also be saved as an Excel workbook by choosing Save As and selecting an appropriate Excel
file type.


![Welcome [] · Zülküf Küçüközer TriangleCanvas.java import javax.microedition.lcdui.Graphics; import javax.microedition.lcdui.game.*; import javax.microedition.m3g.*;](https://static.fdocuments.net/doc/165x107/5d31f91d88c9937a3b8ccf67/welcome-zuelkuef-kuecuekoezer-trianglecanvasjava-import-javaxmicroeditionlcduigraphics.jpg)