Instructions for Growing and Propagating Salvia Divinorum … · Instructions for Growing and...
11
Instructions for Growing and Propagating Salvia Divinorum in Maine by Alex Wall I will base these instructions on the propagation of many plants from one 3” potted Salvia divinorum plant. If you start with a bigger plant, you will still see through these instructions what to do at your plant's stage, and any subsequent stage. The Host Plant Upon receiving the 3” plant, add some dry potting soil (I use Miracle-Gro ® Moisture Control) around its edges without watering. Let the plant sit in muted sunlight for a day. Then water the next day until all the new dry soil is damp. The plant should always, from this point forward, be on a surface that allows drainage. The bottom of the pot should never be sitting in water after watering. The biggest mistake made when growing Salvia is over-watering. This is especially true over the indoor, winter months.
Transcript of Instructions for Growing and Propagating Salvia Divinorum … · Instructions for Growing and...

Instructions for Growing and Propagating Salvia Divinorum in Maine
by
Alex Wall
I will base these instructions on the propagation of many plants from one 3” potted Salvia divinorum plant. If you start with a bigger plant, you will still see through these instructions what to do at your plant's stage, and any subsequent stage.
The Host Plant
Upon receiving the 3” plant, add some dry potting soil (I use Miracle-Gro® Moisture Control) around its edges without watering. Let the plant sit in muted sunlight for a day. Then water the next day until all the new dry soil is damp. The plant should always, from this point forward, be on a surface that allows drainage. The bottom of the pot should never be sitting in water after watering. The biggest mistake made when growing Salvia is over-watering. This is especially true over the indoor, winter months.
Environmental Conditions
From now on you should remember what Salvia's favorite conditions are. It is not at all necessary that all of these be perfect. And it is near impossible in Maine. But Salvia is a very forgiving plant, as you will see. Here are the ideals...
Temperature – 70 to 90 degrees Fahrenheit (F); cannot survive freezing.
Water – clean, cool, once per day, with unhindered drainage.
Humidity – 70% or above.
Light – 12 to 18 hours.
Soil – 50-60% peat moss, with finely ground bark or forest compost, perlite—any rich, dark, high quality potting soil will do.
Fertilizer – after three months, feed, and then every three months thereafter; keeping the following percentages in the soil as best you can...
~ 0.21% nitrogen (N)~ 0.07% phosphate (P2O5)~ 0.14% soluble potash (K2O)~ 0.10% water soluble iron (Fe)
Special Conditions Faced in Maine
Outdoors - If you are starting in the warmer months, then the plant can simply remain outside. My plants in Maine are outside safely from about mid-May to the end of September. Still, one should keep an eye on the possibility of frost. Any temperature forecast of 39 F or lower could still contain localized patches of frost, whenever air becomes still. Any temperature of 40 F or higher, with a slight breeze, and there should be no problem.
The rainfall in Maine is pretty sufficient for summer outdoor growth. The plants should be flushed with a moderate amount of fresh water each or every other day, no matter whether it is by rain or you.
Direct sunlight isn't bad for the plant. But the soil – being so dark – soaks up a lot of radiant heat. I measured the temperature in the soil of a plant sitting in the sun today (June 29) and the thermometer read 94! That is too hot. Even with plenty of water heat will make the roots unable to absorb it, and will also allow less aeration in the soil (roots need air as much as they need water). Muted, overcast, or ambient daylight is fully sufficient. We had an ideal day this last week where from sun-up to sundown, the humidity was 74%, the temp was 80 F, there was a constant overcast-white sky, and no wind. That was a perfect Salvia day.
Speaking of wind. Whenever Salvia has its large leaves (the 4” by 6” ones) it should not be exposed to any wind. The large leaves are like sails and they flutter around, eventually turning themselves upside down and twisting there own stems until they fall off. These leaves are essential for the 8” to 18” growth spurt in height, but after the max height is reached they should be removed. This also helps the

plant focus on growing smaller, cut-able (root-able), branches. Leaves up to about 3” in length will be no problem in the wind.
Pests are not much of a problem with Salvia. Most insects don't like Salvia. I've never had aphids or white flies. The plant is very bitter. I have only ever seen two kinds of pest...
The Friendly Fungus Gnat(larva 5mm and adult 2mm)
Sometimes if plants are out for the summer and then brought inside for the winter, the little fungus gnat is transported in too. These little guys are eliminated by letting the top two inches of soil go bone dry, since the larva of the gnat (that lives in the soil) cannot survive any lower than 1 inch from the surface of the soil. And it can only survive in damp or wet soil. While the soil is drying out completely use a funnel, sticking it in to the soil below two inches, to water the plant. Fungus gnats will not really harm the plants but they are irritating; clinging around windows and flying around your computer screen at night.
If the soil is very heavily infested they will sometimes hurt the roots. Some people go so far as to carefully remove the plant from the soil (by tapping both soil and plant out of the pot and then knocking off all the soil around the roots), microwaving the soil for 5 minutes per pound (to kill everything in it) and then using the sterilized soil again after it cools. I think this is unnecessary, but it is worth mentioning.

The Cheerful Inchworm(middle-left)
If holes are appearing on the leaves of your plant while it is outdoors, check underneath the leaves. Look carefully, because these guys are usually the same color as what they are eating. If you find an inchworm simply take it off the leaf. They only last through about mid-July.
Indoors - If you are starting indoors, during the other 7½ months (October to mid-May), whatever temperature your house is at should be sufficient. I'm stingy and keep my place at 60 F. So not exactly the ideal of 70 F. But the plants don't seem to mind.
The problem with cooler air is that it tends to be drier too. And Maine, with sub-zero winters on the outside, saps all moisture from the inside. Humidity can become a problem. The way around this is to mist the plants thoroughly at least 2 times per day. I misted about 4-5 times per day over the winter, but that may have been obsessive. You have to find the right amount for yourself. But don't worry, you cannot over-mist.
The plants can get most of their light from any window in the house. Light during deep winter can be supplemented with low-watt florescent lights. For all my plants I only used two, 35 watt, lights. December 21 is the shortest day for sunlight, at less than 9 hours. You should try to use two to three additional hours of artificial light per day until 12 hours of natural light are available again (most important from November to February). A timer can work well for this.
Propagation by Rooted Cuttings
Salvia loves to root. In its native environment the stalks become weighed down with smaller stems. This causes them to droop all the way to the soil on the ground. In the highly humid and wet cloud forests that the plant grows in, roots easily develop out of the smaller branches of the fallen stalk, from being in contact with the wet ground. New plants grow up from this rooting.
Seeding - Salvia rarely goes to flower and seed. And when seeds are produced they are often said to be weak and/or non-viable. This has led researchers to believe that the plant is a cultigen (a plant existing only through human cultivation, long enough to become its own species, with no direct relative in the

wild). And because the only place in the WORLD it is cultivated in is Mexico, the need to preserve it makes growing and propagating it very satisfying. There has been recent work by the master grower of Salvia, Sea Mac to successfully produce seed. By doing this he has developed his own strains!
But the the overwhelming amount of propagation is done by “cloning” (rooted cuttings). All sizes of Salvia can be rooted. The only stipulation is that there must be a leaf or two (even if very small) on the cutting to be rooted. A stem without leaves will never root. I found that even one, 1” leaf will root under the right circumstances.
Tiny Rooted Cuttings – It is important to remember what your goals are for rooting. That 1” leaf I rooted turned into a beautiful 3” stemmed plant with several large leaves, about to make it's vertical run. The only problem was, it took 6 months to get it to the 3” size. Still, if tiny cuttings are kept continuously moist – though not entirely submerged in water – they will root. If a person wanted to sell very small rooted cuttings by mail order (something I'm looking in to doing) this would be ideal. One tiny rooted cutting could be sent in a small spice jar, as long as there was plenty of moisture and maybe some of those tiny Styrofoam balls to keep it suspended during the journey. I did experiments and found that as long as the cutting didn't freeze it would last over 7 days in complete darkness before suffering any real problems. USPS Priority Mail only takes 2-4 days, domestically.
1” Rooted Leaf
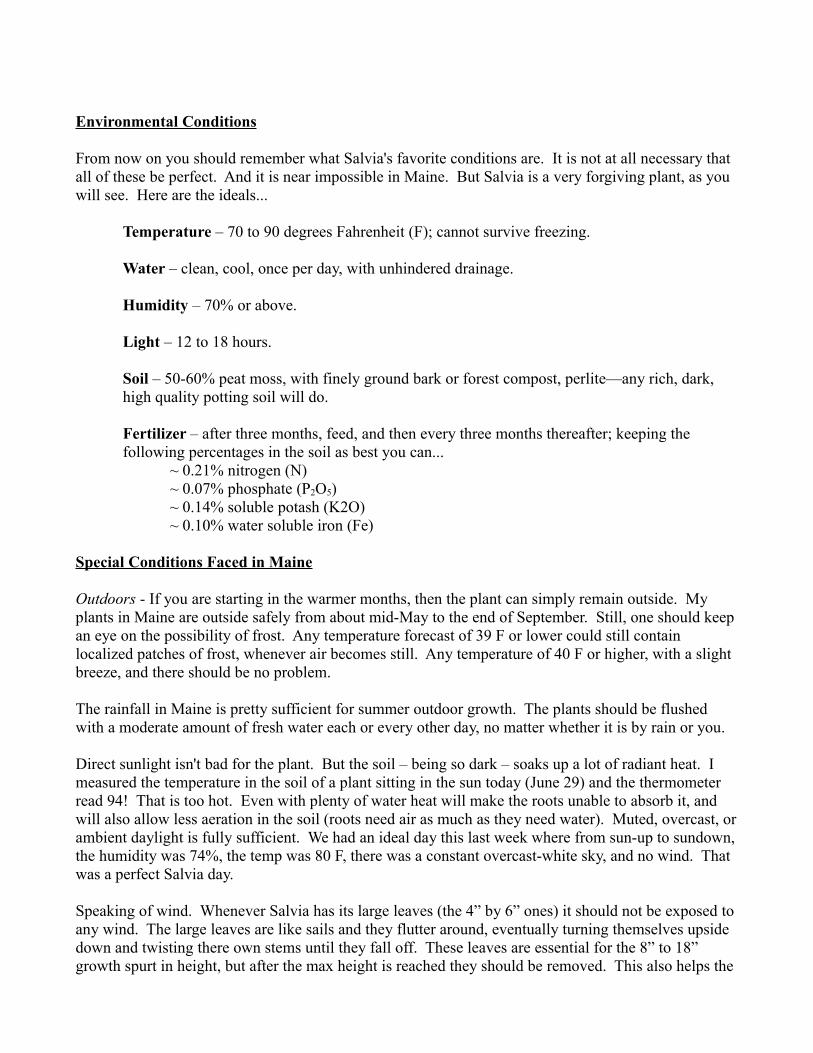
Other Tiny Cuttings Waiting to Root
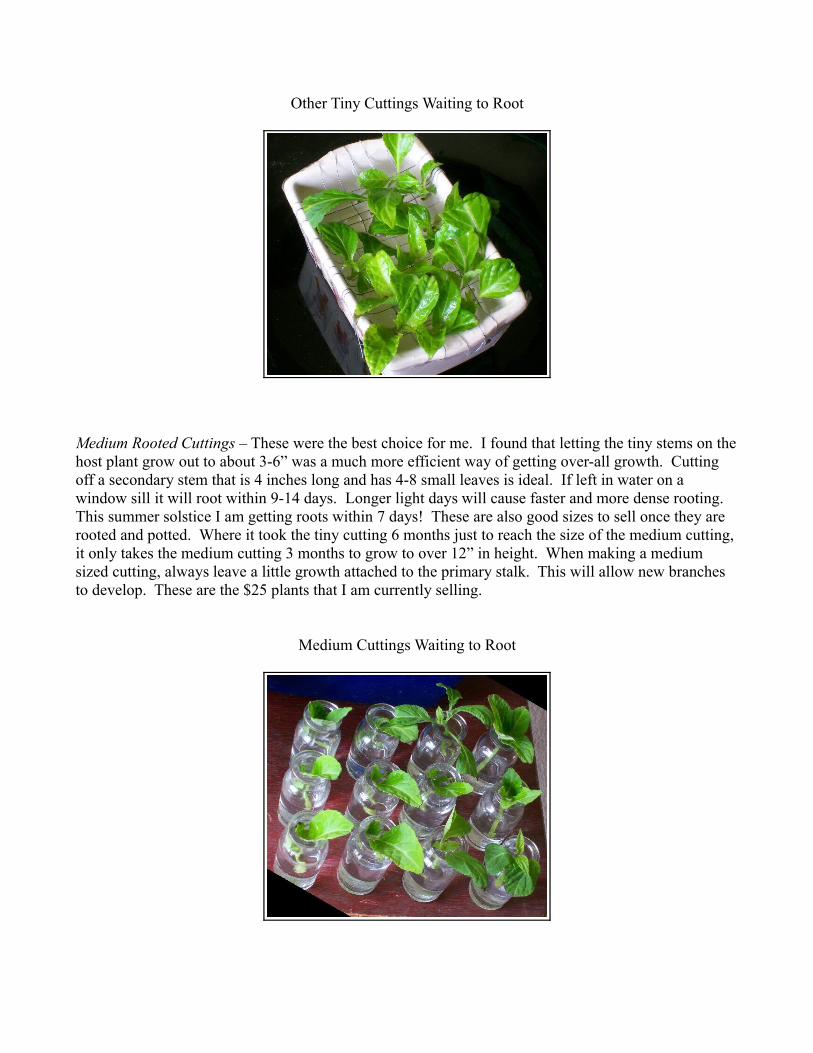
Medium Rooted Cuttings – These were the best choice for me. I found that letting the tiny stems on the host plant grow out to about 3-6” was a much more efficient way of getting over-all growth. Cutting off a secondary stem that is 4 inches long and has 4-8 small leaves is ideal. If left in water on a window sill it will root within 9-14 days. Longer light days will cause faster and more dense rooting. This summer solstice I am getting roots within 7 days! These are also good sizes to sell once they are rooted and potted. Where it took the tiny cutting 6 months just to reach the size of the medium cutting, it only takes the medium cutting 3 months to grow to over 12” in height. When making a medium sized cutting, always leave a little growth attached to the primary stalk. This will allow new branches to develop. These are the $25 plants that I am currently selling.
Medium Cuttings Waiting to Root

Large Rooted Cuttings – When a plant reaches about 30” in an 8-10” pot it will not grow much taller. At this point the top 10-12” can be cut off and rooted. Be sure to leave some stem on the host plant (1-2”) so that the small branches below the cut won't die. If possible lay the longest part of the cut-stem in a tray of water, this will allow more rooting area and will get water to the leaves faster while it roots.
Large Cuttings Waiting to Root
Other Rooting Tips - In all cases, if there are leaves that are as long as the stem of the cutting, cut half the leaf off laterally. This will allow the plant to get chlorophyll, but lessens the stress of getting water to a whole leaf.
Occasionally, cut stems will curl up as they root. In a way this is better for the time when they will be potted. An upside-down candy cane shape allows better root growth in smaller pots. But straight stems tend to produce earlier secondary growth. Having the roots is the most important part.
Summing up: The tiny cuttings are ready to plant when they have 2 or more 1” roots. The medium cuttings are ready to plant when they have 6 or more 1” roots. The large cuttings are ready to plant when they have about 20 or more 3” roots.
Don't fear if the cutting looks very wilted for 1-2 days after being placed in the water. This is totally natural. It will quickly re-hydrate and look fine. You will see a similar phenomenon when planting a rooted cutting. For 1-2 days there may be periods of wilting. But with extra watering and good drainage, and long periods of muted light, the new plant will begin to thrive within about a week.
Ideal Propagation Time Line
Month 1.0
Raise plant to 8” in height.
Number of potted plants: 1Number of cuttings: 0Number of separate plants: 1

Month 2.0
Take a medium cutting (~3”) and put it into a small jar of water. Be sure to remove all leaves except for the top 4-8 of that cutting first.
Allow the host to recover for a couple weeks and grow taller.
Month 2.5
The cutting should be rooted now and the host plant should have another small branch available for cutting.
Plant the first rooted cutting and begin to root the next one.
Number of potted plants: 2Number of cuttings: 1Number of separate plants: 3
Month 3.0
The host should be reaching 10”. Take another cutting and begin to root it.
Plant the second cutting now that it has rooted.
The first rooted cutting should be around 6” now.
Number of potted plants: 3Number of cuttings: 1Number of separate plants: 4
Month 3.5
The host should be about 12” by the end of the month. Take another cutting and begin to root it. (Take two if they are available.)
Plant the third cutting. You might be able to take a cutting from the second plant now that you can begin rooting.
Number of potted plants: 4Number of cuttings: 1-3Number of separate plants: 4-7
By the beginning of the forth month, a 3-6” cutting has become a 12” host, having produced 3 potted plants, plus up to 3 more cuttings being rooted, making a total of up to seven separate plants. And each of those can produce another 7 plants in another 3 months, plus all the clones that the original plant will
produce in that time. There should be no reason why 50 plants aren't possible after 6 months. I have produced over 100 in 10 months by following this method.
In this same way, one can continue on taking cuttings, rooting them, growing them to the point where cuttings can be taken from the new plants, and so on... When harvesting medium cuttings is the focus, the more hosts you have, the better.
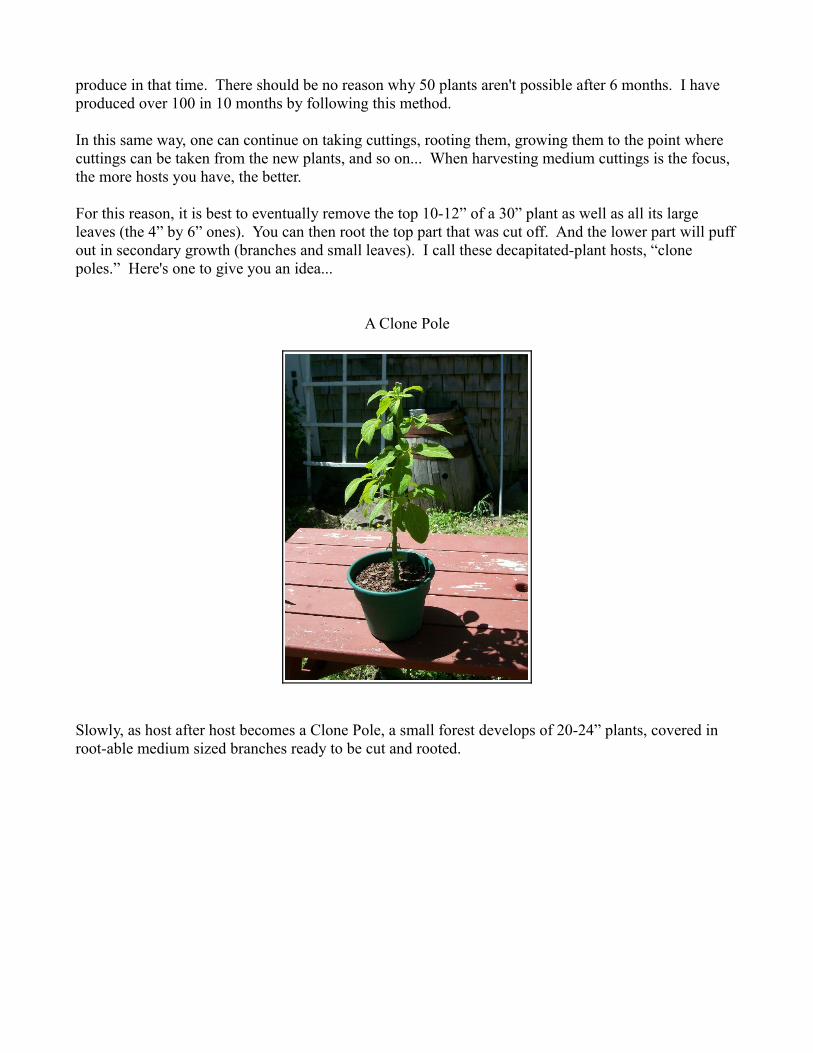
For this reason, it is best to eventually remove the top 10-12” of a 30” plant as well as all its large leaves (the 4” by 6” ones). You can then root the top part that was cut off. And the lower part will puff out in secondary growth (branches and small leaves). I call these decapitated-plant hosts, “clone poles.” Here's one to give you an idea...
A Clone Pole
Slowly, as host after host becomes a Clone Pole, a small forest develops of 20-24” plants, covered in root-able medium sized branches ready to be cut and rooted.

A Clone Pole Forest
Here is another way to look at it: By individual plant.
Each 3-6” cutting takes ~ 14 days to root in water.
Each 3-6” rooted cutting, now potted in a 8-10” pot, takes ~ 30 more days to reach 8” and to provide its first cutting.
Each 8” potted plant, now a host, takes ~ 60 more days to reach 24” and should provide 2-6 additional cuttings in that amount of time.
Each 24” host takes ~ 30 more days to reach 30” and will produce another 2-6 additional cuttings in that amount of time.
Each 30” host has a 12” section removed from its top and becomes a clone pole, producing approximately 1-4 medium cuttings every 2 weeks.
Advantages as a Part-time Business
So, as it stands now (10 months from my first plant), I have 12 Clone Poles (producing 24-48 clones per month) and 14 plants on the way to becoming Clone Poles (which will produce another 28-56 clones per month, within another 3 months), for a grand total Clone Pole forest of 26 hosts, producing 52-104 clones per month.
In addition, I have 70, 3-6” potted plants ready for sale, with another roughly 150-200 of this size to come in the next three months. And three more months will make it 14 months since I started.
That means that the 8” plant I bought in August last year, will have led to the production of about 300 new plants by this September (14 months total).

This propagation is like frequently compounded interest. And in a way it IS interest on an investment, paid back in plant value. When averaged out 300 divided by 14 months = 21 new plants per month. If the average plant is worth $25, then 23 plants are worth $525 per month. And a total value of $7,350 was gained in that 14 month period. My original plant cost me $35. So, essentially, I earned an average of 1,750% plant-interest per month.
Seven thousand dollars for about a year's worth of part-time work isn't so bad.
If I didn't need the money right now, I could simply keep exponentially propagating the Salvia for another year. Sea Mac said it took him 2 full years to have a perpetually self-supplying inventory of plants, enough for him to sell them full time if he chose. Were I to do that the compounding could do amazing things. And you can do it too! Stay tuned!!
Please feel free to email me with questions: [email protected].
Thank you!
Alex Wall