Instruction Manual for Model HYDRO ARC 7500 Arc 7500.pdf · Instruction Manual for Model HYDRO ARC...
15
Setting the Standard in Mobile Power Instruction Manual for Model HYDRO ARC 7500 Hydraulic Generator/Welder Manufacturing of: Vehicle Mounted Generators • Hydraulic Generators P.O. Box 582 • Chester, NY 10918 • 845-469-9151 • Fax: 845-469-7871 • Web Site: www.fabcopower.com
Transcript of Instruction Manual for Model HYDRO ARC 7500 Arc 7500.pdf · Instruction Manual for Model HYDRO ARC...

Setting the Standard in Mobile Power
Instruction Manual for Model
HYDRO ARC 7500 Hydraulic Generator/Welder
Manufacturing of: Vehicle Mounted Generators • Hydraulic Generators
P.O. Box 582 • Chester, NY 10918 • 845-469-9151 • Fax: 845-469-7871 • Web Site: www.fabcopower.com
CAUTION CAUTION
DO NOT RUN WELDER/GENERATOR WITH (OPTIONAL) WATERPROOF CANVAS COVER CANVAS COVER MUST BE REMOVED…. THANK YOU
Initial Installation and Start-Up Be sure you set the hydraulic flow (GPM) to the generator at Approximately 62.5 HZ or 3750 RPM with NO electrical load on the generator. By using this setting you will have approximately 60HZ (cycles) or 3600 RPM when you are running at full rated load. One way this can be accomplished is by using a Photo Tachometer on our generator coupling or generator cooling fan. A Photo Tachometer is an inexpensive tool that can be purchased at McMasters, Grainger, Sears or any other electrical supplier.
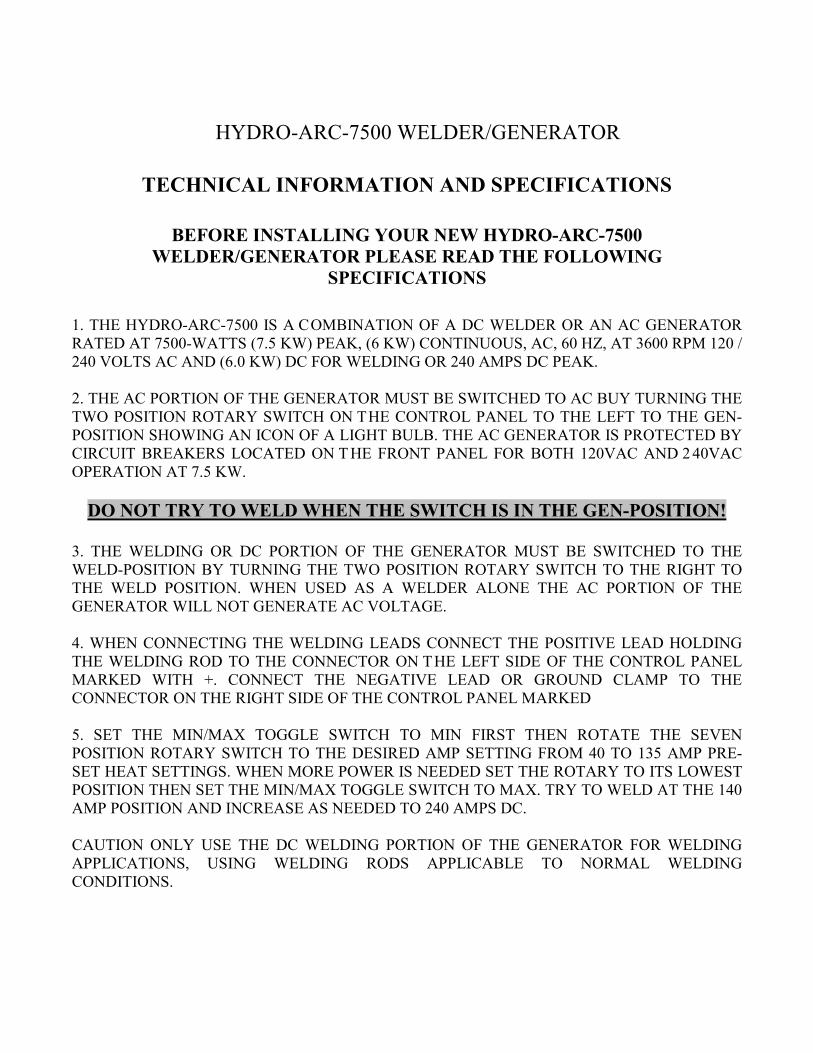
HYDRO-ARC-7500 WELDER/GENERATOR
TECHNICAL INFORMATION AND SPECIFICATIONS
BEFORE INSTALLING YOUR NEW HYDRO-ARC-7500
WELDER/GENERATOR PLEASE READ THE FOLLOWING SPECIFICATIONS
1. THE HYDRO-ARC-7500 IS A COMBINATION OF A DC WELDER OR AN AC GENERATOR RATED AT 7500-WATTS (7.5 KW) PEAK, (6 KW) CONTINUOUS, AC, 60 HZ, AT 3600 RPM 120 / 240 VOLTS AC AND (6.0 KW) DC FOR WELDING OR 240 AMPS DC PEAK. 2. THE AC PORTION OF THE GENERATOR MUST BE SWITCHED TO AC BUY TURNING THE TWO POSITION ROTARY SWITCH ON THE CONTROL PANEL TO THE LEFT TO THE GEN- POSITION SHOWING AN ICON OF A LIGHT BULB. THE AC GENERATOR IS PROTECTED BY CIRCUIT BREAKERS LOCATED ON T HE FRONT PANEL FOR BOTH 120VAC AND 2 40VAC OPERATION AT 7.5 KW.
DO NOT TRY TO WELD WHEN THE SWITCH IS IN THE GEN-POSITION! 3. THE WELDING OR DC PORTION OF THE GENERATOR MUST BE SWITCHED TO THE WELD-POSITION BY TURNING THE TWO POSITION ROTARY SWITCH TO THE RIGHT TO THE WELD POSITION. WHEN USED AS A WELDER ALONE THE AC PORTION OF THE GENERATOR WILL NOT GENERATE AC VOLTAGE. 4. WHEN CONNECTING THE WELDING LEADS CONNECT THE POSITIVE LEAD HOLDING THE WELDING ROD TO THE CONNECTOR ON THE LEFT SIDE OF THE CONTROL PANEL MARKED WITH +. CONNECT THE NEGATIVE LEAD OR GROUND CLAMP TO THE CONNECTOR ON THE RIGHT SIDE OF THE CONTROL PANEL MARKED 5. SET THE MIN/MAX TOGGLE SWITCH TO MIN FIRST THEN ROTATE THE SEVEN POSITION ROTARY SWITCH TO THE DESIRED AMP SETTING FROM 40 TO 135 AMP PRE-SET HEAT SETTINGS. WHEN MORE POWER IS NEEDED SET THE ROTARY TO ITS LOWEST POSITION THEN SET THE MIN/MAX TOGGLE SWITCH TO MAX. TRY TO WELD AT THE 140 AMP POSITION AND INCREASE AS NEEDED TO 240 AMPS DC. CAUTION ONLY USE THE DC WELDING PORTION OF THE GENERATOR FOR WELDING APPLICATIONS, USING WELDING RODS APPLICABLE TO NORMAL WELDING CONDITIONS.
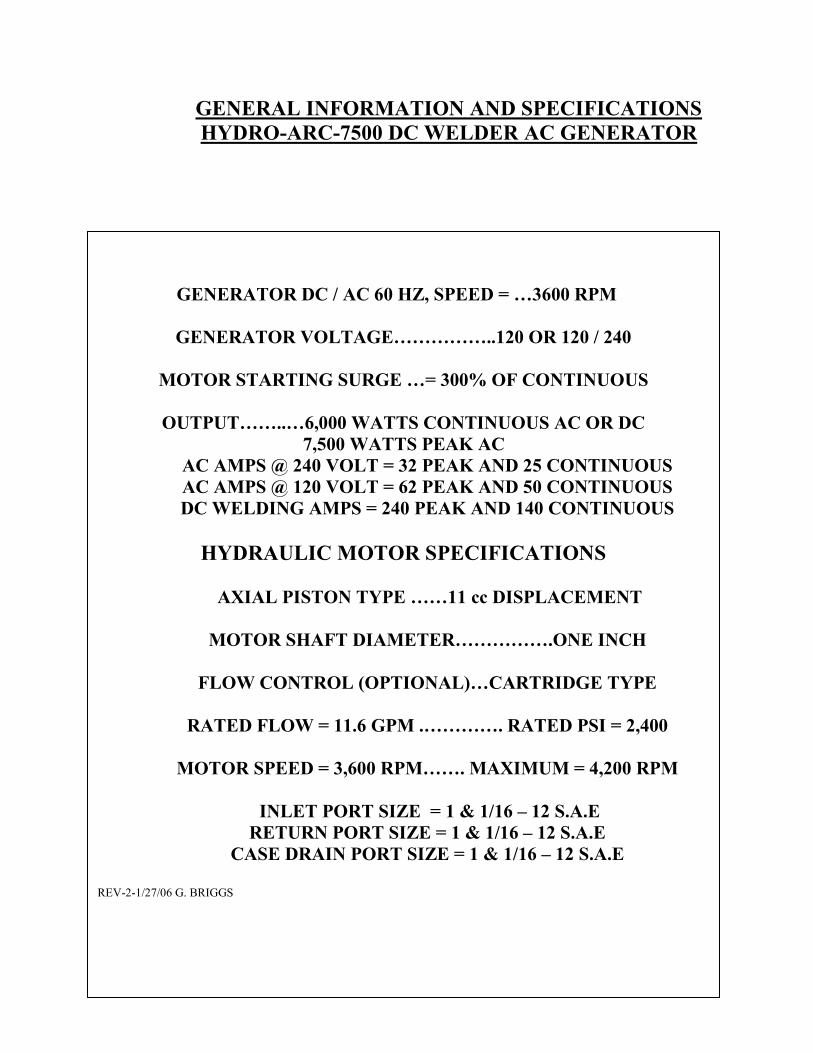
GENERAL INFORMATION AND SPECIFICATIONS HYDRO-ARC-7500 DC WELDER AC GENERATOR
GENERATOR DC / AC 60 HZ, SPEED = …3600 RPM
GENERATOR VOLTAGE……………..120 OR 120 / 240
MOTOR STARTING SURGE …= 300% OF CONTINUOUS
OUTPUT……..…6,000 WATTS CONTINUOUS AC OR DC 7,500 WATTS PEAK AC
AC AMPS @ 240 VOLT = 32 PEAK AND 25 CONTINUOUS AC AMPS @ 120 VOLT = 62 PEAK AND 50 CONTINUOUS DC WELDING AMPS = 240 PEAK AND 140 CONTINUOUS
HYDRAULIC MOTOR SPECIFICATIONS
AXIAL PISTON TYPE ……11 cc DISPLACEMENT
MOTOR SHAFT DIAMETER…………….ONE INCH
FLOW CONTROL (OPTIONAL)…CARTRIDGE TYPE
RATED FLOW = 11.6 GPM .…………. RATED PSI = 2,400
MOTOR SPEED = 3,600 RPM……. MAXIMUM = 4,200 RPM
INLET PORT SIZE = 1 & 1/16 – 12 S.A.E
RETURN PORT SIZE = 1 & 1/16 – 12 S.A.E CASE DRAIN PORT SIZE = 1 & 1/16 – 12 S.A.E
REV-2-1/27/06 G. BRIGGS
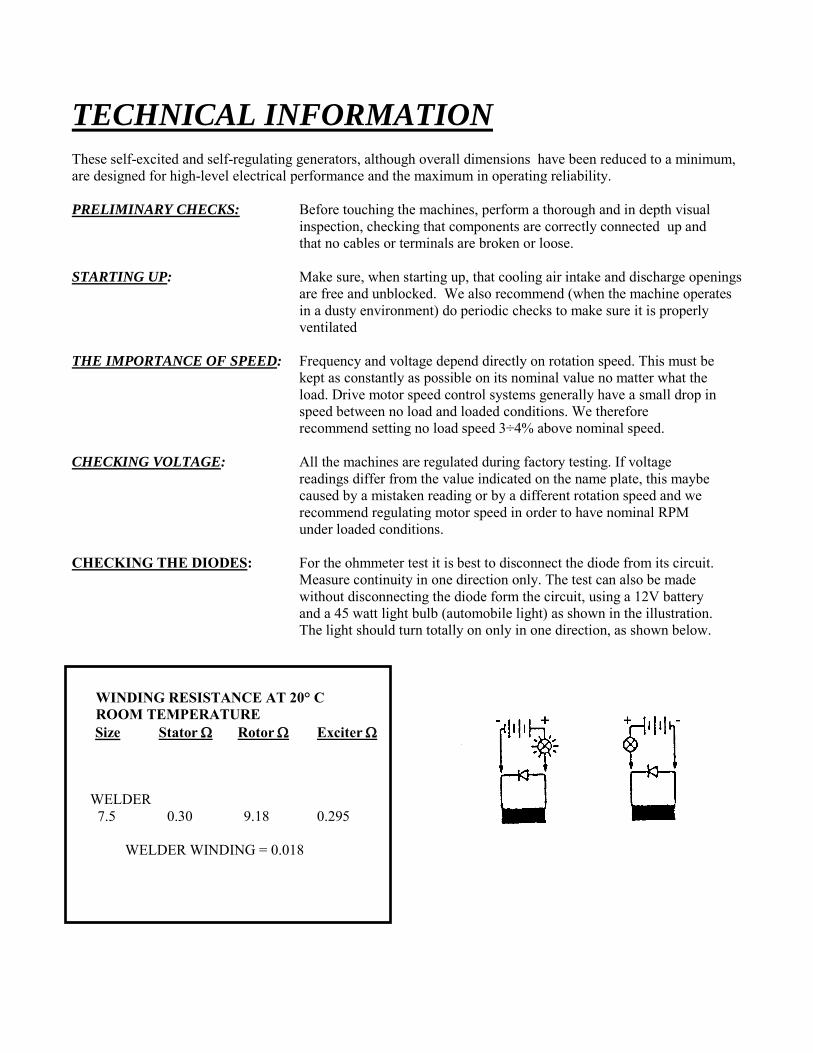
TECHNICAL INFORMATION These self-excited and self-regulating generators, although overall dimensions have been reduced to a minimum, are designed for high-level electrical performance and the maximum in operating reliability.
PRELIMINARY CHECKS: Before touching the machines, perform a thorough and in depth visual
inspection, checking that components are correctly connected up and that no cables or terminals are broken or loose.
STARTING UP: Make sure, when starting up, that cooling air intake and discharge openings
are free and unblocked. We also recommend (when the machine operates in a dusty environment) do periodic checks to make sure it is properly ventilated
THE IMPORTANCE OF SPEED: Frequency and voltage depend directly on rotation speed. This must be
kept as constantly as possible on its nominal value no matter what the load. Drive motor speed control systems generally have a small drop in speed between no load and loaded conditions. We therefore recommend setting no load speed 3÷4% above nominal speed.
CHECKING VOLTAGE: All the machines are regulated during factory testing. If voltage
readings differ from the value indicated on the name plate, this maybe caused by a mistaken reading or by a different rotation speed and we recommend regulating motor speed in order to have nominal RPM under loaded conditions.
CHECKING THE DIODES: For the ohmmeter test it is best to disconnect the diode from its circuit.
Measure continuity in one direction only. The test can also be made without disconnecting the diode form the circuit, using a 12V battery and a 45 watt light bulb (automobile light) as shown in the illustration. The light should turn totally on only in one direction, as shown below.
WINDING RESISTANCE AT 20° C ROOM TEMPERATURE
Size Stator Ω Rotor Ω Exciter Ω
WELDER 7.5 0.30 9.18 0.295 WELDER WINDING = 0.018

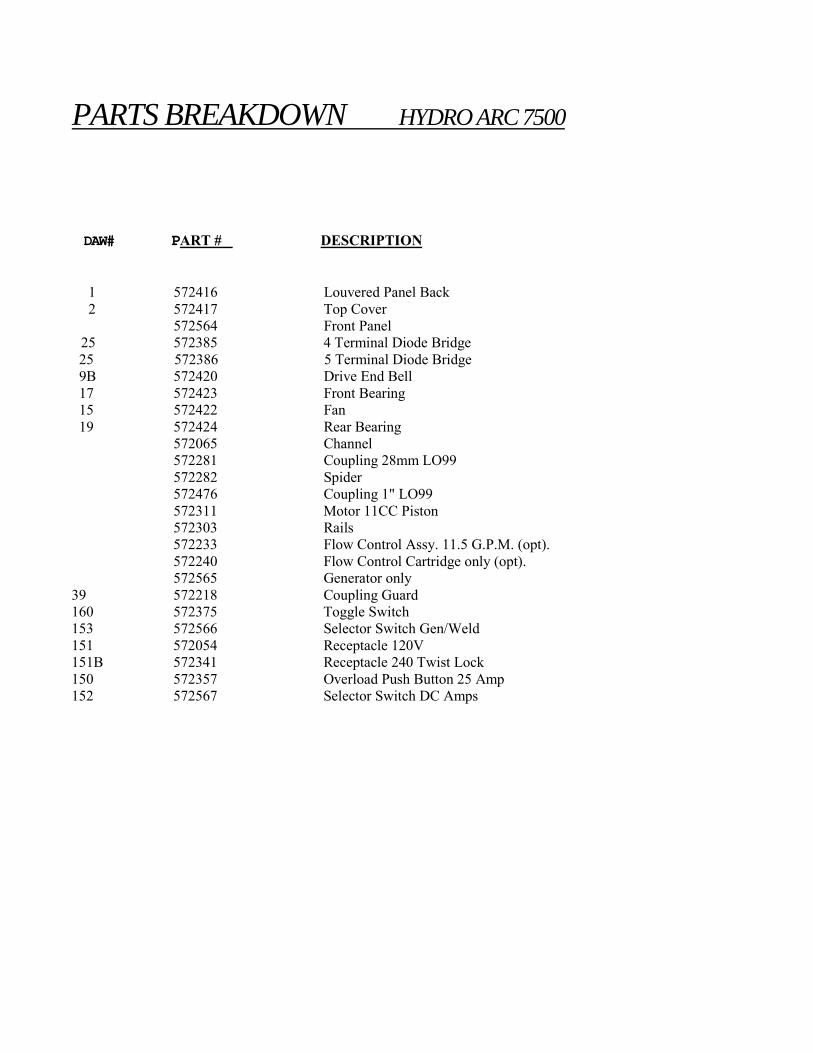
PARTS BREAKDOWN HYDRO ARC 7500 DAW# PART # DESCRIPTION 1 572416 Louvered Panel Back 2 572417 Top Cover 572564 Front Panel 25 572385 4 Terminal Diode Bridge 25 572386 5 Terminal Diode Bridge 9B 572420 Drive End Bell 17 572423 Front Bearing 15 572422 Fan 19 572424 Rear Bearing 572065 Channel 572281 Coupling 28mm LO99 572282 Spider 572476 Coupling 1" LO99 572311 Motor 11CC Piston 572303 Rails 572233 Flow Control Assy. 11.5 G.P.M. (opt). 572240 Flow Control Cartridge only (opt). 572565 Generator only 39 572218 Coupling Guard 160 572375 Toggle Switch 153 572566 Selector Switch Gen/Weld 151 572054 Receptacle 120V 151B 572341 Receptacle 240 Twist Lock 150 572357 Overload Push Button 25 Amp 152 572567 Selector Switch DC Amps

TROUBLE SHOOTING
PROBLEMS CAUSES REMEDIES
ALTERNATOR EXCITATION FAILURE
1. Low Speed 2. Faulty winding
1. Check RPM and set at nominal value.
2. Check that winding resistance is as shown in the tables.
HIGH NO-LOAD VOLTAGE 1. Speed too high.
1. Check and adjust RPM’s
LOW NO-LOAD VOLTAGE 1. Speed too low. 2. Faulty rotary diodes. 3. Breakdown in windings.
1. Check and adjust RPM’s 2. Check and replace. 3. Check winding resistance, as
per tables.
PROPER NO-LOAD BUT LOW LOADED VOLTAGE
1. Low loaded speed. 2. Load too large. 3. Diodes short-circuited
1. Check and regulate RPM. 2. Check and change. 3. Check and replace.
UNSTABLE VOLTAGE 1. Loose contacts. 2. Uneven rotation.
1. Check connections. 2. Check for uniform rotation
speed.
NOISY GENERATOR 1. Broken bearings. 2. Poor couplings.
1. Replace. 2. Check and repair.

FIXED DISPLACEMENT TYPE PUMP 5 6 4 7 3 2 1 TYPICAL HYDRAULIC SCHEMATIC 8
1. HYDRAULIC PUMP 2. PRESSURE RELIEF VALVE 3. CONTROL VALVE 4. PRIORITY FLOW CONTROL* 5. GENERATOR HYRAULIC MOTOR 6. CASE DRAIN LINE**
9 7. RETURN LINE FILTER 8. OIL COOLER 9. HYDRAULIC FLUID RESERVOIR
* Some units may be equipped with integral priority flow control, refer
to specific model number. ** External case drain line may be required on some units refer to
specific model number. When external case drain is required it should be unobstructed direct return to reservoir with a minimum I.D. no less than that of case drain port on generator motor.
FOR SPECIFIC INSTALLATION RECOMMENDATIONS CONSULT FACTORY
··
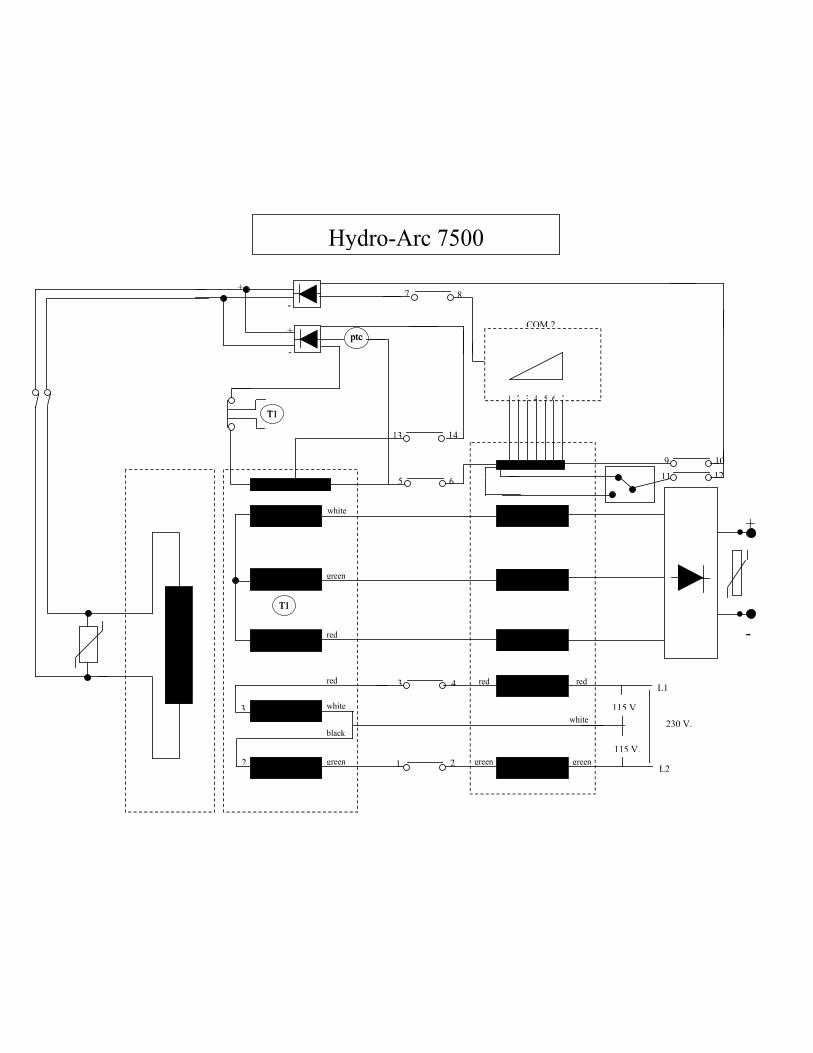
T1T1
ptcptc
1 2 3 4 5 6 7
T1T1
white
green
red
white
red
black
green
red red
white
green green
+ -
+
-
2
3
3
2 1
4
5 6
13 14
7 8
COM 2
9 10 11 12
L1
L2
230 V. 115 V.
115 V.
+
-
Hydro-Arc 7500
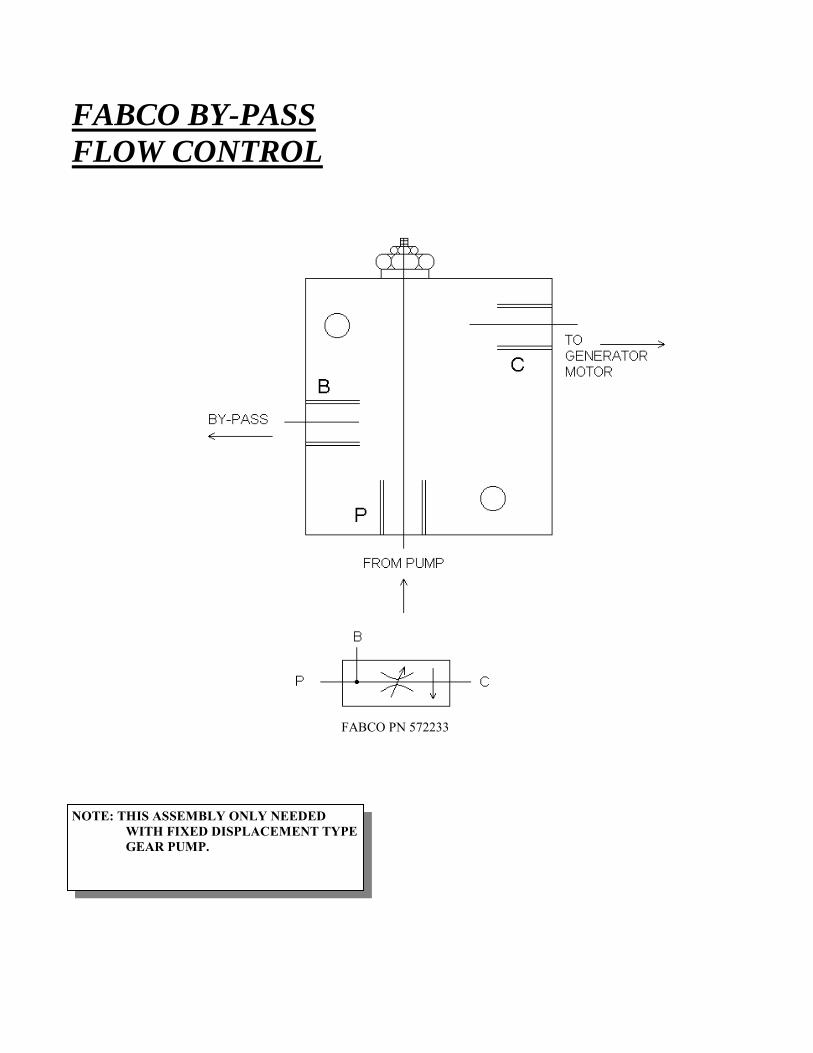
FABCO BY-PASS FLOW CONTROL
FABCO PN 572233 NOTE: THIS ASSEMBLY ONLY NEEDED WITH FIXED DISPLACEMENT TYPE GEAR PUMP.


FABCO POWER’S HYDRO-ARC-7500
120/240 VOLT AC 32 AMP
4 WIRE TWIST LOCKING OUTLET
To connect power to the 120/240 volt single phase outlet mounted on the front panel of the generator, use a 30 AMP 125/250V 3P 4W NEMA - L 14-3, MALE TWIST LOCKING PLUG. Connect a 4-WIRE cord set rated at 250 volts at 30 Amps AC or greater. The wiring shown above can be connected to a standard 120/240 volt circuit breaker box or directly to a 120/240 volt load. The peek generator output is rated at 30 Amps AC at 240 volts. An automatic resetting overload protection device set for 25 Amps is incorporated in the generator controls. R-2-1/30/06-G. BRIGGS

TOP REAR VIEW
CASE DRAIN
RETURN PRESSURE
11 cc PISTON MOTOR ALL FITTINGS ARE # 12 SAE
NOTE: THE PRESSURE AND RETURN PORTS CAN BE USED ON THE TOP OR THE REAR OF THE MOTOR BY EXCHANGING THE CAPPED PLUG FITTINGS.