Instant Chime for XMPP Installation Guide for Apache...
30
OCT 2015 Instant Chime for XMPP Installation Guide for Apache Tomcat and Microsoft SQL
Transcript of Instant Chime for XMPP Installation Guide for Apache...
OCT 2015
Instant Chime for XMPP
Installation Guide for Apache Tomcat and Microsoft SQL
Page | 1 Copyright © 2015 Instant Technologies. All rights reserved.
Rev 16
Copyright and Disclaimer
This document, as well as the software described in it, is furnished under license of the Instant Technologies Software Evaluation Agreement and may be used or copied only in accordance with the terms of such license. The content of this document is furnished for informational use only, is subject to change without notice, and should not be construed as a commitment by Instant Technologies. Instant Technologies assumes no responsibility or liability for any errors or inaccuracies that may appear in this document. All information in this document is confidential and proprietary.
Except as permitted by the Software Evaluation Agreement, no part of this document may be reproduced, stored in a retrieval system, or transmitted in any form or by any means, electronic, mechanical, recording, or otherwise, without the prior written permission of Instant Technologies .
Copyright © 2005 - 2015 Instant Technologies, All rights reserved.
Trademarks
All other trademarks are the property of their respective owners.
Contact Information
See our Web site for Customer Support information.
http://www.instant-tech.com/
Page | 2 Copyright © 2015 Instant Technologies. All rights reserved.
Rev 16
CONTENTS
System Requirements .................................................................................................................................................... 3
Required accounts: .................................................................................................................................................... 4
Overview ........................................................................................................................................................................ 5
Installation Overview for Chime for XMPP Deployment ............................................................................................... 6
SQL Setup and Configuration ......................................................................................................................................... 7
Verifying the SQL Server Configuration ..................................................................................................................... 7
Creating the Chime Database .................................................................................................................................... 7
Configure the Chime SQL Utility Account .................................................................................................................. 7
Install And Configuring Apache Tomcat ........................................................................................................................ 8
Java Runtime Environment ........................................................................................................................................ 8
Install And Configuring Apache Tomcat .................................................................................................................... 8
Install the Chime for XMPP WARS into Tomcat ........................................................................................................... 10
Specifying Database Connection Details ..................................................................................................................... 11
ITFramework Application......................................................................................................................................... 11
Chime Configuration of SQL Connections ................................................................................................................ 13
Chime for XMPP Configuration of LDAP or Active Directory Settings ..................................................................... 15
Accessing Chime for XMPP Web Application............................................................................................................... 18
Disabling default credentials ....................................................................................................................................... 19
Configuing Chime for XMPP Web Client ...................................................................................................................... 20
Configure Server Connection ................................................................................................................................... 20
Configure Web Client ............................................................................................................................................... 21
Customizing The Web Client ........................................................................................................................................ 22
Changing The Chime For XMPP Logo ....................................................................................................................... 22
Connecting To The Web Client ................................................................................................................................ 22
Connecting With A User XMPP Id ............................................................................................................................ 22
Encoding The Seeker Username .............................................................................................................................. 23
Opening The Web Client Using Javascript ............................................................................................................... 23
FAQ .............................................................................................................................................................................. 24
Creating a Chime for XMPP User ............................................................................................................................. 24
Optional: Increasing Apache Tomcat Pool Size for Installations with 5+ Queues ................................................... 27
Optional: Increasing Apache Tomcat Inbound Connections for Queues with 50+ Experts ..................................... 28
Revision History ........................................................................................................................................................... 29
Page | 3 Copyright © 2015 Instant Technologies. All rights reserved.
Rev 16
SYSTEM REQUIREMENTS
64-bit Microsoft Windows Server® 2008 R2, 2012, 2012 R2, or Red Hat 6.x
Application should not be installed on the same server hosting XMPP.
Chime for XMPP may be installed on virtual machines, such as VMWare, Microsoft Hyper-V,
Citrix XenServer, or Oracle Virtual Box.
Read Access to Windows Active Directory or LDAP
Oracle JRE 7.0 + (x86 version)
Create Read/Write access to enterprise SQL environment
o IBM DB2 9.7 and above
o Microsoft SQL Server 2008 R2, 2012, 2014 (including Express Edition)
Cisco Jabber 8.0 and above
o Chime for XMPP will access XMPP server using port 5222 as a Java application
Java application server:
o Apache Tomcat 7.0 and above
o IBM Websphere 8.5 and above
Page | 4 Copyright © 2015 Instant Technologies. All rights reserved.
Rev 16
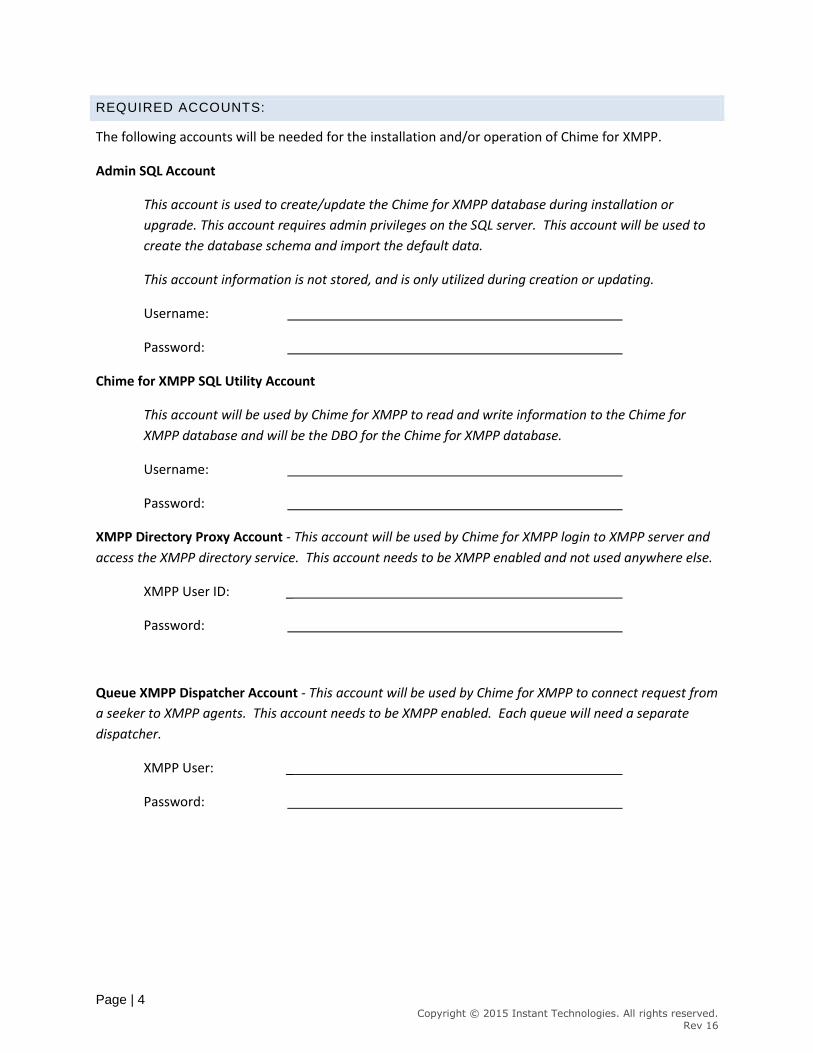
REQUIRED ACCOUNTS:
The following accounts will be needed for the installation and/or operation of Chime for XMPP.
Admin SQL Account
This account is used to create/update the Chime for XMPP database during installation or
upgrade. This account requires admin privileges on the SQL server. This account will be used to
create the database schema and import the default data.
This account information is not stored, and is only utilized during creation or updating.
Username:
Password:
Chime for XMPP SQL Utility Account
This account will be used by Chime for XMPP to read and write information to the Chime for
XMPP database and will be the DBO for the Chime for XMPP database.
Username:
Password:
XMPP Directory Proxy Account - This account will be used by Chime for XMPP login to XMPP server and
access the XMPP directory service. This account needs to be XMPP enabled and not used anywhere else.
XMPP User ID: _
Password:
Queue XMPP Dispatcher Account - This account will be used by Chime for XMPP to connect request from
a seeker to XMPP agents. This account needs to be XMPP enabled. Each queue will need a separate
dispatcher.
XMPP User: _
Password:
Page | 5 Copyright © 2015 Instant Technologies. All rights reserved.
Rev 16
OVERVIEW
Instant Technologies’ Chime for XMPP is an enterprise service desk application that enables service desk
enablement, and ‘click to chat’ functionality, using Cisco Jabber as the IM routing and presence
platform.
Typically, Chime for XMPP is deployed as part of either an Apache Tomcat\Microsoft SQL installation or
an IBM Webphere\IBM DB2 deployment. Your installation and configuration preferences are generally
based on enterprise preferences and internal licensing.
At a high level, Chime for XMPP will be deployed as a Java Spring application under an enterprise
application server - either Apache Tomcat or IBM Websphere. Chime for XMPP provides a rich set of
user interface elements which are accessed via a web browser. Chime for XMPP will leverage enterprise
standard SQL engines, such as either Microsoft SQL or IBM DB2.
Standard installation and deployment scenarios:
1. Apache Tomcat and Microsoft SQL 2. IBM Websphere and IBM DB2 3. IBM Websphere and Microsoft SQL
Chime for XMPP leverages the Cisco Jabber platform for agent awareness and agent IM routing – and
this XMPP functionality may be accessed via an on-premise installation.
Page | 6 Copyright © 2015 Instant Technologies. All rights reserved.
Rev 16
INSTALLATION OVERVIEW FOR CHIME FOR XMPP DEPLOYMENT
The installation procedures for Chime for XMPP are as follows:
Install Chime database.
Install Apache Tomcat.
Install the Chime WARs.
Configure Chime database connections
Start Chime and configure administrators, agents, and queues
Chime consists of following two WAR (Web Archive files) files which are deployed under Apache Tomcat:
1. Chime.war
Chime Web Application is the frontend which allows administrators to: a. Configure/monitor Queues. b. Access reporting module. c. Add/Edit agents and monitor them.
Agents can also access the application to: a. Track their Queue activity b. View Chat Conversations c. Monitor vital Queue statistics like ASA (Average Speed to Answer)
2. ITFramework.war
ITFramework application is the Queue routing engine. It is responsible for running Queues, locating agents for incoming seeker requests and logging of chat conversations. It exposes a set of APIs which allows Chime Web Application to monitor it.
Page | 7 Copyright © 2015 Instant Technologies. All rights reserved.
Rev 16
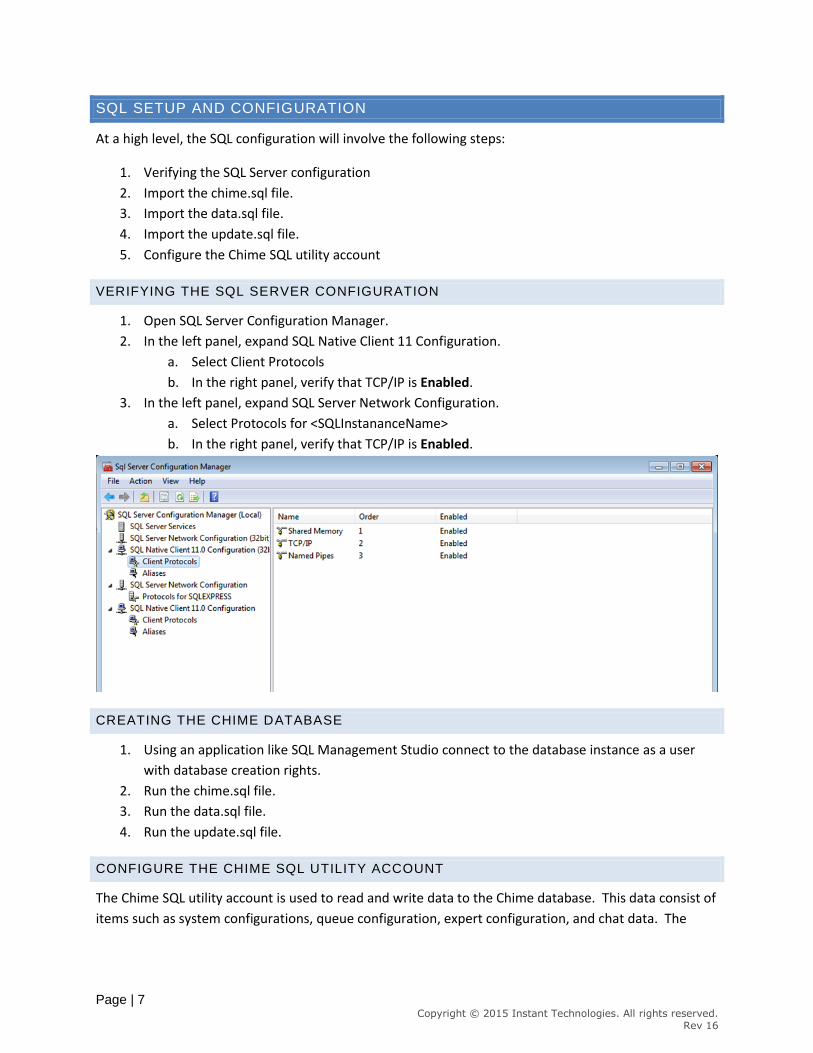
SQL SETUP AND CONFIGURATION
At a high level, the SQL configuration will involve the following steps:
1. Verifying the SQL Server configuration
2. Import the chime.sql file.
3. Import the data.sql file.
4. Import the update.sql file.
5. Configure the Chime SQL utility account
VERIFYING THE SQL SERVER CONFIGURATION
1. Open SQL Server Configuration Manager.
2. In the left panel, expand SQL Native Client 11 Configuration.
a. Select Client Protocols
b. In the right panel, verify that TCP/IP is Enabled.
3. In the left panel, expand SQL Server Network Configuration.
a. Select Protocols for <SQLInstananceName>
b. In the right panel, verify that TCP/IP is Enabled.
CREATING THE CHIME DATABASE
1. Using an application like SQL Management Studio connect to the database instance as a user
with database creation rights.
2. Run the chime.sql file.
3. Run the data.sql file.
4. Run the update.sql file.
CONFIGURE THE CHIME SQL UTILITY ACCOUNT
The Chime SQL utility account is used to read and write data to the Chime database. This data consist of
items such as system configurations, queue configuration, expert configuration, and chat data. The
Page | 8 Copyright © 2015 Instant Technologies. All rights reserved.
Rev 16
account needs read and write access, so we recommend that the account is given DBO (db_owner)
privileges.
Please see “Creating a Chime for XMPP User” in the FAQ section.
INSTALL AND CONFIGURING APACHE TOMCAT
JAVA RUNTIME ENVIRONMENT
The Oracle JRE Version 7+ needs to be installed prior to installing the Apache Tomcat server. The Oracle
JRE (Java Run Time) is available from the Oracle download site.
INSTALL AND CONFIGURING APACHE TOMCAT
Apache Tomcat needs to run as a service for Chime to function correctly
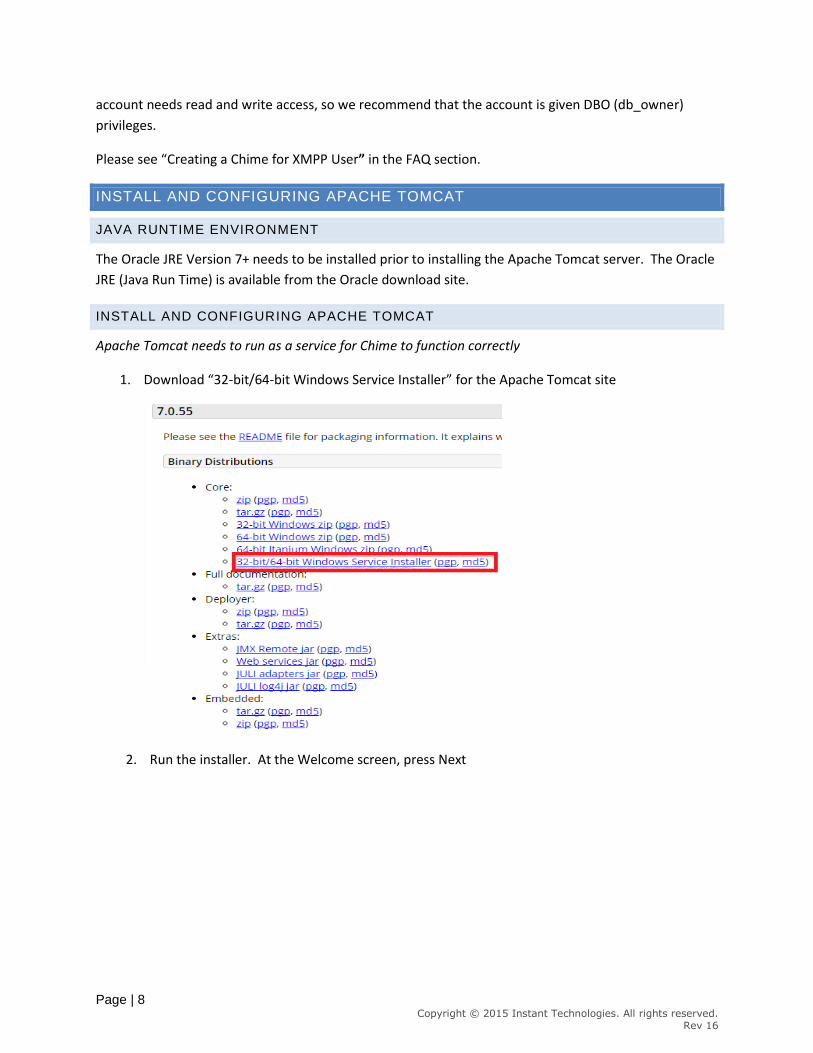
1. Download “32-bit/64-bit Windows Service Installer” for the Apache Tomcat site
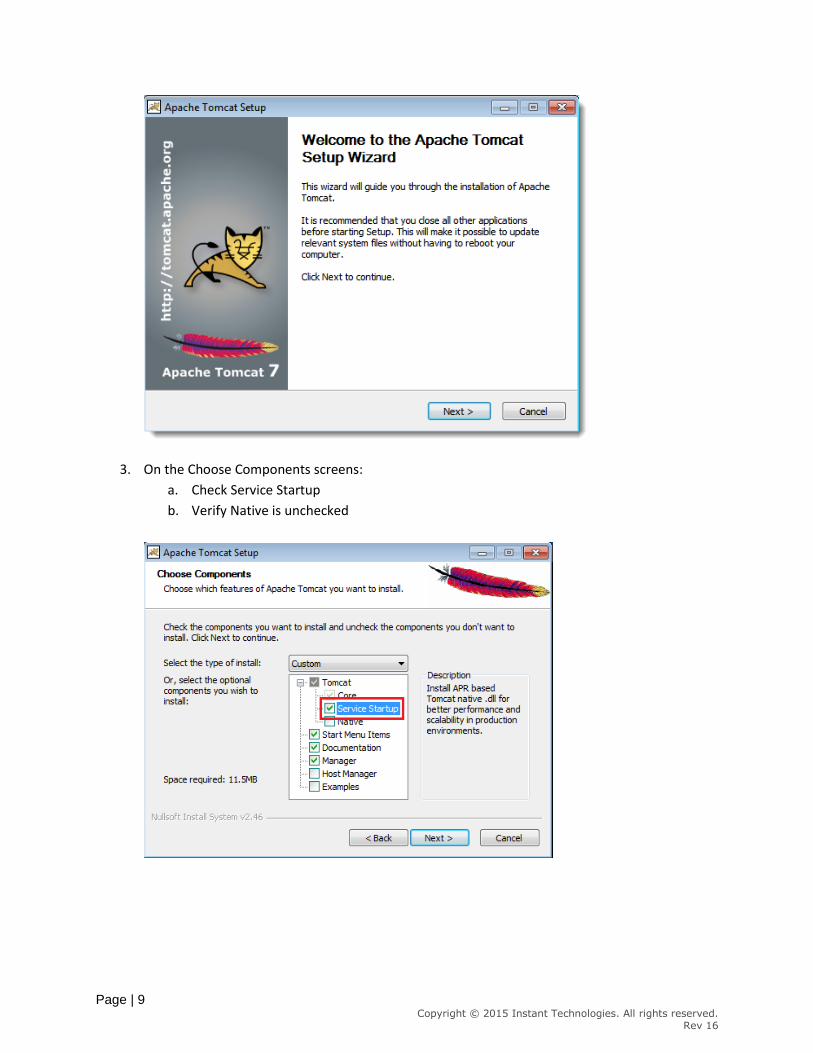
2. Run the installer. At the Welcome screen, press Next
Page | 9 Copyright © 2015 Instant Technologies. All rights reserved.
Rev 16
3. On the Choose Components screens:
a. Check Service Startup
b. Verify Native is unchecked
Page | 10 Copyright © 2015 Instant Technologies. All rights reserved.
Rev 16
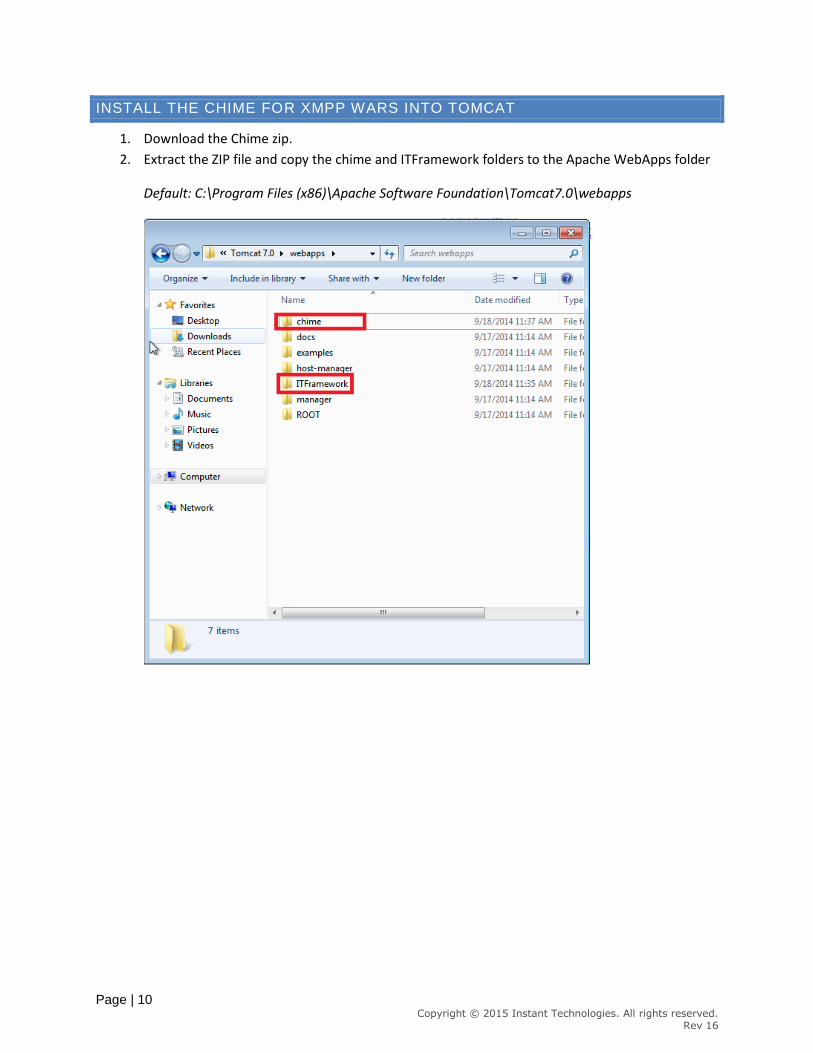
INSTALL THE CHIME FOR XMPP WARS INTO TOMCAT
1. Download the Chime zip.
2. Extract the ZIP file and copy the chime and ITFramework folders to the Apache WebApps folder
Default: C:\Program Files (x86)\Apache Software Foundation\Tomcat7.0\webapps
Page | 11 Copyright © 2015 Instant Technologies. All rights reserved.
Rev 16
SPECIFYING DATABASE CONNECTION DETAILS
Database connection settings will need to be specified for both Chime and ITFramework application.
ITFRAMEWORK APPLICATION
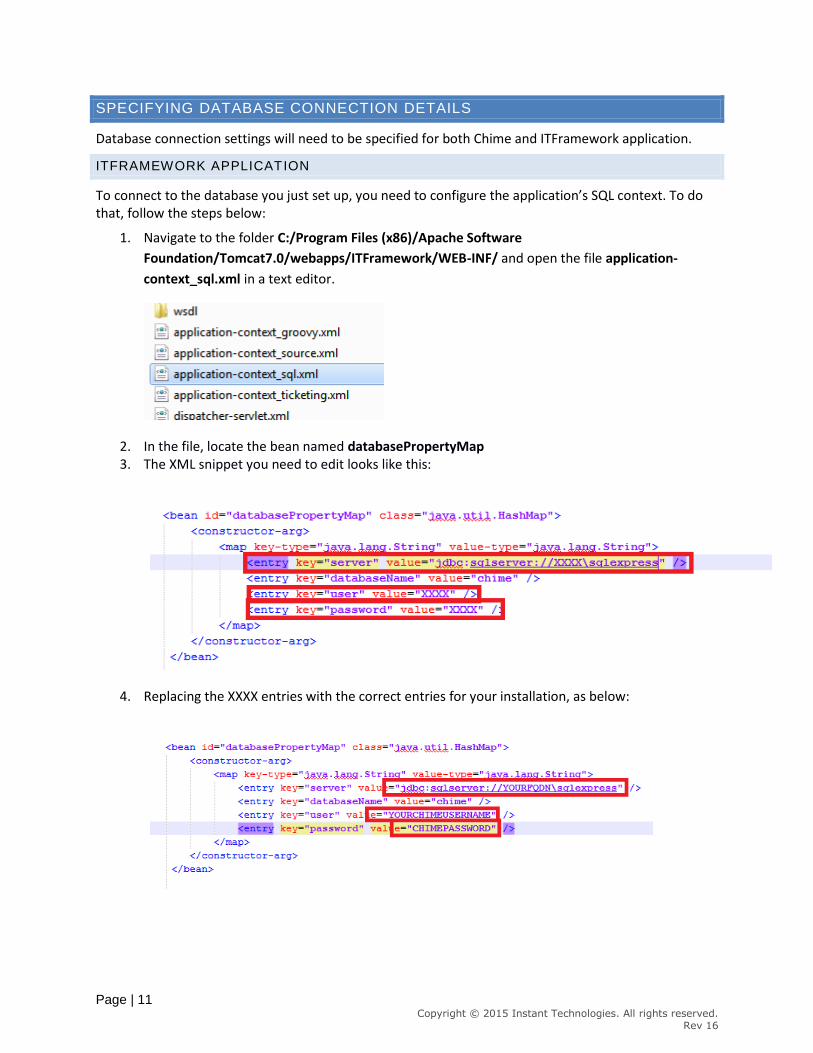
To connect to the database you just set up, you need to configure the application’s SQL context. To do that, follow the steps below:
1. Navigate to the folder C:/Program Files (x86)/Apache Software
Foundation/Tomcat7.0/webapps/ITFramework/WEB-INF/ and open the file application-
context_sql.xml in a text editor.
2. In the file, locate the bean named databasePropertyMap 3. The XML snippet you need to edit looks like this:
4. Replacing the XXXX entries with the correct entries for your installation, as below:
Page | 12 Copyright © 2015 Instant Technologies. All rights reserved.
Rev 16
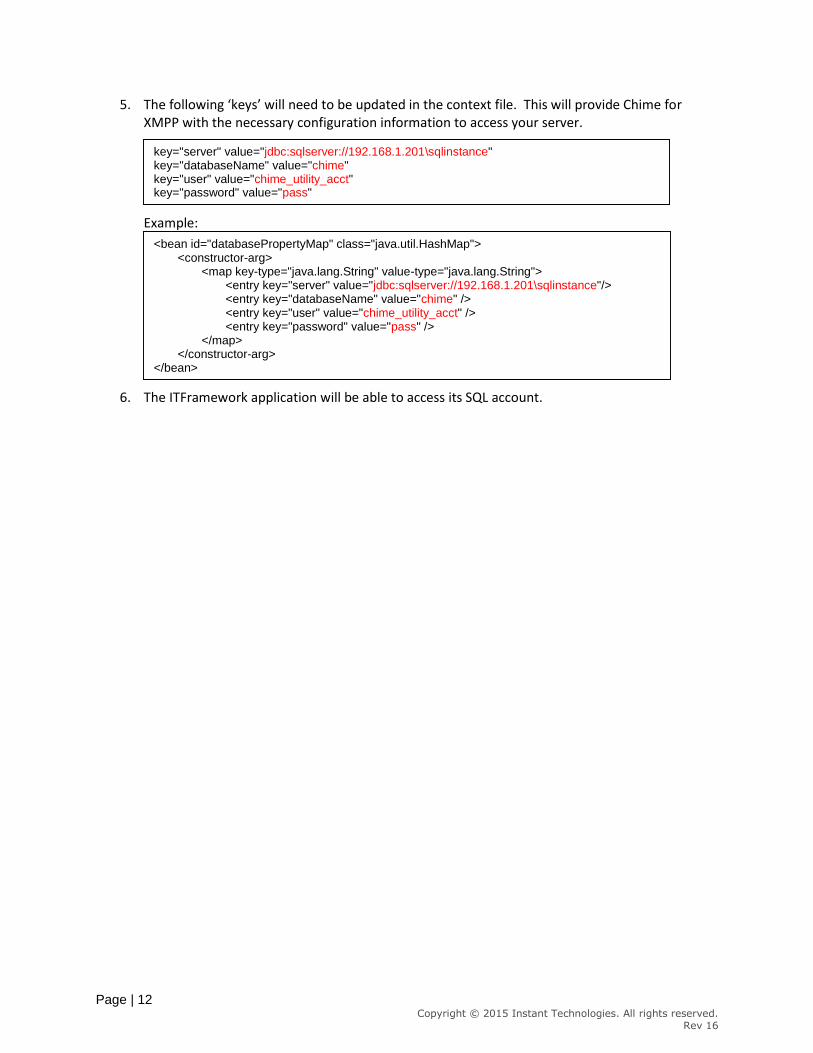
5. The following ‘keys’ will need to be updated in the context file. This will provide Chime for XMPP with the necessary configuration information to access your server.
Example:
6. The ITFramework application will be able to access its SQL account.
key="server" value="jdbc:sqlserver://192.168.1.201\sqlinstance" key="databaseName" value="chime" key="user" value="chime_utility_acct" key="password" value="pass"
<bean id="databasePropertyMap" class="java.util.HashMap"> <constructor-arg>
<map key-type="java.lang.String" value-type="java.lang.String"> <entry key="server" value="jdbc:sqlserver://192.168.1.201\sqlinstance"/> <entry key="databaseName" value="chime" /> <entry key="user" value="chime_utility_acct" /> <entry key="password" value="pass" />
</map> </constructor-arg>
</bean>

Page | 13 Copyright © 2015 Instant Technologies. All rights reserved.
Rev 16
CHIME CONFIGURATION OF SQL CONNECTIONS
To connect to the database you just set up, you need to configure the application’s SQL context. To do that, follow the steps below:
1. Navigate to the folder C:/Program Files (x86)/Apache Software
Foundation/Tomcat7.0/webapps/Chime/WEB-INF/spring and open the file application-
context_sql.xml in a text editor.
2. In the file, locate the bean named databasePropertyMap 3. The XML snippet you need to edit looks like this:
4. Replacing the XXXX entries with the correct entries for your installation, as below:
Page | 14 Copyright © 2015 Instant Technologies. All rights reserved.
Rev 16
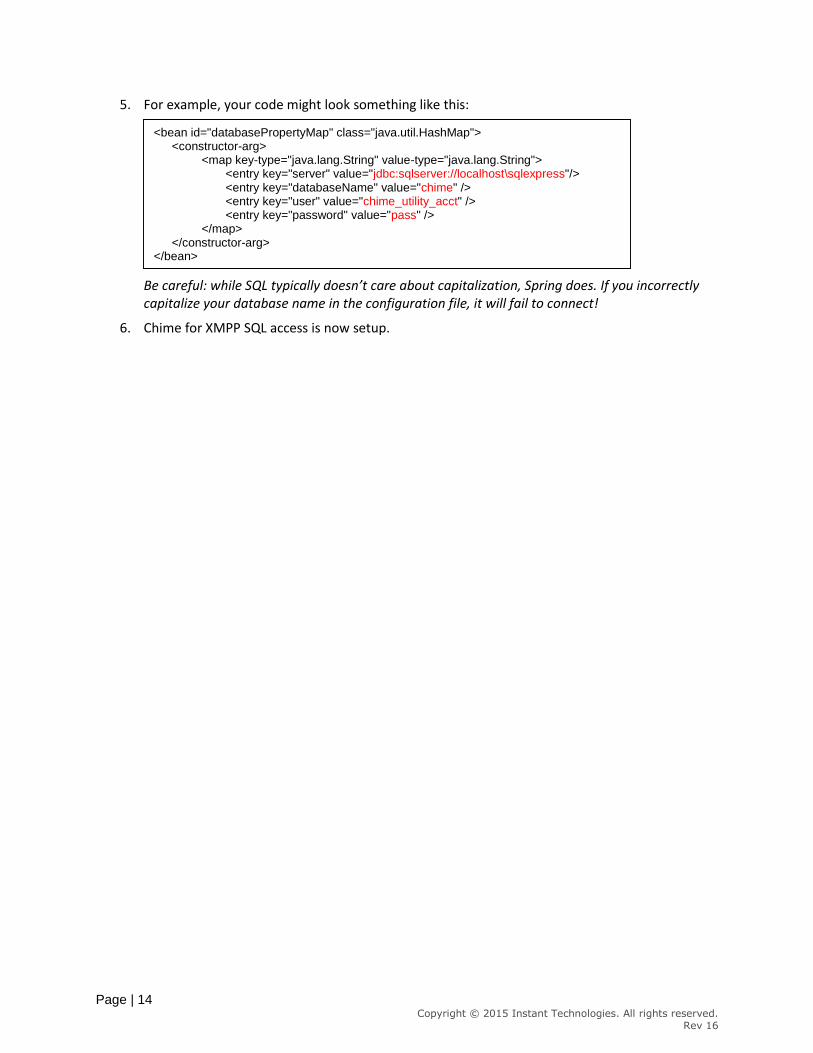
5. For example, your code might look something like this:
Be careful: while SQL typically doesn’t care about capitalization, Spring does. If you incorrectly capitalize your database name in the configuration file, it will fail to connect!
6. Chime for XMPP SQL access is now setup.
<bean id="databasePropertyMap" class="java.util.HashMap"> <constructor-arg>
<map key-type="java.lang.String" value-type="java.lang.String"> <entry key="server" value="jdbc:sqlserver://localhost\sqlexpress"/> <entry key="databaseName" value="chime" /> <entry key="user" value="chime_utility_acct" /> <entry key="password" value="pass" />
</map> </constructor-arg>
</bean>
Page | 15 Copyright © 2015 Instant Technologies. All rights reserved.
Rev 16
CHIME FOR XMPP CONFIGURATION OF LDAP OR ACTIVE DIRECTORY SETTINGS
Chime for XMPP can use LDAP or Active Directory to validate users. The configuration is stored in the application-context_sql.xml. At a high level, you will need to update the properties for 3 “beans” within the context file. The following areas will need to be updated:
Update the contextSource Bean
Update the ldapAuthProvider Bean
Update the ldapPropertyMap Bean
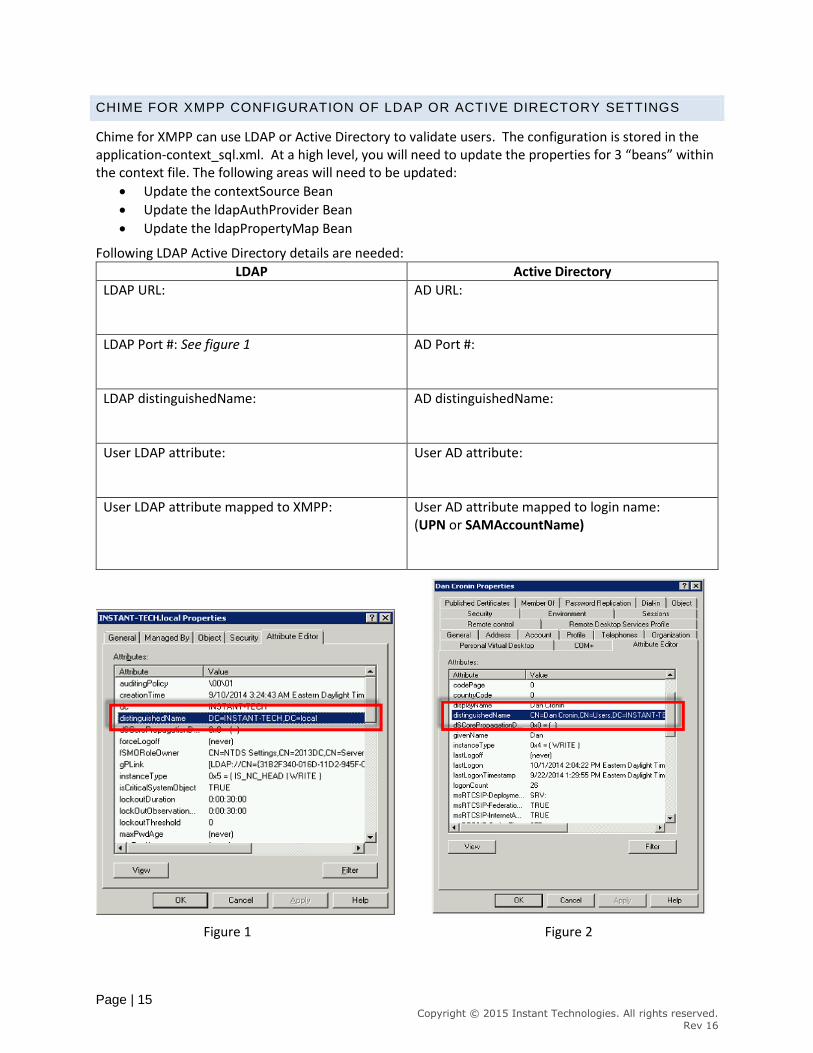
Following LDAP Active Directory details are needed:
LDAP Active Directory
LDAP URL:
AD URL:
LDAP Port #: See figure 1
AD Port #:
LDAP distinguishedName:
AD distinguishedName:
User LDAP attribute:
User AD attribute:
User LDAP attribute mapped to XMPP:
User AD attribute mapped to login name: (UPN or SAMAccountName)
Figure 1 Figure 2
Page | 16 Copyright © 2015 Instant Technologies. All rights reserved.
Rev 16
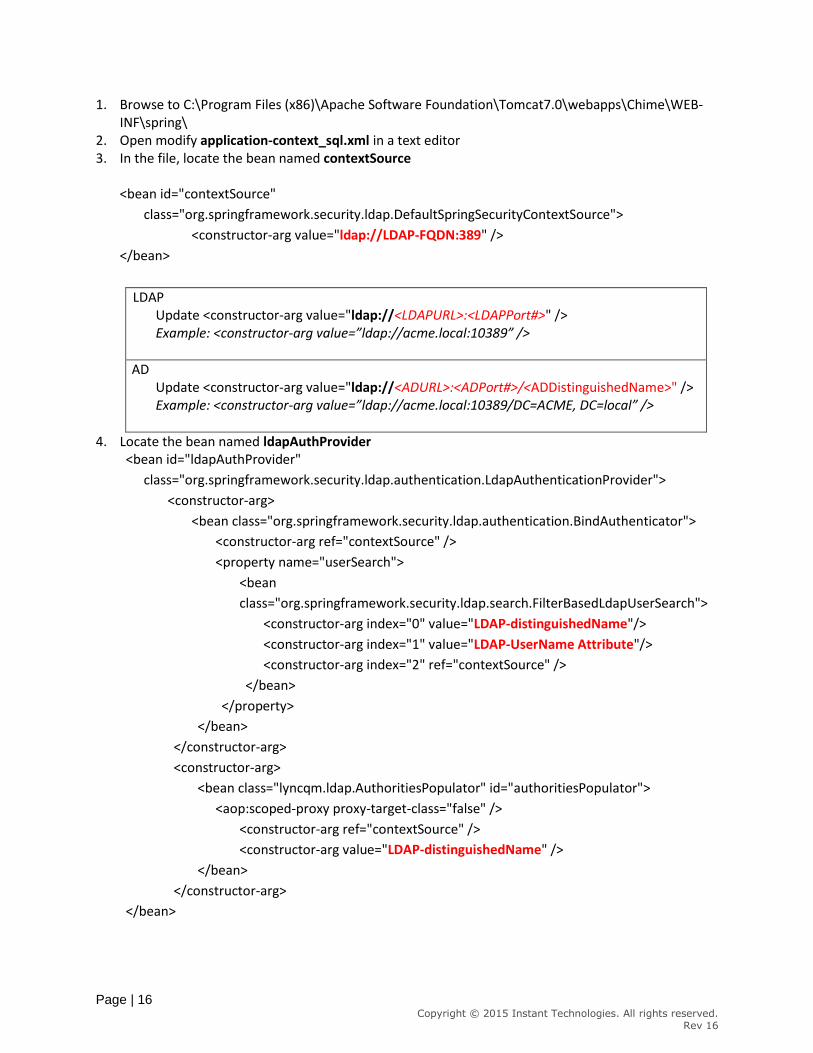
1. Browse to C:\Program Files (x86)\Apache Software Foundation\Tomcat7.0\webapps\Chime\WEB-INF\spring\
2. Open modify application-context_sql.xml in a text editor 3. In the file, locate the bean named contextSource
<bean id="contextSource"
class="org.springframework.security.ldap.DefaultSpringSecurityContextSource">
<constructor-arg value="ldap://LDAP-FQDN:389" />
</bean>
LDAP Update <constructor-arg value="ldap://<LDAPURL>:<LDAPPort#>" /> Example: <constructor-arg value=”ldap://acme.local:10389” />
AD Update <constructor-arg value="ldap://<ADURL>:<ADPort#>/<ADDistinguishedName>" /> Example: <constructor-arg value=”ldap://acme.local:10389/DC=ACME, DC=local” />
4. Locate the bean named ldapAuthProvider <bean id="ldapAuthProvider"
class="org.springframework.security.ldap.authentication.LdapAuthenticationProvider">
<constructor-arg>
<bean class="org.springframework.security.ldap.authentication.BindAuthenticator">
<constructor-arg ref="contextSource" />
<property name="userSearch">
<bean
class="org.springframework.security.ldap.search.FilterBasedLdapUserSearch">
<constructor-arg index="0" value="LDAP-distinguishedName"/>
<constructor-arg index="1" value="LDAP-UserName Attribute"/>
<constructor-arg index="2" ref="contextSource" />
</bean>
</property>
</bean>
</constructor-arg>
<constructor-arg>
<bean class="lyncqm.ldap.AuthoritiesPopulator" id="authoritiesPopulator">
<aop:scoped-proxy proxy-target-class="false" />
<constructor-arg ref="contextSource" />
<constructor-arg value="LDAP-distinguishedName" />
</bean>
</constructor-arg>
</bean>
Page | 17 Copyright © 2015 Instant Technologies. All rights reserved.
Rev 16
LDAP Update:
<constructor-arg index="0" value="<LDAPDistinguishedName>"/> <constructor-arg index="1" value="LDAPUserNameAttribute"/> <constructor-arg value="<LDAPDistinguishedName>"/>
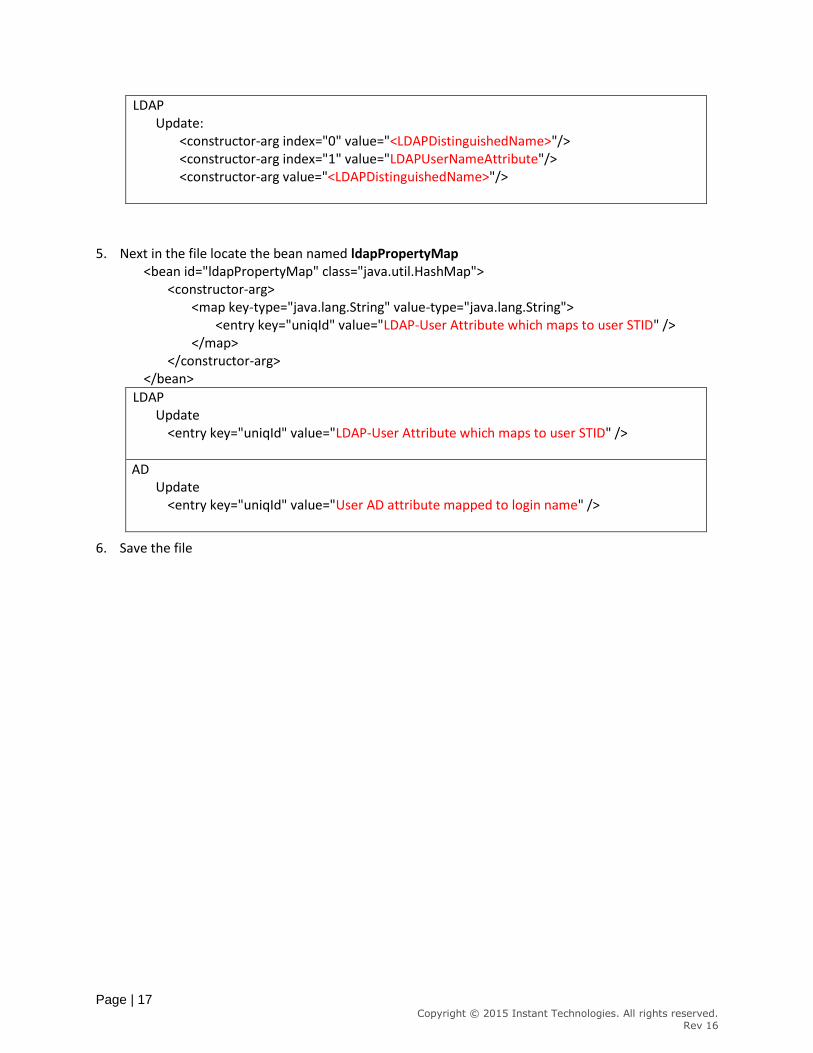
5. Next in the file locate the bean named ldapPropertyMap <bean id="ldapPropertyMap" class="java.util.HashMap">
<constructor-arg> <map key-type="java.lang.String" value-type="java.lang.String">
<entry key="uniqId" value="LDAP-User Attribute which maps to user STID" /> </map>
</constructor-arg> </bean>
LDAP Update
<entry key="uniqId" value="LDAP-User Attribute which maps to user STID" />
AD Update
<entry key="uniqId" value="User AD attribute mapped to login name" />
6. Save the file
Page | 18 Copyright © 2015 Instant Technologies. All rights reserved.
Rev 16
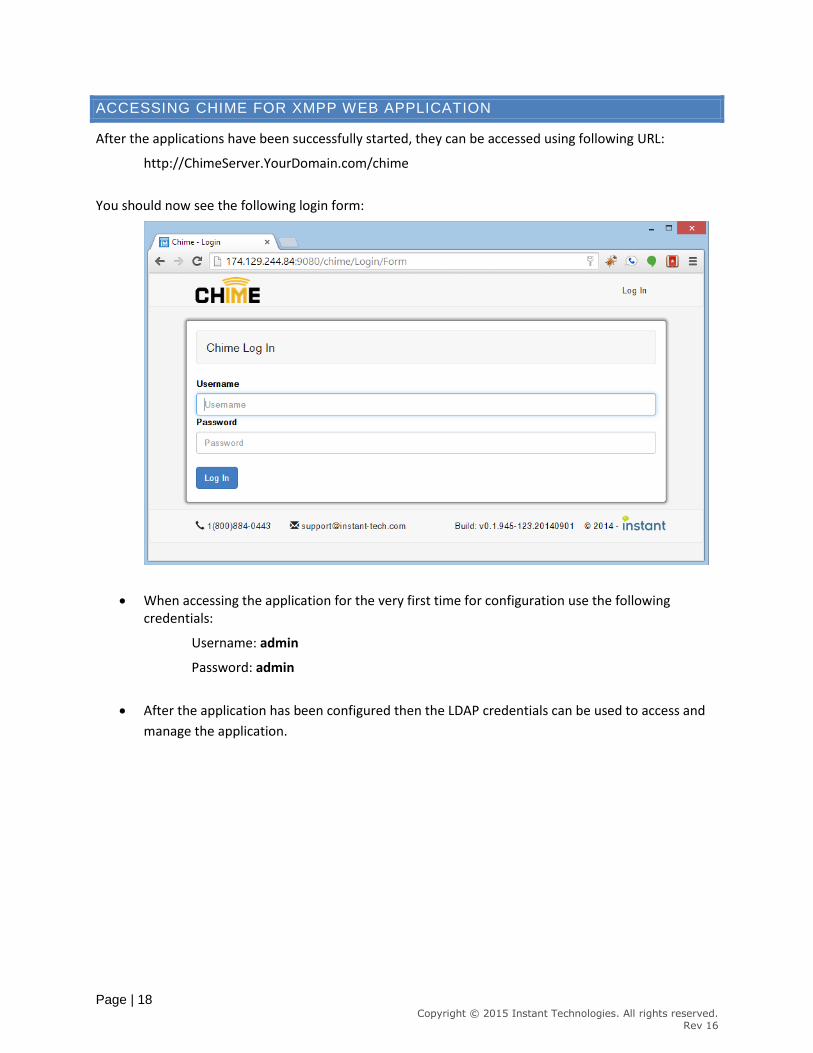
ACCESSING CHIME FOR XMPP WEB APPLICATION
After the applications have been successfully started, they can be accessed using following URL:
http://ChimeServer.YourDomain.com/chime
You should now see the following login form:
When accessing the application for the very first time for configuration use the following credentials:
Username: admin
Password: admin
After the application has been configured then the LDAP credentials can be used to access and
manage the application.
Page | 19 Copyright © 2015 Instant Technologies. All rights reserved.
Rev 16
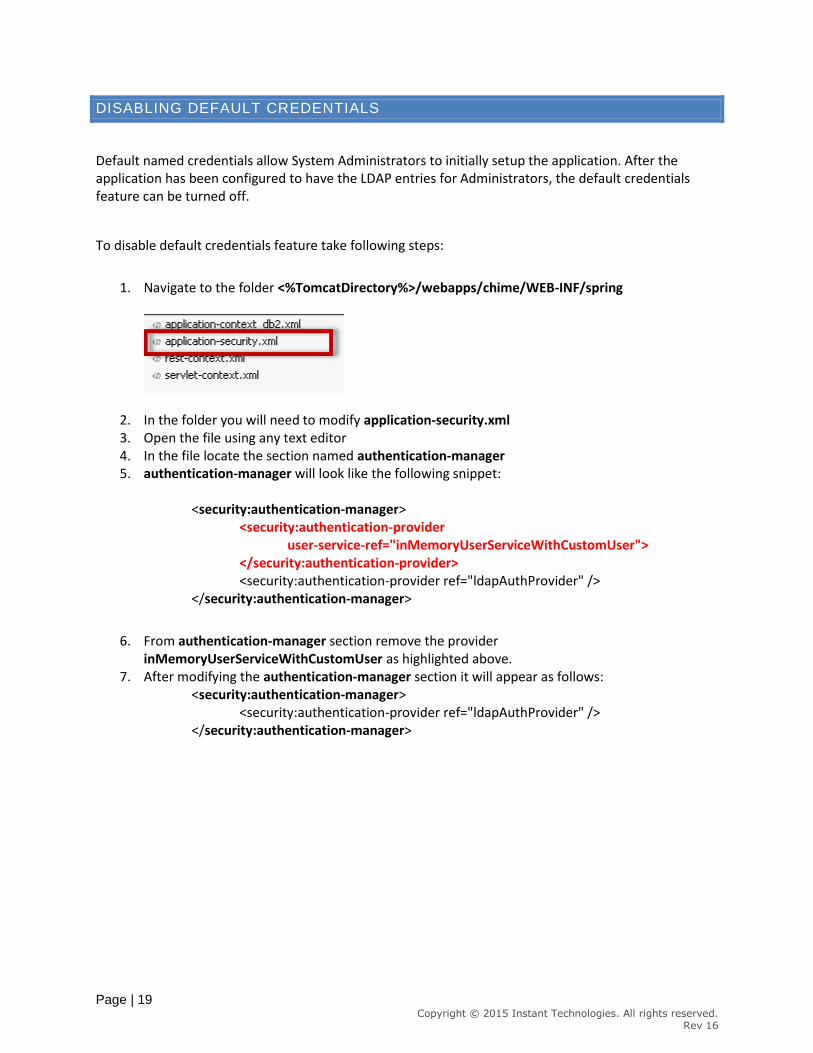
DISABLING DEFAULT CREDENTIALS
Default named credentials allow System Administrators to initially setup the application. After the application has been configured to have the LDAP entries for Administrators, the default credentials feature can be turned off.
To disable default credentials feature take following steps:
1. Navigate to the folder <%TomcatDirectory%>/webapps/chime/WEB-INF/spring
2. In the folder you will need to modify application-security.xml 3. Open the file using any text editor 4. In the file locate the section named authentication-manager 5. authentication-manager will look like the following snippet:
<security:authentication-manager> <security:authentication-provider user-service-ref="inMemoryUserServiceWithCustomUser"> </security:authentication-provider> <security:authentication-provider ref="ldapAuthProvider" /> </security:authentication-manager>
6. From authentication-manager section remove the provider
inMemoryUserServiceWithCustomUser as highlighted above. 7. After modifying the authentication-manager section it will appear as follows:
<security:authentication-manager> <security:authentication-provider ref="ldapAuthProvider" /> </security:authentication-manager>
Page | 20 Copyright © 2015 Instant Technologies. All rights reserved.
Rev 16
CONFIGUING CHIME FOR XMPP WEB CLIENT
The Chime for XMPP web client is a lightweight HTML page hosted on the same server on which Chime
for XMPP is installed.
CONFIGURE SERVER CONNECTION
To enable usage of the Chime for XMPP webclient, you must provide some connection settings so the application can communicate with your XMPP server. The first file you will need to configure is located in the \ITFramework\ChimeClient\js directory, and is named settings.js Navigate to the directory and open settings.js in a text editor. The file should look something like this:
var sametimeServerConfig = { hostPrefix: 'http://', webClientHostURL: '174.129.244.84/ITFramework', sametimeServerLocation: 'xmpp.instant-tech.com', servletPrefix: '/webclient', hashedUsernames: true
};
The settings contained within this JavaScript object provide the connection info that the web client uses to connect with the Chime the XMPP engine. The settings are detailed here:
Name Type Description
hostPrefix string The protocol used to connect to the servlet URL
webClientHostURL string The server address where the web client is hosted
sametimeServerLocation string The server address of the XMPP server
servletPrefix string The directory where the servlet controller is hosted
hashedUsernames boolean If set to true, any XMPP IDs passed to the web client need to be Base64 encoded
Page | 21 Copyright © 2015 Instant Technologies. All rights reserved.
Rev 16
CONFIGURE WEB CLIENT
The web client code needs to be initialized after the page has loaded. At the bottom of the page, right before the closing body tag there should be a <script> tag with a jQuery $(document).ready() function handler. Inside that handler, there should be a call to initialize the chat client.
Webchat.init('sametime', { chatForm: false });
The first parameter for this Webchat.init function is the platform the chat service runs on, in this case it should always be 'sametime'. The second parameter is a configuration object, which will allow you to specify certain options for the chat client. The setting chatForm: false will disable the pre-chat form. Other options will be added in future updates to Chime.
Page | 22 Copyright © 2015 Instant Technologies. All rights reserved.
Rev 16
CUSTOMIZING THE WEB CLIENT
The Chime for XMPP web client can be customized and branded to suit your specific needs. Chime for XMPP installs a default web client with the HTML and CSS content commented to explain what the major elements do. If you wish to customize the web client experience, it is recommended that you begin by creating copies of the webClient.html and webchat.css files. In your new HTML file, change the old reference to webchat.css to match the new copy you have created.
CHANGING THE CHIME FOR XMPP LOGO
Changing the logo displayed in the web client is easy. You should have a logo sized 100x50 pixels in .png format named "logo.png". Place the logo in the \ITFramework\ChimeClient\css\img directory. The logo should now be displayed in all Chime for XMPP web clients hosted on your server. If you want to have different logos for different queues, you will need to create copies of webClient.html
CONNECTING TO THE WEB CLIENT
The web client is accessed can be accessed by opening a browser window to the url for the webClient.html file, with parameters for the queue to hit, and optionally the user connecting to the chat. The URL for the webclient might look something like:
http://<SERVERFQDN>/ITFramework/ChimeClient/webClient.html?userName=Dispatcher%20UserName
The userName parameter should be the XMPP ID for the dispatcher account for the desired queue. If there are spaces in the XMPP ID, those spaces should be encoded with the characters: %20
CONNECTING WITH A USER XMPP ID
If a user is authenticated into an internal page and you have access to their XMPP ID, it is possible to connect with a queue using their XMPP ID by passing an additional parameter stid to the webclient URL. The full URL might look something like:
http://<SERVERFQDN>/ITFramework/ChimeClient/webClient.html?userName=Dispatcher%20UserName&stid=SeekerID
If hashedUsernames is set to true, you will need to Base64 encode the name before passing it to the URL. http://<SERVERFQDN>/ITFramework/ChimeClient/webClient.html?userName=Dispatcher%20UserName&stid=U2Vla2VySUQ
Page | 23 Copyright © 2015 Instant Technologies. All rights reserved.
Rev 16
ENCODING THE SEEKER USERNAME
The web client uses native JavaScript to Base64 encode and decode the username. var seekerUsername = "James T. Kirk"; seekerUsername = window.btoa(seekerUsername);
OPENING THE WEB CLIENT USING JAVASCRIPT
To open the web client, first we need to know a few values. clientAddress: The URL where the webclient is hosted queue: The XMPP username of the dispatcher for the queue seekerUsername (optional)
The plain text or Base64 encoded XMPP ID for the user accessing the webclient Here is an example on how you might open a chat session with a queue. This example assumes you Have jQuery on your page.
<a href="#" class="start-chat">Chat now!</a> <script type="text/javascript">
var clientAddress = "//chime.company.domain/ITFramework/ChimeClient/webClient.html"; var queue = "Helpdesk%20Support" var seekerUsername = "James T. Kirk" seekerUsername = btoa(seekerUsername); $(".start-chat").on("click", function({
window.open(clientAddress + "?userName=" + queue + "&stid=" + seekerUsername,"_blank"); });
</script>
Page | 24 Copyright © 2015 Instant Technologies. All rights reserved.
Rev 16
FAQ
CREATING A CHIME FOR XMPP USER
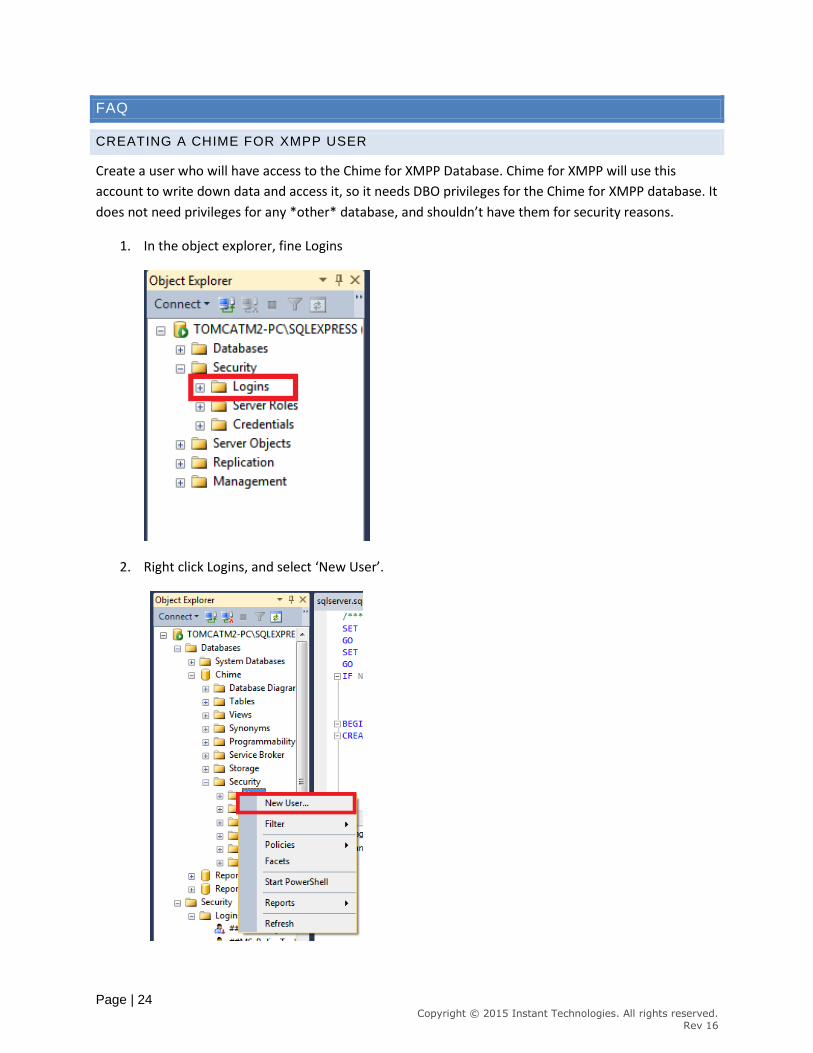
Create a user who will have access to the Chime for XMPP Database. Chime for XMPP will use this
account to write down data and access it, so it needs DBO privileges for the Chime for XMPP database. It
does not need privileges for any *other* database, and shouldn’t have them for security reasons.
1. In the object explorer, fine Logins
2. Right click Logins, and select ‘New User’.
Page | 25 Copyright © 2015 Instant Technologies. All rights reserved.
Rev 16
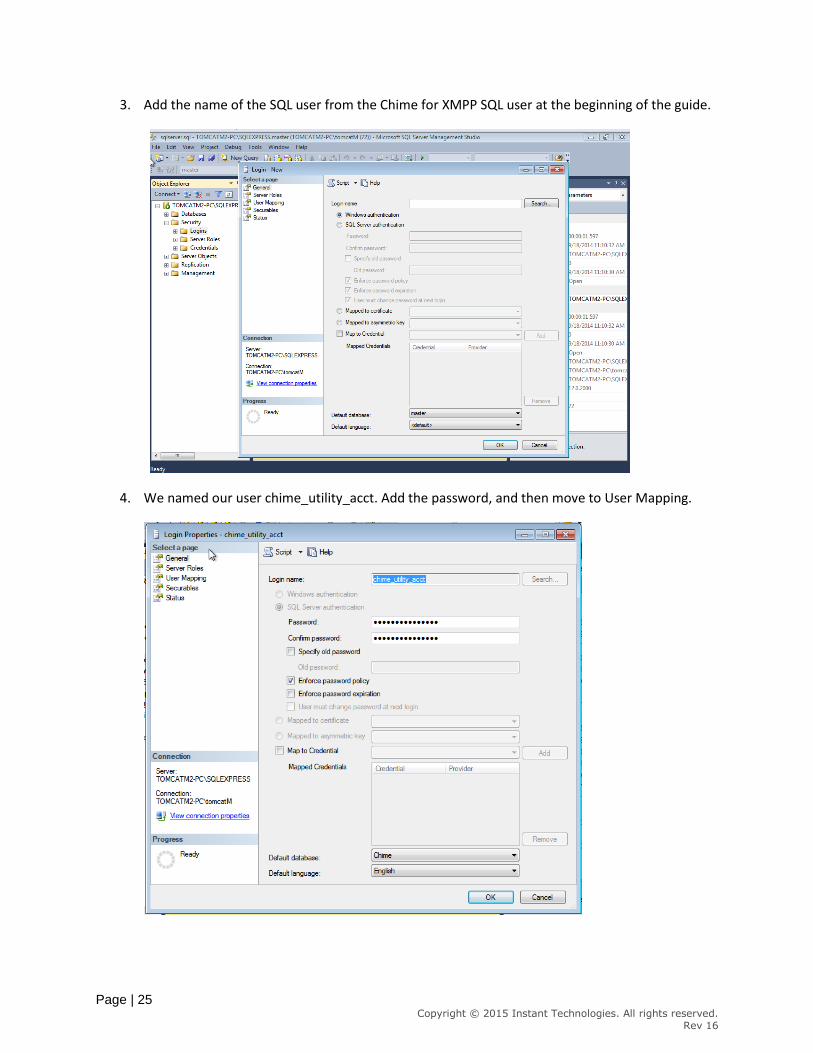
3. Add the name of the SQL user from the Chime for XMPP SQL user at the beginning of the guide.
4. We named our user chime_utility_acct. Add the password, and then move to User Mapping.
Page | 26 Copyright © 2015 Instant Technologies. All rights reserved.
Rev 16
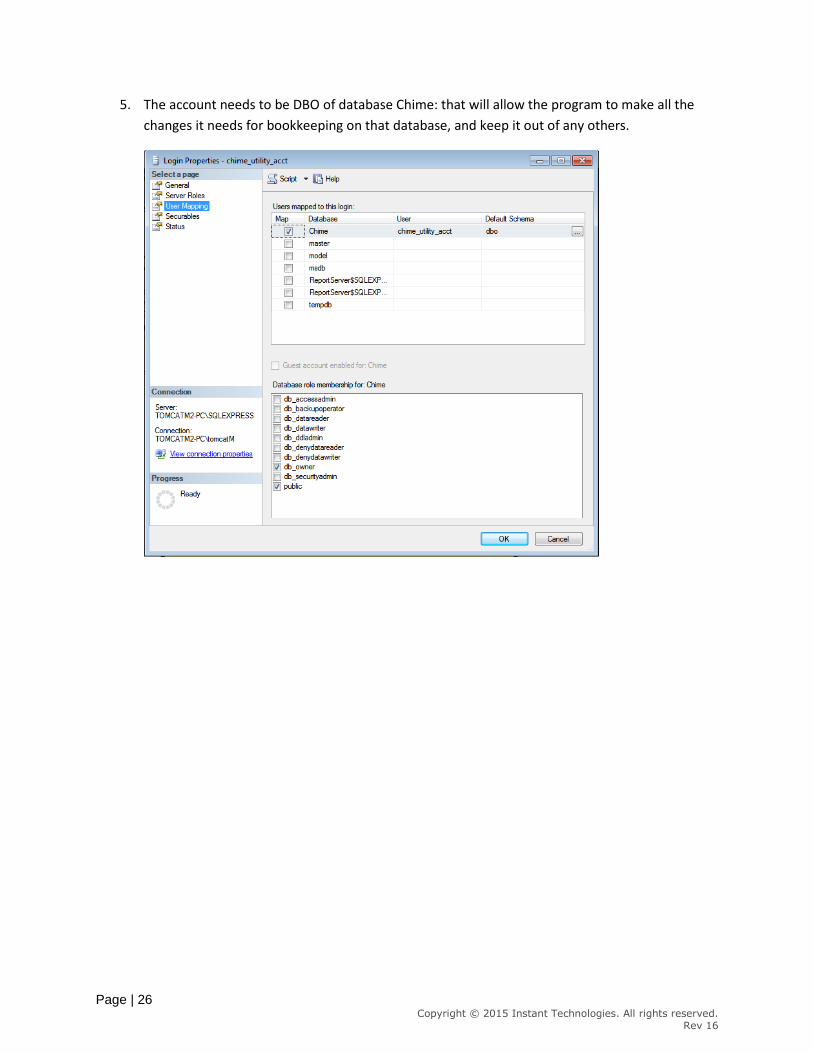
5. The account needs to be DBO of database Chime: that will allow the program to make all the
changes it needs for bookkeeping on that database, and keep it out of any others.
Page | 27 Copyright © 2015 Instant Technologies. All rights reserved.
Rev 16
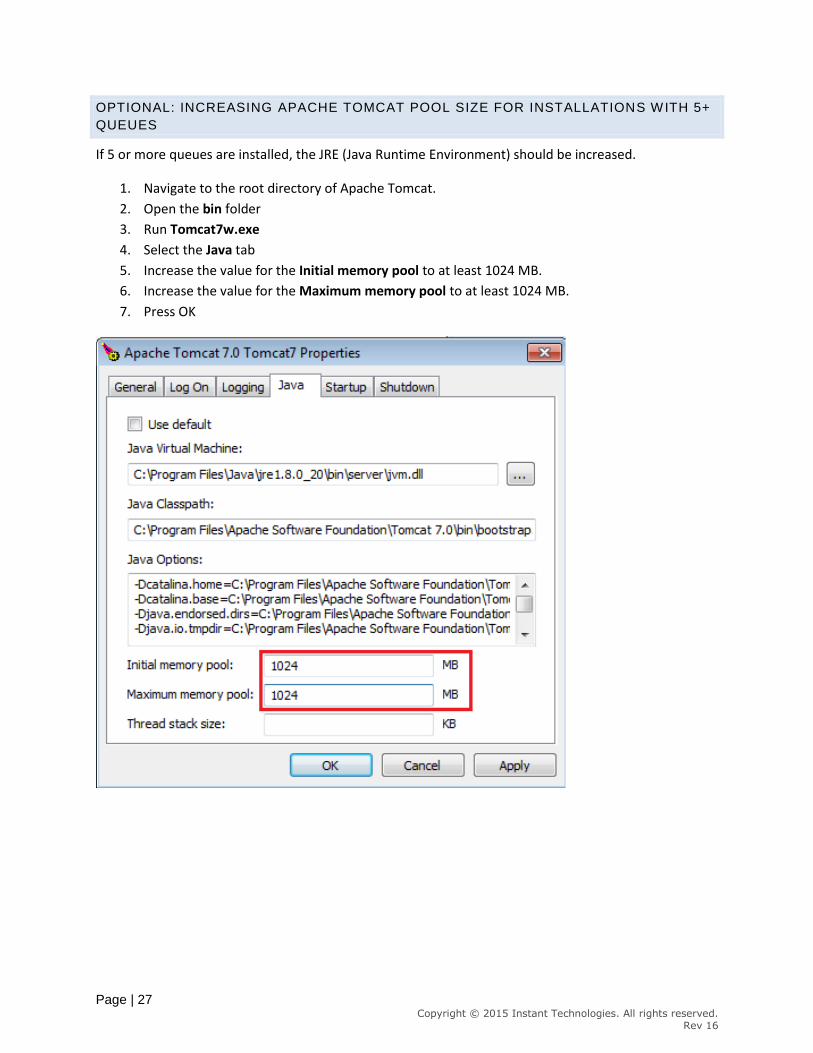
OPTIONAL: INCREASING APACHE TOMCAT POOL SIZE FOR INSTALLATIONS WITH 5+
QUEUES
If 5 or more queues are installed, the JRE (Java Runtime Environment) should be increased.
1. Navigate to the root directory of Apache Tomcat.
2. Open the bin folder
3. Run Tomcat7w.exe
4. Select the Java tab
5. Increase the value for the Initial memory pool to at least 1024 MB.
6. Increase the value for the Maximum memory pool to at least 1024 MB.
7. Press OK

Page | 28 Copyright © 2015 Instant Technologies. All rights reserved.
Rev 16
OPTIONAL: INCREASING APACHE TOMCAT INBOUND CONNECTIONS FOR QUEUES
WITH 50+ EXPERTS
Each UI-based connection with Chime for XMPP can use more than one HTTP connection. In situations
where there are many inbound connections to the server, it may be necessary to increase the number of
permitted inbound connections for Apache Tomcat.
The default value for acceptCount is 100.
The default value for maxThreads is 200.
If you have 50+ experts, we recommend the following to calculate the values for acceptCount and
maxThreads.
For each expert, increase the acceptCount by 5 and increase the maxThreads by 7.
To specify those values:
1. Navigate to the root directory of Apache Tomcat.
2. Open the conf folder
3. Open server.xml in a text editor.
4. Edit the “Connector port” tag to include acceptCount and maxThreads
Original After
<Connector port="8080" protocol="HTTP/1.1"
connectionTimeout="20000"
redirectPort="8443" />
<Connector port="80" protocol="HTTP/1.1"
connectionTimeout="20000"
acceptCount="500"
maxThreads="1000"
redirectPort="8443" />
Page | 29 Copyright © 2015 Instant Technologies. All rights reserved.
Rev 16
REVISION HISTORY
Date User Remarks
OCT 06, 2015 VG Initial Draft