Installing iDENprotectserver 2.0.0 on Red Hat Enterprise ...RHEL/CentOS 6 at RHEL Deployment Guide,...
23
Installing iDENprotect server 2.0.0 on Red Hat Enterprise Linux or CentOS iDENprotect Ltd. Version 2.0.0, March 12th, 2018
Transcript of Installing iDENprotectserver 2.0.0 on Red Hat Enterprise ...RHEL/CentOS 6 at RHEL Deployment Guide,...
Installing iDENprotectserver 2.0.0 on RedHat Enterprise Linux or CentOS
iDENprotect Ltd.
Version 2.0.0, March 12th, 2018

Table of Contents
Before Starting . . . . . . . . . . . . . . . . . . . . . . . . . . . . . . . . . . . . . . . . . . . . . . . . . . . . . . . . . . . . . . . . . . . . . . . . . . . . 2
System Requirements . . . . . . . . . . . . . . . . . . . . . . . . . . . . . . . . . . . . . . . . . . . . . . . . . . . . . . . . . . . . . . . . . . . . 2
Pre-installation Tasks . . . . . . . . . . . . . . . . . . . . . . . . . . . . . . . . . . . . . . . . . . . . . . . . . . . . . . . . . . . . . . . . . . . . 2
Enabling EPEL . . . . . . . . . . . . . . . . . . . . . . . . . . . . . . . . . . . . . . . . . . . . . . . . . . . . . . . . . . . . . . . . . . . . . . . . 2
Installing iDENprotectserver . . . . . . . . . . . . . . . . . . . . . . . . . . . . . . . . . . . . . . . . . . . . . . . . . . . . . . . . . . . . . . . . . . . 4
Verifying Installation . . . . . . . . . . . . . . . . . . . . . . . . . . . . . . . . . . . . . . . . . . . . . . . . . . . . . . . . . . . . . . . . . . . . . 4
Initial iDENprotectserver Setup . . . . . . . . . . . . . . . . . . . . . . . . . . . . . . . . . . . . . . . . . . . . . . . . . . . . . . . . . . . . . . . . 6
Changing Administrator Password . . . . . . . . . . . . . . . . . . . . . . . . . . . . . . . . . . . . . . . . . . . . . . . . . . . . . . . . . 7
Activating Licence . . . . . . . . . . . . . . . . . . . . . . . . . . . . . . . . . . . . . . . . . . . . . . . . . . . . . . . . . . . . . . . . . . . . . . . 7
Configuring Database Connection Parameters. . . . . . . . . . . . . . . . . . . . . . . . . . . . . . . . . . . . . . . . . . . . . . . 8
Using External Database Server . . . . . . . . . . . . . . . . . . . . . . . . . . . . . . . . . . . . . . . . . . . . . . . . . . . . . . . . . 8
Configuring CA Settings . . . . . . . . . . . . . . . . . . . . . . . . . . . . . . . . . . . . . . . . . . . . . . . . . . . . . . . . . . . . . . . . . . 9
Configuring Email Settings . . . . . . . . . . . . . . . . . . . . . . . . . . . . . . . . . . . . . . . . . . . . . . . . . . . . . . . . . . . . . . . 10
Editing Email Templates. . . . . . . . . . . . . . . . . . . . . . . . . . . . . . . . . . . . . . . . . . . . . . . . . . . . . . . . . . . . . . . 10
Configuring LDAP Settings (optional). . . . . . . . . . . . . . . . . . . . . . . . . . . . . . . . . . . . . . . . . . . . . . . . . . . . . . 11
Enabling LDAP Auto-enrolment. . . . . . . . . . . . . . . . . . . . . . . . . . . . . . . . . . . . . . . . . . . . . . . . . . . . . . . . 12
Restarting iDENprotectserver . . . . . . . . . . . . . . . . . . . . . . . . . . . . . . . . . . . . . . . . . . . . . . . . . . . . . . . . . . . . . . 12
Configuring Microsoft Exchange. . . . . . . . . . . . . . . . . . . . . . . . . . . . . . . . . . . . . . . . . . . . . . . . . . . . . . . . . . 12
Installing a Trusted Certificate. . . . . . . . . . . . . . . . . . . . . . . . . . . . . . . . . . . . . . . . . . . . . . . . . . . . . . . . . . . . 13
Generating Private Key and CSR . . . . . . . . . . . . . . . . . . . . . . . . . . . . . . . . . . . . . . . . . . . . . . . . . . . . . . . 13
Signing the CSR. . . . . . . . . . . . . . . . . . . . . . . . . . . . . . . . . . . . . . . . . . . . . . . . . . . . . . . . . . . . . . . . . . . . . . 14
Installing the Certificates. . . . . . . . . . . . . . . . . . . . . . . . . . . . . . . . . . . . . . . . . . . . . . . . . . . . . . . . . . . . . . 14
Testing the Certificate . . . . . . . . . . . . . . . . . . . . . . . . . . . . . . . . . . . . . . . . . . . . . . . . . . . . . . . . . . . . . . . . 14
Appendix A: Installing RHEL 7 . . . . . . . . . . . . . . . . . . . . . . . . . . . . . . . . . . . . . . . . . . . . . . . . . . . . . . . . . . . . . . 16
Appendix B: Installing RHEL 6 . . . . . . . . . . . . . . . . . . . . . . . . . . . . . . . . . . . . . . . . . . . . . . . . . . . . . . . . . . . . . . 19

This guide describes how to install a standalone iDENprotectserver either on a physical Red Hat
Enterprise Linux (RHEL) server or on a virtualised platform using hypervisor software such as VMWare
ESXi. The document assumes general knowledge of RHEL server administration, as well as knowledge
in hypervisor technology if deploying iDENprotectserver to a virtual machine.
This guide only discusses the installation and initial setup of iDENprotectserver. For more in-depth
information on iDENprotectserver architecture and configuration, see iDENprotect Administrator Guide.
iDENprotectserver has been primarily tested on: * {RHEL} 6.8 * {RHEL} 7.2 * CentOS 6.8 * CentOS 7.2
Other versions of RHEL / CentOS major releases 6 and 7 are likely to work, but for maximum
compatibility, we recommend using versions 6.8 and 7.2.
1
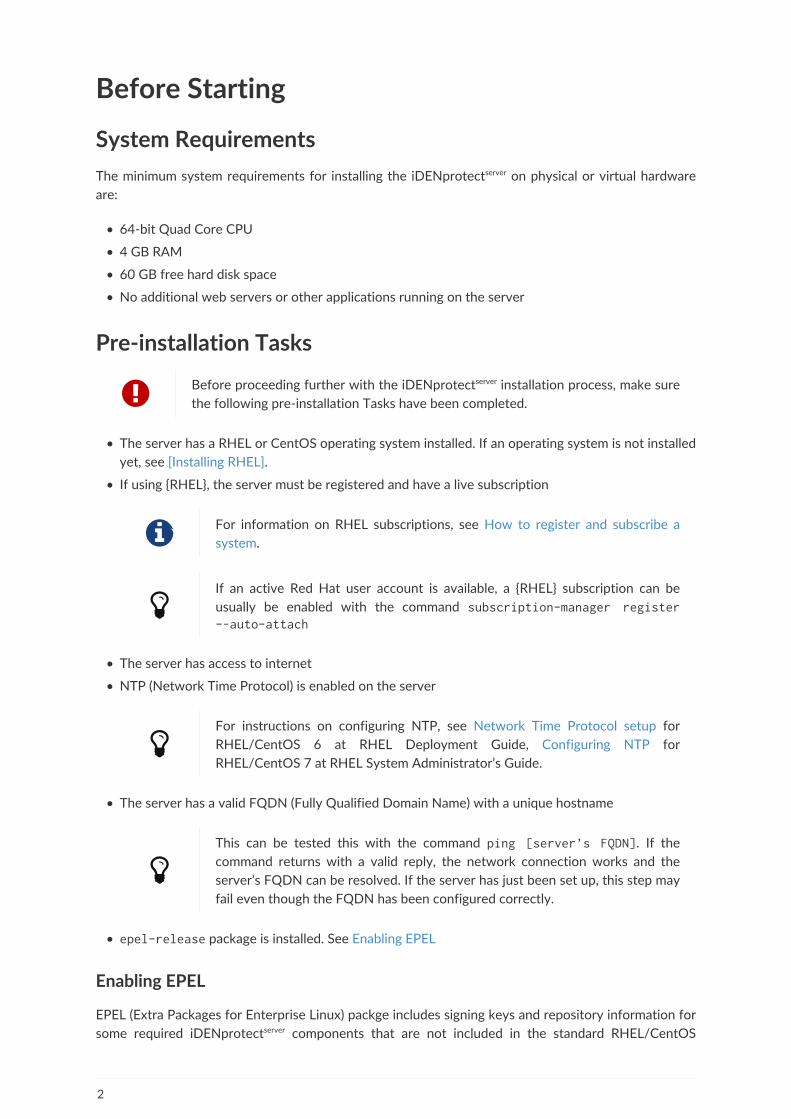
Before Starting
System Requirements
The minimum system requirements for installing the iDENprotectserver on physical or virtual hardware
are:
• 64-bit Quad Core CPU
• 4 GB RAM
• 60 GB free hard disk space
• No additional web servers or other applications running on the server
Pre-installation Tasks
Before proceeding further with the iDENprotectserver installation process, make sure
the following pre-installation Tasks have been completed.
• The server has a RHEL or CentOS operating system installed. If an operating system is not installed
yet, see [Installing RHEL].
• If using {RHEL}, the server must be registered and have a live subscription
For information on RHEL subscriptions, see How to register and subscribe a
system.
If an active Red Hat user account is available, a {RHEL} subscription can be
usually be enabled with the command subscription-manager register-–auto-attach
• The server has access to internet
• NTP (Network Time Protocol) is enabled on the server
For instructions on configuring NTP, see Network Time Protocol setup for
RHEL/CentOS 6 at RHEL Deployment Guide, Configuring NTP for
RHEL/CentOS 7 at RHEL System Administrator’s Guide.
• The server has a valid FQDN (Fully Qualified Domain Name) with a unique hostname
This can be tested this with the command ping [server’s FQDN]. If the
command returns with a valid reply, the network connection works and the
server’s FQDN can be resolved. If the server has just been set up, this step may
fail even though the FQDN has been configured correctly.
• epel-release package is installed. See Enabling EPEL
Enabling EPEL
EPEL (Extra Packages for Enterprise Linux) packge includes signing keys and repository information for
some required iDENprotectserver components that are not included in the standard RHEL/CentOS
2
repositories. Before installing iDENprotectserver, you must enable EPEL by installing the epel-releasepackage.
Installing on CentOS
On CentOS, epel-release is available in the main CentOS repositories. It is installed with a normal
yum command:
yum install epel-release
Installing on RHEL
EPEL does not fall under Red Hat’s Production Support Scope of Coverage, and it is not available in the
main RHEL repositories. However, the epel-release package is available as a downloadable RPM file
from the Fedora Project website for RHEL 7 and RHEL 6. To install the package:
1. Download the right RPM for your operating system version
2. Install it
yum localinstall <file-name.rpm>
For information on the relationship between Fedora Linux and RHEL, see article What is the
relationship between Fedora and Red Hat Enterprise Linux? at Red Hat website.
3

Installing iDENprotectserver
iDENprotectserver is installed locally from an RPM package. The package is not publicly available, please
contact your vendor or support <at> idenprotect.com on how to acquire the installation package.
The iDENprotectserver RPM package contains the following components:
• iDENprotectserver core and iDENprotectserver Admin Console
• iDENprotectserver internal database
• iDENprotectserver security hardening functions
To install iDENprotectserver:
1. Download the iDENprotectserver RPM package to the server
2. Install it with yum
yum --nogpgcheck localinstall <file-name.rpm>
The file name is idenprotect-server, followed by version number and OS architecture information.
iDENprotectserver has a few dependencies, some of which require that the additional epel-releaserepository has been enabled. If yum warns about unresolvable dependencies, fix them before
proceeding with iDENprotectserver installation.
Verifying Installation
During installation, iDENprotectserver is set up to run as a service which is automatically launched after
installation and every server reboot. If the service runs successfully, it means that iDENprotectserver
installation has been successful.
Verifying On CentOS / RHEL 7
1. Enter command systemctl status idenprotect.
2. If the service is running successfully, you’ll see the green text Active: active (exited).
3. If the service is not running, you’ll see the text Active: inactive (dead) instead.
Verifying On CentOS / RHEL 6
1. Enter command service idenprotect status.
2. If the service is running successfully, you’ll see the green text Running followed by PID.
3. If the service is not runnung, you’ll see the red text Not running instead.
If the service is running, open a web browser and access iDENprotectserver Admin Console in
https:\/\/<idenprotect.server.url>. Before a valid SSL certificate is installed, your browser
should show a security warning that you can ignore.
When the URL loads, you should see a login page.
4

Figure 1. iDENprotectserver Login Page
If the service is not running, see instructions on performing troubleshooting from iDENprotect log files
in iDENprotectserver Administrator Guide
5
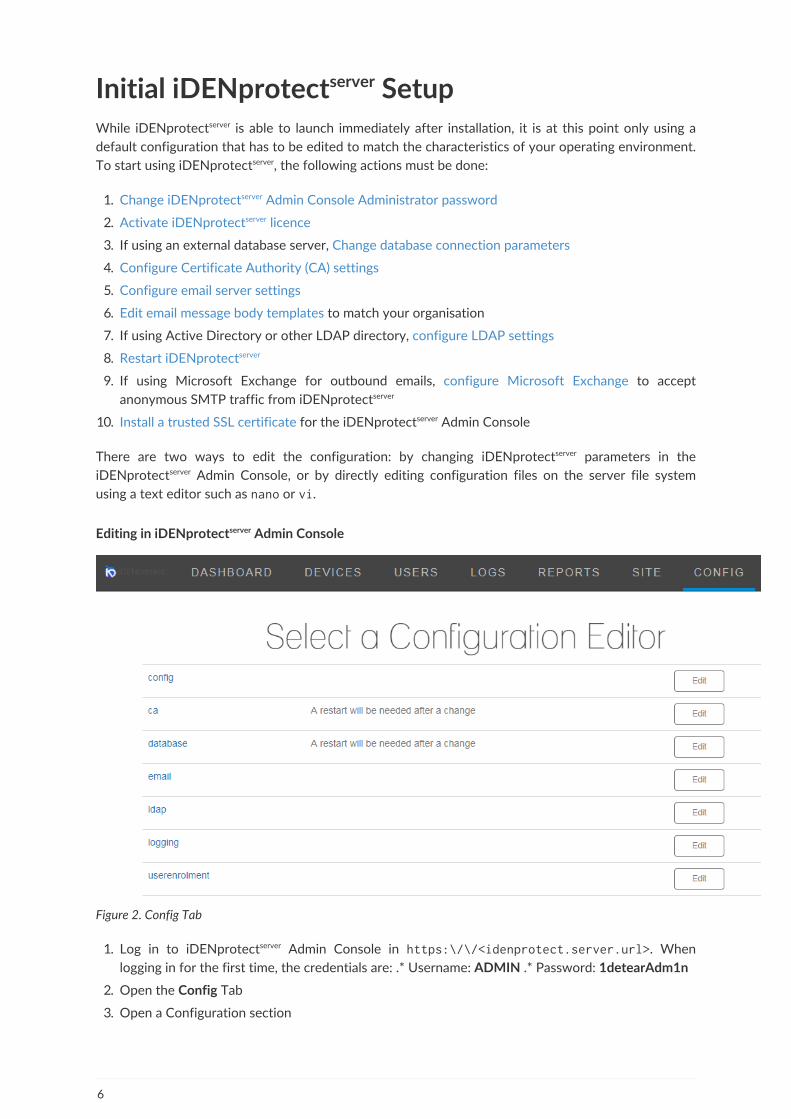
Initial iDENprotectserver SetupWhile iDENprotectserver is able to launch immediately after installation, it is at this point only using a
default configuration that has to be edited to match the characteristics of your operating environment.
To start using iDENprotectserver, the following actions must be done:
1. Change iDENprotectserver Admin Console Administrator password
2. Activate iDENprotectserver licence
3. If using an external database server, Change database connection parameters
4. Configure Certificate Authority (CA) settings
5. Configure email server settings
6. Edit email message body templates to match your organisation
7. If using Active Directory or other LDAP directory, configure LDAP settings
8. Restart iDENprotectserver
9. If using Microsoft Exchange for outbound emails, configure Microsoft Exchange to accept
anonymous SMTP traffic from iDENprotectserver
10. Install a trusted SSL certificate for the iDENprotectserver Admin Console
There are two ways to edit the configuration: by changing iDENprotectserver parameters in the
iDENprotectserver Admin Console, or by directly editing configuration files on the server file system
using a text editor such as nano or vi.
Editing in iDENprotectserver Admin Console
Figure 2. Config Tab
1. Log in to iDENprotectserver Admin Console in https:\/\/<idenprotect.server.url>. When
logging in for the first time, the credentials are: .* Username: ADMIN .* Password: 1detearAdm1n
2. Open the Config Tab
3. Open a Configuration section
6

4. Edit a value or multiple values
5. Commit changes
6. Restart server if required
Editing in Command Line
1. On the server file system, go to directory /etc/idenprotect
2. Edit one of the .properties files
3. Save changes
4. Restart server if required
Changing Administrator Password
The first action after installing iDENprotectserver should always be to change the iDENprotectserver Admin
Console built-in administrator account password:
Figure 3. iDENprotectserver Admin Console User Accounts List
1. Log in to iDENprotectserver Admin Console in https:\/\/<idenprotect.server.url>. When
logging in for the first time, the credentials are: .* Username: ADMIN .* Password: 1detearAdm1n
2. Open the Site Tab
3. Click Reset Password on the ADMIN user
4. Enter and confirm a new password
Activating Licence
iDENprotectserver licence determines the amount of concurrent iDENprotect devices that
iDENprotectserver supports. Without a valid licence, iDENprotectserver will not accept any iDENprotect
enrolments or authentication attempts.
The licence file is supplied from your vendor, or from iDENprotect. The licence file is named
licence.xml. Contact us at support <at> idenprotect.com if you have issues with the licence file.
7
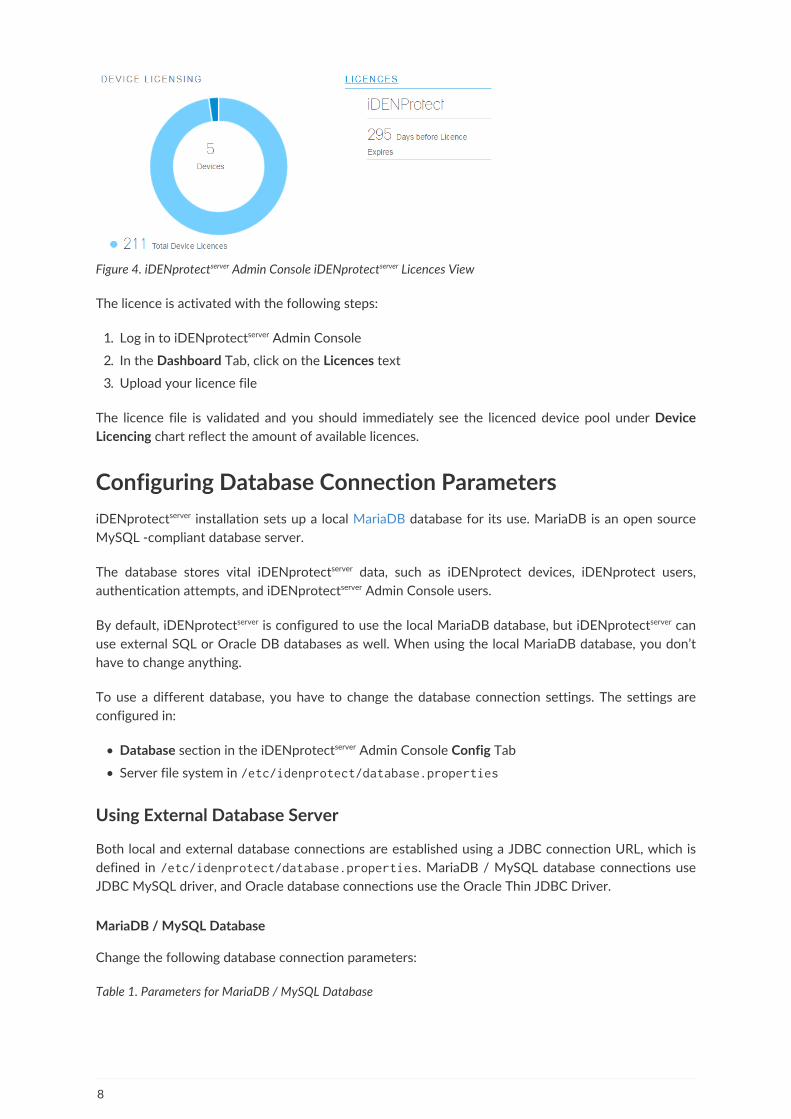
Figure 4. iDENprotectserver Admin Console iDENprotectserver Licences View
The licence is activated with the following steps:
1. Log in to iDENprotectserver Admin Console
2. In the Dashboard Tab, click on the Licences text
3. Upload your licence file
The licence file is validated and you should immediately see the licenced device pool under Device
Licencing chart reflect the amount of available licences.
Configuring Database Connection Parameters
iDENprotectserver installation sets up a local MariaDB database for its use. MariaDB is an open source
MySQL -compliant database server.
The database stores vital iDENprotectserver data, such as iDENprotect devices, iDENprotect users,
authentication attempts, and iDENprotectserver Admin Console users.
By default, iDENprotectserver is configured to use the local MariaDB database, but iDENprotectserver can
use external SQL or Oracle DB databases as well. When using the local MariaDB database, you don’t
have to change anything.
To use a different database, you have to change the database connection settings. The settings are
configured in:
• Database section in the iDENprotectserver Admin Console Config Tab
• Server file system in /etc/idenprotect/database.properties
Using External Database Server
Both local and external database connections are established using a JDBC connection URL, which is
defined in /etc/idenprotect/database.properties. MariaDB / MySQL database connections use
JDBC MySQL driver, and Oracle database connections use the Oracle Thin JDBC Driver.
MariaDB / MySQL Database
Change the following database connection parameters:
Table 1. Parameters for MariaDB / MySQL Database
8

Parameter in Config Tab Parameter in PropertiesFile
Configuration Change
username db.username User name of the iDENprotect database
password db.password The user’s password
driver db.jdbc.driver JDBC Driver name. Set to com.mysql.jdbc.Driver
url db.jdbc.url JDBC connection URL. Set to
jdbc:mysql://<server-ip/hostname>:<port>/<database-name>?autoReconnect=true
vendor db.vendor Database type. Set to MYSQL.
When using MariaDB / MySQL, iDENprotectserver stores all data in database named IDENPROTECT. If the
database doesn’t exist, iDENprotectserver startup script creates the database during initial startup.
Oracle Database
iDENprotectserver supports Oracle Database version 11g Release 2 (11.2.0.x)
Enterprise and Express editions.
To use Oracle Database instead of MariaDB, change the following database connection parameters:
Table 2. Parameters for Oracle Database
Parameter in Config Tab Parameter in PropertiesFile
Configuration Change
username db.username The name of the iDENprotect user / schema on thedatabase
password db.password Password of the user / schema
driver db.jdbc.driver JDBC Driver name. Set to
oracle.jdbc.OracleDriver
url db.jdbc.url JDBC connection URL. Set to to jdbc:<database-SID>:thin:@<server-ip/hostname>:<port>/<global-database-name>
vendor db.vendor Database type. Set to ORACLE.
iDENprotectserver Oracle Database connector requires that an empty schema for the data is created
before launching iDENprotectserver for the first time with the new database connection. During startup,
iDENprotectserver creates all tables and required core data when it detects that the schema exists.
There are multiple ways to create a new user / schema in Oracle Database. For instructions, see
CREATE USER in Oracle Database SQL Reference
Configuring CA Settings
During installation, iDENprotectserver creates Java KeyStore (cakeystore.jkskeystore.jks) and
TrustStore (cakeystore.jkstruststore.jks) files in /etc/idenprotect directory. The created files
9
contain placeholder CA certificates suitable for running iDENprotectserver for development or testing
purposes.
When iDENprotectserver is run in production use, the certificates in the JKS files should be replaced with
your organisation’s signed certificates.
Configuring Email Settings
When in use, iDENprotectserver sends automated iDENprotect emails to users during events such as
iDENprotect registration or PIN reset. To send emails, iDENprotectserver requires a working connection
to an SMTP server.
SMTP settings are configured in:
• Email section in the iDENprotectserver Admin Console Config Tab
• Server file system in /etc/idenprotect/email.properties
To configure the mail server, change the following parameters:
Table 3. Parameters for SMTP Server
Parameter in Config Tab Parameter in PropertiesFile
Configuration Change
mailUser email.gateway.username
Account name for connecting to the SMTP server
mailPassword email.gateway.password
The account’s password
smtpHost email.gateway.host URL or hostname of the SMTP server
smtpPort email.gateway.port Used SMTP port. Default is 25
fromAddress email.gateway.from "From:" email address for all sent mails. Any replies fromthe users will arrive in this mailbox, so either use a knownsupport account or an explicit "do not reply" emailaddress.
fromDisplayName email.gateway.displayname
Sender name for all sent mails.
Editing Email Templates
The emails iDENprotectserver sends are based on editable template files. Each email has a subject and a
message body, which is read from a .vm template file located in /etc/idenprotect/email-templates/. The template files contain some organisation-specific information such as unfilled contact
details.
Edit the following files to match your organisation’s conventions:
• ActivationEmailHtml.vm - email containing a generated Activation Code. Automatically sent to
user after successful enrollment.
• deviceEnrollmentEmailHtml.vm and userEnrollmentEmailHtml.vm - emails containing
instructions on acquiring an iDENprotect App and getting started with iDENprotect. These are
used when an iDENprotect device is set up for a user without the user’s input.
10

• pinResetEmailHtml.vm - email containing a PIN reset notification and a new Activation Code.
PIN reset is initiated by the user.
These emails can contain any text or HTML styling. In addition, the email templates use the following
variables:
• $user.firstName - First name of the email recipient
• $user.lastName - Last name of the email recipient
• $activationCode - Generated one-time Activation Code used during enrolment
• $qrUrl - Generated enrolment QR Code image embedded within the message. Only works with
HTML messages
• $portalQrUrl - URL link to the QR Code
The template files are not backed up anywhere. Make sure to store the original files
before editing them.
Configuring LDAP Settings (optional)
iDENprotectserver can be used with or without LDAP integration. After initial installation, LDAP
integration is disabled. If LDAP is enabled, iDENprotectserver connects iDENprotect users' identities to
an LDAP directory, such as Microsoft Active Directory.
LDAP settings are configured in:
• LDAP section in the iDENprotectserver Admin Console Config Tab
• Server file system in /etc/idenprotect/ldap.properties
To enable LDAP and connect to a LDAP directory, change the following parameters:
Table 4. Parameters for LDAP
Parameter in Config Tab Parameter in PropertiesFile
Description
enabled ldap.enabled Set to true to enable LDAP integration.
server ldap.server LDAP server URL (or IP address) and access port. The
format is ldap://<server-url>:<server-port>
authMethod ldap.auth.method LDAP connection authentication method. Available
options are simple, sasl and anonymous. If unsure of
the right option, set to simple.
authUser ldap.auth.user LDAP service account username (if using simple or SASLauthentication). Ignored if using anonymousauthentication.
authPassword ldap.auth.password LDAP service account password (if using simple or SASLauthentication)
searchBase ldap.search.base Set to the DN (Distinguished Name) of the search baseobject where the LDAP directory lookup search begins
searchObjectClass ldap.search.objectclass
Set to the objectclass of the search base target. If unsure
of the right option, set to person
11

Parameter in Config Tab Parameter in PropertiesFile
Description
userNameField /firstNameField /lastNameField /fullNameField /emailField
ldap.field.user.name / first.name /last.name /full.name / email
Column names in the LDAP directory for the userinformation
The service account referred to in authUser and authPassword requires read access to the LDAP
directory to be able to make queries. We recommend creating a dedicated LDAP account for
iDENprotectserver. The account only requires membership in the Domain Users group.
Enabling LDAP Auto-enrolment
When LDAP is enabled, iDENprotectserver verifies that all connecting iDENprotect users can be found in
the LDAP directory. However, during enrolment an iDENprotect administrator has to manually verify
all newly registered users. This part of enrolment can be further streamlined by enabling LDAP auto-
enrolment.
When auto-enrolment is enabled, iDENprotectserver automatically enrols all new iDENprotect users who
have been assigned to a defined auto-enrolment group in the LDAP directory.
To enable auto-enrolment, change the following paramters:
Table 5. Parameters for LDAP
Parameter in Config Tab Parameter in PropertiesFile
Description
autoEnrollEnabled ldap.autoenroll.enabled
Set to true to enable LDAP auto-enrolment.
autoEnrollGroup ldap.autoenroll.group
Auto-enrolment Group name in the LDAP directory. Allmembers in this group are automatically enroled whenthey register a new Device. The Group syntax is
CN=<GroupName>,OU<GroupFolder>,DC=<LDAPDirectoryName>.
Restarting iDENprotectserver
iDENprotectserver can only be restarted from the command line by restarting the idenprotect-serverservice. The restart takes about 30 seconds
On CentOS / RHEL 7
Enter command systemctl restart idenprotect-server.
On CentOS / RHEL 6
Enter command service idenprotect-server restart.
Configuring Microsoft Exchange
The iDENprotectserver is configured by default to send email on port 25 of the selected SMTP Server
12
using SMTP Basic Authentication.
If the SMTP Server in use is Microsoft Exchange, authentication between Exchange and the
iDENprotectserver may cause issues. In these specific scenarios, a Receive Connector should be
configured that accepts anonymous users.
Configuring the Full Receive Connector is referenced within the following Microsoft TechNet
resource. As a general guide, the process can be outlined as:
1. Open Exchange Management Console
2. Open Server Configuration
3. Select Hub Transport
4. Select Receive Connectors
5. Add new Custom Receive Connector
6. Provide a name for the Connector, for example iDENprotect Connector
7. Go to the Network tab
8. Enter the internal IP Address of iDENprotectserver in the list Receive mail from remote servers that
have these IP addresses
9. Go to the Authentication Tab
10. Select Basic Authentication
11. Go to the Permission Groups tab and select as appropriate e.g. Anonymous Users
Installing a Trusted Certificate
In order to handle web connections securely, the iDENprotectserver must use a valid publicly trusted
digital certificate. If no valid certificate has been configured, iDENprotect devices will not be able to
communicate with the iDENprotectserver.
Generating Private Key and CSR
1. In the iDENprotectserver terminal, create a new 2048-bit RSA key using OpenSSL:
openssl req -new -newkey rsa:2048 -nodes -keyout server.key -out server.csr
Change the name of server.key and server.csr to the hostname of
iDENprotectserver. For example, if the hostname is iden.domain.com, name the
files iden.key and iden.csr.
This starts the process of generating 2 files: a private key file for decrypting TLS traffic and a CSR
(Certificate Signing Request) file
2. Enter the organisational and geographic information for the certificate
3. When prompted for the Common Name, enter the fully qualified domain name of the
iDENprotectserver. For example, iden.domain.com.
4. Enter an email address for contact information regarding the certificate
13

Signing the CSR
Once the CSR file is created, send it to the CA (Certificate Authority) that is to be used for TLS web
connection certificates. The reply from the CA typically contains the signed certificate chain in a .pemor .crt file. This file is the public key of iDENprotectserver. Store it on the iDENprotectserver computer. If
an option is given to sign a certificate for a specific web server, select NGINX bundle.
If the CSR file contents are being copy-pasted, make sure to include all of them.
Many CSRs fail because the BEGIN and END lines were not included in the request.
Installing the Certificates
To set up TLS for iDENprotectserver, both keys must be stored on the server and configured in nginx:
1. Copy the .key file and the CRT or PEM received from the CA in the /var/certs directory
2. Edit /etc/nginx/nginx.conf and add the locations for the keys ssl_certificate and ssl_certificate_key
ssl_certificate: /var/certs/my_domain_name.pem; (or bundle.crt)ssl_certificate_key: /var/certs/my_domain_name.key;
Adjust the file names to match the certificate files on your file system.
3. Restart the nginx web server:
systemctl restart nginx
Testing the Certificate
Open a web browser and enter the URL for the iDENprotectserver. The browser should not alert to any
certificate validation errors.
Depending on the browser, there should be a padlock or similar icon in the address bar, which means
that the iDENprotectserver now has a trusted certificate for the web site.
14

Figure 5. Certificate information
15
Appendix A: Installing RHEL 7This section provides a brief walkthrough of installing {RHEL} on an empty hard drive. For complete
installation instructions, refer to RHEL 7 Installation Guide.
After launching the {RHEL} installer and selecting the install language, the Installation Summary screen
is displayed. Do the following steps to launch the {RHEL} installation process:
1. Set up the localisation settings:
a. Open the Date & Time window and select the time zone
b. Open the Keyboard window and select the keyboard layout
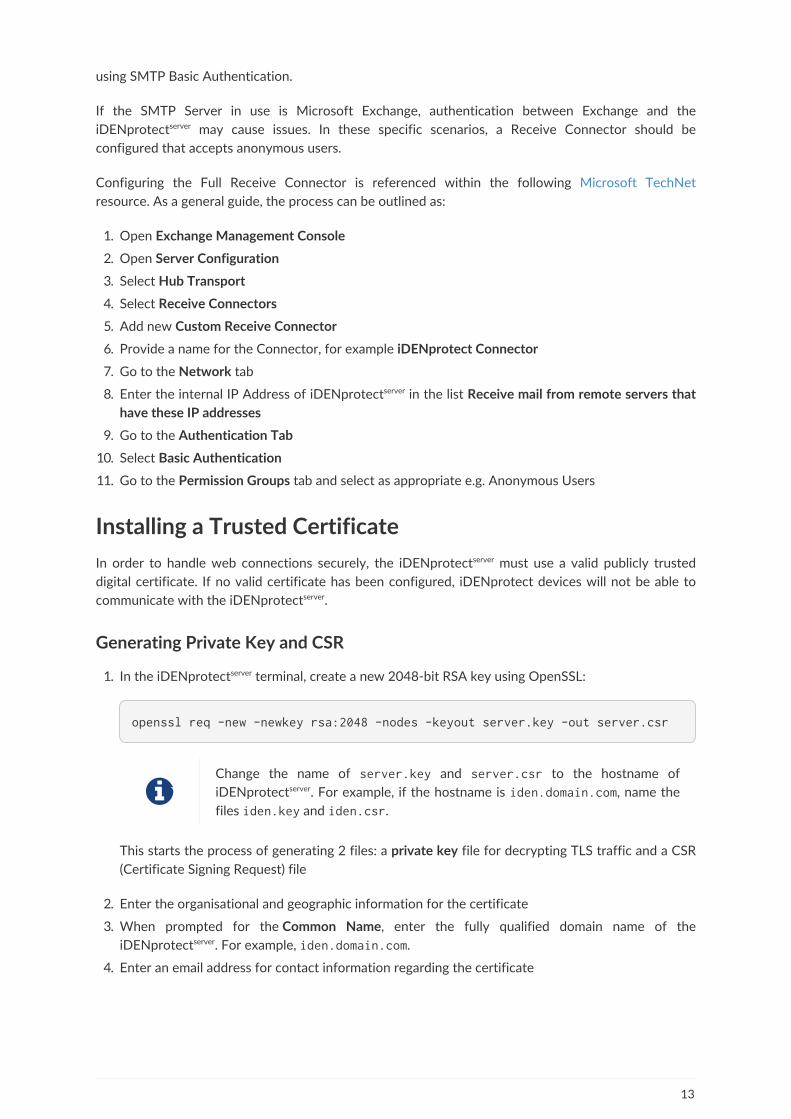
2. Select the server base environment type:
a. Open the Software Selection window
b. Select either Minimal Install or Server with GUI
iDENprotectserver itself does not require a GUI, but having access to a graphical internet
browser (which comes bundled on Server with GUI) on the server is helpful when performing
initial iDENprotectserver setup.
Figure 6. Selecting server type
3. Set up automatic partitioning:
a. Open the Installation Destination window
b. Leave all settings as they are and click Done
16

Figure 7. Setting up partitioning
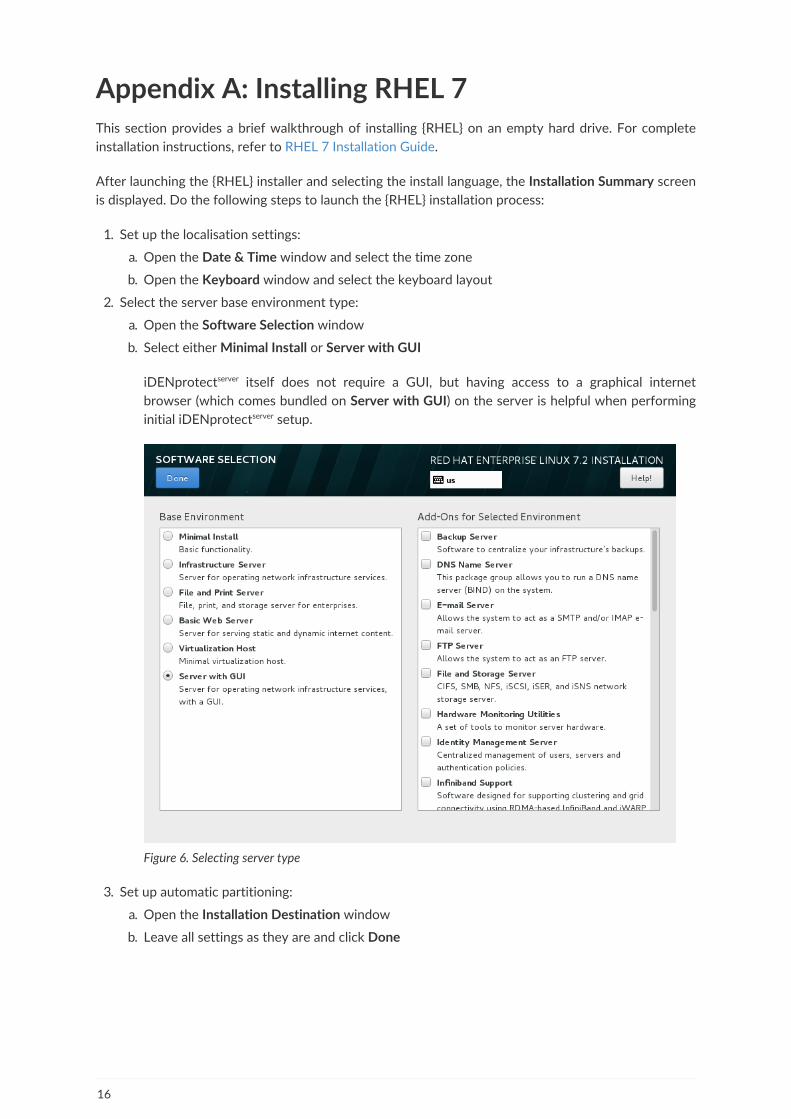
4. Set up the network settings:
a. Open the Network & Hostname window
b. Enter the FQDN (Fully-Qualified Domain Name) of the server in the Host name field
Figure 8. Setting up FQDN
17
c. Enable the Ethernet interface by clicking on the On/Off button
d. Click Configure
e. In the General tab, enable the Automatically connect to this network when it is available
checkbox
Figure 9. Enabling the network connection
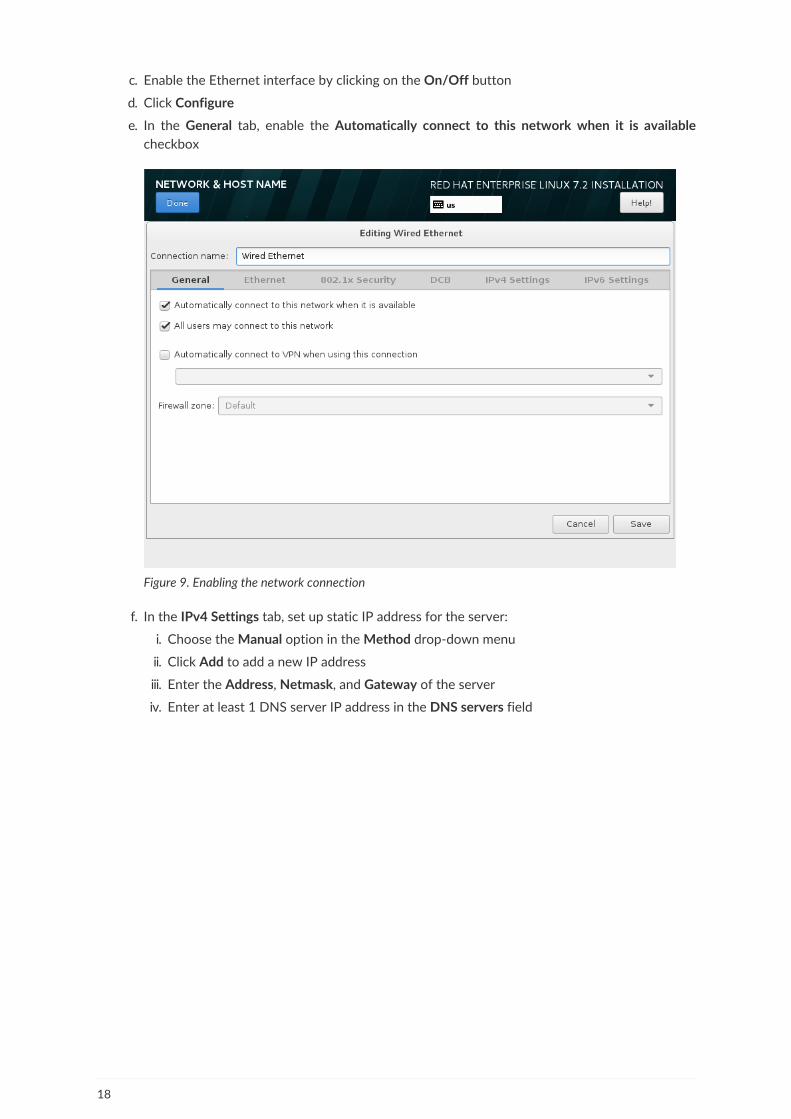
f. In the IPv4 Settings tab, set up static IP address for the server:
i. Choose the Manual option in the Method drop-down menu
ii. Click Add to add a new IP address
iii. Enter the Address, Netmask, and Gateway of the server
iv. Enter at least 1 DNS server IP address in the DNS servers field
18
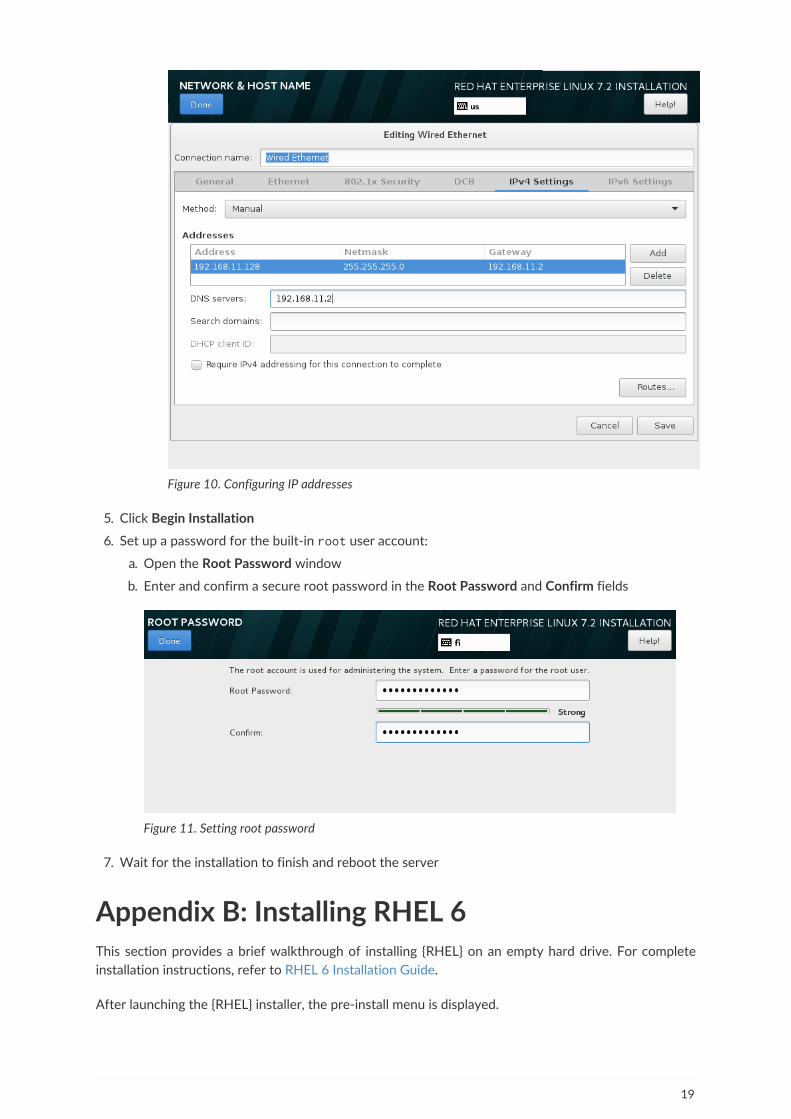
Figure 10. Configuring IP addresses
5. Click Begin Installation
6. Set up a password for the built-in root user account:
a. Open the Root Password window
b. Enter and confirm a secure root password in the Root Password and Confirm fields
Figure 11. Setting root password
7. Wait for the installation to finish and reboot the server
Appendix B: Installing RHEL 6This section provides a brief walkthrough of installing {RHEL} on an empty hard drive. For complete
installation instructions, refer to RHEL 6 Installation Guide.
After launching the {RHEL} installer, the pre-install menu is displayed.
19
1. Select Install or upgrade an existing system
2. Select Ok to perform an installation media consistency test. This will take some time after which
the actual graphical installer application launches next.
3. Select install language. Click Next
4. Select keyboard layout. Click Next
5. Select Basic Storage Devices. Click Next
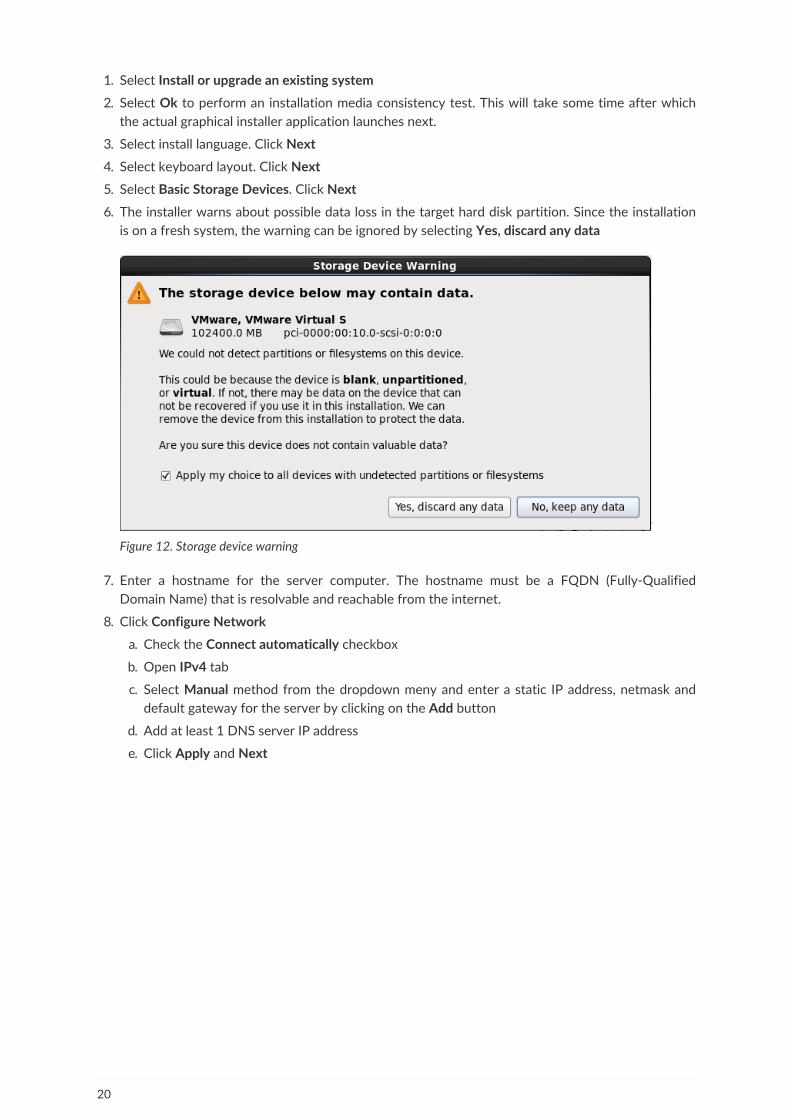
6. The installer warns about possible data loss in the target hard disk partition. Since the installation
is on a fresh system, the warning can be ignored by selecting Yes, discard any data
Figure 12. Storage device warning
7. Enter a hostname for the server computer. The hostname must be a FQDN (Fully-Qualified
Domain Name) that is resolvable and reachable from the internet.
8. Click Configure Network
a. Check the Connect automatically checkbox
b. Open IPv4 tab
c. Select Manual method from the dropdown meny and enter a static IP address, netmask and
default gateway for the server by clicking on the Add button
d. Add at least 1 DNS server IP address
e. Click Apply and Next
20

Figure 13. Setting network connection
9. Select the time zone. Click Next
10. Enter a root password. Click Next
11. Select Use All Space and click Next
12. Select Write changes to disk
13. Select either Basic Server (no GUI) or Desktop (with GUI) and click Next
iDENprotectserver itself does not require a GUI, but having access to a graphical internet browser
(which comes bundled on Desktop) on the server is helpful when performing initial
iDENprotectserver setup.
14. Wait for the installation to finish and reboot the server
21