Installing and Setting Up Your Ring Floodlight Cam · The copper wire from Floodlight Cam is a...
15
Installing and Setting Up Your Ring Floodlight Cam
-
Upload
nguyentuyen -
Category
Documents
-
view
216 -
download
0
Transcript of Installing and Setting Up Your Ring Floodlight Cam · The copper wire from Floodlight Cam is a...

Installing and Setting Up Your
Ring Floodlight Cam

This is so exciting…You are about to set up the world’s most advanced floodlight.
Start by watching the installation videos in the Ring app.
Next, read this manual and keep it handy during installation.
This manual is for informational purposes only. Working with electricity can be dangerous unless proper safety precautions are taken. If you are not comfortable or are inexperienced with the processes and tools described in this manual, we recommend that you hire a licensed electrician.
32

ScrewdriverUse the Phillips bit for installing the mounting bracket and the socket bit to tighten the screw cap covers.
Phillips Bit
Socket Bit
Mounting Bracket This bracket screws into your junction box before attaching to your Floodlight Cam.
Before you beginCheck out all the stuff in the box.
These instructions assume you’re replacing an existing floodlight and/or have a junction box where Floodlight Cam can be mounted. If you don’t have a junction box, then you’ll need to hire an electrician to install one.
Bracket Screw (5)Use 2 to 4 of these to attach the supplied bracket to your junction box.
Wire Nuts (3) Use these to connect Floodlight Cam’s wires to your existing wires.
Screw Cap Covers (2) Use these to cover the ends of the posts on the mounting bracket after installation.
Hook Hang your Floodlight Cam while connecting the wires.
54

How it all fits together
Junction Box(not included)
MountingBracket
BracketScrews
LightAdjustmentCollar
MountingPosts
WireNuts
LightAdjustmentKnob
Motion Detector(for lights)
CameraAdjustmentCollar
ScrewCapCovers
76
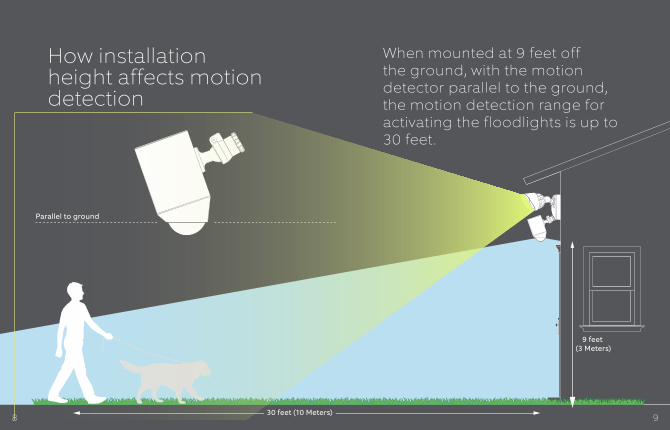
30 feet (10 Meters)
Parallel to ground
9 feet (3 Meters)
How installation height affects motion detection
When mounted at 9 feet off the ground, with the motion detector parallel to the ground, the motion detection range for activating the floodlights is up to 30 feet.
8 9

WARNING: Risk of electrical shock
• Disconnect power at the fuse or circuit breaker before installing.
• Verify that the supply voltage is correct. Connect fixture to a 100 VAC~240 VAC 50/60 Hz power source.
• Properly ground fixture.
• Always follow code standards when installing wired connections.
CAUTION: Risk of fire
• Do not install near combustible or flamable surfaces
NOTICE
• Do not connect this light fixture to a dimmer switch or timer.
Step 1– Shut power off at the breakerIf you don’t know where your breaker is or how to turn off power to your floodlight circuit, hire a licensed electrician.
1110

Step 2 - Prep your Floodlight Cam for installation A Loosen the knobs on the light
fixtures to rotate them out of the way and allow access to the mounting screws.
B Rotate the camera 180 degrees since Floodlight Cam ships with the camera upside down on the fixture.
Do not remove your Floodlight Cam from the ball socket on the base.
1312
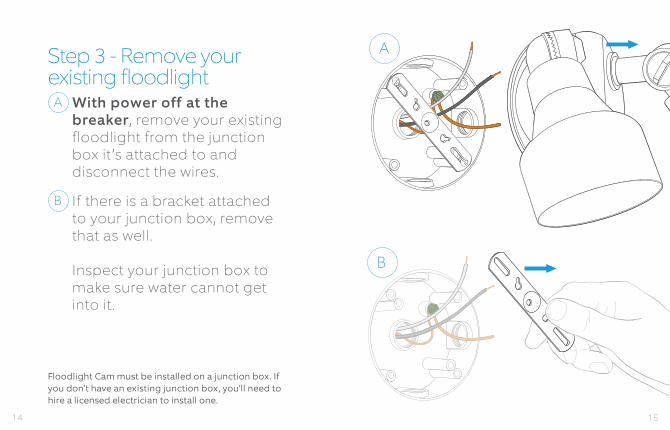
Floodlight Cam must be installed on a junction box. If you don’t have an existing junction box, you’ll need to hire a licensed electrician to install one.
Step 3 - Remove your existing floodlight A With power off at the
breaker, remove your existing floodlight from the junction box it ’s attached to and disconnect the wires.
B If there is a bracket attached to your junction box, remove that as well. Inspect your junction box to make sure water cannot get into it .
A
B
1514

Step 4 - Install the mounting bracketInstall the mounting bracket with the two posts level with the ground (or your wall if mounting on an overhang).
Make sure your existing wires come through the middle of the bracket.
Attach the bracket to your junction box using at least two screws.
1716

Step 5 - Hang Floodlight CamUse the provided hook to hang Floodlight Cam from the bracket while connecting the wires.
Hook one end onto the bracket and the other end in one of the mounting holes on your Floodlight Cam.
1918
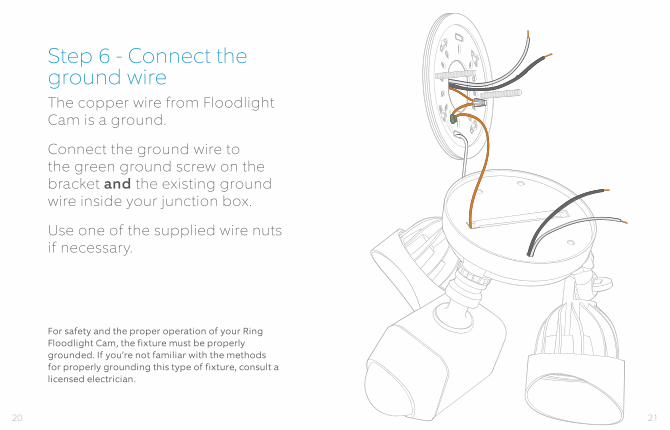
Step 6 - Connect the ground wireThe copper wire from Floodlight Cam is a ground.
Connect the ground wire to the green ground screw on the bracket and the existing ground wire inside your junction box.
Use one of the supplied wire nuts if necessary.
For safety and the proper operation of your Ring Floodlight Cam, the fixture must be properly grounded. If you’re not familiar with the methods for properly grounding this type of fixture, consult a licensed electrician.
2120

Step 7 - Connect the power wiresUse a wire nut to connect the white wire coming out of your junction box to the white wire on your Floodlight Cam.
Then, connect the black wire from your junction box to the black wire on Floodlight Cam with another wire nut.
If you don’t have clearly colored black and white wires coming out of your junction box, consult a licensed electrician.
2322

Step 8 - Place Floodlight Cam on the bracketCarefully push all the wires through the large opening in the bracket.
Align the mounting posts with the holes on Floodlight Cam and press together, securing the screw cap covers with the socket bit .
2524

Step 9 - Restore power at the breakerAfter restoring power, the lights will turn on and your Floodlight Cam will begin speaking to you to let you know it ’s in setup mode.
Step 10 - Perform the in-app setupIn the Ring app, select Set Up a Device and follow the in-app instructions to connect Floodlight Cam to your Wi-Fi network.
26 27

© 2017 Bot Home Automation, Inc. RING, ALWAYS HOME, and CHIME are trademarks of Bot Home Automation, Inc. Last updated: 03/17/17
Troubleshooting TipsFloodlight Cam is not lighting up when I restore power.See if there is a light switch controlling power to your floodlight fixture. If so, make sure it is switched on and stays switched on. If your fixture is connected to a timer, you’ll need to turn off the timer functionality.
Floodlight Cam lights up, but I can’t complete the in-app setup.First, triple check your Wi-Fi password, since this is the most common reason Floodlight Cam can’t complete setup.
Second, check the distance to your Wi-Fi router or access point. If Floodlight Cam is too far from your access point, this will prevent setup from completing. In this instance, our product Chime Pro can help boost your Wi-Fi signal and provide audible alerts from your Floodlight Cam.
Learn more at: ring.com/chime-pro