Installing a new 928 Motorsports All-Aluminum Radiator · Now you can fasten the fan shroud to the...
9
928 Motorsports Supercharger Installation Copyright 2008, 928 Motorsports, LLC All Rights Reserved Installing a new 928 Motorsports All-Aluminum Radiator © Copyright 2008 928 Motorsports, LLC.
Transcript of Installing a new 928 Motorsports All-Aluminum Radiator · Now you can fasten the fan shroud to the...

928 Motorsports Supercharger Installation Copyright 2008, 928 Motorsports, LLC All Rights Reserved
Installing a new 928 Motorsports All-Aluminum Radiator
© Copyright 2008 928 Motorsports, LLC.

2
Toll-Free Tech Hot Line:
877-FOR-928M 877-367-9286
Or
920-485-0928
Or
No instructions can contemplate every eventuality in every installation. Please use this as a guide to the general installation process.
Your car and your process may be slightly different.
© Copyright 2013 928 Motorsports, LLC. All rights reserved

3
Removing the old radiator: Remove the two cold air tubes that run from the air filter box to the top of the radiator fan shroud. Remove the two 10mm bolts that secure the upper fan shroud at the top as shown in Pic-ture 3. Remove the upper radiator hose completely at this time.
In the center of the fan shroud there may be a small air filter housing for the EGR system. Loosen the clamp and remove the hose that is attached to it.
Disconnect the electrical plugs at each of the two fans, and loosen the wire looms from the fan shroud. Locate the hose clamp around the power steering reservoir and remove the clamp. This allows the reservoir to be pushed out of the way when we lift out the shroud in a moment. The reservoir does not have to be drained.
© Copyright 2013 928 Motorsports, LLC. All rights reserved.

4
Using two wrenches in opposition, remove the oil cooler lines where they connect to the radiator end tanks as needed. The number of integral oil coolers in the radiator end tanks varies with the options on your car. This picture on the right has no fan shroud. It is just for illustrative purposes. Your oil cooler fittings will be harder to see. You should be able to push the power steering reser-voir toward the motor and wiggle and lift the fan shroud up and out of the car now. It is a tight fit! Sometimes this is easier with two people, one lifting on each end of the shroud.
The fan shroud will look like this when it is out of the car. (1987-95 model shown)
© Copyright 2013 928 Motorsports, LLC. All rights reserved.

5
Now remove the radiator hold-down clamps, one on each end of the top of the radiator as shown in Picture #6.
Loosen the clamp and remove the small vent hose from the top of the radiator end tank as shown here:
The hose you just unclamped lays in a metal tray that is hooked on to the top front of the radiator. Lift that up and swing it to the side and out of your way now. Underneath the radiator, you will may see a blue plastic drain tap. We recommend that you not use it to drain your radiator, as they often break. Instead, position a drain bucket below the lower radiator hose, loosen the clamps on each end, and remove the hose from the car.
© Copyright 2013 928 Motorsports, LLC. All rights reserved.
6
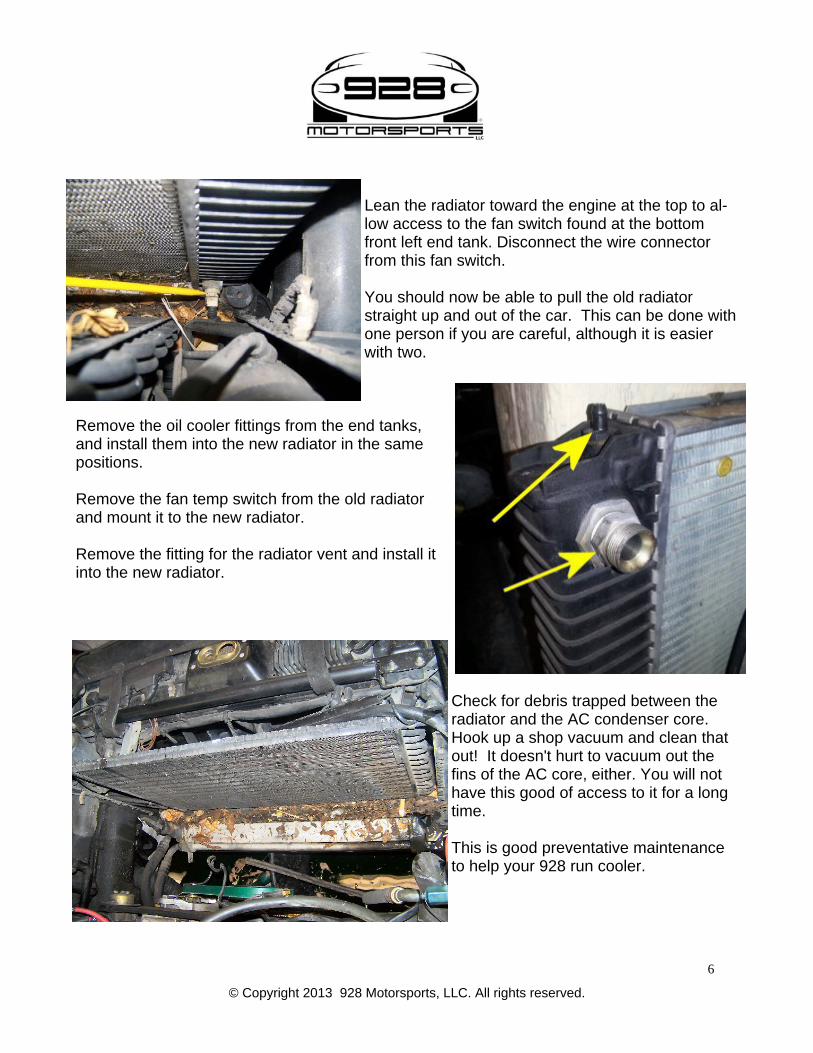
Lean the radiator toward the engine at the top to al-low access to the fan switch found at the bottom front left end tank. Disconnect the wire connector from this fan switch. You should now be able to pull the old radiator straight up and out of the car. This can be done with one person if you are careful, although it is easier with two.
Remove the oil cooler fittings from the end tanks, and install them into the new radiator in the same positions. Remove the fan temp switch from the old radiator and mount it to the new radiator. Remove the fitting for the radiator vent and install it into the new radiator.
Check for debris trapped between the radiator and the AC condenser core. Hook up a shop vacuum and clean that out! It doesn't hurt to vacuum out the fins of the AC core, either. You will not have this good of access to it for a long time. This is good preventative maintenance to help your 928 run cooler.
© Copyright 2013 928 Motorsports, LLC. All rights reserved.

7
Now it is time to install the new radiator. Our radiator is manufactured to the maximum capac-ity possible to improve the cooling. It is 1/4” wider in the cooling core, and the same width and height as the largest radiator Porsche ever put in a 928. Because the radiator you just removed may be shorter than the one going in, we will check the in-stalled height of everything to make sure the hood closes correctly before finishing everything up. The air dam (that sits on top of the radiator and holds the air inlet tubes) is an essential part of the cooling system. It seals against the hood when closed, and prevents the air from going around the radiator rather than through it. Slide the new radiator into position onto the stock rubber lower radiator mounts. Make sure the rubber “donuts” are located inside the pocket provided on the bottom of the end tanks, so the radiator is sitting as low as it can. Slide the fan shroud in place briefly also, and loosely mount to the radiator with the top two bolts. Gently close the hood just to confirm that the height of the new stack (new radiator plus fan shroud/air dam with weather-strip on top) is not too high for the hood to close. If the hood closes normally, proceed to the next page. If the hood cannot close continue here. Because your old radiator is apparently one of the late-model units that was shorter, we need to drop the radiator down just a bit to make room for the air dam. Pull the radiator back out and remove the two lower radia-tor mounts that it sits on. They are held in place from the bottom with 13mm nuts. Use a hacksaw to remove 1/2” from the top of them (as shown here) and re-install them into your 928. Now you can set the new radiator back in place, and test-close the hood again.
© Copyright 2013 928 Motorsports, LLC. All rights reserved.

8
With the new radiator resting on the lower mounts, lean the top back toward the engine and connect the wiring to the fan switch.
Bring the small radiator vent hose back over and attach it to the nipple on the left end tank now. Attach the lower radiator hose to the radiator now. Slide the radiator fan and shroud into place now, but do not attach to the top of the radiator yet.
Re-attach any oil lines or transmission lines to the radiator end-tanks at this time. Now you can fasten the fan shroud to the radiator as before. Plug in the fans to the fan wiring harness. Now you can re-install the radiator hold-down clamps. Attach the lower radiator hose to the motor at the Thermostat housing. Be sure to install the tie-back to hold the lower radiator hose away from the belts as before. Install the upper radiator hose. Reconnect the EGR air hose (if so equipped). Add coolant, run the engine and check for leaks and correct operation of the fans. Shut the engine off. If your radiator was equipped with integral coolers, check the ATF and motor oil levels. Some was lost when the lines were opened.
© Copyright 2013 928 Motorsports, LLC. All rights reserved.

9
Other Cooling Tips:
1) Do not run a higher concentration of anti-freeze than you need to protect your engine from the coldest day it is likely to encounter. Only use 50/50 anti-freeze/water mix if you are in the cold winter regions. If your climate is hotter, your engine will run cooler with 75% water and 25% anti-freeze. You must have some anti-freeze because we want the anti-corrosive addi-tives and water-pump lubricants that it provides. But increasing the water content in your coolant mix will help bring your temps down. 2) On 1978-86 16V 928’s, you have a belt-driven fan off the crankshaft. It is likely the viscous clutch is not working anymore, so than fan will not pull much air through the radiator. We have a kit to replace old belt-driven fan with a modern and efficient electric fan. 3) On 1987-95 928’s, replace your old electric fans and plastic shroud with a more powerful fan and effective shroud system. Any fan shroud that is broken should be replaced as it is allowing air to go around the fan rather than through it. Our new fans are much more powerful than the stock fans, and compatible with your electrical system. We also have new air dams to go on top of the radiator to hold your air intake tubes. 4) Replace your auxiliary (front, pusher) fan with a higher flow model. We have them in stock. 5) Install a lower temp thermostat. We have them in stock. 6) Adding a bottle of “Water-Wetter” can be good for as much as a 10 degree drop in temps.
7) 1987-90 models with Moveable Grille Louvers: Porsche 928’s from these years are equipped with moveable louvers operated by an electric motor to regulate air flow through the radiator. The system was known to cause over-heating when it failed, and they were discontinued by the factory in 1991. Your 928 may or may not have moveable louvers. This picture shows the motor head in front of the radiator. If you see this, your car still has the moveable louver sys-tem in it. Take a moment now to remove it entirely or at least disconnect it and wire the louvers open.
© Copyright 2013 928 Motorsports, LLC. all rights reserved