INSTALLATION SHEET LED bunkers
2
Product range Code Finish Shape AT3016/BLK/RD/CW Black Round AT3016/BLK/OH/CW Black Oval AT3016/WH/RD/CW White Round AT3016/WH/OH/CW White Oval This product may contain substances that can be hazardous to the environment if not disposed of properly. Electrical and electronic equipment should never be disposed of with general household waste but must be separated of it’s correct treatment and recovery. Where possible recycle your packaging. Please keep these instructions safe for future reference. 12W LED Polycarbonate bunker - IP66 with eyelid option. INSTALLATION SHEET LED bunkers AT3016 Installation Read instructions and check you have all the tools and accessories to complete the installation correctly. 1. Isolate the mains power supply before commencing installation. 2. Remove front rim, diffuser and LED PCB from the main body. Position main body against wall and mark screw positions. Make allowance in positioning main body for the mains cable wire to enter through the cable entry hole. Drill the wall to take suitable mounting screws. 3. Securely fix base plate to mounting surface (ceiling/wall) using secure fixing methods, ensuring that cable entry hole in base plate aligns with mains power cable in. Fixing holes are provided on the base plate. Draw the mains power cable through the hole in the base plate in preparation for connection. 4. Terminate the cables into the terminal block ensuring the correct polarity is observed. Ensure all conductors are fully sleeved and insulated. 5. Refit the LED PCB by placing screws through the larger screw hole and slide across to secure. Tighten screws to keep PCB in place. Mount the diffuser and desired front rim. 6. Turn on Mains power supply and test luminaire for correct operation. Your fitting is now ready for use. 2 Remove front rim, diffuser and LED PCB 1 Isolate mains power 3 Power cable Main body Securely fix base plate to mounting surface safety INFORMATION • Luminaires must be installed and fitted by a qualified electrician ensuring the installation complies to the current wiring regulations. • Ensure all electrical connections are secure and that there are no loose strands. • Always switch off the mains supply before installation or servicing. • Do not install this product on damp or newly plastered ceilings. • DO NOT use the light fitting without a cover • DO NOT use the light fitting if the power cord is damage in any way Product specification Voltage 230V~ 50Hz Power consumption 12W Finish White Black Lumen output 930lm* 930lm** Light colour options Cool white Colour temperature 4000K Colour rendering index >80 Beam angle 120° Dimmable No Warranty 3 Years Working temperature -20°C – 45°C IP Rating IP66 Electrical classification Class II *Round: 930lm (665lm with eyelid). Oval: 860lm (605lm with eyelid). **Round: 930lm (550lm with eyelid). Oval: 860lm (520lm with eyelid). L N Driver Driver Power cable 4 Terminate the cables into the terminal block 230mm 90mm Ø300mm 90mm 300mm
Transcript of INSTALLATION SHEET LED bunkers
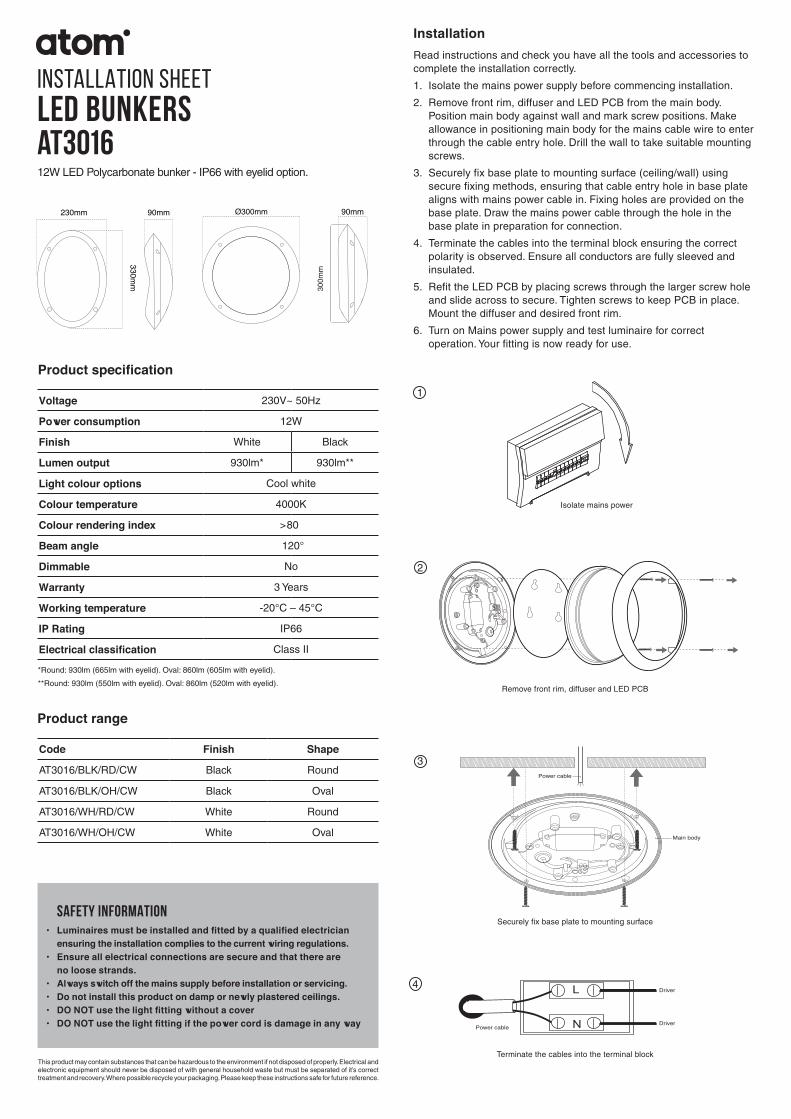
Product range
Code Finish Shape
AT3016/BLK/RD/CW Black Round
AT3016/BLK/OH/CW Black Oval
AT3016/WH/RD/CW White Round
AT3016/WH/OH/CW White Oval
This product may contain substances that can be hazardous to the environment if not disposed of properly. Electrical and electronic equipment should never be disposed of with general household waste but must be separated of it’s correct treatment and recovery. Where possible recycle your packaging. Please keep these instructions safe for future reference.
12W LED Polycarbonate bunker - IP66 with eyelid option.
INSTALLATION SHEETLED bunkers AT3016
Installation
Read instructions and check you have all the tools and accessories to complete the installation correctly.
1. Isolate the mains power supply before commencing installation.
2. Remove front rim, diffuser and LED PCB from the main body. Position main body against wall and mark screw positions. Make allowance in positioning main body for the mains cable wire to enter through the cable entry hole. Drill the wall to take suitable mounting screws.
3. Securely fix base plate to mounting surface (ceiling/wall) using secure fixing methods, ensuring that cable entry hole in base plate aligns with mains power cable in. Fixing holes are provided on the base plate. Draw the mains power cable through the hole in the base plate in preparation for connection.
4. Terminate the cables into the terminal block ensuring the correct polarity is observed. Ensure all conductors are fully sleeved and insulated.
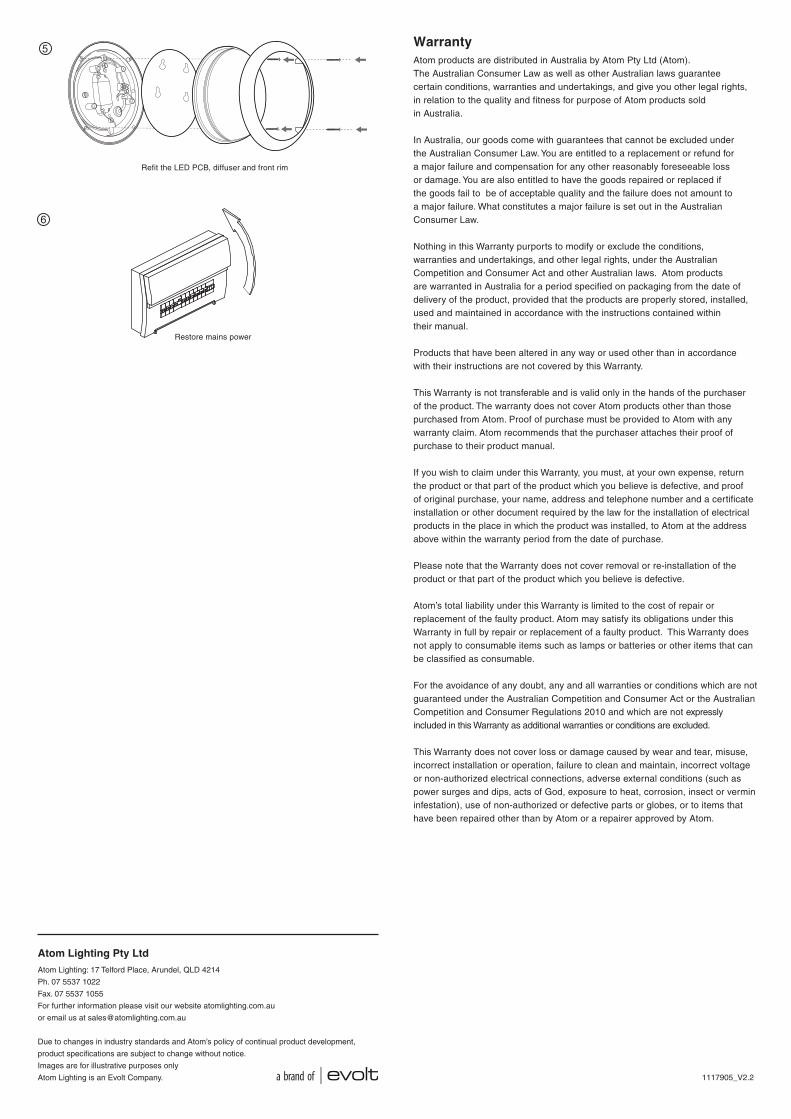
5. Refit the LED PCB by placing screws through the larger screw hole and slide across to secure. Tighten screws to keep PCB in place.Mount the diffuser and desired front rim.
6. Turn on Mains power supply and test luminaire for correct operation. Your fitting is now ready for use.
2
Remove front rim, diffuser and LED PCB
1
Isolate mains power
3Power cable
Main body
Securely fix base plate to mounting surface safety INFORMATION• Luminaires must be installed and fitted by a qualified electrician
ensuring the installation complies to the current wiring regulations.• Ensure all electrical connections are secure and that there are
no loose strands.• Always switch off the mains supply before installation or servicing.• Do not install this product on damp or newly plastered ceilings.• DO NOT use the light fitting without a cover• DO NOT use the light fitting if the power cord is damage in any way
Product specification
Voltage 230V~ 50Hz
Power consumption 12W
Finish White Black
Lumen output 930lm* 930lm**
Light colour options Cool white
Colour temperature 4000K
Colour rendering index >80
Beam angle 120°
Dimmable No
Warranty 3 Years
Working temperature -20°C – 45°C
IP Rating IP66
Electrical classification Class II
*Round: 930lm (665lm with eyelid). Oval: 860lm (605lm with eyelid).
**Round: 930lm (550lm with eyelid). Oval: 860lm (520lm with eyelid).
L
N
Driver
DriverPower cable
4
Terminate the cables into the terminal block
230mm 90mm Ø300mm
90m
m
Ø300m
m
90mm
300m
m
WarrantyAtom products are distributed in Australia by Atom Pty Ltd (Atom). The Australian Consumer Law as well as other Australian laws guarantee certain conditions, warranties and undertakings, and give you other legal rights, in relation to the quality and fitness for purpose of Atom products sold in Australia.
In Australia, our goods come with guarantees that cannot be excluded under the Australian Consumer Law. You are entitled to a replacement or refund for a major failure and compensation for any other reasonably foreseeable loss or damage. You are also entitled to have the goods repaired or replaced if the goods fail to be of acceptable quality and the failure does not amount to a major failure. What constitutes a major failure is set out in the Australian Consumer Law.
Nothing in this Warranty purports to modify or exclude the conditions, warranties and undertakings, and other legal rights, under the Australian Competition and Consumer Act and other Australian laws. Atom products are warranted in Australia for a period specified on packaging from the date of delivery of the product, provided that the products are properly stored, installed, used and maintained in accordance with the instructions contained within their manual.
Products that have been altered in any way or used other than in accordance with their instructions are not covered by this Warranty.
This Warranty is not transferable and is valid only in the hands of the purchaser of the product. The warranty does not cover Atom products other than those purchased from Atom. Proof of purchase must be provided to Atom with any warranty claim. Atom recommends that the purchaser attaches their proof of purchase to their product manual.
If you wish to claim under this Warranty, you must, at your own expense, return the product or that part of the product which you believe is defective, and proof of original purchase, your name, address and telephone number and a certificate installation or other document required by the law for the installation of electrical products in the place in which the product was installed, to Atom at the address above within the warranty period from the date of purchase.
Please note that the Warranty does not cover removal or re-installation of the product or that part of the product which you believe is defective.
Atom’s total liability under this Warranty is limited to the cost of repair or replacement of the faulty product. Atom may satisfy its obligations under this Warranty in full by repair or replacement of a faulty product. This Warranty does not apply to consumable items such as lamps or batteries or other items that can be classified as consumable.
For the avoidance of any doubt, any and all warranties or conditions which are not guaranteed under the Australian Competition and Consumer Act or the Australian Competition and Consumer Regulations 2010 and which are not expressly included in this Warranty as additional warranties or conditions are excluded.
This Warranty does not cover loss or damage caused by wear and tear, misuse, incorrect installation or operation, failure to clean and maintain, incorrect voltage or non-authorized electrical connections, adverse external conditions (such as power surges and dips, acts of God, exposure to heat, corrosion, insect or vermin infestation), use of non-authorized or defective parts or globes, or to items that have been repaired other than by Atom or a repairer approved by Atom.
Atom Lighting Pty LtdAtom Lighting: 17 Telford Place, Arundel, QLD 4214
Ph. 07 5537 1022
Fax. 07 5537 1055
For further information please visit our website atomlighting.com.au
or email us at [email protected]
Due to changes in industry standards and Atom’s policy of continual product development,
product specifications are subject to change without notice.
Images are for illustrative purposes only
Atom Lighting is an Evolt Company. 1117905_V2.2
5
Refit the LED PCB, diffuser and front rim
6
Restore mains power