INSTALLATION REQUIREMENTS - PRIMED & COLORPLUS PRODUCTS - The Home Depot€¦ · James Hardie ®...
6
INSTALLATION Fastener Requirements TR1118_P1/6 7/11 James Hardie ® products contain respirable crystalline silica, which is known to the State of California to cause cancer and is considered by IARC and NIOSH to be a cause of cancer from some occupational sources. Breathing excessive amounts of respirable silica dust can also cause a disabling and potentially fatal lung disease called silicosis, and has been linked with other diseases. Some studies suggest smoking may increase these risks. During installation or handling: (1) work in outdoor areas with ample ventilation; (2) use fiber cement shears for cutting or, where not feasible, use a HardieBlade ® saw blade and dust-reducing circular saw attached to a HEPA vacuum; (3) warn others in the immediate area; (4) wear a properly-fitted, NIOSH-approved dust mask or respirator (e.g. N-95) in accordance with applicable government regulations and manufacturer instructions to further limit respirable silica exposures. During clean-up, use HEPA vacuums or wet cleanup methods - never dry sweep. For further information, refer to our installation instructions and Material Safety Data Sheet available at www.jameshardie.com or by calling 1-800-9HARDIE (1-800-942-7343). FAILURE TO ADHERE TO OUR WARNINGS, MSDS, AND INSTALLATION INSTRUCTIONS MAY LEAD TO SERIOUS PERSONAL INJURY OR DEATH. SD050905 INSTALLATION REQUIREMENTS - PRIMED & COLORPLUS ® PRODUCTS Visit www.jameshardie.com for the most recent version. 4/4 & 5/4 Boards with Back Grooves OUTDOORS 1. Position cutting station so that wind will blow dust away from user and others in working area. 2. Use one of the following methods: b. Better: i. Dust reducing circular saw equipped with a HardieBlade ® saw blade and HEPA vacuum extraction c. Good: i. Dust reducing circular saw with a HardieBlade saw blade (only use for low to moderate cutting) INDOORS - NEVER use a power saw indoors - NEVER use a circular saw blade that does not carry the HardieBlade saw blade trademark - NEVER dry sweep – Use wet suppression or HEPA Vacuum - Important Note: For maximum protection (lowest respirable dust production), James Hardierecommends always using “Best”-level cutting methods where feasible. NIOSH-approved respirators can be used in conjunction with above cutting practices to further reduce dust exposures. Additional exposure information is available at www.jameshardie.com to help you determine the most appropriate cutting method for your job requirements. If concern still exists about exposure levels or you do not comply with the above practices, you should always consult a qualified industrial hygienist or contact James Hardie for further information. SD083105 CUTTING INSTRUCTIONS ¹For additional information on HardieWrap ® Weather Barrier, consult James Hardie at 1-866-4Hardie or www.hardiewrap.com EFFECTIVE JULY 2011 IMPORTANT: FAILURE TO INSTALL AND FINISH THIS PRODUCT IN ACCORDANCE WITH APPLICABLE BUILDING CODES AND JAMES HARDIE WRITTEN APPLICATION INSTRUCTIONS MAY LEAD TO PERSONAL INJURY, AFFECT SYSTEM PERFORMANCE, VIOLATE LOCAL BUILDING CODES, AND VOID THE PRODUCT ONLY WARRANTY. BEFORE INSTALLATION, CONFIRM THAT YOU ARE USING THE CORRECT HARDIEZONE INSTRUCTIONS. TO DETERMINE WHICH HARDIEZONE APPLIES TO YOUR LOCATION, VISIT WWW.HARDIEZONE.COM OR CALL 1-866-942-7343 (866 9HARDIE) NT3 TM GENERAL REQUIREMENTS: • Wood or steel backing must be provided for attaching HardieTrim ® NT3™ boards and the HardieTrim ™ Flat Tabs. Additional framing may be required to ensure the HardieTrim™ Flat and Corner Tabs are fastened properly to the structure. Special attention should be paid to the framing when using a sheathing that does not have fastener holding equivalent to OSB or Plywood sheathing. • A water-resistive barrier is required in accordance with local building code requirements. The water-resistive barrier must be appropriately installed with penetration and junction flashing in accordance with local building code requirements. James Hardie will assume no responsibility for water infiltration. James Hardie does manufacture HardieWrap ® Weather Barrier, a non-woven non-perforated housewrap¹, which complies with building code requirements. • Adjacent finished grade must slope away from the building in accordance with local building codes - typically a minimum of 6" in the first 10'. • Flashing is required over horizontal protruding and exposed trim • Do not install James Hardie ® products such that they may remain in contact with standing water. • DO NOT use stain on James Hardie products. • DO NOT Install HardieTrim over any lapped siding products. For Corners, Band Boards, Windows, and Door Applications: HardieTrim NT3 boards with back grooves are installed with HardieTrim TM Flat Tabs (JH sku no. 280154) and HardieTrim TM Corner Tabs (JH sku no. 280155) which provide concealed fastening. Only HardieTrim Flat and Corner Tabs can be used with HardieTrim NT3 boards to create a concealed fastening. Step 1: Attach HardieTrim Flat Tabs to the back side of the trim using four(4) 18 ga. 1/2"L x 1/4"W narrow crown corrosion resistant staples, equally spaced in one row, positioned no closer than 1/2" from trim edges using a pneumatic staple gun. (Figure 1) Step 2: For wood frame construction, attach the trim to the building with minimum 2, 6d siding nails fastened through the HardieTrim Flat Tabs (Figures 2 & 3) *. ET&F or equivalent fasteners may be used to attach the HardieTrim Flat Tabs to steel frame construction. (Figures 2 & 3) Fastener spacing will vary based on application. Refer to fastener table on page 4. Refer to specific sections in these instructions for required fastener spacing by application (window, band board, etc.) HardieTrim ® NT3 boards can also be installed in a more traditional fashion with finish nails. Use minimum 16 ga. 2" galvanized finish nails spaced at 16" o.c. to attach the trim. For Fascia, Rake, and Frieze board Applications: For fascia, rake, and frieze board applications, use minimum 16 ga. 2" galvanized finish nails to attach the HardieTrim NT3™ boards. Position finish nails no closer than 1/2" from the edges and no closer than 1" from the ends of the trim. Fasteners may be spaced at a maximum of 16" o.c. Ensure trim is adequately fastened. Installation of HardieTrim tabs in Coastal Regions: James Hardie requires that stainless steel staples & fasteners be used when installing HardieTrim Tabs in coastal regions. Installation of HardieTrim Tabs over Pressure Treated Lumber: HardieTrim tabs shall not come in direct contact with ACQ or CA preservative-treated wood. Refer to the General Fastening section of this document for further information. HardieTrim NT3 boards with ColorPlus ® Technology: Remove the laminate sheet as soon as possible after attaching the trim to the building. Figure 3 Figure 1 Figure 2 Plywood or OSB sheathing HardieTrim™ Corner Tabs Weather-resistive barrier Leave a minimum 1/8” gap between the siding and trim, then caulk. 16" o.c. maximum 1” from ends HardieTrim™ Flat Tab HardieTrim™ Flat Tab Fasten 4 staples to the center of the nailing ridge. Fasten HardieTrim Flat Tab to minimum 7/16" OSB with min 2, 6d siding nails 20" OC Min 2" Min 1/2" HardieTrim must be installed such that the HardiePlank or any lapped siding product butts into the trim. DO NOT Install HardieTrim over any lapped siding products. HardieTrim ® NT3 TM board is a decorative non-load bearing trim product. STORAGE & HANDLING: Store flat and keep dry and covered prior to installation. Installing siding wet or saturated may result in shrinkage at butt joints. Carry planks on edge. Protect edges and corners from breakage. James Hardie is not responsible for damage caused by improper storage and handling of the product.
Transcript of INSTALLATION REQUIREMENTS - PRIMED & COLORPLUS PRODUCTS - The Home Depot€¦ · James Hardie ®...
INSTALLATIONFastener Requirements
TR1118_P1/6 7/11
James Hardie® products contain respirable crystalline silica, which is known to the State of California to cause cancer and is considered by IARC and NIOSH to be a cause of cancer from some occupational sources. Breathing excessive amounts of respirable silica dust can also cause a disabling and potentially fatal lung disease called silicosis, and has been linked with other diseases. Some studies suggest smoking may increase these risks. During installation or handling: (1) work in outdoor areas with ample ventilation; (2) use fiber cement shears for cutting or, where not feasible, use a HardieBlade® saw blade and dust-reducing circular saw attached to a HEPA vacuum; (3) warn others in the immediate area; (4) wear a properly-fitted, NIOSH-approved dust mask or respirator (e.g. N-95) in accordance with applicable government regulations and manufacturer instructions to further limit respirable silica exposures. During clean-up, use HEPA vacuums or wet cleanup methods - never dry sweep. For further information, refer to our installation instructions and Material Safety Data Sheet available at www.jameshardie.com or by calling 1-800-9HARDIE (1-800-942-7343). FAILURE TO ADHERE TO OUR WARNINGS, MSDS, AND INSTALLATION INSTRUCTIONS MAY LEAD TO SERIOUS PERSONAL INJURY OR DEATH. SD050905
INSTALLATION REQUIREMENTS - PRIMED & COLORPLUS® PRODUCTS Visit www.jameshardie.com for the most recent version.
4/4 & 5/4 Boards with Back Grooves
OUTDOORS1. Position cutting station so that wind will blow dust away from user and others in working area.2. Use one of the following methods: b. Better: i. Dust reducing circular saw equipped with a HardieBlade® saw blade and HEPA vacuum extraction c. Good: i. Dust reducing circular saw with a HardieBlade saw blade (only use for low to moderate cutting)
INDOORS - NEVER use a power saw indoors - NEVER use a circular saw blade that does not carry the HardieBlade saw blade trademark- NEVER dry sweep – Use wet suppression or HEPA Vacuum- Important Note: For maximum protection (lowest respirable dust production), James Hardierecommends always using “Best”-level cutting methods where feasible.
NIOSH-approved respirators can be used in conjunction with above cutting practices to further reduce dust exposures. Additional exposure information is available at www.jameshardie.com to help you determine the most appropriate cutting method for your job requirements. If concern still exists about exposure levels or you do not comply with the above practices, you should always consult a qualified industrial hygienist or contact James Hardie for further information. SD083105
CUTTING INSTRUCTIONS
¹For additional information on HardieWrap® Weather Barrier, consult James Hardie at 1-866-4Hardie or www.hardiewrap.com
EFFECTIVE JULY 2011
IMPORTANT: FAILURE TO INSTALL AND FINISH THIS PRODUCT IN ACCORDANCE WITH APPLICABLE BUILDING CODES AND JAMES HARDIE WRITTEN APPLICATION INSTRUCTIONS MAY LEAD TO PERSONAL INJURY, AFFECT SYSTEM PERFORMANCE, VIOLATE LOCAL BUILDING CODES, AND VOID THE
PRODUCT ONLY WARRANTY. BEFORE INSTALLATION, CONFIRM THAT YOU ARE USING THE CORRECT HARDIEZONE INSTRUCTIONS. TO DETERMINE WHICH HARDIEZONE APPLIES TO YOUR LOCATION, VISIT WWW.HARDIEZONE.COM OR CALL 1-866-942-7343 (866 9HARDIE)
NT3TM
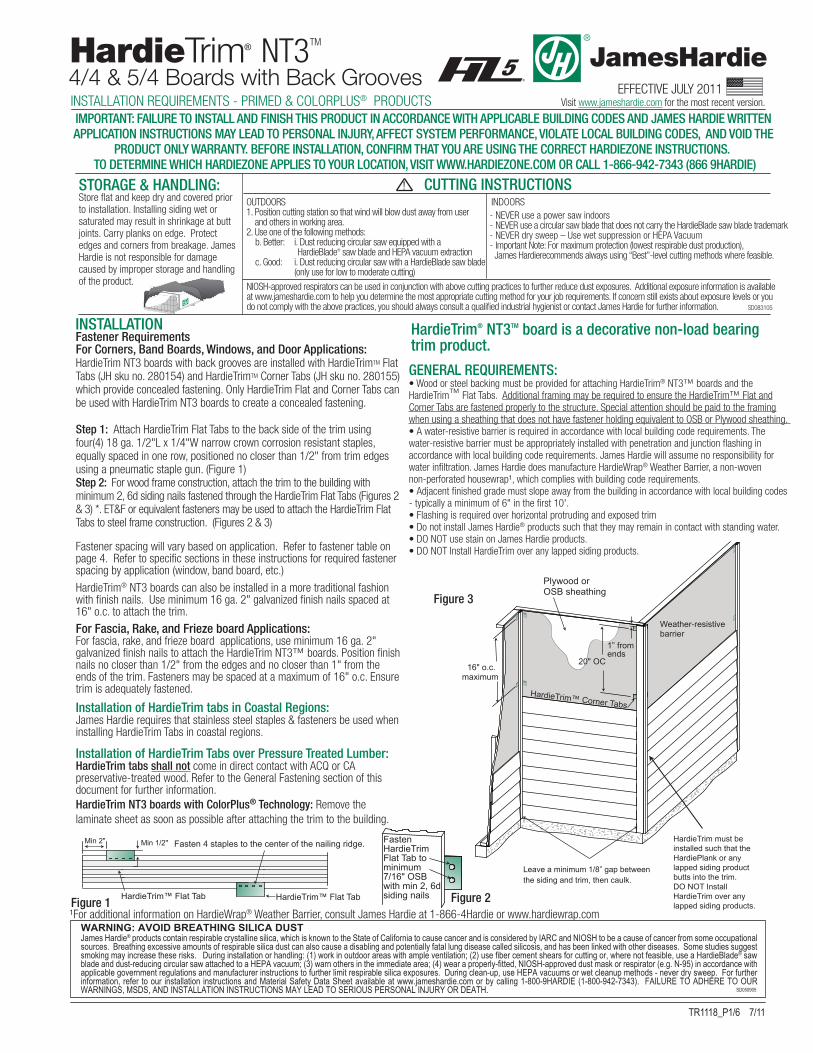
GENERAL REQUIREMENTS:• Wood or steel backing must be provided for attaching HardieTrim® NT3™ boards and the HardieTrim™ Flat Tabs. Additional framing may be required to ensure the HardieTrim™ Flat and Corner Tabs are fastened properly to the structure. Special attention should be paid to the framing when using a sheathing that does not have fastener holding equivalent to OSB or Plywood sheathing. • A water-resistive barrier is required in accordance with local building code requirements. The water-resistive barrier must be appropriately installed with penetration and junction flashing in accordance with local building code requirements. James Hardie will assume no responsibility for water infiltration. James Hardie does manufacture HardieWrap® Weather Barrier, a non-woven non-perforated housewrap¹, which complies with building code requirements.• Adjacent finished grade must slope away from the building in accordance with local building codes - typically a minimum of 6" in the first 10'.• Flashing is required over horizontal protruding and exposed trim• Do not install James Hardie® products such that they may remain in contact with standing water.• DO NOT use stain on James Hardie products.• DO NOT Install HardieTrim over any lapped siding products.
For Corners, Band Boards, Windows, and Door Applications:HardieTrim NT3 boards with back grooves are installed with HardieTrimTM Flat Tabs (JH sku no. 280154) and HardieTrimTM Corner Tabs (JH sku no. 280155) which provide concealed fastening. Only HardieTrim Flat and Corner Tabs can be used with HardieTrim NT3 boards to create a concealed fastening.
Step 1: Attach HardieTrim Flat Tabs to the back side of the trim using four(4) 18 ga. 1/2"L x 1/4"W narrow crown corrosion resistant staples, equally spaced in one row, positioned no closer than 1/2" from trim edges using a pneumatic staple gun. (Figure 1)Step 2: For wood frame construction, attach the trim to the building with minimum 2, 6d siding nails fastened through the HardieTrim Flat Tabs (Figures 2 & 3) *. ET&F or equivalent fasteners may be used to attach the HardieTrim Flat Tabs to steel frame construction. (Figures 2 & 3)
Fastener spacing will vary based on application. Refer to fastener table on page 4. Refer to specific sections in these instructions for required fastener spacing by application (window, band board, etc.)
HardieTrim® NT3 boards can also be installed in a more traditional fashion with finish nails. Use minimum 16 ga. 2" galvanized finish nails spaced at 16" o.c. to attach the trim.
For Fascia, Rake, and Frieze board Applications:For fascia, rake, and frieze board applications, use minimum 16 ga. 2" galvanized finish nails to attach the HardieTrim NT3™ boards. Position finish nails no closer than 1/2" from the edges and no closer than 1" from the ends of the trim. Fasteners may be spaced at a maximum of 16" o.c. Ensure trim is adequately fastened. Installation of HardieTrim tabs in Coastal Regions:James Hardie requires that stainless steel staples & fasteners be used when installing HardieTrim Tabs in coastal regions.
Installation of HardieTrim Tabs over Pressure Treated Lumber: HardieTrim tabs shall not come in direct contact with ACQ or CA preservative-treated wood. Refer to the General Fastening section of this document for further information.HardieTrim NT3 boards with ColorPlus® Technology: Remove the laminate sheet as soon as possible after attaching the trim to the building.
Figure 3
Figure 1 Figure 2
Plywood orOSB sheathing
HardieTrim™ Corner Tabs
Weather-resistivebarrier
Leave a minimum 1/8” gap betweenthe siding and trim, then caulk.
16" o.c.maximum
1” fromends
HardieTrim™ Flat TabHardieTrim™ Flat Tab
Fasten 4 staples to the center of the nailing ridge. Fasten HardieTrimFlat Tab to minimum 7/16" OSB with min 2, 6d siding nails
20" OC
Min 2" Min 1/2" HardieTrim must be installed such that the HardiePlank or any lapped siding product butts into the trim.DO NOT Install HardieTrim over any lapped siding products.
HardieTrim® NT3TM board is a decorative non-load bearingtrim product.
STORAGE & HANDLING:Store flat and keep dry and covered prior to installation. Installing siding wet or saturated may result in shrinkage at butt joints. Carry planks on edge. Protect edges and corners from breakage. James Hardie is not responsible for damage caused by improper storage and handling of the product.
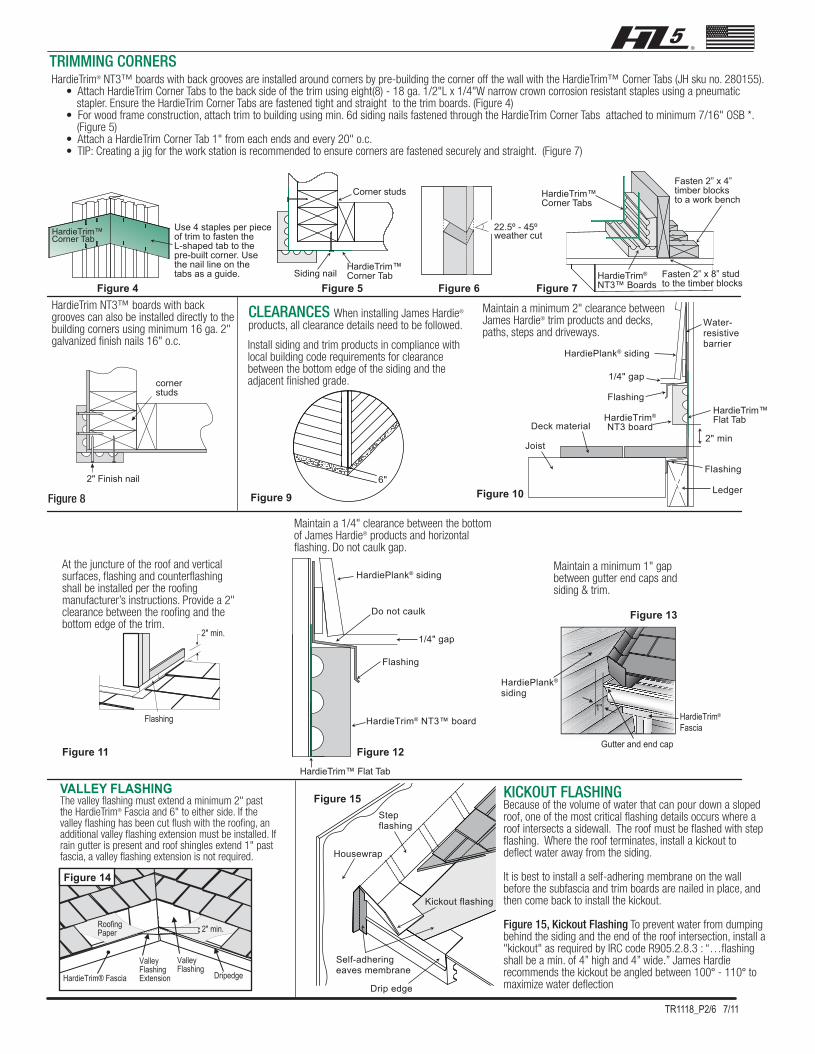
VALLEY FLASHINGThe valley flashing must extend a minimum 2" past the HardieTrim® Fascia and 6" to either side. If the valley flashing has been cut flush with the roofing, an additional valley flashing extension must be installed. If rain gutter is present and roof shingles extend 1" past fascia, a valley flashing extension is not required.
Figure 9
TR1118_P2/6 7/11
TRIMMING CORNERS
Maintain a minimum 2" clearance between James Hardie® trim products and decks, paths, steps and driveways.
Figure 15
Maintain a minimum 1" gap between gutter end caps and siding & trim.
CLEARANCES When installing James Hardie®
products, all clearance details need to be followed.
HardieTrim® Fascia DripedgeValleyFlashingExtension
ValleyFlashing
RoofingPaper 2" min.
Figure 14
Figure 13
1"
Gutter and end cap
Figure 4 Figure 5
At the juncture of the roof and vertical surfaces, flashing and counterflashing shall be installed per the roofing manufacturer’s instructions. Provide a 2" clearance between the roofing and the bottom edge of the trim.
2" min.
Figure 11
Flashing
Figure 10
Joist
Deck materialHardieTrim®
NT3 board
Ledger
Flashing
2" min
HardieTrim™Flat Tab
Flashing
1/4" gap
HardiePlank® siding
Water-resistivebarrier
Figure 12
Maintain a 1/4" clearance between the bottom of James Hardie® products and horizontal flashing. Do not caulk gap.
HardiePlank® siding
HardiePlank®
siding
Do not caulk
1/4" gap
Flashing
HardieTrim® NT3™ board
HardieTrim™ Flat Tab
Self-adheringeaves membrane
Kickout flashing
Drip edge
Stepflashing
Housewrap
Use 4 staples per pieceof trim to fasten theL-shaped tab to thepre-built corner. Usethe nail line on thetabs as a guide.
Corner studsFasten 2” x 4”timber blocksto a work benchHardieTrim™
Corner Tabs
Fasten 2” x 8” studto the timber blocks
HardieTrim®
NT3™ BoardsSiding nail
HardieTrim™Corner Tab
HardieTrim™Corner Tab
6"
weather cut22.5º - 45º
Figure 6 Figure 7
HardieTrim®
Fascia
KICKOUT FLASHINGBecause of the volume of water that can pour down a sloped roof, one of the most critical flashing details occurs where a roof intersects a sidewall. The roof must be flashed with step flashing. Where the roof terminates, install a kickout to deflect water away from the siding.
It is best to install a self-adhering membrane on the wall before the subfascia and trim boards are nailed in place, and then come back to install the kickout.
Figure 15, Kickout Flashing To prevent water from dumping behind the siding and the end of the roof intersection, install a "kickout" as required by IRC code R905.2.8.3 : “…flashing shall be a min. of 4” high and 4” wide.” James Hardie recommends the kickout be angled between 100° - 110° to maximize water deflection
cornerstuds
Figure 8
2" Finish nail
Install siding and trim products in compliance with local building code requirements for clearance between the bottom edge of the siding and the adjacent finished grade.
HardieTrim NT3™ boards with back grooves can also be installed directly to the building corners using minimum 16 ga. 2" galvanized finish nails 16" o.c.
HardieTrim® NT3™ boards with back grooves are installed around corners by pre-building the corner off the wall with the HardieTrim™ Corner Tabs (JH sku no. 280155). • Attach HardieTrim Corner Tabs to the back side of the trim using eight(8) - 18 ga. 1/2"L x 1/4"W narrow crown corrosion resistant staples using a pneumatic
stapler. Ensure the HardieTrim Corner Tabs are fastened tight and straight to the trim boards. (Figure 4) • For wood frame construction, attach trim to building using min. 6d siding nails fastened through the HardieTrim Corner Tabs attached to minimum 7/16" OSB *.
(Figure 5) • Attach a HardieTrim Corner Tab 1" from each ends and every 20" o.c. • TIP: Creating a jig for the work station is recommended to ensure corners are fastened securely and straight. (Figure 7)
TR1118_P3/6 7/11
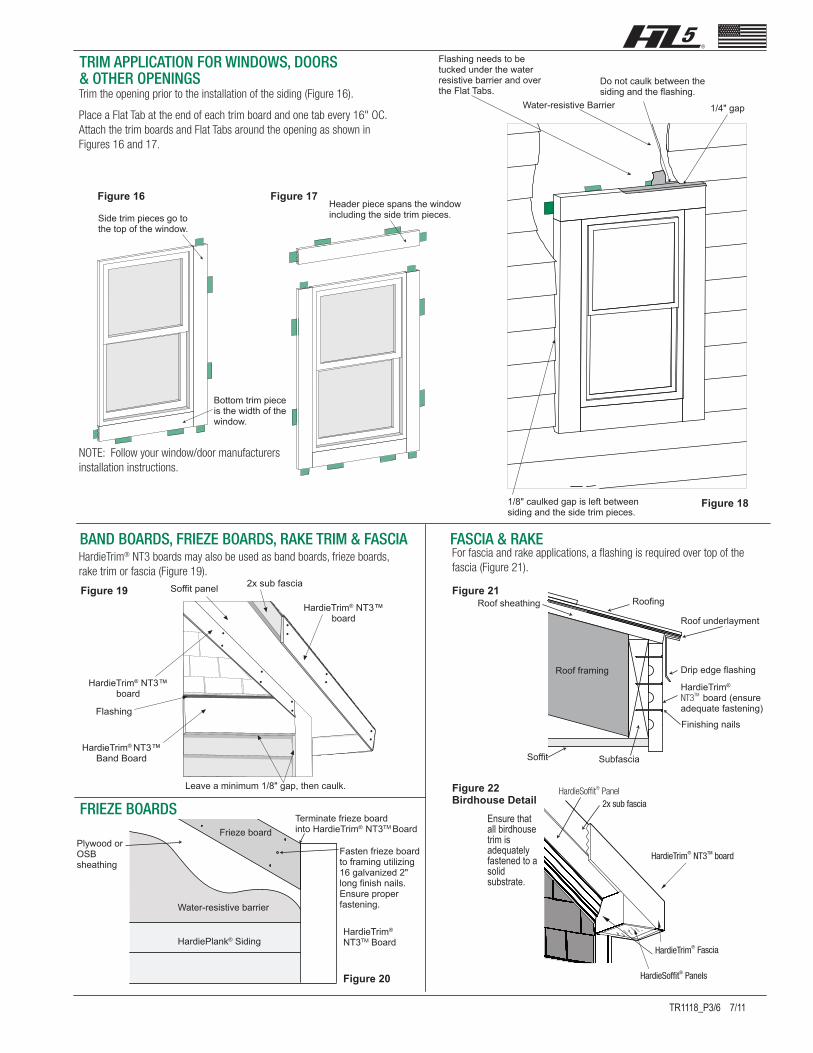
Flashing needs to betucked under the waterresistive barrier and overthe Flat Tabs.
Water-resistive Barrier 1/4" gap
Do not caulk between thesiding and the flashing.
1/8" caulked gap is left betweensiding and the side trim pieces.
Figure 18
For fascia and rake applications, a flashing is required over top of thefascia (Figure 21).
FASCIA & RAKE
TRIM APPLICATION FOR WINDOWS, DOORS& OTHER OPENINGS
BAND BOARDS, FRIEZE BOARDS, RAKE TRIM & FASCIA
FRIEZE BOARDS
HardieTrim® NT3 boards may also be used as band boards, frieze boards,rake trim or fascia (Figure 19).
Figure 19
Figure 20
Figure 21
Figure 22Birdhouse Detail
HardieSoffit® Panel
Ensure that all birdhouse trim is adequately fastened to a solid substrate.
RoofingRoof sheathing
Roof framing
Soffit Subfascia
Finishing nails
HardieTrim®
NT3TM board (ensureadequate fastening)
Drip edge flashing
Roof underlayment
Leave a minimum 1/8" gap, then caulk.
Soffit panel 2x sub fascia
HardieTrim® NT3™ board
HardieTrim® NT3™
Band Board
HardieTrim® NT3™ board
Flashing
Frieze boardTerminate frieze boardinto HardieTrim® NT3TM Board
HardieTrim®
NT3TM BoardHardiePlank® Siding
Water-resistive barrier
Plywood orOSBsheathing
Fasten frieze boardto framing utilizing16 galvanized 2" long finish nails.Ensure properfastening.
Trim the opening prior to the installation of the siding (Figure 16).
Place a Flat Tab at the end of each trim board and one tab every 16" OC.Attach the trim boards and Flat Tabs around the opening as shown inFigures 16 and 17.
Figure 16 Figure 17
NOTE: Follow your window/door manufacturersinstallation instructions.
Side trim pieces go tothe top of the window.
Bottom trim pieceis the width of thewindow.
Header piece spans the windowincluding the side trim pieces.
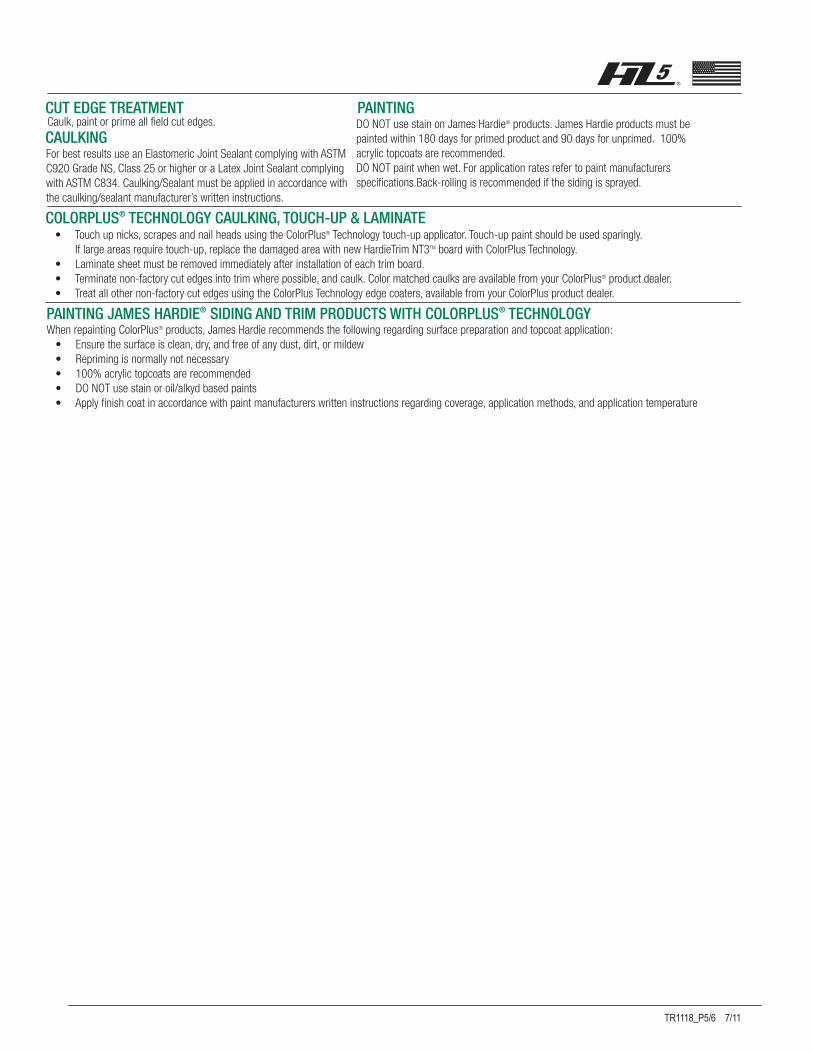
PNEUMATIC FASTENING:
FASTENER TABLE
GENERAL FASTENING REQUIREMENTS
Do not under
drive nails.
HardieTrim™
Flat and Corner TabsHardieTrim™
Flat andCorner Tabs
Only use staples tofasten HardieTrim™ Flat andCorner Tabs to the trim boards.
Siding nailattaches tabto the wall.
Flush
• Drive fasteners perpendicular to the trim and framing.• Do not drive fasteners at an angle.• For wood framing, under driven fasteners should be hit flush to the HardieTrim™ Flat and Corner Tabs with a hammer (for steel framing, remove and replace nail).• Do not use aluminum fasteners, staples, or clipped head nails to attach the product directly to the building.
HardieTrim® NT3TM boards with the back groove can be fastened with a pneumatic tool. All fasteners should be driven flush to the HardieTrim™ Flat and Corner Tabs (Figure 26). A flush mount attachment on the pneumatic tool is recommended. This will help control the depth the fastener is driven. If setting the depth proves difficult, choose a setting that under drives the fastener. (Drive under driven fasteners snug with a smooth faced hammer - Does not apply for installation to steel framing).
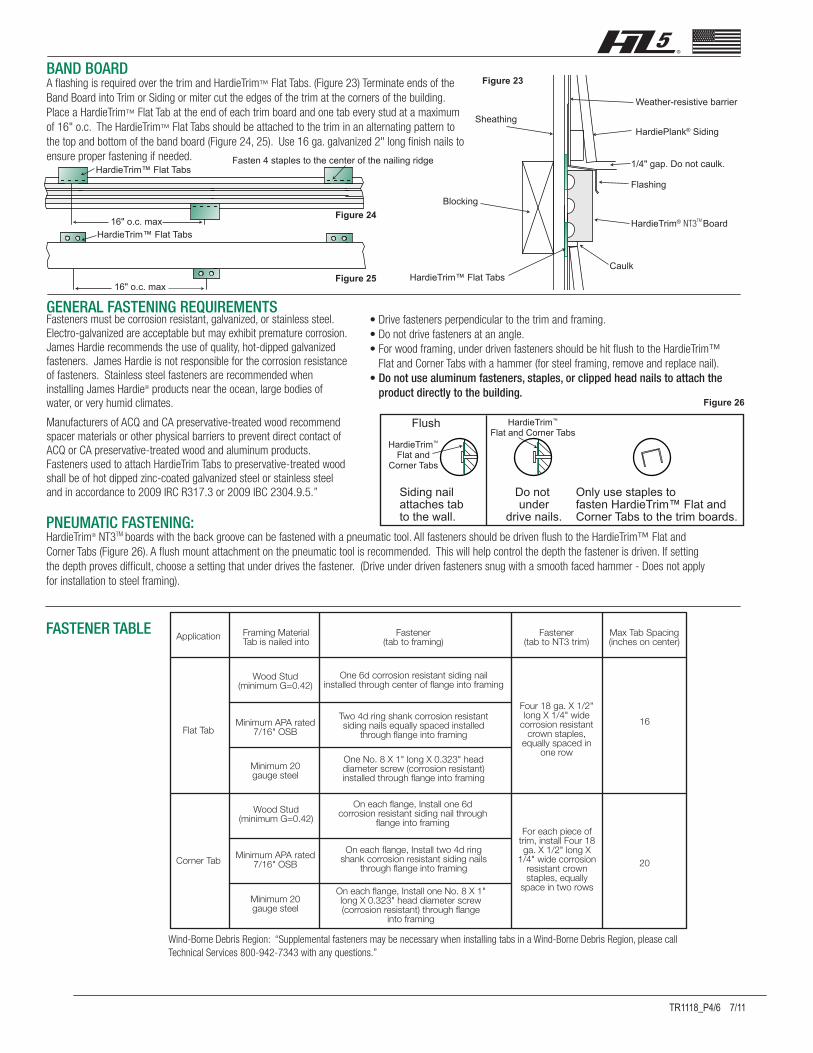
A flashing is required over the trim and HardieTrim™ Flat Tabs. (Figure 23) Terminate ends of theBand Board into Trim or Siding or miter cut the edges of the trim at the corners of the building.Place a HardieTrim™ Flat Tab at the end of each trim board and one tab every stud at a maximumof 16" o.c. The HardieTrim™ Flat Tabs should be attached to the trim in an alternating pattern tothe top and bottom of the band board (Figure 24, 25). Use 16 ga. galvanized 2" long finish nails toensure proper fastening if needed.
BAND BOARDFigure 23
Figure 24
Figure 25
Figure 26
HardieTrim™ Flat TabsCaulk
HardieTrim® NT3TM Board
Flashing
1/4" gap. Do not caulk.
HardiePlank® Siding
Weather-resistive barrier
Sheathing
Fasten 4 staples to the center of the nailing ridgeHardieTrim™ Flat Tabs
16" o.c. max
Blocking
HardieTrim™ Flat Tabs
16" o.c. max
TR1118_P4/6 7/11
Application Framing MaterialTab is nailed into
Flat Tab
Wood Stud(minimum G=0.42)
Minimum APA rated7/16" OSB
Corner TabMinimum APA rated
7/16" OSB
Minimum 20gauge steel
Minimum 20gauge steel
Wood Stud(minimum G=0.42)
Fastener(tab to NT3 trim)
Max Tab Spacing(inches on center)
Four 18 ga. X 1/2" long X 1/4" wide
corrosion resistant crown staples,
equally spaced in one row
16
For each piece of trim, install Four 18 ga. X 1/2" long X
1/4" wide corrosion resistant crown staples, equally
space in two rows
20
Fastener(tab to framing)
One 6d corrosion resistant siding nailinstalled through center of flange into framing
Two 4d ring shank corrosion resistantsiding nails equally spaced installed
through flange into framing
One No. 8 X 1" long X 0.323" headdiameter screw (corrosion resistant)installed through flange into framing
On each flange, Install one 6dcorrosion resistant siding nail through
flange into framing
On each flange, Install two 4d ringshank corrosion resistant siding nails
through flange into framing
On each flange, Install one No. 8 X 1"long X 0.323" head diameter screw(corrosion resistant) through flange
into framing
Wind-Borne Debris Region: “Supplemental fasteners may be necessary when installing tabs in a Wind-Borne Debris Region, please call Technical Services 800-942-7343 with any questions.”
Fasteners must be corrosion resistant, galvanized, or stainless steel. Electro-galvanized are acceptable but may exhibit premature corrosion. James Hardie recommends the use of quality, hot-dipped galvanized fasteners. James Hardie is not responsible for the corrosion resistance of fasteners. Stainless steel fasteners are recommended when installing James Hardie® products near the ocean, large bodies of water, or very humid climates. Manufacturers of ACQ and CA preservative-treated wood recommend spacer materials or other physical barriers to prevent direct contact of ACQ or CA preservative-treated wood and aluminum products. Fasteners used to attach HardieTrim Tabs to preservative-treated wood shall be of hot dipped zinc-coated galvanized steel or stainless steel and in accordance to 2009 IRC R317.3 or 2009 IBC 2304.9.5.”
CAULKING
PAINTING
For best results use an Elastomeric Joint Sealant complying with ASTM C920 Grade NS, Class 25 or higher or a Latex Joint Sealant complying with ASTM C834. Caulking/Sealant must be applied in accordance with the caulking/sealant manufacturer’s written instructions.
DO NOT use stain on James Hardie® products. James Hardie products must be painted within 180 days for primed product and 90 days for unprimed. 100% acrylic topcoats are recommended.DO NOT paint when wet. For application rates refer to paint manufacturers specifications.Back-rolling is recommended if the siding is sprayed.
• Touch up nicks, scrapes and nail heads using the ColorPlus® Technology touch-up applicator. Touch-up paint should be used sparingly. If large areas require touch-up, replace the damaged area with new HardieTrim NT3TM board with ColorPlus Technology. • Laminate sheet must be removed immediately after installation of each trim board. • Terminate non-factory cut edges into trim where possible, and caulk. Color matched caulks are available from your ColorPlus® product dealer. • Treat all other non-factory cut edges using the ColorPlus Technology edge coaters, available from your ColorPlus product dealer.
COLORPLUS® TECHNOLOGY CAULKING, TOUCH-UP & LAMINATE
PAINTING JAMES HARDIE® SIDING AND TRIM PRODUCTS WITH COLORPLUS® TECHNOLOGYWhen repainting ColorPlus® products, James Hardie recommends the following regarding surface preparation and topcoat application: • Ensure the surface is clean, dry, and free of any dust, dirt, or mildew • Repriming is normally not necessary • 100% acrylic topcoats are recommended • DO NOT use stain or oil/alkyd based paints • Apply finish coat in accordance with paint manufacturers written instructions regarding coverage, application methods, and application temperature
CUT EDGE TREATMENTCaulk, paint or prime all field cut edges.
TR1118_P5/6 7/11
Additional Installation Information, Warranties, and Warnings are available at
www.jameshardie.com
© 2010 James Hardie Technology Limited. All rights reserved.TM, SM, and ® denote trademarks or registered trademarks of James Hardie Technology Limited. is a registered trademark of James Hardie Technology Limited.
TR1118_P6/6 7/11
RECOGNITION: HardieTrim NT3TM boards may be installed as an equal alternative to conventional trim permitted for use in; the 2003 International Residence Code for One - and Two - Family - Dwellings, Section R703.1. the 2003 International Residence Code for One - and Two - Family - Dwellings, Section R703.1.