Installation Quick Reference Guide · 3 Pointing the Antenna Using a Voltmeter on a Transmit ISL...
58
CORPORATE HEADQUARTERS 13865 SUNRISE VALLEY DRIVE HERNDON, VA 20171 +1 703.648.8000 www.idirect.net iDirect iNFINITI series™ 3000/5000/7000 Satellite Router and iDirect NetModem II Plus Installation Quick Reference Guide August 12, 2005 Release 6.X
Transcript of Installation Quick Reference Guide · 3 Pointing the Antenna Using a Voltmeter on a Transmit ISL...

CORPORATE HEADQUARTERS 13865 SUNRISE VALLEY DRIVE HERNDON, VA 20171 +1 703.648.8000 www.idirect.net
iDirect iNFINITI series™ 3000/5000/7000 Satellite Router
and iDirect NetModem II Plus
Installation Quick Reference Guide
August 12, 2005 Release 6.X

Installation Quick Reference Guide 2
Copyright © 20004-2005, iDirect, Inc. All rights reserved. This manual may not be reproduced, in part or in whole, without the permission of iDirect, Inc.
The specifications and information regarding the products in this manual are subject to change without notice. All statements, information, and recommendations in this manual are believed to be accurate, but are presented without warranty of any kind, express, or implied. Users must take full responsibility for their application of any products.
iDirect Technologies, iDirect iNFINITI series, iDirect 3000 series and iDirect 5000 series are registered trademarks or trademarks of iDirect, Inc. in the United States and/or other countries.
Trademarks, brand names and products mentioned in this manual are the property of their respective owners. All such references are used strictly in an editorial fashion with no intent to convey any affiliation with the name or the product’s rightful owner.
iDirect Technologies™ International Headquarters 13865 Sunrise Valley Drive Herndon, VA 20171 www.iDirect.net
HQ: 1.703.648.8000
Toll free from within the US 1.888.362.5475
Doc Name QR_iSite_RevD_DRAFT.pdf

Installation Quick Reference Guide 3
Contents 1 GETTING STARTED ..........................................................................................................6
1.1 INTRODUCTION .............................................................................................................................6 1.2 REQUIRED EQUIPMENT..................................................................................................................6 1.3 WHEN TO USE THIS GUIDE ............................................................................................................6 1.4 BEFORE YOU BEGIN .....................................................................................................................7
2 SETTING UP YOUR ANTENNA.........................................................................................8 2.1 SELECT A SITE FOR THE ANTENNA ................................................................................................8 2.2 ASSEMBLE THE ANTENNA .............................................................................................................8 2.3 ALIGN THE ANTENNA TOWARD THE SPACECRAFT...........................................................................8
3 POINTING THE ANTENNA USING A VOLTMETER ON A TRANSMIT ISL CABLE......10 3.1 PREPARING THE IDU (INDOOR UNIT) AND ODU (OUTDOOR UNIT) FOR POINTING...........................10 3.2 LOGGING IN TO YOUR NETMODEM...............................................................................................10 3.3 CALCULATE POLARIZATION, AZIMUTH, AND ELEVATION ...............................................................12 3.4 PERFORM PULSE WIDTH MODULATION (PWM) ANTENNA POINTING .............................................13
4 FINE-TUNING ANTENNA POINTING AND CROSS POLARIZATION............................17 4.1 SET UP THE NETMODEM (OR SATELLITE ROUTER) FOR CROSS POLARIZATION..............................17 4.2 SET UP ISITE FOR CROSS POLARIZATION.....................................................................................17 4.3 PREPARING FOR THE CROSS-POLARIZATION TEST .......................................................................18 4.4 RUNNING THE CROSS-POLARIZATION TEST..................................................................................18
4.4.1 Adjusting Azimuth.............................................................................................................19 4.4.2 Adjusting Elevation ...........................................................................................................19 4.4.3 Peaking the Polarization...................................................................................................19 4.4.4 After the Cross Polarization Test......................................................................................20
5 ESTABLISHING THE 1 DB COMPRESSION POINT ......................................................21 6 RECORDING THE GEO LOCATION - MOBILE SECURE REMOTES ONLY.................22
6.1 SETTING THE NETMODEM’S GEO LOCATION ................................................................................22 6.2 VERIFYING THE NETMODEM’S GEO LOCATION .............................................................................22
7 BRINGING THE NETMODEM (OR SATELLITE ROUTER) INTO THE NETWORK .......23 7.1 NETMODEM II PLUS FRONT PANEL LEDS....................................................................................23 7.2 SERIES 3000, 5000 AND 7000 FRONT PANEL LEDS....................................................................24 7.3 POST ACQUISITION ACTIVITIES....................................................................................................25
7.3.1 Network Help Desk Duties................................................................................................25
Installation Quick Reference Guide 4
7.3.2 Remote Duties ..................................................................................................................26 APPENDIX A – INSTALLING REMOTE SOFTWARE ON YOUR LAPTOP...........................28
A.1 INSTALLING SOFTWARE DOWNLOADED OVER THE INTERNET .............................................................28 A.2 INSTALLING SOFTWARE FROM THE IDIRECT NETMODEM CD:.............................................................29
APPENDIX B – ESTABLISHING A NETMODEM/SATELLITE ROUTER CONSOLE CONNECTION .........................................................................................................................30 APPENDIX C – GAINING IP CONNECTIVITY TO THE NETMODEM....................................33 APPENDIX D - TERMINATION OF COAXIAL CABLE...........................................................37 APPENDIX E – DISABLING THE PWM VOLTAGE THROUGH IBUILDER...........................41 APPENDIX F – DOWNLOADING THE OPTIONS FILE IN ISITE ...........................................43 APPENDIX G – DOWNLOADING PACKAGES IN ISITE........................................................45 APPENDIX H – DOWNLOADING THE APPLICATION AND FIRMWARE IMAGES (NETMODEM II AND II PLUS ONLY) ......................................................................................48 APPENDIX I – LOADING IMAGES USING THE TFTP SERVER (INFINITI SERIES ONLY) .52 APPENDIX J – GAINING IP CONNECTIVITY TO THE INFINITI SATELLITE ROUTER .......53 APPENDIX K – POINTING THE ANTENNA THROUGH THE CONSOLE PORT ..................56
K.1 PERFORMING CONSOLE ANTENNA POINTING ..............................................................................56 K.2 MODIFYING THE OPTIONS FILE TO DISABLE THE TRANSMIT PWM VOLTAGE.................................56 K.3 STARTING THE CONSOLE POINTING ............................................................................................57 K.4 USING THE DVM FOR CONSOLE POINTING...................................................................................57 K.5 CONSOLE POINTING....................................................................................................................58

Installation Quick Reference Guide 5
Figures Figure 1 Antenna Elevation Offset.............................................................................................9 Figure 2: Comparing Signal Strengths .....................................................................................14 Figure 3: Locking into a Carrier Stream....................................................................................15 Figure 4 iSite Cross Polarization .............................................................................................17 Figure 5 NetModem II Plus Front Panel ..................................................................................23 Figure 6 : iDirect 3000 series Satellite Router ..........................................................................24 Figure 7 : Sample Output of the Laninfo Command ................................................................33 Figure 8 Dimensions A and B.................................................................................................38
Tables Table 1: NetModem II Plus Front Panel LED Status ...............................................................23 Table 2: iDirect 3000/5000/70000 LED Status ........................................................................24 Table 3: DB-9 to RJ-45 Adapter Pinouts .................................................................................30 Table 4 : Coax Trim Table ........................................................................................................38 Table 5: Signal Strength Ranges..............................................................................................58

Installation Quick Reference Guide 6
1 Getting Started
1.1 Introduction This Quick Reference Guide is intended to help the user quickly commission his iDirect NetModem II Plus or iDirect iNFINITI series™ 3000, 5000 or 7000 Satellite Router. Throughout this manual, we will refer to an iDirect NetModem II Plus as a “NetModem” and to an iDirect iNFINITI series™ 3000, 5000 or 7000 Satellite Router as simply a “Satellite Router”. Differences in the handling of the different typed of Satellite Routers will be noted.
1.2 Required Equipment You will need the following equipment to successfully commission your iDirect NetModem or Satellite Router in the field:
1. A console cable with DB9 adapter
2. A cross-over LAN cable
3. Digital (or Analog) Voltmeter plus adaptor from voltmeter to IFL “F” connector
4. A hand-held GPS unit or a map that shows your current geographic location coordinates
5. A laptop with Windows XP or Windows 2000 Service Pack 3 loaded; (512 MB RAM recommended; 1 GHz processor or more; and at least 50 MB of free disk space) We recommend disabling the firewall for call functioning.
6. iDirect iSite software installed on the laptop and the correct options file and remote application and firmware images downloaded to the laptop.
Please refer to the appendices for additional information about installing iSite software on your laptop, establishing a console connection to your NetModem or Satellite Router, and gaining IP connectivity to the NetModem or iNFINITI series.
1.3 When to Use this Guide Once you have successfully commissioned your iDirect NetModem II Plus or iNFINITI series Satellite Router at a specific location, you can reset it at any time without repeating the procedures in this manual again. It will perform its self-test startup sequence and acquire into the network. However, these procedures must be repeated every time you move it from one established location to another.

Installation Quick Reference Guide 7
1.4 Before You Begin This document assumes that the following prerequisite conditions already exist, or can be made to exist, prior to beginning the commissioning procedure.
Additional information intended to help you achieve these conditions is contained in the Appendices of this document.
1. An appropriate antenna location has been selected. See Section 2.1.
2. If you are commissioning a NetModem, it is configured with the correct options file, and application and firmware images. See the Appendices.
3. If you are commissioning a Satellite Router, it is configured with the correct Options file and Image Package. See the Appendices.
4. IP connectivity is established between the NetModem or Satellite Router and the laptop running iSite. See Appendix C.
5. To support iDirect iNFINITI series™ Satellite Routers, the Network must be operating on iDS version 6.0.1 or later.
Do NOT proceed to commissioning your iDirect NetModem II Plus or iNFINITI series Satellite Router unless you have completed all of the above.

2 Setting Up your Antenna
2.1 Select a Site for the Antenna It is important to select an appropriate site for your antenna, prior to assembling the antenna.
1. Select a level surface that is approximately 10 feet by 10 feet.
2. Verify that nothing is blocking the line of site to the satellite in azimuth and elevation
3. Verify the IFL cable can reach the NetModem or iNFINITI series from the antenna location (RG-6 IFL cable may be used up to a distance of 250 feet. If your run is longer, RG-11 must be used, up to a distance of 500 feet.)
4. Verify that the IFL cable does not cross roads or heavy foot-traffic areas.
2.2 Assemble the Antenna Assemble the antenna using the supplied antenna assembly instructions. After installation, ensure that the following are true:
1. The antenna base is on a stable surface that will not shift during windstorms.
2. Ballast is installed on the antenna base.
3. The mast pipe is plumb.
2.3 Align the Antenna toward the Spacecraft You are now ready to perform the initial alignment of your antenna.
1. Set the antenna’s polarization to the approximate value provided by iSite’s Look Angle Calculator.
2. Set elevation to the value provided by iSite’s Look Angle Calculator.
Installation Quick Reference Guide 8

Magnetic Angle of Declination
To take into consideration the magnetic angle of declination in your location and to ensure that the compass reading is correct, you must
1. Take a reading at the back of the antenna
2. So that you have something to point to, mark a reference point some distance ahead on the antenna.
Keep in mind that large metal objects can throw off compass readings.
Antenna Offset Angle
The 1.8 meter antenna has 22.6° offset and a 1.2 meter antenna has 17° offset. For example, an elevation angle of 50° would be set as follows:
50° - 22.6° = 27.4°
The back plane is perpendicular to the line of sight of the antenna plus 22.6°.
If the back plane is at 90°, the antenna elevation angle is at 22.6°.
In the example above the antenna would be elevated from 90° to 117.4° or depending on the type of inclinometer being used a reading of 62.6° to reach an elevation angle to 50°.
Figure 1 Antenna Elevation Offset
3. To prepare the antenna for pointing, move the antenna off the desired azimuth, by swinging the antenna 20° away in azimuth. This will enable you to get a clear sky reading and compare signal strengths during the antenna pointing procedure.
Installation Quick Reference Guide 9

3 Pointing the Antenna Using a Voltmeter on a Transmit ISL Cable
This section describes pointing the antenna using Pulse Width Modulation and iSite. Pointing through the Console Port, as an alternative pointing method is described in Appendix K of this document.
3.1 Preparing the IDU (Indoor Unit) and ODU (Outdoor Unit) for Pointing
1. If your NetModem (or Satellite Router) is powered on, power it off at this time.
2. Ensure that the Receive IFL cable is connected from the LNB to the IDU.
3. Ensure that the Transmit IFL cable is connected to the IDU.
4. Disconnect the Transmit IFL cable from the BUC and connect it to the Digital Volt Meter
3.2 Logging in to Your NetModem
1. Power on your NetModem (or Satellite Router) and make sure that you have IP connectivity to it from your laptop computer.
2. Launch the iSite application on your laptop.
3. If the remote is on the same LAN, it will be auto-detected. However, if it is on a different LAN, you must right-click on the globe in the iSite Tree View, and then select New to create a new remote.
4. Select your remote, right-click on the remote, and then select Login.
Installation Quick Reference Guide 10

5. In Login, enter the case-sensitive, default password, iDirect and the IP address of the NetModem (or Satellite Router). In this example 10.0.5.1.
6. Select Admin, and then click OK.
NOTE
For instructions on determining the IP address of your Netmodem or Satellite Router, please refer to the appendices.
A new password may have been assigned at your Network Operator’s Help Desk. If “iDirect” doesn’t work, obtain the correct password by contacting the Network Help Desk.
NOTE If you do not have admin privileges, log in as User.
NOTE You can only change the password at the remote unit,
if the original password is known.
Installation Quick Reference Guide 11

3.3 Calculate Polarization, Azimuth, and Elevation Using iSite, calculate the polarization, azimuth, and elevation appropriate for your current location.
1. In the iSite Tree View, select the remote, right-click the remote, select Align Antenna, and then click Antenna Pointing.
2. On the Look Angle Calculator tab, Longitude parameters should already be entered for you in Spacecraft Position. If they are not, enter the appropriate longitude values for the satellite that you are using.
Installation Quick Reference Guide 12

If you are implementing a mobile remote, the white fields will all be blank. You must enter the following information.
1. In Remote Location, enter the appropriate latitude and longitude values for your current geographic location. In mobile remotes, this can be determined by your GPS unit.
2. In Spacecraft Position, enter the appropriate longitude values for the satellite that you are using
3. In Elevation Information, enter the appropriate Offset value for your antenna.
The offset for a 1.8 meter antenna is 22.6°.
The offset for a 1.2 meter antenna is 17°.
When all of the information is entered, iSite automatically calculates your polarization offset, azimuth, and elevation values.
NOTE
Write these values down, or leave this screen open on your laptop. You will need these values later to perform the initial pointing of your antenna.
3.4 Perform Pulse Width Modulation (PWM) Antenna Pointing Next, you must fine-tune the antenna pointing. You will attempt to lock onto the downstream carrier for your network, by sweeping the antenna in azimuth, looking for a value in the range of 12 to 24 volts DC. Readings in this range indicate that you have successfully locked into the correct satellite.
Signal Strength Ranges
volts DC Antenna Status
0 – 2: Not in pointing mode, hardware problem, or off satellite
2 – 10 Detecting RF energy, but not locked on the downstream carrier
12 – 24 Locked on the downstream carrier
NOTE You can only get a reading of >= 12 volts when you
are locked onto the correct spacecraft or network.
Installation Quick Reference Guide 13

If you are not already connected to the NetModem (or Satellite Router), power it on, launch iSite, and connect to the NetModem following the instructions earlier in this section
4. In the iSite Tree View, right—click the remote, select Align Antenna, and then click Antenna Pointing.
5. Slowly sweep the reflector in azimuth until a signal of the appropriate strength is found.
The signal reading on the pointing graph will turn red, then yellow, and finally, completely green, as you sweep the reflector to lock onto the downstream carrier.
Figure 2: Comparing Signal Strengths
Installation Quick Reference Guide 14

When you have achieved strong signal strength on the correct satellite, you should see:
1. a green reading on the Antenna Pointing graph
2. a reading within the desired range in the Current Signal Strength box
3. a signal within the correct range on the digital voltmeter (DVM) => 12 volts
NOTE You will not get a correct reading ((DVM) >= 12 volts)
from the wrong spacecraft or network.
4. If the desired signal is not found, increase or decrease elevation setting by 2° increments and repeat the azimuth sweep, until the correct signal is found.
Figure 3: Locking into a Carrier Stream
Installation Quick Reference Guide 15

When you have found the desired signal:
5. Tighten down the 4 bolts on the Yoke Cap that secure the Yoke Cap to the Mast Pipe.
6. Ensure that the Top Plate locking bolts are snug to allow azimuth movement
7. Adjust the elevation until maximum dc voltage is obtained
The rest of the azimuth adjustments will be made with the azimuth adjustment screws.
8. Fine tune azimuth until maximum dc voltage is obtained
9. Make sure azimuth and elevation are locked down
10. Adjust polarization until maximum dc voltage is obtained
11. Write down the final antenna pointing voltage reading and give the reading to the operator at the Network Help Desk
12. In iSite, click Stop to exit the modem’s antenna pointing mode
13. Power down the NetModem (or Satellite Router).
CAUTION
You must power down the NetModem (or Satellite Router) before continuing to the next section, Fine-tuning Antenna Pointing and Cross Polarization.
Installation Quick Reference Guide 16

4 Fine-tuning Antenna Pointing and Cross Polarization
Complete fine-tuning the antenna pointing and cross polarization from within the iSite GUI.
4.1 Set up the NetModem (or Satellite Router) for Cross Polarization
1. Disable the power to the NetModem (or Satellite Router) to set it up for cross polarization.
2. Disconnect the receive IFL cable from the NetModem (or Satellite Router).
3. Disconnect the transmit IFL cable from the DVM and connect it to the BUC.
4.2 Set up iSite for Cross Polarization The remote portion of the cross polarization test is conducted from the iSite GUI.
1. Power on the NetModem (or Satellite Router) and ensure that you have IP connectivity to it from your laptop.
2. Launch iSite and connect to the NetModem (or Satellite Router) using its IP address
3. Log in as Admin with a valid password.
4. In the iSite main menu, select Configure, select Align Antenna, and then click Cross Polarization.
Figure 4 iSite Cross Polarization
Installation Quick Reference Guide 17

4.3 Preparing for the Cross-Polarization Test
1. While still in the iSite GUI, call the Network Help Desk. The operator will establish a conference call between you, the help desk, and the satellite provider.
2. Provide the final antenna pointing voltage reading to the operator at the Network Help Desk; he will record the value for their records.
3. Provide the final antenna pointing voltage reading to the operator at the Network Help Desk; he will record the value for their records
4. Obtain the test frequency from the satellite provider and enter the test frequency into the RF Uplink Frequency box.
The BUC LO frequency is read from the options file on your NetModem. Using these values, iSite automatically calculates the L-Band TX frequency.
5. Verify the L-Band TX frequency with the Network Help Desk operator.
The BUC LO frequency will typically show a value of 13050 MHz for KU-Band and 4900 for C-Band. This value is read from the options file on your NetModem. Using the RF Uplink and BUC LO frequencies, iSite automatically generates an L-Band frequency for the NetModem.
4.4 Running the Cross-Polarization Test
1. When instructed by the satellite provider, click the Start button. This will program the NetModem with the calculated L-Band frequency.
CAUTION
Do not click the Start button until instructed to do so by the satellite provider. When you do click Start, your NetModem will start transmitting a Continuous Wave Carrier, or “CW.”
CAUTION
You may receive an error message after clicking the Start button. If this happens, click the Stop button and try again.
2. If the Satellite Provider asks you to adjust the NetModem’s (or Satellite Router’s) transmit power, in the Transmit Power box, select a power value as appropriate.
The satellite provider will then ask to have the azimuth, polarization, and/or elevation adjusted. The polarization is usually adjusted first. If the correct isolation cannot be achieved, then the operator may ask to adjust the azimuth and/or elevation.
Installation Quick Reference Guide 18

Installation Quick Reference Guide 19
4.4.1 Adjusting Azimuth
1. Adjust the azimuth and the elevation, by making ¼ turns of the adjustment nut, and then waiting for the satellite provider to measure the cross polarization reading. The provider will then instruct you to continue adjusting in the same direction or to reverse the direction.
2. Adjust the azimuth by loosening the four bolts on top of the canister as little and as evenly between the four as possible.
Loosening the four bolts too much, or adjusting some of them more than others, will throw the elevation off more than necessary.
3. After the azimuth has been peaked, make certain that the four bolts and the fine adjustment rod are completely tightened, so that the elevation is not affected later, after being peaked.
4.4.2 Adjusting Elevation
The elevation adjustment is performed in the same manner as the azimuth adjustment.
1. Using the elevation rod/nut, adjust the elevation.
2. Once the elevation is peaked, make certain that the elevation rod and nuts are completely tightened.
4.4.3 Peaking the Polarization
The polarization of the feed will now be peaked.
1. Loosen the two screws at the feed.
2. Loosen the hose clamp on the back end of the BUC just enough that entire assembly (feed, BUC, and LNB) will rotate freely.
3. At the direction of the satellite provider, move the feed in one direction in approximately 1/2° increments, or as little as possible.
4. Wait for the satellite provider to take a measurement. The satellite provider may tell you to continue moving the feed in the same direction, or to reverse the direction. Continue until the satellite provider tells you that the polarization is peaked.
5. Lock down the two screws and the hose clamp to secure the outdoor unit.
At this point, the canister bolts on the pole should be completely tightened.

Installation Quick Reference Guide 20
4.4.4 After the Cross Polarization Test
1. Wait for the satellite provider to verify that the cross polarization is still good after everything is tightened.
2. Confirm that the network operator at the help desk has recorded the cross polarization results
3. This completes the satellite provider’s portion of the call. Disconnect the satellite provider from the call, but do not shut down iSite or stop the cross polarization test yet.

5 Establishing the 1 dB Compression Point
The 1 dB Compression Point test is performed with the same CW setup used during the previous cross polarization test. This test establishes the point at which the NetModem’s (or Satellite Router’s) transmit power saturates the BUC.
1. While still in iSite Cross Polarization dialog box and the Network Operator is watching the CW, increase the transmit power of the carrier in the Adjust Transmit Power drop-down box by 1 dBm increments
CAUTION
The operator should see the CW increase in power by approximately 1 dB. If the power does not increase, then the BUC may already be saturated. Although this scenario is unusual, it can occur.
2. If power does not increase, decrease the power by 1 dBm until the operator sees the CW decrease by 1 dB.
NOTE The last point at which the CW changes by 1 dB is the
1 dB compression point.
3. If power does not increase, decrease the power by 1 dBm until the operator sees the CW decrease by 1 dB.
4. Record the TX power value. This will be used as the maximum power for this remote in the NMS.
5. Click the Stop button to turn off the CW carrier and exit the iSite application.
The 1 dB compression point has now been established. Do not power off the NetModem (or Satellite Router) yet.
Installation Quick Reference Guide 21

6 Recording the Geo Location - Mobile Secure Remotes Only
NOTE
This section describes a specific operational scenario for configuring remote NetModems and Satellite Routers as both Mobile and Secure. If your remotes do not fall into this category, skip this section.
If for security reasons the NetModem’s (or Satellite Router’s) geographic location coordinates have not been recorded by the Network Help Desk, you must enter these coordinates into the NetModem (or Satellite router) manually, before the modem will acquire into the network.
CAUTION
It is critical that the geographic coordinates accurately reflect your current geographic location. If the values are incorrect, your NetModem (or Satellite Router) will not be acquired into the network.
6.1 Setting the NetModem’s Geo Location You will enter the lat/long coordinates from the NetModem (or Satellite Router) console via a special command.
1. Open a HyperTerminal session on the NetModem’s (or Satellite Router’s) console. Alternatively, you may telnet to the NetModem (or Satellite Router).
2. At the prompt, type the following command
latlong <your lat> [N|S] <your long> [E|W]
Format of the latlong Command
The format of the latlong command is: latlong <lat> [N/S] <long> [E/W]
When entering this command, replace the <lat> string with your current latitude in decimal notation, followed by N for north or S for south. Replace the <long> string with your current longitude in decimal notation, followed by E for east or W for west.
6.2 Verifying the NetModem’s Geo Location You should verify that you have entered the correct geographic location coordinates.
1. Type “extras show” at the console prompt to display the current settings for latitude and longitude.
2. Reset the NetModem (or Satellite Router).
Installation Quick Reference Guide 22

7 Bringing the NetModem (or Satellite Router) into the Network
After you have entered the correct geographic coordinates for your current location and reset the NetModem, the NetModem should perform its power-up self-test and acquire into the network. Observe the LEDs on the front of the NetModem while the network powers on and goes through the acquisition process. You will see various combinations of front-panel lights indicating the current status of the NetModem.
The first time that the NetModem is acquired into the network, complete the post-acquisition steps in sections 7.3 below.
If your NetModem does not acquire into the network, contact the Network Help Desk for assistance.
7.1 NetModem II Plus Front Panel LEDs Various combinations of the power and network LEDs on the front panel of the NetModem II Plus will indicate the different states of the iDirect NetModem.
Figure 5 NetModem II Plus Front Panel
Table 1: NetModem II Plus Front Panel LED Status
NetModem II Plus Front Panel Status Combinations
POWER NETWORK Indicated Unit Status
Dark Dark Unit is Powered OFF
Solid Green Dark Unit is booting Up.
Solid Green Flashing Yellow Unit is attempting to lock on the downstream carrier.
Solid Green Solid Yellow Unit is locked on the downstream carrier.
Solid Green Flashing Green Unit is transmitting and attempting to acquire.
Solid Green Solid Green Unit is acquired into the network.
The Test LED is normally off. If the test LED is flashing yellow, then self test has detected a hardware fault or boot up software loading error.
Installation Quick Reference Guide 23

7.2 Series 3000, 5000 and 7000 Front Panel LEDs Various combinations of the LEDs on the front panel of the 3000/5000/7000 series remote will indicate the different states of your iDirect NetModem.
Figure 6 : iDirect 3000 series Satellite Router
Table 2: iDirect 3000/5000/70000 LED Status
LED Label LED Color Indicated Unit Status
OFF Indicates that the IDU is powered Off or there is a Power Supply problem. PWR
GREEN The IDU is powered On. The boot loader has started.
GREEN Indicates that the remotes have been acquired into the network.
FLASHING GREEN Indicates that the elements are in network acquisition.
SOLID YELLOW Indicates that the downstream SCPC is locked.
NET
FLASHING YELLOW Indicates that the downstream SCPC is not locked.
GREEN IDU is functioning properly. The DRAM test is successful.
FLASHING
GREEN Indicates that the unit is booting. The DRAM test is in progress. STATUS
RED Indicates a serious fault or failure in either software, hardware or configuration. May indicate that the DRAM test failed.
GREEN Indicates that the IDU’s transmitter is enabled. TX
YELLOW Indicates that the IDU’s transmitter is disabled.
Installation Quick Reference Guide 24

LED Label LED Color Indicated Unit Status
GREEN Indicates that the IDU transmitter is successfully locked to the downstream.
RX
YELLOW Indicates that the IDU is not locked to the downstream carrier.
7.3 Post Acquisition Activities
To guarantee trouble-free operation of your NetModem (or Satellite Router), certain activities should be completed after the NetModem (or Satellite Router) comes into the network for the first time. Some activities will be performed at the Network Help Desk. Other activities will be performed by you.
7.3.1 Network Help Desk Duties
After commissioning the NetModem (or Satellite Router) for the first time and after it has acquired into the network, the Network Help Desk will take control of the NetModem (or Satellite Router) to perform the following tasks.
CAUTION Do not power down the NetModem during this time.
1. The Network Help Desk will make adjustments to the NetModem’s (or Satellite Router’s) configuration to set the initial and maximum transmit power settings. Initial transmit power is typically set to 1 to 2 dB above nominal transmit power in clear sky conditions. The maximum transmit power is set for the 1 dB compression point.
CAUTION
Setting the initial power too high above the normal operating levels can cause problems with the remote acquiring into the network or cause problems on the network.
2. The Network Help Desk will download the updated configuration to the NetModem (or Satellite Router) and issue a reset.
3. The Network Help Desk will also record levels of the remote NetModem (or Satellite Router) as a baseline for troubleshooting.
Installation Quick Reference Guide 25

4. The Network Help Desk will ensure that the software and firmware on the NetModem (or Satellite Router) are at the correct revision level. If necessary they will upgrade the software on the NetModem and issue a reset.
The Network Help Desk will let you know when they are finished.
7.3.2 Remote Duties
After the Network Help Desk has made any necessary adjustments to the NetModem’s (or Satellite Router’s) configuration, you should record some baseline readings for local reference, in case the antenna is moved, or some other service issue arises.
Use the following procedure to record the baseline readings.
1. Open a HyperTerminal session to the NetModem’s (or Satellite Router’s) console. Alternatively, you may telnet to it.
2. Record the receive SNR of the NetModem (or Satellite Router).
(> 10.0 dB Clear Sky Conditions).
3. The transmit power of the NetModem (or Satellite Router).
4. The receive composite power into the NetModem (or Satellite Router).
(-60 to –5 dBm).
5. The temperature reading in Celsius.
Installation Quick Reference Guide 26

Installation Quick Reference Guide 27
Example: Remote Status Message
RemoteStatus: t:000017435715 SNR=15.60 RxPower=-33.79 dBm TxPower=-15.00 dBm DigitalRxPower=21.07 Temp=49.1 TDM_Lost=0 FllDac = 1812 LAN Port: 10 Mbps Half Duplex (AutoNegotiation: None)
These readings should be checked periodically to ensure that the service is not degrading. These readings will be monitored from the Network Help Desk. Heavy weather or sandstorms can cause these levels to change. During heavy weather or sandstorms the levels should be monitored because it is important that they return to the original readings once the weather or sandstorm has cleared.

Appendix A – Installing Remote Software on Your Laptop These instructions will guide you through the process of installing iSite software and remote images onto your laptop computer.
Components of the Remote-Modem Images Software
• The NMS iSite program and support files • The NetModem II Remote-Modem application and image files • The NetModem II Plus Remote-Modem application and image files • The iNFINITI Remote-Modem application and image files
A directory structure similar to the following will be created when the files are uncompressed:
NetModem-<6_0_X>/
iSite/
Images
Remote_2plus/
Remote_iNFINITI
Remote_NM2/
The steps for installing the software are dependent upon whether you downloaded the software via the Internet, or received a copy on a CD.
A.1 Installing Software Downloaded Over the Internet iSite software is usually distributed in a ZIP file. Once you have the ZIP file you can extract the contents using one of the several Windows tools that recognize the .zip format, such as Info-Zip (at http://www.info-zip.org/), WinZip (at http://www.winzip.com/), or PKZIP (at http://www.pkware.com/).
After receiving the compressed archive file remote-<version>.zip from iDirect, copy it to a directory where you can uncompress the files.
NOTE <version> is the NetModem version number in the
form ‘6_X_X’.
1. Uncompress the files by using unzip, WinZip, PKZIP, or another utility that understands the .zip format.
2. If desired, create a shortcut on the desktop or Windows taskbar to iSite.exe (located in the iSite folder).
Installation Quick Reference Guide 28

A.2 Installing software from the iDirect NetModem CD:
1. Put the iDirect NetModem CD into the CD drive, and locate the file remote-<version>.zip in the directory NetModem-<version> on the CD.
NOTE <version> is the NetModem version number in the
form ‘6_X_X’.
2. Uncompress the files in the .zip file to a folder on your hard drive by using unzip, WinZip, PKZIP, or another utility that understands the .zip format.)
3. Create a shortcut to iSite.exe (in the iSite folder) on the desktop or Windows taskbar, if desired.
Installation Quick Reference Guide 29

Installation Quick Reference Guide 30
Appendix B – Establishing a NetModem/Satellite Router Console Connection You can use any terminal emulator to connect to the NetModem console. The HyperTerm application comes pre-installed on all Windows 2000 and XP machines.
In addition to the NetModem Console Table cable, you will need an RJ-45 to DB-9 adapter.
The pin outs for a NetModem console cable are as follows:
Table 3: DB-9 to RJ-45 Adapter Pinouts
DB-9 to RJ-45 Adapter Pin-Out
RJ-45 Color Code DB-9
1 Blue 8
2 Orange 6
3 Black 2
4 Red 5
5 Green N.C.
6 Yellow 3
7 Brown 4
8 White/Gray 7
Complete the following procedure to set up and save a Hyper Terminal session:
1. Connect the RJ-45 to DB-9 adapter to the COM1 port of your laptop.
2. Plug the other end of the cable into the Console port of the iDirect NetModem or Satellite Router.
3. In the Windows Start menu, select Programs, select Accessories, select Communications, and then select HyperTerminal.

4. You may have to answer some questions about your area code and provide dialing information. (The information that you enter here isn’t important, but you must enter something.)
5. In the Connection Description dialog box, enter a name for the connection, such as “NetModem Console.” (You may also select an icon other than the default icon.)
6. Select COM1 in the Connect To dialog box.
Installation Quick Reference Guide 31

7. Using the default variables in in the COM1 Properties dialog box below, enter the session properties. Be certain that your settings exactly match these settings.
NOTE
If you lose contact with the remote and if this is a mobile remote, then the console port settings will change during the boot process to 4800 bps, while all other settings will remain the same. In order to reestablish communication with the NetModem console port, you must change your serial settings to match those in this dialog box.
8. Click Enter a few times to see if you can generate a response from the NetModem. If you are successful, you will see the NetModem console prompt. If you are unable to generate a response from the NetModem, reexamine your settings to be certain that they are correct.
9. When you close the console session, you will be prompted to save the session. Click Yes to save this session for re-use later
Installation Quick Reference Guide 32

Appendix C – Gaining IP Connectivity to the NetModem C.1 Mandatory Conditions Establishing IP connectivity to the NetModem from your laptop computer requires the following conditions to exist:
1. Your computer must be connected directly to the NetModem via a LAN crossover cable, or indirectly via an external switch or router.
2. Your computer’s IP address must be in the range of addresses specified by the NetModem’s IP address and subnet mask
3. Your subnet mask must match the NetModem’s subnet mask.
C.2 Determining the NetModem’s IP Address and Subnet Mask The easiest way to determine the NetModem’s IP address is to establish a console session and type the appropriate console command.
1. Open a console session to the NetModem. (See Appendix B for details.)
2. At the NetModem prompt, enter the command laninfo. Sample output is shown below.
Figure 7 : Sample Output of the Laninfo Command
Installation Quick Reference Guide 33

C.3 Modifying Your Laptop’s IP Address and Subnet Mask To modify your laptop’s IP address, you must bring up the Network Connections window, and then launch TCP properties.
1. From your computer’s Control Panel, double-click Network Connections. This screen’s appearance is different in Windows 2000 and Windows XP.
2. Launch the status dialog box for your Local Area Connection object by double-clicking on the icon. The dialog box should look similar to the following.
3. Click Properties.
Installation Quick Reference Guide 34

4. In the Local Area Connection Properties dialog box, select the Internet Protocol box.
5. Click the Properties button.
Installation Quick Reference Guide 35
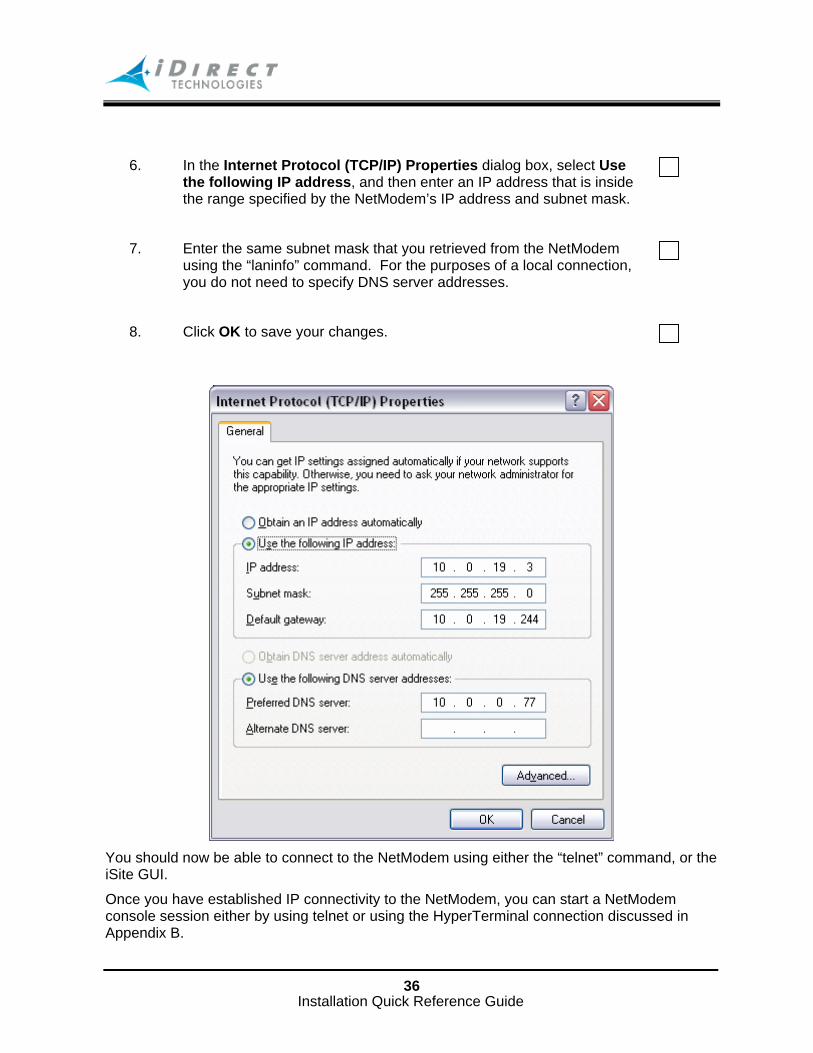
6. In the Internet Protocol (TCP/IP) Properties dialog box, select Use the following IP address, and then enter an IP address that is inside the range specified by the NetModem’s IP address and subnet mask.
7. Enter the same subnet mask that you retrieved from the NetModem using the “laninfo” command. For the purposes of a local connection, you do not need to specify DNS server addresses.
8. Click OK to save your changes.
You should now be able to connect to the NetModem using either the “telnet” command, or the iSite GUI.
Once you have established IP connectivity to the NetModem, you can start a NetModem console session either by using telnet or using the HyperTerminal connection discussed in Appendix B.
Installation Quick Reference Guide 36

Appendix D - Termination of Coaxial Cable
D.1 Recommended Tools
Paladin Tools: LC-CST-CATV-"F" 1257
D.2 Terminating a Type-F Connector onto a RG-6 or RG-11 cable
1. Cut off each end of the coax squarely with the proper cable cutter.
CAUTION: If other cutter type used, ensure the center conductor is straight and cylindrical without any burrs. Failure to do so will result in damage to the NetModem, BUC, and/or LNB connector.
Installation Quick Reference Guide 37

Figure 8 Dimensions A and B
Table 4 : Coax Trim Table
Coax Trim Dimensions a inch (mm) b inch (mm) Braid Fold Back
RG-6 1/8 (9.5) 1/4 (6.4) 1/4 (6.4) RG-11 7/16 (10.3) 5/16 (7.9) 7/16 (10.3)
2. Remove jacket material and foam insulation per dimension “ a ” in the trim table as shown. For RG-6, use a 2-step Coax Stripper, such as the LC-CST 1257 from Paladin Tools.
Step 3: Remove any foil in the braid. Fold the braid back over the jacket and trim the braid
length per the “Braid Fold Back” in the Coax Trim Dimension Table.
Step 4: Remove foil and cut dielectric to length “ b ” (if using a coax stripper, then skip this
step). Be careful not to cut into the copper of the center conductor. Remove any dielectric residue.
Step 5: If the conductive foil is burred, then smooth out the burr so that the edge (area where
the dielectric material was removed) is smooth and provides a lead-in for the connector mandrel.
Step 6: Install connector mandrel over foil and underneath the braid.
Installation Quick Reference Guide 38

NOTE
Since the RG-11 connector has built-in center pin, ensure the coax center pin makes contact to the internal seizing pin of the connector. Refer to picture below.
NOTE
For RG-6, the white color inner dielectric insulation should be flush even with the inner rear surface of the connector. Refer to the picture below for RG-6 termination.
Step 7: Crimp the connector with the proper crimp tool such as CablePrep HCT-775 for RG-6 or HCT-116 for RG-11.
Installation Quick Reference Guide 39

Step 8: Inspect and ensure that the copper center conductor only protrudes 1/8 inch (3.2mm) nominally beyond the rim of the F-connector. Trim if necessary.
NOTE
The copper center conductor shall only extend 1/8 inch (3.2mm) beyond the rim of the F-connector. It must be straight and cylindrical without any burrs at the end. Failure to do so will result in damage to the NetModem, BUC, LNB connector, and/or cause possible intermittent service.
Installation Quick Reference Guide 40

Appendix E – Disabling the PWM Voltage through iBuilder In release 6.0 or above, if you have access to iBuilder, you can verify that the transmit PWM voltage normally present on the transmit IFL cable is disabled.
To verify the transmit PWM voltage normally present on the transmit IFL cable is disabled through iBuilder complete the following procedure.
1. Power up the NetModem and let it boot up completely.
2. In iBuilder, right-click on the remote and select modify.
Installation Quick Reference Guide 41

3. In the Modify Configuration dialog box, make sure that the Disable Tx PWM check box is selected.
4. Reset the NetModem.
Installation Quick Reference Guide 42

Appendix F – Downloading the Options File in iSite Download images before downloading your options files. To download the options file.
1. Open iSite, right-click on the remote and select Download Option from
Disk. (Alternately click the button.)
2. Locate the Options file, highlight and click Open.
Installation Quick Reference Guide 43

3. When iSite requests confirmation of the download request, click Yes.
4. Download reports “success”. Click Reset Now to reset the Netmodem
Installation Quick Reference Guide 44

Appendix G – Downloading Packages in iSite 1. Open iSite, right-click on the remote and select Download Package.
2. In the Download Package Dialog select the folder button and locate and select the Remote-iNFINITI image package on your laptop.
Installation Quick Reference Guide 45

3. In the Download Package dialog, select Don’t check versions, Download images only and Don’t reset, and then click Start.
Installation Quick Reference Guide 46

4. Wait and observe the information in the Information section of the Download Package dialog until you see “Done”.
Installation Quick Reference Guide 47

Appendix H – Downloading the Application and Firmware Images (NetModem II and II Plus Only) Download images before the options file.
1. Open iSite, right-click on the remote and select Download Images.
Installation Quick Reference Guide 48

In the Download Command Center, the image name column lists all possible image variations. Currently loaded images are displayed in the “Modem version” column.
2. Click the Select button to locate the correct image set.
Installation Quick Reference Guide 49

3. Click the Select button to locate the correct image set on your laptop
Remote_ImageSet_2plus.ldr identifies the images to be loaded. iSite automatically selects Compress and Download for each image being updated.
4. In the Downlaod Command Center, select Download for each image to update.
Installation Quick Reference Guide 50

5. Wait for “Completed” to be displayed. Reset only if images are compatible with the options file.
6. Close the Download Command Center.
Installation Quick Reference Guide 51

Installation Quick Reference Guide 52
Appendix I – Loading Images using the TFTP Server (iNFINITI series Only)
An alternate method of loading the images is to use the TFTP server that comes bundled with iSite.
1. Open iSite and from the File menu select TFTP.
2. A pop up window will prompt you to the TFTP server local folder. Browse and select the folder in which the remote package resides.
3. Open a console session to the iNFINITI unit and login to the Linux prompt as root.
4. Type “service idirect_falcon stop”. This will stop the application.
5. Type “tftp_package.sh <IP address of TFTP server> <package name>”.
For example, if your PC is 10.10.1.2 and you are loading 6.0.3 remote package the command will be “tftp_package.sh 10.10.1.2 remote 6_0_3.pkg”.
6. Once the transfer is complete, reset the unit using the “reboot” command.

Appendix J – Gaining IP Connectivity to the iNFINITI Satellite Router
1. Open a HyperTerminal Session on your laptop.
2. Log in to the Satellite Router as root and use the default password “iDirect”.
Installation Quick Reference Guide 53

3. At the Linux prompt, type ifconfig iXP1
for a 5000 or 7000 series Satellite Router to determine the Satellite Router’s IP address.
(Type ifconfig iXP0 for 3000 series)
4. Check the IP address and subnet mask of the Satellite Router.
Installation Quick Reference Guide 54

5. Configure your laptop’s IP address to be in the same subnet as the Satellite Router’s interface.
6. Use the following commands to change the default gateway of the Satellite Router to your be the same as your laptop’s IP address.
Route –n
route del default gw
route add default gw
7. Now iSite will autodetect the Satellite Router and you will be able to log in to it through iSite.
Installation Quick Reference Guide 55
Appendix K – Pointing the Antenna through the Console Port
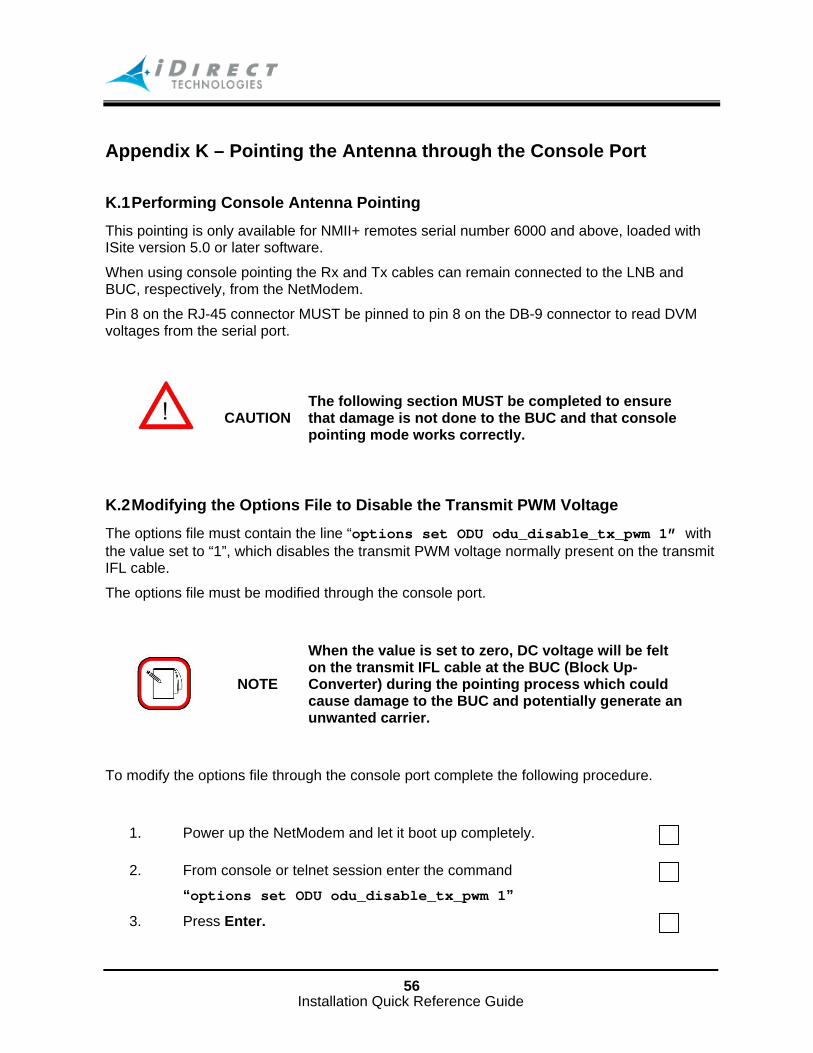
K.1 Performing Console Antenna Pointing
This pointing is only available for NMII+ remotes serial number 6000 and above, loaded with ISite version 5.0 or later software.
When using console pointing the Rx and Tx cables can remain connected to the LNB and BUC, respectively, from the NetModem.
Pin 8 on the RJ-45 connector MUST be pinned to pin 8 on the DB-9 connector to read DVM voltages from the serial port.
CAUTION The following section MUST be completed to ensure that damage is not done to the BUC and that console pointing mode works correctly.
K.2 Modifying the Options File to Disable the Transmit PWM Voltage
The options file must contain the line “options set ODU odu_disable_tx_pwm 1” with the value set to “1”, which disables the transmit PWM voltage normally present on the transmit IFL cable.
The options file must be modified through the console port.
NOTE
When the value is set to zero, DC voltage will be felt on the transmit IFL cable at the BUC (Block Up-Converter) during the pointing process which could cause damage to the BUC and potentially generate an unwanted carrier.
To modify the options file through the console port complete the following procedure.
1. Power up the NetModem and let it boot up completely.
2. From console or telnet session enter the command
“options set ODU odu_disable_tx_pwm 1”
3. Press Enter.
Installation Quick Reference Guide 56

Installation Quick Reference Guide 57
4. Type “options flash”
5. Press Enter.
6. Reset the NetModem.
After the modem reboots, you must make sure that the correct entry is in the options file.
1. Type “options show ODU”
2. Press Enter.
3. In the ODU group, check to see that the line odu_disable_tx_pwm = 1 is present. If this line is not present in the Options file, you must not start console pointing until it is present, or you will damage your hardware.
K.3 Starting the Console Pointing To start the console pointing, enter the following commands.
1. Type “rx pointing enable”
2. Type “rx pointing on”
At this point, the NetModem is in console pointing mode.
K.4 Using the DVM for Console Pointing
To use the digital voltmeter for console pointing, complete the following.
1. Disconnect the console port from the laptop, or PC, leaving the RJ-45 connector in the NetModem.
2. From the DB-9 connector, connect pin 4 or 5 (GND) to the negative probe on the DVM.
3. Connect pin 8 (+) to the positive probe on the DVM.
4. Point the antenna using the normal procedure, until the signal falls into the desired range.

Table 5: Signal Strength Ranges
Signal Strength Ranges
volts DC Antenna Status
0-2.5 vdc RF energy is detected, but from the wrong satellite
2.6 – 5.0 vdc Carrier lock, correct satellite
NOTE
The LEDs on both the front and rear panel of the NetModem II Plus will verify Carrier Lock. If the front “Network” LED is solid orange it indicates Carrier Lock. If the rear “RX” LED is solid green, it indicates Carrier Lock.
K.5 Console Pointing
1. Slowly sweep the reflector in azimuth until a signal of the appropriate strength is found.
2. If the desired signal is not found, increase or decrease elevation setting by 2° and repeat the azimuth sweep.
3. When you have found the desired signal, tighten down the 4 bolts on the Yoke Cap that secure the Yoke Cap to the Mast Pipe.
The remaining azimuth adjustments are made with the azimuth adjustment screws.
1. Ensure Top Plate locking bolts are snug to allow azimuth movement.
2. Adjust the elevation until maximum dc voltage is obtained.
3. Fine tune azimuth until maximum dc voltage is obtained.
4. Make sure azimuth and elevation are locked down
5. Adjust polarization until maximum dc voltage is obtained
6. Write down the final antenna pointing voltage reading and give the reading to the operator at the Network Help Desk
7. When finished pointing, disconnect power from the NetModem to stop the pointing process
Installation Quick Reference Guide 58