Installation of the Whisper Quiet Built-in Air compressor ... · Installation of the Whisper Quiet...
8
Installation of the Whisper Quiet Built-in Air compressor in the SRI 8610C/310C GC SRI part# 8690-0070 (120voltsAC) Part#8690-2270 (230voltsAC ) Includes the following parts: Air compressor Filter/silicone connecting tubing Copper tubing with welded fitting Tubing jumper 1/8” bulkhead fitting Switch with wire leads (4) Nuts and flat washers Check the label on the air com- pressor to make sure it is the cor- rect voltage. The photo shows a 230voltAC air compressor Remove the six Phillips head screws which hold the bottom plate of the GC. Page 1 SRI Tech Support 310-214-5092 www.srigc.com
Transcript of Installation of the Whisper Quiet Built-in Air compressor ... · Installation of the Whisper Quiet...

Installation of the Whisper Quiet Built-in Air compressor in the SRI 8610C/310C GC
SRI part# 8690-0070 (120voltsAC) Part#8690-2270 (230voltsAC ) Includes the following parts: Air compressor Filter/silicone connecting tubing Copper tubing with welded fitting Tubing jumper 1/8” bulkhead fitting Switch with wire leads (4) Nuts and flat washers Check the label on the air com-pressor to make sure it is the cor-rect voltage. The photo shows a 230voltAC air compressor Remove the six Phillips head screws which hold the bottom plate of the GC.
Page 1
SRI Tech Support 310-214-5092 www.srigc.com
Installation of the Whisper Quiet Built-in Air compressor in the SRI 8610C/310C GC
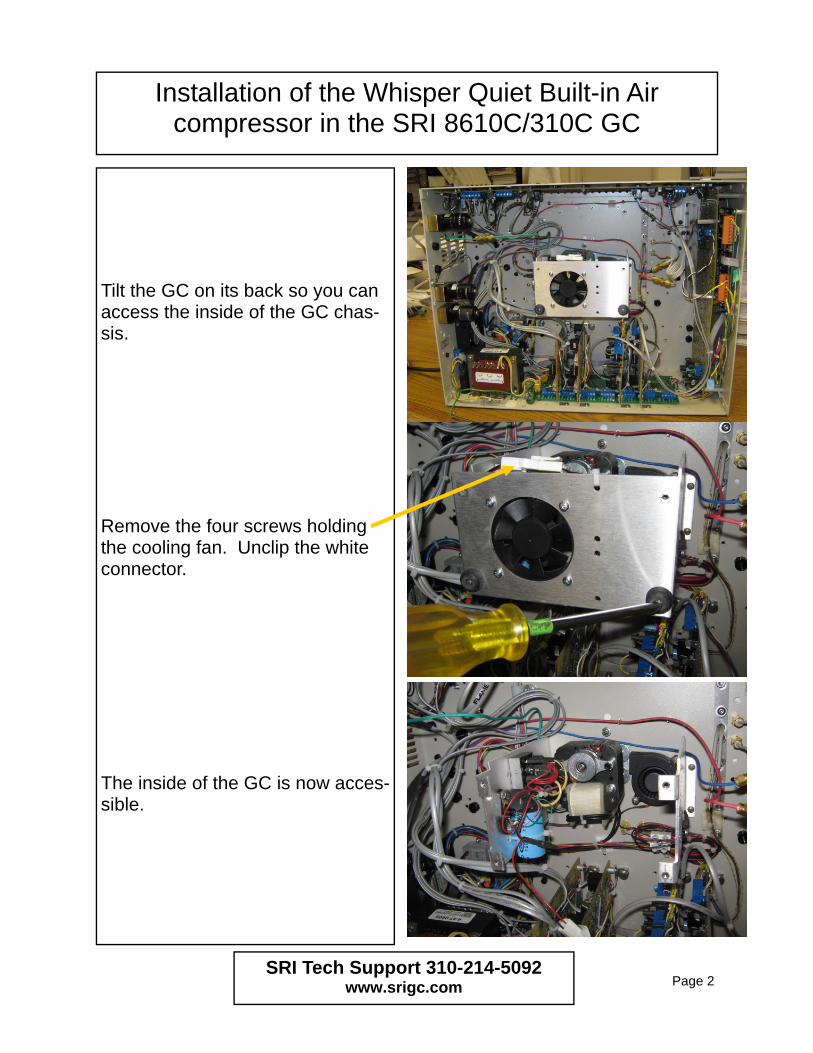
Tilt the GC on its back so you can access the inside of the GC chas-sis. Remove the four screws holding the cooling fan. Unclip the white connector. The inside of the GC is now acces-sible.
Page 2
SRI Tech Support 310-214-5092 www.srigc.com

Installation of the Whisper Quiet Built-in Air compressor in the SRI 8610C/310C GC
Remove the eight hex head screws from around the front panel of the GC. The hex wrench size is 5/64inch. Remove the two Phillips head screws which hold the rubber bum-bers at the front corner of the chassis. The front panel of the GC can then be flipped up. Do not disconnect any wires.
Page 3
SRI Tech Support 310-214-5092 www.srigc.com

Installation of the Whisper Quiet Built-in Air compressor in the SRI 8610C/310C GC
Remove the twelve 1/4inch nuts and lockwashers holding the dis-play board to the front panel. Be careful not to lose the lock-washers or let them fall into the GC. After you remove the nut you may have to lift the lockwasher with your fingernail. Pull the display board slightly away from the display board. Be careful not to lose the fiber spacers which will fall off the studs easily if you allow the front panel to fall.
Page 4
SRI Tech Support 310-214-5092 www.srigc.com

Installation of the Whisper Quiet Built-in Air compressor in the SRI 8610C/310C GC
Install the air compressor on/off switch in the circuit board location immediately behind the hole in the front panel. Solder the two wires from the switch to the two holes adjacent to the switch as shown. The two wires from the air compressor itself are connected into the two screw terminals immediately to the left of the switch. Secure the switch in the circuit board with the nut and lockwasher.
Page 5
SRI Tech Support 310-214-5092 www.srigc.com

Installation of the Whisper Quiet Built-in Air compressor in the SRI 8610C/310C GC
If it is not already connected re-move the air compressor outlet fit-ting and replace with the fitting to which the copper tubing is welded. Locate the four studs which are pre-installed in the chassis. The studs line up with the rubber feet of the air compressor. Place a flat washer in the recess in each of the air compressor’s feet.
Page 6
SRI Tech Support 310-214-5092 www.srigc.com

Installation of the Whisper Quiet Built-in Air compressor in the SRI 8610C/310C GC
Use a nut driver or small socket wrench to tighten the four lock nuts ( nut with nylon inserts in the nut ). Tighten the lock nuts snug but not so tight that the rubber foot of the air compressor is squished. The idea is that the air compressor feet will be secure but loose and flexi-ble so the vibration of the air com-pressor is not transmitted to the chassis. When the air compressor is in place it should like like the photo. Bend the copper tubing as neces-sary so the tubing does not touch anything. Tighten the 1/8inch bulkhead fitting in the hole marked AIR OUT. Be sure to use a lockwasher on both sides of the chassis to prevent the bulkhead fitting from rotating.
Page 7
SRI Tech Support 310-214-5092 www.srigc.com
Installation of the Whisper Quiet Built-in Air compressor in the SRI 8610C/310C GC
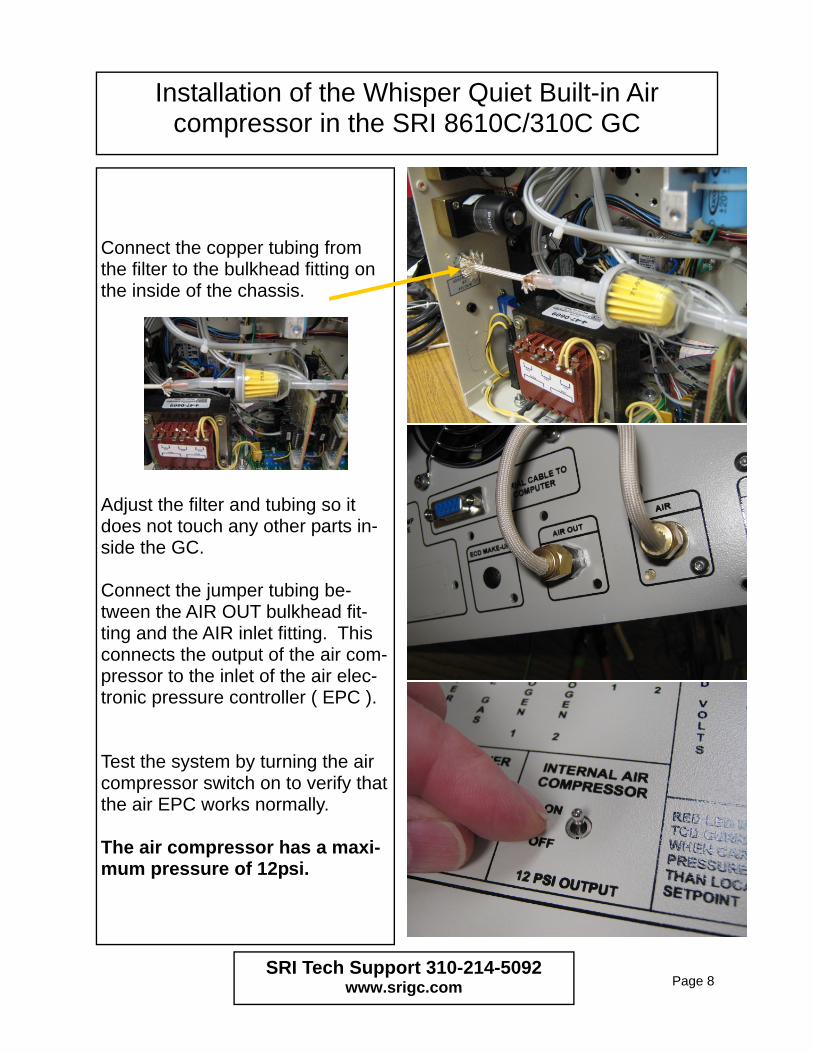
Connect the copper tubing from the filter to the bulkhead fitting on the inside of the chassis. Adjust the filter and tubing so it does not touch any other parts in-side the GC. Connect the jumper tubing be-tween the AIR OUT bulkhead fit-ting and the AIR inlet fitting. This connects the output of the air com-pressor to the inlet of the air elec-tronic pressure controller ( EPC ). Test the system by turning the air compressor switch on to verify that the air EPC works normally. The air compressor has a maxi-mum pressure of 12psi.
Page 8
SRI Tech Support 310-214-5092 www.srigc.com