pliers - TAPARIA TOOLS · Title: pliers Author: anirudh Created Date: 20130325071404Z

©2014 Rekluse Motor Sports Rekluse Motor Sports, Inc.
12000 W Franklin Rd Boise, Idaho 83709
208-426-0659 [email protected]
REKLUSE MOTOR SPORTS The Rekluse Torq Drive Kit
INSTALLATION
GUIDE
Doc ID: 191-7100A Doc Rev: 031618
OVERVIEW
This kit will replace most of the OEM clutch parts, including the clutch pack. Only Rekluse Friction Disks can be used with the Torq Drive Product. For most models the clutch pack will have 12x friction disks and 12x Rekluse drive plates.
The Rekluse Clutch Cover must be used with the Torq Drive product or interference could occur between the clutch cover and rotating clutch parts.
INSTALLATION TIPS
Be sure to use proper eye protection
Laying the bike on its left side allows for easy clutch access and eliminates the need to drain oil
An air or electric impact wrench works well to remove the center clutch nut, or you can place the bike in top gear and hold the rear brake while loosening the center clutch nut with a socket
Channel-lock style pliers work best to bend the tabs of the washer up over the center clutch nut
See “Dirt Torq Drive Installation” video at Rekluse.com/videos.
TOOLS NEEDED
8mm socket
Center Clutch Nut Socket (27-32mm)
5mm Allen Socket
Torque wrench (in-lb & ft-lb, or N-m)
Channel-lock pliers

Rekluse Torq Drive Page 2
INCLUDED PARTS
Item Item Type Qty
6 Pressure Plate 1
23 Clutch Cover 1
27 Center Clutch Hub 1
30 Lock Tab Washer 1
31 Screw Sleeve 6
47 Fastener – M6 Pressure Plate Bolt 6
60, 60.1 Pressure Plate Spring (5 for 250F, 12 for 450F/250 2-Strokes) 10,12
67 Steel Drive Plate 12
69 Rekluse Friction Disk 12
70 Basket Sleeves 12
88 Spring Kit 1
Visit Rekluse.com/support for a full parts fiche illustration and part numbers.
Rekluse Torq Drive Page 3
BIKE PREP &
DISASSEMBLY
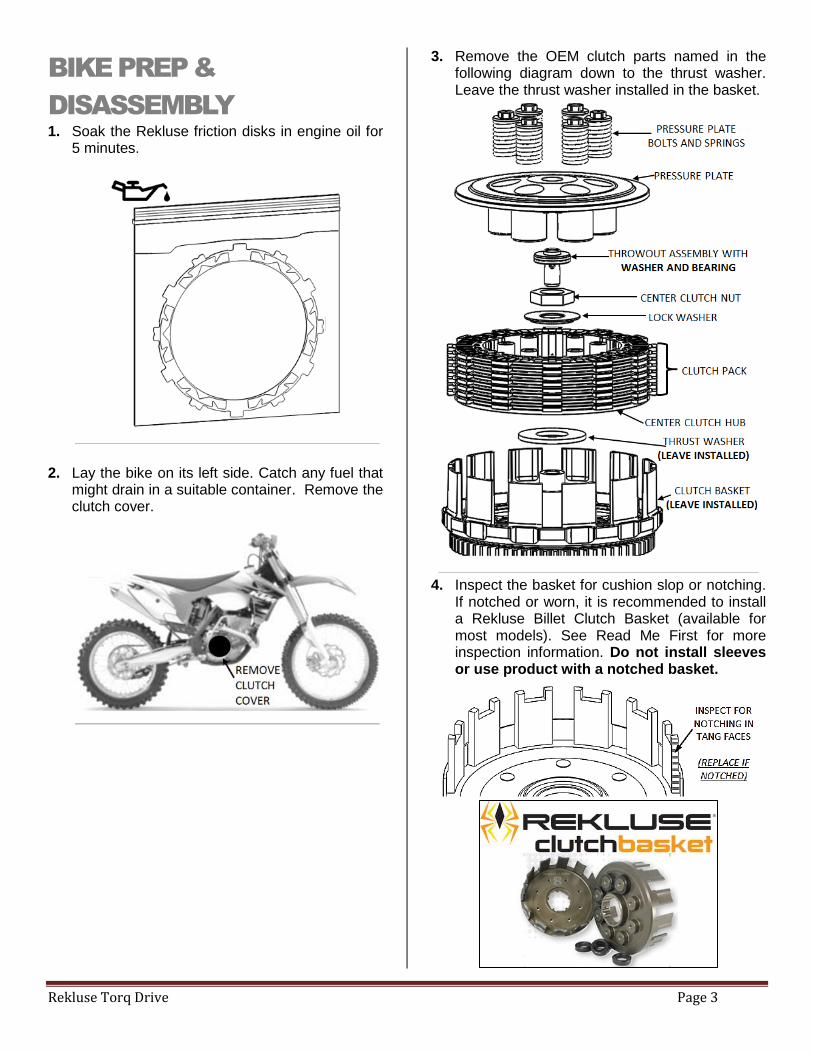
1. Soak the Rekluse friction disks in engine oil for 5 minutes.
2. Lay the bike on its left side. Catch any fuel that
might drain in a suitable container. Remove the clutch cover.
3. Remove the OEM clutch parts named in the following diagram down to the thrust washer. Leave the thrust washer installed in the basket.
4. Inspect the basket for cushion slop or notching. If notched or worn, it is recommended to install a Rekluse Billet Clutch Basket (available for most models). See Read Me First for more inspection information. Do not install sleeves or use product with a notched basket.

Rekluse Torq Drive Page 4
INSTALLATION
5. Install the Rekluse Center Clutch Hub, making sure the OEM thrust washer is in place.
NOTES:
1. Be sure to use the Rekluse-supplied Lock Tab Washer [#30] when reinstalling, not the OEM Lock Washer.
2. RMZ450, KX450F, KX250F: Install the included Rekluse Center Clutch Nut. Hex size = 1¼“(32mm). All other models: Reuse the OEM Center Clutch Nut.
6. Torque the nut to 50 ft-lb (68 N-m), and bend
up both tabs of the tab washer using channel-lock pliers. After torqueing check to see that the center clutch rotates freely with the bike in neutral. Over-torqueing the nut can cause excessive clutch drag.
7. Install the [#70] Rekluse basket sleeves in the
orientation shown making sure they are seated in the basket slots.
NOTE: When seated in the basket the sleeves may stick above or below the top of the basket.
Rekluse Torq Drive Page 5
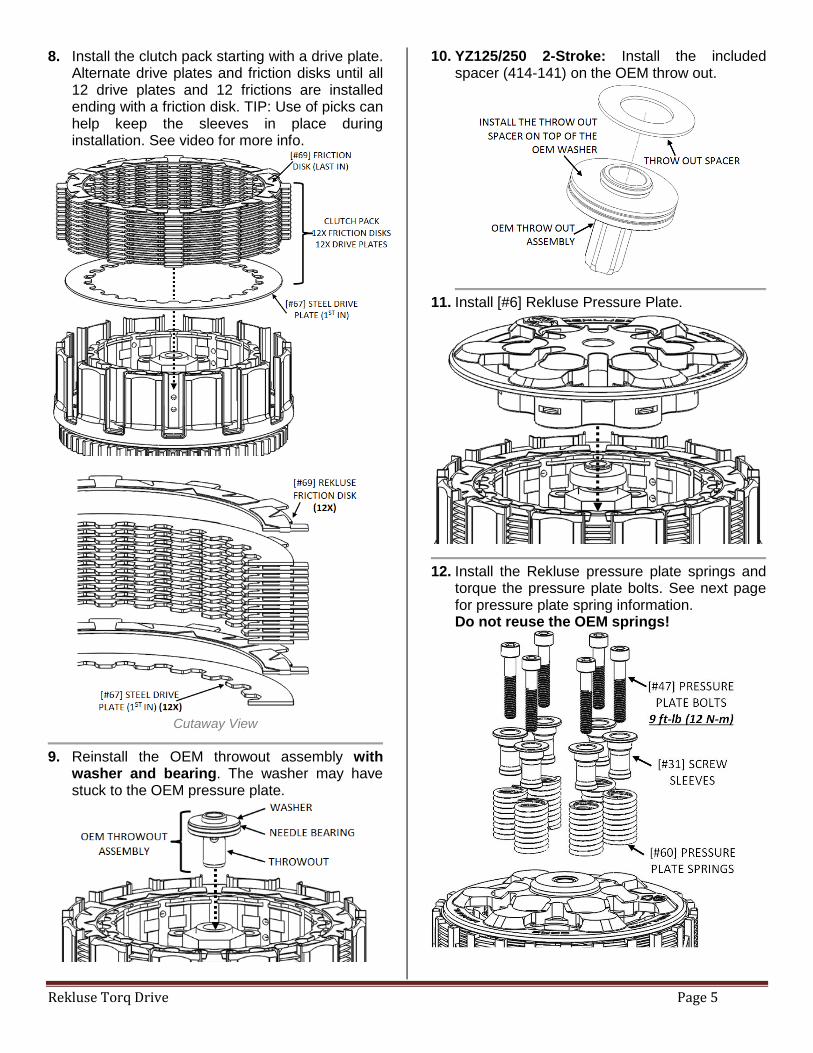
8. Install the clutch pack starting with a drive plate. Alternate drive plates and friction disks until all 12 drive plates and 12 frictions are installed ending with a friction disk. TIP: Use of picks can help keep the sleeves in place during installation. See video for more info.
Cutaway View
9. Reinstall the OEM throwout assembly with
washer and bearing. The washer may have stuck to the OEM pressure plate.
10. YZ125/250 2-Stroke: Install the included spacer (414-141) on the OEM throw out.
11. Install [#6] Rekluse Pressure Plate.
12. Install the Rekluse pressure plate springs and
torque the pressure plate bolts. See next page for pressure plate spring information. Do not reuse the OEM springs!
Rekluse Torq Drive Page 6
PRESSURE PLATE SPRING INFORMATION
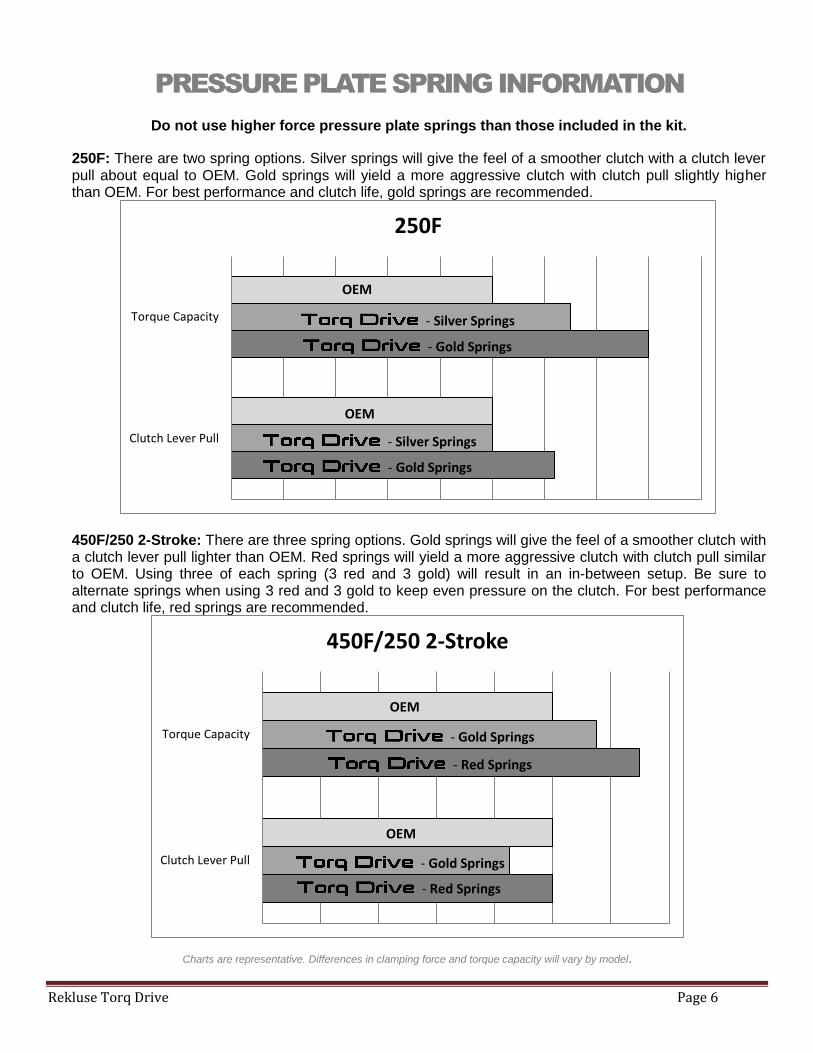
Do not use higher force pressure plate springs than those included in the kit.
250F: There are two spring options. Silver springs will give the feel of a smoother clutch with a clutch lever pull about equal to OEM. Gold springs will yield a more aggressive clutch with clutch pull slightly higher than OEM. For best performance and clutch life, gold springs are recommended.
450F/250 2-Stroke: There are three spring options. Gold springs will give the feel of a smoother clutch with a clutch lever pull lighter than OEM. Red springs will yield a more aggressive clutch with clutch pull similar to OEM. Using three of each spring (3 red and 3 gold) will result in an in-between setup. Be sure to alternate springs when using 3 red and 3 gold to keep even pressure on the clutch. For best performance and clutch life, red springs are recommended.
Charts are representative. Differences in clamping force and torque capacity will vary by model.
Clutch Lever Pull
Torque Capacity
250F
- Gold Springs
- Silver Springs
OEM
- Silver Springs
- Gold Springs
OEM
OEM
Clutch Lever Pull
Torque Capacity
450F/250 2-Stroke
OEM
- Gold Springs
- Red Springs
- Red Springs
- Gold Springs
Rekluse Torq Drive Page 7
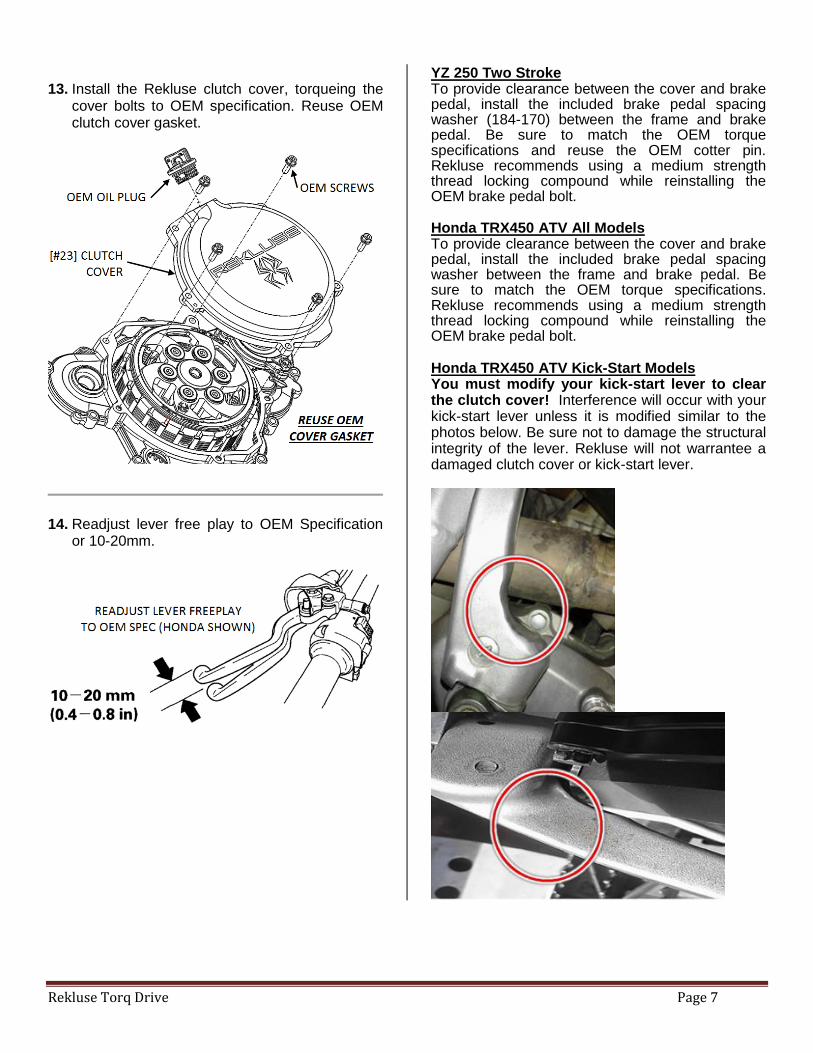
13. Install the Rekluse clutch cover, torqueing the cover bolts to OEM specification. Reuse OEM clutch cover gasket.
14. Readjust lever free play to OEM Specification or 10-20mm.
YZ 250 Two StrokeTo provide clearance between the cover and brake pedal, install the included brake pedal spacing washer (184-170) between the frame and brake pedal. Be sure to match the OEM torque specifications and reuse the OEM cotter pin. Rekluse recommends using a medium strength thread locking compound while reinstalling the OEM brake pedal bolt. Honda TRX450 ATV All ModelsTo provide clearance between the cover and brake pedal, install the included brake pedal spacing washer between the frame and brake pedal. Be sure to match the OEM torque specifications. Rekluse recommends using a medium strength thread locking compound while reinstalling the OEM brake pedal bolt. Honda TRX450 ATV Kick-Start Models You must modify your kick-start lever to clear the clutch cover! Interference will occur with your kick-start lever unless it is modified similar to the photos below. Be sure not to damage the structural integrity of the lever. Rekluse will not warrantee a damaged clutch cover or kick-start lever.
©2014 Rekluse Motor Sports Rekluse Motor Sports, Inc.
12000 W Franklin Rd Boise, Idaho 83709
208-426-0659 [email protected]
BREAK-IN
- Break-in will occur over the first 1-2 hours of use, depending on the rider. During break-in more clutch drag may occur than normal.
TROUBLE SHOOTING
Clutch Drag: - Cold Drag Only – If drag occurs only while the
bike is cold, oil is the most likely cause. Be sure to warm up the bike before riding/racing. Use of lighter weight oil can help to minimize cold drag.
- Hot and Cold Drag – Ensure that the center clutch nut is properly torqued so that the center clutch spins freely. Check for any warped or not flat plates in the clutch pack, either drive plates or frictions.
Clutch Slip: - If clutch slip occurs, inspect the clutch for signs
of wear or heat. - Use of the heaviest springs included with the kit
will reduce the chance of clutch slipping and/or excessive heat.
MAINTENANCE
- Inspect all of your clutch parts at regular maintenance intervals for signs of wear or excessive heat, and replace components as necessary. See Read Me First for clutch basket inspection information. Rekluse recommends inspecting at 5 hours of use, then every 10 hours after. Clutch wear is very dependent on the riders use, inspection interval may vary.
- Inspect and replace basket sleeves if they appear to be notched from friction disks. Rekluse recommends replacing them every 25 hours for abusive riding/racing, every 50 hours for moderate riding, or every time friction disks are replaced.
- Replace friction disks if they measure below 0.068” (1.73mm) thickness or if they are glazed and/or burnt.
- Keep up with regular oil changes and other bike maintenance. Ultimately, better clutch longevity and performance is greatly increased with oil quality and other bike factors that reduce engine heat.
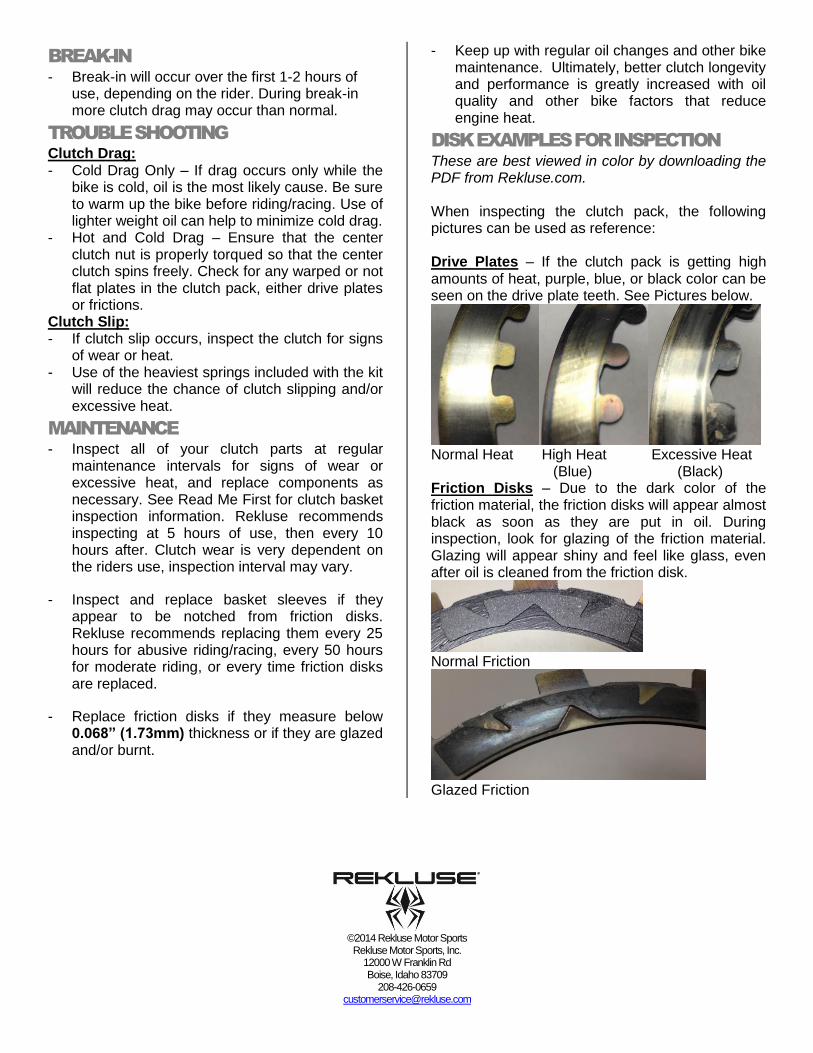
DISK EXAMPLES FOR INSPECTION
These are best viewed in color by downloading the PDF from Rekluse.com. When inspecting the clutch pack, the following pictures can be used as reference: Drive Plates – If the clutch pack is getting high amounts of heat, purple, blue, or black color can be seen on the drive plate teeth. See Pictures below.
Normal Heat High Heat Excessive Heat (Blue) (Black) Friction Disks – Due to the dark color of the friction material, the friction disks will appear almost black as soon as they are put in oil. During inspection, look for glazing of the friction material. Glazing will appear shiny and feel like glass, even after oil is cleaned from the friction disk.
Normal Friction
Glazed Friction