
INSTALLATION MANUAL - pioneer-latin.com · 2. Sección del amplificador de refuerzo 4. Fije los...
7
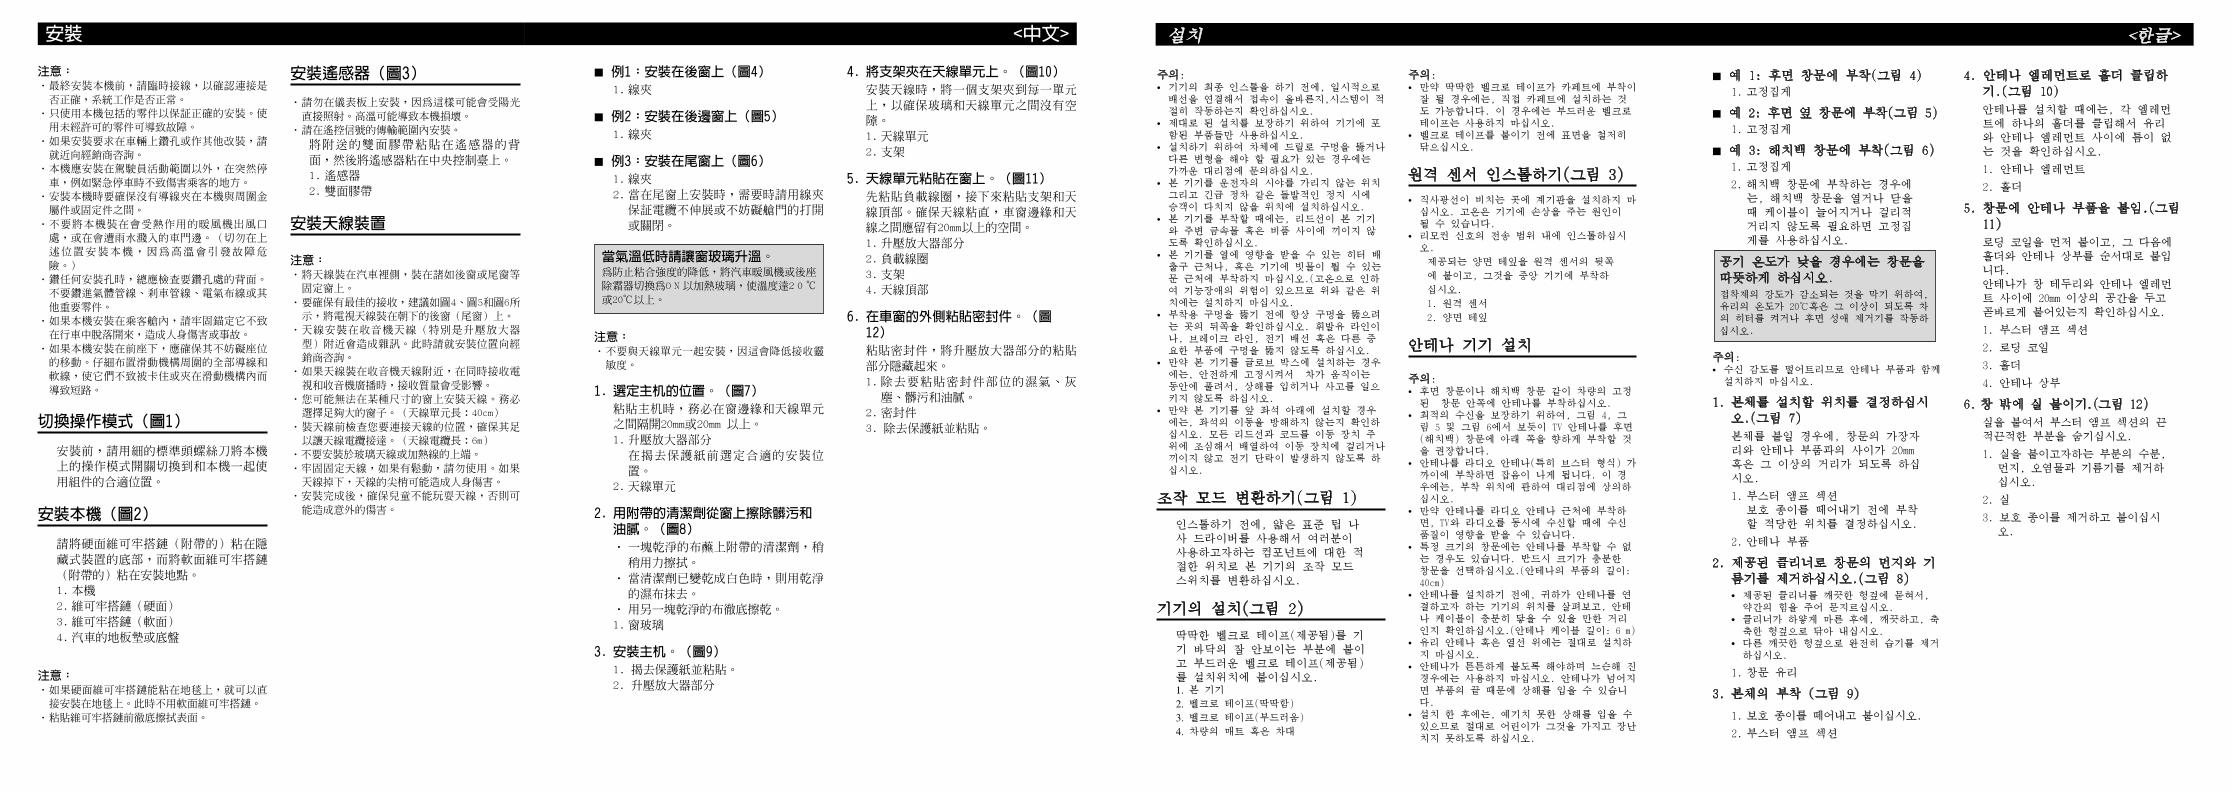
GEX-P5750TV INSTALLATION MANUAL INSTALLATION MANUAL This product conforms to new cord colors. Los colores de los cables de este producto se conforman con un nuevo código de colores. <KSNNF> <05D00000> Printed in Japan Imprimé au Japon <CRD4000-A> ES 1. Remote sensor 2. Double-sided tape 1. This unit 2. Velcro tape (hard) 3. Velcro tape (soft) 4. Car nat or chassis 1. Clamps Clamps 1. Booster amp section Decide on a suitable location for mounting before removing the protective paper. 20 mm 20 mm 2. Antenna elements Fig. 3 Fig. 5 1. Window glass 1. Booster amp section 20 mm 2. Loading coil 3. Holder 4. Antenna top 1. Remove moisture, dust, dirt and oil from where you are going to stick on the seal. 2. Seal 3. Remove the protective paper and stick on. 1. Remove the protective paper and stick on. 2. Booster amp section 1. Antenna element 2. Holder Fig. 1 Fig. 2 Fig. 4 1. Clamps 2. When mounting on a hatchback window, use clamps where necessary to assure the cable is not stretched or does not cause an obstruction when the hatch is opened or closed. Fig. 6 Fig. 7 Fig. 8 Fig. 9 Fig. 10 Fig. 11 Fig. 12
Transcript of INSTALLATION MANUAL - pioneer-latin.com · 2. Sección del amplificador de refuerzo 4. Fije los...

GEX-P5750TV
INST
ALLA
TION
MAN
UAL INSTALLATION
MANUAL
This product conforms to new cord colors.Los colores de los cables de este producto se conforman con un nuevo código de colores.
<KSNNF> <05D00000>
Printed in JapanImprimé au Japon
<CRD4000-A> ES
1. Remote sensor
2. Double-sided tape
1. This unit
2. Velcro tape (hard)
3. Velcro tape (soft)
4. Car nat or chassis
1. Clamps
Clamps
1. Booster amp section Decide on a suitable location for mounting before removing the protective paper.
20 mm
20 mm
2. Antenna elements
Fig. 3
Fig. 5
1. Window glass1. Booster amp section
20 mm
2. Loading coil
3. Holder
4. Antenna top
1. Remove moisture, dust, dirt and oil from where you are going to stick on the seal.
2. Seal
3. Remove the protective paper and stick on.
1. Remove the protective paper and stick on.
2. Booster amp section 1. Antenna element
2. Holder
Fig. 1 Fig. 2
Fig. 4
1. Clamps
2. When mounting on a hatchback window, use clamps where necessary to assure the cable is not stretched or does not cause an obstruction when the hatch is opened or closed.
Fig. 6
Fig. 7 Fig. 8
Fig. 9 Fig. 10
Fig. 11 Fig. 12

• Antes de montar la antena, compruebe laubicación de la unidad que va a conectar a laantena, y asegúrese de que se encuentrasuficientemente cerca del cable de antena para quealcance. (Longitud de cable de antena: 6 m)
• Nunca instale sobre una antena de vidrio o cablesde calentamiento.
• Fije la antena firmemente, y no utilice si se ponefloja. Si la antena cae, las puntas de los elementospueden dañarse.
• Después de instalar, asegúrese de que los niños nojueguen con la antena, ya que esto puede serpeligroso.
7 Ejemplo 1: Montando a una ventanatrasera (Fig. 4)1. Bridas
7 Ejemplo 2: Montando sobre unaventana de lado trasero (Fig. 5)1. Bridas
7 Ejemplo 3: Montando a una ventana decompuerta trasera (Fig. 6)1. Bridas 2. Cuando monte sobre una ventana de
compuerta trasera, utilice bridas endonde sea necesario para asegurarque el cable no sea estirado, niocasione obstrucciones cuando seabre o cierra la compuerta.
Nota:• No instale con los elementos de la antena juntos
ya que eso reduce la sensibilidad de recepción.
1. Decida sobre la ubicación para elcuerpo principal. (Fig. 7)Cuando se fija sobre el cuerpoprincipal, asegúrese de que hay unespacio de 20 mm o más entre el bordede la ventana y los elementos de laantena.1. Sección del amplificador de refuerzo
Decida sobre una ubicaciónadecuada para el montaje antes dequitar el papel de protección.
2. Elemento de antena
2. Quite la suciedad y aceite desde laventana con el limpiador. (Fig. 8)• Aplique el limpiador suministrado a un paño
de limpieza y limpie, aplicando poca presión.• Cuando el limpiador se haya secado en
blanco, limpie quitando con un pañohumedecido y limpio.
• Seque completamente con otro paño limpio.1. Vidrio de ventana
3. Montaje del cuerpo principal. (Fig. 9)1. Retire el papel protector y pegue.2. Sección del amplificador de refuerzo
4. Fije los soportes al elemento deantena. (Fig. 10)En el montaje de la antena, fije unsoporte a cada elemento para asegurarque no quede espacio entre la luna ylos elementos de la antena.1. Elemento de la antena2. Soporte
5. Fijación de los elementos de laantena a una ventana. (Fig. 11)Pegue sobre la bobina de carga,seguido por los soportes y partessuperiores de la antena en orden.Confirme que la antena esté rectamentepegada, con un espacio de 20 mm omás entre el borde de la ventana y loselementos de la antena.1. Sección del amplificador de
refuerzo 2. Bobina de carga 3. Soporte4. Parte superior de la antena
6. Adherencia del sello a la parteexterna de la ventana. (Fig. 12)Adhiera el sello de manera que ocultela parte adhesiva de la sección delamplificador de refuerzo. 1. Quite la humedad, polvo, suciedad
y grasa de la parte donde va a pegarel sello.
2. Sello3. Quite el papel protector y péguelo.
Caliente el vidrio de la ventanacuando la temperatura del aire seencuentre baja.Para evitar una reducción en la resistencia adhe-siva, active el calefactor o el desempañadortrasero del automóvil para calentar el vidrio auna temperatura de 20°C o más.
Nota:• Antes de la instalación final de la unidad, conecte
provisionalmente el cableado para confirmar quelas conexiones son correctas y el sistema funcionasatisfactoriamente.
• Utilice solamente las partes incluídas con launidad para asegurar una instalación adecuada. Eluso de partes no autorizadas puede ocasionarfallas de funcionamiento.
• Si la instalación requiere del taladrado de orificiosu otras modificaciones del vehículo, consulte consu agente o concesionario más cercano a sudomicilio.
• Instale la unidad en donde no interfiera con elconductor y no pueda lesionar al pasajero en casode una parada repentina, tal como una frenada deemergencia.
• Cuando monte esta unidad, cerciórese que ningunode los cables queda aprisionado entre esta unidady accesorios o partes metálicas circundantes.
• No monte esta unidad cerca de la salida delcalefactor, en donde podría ser afectado por elcalor o cerca de las puertas, en donde la lluviapodría salpicar sobre la misma. (Para evitar elriego de fallos de funcionamiento producidos porlas altas temperaturas, evite la instalación en loslugares arriba.)
• Antes de taladrar cualquier orificio de montajesiempre compruebe lo que hay detrás en dondedesea taladrar los orificios. No taladre en la líneade combustible, cableado eléctrico u otras partesimportantes.
• Si esta unidad es instalada en el compartimientode pasajeros, fíjela seguramente de modo que nose desprenda mientras el automóvil se encuentraen movimiento, y pueda ocasionar lesiones oaccidentes.
• Si esta unidad se instale bajo un asiento delantero,cerciórese de que no obstruye el movimiento delasiento. Pase todos los cables y conductorescuidadosamente a través de los mecanismodeslizantes, de modo que no queden aprisionadoso atrapados en el mecanismo y ocasionen un cortocircuito.
Conmutación del modo deoperación (Fig. 1)
Antes de la instalación, usando undestornillador de punta plana, cambie laposición del interruptor del modo deoperación situado en esta unidad a laadecuada para el componente que ustedestá utilizando.
Instalación de la unidad (Fig. 2)
Pegue la cinta Velcro (suministrada) sobrela parte inferior de la unidad oculta-alejaday pegue la cinta Velcro blanda(suministrada) sobre el sitio de instalación.1. Esta unidad2. Cinta Velcro (dura)3. Cinta Velcro (blanda)4. Alfombra del automóvil o chasis
Nota:• La instalación directa sobre la alfombra es posible
si la cinta Velcro dura puede adherirse a laalfombra. En este caso, no utilice cinta Velcroblanda.
• Limpie completamente la superficie antes de fijarla cinta adherente o Velcro.
Instalación del sensor remoto(Fig.3)• No lo instale en el tablero de instrumentos donde
pueda quedar expuesto a la luz directa del sol. Lasaltas temperaturas pueden causar daño a launidad.
• Instálelo dentro de la gama de transmisión de laseñal.
Adhiera la cinta de doble adherencia aldorso del sensor remoto, y sujételo a laconsola central.1. Sensor remoto2. Cinta de doble adherencia
Instalación de la unidad de antena
Nota:• Monte la antena en el interior del automóvil sobre
las ventanas fijas tales como ventanas traseras oventanas de compuerta trasera.
• Para asegurar una recepción óptima, serecomienda que monte la antena de TV sobre unaventana trasera (compuerta trasera) apuntandohacia abajo como se muestra en la Fig. 4, Fig. 5 yFig. 6.
• Montando la antena cerca de una antena de radio(particularmente del tipo con refuerzo) resultaráen ruidos. En este caso, consulte su revendedorcon respecto a la ubicación de montaje.
• Si la antena se monta cerca de una antena deradio, la calidad de la recepción puede serafectada durante la recepción simultánea deemisoras de TV y radio.
• Puede no llegar a montar la antena sobre lasventanas de un cierto tamaño. Asegúrese de elegiruna ventana que sea suficientemente grande.(Longitud de elemento de antena: 40 cm)
Instalación <ESPAÑOL>
Note:• Before making a final installation of the unit, tem-
porarily connect the wiring to confirm that theconnections are correct and the system works properly.
• Use only the parts included with the unit to ensureproper installation. The use of unauthorized partscan cause malfunctions.
• Consult with your nearest dealer if installationrequires the drilling of holes or other modifica-tions of the vehicle.
• Install the unit where it does not get in the driver’sway and cannot injure the passenger if there is asudden stop, like an emergency stop.
• When mounting this unit, make sure none of theleads are trapped between this unit and the sur-rounding metalwork or fittings.
• Do not mount this unit near the heater outlet,where it would be affected by heat, or near thedoors, where rainwater might splash onto it.(Never install in locations such as the abovebecause of the danger of malfunction due to hightemperatures.)
• Before drilling any mounting holes always checkbehind where you want to drill the holes. Do notdrill into the gas line, brake line, electrical wiringor other important parts.
• If this unit is installed in the passenger compart-ment, anchor it securely so it does not break freewhile the car is moving, and cause injury or anaccident.
• If this unit is installed under a front seat, makesure it does not obstruct seat movement. Route allleads and cords carefully around the sliding mech-anism so they do not get caught or pinched in themechanism and cause a short circuit.
Switching the operation mode (Fig. 1)
Before installing, use a thin standardtip screwdriver to switch the operationmode switch on this unit to the appro-priate position for the component youare using it with.
Installing the Unit (Fig. 2)
Adhere the hard Velcro tape (provided)to the bottom of the hide-away unit andadhere the soft Velcro tape (provided)to the installation location.1. This unit2. Velcro tape (hard)
3. Velcro tape (soft)4. Car mat or chassis
Note:• Direct installation on the carpet is possible if the
hard Velcro tape will adhere to the carpet. Do notuse the soft Velcro tape in this case.
• Thoroughly wipe off the surface before affixingthe velcro tape.
Installing the remote sensor (Fig. 3)• Do not install on the dashboard where it may be
subjected to direct sunlight. High temperaturesmay result in damage to the unit.
• Install within the transmission range of the remotecontrol signal.
Stick the supplied double-sided tape tothe back of the remote sensor, andattach it to the center console.1. Remote sensor2. Double-sided tape
Installing the Antenna unit
Note:• Mount the antenna on the inside of the car on
fixed windows such as rear windows or hatchbackwindows.
• To assure optimum reception, it is recommendedyou mount the TV antenna on a rear (hatchback)windows pointing down as shown in the Fig. 4,Fig. 5 and Fig. 6.
• Mounting the antenna near a radio antenna (par-ticularly a booster type) will result in noise. Inthis case, consult your dealer concerning mount-ing location.
• If the antenna is mounted near a radio antenna,reception quality may be effected during simulta-neous reception of TV and radio broadcasts.
• You may not be able to mount the antenna onwindows of certain size, Be sure to select a win-dow that is large enough. (Antenna element length :40 cm)
• Before mounting the antenna, check the locationof the unit you are going to connect the antennato, and make sure it is near enough for the anten-na cable to reach. (Antenna cable length: 6 m)
• Never install on top of a glass antenna or heatingwires.
• Secure the antenna firmly, and do not use if itcomes loose. If the antenna falls down, the tips ofthe elements may cause injury.
Installation <ENGLISH>
• After installing, make sure children don’t playwith it as it may result in unexpected injury.
7 Example 1: Mounting on a rear window (Fig. 4)1. Clamps
7 Example 2: Mounting on a rear sidewindow (Fig. 5) 1. Clamps
7 Example 3: Mounting on a hatchbackwindow (Fig. 6)1. Clamps2. When mounting on a hatchback win-
dow, use clamps where necessary toassure the cable is not stretched or doesnot cause an obstruction when the hatchis opened or closed.
Note:• Do not install with the antenna elements together
as this reduces reception sensitivity.
1. Decide on the location for the mainbody. (Fig. 7)When sticking on the main body, makesure there is a space of 20 mm or morebetween the edge of the window andthe antenna elements.1. Booster amp section
Decide on a suitable location formounting before removing the pro-tective paper.
2. Antenna elements
2. Remove dirt and oil from the win-dow with the supplied cleaner. (Fig. 8)• Apply the supplied cleaner to a clean cloth
and wipe, applying a little pressure.• When the cleaner has dried white, wipe off
with a clean, damp cloth.• Dry thoroughly with another clean cloth.1. Window glass
3. Mounting on the booster amp section (Fig. 9)1. Remove the protective paper and
stick on.2. Booster amp section
4. Clipping holders onto the antennaelement. (Fig. 10)When mounting the antenna, clip onone holder to each element to assurethere’s no space between the glass andthe antenna elements.1. Antenna element2. Holder
5. Sticking antenna elements to a window. (Fig. 11)Stick on the loading coil first, followedby the holders and antenna tops inorder. Make sure the antenna is stuckon straight, with a space of 20 mm ormore between the edge of the windowand the antenna elements.1. Booster amp section2. Loading coil3. Holder4. Antenna top
6. Sticking the seal on the outside of awindow. (Fig. 12)Stick on the seal so that it hides thesticky part of the booster amp section.1. Remove moisture, dust, durt and oil
from where you are going to stickthe seal.
2. Seal3. Remove the protective paper and
stick on.
Warm the window glass when theair temperature is low.To prevent a reduction in adhesive strength ONthe car heater or rear deffoger to warm the glassto a temperature of 20˚C or more.

6. Blue
11. This unit
9. To video output
3 m
6. Blue
1. AV-BUS cable (supplied)
1. AV-BUS cable (supplied)
AV receiver(e.g. AVH-P5750DVD)(sold separately)
2.
6. Blue
4. Black
3. Yellow
16. White/Red
3 m
3 m
AV-BUS cable(supplied)
1.
3. Yellow
3. Yellow
3. Yellow
4. Black
4. Black
4. Black
4. Black
6. Blue
IP-BUS cable(supplied)
8.
10. RCA cable(soldseparately)
Display(e.g. AVD-W8000)(sold separately)
12.
13. IP-BUS cable(sold separately)
To video1 input
14.
To video 2input
15.
16. White/Red
10. RCA cable(sold separately)
(RCA cablesupplied withDVD player)
17.
DVD Player(e.g. XDV-P9—)(sold separately)
18.
Multi-CD Player(sold separately)
19.
3. Yellow
4. Black
4. Black
20. Use AV-BUS cable (50 cm ) if necessary.
Vehicle Dynamics Processor(e.g. AVG-VDP1)(sold separately)
5.
50 cm
26-pin cable(supplied with Vehicle Dynamics Processor)
7.
1. Blue
8. This unit
1. Blue
3 m6. Black
IP-BUS cable(supplied)
9.
7. IP-BUS input
3. Pioneer head unit(sold separately)
AV-BUS cable(supplied)
5.
3 m 6. Black
2. AV-BUS input
4. AV system display(e.g. AVX-P7650)(sold separately)
10. This unit
5. To video input
1. To video 1 input
7. To rear out(REAR OUT)
9. To front out(FRONT VIDEO OUT)
3 m
8. Black
4. RCA cable(sold separately)
6. Yellow
Display unit with RCA input jack(sold separately)
11.
3. Remote sensor(supplied)
2. Display(e.g. AVD-W8000)(sold separately)
Fig. 13
Fig. 14
Fig. 15
Fig. 16
1. This unit
2. Fuse holder
3. YellowTo terminal always supplied with powerregardless of ignition switch position.
6. Black (ground)To vehicle (metal) body
5. Red(Connect this lead only when this unitis used as STAND ALONE mode.)To electric terminal controlled byignition switch (12 V DC) ON/OFF.
.
14. Parking brake switch
12. Power supply side
11. Light greenUsed to detect the ON/OFF status ofthe parking brake. This lead must beconnected to the power supply side ofthe parking brake switch.
4. Fuse resistor
13. Ground side
7. Connection method
8. Clamp the lead. 9. Clamp firmly withneedle-nosed pliers.
10. Note:• The position of the parking brake switch depends
on the vehicle model. For details, consult thevehicle Owner’s Manual or dealer.
Fig. 17

7 When using this unit as “STAND ALONE” mode (Fig. 15)
1. To video 1 input2. Display (e.g. AVD-W8000) (sold separately)3. Remote sensor (supplied)4. RCA cable (sold separately)5. To video input6. Yellow7. To rear out (REAR OUT)8. Black9. To front out (FRONT VIDEO OUT)
10. This unit11. Display unit with RCA input jack
(sold separately)
Disconnecting an AV-BUS connector(Fig. 16)
When disconnecting an AV-BUS con-nector, grasp it firmly on both sidesand pull towards you. This will unlockthe connector, enabling disconnection.
Connecting the power cord (Fig. 17)1. This unit2. Fuse holder3. Yellow
To terminal always supplied with powerregardless of ignition switch position.
4. Fuse resistor5. Red
(Connect this lead only when this unit is usedas STAND ALONE mode.)To electric terminal controlled by ignitionswitch (12 V DC) ON/OFF.
6. Black (ground)To vehicle (metal) body.
7. Connection method8. Clamp the lead.9. Clamp firmly with needle-nosed pliers.
10.Note• The position of the parking brake switch
depends on the vehicle model. For details,consult the vehicle Owner’s Manual or dealer.
11.Light greenUsed to detect the ON/OFF status of theparking brake. This lead must be connectedto the power supply side of the parking brakeswitch.
12.Power supply side13.Ground side14.Parking brake switch
TV antenna connection (Fig. 18)
7 When connecting the TV Antenna (supplied)
1. This unit2. TV antenna (supplied)3. TV antenna inputs
Connect from 1 in order.4. Fuse holder5. Red6. To electric terminal controlled by the ignition
switch (12 V DC) ON/OFF.7. Black (ground)8. To vehicle (metal) body.
Rear display connection (Fig. 19)
Note:• Output to this product’s Rear Display is ON when
the Head Unit’s source is TV.If the Head Unit’s source is anything other thanTV or Head Unit is OFF, pressing POWER buttonon the supplied remote control enables you tooperate TV independently for the Rear Display.
• Output from this product’s rear audio output ismonaural.
1. This unit2. RCA video output (Yellow)3. RCA audio output (White, Red)4. RCA cables (sold separately)5. To audio inputs6. To video input7. Display with RCA input jacks
Note:• This unit is for vehicles with a 12-volt battery and
negative grounding. Before installing it in a recre-ational vehicle, truck, or bus, check the batteryvoltage.
• To avoid shorts in the electrical system, be sure todisconnect the ≠ battery cable before beginninginstallation.
• Refer to the owner’s manual for details on con-necting the other units, then make connectionscorrectly.
• Secure the wiring with cable clamps or adhesivetape. To protect the wiring, wrap adhesive tapearound them where they lie against metal parts.
• Route and secure all wiring so it cannot touch anymoving parts, such as the gear shift, handbrakeand seat rails. Do not route wiring in places thatget hot, such as near the heater outlet. If the insu-lation of the wiring melts or gets torn, there is adanger of the wiring short-circuiting to the vehiclebody.
• Don’t pass the yellow lead through a hole into theengine compartment to connect to the battery.This will damage the lead insulation and cause avery dangerous short.
• Do not shorten any leads. If you do, the protectioncircuit may fail to work when it should.
• Never feed power to other equipment by cuttingthe insulation of the power supply lead of the unitand tapping into the lead. The current capacity ofthe lead will be exceeded, causing over heating.
• When replacing fuse, be sure to only use fuse ofthe rating prescribed on the fuse holder.
• To prevent incorrect connection, the input side ofthe IP-BUS connector is blue, and the output sideis black. Connect the connectors of the same col-ors correctly.
• To minimize noise locate the TV antenna cable,radio antenna cable and RCA cable as far awayfrom each other as possible.
Connection Diagram
7 When using this unit as “SRC : OSD OFF” mode (Fig. 13)
1. AV-BUS cable (supplied) 2. AV receiver (e.g. AVH-P5750DVD)
(sold separately)3. Yellow4. Black5. Vehicle Dynamics Processor (e.g. AVG-VDP1)
(sold separately)6. Blue7. 26-pin cable
(supplied with Vehicle Dynamics Processor)8. IP-BUS cable (supplied)9. To video output
10. RCA cable (sold separately)11. This unit12. Display (e.g. AVD-W8000) (sold separately)13. IP-BUS cable (sold separately)14. To video 1 input15. To video 2 input16. White/Red17. RCA cable (supplied with DVD player)18. DVD player (e.g. XDV-P9—) (sold separately)19. Multi-CD Player (sold separately)20. Use AV-BUS cable (50 cm) if necessary.
7 When using this unit as “SRC : OSD ON” mode (Fig. 14)
1. Blue2. AV-BUS input3. Pioneer head unit (sold separately)4. AV system display (e.g. AVX-P7650)
(sold separately)5. AV-BUS cable (supplied)6. Black7. IP-BUS input8. This unit9. IP-BUS cable (supplied)
• Cords for this product and those for otherproducts may be different colors even if theyhave the same function. When connecting thisproduct to another product, refer to the sup-plied manuals of both products and connectcords that have the same function.
Connecting the Units <ENGLISH>
2. TV antenna (supplied) 1. This unit
3. TV antenna inputsConnect from 1 in o
6 m
5. Red
5. Red
4. Fuse holder
4. Fuse holder
6. To electric terminal controlled bythe ignition switch (12 V DC) ON/
7. Black (ground)
7. Black (ground)
8. To vehicle (metal) body.
6. To video input
5. To audio inputs
1. This unit
2. RCA video output (Yellow)
4. RCA cables (sold separately)
3. RCA audio output (White, Red)
7. Display with RCA input jacks
Fig. 18
Fig. 19

7 En el uso de esta unidad en el modo“STAND ALONE” (Fig. 15)
1. A la entrada de video 12. Visualizador (ej. AVD-W8000) (vendido sepa-
radamente)3. Sensor remoto (suministrado)4. Cable RCA (vendido separadamente)5. A la entrada de video6. Amarillo 7. A la salida trasera (REAR OUT)8. Negro9. A la salida frontal (FRONT VIDEO OUT)
10. Esta unidad11. Unidad visualizadora con conector de entrada
RCA (vendida separadamente)
Desconexión del conector AV-BUS(Fig. 16)
Cuando desconecte un conector AV-BUS, agárrelo firmemente enambos los lados y tire. Esto soltará elconector, permitiendo su desconexión.
Conexión del cable de alimentación (Fig. 17)
1. Esta unidad2. Portafusible3. Amarillo
Al terminal con suministro constante de elec-tricidad, independientemente de la posicióndel interruptor de encendido.
4. Resistencia de fusible5. Rojo
(Conecte este cable sólo cuando se utilice launidad en modo STAND ALONE.)Al terminal de energía eléctrica controladopor el interruptor de encendido del vehículo(12 V de CC.) ON/OFF.
6. Negro (masa)A la carrocería del vehículo (parte metálica).
7. Método de conexión8. Apriete el cable.9. Apriete firmemente con alicates de punta de
aguja.10.Nota:• La posición del freno de estacionamiento
depende del modelo del vehículo. Para cono-cer detalles, consulte el manual del propi-etario del vehículo o a su concesionario.
11.Verde claroSe utiliza para detectar el estado ON/OFF delfreno de mano. Este cable debe conectarse allado de alimentación del interruptor del frenode mano.
12.Lado de alimentación13.Lado de masa14.Interruptor del freno de mano
Conexión a la antena de TV (Fig. 18)
7 Cuando se conecta la antena de TV (suministrado)
1. Esta unidad2. Antena de TV (suministrado) 3. Entradas de antena de TV
Conecte desde 1 en orden.4. Portafusible5. Rojo 6. Al terminal de energía eléctrica controlado por
el interruptor de encendido del vehículo (12 Vde CC.) ON/OFF.
7. Negro (masa)8. A la carrocería del vehículo (parte metálica).
Conexión de presentación visualtrasera (Fig. 19)
Nota:• La salida a la presentación visual trasera de este
producto está encendida (en ON) cuando la fuentede la unidad principal está en TV.Si la fuente de la unidad principal es diferente aTV o la unidad principal está en OFF, pulse elbotón POWER del mando a distancia propor-cionado para poder utilizar la TV independiente-mente para la presentación visual trasera.
• La salida de audio trasera de este producto esmonofónica.
1. Esta unidad2. Salida de vídeo RCA (amarilla)3. Salida de audio RCA (blanca, roja)4. Cables RCA (vendidos separadamente)5. A las entradas de audio6. A las entradas de vídeo7. Presentación visual con tomas de entrada RCA
Nota:• Esta unidad es para vehículos con una batería de
12 voltios y masa negativa. Antes de montarlo enun autobús, camión o vehículo de recreación,compruebe el voltaje de la batería.
• Para evitar cortocircuitos en el sistema eléctrico,cerciórese de desconectar el cable de batería ≠antes de comenzar la instalación.
• Para los detalles sobre la conexión a otrasunidades, refiérase al manual del propietario yluego haga las conexiones correctamente.
• Asegure el cableado con grapas de cable o cintaaisladora. Para proteger el cableado, envuelva concinta aisladora alrededor del cableado en las partesen donde se apoya contra las partes metálicas.
• Pase y asegure todo el cableado de modo que notoque ninguna de la partes móviles, tales comoengranaje de cambio, freno de mano y carriles delasiento. No pase el cableado por lugares que secalientan, tales como cerca una salida del calefactor.Si la aislación del cableado se derrite o se rompe,existe el peligro de que el cableado se ponga encortocircuito con la carrocería del vehículo.
• No pase el conductor amarillo a través de un orifi-cio en el compartimiento del motor para conectara la batería. Esto dañará el material aislante delconductor y causará un cortocircuito peligroso.
• No ponga en cortocircuito ninguno de los conduc-tores. Si lo hace, el circuito de protección fallaráen el momento que deba funcionar.
• No alimente otro equipo cortando la aislación delconductor de suministro de alimentación de launidad y enrrollando en el conductor. La capaci-dad actual del conductor será excedida, ocasion-ando sobrecalentamiento.
• En el reemplazo del fusible, asegúrese de usarsólo el fusible del régimen prescrito en el porta-fusible.
• Para evitar una conexión incorrecta, el lado deentrada del conector IP-BUS es azul, y el lado desalida es negro. Conecte los conectores de losmismos colores correctamente.
• Para minimizar el ruido ubique el cable de la ante-na de TV, el cable de la antena de radio y cableRCA tan alejados como sea posible uno de otro.
Diagrama de conexión
7 En el uso de esta unidad en el modo“SRC : OSD OFF” (Fig. 13)
1. Cable AV-BUS (suministrado)2. Receptor de AV (ej. AVH-P5750DVD)
(vendido separadamente)3. Amarillo4. Negro5. Procesador de dinámica de vehículo (ej. AVG-
VDP1) (vendido separadamente)6. Azul7. Cable de 26 clavijas
(suministrado con el Procesador de dinámica devehículo)
8. Cable IP-BUS (suministrado)9. A la salida de video
10. Cable RCA (vendido separadamente)11. Esta unidad12. Visualizador (e.g. AVD-W8000) (vendido sepa-
radamente)13. Cable IP-BUS (vendido separadamente)14. A la entrada de video 1 15. A la entrada de video 2 16. Blanco/Rojo17. Cable RCA (suministrado con reproductor de
DVD)18. Reproductor de DVD (e.g. XDV-P9— (vendido
separadamente)19. Reproductor Multi-CD (vendido separadamente)20. Use el cable AV-BUS (50 cm) si fuera necesario.
7 En el uso de esta unidad en el modo“SRC: OSD ON” (Fig. 14)
1. Azul2. Entrada AV-BUS 3. Unidad de cabeza de Pioneer (vendida separada-
mente)4. Visualizador del sistema AV (ej. AVX-P7650)
(vendido separadamente)5. Cable AV-BUS (suministrado)6. Negro7. Entrada IP-BUS8. Esta unidad9. Cable IP-BUS (suministrado)
• Los cables para esta unidad y aquéllas paralas unidades pueden ser de colores diferentesaun si tienen la misma función. En laconexión de este producto a otro, refiérase alos manuales suministrados de ambosproductos y conecte los cordones que tienenla misma función.
Conexion de las unidades <ESPAÑOL>


![· Web view– ceturtdaļviļņa vertikālā antena [“ground plane” tipa antena], – antena ar parazītelementiem [jagi],](https://static.fdocuments.net/doc/165x107/5aae6cbd7f8b9adb688c5507/view-ceturtdalvilna-vertikala-antena-ground-plane-tipa-antena-.jpg)


