Installation Manual INMARSAT MINI-C MES FELCOM19 · All brand and ... Installation Manual INMARSAT...
44
www.furuno.com All brand and product names are trademarks, registered trademarks or service marks of their respective holders. Installation Manual INMARSAT MINI-C MES FELCOM19 SAFETY INSTRUCTIONS ................................................................................................ i SYSTEM CONFIGURATION ........................................................................................... ii EQUIPMENT LISTS........................................................................................................ iii 1. MOUNTING.............................................................................................................. 1-1 1.1 Antenna Unit ...................................................................................................................... 1-1 1.2 Communication Unit........................................................................................................... 1-2 1.3 Junction Box IC-318........................................................................................................... 1-3 1.4 AC/DC Power Supply Unit PR-240 (option) ....................................................................... 1-4 2. WIRING .................................................................................................................... 2-1 2.1 Antenna Cable Connector at the Communication Unit ...................................................... 2-2 2.2 Junction Box IC-318........................................................................................................... 2-5 3. INITIAL SETTINGS.................................................................................................. 3-1 3.1 How to Install Software ...................................................................................................... 3-1 3.2 How to Set the IMN (INMARSAT MOBILE NO.) ................................................................ 3-3 3.3 How to Select Position-fixing Equipment ........................................................................... 3-4 3.4 PC Window Setup .............................................................................................................. 3-5 4. HOW TO INSTALL OPTIONAL EQUIPMENT ........................................................ 4-1 4.1 IPX2 Kit OP16-58 (cables)/Waterproofing Kit OP16-60 (for IC-318) ................................. 4-1 4.2 Waterproofing Kit OP16-61 (for IC-219) ............................................................................ 4-2 4.3 Waterproofing Kit OP16-68 (for IC-307) ............................................................................ 4-4 5. HOW TO CHANGE POWER SUPPLY SPECIFICATIONS..................................... 5-1 APPENDIX 1 JIS CABLE GUIDE ............................................................................. AP-1 PACKING LISTS ......................................................................................................... A-1 OUTLINE DRAWINGS ................................................................................................ D-1 INTERCONNECTION DIAGRAM ................................................................................ S-1
Transcript of Installation Manual INMARSAT MINI-C MES FELCOM19 · All brand and ... Installation Manual INMARSAT...

www.furuno.com
All brand and product names are trademarks, registered trademarks or service marks of their respective holders.
Installation Manual
INMARSAT MINI-C MES
FELCOM19
SAFETY INSTRUCTIONS ................................................................................................ i
SYSTEM CONFIGURATION ........................................................................................... ii
EQUIPMENT LISTS........................................................................................................ iii
1. MOUNTING..............................................................................................................1-11.1 Antenna Unit ......................................................................................................................1-1
1.2 Communication Unit...........................................................................................................1-2
1.3 Junction Box IC-318...........................................................................................................1-3
1.4 AC/DC Power Supply Unit PR-240 (option).......................................................................1-4
2. WIRING....................................................................................................................2-12.1 Antenna Cable Connector at the Communication Unit ......................................................2-2
2.2 Junction Box IC-318...........................................................................................................2-5
3. INITIAL SETTINGS..................................................................................................3-13.1 How to Install Software ......................................................................................................3-1
3.2 How to Set the IMN (INMARSAT MOBILE NO.)................................................................3-3
3.3 How to Select Position-fixing Equipment ...........................................................................3-4
3.4 PC Window Setup..............................................................................................................3-5
4. HOW TO INSTALL OPTIONAL EQUIPMENT ........................................................4-14.1 IPX2 Kit OP16-58 (cables)/Waterproofing Kit OP16-60 (for IC-318) .................................4-1
4.2 Waterproofing Kit OP16-61 (for IC-219) ............................................................................4-2
4.3 Waterproofing Kit OP16-68 (for IC-307) ............................................................................4-4
5. HOW TO CHANGE POWER SUPPLY SPECIFICATIONS.....................................5-1
APPENDIX 1 JIS CABLE GUIDE .............................................................................AP-1
PACKING LISTS ......................................................................................................... A-1
OUTLINE DRAWINGS ................................................................................................ D-1
INTERCONNECTION DIAGRAM ................................................................................ S-1

*00017651710**00017651710**00017651710**00017651710*

i
SAFETY INSTRUCTIONS
Standard Steering
Antenna Unit IC-119
Communication Unit IC-219
AC/DC Power Supply Unit PR-240
Do not open the equipment unless totally familiar with electrical circuits and service manual.
Only qualified personnel should work inside the equipment.
Turn off the power at the mains switchboard before beginning the installation. Post a sign near the switch to indicate it should not be turned on while the equip-ment is being installed.
Fire, electrical shock or serious injury can result if the power is left on or is applied while the eqiuipment is being installed.
ELECTRICAL SHOCK HAZARD
0.30 m 0.30 m
0.30 m 0.30 m
Do not approach the radome closer than 0.5 m when it is transmitting.
Microwave radiation can cause severe injury or illness. Radiation level: 10 W/m
2 at 0.5 m
0.90 m 0.60 m
WARNING CAUTION
Junction Box IC-318
SSAS Alert Unit IC-307
0.90 m 0.60 m
0.70 m 0.45 m
Ground the equipment to preventelectrical shock and mutualinterface.
Use the correct fuse.
Confirm that the power supply voltage is compatible with the voltage rating of the equipment.
Connection to the wrong power supply can cause fire or equipment damage. The voltage rating appears on the label at the rear of the terminal unit.
Use of wrong fuse can result in damage to the equipment.
Keep the following compass safe distances.

ii
SYSTEM CONFIGURATION
Antenna Unit Exposed to Weather
Communication Unit Protected from Weather
Other Units Protected from Weather
PERSONAL
COMPUTER
(PC/AT compatible)
ANTENNA
UNIT
IC-119
COMMUNICATION UNIT IC-219 (with internal GPS receiver)
POWER SUPPLY
100-115/200-230
1φ, 50/60 Hz
POWER SUPPLY
12-24 VDC
AC/DC Power Supply PR-240
PRINTER
JUNCTION BOX
IC-318
SSAS ALERT UNIT*
IC-307
SSAS ALERT UNIT*
IC-307
*: At least two SSAS Alert Units are required.
CATEGORY OF UNITS
(Max. 3 units)
Navigation Equipment
(GNSS)
POWER SUPPLY
24 VDC

iii
EQUIPMENT LISTS
Standard supply
Optional supply
Name Type Code No. Qty Remarks
Antenna Unit IC-119 - 1
Communication Unit IC-219 - 1
Junction Box IC-318 - 1 For SSAS only.
SSAS Alert Unit IC-307 - 2 For SSAS only.
Installation Materials CP16-02100 000-043-411 1 For Antenna Unit
CP16-05301 001-179-990 1 For Communication unit
CP16-05101 001-180-020 1 For Junction Box, SSAS only
Spare Parts SP16-01401 004-439-530 1 For Communication unit, fuses
Accessories FP16-02700 000-021-675 1 For Communication unit, CD-R
Name Type Code No. Qty Remarks
AC/DC Power
Supply Unit
PR-240 000-013-632 1
SSAS Alert Unit IC-307 - 1
Cable Assy. COSPEVVSBC 5PX0.2LF 000-560-452-10 1 5P, 10 m
COSPEVVSBC 5PX0.2LF 000-103-868-10 1 5P, 20 m
COSPEVVSBC 5PX0.2LF 000-103-869-10 1 5P, 30m
COSPEVVSBC 5PX0.2LF 000-132-829-10 1 5P, 40 m
COSPEVVSBC 5PX0.2LF 000-132-828-10 1 5P, 50 m
Junction Box IC-318 - 1
Antenna Unit IC-119 - 1
Antenna Mount-
ing KitCP16-03701 004-555-000 1
For IC-119
Antenna Bracket CP16-03702 001-016-260 1
Antenna Mount-
ing PipeCP16-03703 001-014-510 1
IP22 Kit OP16-58 001-180-070 1
Water Proof Kit OP16-61 001-180-110 1 For IC-219
OP16-68 001-189-400 1 For IC-307
Installation Mate-
rials
CP16-03610 000-043-647 1 w/pipe, 30 m
CP16-03620 000-043-648 w/pipe, 50 m
CP16-03630 000-043-649 w/pipe, 100 m
CP16-05020 000-016-923w/pipe, 30 m, for ar-
mored cable
CP16-03650 000-043-650 w/o pipe, 30 m
CP16-03660 000-043-651 w/o pipe, 50 m
CP16-03670 000-043-652 w/o pipe, 100 m
CP16-05030 000-016-924w/o pipe, 30 m, for ar-
mored cable

EQUIPMENT LISTS
iv
This page is intentionally left blank.

1-1
1. MOUNTING
1.1 Antenna Unit
1.1.1 Mounting location
Refer to IMO resolutions A663(16) and A.807(19), as amended.
• There should be no interfering object within the line-of sight to the satellite. Objects
within line-of sight to a satellite, for example, a mast may block transmission/recep-
tion. Mount the antenna unit as high as possible. This keeps it free of interfering ob-
jects and water spray. The location should be well away from a GPS antenna. A
GPS receiver may be interfered by the Inmarsat C wave.
• If Inmarsat ship earth stations other than C are installed, separate the Inmarsat an-
tenna at least 8 m.
• Separate the antenna unit from an S-band radar as follows:
• The allowable vibration level as specified by Inmarsat is as shown in the table be-
low.
Allowable vibration level
Frequency Level
2 to 10 Hz 2.54 mm Peak Amplitude
10 to 100 Hz 9.8 m/s2 Peak Acceleration
NOTICEDo not apply paint, anti-corrosive sealant or contact spray to
coating or plastic parts of the equipment.
Those items contain organic solvents that can damage coating and
plastic parts, especially plastic connectors.
HORIZONTAL LINE
Install above this line
PROHIBITED
ZONE1.5 m
5 m
15
2 m
S-band radar
INSTALLTION
ZONE
2 m

1. MOUNTING
1-2
• Avoid the location near tunnels and stacks; smoke and soot on the radome can low-
er signal level (leave 10 m or more in horizontal distance).
• Separate the antenna unit 5 m from HF, VHF of 27 MHz antenna.
1.1.2 Mounting
The antenna cable is available in lengths of 30 m, 50 m and 100 m (see table below).
To mount the antenna unit, a dedicated mounting pipe is necessary.
For how to mount the antenna, see the outline drawing at the end of this manual and
“Installation and Replacement of Antenna Unit”, included with the antenna unit.
1.2 Communication Unit
Select the following place to install the communication unit.
• The temperature and humidity should be moderate and stable.
• For maintenance and checking purposes, leave sufficient space at the sides and
rear of the unit and leave slack in cables.
Mounting
Use two self-tapping screws (4x40, supplied) to fix the communication unit. The unit
can be mounted on a bulkhead, a tabletop or on the underside of table. Use the fixing
holes at the top for bulkhead mounting, or the fixing holes at the bottom for tabletop
mounting or underside of a table.
After mounting the unit, cover the screw heads with the cosmetic caps (2 pcs, sup-
plied) to fixing hole to cover the screw head. Note that the rear panel should be down-
ward when the communication unit is mounted on the bulkhead.
Cable length Type Remarks
30 m (no armor) TP5FBAW-5DFB TNC connector at both ends
30 m (w/armor) 5D-FB-CV-NP N connector on one end (antenna side)
50 m (w/armor) 8D-FB-CV
100 m (w/armor) 12D-SFA-CV
Fixing hole
(two, φ 4.5)
Rear panel
(top view)
(front view)

1. MOUNTING
1-3
How to connect the LAN cable
Use two binding screws (pre-attached) and the LAN cover to connect the LAN cable
to the communication unit. Use the cable tie (supplied) to fix the cable.
1.3 Junction Box IC-318
The junction box IC-318 is connected to the communication unit by using the cable
assy 16S0344 (2 m, attached to the junction box). Install the junction box within 2 m
from the communication unit.
1. Remove four screws from the unit to separate the bottom chassis from the top
chassis.
2. Fix the bottom chassis to the mounting location with four self-tapping screws
(4x16, supplied).
3. Connect the cables referring to Chapter 2.
Junction box IC-318
LAN cover
Fix the cable here with a cable tie.

1. MOUNTING
1-4
1.4 AC/DC Power Supply Unit PR-240 (option)
Fix the unit on a table with four self-tapping screws.
AC/DC power supply unit

2-1
2. WIRING
Wiring of FELCOM19
Power supply12-24 VDC
Copper strap1.2 m
Ground wire
RW-4747
TP5FBAW-5DFB, 30 m
(No armor)
Connector at both ends
0.34 mFor cable w/armor
TNCP-NJ
Cable assyTPA5FB0.4NJ5FBA-5DFB0.4 m
LAN cable
PC
CAUTION
MJ-A3SPF0016-035
5D-FB-CV-NP, 30 m
8D-FB-CV, 50 m
12D-SFA-CV, 100 m
Connector at one end
Connector N-P-5DFB
N-P-12DSFA
N-P-8DFB
(supplied, local arrange)
This unit is shipped with a 10 A fuse, which
is for use with a 12 VDC power supply. For
24 VDC power, replace the fuse with a 5A
fuse.
Attach the label for 5 A to the fuse cover on
the power cable.
Use of wrong fuse can result in damage to
the equipment.

2. WIRING
2-2
2.1 Antenna Cable Connector at the Communication Unit
5D-FB-CV-NP (30 m)
How to fabricate antenna cable 5D-FB-CV-NP
30
Cover with heat-shrink tubing and heat.
Outer Sheath
Armor
15
Nut
GasketClamp
Inner Sheath
Braided Shield
5
Washer
50
Cut braided shield here.
3.5
InsulatorCore
Center Pin
Solder here.
Ring
Insulator Ring
Shell
Nut
Remove the outer sheath, armor and inner-
sheath by the dimensions shown.
Set the nut, washer, gasket, clamp onto
cable as shown.
- Be careful not to damage the braided
shield.
Fold back the braided shield onto the clamp
and trim the shield as shown.
Make the length of insulator 3.5 mm and the
length of the core 5 mm.
- Be careful not to damage the core.
Set the center pin to the core and solder the
pin from the hole in the pin.
(Pull the pin with approx. 1 kg of force to
check strength of solder joint.)
- Be sure the solder is flush with surface of
pin.
- Be sure there is no gap between center
pin and insulator. Do not push the center pin
into the insulator.
- Do the soldering as quickly as possible so
as not to deform the insulator.
Set the ring and insulator ring onto the
cable.
Set the shell to the cable then turn the nut to
tighten. (Do not tighten by turning shell.) -
Use a wrench or the like to tighten the nut
securely.

2. WIRING
2-3
8D-FB-CV (50 m)
How to fabricate antenna cable 8D-FB-CV
Outer Sheath
Armor Shield
Dimensions in millimeters.
50 30
Cover with heat-shrink tubing and heat.
30 10
Clamp Nut
Gasket (reddish brown)
Clamp
Trim shield here.
Aluminum Foil
Insulator
Trim aluminum tape foil here.
1
5
Pin
ShellClamp Nut
Solder through the hole.
Remove outer sheath and armor by the
dimensions shown left.
Expose inner sheath and shield by the
dimensions shown left.
Remove insulator and core by 10 mm.
Twist shield end.
Slip on clamp nut, gasket and clamp as shown
left.
Fold back shield over clamp and trim.
Cut aluminum foil at four places, 90 from one
another.
Fold back aluminum tape foil onto shield and trim.
Expose the insulator by 1 mm.
Expose the insulator by 5 mm.
Slip the pin onto the conductor. Solder them
together through the hole on the pin.
Insert the pin into the shell. Screw the
clamp nut into the shell.
(Tighten by turning the clamp nut. Do not
tighten by turning the shell.)
Inner Sheath

2. WIRING
2-4
12D-SFA-CV (100 m)
How to fabricate antenna cable 12D-SFA-CV
Outer Sheath
Armor Inner Sheath Shield
Dimensions in millimeters.
80 12
Nut
Washer
Gasket Clamp
1.8
4.5
Clamp Nut
Pin
Solder through the hole.
Remove outer sheath and armor by the
dimensions shown left.
Expose inner sheath and shield by the
dimensions shown left.
Twist shield end.
Slip on clamp nut, gasket and clamp as shown left.
Expose the insulator by 1.8 mm.
Expose the core by 4.5 mm.
Slip the pin onto the conductor. Solder them
together through the hole on the pin.
Insert the pin into the shell. Screw the clamp
nut into the shell.
(Tighten by turning the clamp nut. Do not
tighten by turning the shell.)
30
Cover with heat-shrink tubing and heat.

2. WIRING
2-5
2.2 Junction Box IC-318
Use the junction box IC-318 to connect the distress alert/received call unit IC-305 and
other units (max. four units) to the communication unit. Unfasten four screws to re-
move the units cover to connect cables.
For connection, use the optional 5 pair cable CO-SPEVV-SB-C 0.2x5P, JIS cable (Ja-
pan Industrial Standard) TTYCS-4(LA) or equivalent.
Input/output sentences
The following sentences can be input/output with the navigator connected.
Input sentences
BWC, BWR, DBT, DTM, GGA, GLL, GNS, GSA, MTW, RMA, RMB, RMC,
VDO, VDR, VTG, WPL, ZDA
Cover
Terminal board
Procedure
1. Insert from direction 1 .
2. Tilt slightly toward 2 .
3. Insert cable core to 3 .
Core 7 mm
12
3
Vcc
GND
TD/RD-A
TD/RD-B
NC
ALM-H
RD-A(NAV)
RD-B(NAV)
GND
SSAS OUT-H
SSAS OUT-C
SSAS IN-H
SSAS IN-C
SSAS CTRIC
-305/3
061
2
3
4
5
6
7
8
9
10
11
12
13
14
15
Cable clamp
4. Pull out the screwdriver.
Note 1: Do not insert the wire deeply, to
prevent pinching its sheath.
Note 2: Pull the wire slightly to confirm
that it is in the slot correctly.
Sticker for
connection of
other equipment
ALM-C
For TTYCSLA cable, use the screws
and crimp-on lugs shown below to
connect the drain wire of that cable.
Screws and crimp-on lugs
(supplied in the IC-318)
IC-318, inside view
Fold back
15 mm 90 mm 7 mm

2. WIRING
2-6
This page is intentionally left blank.

3-1
3. INITIAL SETTINGS
This chapter shows you how to setup the equipment. Some procedures require entry
of job no. and password. Ask your dealer.
3.1 How to Install Software
After installing the equipment, install the FELCOM19 software (F19PC) in the PC as
follows:
1. Turn on the PC.
2. Set the CD-ROM in CD drive.
3. Click the icon of “SETUP.EXE” in the CD-ROM. The setup procedure begins,
showing the welcome dialog box.
4. Click the Next button.

3. INITIAL SETTINGS
3-2
5. Enter your name and organization.
6. Click the Next button.
7. Click the Install button and the installation begins. When the installation is com-
pleted, the FELCOM19 dialog box appears.

3. INITIAL SETTINGS
3-3
8. Click the Next button.
9. Click the Finish button. The FELCOM 19 PC application shortcut is created on
the desktop.
Note: To uninstall the F19 application from the PC, see the operator’s manual.
3.2 How to Set the IMN (INMARSAT MOBILE NO.)
Set your IMN (Inmarsat Mobile No.) using the PC as below.
1. Power on the communication unit and PC in order.
2. Double click [F19PC] on the screen to start the program.
3. Press the function key F8 to show the [Setup] menu.
4. Press 2 key to display the [System Setup] menu.
Setup
File Edit Transmit EGC Reports Logs Options Setup Distress StopAlarm
1. System Setup
2. Editor Setup
3. Terminal Setup
4. EGC Setup
5. Auto Mode Setup
6. E-Mail Setup
7. Directories
8. Configuration
Setup
System Setup
01:53 12-01-31 (YY-MM-DD)
INMARSAT-C
OFF
INT
INT
INT
System Date & Time
IMN
MES Operation Mode
Nav Port
Active Port
Message Output Port
EGC Output Port
Network Setup
Command Window

3. INITIAL SETTINGS
3-4
5. Confirm that the [IMN] is selected, and then press the Enter key.
An input box appears.
6. Key in your IMN.
7. Press the Enter key.
8. Press the Esc key to erase the input box.
9. Press the Enter key.
To clear the IMN, select IMN, then press I, M, N while pressing the Alt key. When us-
ing the FELCOM19 for VMS (Vessel Monitoring System), DNID (Data Network ID) has
to be downloaded via the LES (Land Earth Station). This arrangement is normally
done by authority of VMS.
3.3 How to Select Position-fixing Equipment
Select the position-fixing equipment that is to feed navigation data to the FELCOM.
1. Press the F8 and 1 keys to show the [System Setup] menu.
2. Select [Nav Port] then press the Enter key.
3. Select the navigator connected to the FELCOM then press the Enter key.
OFF: No navigator connected.
Auto: If two or more navigators are connected, the FELCOM automatically se-
lects the position sensor in the order of GPS and Loran C.
INT: Use the navigator that is built into the communication unit.
EXT: Use an external navigator.
4. Press the Esc key several times to close the menu.

3. INITIAL SETTINGS
3-5
3.4 PC Window Setup
The [Terminal Setup] menu provides for set up of the PC window. The set up includes
selection of date display format, screen saver and window colors.
1. Press the F8 and 3 keys to show the [Terminal Setup] menu.
2. Select [Detail] then press the Enter key to show the [Network Adapter List].
Note: The [Network Adapter List] shows the name of the LAN interface and the IP
address of the PC (terminals installed for the FELCOM system). The LAN inter-
faces have names to distinguish them from one another. The asterisk marks the
LAN interface currently selected for communication.
3. Select the LAN interface to use for communication then press the Enter key.
4. Select [Connection] then press the Enter key to show the [Connection List]. This
list shows the names of the terminals that can be connected to the LAN interface.
Note: The No., Name, IMN, IP address/subnet mask and software version of each
terminal are shown. The asterisk marks the terminal currently selected for
communication.
5. Select the terminal to use then press the Enter key.
6. Select [Date Disp. Form] then press the Enter key to open its options window.
7. Select [YY-MM-DD], [MMM-DD-YY] or [DD-MMM-YY] as appropriate then press
the Enter key.
8. Select [Screen Saver] then press the Enter key.
9. Turn the screensaver ON or OFF as appropriate then press the Enter key. When
enabled, the screensaver automatically starts 10 minutes after there is no key op-
eration. To release the screensaver, press any key.
Connnection
Detail Terminal Network Information
Eth0 172.31.16.100 /24
Date Disp. Form YY-MM-DD
Screen Saver OFF
Window Color
Terminal Setup
Name IP Address
*Eth0 172.31.16.100/24
Eth1 192.168.16.11/24
Eth2 - - -.- - -.- - -.- - -./- -
Eth3 - - -.- - -.- - -.- - -./- -
Eth4 - - -.- - -.- - -.- - -./- -
Network Adapter List
No. Name IMN IP Address Software Version
*01 F19_123456 123432588 172.31.16.100/24 1650248-01
02 F19_133234 456789210 192.168.16.11/24 1650248-01
03
04
05
06
07
08
09
10
Connection List

3. INITIAL SETTINGS
3-6
10. Select [Window Color] then press the Enter key.
11. Set the window colors as follows:
1) [Select Preset] provides three preconfigured window color sets. Use one of
these sets, or continue this procedure to customize window colors.
2) Select [Window]. Use or key to select the window for which to select col-
or.
Base Window: Standby display
RCV Message Display: Receive message display
EGC Message Display: EGC message display
EDIT1 - EDIT2: Editor screens 1 and 2
Function: Menu
Sub Menu 1 - Sub Menu 4: Sub menus 1-4
Message: Status message
Window Color
Select Preset 1 2 3
Load Default
- - - - - - - - - - - - - - - - - - - - - - -Edit Color
Window [ Base Window ]
Fore Color [ L-WHITE ]
Back Color [ BLUE ]
- - - - - - - - - - - - - - - - - - - - - - -To Change: ENTER To Change Value:L<=>R

3. INITIAL SETTINGS
3-7
Preset
No.Window Fore Color Back Color
1 Base Window L-WHITE BLUE
RCV Message Display WHITE BLACK
EGC Message Display WHITE BLACK
EDIT 1 BLACK GREEN
EDIT 2 MAGENTA WHITE
Function BLACK CYAN
Sub Menu 1 BLACK WHITE
Sub Menu 2 BLUE WHITE
Sub Menu 3 L-WHITE BLACK
Sub Menu 4 WHITE BLACK
Message WHITE MAGENTA
2 Base Window BLACK L-WHITE
RCV Message Display BLACK WHITE
EGC Message Display BLACK WHITE
EDIT 1 BLACK WHITE
EDIT 2 BLACK L-CYAN
Function BLACK WHITE
Sub Menu 1 BLUE L-WHITE
Sub Menu 2 BLUE WHITE
Sub Menu 3 L-WHITE BLUE
Sub Menu 4 WHITE BLACK
Message L-WHITE BLUE
3 Base Window L-WHITE BLACK
RCV Message Display BLACK GRAY
EGC Message Display BLACK GRAY
EDIT 1 BLACK GRAY
EDIT 2 WHITE BLUE
Function L-WHITE BLACK
Sub Menu 1 L-CYAN BLACK
Sub Menu 2 L-GREEN BLACK
Sub Menu 3 L-MAGENTA BLACK
Sub Menu 4 WHITE BLACK
Message WHITE BLUE
3. INITIAL SETTINGS
3-8
3) Select [Fore Color].
4) Use or key to select a color.
5) Select [Back Color].
6) Use or key to select a color.
7) To select colors for other windows repeat steps 2)-6).
12. Press the Enter key to show the [Update] window.
13. [Yes] is selected; press the Enter key.
14. Press the Esc key several times to return to the standby display.
To restore all default color settings, select [Window Color] from the [Terminal Setup]
menu, select [Load Default], press the Enter key then press the Enter key again.
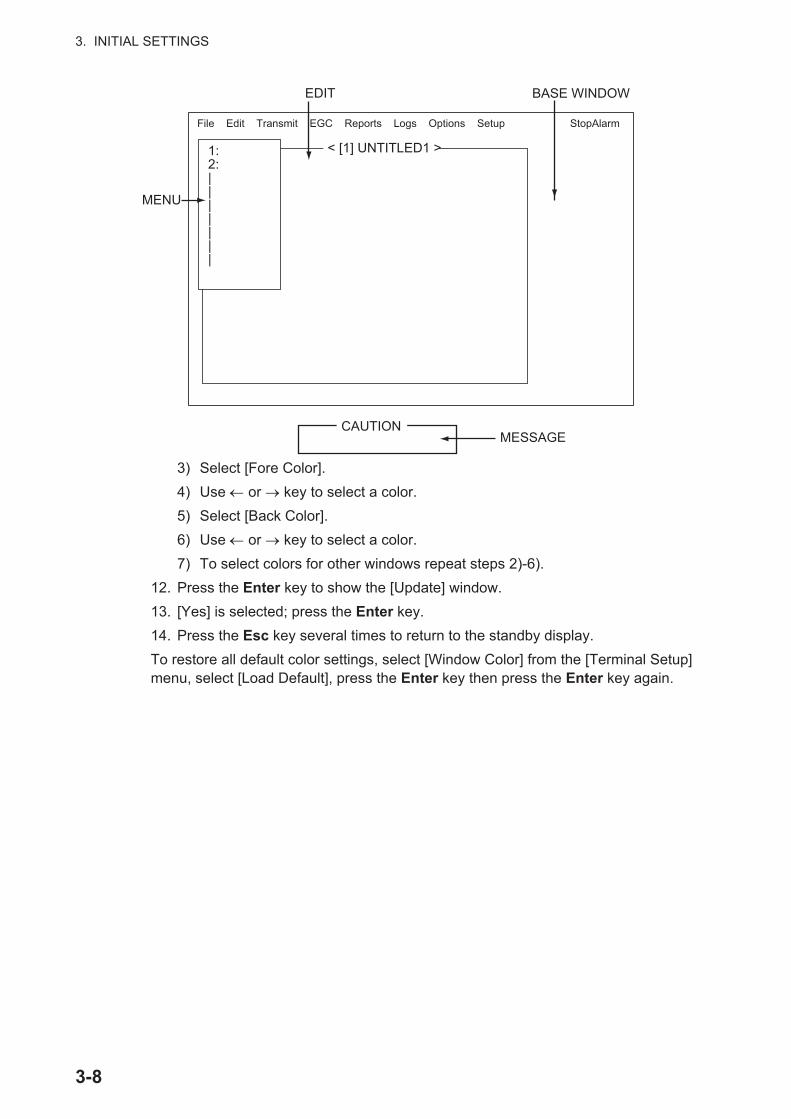
1:2:|||||||
MENU
< [1] UNTITLED1 >
EDIT BASE WINDOW
CAUTIONMESSAGE
File Edit Transmit EGC Reports Logs Options Setup StopAlarm

4-1
4. HOW TO INSTALL OPTIONAL EQUIPMENT
The optional waterproofing kits OP16-58 and OP16-61 are used to protect the con-
nectors on the communication unit from water splash. Note that these optional kits
should be used as a couple.
4.1 IPX2 Kit OP16-58 (cables)/Waterproofing Kit OP16-60 (for IC-318)
OP16-58
Connect the waterproofed D-sub cables to the rear of the communication unit, instead
of the standard supply cable.
OP16-58 (Code No.: 001-180-070)
OP16-60
To mount the IC-318 on a bulkhead, use the waterproofing kit to keep water splash
out of the unit. When the OP16-58 is used, replace the cable from the IC-318 with the
XM-FD-361 as shown on next page.
OP16-60 (Code No.: 001-180-090)
Name Type Code No. Qty Remarks
Cable Assy. H230817-1 001-176-552-10 1 Not used.
H230817-2 000-176-553-10 1 Not used.
XM-FD-361 000-176-551-10 1 For connection with IC-318
Name Type Code No. Qty
Cover gasket 16-023-5502 100-373-530-10 1
Grommet 16-023-5503 100-373-540-10 1

4. HOW TO INSTALL OPTIONAL EQUIPMENT
4-2
4.2 Waterproofing Kit OP16-61 (for IC-219)
Note: When the communication unit is mounted on a bulkhead, the rear panel (
the side with connectors) should be downward for waterproofing.
OP16-61 (Code No.: 001-180-110)
Name Type Code No. Qty
Binding Screw #4-4OUNCX3/16 000-176-619-10 2
Dsub Cover 16-023-4532 100-373-520-10 1
D-sub Gasket 16-023-4513 100-368-120-10 1
LAN Packing 2 16-023-4512 100-368-110-10 1
LAN Waterproof Plate 16-023-4531 100-368-180-10 1
Attach the grommet to this notch.
Cable assy.
XM-FD-361
Attach the cover gasket to here (reverse side).
Pan head screw
(M4x8, 2 pcs.)
# Color
1 Blue
2 Brown
3 Purple
4 Gray
5 -
6 Green
7 Yellow
8 Orange
9 Pink
10 Light-green
11 White (w/black dots)
12 White (w/red dots)
13 Black
14 Red
15 Light-blue

4. HOW TO INSTALL OPTIONAL EQUIPMENT
4-3
Cables connected
No cables connected
Peel the paper and attach the D-sub gasket
(supplied with OP16-61) to the communication
unit. Then, connect the waterproofing cable
XM-FD-361 (supplied with OP16-58)
to connect with the IC-318.
1. Unfasten two binding screws to detach
the LAN cover from the communication unit.
2. Peel the paper and attach the LAN packing 2
(supplied with OP16-61) to the communication unit.
3. Re-attach the LAN cover.
LAN cover
(16-023-4507)
LAN packing 2
(16-023-4512)
D-sub gasket
(16-023-4513)
LAN waterproof plate
(16-023-4531)
Dsub cover
(16-023-4532)
Use two binding screws
(pre-attached) to fasten the
LAN waterproof plate (supplied
with OP16-61).Peel the paper and attach the D-sub gasket (supplied with OP16-61) to the commu-nication unit. Then, fasten two binding screws (#4-4OUNCX3/16, supplied with OP16-61) to fix the Dsub cover (supplied with OP16-61).

4. HOW TO INSTALL OPTIONAL EQUIPMENT
4-4
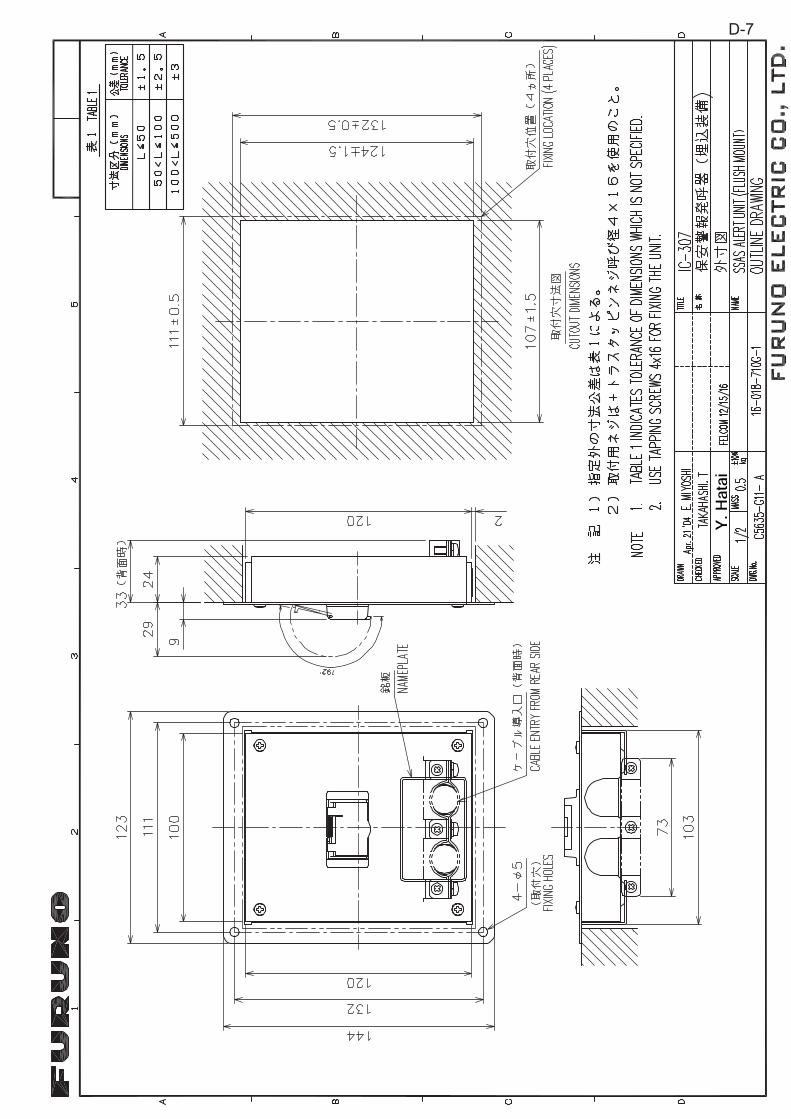
4.3 Waterproofing Kit OP16-68 (for IC-307)
Note: This kit cannot be used if the IC-307 is mounted face upward.
OP16-68 (Code No.: 001-189-400)
1. Unfasten four screws to remove the cover of IC-307.
2. Attach supplied fixing tape to the underside of the cover as shown in the illustra-
tion below.
3. Attach the cover.
4. Remove the paper from the waterproofing cover and attach the cover as shown in
the illustration below.
Name Type Code No. Qty
Water proofing Cover 16-023-5501 100-374-950-10 1
Fixing Tape 24-009-1225 100-368-200-10 2
Fixing tape
(IC-307)

5-1
5. HOW TO CHANGE POWER SUP-PLY SPECIFICATIONS
The AC-DC power supply PR-240 is shipped ready for connection to a 200-230 VAC
ship’s mains. If the ship’ mains is 100 VAC, change the tap connection and terminal
board connection as below. Attach a label supplied as accessories to the front panel
according to the ship’s mains.
Note: The DC output load must be less than 8 A.
Ship’s mains Tap connection Terminal board Label
200 to 230 VAC SEL 230 V Below (a) 200-230 VAC, 2.2-1.7 A,
1 50/60 Hz
100 to 115 VAC SEL 115 V Below (b) 100-115 VAC, 3.2-2.6 A,
1 50/60 Hz
Remove screw and cover.
Cover
12345678
SEL
115V
1
2
3
100-115 VAC
1
2
3
200-230 VAC(a)
(b)
Output Setting: Normal Close Set plug to 2 & 3 pins of J4 (Factory setting)
Normal Open Set plug to 1 & 2 pins of J4
AC Power Switch
(When connecting DC input, note that the DC power is
supplied even though this switch is turned off.)
Heat sink
Tap connection
(Pull out to disconnect.)
Front panel
Terminal board
Gray
Black
Gray
Black
Attach appropriate label.Front panel
Coil
Relay
321
J4
AC FAIL: Connect to Alarm system.
SEL
230V

AP-1
APPENDIX 1 JIS CABLE GUIDE
Core Cable Core Cable
Type Area Diameter Type Area Diameter
TTYCS-4
MPYC-5
TPYC
The following reference table lists gives the measurements of JIS cables commonly used with Furuno products:
Cables listed in the manual are usually shown as Japanese Industrial Standard (JIS). Use the following guide to locate an equivalent cable locally.
JIS cable names may have up to 6 alphabetical characters, followed by a dash and a numerical value (example: DPYC-2.5). For core types D and T, the numerical designation indicates the cross-sectional Area (mm2) of the core wire(s) in the cable. For core types M and TT, the numerical designation indicates the number of core wires in the cable.
1. Core Type 2. Insulation Type 3. Sheath Type
D Double core power line P Ethylene Propylene Y Vinyl
T Triple core power line
M 1 mm Multi core
TT 0.75mm twisted pair communications (1Q=quad cable)
4. Armor Type 5. Shielding Type 6. Core Sheath
C Steel Y Corrosive Resistant S All cores in one sheath
-S Individually sheathed cores
SLA
DPYC
Diameter Diameter
DPYC-1.5 1.5mm2 1.56mm 11.7mm
DPYC-2.5 2.5mm2 2.01mm 12.8mm
DPYC-4 4.0mm2 2.55mm 13.9mm
DPYC-6 6.0mm2 3.12mm 15.2mm
DPYC-10 10.0mm2 4.05mm 17.1mm
DPYC-16 16.0mm2 5.10mm 19.4mm
DPYCY-1.5 1.5mm2 1.56mm 13.7mm
DPYCY-2.5 2.5mm2 2.01mm 14.8mm
DPYCY-4 4.0mm 2.55mm 15.9mm
DPYCYSLA-1.5 1.5mm2 1.56mm 13.9mm
DPYCYSLA-2.5 2.5mm2 2.01mm 15.0mm
MPYC-2 1.0mm2 1.29mm 10.0mm
MPYC-4 1.0mm2 1.29mm 11.2mm
MPYC-7 1.0mm2 1.29mm 13.2mm
MPYCY-12 1.0mm2 1.29mm 19.0mm
MPYCY-19 1.0mm2 1.29mm 22.0mm
TTYC-7S 0.75mm2 1.11mm 20.8mm
TTYCSLA-1 0.75mm2 1.11mm 9.4mm
TTYCSLA-1Q 0.75mm2 1.11mm 10.8mm
TTYCSLA-4 0.75mm2 1.11mm 15.7mm
TTYCY-4S 0.75mm2 1.11mm 17.9mm
TTYCYS-1 0.75mm2 1.11mm 12.1mm
TTYCYS-4 0.75mm2 1.11mm 18.5mm
TPYCY-1.5 1.5mm2 1.56mm 14.5mm
TPYCY-2.5 2.5mm2 2.01mm 15.5mm
TPYCY-4 4.0mm2 2.55mm 16.9mm
TPYCYSLA-1.5 1.5mm2 1.56mm 13.9mm
EX: DPYCYS - 1.5 MPYC - 5Designation type Core Area (mm2) Designation type # of cores
1 2 3 4 5 6 1 2 3 4
-SLA Individually sheathed cores, plastic tube sheathw/aluminum tape
All cores in one sheath, plastic tube sheathw/aluminum tape
AP-1


17/May/2012 Y.NISHIYAMA
D-1

30/Apr/2012 Y.NISHIYAMA
D-2

30/Apr/2012 Y.NISHIYAMA
D-3

19/J
an/2
012
Y.N
ISHI
YAM
A
D-4

17/May/2012 Y.NISHIYAMA
D-5

6/Oct/2010 Y. NISHIYAMA
D-6
Y. Ha
tai
D-7

D-8

31/May/2012 Y.NISHIYAMA
D-9

S-1
31/M
ay/2
012
Y.N
ISHI
YAM
A