INSTALLATION INSTRUCTIONS with 400CW / T CURTAIN WALL · 2.Field verify DLO of installed curtain...
84
3056 Walker Ridge Dr. NW, Suite G · Walker, MI 49544 · 800-866-2227 OCTOBER 2019 www.tubeliteinc.com Page 1 LEADERS IN ECO-EFFICIENT STOREFRONT, CURTAINWALL AND ENTRANCE SYSTEMS ® 400 4-SIDE SSG CASSETTE INSTALLATION INSTRUCTIONS with 400CW / T CURTAIN WALL
Transcript of INSTALLATION INSTRUCTIONS with 400CW / T CURTAIN WALL · 2.Field verify DLO of installed curtain...
3056 Walker Ridge Dr. NW, Suite G · Walker, MI 49544 · 800-866-2227
OCTOBER 2019www.tubeliteinc.comPage
1
LEADERS IN ECO-EFFICIENT STOREFRONT,
CURTAINWALL AND ENTRANCE SYSTEMS
®
400 4-SIDE SSG CASSETTE
INSTALLATION INSTRUCTIONS
with 400CW / T CURTAIN WALL

B
L
A
N
K
www.tubeliteinc.comPage 2
LEADERS IN ECO-EFFICIENT STOREFRONT,
CURTAINWALL AND ENTRANCE SYSTEMS
®
OCTOBER 2019
400 4-SIDE SSG CASSETTE on 400CW / T INSTALLATION INSTRUCTIONS

TABLE OF CONTENTS
GENERAL CONSTRUCTION NOTES ..............................................................................................5 - 6
QUICK REFERENCE CHECKLIST ......................................................................................................6
ELEVATION and DETAILS...........................................................................................................7 - 14
FRAME EXTRUSIONS and ACCESSORIES.................................................................................15 - 18
SUPPORT FRAME (400T) BACK MEMBER PREP.......................................................................19 - 22
STANDARD CASSETTE FRAME
FRAME SIZE CALCULATOR......................................................................................................23
FRAME CUT SIZE CALCULATOR and FRAME END PREP......................................................24
CASSETTE GLASS SIZE CALCULATOR...................................................................................25
CASSETTE FRAME ASSEMBLY................................................................................................26
CASSETTE FRAME GLAZING............................................................................................27 - 28
CASSETTE FRAME - "Glass-to-Edge" HEAD & JAMB
FRAME SIZE CALCULATOR......................................................................................................29
FRAME CUT SIZE CALCULATOR and FRAME END PREP......................................................30
CASSETTE GLASS SIZE CALCULATOR...................................................................................31
CASSETTE FRAME ASSEMBLY................................................................................................32
CASSETTE FRAME GLAZING............................................................................................33 - 34
"Glass-to-Edge" HEAD & JAMB FRAME INSTALLATION SEQUENCE.....................................35
CASSETTE FRAME - "Glass-to-Edge" HEAD ONLY
FRAME SIZE CALCULATOR......................................................................................................36
FRAME CUT SIZE CALCULATOR and FRAME END PREP......................................................37
CASSETTE GLASS SIZE CALCULATOR...................................................................................38
CASSETTE FRAME ASSEMBLY................................................................................................39
CASSETTE FRAME GLAZING............................................................................................40 - 41
"Glass-to-Edge" HEAD FRAME INSTALLATION SEQUENCE...................................................42
CASSETTE FRAME - "Glass-to-Edge" SILL ONLY
FRAME SIZE CALCULATOR......................................................................................................43
FRAME CUT SIZE CALCULATOR and FRAME END PREP......................................................44
CASSETTE GLASS SIZE CALCULATOR...................................................................................45
CASSETTE FRAME ASSEMBLY................................................................................................46
CASSETTE FRAME GLAZING............................................................................................47 - 48
"Glass-to-Edge" SILL FRAME INSTALLATION SEQUENCE.....................................................49
www.tubeliteinc.comPage 3
LEADERS IN ECO-EFFICIENT STOREFRONT,
CURTAINWALL AND ENTRANCE SYSTEMS
®
OCTOBER 2019
400 4-SIDE SSG CASSETTE on 400CW / T INSTALLATION INSTRUCTIONS
CASSETTE FRAME - "Glass-to-Edge" SILL & JAMB
FRAME SIZE CALCULATOR......................................................................................................50
FRAME CUT SIZE CALCULATOR and FRAME END PREP......................................................51
CASSETTE GLASS SIZE CALCULATOR...................................................................................52
CASSETTE FRAME ASSEMBLY................................................................................................53
CASSETTE FRAME GLAZING............................................................................................54 - 55
"Glass-to-Edge" SILL & JAMB FRAME INSTALLATION SEQUENCE.......................................56
CASSETTE FRAME - "Glass-to-Edge" JAMB ONLY
FRAME SIZE CALCULATOR......................................................................................................57
FRAME CUT SIZE CALCULATOR and FRAME END PREP......................................................58
CASSETTE GLASS SIZE CALCULATOR...................................................................................59
CASSETTE FRAME ASSEMBLY................................................................................................60
CASSETTE FRAME GLAZING............................................................................................61 - 62
"Glass-to-Edge" JAMB FRAME INSTALLATION SEQUENCE...................................................63
OUTSIDE CORNER CASSETTE FRAME
FRAME SIZE CALCULATOR......................................................................................................64
FRAME CUT SIZE CALCULATOR and FRAME END PREP......................................................65
CASSETTE GLASS SIZE CALCULATOR...................................................................................66
CASSETTE FRAME ASSEMBLY................................................................................................67
CASSETTE FRAME GLAZING............................................................................................68 - 69
INSIDE CORNER CASSETTE FRAME
FRAME SIZE CALCULATOR......................................................................................................70
FRAME CUT SIZE CALCULATOR and FRAME END PREP......................................................71
CASSETTE GLASS SIZE CALCULATOR...................................................................................72
CASSETTE FRAME ASSEMBLY................................................................................................73
CASSETTE FRAME GLAZING............................................................................................74 - 75
INSIDE CORNER FRAME INSTALLATION SEQUENCE...........................................................76
STANDARD CASSETTE FRAME INSTALLATION SEQUENCE...................................................77 - 78
TYPICAL ANCHOR PATTERN - Adjacent Frames..............................................................................79
CASSETTE FRAME PERIMETER CLOSURE TRIM INSTALLATION (options 1 & 2)..................80 - 81
CASSETTE FRAME SEAL and PERIMETER SEAL INSTRUCTIONS.................................................82
CASSETTE FRAME to CAPTURED DETAIL INSTRUCTIONS............................................................83
CASSETTE DOOR FRAME PERIMETER DETAIL INSTRUCTIONS...................................................84
TABLE OF CONTENTS - continued
www.tubeliteinc.comPage 4
LEADERS IN ECO-EFFICIENT STOREFRONT,
CURTAINWALL AND ENTRANCE SYSTEMS
®
OCTOBER 2019
400 4-SIDE SSG CASSETTE on 400CW / T INSTALLATION INSTRUCTIONS
1. These instructions cover typical product application, fabrication, installation and standard conditions and are general in nature.
They provide useful guidelines, but the fnal shop drawings may include additional details specifc to the project. Any confict or
discrepancies must be clarifed prior to execution.
2. Materials stored at the job site must be kept in a safe place protected from possible damage by other trades Stack with
adequate separation so materials will not rub together and store off the ground. Cardboard or paper wrapped materials must be
kept dry. Check arriving materials for quantity and keep a record of where various materials are stored.
3. All field welding must be done in accordance with AISC guidelines. All aluminum and glass should be shielded from field
welding to avoid damage from weld splatter. Results will be unsightly and may be structurally unsound. Advise general
contractor and other trades accordingly.
4. Coordinate protection of installed work with general contractor and/or other trades.
5. Coordinate sequence of other trades which afect framing installation with the general contractor (e.g. fire proofing, back up
walls, partitions, ceilings, mechanical ducts, HVAC, etc.).
6. General contractor should furnish and guarantee bench marks, offset lines and opening dimensions. These items should be
checked for accuracy before proceeding with erection. Make certain that all adjacent substrate construction is in accordance
with the contract documents and/or approved shop drawings. If not, notify the general contractor in writing before proceeding
with installation because this could constitute acceptance of adjacent substrate construction by others.
7. Isolate all aluminum to be placed directly in contact with masonry or other incompatible materials with a heavy coat of zinc
chromate or bituminous paint. Fasteners attaching framing to building structure are typically not provided by Tubelite.
8. Sealant selection is the responsibility of the erector, installer and/or glazing contractor and must be approved by the sealant
manufacturer with regard to application and compatibility for its intended use. All sealants must be used in strict accordance with
the manufacturer’s instructions and applied only by trained personnel to surfaces that have been properly prepared.
9. Sealant must be compatible with all materials with which they have contact, including other sealant surfaces. Consult the
sealant manufacturer for recommendations relative to shelf life, compatibility, cleaning of substrate, priming, tooling adhesion,
etc. Recommend sealant manufacturer perform adhesion "pull test" at "wet" glazing for quality assurance.
10. Drainage gutters and weep holes must be kept clean at all times. Tubelite will not accept responsibility for improper drainage
as a result of clogged gutters and weep holes.
11. This product requires clearances at the head, sill and jambs to allow for thermal expansion and contraction as well as
construction tolerances. Refer to final distribution drawings for joint sizes. Joints smaller than 1/2 ” may be subject to
failure. Consult the sealant manufacturer for proper sizing of joints.
12. All framing members, entrances and other materials are to be installed plumb, level and true with regard to established
bench marks, column center lines or other working points established by the general contractor and checked by the erector,
installer and/or glazing contractor.
13. After sealant is set and a representative amount of the wall has been glazed (500 square feet or more), run a water hose test
to check installation. On large projects, a hose test should be repeated during glazing operation. This testing should be
conducted in accordance with AAMA 501.2 specifcations.
14. Cleaning of exposed aluminum surfaces should be done per AAMA recommendations.
15. Care must be taken when assembling aluminum framing components. Over tightening any fastener may cause stripping or
fastener failure. Tubelite recommends the use of drill motors with clutches engaged to provide satisfactory tightening of the
screw while preventing over torque. The use of impact drill motors is not recommended due to the absence of a clutch device.
16. Check www.tubeliteinc.com for any installation instruction updates.
GENERAL CONSTRUCTION NOTES
www.tubeliteinc.comPage 5
LEADERS IN ECO-EFFICIENT STOREFRONT,
CURTAINWALL AND ENTRANCE SYSTEMS
®
OCTOBER 2019
400 4-SIDE SSG CASSETTE on 400CW / T INSTALLATION INSTRUCTIONS
GENERAL CONSTRUCTION NOTES
400CW/T ASSEMBLY AND INSTALLATION
Refer to Tubelite, Inc website (tubeliteinc.com) for 400CW/T curtain wall installation instructions.
1. Make sure the opening is square and the perimeter from edge of frame to substrate is 1/2" minimum clearance.
2. Sealant at Horizontal to Vertical frame intersection is not required where Cassette framing will be installed.
3. Water dam installation is not required where Cassette framing will be installed.
4. Check anchor size and location against installation instructions or approved shop drawings.
QUICK REFERENCE CHECKLIST
1. Review slide-n-pivot jamb anchor installation: Pre-load in jamb framing prior to assemble OR mill slot in jamb framing to
install slide-n-pivot jamb anchor after cassette frame assembly.
2. Field verify DLO of installed curtain wall prior to cassette frame machining and assembly.
3. Each cassette type has its own sequence of pages for size determination to installation phase.
4. Cassette frames can be installed in vertical runs, horizontal runs or shingled. If spot frame installation is require then
head / jamb slide-n-pivot anchor clips must be used at sill also.
5. Sill / Head-Sill slide-n-pivot anchor design for "rollover" cassette installation.
6. Install P4216 PVC perimeter isolator prior to cassette frame installation.
7. Install P4209 gasket prior to cassette frame installation.
8. Install all Outside and Inside corner frame inserts prior to cassette frame installation.
9. Install inside corner cassette frame prior to installation of adjacent cassette frames.
NOTE: Refer to pages 80 -82 for perimeter trim closure installation. Option two requires vertical members to have
stem removed 1" from both ends head and sill. This will need to be completed prior to frame installation.
FRAME SIZE CALCULATION
Refer to individual cassette frame types for cassette frame size calculator
GLASS SIZE CALCULATION
Refer to individual cassette frame types for cassette glass size calculator
www.tubeliteinc.comPage 6
LEADERS IN ECO-EFFICIENT STOREFRONT,
CURTAINWALL AND ENTRANCE SYSTEMS
®
400 4-SIDE SSG CASSETTE on 400CW / T INSTALLATION INSTRUCTIONS
NOTE: Tubelite Inc is not responsible for glass to frame installation, approval of glass to frame installation or
materials used for glass to frame installation.
It is the glazing contractors responsibility to obtain approval from glass manufacturer for glass installation.
Finished sections of cassette framing may need to be sent to sealant manufacture for adhesion testing and
approval.
3M VHB TAPE APPLICATION GLAZING
Approved shop drawings showing frame sizes and frame installation, AND finished sections of the cassette framing are
required to be sent to 3M for review and approval prior to purchasing tape or glazing commences. Glazing contractor
will be required to be trained and certified by qualified 3M personnel prior to VHB tape application or glass installation.
(See 3M website for contact information)
OCTOBER 2019
17. For cold weather installation, glazing materials (including but not limited to glazing gaskets, isolators and gaskets for
air seals and expansion mullions) can become more rigid and thus more difficult to install. These materials should be
installed at temperatures above 40 degrees Fahrenheit for proper system performance and ease of installation. A hot box
may be required to warm the glazing materials prior to installation. Allow glazing materials to lay flat at 50 degrees Fahrenheit
minimum temperature prior to installing.
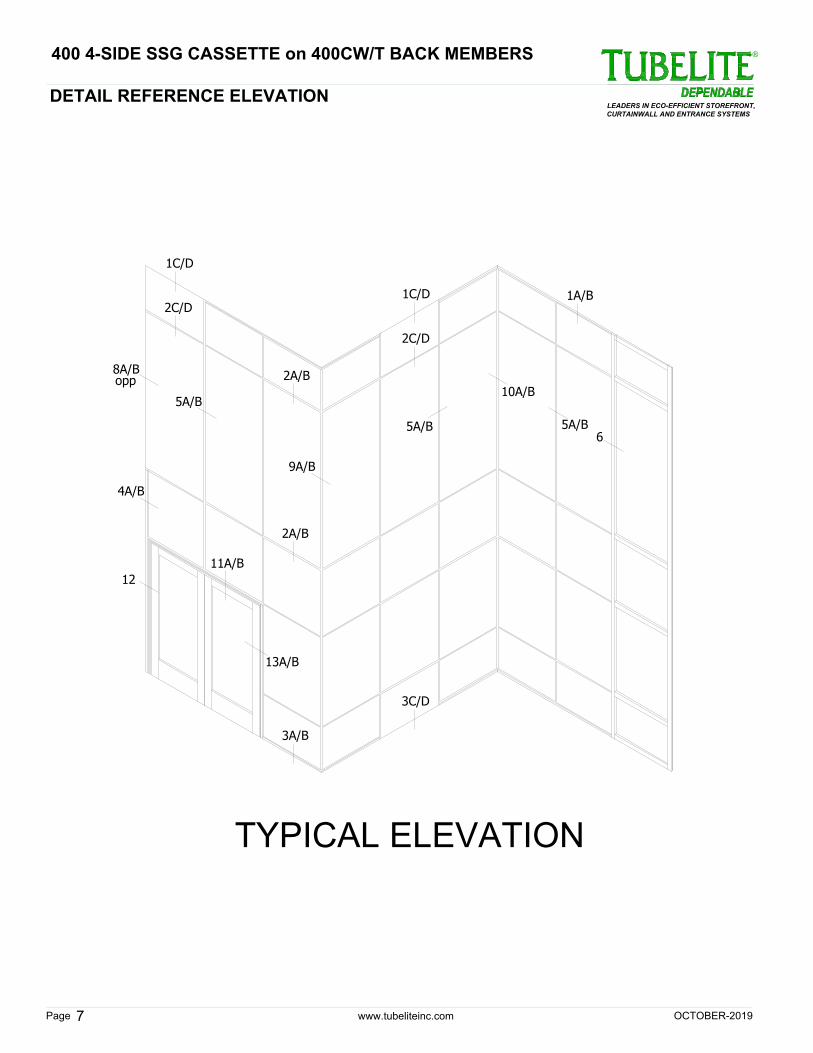
8A/B
4A/B
1C/D
1A/B
1C/D
2C/D
2A/B
TYPICAL ELEVATION
2C/D
2A/B
5A/B
9A/B
6
5A/B
10A/B
3C/D
5A/B
11A/B
12
13A/B
opp
DETAIL REFERENCE ELEVATION
www.tubeliteinc.comPage
LEADERS IN ECO-EFFICIENT STOREFRONT,
CURTAINWALL AND ENTRANCE SYSTEMS
®
OCTOBER-2019
7
400 4-SIDE SSG CASSETTE on 400CW/T BACK MEMBERS
3A/B
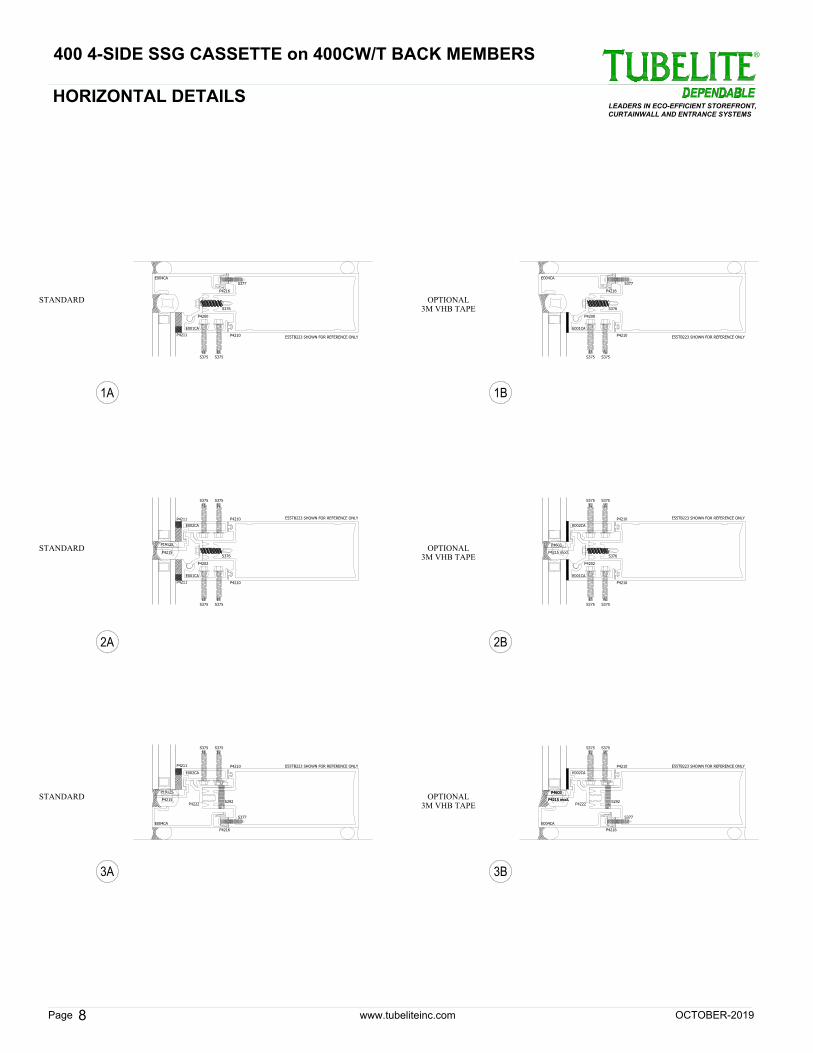
HORIZONTAL DETAILS
www.tubeliteinc.comPage
LEADERS IN ECO-EFFICIENT STOREFRONT,
CURTAINWALL AND ENTRANCE SYSTEMS
®
8
STANDARD
E55TB223 SHOWN FOR REFERENCE ONLY
E55TB223 SHOWN FOR REFERENCE ONLY
E55TB223 SHOWN FOR REFERENCE ONLY
OPTIONAL3M VHB TAPE
E55TB223 SHOWN FOR REFERENCE ONLY
E55TB223 SHOWN FOR REFERENCE ONLY
E55TB223 SHOWN FOR REFERENCE ONLY
P4603
P4215 mod.
P4603
P4215 mod.
E001CA
P4211
P4200
S376
S375 S375
P4210
P4216
S377
E004CA
E001CA
P4200
S376
S375 S375
P4210
P4216
S377
E004CA
E001CA
P4211
P4202
S376
S375 S375
P4210
P4211
S375 S375
P4210
P1912S
P4215
P4211
S375 S375
P4210
P1912S
P4215
P4216
S377
E004CA
E002CA
E002CA
E001CA
P4202
S376
P4210
S375 S375
P4210
E002CA
S375 S375
P4603
P4215 mod.
S375 S375
P4210
E002CA
P4216
S377
E004CA
STANDARD OPTIONAL3M VHB TAPE
STANDARD OPTIONAL3M VHB TAPE
1A 1B
2A 2B
3A 3B
S292
P4222
S292
P4222
OCTOBER-2019
400 4-SIDE SSG CASSETTE on 400CW/T BACK MEMBERS

HORIZONTAL DETAILS
www.tubeliteinc.comPage
LEADERS IN ECO-EFFICIENT STOREFRONT,
CURTAINWALL AND ENTRANCE SYSTEMS
®
9
E55TB223 SHOWN FOR REFERENCE ONLY
E55TB223 SHOWN FOR REFERENCE ONLY
E55TB223 SHOWN FOR REFERENCE ONLY
P4603
E55TB223 SHOWN FOR REFERENCE ONLY
E55TB223 SHOWN FOR REFERENCE ONLY
E55TB223 SHOWN FOR REFERENCE ONLY
P4603
P4603 mod.
E009CA
S375 S375
P4210
P4211
P4204
P4209
S376
E011CA
E009CA
S375 S375
P4210
P4204
P4209
S376
E011CA
E001CA
P4200
S376
P4210
S375 S375
P4210
E001CA
P4200
P4211
P4211
P1912S
P4217
S375 S375
E001CA
P4200
S376
P4210
S375 S375
P4210
E001CA
P4200
S375 S375
P4617
P4623
P4211
S376 S376
E010CA P4210
P4623
S376 S376
E010CA P4210
OPTIONALGLASS to EDGE
OPTIONALGLASS to EDGE3M VHB TAPE
OPTIONALGLASS to EDGE
OPTIONALGLASS to EDGE3M VHB TAPE
OPTIONALGLASS to EDGE
OPTIONALGLASS to EDGE3M VHB TAPE
P4212
1C 1D
2C 2D
3C 3D
S292
P4222
P4212
S292
P4222
OCTOBER-2019
400 4-SIDE SSG CASSETTE on 400CW/T BACK MEMBERS
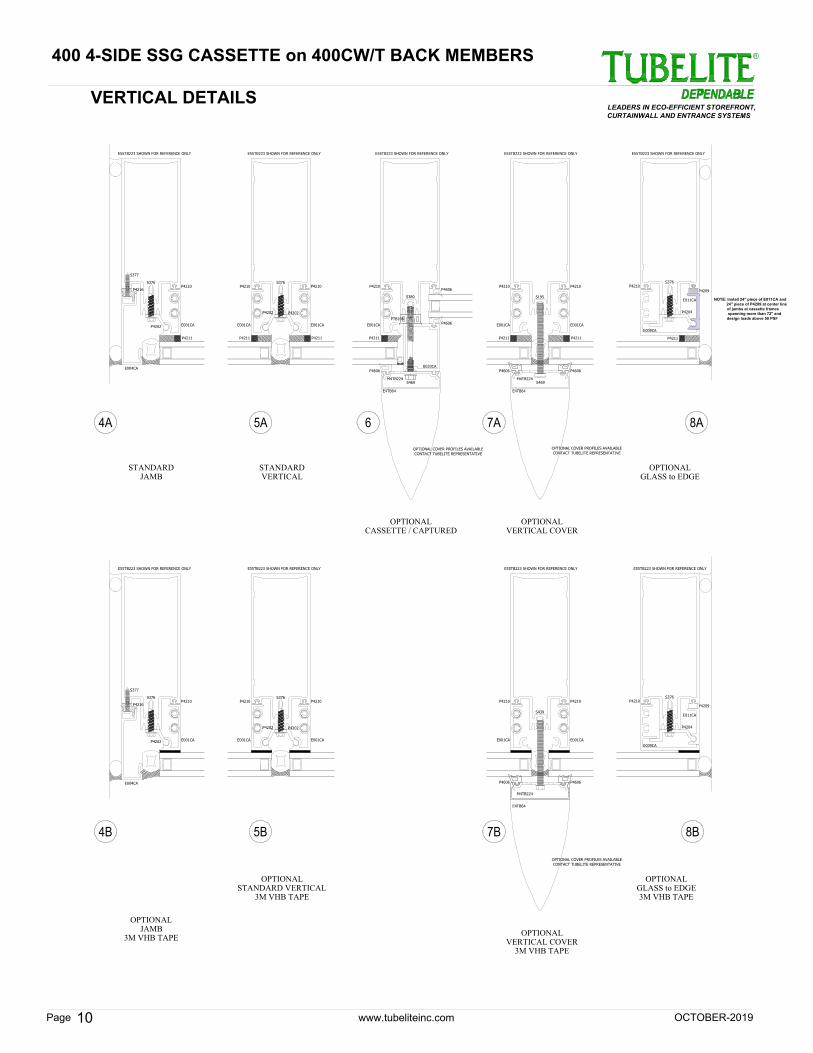
VERTICAL DETAILS
www.tubeliteinc.comPage
LEADERS IN ECO-EFFICIENT STOREFRONT,
CURTAINWALL AND ENTRANCE SYSTEMS
®
10
E55TB223 SHOWN FOR REFERENCE ONLY E55TB223 SHOWN FOR REFERENCE ONLY E55TB223 SHOWN FOR REFERENCE ONLY
S195
E55TB223 SHOWN FOR REFERENCE ONLY
E55TB223 SHOWN FOR REFERENCE ONLY E55TB223 SHOWN FOR REFERENCE ONLY
S439
E55TB223 SHOWN FOR REFERENCE ONLY
E55TB223 SHOWN FOR REFERENCE ONLY
E55TB223 SHOWN FOR REFERENCE ONLY
STANDARDJAMB
OPTIONALJAMB
3M VHB TAPE
P4216
S377
E004CA
E001CA
P4211
P4202
P4210
S376
P4216
S377
E004CA
E001CA
P4202
P4210
S376
E001CA
P4211
P4202
P4210
S376
P4210
E001CA
P4211
P4202
STANDARDVERTICAL
E001CA
P4211
P4210P4210
E001CA
P4211
S380
P4210
E001CA
P4211
P4606
P4606
PTB108
P4606
E033CA
E4TB64
M4TB224
S469
OPTIONAL COVER PROFILES AVAILABLE
CONTACT TUBELITE REPRESENTATIVE
OPTIONAL COVER PROFILES AVAILABLE
CONTACT TUBELITE REPRESENTATIVE
P4606
E4TB64
M4TB224
S469
P4606
OPTIONALCASSETTE / CAPTURED
OPTIONALVERTICAL COVER
OPTIONALGLASS to EDGE
P4204
P4209
S376
E011CA
E009CA
P4210
P4211
OPTIONALSTANDARD VERTICAL
3M VHB TAPE
OPTIONALVERTICAL COVER
3M VHB TAPE
OPTIONALGLASS to EDGE3M VHB TAPE
E001CA
P4210P4210
E001CA
P4606
E4TB64
M4TB224
P4606
E001CA
P4202
P4210
S376
P4210
E001CA
P4202
P4204
P4209
S376
E011CA
E009CA
P4210
OPTIONAL COVER PROFILES AVAILABLE
CONTACT TUBELITE REPRESENTATIVE
4A
4B
5A 6 7A 8A
5B 7B 8B
NOTE: Install 24" piece of E011CA and
24" piece of P4209 at center line
of jambs at cassette frames
spanning more than 72" and
design loads above 50 PSF
OCTOBER-2019
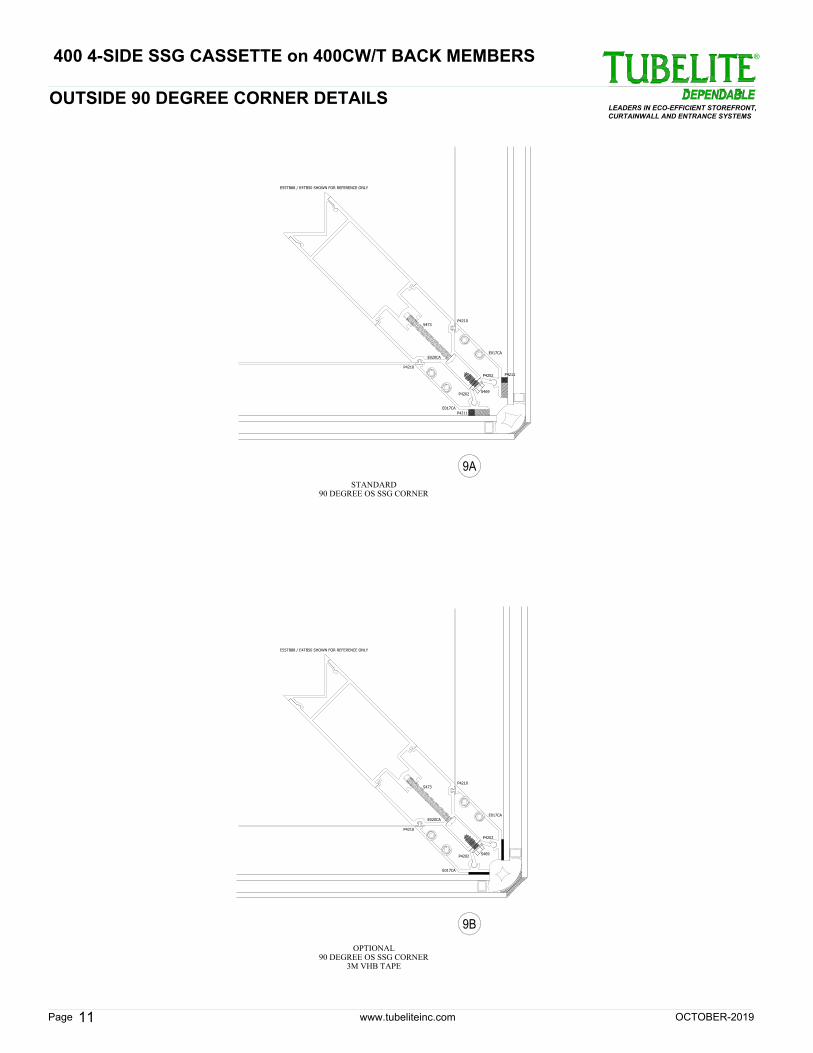
400 4-SIDE SSG CASSETTE on 400CW/T BACK MEMBERS
OUTSIDE 90 DEGREE CORNER DETAILS
www.tubeliteinc.comPage
LEADERS IN ECO-EFFICIENT STOREFRONT,
CURTAINWALL AND ENTRANCE SYSTEMS
®
11
E55TB88 / E4TB50 SHOWN FOR REFERENCE ONLY
STANDARD90 DEGREE OS SSG CORNER
OPTIONAL90 DEGREE OS SSG CORNER
3M VHB TAPE
S473
E020CA
P4202
P4210
P4210
P4202
S469
E017CA
E017CA
P4211
P4211
S473
E020CA
P4202
P4210
P4210
P4202
S469
E017CA
E017CA
E55TB88 / E4TB50 SHOWN FOR REFERENCE ONLY
9A
9B
OCTOBER-2019
400 4-SIDE SSG CASSETTE on 400CW/T BACK MEMBERS
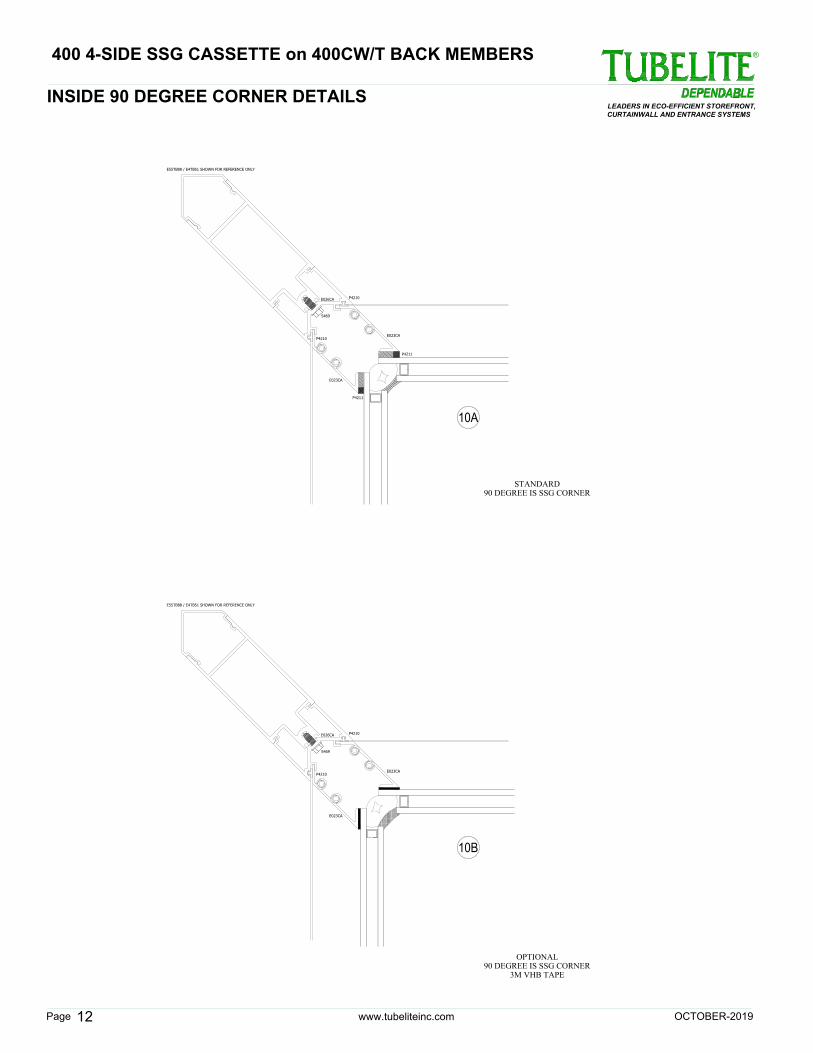
INSIDE 90 DEGREE CORNER DETAILS
www.tubeliteinc.comPage
LEADERS IN ECO-EFFICIENT STOREFRONT,
CURTAINWALL AND ENTRANCE SYSTEMS
®
12
STANDARD90 DEGREE IS SSG CORNER
OPTIONAL90 DEGREE IS SSG CORNER
3M VHB TAPE
S469
P4210
P4210
E023CA
E023CA
P4211
P4211
E026CA
S469
P4210
P4210
E023CA
E023CA
E026CA
E55TB88 / E4TB51 SHOWN FOR REFERENCE ONLY
E55TB88 / E4TB51 SHOWN FOR REFERENCE ONLY
10A
10B
OCTOBER-2019
400 4-SIDE SSG CASSETTE on 400CW/T BACK MEMBERS
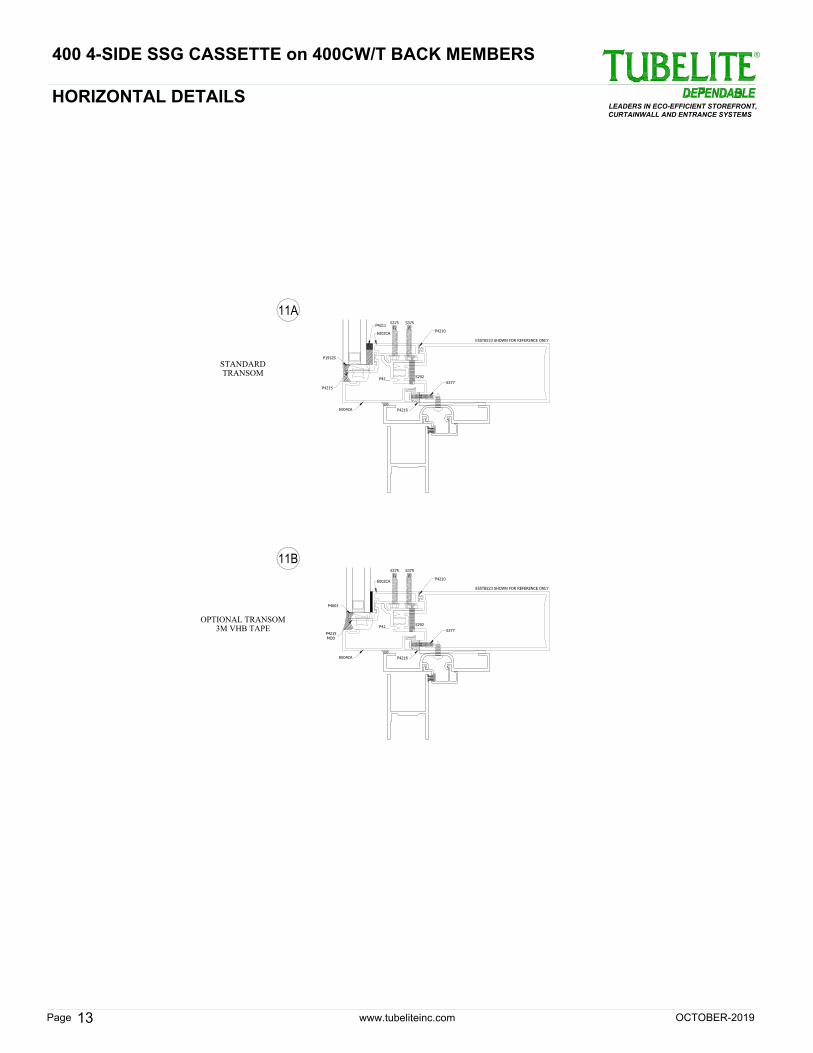
HORIZONTAL DETAILS
www.tubeliteinc.comPage
LEADERS IN ECO-EFFICIENT STOREFRONT,
CURTAINWALL AND ENTRANCE SYSTEMS
®
13
E55TB223 SHOWN FOR REFERENCE ONLY
E55TB223 SHOWN FOR REFERENCE ONLY
S375 S375
STANDARDTRANSOM
OPTIONAL TRANSOM3M VHB TAPE
S375 S375
P4216
E004CA
S377
P4215
P4210
P4211
E002CA
P1912S
P4216
E004CA
S377
P4215
MOD
P4210
E002CA
P4603
11A
11B
S292
P42__
S292
P42__
OCTOBER-2019
400 4-SIDE SSG CASSETTE on 400CW/T BACK MEMBERS
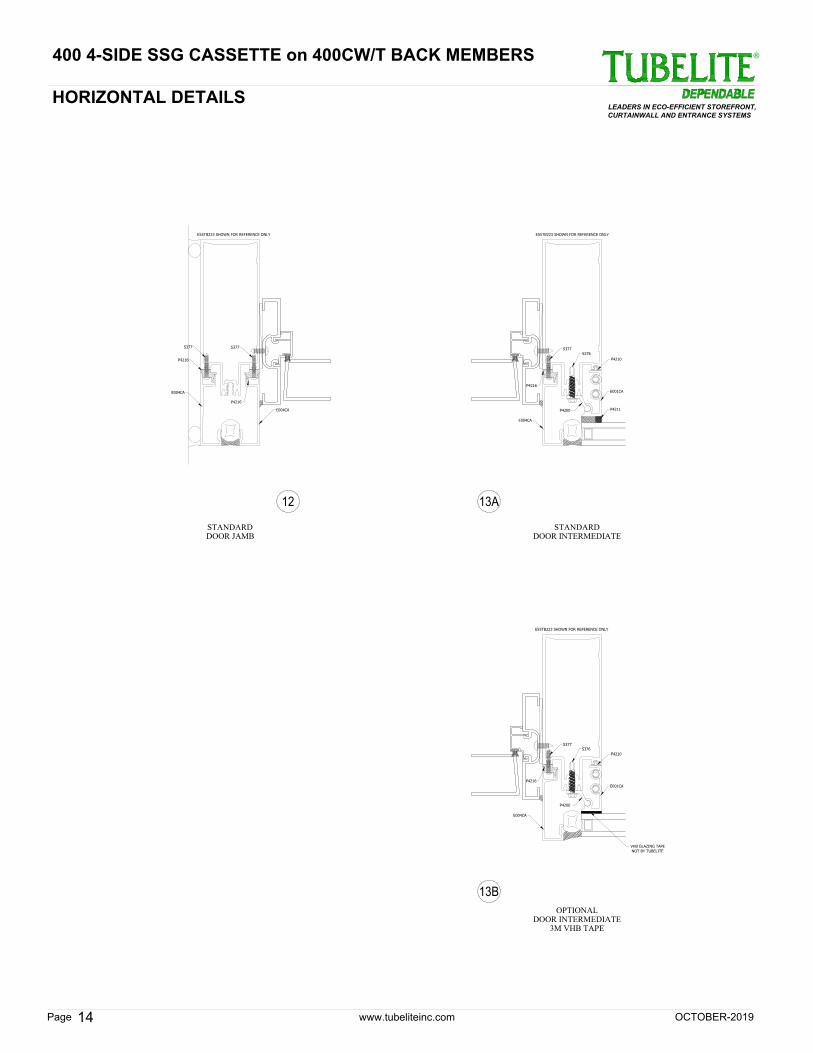
E55TB223 SHOWN FOR REFERENCE ONLY E55TB223 SHOWN FOR REFERENCE ONLY
E55TB223 SHOWN FOR REFERENCE ONLY
STANDARDDOOR JAMB
STANDARDDOOR INTERMEDIATE
OPTIONALDOOR INTERMEDIATE
3M VHB TAPE
E004CA
P4216
S377
S377
P4216
E004CA
E004CA
P4216
S377
E004CA
P4216
S377
S376
P4210
P4200
E001CA
P4211
P4210
P4200
E001CA
S376
VHB GLAZING TAPE
NOT BY TUBELITE
HORIZONTAL DETAILS
www.tubeliteinc.comPage
LEADERS IN ECO-EFFICIENT STOREFRONT,
CURTAINWALL AND ENTRANCE SYSTEMS
®
14
12 13A
13B
OCTOBER-2019
400 4-SIDE SSG CASSETTE on 400CW/T BACK MEMBERS
SHAPE DESCRIPTIONPart No.
Stock
Length
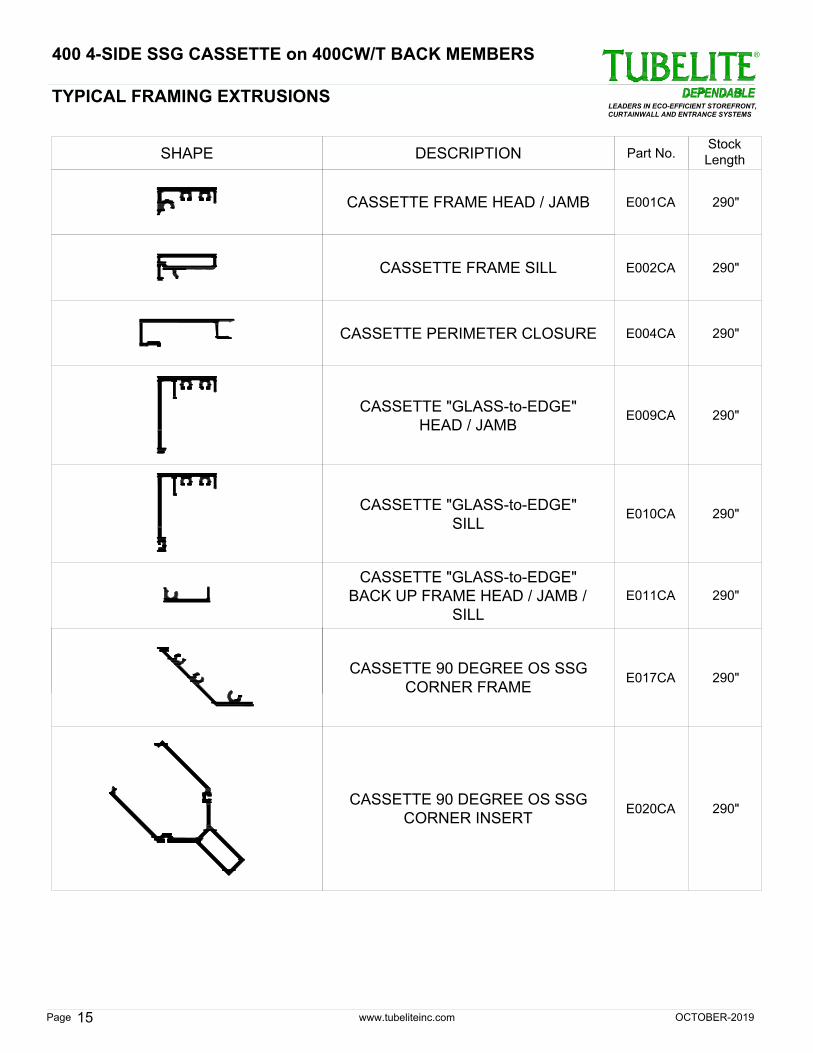
TYPICAL FRAMING EXTRUSIONS
www.tubeliteinc.comPage
LEADERS IN ECO-EFFICIENT STOREFRONT,
CURTAINWALL AND ENTRANCE SYSTEMS
®
15
CASSETTE FRAME HEAD / JAMBE001CA 290"
CASSETTE FRAME SILLE002CA 290"
CASSETTE PERIMETER CLOSUREE004CA 290"
CASSETTE "GLASS-to-EDGE"
HEAD / JAMB
E009CA 290"
CASSETTE "GLASS-to-EDGE"
SILL
E010CA 290"
CASSETTE "GLASS-to-EDGE"
BACK UP FRAME HEAD / JAMB /
SILL
E011CA 290"
CASSETTE 90 DEGREE OS SSG
CORNER FRAME
E017CA 290"
CASSETTE 90 DEGREE OS SSG
CORNER INSERT
E020CA 290"
OCTOBER-2019
400 4-SIDE SSG CASSETTE on 400CW/T BACK MEMBERS
SHAPE DESCRIPTIONPart No.
Stock
Length
TYPICAL FRAMING EXTRUSIONS
www.tubeliteinc.comPage
LEADERS IN ECO-EFFICIENT STOREFRONT,
CURTAINWALL AND ENTRANCE SYSTEMS
®
16
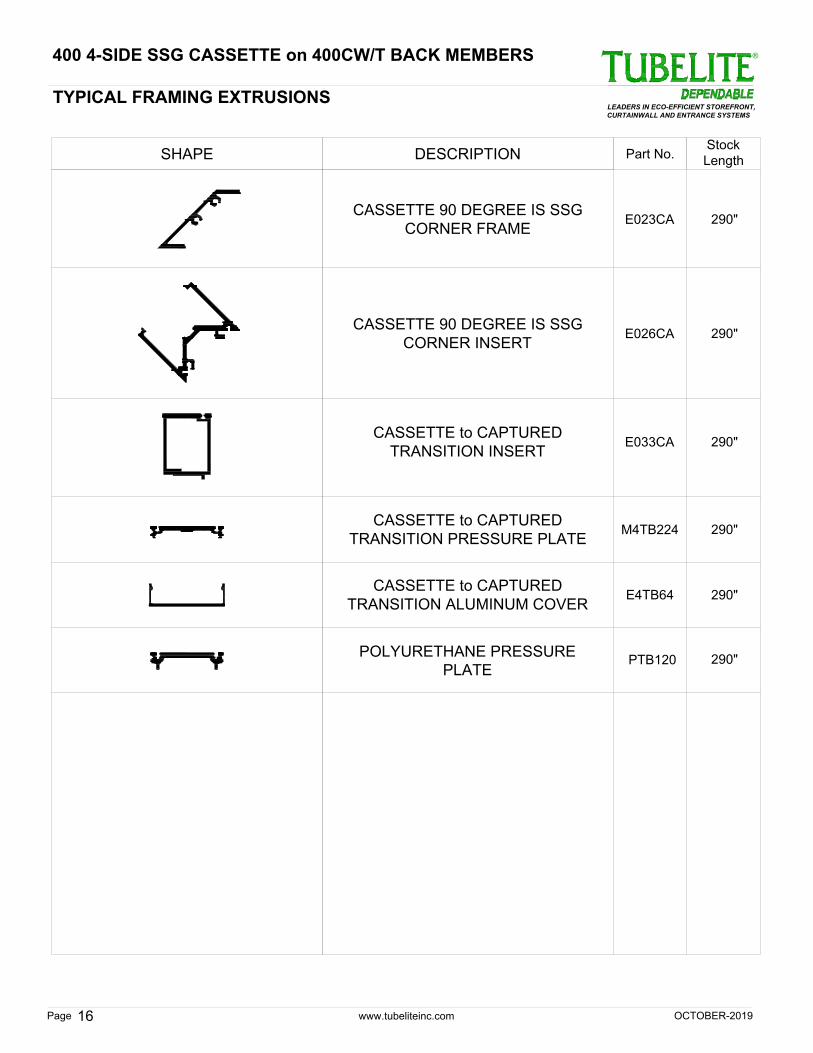
CASSETTE 90 DEGREE IS SSG
CORNER FRAME
E023CA 290"
CASSETTE 90 DEGREE IS SSG
CORNER INSERT
E026CA 290"
CASSETTE to CAPTURED
TRANSITION PRESSURE PLATE
M4TB224 290"
CASSETTE to CAPTURED
TRANSITION ALUMINUM COVER
E4TB64 290"
CASSETTE to CAPTURED
TRANSITION INSERT
E033CA 290"
OCTOBER-2019
400 4-SIDE SSG CASSETTE on 400CW/T BACK MEMBERS
PTB120
POLYURETHANE PRESSURE
PLATE
290"
SHAPE DESCRIPTIONPart No.
Stock
Length
TYPICAL EXTRUDED ACCESSORIES
www.tubeliteinc.comPage
LEADERS IN ECO-EFFICIENT STOREFRONT,
CURTAINWALL AND ENTRANCE SYSTEMS
®
17
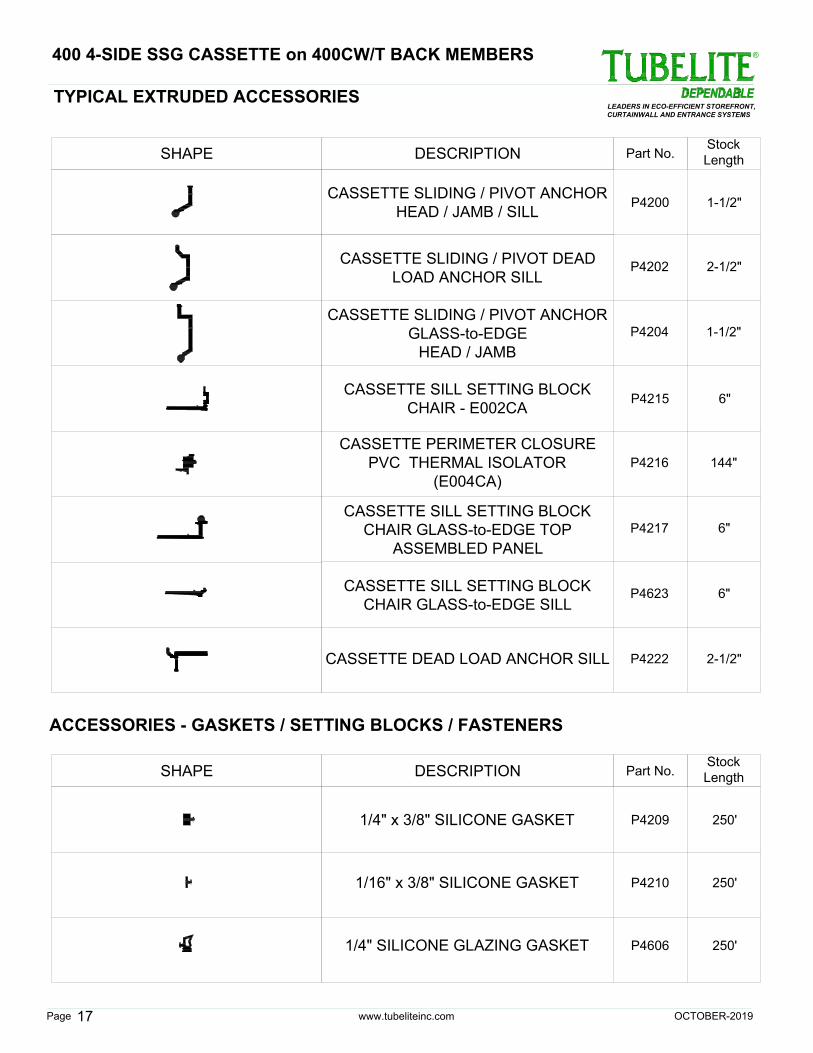
CASSETTE SILL SETTING BLOCK
CHAIR - E002CA
P4215 6"
CASSETTE SLIDING / PIVOT ANCHOR
HEAD / JAMB / SILL
P4200 1-1/2"
P4202 2-1/2"
CASSETTE SLIDING / PIVOT ANCHOR
GLASS-to-EDGE
HEAD / JAMB
P4204 1-1/2"
CASSETTE SILL SETTING BLOCK
CHAIR GLASS-to-EDGE SILL
P4623 6"
CASSETTE SILL SETTING BLOCK
CHAIR GLASS-to-EDGE TOP
ASSEMBLED PANEL
P4217 6"
CASSETTE SLIDING / PIVOT DEAD
LOAD ANCHOR SILL
CASSETTE PERIMETER CLOSURE
PVC THERMAL ISOLATOR
(E004CA)
P4216 144"
1/4" x 3/8" SILICONE GASKETP4209 250'
1/16" x 3/8" SILICONE GASKETP4210 250'
P4606 250'1/4" SILICONE GLAZING GASKET
CASSETTE DEAD LOAD ANCHOR SILLP4222 2-1/2"
ACCESSORIES - GASKETS / SETTING BLOCKS / FASTENERS
SHAPE DESCRIPTIONPart No.
Stock
Length
OCTOBER-2019
400 4-SIDE SSG CASSETTE on 400CW/T BACK MEMBERS
SHAPE DESCRIPTIONPart No.
Stock
Length
ACCESSORIES - GASKETS / SETTING BLOCKS / FASTENERS
www.tubeliteinc.comPage
LEADERS IN ECO-EFFICIENT STOREFRONT,
CURTAINWALL AND ENTRANCE SYSTEMS
®
18
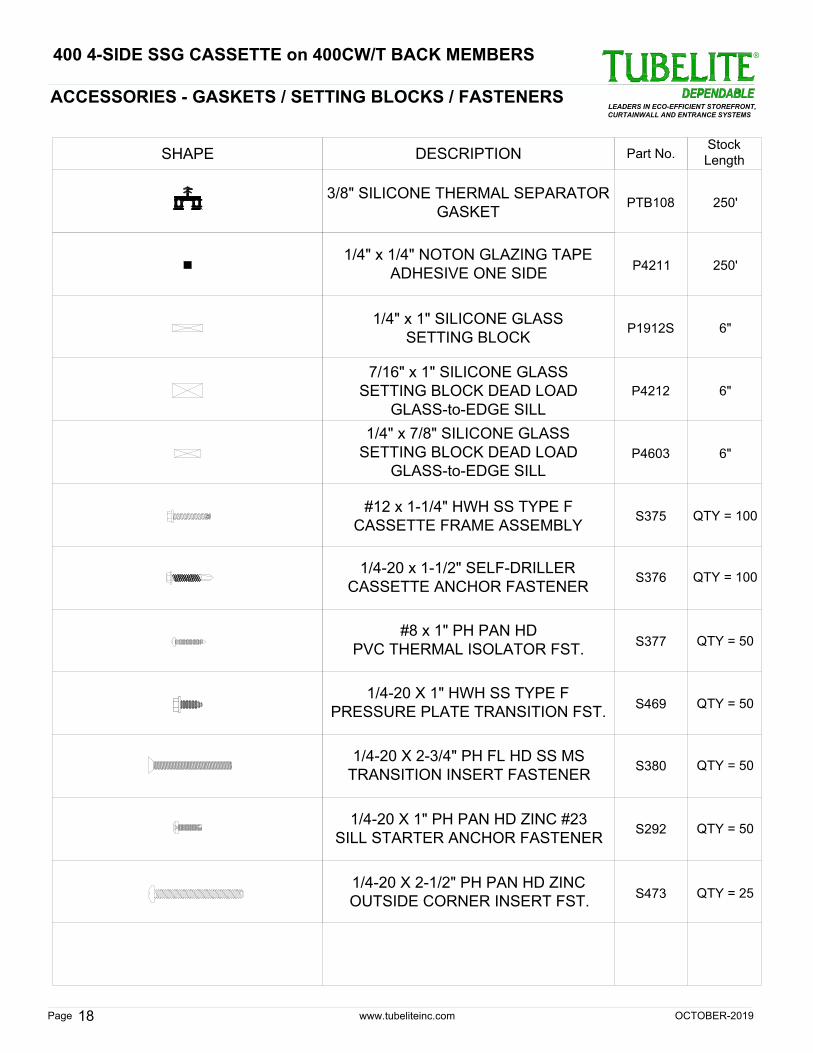
PTB108 250'
3/8" SILICONE THERMAL SEPARATOR
GASKET
P4211 250'
1/4" x 1/4" NOTON GLAZING TAPE
ADHESIVE ONE SIDE
P1912S 6"
1/4" x 1" SILICONE GLASS
SETTING BLOCK
P4212 6"
7/16" x 1" SILICONE GLASS
SETTING BLOCK DEAD LOAD
GLASS-to-EDGE SILL
P4603 6"
1/4" x 7/8" SILICONE GLASS
SETTING BLOCK DEAD LOAD
GLASS-to-EDGE SILL
S375 QTY = 100
#12 x 1-1/4" HWH SS TYPE F
CASSETTE FRAME ASSEMBLY
S376 QTY = 100
1/4-20 x 1-1/2" SELF-DRILLER
CASSETTE ANCHOR FASTENER
S377 QTY = 50
#8 x 1" PH PAN HD
PVC THERMAL ISOLATOR FST.
S469 QTY = 50
1/4-20 X 1" HWH SS TYPE F
PRESSURE PLATE TRANSITION FST.
S380 QTY = 50
1/4-20 X 2-3/4" PH FL HD SS MS
TRANSITION INSERT FASTENER
S292 QTY = 50
1/4-20 X 1" PH PAN HD ZINC #23
SILL STARTER ANCHOR FASTENER
OCTOBER-2019
400 4-SIDE SSG CASSETTE on 400CW/T BACK MEMBERS
1/4-20 X 2-1/2" PH PAN HD ZINC
OUTSIDE CORNER INSERT FST.
S473 QTY = 25
E55TB223
P4216
S377
P4210
E55TB223
P4210
P4216
S377
P4210
P4210
P4210 P4210
www.tubeliteinc.comPage
LEADERS IN ECO-EFFICIENT STOREFRONT,
CURTAINWALL AND ENTRANCE SYSTEMS
®
OCTOBER-2019
19
400 4-SIDE SSG CASSETTE on 400CW / T BACK MEMBERS
E55TB223
E55TB223
P4210
E55TB223
P4222
S292
P4216
S377
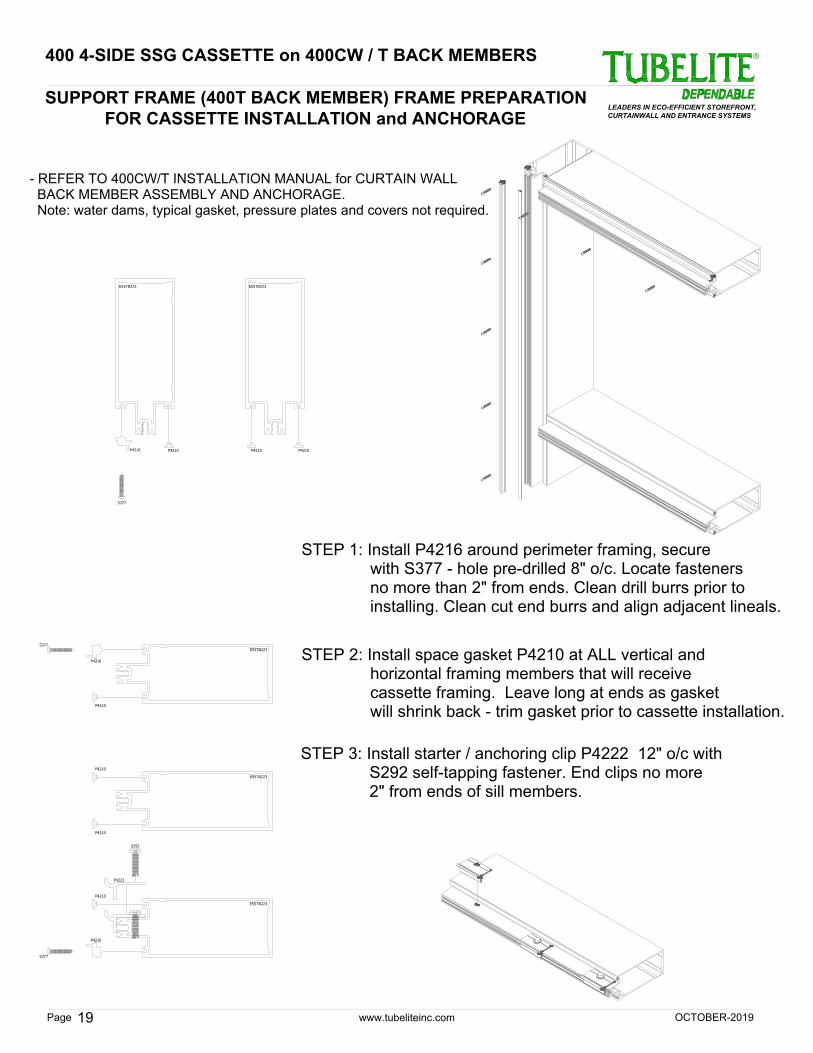
SUPPORT FRAME (400T BACK MEMBER) FRAME PREPARATION
FOR CASSETTE INSTALLATION and ANCHORAGE
STEP 1: Install P4216 around perimeter framing, secure
with S377 - hole pre-drilled 8" o/c. Locate fasteners
no more than 2" from ends. Clean drill burrs prior to
installing. Clean cut end burrs and align adjacent lineals.
STEP 2: Install space gasket P4210 at ALL vertical and
horizontal framing members that will receive
cassette framing. Leave long at ends as gasket
will shrink back - trim gasket prior to cassette installation.
STEP 3: Install starter / anchoring clip P4222 12" o/c with
S292 self-tapping fastener. End clips no more
2" from ends of sill members.
- REFER TO 400CW/T INSTALLATION MANUAL for CURTAIN WALL
BACK MEMBER ASSEMBLY AND ANCHORAGE.
Note: water dams, typical gasket, pressure plates and covers not required.
www.tubeliteinc.comPage
LEADERS IN ECO-EFFICIENT STOREFRONT,
CURTAINWALL AND ENTRANCE SYSTEMS
®
20
S473
E020CA
P4210
P4210
S473
E020CA
P4210
P4210
E55TB223 E55TB223
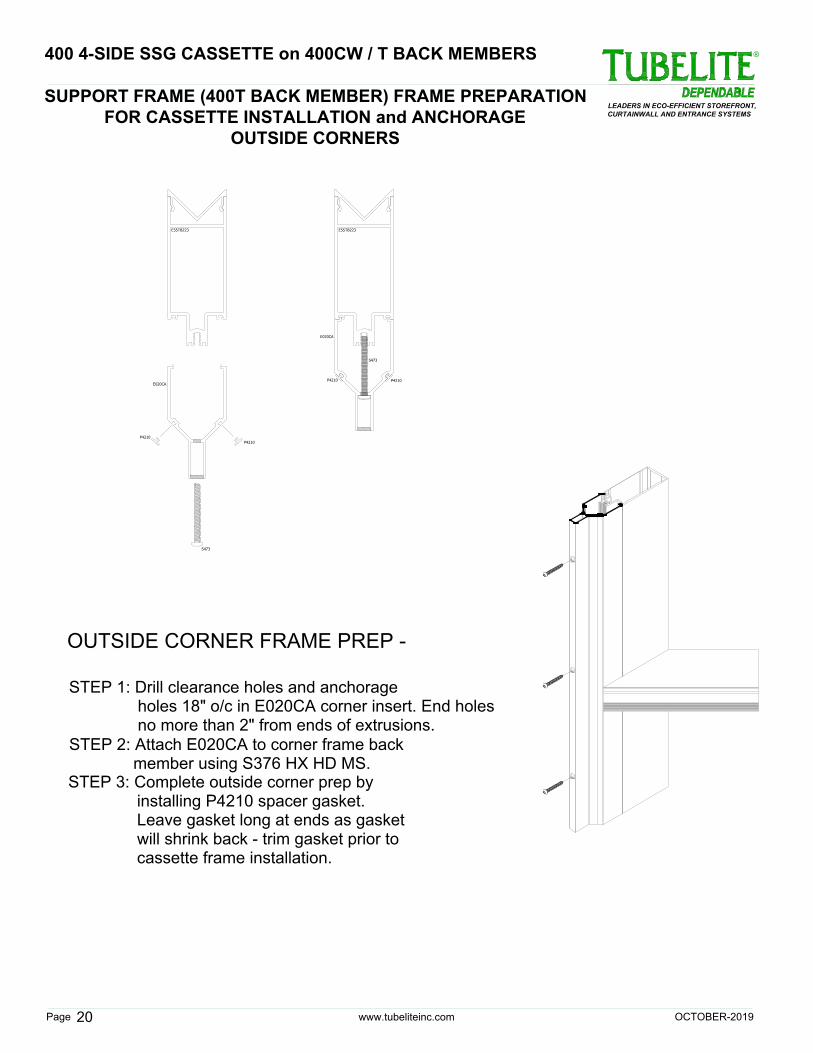
SUPPORT FRAME (400T BACK MEMBER) FRAME PREPARATION
FOR CASSETTE INSTALLATION and ANCHORAGE
OUTSIDE CORNERS
STEP 1: Drill clearance holes and anchorage
holes 18" o/c in E020CA corner insert. End holes
no more than 2" from ends of extrusions.
OUTSIDE CORNER FRAME PREP -
STEP 2: Attach E020CA to corner frame back
member using S376 HX HD MS.
STEP 3: Complete outside corner prep by
installing P4210 spacer gasket.
Leave gasket long at ends as gasket
will shrink back - trim gasket prior to
cassette frame installation.
OCTOBER-2019
400 4-SIDE SSG CASSETTE on 400CW / T BACK MEMBERS
S469
E55TB88
E55TB88
S469
E026CA
E026CA
P4210 P4210
P4210
P4210
www.tubeliteinc.comPage
LEADERS IN ECO-EFFICIENT STOREFRONT,
CURTAINWALL AND ENTRANCE SYSTEMS
®
21
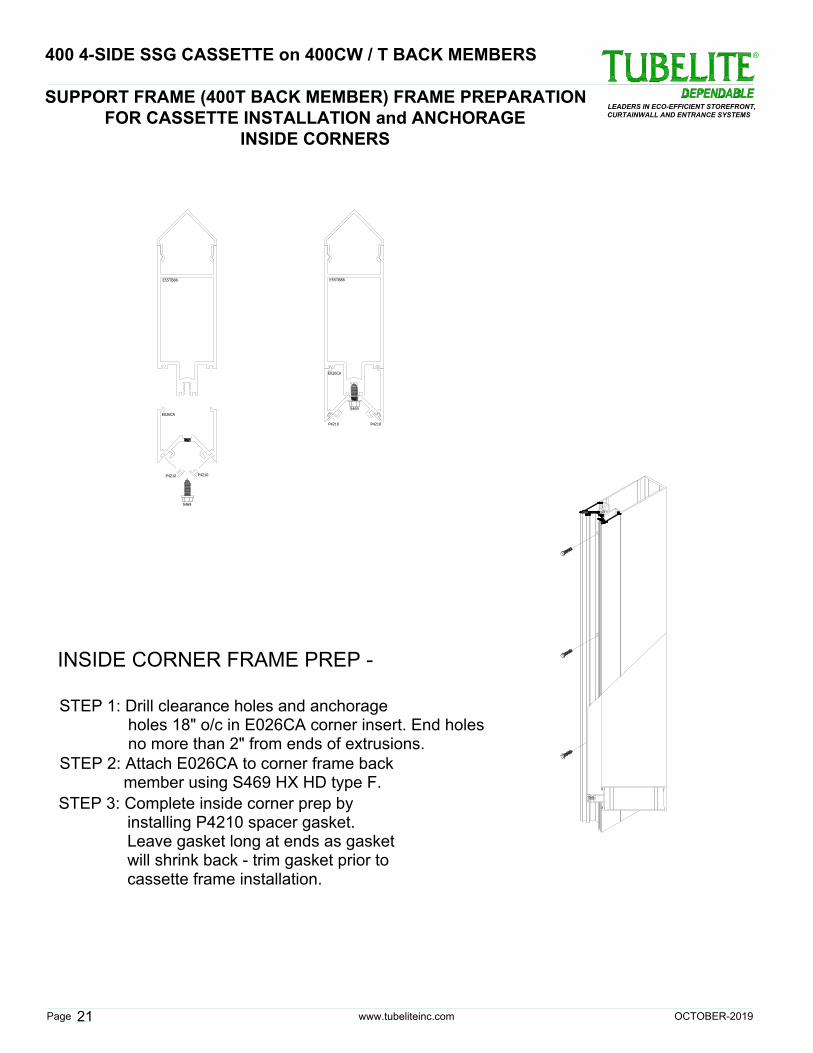
STEP 1: Drill clearance holes and anchorage
holes 18" o/c in E026CA corner insert. End holes
no more than 2" from ends of extrusions.
INSIDE CORNER FRAME PREP -
STEP 2: Attach E026CA to corner frame back
member using S469 HX HD type F.
STEP 3: Complete inside corner prep by
installing P4210 spacer gasket.
Leave gasket long at ends as gasket
will shrink back - trim gasket prior to
cassette frame installation.
SUPPORT FRAME (400T BACK MEMBER) FRAME PREPARATION
FOR CASSETTE INSTALLATION and ANCHORAGE
INSIDE CORNERS
OCTOBER-2019
400 4-SIDE SSG CASSETTE on 400CW / T BACK MEMBERS

www.tubeliteinc.comPage
LEADERS IN ECO-EFFICIENT STOREFRONT,
CURTAINWALL AND ENTRANCE SYSTEMS
®
22
P4210
E55TB223
E55TB223
P4222
S292
E55TB223
S376
P4204
P4210
P4210
S376
P4204
E55TB223
P4210
S376
P4209
E011CA
P4204
P4212
NOTE: Install 24" piece of E011CA and
24" piece of P4209 at center line
of jambs at cassette frames
spanning more than 72" and
design loads above 50 PSF
Leave gasket long at ends as gasket
STEP 2: Complete "Glass-to-Edge head prep by
STEP 1: Install anchor clip P4204 12" o/c using fastener
cassette frame installation.
S292 - No more than 2" from ends of DLO.
E011CA
P4209
S376 - No more than 2" from ends of DLO.
SUPPORT FRAME (400T BACK MEMBER) FRAME PREPARATION
FOR CASSETTE INSTALLATION and ANCHORAGE
"Glass-to-Edge" - JAMB, HEAD & SILL
"Glass-to-Edge JAMB FRAME PREP -
will shrink back - trim gasket prior to
STEP 2: Complete "Glass-to-Edge jamb prep by
installing P4210 spacer gasket.
STEP 1: Install anchor clip P4204 12" o/c using fastener
cassette frame installation.
installing P4210 spacer gasket.
S376 - No more than 2" from ends of DLO.
"Glass-to-Edge HEAD FRAME PREP -
will shrink back - trim gasket prior to
Leave gasket long at ends as gasket
cassette frame installation.
"Glass-to-Edge SILL FRAME PREP -
STEP 1: Install anchor clip P4222 12" o/c using fastener
installing P4210 spacer gasket.
Leave gasket long at ends as gasket
STEP 3: Complete "Glass-to-Edge jamb prep by
will shrink back - trim gasket prior to
STEP 2: Install silicone dead load block P4212
locating between P4222 anchor clip.
OCTOBER-2019
400 4-SIDE SSG CASSETTE on 400CW / T BACK MEMBERS
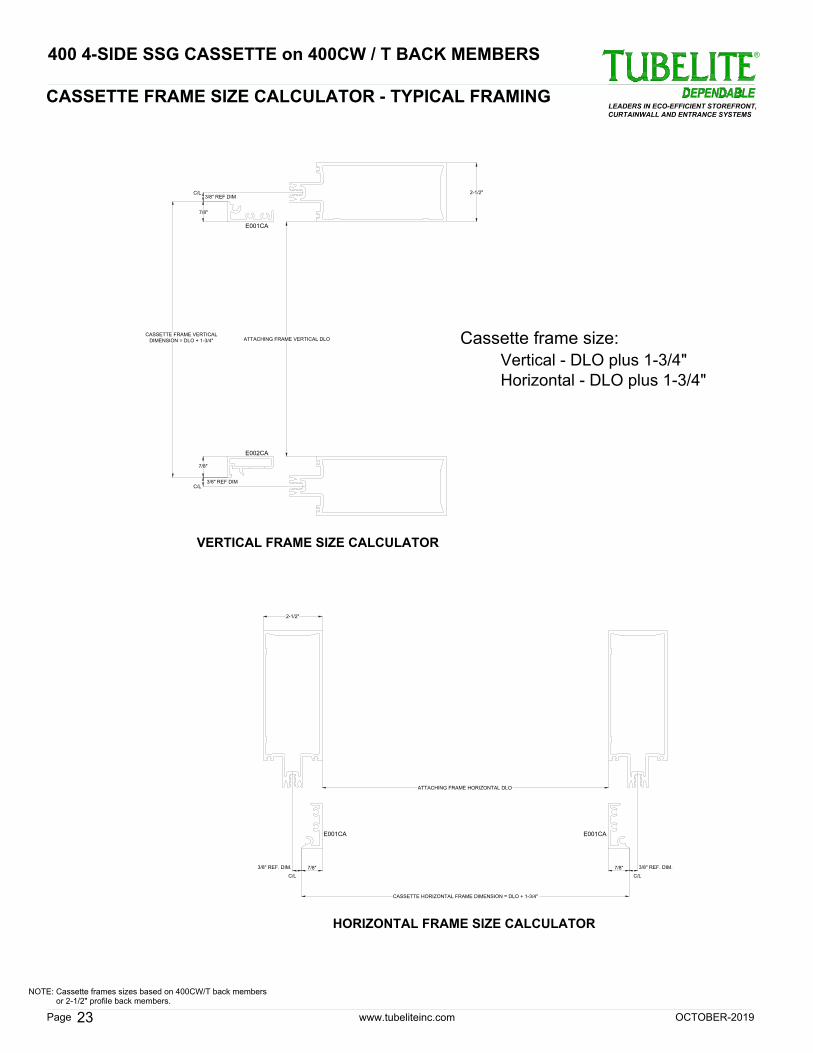
CASSETTE FRAME SIZE CALCULATOR - TYPICAL FRAMING
www.tubeliteinc.comPage
LEADERS IN ECO-EFFICIENT STOREFRONT,
CURTAINWALL AND ENTRANCE SYSTEMS
®
OCTOBER-2019
23
400 4-SIDE SSG CASSETTE on 400CW / T BACK MEMBERS
7/8"
ATTACHING FRAME HORIZONTAL DLO
C/L
CASSETTE HORIZONTAL FRAME DIMENSION = DLO + 1-3/4"
3/8" REF. DIM.
C/L
3/8" REF. DIM.
HORIZONTAL FRAME SIZE CALCULATOR
VERTICAL FRAME SIZE CALCULATOR
ATTACHING FRAME VERTICAL DLO
CASSETTE FRAME VERTICAL
DIMENSION = DLO + 1-3/4"
7/8"
7/8"
3/8" REF DIM
C/L
3/8" REF DIM
C/L
7/8"
2-1/2"
2-1/2"
NOTE: Cassette frames sizes based on 400CW/T back members
or 2-1/2" profile back members.
Cassette frame size:
Vertical - DLO plus 1-3/4"
Horizontal - DLO plus 1-3/4"
E001CAE001CA
E002CA
E001CA
www.tubeliteinc.comPage
LEADERS IN ECO-EFFICIENT STOREFRONT,
CURTAINWALL AND ENTRANCE SYSTEMS
®
24
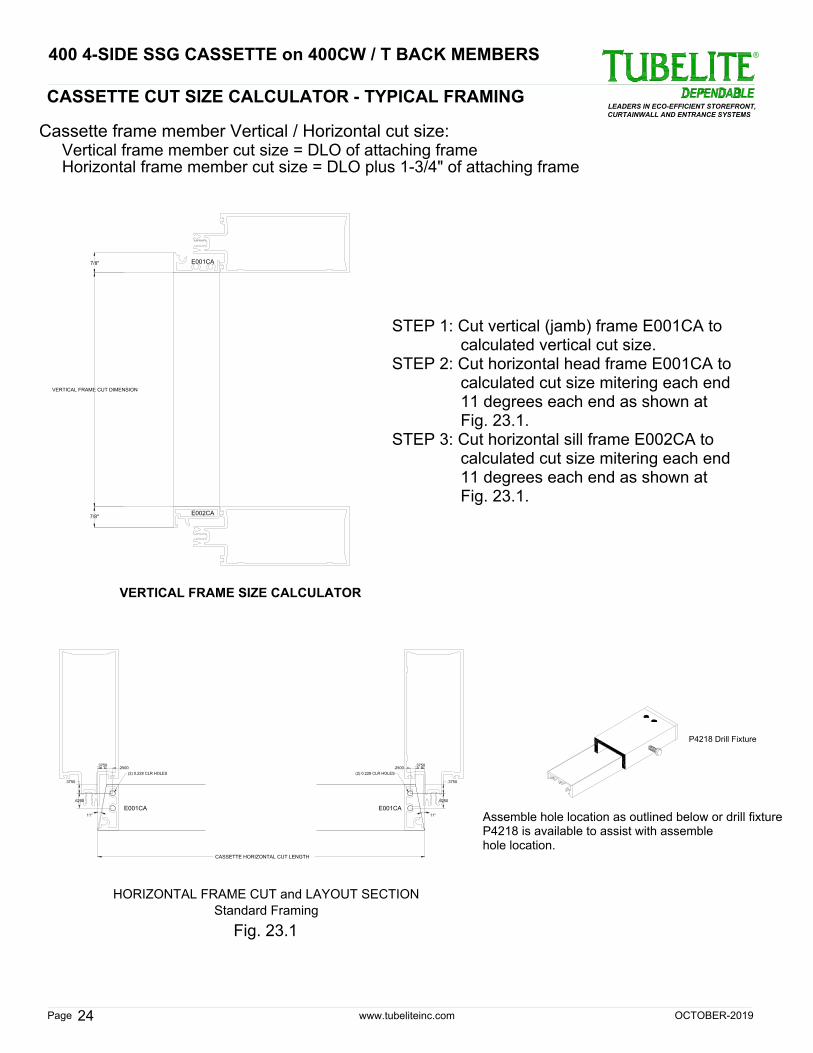
CASSETTE CUT SIZE CALCULATOR - TYPICAL FRAMING
VERTICAL FRAME SIZE CALCULATOR
VERTICAL FRAME CUT DIMENSION
7/8"
7/8"
.2500
(2) 0.228 CLR HOLES
11°
.3750
.6250
.3750
.2500
(2) 0.228 CLR HOLES
11°
.3750
.6250
CASSETTE HORIZONTAL CUT LENGTH
.3750
HORIZONTAL FRAME CUT and LAYOUT SECTION
Standard Framing
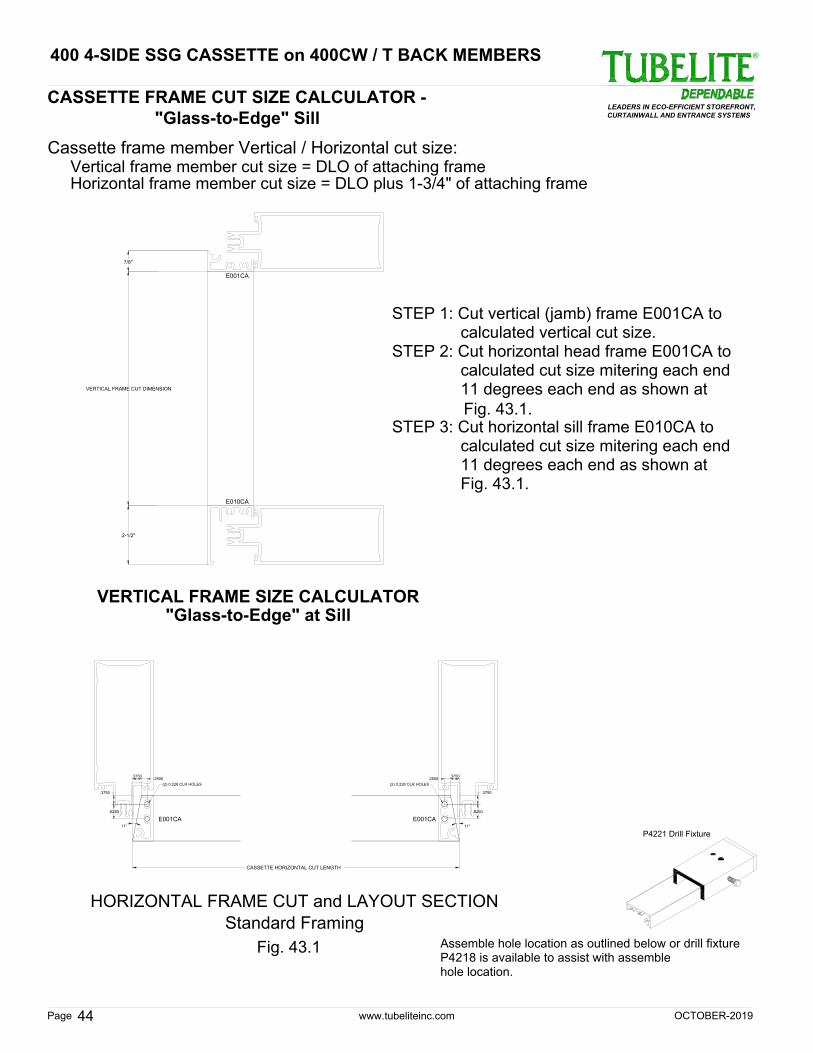
Cassette frame member Vertical / Horizontal cut size:
Vertical frame member cut size = DLO of attaching frame
Horizontal frame member cut size = DLO plus 1-3/4" of attaching frame
P4218 Drill Fixture
Assemble hole location as outlined below or drill fixture
P4218 is available to assist with assemble
hole location.
E001CA
calculated vertical cut size.
E001CAE001CA
E002CA
STEP 1: Cut vertical (jamb) frame E001CA to
11 degrees each end as shown at
STEP 2: Cut horizontal head frame E001CA to
11 degrees each end as shown at
calculated cut size mitering each end
Fig. 23.1
calculated cut size mitering each end
Fig. 23.1.
Fig. 23.1.
STEP 3: Cut horizontal sill frame E002CA to
400 4-SIDE SSG CASSETTE on 400CW / T BACK MEMBERS
OCTOBER-2019
www.tubeliteinc.comPage
LEADERS IN ECO-EFFICIENT STOREFRONT,
CURTAINWALL AND ENTRANCE SYSTEMS
®
25
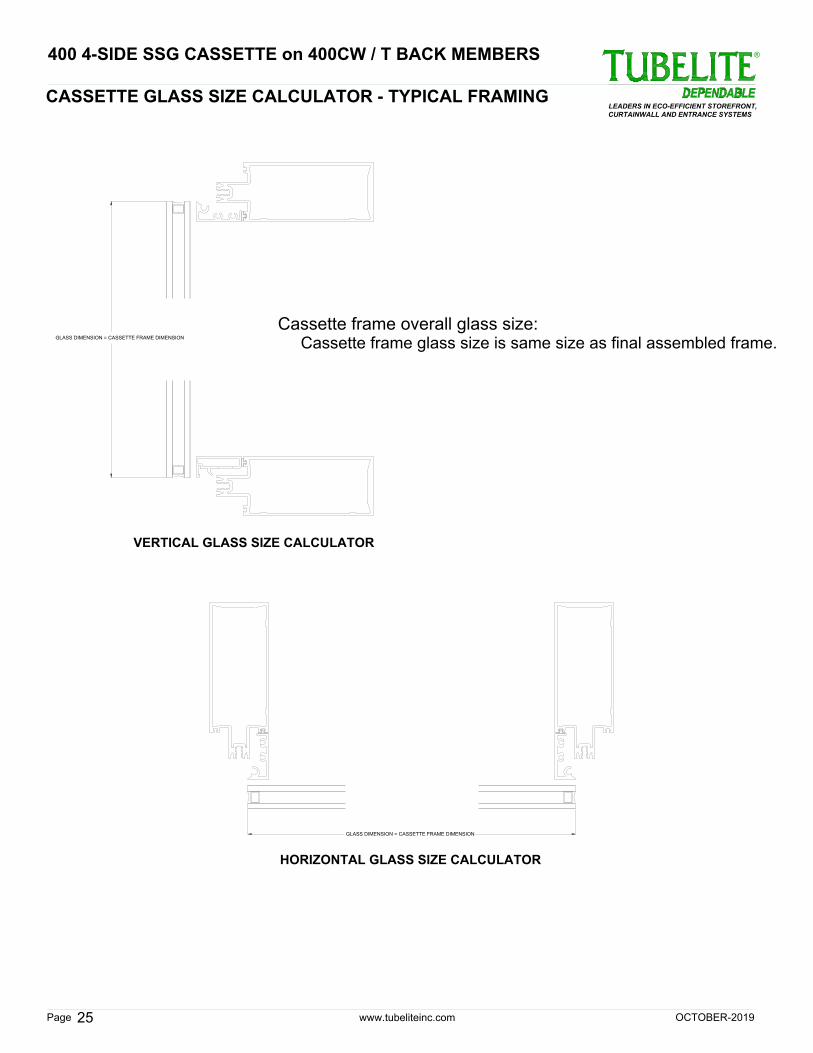
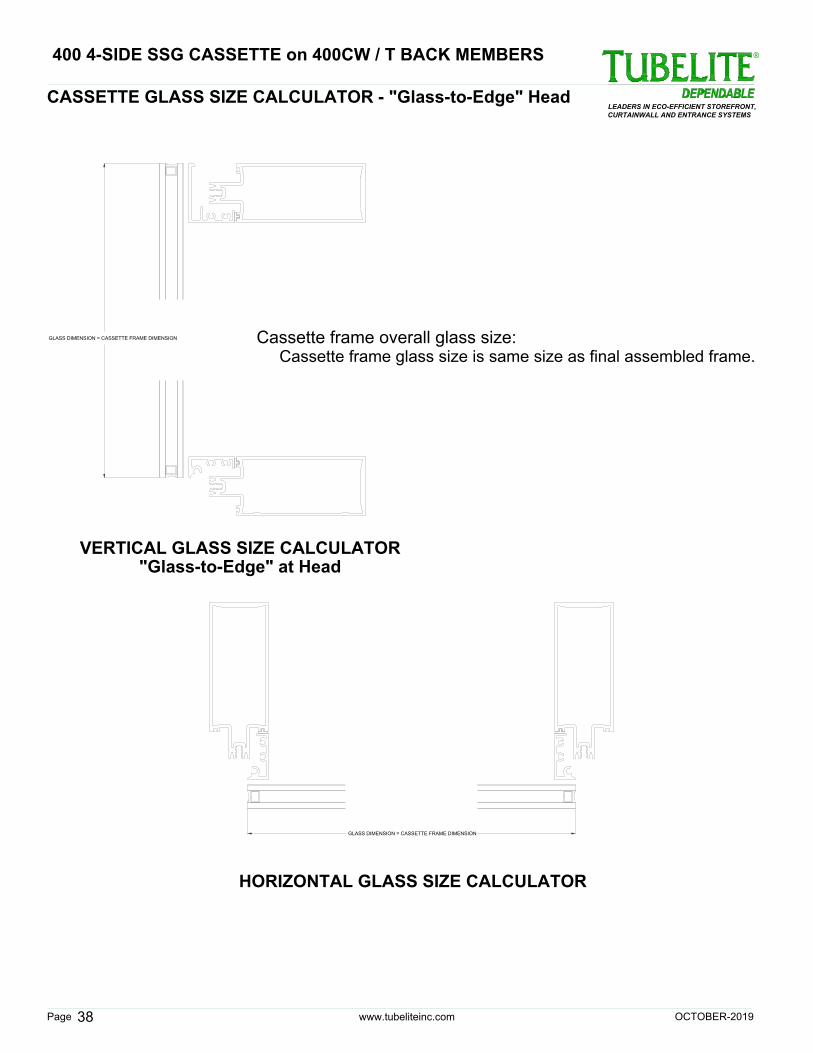
HORIZONTAL GLASS SIZE CALCULATOR
VERTICAL GLASS SIZE CALCULATOR
GLASS DIMENSION = CASSETTE FRAME DIMENSION
GLASS DIMENSION = CASSETTE FRAME DIMENSION
CASSETTE GLASS SIZE CALCULATOR - TYPICAL FRAMING
Cassette frame overall glass size:
Cassette frame glass size is same size as final assembled frame.
400 4-SIDE SSG CASSETTE on 400CW / T BACK MEMBERS
OCTOBER-2019
www.tubeliteinc.comPage
LEADERS IN ECO-EFFICIENT STOREFRONT,
CURTAINWALL AND ENTRANCE SYSTEMS
®
26
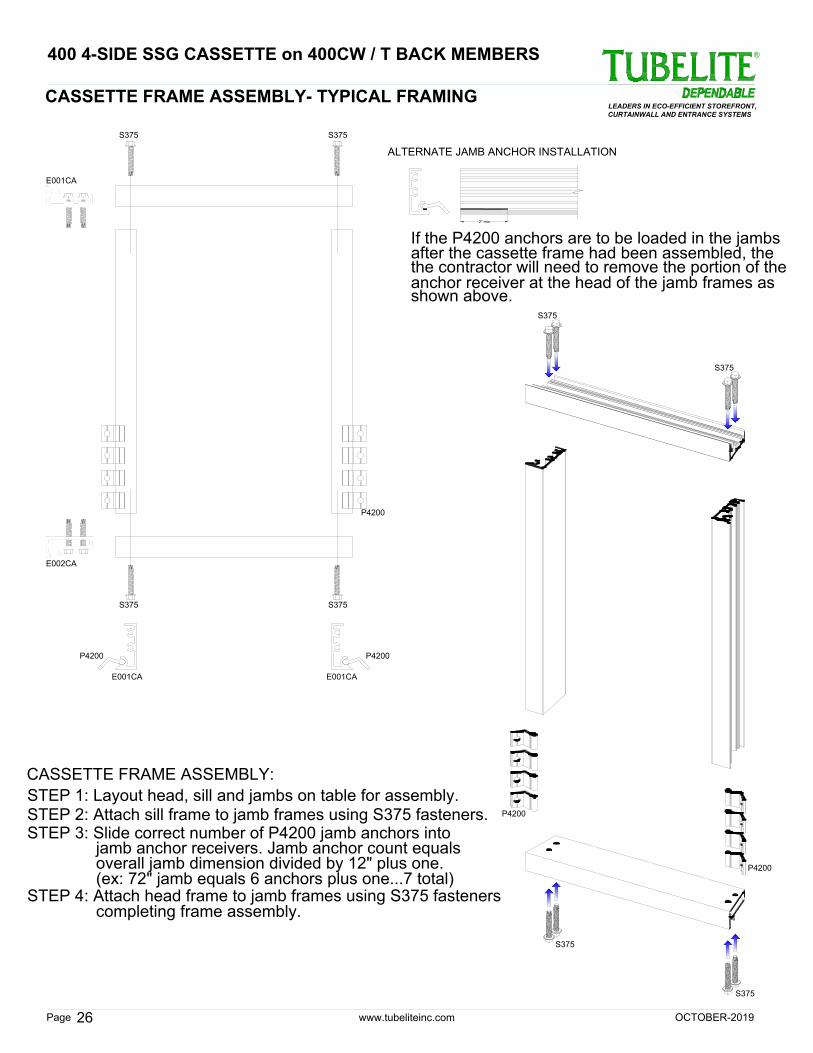
CASSETTE FRAME ASSEMBLY- TYPICAL FRAMING
anchor receiver at the head of the jamb frames as
P4200
P4200
P4200
S375S375
S375
S375
S375
S375
P4200
E001CAE001CA
E002CA
E001CA
S375S375
2" min
If the P4200 anchors are to be loaded in the jambs
after the cassette frame had been assembled, the
the contractor will need to remove the portion of the
ALTERNATE JAMB ANCHOR INSTALLATION
STEP 2: Attach sill frame to jamb frames using S375 fasteners.
CASSETTE FRAME ASSEMBLY:
STEP 1: Layout head, sill and jambs on table for assembly.
STEP 3: Slide correct number of P4200 jamb anchors into
jamb anchor receivers. Jamb anchor count equals
overall jamb dimension divided by 12" plus one.
(ex: 72" jamb equals 6 anchors plus one...7 total)
STEP 4: Attach head frame to jamb frames using S375 fasteners
completing frame assembly.
P4200
shown above.
400 4-SIDE SSG CASSETTE on 400CW / T BACK MEMBERS
OCTOBER-2019
www.tubeliteinc.comPage
LEADERS IN ECO-EFFICIENT STOREFRONT,
CURTAINWALL AND ENTRANCE SYSTEMS
®
27
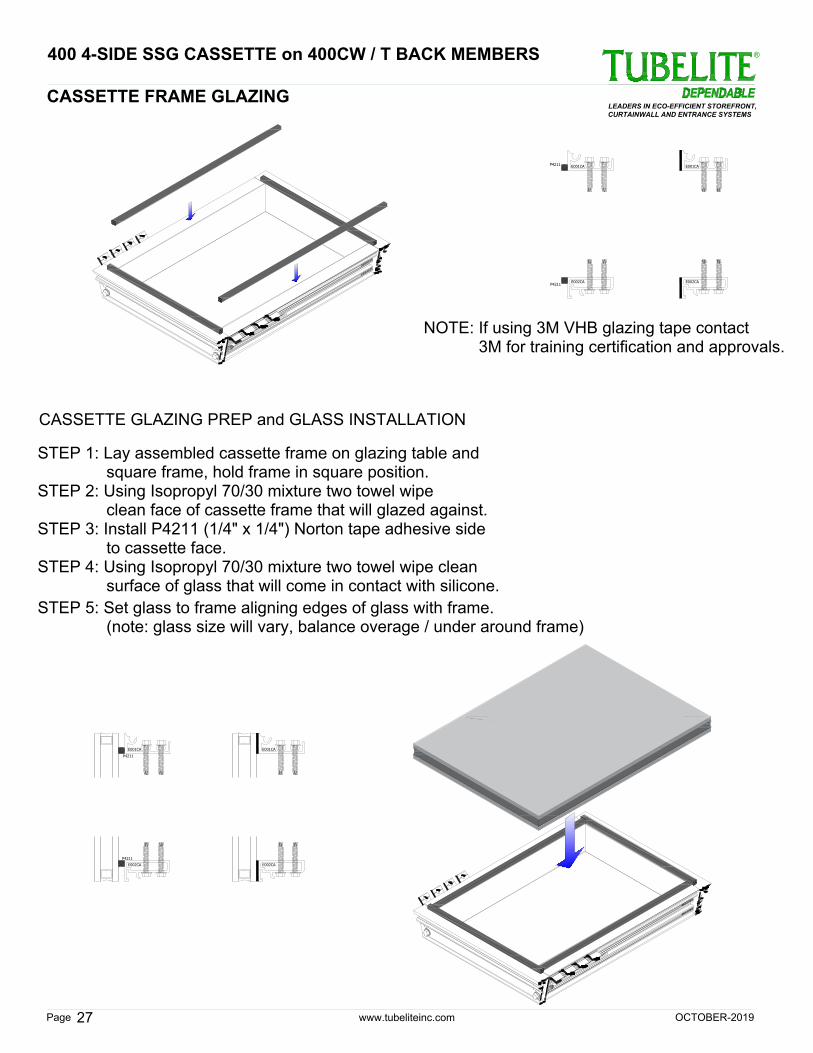
CASSETTE FRAME GLAZING
E001CA
P4211
P4211
E002CA
E001CA
P4211
P4211
E002CA
E001CA
E002CA
E001CA
E002CA
clean face of cassette frame that will glazed against.
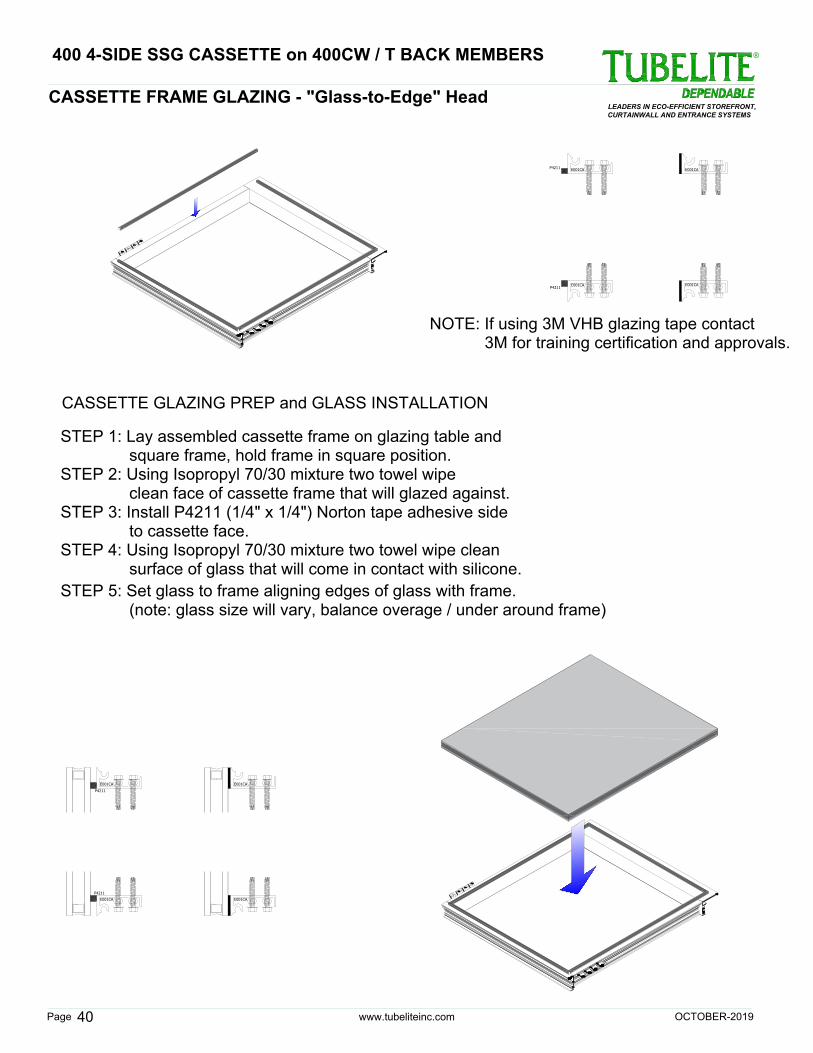
CASSETTE GLAZING PREP and GLASS INSTALLATION
NOTE: If using 3M VHB glazing tape contact
3M for training certification and approvals.
STEP 1: Lay assembled cassette frame on glazing table and
square frame, hold frame in square position.
STEP 2: Using Isopropyl 70/30 mixture two towel wipe
STEP 3: Install P4211 (1/4" x 1/4") Norton tape adhesive side
STEP 5: Set glass to frame aligning edges of glass with frame.
to cassette face.
(note: glass size will vary, balance overage / under around frame)
STEP 4: Using Isopropyl 70/30 mixture two towel wipe clean
surface of glass that will come in contact with silicone.
400 4-SIDE SSG CASSETTE on 400CW / T BACK MEMBERS
OCTOBER-2019
www.tubeliteinc.comPage
LEADERS IN ECO-EFFICIENT STOREFRONT,
CURTAINWALL AND ENTRANCE SYSTEMS
®
28
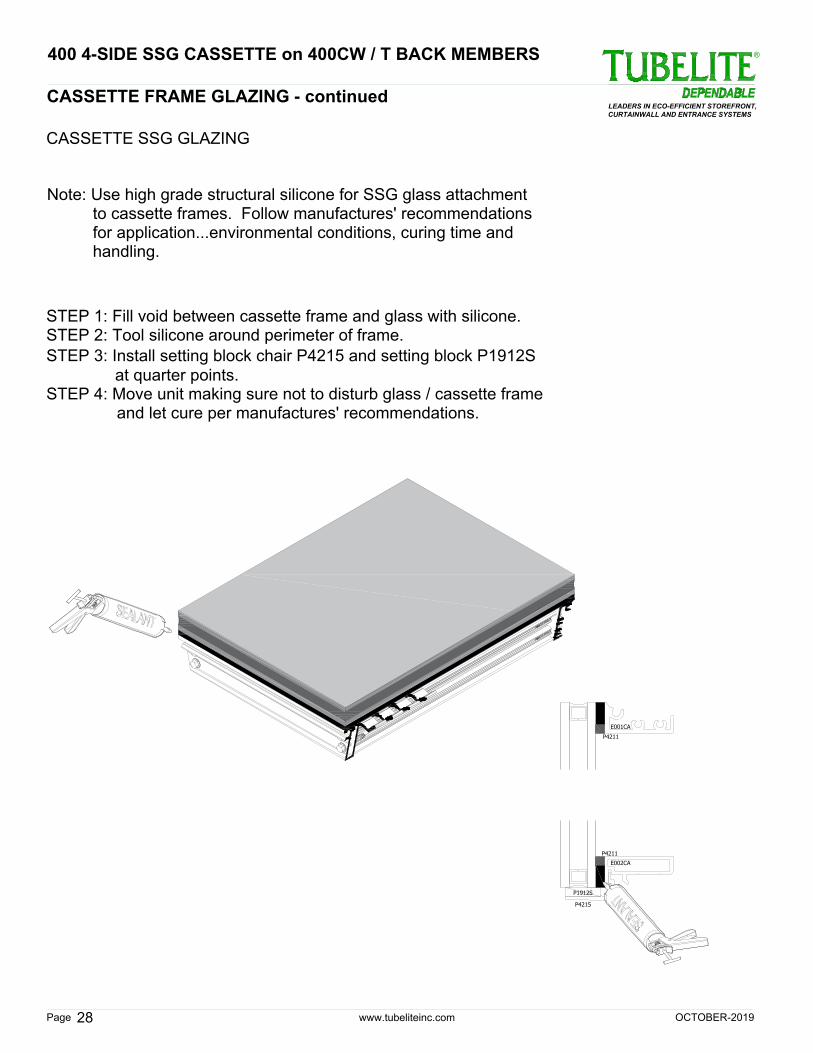
CASSETTE FRAME GLAZING - continued
E001CA
P4211
P4211
E002CA
P1912S
P4215
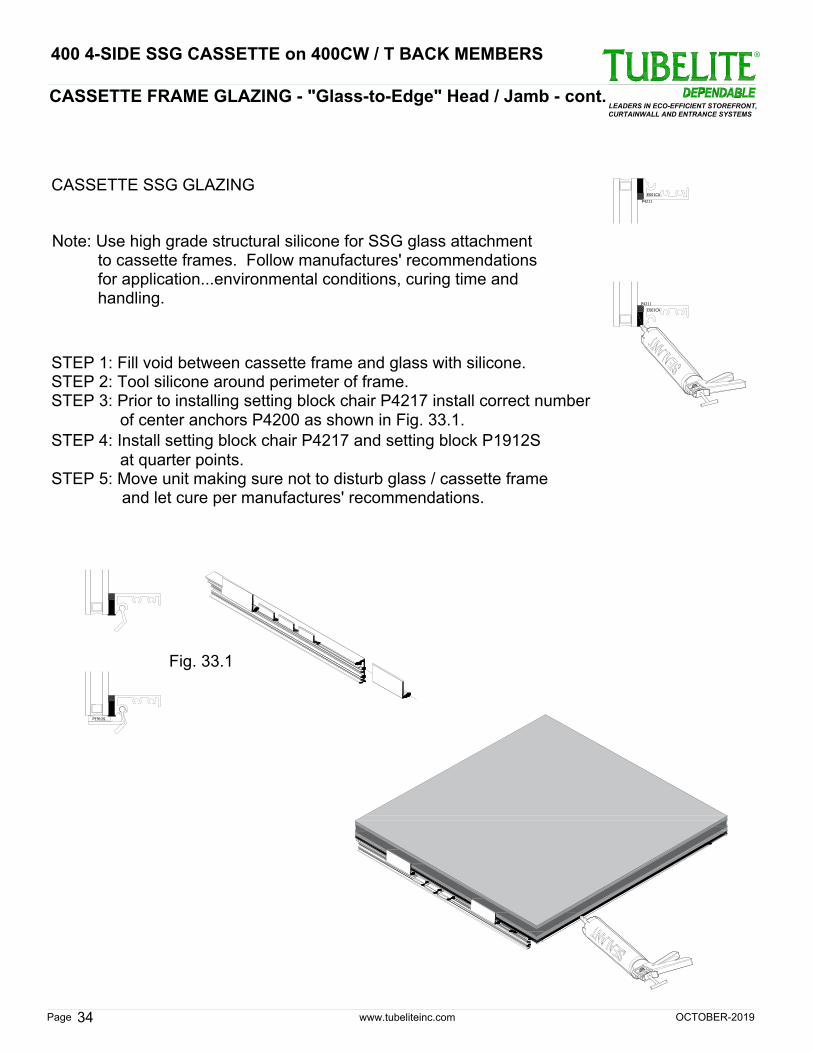
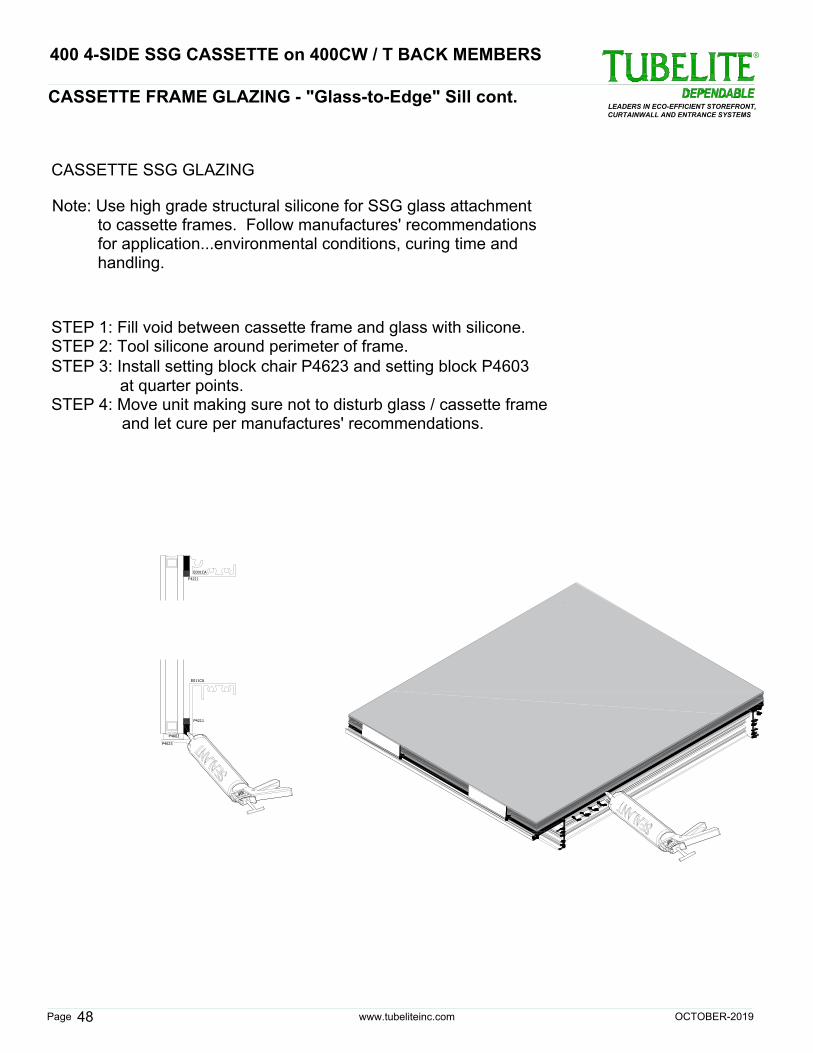
CASSETTE SSG GLAZING
Note: Use high grade structural silicone for SSG glass attachment
to cassette frames. Follow manufactures' recommendations
for application...environmental conditions, curing time and
handling.
STEP 1: Fill void between cassette frame and glass with silicone.
STEP 2: Tool silicone around perimeter of frame.
STEP 4: Move unit making sure not to disturb glass / cassette frame
and let cure per manufactures' recommendations.
STEP 3: Install setting block chair P4215 and setting block P1912S
at quarter points.
400 4-SIDE SSG CASSETTE on 400CW / T BACK MEMBERS
OCTOBER-2019

www.tubeliteinc.comPage
LEADERS IN ECO-EFFICIENT STOREFRONT,
CURTAINWALL AND ENTRANCE SYSTEMS
®
OCTOBER-2019
29
400 4-SIDE SSG CASSETTE on 400CW / T BACK MEMBERS
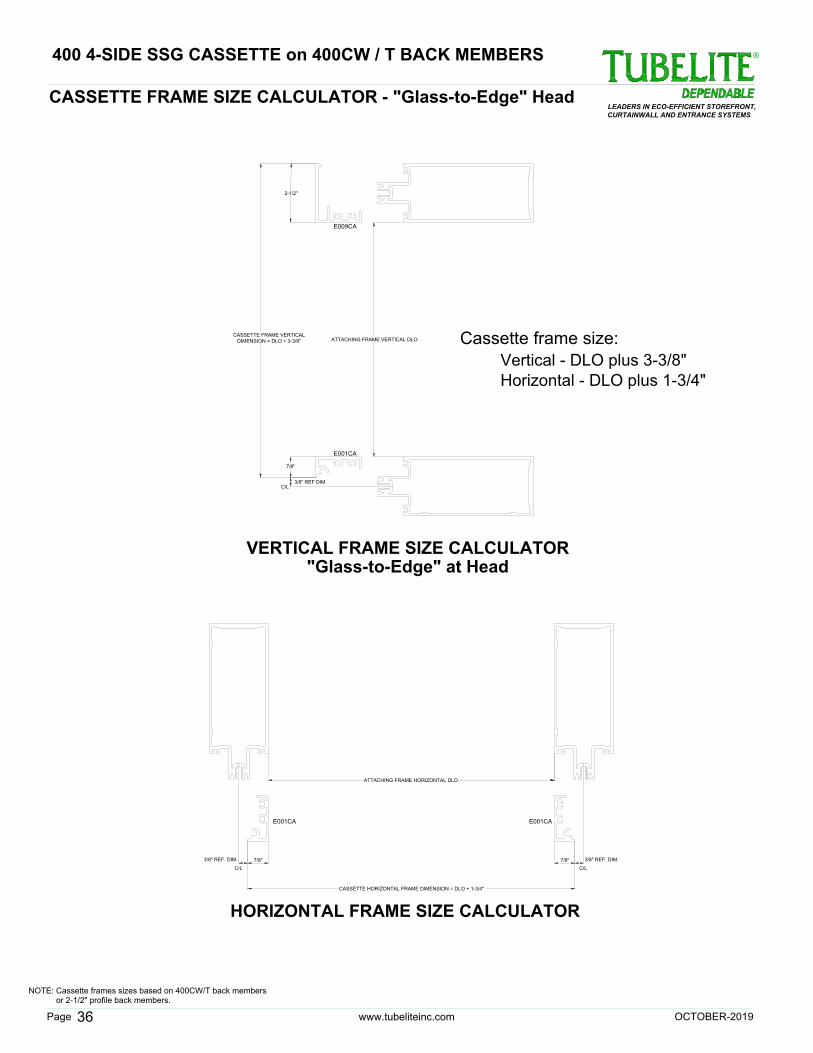
ATTACHING FRAME VERTICAL DLO
CASSETTE FRAME VERTICAL
DIMENSION = DLO + 3-3/8"
2-1/2"
7/8"
3/8" REF DIM
C/L
VERTICAL FRAME SIZE CALCULATOR
"Glass-to-Edge" at Head
7/8"
ATTACHING FRAME HORIZONTAL DLO
CASSETTE HORIZONTAL FRAME DIMENSION = DLO + 3-3/8"
C/L
3/8" REF. DIM.
2-1/2"
HORIZONTAL FRAME SIZE CALCULATOR
"Glass-to-Edge" at Jamb
CASSETTE FRAME SIZE CALCULATOR -
"Glass-to-Edge" Head / Jamb
Vertical - DLO plus 3-3/8"
Cassette frame size:
Horizontal - DLO plus 3-3/8"
or 2-1/2" profile back members.
NOTE: Cassette frames sizes based on 400CW/T back members
E001CA
E001CA
E009CA
E009CA
www.tubeliteinc.comPage
LEADERS IN ECO-EFFICIENT STOREFRONT,
CURTAINWALL AND ENTRANCE SYSTEMS
®
30
VERTICAL FRAME SIZE CALCULATOR
"Glass-to-Edge" at Head
"Glass-to-Edge" at Jamb
VERTICAL FRAME CUT DIMENSION
2-1/2"
7/8"
HORIZONTAL FRAME CUT and LAYOUT SECTION
.2500
.3750
.6250
2.5000
2.0000
(2) 0.228 CLR HOLES
.3750
.6250
(2) 0.228 CLR HOLES
.2500
1.9375
0.5000
CASSETTE HORIZONTAL FRAME DIMENSION
0.3750
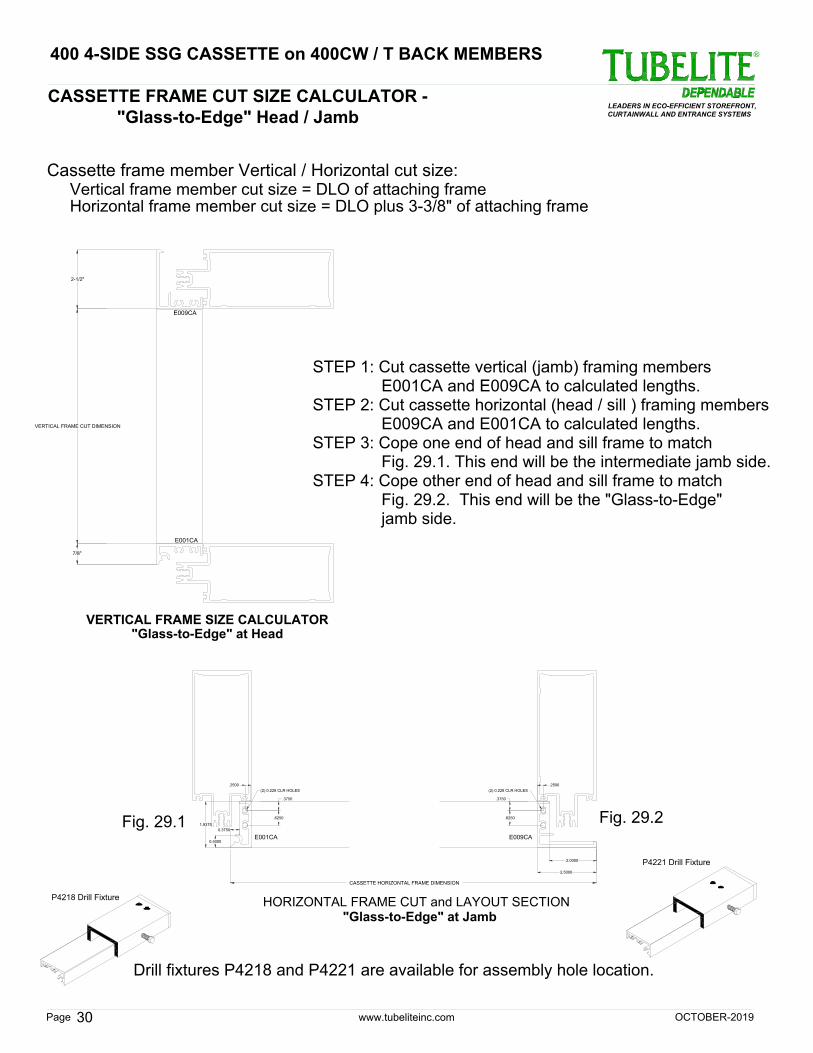
Cassette frame member Vertical / Horizontal cut size:
CASSETTE FRAME CUT SIZE CALCULATOR -
"Glass-to-Edge" Head / Jamb
Horizontal frame member cut size = DLO plus 3-3/8" of attaching frame
Vertical frame member cut size = DLO of attaching frame
P4218 Drill Fixture
P4221 Drill Fixture
Drill fixtures P4218 and P4221 are available for assembly hole location.
E001CA
Fig. 29.1
E009CA
E001CA
Fig. 29.2
E009CA
STEP 1: Cut cassette vertical (jamb) framing members
E001CA and E009CA to calculated lengths.
STEP 2: Cut cassette horizontal (head / sill ) framing members
E009CA and E001CA to calculated lengths.
STEP 3: Cope one end of head and sill frame to match
Fig. 29.1. This end will be the intermediate jamb side.
STEP 4: Cope other end of head and sill frame to match
Fig. 29.2. This end will be the "Glass-to-Edge"
jamb side.
400 4-SIDE SSG CASSETTE on 400CW / T BACK MEMBERS
OCTOBER-2019
www.tubeliteinc.comPage
LEADERS IN ECO-EFFICIENT STOREFRONT,
CURTAINWALL AND ENTRANCE SYSTEMS
®
31
HORIZONTAL GLASS SIZE CALCULATOR
"Glass-to-Edge" at Jamb
GLASS DIMENSION = CASSETTE FRAME DIMENSION
VERTICAL GLASS SIZE CALCULATOR
"Glass-to-Edge" at Head
GLASS DIMENSION = CASSETTE FRAME DIMENSION
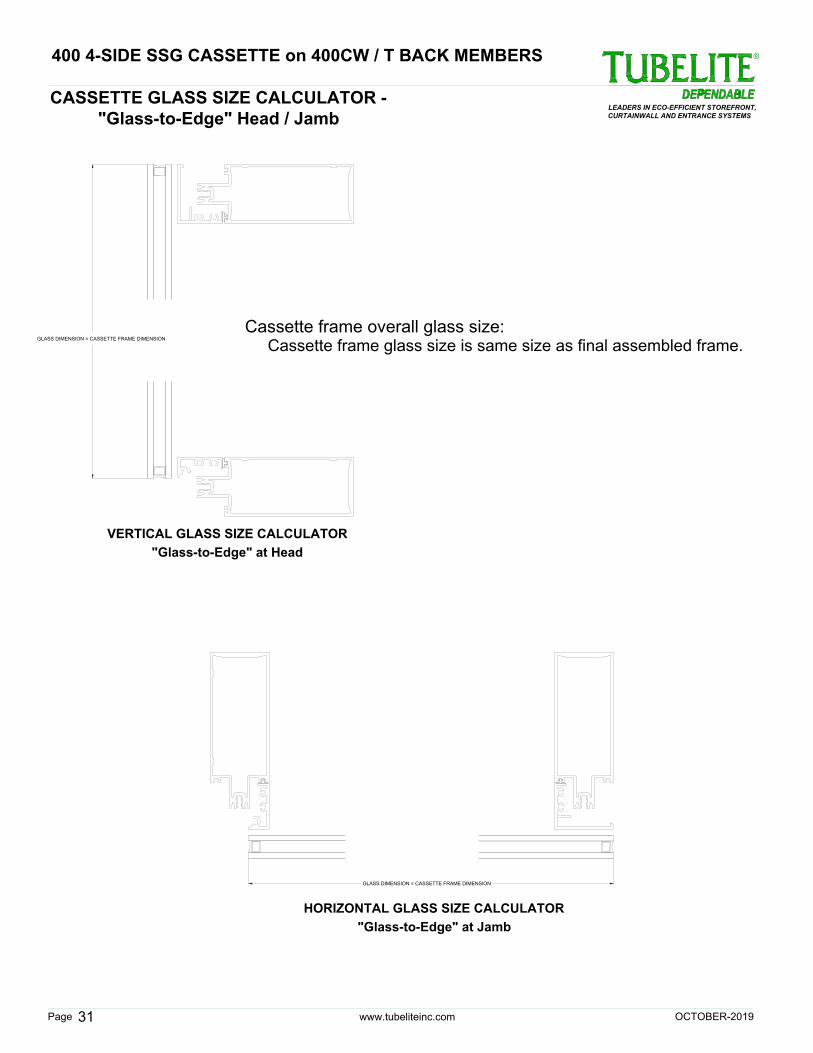
Cassette frame overall glass size:
Cassette frame glass size is same size as final assembled frame.
CASSETTE GLASS SIZE CALCULATOR -
"Glass-to-Edge" Head / Jamb
400 4-SIDE SSG CASSETTE on 400CW / T BACK MEMBERS
OCTOBER-2019
www.tubeliteinc.comPage
LEADERS IN ECO-EFFICIENT STOREFRONT,
CURTAINWALL AND ENTRANCE SYSTEMS
®
32
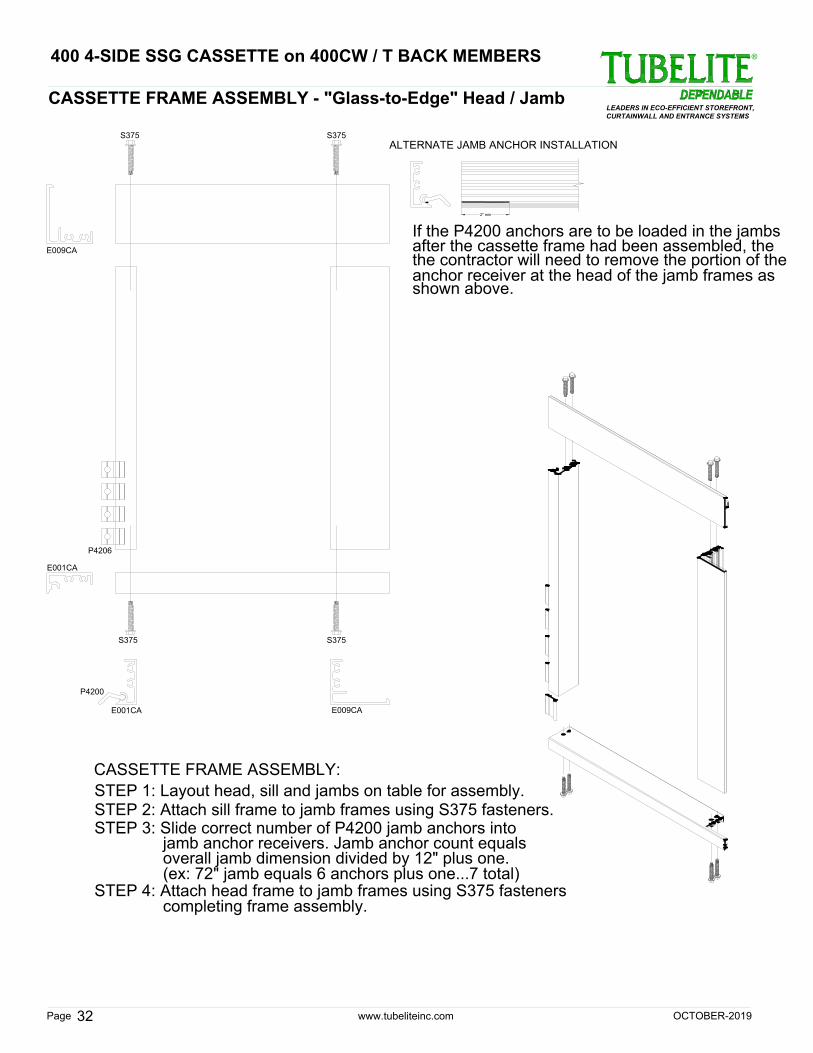
STEP 3: Slide correct number of P4200 jamb anchors into
E009CA
CASSETTE FRAME ASSEMBLY:
overall jamb dimension divided by 12" plus one.
STEP 1: Layout head, sill and jambs on table for assembly.
STEP 2: Attach sill frame to jamb frames using S375 fasteners.
jamb anchor receivers. Jamb anchor count equals
STEP 4: Attach head frame to jamb frames using S375 fasteners
(ex: 72" jamb equals 6 anchors plus one...7 total)
completing frame assembly.
CASSETTE FRAME ASSEMBLY - "Glass-to-Edge" Head / Jamb
P4206
S375
E001CA
S375
S375
S375
E001CA
E009CA
P4200
If the P4200 anchors are to be loaded in the jambs
anchor receiver at the head of the jamb frames as
2" min
after the cassette frame had been assembled, the
ALTERNATE JAMB ANCHOR INSTALLATION
the contractor will need to remove the portion of the
shown above.
400 4-SIDE SSG CASSETTE on 400CW / T BACK MEMBERS
OCTOBER-2019
www.tubeliteinc.comPage
LEADERS IN ECO-EFFICIENT STOREFRONT,
CURTAINWALL AND ENTRANCE SYSTEMS
®
33
E001CA
P4211
P4211
E001CA
P4211
P4211
E001CA
E001CA
E001CA
E001CA
E001CA
E001CA
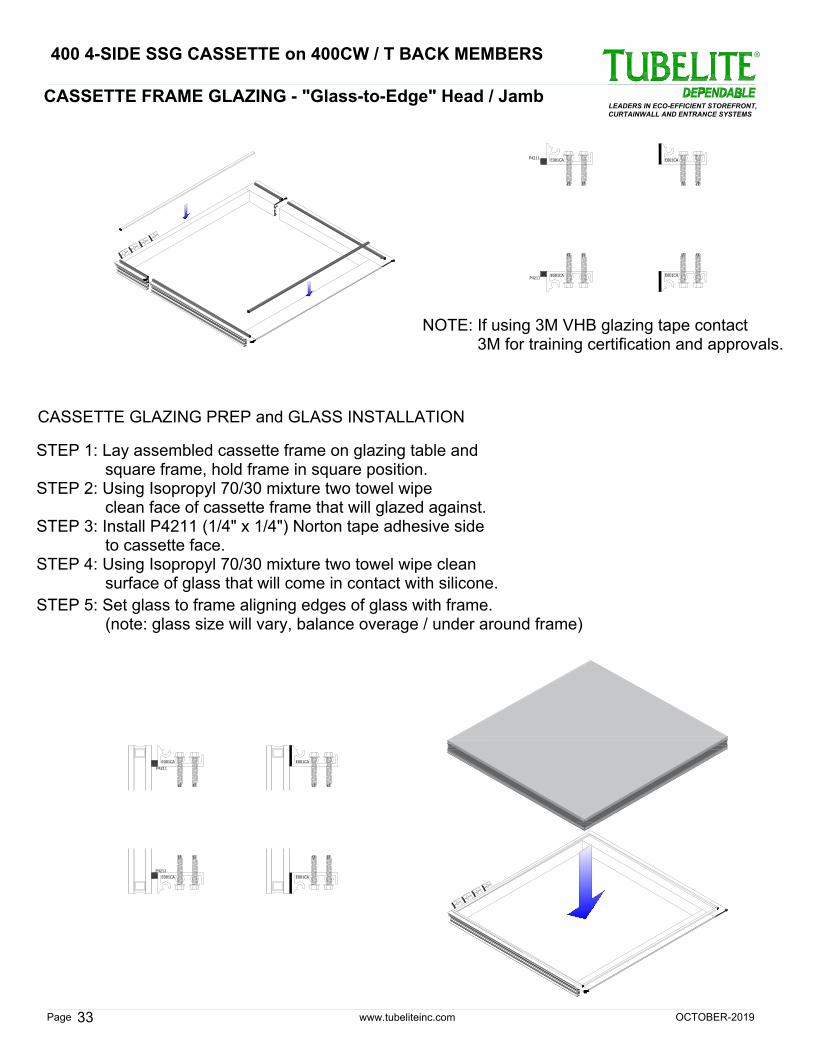
CASSETTE FRAME GLAZING - "Glass-to-Edge" Head / Jamb
to cassette face.
STEP 5: Set glass to frame aligning edges of glass with frame.
(note: glass size will vary, balance overage / under around frame)
CASSETTE GLAZING PREP and GLASS INSTALLATION
surface of glass that will come in contact with silicone.
3M for training certification and approvals.
STEP 4: Using Isopropyl 70/30 mixture two towel wipe clean
square frame, hold frame in square position.
NOTE: If using 3M VHB glazing tape contact
STEP 1: Lay assembled cassette frame on glazing table and
STEP 2: Using Isopropyl 70/30 mixture two towel wipe
STEP 3: Install P4211 (1/4" x 1/4") Norton tape adhesive side
clean face of cassette frame that will glazed against.
400 4-SIDE SSG CASSETTE on 400CW / T BACK MEMBERS
OCTOBER-2019
www.tubeliteinc.comPage
LEADERS IN ECO-EFFICIENT STOREFRONT,
CURTAINWALL AND ENTRANCE SYSTEMS
®
34
E001CA
P4211
P4211
E001CA
Fig. 33.1
CASSETTE FRAME GLAZING - "Glass-to-Edge" Head / Jamb - cont.
Note: Use high grade structural silicone for SSG glass attachment
STEP 5: Move unit making sure not to disturb glass / cassette frame
at quarter points.
P1912S
handling.
to cassette frames. Follow manufactures' recommendations
CASSETTE SSG GLAZING
for application...environmental conditions, curing time and
STEP 2: Tool silicone around perimeter of frame.
STEP 1: Fill void between cassette frame and glass with silicone.
and let cure per manufactures' recommendations.
STEP 4: Install setting block chair P4217 and setting block P1912S
of center anchors P4200 as shown in Fig. 33.1.
STEP 3: Prior to installing setting block chair P4217 install correct number
400 4-SIDE SSG CASSETTE on 400CW / T BACK MEMBERS
OCTOBER-2019
www.tubeliteinc.comPage
LEADERS IN ECO-EFFICIENT STOREFRONT,
CURTAINWALL AND ENTRANCE SYSTEMS
®
35
E55TB223
S376
P4204
E55TB223
E55TB223
S376
P4204
E55TB223
S376
P4200
E55TB223
S376
P4204
E55TB223
E55TB223
E009CA
S376
P4204
E009CA
E009CA
E001CA
E001CA
E55TB223
E009CA
S376
P4204
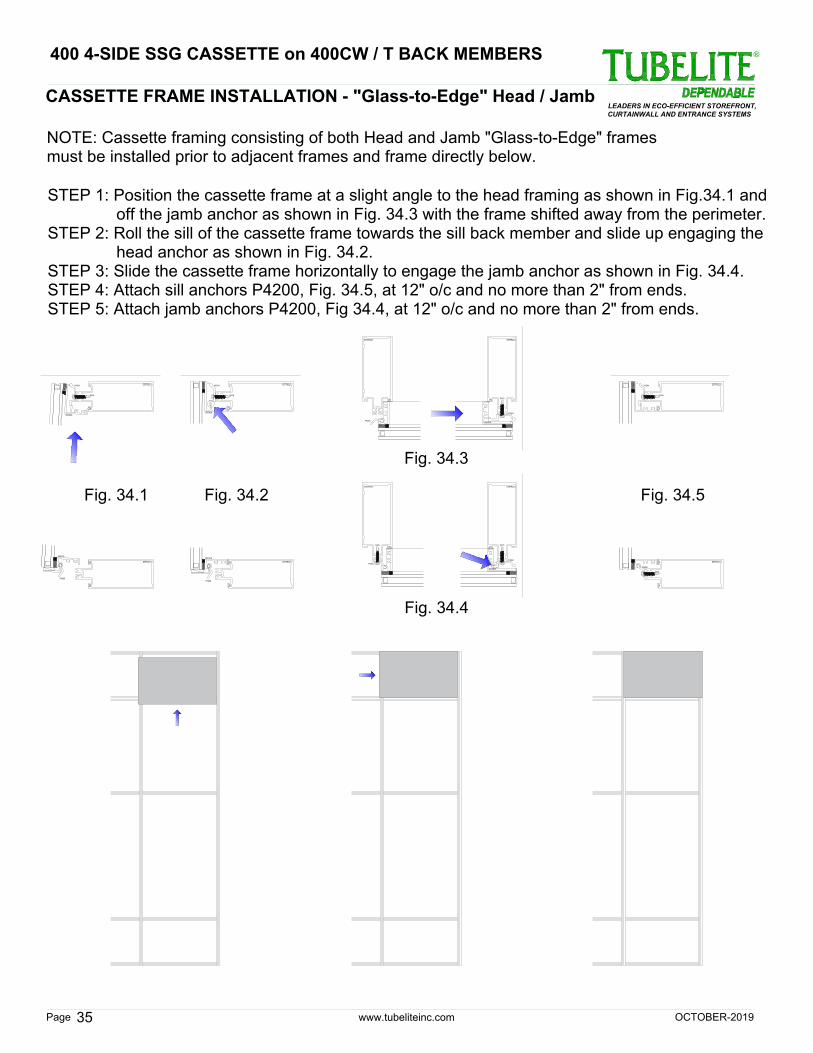
CASSETTE FRAME INSTALLATION - "Glass-to-Edge" Head / Jamb
Fig. 34.5
STEP 4: Attach sill anchors P4200, Fig. 34.5, at 12" o/c and no more than 2" from ends.
STEP 5: Attach jamb anchors P4200, Fig 34.4, at 12" o/c and no more than 2" from ends.
P4200
Fig. 34.2
Fig. 34.3
Fig. 34.4
NOTE: Cassette framing consisting of both Head and Jamb "Glass-to-Edge" frames
Fig. 34.1
must be installed prior to adjacent frames and frame directly below.
E55TB223
E55TB223
STEP 1: Position the cassette frame at a slight angle to the head framing as shown in Fig.34.1 and
S376
off the jamb anchor as shown in Fig. 34.3 with the frame shifted away from the perimeter.
STEP 2: Roll the sill of the cassette frame towards the sill back member and slide up engaging the
STEP 3: Slide the cassette frame horizontally to engage the jamb anchor as shown in Fig. 34.4.
P4200
head anchor as shown in Fig. 34.2.
P4200
P4200
400 4-SIDE SSG CASSETTE on 400CW / T BACK MEMBERS
OCTOBER-2019
www.tubeliteinc.comPage
LEADERS IN ECO-EFFICIENT STOREFRONT,
CURTAINWALL AND ENTRANCE SYSTEMS
®
OCTOBER-2019
36
400 4-SIDE SSG CASSETTE on 400CW / T BACK MEMBERS
ATTACHING FRAME VERTICAL DLO
CASSETTE FRAME VERTICAL
DIMENSION = DLO + 3-3/8"
2-1/2"
7/8"
3/8" REF DIM
C/L
VERTICAL FRAME SIZE CALCULATOR
"Glass-to-Edge" at Head
7/8"
ATTACHING FRAME HORIZONTAL DLO
CASSETTE HORIZONTAL FRAME DIMENSION = DLO + 1-3/4"
C/L
3/8" REF. DIM.
HORIZONTAL FRAME SIZE CALCULATOR
C/L
3/8" REF. DIM.
7/8"
CASSETTE FRAME SIZE CALCULATOR - "Glass-to-Edge" Head
Vertical - DLO plus 3-3/8"
E001CA
Cassette frame size:
Horizontal - DLO plus 1-3/4"
NOTE: Cassette frames sizes based on 400CW/T back members
or 2-1/2" profile back members.
E009CA
E001CA
E001CA
www.tubeliteinc.comPage
LEADERS IN ECO-EFFICIENT STOREFRONT,
CURTAINWALL AND ENTRANCE SYSTEMS
®
37
VERTICAL FRAME SIZE CALCULATOR
"Glass-to-Edge" at Head
VERTICAL FRAME CUT DIMENSION
2-1/2"
7/8"
.2500
(2) 0.228 CLR HOLES
11°
.3750
.6250
.3750
.2500
(2) 0.228 CLR HOLES
11°
.3750
.6250
CASSETTE HORIZONTAL CUT LENGTH
.3750
HORIZONTAL FRAME CUT and LAYOUT SECTION
Standard Framing
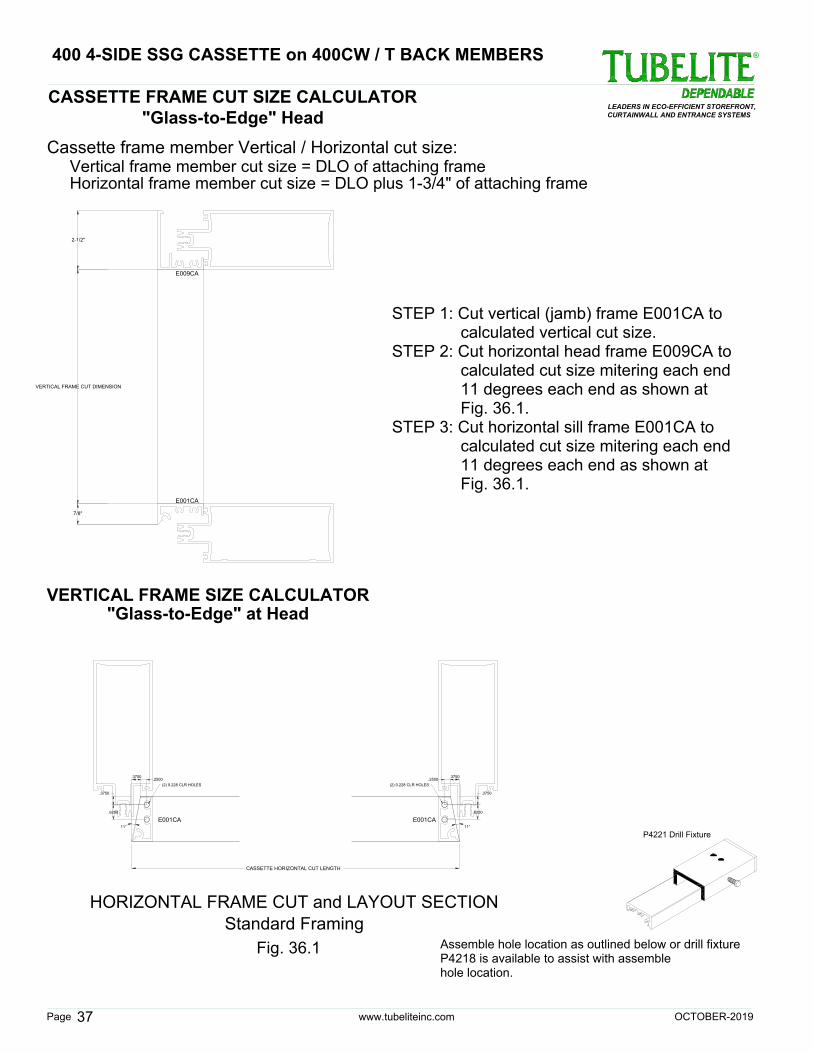
Assemble hole location as outlined below or drill fixture
P4218 is available to assist with assemble
E009CA
E001CA
Fig. 36.1.
calculated vertical cut size.
CASSETTE FRAME CUT SIZE CALCULATOR
"Glass-to-Edge" Head
P4221 Drill Fixture
Cassette frame member Vertical / Horizontal cut size:
Vertical frame member cut size = DLO of attaching frame
hole location.
Horizontal frame member cut size = DLO plus 1-3/4" of attaching frame
E001CA
STEP 1: Cut vertical (jamb) frame E001CA to
E001CA
STEP 3: Cut horizontal sill frame E001CA to
11 degrees each end as shown at
STEP 2: Cut horizontal head frame E009CA to
calculated cut size mitering each end
Fig. 36.1
Fig. 36.1.
11 degrees each end as shown at
calculated cut size mitering each end
400 4-SIDE SSG CASSETTE on 400CW / T BACK MEMBERS
OCTOBER-2019
www.tubeliteinc.comPage
LEADERS IN ECO-EFFICIENT STOREFRONT,
CURTAINWALL AND ENTRANCE SYSTEMS
®
38
VERTICAL GLASS SIZE CALCULATOR
"Glass-to-Edge" at Head
GLASS DIMENSION = CASSETTE FRAME DIMENSION
GLASS DIMENSION = CASSETTE FRAME DIMENSION
HORIZONTAL GLASS SIZE CALCULATOR
Cassette frame overall glass size:
CASSETTE GLASS SIZE CALCULATOR - "Glass-to-Edge" Head
Cassette frame glass size is same size as final assembled frame.
400 4-SIDE SSG CASSETTE on 400CW / T BACK MEMBERS
OCTOBER-2019

www.tubeliteinc.comPage
LEADERS IN ECO-EFFICIENT STOREFRONT,
CURTAINWALL AND ENTRANCE SYSTEMS
®
39
CASSETTE FRAME ASSEMBLY - "Glass-to-Edge" Head
E001CA
P4200
E001CA
E001CA
P4200
2" min
ALTERNATE JAMB ANCHOR INSTALLATION
If the P4200 anchors are to be loaded in the jambs
shown above.
the contractor will need to remove the portion of the
after the cassette frame had been assembled, the
anchor receiver at the head of the jamb frames as
S375 S375
S375S375
E009CA
CASSETTE FRAME ASSEMBLY:
STEP 1: Layout head, sill and jambs on table for assembly.
STEP 2: Attach sill frame to jamb frames using S375 fasteners.
STEP 3: Slide correct number of P4200 jamb anchors into
jamb anchor receivers. Jamb anchor count equals
overall jamb dimension divided by 12" plus one.
(ex: 72" jamb equals 6 anchors plus one...7 total)
STEP 4: Attach head frame to jamb frames using S375 fasteners
completing frame assembly.
400 4-SIDE SSG CASSETTE on 400CW / T BACK MEMBERS
OCTOBER-2019
www.tubeliteinc.comPage
LEADERS IN ECO-EFFICIENT STOREFRONT,
CURTAINWALL AND ENTRANCE SYSTEMS
®
40
E001CA
P4211
P4211
E001CA
P4211
P4211
E001CA
E001CA
E001CA
E001CA
E001CA
E001CA
STEP 2: Using Isopropyl 70/30 mixture two towel wipe
surface of glass that will come in contact with silicone.
CASSETTE GLAZING PREP and GLASS INSTALLATION
CASSETTE FRAME GLAZING - "Glass-to-Edge" Head
square frame, hold frame in square position.
STEP 1: Lay assembled cassette frame on glazing table and
STEP 3: Install P4211 (1/4" x 1/4") Norton tape adhesive side
STEP 4: Using Isopropyl 70/30 mixture two towel wipe clean
clean face of cassette frame that will glazed against.
STEP 5: Set glass to frame aligning edges of glass with frame.
to cassette face.
(note: glass size will vary, balance overage / under around frame)
3M for training certification and approvals.
NOTE: If using 3M VHB glazing tape contact
400 4-SIDE SSG CASSETTE on 400CW / T BACK MEMBERS
OCTOBER-2019
www.tubeliteinc.comPage
LEADERS IN ECO-EFFICIENT STOREFRONT,
CURTAINWALL AND ENTRANCE SYSTEMS
®
41
E001CA
P4211
P4211
E001CA
P1912S
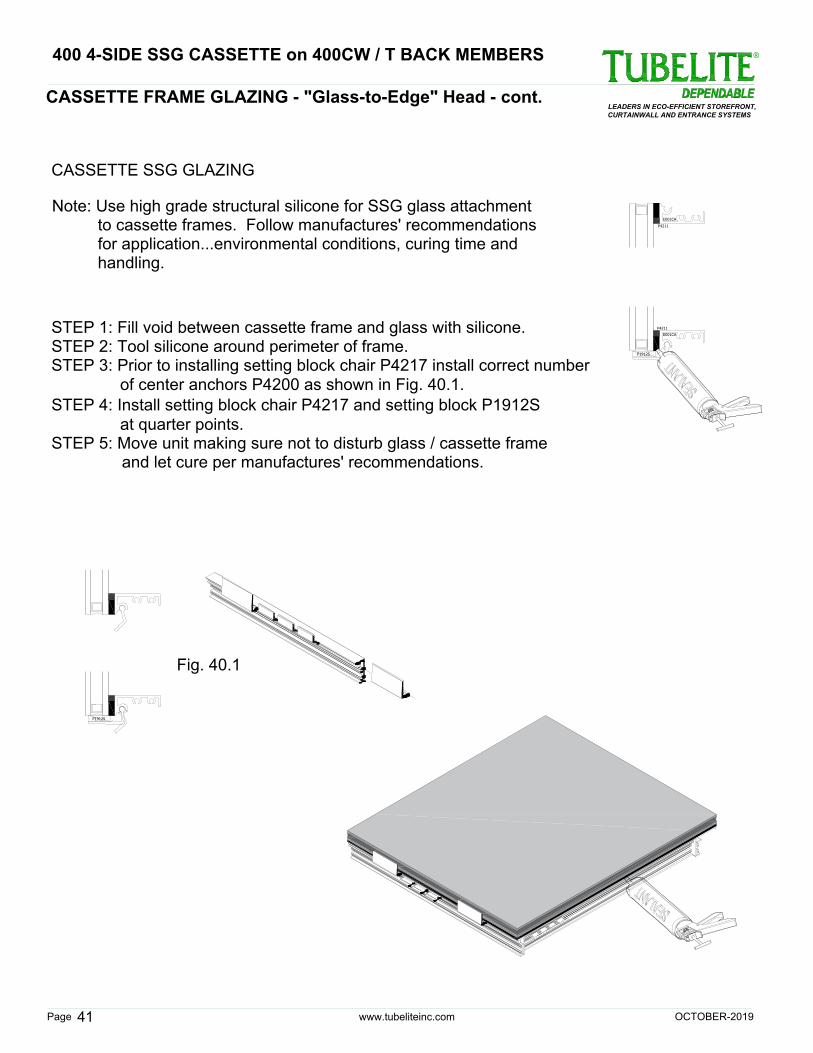
for application...environmental conditions, curing time and
and let cure per manufactures' recommendations.
STEP 4: Install setting block chair P4217 and setting block P1912S
to cassette frames. Follow manufactures' recommendations
STEP 1: Fill void between cassette frame and glass with silicone.
CASSETTE FRAME GLAZING - "Glass-to-Edge" Head - cont.
Note: Use high grade structural silicone for SSG glass attachment
CASSETTE SSG GLAZING
STEP 5: Move unit making sure not to disturb glass / cassette frame
handling.
STEP 2: Tool silicone around perimeter of frame.
at quarter points.
of center anchors P4200 as shown in Fig. 40.1.
P1912S
STEP 3: Prior to installing setting block chair P4217 install correct number
Fig. 40.1
400 4-SIDE SSG CASSETTE on 400CW / T BACK MEMBERS
OCTOBER-2019
www.tubeliteinc.comPage
LEADERS IN ECO-EFFICIENT STOREFRONT,
CURTAINWALL AND ENTRANCE SYSTEMS
®
42
E55TB223
S376
P4204
E55TB223
E55TB223
S376
P4204
E55TB223
S376
P4200
E55TB223
S376
P4204
E55TB223
E009CA
E009CA
E001CA
E001CA
E55TB223
P4200
E55TB223
P4200
E55TB223
S376
P4200
E55TB223
S376
P4200
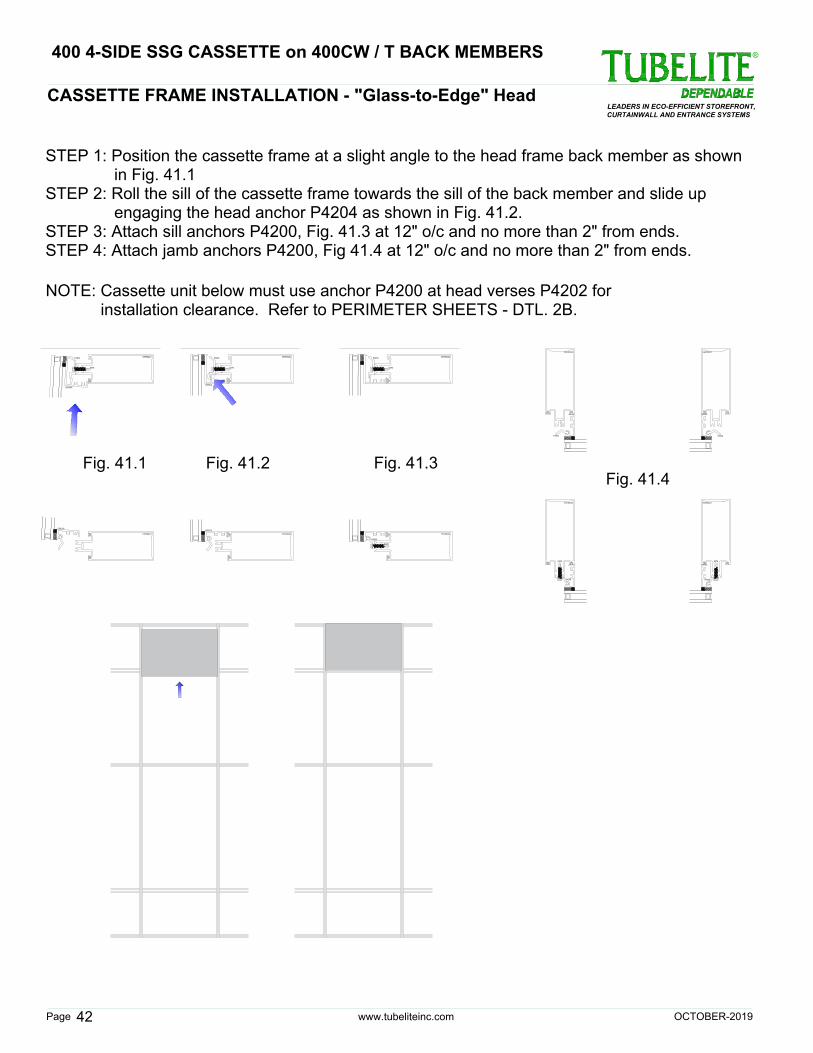
CASSETTE FRAME INSTALLATION - "Glass-to-Edge" Head
in Fig. 41.1
Fig. 41.3
STEP 3: Attach sill anchors P4200, Fig. 41.3 at 12" o/c and no more than 2" from ends.
Fig. 41.4
Fig. 41.2
NOTE: Cassette unit below must use anchor P4200 at head verses P4202 for
Fig. 41.1
STEP 1: Position the cassette frame at a slight angle to the head frame back member as shown
installation clearance. Refer to PERIMETER SHEETS - DTL. 2B.
engaging the head anchor P4204 as shown in Fig. 41.2.
STEP 2: Roll the sill of the cassette frame towards the sill of the back member and slide up
STEP 4: Attach jamb anchors P4200, Fig 41.4 at 12" o/c and no more than 2" from ends.
400 4-SIDE SSG CASSETTE on 400CW / T BACK MEMBERS
OCTOBER-2019

www.tubeliteinc.comPage
LEADERS IN ECO-EFFICIENT STOREFRONT,
CURTAINWALL AND ENTRANCE SYSTEMS
®
OCTOBER-2019
43
400 4-SIDE SSG CASSETTE on 400CW / T BACK MEMBERS
VERTICAL FRAME SIZE CALCULATOR
"Glass-to-Edge" at Sill
7/8"
ATTACHING FRAME HORIZONTAL DLO
CASSETTE HORIZONTAL FRAME DIMENSION = DLO + 1-3/4"
C/L
3/8" REF. DIM.
HORIZONTAL FRAME SIZE CALCULATOR
CASSETTE FRAME SIZE CALCULATOR - "Glass-to-Edge" Sill
C/L
3/8" REF. DIM.
7/8"
ATTACHING FRAME VERTICAL DLO
CASSETTE FRAME VERTICAL
DIMENSION = DLO + 3-3/8"
2-1/2"
7/8"
3/8" REF DIM
C/L
Horizontal - DLO plus 1-3/4"
E010CA
E001CA
Cassette frame size:
or 2-1/2" profile back members.
Vertical - DLO plus 3-3/8"
NOTE: Cassette frames sizes based on 400CW/T back members
E001CA
E001CA
www.tubeliteinc.comPage
LEADERS IN ECO-EFFICIENT STOREFRONT,
CURTAINWALL AND ENTRANCE SYSTEMS
®
44
VERTICAL FRAME SIZE CALCULATOR
"Glass-to-Edge" at Sill
CASSETTE FRAME CUT SIZE CALCULATOR -
"Glass-to-Edge" Sill
VERTICAL FRAME CUT DIMENSION
2-1/2"
7/8"
.2500
(2) 0.228 CLR HOLES
.6250
11°
.3750.3750
Standard Framing
HORIZONTAL FRAME CUT and LAYOUT SECTION
(2) 0.228 CLR HOLES
.2500
.6250
.3750
11°
CASSETTE HORIZONTAL CUT LENGTH
.3750
Assemble hole location as outlined below or drill fixture
E001CA
P4218 is available to assist with assemble
Horizontal frame member cut size = DLO plus 1-3/4" of attaching frame
E001CA
Fig. 43.1
STEP 1: Cut vertical (jamb) frame E001CA to
Cassette frame member Vertical / Horizontal cut size:
STEP 2: Cut horizontal head frame E001CA to
calculated cut size mitering each end
calculated vertical cut size.
Fig. 43.1.
Fig. 43.1.
11 degrees each end as shown at
STEP 3: Cut horizontal sill frame E010CA to
11 degrees each end as shown at
P4221 Drill Fixture
hole location.
calculated cut size mitering each end
E001CA
Vertical frame member cut size = DLO of attaching frame
E010CA
400 4-SIDE SSG CASSETTE on 400CW / T BACK MEMBERS
OCTOBER-2019
www.tubeliteinc.comPage
LEADERS IN ECO-EFFICIENT STOREFRONT,
CURTAINWALL AND ENTRANCE SYSTEMS
®
45
VERTICAL GLASS SIZE CALCULATOR
"Glass-to-Edge" at Sill
GLASS DIMENSION = CASSETTE FRAME DIMENSION
CASSETTE GLASS SIZE CALCULATOR - "Glass-to-Edge" Sill
HORIZONTAL GLASS SIZE CALCULATOR
GLASS DIMENSION = CASSETTE FRAME DIMENSION
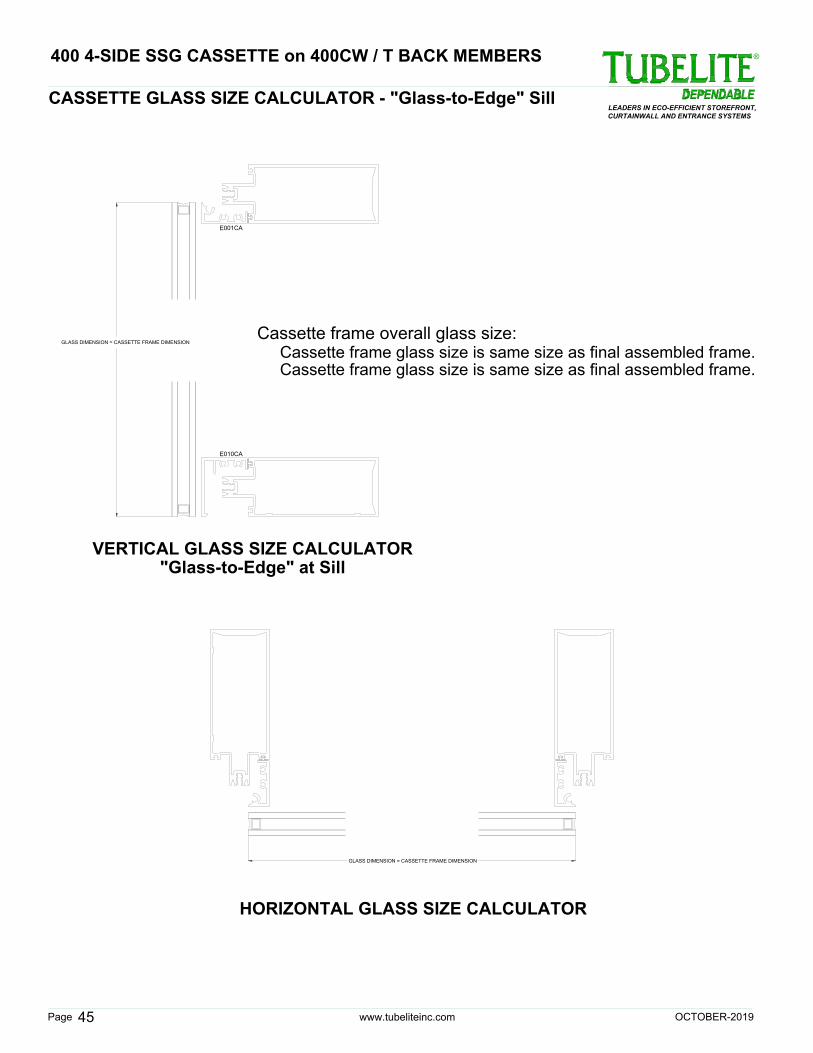
Cassette frame overall glass size:
Cassette frame glass size is same size as final assembled frame.
E010CA
E001CA
Cassette frame glass size is same size as final assembled frame.
400 4-SIDE SSG CASSETTE on 400CW / T BACK MEMBERS
OCTOBER-2019
www.tubeliteinc.comPage
LEADERS IN ECO-EFFICIENT STOREFRONT,
CURTAINWALL AND ENTRANCE SYSTEMS
®
46
CASSETTE FRAME ASSEMBLY - "Glass-to-Edge" Sill
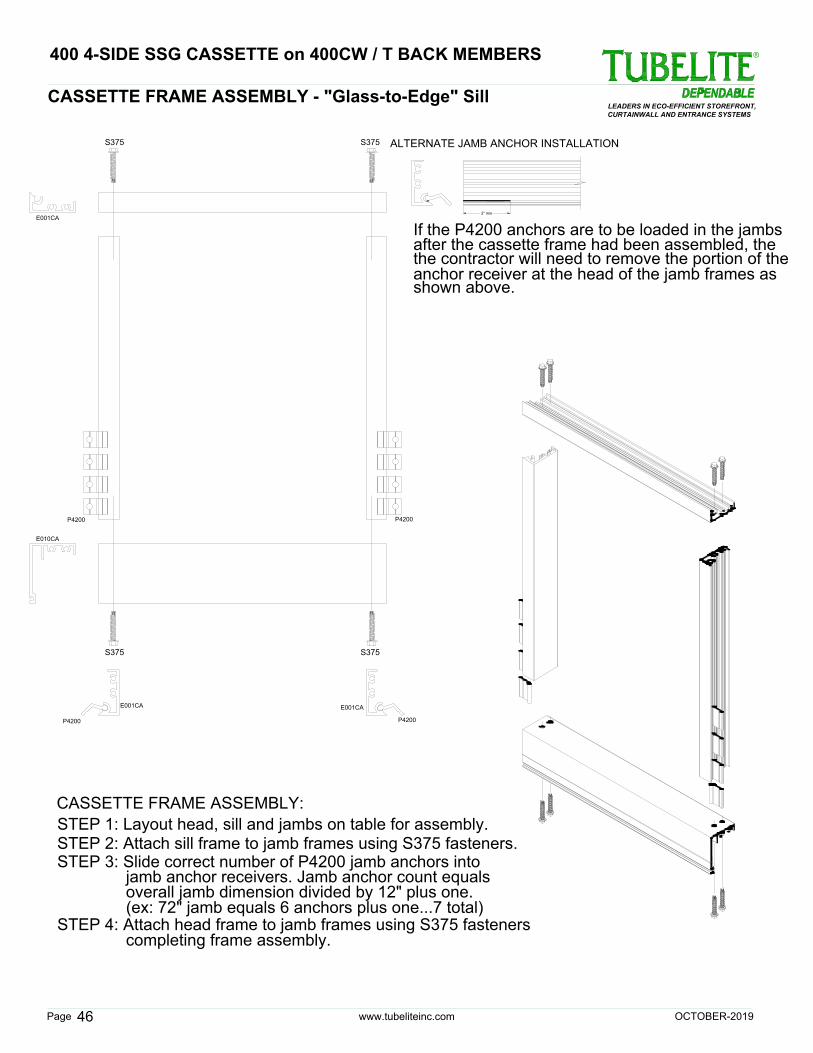
CASSETTE FRAME ASSEMBLY:
STEP 1: Layout head, sill and jambs on table for assembly.
STEP 3: Slide correct number of P4200 jamb anchors into
jamb anchor receivers. Jamb anchor count equals
(ex: 72" jamb equals 6 anchors plus one...7 total)
STEP 4: Attach head frame to jamb frames using S375 fasteners
STEP 2: Attach sill frame to jamb frames using S375 fasteners.
overall jamb dimension divided by 12" plus one.
completing frame assembly.
E010CA
E001CA
E001CA
P4200
P4200
E001CA
P4200
P4200
S375
S375
S375
anchor receiver at the head of the jamb frames as
If the P4200 anchors are to be loaded in the jambs
the contractor will need to remove the portion of the
ALTERNATE JAMB ANCHOR INSTALLATION
S375
2" min
shown above.
after the cassette frame had been assembled, the
400 4-SIDE SSG CASSETTE on 400CW / T BACK MEMBERS
OCTOBER-2019
www.tubeliteinc.comPage
LEADERS IN ECO-EFFICIENT STOREFRONT,
CURTAINWALL AND ENTRANCE SYSTEMS
®
47
CASSETTE FRAME GLAZING - "Glass-to-Edge" Sill
E001CA
P4211
P4211
E001CA
E010CA
E010CA
E001CA
P4211
P4211
E010CA
E001CA
E010CA
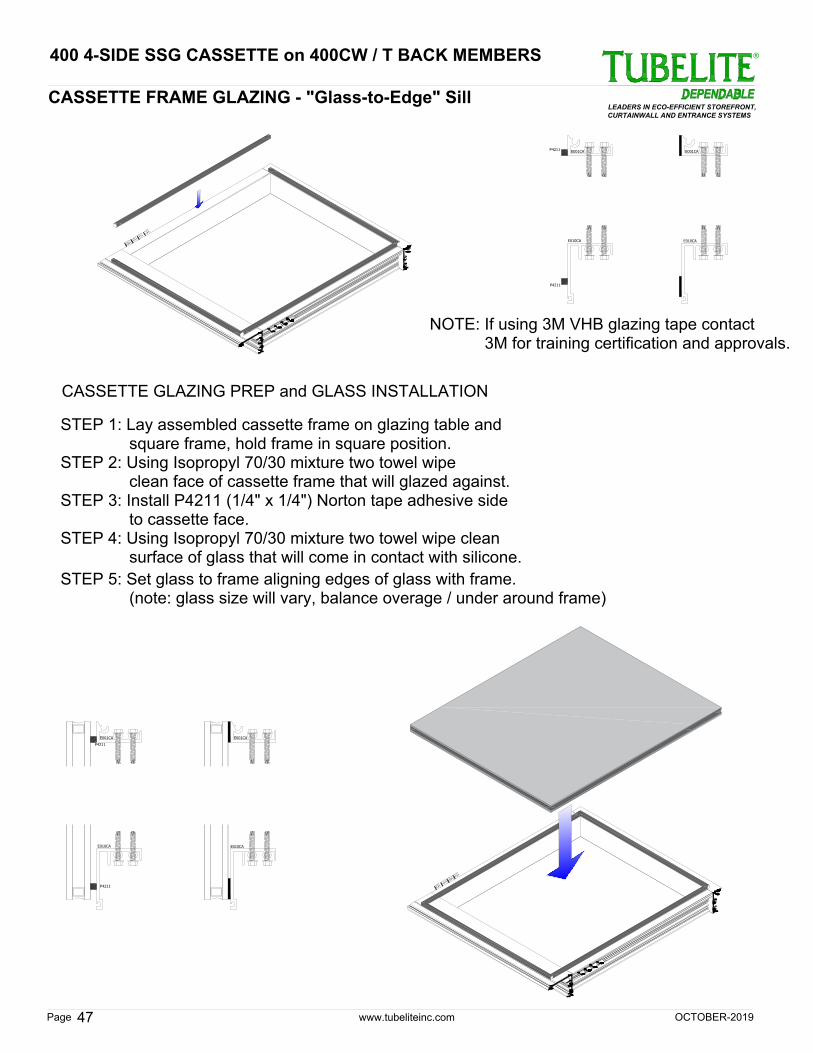
to cassette face.
NOTE: If using 3M VHB glazing tape contact
STEP 1: Lay assembled cassette frame on glazing table and
CASSETTE GLAZING PREP and GLASS INSTALLATION
square frame, hold frame in square position.
STEP 5: Set glass to frame aligning edges of glass with frame.
STEP 2: Using Isopropyl 70/30 mixture two towel wipe
(note: glass size will vary, balance overage / under around frame)
surface of glass that will come in contact with silicone.
STEP 3: Install P4211 (1/4" x 1/4") Norton tape adhesive side
clean face of cassette frame that will glazed against.
STEP 4: Using Isopropyl 70/30 mixture two towel wipe clean
3M for training certification and approvals.
400 4-SIDE SSG CASSETTE on 400CW / T BACK MEMBERS
OCTOBER-2019
www.tubeliteinc.comPage
LEADERS IN ECO-EFFICIENT STOREFRONT,
CURTAINWALL AND ENTRANCE SYSTEMS
®
48
CASSETTE FRAME GLAZING - "Glass-to-Edge" Sill cont.
E001CA
P4211
P4211
E011CA
P4603
P4623
Note: Use high grade structural silicone for SSG glass attachment
CASSETTE SSG GLAZING
STEP 2: Tool silicone around perimeter of frame.
STEP 1: Fill void between cassette frame and glass with silicone.
to cassette frames. Follow manufactures' recommendations
for application...environmental conditions, curing time and
handling.
STEP 3: Install setting block chair P4623 and setting block P4603
STEP 4: Move unit making sure not to disturb glass / cassette frame
and let cure per manufactures' recommendations.
at quarter points.
400 4-SIDE SSG CASSETTE on 400CW / T BACK MEMBERS
OCTOBER-2019
www.tubeliteinc.comPage
LEADERS IN ECO-EFFICIENT STOREFRONT,
CURTAINWALL AND ENTRANCE SYSTEMS
®
49
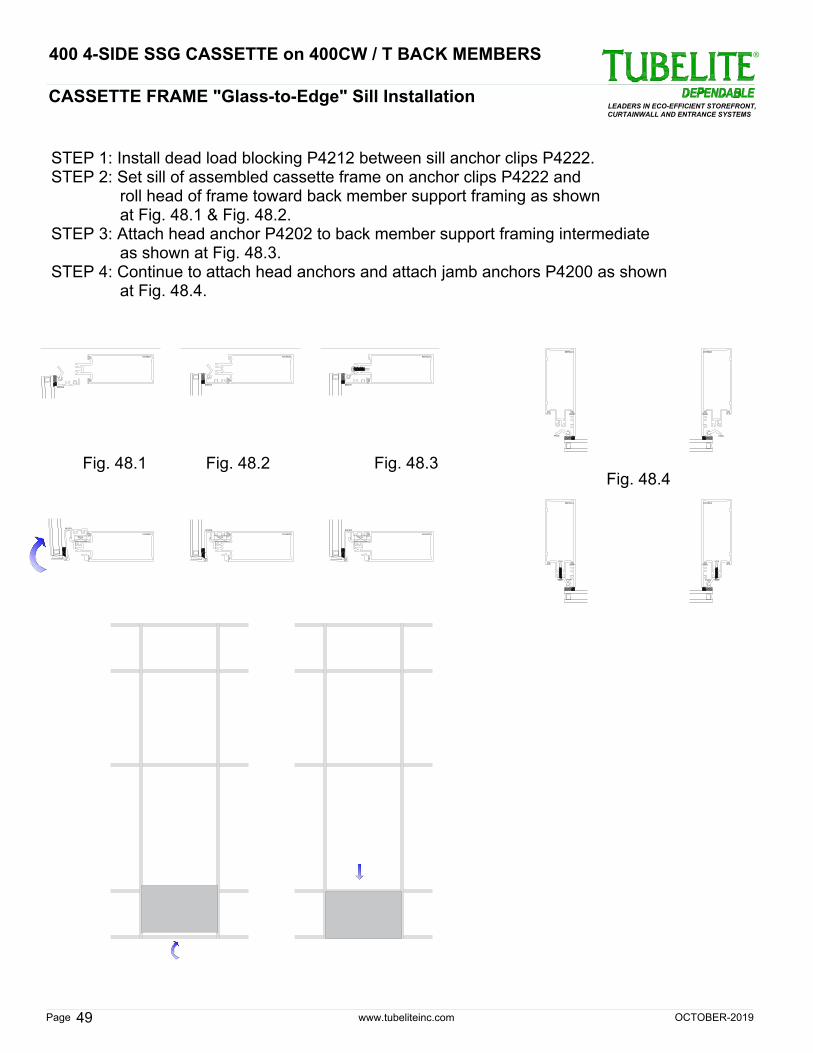
CASSETTE FRAME "Glass-to-Edge" Sill Installation
E55TB223
E55TB223
E55TB223
E55TB223
E55TB223
P4200
E55TB223
P4200
E55TB223
S376
P4200
E55TB223
S376
P4200
E001CA
P4212
E001CA
E010CA
E010CA
P4212
E55TB223
E55TB223
E001CA
E010CA
P4212
Fig. 48.1 Fig. 48.3Fig. 48.2
Fig. 48.4
STEP 1: Install dead load blocking P4212 between sill anchor clips P4222.
STEP 2: Set sill of assembled cassette frame on anchor clips P4222 and
roll head of frame toward back member support framing as shown
at Fig. 48.1 & Fig. 48.2.
STEP 3: Attach head anchor P4202 to back member support framing intermediate
as shown at Fig. 48.3.
STEP 4: Continue to attach head anchors and attach jamb anchors P4200 as shown
at Fig. 48.4.
400 4-SIDE SSG CASSETTE on 400CW / T BACK MEMBERS
OCTOBER-2019

www.tubeliteinc.comPage
LEADERS IN ECO-EFFICIENT STOREFRONT,
CURTAINWALL AND ENTRANCE SYSTEMS
®
OCTOBER-2019
50
400 4-SIDE SSG CASSETTE on 400CW / T BACK MEMBERS
VERTICAL FRAME SIZE CALCULATOR
"Glass-to-Edge" at Sill
CASSETTE FRAME SIZE CALCULATOR -
"Glass-to-Edge" Sill / Jamb
ATTACHING FRAME VERTICAL DLO
CASSETTE FRAME VERTICAL
DIMENSION = DLO + 3-3/8"
2-1/2"
7/8"
3/8" REF DIM
C/L
7/8"
ATTACHING FRAME HORIZONTAL DLO
CASSETTE HORIZONTAL FRAME DIMENSION = DLO + 3-3/8"
C/L
3/8" REF. DIM.
2-1/2"
HORIZONTAL FRAME SIZE CALCULATOR
"Glass-to-Edge" at Jamb
NOTE: Cassette frames sizes based on 400CW/T back members
or 2-1/2" profile back members.
Cassette frame size:
Vertical - DLO plus 3-3/8"
Horizontal - DLO plus 3-3/8"
E010CA
E001CA
E001CA
E009CA
www.tubeliteinc.comPage
LEADERS IN ECO-EFFICIENT STOREFRONT,
CURTAINWALL AND ENTRANCE SYSTEMS
®
51
VERTICAL FRAME SIZE CALCULATOR
"Glass-to-Edge" at Sill
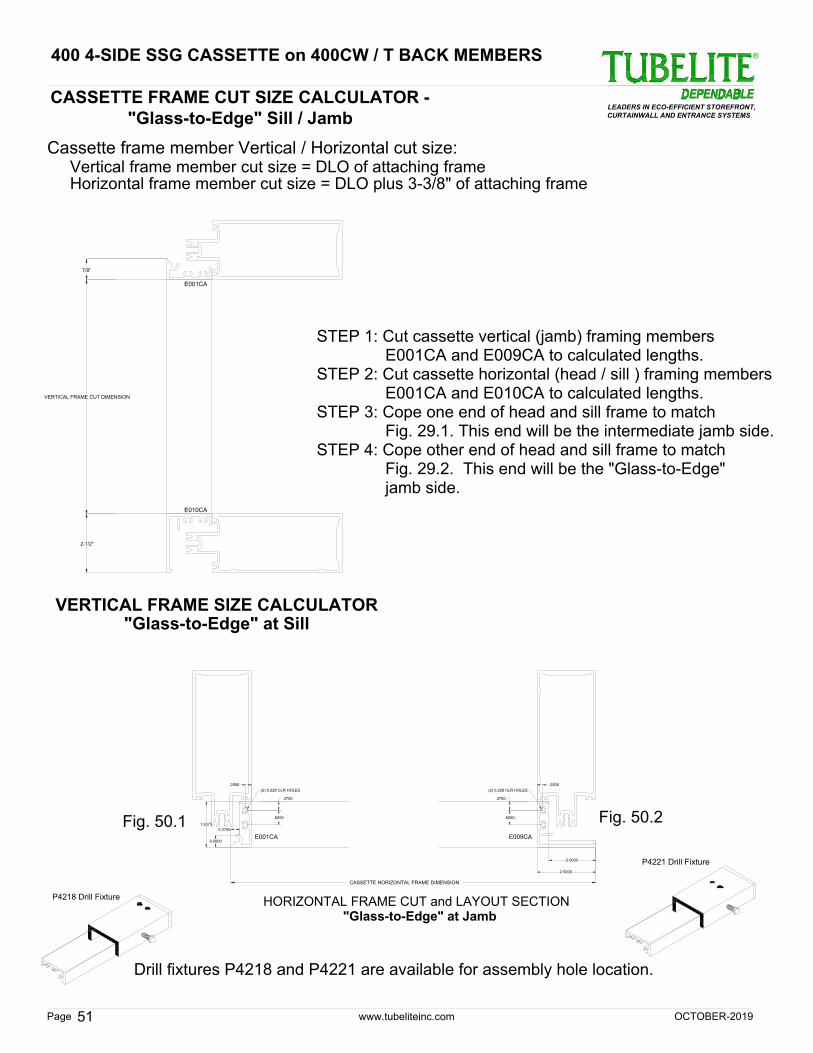
CASSETTE FRAME CUT SIZE CALCULATOR -
"Glass-to-Edge" Sill / Jamb
VERTICAL FRAME CUT DIMENSION
2-1/2"
7/8"
Cassette frame member Vertical / Horizontal cut size:
Vertical frame member cut size = DLO of attaching frame
Horizontal frame member cut size = DLO plus 3-3/8" of attaching frame
E010CA
E001CA
"Glass-to-Edge" at Jamb
HORIZONTAL FRAME CUT and LAYOUT SECTION
.2500
.3750
.6250
2.5000
2.0000
(2) 0.228 CLR HOLES
.3750
.6250
(2) 0.228 CLR HOLES
.2500
1.9375
0.5000
CASSETTE HORIZONTAL FRAME DIMENSION
0.3750
P4218 Drill Fixture
P4221 Drill Fixture
Drill fixtures P4218 and P4221 are available for assembly hole location.
E001CA E009CA
Fig. 50.1
Fig. 50.2
STEP 1: Cut cassette vertical (jamb) framing members
E001CA and E009CA to calculated lengths.
STEP 2: Cut cassette horizontal (head / sill ) framing members
E001CA and E010CA to calculated lengths.
STEP 3: Cope one end of head and sill frame to match
Fig. 29.1. This end will be the intermediate jamb side.
STEP 4: Cope other end of head and sill frame to match
Fig. 29.2. This end will be the "Glass-to-Edge"
jamb side.
400 4-SIDE SSG CASSETTE on 400CW / T BACK MEMBERS
OCTOBER-2019

www.tubeliteinc.comPage
LEADERS IN ECO-EFFICIENT STOREFRONT,
CURTAINWALL AND ENTRANCE SYSTEMS
®
52
VERTICAL GLASS SIZE CALCULATOR
"Glass-to-Edge" at Sill
CASSETTE GLASS SIZE CALCULATOR -
"Glass-to-Edge" Sill / Jamb
GLASS DIMENSION = CASSETTE FRAME DIMENSION
HORIZONTAL GLASS SIZE CALCULATOR
"Glass-to-Edge" at Jamb
GLASS DIMENSION = CASSETTE FRAME DIMENSION
Cassette frame overall glass size:
Cassette frame glass size is same size as final assembled frame.
E010CA
E001CA
E001CA E009CA
400 4-SIDE SSG CASSETTE on 400CW / T BACK MEMBERS
OCTOBER-2019
www.tubeliteinc.comPage
LEADERS IN ECO-EFFICIENT STOREFRONT,
CURTAINWALL AND ENTRANCE SYSTEMS
®
53
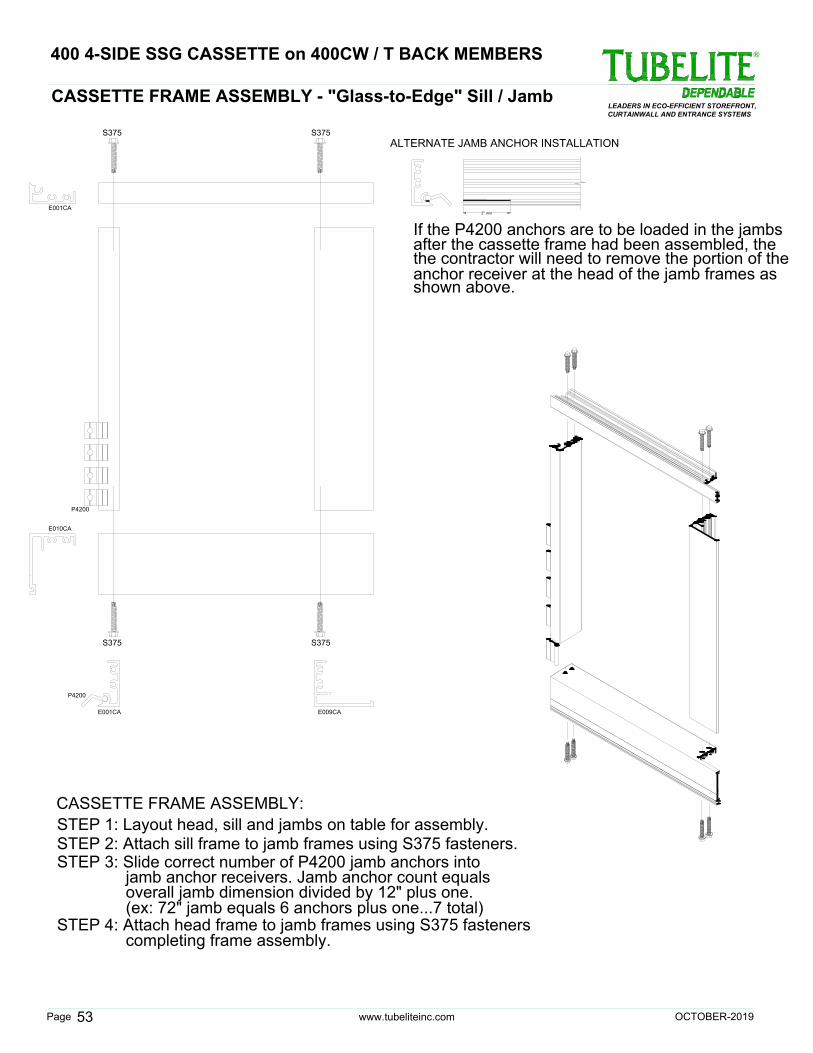
CASSETTE FRAME ASSEMBLY - "Glass-to-Edge" Sill / Jamb
S375 S375
S375S375
E010CA
E001CA
E001CA
P4200
P4200
E009CA
2" min
ALTERNATE JAMB ANCHOR INSTALLATION
after the cassette frame had been assembled, the
shown above.
the contractor will need to remove the portion of the
If the P4200 anchors are to be loaded in the jambs
anchor receiver at the head of the jamb frames as
CASSETTE FRAME ASSEMBLY:
STEP 1: Layout head, sill and jambs on table for assembly.
STEP 2: Attach sill frame to jamb frames using S375 fasteners.
STEP 3: Slide correct number of P4200 jamb anchors into
jamb anchor receivers. Jamb anchor count equals
overall jamb dimension divided by 12" plus one.
(ex: 72" jamb equals 6 anchors plus one...7 total)
STEP 4: Attach head frame to jamb frames using S375 fasteners
completing frame assembly.
400 4-SIDE SSG CASSETTE on 400CW / T BACK MEMBERS
OCTOBER-2019
www.tubeliteinc.comPage
LEADERS IN ECO-EFFICIENT STOREFRONT,
CURTAINWALL AND ENTRANCE SYSTEMS
®
54
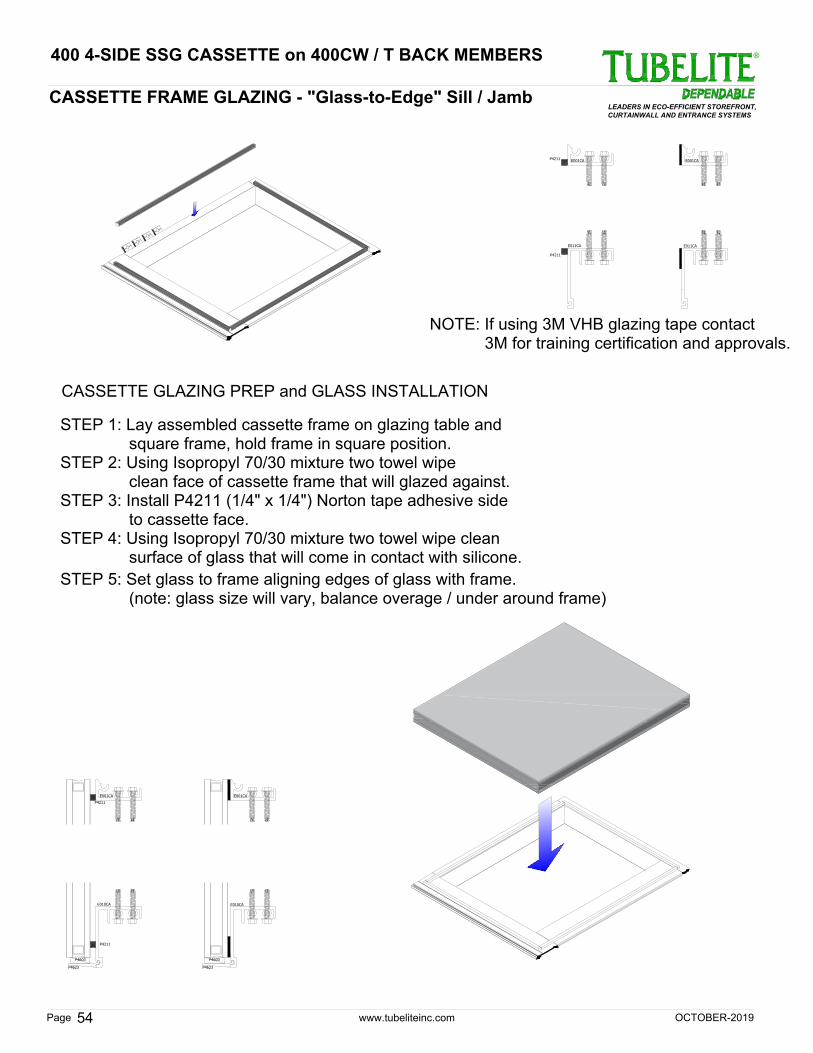
CASSETTE FRAME GLAZING - "Glass-to-Edge" Sill / Jamb
E001CA
P4211
P4211
E001CA
P4211
P4211
E010CA
E001CA
E001CA
E010CA
E011CA
E011CA
P4603
P4623
P4603
P4623
NOTE: If using 3M VHB glazing tape contact
3M for training certification and approvals.
STEP 1: Lay assembled cassette frame on glazing table and
CASSETTE GLAZING PREP and GLASS INSTALLATION
STEP 2: Using Isopropyl 70/30 mixture two towel wipe
to cassette face.
surface of glass that will come in contact with silicone.
square frame, hold frame in square position.
STEP 5: Set glass to frame aligning edges of glass with frame.
STEP 3: Install P4211 (1/4" x 1/4") Norton tape adhesive side
clean face of cassette frame that will glazed against.
STEP 4: Using Isopropyl 70/30 mixture two towel wipe clean
(note: glass size will vary, balance overage / under around frame)
400 4-SIDE SSG CASSETTE on 400CW / T BACK MEMBERS
OCTOBER-2019
www.tubeliteinc.comPage
LEADERS IN ECO-EFFICIENT STOREFRONT,
CURTAINWALL AND ENTRANCE SYSTEMS
®
55
E001CA
P4211
P4211
E011CA
P4603
P4623
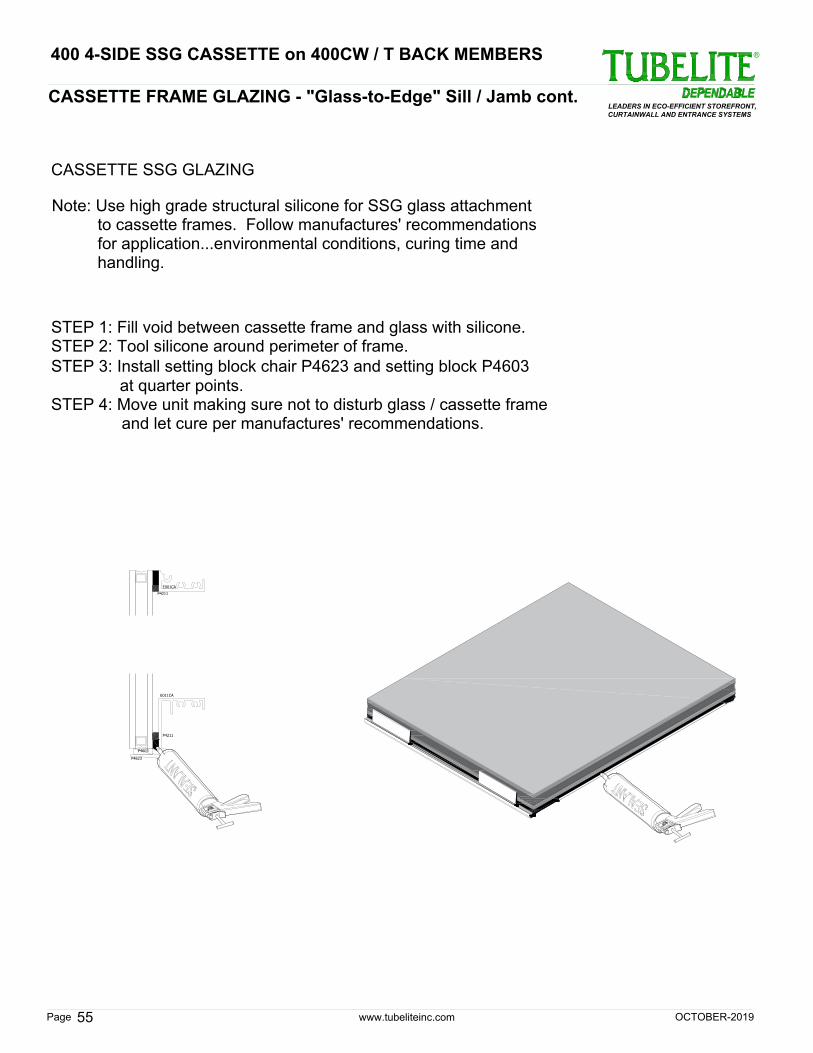
CASSETTE FRAME GLAZING - "Glass-to-Edge" Sill / Jamb cont.
CASSETTE SSG GLAZING
STEP 2: Tool silicone around perimeter of frame.
Note: Use high grade structural silicone for SSG glass attachment
STEP 1: Fill void between cassette frame and glass with silicone.
handling.
to cassette frames. Follow manufactures' recommendations
for application...environmental conditions, curing time and
STEP 3: Install setting block chair P4623 and setting block P4603
STEP 4: Move unit making sure not to disturb glass / cassette frame
and let cure per manufactures' recommendations.
at quarter points.
400 4-SIDE SSG CASSETTE on 400CW / T BACK MEMBERS
OCTOBER-2019
www.tubeliteinc.comPage
LEADERS IN ECO-EFFICIENT STOREFRONT,
CURTAINWALL AND ENTRANCE SYSTEMS
®
56
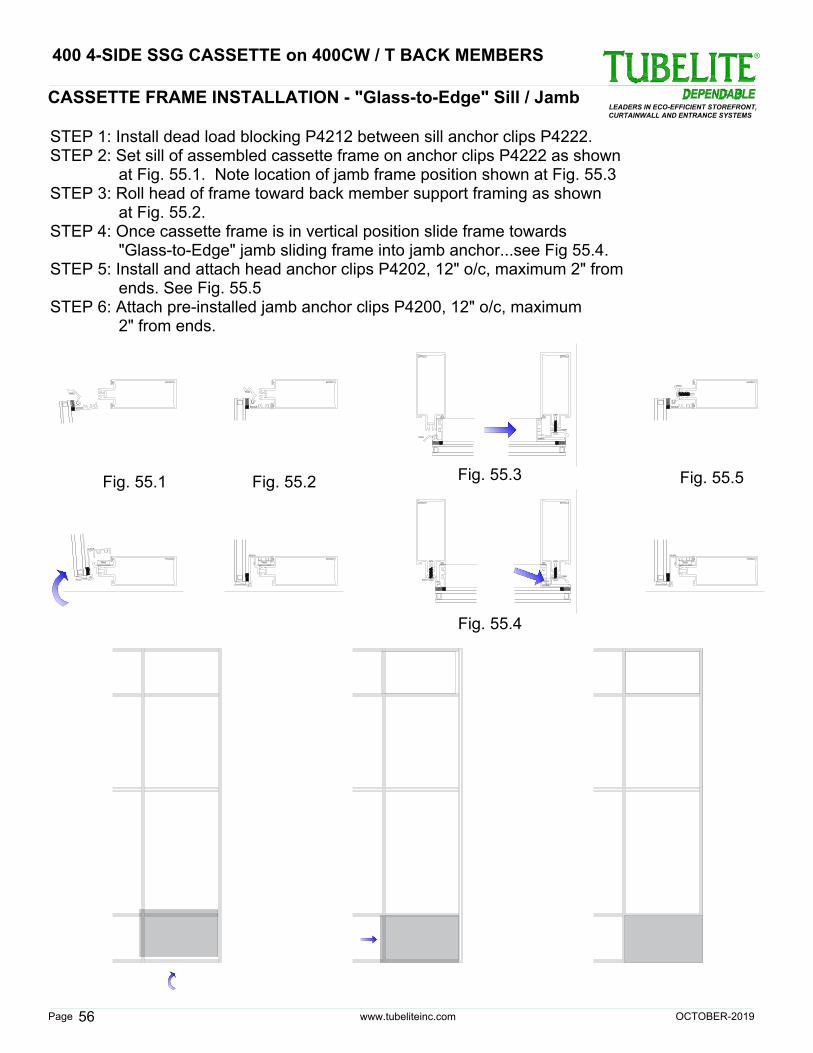
CASSETTE FRAME INSTALLATION - "Glass-to-Edge" Sill / Jamb
E001CA
P4202
E001CA
P4202
E001CA
P4202
E55TB223 E55TB223 E55TB223
E010CA
P4212
E55TB223
E010CA
P4212
E55TB223
E010CA
P4212
E55TB223
Fig. 55.1 Fig. 55.2
Fig. 55.5
E55TB223
E009CA
S376
P4204
E55TB223
E009CA
S376
P4204
Fig. 55.4
Fig. 55.3
E55TB223
E55TB223
S376
P4200
P4200
STEP 1: Install dead load blocking P4212 between sill anchor clips P4222.
STEP 2: Set sill of assembled cassette frame on anchor clips P4222 as shown
at Fig. 55.1. Note location of jamb frame position shown at Fig. 55.3
STEP 3: Roll head of frame toward back member support framing as shown
at Fig. 55.2.
STEP 4: Once cassette frame is in vertical position slide frame towards
"Glass-to-Edge" jamb sliding frame into jamb anchor...see Fig 55.4.
STEP 5: Install and attach head anchor clips P4202, 12" o/c, maximum 2" from
ends. See Fig. 55.5
STEP 6: Attach pre-installed jamb anchor clips P4200, 12" o/c, maximum
2" from ends.
400 4-SIDE SSG CASSETTE on 400CW / T BACK MEMBERS
OCTOBER-2019
www.tubeliteinc.comPage
LEADERS IN ECO-EFFICIENT STOREFRONT,
CURTAINWALL AND ENTRANCE SYSTEMS
®
OCTOBER-2019
57
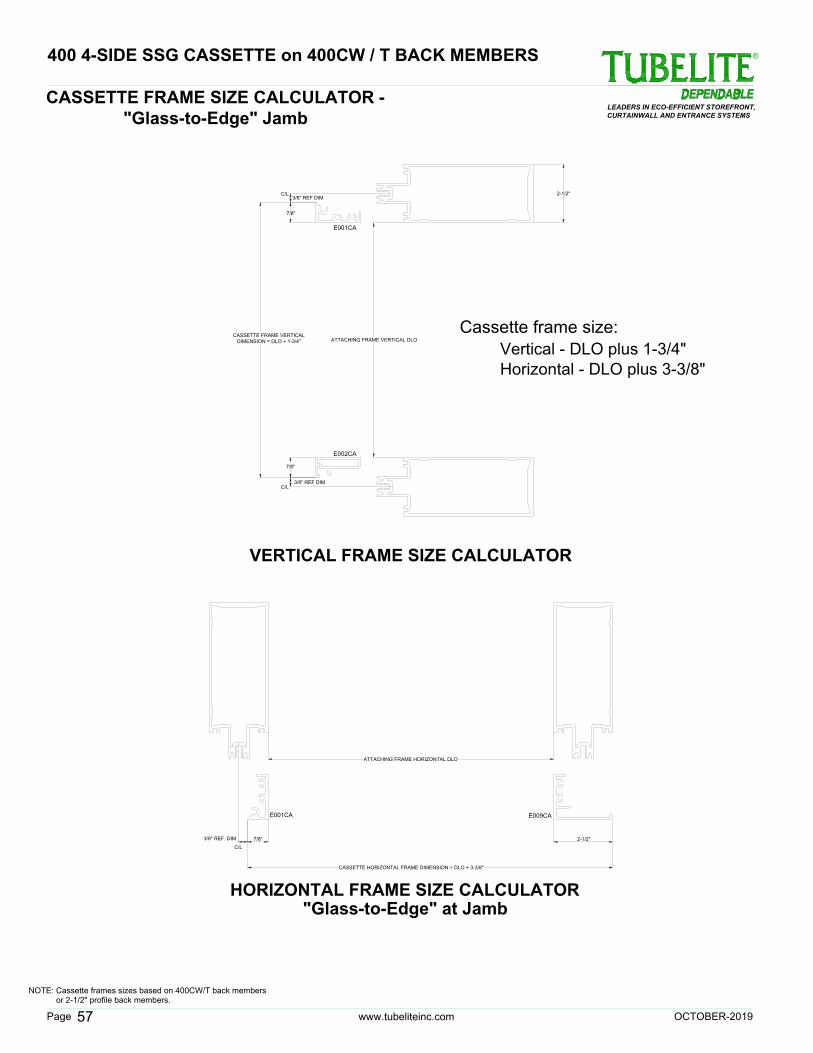
400 4-SIDE SSG CASSETTE on 400CW / T BACK MEMBERS
7/8"
ATTACHING FRAME HORIZONTAL DLO
CASSETTE HORIZONTAL FRAME DIMENSION = DLO + 3-3/8"
C/L
3/8" REF. DIM.
2-1/2"
HORIZONTAL FRAME SIZE CALCULATOR
"Glass-to-Edge" at Jamb
VERTICAL FRAME SIZE CALCULATOR
ATTACHING FRAME VERTICAL DLO
CASSETTE FRAME VERTICAL
DIMENSION = DLO + 1-3/4"
7/8"
7/8"
3/8" REF DIM
C/L
3/8" REF DIM
C/L2-1/2"
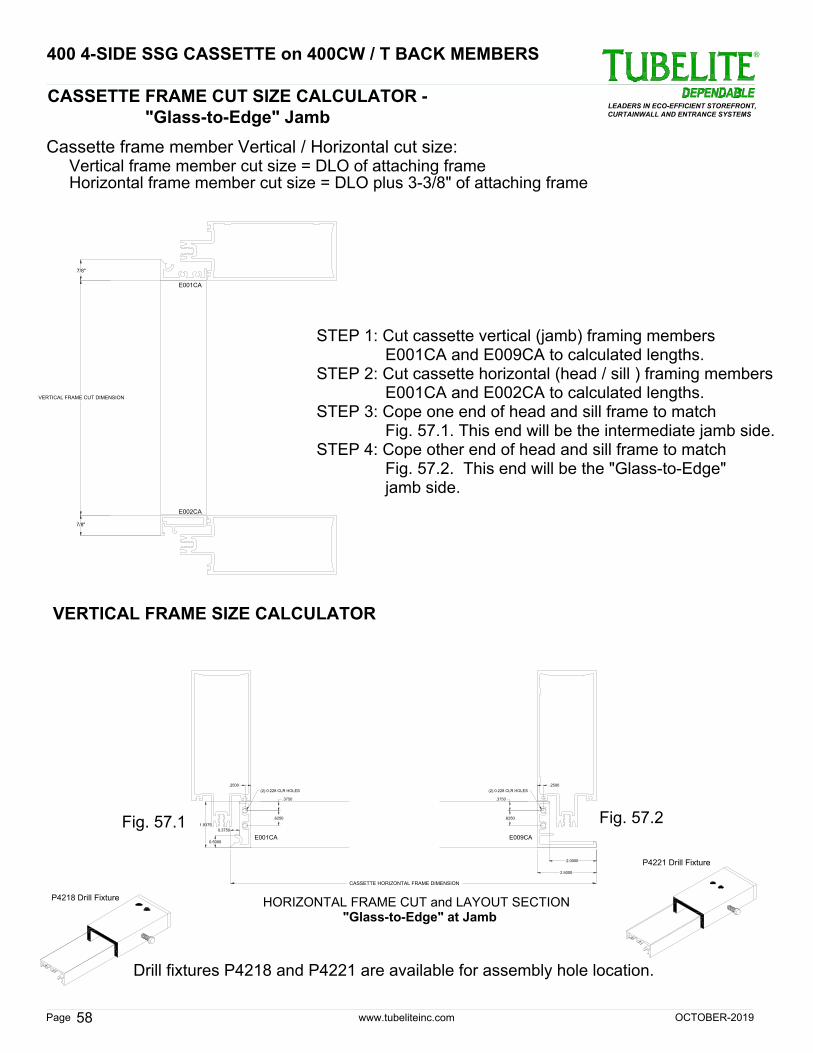
CASSETTE FRAME SIZE CALCULATOR -
"Glass-to-Edge" Jamb
NOTE: Cassette frames sizes based on 400CW/T back members
or 2-1/2" profile back members.
Cassette frame size:
Vertical - DLO plus 1-3/4"
Horizontal - DLO plus 3-3/8"
E002CA
E001CA
E001CA
E009CA
www.tubeliteinc.comPage
LEADERS IN ECO-EFFICIENT STOREFRONT,
CURTAINWALL AND ENTRANCE SYSTEMS
®
58
VERTICAL FRAME SIZE CALCULATOR
VERTICAL FRAME CUT DIMENSION
7/8"
7/8"
CASSETTE FRAME CUT SIZE CALCULATOR -
"Glass-to-Edge" Jamb
Cassette frame member Vertical / Horizontal cut size:
Vertical frame member cut size = DLO of attaching frame
Horizontal frame member cut size = DLO plus 3-3/8" of attaching frame
STEP 1: Cut cassette vertical (jamb) framing members
E001CA and E009CA to calculated lengths.
STEP 2: Cut cassette horizontal (head / sill ) framing members
E001CA and E002CA to calculated lengths.
STEP 3: Cope one end of head and sill frame to match
Fig. 57.1. This end will be the intermediate jamb side.
STEP 4: Cope other end of head and sill frame to match
Fig. 57.2. This end will be the "Glass-to-Edge"
jamb side.
"Glass-to-Edge" at Jamb
HORIZONTAL FRAME CUT and LAYOUT SECTION
.2500
.3750
.6250
2.5000
2.0000
(2) 0.228 CLR HOLES
.3750
.6250
(2) 0.228 CLR HOLES
.2500
1.9375
0.5000
CASSETTE HORIZONTAL FRAME DIMENSION
0.3750
P4218 Drill Fixture
P4221 Drill Fixture
Drill fixtures P4218 and P4221 are available for assembly hole location.
E001CA E009CA
Fig. 57.1
Fig. 57.2
E002CA
E001CA
400 4-SIDE SSG CASSETTE on 400CW / T BACK MEMBERS
OCTOBER-2019
www.tubeliteinc.comPage
LEADERS IN ECO-EFFICIENT STOREFRONT,
CURTAINWALL AND ENTRANCE SYSTEMS
®
59
HORIZONTAL GLASS SIZE CALCULATOR
"Glass-to-Edge" at Jamb
GLASS DIMENSION = CASSETTE FRAME DIMENSION
VERTICAL GLASS SIZE CALCULATOR
GLASS DIMENSION = CASSETTE FRAME DIMENSION
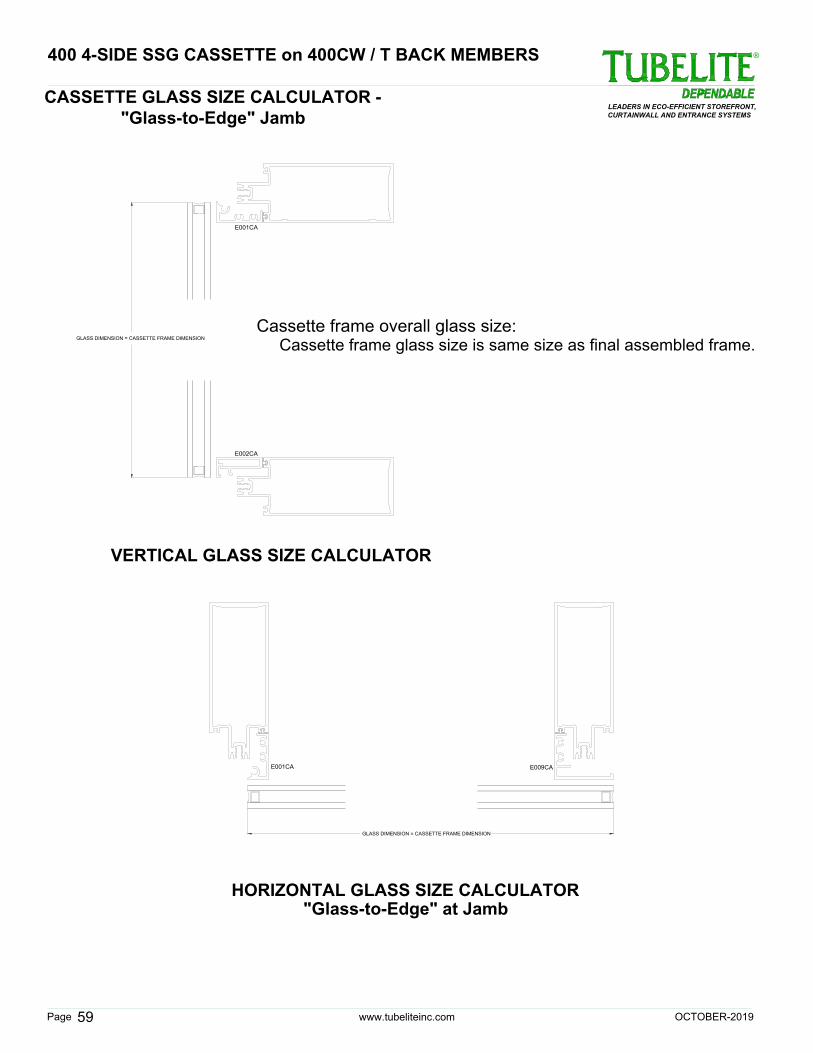
CASSETTE GLASS SIZE CALCULATOR -
"Glass-to-Edge" Jamb
Cassette frame overall glass size:
Cassette frame glass size is same size as final assembled frame.
E002CA
E001CA
E001CA
E009CA
400 4-SIDE SSG CASSETTE on 400CW / T BACK MEMBERS
OCTOBER-2019
www.tubeliteinc.comPage
LEADERS IN ECO-EFFICIENT STOREFRONT,
CURTAINWALL AND ENTRANCE SYSTEMS
®
60
E002CA
E001CA
E001CA
E009CA
P4200
S375
P4200
S375
S375 S375
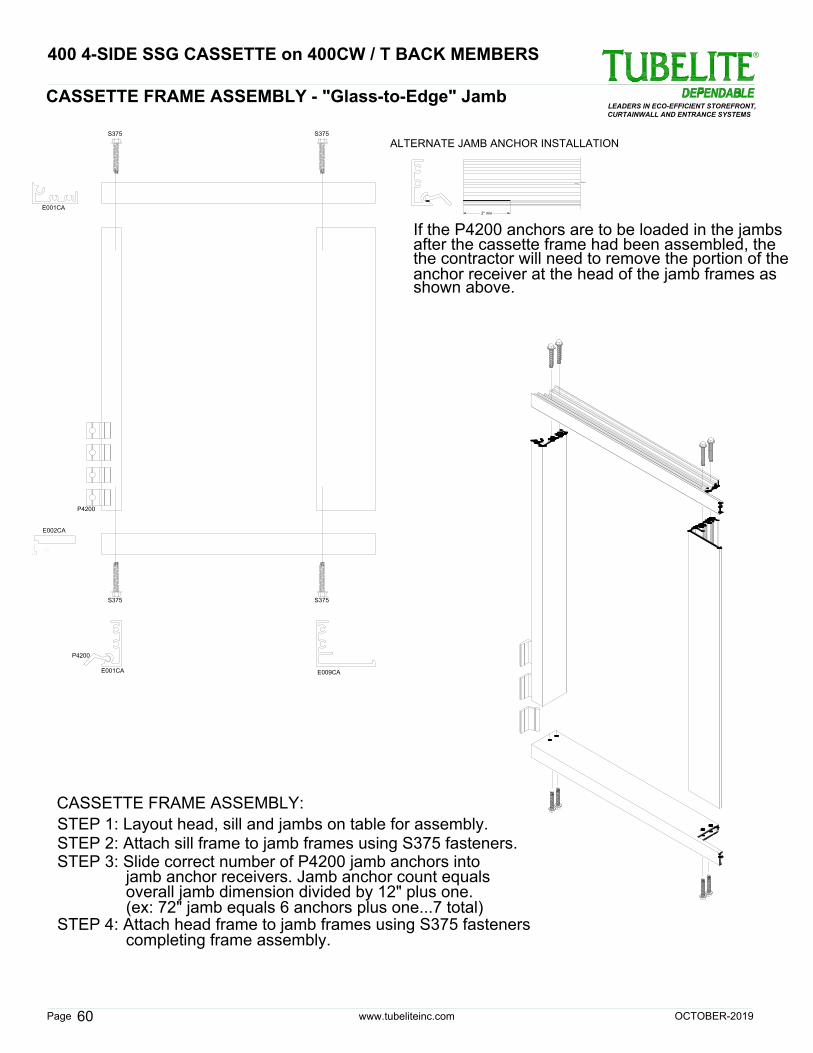
CASSETTE FRAME ASSEMBLY - "Glass-to-Edge" Jamb
2" min
ALTERNATE JAMB ANCHOR INSTALLATION
after the cassette frame had been assembled, the
shown above.
the contractor will need to remove the portion of the
If the P4200 anchors are to be loaded in the jambs
anchor receiver at the head of the jamb frames as
CASSETTE FRAME ASSEMBLY:
STEP 1: Layout head, sill and jambs on table for assembly.
STEP 2: Attach sill frame to jamb frames using S375 fasteners.
STEP 3: Slide correct number of P4200 jamb anchors into
jamb anchor receivers. Jamb anchor count equals
overall jamb dimension divided by 12" plus one.
(ex: 72" jamb equals 6 anchors plus one...7 total)
STEP 4: Attach head frame to jamb frames using S375 fasteners
completing frame assembly.
400 4-SIDE SSG CASSETTE on 400CW / T BACK MEMBERS
OCTOBER-2019
www.tubeliteinc.comPage
LEADERS IN ECO-EFFICIENT STOREFRONT,
CURTAINWALL AND ENTRANCE SYSTEMS
®
61
E001CA
P4211
P4211
E002CA
E001CA
P4211
P4211
E002CA
E001CA
E002CA
E001CA
E002CA
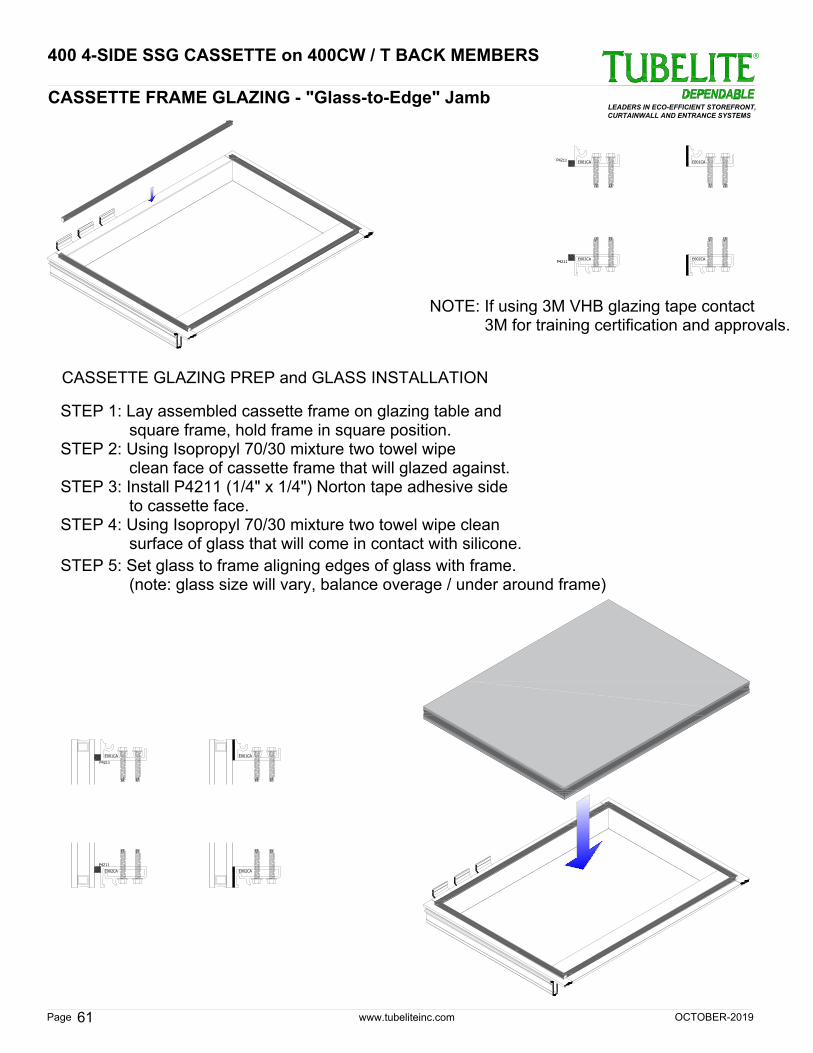
CASSETTE FRAME GLAZING - "Glass-to-Edge" Jamb
NOTE: If using 3M VHB glazing tape contact
3M for training certification and approvals.
STEP 1: Lay assembled cassette frame on glazing table and
CASSETTE GLAZING PREP and GLASS INSTALLATION
STEP 2: Using Isopropyl 70/30 mixture two towel wipe
to cassette face.
surface of glass that will come in contact with silicone.
square frame, hold frame in square position.
STEP 5: Set glass to frame aligning edges of glass with frame.
STEP 3: Install P4211 (1/4" x 1/4") Norton tape adhesive side
clean face of cassette frame that will glazed against.
STEP 4: Using Isopropyl 70/30 mixture two towel wipe clean
(note: glass size will vary, balance overage / under around frame)
400 4-SIDE SSG CASSETTE on 400CW / T BACK MEMBERS
OCTOBER-2019
www.tubeliteinc.comPage
LEADERS IN ECO-EFFICIENT STOREFRONT,
CURTAINWALL AND ENTRANCE SYSTEMS
®
62
E001CA
P4211
P4211
E002CA
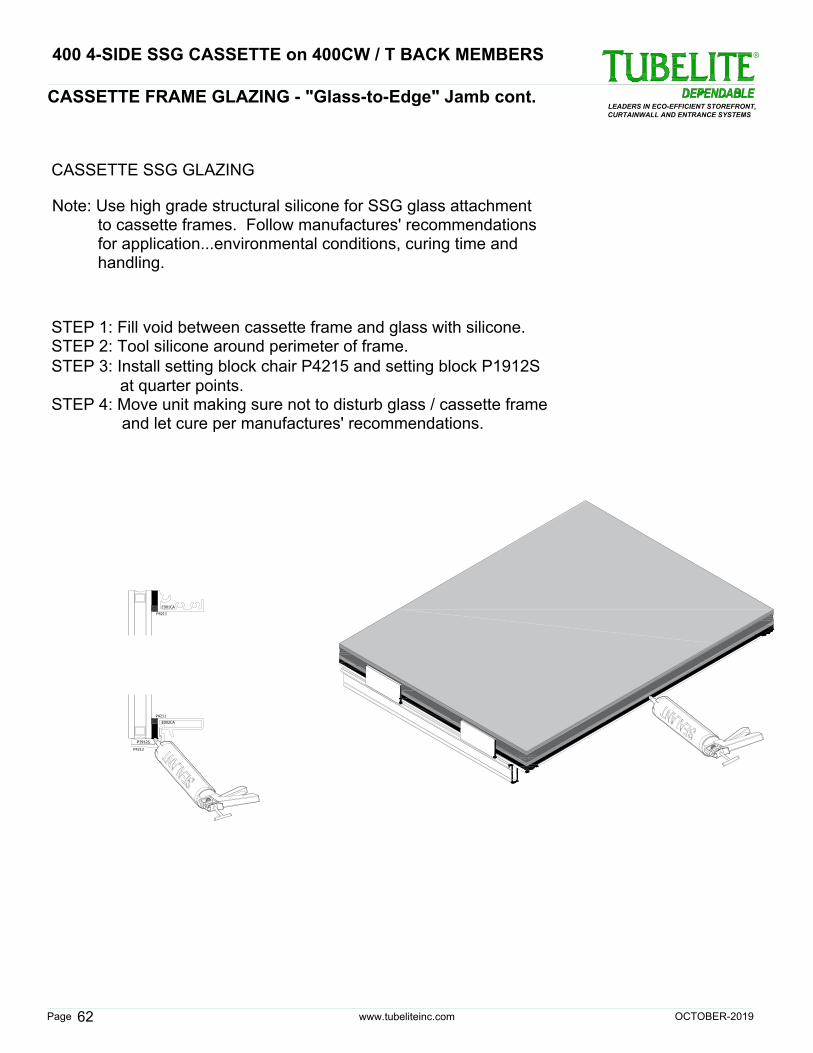
CASSETTE FRAME GLAZING - "Glass-to-Edge" Jamb cont.
CASSETTE SSG GLAZING
STEP 2: Tool silicone around perimeter of frame.
Note: Use high grade structural silicone for SSG glass attachment
STEP 1: Fill void between cassette frame and glass with silicone.
handling.
to cassette frames. Follow manufactures' recommendations
for application...environmental conditions, curing time and
STEP 3: Install setting block chair P4215 and setting block P1912S
STEP 4: Move unit making sure not to disturb glass / cassette frame
and let cure per manufactures' recommendations.
at quarter points.
P4212
P1912S
400 4-SIDE SSG CASSETTE on 400CW / T BACK MEMBERS
OCTOBER-2019
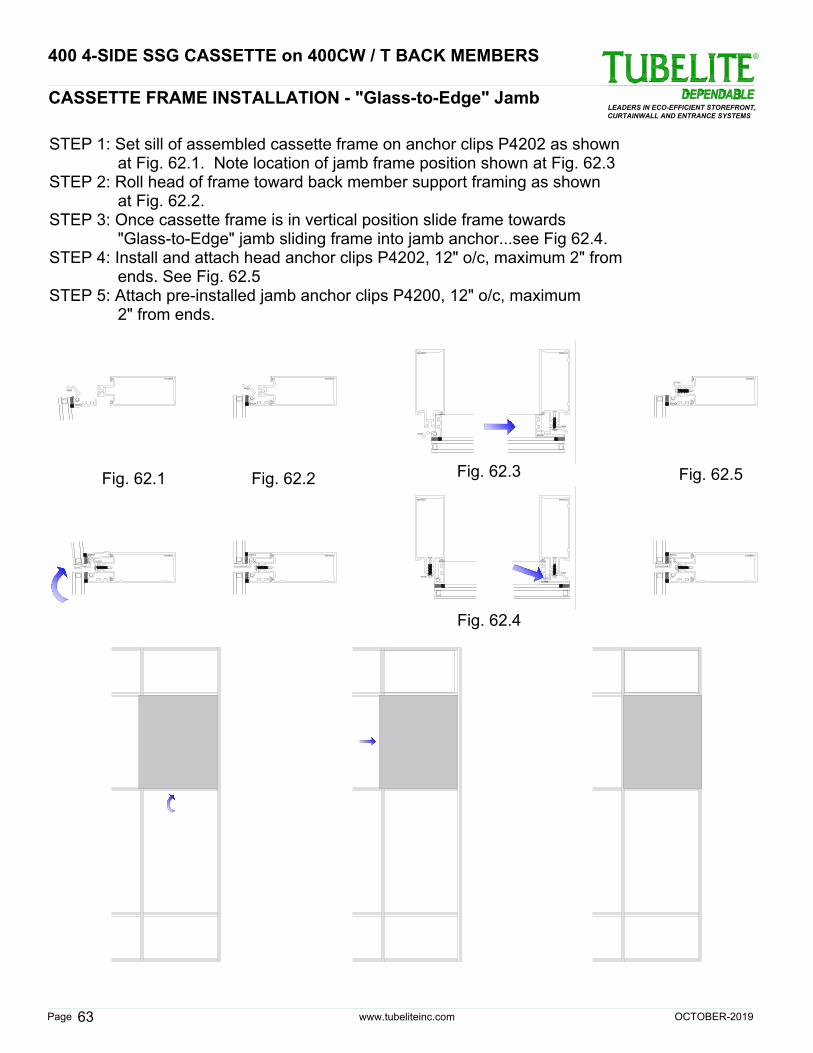
www.tubeliteinc.comPage
LEADERS IN ECO-EFFICIENT STOREFRONT,
CURTAINWALL AND ENTRANCE SYSTEMS
®
63
E001CA
E001CA
P4202
E001CA
P4202
E55TB223 E55TB223 E55TB223
Fig. 62.1 Fig. 62.2
Fig. 62.5
E55TB223
E009CA
S376
P4204
E55TB223
E009CA
S376
P4204
Fig. 62.4
Fig. 62.3
E55TB223
E55TB223
S376
P4200
P4200
E55TB223
E002CA
E002CA
E55TB223
E002CA
E55TB223
CASSETTE FRAME INSTALLATION - "Glass-to-Edge" Jamb
STEP 1: Set sill of assembled cassette frame on anchor clips P4202 as shown
at Fig. 62.1. Note location of jamb frame position shown at Fig. 62.3
STEP 2: Roll head of frame toward back member support framing as shown
at Fig. 62.2.
STEP 3: Once cassette frame is in vertical position slide frame towards
"Glass-to-Edge" jamb sliding frame into jamb anchor...see Fig 62.4.
STEP 4: Install and attach head anchor clips P4202, 12" o/c, maximum 2" from
ends. See Fig. 62.5
STEP 5: Attach pre-installed jamb anchor clips P4200, 12" o/c, maximum
2" from ends.
P4202
P4202
400 4-SIDE SSG CASSETTE on 400CW / T BACK MEMBERS
OCTOBER-2019
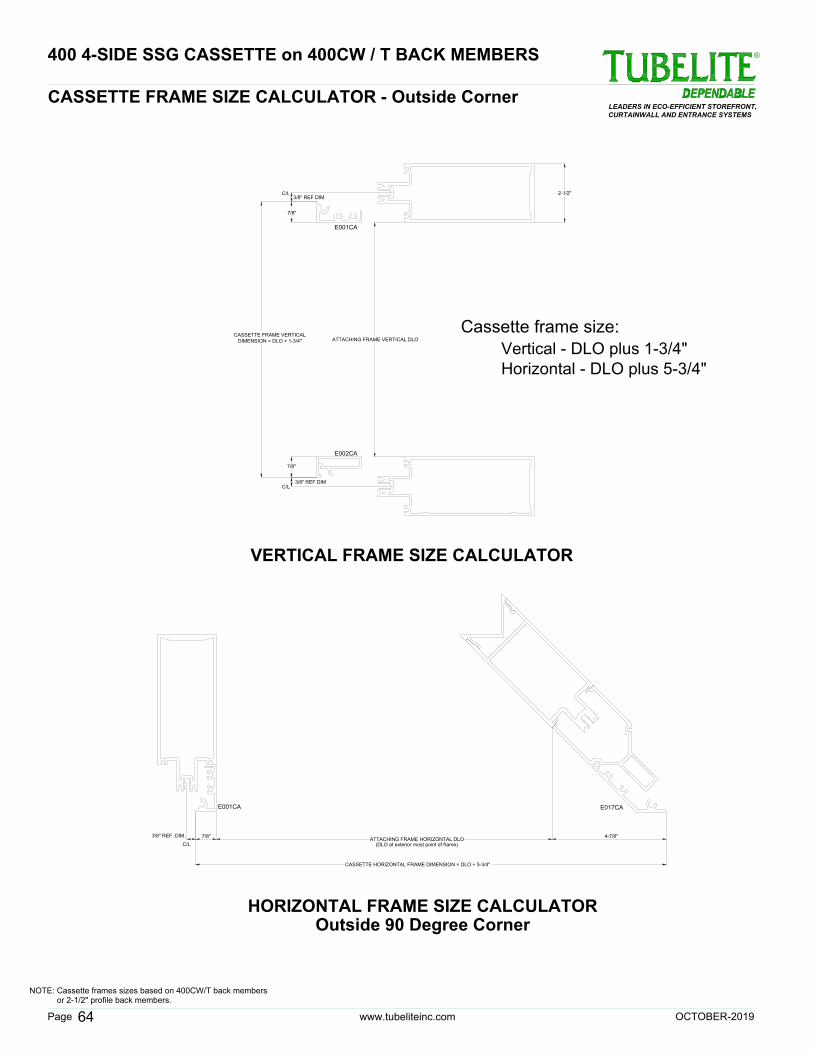
www.tubeliteinc.comPage
LEADERS IN ECO-EFFICIENT STOREFRONT,
CURTAINWALL AND ENTRANCE SYSTEMS
®
OCTOBER-2019
64
400 4-SIDE SSG CASSETTE on 400CW / T BACK MEMBERS
CASSETTE FRAME SIZE CALCULATOR - Outside Corner
VERTICAL FRAME SIZE CALCULATOR
ATTACHING FRAME VERTICAL DLO
CASSETTE FRAME VERTICAL
DIMENSION = DLO + 1-3/4"
7/8"
7/8"
3/8" REF DIM
C/L
3/8" REF DIM
C/L2-1/2"
7/8"
ATTACHING FRAME HORIZONTAL DLO
CASSETTE HORIZONTAL FRAME DIMENSION = DLO + 5-3/4"
C/L
3/8" REF. DIM.
4-7/8"
HORIZONTAL FRAME SIZE CALCULATOR
Outside 90 Degree Corner
(DLO at exterior most point of frame)
NOTE: Cassette frames sizes based on 400CW/T back members
or 2-1/2" profile back members.
Cassette frame size:
Vertical - DLO plus 1-3/4"
Horizontal - DLO plus 5-3/4"
E002CA
E001CA
E001CA
E017CA

www.tubeliteinc.comPage
LEADERS IN ECO-EFFICIENT STOREFRONT,
CURTAINWALL AND ENTRANCE SYSTEMS
®
65
CASSETTE FRAME CUT SIZE CALCULATOR - Outside Corner
VERTICAL FRAME SIZE CALCULATOR
VERTICAL FRAME CUT DIMENSION
7/8"
7/8"
HORIZONTAL FRAME CUT and LAYOUT SECTION
Outside Corner
.2500
(2) 0.228 CLR HOLES
11°
.3750
.6250
CASSETTE HORIZONTAL CUT LENGTH
.3750
.3750
.6250
(2) 0.228 CLR HOLES
.1875
.6250
50°
2.25
Cassette frame member Vertical / Horizontal cut size:
Vertical frame member cut size = DLO of attaching frame
Horizontal frame member cut size = DLO plus 5-3/4" of attaching frame
STEP 1: Cut cassette vertical (jamb) framing members
E001CA and E017CA to calculated lengths.
STEP 2: Cut cassette horizontal (head / sill ) framing members
E001CA and E002CA to calculated lengths.
STEP 3: Cope one end of head and sill frame to match
Fig. 64.1. This end will be the intermediate jamb side.
STEP 4: Cope other end of head and sill frame to match
Fig. 64.2. This end will be the Outside Corner
jamb side.
P4218 Drill Fixture
Drill fixtures P4218 and P4219 are available for assembly hole location.
E001CA
E017CA
E002CA
E001CA
Fig. 64.1
Fig. 64.2
P4219 Drill Fixture
400 4-SIDE SSG CASSETTE on 400CW / T BACK MEMBERS
OCTOBER-2019
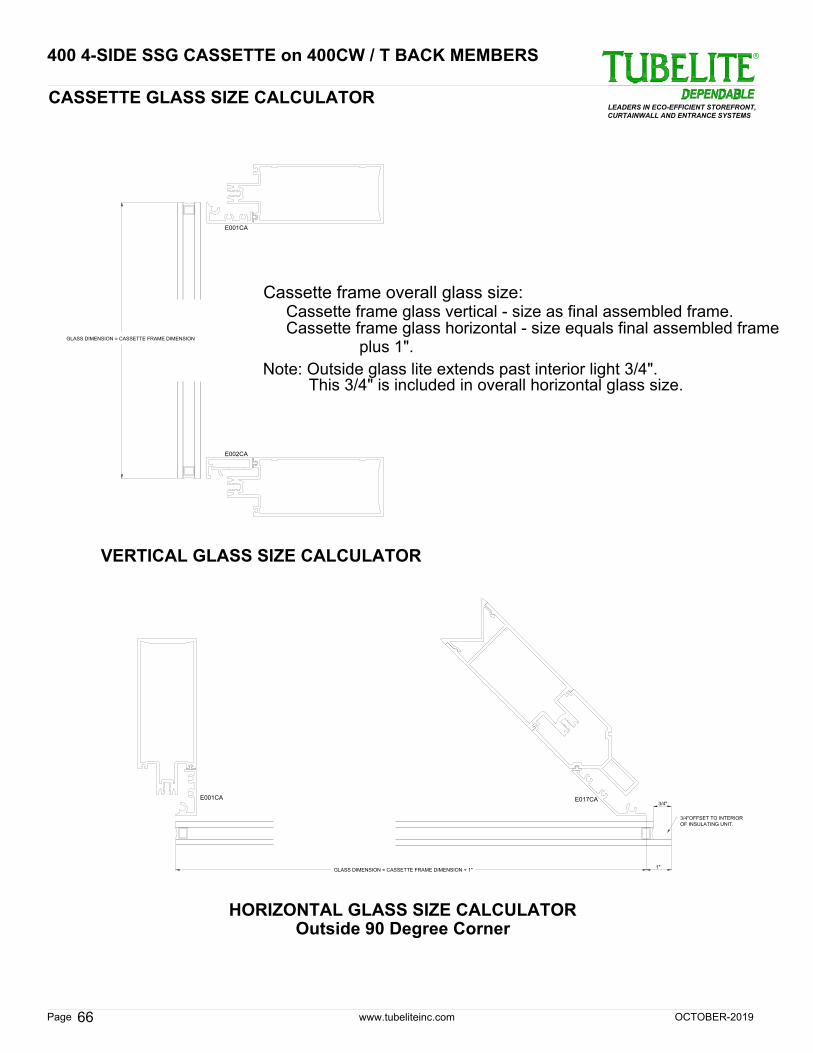
www.tubeliteinc.comPage
LEADERS IN ECO-EFFICIENT STOREFRONT,
CURTAINWALL AND ENTRANCE SYSTEMS
®
66
CASSETTE GLASS SIZE CALCULATOR
VERTICAL GLASS SIZE CALCULATOR
GLASS DIMENSION = CASSETTE FRAME DIMENSION
HORIZONTAL GLASS SIZE CALCULATOR
Outside 90 Degree Corner
GLASS DIMENSION = CASSETTE FRAME DIMENSION + 1"
1"
3/4"
3/4"OFFSET TO INTERIOR
OF INSULATING UNIT.
Cassette frame overall glass size:
Cassette frame glass vertical - size as final assembled frame.
Cassette frame glass horizontal - size equals final assembled frame
Note: Outside glass lite extends past interior light 3/4".
This 3/4" is included in overall horizontal glass size.
plus 1".
E002CA
E001CA
E001CA
E017CA
400 4-SIDE SSG CASSETTE on 400CW / T BACK MEMBERS
OCTOBER-2019
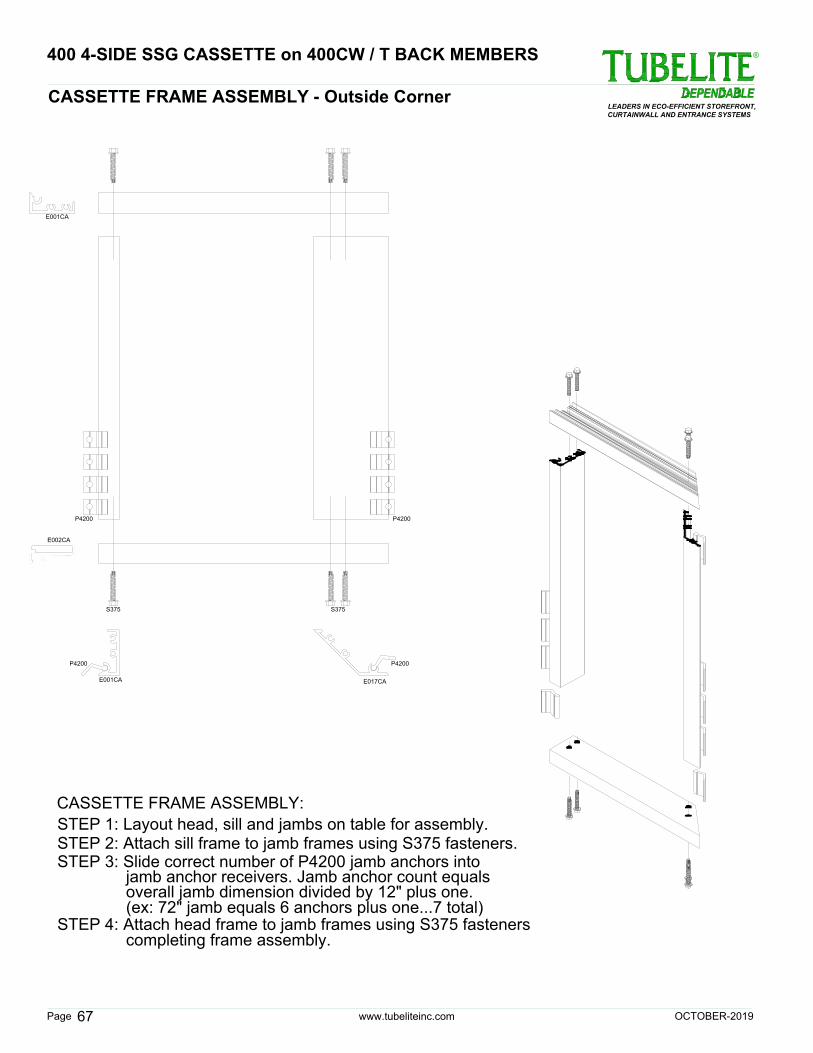
www.tubeliteinc.comPage
LEADERS IN ECO-EFFICIENT STOREFRONT,
CURTAINWALL AND ENTRANCE SYSTEMS
®
67
CASSETTE FRAME ASSEMBLY - Outside Corner
E001CA
E017CA
E002CA
E001CA
P4200
S375 S375
P4200
P4200 P4200
CASSETTE FRAME ASSEMBLY:
STEP 1: Layout head, sill and jambs on table for assembly.
STEP 2: Attach sill frame to jamb frames using S375 fasteners.
STEP 3: Slide correct number of P4200 jamb anchors into
jamb anchor receivers. Jamb anchor count equals
overall jamb dimension divided by 12" plus one.
(ex: 72" jamb equals 6 anchors plus one...7 total)
STEP 4: Attach head frame to jamb frames using S375 fasteners
completing frame assembly.
400 4-SIDE SSG CASSETTE on 400CW / T BACK MEMBERS
OCTOBER-2019
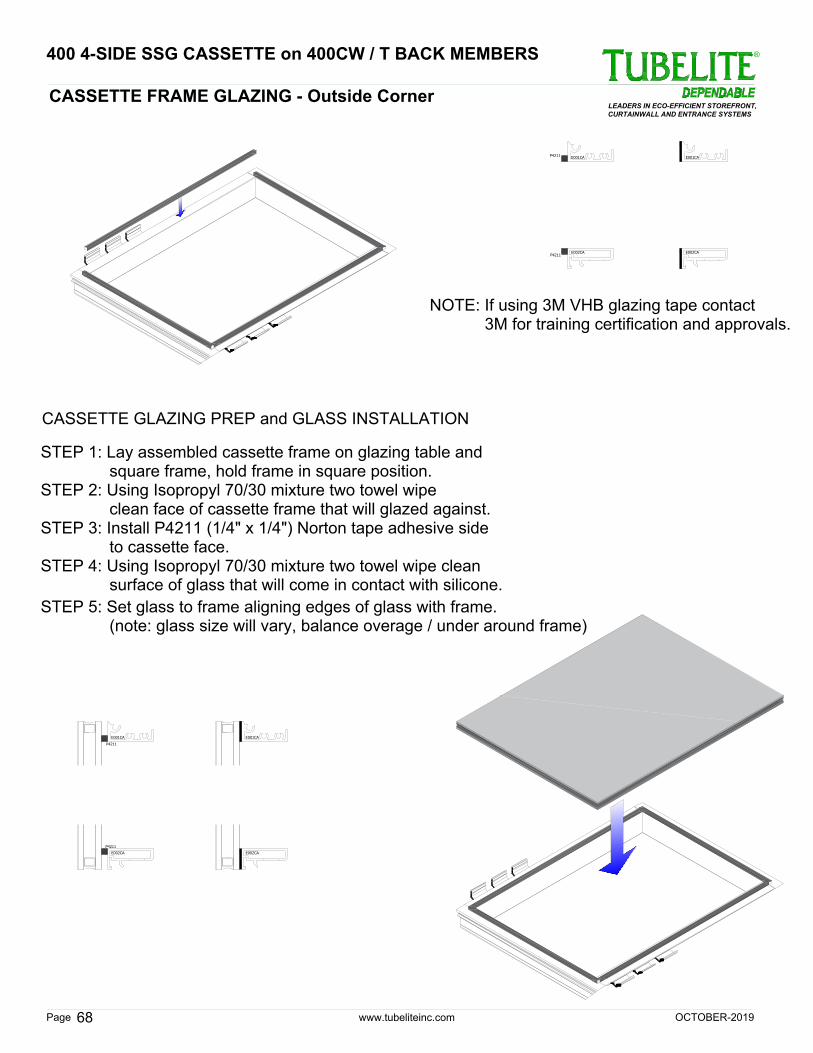
www.tubeliteinc.comPage
LEADERS IN ECO-EFFICIENT STOREFRONT,
CURTAINWALL AND ENTRANCE SYSTEMS
®
68
CASSETTE FRAME GLAZING - Outside Corner
E001CA
P4211
P4211
E002CA
E001CA
P4211
P4211
E002CA
E001CA
E002CA
E001CA
E002CA
NOTE: If using 3M VHB glazing tape contact
3M for training certification and approvals.
STEP 1: Lay assembled cassette frame on glazing table and
CASSETTE GLAZING PREP and GLASS INSTALLATION
STEP 2: Using Isopropyl 70/30 mixture two towel wipe
to cassette face.
surface of glass that will come in contact with silicone.
square frame, hold frame in square position.
STEP 5: Set glass to frame aligning edges of glass with frame.
STEP 3: Install P4211 (1/4" x 1/4") Norton tape adhesive side
clean face of cassette frame that will glazed against.
STEP 4: Using Isopropyl 70/30 mixture two towel wipe clean
(note: glass size will vary, balance overage / under around frame)
400 4-SIDE SSG CASSETTE on 400CW / T BACK MEMBERS
OCTOBER-2019
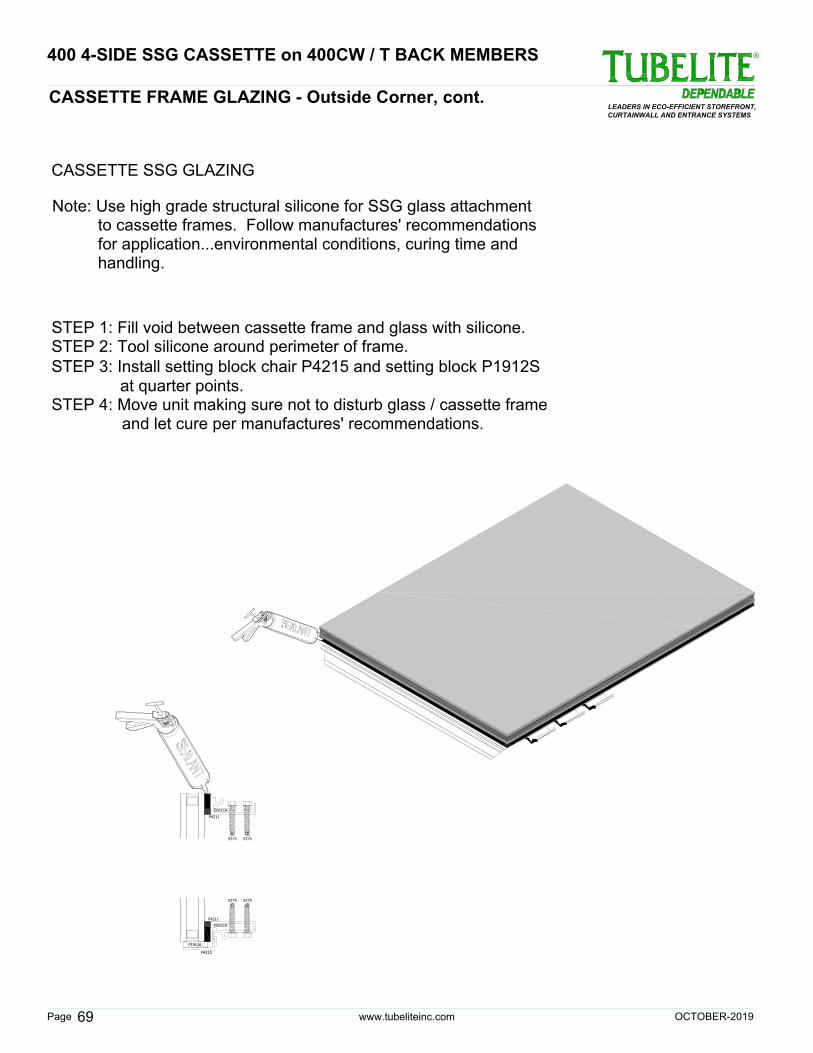
www.tubeliteinc.comPage
LEADERS IN ECO-EFFICIENT STOREFRONT,
CURTAINWALL AND ENTRANCE SYSTEMS
®
69
CASSETTE FRAME GLAZING - Outside Corner, cont.
E001CA
P4211
S375 S375
P4211
S375 S375
E002CA
P4215
P1912S
CASSETTE SSG GLAZING
STEP 2: Tool silicone around perimeter of frame.
Note: Use high grade structural silicone for SSG glass attachment
STEP 1: Fill void between cassette frame and glass with silicone.
handling.
to cassette frames. Follow manufactures' recommendations
for application...environmental conditions, curing time and
STEP 3: Install setting block chair P4215 and setting block P1912S
STEP 4: Move unit making sure not to disturb glass / cassette frame
and let cure per manufactures' recommendations.
at quarter points.
400 4-SIDE SSG CASSETTE on 400CW / T BACK MEMBERS
OCTOBER-2019

www.tubeliteinc.comPage
LEADERS IN ECO-EFFICIENT STOREFRONT,
CURTAINWALL AND ENTRANCE SYSTEMS
®
OCTOBER-2019
70
400 4-SIDE SSG CASSETTE on 400CW /T BACK MEMBERS
CASSETTE FRAME SIZE CALCULATOR - Inside Corner
VERTICAL FRAME SIZE CALCULATOR
ATTACHING FRAME VERTICAL DLO
CASSETTE FRAME VERTICAL
DIMENSION = DLO + 1-3/4"
7/8"
7/8"
3/8" REF DIM
C/L
3/8" REF DIM
C/L2-1/2"
7/8"
ATTACHING FRAME HORIZONTAL DLO
CASSETTE HORIZONTAL FRAME DIMENSION = DLO
C/L
3/8" REF. DIM.
7/8"
HORIZONTAL FRAME SIZE CALCULATOR
Inside 90 Degree Corner
(DLO at exterior most point of frame)
NOTE: Cassette frames sizes based on 400CW/T back members
or 2-1/2" profile back members.
Cassette frame size:
Vertical - DLO plus 1-3/4"
Horizontal - DLO plus 1-9/16"
E001CA
E001CA
E001CA
E023CA

www.tubeliteinc.comPage
LEADERS IN ECO-EFFICIENT STOREFRONT,
CURTAINWALL AND ENTRANCE SYSTEMS
®
71
CASSETTE FRAME CUT SIZE CALCULATOR - Inside Corner
VERTICAL FRAME SIZE CALCULATOR
VERTICAL FRAME CUT DIMENSION
7/8"
7/8"
HORIZONTAL FRAME CUT and LAYOUT SECTION
Inside Corner
CASSETTE HORIZONTAL CUT LENGTH
.6250
.3750
.6250
45°
0.375
0.5214
1.9375
.3750
.6250
(2) 0.228 CLR HOLES
.2500
1.9375
0.5000
0.3750
Cassette frame member Vertical / Horizontal cut size:
Vertical frame member cut size = DLO of attaching frame
Horizontal frame member cut size = DLO plus 1-9/16" of attaching frame
STEP 1: Cut cassette vertical (jamb) framing members
E001CA and E023CA to calculated lengths.
STEP 2: Cut cassette horizontal (head / sill ) framing members
E001CA to calculated lengths.
STEP 3: Cope one end of head and sill frame to match
Fig. 70.1. This end will be the intermediate jamb side.
STEP 4: Cope other end of head and sill frame to match
Fig. 70.2. This end will be the Inside Corner
jamb side.
E001CA
E001CA
E001CA E023CA
0.5214
P4218 Drill Fixture
Drill fixtures P4218 and P4220 are available for assembly hole location.
Fig. 70.1
Fig. 70.2
Fig. 70.3
STEP 5: Cut end of head and sill frame as shown in Fig. 70.3.
P4220 Drill Fixture
400 4-SIDE SSG CASSETTE on 400CW /T BACK MEMBERS
OCTOBER-2019
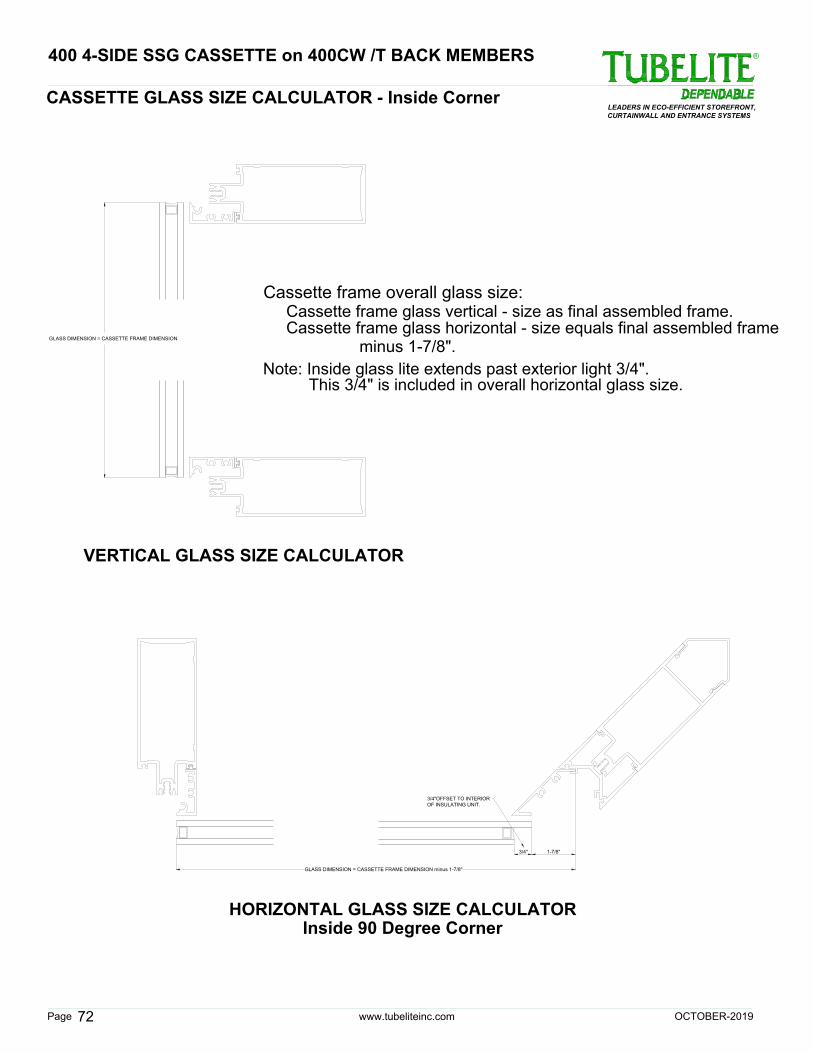
www.tubeliteinc.comPage
LEADERS IN ECO-EFFICIENT STOREFRONT,
CURTAINWALL AND ENTRANCE SYSTEMS
®
72
CASSETTE GLASS SIZE CALCULATOR - Inside Corner
VERTICAL GLASS SIZE CALCULATOR
GLASS DIMENSION = CASSETTE FRAME DIMENSION
HORIZONTAL GLASS SIZE CALCULATOR
Inside 90 Degree Corner
GLASS DIMENSION = CASSETTE FRAME DIMENSION minus 1-7/8"
3/4"
3/4"OFFSET TO INTERIOR
OF INSULATING UNIT.
1-7/8"
Cassette frame overall glass size:
Cassette frame glass vertical - size as final assembled frame.
Cassette frame glass horizontal - size equals final assembled frame
Note: Inside glass lite extends past exterior light 3/4".
This 3/4" is included in overall horizontal glass size.
minus 1-7/8".
400 4-SIDE SSG CASSETTE on 400CW /T BACK MEMBERS
OCTOBER-2019
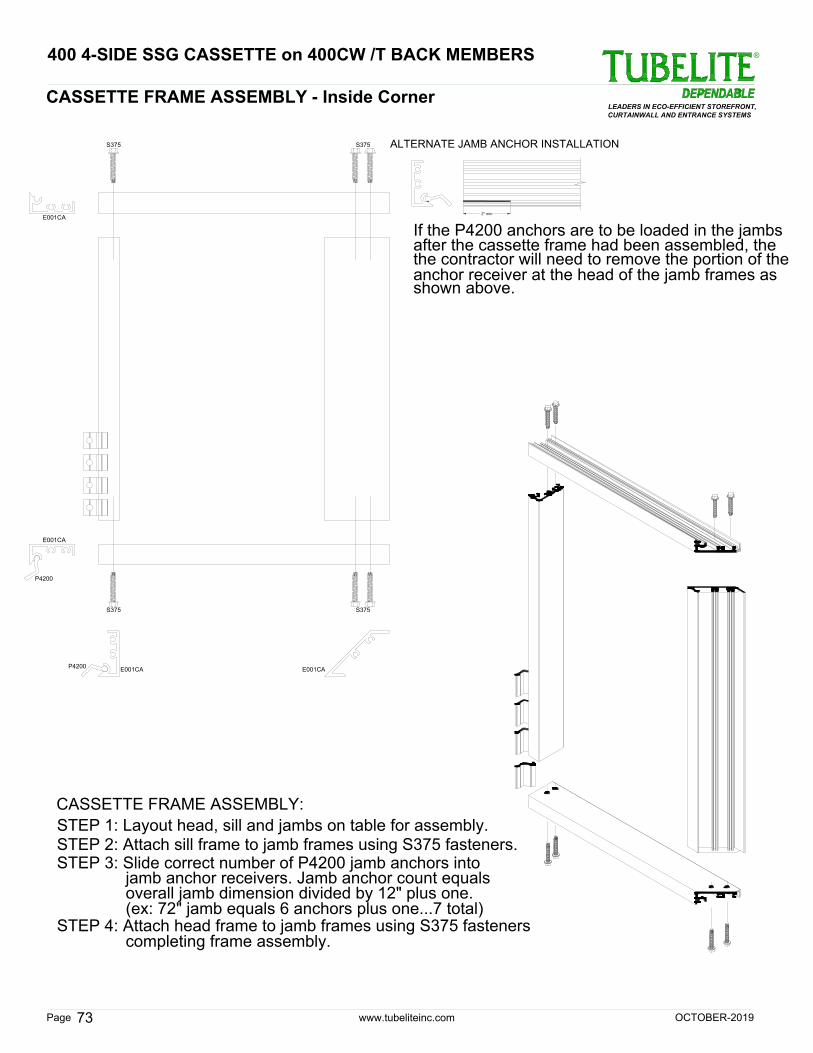
www.tubeliteinc.comPage
LEADERS IN ECO-EFFICIENT STOREFRONT,
CURTAINWALL AND ENTRANCE SYSTEMS
®
73
CASSETTE FRAME ASSEMBLY - Inside Corner
2" min
ALTERNATE JAMB ANCHOR INSTALLATION
after the cassette frame had been assembled, the
shown above.
the contractor will need to remove the portion of the
If the P4200 anchors are to be loaded in the jambs
anchor receiver at the head of the jamb frames as
E001CA
E001CA
S375
E001CA
P4200
P4200
S375
E001CA
S375 S375
CASSETTE FRAME ASSEMBLY:
STEP 1: Layout head, sill and jambs on table for assembly.
STEP 2: Attach sill frame to jamb frames using S375 fasteners.
STEP 3: Slide correct number of P4200 jamb anchors into
jamb anchor receivers. Jamb anchor count equals
overall jamb dimension divided by 12" plus one.
(ex: 72" jamb equals 6 anchors plus one...7 total)
STEP 4: Attach head frame to jamb frames using S375 fasteners
completing frame assembly.
400 4-SIDE SSG CASSETTE on 400CW /T BACK MEMBERS
OCTOBER-2019
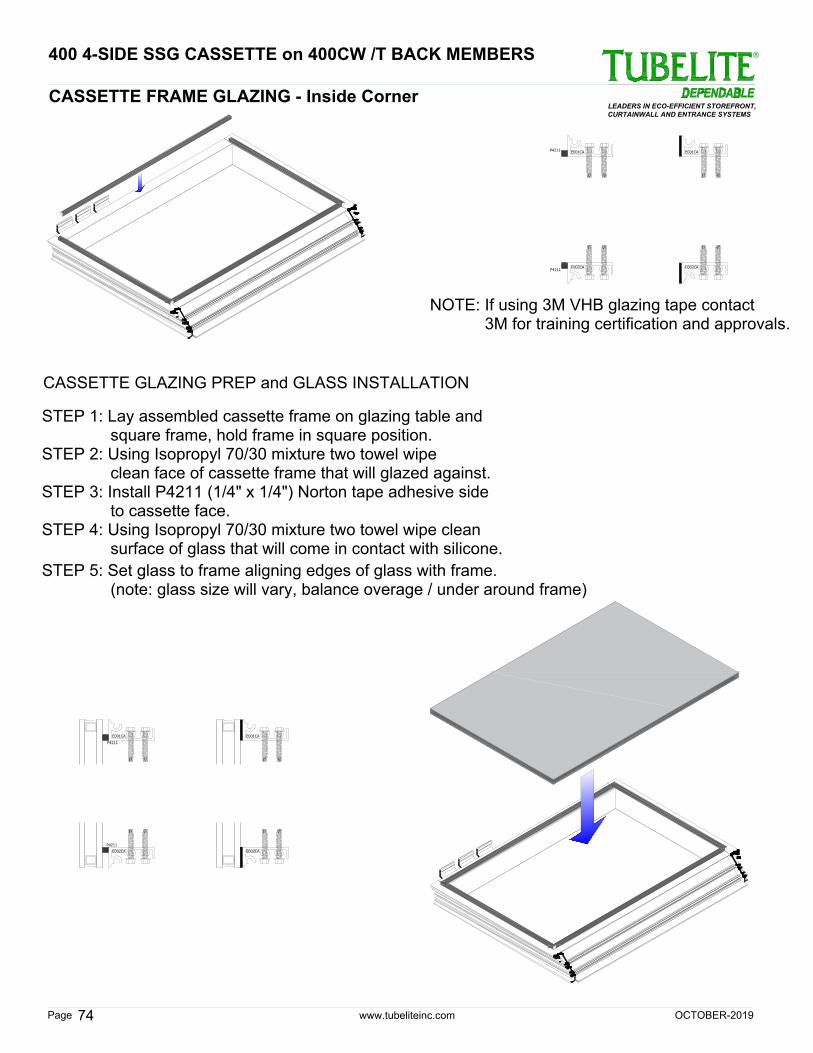
www.tubeliteinc.comPage
LEADERS IN ECO-EFFICIENT STOREFRONT,
CURTAINWALL AND ENTRANCE SYSTEMS
®
74
CASSETTE FRAME GLAZING - Inside Corner
E001CA
P4211
P4211
E002CA
E001CA
P4211
P4211
E002CA
E001CA
E002CA
E001CA
E002CA
NOTE: If using 3M VHB glazing tape contact
3M for training certification and approvals.
STEP 1: Lay assembled cassette frame on glazing table and
CASSETTE GLAZING PREP and GLASS INSTALLATION
STEP 2: Using Isopropyl 70/30 mixture two towel wipe
to cassette face.
surface of glass that will come in contact with silicone.
square frame, hold frame in square position.
STEP 5: Set glass to frame aligning edges of glass with frame.
STEP 3: Install P4211 (1/4" x 1/4") Norton tape adhesive side
clean face of cassette frame that will glazed against.
STEP 4: Using Isopropyl 70/30 mixture two towel wipe clean
(note: glass size will vary, balance overage / under around frame)
400 4-SIDE SSG CASSETTE on 400CW /T BACK MEMBERS
OCTOBER-2019

www.tubeliteinc.comPage
LEADERS IN ECO-EFFICIENT STOREFRONT,
CURTAINWALL AND ENTRANCE SYSTEMS
®
75
E001CA
P4211
S375 S375
E001CA
P4211
S375 S375
P1912S
Fig. 75.1
CASSETTE SSG GLAZING
Note: Use high grade structural silicone for SSG glass attachment
to cassette frames. Follow manufactures' recommendations
for application...environmental conditions, curing time and
handling.
STEP 1: Fill void between cassette frame and glass with silicone.
STEP 2: Tool silicone around perimeter of frame.
STEP 5: Move unit making sure not to disturb glass / cassette frame
and let cure per manufactures' recommendations.
STEP 4: Install setting block chair P4217 and setting block P1912S
at quarter points.
STEP 3: Prior to installing setting block chair P4217 install correct number
of center anchors P4200 as shown in Fig. 75.1.
CASSETTE FRAME GLAZING - Inside Corner cont.
400 4-SIDE SSG CASSETTE on 400CW /T BACK MEMBERS
OCTOBER-2019

www.tubeliteinc.comPage
LEADERS IN ECO-EFFICIENT STOREFRONT,
CURTAINWALL AND ENTRANCE SYSTEMS
®
76
CASSETTE FRAME INSTALLATION - Inside Corner
E4TB51
E026CA
S469
E55TB88
E55TB223
E4TB51
E026CA
S469
E55TB88
E55TB223
E4TB51
E026CA
S469
E55TB88
E55TB223
E55TB223
E55TB223
P4200
E55TB223
S376
P4200
E55TB223
P4200
Fig. 76.2
Fig. 74.1
Fig. 76.3
Fig. 76.4
Fig. 76.5 Fig. 76.6
3/4" spacer block
STEP 1: Placing a 3/4" spacer block on top of the lower unit will
assist in setting up proper Cassette position. Refer to
Fig. 76.1
STEP 2: Place Cassette frame inside corner jamb in position at
inside corner insert. Refer to Fig. 76.2 & 76.5
STEP 3: Place opposite jamb towards back member and slide
inside corner jamb into jamb insert receiver leg. Refer
Fig. 76.3 & 76.4.
STEP 4: Attach head anchors P4200 and jamb anchors P4200,
then sill anchors P4200 to secure Cassette frame. Refer
to Fig. 76.6. All anchors 12" o/c max and min 2" from ends.
P4200
P4200
P4200
P4200
400 4-SIDE SSG CASSETTE on 400CW /T BACK MEMBERS
OCTOBER-2019
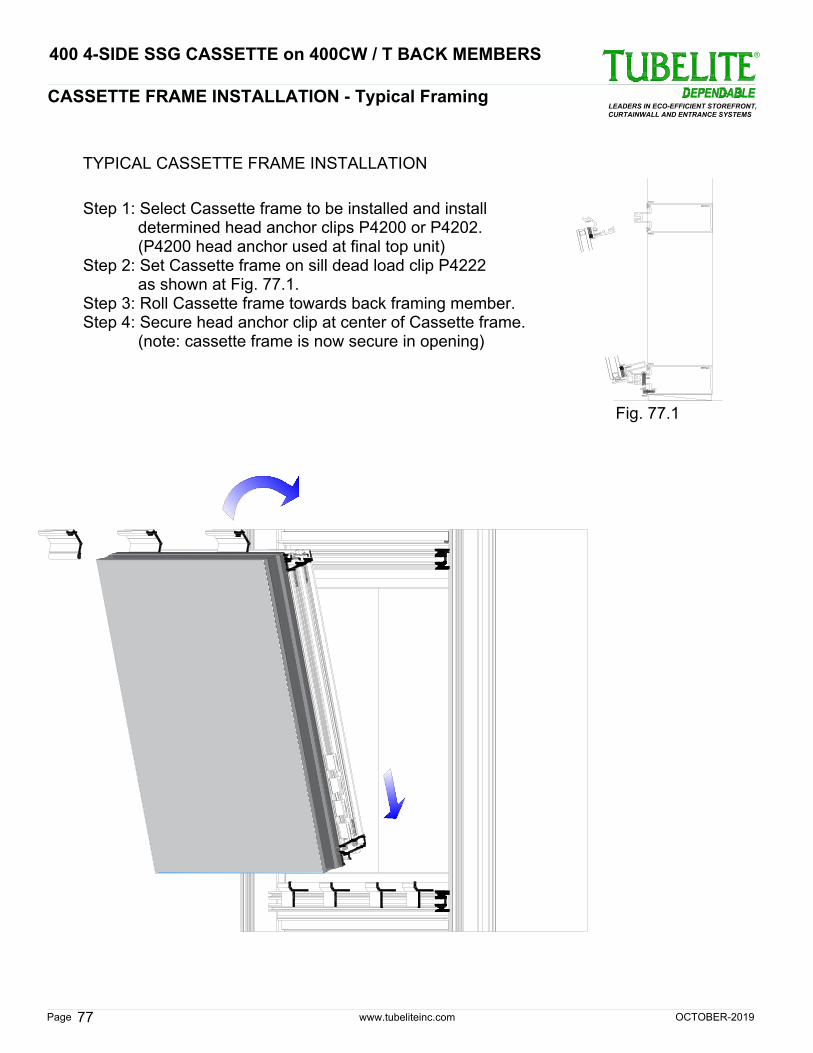
E55TB223
www.tubeliteinc.comPage
LEADERS IN ECO-EFFICIENT STOREFRONT,
CURTAINWALL AND ENTRANCE SYSTEMS
®
400 4-SIDE SSG CASSETTE on 400CW / T BACK MEMBERS
OCTOBER-2019
77
CASSETTE FRAME INSTALLATION - Typical Framing
E55TB223
P
4
2
1
1
E
0
0
1
C
A
P
4
2
0
2
P4210
P4210
P
4
2
1
1
P4210
P
1
9
1
2
S
P4216
S377
E
0
0
2
C
A
P4222
S292
TYPICAL CASSETTE FRAME INSTALLATION
Step 1: Select Cassette frame to be installed and install
determined head anchor clips P4200 or P4202.
(P4200 head anchor used at final top unit)
Step 2: Set Cassette frame on sill dead load clip P4222
as shown at Fig. 77.1.
Step 3: Roll Cassette frame towards back framing member.
Step 4: Secure head anchor clip at center of Cassette frame.
(note: cassette frame is now secure in opening)
Fig. 77.1
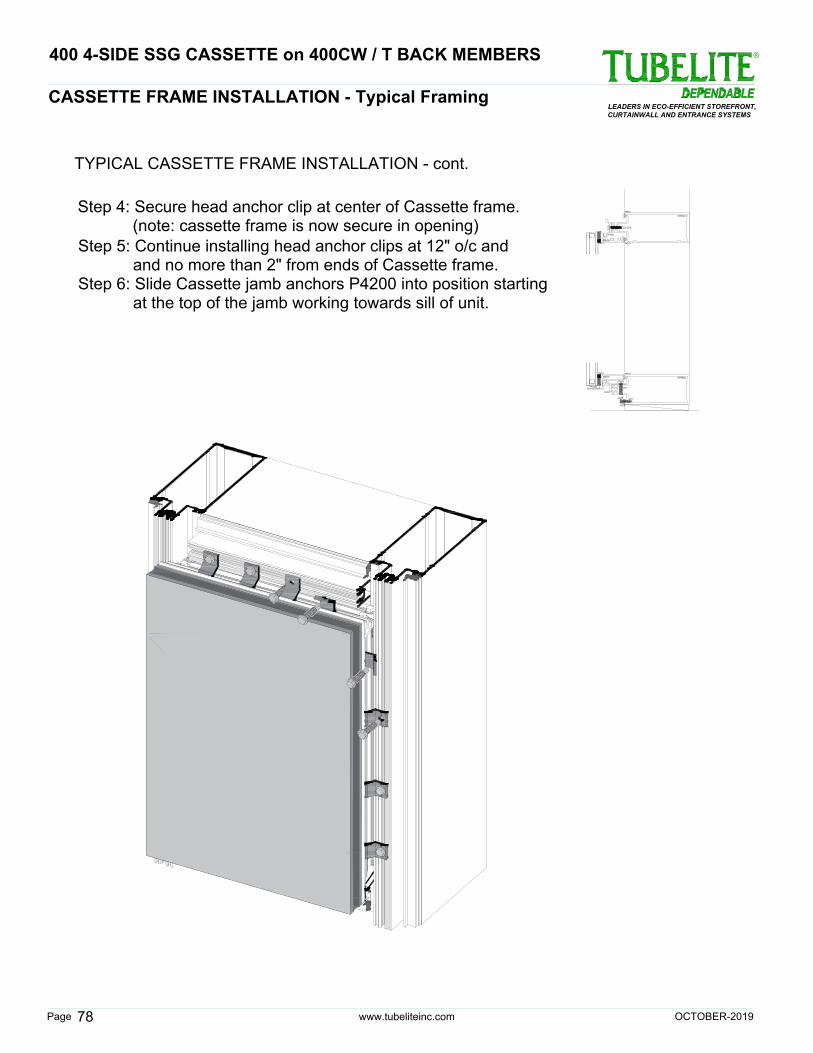
LEADERS IN ECO-EFFICIENT STOREFRONT,
CURTAINWALL AND ENTRANCE SYSTEMS
®
www.tubeliteinc.com
78
Page
CASSETTE FRAME INSTALLATION - Typical Framing
E55TB223
E001CA
P4211
P4210
P4202
P4210
E55TB223
P4211
P4210
P1912S
P4216
S377
E002CA
P4222
S292
S376
Step 5: Continue installing head anchor clips at 12" o/c and
and no more than 2" from ends of Cassette frame.
Step 6: Slide Cassette jamb anchors P4200 into position starting
at the top of the jamb working towards sill of unit.
TYPICAL CASSETTE FRAME INSTALLATION - cont.
Step 4: Secure head anchor clip at center of Cassette frame.
(note: cassette frame is now secure in opening)
OCTOBER-2019
400 4-SIDE SSG CASSETTE on 400CW / T BACK MEMBERS
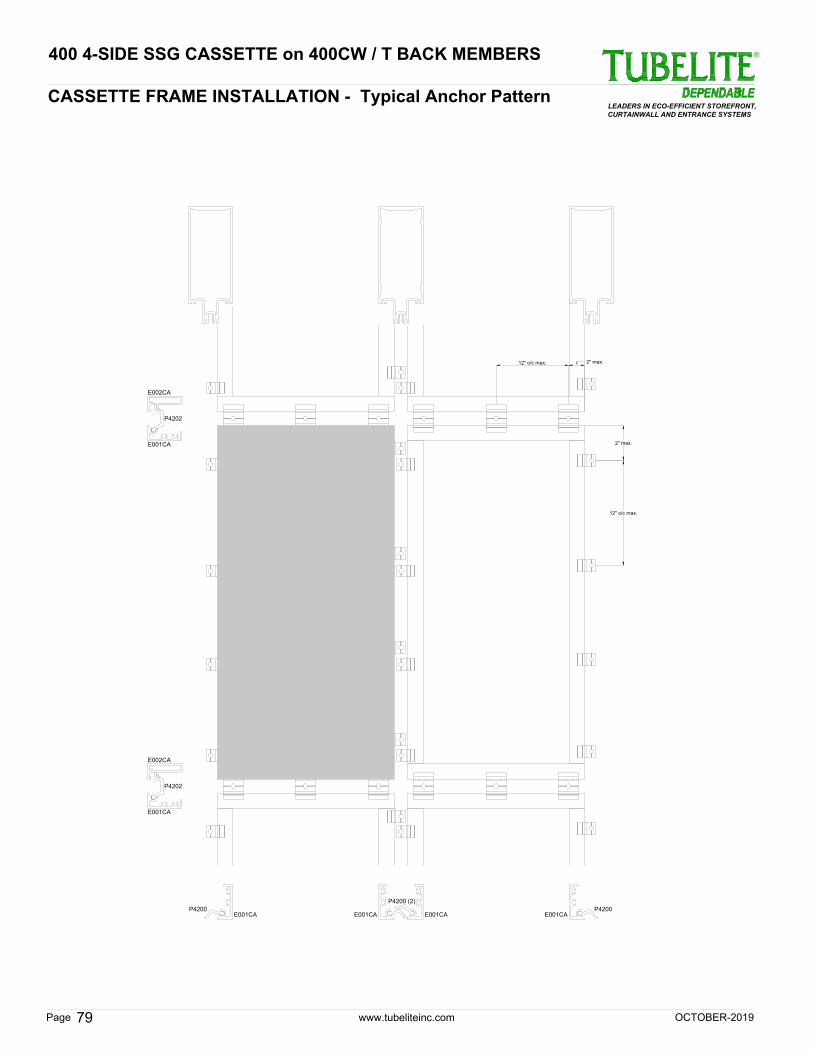
www.tubeliteinc.comPage
LEADERS IN ECO-EFFICIENT STOREFRONT,
CURTAINWALL AND ENTRANCE SYSTEMS
®
79
CASSETTE FRAME INSTALLATION - Typical Anchor Pattern
2" max.
12" o/c max.
E001CA
E002CA
E001CA
E002CA
P4202
E001CA E001CA E001CA E001CA
P4202
P4200
P4200 (2)
P4200
2" max.
12" o/c max.
OCTOBER-2019
400 4-SIDE SSG CASSETTE on 400CW / T BACK MEMBERS
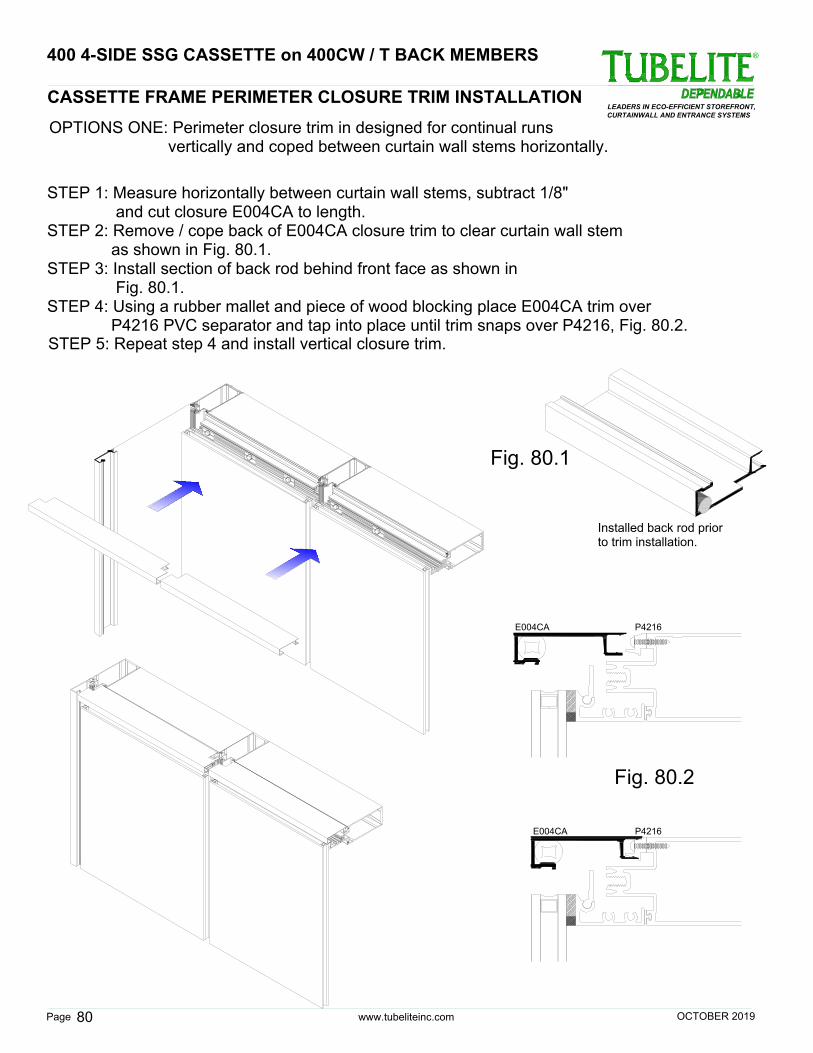
www.tubeliteinc.comPage
LEADERS IN ECO-EFFICIENT STOREFRONT,
CURTAINWALL AND ENTRANCE SYSTEMS
®
80
400 4-SIDE SSG CASSETTE on 400CW / T BACK MEMBERS
CASSETTE FRAME PERIMETER CLOSURE TRIM INSTALLATION
Fig. 80.1
Installed back rod prior
to trim installation.
OPTIONS ONE: Perimeter closure trim in designed for continual runs
vertically and coped between curtain wall stems horizontally.
STEP 1: Measure horizontally between curtain wall stems, subtract 1/8"
and cut closure E004CA to length.
STEP 2: Remove / cope back of E004CA closure trim to clear curtain wall stem
as shown in Fig. 80.1.
STEP 3: Install section of back rod behind front face as shown in
Fig. 80.1.
STEP 4: Using a rubber mallet and piece of wood blocking place E004CA trim over
P4216 PVC separator and tap into place until trim snaps over P4216, Fig. 80.2.
STEP 5: Repeat step 4 and install vertical closure trim.
P4216E004CA
P4216E004CA
Fig. 80.2
OCTOBER 2019
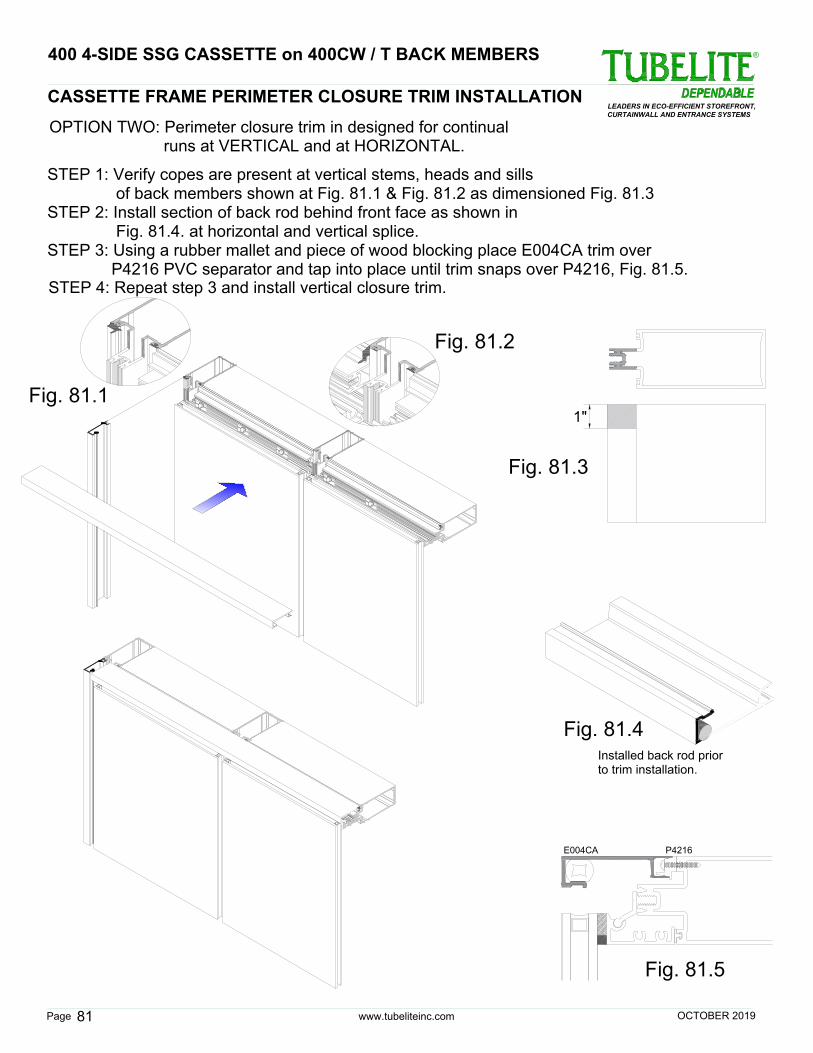
Fig. 81.1
Fig. 81.2
www.tubeliteinc.comPage
LEADERS IN ECO-EFFICIENT STOREFRONT,
CURTAINWALL AND ENTRANCE SYSTEMS
®
81
400 4-SIDE SSG CASSETTE on 400CW / T BACK MEMBERS
CASSETTE FRAME PERIMETER CLOSURE TRIM INSTALLATION
Fig. 81.4
Installed back rod prior
to trim installation.
OPTION TWO: Perimeter closure trim in designed for continual
runs at VERTICAL and at HORIZONTAL.
STEP 2: Install section of back rod behind front face as shown in
Fig. 81.4. at horizontal and vertical splice.
STEP 3: Using a rubber mallet and piece of wood blocking place E004CA trim over
P4216 PVC separator and tap into place until trim snaps over P4216, Fig. 81.5.
STEP 4: Repeat step 3 and install vertical closure trim.
P4216E004CA
Fig. 81.5
OCTOBER 2019
1"
Fig. 81.3
STEP 1: Verify copes are present at vertical stems, heads and sills
of back members shown at Fig. 81.1 & Fig. 81.2 as dimensioned Fig. 81.3
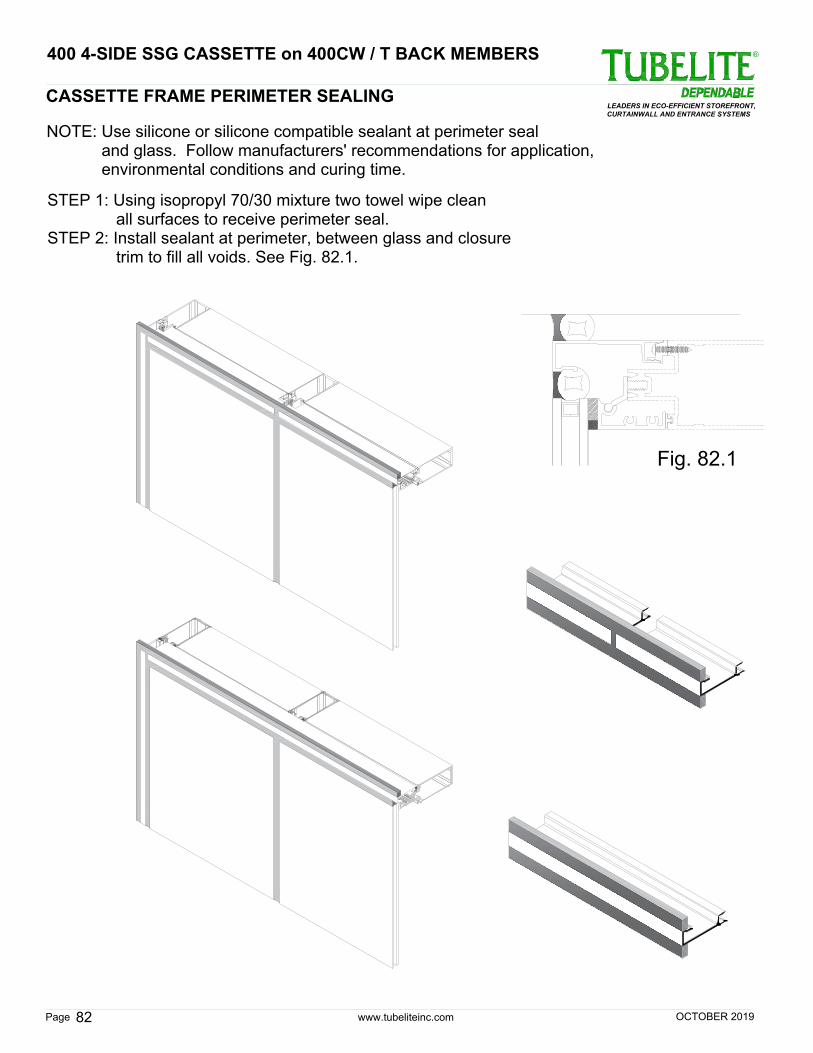
www.tubeliteinc.comPage
LEADERS IN ECO-EFFICIENT STOREFRONT,
CURTAINWALL AND ENTRANCE SYSTEMS
®
82
400 4-SIDE SSG CASSETTE on 400CW / T BACK MEMBERS
CASSETTE FRAME PERIMETER SEALING
NOTE: Use silicone or silicone compatible sealant at perimeter seal
and glass. Follow manufacturers' recommendations for application,
environmental conditions and curing time.
STEP 1: Using isopropyl 70/30 mixture two towel wipe clean
all surfaces to receive perimeter seal.
STEP 2: Install sealant at perimeter, between glass and closure
trim to fill all voids. See Fig. 82.1.
Fig. 82.1
OCTOBER 2019
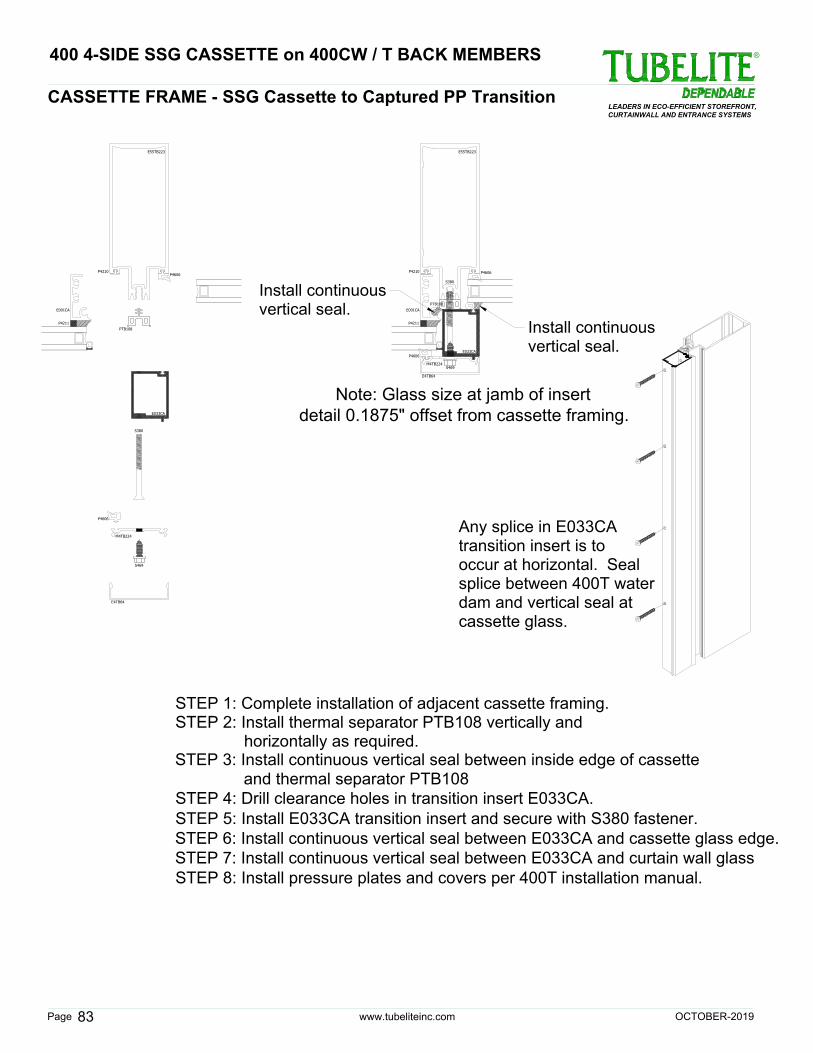
www.tubeliteinc.comPage
LEADERS IN ECO-EFFICIENT STOREFRONT,
CURTAINWALL AND ENTRANCE SYSTEMS
®
83
CASSETTE FRAME - SSG Cassette to Captured PP Transition
E55TB223
S380
P4210
E001CA
P4211
P4606
PTB108
P4606
E033CA
E4TB64
M4TB224
S469
E55TB223
S380
P4210
E001CA
P4211
P4606
PTB108
P4606
E033CA
E4TB64
M4TB224
S469
Note: Glass size at jamb of insert
detail 0.1875" offset from cassette framing.
STEP 1: Complete installation of adjacent cassette framing.
STEP 2: Install thermal separator PTB108 vertically and
horizontally as required.
STEP 4: Drill clearance holes in transition insert E033CA.
STEP 5: Install E033CA transition insert and secure with S380 fastener.
STEP 8: Install pressure plates and covers per 400T installation manual.
OCTOBER-2019
400 4-SIDE SSG CASSETTE on 400CW / T BACK MEMBERS
Install continuous
vertical seal.
Install continuous
vertical seal.
Any splice in E033CA
transition insert is to
occur at horizontal. Seal
splice between 400T water
dam and vertical seal at
cassette glass.
STEP 3: Install continuous vertical seal between inside edge of cassette
and thermal separator PTB108
STEP 6: Install continuous vertical seal between E033CA and cassette glass edge.
STEP 7: Install continuous vertical seal between E033CA and curtain wall glass
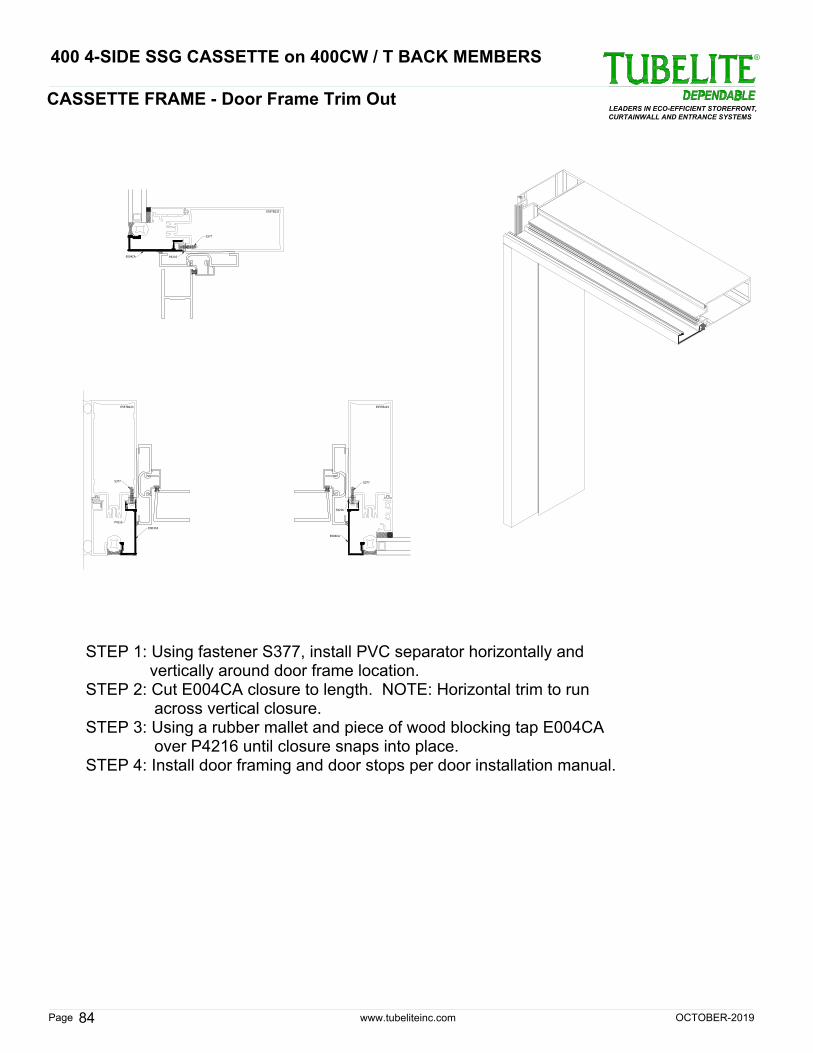
www.tubeliteinc.comPage
LEADERS IN ECO-EFFICIENT STOREFRONT,
CURTAINWALL AND ENTRANCE SYSTEMS
®
84
CASSETTE FRAME - Door Frame Trim Out
E55TB223
S377
P4216
E004CA
E004CA
P4216
S377
E55TB223
P4216
E004CA
S377
E55TB223
STEP 1: Using fastener S377, install PVC separator horizontally and
vertically around door frame location.
STEP 2: Cut E004CA closure to length. NOTE: Horizontal trim to run
across vertical closure.
STEP 3: Using a rubber mallet and piece of wood blocking tap E004CA
over P4216 until closure snaps into place.
STEP 4: Install door framing and door stops per door installation manual.
OCTOBER-2019
400 4-SIDE SSG CASSETTE on 400CW / T BACK MEMBERS