INSTALLATION INSTRUCTIONS TC BROS. CHOPPERS® PART … Sportster Forward Controls Kit...
8
INSTALLATION INSTRUCTIONS TC BROS. CHOPPERS® PART #102-0075 & #102-0076 (No Pegs) FORWARD CONTROLS KIT FOR ALL 2004-2013 HARLEY DAVIDSON® SPORTSTER® MODELS If downloading & printing these instructions online, be sure to set your printer to “Full Scale” Note: Please be aware that this procedure may exceed your technical abilities. Please read instructions completely and carefully before attempting installation. If you are unsure of your abilities, please consult a service professional. WARNING: INSTALL & USE AT YOUR OWN RISK! Always wear and use all proper safety gear at all times when installing this product. We have made every attempt to ensure that these instructions are concise and easy to follow, but if any mistakes are found, or you require additional information, we can be reached M-F from 8:00am-5:00pm EST by calling 419-265-9399 or via email at [email protected]. TC Bros Choppers LLC assumes no liability for any personal injury or property damage caused by the installation and/or use or misuse of this or any other product. Recommended Tools for Installation: 1.) Combination Wrenches in 7/16”, 1/2", 9/16” and 3/4" sizes 2.) Torque Wrench that measures in ft-lbs or N-m (torque values given are for dry fasteners) 3.) Standard Hex Key Wrenches (a.k.a. “Allen Wrenches”) 4.) Ratchet and Socket set 5.) Soft faced mallet (Rubber or plastic is preferred) 6.) Loctite #243 Medium Strength Threadlocker (Blue) or equivalent 7.) Grease (Multi-purpose Automotive, wheel bearing, or marine grade are sufficient) FORWARD CONTROLS INSTALLATION INSTRUCTIONS: 1.) Remove Exhaust. 2.) If your bike has factory mid controls, remove shifter, brake pedal, footpegs, mounting brackets, and brake linkage rod. (No need to remove rear master cylinder) 3.) If your bike has factory forward controls, first disconnect linkage rods, then remove all forward controls mounts and hardware. (No need to remove rear master cylinder) 4.) Please refer to supplied parts diagrams on following pages for part number references for remainder of installation instructions. NOTE: Apply threadlocker to all threaded mounting hardware during installation. 5.) Insert ½-13x2½” bolt (part #119-0210) through shifter side forward control mount (part #MB204XL-L). It will pass all the way through the welded spacer and threads will protrude out the other side. 6.) Install shifter side forward control mount (part #MB204XL-L) loosely to bike using quantity two 3/8-16x3” bolts (part #119-0170) and quantity two 3/8 Flat Washers (part #119-0026). Remember to apply threadlocker. It will install in the same location as your stock shifter side forward control mount that you removed in step 3. See figure 1. Using a torque wrench, torque the 3/8” bolts (part #119-0170) to 30 ft-lbs (40.7 N-m). 7.) Begin installing the shifter side forward control assembly by liberally applying threadlocker to the threads of the ½-13x2½” bolt (part #119-0210) and loosely threading it into the footpeg mounting clevis (part #FC888XL). Be sure to orient the footpeg mounting clevis (part #FC888XL) so that the milled slot of the clevis is approximately at a 45 degree angle to the ground. This angle will assist the peg in folding if it were ever to contact the ground while riding. You most likely will not be able to reach the head of the 119-0210 bolt with a torque wrench, so just tighten securely using a ¾” combination wrench. 8.) Install the shift lever assembly (part #120-0024) to the splined shifter shaft protruding from your engine by tapping it into position with a soft faced mallet until it is fully seated onto the shaft. Be sure to orient the shift lever so that the threaded linkage attachment hole is in the 6:00 position (pointing straight down). Tighten supplied socket head bolt securely to clamp shift lever to shift shaft. 9.) Install supplied 5/16-24 hex jam nuts (part #119-0103) onto either end of shift linkage rod (part #FC208XL). Follow by installing supplied 5/16” heim joints (part #119-0009) onto either end of linkage rod as well.
Transcript of INSTALLATION INSTRUCTIONS TC BROS. CHOPPERS® PART … Sportster Forward Controls Kit...
INSTALLATION INSTRUCTIONS
TC BROS. CHOPPERS®
PART #102-0075 & #102-0076 (No Pegs)
FORWARD CONTROLS KIT FOR ALL 2004-2013 HARLEY DAVIDSON® SPORTSTER® MODELS
If downloading & printing these instructions online, be sure to set your printer to “Full Scale”
Note: Please be aware that this procedure may exceed your technical abilities. Please read instructions completely and
carefully before attempting installation. If you are unsure of your abilities, please consult a service professional.
WARNING: INSTALL & USE AT YOUR OWN RISK! Always wear and use all proper safety gear at all times when installing
this product. We have made every attempt to ensure that these instructions are concise and easy to follow, but if any
mistakes are found, or you require additional information, we can be reached M-F from 8:00am-5:00pm EST by calling
419-265-9399 or via email at [email protected]. TC Bros Choppers LLC assumes no liability for any personal
injury or property damage caused by the installation and/or use or misuse of this or any other product.
Recommended Tools for Installation:
1.) Combination Wrenches in 7/16”, 1/2", 9/16” and 3/4" sizes
2.) Torque Wrench that measures in ft-lbs or N-m (torque values given are for dry fasteners)
3.) Standard Hex Key Wrenches (a.k.a. “Allen Wrenches”)
4.) Ratchet and Socket set
5.) Soft faced mallet (Rubber or plastic is preferred)
6.) Loctite #243 Medium Strength Threadlocker (Blue) or equivalent
7.) Grease (Multi-purpose Automotive, wheel bearing, or marine grade are sufficient)
FORWARD CONTROLS INSTALLATION INSTRUCTIONS:
1.) Remove Exhaust.
2.) If your bike has factory mid controls, remove shifter, brake pedal, footpegs, mounting brackets, and brake
linkage rod. (No need to remove rear master cylinder)
3.) If your bike has factory forward controls, first disconnect linkage rods, then remove all forward controls mounts
and hardware. (No need to remove rear master cylinder)
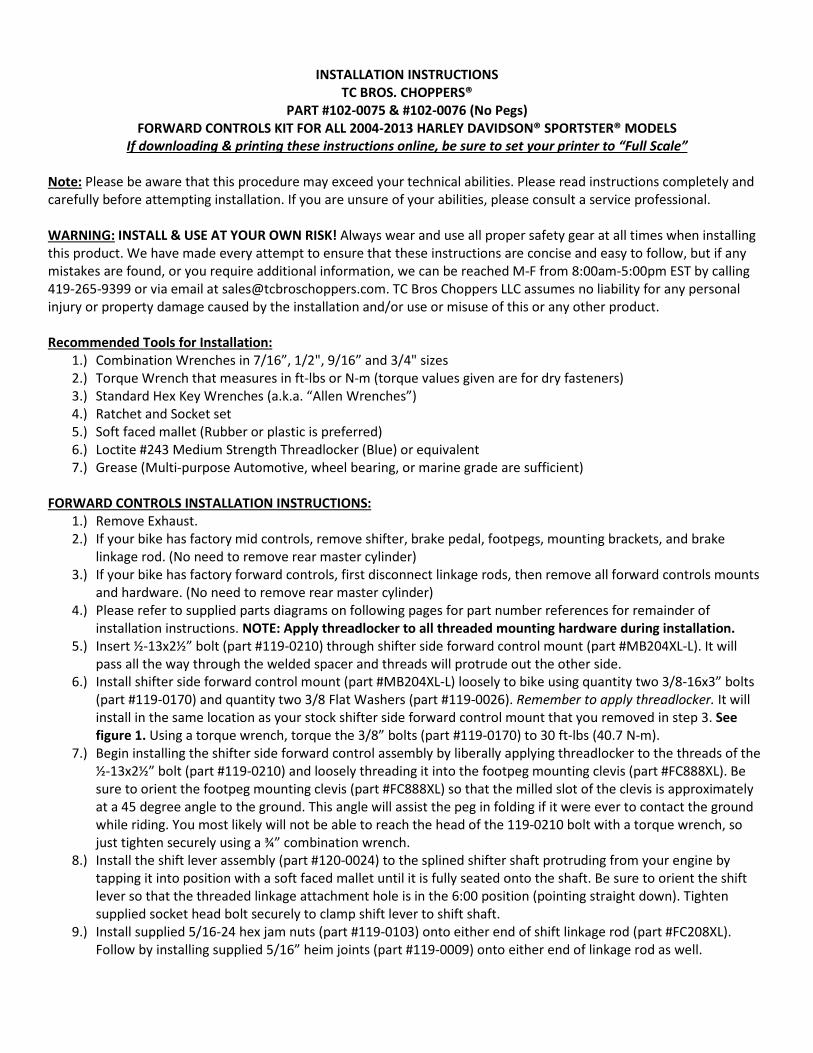
4.) Please refer to supplied parts diagrams on following pages for part number references for remainder of
installation instructions. NOTE: Apply threadlocker to all threaded mounting hardware during installation.
5.) Insert ½-13x2½” bolt (part #119-0210) through shifter side forward control mount (part #MB204XL-L). It will
pass all the way through the welded spacer and threads will protrude out the other side.
6.) Install shifter side forward control mount (part #MB204XL-L) loosely to bike using quantity two 3/8-16x3” bolts
(part #119-0170) and quantity two 3/8 Flat Washers (part #119-0026). Remember to apply threadlocker. It will
install in the same location as your stock shifter side forward control mount that you removed in step 3. See
figure 1. Using a torque wrench, torque the 3/8” bolts (part #119-0170) to 30 ft-lbs (40.7 N-m).
7.) Begin installing the shifter side forward control assembly by liberally applying threadlocker to the threads of the
½-13x2½” bolt (part #119-0210) and loosely threading it into the footpeg mounting clevis (part #FC888XL). Be
sure to orient the footpeg mounting clevis (part #FC888XL) so that the milled slot of the clevis is approximately
at a 45 degree angle to the ground. This angle will assist the peg in folding if it were ever to contact the ground
while riding. You most likely will not be able to reach the head of the 119-0210 bolt with a torque wrench, so
just tighten securely using a ¾” combination wrench.
8.) Install the shift lever assembly (part #120-0024) to the splined shifter shaft protruding from your engine by
tapping it into position with a soft faced mallet until it is fully seated onto the shaft. Be sure to orient the shift
lever so that the threaded linkage attachment hole is in the 6:00 position (pointing straight down). Tighten
supplied socket head bolt securely to clamp shift lever to shift shaft.
9.) Install supplied 5/16-24 hex jam nuts (part #119-0103) onto either end of shift linkage rod (part #FC208XL).
Follow by installing supplied 5/16” heim joints (part #119-0009) onto either end of linkage rod as well.
10.) Attach shift linkage rod to shift lever installed in step 8 by passing supplied button head mounting bolt through
heim joint and threading into shift lever. Follow by loosely installing remaining end of shift linkage rod to
forward control pivot plate (part #FC204XL) using 5/16-18x1¼” socket head bolt (part #119-0209) and 5/16-18
locknut (part #119-0004). Be sure to install so that both heim joints are on the outer faces of both the pivot
plate and the shift lever. This will ensure that there is no contact with the engine case, and the heim joints are
not binding. Please refer to parts diagram for orientation.
11.) If you purchased part #102-0075, you can skip this step. If you purchased part #102-0076 (forward controls
without pegs), now is time to install your footpeg (not included) using the supplied 3/8-16x1¼ (part #119-0040)
button head bolt and 3/8-16 (part #119-0155) locknut. Follow by installing toe peg (not included).
12.) While seated on the bike, check that the shifter pedal is in a comfortable position and you can operate it easily
with your foot. You can adjust the position of the pedal by unbolting the heim joint (part #119-0009) from the
pivot plate (part #FC204XL) and adjusting the length of the linkage rod by threading it in or out of the heim
joints, then reinstalling the linkage to the forward control. Take care to maintain a minimum of ½” (12.7mm) of
linkage rod thread engagement in both heim joints. Once proper adjustments have been made, apply
threadlocker to linkage bolts and tighten securely to 11 ft-lbs (14.9 N-m). Remember to tighten the #119-0103
jam nuts to the #119-0009 heim joints as well. At this time, the shifter side forward control installation is
complete.
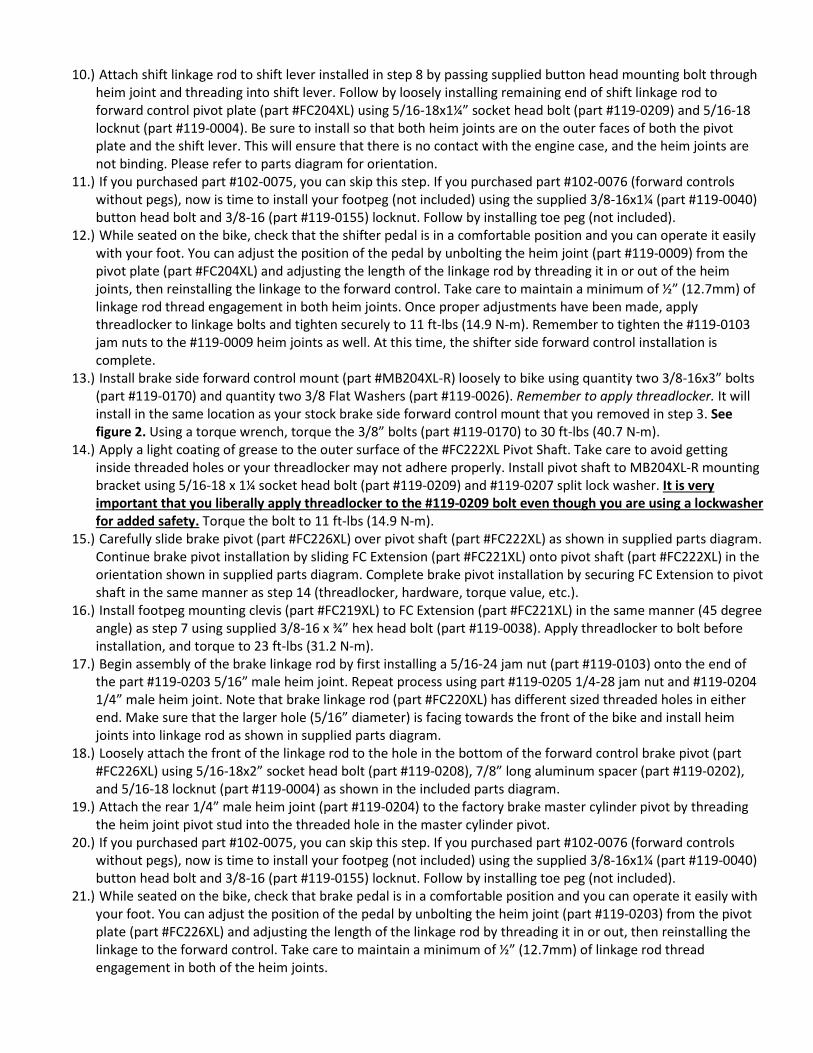
13.) Install brake side forward control mount (part #MB204XL-R) loosely to bike using quantity two 3/8-16x3” bolts
(part #119-0170) and quantity two 3/8 Flat Washers (part #119-0026). Remember to apply threadlocker. It will
install in the same location as your stock brake side forward control mount that you removed in step 3. See
figure 2. Using a torque wrench, torque the 3/8” bolts (part #119-0170) to 30 ft-lbs (40.7 N-m).
14.) Apply a light coating of grease to the outer surface of the #FC222XL Pivot Shaft. Take care to avoid getting
inside threaded holes or your threadlocker may not adhere properly. Install pivot shaft to MB204XL-R mounting
bracket using 5/16-18 x 1¼ socket head bolt (part #119-0209) and #119-0207 split lock washer. It is very
important that you liberally apply threadlocker to the #119-0209 bolt even though you are using a lockwasher
for added safety. Torque the bolt to 11 ft-lbs (14.9 N-m).
15.) Carefully slide brake pivot (part #FC226XL) over pivot shaft (part #FC222XL) as shown in supplied parts diagram.
Continue brake pivot installation by sliding FC Extension (part #FC221XL) onto pivot shaft (part #FC222XL) in the
orientation shown in supplied parts diagram. Complete brake pivot installation by securing FC Extension to pivot
shaft in the same manner as step 14 (threadlocker, hardware, torque value, etc.).
16.) Install footpeg mounting clevis (part #FC219XL) to FC Extension (part #FC221XL) in the same manner (45 degree
angle) as step 7 using supplied 3/8-16 x ¾” hex head bolt (part #119-0038). Apply threadlocker to bolt before
installation, and torque to 23 ft-lbs (31.2 N-m).
17.) Begin assembly of the brake linkage rod by first installing a 5/16-24 jam nut (part #119-0103) onto the end of
the part #119-0203 5/16” male heim joint. Repeat process using part #119-0205 1/4-28 jam nut and #119-0204
1/4” male heim joint. Note that brake linkage rod (part #FC220XL) has different sized threaded holes in either
end. Make sure that the larger hole (5/16” diameter) is facing towards the front of the bike and install heim
joints into linkage rod as shown in supplied parts diagram.
18.) Loosely attach the front of the linkage rod to the hole in the bottom of the forward control brake pivot (part
#FC226XL) using 5/16-18x2” socket head bolt (part #119-0208), 7/8” long aluminum spacer (part #119-0202),
and 5/16-18 locknut (part #119-0004) as shown in the included parts diagram.
19.) Attach the rear 1/4” male heim joint (part #119-0204) to the factory brake master cylinder pivot by threading
the heim joint pivot stud into the threaded hole in the master cylinder pivot.
20.) If you purchased part #102-0075, you can skip this step. If you purchased part #102-0076 (forward controls
without pegs), now is time to install your footpeg (not included) using the supplied 3/8-16x1¼ (part #119-0040)
button head bolt and 3/8-16 (part #119-0155) locknut. Follow by installing toe peg (not included).
21.) While seated on the bike, check that brake pedal is in a comfortable position and you can operate it easily with
your foot. You can adjust the position of the pedal by unbolting the heim joint (part #119-0203) from the pivot
plate (part #FC226XL) and adjusting the length of the linkage rod by threading it in or out, then reinstalling the
linkage to the forward control. Take care to maintain a minimum of ½” (12.7mm) of linkage rod thread
engagement in both of the heim joints.

22.) Now that both sides of the forward controls have been installed, and the linkages have been adjusted properly,
it is time to apply threadlocker and tighten all remaining hardware securely. Once completed, reinstall exhaust
and double check that both the shifter and brake operate smoothly and comfortably before use.
FIGURE 1
FIGURE 2

14 24
23
13 16
15
25
26
17
22
20
8
21
8
34 20
33
28
28
18
19
27
27
12
30
5
34
35
27
28
27
28
29
32
11
10
9
87
33
4
26
25 15
3
32
31
1
35
34
242
23
14
6
TC BROS CHOPPERS®
PART #102-0075
FORWARD CONTROLS (WITH PEGS)
2004-2013 HD SPORTSTER® MODELS
SHIFTER SIDE
BRAKE SIDE
TC BROS CHOPPERS LLC
www.tcbros.com
sales@
tcbroschoppers.com
419-265-9399

PARTS LIST
DESCRIPTIONPART NUMBERQTYITEM
FC EXTENSIONFC221XL11
FC CLEVISFC219XL12
PIVOT SHAFTFC222XL13
BRAKE PIVOTFC226XL14
RH MOUNTMB204XL-R15
.319 ID x 1/2 OD x 7/8 LG ALUMINUM SPACER119-020216
5/16-24 MALE HEIM JOINT STEEL ZINC PLT119-020317
5/16-24 SS JAM NUT119-010338
BRAKE RODFC220XL19
1/4-28 SS JAM NUT119-0205110
1/4-28 MALE HEIM JOINT W/ STUD ZINC PLT119-0204111
LH MOUNTMB204XL-L112
FC CLEVISFC888XL113
HD FOOTPEGFP883XL214
HD TOE PEGFP884XL215
7/8"IDx1"ODx1/2"LG BRONZE FLANGE BUSHING119-0153116
SHIFT SIDE PIVOTFC204XL117
1"ID x1-5/8"OD x1/16"TH BRONZE THRUST WASHER119-0154118
7/8 IDx1-5/8 OD ALUMINUM SHAFT COLLAR119-0152119
5/16-24 FEMALE HEIM JOINT119-0009220
SHIFT LINKAGEFC208XL121
SHIFT LEVER ASSEMBLY (WITH BOLTS)120-0024122
3/8-16x1-1/4 SS BUTTON HEAD BOLT119-0040223
3/8-16 THIN HEX LOCKNUT SS119-0155224
5/16 SS LOCK WASHER119-0018225
5/16-24x3/4 SS BUTTON HEAD BOLT119-0157226
3/8 SAE WASHER119-0026427
3/8-16 x3" HEX BOLT119-0170428
5/16-18x2 STAINLESS SOCKET HEAD CAP SCREW119-0208129
1/2-13x2-1/2 HEX BOLT119-0210130
3/8-16x3/4 HEX BOLT119-0038131
3/4 IDx7/8 ODx1/2 LG BRONZE FLG BUSHING119-0064232
5/16-18 SS NYLOCK NUT119-0004233
5/16-18x1.25 STAINLESS SOCKET HEAD CAP SCREW119-0209334
5/16 SS SPLIT LOCK WASHER FOR SHCS119-0207235
TC BROS CHOPPERS®
PART #102-0075
FORWARD CONTROLS (WITH PEGS) PARTS LIST 2004-2013 HD SPORTSTER® MODELS
TC BROS CHOPPERS LLCwww.tcbros.com

22
21
13
15
14
30
819
8
18
20
16
29
18
24 2
3
23
24
17
12
26
5
30
31
23
24
25
23
24
11
10
98
7
28
6
29
4
3
28
27
1
31
30
22
2
21
TC B
ROS C
HOPPERS
®
PART #
102-0
076
FORW
ARD C
ONTROLS (NO P
EGS)
2004-2
013 H
D S
PORTSTER
® M
ODELS
SHIF
TER S
IDE
BRAKE S
IDE
TC B
ROS C
HOPPERS L
LC
www.tcb
ros.co
msa
les@
tcbro
schoppers
.com
419-2
65-9
399

PARTS LIST
DESCRIPTIONPART NUMBERQTYITEM
FC EXTENSIONFC221XL11
FC CLEVISFC219XL12
PIVOT SHAFTFC222XL13
BRAKE PIVOTFC226XL14
RH MOUNTMB204XL-R15
.319 ID x 1/2 OD x 7/8 LG ALUMINUM SPACER119-020216
5/16-24 MALE HEIM JOINT STEEL ZINC PLT119-020317
5/16-24 SS JAM NUT119-010338
BRAKE RODFC220XL19
1/4-28 SS JAM NUT119-0205110
1/4-28 MALE HEIM JOINT W/ STUD ZINC PLT119-0204111
LH MOUNTMB204XL-L112
FC CLEVISFC888XL113
7/8"IDx1"ODx1/2"LG BRONZE FLANGE BUSHING119-0153114
SHIFT SIDE PIVOTFC204XL115
1"ID x1-5/8"OD x1/16"TH BRONZE THRUST WASHER119-0154116
7/8 IDx1-5/8 OD ALUMINUM SHAFT COLLAR119-0152117
5/16-24 FEMALE HEIM JOINT119-0009218
SHIFT LINKAGEFC208XL119
SHIFT LEVER ASSEMBLY (WITH BOLTS)120-0024120
3/8-16x1-1/4 SS BUTTON HEAD BOLT119-0040221
3/8-16 THIN HEX LOCKNUT SS119-0155222
3/8 SAE WASHER119-0026423
3/8-16 x3" HEX BOLT119-0170424
5/16-18x2 STAINLESS SOCKET HEAD CAP SCREW119-0208125
1/2-13x2-1/2 HEX BOLT119-0210126
3/8-16x3/4 HEX BOLT119-0038127
3/4 IDx7/8 ODx1/2 LG BRONZE FLG BUSHING119-0064228
5/16-18 SS NYLOCK NUT119-0004229
5/16-18x1.25 STAINLESS SOCKET HEAD CAP SCREW119-0209330
5/16 SS SPLIT LOCK WASHER FOR SHCS119-0207231
TC BROS CHOPPERS®
PART #102-0076
FORWARD CONTROLS (NO PEGS) PARTS LIST
2004-2013 HD SPORTSTER® MODELS
TC BROS CHOPPERS LLCwww.tcbros.com
419-265-9399

TC B
ROS C
HOPPERS
PART #
102-0
075 &
#102-0
076
HD S
PORTSTER FORW
ARD C
ONTROLS
HARDW
ARE D
IAGRAM (FULL S
IZE)
119-0204 119-0009119-0009
119-0203
119-0038
119-0040
119-0040
119-0202
119-0026119-0026119-0026
119-0026
119-0155
119-0155
119-0103
119-0103
119-0103
119-0205
119-0207
119-0207
119-0004
119-0004
119-0209 119-0209119-0209
119-0208
119-0210
119-0170
119-0170
119-0170
119-0170