
Installation instructions - oxgard.ruT-10H... · Full-height turnstile Oxgard Praktika Т-10...
40
Installation instructions www.oxgard.com [email protected] Tel.: +7(812) 366-15-94 Full-height turnstile Oxgard Praktika T-10 (T-10H) VOZROZHDENIE METALWORKS
Transcript of Installation instructions - oxgard.ruT-10H... · Full-height turnstile Oxgard Praktika Т-10...

Installation
instructions
www.oxgard.com
Tel.: +7(812) 366-15-94
Full-height turnstile Oxgard Praktika T-10 (T-10H)
VOZROZHDENIE METALWORKS

PROTECTING THE FUTURE

Installation instructions 3
PROTECTING THE FUTURE
Contents
List of abbreviations used ............................................................................ 4
1. Main technical parameters ....................................................................... 5
2. Design of the article ................................................................................. 5
3. Safety requirements ................................................................................ 11
4. Installation of the turnstile ..................................................................... 13
4.1. Necessary equipment ........................................................................ 13
4.2. Installation of the turnstile ................................................................ 14
5. Connection of the turnstile: .................................................................... 25
5.1. Connection of the control board. ...................................................... 28
5.2. Connection of the access control system (optionally) ..................... 29
5.3. Connection of the control board to the ACS controller. .................. 32
Appendix 1. Short summary of the data transmission bus CAN2.0 .......... 35
Appendix 2. Arrangement of the installation openings relative to the
external dimensions of the turnstile ........................................................... 36

Full-height turnstile Oxgard Praktika Т-10 (T-10H) 4
List of abbreviations used
PSU - power supply unit
S&FA - security and fire alarm
CB - control board
ACS - access control system
NC - normally closed
NO - normally opened
Turnstile firmware version _ v1.1

Installation instructions 5
PROTECTING THE FUTURE
1. Main technical parameters
Table 1. General
Parameter Turnstile Console
Overall dimensions (H x W x D),
mm:
2290х1500х1375
107х107х25
Weight (net), kg 320 0.5
Temperature range, °С:
- during operation
- during transportation and storage
-40...+50
-40...+50
+1...+40
+1...+40
Relative air humidity, %, at most 95 80
Width of a created passage, mm 600
Through-flow rate, persons per
minute 20
Service life, year 8 8
Table 2. Electrical data
Parameter Turnstile Console
Power supply voltage, V: 220 12.0
Rated consumption power*, W 75
*- values are given for the rated power supply voltage
The original manufacturer reserves its right to change the scope of supply, technical characteristics
and external appearance of the article.
2. Design of the article
The turnstile is a normally opened (NO) barrier device.
When the power is off, turnstile authorizes passages in both directions.
The turnstile body and obstructing bars can be made of:
- power-coated steel (T-10)
- stainless steel (T-10H)

Full-height turnstile Oxgard Praktika Т-10 (T-10H) 6
PROTECTING THE FUTURE
Both turnstile variations ensure prolonged service life of the turnstile
in adverse environmental conditions.
General view and overall dimensions of the turnstile are shown on
Fig. 2 and 3.
The turnstile consists of:
- fixed enclosure panel (1);
- mobile enclosure elements (rotatory wicket door) (2);
- fixed enclosure elements (3);
- upper module (4);
- actuator (5) within the upper module.
The general view of the turnstile is represented by Fig. 2. The middle
part of the turnstile’s upper module is provided with two removable lock
doors for fast access to the cross-board when connecting CB and ACS
cables and the power supply cable. The cable inputs shall be led to two
racks of the fixed enclosure panel (at choice) (Fig. 2).
In its initial state the turnstile is closed (the turnstile is closed for
passage in both directions).
Two options are provided for occlusion of the passage zone by the leaves
in the initial state of the turnstile to determine its possible operating
modes:
- in the initial state of the turnstile the passage zone is occluded by
one leaf; from this state the standard operating modes of the turnstile
can be assigned.

Installation instructions 7
PROTECTING THE FUTURE
Fig. 1. Initial position of the leaves

Full-height turnstile Oxgard Praktika Т-10 (T-10H) 8
PROTECTING THE FUTURE
Fig. 2. General view of the turnstile.

Installation instructions 9
PROTECTING THE FUTURE
Fig. 3. General view and overall dimensions of the turnstile
Display panel
The display panel of the turnstile is located at the upper module of
the turnstile below an acrylic glass insert. The operating modes of the
turnstile are displayed on the panels (from two sides), as mnemonic
symbols for enabling/disabling the passage (Fig. 4).

Full-height turnstile Oxgard Praktika Т-10 (T-10H) 10
PROTECTING THE FUTURE
Fig. 4. External appearance of the display panel
Control board
The CB body is made of grinded stainless steel. The front side is
fitted with control buttons and LED indicators for desk operation modes
(Fig. 5). The standard length of the cable included in the scope of supply is
10 meters. The control board cable is laid in the body of the upper module
4 (Fig. 2) through the cable input rack in the fixed enclosure panel 1 (Fig.
2).
The control board cable shall be extended if necessary.
The control board shall be connected to the turnstile via the cross-
board of Fig. 16 as per Table 4.

Installation instructions 11
PROTECTING THE FUTURE
Fig. 5. External appearance of the control board
3. Safety requirements
When operating the turnstile it is required to follow general safety rules for
operating electrical installations.
It is forbidden to:
- operate the turnstile in conditions not complying with the requirements to
operating conditions
- operate the turnstile under power supply voltage different from that
specified in Table 2.
When maintaining the turnstile: All the works shall be done only with the turnstile de-energized.
When removing and installing large-sized and heavy parts of the turnstile
be doubly careful and prevent the parts from dropping.
Operating conditions:
The turnstile is resistant to environmental impact under U2 version as per

Full-height turnstile Oxgard Praktika Т-10 (T-10H) 12
PROTECTING THE FUTURE
GOST 15150-69 (to be operated outdoors).
IP protection code is 54. The turnstile can be operated at ambient temperature between -40°С to
+50°С and relative air humidity up to 95% at the temperature +25°С.
The turnstile control board is resistant to environmental impact under UHL
4 option as per GOST 15150-69 (to be operated indoors under artificially
adjustable climatic conditions). The control board can be operated at ambient temperature between +1°С
to +55°С and relative air humidity up to 80% at the temperature +25°С.
CAUTION! Non-observance of the requirements from this section can
cause damage to human life & health and full or partial loss of functions of
the article and/or auxiliary equipment.
CAUTION! The original manufacturer shall not take responsibility for
damage to human life & health, full or partial loss of functions of the
article and/or auxiliary equipment due to non-observance of safety
requirements of this section and void the warranty for this article.
Installation instructions 13
PROTECTING THE FUTURE
IT IS STRICTLY FORBIDDEN:
to use compounds and liquids for cleaning the article, which are
chemically aggressive for materials of the body.
4. Installation of the turnstile
CAUTION! The turnstile shall be reliably installed so as to avoid its
oscillation and/or capsizing in operation. If the turnstile is to be installed
on floors with low strength, take measures to reinforce the floors in the
place of installation.
Carefully study the present section of the Instructions before starting to
check the operability.
4.1. Necessary equipment
Equipment to be used for installation of the turnstile:
electric drilling machine;
18 mm-diameter carbide drill for boring anchor openings in a
floor (it is recommended to use a sleeve anchor with the bolt
FH 11-S 18/10);
19-mm wrench;
19-mm key wrench with a lever;
flat blade screwdriver;
plumbing line or mechanic’s level;
steel shims for adjustment of the turnstile;
round file;
side-cutting pliers;
500 g hammer;

Full-height turnstile Oxgard Praktika Т-10 (T-10H) 14
PROTECTING THE FUTURE
plumbing line or mechanic’s level.
4.2. Installation of the turnstile
4.2.1. Places for installation of the enclosure panels and mobile and fixed
elements of the turnstile and cable routes shall be pre-arranged according
to the working drawing (Fig. 22).
Pay attention that cable ends come out of the ground for 4 meters as
electrical connections shall be made in the upper module of the
turnstile.
4.2.2. Surface to be used for installation of the full-height turnstile shall be
smooth and pre-arranged. For this purpose it is recommended to use
concrete or other noncombustible material.
4.2.3. By guidelines from the installation drawing (Fig. 20) mark the
location for boring by means of a pattern.
4.2.4. According to the installation dimensions (Fig. 21) prepare 9
openings with 18 mm diameter in a floor to put anchors for fixing the
turnstile stand for the depth of 80 mm. The installation openings shall be
arranged relative to external dimensions of the turnstile as per Appendix 2
(Fig. 20, Fig. 21).The depth of the insert opening shall exceed the anchor
length for 5 mm. Insert the anchors into the openings.
Caution! The anchor bolts from the original manufacturer are suitable for
solving the most of problems, however in each specific case of installation
it shall take into account environmental conditions and a type of soil on
which the turnstile is installed. All the construction works shall be
coordinated and agreed by a qualified engineer who possesses all

Installation instructions 15
PROTECTING THE FUTURE
necessary information.
The equipment shall be attached to the foundation before the
operation starts!
The original manufacturer shall not take responsibility for emergencies or
failures resulted from improper fixture of the equipment.
4.2.5. Install the C clamps of Fig. 20 by means of the bolts with anchors
(not included in the scope of supply) in the locations for fixturing of the
turnstile. Tighten the bolts to fix the expanding anchors in the soil.
4.2.6. Select a rack of the fixed enclosure panel, along which cables for
control and power supply of the turnstile will be laid to the upper module.
Prepare the cable channel from the site to the installation location of the
CB and, if required, to the place of connection of ACS and S&FA.
The cables shall be led to the upper module through the openings made
in the racks of the fixed enclosure panel (Fig. 2). It is necessary to
prepare a trench for that rack of the fixed module which will be used by
you to lay cables to the upper module.
4.2.7. Open the box and unpack the turnstile, check the scope of supply for
the following:
part of the fixed enclosure panel (1);
parts of the mobile enclosure elements (rotatory wicket door)
(2);
parts of the fixed enclosure elements (3);
parts of the upper module (4);
actuator(5);
CB with a cable;
keys for the door lock (4 pieces);

Full-height turnstile Oxgard Praktika Т-10 (T-10H) 16
PROTECTING THE FUTURE
accompanying documentation.
Fig. 6. Installation dimensions
4.2.8. Assemble the fixe enclosure panel of the turnstile of Fig. 7. Install
it on the prepared site by pre-passing into its rack CB cables, power
supply cables, ACS and S&FA cables to the upper module.

Installation instructions 17
PROTECTING THE FUTURE
1 Bend section
2 Opposite bend section
3 Bolt М-12х40 DIN 933
4 Plug 30-33T38ЧK
5 Washer М12 DIN 125
6 Washer М12 DIN 127
7 Nut М-12
Fig. 7. Assembly of the fixed enclosure panel.
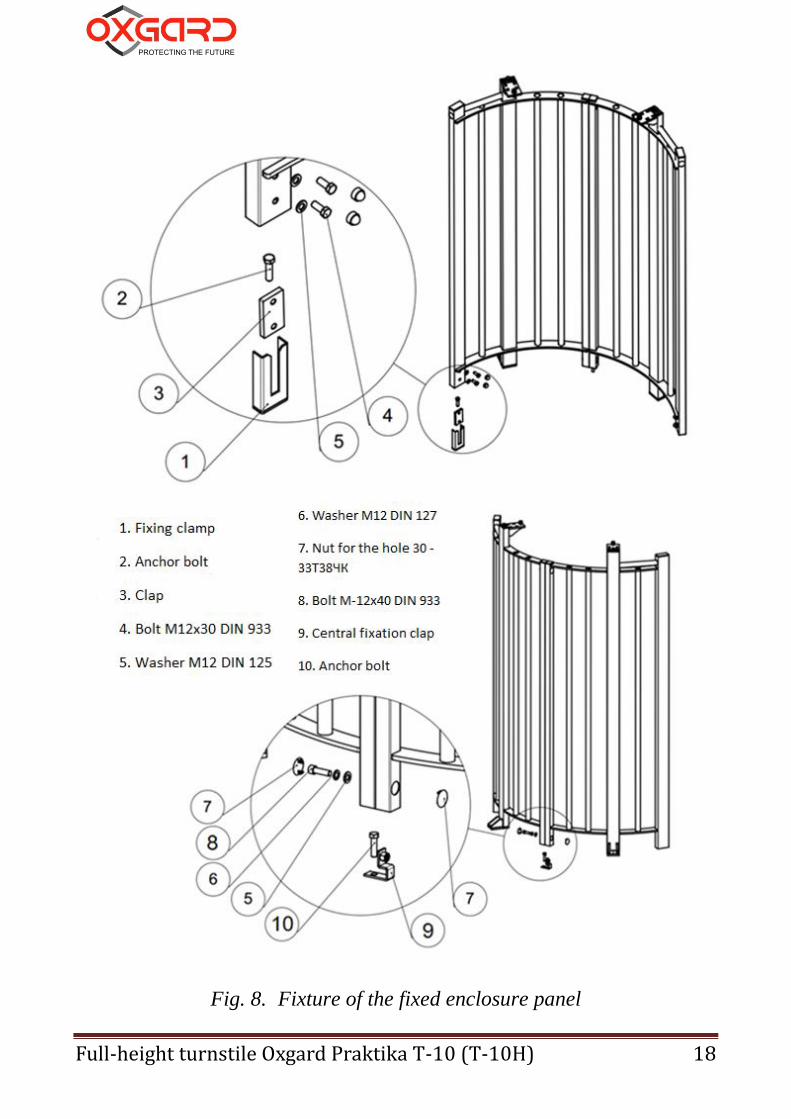
4.2.9. Fix the fixed enclosure panel of the turnstile with the clamps 1 (2
pcs) and central clap 10, anchor bolts 2 and 10 M12 (Fig. 8) by
screwing them into respective anchors by means of the 19-mm key.
Full-height turnstile Oxgard Praktika Т-10 (T-10H) 18
PROTECTING THE FUTURE
Fig. 8. Fixture of the fixed enclosure panel

Installation instructions 19
PROTECTING THE FUTURE
4.2.10. Install and fix the fixed enclosure element of the turnstile with
the anchors (Fig. 9) by screwing them into respective openings by
means of the 19-mm key. Install plastic caps onto heads of the fixture
bolts.
Fig. 9. Installation of the fixed enclosure element

Full-height turnstile Oxgard Praktika Т-10 (T-10H) 20
PROTECTING THE FUTURE
4.2.11. Assemble the mobile elements of the turnstile (rotatory wicket
door) of Fig.10.
• Turn the sections of the wicket door so as:
• (h upper > h lower).
Place the rotor sections onto the upper flange so as to close the passage
(Fig.1).

Installation instructions 21
PROTECTING THE FUTURE

Full-height turnstile Oxgard Praktika Т-10 (T-10H) 22
PROTECTING THE FUTURE
Fig. 10. Assembly of the rotatory wicket door.
4.2.12. Install the upper module of the turnstile onto the fixed enclosure
elements by pre-passing the cables into the respective holes. Fix the
upper module by fixing bolts of Fig. 11 and 12.
Attention The upper module has a significant weight and therefore at
least two workers are needed to lift it.

Installation instructions 23
PROTECTING THE FUTURE
1. Bolt М12х30 DIN 933
2. Washer М12 DIN 127
3. Washer М12 DIN 125
4. Nut М12 DIN 934
5. Clap for nut М12
Fig. 11. Attachment of the upper module of the turnstile.

Full-height turnstile Oxgard Praktika Т-10 (T-10H) 24
PROTECTING THE FUTURE
1. Bolt М12х30 DIN 933
2. Nut М12 DIN 934
3. Washer М12 DIN 127
4. Washer М12 DIN 125
5. Clap for nut М12
Fig. 12. Attachment of the second fixed enclosure element
4.2.13. Install the fluoroplastic bushing onto the lower axle, install the
rotatory wicket door onto the lower axle of the rotor fixture fixed in the
concrete base. Attach the rotatory wicket door to the upper module with
the help of 6 bolts M12.
Plate 1
Nut M12
Plate 2

Installation instructions 25
PROTECTING THE FUTURE
The upper cover shall be attached to the upper module by means of four
nuts (4) and four washers (Fig. 13). Four pins for fixing the upper cover
are located internally of the cover.
Fig. 13. Fixture of the upper cover
5. Connection of the turnstile:
The cables shall be led through a hole made in the rack of the fixed
enclosure panel of the turnstile (Fig. 2). Fix the cable with cable ties.
220 V power supply shall be connected to the terminals located on
the DIN rack. The connection diagram is shown on Fig. 14.

Full-height turnstile Oxgard Praktika Т-10 (T-10H) 26
PROTECTING THE FUTURE
Fig. 14.
220 V 12 V

Installation instructions 27
PROTECTING THE FUTURE
CB and ACS shall be connected via the cross-board. Fig. 15 shows
an arrangement of the cross-board on the upper module of the turnstile.
Check if the cables are reliably connected. Install the doors and lock them.
Подключение питания, пульта
управления и СКУД
Fig. 15. Arrangement of the cross-board on the upper module of the
turnstile.
Fig. 16 shows external appearance of the cross-board and the
arrangement of connectors for connection of CB, ACS and S&FA.
Connection of power supply, the control
board and ACS

Full-height turnstile Oxgard Praktika Т-10 (T-10H) 28
PROTECTING THE FUTURE
Fig. 16. External appearance of the cross-board
Table 3. Modes for operating the turnstile
Position of the jumpers Mode for operating the turnstile
J1 removed Pulse mode (see item 5.3.)
J1 set Potential mode (see item 5.3.)
J2 set The turnstile is not responding to commands
by the board and the status of the buttons is
transmitted to the outputs I/O1...I/O4 (see
item 5.4)
J2 removed The turnstile is controlled by the board and the
status of the buttons is transmitted to the
outputs I/O1...I/O4 (see item 5.4)
- J3 jumper is not used
- J4 jumper is used for arrangement of normal operation of CAN2.0. bus,
see Appendix 1.
5.1. Connection of the control board.
The CB is connected to a group of terminals Control Board at the
cross-board. The terminals are marked as: 12V, CL, CH, GND.
The CB shall be connected as per terminal labeling listed in Table 4.

Installation instructions 29
PROTECTING THE FUTURE
Table 4. Labeling of the terminals for connecting the CB
Labeling of the
terminals
Color
of the wire
12V Red
CL Yellow
CH Green
GND Blue
5.2. Connection of the access control system (optionally)
The ACS controller is connected to the group of the terminals:
Access Control System at the cross-board. The terminals are marked
as: LEFT, RIGHT, STOP, AP, GND. The terminals are designated
according to Table 5.
Table 5. Designation of ACS terminals
Labeling of the
terminals Designation of terminals
LEFT, RIGHT single-time passage to left/right
(the lowest priority)
STOP the passage is forbidden (“Stop” mode)
(the middle priority)
AP free exit (“Antipanic”)
(the highest priority)
GND general terminal
The inputs for connecting the ACS are differed according to the
priorities:

Full-height turnstile Oxgard Praktika Т-10 (T-10H) 30
PROTECTING THE FUTURE
the highest priority is assigned to the output AP. While this input is
closed to the GND terminal, the turnstile is free for exit and NOT
RESPONDING (!!!) to other effects;
the middle priority is assigned to the output STOP. When closing this
input to the terminal GND, the turnstile is changing into the mode “Stop”
and is not responding to other effects besides AP;
LEFT and RIGHT are assigned with the same low priority and
designed to switch a single-time passage in one or opposite direction. If
the two inputs are closed, the passage is allowed in that direction whose
input was closed first. If the passage has not taken place, the turnstile
would be automatically switched into the mode “Stop” after 5 seconds.
CAUTION (!) If one of inputs STOP and/or AP is closed, the
commands from the board are not accepted as ACS is assigned with a
higher priority.
The inputs STOP and AP are potential ones, i.e. as long as the input
is closed to the terminal GND, the turnstile is operated in a respective
mode, whereas after opening the terminals the turnstile is switched into the
mode “Stop” irrespective of which mode was prior to ACS operation.
The inputs LEFT and RIGHT are operable both in a potential and
pulse mode as well (to be actuated in response to closing to the terminal
GND). The pulse mode is set as default.
In order to switch into a potential mode of operation it is necessary
to set the jumper J1 (Fig. 16). In this case the mode for passage to left/right
is switched only for the time of supplying a control signal to the inputs
LEFT/RIGHT. The mode of free passage can be set by simultaneously

Installation instructions 31
PROTECTING THE FUTURE
supplying control signals to both inputs. The priority of the inputs LEFT
and RIGHT when switching into the pulse mode remains unchanged.
The cross-board is designed with two relay outputs for ACS which operate
under the “dry contact” principle, namely PassOk1 and PassOk2. NO and
COMM means normally opened connection, NC and COMM means
normally closed connection. Actuation of one of the contact groups means
that a passage was performed in a respective direction (PassOk1 – to right,
PassOk2 – to left). “Dry contact” will close/open when the rotatory wicket
door is turned for the angle of 60 degrees. The light emitting diodes D1
and D2 shall signal a relay status with PassOk1 meaning to right and
PassOk2 meaning to left.
The cross-board is designed with a relay output for ACS which operates
under the “dry contact” principle, namely Status. NO and COMM means
normally open connection, whose contacts shall be closed when the
turnstile is switched into the mode AP with simultaneous lighting up of the
D3 diode.
The cross-board is also provided with the following light emitting diodes:
D4 signalizes a supply of a command into the input LEFT.
D5 signalizes a supply of a command into the input RIGHT.
D6 signalizes a supply of a command into the input STOP.
D7 signalizes a supply of a command into the input AP.
Jumper J4 must be installed to be used for connecting the 120 Ohm
resistor to the bus CAN 2.0 in order to provide for its normal operation.
When using two control boards J4 is not installed as the 120 Ohm resistors
are fitted into the terminals CL and CH at the same boards.

Full-height turnstile Oxgard Praktika Т-10 (T-10H) 32
PROTECTING THE FUTURE
5.3. Connection of the control board to the ACS controller.
In some cases the turnstile CB is required to be connected directly to the
ACS controller, as passages to be enabled by the board (when unattended
by the controller) are perceived by the system as “break-in”.
In order to apply this diagram for connecting the turnstile it is
necessary to install the jumper J2 onto the cross-board (Fig. 16). If the
jumper J2 is installed, the turnstile is not responding to commands by the
board, but just transmits their status to the contacts of the terminal blocks
I/O1...I/O4 (Fig. 16) which are open-collector outputs. The contacts are
designed as per Table 6, with the board buttons numbered as shown on
Fig. 17. This group of contacts should have an output current of 150 mA at
most, with maximum allowable voltage 24 V.
Fig. 17. Numeration of the control board buttons

Installation instructions 33
PROTECTING THE FUTURE
Table 6. Designation in the group of I/O contacts
Labeling of
the terminals Designation of terminals
I/O1 Status of the button “Left” (1, Fig. 17)
I/O2 Status of the button “Right” (3, Fig. 17)
I/O3 Status of the button “Stop” (2, Fig. 17)
I/O4 Status of the button “Antipanic” (4, Fig. 17)
The outputs I/O1...I/O3 display a current status of the CB buttons,
i.e. the transistor shall open when pressing the respective button. The
output I/O4 is reversed in its status when pressing the “Antipanic” button
each time.
The outputs I/O1...I/O4 can be connected both directly to the ACS
controller and via the relay as well. If the relay is used, the diode must (!)
be connected in parallel to the winding (Fig. 18).
Fig. 18. Diagram for connection of the diode in parallel to the relay
winding
Cross-
board

Full-height turnstile Oxgard Praktika Т-10 (T-10H) 34
PROTECTING THE FUTURE
The diagram for connecting the CB to the ACD controller is shown
on Fig. 19. In this option the controller governs the turnstile by the
contacts “Left”, “Right” and “Stop”, while the contact “Antipanic” is
switched on/off by the board. An important feature for connecting the CB
via the ACS controller is that it is impossible to use turnstile modes which
are set by combinations of the board buttons (besides the mode of free
passage in a potential control mode, see the section 5.3 of the Instructions).
In this case ACS is responsible for these modes.
Fig. 19. Diagram for connection of CB to the ACS controller
ACS Cross-
board
Installation instructions 35
PROTECTING THE FUTURE
Appendix 1. Short summary of the data transmission bus CAN2.0
The CB is operated by the up-to-date noise-resistant bus under the
standard CAN2.0. According to the standard CAN2.0 the length of the
cable for transmitting signals can reach more than one kilometer, but
correct operation at such distances depends on many factors. At distances
more than 25 meters the twisted pair Cat5e or Cat6 must be used. Total
electrical resistance in the wire for DC power supply to CB shall not
exceed 50 Ohm. If this requirement cannot be met, an additional
12 V/100 mA power supply unit can be installed at the place where the
control board is installed (with minimum operating power supply voltage
to CB equal to 7.5 V). In this situation 3 wires from the turnstile, i.e. CL,
CH, GND, are sufficient for correct operation. Two control boards can be
connected to one turnstile.
The CAN2.0 bus has an important feature by available 120 Ohm
resistors at the bus ends. The standard CB is already fitted with such a
resistor. When using one control board it is recommended to connect an
additional (second) 120 Ohm resistor, located at the cross-board to the
terminals CL and CH, by setting jumper J4.
It is not required to do so, if two control boards are to be connected, as the
bus ends are already fitted with the required resistors. And jumper J4 shall
be removed.

Full-height turnstile Oxgard Praktika Т-10 (T-10H) 36
PROTECTING THE FUTURE
Appendix 2. Arrangement of the installation openings relative to the
external dimensions of the turnstile
Fig. 20. Arrangement of the installation openings relative to the external
dimensions of the turnstile
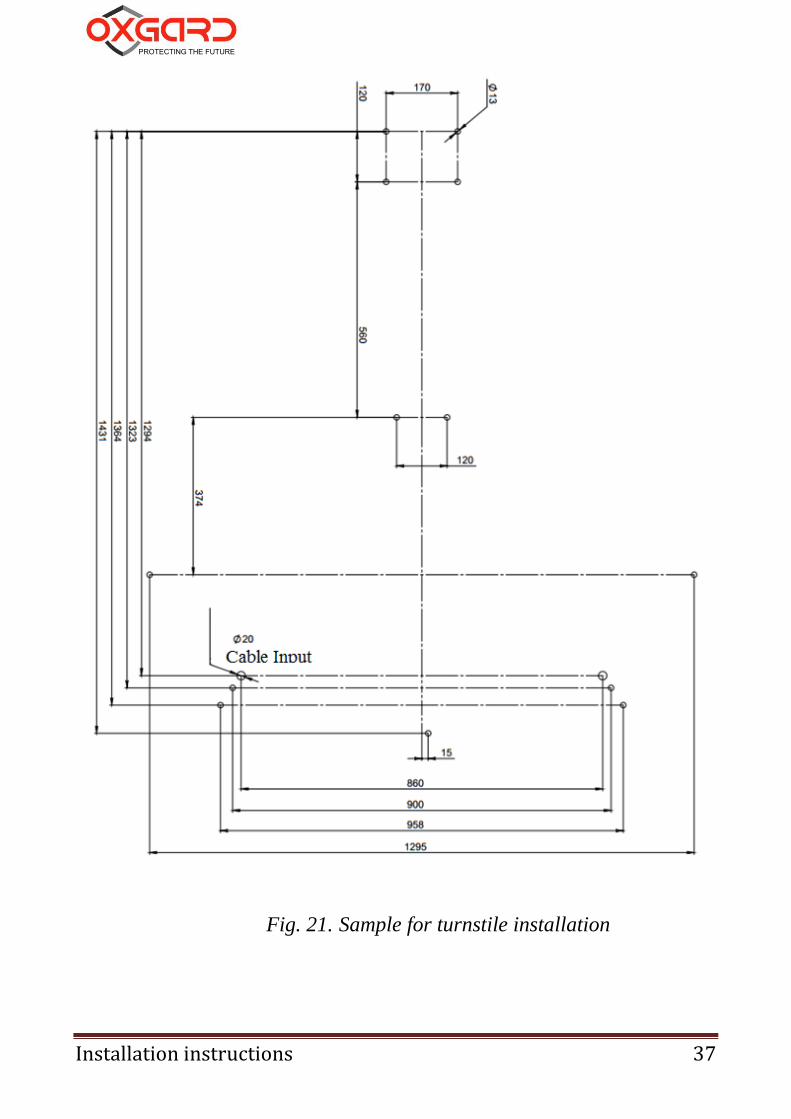
Installation instructions 37
PROTECTING THE FUTURE
Fig. 21. Sample for turnstile installation

Full-height turnstile Oxgard Praktika Т-10 (T-10H) 38
PROTECTING THE FUTURE
Fig. 22. Turnstile installation dimensions

Installation instructions 39
PROTECTING THE FUTURE

Vozrozhdenie LLC
192289 Saint Petersburg
66 Sophiyskaya St.
Tel./fax +7 (812) 336 15 94
www.oxgard.com
VOZROZHDENIE METALWORKS


