Installation Instructions - Orion Energy...
5
1 Made in USA Installation Instructions ©2016 Orion Energy Systems, Inc. All rights reserved. Orion and Light Years Ahead are trademarks/ service marks of Orion Energy Systems, Inc. Design modification rights reserved. 20160830 Orion Energy Systems, Inc. orionlighting.com 1.800.660.9340 Use this instruction to install the VTOD1 2' wide fixture. Components 1 LED VaporTight Wide 2' 2 (4) Standard fixture clips that come shipped with product Step-by-Step Instructions LED VaporTight Wide Fixture Instruction Number: P-INT-X-382 Product Series: VTOD1 2' 1 Remove fixture and fixture clips from packaging. 2 Attach (4) fixture clips to body. (See Fig. 1 and Fig. 2 for complete install of fixture clips) 3 Follow separate installation instructions for mounting/hanging fixture in the field provided with customers selected option. 4 Connect fixture to power supply per NEC and local codes. Check the label on the back of the fixture to verify the voltage. NOTE: For battery back up models, the labeled wire needs to be unswitched. Installers are responsible for ensuring the incoming power connection is properly installed and connected to maintain the IP rating of the fixture. 5 After power is connected to fixture, restore power and test fixture. Additional Product Information For maintenance to driver or internal components, see image A for opening the latches. All latches must be open before lens can be removed. Release gear tray from the (2) internal release latches on one side of the fixture. See images B, C and D for gear tray release operation. 1 2 WARNING! Risk of fire or electric shock. To reduce risk of electrical shock, turn off power supply before installation or servicing. 1. Field installers are responsible for recognizing specific site requirements and making adjustments to assure a complete, functional installation. 2. Make all power connections using UL listed components. 3. Electrical connections must be made by a qualified electrician and in accordance with NEC and local codes. A B C D
-
Upload
truonghanh -
Category
Documents
-
view
219 -
download
1
Transcript of Installation Instructions - Orion Energy...

1Made in USA
Installation Instructions
©2016 Orion Energy Systems, Inc. All rights reserved. Orion and Light Years Ahead are trademarks/
service marks of Orion Energy Systems, Inc. Design modification rights reserved. 20160830O ri o n E n e rgy Sy s te m s , I n c . orionlighting.com 1. 8 0 0 . 6 6 0 . 9 3 4 0
Use this instruction to install the VTOD1 2' wide fixture.
Components1 LED VaporTight Wide 2'2 (4) Standard fixture clips that come shipped with
product
Step-by-Step Instructions
LED VaporTight Wide Fixture Instruction Number: P-INT-X-382Product Series: VTOD1 2'
1 Remove fixture and fixture clips from packaging.
2 Attach (4) fixture clips to body. (See Fig. 1 and Fig. 2 for complete install of fixture clips)
3 Follow separate installation instructions for mounting/hanging fixture in the field provided with customers selected option.
4 Connect fixture to power supply per NEC and local codes. Check the label on the back of the fixture to verify the voltage. NOTE: For battery back up models, the labeled wire needs to be unswitched. Installers are responsible for ensuring the incoming power connection is properly installed and connected to maintain the IP rating of the fixture.
5 After power is connected to fixture, restore power and test fixture.
Additional Product InformationFor maintenance to driver or internal components, see image A for opening the latches. All latches must be open before lens can be removed. Release gear tray from the (2) internal release latches on one side of the fixture. See images B, C and D for gear tray release operation.
1 2
WARNING! Risk of fire or electric shock. To reduce risk of electrical shock, turn off power supply before installation or servicing.
1. Field installers are responsible for recognizing specific site requirements and making adjustments to assure a complete, functional installation.
2. Make all power connections using UL listed components.
3. Electrical connections must be made by a qualified electrician
and in accordance with NEC and local codes.
A B
C D

1Made in USA
Installation Instructions
©2016 Orion Energy Systems, Inc. All rights reserved. Orion and Light Years Ahead are trademarks/
service marks of Orion Energy Systems, Inc. Design modification rights reserved. 20160830O ri o n E n e rgy Sy s te m s , I n c . orionlighting.com 1. 8 0 0 . 6 6 0 . 9 3 4 0
Use this instruction to install the VTOD1 4' wide fixture.
Components1 LED VaporTight Wide 4'2 (4) Standard fixture clips that come shipped with
product
Step-by-Step Instructions
LED VaporTight Wide Fixture Instruction Number: P-INT-X-383Product Series: VTOD1 4'
1 Remove fixture with installed fixture clips from packaging. (See Fig. 1)
2 Follow separate installation instructions for mounting/hanging fixture in the field provided with customers selected option.
3 Connect fixture to power supply per NEC and local codes. Check the label on the back of the fixture to verify the voltage. NOTE: For battery back up models, the labeled wire needs to be unswitched. Installers are responsible for ensuring the incoming power connection is properly installed and connected to maintain the IP rating of the fixture.
4 After power is connected to fixture, restore power and test fixture.
Additional Product InformationFor maintenance to driver or internal components, see image A for opening the latches. All latches must be open before lens can be removed. Release gear tray from the (2) internal release latches on one side of the fixture. See images B, C and D for gear tray release operation.
1
WARNING! Risk of fire or electric shock. To reduce risk of electrical shock, turn off power supply before installation or servicing.
1. Field installers are responsible for recognizing specific site requirements and making adjustments to assure a complete, functional installation.
2. Make all power connections using UL listed components.
3. Electrical connections must be made by a qualified electrician
and in accordance with NEC and local codes.
A B
C D
1Made in USA
Installation Instructions
©2016 Orion Energy Systems, Inc. All rights reserved. Orion and Light Years Ahead are trademarks/
service marks of Orion Energy Systems, Inc. Design modification rights reserved. 20160830O ri o n E n e rgy Sy s te m s , I n c . orionlighting.com 1. 8 0 0 . 6 6 0 . 9 3 4 0
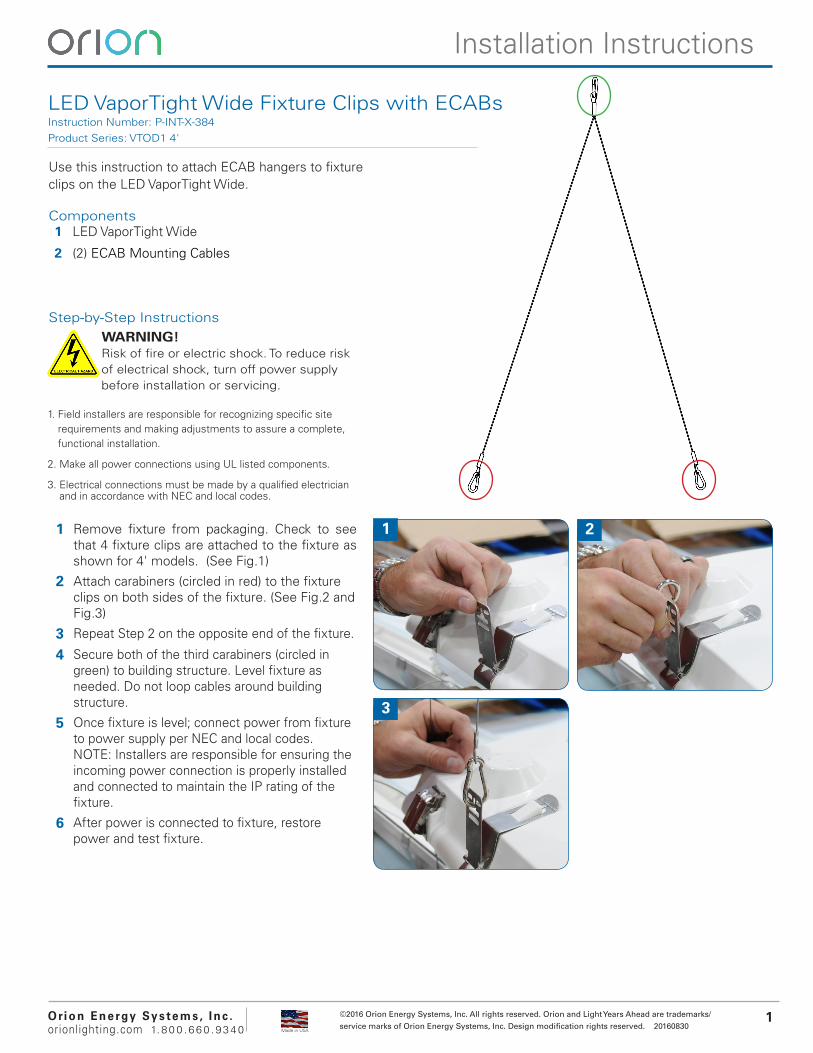
Use this instruction to attach ECAB hangers to fixture clips on the LED VaporTight Wide.
Components1 LED VaporTight Wide
2 (2) ECAB Mounting Cables
Step-by-Step Instructions
LED VaporTight Wide Fixture Clips with ECABs Instruction Number: P-INT-X-384Product Series: VTOD1 4'
1 Remove fixture from packaging. Check to see that 4 fixture clips are attached to the fixture as shown for 4' models. (See Fig.1)
2 Attach carabiners (circled in red) to the fixture clips on both sides of the fixture. (See Fig.2 and Fig.3)
3 Repeat Step 2 on the opposite end of the fixture.
4 Secure both of the third carabiners (circled in green) to building structure. Level fixture as needed. Do not loop cables around building structure.
5 Once fixture is level; connect power from fixture to power supply per NEC and local codes. NOTE: Installers are responsible for ensuring the incoming power connection is properly installed and connected to maintain the IP rating of the fixture.
6 After power is connected to fixture, restore power and test fixture.
1 2
3
WARNING! Risk of fire or electric shock. To reduce risk of electrical shock, turn off power supply before installation or servicing.
1. Field installers are responsible for recognizing specific site requirements and making adjustments to assure a complete, functional installation.
2. Make all power connections using UL listed components.
3. Electrical connections must be made by a qualified electrician
and in accordance with NEC and local codes.

1Made in USA
Installation Instructions
©2016 Orion Energy Systems, Inc. All rights reserved. Orion and Light Years Ahead are trademarks/
service marks of Orion Energy Systems, Inc. Design modification rights reserved. 20160830O ri o n E n e rgy Sy s te m s , I n c . orionlighting.com 1. 8 0 0 . 6 6 0 . 9 3 4 0
Use this instruction to install the VTOD1 2' wide fixtures with the CT4-CM1.25 brackets.
Components1 LED VaporTight Wide 2 (2) CT4-CM1.25 Brackets3 (4) Standard fixture clips that come with product
Step-by-Step Instructions
LED VaporTight Wide Fixture Standard Ceiling Mount Instruction Number: P-INT-X-353Product Series: VTOD1 2'
1 Remove fixture and fixture clips from packaging.
2 Attach (4) fixture clips to body. (See Fig. 1 and Fig. 2 for complete install of fixture clips)
3 Install brackets in surface. Measure distance in between fixture clips for spacing criteria for brackets. (See Fig. 3)
4 Hang each side separately in the ceiling brackets and ensure clip snaps into place. (See Fig 4. & Fig. 5)
5 Connect fixture to power supply per NEC and local codes. Check the label on the back of the fixture to verify the voltage. NOTE: For battery back up models, the labeled wire needs to be unswitched. Installers are responsible for ensuring the incoming power connection is properly installed and connected to maintain the IP rating of the fixture.
6 After power is connected to fixture, restore power and test fixture.
Additional Product InformationFor maintenance to driver or internal components, see image A for opening the latches. All latches must be open before lens can be removed. Release gear tray from the (2) internal release latches on one side of the fixture. See images B, C and D for gear tray release operation.
1 2
3WARNING! Risk of fire or electric shock. To reduce risk of electrical shock, turn off power supply before installation or servicing.
1. Field installers are responsible for recognizing specific site requirements and making adjustments to assure a complete, functional installation.
2. Make all power connections using UL listed components.
3. Electrical connections must be made by a qualified electrician
and in accordance with NEC and local codes.
4
5
A B
C D

1Made in USA
Installation Instructions
©2017 Orion Energy Systems, Inc. All rights reserved. Orion and Light Years Ahead are trademarks/
service marks of Orion Energy Systems, Inc. Design modification rights reserved. 20170518O ri o n E n e rgy Sy s te m s , I n c . orionlighting.com 1. 8 0 0 . 6 6 0 . 9 3 4 0
Use this instruction to install the VTOD12 or VTOD14 fixture with rigid mount brackets.
Components1 Fixture (Ordered separately)2 LED-VTOD1-RMBSS-KIT (Includes 2 brackets and
4 installation nuts attached to brackets)3 LED-VTOD1-RMBSS-TEMPLATE
Tools Required for Installation-Cordless drill-Wire strippers-Fasteners to secure brackets to mounting surface-Nut driver
Step-by-Step Instructions
Vaportight Wide Standard and BiLevel Rigid Mount BracketsInstruction Number: P-INT-X-398Product Series: VTOD1
1 Remove fixture and hanging components from packaging.
2 Using the LED-VTOD1-RMBSS-TEMPLATE shown in Fig. A mark where self supplied fasteners will go with a pen or marker. Holes closest to the edge are for 4' models, intererior holes are for 2' models.
3 Align one of the mounting brackets to the pre-marked position, then secure the mounting bracket to the building structure in an appropriate manner for the structure. Repeat this process with the other mounting bracket. (See Fig. B for image of mounting brackets)
4 Loosen the (2) nuts on each mounting bracket with nut driver. (See red arrows on Fig. B for nut locations)
5 Insert one of the mounting brackets into the fixture mounting tab (See Fig. 1) and tighten so the bracket is secured to the fixture. Repeat this process with the other mounting bracket. Ensure all 4 nuts are secured tight with nut driver.
6 Connect fixture to power supply for NEC and local codes. Check the label on the back of the fixture to verify the voltage. After power is connected to fixture, restore power and test fixture.
A
B 1
WARNING! Risk of fire or electric shock. To reduce risk of electrical shock, turn off power supply before installation or servicing.
1. Field installers are responsible for recognizing specific site requirements and making adjustments to assure a complete, functional installation.
2. Make all power connections using UL listed components.
3. Electrical connections must be made by a qualified electrician
and in accordance with NEC and local codes.