Installation Instructions : AUDI S5 3.0T : Page 1 · Installation Instructions : AUDI S5 3.0T: Page...
14
Installation Instructions : AUDI S5 3.0T : Page 1 1. We will start by removing the front slam panel cover. Remove the clips/screws holding the cover in place and remove the cover from the engine bay. 2. Remove the 2 screws holding the intake duct in place. 3. Using a screwdriver – carefully release the rubber duct from the airbox by pushing down the tabs. 4. You should be able to pull it away from the airbox as shown.
Transcript of Installation Instructions : AUDI S5 3.0T : Page 1 · Installation Instructions : AUDI S5 3.0T: Page...

Installation Instructions : AUDI S5 3.0T : Page 1
1. We will start by removing the front slam panel cover. Remove the clips/screws
holding the cover in place and remove the cover from the engine bay.
2. Remove the 2 screws holding the intake duct in place.
3. Using a screwdriver – carefully release the rubber duct from the airbox by pushing down the
tabs.
4. You should be able to pull it away from the airbox as shown.

Installation Instructions : AUDI S5 3.0T: Page 2
5. Remove the hose from the intake tube. 6. Remove the hose at the rear from the silencer box on the tube.
7. Pull the vacuum out from the back of the intake tube next to the throttle body. 8. Loosen hose clamp around the throttle body and pull the tube away.

9. Remove the inlet tube from the airbox side too and completely remove from the engine
bay.
11. Remove this bracket which held an airbox mount. Retain the screw for use later on. 12. Push the smaller silicon coupler over the throttle body. Ensure it is fully on and uniform all
the way around. Use 2 x 70-90mm hose clamps as shown and secure the hose clamp around the
throttle body.
10. Disconnect breather tube from the airbox by pinching in two side of the flange around the
tube to release the clips. The airbox can now be pulled upwards and removed from the engine
bay.
Installation Instructions : : AUDI S5 3.0T: Page 3
Installation Instructions : AUDI S5 3.0T : Page 4
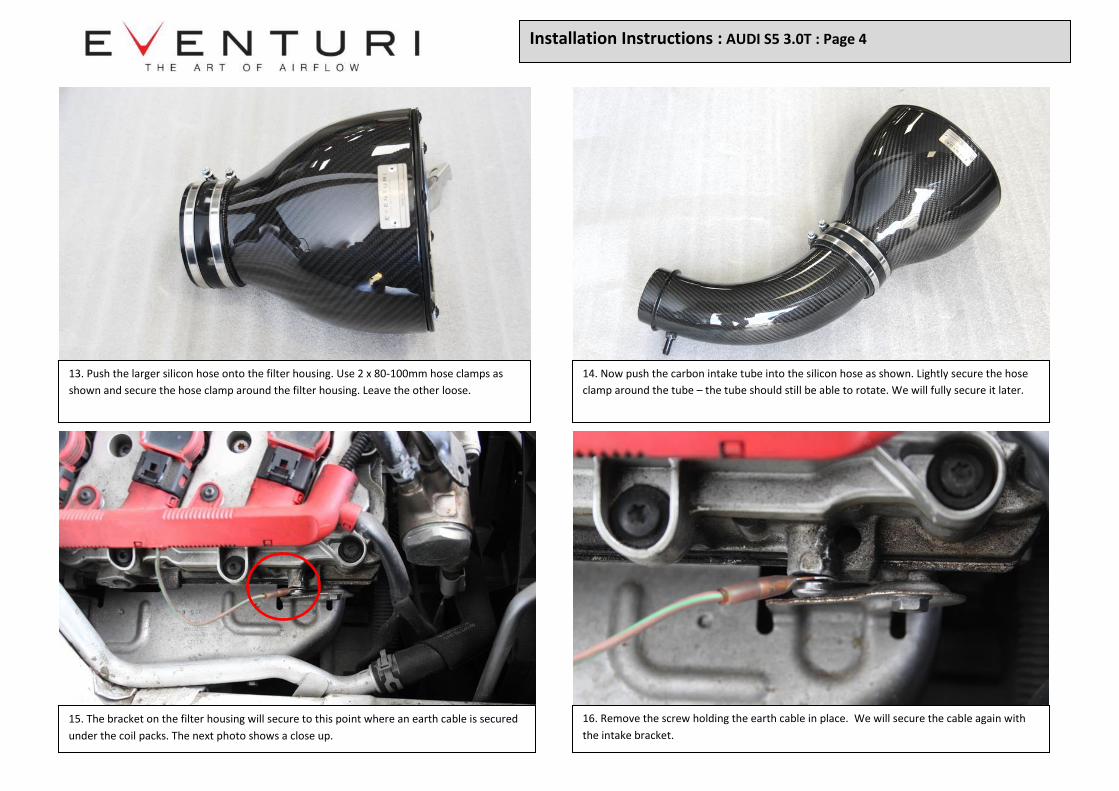
13. Push the larger silicon hose onto the filter housing. Use 2 x 80-100mm hose clamps as
shown and secure the hose clamp around the filter housing. Leave the other loose.
.
14. Now push the carbon intake tube into the silicon hose as shown. Lightly secure the hose
clamp around the tube – the tube should still be able to rotate. We will fully secure it later.
15. The bracket on the filter housing will secure to this point where an earth cable is secured
under the coil packs. The next photo shows a close up.
16. Remove the screw holding the earth cable in place. We will secure the cable again with
the intake bracket.

Installation Instructions : AUDI S5 3.0T : Page 5
17. Push the intake tube into the silicon hose at the throttle body. Do not secure fully yet –
tube should still be able to rotate freely.
18. The flange on the bracket needs to line up with the mounting point where the earth cable
was attached.
19. Here is another angle with the mounting point circled in red. Rotate the housing so that
the bracket meets the mount. See next step.
.
20. Line up the housing so that the bracket meets the mount as shown. Hold it in this position
and tighten the hose clamp around the tube as shown in next step.

Installation Instructions : AUDI S5 3.0T : Page 6
21. Holding the housing in place, secure the hose clamp around the tube where it meets the
housing. Do not over tighten.
22. Now we will secure the bracket using the supplied M6 flanged bolt.
23. Push the earth cable over the bolt as shown and then push the bolt through the hole in
the bracket and into the threaded mount on the engine. Screw the bolt in but don’t fully
tighten yet – you need to adjust the position of the housing.
24. Bracket should sit against the mount like this.
.

Installation Instructions : AUDI S5 3.0T: Page 7
25. Looking at the housing from the side – there should be a small gap between the housing and the
engine. Adjust the position of the housing and secure the M6 bolt on the bracket.
26. Now push the tube into the silicon so that the carbon flange meets the silicon
uniformly and tighten the remaining hose clamp – don’t over tighten.
27. Push the boost/vacuum line onto the tube.
28. We will now prepare and install the duct and scoop.
Steps 29 - 33 are for the facelift S5.
Steps 34 - 36 are for the pre-facelift S5.

Installation Instructions : AUDI S5 3.0T: Page 8
29. For facelift S5’s: Place the stock duct in place and secure with the 2 screws previously
removed.
30. Assemble the scoop to the metal scoop extension plate using 3 black M5 screws and lock
nuts.
31. Place the scoop assembly into position so that the 3 slots on the metal scoop extension
sit over the stock duct edge.
32. Position the scoop so it sits against the grill – avoiding any obstructions. Once in position,
mark and drill 3 holes in the stock duct as shown in next step.

Installation Instructions : AUDI S5 3.0T: Page 9
33. Use a 5mm drill bit to make 3 holes in the stock duct using the slots in the metal scoop
extension as a guide. Do not secure the scoop to the duct yet.
34. For pre-face lift S5’s: Place the stock duct in place and secure with the 2 screws previously
removed.
35. Place the carbon scoop by itself onto the duct as shown. 36. Position the scoop so it sits against the grill – avoiding any obstructions. Once in position,
mark and drill 3 holes in the stock duct through the 3 holes on the scoop using a 5mm drill bit.
Do not secure the scoop to the duct yet.

Installation Instructions : AUDI S5 3.0T: Page 10
37. Take the stock duct and the carbon duct – insert the right side corner into the plastic
duct as shown and then push the rest of the carbon duct into the stock plastic one. It should
click securely into place.
38. The carbon should sit under the plastic tabs of the stock duct on the top and bottom. Make sure
the carbon duct is fully inserted into the stock duct – both the top and bottom should click into
place.
39. Take the flexible tubing and attach one end to the secondary outlet of the carbon
duct. Secure it with the remaining hose clamp.
40. The flexible tube will sit underneath the headlamp – for ease of installation, we will move the
headlamp forward. Remove the 3 screws holding it in place. 2 Shown here.
Plastic Tabs

41. Here is the third screw to be removed. 42. Now carefully move the headlight out by a couple of inches. Just enough to allow the flexible
duct to be positioned.
43. Take the duct assembly and lower the flexible tube behind the headlight.
44. Feed the flexible tube underneath the headlamp - see next step.
Installation Instructions : AUDI S5 3.0T: Page 11

45. Push the tube under the headlight and keep feeding it as you lower the duct. The tube
should be near the front bumper area.
46. Keep pushing the flexible tube down until you can line up the carbon duct with the carbon
housing. The metal cowl at the mouth of the filter should go inside the carbon duct. Be careful not
to pull the rubber edging on the duct out of position. If this does happen – pull the duct back out
and re-align the rubber edging.
47. Now position the scoop assembly over the holes previously drilled and secure with 3
black screws and lock nuts. Photo shows facelift version.
48. For the pre-face lift version, lower the scoop into place and secure with 3 black screws and lock
nuts.
Installation Instructions : AUDI S5 3.0T: Page 12

49. Now secure the stock duct with the 2 screws it was originally secured with. 50. Now carefully push the headlight back into position and secure the 3 previously removed
screws.
51. Push the breather adapter into the small filter and secure the clamp.
52. Push the breather assembly onto the secondary air pump tube – it will click into place. Also
secure the breather filter bracket to the chassis using the previously removed screw in step 11.
Installation Instructions : AUDI S5 3.0T: Page 13

53. Pull the breather filter upwards so that so are able to push the flexible air pump tube
into the bracket.
54. Lower the filter so that it sits on the bracket.
55. Install the slam panel cover and secure with the screws/plugs previously removed.
Installation Instructions : AUDI S5 3.0T: Page 14
You have now completed the installation of the Eventuri Audi B8 S5
System.
Please take all necessary precautions while installing this system.
Eventuri cannot take responsibility for an incorrectly installed intake or
any damage caused during installation.