Installation Instructions and User Guide - Welcome to … · Installation Instructions and User...
25
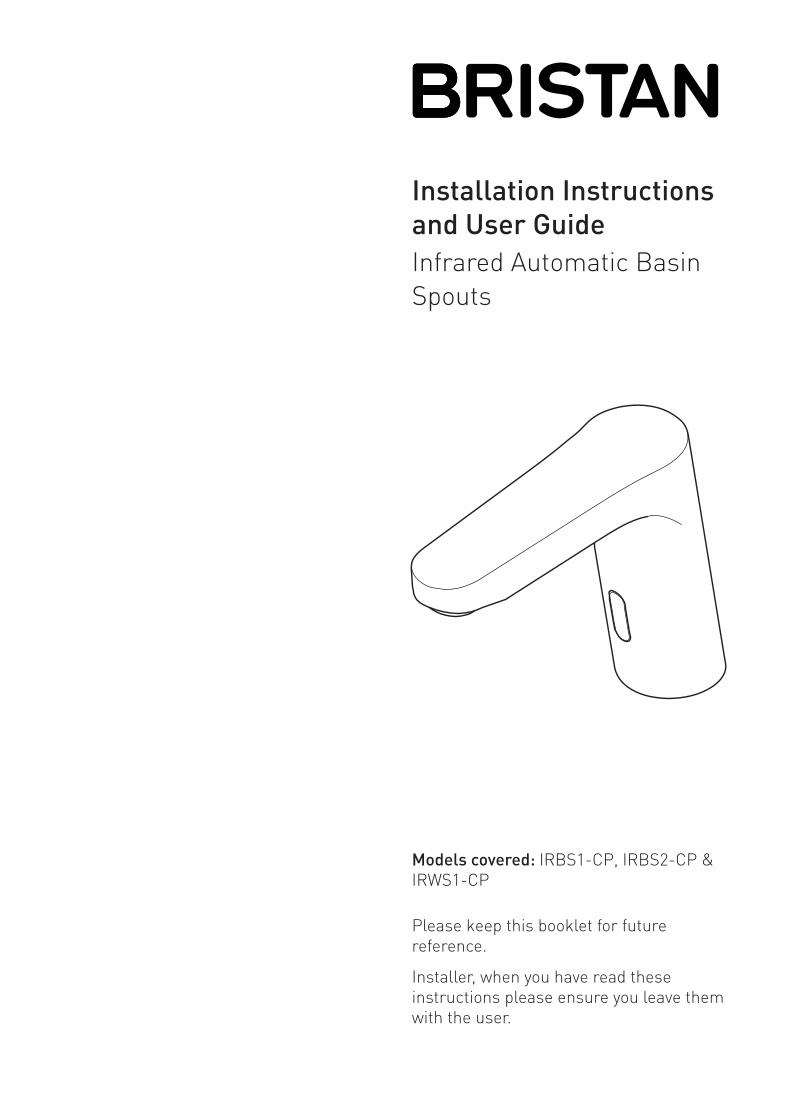
Please keep this booklet for future reference. Installer, when you have read these instructions please ensure you leave them with the user. Installation Instructions and User Guide Infrared Automatic Basin Spouts Models covered: IRBS1-CP, IRBS2-CP & IRWS1-CP
Transcript of Installation Instructions and User Guide - Welcome to … · Installation Instructions and User...
Please keep this booklet for future
reference.
Installer, when you have read these
instructions please ensure you leave them
with the user.
Installation Instructions
and User Guide
Infrared Automatic Basin
Spouts
Models covered: IRBS1-CP, IRBS2-CP &
IRWS1-CP
2
Contents
Thank you for choosing Bristan, the UK’s leading showers and taps expert.
Your Bristan basin spout has a non-touch control which uses infrared sensing
technology to detect human presence. Once detected, the spout instantly dispenses
water and automatically stops once the user moves their hands away to eliminate
unnecessary water wastage, whilst creating a more hygienic washroom solution.
All products manufactured and supplied by Bristan are safe and comply to legislative
requirements. Providing they are installed correctly and receive regular maintenance in
accordance with these instructions your user experience will not be affected.
For a safe and successful installation these instructions should be used as guidance,
thereafter they should be left with the user.
Important Safety Information ................................................... 3
General Information ................................................................. 4
Product Features ...................................................................... 5
Specifi cations ........................................................................... 6
Dimensions ............................................................................... 7-8
Installation Requirements ....................................................... 9
Installation ................................................................................ 10-15
IRBS1-CP ............................................................................. 10
IRBS2-CP ............................................................................. 11
IRWS1-CP ............................................................................ 12
Inserting Batteries ............................................................... 13
Electrical Connections ........................................................ 14
Water Connections .............................................................. 15-16
Operation .................................................................................. 17
Maintenance ............................................................................. 18-19
Troubleshooting ........................................................................ 20-21
Guarantee ................................................................................. 22-23
Need help? Give us a call on 0844 701 6273 and speak to one of our trained advisers.
3
Important Safety Information
• Please read these instructions thoroughly and retain for future use.
• All products manufactured and supplied by Bristan are safe provided they are installed,
used correctly and receive regular maintenance in accordance with these instructions.
• If you are in any doubt about your ability to install this product safely you must
employ the services of an experienced qualifi ed plumber.
• These fi ttings need to be installed in accordance with, and meet the requirements of
the Water Supply (Water Fittings) Regulations 1999 and Scottish Byelaws 2004.
• Warning: Do not operate the product if you suspect it is frozen. Do not site it
where it might be subjected to freezing conditions.
• Remove all packaging and check the contents for damage before starting installation.
• Before starting any installation please consider the following: before drilling into walls,
check that there are no hidden electrical wires, cables or water supply pipes. This can
be checked with the aid of an electronic detector.
• If power tools are used do not forget to: - Wear eye protection
- Unplug equipment after use
• Fitting isolating valves to the inlet feeds is required for ease of maintenance.
• Warning: Before installing the new spout it is essential that you thoroughly fl ush
through the pipework in order to remove any remaining swarf, solder, etc.
Failure to carry out this procedure could cause problems or damage to the workings of
the spout.
• This product must not be modifi ed in any way as this will invalidate the guarantee.
Need help? Give us a call on 0844 701 6273 and speak to one of our trained advisers.
4
General Information
Operating pressure range: Minimum 1.0 bar, Maximum 5.0 bar.
Maximum static pressure: 10.0 bar.
This product has been tested to meet the requirements of the Water Regulations
Advisory Scheme (WRAS) and satisfi es the requirements of the Water Supply (Water
Fittings) Regulations 1999 and current byelaws.
BS 6700 recommends the temperature of stored water should never exceed 65°C.
A stored water temperature of 60°C is considered suffi cient to meet all normal
requirements and will minimise the build up of limescale in hard water areas.
This product should be installed in compliance with the current Water Regulations.
If in doubt, contact a registered plumber or your Local Water Authority or the Secretary
of The Institute of Plumbing, address as follows;-
The Institute of Plumbing,
64 Station Lane,
Hornchurch,
Essex, RM12 6NB
Tel:01708 472791
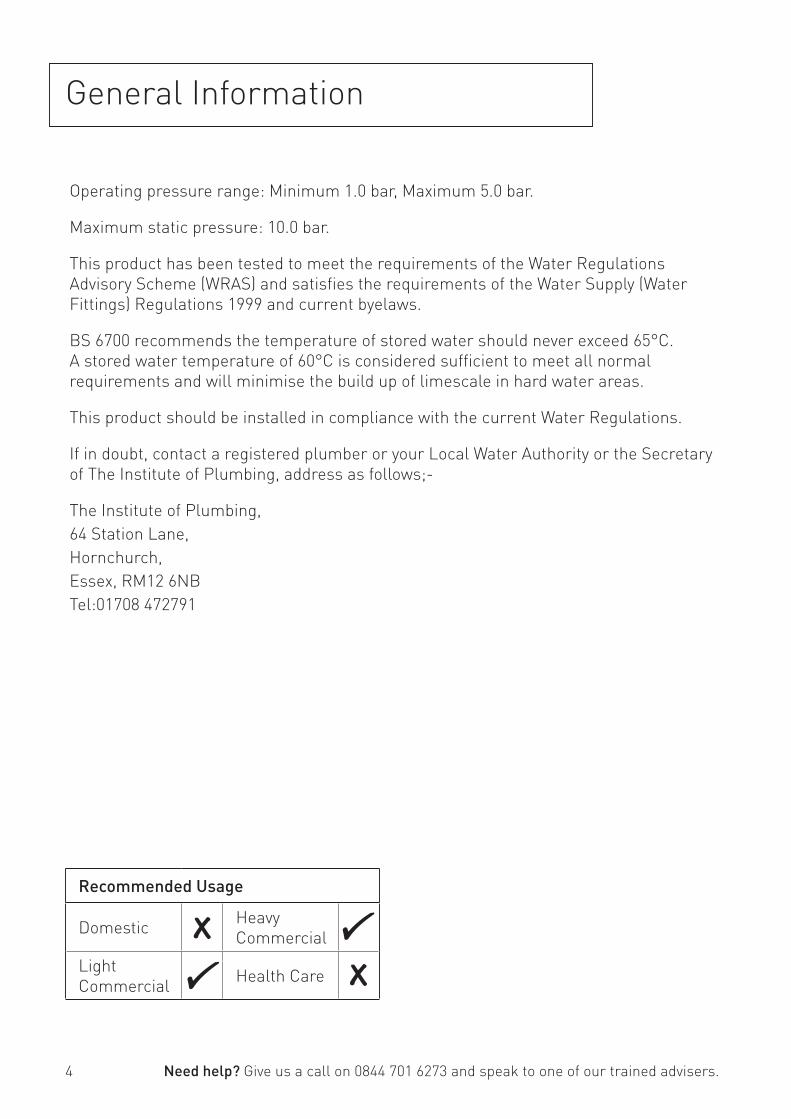
Recommended Usage
DomesticHeavy
Commercial
Light
CommercialHealth Care
Need help? Give us a call on 0844 701 6273 and speak to one of our trained advisers.

5
Product features
Water Effi cient
When the users hands enter the sensing
range, the indicator light in the sensor
will illuminate. Water will fl ow out
immediately until the user draws their
hands back from the sensor.
The water will automatically stop after
a maximum of 55 seconds ± 5 seconds
to avoid wasting water. If more water is
required wait 4 seconds and then place
hands back in the sensing range.
More Hygienic
The proximity sensor removes the need to
touch the spout body, reducing the spread
of germs and reducing the chance of
cross infection.
Battery Override
In the event of a power failure, the product
will automatically switch to battery
operated mode to ensure the spout
continues to function.
Low Battery Warning
When the batteries run low and the
power falls below 3.9V the sensor light
will fl icker to indicate the batteries are
running low and need replacing.
When the batteries are exhausted the
sensor light will not light up.
IRBS1-CP
IRBS2-CP
IRWS1-CP
Need help? Give us a call on 0844 701 6273 and speak to one of our trained advisers.
Sensor
Sensor
Sensor
underneath
6
Specifi cations
Need help? Give us a call on 0844 701 6273 and speak to one of our trained advisers.
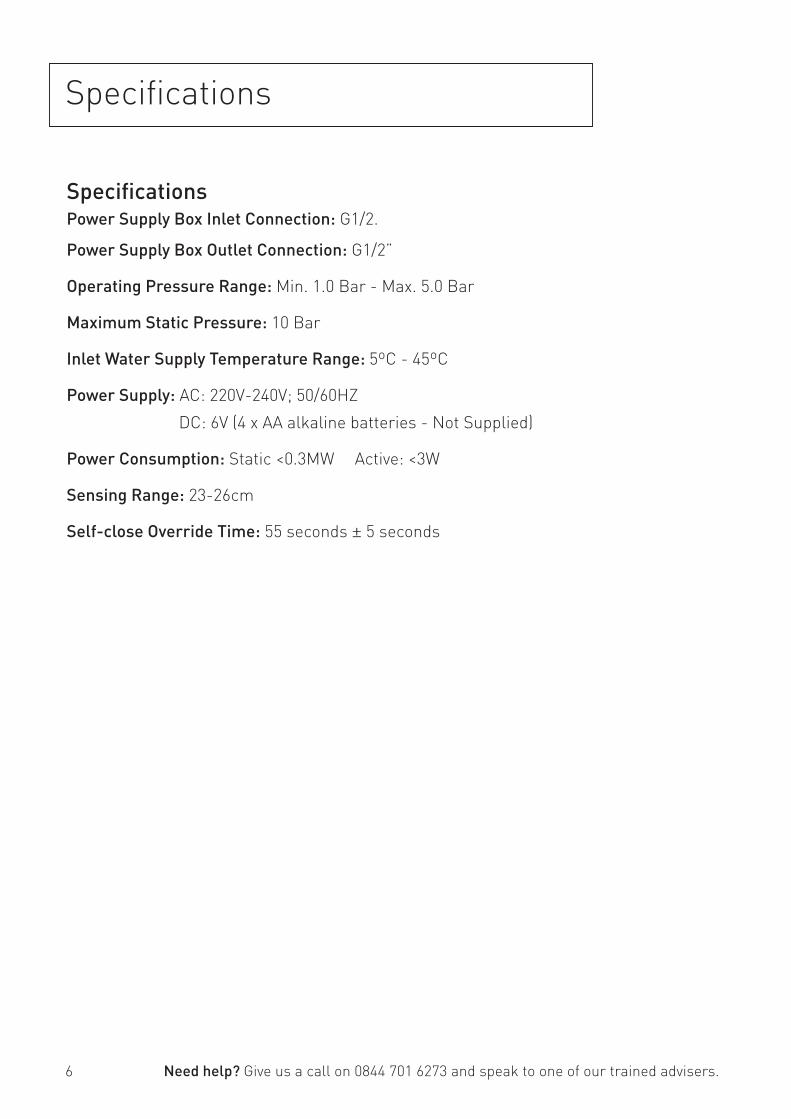
Specifi cations
Power Supply Box Inlet Connection: G1/2.
Power Supply Box Outlet Connection: G1/2”
Operating Pressure Range: Min. 1.0 Bar - Max. 5.0 Bar
Maximum Static Pressure: 10 Bar
Inlet Water Supply Temperature Range: 5ºC - 45ºC
Power Supply: AC: 220V-240V; 50/60HZ
DC: 6V (4 x AA alkaline batteries - Not Supplied)
Power Consumption: Static <0.3MW Active: <3W
Sensing Range: 23-26cm
Self-close Override Time: 55 seconds ± 5 seconds
7
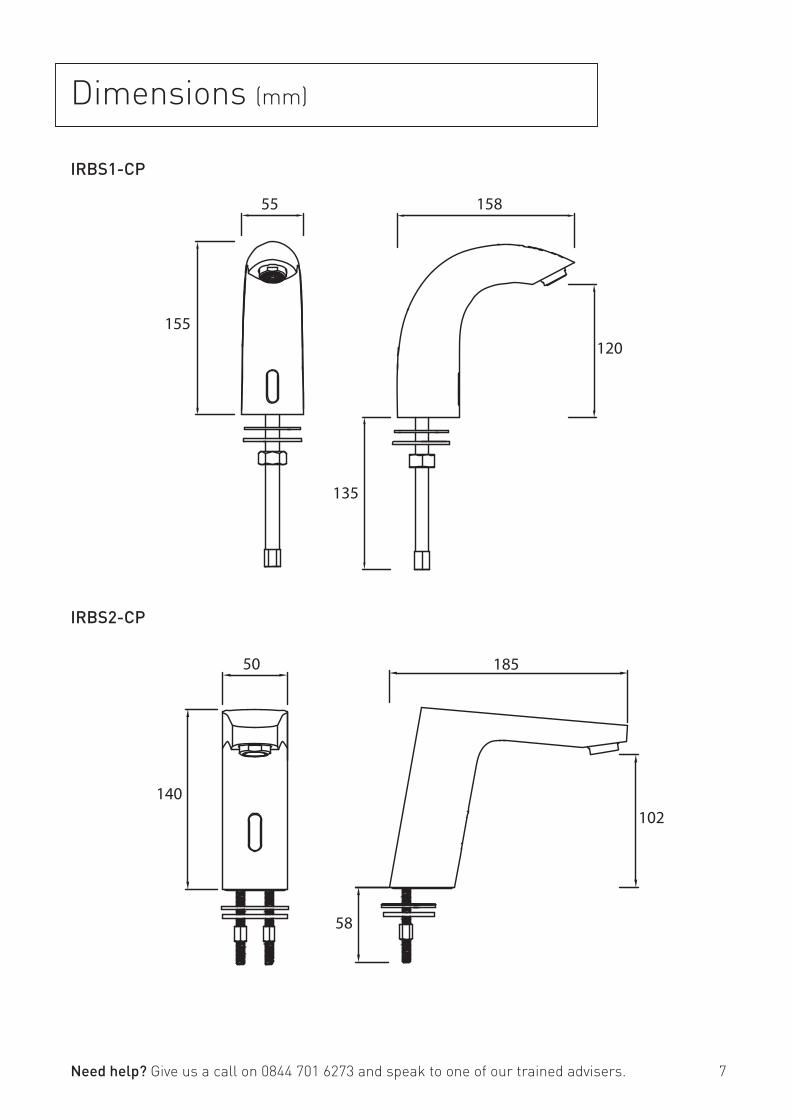
Dimensions (mm)
155
55
135
158
120
140
50 185
58
102
IRBS1-CP
IRBS2-CP
Need help? Give us a call on 0844 701 6273 and speak to one of our trained advisers.
8
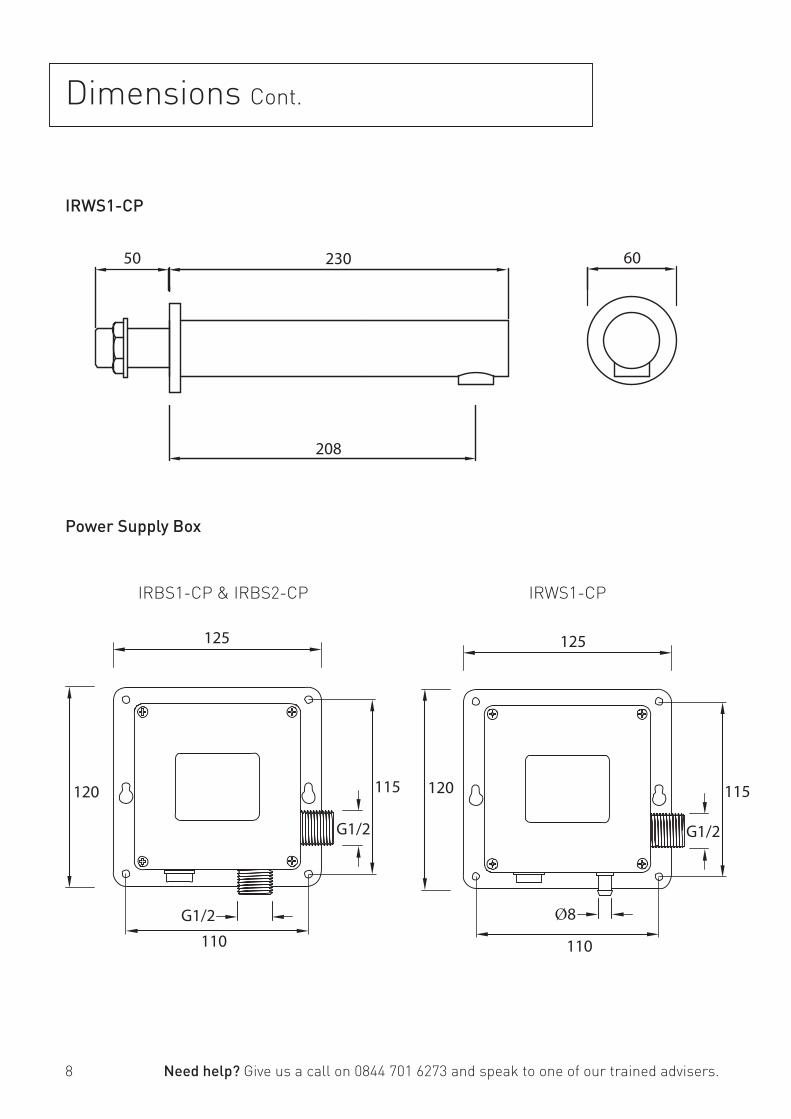
Dimensions Cont.
50 230
208
60
IRWS1-CP
110
Power Supply Box
Need help? Give us a call on 0844 701 6273 and speak to one of our trained advisers.
110
115 115
G1/2 G1/2
120 120
125 125
Ø8
IRBS1-CP & IRBS2-CP IRWS1-CP
G1/2
9
Installation Requirements
Electrical Connections
Regulations: The electrical installation
must be carried out in accordance with
the national electrical regulations and
installed by a qualifi ed person.
Safety: In the interests of electrical safety
a 30 mA residual current device (R.C.D not
supplied) should be installed in the supply
circuit. This may be part of a consumer
unit or a separate unit.
Before starting work on the electrical
supply ensure the power supply is
isolated.
DO NOT allow the supply cord to contact
hot surfaces. The cord should be safely
routed and secured by cable clips.
Connections: The power supply box must
be permanently connected to the fi xed
wiring of the mains supply using the
factory fi tted supply cord, via a switched
fused spur off the ring main.
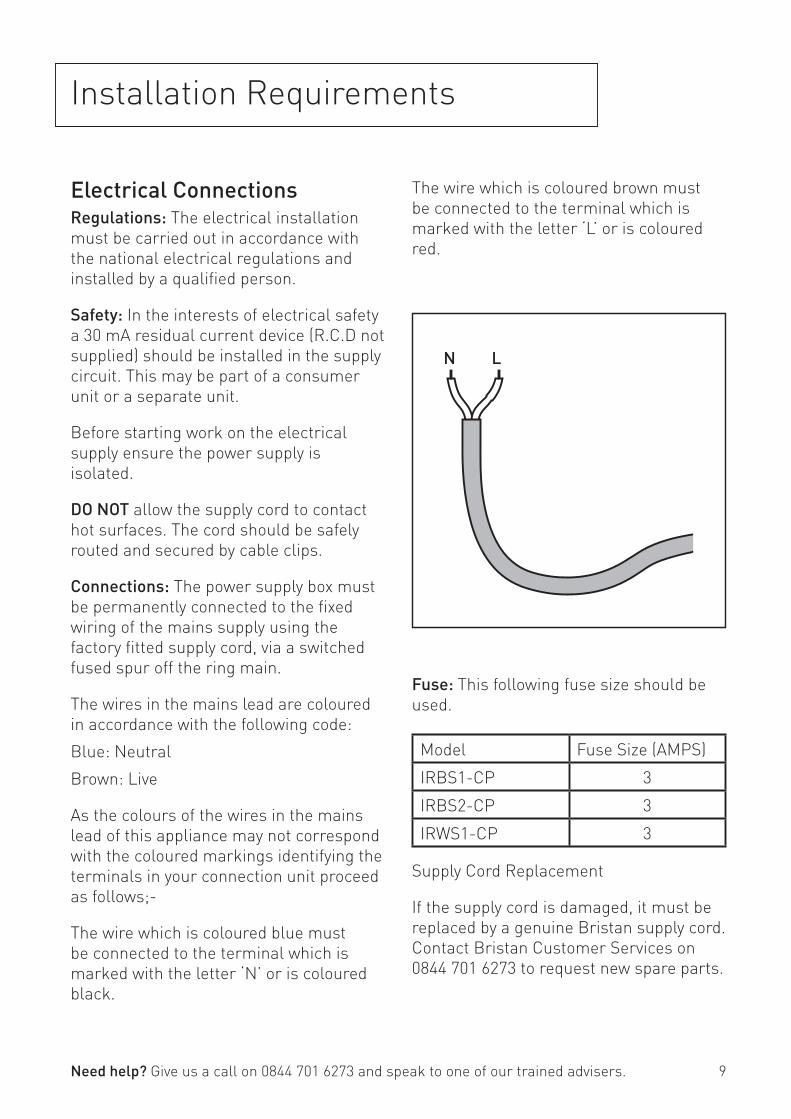
The wires in the mains lead are coloured
in accordance with the following code:
Blue: Neutral
Brown: Live
As the colours of the wires in the mains
lead of this appliance may not correspond
with the coloured markings identifying the
terminals in your connection unit proceed
as follows;-
The wire which is coloured blue must
be connected to the terminal which is
marked with the letter ‘N’ or is coloured
black.
The wire which is coloured brown must
be connected to the terminal which is
marked with the letter ‘L’ or is coloured
red.
Fuse: This following fuse size should be
used.
Model Fuse Size (AMPS)
IRBS1-CP 3
IRBS2-CP 3
IRWS1-CP 3
Supply Cord Replacement
If the supply cord is damaged, it must be
replaced by a genuine Bristan supply cord.
Contact Bristan Customer Services on
0844 701 6273 to request new spare parts.
N L
Need help? Give us a call on 0844 701 6273 and speak to one of our trained advisers.
10
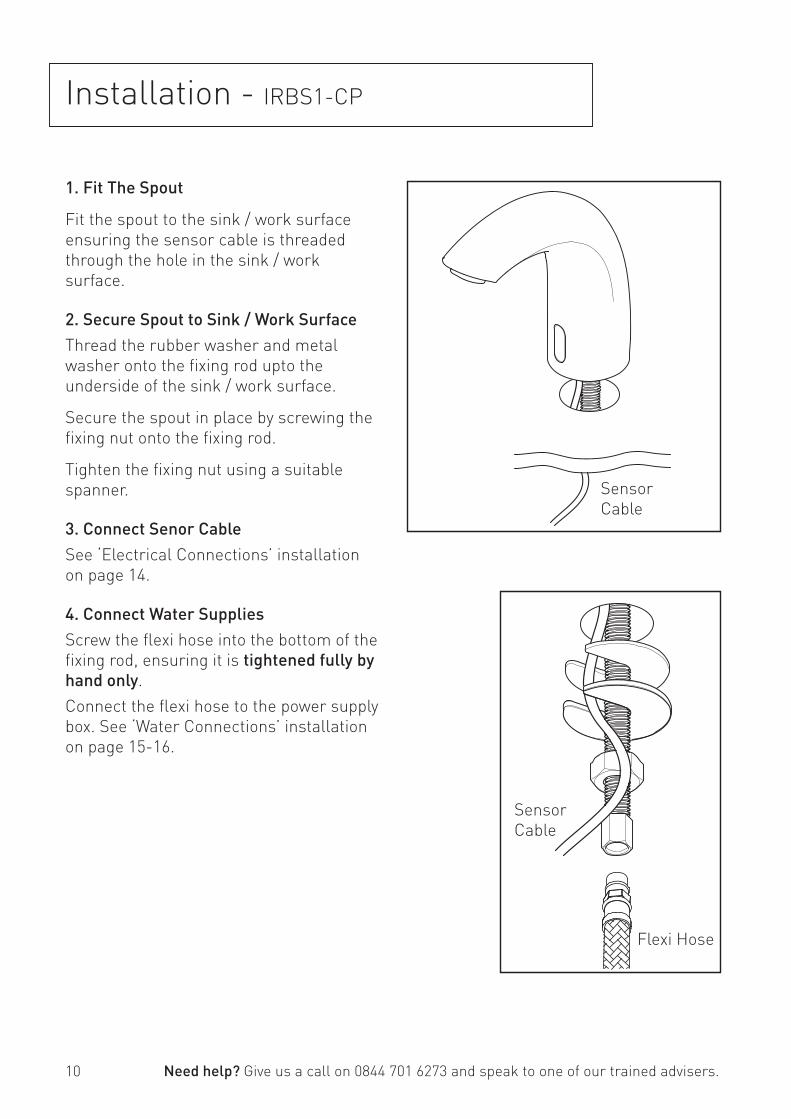
Installation - IRBS1-CP
Sensor
Cable
Sensor
Cable
1. Fit The Spout
Fit the spout to the sink / work surface
ensuring the sensor cable is threaded
through the hole in the sink / work
surface.
2. Secure Spout to Sink / Work Surface
Thread the rubber washer and metal
washer onto the fi xing rod upto the
underside of the sink / work surface.
Secure the spout in place by screwing the
fi xing nut onto the fi xing rod.
Tighten the fi xing nut using a suitable
spanner.
3. Connect Senor Cable
See ‘Electrical Connections’ installation
on page 14.
4. Connect Water Supplies
Screw the fl exi hose into the bottom of the
fi xing rod, ensuring it is tightened fully by
hand only.
Connect the fl exi hose to the power supply
box. See ‘Water Connections’ installation
on page 15-16.
Need help? Give us a call on 0844 701 6273 and speak to one of our trained advisers.
Flexi Hose
11
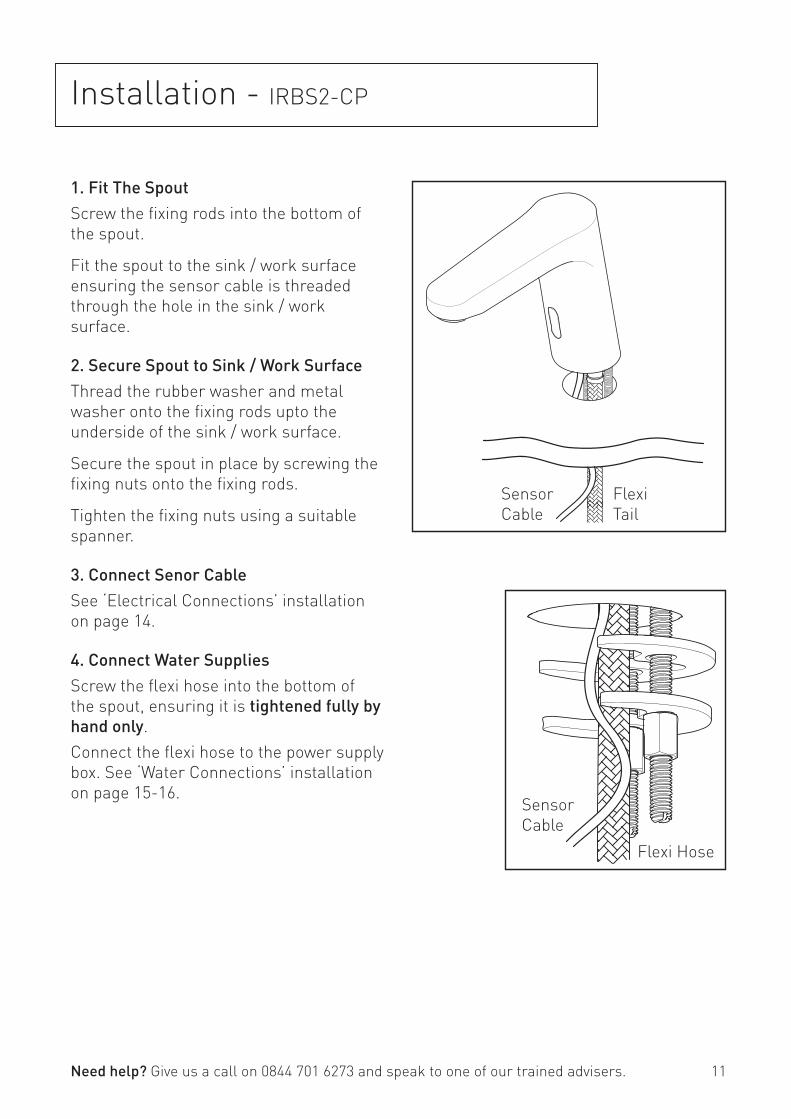
1. Fit The Spout
Screw the fi xing rods into the bottom of
the spout.
Fit the spout to the sink / work surface
ensuring the sensor cable is threaded
through the hole in the sink / work
surface.
2. Secure Spout to Sink / Work Surface
Thread the rubber washer and metal
washer onto the fi xing rods upto the
underside of the sink / work surface.
Secure the spout in place by screwing the
fi xing nuts onto the fi xing rods.
Tighten the fi xing nuts using a suitable
spanner.
3. Connect Senor Cable
See ‘Electrical Connections’ installation
on page 14.
4. Connect Water Supplies
Screw the fl exi hose into the bottom of
the spout, ensuring it is tightened fully by
hand only.
Connect the fl exi hose to the power supply
box. See ‘Water Connections’ installation
on page 15-16.Sensor
Cable
Sensor
Cable
Installation - IRBS2-CP
Need help? Give us a call on 0844 701 6273 and speak to one of our trained advisers.
Flexi
Tail
Flexi Hose
12
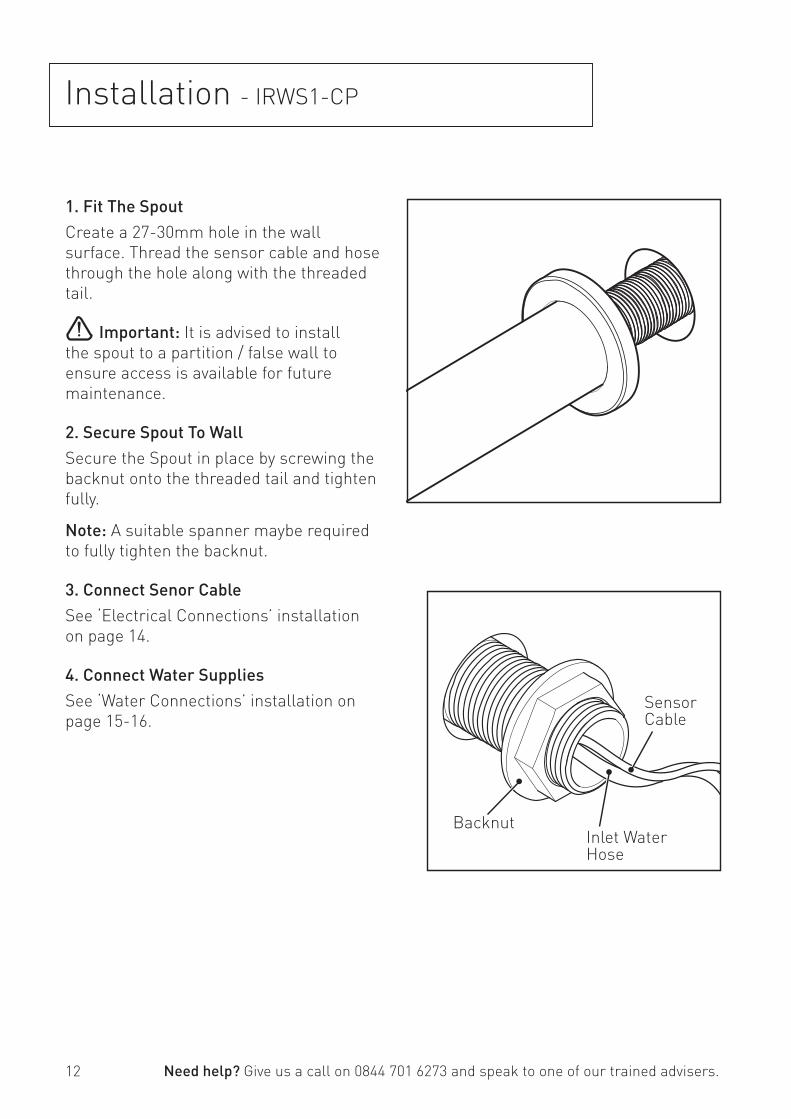
1. Fit The Spout
Create a 27-30mm hole in the wall
surface. Thread the sensor cable and hose
through the hole along with the threaded
tail.
Important: It is advised to install
the spout to a partition / false wall to
ensure access is available for future
maintenance.
2. Secure Spout To Wall
Secure the Spout in place by screwing the
backnut onto the threaded tail and tighten
fully.
Note: A suitable spanner maybe required
to fully tighten the backnut.
3. Connect Senor Cable
See ‘Electrical Connections’ installation
on page 14.
4. Connect Water Supplies
See ‘Water Connections’ installation on
page 15-16.
Installation - IRWS1-CP
Backnut
Need help? Give us a call on 0844 701 6273 and speak to one of our trained advisers.
Inlet Water Hose
Sensor Cable
13
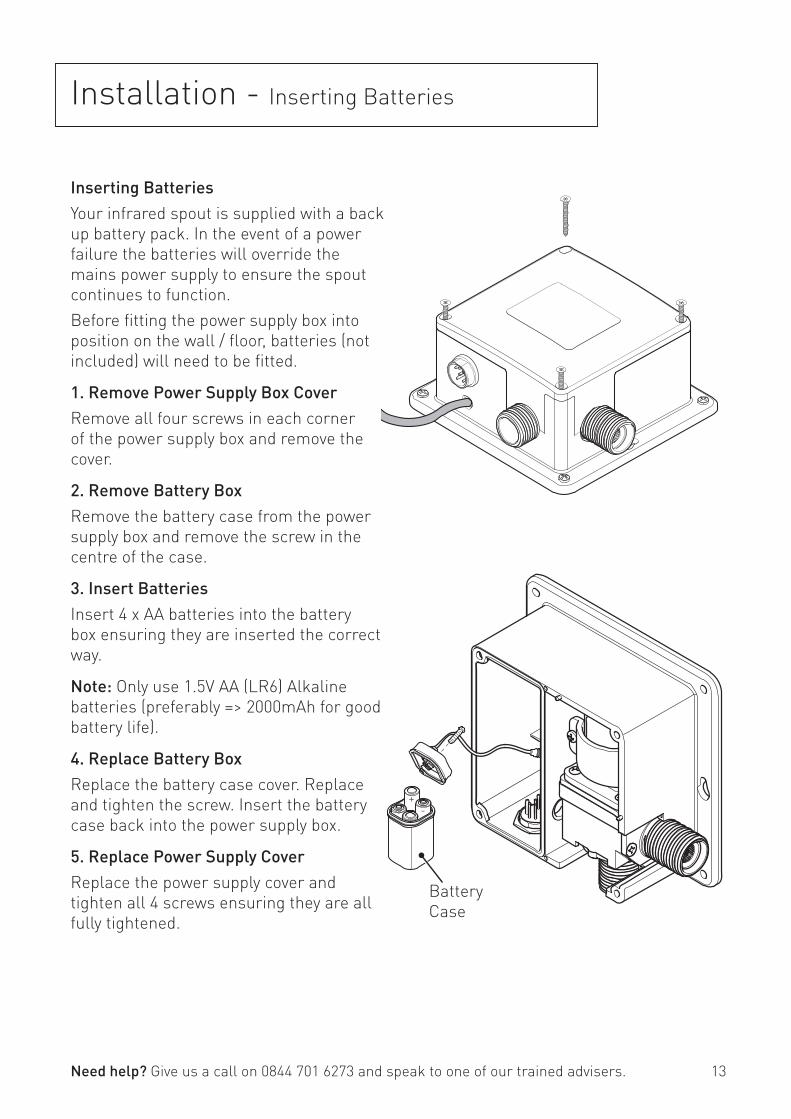
Installation - Inserting Batteries
Inserting Batteries
Your infrared spout is supplied with a back
up battery pack. In the event of a power
failure the batteries will override the
mains power supply to ensure the spout
continues to function.
Before fi tting the power supply box into
position on the wall / fl oor, batteries (not
included) will need to be fi tted.
1. Remove Power Supply Box Cover
Remove all four screws in each corner
of the power supply box and remove the
cover.
2. Remove Battery Box
Remove the battery case from the power
supply box and remove the screw in the
centre of the case.
3. Insert Batteries
Insert 4 x AA batteries into the battery
box ensuring they are inserted the correct
way.
Note: Only use 1.5V AA (LR6) Alkaline
batteries (preferably => 2000mAh for good
battery life).
4. Replace Battery Box
Replace the battery case cover. Replace
and tighten the screw. Insert the battery
case back into the power supply box.
5. Replace Power Supply Cover
Replace the power supply cover and
tighten all 4 screws ensuring they are all
fully tightened.
-+
Need help? Give us a call on 0844 701 6273 and speak to one of our trained advisers.
Battery
Case
14
Installation - Electrical Connections
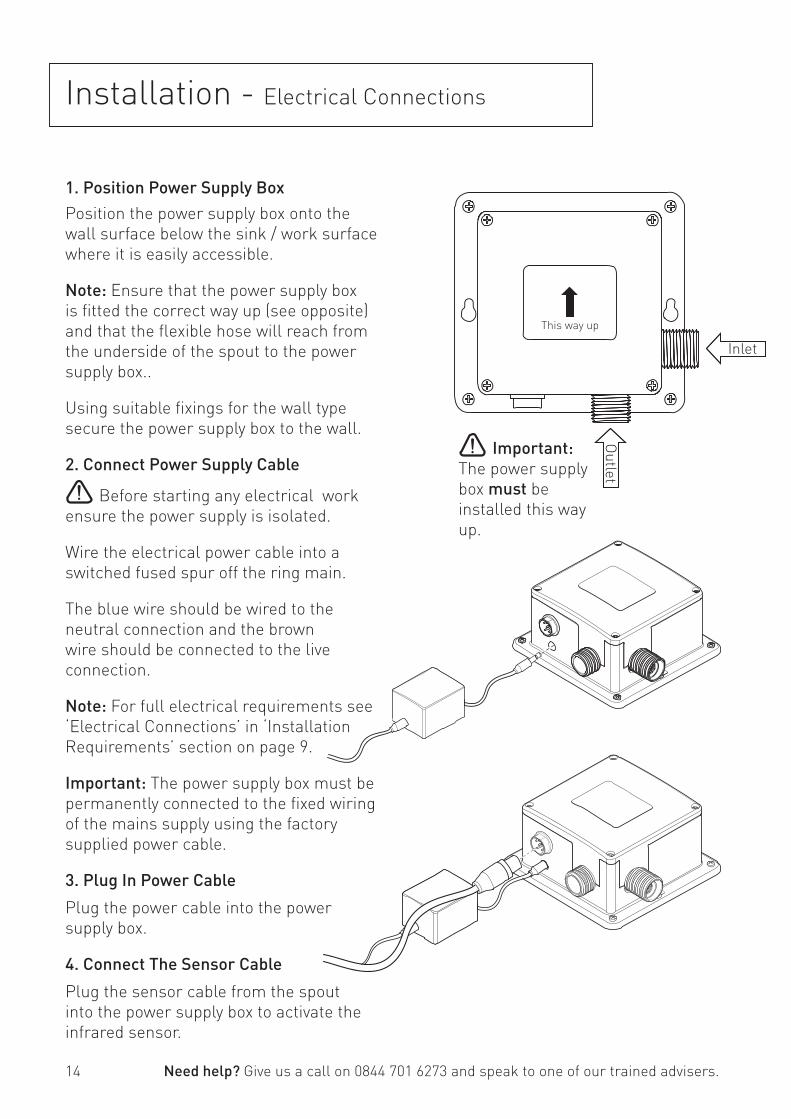
1. Position Power Supply Box
Position the power supply box onto the
wall surface below the sink / work surface
where it is easily accessible.
Note: Ensure that the power supply box
is fi tted the correct way up (see opposite)
and that the fl exible hose will reach from
the underside of the spout to the power
supply box..
Using suitable fi xings for the wall type
secure the power supply box to the wall.
2. Connect Power Supply Cable
Before starting any electrical work
ensure the power supply is isolated.
Wire the electrical power cable into a
switched fused spur off the ring main.
The blue wire should be wired to the
neutral connection and the brown
wire should be connected to the live
connection.
Note: For full electrical requirements see
‘Electrical Connections’ in ‘Installation
Requirements’ section on page 9.
Important: The power supply box must be
permanently connected to the fi xed wiring
of the mains supply using the factory
supplied power cable.
3. Plug In Power Cable
Plug the power cable into the power
supply box.
4. Connect The Sensor Cable
Plug the sensor cable from the spout
into the power supply box to activate the
infrared sensor.
Need help? Give us a call on 0844 701 6273 and speak to one of our trained advisers.
Inlet
Ou
tlet
Important:
The power supply
box must be
installed this way
up.
This way up
15
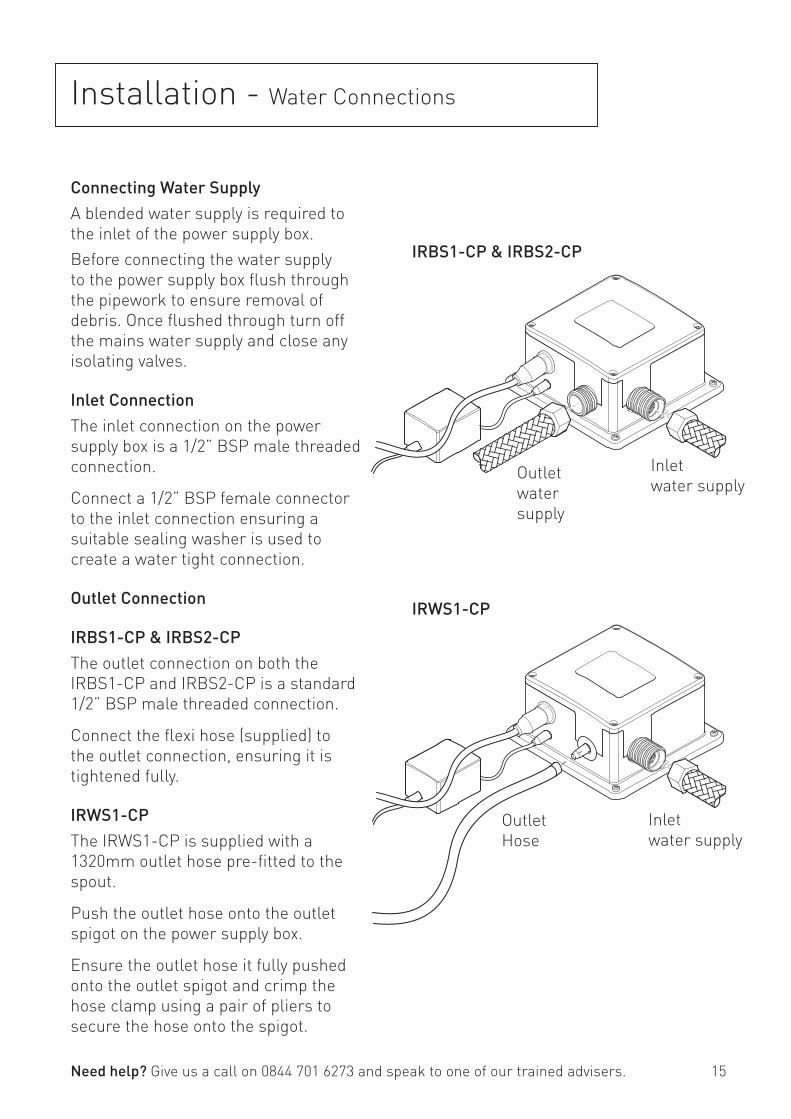
Connecting Water Supply
A blended water supply is required to
the inlet of the power supply box.
Before connecting the water supply
to the power supply box fl ush through
the pipework to ensure removal of
debris. Once fl ushed through turn off
the mains water supply and close any
isolating valves.
Inlet Connection
The inlet connection on the power
supply box is a 1/2” BSP male threaded
connection.
Connect a 1/2” BSP female connector
to the inlet connection ensuring a
suitable sealing washer is used to
create a water tight connection.
Outlet Connection
IRBS1-CP & IRBS2-CP
The outlet connection on both the
IRBS1-CP and IRBS2-CP is a standard
1/2” BSP male threaded connection.
Connect the fl exi hose (supplied) to
the outlet connection, ensuring it is
tightened fully.
IRWS1-CP
The IRWS1-CP is supplied with a
1320mm outlet hose pre-fi tted to the
spout.
Push the outlet hose onto the outlet
spigot on the power supply box.
Ensure the outlet hose it fully pushed
onto the outlet spigot and crimp the
hose clamp using a pair of pliers to
secure the hose onto the spigot.
Inlet
water supplyOutlet
water
supply
Outlet
Hose
Inlet
water supply
IRBS1-CP & IRBS2-CP
IRWS1-CP
Installation - Water Connections
Need help? Give us a call on 0844 701 6273 and speak to one of our trained advisers.
16
Installation - Water Connections
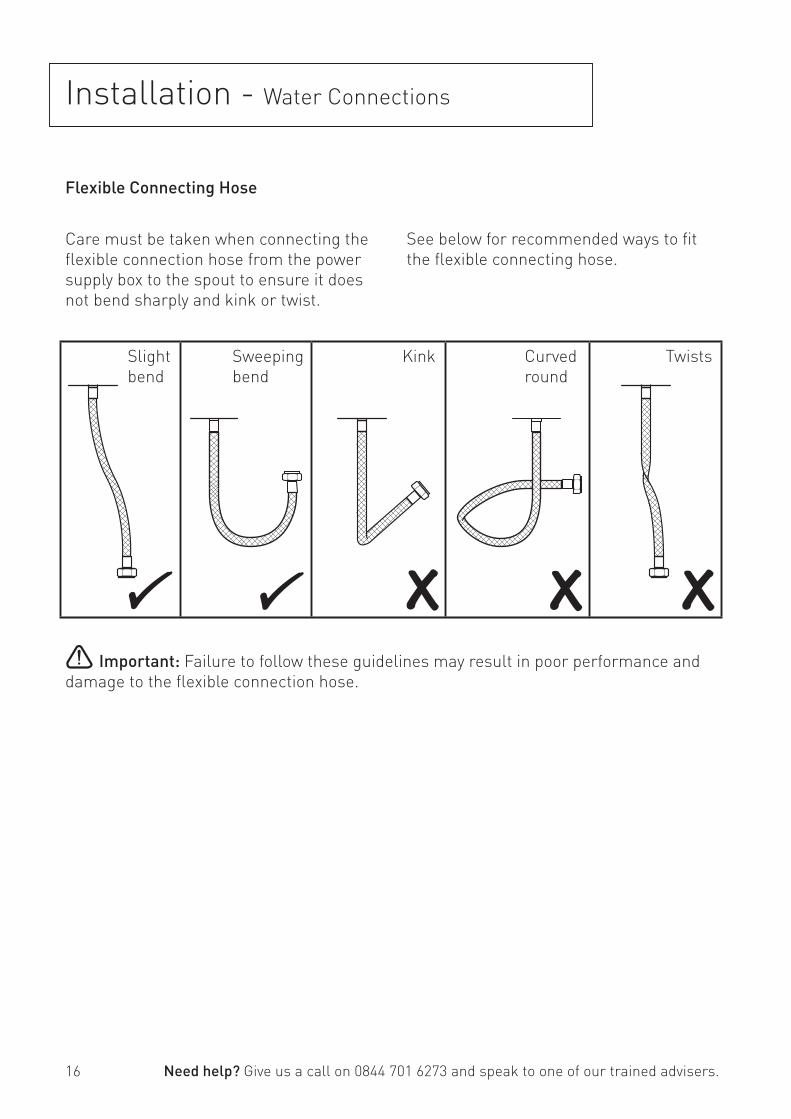
Flexible Connecting Hose
Care must be taken when connecting the
fl exible connection hose from the power
supply box to the spout to ensure it does
not bend sharply and kink or twist.
See below for recommended ways to fi t
the fl exible connecting hose.
Important: Failure to follow these guidelines may result in poor performance and
damage to the fl exible connection hose.
Slight
bend
Sweeping
bend
Kink Curved
round
Twists
Need help? Give us a call on 0844 701 6273 and speak to one of our trained advisers.
17
Operation
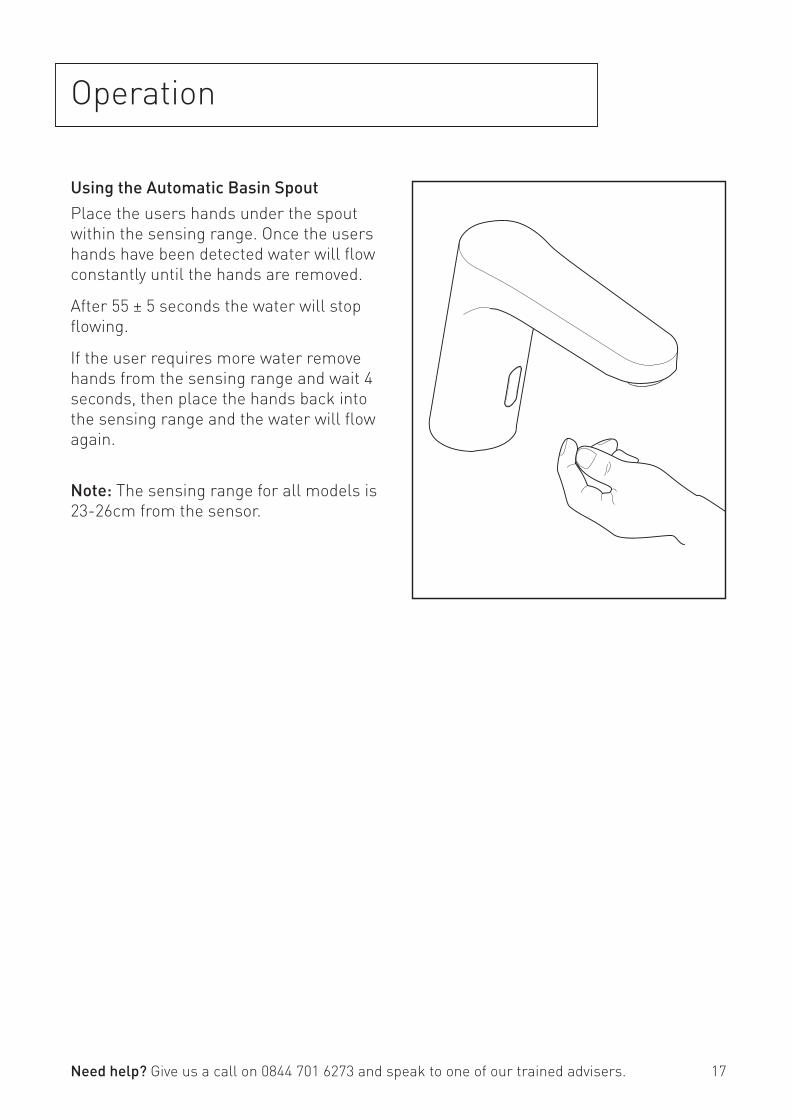
Using the Automatic Basin Spout
Place the users hands under the spout
within the sensing range. Once the users
hands have been detected water will fl ow
constantly until the hands are removed.
After 55 ± 5 seconds the water will stop
fl owing.
If the user requires more water remove
hands from the sensing range and wait 4
seconds, then place the hands back into
the sensing range and the water will fl ow
again.
Note: The sensing range for all models is
23-26cm from the sensor.
Need help? Give us a call on 0844 701 6273 and speak to one of our trained advisers.

18
Maintenance
General Cleaning
Your fi tting has a high quality fi nish and
should be treated with care to preserve
the visible surfaces. All surfaces will
wear if not cleaned correctly, the only safe
way to clean your mixer is to wipe with a
soft damp cloth. Stains can be removed
using washing up liquid. All bath cleaning
powders and liquids will damage the
surface of your fi tting, even the non-
scratch cleaners.
Note: Never use abrasive detergents or
disinfectants or those containing alcohol,
hydrochloric acid or phosphoric acid.
Bristan recommend E-cloth for
cleaning all of our bathroom
& kitchen products. Using
just water, E-cloth gives a
smear free, deep clean by breaking up
and holding dirt, which normal cloths
leave behind. Order through your Bristan
stockist (order code: ECLOTH).
Cleaning the Inlet Filter
Before carrying out any maintenance, turn
off the mains water supply and close any
isolating valves.
In hard water area it may be necessary
to regularly clean the inlet fi lter in the
power supply box to maintain optimum
performance of the infrared spout.
Remove the inlet supply connection and
remove the inlet fi lter. Run under cold
water to remove any build up of limescale
and debris. Replace the fi lter and
re-attach the inlet connection, ensuring
that the sealing washer is also refi tted.
Inlet Filter
Inlet
water supply
Need help? Give us a call on 0844 701 6273 and speak to one of our trained advisers.
19
Maintenance
Disposal and Recycling
End of Product Life
When this appliance has reached the end
of its serviceable life, it should be
disposed of in a safe manner, in
accordance with current local authority
recycling, or waste disposal policy.
Battery Disposal
Spent batteries should not be disposed
of with normal household waste. Contact
your local authority for information on
waste disposal and recycling.
This symbol on the product or packaging
indicates that this product should not be
disposed of with your other household
waste. Instead, it is your responsibility to
dispose of your waste equipment by
handing it over to a designated collection
point for the recycling of waste electrical
and electronic equipment. The separate
collection and recycling of your waste
equipment at the time of disposal will
help to conserve natural resources and
ensure that it is recycled in a manner that
protects human health and the
environment.
For more information about where you
can drop off your waste
equipment for recycling, please contact
your local council office, your household
waste disposal service or the shop where
you purchased the product.
Need help? Give us a call on 0844 701 6273 and speak to one of our trained advisers.
20
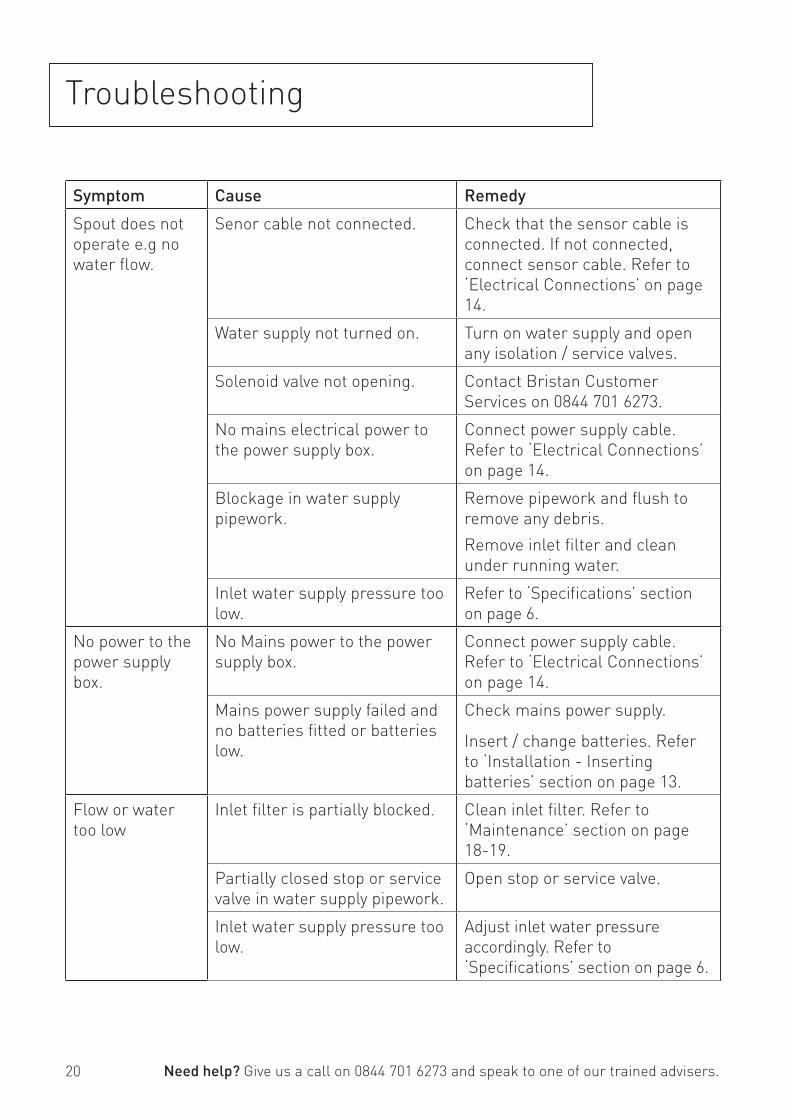
Symptom Cause Remedy
Spout does not
operate e.g no
water fl ow.
Senor cable not connected. Check that the sensor cable is
connected. If not connected,
connect sensor cable. Refer to
‘Electrical Connections’ on page
14.
Water supply not turned on. Turn on water supply and open
any isolation / service valves.
Solenoid valve not opening. Contact Bristan Customer
Services on 0844 701 6273.
No mains electrical power to
the power supply box.
Connect power supply cable.
Refer to ‘Electrical Connections’
on page 14.
Blockage in water supply
pipework.
Remove pipework and fl ush to
remove any debris.
Remove inlet fi lter and clean
under running water.
Inlet water supply pressure too
low.
Refer to ‘Specifi cations’ section
on page 6.
No power to the
power supply
box.
No Mains power to the power
supply box.
Connect power supply cable.
Refer to ‘Electrical Connections’
on page 14.
Mains power supply failed and
no batteries fi tted or batteries
low.
Check mains power supply.
Insert / change batteries. Refer
to ‘Installation - Inserting
batteries’ section on page 13.
Flow or water
too low
Inlet fi lter is partially blocked. Clean inlet fi lter. Refer to
‘Maintenance’ section on page
18-19.
Partially closed stop or service
valve in water supply pipework.
Open stop or service valve.
Inlet water supply pressure too
low.
Adjust inlet water pressure
accordingly. Refer to
‘Specifi cations’ section on page 6.
Troubleshooting
Need help? Give us a call on 0844 701 6273 and speak to one of our trained advisers.
21
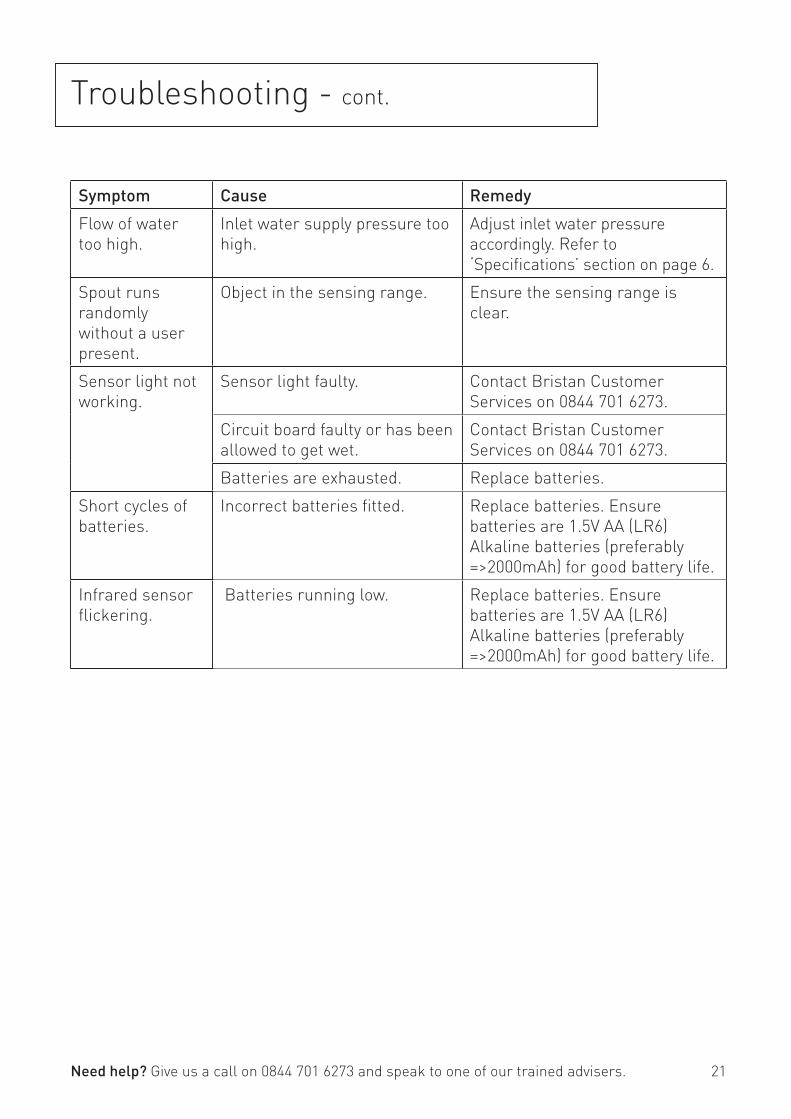
Symptom Cause Remedy
Flow of water
too high.
Inlet water supply pressure too
high.
Adjust inlet water pressure
accordingly. Refer to
‘Specifi cations’ section on page 6.
Spout runs
randomly
without a user
present.
Object in the sensing range. Ensure the sensing range is
clear.
Sensor light not
working.
Sensor light faulty. Contact Bristan Customer
Services on 0844 701 6273.
Circuit board faulty or has been
allowed to get wet.
Contact Bristan Customer
Services on 0844 701 6273.
Batteries are exhausted. Replace batteries.
Short cycles of
batteries.
Incorrect batteries fi tted. Replace batteries. Ensure
batteries are 1.5V AA (LR6)
Alkaline batteries (preferably
=>2000mAh) for good battery life.
Infrared sensor
fl ickering.
Batteries running low. Replace batteries. Ensure
batteries are 1.5V AA (LR6)
Alkaline batteries (preferably
=>2000mAh) for good battery life.
Troubleshooting - cont.
Need help? Give us a call on 0844 701 6273 and speak to one of our trained advisers.
22
Guarantee
At Bristan, we want to make things as
easy as possible for our customers.
That’s why we design products that are
easy to fi t and use, and that are quality
tested to make sure they won’t let you
down. It’s also why we offer solid
guarantees on all products, effective from
the date of purchase, to give you peace of
mind.
All Bristan Commercial taps are covered
by a 1 year guarantee. This also includes
1 year labour cover which means that, in
the unlikely event that there is a problem
in the fi rst year after purchase, we’ll send
one of our expert engineers to fi x it.
*Labour is provided by an approved
Bristan Care engineer or appointed
representative. The guarantee only applies
to products with a manufacturing fault.
There will be a call out charge for any
incidents where no fault has been found
with the product, or if the issue is due to
poor installation or maintenance.
Guarantee Terms and Conditions
This guarantee is in addition to your
statutory and other legal rights and is
subject to the following conditions:
• The product was purchased within the
United Kingdom or Republic of Ireland.
• The guarantee applies solely to the
original purchaser with proof of purchase.
• The installation must allow ready access
to all products for the purpose of
inspection, maintenance or replacement.
• Repair under this guarantee does not
extend the original expiry date. The
guarantee on any replacement parts or
product ends at the original expiry date
• Any part found to be defective during the
guarantee period will be replaced without
charge, providing that the product has
been installed in accordance with the
instructions given in this guide and used
as the manufacturer intended.
The guarantee does not cover
• Damage or defects caused by:
- General wear and tear (including special
non-chrome fi nishes;
- Components such as fi lters, seals, ‘O’
rings and washers)
- Incorrect installation
- Repair using non-Bristan part
- Accidental or wilful misuse
- Corrosion and the use of inappropriate
cleaning products.
- System debris including the build up of
limescale (which can be controlled
through regular servicing and
maintenance)
• Compensation for loss of use of the
product or consequential loss of any kind.
In the interests of continuous product
improvement, Bristan reserves the right
to alter product specifi cations without
notice.
The Bristan Product Guarantee does not
affect your statutory rights as a consumer.
Need help? Give us a call on 0844 701 6273 and speak to one of our trained advisers.
23
Guarantee & Service Policy
Need help?
If this product does not function correctly
when fi rst used, contact Bristan Care
Customer Service on 0844 701 6273
where our expert team of advisors will be
able to offer you help and advice.
Problems during the guarantee period
In the unlikely event that you encounter
any problems with the product during the
guarantee period, contact Bristan Care
Customer Service on 0844 701 6273 with
your proof of purchase and we will work to
resolve the problem quickly.
Bristan Care Customer Support
Bristan customers also benefi t from the
support of Bristan Care, our
comprehensive customer support
package which offers:
Technical support hotline
(Tel: 0844 701 6273) with access to fully
trained advisors who can offer installation
advice, talk you through quick
maintenance checks, or recommend the
best course of action to fi x any problems
with a product
Expert advice
Find easy to follow ‘how to’ video guides
and technical FAQs online at
www.bristan.com. Our guides take you
step-by-step through many product
installations and you can fi nd plenty of
easy guides to quick product fi xes and
servicing.
Spare parts
We hold thousands of spares and we keep
them for discontinued products for over
seven years. Spares can easily be ordered
online at www.bristan.com and are
dispatched the same day.
Expert plumbing engineers
If we can’t solve the problem over the
‘phone or with a spare part, then we’ll
send out one of our Bristan Care
engineers to take a look. Bristan Care
engineers provide free support for
products that are within guarantee, but
are also available to service products that
are out of guarantee for a small charge.
For details, please call customer services
on 0844 701 6273.
Need help? Give us a call on 0844 701 6273 and speak to one of our trained advisers.

24
Bristan Group Ltd.
Birch Coppice Business Park
Dordon
Tamworth
Staffordshire
B78 1SG
Web: www.bristan.com
Email: [email protected]
A Masco Company
Part Number: FI Infrared Spouts
Issue: D1
Useful contact details:
Customer Service:
0844 7016273
Customer Service Email:
Customer Service Fax:
0844 7016275
Reception:
0844 7016274
Join us on...

Bristan, Birch Coppice Business Park, Dordon, Tamworth, B78 1SG
Telephone: 0844 701 6274 Facsimile: 0844 701 6275
Web Site: www.bristan.com Email: [email protected]
The information contained on this page was correct at date of issue. Fitting dimensions are provided as a guide only. Some variation may occur due to manufacturing tolerances. Bristan pursues a policy of continuing improvement in design and performance of its products and so reserves the right to change specifications without prior notice.
TECHNICAL DATASHEET
COMMERCIALInfrared Automatic Basin Spout
Flow Rates (litres per minute)
SystemPressure 0.5bar 1bar 2bar 3bar 4bar 5bar
2.2 3.8 4.9 4.8 5.1 5.3
Additional Information
• 55 seconds (± 5 seconds) timed flow.
• 23-26cm sensing range.
• Power consumption: Static <0.3MW Active: <3MW.
• Inlet water supply temperature range: 5°C - 45°C.
• Battery override
• Low battery warning light
• Water efficient – Water will only flow when the hands are in the sensing range
Technical Advice: For further information please call 0844 7016273 or email [email protected]
Guarantee: 1 year covering manufacturing faults.
Compliance / Approvals
BREEAM Compliant
WRAS Approved: Certificate Number: 1304068
Product Specification
Product Code: IRBS1-CPFinish: ChromeProduct Type: CommercialConstruction: Body is of brass construction Power Supply: AC: 220V-240V, 50/60HZ
DC: 6V (4x AA alkaline batteries (not supplied)Water Supply: Suitable for high pressure systemsWorking Pressures: Min 1.0bar, Max 5.0bar
Maximum Static Pressure: 10.0 bar