
INSTALLATION I F COMMERCIAL H & C 7.5 TON - Northern...
32
All information contained herein is subject to change without notice. INSTALLATION INSTRUCTIONS FOR COMMERCIAL HEATING & COOLING 7.5 TON - 12.5 TON PACKAGE GAS SERIES CPG SERIES RECOGNIZE THIS SYMBOL AS A SAFETY PRECAUTION. ATTENTION INSTALLING PERSONNEL Prior to installation, thoroughly familiarize yourself with this Installation Manual. Observe all safety warnings. During installation or repair, caution is to be observed. It is your responsibility to install the product safely and to educate the customer on its safe use. This Forced Air Central Unit Design Complies With Requirements Embodied in The American National Standard / National Standard of Canada Shown Below. ANSI Z21.47•CSA-2.3 Central Furnaces C US ® © 2008 - 2010 Goodman Manufacturing Company, L.P. 5151 San Felipe, Suite 500 ◊ Houston, TX 77056 www .goodmanmfg.com www .amana-hac.com IO-337J 6/10 *NOTE: Please contact your distributor or our website for the applicable Specification Sheet referred to in this manual.
Transcript of INSTALLATION I F COMMERCIAL H & C 7.5 TON - Northern...

All information contained herein is subject to change without notice.
INSTALLATION INSTRUCTIONS FORCOMMERCIAL HEATING & COOLING
7.5 TON - 12.5 TON PACKAGE GAS SERIESCPG SERIES
RECOGNIZE THIS SYMBOL AS A SAFETY PRECAUTION.
ATTENTION INSTALLING PERSONNELPrior to installation, thoroughly familiarize yourself with this Installation Manual. Observe all safety warnings.
During installation or repair, caution is to be observed.
It is your responsibility to install the product safely and to educate the customer on its safe use.
This Forced Air Central Unit Design Complies WithRequirements Embodied in The American NationalStandard / National Standard of Canada ShownBelow.
ANSI Z21.47•CSA-2.3 Central Furnaces
C US
®
© 2008 - 2010 Goodman Manufacturing Company, L.P.5151 San Felipe, Suite 500 ◊ Houston, TX 77056
www.goodmanmfg.com www.amana-hac.com
IO-337J6/10
*NOTE: Please contact your distributor or our websitefor the applicable Specification Sheet referred to in this manual.

2
REPLACEMENT PARTS
ORDERING PARTS
When reporting shortages or damages, or ordering repairparts, give the complete unit model and serial numbersas stamped on the unit’s nameplate.
Replacement parts for this appliance are availablethrough your contractor or local distributor. For thelocation of your nearest distributor, consult the whitebusiness pages, the yellow page section of the localtelephone book or contact:
CONSUMER AFFAIRSGOODMAN MANUFACTURING COMPANY, L.P.
7401 SECURITY WAYHOUSTON, TEXAS 77040
877-254-4729
SAFETY INSTRUCTIONS
TO THE INSTALLER
Before installing this unit, please read this manual tofamiliarize yourself on the specific items which must beadhered to, including maximum external static pressureto unit, air temperature rise, minimum or maximum CFMand motor speed connections.
Keep this literature in a safe place for future reference.
IF THE INFORMATION IN THESE INSTRUCTIONS IS NOT FOLLOWED EXACTLY, A FIRE OR EXPLOSION MAY RESULT CAUSING PROPERTYDAMAGE, PERSONAL INJURY OR LOSS OF LIFE.DO NOT STORE OR USE GASOLINE OR OTHER FLAMMABLE VAPORS AND LIQUIDS IN THE VICINITY OF THIS OR ANY OTHER APPLIANCE.
DO NOT TRY TO LIGHT ANY APPLIANCE.DO NOT TOUCH ANY ELECTRICAL SWITCH; DO NOT USE ANY PHONE IN YOUR BUILDING.IMMEDIATELY CALL YOUR GAS SUPPLIER FROM A NEIGHBOR’S PHONE. FOLLOW THE GAS SUPPLIER’S INSTRUCTIONS.IF YOU CANNOT REACH YOUR GAS SUPPLIER, CALL THE FIRE DEPARTMENT.
INSTALLATION AND SERVICE MUST BE PERFORMED BY A QUALIFIED INSTALLER, SERVICE AGENCY OR THE GAS SUPPLIER.
WHAT TO DO IF YOU SMELL GAS:
WARNING
DO NOT CONNECT TO OR USE ANY DEVICE THAT IS NOT DESIGN CERTIFIED BY GOODMAN FOR USE WITH THIS UNIT. SERIOUS PROPERTY DAMAGE, PERSONAL INJURY, REDUCED UNIT PERFORMANCE AND/OR HAZARDOUS CONDITIONS MAY RESULT FROM THE USE OF SUCH NON‐APPROVED DEVICES.
WARNING
SHOULD OVERHEATING OCCUR OR THE GAS SUPPLY FAIL TO SHUT OFF, TURN OFF THE MANUAL GAS SHUTOFF VALVE EXTERNAL TO THE FURNACE BEFORE TURNING OFF THE ELECTRICAL SUPPLY.
WARNING
SHEET METAL PARTS, SCREWS, CLIPS AND SIMILAR ITEMS INHERENTLY HAVE SHARP EDGES, AND IT IS NECESSARY THAT THE INSTALLER AND SERVICE PERSONNEL EXERCISE CAUTION.
CAUTION
IndexReplacement Parts ........................................................ 2
Safety Instructions ........................................................ 2
General Information ...................................................... 3
Unit Location ................................................................. 4
Clearances ..................................................................... 6
Roof Curb Post-Installation .......................................... 6
Checks ........................................................................... 6
Roof Top Duct Connections ......................................... 6
Rigging Details .............................................................. 7
Electrical Wiring ............................................................ 8
Gas Supply Piping ....................................................... 10
Propane Gas Installations .......................................... 12
Circulating Air and Filters ........................................... 13
Venting ......................................................................... 13
Condensate Drain Connection ................................... 13
Startup, Adjustments, and Checks ............................ 13
Normal Sequence Of Operation ................................. 19
Troubleshooting .......................................................... 20
Input Rating ................................................................. 21
Air flow Adjustments................................................... 21
Motor Sheave Adjustments ........................................ 21
Maintenance ................................................................ 22
Appendix A Blower Performance Data ...................... 24
Belt Drive - STANDARD hORIZONTAL ....................... 24
Appendix A Blower Performance Data ...................... 25
Belt Drive - STANDARD dOWN sHOT ........................ 25
Belt Drive - HIGH STATIC (“AA” Models Only) .......... 26
Appendix B Electrical Data ......................................... 27
Appendix C Unit Dimensions ..................................... 28
Wiring Diagrams .......................................................... 29

3
THIS PRODUCT CONTAINS OR PRODUCES A CHEMICAL OR CHEMICALS WHICH MAY CAUSE SERIOUS ILLNESS OR DEATH AND WHICH ARE KNOWN TO THE STATE OF CALIFORNIA TO CAUSE CANCER, BIRTH DEFECTS OR OTHER REPRODUCTIVE HARM.
WARNING
TO AVOID PROPERTY DAMAGE, PERSONAL INJURY OR DEATH, DO NOT USE THIS UNIT IF ANY PART HAS BEEN UNDER WATER. IMMEDIATELY CALL A QUALIFIED SERVICE TECHNICIAN TO INSPECT THE FURNACE AND TO REPLACE ANY PART OF THE CONTROL SYSTEM AND ANY GAS CONTROL HAVING BEEN UNDER WATER.
WARNING
THIS UNIT MUST NOT BE USED AS A “CONSTRUCTION HEATER” DURING THE FINISHING PHASES OF CONSTRUCTION ON A NEW STRUCTURE. THIS TYPE OF USE MAY RESULT IN PREMATURE FAILURE OF THE UNIT DUE TO EXTREMELY LOW RETURN AIR TEMPERATURES AND EXPOSURE TO CORROSIVE OR VERY DIRTY ATMOSPHERES.
WARNING
HIGH VOLTAGE !DISCONNECT ALL POWER BEFORE SERVICING OR INSTALLING THIS UNIT. MULTIPLE POWER SOURCES MAY BE PRESENT. FAILURE TO DO SO MAY CAUSE PROPERTY DAMAGE, PERSONAL INJURY OR DEATH.
WARNING
TO PREVENT THE RISK OF PROPERTY DAMAGE, PERSONAL INJURY OR DEATH, DO NOT STORE COMBUSTIBLE MATERIALS OR USE GASOLINE OR OTHER FLAMMABLE LIQUIDS OR VAPORS IN THE VICINITY OF THIS APPLIANCE.
WARNING
ONLY INDIVIDUALS MEETING (AT A MINIMUM) THE REQUIREMENTS OF AN “ENTRY LEVEL TECHNICIAN” AS SPECIFIED BY THE AIR CONDITIONING, HEATING, AND REFRIGERATION INSTITUTE (AHRI) MAY USE THIS INFORMATION. ATTEMPTING TO INSTALL OR REPAIR THIS UNIT WITHOUT SUCH BACKGROUND MAY RESULT IN PRODUCT DAMAGE, PERSONAL INJURY OR DEATH.
WARNING
-
CARBON MONOXIDE POISONINGHAZARD
RISQUE D'EMPOISONNEMENT AUMONOXYDE DE CARBONE
FAILURE TO KEEP THIS COMPARTMENT CLOSEDEXCEPT WHEN SERVICING COULD RESULT INCARBON MONOXIDE POISONING OR DEATH.
THIS COMPARMENT MUST BE CLOSED EXCEPTWHEN SERVICING
SI CE COMPARTMENT N'EST PAS FERME ENTOUT TEMPS, SAUF EN CAS DE REPARATION, IL YA RISQUE D'EMPOISONNEMENT OU MONOXYDEDE CARBONE OU DE MORT.
CE COMPARTIMENT DOIT ETRE FERME SAUF AUMOMENT DE L'ENTRETIEN.
WARNING
AVERTISSEMENT
ADVERTENCIA
0140L00106
PELIGRO MONOXIDO DE CARBONOTOXICOEL FRACASO DE NO MANTENERCOMPARTIMIENTO CERRADO MENOS DURANTE,ATENDER, PODRIA TENER COMO RESULTADOENVENENAR DE MONOXIDO DE CARBONO OMUERTE.ESTE COMPARTIMIENTO DEBE CERRADO MENOSAL ATENDER
GENERAL INFORMATION
TO PREVENT PROPERTY DAMAGE, PERSONAL INJURY OR DEATH DUE TO FIRE, EXPLOSIONS, SMOKE, SOOT, CONDENSATION, ELECTRIC SHOCK OR CARBON MONOXIDE, THIS UNIT MUST BE PROPERLY INSTALLED, REPAIRED, OPERATED AND MAINTAINED.
WARNING
This unit is approved for outdoor installation ONLY. Toassure that your unit operates safely and efficiently, it mustbe installed, operated, and maintained in accordance withthese installation and operating instructions, all local buildingcodes and ordinances, or in their absence, with the latestedition of the National Fuel Gas Code NFPA54/ANSI Z223.1and National Standard of Canada CAN/CSA B149 Installa-tion Codes.
The heating and cooling capacities of the unit should begreater than or equal to the design heating and cooling loadsof the area to be conditioned. The loads should be calculatedby an approved method or in accordance with ASHRAE Guideor Manual J - Load Calculations published by the Air Condi-tioning Contractors of America.
Obtain from:
American National Standards Institute1430 Broadway
New York, NY 10018

4
System design and installation should also, where applicable,follow information presented in accepted industry guides suchas the ASHRAE Handbooks. The manufacturer assumes noresponsibility for equipment installed in violation of any codeor regulation. The mechanical installation of the packagedroof top units consists of making final connections betweenthe unit and building services; supply and return duct con-nections; and drain connections (if required). The internalsystems of the unit are completely factory-installed and testedprior to shipment.
Units are generally installed on a steel roof mounting curbassembly which has been shipped to the job site for installa-tion on the roof structure prior to the arrival of the unit. Themodel number shown on the unit’s identification plate identi-fies the various components of the unit such as refrigerationtonnage, heating input and voltage.
Carefully inspect the unit for damage including damage tothe cabinetry. Any bolts or screws which may have loosenedin transit must be re-tightened. In the event of damage, thereceiver should:
1. Make notation on delivery receipt of any visibledamage to shipment or container.
2. Notify carrier promptly and request an inspection.3. In case of concealed damage, carrier should be
notified as soon as possible-preferably within 5 days.4. File the claim with the following supporting documents:a. Original Bill of Lading, certified copy, or indemnity
bond.b. Original paid freight bill or indemnity in lieu thereof.c. Original invoice or certified copy thereof, showing
trade and other discounts or reductions.d. Copy of the inspection report issued by carrier
representative at the time damage is reported to thecarrier. The carrier is responsible for making promptinspection of damage and for a thoroughinvestigation of each claim. The distributor ormanufacturer will not accept claims from dealers fortransportation damage.
NOTE: When inspecting the unit for transportation damage,remove all packaging materials. Recycle or dispose of thepackaging material according to local codes.
PRE-INSTALLATION CHECKS
Carefully read all instructions for the installation prior to in-stalling unit. Ensure each step or procedure is understoodand any special considerations are taken into account be-fore starting installation. Assemble all tools, hardware andsupplies needed to complete the installation. Some items mayneed to be purchased locally.
UNIT LOCATION
TO PREVENT POSSIBLE EQUIPMENT DAMAGE, PROPERTY DAMAGE, PERSONAL INJURY OR DEATH, THE FOLLOWING BULLET POINTS MUST BE OBSERVED WHEN INSTALLING THE UNIT.
WARNING
IMPORTANT NOTE: Remove wood shipping rails and metalshipping brace (if applicable) prior to installation of the uniton a roof curb.
ALL INSTALLATIONS:
NOTE: Appliance is shipped from factory for vertical ductapplication.Proper installation of the unit ensures trouble-free operation.Improper installation can result in problems ranging fromnoisy operation to property or equipment damages, danger-ous conditions that could result in injury or personal propertydamage and could void the warranty. Give this booklet to theuser and explain it’s provisions. The user should retain theseinstructions for future reference.
• For proper flame pattern within the heat exchangerand proper condensate drainage, the unit must bemounted level.
• The flue outlet must be at least 12 inches from anyopening through which flue gases could enter abuilding, and at least three feet above any forced airinlet located within ten feet. The economizer/manualfresh air intake/motorized fresh air intake andcombustion air inlet mounted on the unit are notaffected by this restriction.
• To avoid possible corrosion of the heat exchanger,do not locate the unit in an area where the outdoor air(i.e. combustion air for the unit) will be frequentlycontaminated by compounds containing chlorine orfluorine. Common sources of such compounds includeswimming pool chemicals and chlorine bleaches, paintstripper, adhesives, paints, varnishes, sealers, waxes(which are not yet dried) and solvents used duringconstruction and remodeling. Various commercial andindustrial processes may also be sources of chlorine/fluorine compounds.
• To avoid possible illness or death of the buildingoccupants, do NOT locate outside air intake device(economizer, manual fresh air intake, motorized freshair intake) too close to an exhaust outlet, gas venttermination, or plumbing vent outlet. For specificdistances required, consult local codes.
• Allow minimum clearances from the enclosure for fireprotection, proper operation, and service access (seeunit clearances). These clearances must bepermanently maintained.
• The combustion air inlet and flue outlet on the unitmust never be obstructed. If used, do not allow theeconomizer/manual fresh air damper/ motorized freshair damper to become blocked by snow or debris. Insome climates or locations, it may be necessary toelevate the unit to avoid these problems.
• When the unit is heating, the temperature of the returnair entering the unit must be between 50° F and 100°F.

5
GROUND LEVEL INSTALLATIONS ONLY:• When the unit is installed on the ground adjacent to
the building, a level concrete (or equal) base isrecommended. Prepare a base that is 3” larger thanthe package unit footprint and a minimum of 3” thick.
• The base should also be located where no runoff ofwater from higher ground can collect in the unit.
ROOF TOP INSTALLATIONS ONLY:• To avoid possible property damage or personal injury,
the roof must have sufficient structural strength to carrythe weight of the unit(s) and snow or water loads asrequired by local codes. Consult a structural engineerto determine the weight capabilities of the roof.
• The unit may be installed directly on wood floors oron Class A, Class B, or Class C roof covering material.
• To avoid possible personal injury, a safe, flat surfacefor service personnel should be provided.
• As indicated on the unit data plate, a minimumclearance of 36” to any combustible material isrequired on the furnace access side of the unit. Allcombustible materials must be kept out of this area.
• This 36” clearance must also be maintained to insureproper combustion air and flue gas flow. Thecombustion air intake and furnace flue discharge mustnot be blocked for any reason, including blockage bysnow.
• Adequate clearances from the furnace flue dischargeto any adjacent public walkways, adjacent buildings,building openings or openable windows must bemaintained in accordance with the latest edition ofthe National Fuel Gas Code (ANSI Z223.1)
• Minimum horizontal clearance of 48” from the furnaceflue discharge to any electric meters, gas meters,regulators and relief equipment is required.
UNIT PRECAUTIONS
• Do not stand or walk on the unit.• Except for holes in the wiring entrances (see Figure
below), do not drill holes anywhere in panels or inthe base frame of the unit. Unit access panelsprovide structural support.
LOW VOLTAGE ENTRANCE
DIMPLES MARK DRILL LOCATIONS
HIGH VOLTAGE ENTRANCE
10 3/16”
3 3/4”
26 ½”
ELECTRICAL ENTRANCE LOCATIONS• Do not remove any access panels until unit has been
installed on roof curb or field supplied structure.• Do not roll unit across finished roof without prior
approval of owner or architect.• Do not skid or slide on any surface as this may
damage unit base. The unit must be stored on aflat, level surface. Protect the condenser coilbecause it is easily damaged.
ROOF CURB INSTALLATIONS ONLY:Curb installations must comply with local codes and shouldbe done in accordance with the established guidelines of theNational Roofing Contractors Association.
Proper unit installation requires that the roof curb be firmlyand permanently attached to the roof structure. Check foradequate fastening method prior to setting the unit on thecurb.
Full perimeter roof curbs are available from the factory andare shipped unassembled. Field assembly, squaring, level-ing and mounting on the roof structure are the responsibilityof the installing contractor. All required hardware necessaryfor the assembly of the sheet metal curb is included in thecurb accessory.
TO PREVENT POSSIBLE EQUIPMENT DAMAGE, PROPERTY DAMAGE, PERSONAL INJURY OR DEATH, THE FOLLOWING BULLET POINTS MUST BE OBSERVED WHEN INSTALLING THE UNIT.
WARNING
• Sufficient structural support must be determined priorto locating and mounting the curb and package unit.
• Ductwork must be constructed using industryguidelines. The duct work must be placed into theroof curb before mounting the package unit. Our fullperimeter curbs include duct connection frames to beassembled with the curb. Cantilevered type curbsare not available from the factory.

6
• Curb insulation, cant strips, flashing and generalroofing material are furnished by the contractor.
The curbs must be supported on parallel sides by roof mem-bers. The roof members must not penetrate supply and re-turn duct opening areas as damage to the unit might occur.
NOTE: The unit and curb accessories are designed to allowvertical duct installation before unit placement. Ductinstallation after unit placement is not recommended.
ALL CURBS LOOK SIMILAR. TO AVOID INCORRECT CURB POSITIONING, CHECK JOB PLANS CAREFULLY AND VERIFY MARKINGS ON CURB ASSEMBLY. INSTRUCTIONS MAY VARY IN CURB STYLES AND SUPERCEDE INFORMATION SHOWN.
CAUTION
See the manual shipped with the roof curb for assembly andinstallation instructions.
CLEARANCES
36” MIN.
75”
48”
6”
48”
UNIT CLEARANCESAdequate clearance around the unit should be kept for safety,service, maintenance, and proper unit operation. A total clear-ance of 75” on the main control panel side of the unit is rec-ommended to facilitate possible fan shaft, coil, electric heatand gas furnace removal. A clearance of 48” is recommendedon all other sides of the unit to facilitate possible compressorremoval, to allow service access and to insure proper venti-lation and condenser airflow. The unit must not be installedbeneath any obstruction. The unit should be installed re-mote from all building exhausts to inhibit ingestion of exhaustair into the unit fresh air intake.
INSULATEDPANELS
ROOF CURB INSTALLATION
ROOF CURB POST-INSTALLATIONCHECKS
After installation, check the top of the curb, duct connectionframe and duct flanges to make sure gasket has been ap-plied properly. Gasket should be firmly applied to the top ofthe curb perimeter, duct flanges and any exposed duct con-nection frame. If gasket is loose, re-apply using strongweather resistant adhesive.
PROTRUSION
Inspect curb to ensure that none of the utility services (elec-tric) routed through the curb protrude above the curb.
IF PROTRUSIONS EXIST, DO NOT ATTEMPT TO SET UNIT ON CURB. INFORMATION SHOWN.
CAUTION
ROOF TOP DUCT CONNECTIONS
Install all duct connections on the unit before placing the uniton rooftop.
HORIZONTAL DISCHARGE
For horizontal discharge, remove the supply and return ductcovers and place them over the vertical discharge return andsupply openings. Install with insulation facing up, using thelonger screws provided in the literature package.

7
Ensure that the top of the duct connection frame is flush withthe top of the roof curb.
Flexible duct connectors between the unit and ducts are rec-ommended. Insulate and weatherproof all external ductworkand joints as required and in accordance with local codes.
RETURN
SUPPLY13 7/8”
28 3/8” 7 3/8”
12 5/8” 5 7/8”
6 1/4”
36 3/8”
REMOVE COVERS
HORIZONTAL DISCHARGE DUCT CONNECTIONS
RIGGING DETAILS
TO PREVENT PROPERTY DAMAGE, THE UNIT SHOULD REMAIN IN AN UPRIGHT POSITION DURING ALL RIGGING AND MOVING OPERATIONS. TO FACILITATE LIFTING AND MOVING WHEN A CRANE IS USED, PLACE THE UNIT IN AN ADEQUATE CABLE SLING.
WARNING
DO NOT LIFT UNITS TWO AT A TIME. PROVISIONS FOR FORKS HAVE BEEN INCLUDED IN THE UNIT BASE FRAME. MINIMUM FORK LENGTH IS 48” TO PREVENT DAMAGE TO THE UNIT.
CAUTION
Provisions for forks have been included in the unit base frame.No other fork locations are approved.
TO PREVENT POSSIBLE EQUIPMENT DAMAGE, PROPERTY DAMAGE, PERSONAL INJURY OR DEATH, THE FOLLOWING BULLET POINTS MUST BE OBSERVED WHEN INSTALLING THE UNIT.
WARNING
• Unit must be lifted by the four lifting holes located atthe base frame corners.
• Lifting cables should be attached to the unit withshackles.
• The distance between the crane hook and the top ofthe unit must not be less than 60”.
• Two spreader bars must span over the unit to preventdamage to the cabinet by the lift cables. Spreaderbars must be of sufficient length so that cables do notcome in contact with the unit during transport.
Remove wood struts mounted beneath unit baseframe before setting unit on roof curb. These strutsare intended to protect unit base frame from fork liftdamage. Removal is accomplished by extracting thesheet metal retainers and pulling the struts throughthe base of the unit. Refer to rigging label on the unit.
• Your unit may be equipped with a steel shipping bracelocated underneath the unit (under compressors). Ifinstalling on a roof curb, the brace MUST be removed.Follow the following instructions for removal.
WHEN UNIT IS SUSPENDED, BOARDS AND SHIPPING BRACE WILL DROP WHEN SCREWS ARE REMOVED. TO PREVENT PERSONAL INJURY, STAND CLEAR.REMOVE FORK HOLE BRACKETS, BOARDS AND SHIPPING BRACE FROM BOTTOMOF UNIT BEFORE PLACING UNIT ONTO CURB.
CAUTION
Before installing this unit on a roof curb:1. Remove wooden struts per installation instructions.
These are the struts that are located in the fork holesand are used to protect the unit from damage whilelifting with forks.
2. Locate and remove the twelve (12) screws that attachthe shipping brace to the side rails. There will be six(6) screws on each side of the unit and they are in adiagonal pattern. See following figure.
3. Lift unit per the “Rigging Details” section of theinstallation instructions, observing all warnings andcautions. Lift the unit high enough off the ground toreach under and grasp the shipping brace.
4. Rotate the brace by tapping the ends until the bracefalls free from the unit.
5. Dispose of the brace appropriately.

8
Important: If using bottom discharge with roof curb, duct-work should be attached to the curb prior to installing theunit. Ductwork dimensions are shown in Roof Curb Installa-tion Instructions.
Refer to the Roof Curb Installation Instructions for proper curbinstallation. Curbing must be installed in compliance with theNational Roofing Contractors Association Manual.
Lower unit carefully onto roof mounting curb. While riggingunit, center of gravity will cause condenser end to be lowerthan supply air end.
To assist in determining rigging requirements, unit weightsare shown as follows:
CG
B D
A C
RETURN
SUPPLY
EVAPORATOR COILCOMPRESSOR 1
COMPRESSOR 2
Y
X
CORNER & CENTER OF GRAVITY LOCATIONS
090/102 120 150
Corner Weight - A 195 230 335
Corner Weight - B 270 330 390
Corner Weight - C 240 280 295
Corner Weight - D 330 405 345
Unit Shipping Weight 1055 1275 1390
Unit Operating Weight 1030 1235 1365
X (Inches) 55 55 47
Y (Inches) 36 36 33.5
DATACPG Weights (lbs)
TO PREVENT SEVERE DAMAGE TO THE BOTTOM OF THE UNIT, DO NOT FORK LIFT UNIT AFTER WOOD STRUTS HAVE BEEN REMOVED.
CAUTION
Bring condenser end of unit into alignment with the curb. Withcondenser end of the unit resting on curb member and usingcurb as a fulcrum, lower opposite end of the unit until entireunit is seated on the curb. When a rectangular cantilevercurb is used, care should be taken to center the unit. Checkfor proper alignment and orientation of supply and returnopenings with duct.
RIGGING REMOVAL
TO PREVENT DAMAGE TO THE UNIT, DO NOT ALLOW CRANE HOOKS AND SPREADER BARS TO REST ON THE ROOF OF THE UNIT.
CAUTION
Remove spreader bars, lifting cables and other rigging equip-ment.
ELECTRICAL WIRING
HIGH VOLTAGE !DISCONNECT ALL POWER BEFORE SERVICING OR INSTALLING THIS UNIT. MULTIPLE POWER SOURCES MAY BE PRESENT. FAILURE TO DO SO MAY CAUSE PROPERTY DAMAGE, PERSONAL INJURY OR DEATH.
WARNING
HIGH VOLTAGE !TO AVOID PERSONAL INJURY OR DEATH DUE TO ELECTRICAL SHOCK, DO NOT TAMPER WITH FACTORY WIRING. THE INTERNAL POWER AND CONTROL WIRING OF THESE UNITS ARE FACTORY‐INSTALLED AND HAVE BEEN THOROUGHLY TEST PRIOR TO SHIPMENT. CONTACT YOUR LOCAL REPRESENTATIVE IF ASSISTANCE IS REQUIRED.
WARNING
TO PREVENT DAMAGE TO THE WIRING, PROTECT WIRING FROM SHARP EDGES. FOLLOW NATIONAL ELECTRICAL CODE AND ALL LOCAL CODES AND ORDINANCES. DO NOT ROUTE WIRES THROUGH REMOVABLE ACCESS PANELS.
CAUTION

9
CONDUIT AND FITTINGS MUST BE WEATHER‐TIGHT TO PREVENT WATER ENTRY INTO THE BUILDING.
CAUTION
For unit protection, use a fuse or HACR circuit breaker that isin excess of the circuit ampacity, but less than or equal to themaximum overcurrent protection device. DO NOT EXCEEDTHE MAXIMUM OVERCURRENT DEVICE SIZE SHOWNON UNIT DATA PLATE.
All line voltage connections must be made through weather-proof fittings. All exterior power supply and ground wiringmust be in approved weatherproof conduit.
The main power supply wiring to the unit and low voltagewiring to accessory controls must be done in accordance withthese instructions, the latest edition of the National ElectricalCode (ANSI/NFPA 70), and all local codes and ordinances.All field wiring shall conform with the temperature limitationsfor Type T wire (63°F/35°C rise).
The main power supply shall be three-phase, three wire. Theunit is factory wired for the voltage shown on the unit’s dataplate.
NOTE: If supply voltage is 208V, all leads on primary of trans-former TRANS1 must be moved from the 230V to the 208Vtap.
Main power wiring should be sized for the minimum wireampacity shown on the unit’s database. Size wires in accor-dance with the ampacity tables in Article 310 of the NationalElectrical Code. If long wires are required, it may be neces-sary to increase the wire size to prevent excessive voltagedrop. Wires should be sized for a maximum of 3% voltagedrop.
TO AVOID PROPERTY DAMAGE OR PERSONAL INJURY DUE TO FIRE, USE ONLY COPPER CONDUCTORS.
CAUTION
TO PREVENT IMPROPER AND DANGEROUS OPERATION DUE TO WIRING ERRORS, LABEL ALL WIRES PRIOR TO DISCONNECTION WHEN SERVICING CONTROLS. VERIFY PROPER OPERATION AFTER SERVICING.
CAUTION
NOTE: A weather-tight disconnect switch, properly sized forthe unit total load, must be field installed. An external fieldsupplied disconnect may be mounted on the exterior panel.
Ensure the data plate is not covered by the field-supplieddisconnect switch.
• Some disconnect switches are not fused. Protect thepower leads at the point of distribution in accordancewith the unit data plate.
• The unit must be electrically grounded in accordancewith local codes or, in the absence of local codes,with the latest edition of the National Electrical Code
(ANSI-NFPA 70). A ground lug is provided for thispurpose. Size grounding conductor in accordancewith Table 250-95 of the National Electrical Code. Donot use the ground lug for connecting a neutralconductor.
• Connect power wiring to the middle contactor withinthe main control box.
3
42
1
6
RCCF
FANC
FANC
RCCF
FAN
CFA
NC
POWERWIRING
THERMOSTATWIRING
POWER AND LOW VOLTAGE BLOCK LOCATIONS
FAILURE OF UNIT DUE TO OPERATION ON IMPROPER LINE VOLTAGE OR WITH EXCESSIVE PHASE UNBALANCE CONSTITUTES PRODUCT ABUSE AND WILL VOID YOUR WARRANTY AND MAY CAUSE SEVERE DAMAGE TO THE UNIT ELECTRICAL COMPONENTS.
WARNING
AREAS WITHOUT CONVENIENCE OUTLET
It is recommended that an independent 115V power sourcebe brought to the vicinity of the roof top unit for portable lightsand tools used by the service mechanic.
UNITS INSTALLED ON ROOF TOPS
Main power and low voltage wiring may enter the unit throughthe side or through the roof curb. Install conduit connectorsat the desired entrance locations. External connectors mustbe weatherproof. All holes in the unit base must be sealed(including those around conduit nuts) to prevent water leak-age into building. All required conduit and fittings are to befield supplied.
Supply voltage to roof top unit must not vary by more than10% of the value indicated on the unit data plate. Phasevoltage unbalance must not exceed 2%. Contact your localpower company for correction of improper voltage or phaseunbalance.

10
LOW VOLTAGE ENTRANCE
DIMPLES MARK DRILL LOCATIONS
HIGH VOLTAGE ENTRANCE
10 3/16”
3 3/4”
26 ½”
ELECTRICAL ENTRANCE LOCATIONSUnit is equipped with a Low Voltage Terminal Block and hasSingle Point wiring to the contactor.
LOW VOLTAGE CONTROL WIRING
1. A 24V thermostat must be installed for unit operation.It may be purchased with the unit or field -supplied.Thermostats may be programmable orelectromechanical as required.
2. Locate thermostat or remote sensor in the conditionedspace where it will sense average temperature. Donot locate the device where it may be directly exposedto supply air, sunlight or other sources of heat. Followinstallation instructions packaged with the thermostat.
3. Use #18 AWG wire for 24V control wiring runs notexceeding 75 feet. Use #16 AWG wire for 24V controlwiring runs not exceeding 125 feet. Use #14 AWGwire for 24V control wiring runs not exceeding 200feet. Low voltage wiring may be National ElectricalCode (NEC) Class 2 where permitted by local codes.
4. Route thermostat wires from sub-base terminals tothe unit. Control wiring should enter through the ductpanel (dimple marks entrance location). Connectthermostat and any accessory wiring to low voltageterminal block TB1 in the main control box.
NOTE: Field-supplied conduit may need to be installeddepending on unit/curb configuration. Use #18 AWG solidconductor wire whenever connecting thermostat wires toterminals on sub-base. DO NOT use larger than #18 AWGwire. A transition to #18 AWG wire may be required beforeentering thermostat sub-base.
LEAD THERMOSTATRed R (24V)
Green G (Fan)Yellow Y1 (High Cool)Purple Y2 (Low Cool)Blue Common (if req'd)
W hite W1 (Heat)Brown W 2 (High Heat)
CPG 090 THROUGH 300 (GAS HEAT)
GAS SUPPLY PIPING
TO PREVENT PERSONAL INJURY OR DEATH DUE TO IMPROPER INSTALLATION, ADJUSTMENT, ALTERATION, SERVICE OR MAINTENANCE, REFER TO THIS MANUAL. FOR ADDITIONAL ASSISTANCE OR INFORMATION, CONSULT A QUALIFIED INSTALLER, SERVICE AGENCY OR THE GAS SUPPLIER.
WARNING
IMPORTANT NOTE: This unit is factory set to operate onnatural gas at the altitudes shown on the rating plate.
TO PREVENT PROPERTY DAMAGE, PERSONAL INJURY OR DEATH WHEN EITHER USING PROPANE GAS ALONE OR AT HIGHER ALTITUDES, OBTAIN AND INSTALL THE PROPER CONVERSION KIT(S). FAILURE TO DO SO CAN RESULT IN UNSATISFACTORY OPERATION AND/OR EQUIPMENT DAMAGE. HIGH ALTITUDE KITS ARE FOR U.S. INSTALLATIONS ONLY AND ARE NOT APPROVED FOR USE IN CANADA.
WARNING
The rating plate is stamped with the model number, type ofgas and gas input rating. Make sure the unit is equipped tooperate on the type of gas available. Conversion to propane(LP) gas is permitted with the use of the factory authorizedconversion kit (see the unit Technical Manual for the appro-priate kit). For High Altitude derates, refer to the latest editionof the National Fuel Gas Code NFPA 54/ANSI Z223.1.
NATURAL Min. 5.0" W.C., Max. 10.0" W.C.
PROPANE Min. 11.0" W.C., Max. 14.0" W.C.
INLET GAS PRESSURE
Inlet Gas Pressure Must Not Exceed the Maximum Value Shown in TableAbove.
The minimum supply pressure should not vary from thatshown in the table above because this could prevent the unitfrom having dependable ignition. In addition, gas input to theburners must not exceed the rated input shown on the ratingplate. Overfiring of the unit could result in premature heatexchanger failure.
PIPING
IMPORTANT NOTE: To avoid possible unsatisfactory opera-tion or equipment damage due to under firing of equipment,do not undersize the natural/propane gas piping from themeter/tank to the unit. When sizing a trunk line, include allappliances on that line that could be operated simultaneously.
11
The rating plate is stamped with the model number, type ofgas and gas input rating. Make sure the unit is equipped tooperate on the type of gas available. The gas line installationmust comply with local codes, or in the absence of local codes,with the latest edition of the National Fuel Gas Code NFPA54/ANSI Z223.1.
Natural Gas Connection
Length of Pipe in Feet 1/2 3/4 1 1 1/4 1 1/2
10 132 278 520 1050 160020 92 190 350 730 110030 73 152 285 590 98040 63 130 245 500 76050 56 115 215 440 67060 50 105 195 400 61070 46 96 180 370 56080 43 90 170 350 53090 40 84 160 320 490100 38 79 150 305 460
Pressure = .50 PSIG or less and Pressure Drop of 0.3" W.C. (Based on 0.60 Specific Gravity Gas)
Natural Gas Capacity of Pipein Cubic Feet of Gas Per Hour (CFH)
Nominal Black Pipe Size (inches)
BTUH Furnace InputHeating Value of Gas (BTU/Cubic Foot)
CFH =
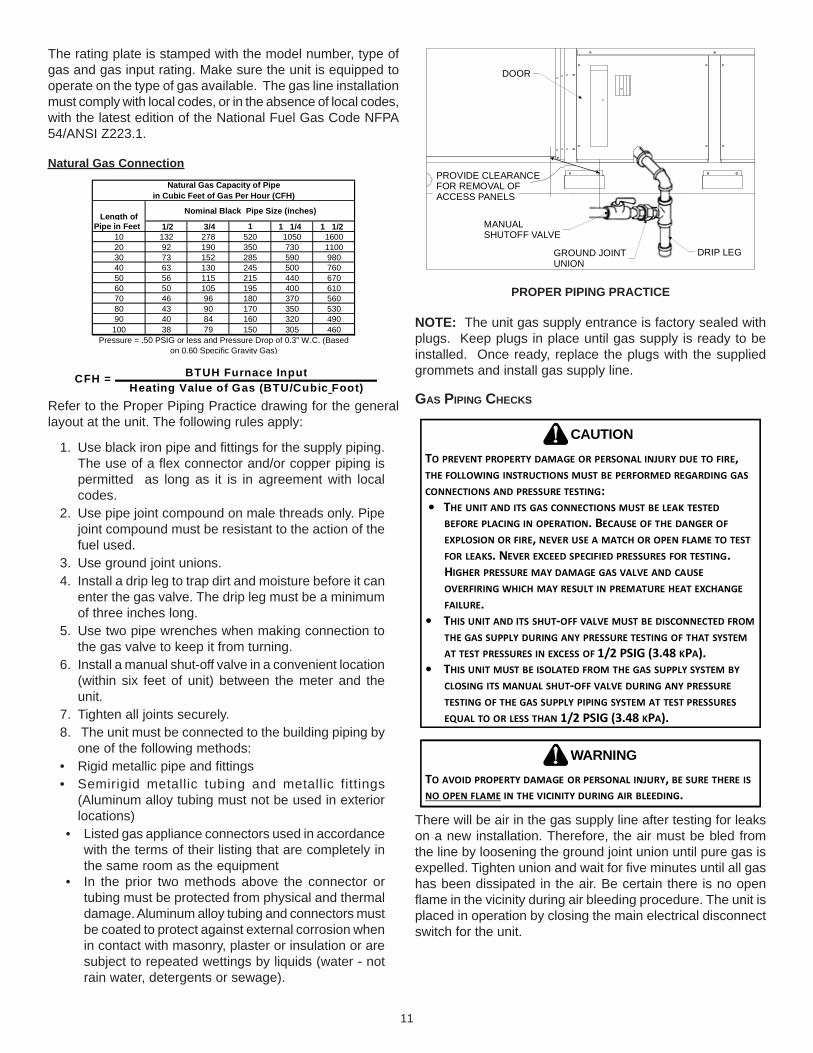
Refer to the Proper Piping Practice drawing for the generallayout at the unit. The following rules apply:
1. Use black iron pipe and fittings for the supply piping.The use of a flex connector and/or copper piping ispermitted as long as it is in agreement with localcodes.
2. Use pipe joint compound on male threads only. Pipejoint compound must be resistant to the action of thefuel used.
3. Use ground joint unions.4. Install a drip leg to trap dirt and moisture before it can
enter the gas valve. The drip leg must be a minimumof three inches long.
5. Use two pipe wrenches when making connection tothe gas valve to keep it from turning.
6. Install a manual shut-off valve in a convenient location(within six feet of unit) between the meter and theunit.
7. Tighten all joints securely.8. The unit must be connected to the building piping by
one of the following methods:• Rigid metallic pipe and fittings• Semirigid metallic tubing and metallic fittings
(Aluminum alloy tubing must not be used in exteriorlocations)
• Listed gas appliance connectors used in accordancewith the terms of their listing that are completely inthe same room as the equipment
• In the prior two methods above the connector ortubing must be protected from physical and thermaldamage. Aluminum alloy tubing and connectors mustbe coated to protect against external corrosion whenin contact with masonry, plaster or insulation or aresubject to repeated wettings by liquids (water - notrain water, detergents or sewage).
PROVIDE CLEARANCEFOR REMOVAL OFACCESS PANELS
MANUALSHUTOFF VALVE
DRIP LEG
DOOR
GROUND JOINTUNION
PROPER PIPING PRACTICE
NOTE: The unit gas supply entrance is factory sealed withplugs. Keep plugs in place until gas supply is ready to beinstalled. Once ready, replace the plugs with the suppliedgrommets and install gas supply line.
GAS PIPING CHECKS
TO PREVENT PROPERTY DAMAGE OR PERSONAL INJURY DUE TO FIRE, THE FOLLOWING INSTRUCTIONS MUST BE PERFORMED REGARDING GAS CONNECTIONS AND PRESSURE TESTING: • THE UNIT AND ITS GAS CONNECTIONS MUST BE LEAK TESTED
BEFORE PLACING IN OPERATION. BECAUSE OF THE DANGER OF EXPLOSION OR FIRE, NEVER USE A MATCH OR OPEN FLAME TO TEST FOR LEAKS. NEVER EXCEED SPECIFIED PRESSURES FOR TESTING. HIGHER PRESSURE MAY DAMAGE GAS VALVE AND CAUSE OVERFIRING WHICH MAY RESULT IN PREMATURE HEAT EXCHANGE FAILURE.
• THIS UNIT AND ITS SHUT‐OFF VALVE MUST BE DISCONNECTED FROM THE GAS SUPPLY DURING ANY PRESSURE TESTING OF THAT SYSTEM AT TEST PRESSURES IN EXCESS OF 1/2 PSIG (3.48 KPA).
• THIS UNIT MUST BE ISOLATED FROM THE GAS SUPPLY SYSTEM BY CLOSING ITS MANUAL SHUT‐OFF VALVE DURING ANY PRESSURE TESTING OF THE GAS SUPPLY PIPING SYSTEM AT TEST PRESSURES EQUAL TO OR LESS THAN 1/2 PSIG (3.48 KPA).
CAUTION
TO AVOID PROPERTY DAMAGE OR PERSONAL INJURY, BE SURE THERE IS IN THE VICINITY DURING AIR BLEEDING.NO OPEN FLAME
WARNING
There will be air in the gas supply line after testing for leakson a new installation. Therefore, the air must be bled fromthe line by loosening the ground joint union until pure gas isexpelled. Tighten union and wait for five minutes until all gashas been dissipated in the air. Be certain there is no openflame in the vicinity during air bleeding procedure. The unit isplaced in operation by closing the main electrical disconnectswitch for the unit.

12
PROPANE GAS INSTALLATIONS
TO AVOID PROPERTY DAMAGE, PERSONAL INJURY OR DEATH DUE TO FIRE OR EXPLOSION CAUSED BY A PROPANE GAS LEAK, INSTALL A GAS DETECTING WARNING DEVICE. SINCE RUST CAN REDUCE THE LEVEL OF ODORANT IN PROPANE GAS, A GAS DETECTING WARNING DEVICE IS THE ONLY RELIABLE WAY TO DETECT A PROPANE GAS LEAK. CONTACT A LOCAL PROPANE GAS SUPPLIER ABOUT INSTALLING A GAS DETECTING WARNING DEVICE.
WARNING
IMPORTANT NOTE: Propane gas conversion kits must beinstalled to convert units to propane gas.
All propane gas equipment must conform to the safetystandards of the National Board of Fire Underwriters (SeeNBFU Manual 58). Line pressure 11.3 - 14” w.c.For satisfactory operation, propane gas manifold pressuremust be within 9.7 - 10.3 inches w.c. for high fire and within6.7 - 7.3 inches w.c. low fire at the manifold with all gas appli-ances in operation. Maintaining proper gas pressure dependson three main factors:
1. Vaporization rate, which depends on (a) temperatureof the liquid, and (b) wetted surface area of thecontainer or containers.
2. Proper pressure regulation.3. Pressure drop in lines between regulators, and
between second stage regulator and the appliance.Pipe size required will depend on length of pipe runand total load of all appliances.
TANKS AND PIPING
Complete information regarding tank sizing forvaporization, recommended regulator settings and pipesizing is available from most regulator manufacturers andpropane gas suppliers.Since propane gas will quickly dissolve white lead or moststandard commercial compounds, special pipe dopemust be used. Shellac base compounds resistant to theactions of liquefied petroleum gases such as Gasolac®,Stalactic®, Clyde’s® or John Crane® are satisfactory.
See below for typical propane gas piping.
200 PSIGMaximum
5 to 15 PSIG(20 PSIG Max.)
Continuous11" W.C.
Second StageRegulator
First StageRegulator
TYPICAL PROPANE GAS PIPING
ROOF TOP LOCATION AND INSTALLATION
The gas supply piping location and installation for roof topunits must be in accordance with local codes or, in the ab-sence of locals codes, with ordinances of the latest edition ofthe National Fuel Gas Code (ANSI Z223.1).
A manual gas shutoff valve must be field installed external tothe roof top unit. In addition, a drip leg must be installed nearthe inlet connection. A ground joint union connection is re-quired between the external shutoff valve and the unit con-nection to the gas valve to permit removal of the burner as-sembly for servicing.
1. Route gas piping to unit so that it does not interferewith the removal of access panels. Support and alignpiping to prevent strains or misalignment of themanifold assembly.
2. All units are furnished with standard female NPT pipeconnections. Connection pipe sizes for CPG090through 300 units is 3/4" NPT The size of the gassupply piping to the unit must be based on length ofrun, number of units on the system, gascharacteristics, BTU requirement and available supplypressure. All piping must be done in accordance withlocal codes or, in the absence of local codes, with thelatest edition of the National Fuel Gas Code (ANSIZ223.1).NOTE: The gas connection size at the unit does NOTestablish the size of the supply line.
3. These units are designed for either natural or propane(LP) gas and are specifically constructed at the factoryfor only one of these fuels. The fuels are NOTinterchangeable. However, the furnace can beconverted in the field from natural gas to LP gas withthe appropriate factory kit (see unit Technical Manualfor the appropriate kit). Only a qualified contractor,experienced with natural and propane gas systems,should attempt conversion. Kit instructions must befollowed closely to assure safe and reliable unitoperation.
4. With all units on a common line operating under fullfire, natural gas main supply pressure should beadjusted to approximately 7.0" w.c., measured at theunit gas valve. If the gas pressure at the unit is greaterthan 10.5" w.c., the contractor must furnish and installan external type positive shutoff service pressureregulator. The unit will not function satisfactorily ifsupply gas pressure is less than 5.5" w.c. or greaterthan 10.5" w.c..NOTE: A minimum horizontal distance of 48"between the regulator and the furnace flue dischargeis required.
5. With all units on a common line operating under fullLP gas main supply pressure should be at least 11.0"w.c. and must be no greater than 14.0" w.c., measuredat the unit gas valve. Unit will not function satisfactorilyif supply gas pressure is less than 11.0" w.c. or greaterthan 14.0" w.c..

13
6. All pipe connections should be sealed with a pipethread compound, which is resistant to the fuel usedwith the furnace. A soapy water solution should beused to check all joints for leaks. A 1/8" NPT pluggedtap is located on the entering side of the gas valve fortest gauge connection to measure supply (main) gaspressure. Another 1/8" tap is provided on the side ofthe manifold for checking manifold pressure.
THIS UNIT AND ITS INDIVIDUAL SHUTOFF VALVE MUST BE DISCONNECTED FROM THE GAS SUPPLY SYSTEM DURING ANY PRESSURE TESTING OF THAT SYSTEM AT TEST PRESSURES IN EXCESS OF 1/2 PSIG (13.8” W.C.).
WARNING
THIS UNIT MUST BE ISOLATED FROM THE GAS SUPPLY PIPING SYSTEM BY CLOSING ITS INDIVIDUAL MANUAL SHUTOFF VALVE DURING ANY PRESSURE TESTING EQUAL TO OR LESS THAN 1/2 PSIG.
CAUTION
7. There must be no obstruction to prevent the flow ofcombustion and ventilating air. A vent stack is notrequired and must never be used. The power venterwill supply an adequate amount of combustion air aslong as the air passageways are kept free of anyobstructions and the recommended external unitclearances are maintained.
CIRCULATING AIR AND FILTERSDUCTWORK
The supply duct should be provided with an access panellarge enough to inspect the air chamber downstream of theheat exchanger. A cover should be tightly attached to pre-vent air leaks.
Ductwork dimensions are shown in the roof curb installationmanual.
If desired, supply and return duct connections to the unit maybe made with flexible connections to reduce possible unitoperating sound transmission.
VENTINGNOTE: Venting is self-contained.
CONDENSATE DRAIN CONNECTION
CONDENSATE DRAIN CONNECTION
A 3/4” NPT drain connection is supplied for condensate pip-ing. An external trap must be installed for proper condensatedrainage.
UNIT 2" MINIMUM
FLEXIBLETUBING-HOSEOR PIPE
3" MINIMUM
A POSITIVE LIQUIDSEAL IS REQUIRED
DRAIN CONNECTIONInstall condensate drain trap as shown. Use 3/4" drain lineand fittings or larger. Do not operate without trap.
HORIZONTAL DRAIN
Drainage of condensate directly onto the roof may be ac-ceptable; refer to local code. It is recommended that a smalldrip pad of either stone, mortar, wood or metal be provided toprevent any possible damage to the roof.
CLEANING
Due to the fact that drain pans in any air conditioning unitwill have some moisture in them, algae and fungus willgrow due to airborne bacteria and spores. Periodic clean-ing is necessary to prevent this build-up from plugging thedrain.
STARTUP, ADJUSTMENTS, AND CHECKS
HIGH VOLTAGE!TO AVOID PERSONAL INJURY OR DEATH DUE TO ELECTRICAL SHOCK, BOND THE FRAME OF THIS UNIT TO THE BUILDING ELECTRICAL GROUND BY USE OF THE GROUNDING TERMINAL PROVIDED OR OTHER ACCEPTABLE MEANS. DISCONNECT ALL POWER BEFORE SERVICING OR INSTALLING THIS UNIT.
WARNING
PRE-STARTUP INSTRUCTIONS
TO PREVENT PROPERTY DAMAGE OR PERSONAL INJURY, DO NOT START THE UNIT UNTIL ALL NECESSARY PRE‐CHECKS AND TEST HAVE BEEN PERFORMED.
CAUTION
Prior to the beginning of Startup, Adjustments, and Checksprocedures, the following steps should be completed in thebuilding.
THERMOSTAT. Set the thermostat in the conditionedspace at a point at least 10°F below zone temperature.Set the thermostat system switch on COOL and thefan switch on AUTO.

14
MOVING MACHINERY HAZARD!TO PREVENT POSSIBLE PERSONAL INJURY OR DEATH, DISCONNECT POWER TO THE UNIT AND PADLOCK IN THE “OFF” POSITION BEFORE SERVICING FANS.
WARNING
HEATING STARTUP
This unit is equipped with an electronic ignition device to au-tomatically light the main burners. It also has a power ventblower to exhaust combustion products.
On new installations, or if a major component has been re-placed, the operation of the unit must be checked.
Check unit operation as outlined in the following instructions.If any sparking, odors, or unusual sounds are encountered,shut off electrical power and recheck for wiring errors, or ob-structions in or near the blower motors. Duct covers mustbe removed before operating unit.
The Startup, Adjustments, and Checks procedure provides astep-by-step sequence which, if followed, will assure theproper startup of the equipment in the minimum amount oftime. Air balancing of duct system is not considered part ofthis procedure. However, it is an important phase of any airconditioning system startup and should be performed uponcompletion of the Startup, Adjustments, and Checks proce-dure. The Startup, Adjustments, and Checks procedure atoutside ambients below 55°F should be limited to a readi-ness check of the refrigeration system with the required finalcheck and calibration left to be completed when the outsideambient rises above 55°F.
TOOLS REQUIRED
Refrigeration gauge and manifoldVoltmeterClamp-on ammeterOhmmeterTest lead (Minimum #16 AWG with insulated alligator clips)Manometer for verifying gas pressure 0 to 20" w.c.Air temperature measuring deviceGeneral refrigeration mechanics’ tools
TEMPORARY HEATING OR COOLING
If the unit is to be used for temporary heating or cooling, a“Startup, Adjustments, and Checks” must first be performedin accordance with this manual. Failure to comply with thisrequirement will void the warranty. After the machines areused for temporary heating or cooling, inspect the coils, fans,and motors for unacceptable levels of construction dust anddirt and install new filters.
CONTRACTOR RESPONSIBILITY
The installing contractor must be certain that:
• All supply and return air ductwork is in place andcorresponds with installation instructions.
• All thermostats are mounted and wired in accordancewith installation instructions.
• All electric power, all gas, hot water or steam lineconnections, and the condensate drain installationhave been made to each unit on the job. These mainsupply lines must be functional and capable ofoperating all units simultaneously.
ROOF CURB INSTALLATION CHECK
Inspect the roof curb for correct installation. The unit and curbassembly should be level. Inspect the flashing of the roofmounting curb to the roof, especially at the corners, for goodworkmanship. Also check for leaks around gaskets. Note anydeficiencies in a separate report and forward to the contrac-tor.
OBSTRUCTIONS, FAN CLEARANCE AND WIRING
Remove any extraneous construction and shipping materi-als that may be found during this procedure. Rotate all fansmanually to check for proper clearances and that they rotatefreely. Check for bolts and screws that may have jarred looseduring shipment to the jobsite. Retighten if necessary. Re-tighten all electrical connections.
PRE-STARTUP PRECAUTIONS
It is important to your safety that the unit has been properlygrounded during installation. Check ground lug connectionin main control box for tightness prior to closing circuit breakeror disconnect switch. Verify that supply voltage on line sideof disconnect agrees with voltage on unit identification plateand is within the utilization voltage range as indicated in Ap-pendix C Electrical Data.
System Voltage - That nominal voltage value assigned to acircuit or system for the purpose of designating its voltageclass.
Nameplate Voltage - That voltage assigned to a piece ofequipment for the purpose of designating its voltage classand for the purpose of defining the minimum and maximumvoltage at which the equipment will operate.
Utilization Voltage - The voltage of the line terminals of theequipment at which the equipment must give fully satisfac-tory performance. Once it is established that supply voltagewill be maintained within the utilization range under all sys-tem conditions, check and calculate if an unbalanced condi-tion exists between phases. Calculate percent voltage un-balance as follows:

15
Three Phase Models
3) PERCENT VOLTAGE UNBALANCE
2) MAXIMUM VOLTAGE DEVIATIONSFROM AVERAGE VOLTAGE
1) AVERAGE VOLTAGE
HOW TO USE THE FORMULA:EXAMPLE: With voltage of 220, 216, and 2131) Average Voltage = 220+216+213=649 / 3 = 2162) Maximum Voltage Deviations from Average Voltage = 220 - 216 = 4
3) Percent Voltage Unbalance = 100 x = = 1.8%
Percent voltage unbalance MUST NOT exceed 2%.
4216
400216
= 100 X
FIELD DUCT CONNECTIONS
Verify that all duct connections are tight and that there is noair bypass between supply and return.
CONTROL VOLTAGE CHECK
With disconnect switch in the open “OFF” position, discon-nect blue wire from low voltage transformer TRANS1. Closethe disconnect switch to energize TRANS1 control trans-former. Check primary and secondary (24V) of control trans-former TRANS1.
THERMOSTAT PRELIMINARY CHECK
With disconnect switch open and blue wire disconnected fromTRANS1 transformer, attach one lead of ohmmeter to termi-nal R on TB1 terminal block. Touch, in order, the other ohm-meter lead to terminals Y1, Y2 and G at TB1 terminal block.There must be continuity from terminal R to terminals Y andG. R to Y indicates cool. R to G indicates fan (auto). Replaceblue wire on TRANS1 transformer.
FILTER SECTION CHECK
Remove filter section access panels and check that filtersare properly installed. Note airflow arrows on filter frames.
BEARING CHECK
Prior to energizing any fans, check and make sure that allsetscrews are tight so that bearings are properly secured toshafts.
SET EVAPORATOR FAN RPM
Actual RPM’s must be set and verified with a tachometer orstrobe light. Refer to Appendices A and B for basic unit fanRPM. Refer also to “Airflow” section of this manual. Withdisconnect switch open, disconnect thermostat wires fromterminals Y and W. This will prevent heating and mechanicalcooling from coming on. Place a jumper wire across termi-nals R and G at TB1 terminal block. Close disconnect switch;evaporator fan motor will operate so RPM can be checked.
For gas heat units, the airflow must be adjusted so that theair temperature rise falls within the ranges given stated onData Plate (see Appendix A - Blower Performance).
TENSION AND ALIGNMENT ADJUSTMENT
Correct belt tension is very important to the life of your belt.Too loose a belt will shorten its life; too tight, premature mo-tor and bearing failure will occur. Check you belt drive foradequate “run-in” belt tension by measuring the force requiredto deflect the belt at the midpoint of the span length. Belttension force can be measured using a belt tension gauge,available through most belt drive manufacturers.
t = Span length, inchesC = Center distance, inchesD = Larger sheave diameter, inchesd = Smaller sheave diameter, inchesh = Deflection height, inches
DRIVE BELT TENSION ADJUSTMENT
BELT DRIVE Used New
7.5 Ton 2.6 to 3.6 4.5 ± .5 5.5 ± .5 1/4 ± 1/16
8.5 2.6 to 3.6 4.5 ± .5 5.5 ± .5 1/4 ± 1/16
10 Ton 3.0 to 4.0 4.5 ± .5 5.5 ± .5 1/4 ± 1/16
1/4 ± 1/16
1/4 ± 1/16
7.5 Ton 1/4 ± 1/16
8.5 1/4 ± 1/16
10 Ton 1/4 ± 1/16
1/4 ± 1/16
1/4 ± 1/1612.5 Ton
A, AX High Static
3.6 to 4.6 4.9 ± .5 6.0 ± .5
12.5 Ton 2.6 to 3.6 4.5 ± .5 5.5 ± .5
3.0 to 4.0 4.5 ± .5 5.5 ± .5
A, AX Standard
MODEL DEFLECTION(in)
DEFLECTIONFORCE (lbs)
SHEAVEDIAMETER
(in)
TYPE
RECOMMENDED POUNDS OF FORCE PER BELTThe correct deflection force is 5 Ibs. for a new belt and 3.5Ibs. for a belt that has been run in. New belt tension includesinitial belt stretch. When new V-belts are installed on a drivethe initial tension will drop rapidly during the first few hours.Check tension frequently during the first 24 hours of opera-tion. Subsequent retensioning should fall between the mini-mum and maximum force. To determine the deflection dis-tance from the normal position, use a straightedge or stretcha cord from sheave to sheave to use as a reference line. Onmultiple belt drives, an adjacent undeflected belt can be usedas a reference.

16
EVAPORATOR FAN ROTATION CHECK (THREE PHASE MODELSONLY)Check that fan rotates clockwise when viewed from the driveside of unit and in accordance with rotation arrow shown onblower housing. If it does not, reverse any two incoming powercables at Single Point Power Block. In this case, repeat bear-ing check.
Do not attempt to change load side wiring. Internal wiringassures all motors and compressors will rotate in correct di-rection once evaporator fan motor rotation check has beenmade.
ELECTRICAL INPUT CHECK
Make preliminary check of evaporator fan ampere draw andverify that motor nameplate amps are not exceeded. A finalcheck of amp draw should be made upon completion of airbalancing of the duct system (see Appendix C).
RESTORING CONNECTIONS
With disconnect switch open, remove jumper wire from ter-minals R and G at TB1 terminal block, and reconnect ther-mostat wires to terminals Y and W.
REFRIGERATION SYSTEM CHECKS
Ensure the hold-down bolts on the compressor are secureand have not vibrated loose during shipment. Check that vi-bration grommets have been installed. Visually check all pip-ing and clamps. The entire refrigeration system has beenfactory charged and tested, making it unnecessary to fieldcharge. Factory charges are shown in Appendix C and onthe unit nameplate.
Install service manifold hoses. Gauges should read satura-tion pressure corresponding to ambient temperature. Chargeshould be checked to obtain 12° to 15° of sub-cooling persystem (i.e. compressor circuits).
Rollout Protection ControlThe rollout protection device opens, cutting power to thegas valve, if the flames from the burners are not properlydrawn into the heat exchanger. The rollout protectiondevice is located on the burner bracket. The reason forelevated temperatures at the control should bedetermined and repaired prior to resetting this manualreset control.
TO AVOID PROPERTY DAMAGE, PERSONAL INJURY OR DEATH DUE TO FIRE OR EXPLOSION, A QUALIFIED SERVICER MUST INVESTIGATE THE REASON FOR THE ROLLOUT PROTECTION DEVICE TO OPEN BEFORE MANUALLY RESETTING THE ROLLOUT PROTECTION DEVICE.
WARNING
Secondary Limit ControlThe secondary limit control is located on the top of the blowerscroll assembly. This control opens when elevated tempera-tures are sensed. Elevated temperatures at the control arenormally caused by blower failure. The reason for the open-ing should be determined and repaired prior to resetting.
If the power to the unit is interrupted during the heating cycle,it may cause the secondary limit to trip. Once the blower com-partment temperature drops below the limit reset tempera-ture, the limit will automatically reset.
Pre-Operation Checks1. Close the manual gas valve external to the unit.2. Turn off the electrical power supply to the unit.3. Set the room thermostat to its lowest possible setting.4. Remove the heat exchanger door on the side of the
unit by removing screws.5. This unit is equipped with an ignition device which
automatically lights the main burner. DO NOT try tolight burner by any other method.
6. Move the gas control valve switch to the OFF position.Do not force.
7. Wait five minutes to clear out any gas.8. Smell for gas, including near the ground. This is
important because some types of gas are heavier thanair. If you have waited five minutes and you do smellgas, immediately follow the warnings on page 3 ofthis manual. If having waited for five minutes and nogas smell is noted, move the gas control valve switchto the ON position.
9. Replace the heat exchanger door on the side of theunit.
10. Open the manual gas valve external to the unit.11. Turn on the electrical power supply to the unit.12. Set the thermostat to desired setting.
Gas Supply And Manifold CheckGas supply pressure and manifold pressure with the burnersoperating must be as specified on the rating plate.
Gas Inlet Pressure CheckGas inlet pressure must be checked and adjusted in accor-dance to the type of fuel being consumed.
With Power And Gas Off:1. Connect a water manometer or adequate gauge to
the inlet pressure tap of the gas valve.Inlet gas pressure can also be measured by removingthe cap from the dripleg and installing a predrilled capwith a hose fitting.
With Power And Gas On:2. Put unit into heating cycle and turn on all other gas
consuming appliances.

17
NATURAL Min. 5.0" W.C., Max. 10.0" W.C.
PROPANE Min. 11.0" W.C., Max. 14.0" W.C.
INLET GAS PRESSURE
NOTE: Inlet Gas Pressure Must Not Exceed the MaximumValue Shown.If operating pressures differ from above, make necessarypressure regulator adjustments, check piping size, etc., and/or consult with local utility.
Manifold Pressure CheckThe gas valve has a tapped opening to facilitate measure-ment of the manifold pressure. A “U” Tube manometer hav-ing a scale range from 0 to 12 inches of water should beused for this measurement. The manifold pressure must bemeasured with the burners operating.
To adjust the pressure regulator, remove the adjustment screwor cover on the gas valve. Turn out (counterclockwise) todecrease pressure, turn in (clockwise) to increase pressure.Only small variations in gas flow should be made by meansof the pressure regulator adjustment. In no case should thefinal manifold pressure vary more than plus or minus 0.3inches water column from the specified nominal pressure.Any major changes in flow should be made by changing thesize of the burner orifices. The measured input rate to thefurnace must not exceed the rating specified on the unit rat-ing plate.
For natural gas, the manifold pressure must be between 3.2and 3.8 inches w.c. (3.5 nominal) for high fire and between1.7 and 2.3 inches w.c. (2.0 nominal) for low fire.
For propane gas, the manifold pressure must be between9.7 and 10.3 inches w.c. (10.0 nominal) for high fire and be-tween 6.7 and 7.3 inches w.c. (7.0 nominal) for low fire.
Gas Input (Natural Gas Only) CheckTo measure the gas input use a gas meter and proceedas follows:1. Turn off gas supply to all other appliances except the
unit.2. With the unit operating, time the smallest dial on the
meter for one complete revolution. If this is a 2 cubicfoot dial, divide the seconds by 2; if it is a 1 cubic footdial, use the seconds as is. This gives the secondsper cubic foot of gas being delivered to the unit.
3. INPUT=GAS HTG VALUE x 3600 / SEC. PER CUBICFOOT
Example: Natural gas with a heating value of 1000 BTU percubic foot and 34 seconds per cubic foot as determined byStep 2, then:
Input = 1000 x 3600 / 34 = 106,000 BTU per Hour.NOTE: BTU content of the gas should be obtainedfrom the gas supplier. This measured input must notbe greater than shown on the unit rating plate.
4. Relight all other appliances turned off in step 1. Besure all pilot burners are operating.
Main Burner Flame CheckFlames should be stable, soft and blue (dust may cause or-ange tips but they must not be yellow) and extending directlyoutward from the burner without curling, floating or lifting off.
Temperature Rise CheckCheck the temperature rise through the unit by placing ther-mometers in supply and return air registers as close to theunit as possible. Thermometers must not be able to sampletemperature directly from the unit heat exchangers, or falsereadings could be obtained.
1. All registers must be open; all duct dampers must bein their final (fully or partially open) position and theunit operated for 15 minutes on HIGH FIRE beforetaking readings.
2. The temperature rise must be within the rangespecified on the rating plate.
NOTE: Air temperature rise is the temperature differencebetween supply and return air.With a properly designed system, the proper amount of tem-perature rise will normally be obtained when the unit is oper-ated at rated input with the recommended blower speed.
If the correct amount of temperature rise is not obtained, itmay be necessary to change the blower speed. A higherblower speed will lower the temperature rise. A slower blowerspeed will increase the temperature rise.
NOTE: Blower speed MUST be set to give the correct airtemperature rise through the unit as marked on the ratingplate.
REFRIGERATION SEQUENCE CHECK
With the disconnect switch open, remove the field connectedthermostat wire from terminal R on TB1 terminal block. Placea jumper across terminals R and G, and across R and Y onTB1 terminal block. Close the disconnect switch. The follow-ing operational sequence should be observed.
1. Current through primary winding of transformerTRANS1 energizes the 24-volt control circuit.
2. To simulate a mechanical call for cooling from the wallthermostat, place a jumper across terminals R andY1 of terminal block TB1.
3. UNIT WITH ECONOMIZER OPTION: Thecompressor circuit is interlocked through terminals 3and 4 of the economizer module. If the outdoor airenthalpy (temperature and humidity) is not suitablefor cooling, the economizer terminals will be closedpermitting compressor to be energized.
4. The belt drive blower contactor closes its contacts L1,L2 and L3 to T1, T2 and T3 to provide power to thesupply fan motor.

18
5. Check supply fan rotation. If the supply fan is rotatingin the wrong direction, disconnect and lock off SinglePoint Power Block. Do not attempt to change loadside wiring. Internal wiring is set at the factory to assurethat the supply fan and compressors all rotate in theproper direction. Verification of correct supply fanrotation at initial startup will also indicate correctcompressor rotation. Reconnect power and check forproper operation.
6. Compressor contactor closes its contacts L1, L2 andL3 to T1, T2 and T3 to provide power to thecompressor motor COMP 1; COMP 2, if conditionsare correct. In addition, contactor C1 closes its contactL3 to T3 , energizing the condenser fan motor.
BURN HAZARD! DO NOT TOUCH! DISCHARGE LINE MAY BE HOT!
WARNING
7. Check that each compressor is operating correctly.The scroll compressors in these units MUST operatein the proper rotation. To ensure the compressors areoperating in the correct direction, check thecompressor discharge line pressure or temperatureafter each compressor is started.The discharge pressure and discharge linetemperature should increase. If this does not occurand the compressor is producing an exceptionalamount of noise, perform the following checks.• Ensure all compressors and the supply fan motor
are operating in the proper direction. If a singlemotor is operating backwards, check the powerwiring for that motor and correct any leads thathave been interchanged at the contactor or at themotor.
• If all of the motors are operating backward,disconnect the unit power supply and lock it in the“OFF” position. Switch two leads of the powersupply at the unit Single Point Power Block.Reconnect power and check for compressor andsupply fan motor operation.
8. With all safety devices closed, the system will continuecooling operation until the thermostat is satisfied.
9. Disconnecting the jumper wire between R and Y1 andY2 and between R and G on TB1 terminal block willsimulate a satisfied thermostat. The compressors willcycle off and IIC (pin 12) will initiate its time delaycycle. The compressor and the supply fan will cycleoff.
10. After a time delay of approximately 3 minutes, thecompressor control circuits will be ready to respondto a subsequent call for cooling from the wallthermostat.
11. Open disconnect switch. Reconnect the fieldthermostat wire at terminal R on terminal block TB1.
REFRIGERATION PERFORMANCE CHECK
Under normal summertime (full load) operating conditions,superheat should be between 8°F and 12°F and sub-coolingmeasured at the condenser outlet should be 15°F (nominal).A 25°F to 35°F temperature difference should exist betweenthe entering condenser air and the temperature correspond-ing to the compressor saturated discharge pressure. Checkthat compressor RLA corresponds to values shown in Ap-pendix C. RLA draw can be much lower than values listed atlow load conditions and low ambient condensing tempera-tures. Values in Appendix C can slightly exceed at high loadconditions and high ambient condensing temperatures.
GAS SUPPLY PRESSURES & REGULATOR ADJUSTMENTS
SHOULD OVERHEATING OCCUR OR THE GAS SUPPLY FAIL TO SHUT OFF, TURN OFF THE MANUAL GAS SHUTOFF VALVE EXTERNAL TO THE UNIT BEFORE TURNING OFF THE ELECTRICAL SUPPLY.
WARNING
TO AVOID PROPERTY DAMAGE, PERSONAL INJURY OR DEATH, DO NOT FIRE GAS UNIT WITH FLUE BOX COVER REMOVED.
WARNING
NOTE: Except during brief periods when gas pressures arebeing measured by qualified service personnel, the furnaceaccess panel must always be secured in place when thefurnace is in operation. An inspection port in the access panelis provided to monitor the flame.The first step in checking out the gas-fired furnace is to testthe gas supply piping to the unit for tightness and purge thesystem of air using methods outlined in the latest edition ofthe National Fuel Gas Code ANSI Z223.1. Verify that thedisconnect switch is in the “OFF” position. A soapy watersolution should be used to check for gas leaks. Since the unitis subject to considerable jarring during shipment, it is ex-tremely important that all gas connections and joints be testedfor tightness. Gas piping downstream from the unit inlet shouldbe checked for leaks during the subsequent sequence check.
The supply gas pressure should be adjusted to 7.0" w.c. onnatural gas and 11.0" on LP gas with the gas burners operat-ing. If there is more than one unit on a common gas line, thepressures should be checked with all units under full fire. Asupply pressure tap is provided on the upstream side of thegas valve. A manifold pressure tap is provided on the mani-fold. The normal manifold pressure for full input is 3.5" w.c.on natural gas and 10.0" w.c. for propane gas. Minimum gassupply pressure is 5.5" w.c. for natural gas and 11.0" for pro-pane gas. In order to obtain rating, gas supply pressure mustbe 11.0" w.c. for propane gas.

19
The pressure regulator on LP gas models is adjusted for 10.0"w.c. manifold pressure and is intended to prevent over-firingonly. Do not attempt adjustment of the built-in pressure regu-lator unless the supply pressure is at least 7.0" w.c. on natu-ral gas or 14.0" w.c. on propane gas. Check the location ofthe ignition electrode and the flame sensor for correct gapsetting.
NATURAL (Dia)
PROPANE (LP)(Dia)
210,000 6 35,000 #34 #52
MAXIMUM INPUT (BTUH)
NUMBERof
BURNERS
MAXIMUMBTUH/BURNER
GAS ORIFICES
HEAT EXCHANGER AND BURNER ORIFICE SPECIFICATIONS
NOTE: Gas appliances located more than 2000 feet abovesea level must be derated 4% per 1000 feet of total elevationand that variance in gas heating value and specific gravityrequire change in manifold pressure to obtain rating, it ismandatory that the input be adjusted at the installation site.All installations should be made as outlined in the latest editionof the National Fuel Gas Code ANSI Z223.1, section“Procedures To Be Followed To Place An Appliance inOperation”. Refer also to the “User’s Information Manual”supplied with the unit for additional information on the gasfurnace.
Unit Shutdown1. Set the thermostat to lowest setting.2. Turn off the electrical power supply to the unit.3. Remove the heat exchanger door on the side of the
unit by removing screws.4. Move the gas control valve switch to the OFF position.
Do not force.5. Close manual gas shutoff valve external to the unit.6. Replace the heat exchanger door on the unit.7. If cooling and/or air circulation will be desired, turn
ON the electrical power.
NORMAL SEQUENCE OF OPERATION
HEATING
This unit has one (RS) Manual Reset Limit Control Switch.Check the limit to make sure it has not tripped. The limit mayarrive at the job site tripped as a result of shipping shock.
If the ventor motor comes on, but the unit does not attemptignition, check if the ALS (Automatic Reset High Limit Con-trol Switch) requires resetting.
1. With electricity and gas turned on, the system switchin the “HEAT” or “AUTO” position and the fan switchin the “AUTO” position, the thermostat will close thecircuit between unit terminals R and W (R-W) whenthe temperature falls below the thermostat setting.
2. D1 on IIC energizes relay IDMR.3. Relay IDMR energizes the ventor motor IDM.4. Operation of the vent motor closes the pressure switch
PS located in the burner compartment. the controlthen initiates a 15-second pre-purge time delay.During this period, the ventor motor will clear thecombustion chamber of any residual gas.
5. After the pre-purge period, the ignition controlenergizes the Wl-C gas valve and simultaneouslyinitiates a “three (3)-try” spark ignition sequence.
6. When the burners are ignited, a minimum four (4)micro-amp DC current will flow through the flamebetween the sensor electrode and the groundedburner.
7. When the controller proves that the flame has beenestablished, it will keep the gas valve energized anddiscontinue the ignition spark. First stage manifoldpressure will be approximately 2.0" w.c. for naturalgas and 7.0" w.c. for propane (LP).
8. If the control is unable to ignite the burners after itsinitial attempt, it will initiate another purge and sparksequence. A third purge and spark sequence will beinitiated if the second attempt is unsuccessful. If thethird attempt is unsuccessful, the controller will closethe gas valve and lock itself out. It may be reset bymomentarily interrupting power. This may beaccomplished by briefly lowering the room thermostatset-point below room temperature, or by shutting offthe main power to the unit. (See TP-105 for moredetails.)
9. Integrated ignition control will close its normally opencontacts after a delay of approximately 30 seconds.This action energizes contactor BC and starts thesupply fan motor. Operation of the supply fancirculates air across the heat exchanger and deliversheated air to the conditioned space.
10. When the space temperature rises, the thermostatwill open R-W. Opening R-W will cause the gas valveto close, and the furnace to shut down.
11. The furnace has three high temperature limit controls,which can shut down the burner. They do not shutdown the ventor motor.
AUTOMATIC RESET HIGH LIMIT CONTROL (LS)Located in the burner compartment on the heat exchanger,its sensing element projects through the blower section bulk-head and senses the temperature at the rear of the furnace.It will cycle the furnace off if the temperature exceeds 100°Fplus maximum rise.

20
AUTOMATIC RESET HIGH LIMIT CONTROL (ALS)Located in the blower compartment on the blower housing, itsenses air temperature within the blower compartment andprotects the filters from excessive temperature. It will shutdown the furnace if it senses excessive temperatures.
MANUAL RESET FLAME ROLLOUT CONTROL (RS)Located in the burner compartment at the top of the burnerassembly, it senses high temperature that could occur if theheat exchanger tubes were plugged and the flame was roll-ing out instead of entering the tubes. It has a manual push-button reset that cannot be actuated until the limit control hascooled.
TROUBLESHOOTING
IGNITION CONTROL ERROR CODES
The following presents probable causes of questionable unitoperation. Refer to Diagnostic Indicator Chart for an inter-pretation of the signal and to this section for an explanation.
Remove the control box access panel and note the numberof diagnostic LED flashes. Refer to Diagnostic Indicator Chartfor an interpretation of the signal and to this section for anexplanation.
ABNORMAL OPERATION - HEATING
Internal Control FailureIf the integrated ignition control in this unit encounters an in-ternal fault, it will go into a “hard” lockout and turn off thediagnostic LED. If diagnostic LED indicates an internal fault,check power supply to unit for proper voltage, check all fuses,circuit breakers and wiring. Disconnect electric power forfive seconds. If LED remains off after restoring power, re-place control.
External LockoutAn external lockout occurs if the integrated ignition controldetermines that a measurable combustion cannot be estab-lished within three (3) consecutive ignition attempts. If flameis not established within the seven (7) second trial for igni-tion, the gas valve is deenergized, 15 second inter-purge cycleis completed, and ignition is reattempted. The control willrepeat this routine three times if a measurable combustion isnot established. The control will then shut off the induceddraft blower and go into a lockout state.
If flame is established but lost, the control will energize thecirculator blower at the heat speed and then begin a newignition sequence. If flame is established then lost on subse-quent attempts, the control will recycle for four (4) consecu-tive ignition attempts (five attempts total) before locking out.
The diagnostic fault code is 1 flash for a lockout due to failedignition attempts or flame dropouts. The integrated controlwill automatically reset after one hour, or it can be reset byremoving the thermostat signal or disconnecting the electri-cal power supply for over five seconds. If the diagnostic LEDindicates an external lockout, perform the following checks:
• Check the supply and manifold pressures• Check the gas orifices for debris• Check gas valve for proper operation• Check secondary limit
A dirty filter, excessive duct static, insufficient airflow, a faulty limit, or a failed circulator blower cancause this limit to open. Check filters, total externalduct static, circulator blower motor, blower motorspeed tap (see wiring diagram), and limit. Aninterruption in electrical power during a heatingcycle may also cause the auxiliary limit to open.The automatic reset secondary limit is located ontop of the circulator blower assembly.
• Check rollout limitIf the burner flames are not properly drawn intothe heat exchanger, the flame rollout protectiondevice will open. Possible causes are restrictedor blocked flue passages, blocked or cracked heatexchanger, a failed induced draft blower, orinsufficient combustion air. The rollout protectiondevice is a manual reset limit located on the burnerbracket. The cause of the flame rollout must bedetermined and corrected before resetting the limit.
• Check flame sensorA drop in flame signal can be caused by nearlyinvisible coating on the sensor. Remove the sensorand carefully clean with steel wool.
• Check wiringCheck wiring for opens/shorts and miswiring.
IMPORTANT: If you have to frequently reset your gas/electricpackage unit, it means that a problem exists that should becorrected. Contact a qualified servicer for further information.
Pressure Switch Stuck OpenA pressure switch stuck open can be caused by a faulty pres-sure switch, faulty wiring, a disconnected or damaged hose,a blocked or restricted flue, or a faulty induced draft blower.
If the control senses an open pressure switch during the pre-purge cycle, the induced draft blower only will be energized.If the pressure switch opens after ignition has begun the gasvalve is deenergized, the circulator blower heat off cycle be-gins, and the induced draft blower remains on. The diagnos-tic fault code is two flashes.
Pressure Switch Stuck ClosedA stuck closed pressure switch can be caused by a faultypressure switch or faulty wiring. If the control encounters apressure switch stuck closed, the induced draft blower re-mains off. The diagnostic LED code for this fault is three (3)flashes.

21
Open Thermal Protection DeviceIf the primary limit switch opens, the gas valve is immediatelydeenergized, the induced draft and air circulating blowersare energized. The induced draft and air circulator blowersremain energized until the limit switch recloses. The diag-nostic fault code for an open limit is four (4) flashes.
A primary limit will open due to excessive supply air tempera-tures. This can be caused by a dirty filter, excessive ductstatic, insufficient air flow, or a faulty limit. Check filters, totalexternal duct static, blower motor, blower motor speed tap(see wiring diagram), and limit. This limit will automaticallyreset once the temperature falls below a preset level.
Flame Detected with Gas Valve ClosedIf flame is detected with the gas valve deenergized, the com-bustion and air circulator blowers are energized. The diag-nostic fault code is five (5) flashes for this condition. Thecontrol can be reset by removing the power supply to the unitor it will automatically reset after one hour. Miswiring is theprobable cause for this fault.
ABNORMAL OPERATION - COOLING
Short Cycle Compressor DelayThe automatic ignition control has a built-in feature that pre-vents damage to the compressor in short cycling situations.In the event of intermittent power losses or intermittent ther-mostat operation, the ignition control will delay output to thecompressor contactor for three minutes from the time poweris restored. (Compressor is off a total of three minutes). Thediagnostic LED will flash six (6) times to indicate the com-pressor contactor output is being delayed.
NOTE: Some electronic thermostats also have a built-incompressor short cycle timer that may be longer than thethree minute delay given above. If you are using an electronicthermostat and the compressor has not started after threeminutes, wait an additional five minutes to allow the thermostatto complete its short cycle delay time.
INPUT RATING
It is the responsibility of the contractor to adjust the gas inputto the unit. The input rate can be calculated by using theformula:
INPUT Btu/Hr = 3600 x HVT
WHERE:HV = Heating value of fuel = Btu/ft of gasT = Time in seconds per ft of gas flow as read from gas meter
3
3
Adjust input rate by varying the adjustment of the gas pres-sure regulator on the gas valve. All adjustments must be madewith furnace operating at high fire and at normal operatingtemperature. Clockwise (P) rotation of the pressure regula-tor screw increases pressure and gas flow rate. Turn screwcounterclockwise (Q) to decrease pressure and gas flow rate.
After adjustment the furnace temperature rise must be withinthe range specified on the unit data plate. NOTE: Thermalefficiency of the furnace is a product efficiency rating deter-mined under continuous operating conditions independentof any installed system.
INLET OUTLET
Gas ValveOn/Off Switch
Regulator Cover Screws(Reg. Adj. Beneath these screws)
High FireAdjust
Low FireAdjust
WHITE-RODGERS 36H54 PRESSURE ADJUSTMENTS
TO PREVENT UNRELIABLE OPERATION OR EQUIPMENT DAMAGE, THE GAS MANIFOLD PRESSURE MUST BE AS SPECIFIED ON THE UNIT RATING PLATE. ONLY MINOR ADJUSTMENTS SHOULD BE MADE BY ADJUSTING THE GAS VALVE PRESSURE REGULATOR.
CAUTION
AIR FLOW ADJUSTMENTS
The drive on the supply fan is typically set in the middle of theRPM range. The drive motor sheave pitch diameter is fieldadjustable for the required airflow. Refer to “DriveAdjustments” section below.When the final adjustments are complete, the current drawof the motor should be checked and compared to the fullload current rating of the motor. The amperage must not ex-ceed the service factor stamped on the motor nameplate.The total airflow must not be less than that required for op-eration of the electric heaters or the furnace.
If an economizer is installed, check the unit operating bal-ance with the economizer at full outside air and at minimumoutside air. Upon completion of the air flow balancing, werecommend replacing the variable pitched motor sheave witha properly-sized fixed sheave. A matching fixed sheave willprovide longer belt and bearing life and vibration free opera-tion. Initially, it is best to have a variable pitched motor sheavefor the purpose of airflow balancing, but once the balancehas been achieved, fixed sheaves maintain alignment andminimize vibration more effectively. For direct drive units, movegreen wire for fan.
MOTOR SHEAVE ADJUSTMENTS
VL, VM & 2VP VARIABLE PITCH KEY TYPE MOTOR SHEAVES
The driving and driven motor sheaves should be in align-ment with each other and the shafts parallel.

22
VL & VM SHEAVES ADJUSTMENT
1. Loosen set screw “B” using a 5/32" Allen key.2. Making half or full turns from closed position, adjust
sheave pitch diameter for desired speed. DO NOTOPEN MORE THAN FIVE FULL TURNS.
3. Tighten set screw “B” securely over flat.4. Carefully put on belts and adjust belt tension. DO NOT
FORCE BELTS OVER GROOVES.5. Ensure all keys are in place and the set screws tight
before starting drive. Recheck set screws and belttension after 24 hours service.
NOTE: Future adjustments should be made by loosening thebelt tension and increasing or decreasing the pitch diameterof the sheave by half or full turns as required. Readjust belttension before starting drive.
C
B
VL & VM
NOTE: For horizontal discharge, remove the supply and returnduct covers and place them over the vertical discharge returnand supply openings (bottom of unit).
NOTE: Do not operate sheave with flange projecting beyondthe hub end.
MAINTENANCE
HIGH VOLTAGE !DISCONNECT ALL POWER BEFORE SERVICING OR INSTALLING THIS UNIT. MULTIPLE POWER SOURCES MAY BE PRESENT. FAILURE TO DO SO MAY CAUSE PROPERTY DAMAGE, PERSONAL INJURY OR DEATH.
WARNING
TO PREVENT PERSONAL INJURY OR DEATH DUE TO IMPROPER INSTALLATION, ADJUSTMENT, ALTERATION, SERVICE OR MAINTENANCE, REFER TO THIS MANUAL. FOR ADDITIONAL ASSISTANCE OR INFORMATION, CONSULT A QUALIFIED INSTALLER, SERVICE AGENCY OR THE GAS SUPPLIER.
WARNING
SHEET METAL PARTS, SCREWS, CLIPS AND SIMILAR ITEMS INHERENTLY HAVE SHARP EDGES, AND IT IS NECESSARY THAT THE INSTALLER AND SERVICE PERSONNEL EXERCISE CAUTION.
CAUTION
Preventive maintenance is the best way to avoid unneces-sary expense and inconvenience. Have this system inspectedat regular intervals by qualified service personnel, at leasttwice a year. Routine maintenance should cover the follow-ing items:
1. Tighten all belts, set screws, and wire connections.2. Clean evaporator and condenser coils mechanically
or with cold water, if necessary. Usually any fouling isonly matted on the entering air face of the coil andcan be removed by brushing.
3. Lubricate motor bearings.4. Align or replace belts as needed.5. Replace filters as needed (see below).6. Check for blockage of condensate drain.7. Check power and control voltages.8. Check running amperage.9. Check operating temperatures and pressures.10. Check and adjust temperature and pressure controls.11. Check and adjust damper linkages.12. Check operation of all safety controls.13. Examine gas furnaces (see below and the User’s
Information Manual).14. Check condenser fans and tighten set screws.
FILTERS
TO PREVENT PROPERTY DAMAGE DUE TO FIRE AND LOSS OF EQUIPMENT EFFICIENCY OR EQUIPMENT DAMAGE DUE TO DUST AND LINT BUILD UP ON INTERNAL PARTS, NEVER OPERATE UNIT WITHOUT AN AIR FILTER INSTALLED IN THE RETURN AIR SYSTEM.
CAUTION
Every application may require a different frequency of replace-ment of dirty filters. Filters must be replaced at least everythree (3) months during operating seasons.
Dirty filters are the most common cause of inadequate heat-ing or cooling performance. Filter inspection should be madeat least every two months; more often if necessary becauseof local conditions and usage.
Dirty throwaway filters should be discarded and replaced witha new, clean filter.
Disposable return air filters are supplied with this unit. Seethe unit Specification Sheet or Technical Manual for the cor-rect size and part number. To remove the filters, remove thefilter access panel on return side of the unit.
CABINET FINISH MAINTENANCE
Use a fine grade automotive wax on the cabinet finish tomaintain the finish’s original high luster. This is especiallyimportant in installations with extended periods of direct sun-light.

23
CLEAN OUTSIDE COIL (QUALIFIED SERVICER ONLY)The coil with the outside air flowing over it should be inspectedannually and cleaned as frequently as necessary to keep thefinned areas free of lint, hair and debris.
CONDENSER, EVAPORATOR, AND INDUCED DRAFT MOTORS
Bearings on the air circulating blower motor, condenser mo-tor and the combustion fan motor are permanently lubricated.No additional oiling is required.
FLAME SENSOR (QUALIFIED SERVICER ONLY)A drop in the flame current can be caused by a nearly invis-ible coating on the flame sensor. This coating, created by thefuel or combustion air supply, can be removed by carefullycleaning the flame sensor with steel wool.
NOTE: After cleaning, the microamp signal should be stableand in the range of 4 - 6 microamps DC.
FLUE PASSAGES (QUALIFIED SERVICER ONLY)At the start of each heating season, inspect and, if neces-sary, clean the unit flue passage.
LUBRICATION
The fan shaft bearings, the 1 to 2 HP supply fan motors thecondenser fan motors and compressors are permanently lu-bricated.
INSPECTION & CLEANING
All flue product carrying areas of the furnace, its vent sys-tem, and main burners should be examined by a qualifiedservice agency before the start of each heating season. Thisexamination is necessary for continued safe operation. Par-ticular attention should be given to deterioration from corro-sion or other sources. This examination is accomplished inthe following manner.
1. Disconnect power to the unit and remove furnacesection access panel.
2. Remove burner assembly:a. Disconnect the three wires from the gas valve after
noting which wires are connected to each terminal.b. Disconnect wires from the flame rod and ignition
electrode.c. Disconnect the gas piping at the union.d. The entire burner assembly can now be removed
from the unit.
NOTE: Use all screws that were removed; they arenecessary for safe and proper operation of the unit.
3. Inspect and periodically clean the vent outlet (birdscreen) on the access panel.
NOTE: Periodic observation of the flame and a log of C02measurements are recommended. This will aid in determiningwhether the furnace is operating efficiently or if the furnacerequires cleaning.
Flames should be stable, soft and blue (dust may cause or-ange tips but must not be yellow). The flames must extenddirectly outward from the burner without curling, floating orlifting off.
BURNER FLAME
TO AVOID PERSONAL INJURY OR DEATH DUE TO ELECTRIC SHOCK, DO NOT REMOVE ANY INTERNAL COMPARTMENT COVERS OR ATTEMPT ANY ADJUSTMENT. CONTACT A QUALIFIED SERVICER AT ONCE IF AN ABNORMAL FLAME SHOULD DEVELOP.
WARNING
At least once a year, prior to or during the heating season,make a visual check of the burner flames.
NOTE: This will involve removing and reinstalling the heatexchanger door on the unit, which is held by two screws. Ifyou are uncertain about your ability to do this, contact aqualified servicer.If a strong wind is blowing, it may alter the airflow patternwithin the unit enough that an inspection of the burner flamesis not possible.
FUNCTIONAL PARTS
Refer to the unit Parts Catalog for a list of functional parts.Parts are available from your distributor.
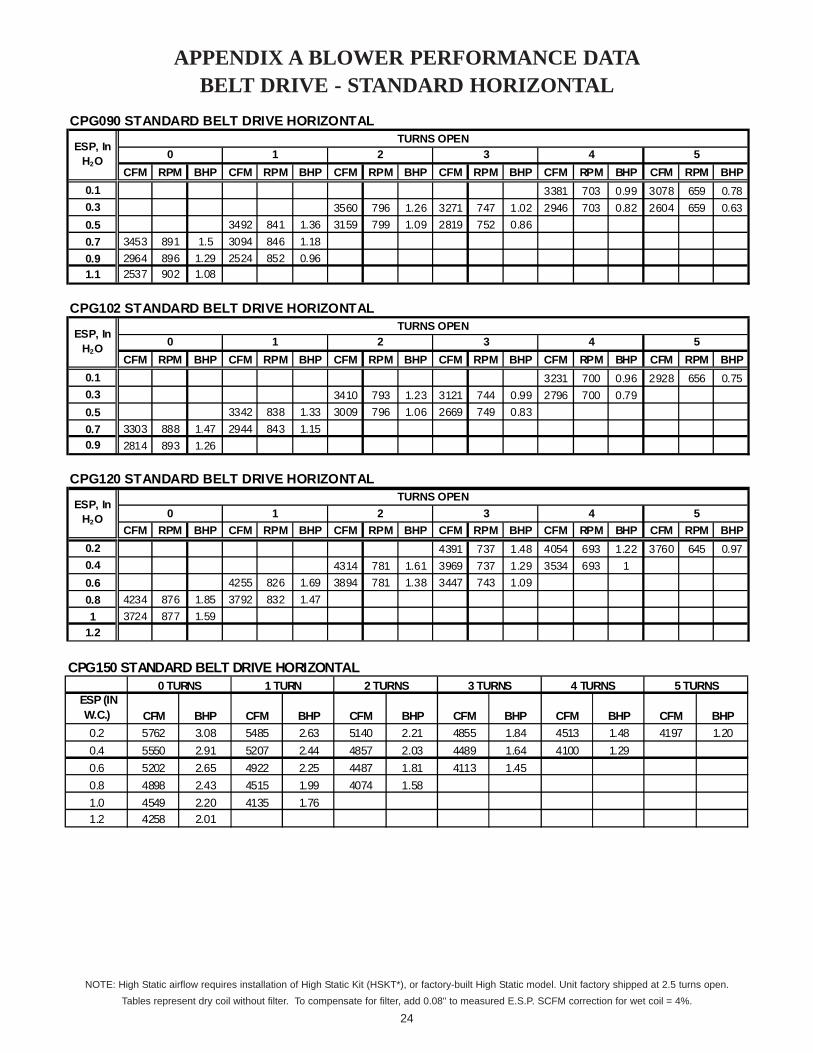
24
APPENDIX A BLOWER PERFORMANCE DATABELT DRIVE - STANDARD HORIZONTAL
NOTE: High Static airflow requires installation of High Static Kit (HSKT*), or factory-built High Static model. Unit factory shipped at 2.5 turns open.Tables represent dry coil without filter. To compensate for filter, add 0.08" to measured E.S.P. SCFM correction for wet coil = 4%.
CPG090 STANDARD BELT DRIVE HORIZONTAL
CFM RPM BHP CFM RPM BHP CFM RPM BHP CFM RPM BHP CFM RPM BHP CFM RPM BHP0.1 3381 703 0.99 3078 659 0.780.3 3560 796 1.26 3271 747 1.02 2946 703 0.82 2604 659 0.630.5 3492 841 1.36 3159 799 1.09 2819 752 0.860.7 3453 891 1.5 3094 846 1.180.9 2964 896 1.29 2524 852 0.961.1 2537 902 1.08
CPG102 STANDARD BELT DRIVE HORIZONTAL
CFM RPM BHP CFM RPM BHP CFM RPM BHP CFM RPM BHP CFM RPM BHP CFM RPM BHP0.1 3231 700 0.96 2928 656 0.750.3 3410 793 1.23 3121 744 0.99 2796 700 0.790.5 3342 838 1.33 3009 796 1.06 2669 749 0.830.7 3303 888 1.47 2944 843 1.150.9 2814 893 1.26
CPG120 STANDARD BELT DRIVE HORIZONTAL
CFM RPM BHP CFM RPM BHP CFM RPM BHP CFM RPM BHP CFM RPM BHP CFM RPM BHP0.2 4391 737 1.48 4054 693 1.22 3760 645 0.970.4 4314 781 1.61 3969 737 1.29 3534 693 10.6 4255 826 1.69 3894 781 1.38 3447 743 1.090.8 4234 876 1.85 3792 832 1.471 3724 877 1.59
1.2
ESP, In H2O
TURNS OPEN0 1 2 3 4 5
ESP, In H2O
TURNS OPEN0 1 2 3 4 5
ESP, In H2O
TURNS OPEN0 1 2 3 4 5
CPG150 STANDARD BELT DRIVE HORIZONTAL
ESP (IN W.C.) CFM BHP CFM BHP CFM BHP CFM BHP CFM BHP CFM BHP0.2 5762 3.08 5485 2.63 5140 2.21 4855 1.84 4513 1.48 4197 1.200.4 5550 2.91 5207 2.44 4857 2.03 4489 1.64 4100 1.290.6 5202 2.65 4922 2.25 4487 1.81 4113 1.450.8 4898 2.43 4515 1.99 4074 1.581.0 4549 2.20 4135 1.761.2 4258 2.01
0 TURNS 1 TURN 2 TURNS 3 TURNS 4 TURNS 5 TURNS

25
APPENDIX A BLOWER PERFORMANCE DATABELT DRIVE - STANDARD DOWN SHOT
CPG090 STANDARD BELT DRIVE DOWN SHOT
CFM RPM BHP CFM RPM BHP CFM RPM BHP CFM RPM BHP CFM RPM BHP CFM RPM BHP0.1 3522 750 1.14 3228 706 0.94 2964 661 0.730.3 3337 800 1.19 3102 756 1 2800 706 0.76 2504 661 0.590.5 3387 844 1.32 2834 806 0.99 2603 757 0.80.7 3453 893 1.5 2903 850 1.120.9 2957 899 1.29
CPG102 STANDARD BELT DRIVE DOWN SHOT
CFM RPM BHP CFM RPM BHP CFM RPM BHP CFM RPM BHP CFM RPM BHP CFM RPM BHP0.1 3372 747 1.11 3078 703 0.91 2814 658 0.700.3 3187 797 1.16 2952 753 0.97 2650 703 0.730.5 3237 841 1.29 2684 803 0.96 2453 754 0.770.7 3303 890 1.47 2753 847 1.090.9 2807 896 1.26
CPG120 STANDARD BELT DRIVE DOWN SHOT
CFM RPM BHP CFM RPM BHP CFM RPM BHP CFM RPM BHP CFM RPM BHP CFM RPM BHP0.2 4316 780 1.57 4118 738 1.36 3771 687 1.08 3376 644 0.850.4 4282 830 1.76 3928 786 1.4 3595 740 1.130.6 4232 874 1.87 3872 830 1.52 3444 786 1.20.8 3839 880 1.64 3367 836 1.271 3326 885 1.4
1.2
ESP, In H2O
TURNS OPEN0 1 2 3 4 5
TURNS OPENESP, In
H2O 4 50 1 2 3
ESP, In H2O
TURNS OPEN0 1 2 3 4 5
CPG150 STANDARD BELT DRIVE DOWN SHOT
ESP (IN W.C.) CFM BHP CFM BHP CFM BHP CFM BHP CFM BHP CFM BHP0.2 5514 2.92 5604 3.22 5064 2.16 4775 1.81 4514 1.49 4271 1.230.4 5279 2.74 5110 2.40 4696 1.94 4447 1.63 4123 1.310.6 5185 2.67 4813 2.20 4352 1.74 4039 1.430.8 4766 2.37 4526 2.021.0 4223 2.01
0 TURNS 1 TURN 2 TURNS 3 TURNS 4 TURNS 5 TURNS
NOTE: High Static airflow requires installation of High Static Kit (HSKT*), or factory-built High Static model. Unit factory shipped at 2.5 turns open.Tables represent dry coil without filter. To compensate for filter, add 0.08" to measured E.S.P. SCFM correction for wet coil = 4%.

26
APPENDIX A BLOWER PERFORMANCE DATABELT DRIVE - HIGH STATIC (“AA” MODELS ONLY)
NOTE: High Static airflow requires installation of High Static Kit (HSKT*), or factory-built High Static model. Unit factory shipped at 2.5 turns open.Tables represent dry coil without filter. To compensate for filter, add 0.08" to measured E.S.P. SCFM correction for wet coil = 4%.
CPG090 HIGH STATIC BELT DRIVE DOWN SHOT
CFM RPM BHP CFM RPM BHP CFM RPM BHP CFM RPM BHP CFM RPM BHP CFM RPM BHP0.7 3575 904 1.660.9 3258 925 1.56 3113 909 1.411.1 3580 1013 1.97 3001 948 1.42 2722 915 1.251.3 3616 1063 2.17 3247 1019 1.79 2646 959 1.31.5 3275 1069 2.05 2803 1025 1.681.7 3346 1118 2.24 2885 1074 1.971.9 3009 1125 2.052.1
CPG120 HIGH STATIC BELT DRIVE DOWN SHOT
CFM RPM BHP CFM RPM BHP CFM RPM BHP CFM RPM BHP CFM RPM BHP CFM RPM BHP0.8 4188 943 2.11 3793 889 1.671 4305 1002 2.39 3836 946 1.89 3416 893 1.45
1.2 4324 1053 2.63 3879 1003 2.11 3425 951 1.631.4 4428 1109 2.92 3973 1056 2.35 3434 1009 1.81.6 4465 1160 3.2 4088 1113 2.67 3506 1068 2.11.8 4129 1168 2.9 3625 1122 2.32 3694 1175 2.65
CPG090 HIGH STATIC BELT DRIVE HORIZONTAL
CFM RPM BHP CFM RPM BHP CFM RPM BHP CFM RPM BHP CFM RPM BHP CFM RPM BHP0.7 3567 903 1.580.9 3596 953 1.79 3145 906 1.391.1 3630 1007 1.97 3168 963 1.56 2675 909 1.181.3 3649 1063 2.19 3255 1021 1.8 2724 965 1.351.5 3316 1068 2 2823 1058 1.611.7 3287 1112 2.16 2869 1074 1.781.9 2970 1122 22.1 2644 1133 1.92
CPG120 HIGH STATIC BELT DRIVE HORIZONTAL
CFM RPM BHP CFM RPM BHP CFM RPM BHP CFM RPM BHP CFM RPM BHP CFM RPM BHP0.8 4408 885 2.021 4464 940 2.29 3929 891 1.76
1.2 4585 996 2.58 4026 946 2 3436 897 1.461.4 4697 1049 2.92 4141 1001 2.26 3509 951 1.71.6 4264 1056 2.58 3663 1007 1.961.8 4359 1105 2.85 3785 1061 2.222 3907 1114 2.49
DO NOT OPERATE
ESP, In H2O
TURNS OPEN0 1 2 3 4 5
ESP, In H2O
TURNS OPEN0 1 2 3 4 5
ESP, In H2O
TURNS OPEN0 1 2 3 4 5
DO NOT OPERATE
DO NOT OPERATE
TURNS OPENESP, In
H2O4 50 1 2 3
CPG150 HIGH STATIC BELT DRIVE HORIZONTAL
ESP (IN W.C.) CFM BHP CFM BHP CFM BHP CFM BHP CFM BHP CFM BHP0.6 5967 3.92 5451 3.16 5275 2.770.8 5628 3.61 5223 2.97 4959 2.541.0 5840 4.10 5385 3.39 4999 2.80 4635 2.311.2 5643 3.90 5003 3.06 4803 2.65 4160 1.991.4 6007 4.93 5740 4.32 5229 3.51 4576 2.71 4440 2.381.6 5752 4.64 5401 3.97 4917 3.231.8 5380 4.24 5033 3.61 4397 2.792.0 5065 3.91 4573 3.18
CPG150 HIGH STATIC BELT DRIVE DOWN SHOT
ESP (IN W.C.) CFM BHP CFM BHP CFM BHP CFM BHP CFM BHP CFM BHP0.6 5515 3.21 5124 2.680.8 5840 4.06 5781 3.73 5344 3.07 4721 2.371.0 5908 4.49 5643 3.86 5369 3.36 4887 2.71 4365 2.131.2 5869 4.74 5542 4.11 5229 3.47 4853 2.92 4404 2.35 3986 1.881.4 5464 4.30 5180 3.75 4917 3.19 4584 2.71 4197 2.211.6 5229 4.05 4960 3.53 4397 2.75 4204 2.411.8 4961 3.78 4553 3.162.0 4790 3.61 4315 2.95
0 TURNS 1 TURN 2 TURNS 3 TURNS
4 TURNS 5 TURNS
4 TURNS 5 TURNS
0 TURNS 1 TURN 2 TURNS 3 TURNS

27
APPENDIX B ELECTRICAL DATA
MIN MAX Qty RLA LRA Qty HP RLA HP FLA
208/230-60-3 187 253 2 13.1 83.1 2 1/4 1.40 BD STD STATIC 1.5 5.0
460-60-3 414 506 2 6.1 41.0 2 1/4 0.80 BD STD STATIC 1.5 2.5
575-60-3 518 633 2 4.4 33 2 1/4 0.60 BD STD STATIC 1.5 2.3
208/230-60-3 187 253 2 14.5 98.0 2 1/4 1.40 BD STD STATIC 2.0 7.8
460-60-3 414 506 2 6.3 55.0 2 1/4 0.80 BD STD STATIC 2.0 3.9
575-60-3 518 633 2 6.0 41.0 2 1/4 0.60 BD STD STATIC 2.0 2.5
208/230-60-3 187 253 2 16.0 110.0 2 1/3 2.40 BD STD STATIC 2.0 7.8
460-60-3 414 506 2 7.8 52.0 2 1/3 1.20 BD STD STATIC 2.0 3.9
575-60-3 518 633 2 6.4 38.9 2 1/3 0.90 BD STD STATIC 2.0 2.5
208/230-60-3 187 253 2 22.4 149.0 2 1/3 2.40 BD STD STATIC 3.0 9.4
460-60-3 414 506 2 10.6 75.0 2 1/3 1.20 BD STD STATIC 3.0 4.7
575-60-3 518 633 2 7.70 54.0 2 1/3 0.90 BD STD STATIC 3.0 4.2
ELECTRICAL DATA
ID MOTOR APPL
COMPRESSOR (ea)
OD FAN MOTORS (ea)
ID FAN MOTOR (ea)
VOLTAGE LIMITATIONVOLTAGE
(NAMEPLATE)
10 TON
MODELS
12.5 TON
7.5 TON
8.5 TON

28
APPENDIX C UNIT DIMENSIONS
HORIZONTAL DISCHARGE
VERTICAL DISCHARGE (BOTTOM OF UNIT)
NOTEFor horizontal discharge, remove the supplyand return duct covers and place them overthe vertical discharge return and supplyopenings. Install with insulation facing up,using the longer screws provided in theliterature package.
RETURN
SUPPLY13 7/8”
28 3/8” 7 3/8”
12 5/8”
6 1/4”
36 3/8”
5 7/8”
RETURN
SUPPLY5 3/8”
7 1/2”
6 1/2”
99 1/8”
61 3/4”
Y
7.5 8.5 10 12.5
Y 52 7/8" 52 7/8" 52 7/8" 58 7/8"

29
HIGH VOLTAGE!DISCONNECT ALL POWER BEFORE SERVICING OR INSTALLING THISUNIT. MULTIPLE POWER SOURCES MAY BE PRESENT. FAILURE TODO SO MAY CAUSE PROPERTY DAMAGE, PERSONAL INJURY OR DEATH.
NOTE 2PLF
BLRS
CM2
L1L2
L3C
T1T3
T2
GR
YL
RDBK
YLRD
BK
PU
BK
OR
PU
BR
BR BK
RD
RDRD
RD
PK
S2S1
GND
WH
WH
YL
YL/PK
YL/PK
BL/PK
YL/PK
BL/PK
RD
BL
BL
OR
RD
BL
BL
BK
RD
BK
OR
PU
BR BK
BRTB1
RD
RD
YL
RD
RD
BK
BC
SMOKE/FIRE DETECTOR REPLACES JUMPER WIRE
BR
RD
RD
ORBK
WH
NOTE 3SEE
PU
GR
BL
OR
ORBK
BLBL
BL
WH
OR
GR
BL
PU
PU
WH
BL BLGR
BL
BL GR
YL
PU YL
PU
YLYL
RD
BL
RD
YL
BRWH
RD
PUBL
GR
WH
RDRD
BK
RD
BKRD
BK
YL
460-575/3/60SEE NOTE 4
WH
YL
POWER SUPPLY
RD
BK
OR
RD
YL
BR
NOTE 5 WH BK
RD
RD
GR
RD
TR
460 OR APPROPRIATE INPUT VOLTAGE
240
3
1
T3 T2 T1
32
1
HPS1
LPS1
EM
FC2
COMP2
LPS2
HPS2
L2L1CC2
T2T1
L3
T3
R
FC1
VM
IGN
FS
32460 COR APPROPRIATE INPUT VOLTAGE
1
TR24V
VMR
4
2
GV
W1CY1Y2 G
L2
UN
US
EDC
OO
LH
EAT
ALS
9 68
7 45
PS
DI
FSL1
45
6
23
1
ECON
118
1297 10
LS
COMP1L2L1
CC1T2T1
IIC
L3
T3
CM1
W2TB1
T1T2T3
0140L00550 REV A
Wiring is subject to change. Always refer to the wiring diagram on the unit for the most up-to-date wiring.
CPG(090/102/120/150)2104B*/7B* THREE PHASE 460-575/60 HZ BELT DRIVE WIRING DIAGRAM

30
CPG(090/102/120/150)2104B*/7B* THREE PHASE 460-575/60 HZ BELT DRIVE WIRING DIAGRAMHIGH VOLTAGE!DISCONNECT ALL POWER BEFORE SERVICING OR INSTALLING THISUNIT. MULTIPLE POWER SOURCES MAY BE PRESENT. FAILURE TODO SO MAY CAUSE PROPERTY DAMAGE, PERSONAL INJURY OR DEATH.
Wiring is subject to change. Always refer to the wiring diagram on the unit for the most up-to-date wiring.
2
1
OR
RDY1
WH
R
O
W
Y/Y2
YL
TB1
BL
W
R
YR
Y1
WITH ECONOMIZER OPTION
GR
G
NO ECONOMIZER
TB1
C
RD
C
R
OC
O
YL
G
Y/Y2
C
W
OSTAT
OR
Y2
WH
W
BL
G G
GR
STAT
YLR
G
C
Y2
OSTAT
O
WH
2 STAGE COOLING
C
GR
BLOR
RY1
RD
PK
W
Y/Y2
GW
TB1
Y1
W1 TO W2 WIRE JUMPER.5. FOR TWO STAGE OPERATION REMOVE
NOTE 5
W2
INSTALLER/SERVICEMAN
TROUBLESHOOTING THIS APPLIANCE. STATUS LIGHT CODES ARE AS FOLLOWS:THE STATUS LIGHT ON THE FURNACE CONTROL MAY BE USED AS A GUIDE TO
FALSE FLAME SENSED
OPEN LIMIT SWITCH
WITHOUT INDUCER ONPRESSURE SWITCH CLOSED
OPENPRESSURE SWITCH
NORMAL OPERATION
3 BLINKS
6 BLINKS
4 BLINKS
5 BLINKS
OUTPUT DELAYCOMPRESSOR
OFF
ON
1 BLINK
2 BLINKS
STATUS LIGHT
SWITCHOPEN AUX. LIMIT
IGNITION FAILURE
SWITCHOPEN ROLLOUT
INTERNAL CONTROLNO POWER OR
EQUIPMENT STATUS
PRESSURE SWITCHCHECK
BAD SWITCHMAIN LIMIT OPEN
STICKING GAS VALVE
ANTI-CYCLE TIMER3 MIN. COMP.
PRESSURE SWITCHCHECK
GAS PRESSURE
FLAME ROLLOUT
AUX. LIMIT OPEN
FLAME SENSOR
BAD SWITCH
GAS VALVE
GAS FLOWREPLACE CONTROL
CHECK FUSE ON CONTROLCHECK INPUT POWER
------
CHECK
C2
HPS2LPS2
LPS1HPS1
7
G
TO THERMOSTAT
R
IIC
9
W1
11
12
8
6
3
ECON10
PS
ALS
NOTE 3L1
4
5
FFS
D1CH
LS
C
GVRS
C1
L2NOTE 3
IGNFS
VMR
IICBC
5
47
869
1
23
TR
24V
TB1
TB12
NOTEPLF
L1SUPPLY VOLTAGE
460-575/3/60 L2 L3
31
WH2 4
RCCF1
CC1
T3
COMP1
T2
FCM1
EM
CC1T1
C
CC1
BC
T2
BC
BC
RCCF2
CC2
T3
T1COMP2 T2
FCM2
CC2T1
C
CC2
T3
T2
VM
TR
R
1 3460V OR APPROPRIATE INPUT VOLTAGE
460V OR APPROPRIATE INPUT VOLTAGE
VENT MOTOR RELAYVENT MOTORTRANSFORMERTERMINAL BLOCK (24V SIGNAL)ROLLOUT SWITCHPRESSURE SWITCHFEMALE PLUG/CONNECTORLIMIT SWITCHLOW PRESSURE SWITCHIGNITORINTEGRATED IGNITION CONTROLINDOOR BLOWER RELAYHIGH PRESSURE SWITCHGAS VALVEEQUIPMENT GROUNDFLAME SENSORFAN CAPACITORFUSEEVAPORATOR MOTORCOMPRESSOR CONTACTORCONDENSER MOTORCOMPRESSORBLOWER CONTACTORAUXILIARY LIMIT SWITCH
VMRVMTRTB1RSPSPLFLSLPSIGNIICIBRHPSGVGNDFSFCFEMCCCMCOMPBCALS
PINK STRIPBL/PK BLUE WITH PINK STRIPYL/PK YELLOW WITHYL YELLOWWH WHITERD REDPU PURPLEPK PINKOR ORANGEGR GREENBR BROWNBL BLUEBK BLACK
WIRE CODE
NOTES
2 (USE COPPER CONDUCTOR ONLY). SIZE AND TYPE OF INSULATION AS ORIGINAL.1. REPLACEMENT WIRE MUST BE THE SAME
3 ACCESSORY. ATTACH FEMALE PLUG TO THE ECONOMIZER COMPARTMENT. REMOVE MALE PLUG AND TO BLOWER HOUSING IN RETURN AIR2. ACCESSORY ECONOMIZER PLUG ADJACENT
4. USE COPPER CONDUCTORS ONLY.USE NEC CLASS 2 WIRE.
43. L1 AND L2 ON IIC CONTROL IS 24V INPUT.
HIGH VOLTAGE OPTIONAL LOW VOLTAGE LINE VOLTAGE
FIELD WIRING
LOW VOLTAGE HIGH VOLTAGE
FIELD WIRINGTHERMOSTAT
FACTORY WIRING
460-575/3/60 0140L00551 REV B
COMPONENT LEGEND
Y1 YY2

31
HIGH VOLTAGE!DISCONNECT ALL POWER BEFORE SERVICING OR INSTALLING THISUNIT. MULTIPLE POWER SOURCES MAY BE PRESENT. FAILURE TODO SO MAY CAUSE PROPERTY DAMAGE, PERSONAL INJURY OR DEATH.
Wiring is subject to change. Always refer to the wiring diagram on the unit for the most up-to-date wiring.
CPG(090/102/120/150)2103B* THREE PHASE 208-240/60 HZ BELT DRIVE WIRING DIAGRAM
0140L00552 REV B
GND
T3
RD
L3
POWER SUPPLY
YL
WH
SEE NOTE 4208-240/3/60
YL
IIC
T1 T2
RD
RDBK
YL
CC1
L1 L2
BK
COMP1
RD
WH
BLPU
RDRD
WHBR
YL
RD
BL
YL
YL
YL
PU
YL
NOTE 2PLF
YL
GRBL
BL
GR BL
G
BL
Y2 C W1
WHPU
GV
BL
GR
OR
WH
BL
BLBL
BK OR
RD
OR
BL
GR
SEENOTE 3
WHBK
VM
OR
RD
RD
SMOKE/FIREDETECTORREPLACES JUMPERWIRE
T2T3
T1
C
BC
BK
RD
R
L3L2
L1
RD
YLLPS1
HPS1
COMP2
FC2
RD
RD
TB1BR
PU
CM1
BK
EM
OR
BK
RD
BK
BL
BL
RD
OR
OR
RD
BL
BL
WH
WH32
1
YLPU
9 68
7 45
PU
BK
BR BR BK
PU
BKYL
YL
YL
BL
BL
BK
BK
GR
TB1
GR
YLRD
BK
RD
W2
BR
VMR
PK
Y1
BL
RD
L2L1CC2
T2T1
L3
T3 CM2
3
1208 C12
2403
TR24V
LS RD
S2S1
RD
RDGR
IGN
FS
LPS2
HPS2
ALS
PURS
PSPU
WH
SEENOTE
5
BKWH
RD
GR
FC1RD
BR
BK
BK
BK

32
HIGH VOLTAGE!DISCONNECT ALL POWER BEFORE SERVICING OR INSTALLING THISUNIT. MULTIPLE POWER SOURCES MAY BE PRESENT. FAILURE TODO SO MAY CAUSE PROPERTY DAMAGE, PERSONAL INJURY OR DEATH.
Wiring is subject to change. Always refer to the wiring diagram on the unit for the most up-to-date wiring.
CPG(090/102/120/150)2103B* THREE PHASE 208-240/60 HZ BELT DRIVE WIRING DIAGRAM
208-240/3/60 0140L00553 REV B
VM
208-240/3/60SUPPLY VOLTAGE
RCCF1
CC1
L2
T3
COMP1
T2
FCM1
EM
L1
CC1T1
C
CC1
T3
L3
BC
T2
BC
BC
RCCF2
CC2
T3
T1COMP2 T2
FCM2
CC2T1
C
CC2
T3
T2
SEE UNIT RATING PLATE FOR TYPE AND SIZE
COMPONENT LEGEND
OF OVER CURRENT PROTECTION
THERMOSTATFIELD WIRING
ALSBCCCCMCOMPEMFFCFSGNDGVHPSIBRIICIGNLPSLSPLFPSRSTB1TRVMVMR
OPTIONAL HIGH VOLTAGE
HIGH VOLTAGE
FIELD WIRING
OR ORANGE
YL YELLOW
PU PURPLE
GR GREEN
PK PINK
RD REDWH WHITE
LOW VOLTAGE
BK BLACKWIRE CODE
BR BROWNBL BLUE
LINE VOLTAGEFACTORY WIRING
LOW VOLTAGE
AUXILIARY LIMIT SWITCHBLOWER CONTACTORCOMPRESSOR CONTACTORCONDENSER MOTORCOMPRESSOREVAPORATOR MOTORFUSEFAN CAPACITORFLAME SENSOREQUIPMENT GROUNDGAS VALVEHIGH PRESSURE SWITCHINDOOR BLOWER RELAYINTEGRATED IGNITION CONTROLIGNITORLOW PRESSURE SWITCHLIMIT SWITCHFEMALE PLUG/CONNECTORPRESSURE SWITCHROLLOUT SWITCHTERMINAL BLOCK (24V SIGNAL)TRANSFORMERVENT MOTORVENT MOTOR RELAY
3. L1 AND L2 ON IIC CONTROL IS 24V INPUT.44. USE COPPER CONDUCTORS ONLY. USE NEC CLASS 2 WIRE.5. FOR TWO STAGE OPERATION REMOVE W1 TO W2 JUMPER WIRE
2. ACCESSORY ECONOMIZER PLUG ADJACENT TO BLOWER HOUSING IN RETURN AIR COMPARTMENT. REMOVE MALE PLUG AND ATTACH FEMALE PLUG TO THE ECONOMIZER ACCESSORY.3
1. REPLACEMENT WIRE MUST BE THE SAME SIZE AND TYPE OF INSULATION AS ORIGINAL. (USE COPPER CONDUCTOR ONLY).2
NOTES
YL /PK YELLOW WITH PINK STRIPBL /PK BLUE WITH PINK STRIP
2VMR
RD
W1
STAT
Y1
Y2
WH
C
G
YLY/Y2
2 STAGE COOLING
R
C
G
R
W1
TB1
PK
GR
Y1
BLW2BRW2
Y1 YY2
NOTE 5
W2
24V
TB1
BCIIC
VMR
FSIGN
NOTE 3
C1
RSGV
PLFC
NOTE 2
LS
H CD1
FSF
5
4
NOTE 3
ALS
PS
10
3
6
8
12
11
W1
9
IIC
R G
7
LPS1 HPS1
HPS2 LPS2
C2
321
9 687 4
5
INSTALLER/SERVICEMAN
FALSE FLAME SENSED
OPEN LIMIT SWITCH
WITHOUT INDUCER ON
PRESSURE SWITCHOPEN
NORMAL OPERATION
3 BLINKS
6 BLINKS
4 BLINKS
5 BLINKSCOMPRESSOROUTPUT DELAY
OFF
ON
1 BLINK
2 BLINKS
STATUS LIGHT
OPEN AUX. LIMITSWITCH
IGNITION FAILURE
OPEN ROLLOUTSWITCH
NO POWER ORINTERNAL CONTROL
EQUIPMENT STATUS
CHECKPRESSURE SWITCH
MAIN LIMIT OPENBAD SWITCH
3 MIN. COMP.ANTI-CYCLE TIMER
CHECKPRESSURE SWITCH
GAS PRESSURE
FLAME ROLLOUT
AUX. LIMIT OPEN
FLAME SENSOR
BAD SWITCH
GAS VALVE
GAS FLOW
------
CHECK
S1S2
208-240V31
TB1
TR
6. FOR 208V 0PERATION MOVE BLACK WIRE FROM TERMINAL 3 TO TERMINAL 2 ON TRANSFORMER.
1
2


