Installation Guide-Worksoft Certify Integration with SAP …docs.worksoft.com/Certify Integration...
27
Worksoft, Inc. · 15851 Dallas Parkway, Suite 855 · Addison, TX 75001 www.worksoft.com · 866-836-1773 Worksoft Certify ® Integration with SAP ® Solution Manager Installation Guide
Transcript of Installation Guide-Worksoft Certify Integration with SAP …docs.worksoft.com/Certify Integration...

Worksoft, Inc. · 15851 Dallas Parkway, Suite 855 · Addison, TX 75001www.worksoft.com · 866-836-1773
Worksoft Certify® Integration with SAP® Solution Manager
Installation Guide

PN WCSAPSM 903 100416
Worksoft Certify Integration with SAP Solution Manager Installation Guide
Version 9.0.3
© Copyright 2016 by Worksoft, Inc. All rights reserved.
Worksoft is a business name of Worksoft, Inc. Information in this document is subject to change and revision without notice. No part of this manual may be reproduced by any means, electronic or mechanical, for any purpose other than the purchaser’s personal use, without prior written permission from Worksoft.
Worksoft provides this documentation “as is” without warranty of any kind, either express or implied. Worksoft may revise information in this document without notice and does not represent a commitment on the part of Worksoft, Inc.
Worksoft, Inc. may have patents or pending patent applications covering subject matter in this document. The furnishing of this document does not give you any license to these patents except as expressly provided in any written license agreement from Worksoft, Inc.
Patent
Worksoft Certify®
U.S. Patent No. 7,600,220
Trademarks
Worksoft Certify® is a registered trademark of Worksoft, Inc.
All other trademarks and trade names mentioned in this guide are the property of their respective owners.
Third-Party Copyrights
This product includes software developed and copyrighted by the following persons or companies:
• Reprise License Manager™
• Data Dynamics, Ltd., ActiveReports
• Microsoft® Enterprise Library
• Infragistics® NetAdvantage®
• Apache Logging Services log4net
• Antlr ANTLR
The above copyright holders disclaim all responsibility or liability with respect to its usage or its effect upon hardware or computer systems.
Worksoft Certify Integration with SAP Solution Manager Installation Guide 3
Table of Contents
Chapter 1 Overview . . . . . . . . . . . . . . . . . . . . . . . . . . . . . . . . . . . . . . . . . . . . . . . . . . . .4
Understanding Worksoft Certify and SAP Solution Manager Integration . . . . . . . . . . . . . . . . . . . 5
Test Results . . . . . . . . . . . . . . . . . . . . . . . . . . . . . . . . . . . . . . . . . . . . . . . . . . . . . . . . . 5Certify and Solution Manager Link . . . . . . . . . . . . . . . . . . . . . . . . . . . . . . . . . . . . . . . . . . 5
Chapter 2 Configuring SAP Solution Manager . . . . . . . . . . . . . . . . . . . . . . . . . . . . . . .7
Overview . . . . . . . . . . . . . . . . . . . . . . . . . . . . . . . . . . . . . . . . . . . . . . . . . . . . . . . . . . . . . . 8
Setting Up SAP eCATT . . . . . . . . . . . . . . . . . . . . . . . . . . . . . . . . . . . . . . . . . . . . . . . . . . . . . 8
Registering Certify as a Third-Party Test Tool . . . . . . . . . . . . . . . . . . . . . . . . . . . . . . . . . . . . 13
Enabling Test Case Types . . . . . . . . . . . . . . . . . . . . . . . . . . . . . . . . . . . . . . . . . . . . . . . . . . 16
Creating an eCATT Role and User Account . . . . . . . . . . . . . . . . . . . . . . . . . . . . . . . . . . . . . . 17
Chapter 3 Configuring Worksoft Certify . . . . . . . . . . . . . . . . . . . . . . . . . . . . . . . . . . .22
Creating a User Named ECATTUser in Certify . . . . . . . . . . . . . . . . . . . . . . . . . . . . . . . . . . . . 23
Configuring Global Settings for Solution Manager Integration . . . . . . . . . . . . . . . . . . . . . . . . . 24
Appendix A Troubleshooting . . . . . . . . . . . . . . . . . . . . . . . . . . . . . . . . . . . . . . . . . . .26
Verifying ECATT_ET_USR User is Not Locked . . . . . . . . . . . . . . . . . . . . . . . . . . . . . . . . . . . . 26
Solution Manager Submits Wrong Password to Certify . . . . . . . . . . . . . . . . . . . . . . . . . . . . . . 27
Chapter 1 Overview
In This Chapter
Understanding Worksoft Certify and SAP Solution Manager Integration.......................... 5
Worksoft Certify Integration with SAP Solution Manager Installation Guide 4

Understanding Worksoft Certify and SAP Solution Manager Integration
Understanding Worksoft Certify and SAP Solution Manager Integration
By integrating Worksoft Certify® with SAP® Solution Manager, you can create, edit, execute, and view the results of the Certify processes from within SAP Solution Manager.
You will be able to leverage SAP and Worksoft Best Practices for the following:
• Test organization
• Test execution
• Test package status analysis
Solution Manager contains test assets and links to the business processes to be validated, and Certify contains the automated and manual test processes, as well as the associated test assets to enable test automation.
As your test processes are defined and documented in Certify, you may want to link them back to SAP Solution Manager in order to have:
• An original inventory of business processes
• A central point of project governance
Test Results
Also, if you integrate Solution Manager with Certify, then test results are returned to both Certify and Solution Manager. You can store all results in a single repository in Solution Manager and ensure that the business requirements have been met by viewing your test packages and Test Workbench.
The Test Workbench provides a high-level view of the automation results in Solution Manager. You can check at any time the progress of individual test cases or an entire test package with the Test Workbench.
Certify and Solution Manager Link
Certify test processes are linked to the business processes in Solution Manager. From Solution Manager, you can:
• Create new Certify processes
• Edit existing Certify processes
• Execute Certify processes by invoking Certify for execution
• Review test results
Worksoft Certify Integration with SAP Solution Manager Installation Guide 5
Certify and Solution Manager Link
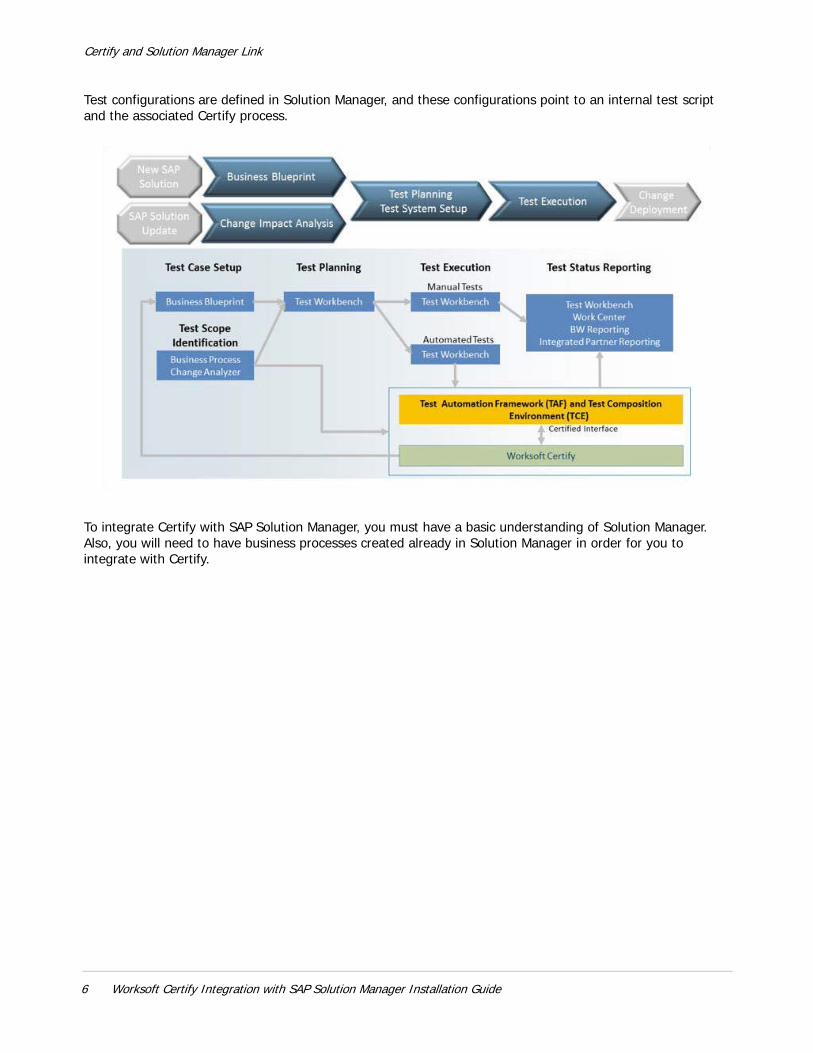
Test configurations are defined in Solution Manager, and these configurations point to an internal test script and the associated Certify process.
To integrate Certify with SAP Solution Manager, you must have a basic understanding of Solution Manager. Also, you will need to have business processes created already in Solution Manager in order for you to integrate with Certify.
6 Worksoft Certify Integration with SAP Solution Manager Installation Guide
Chapter 2 Configuring SAP Solution Manager
In This Chapter
Overview .................................................................................................................. 8
Setting Up SAP eCATT................................................................................................ 8
Registering Certify as a Third-Party Test Tool ............................................................. 13
Enabling Test Case Types ......................................................................................... 16
Creating an eCATT Role and User Account ................................................................. 17
Worksoft Certify Integration with SAP Solution Manager Installation Guide 7
Overview
Overview
In order to integrate SAP Solution Manager with Worksoft Certify, you will need to utilize SAP’s extended Computer Aided Test Tool (eCATT), which is the SAP’s document interface for communication between SAP and testing applications. Your eCATT must be set up correctly in order to implement this integration with Certify.
This chapter will guide you on how to make the following changes to your SAP Server:
• Set up your SAP extended Computer Aided Test Tool (eCATT).
• Register Certify as a test tool.
• Enable third-party test case types.
• Create a new SAP user to communicate between SAP eCATT and Certify.
Before you begin, you will need to:
• Install both Certify and the SAP GUI client on the client machine where you will be using Certify in combination with your SAP Solution Manager.
• If you access your SAP Server through an SAP gateway, then you must create a registry key on the client that defines your default SAP GUI connection.
Setting Up SAP eCATT
The SAP Central Test Management System uses an eCATT test script to test all of the components on all systems. The test system and the central test management system communicate through the remote function call (RFC) interface. Even for an automated test run, a connection via RFC always requires an interaction with the user because the client, user name, and password must be re-entered for every system called by RFC. Although this problem could be solved by storing the logon data in the RFC connection, it is not recommended for security reasons.
The procedure recommended by SAP is to set up a trusted RFC connection that requires neither a manual logon to the target server nor the logon data be stored anywhere. An exact instruction for setting up a trusted RFC connection can be found in SAP Note 128447.
When you set up your SAP eCATT, you must do the following tasks:
• Verify the SAP support package level.
• Create explicit permissions for every client that will test via eCATT.
• Enable scripting with transaction rz11.
• Remove existing parameter pre-assignments.
8 Worksoft Certify Integration with SAP Solution Manager Installation Guide
Setting Up SAP eCATT
To verify SAP support package level:
First, all systems to be tested must fulfill specific minimum requirements regarding the installed support package levels.
You will need to verify that your system meets the required support package level. For more information about required release and support levels, see SAP Note 519858.
To create explicit permission for every client that will test via eCATT:
An explicit permission must be set for every client that has an automated test which will run via eCATT.
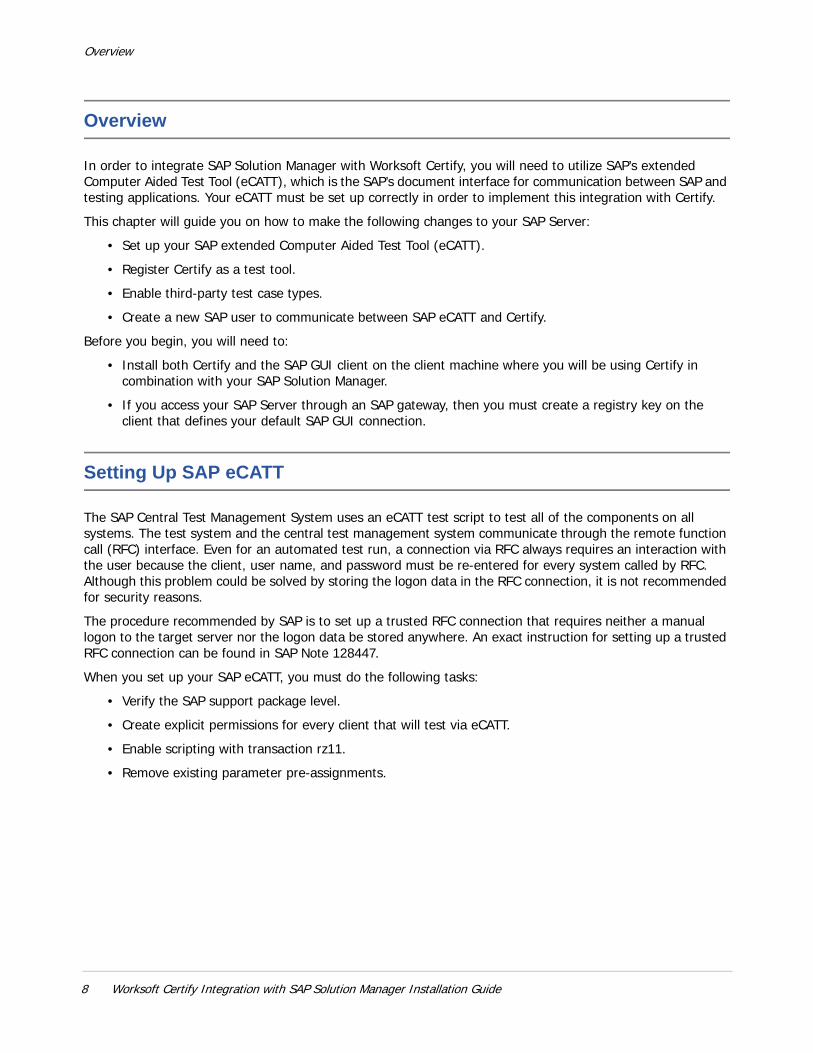
1 From Solution Manager, type the transaction code SCC4 in the Command field of the SAP toolbar.
2 Press <Enter>.
The Display View Contents: Overview screen appears.
3 Click the Display > Change button.
The New Entries button appears.
4 Click the New Entries button.
The New Entries: Details of Added Entries screen appears.
Worksoft Certify Integration with SAP Solution Manager Installation Guide 9
Setting Up SAP eCATT
5 Fill in the information about the client.
6 In the Cross-Client Object Changes field, select Changes to Repository and cross-client Customizing allowed from the drop-down list.
7 In the CATT and eCATT Restrictions field, select one of the following options.
8 Repeat the process to create all of your clients.
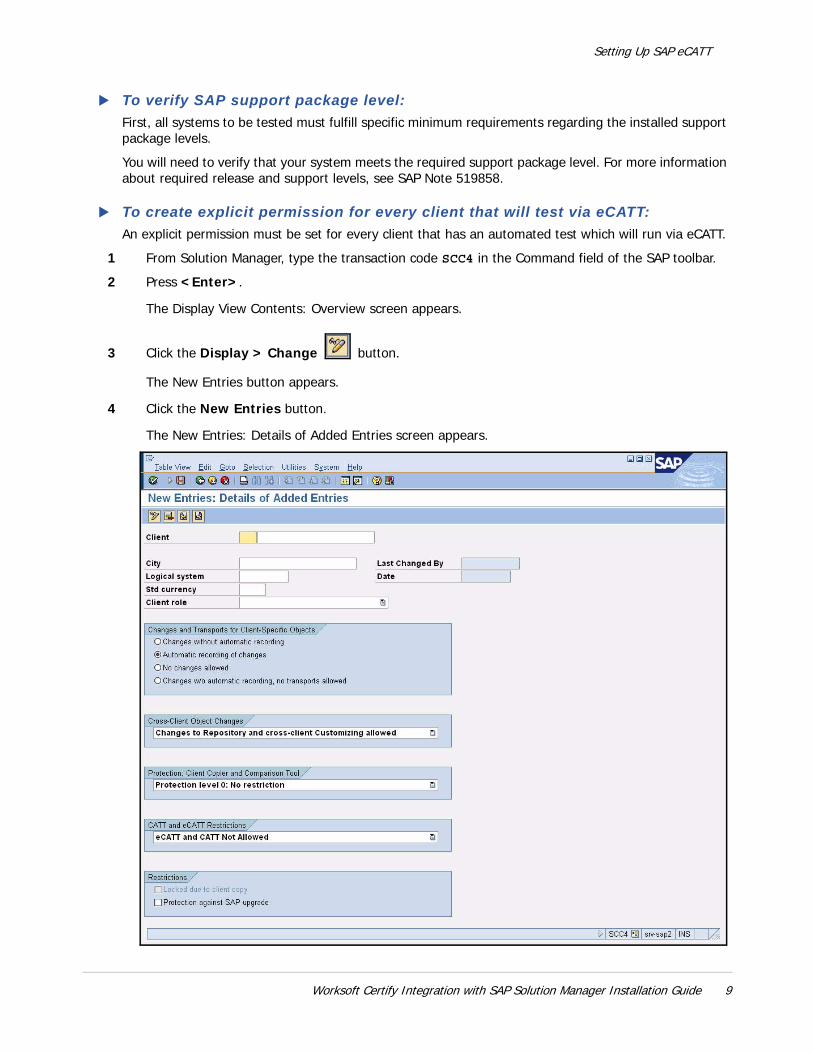
To enable scripting with transaction rz11:
1 From the SAP GUI interface, type rz11 in the Command field of the SAP toolbar.
2 Press <Enter>.
The Maintain Profile Parameter screen appears.
3 In the Param Name field, type the following: sapgui/user_scripting.
4 Click Display.
Option Description
eCATT and CATT Allowed Enables you to implement eCATT and CATT without restrictions. Using inline ABAP and function modules, any code can be run on the target system (security).
eCATT and CATT Only Allowed for ‘Trusted RFC’
Automated test cases can be started only if the target system has been addressed via a trusted RFC connection. In this case, the full range of functions can be implemented for tests on this client.
eCATT Allowed, but FUN/ABAP and CATT not Allowed
Only transactions can be executed in the target client. They must be addressed via eCATT.
eCATT Allowed, but FUN/ABAP and CATT only for ‘Trusted RFC’
This protection level allows calling function modules and executing inline ABAP provided that the connection to the target system is established via a trusted RFC.
10 Worksoft Certify Integration with SAP Solution Manager Installation Guide
Setting Up SAP eCATT
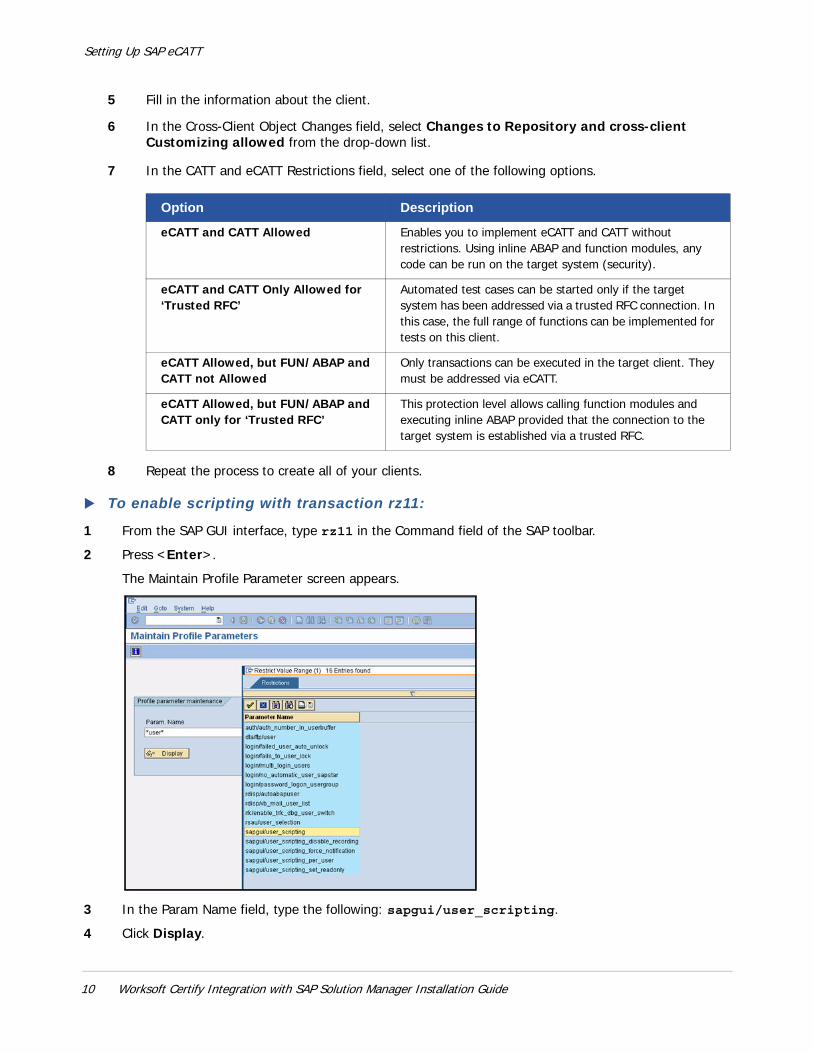
The Display Profile Parameter Attributes screen appears.
5 Click the Change Value button.
The Change Parameter Value screen appears.
6 In the New Value field, type TRUE.
7 Click the Save button.
8 Repeat Step 3 through Step 7 for the following parameters:
Parameter Value
sapgui/user_scripting_disable_recording FALSE
sapgui/user_scripting_force_notification FALSE
sapgui/user_scripting_set_readonly FALSE
Worksoft Certify Integration with SAP Solution Manager Installation Guide 11
Setting Up SAP eCATT
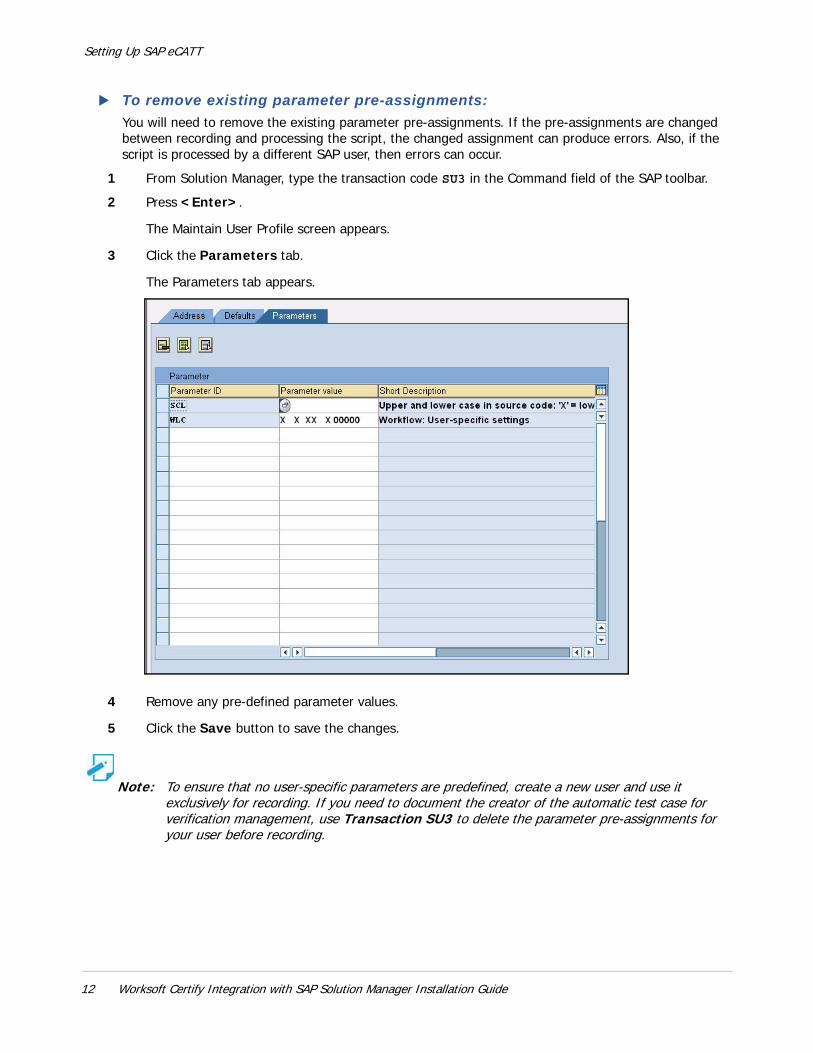
To remove existing parameter pre-assignments:
You will need to remove the existing parameter pre-assignments. If the pre-assignments are changed between recording and processing the script, the changed assignment can produce errors. Also, if the script is processed by a different SAP user, then errors can occur.
1 From Solution Manager, type the transaction code SU3 in the Command field of the SAP toolbar.
2 Press <Enter>.
The Maintain User Profile screen appears.
3 Click the Parameters tab.
The Parameters tab appears.
4 Remove any pre-defined parameter values.
5 Click the Save button to save the changes.
Note: To ensure that no user-specific parameters are predefined, create a new user and use it exclusively for recording. If you need to document the creator of the automatic test case for verification management, use Transaction SU3 to delete the parameter pre-assignments for your user before recording.
12 Worksoft Certify Integration with SAP Solution Manager Installation Guide
Registering Certify as a Third-Party Test Tool
Registering Certify as a Third-Party Test Tool
In order to enable the integration with Solution Manager, you must register Worksoft Certify as a third-party test tool. To register Certify as a test tool, you will need to first navigate to the Solution Manager registration tool.
To navigate to the Solution Manager registration tool:
This procedure will show you the two different ways to navigate to the registration tool.
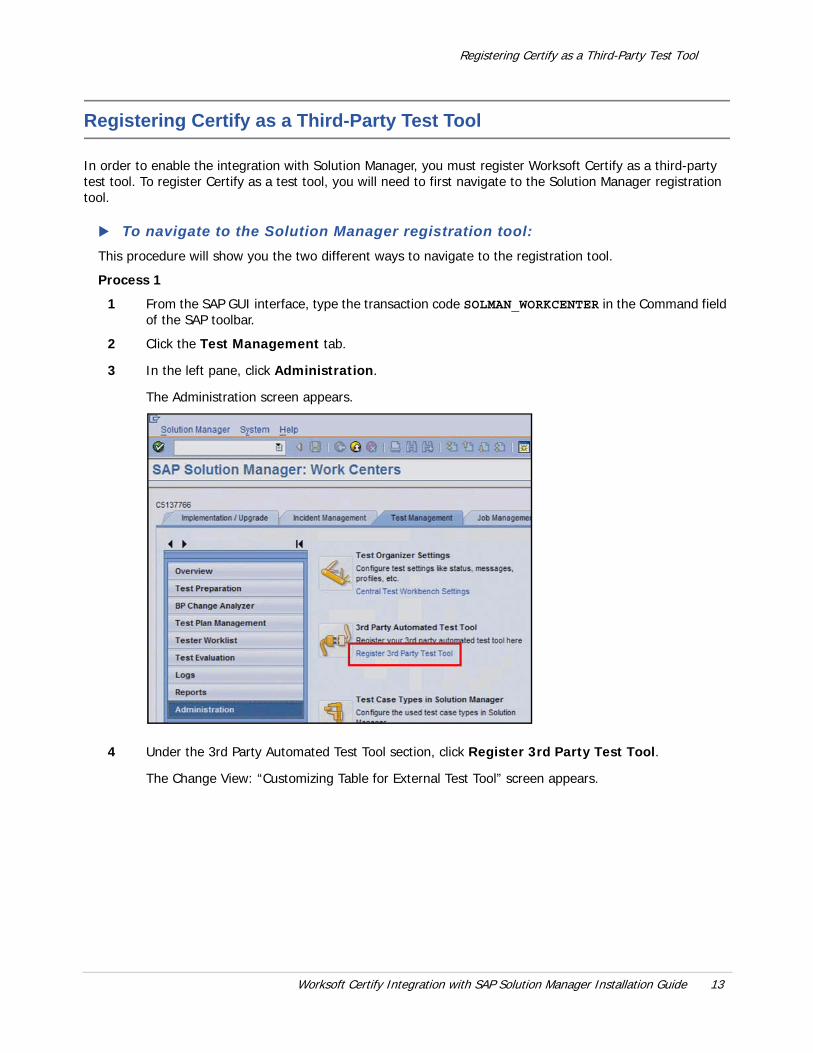
Process 1
1 From the SAP GUI interface, type the transaction code SOLMAN_WORKCENTER in the Command field of the SAP toolbar.
2 Click the Test Management tab.
3 In the left pane, click Administration.
The Administration screen appears.
4 Under the 3rd Party Automated Test Tool section, click Register 3rd Party Test Tool.
The Change View: “Customizing Table for External Test Tool” screen appears.
Worksoft Certify Integration with SAP Solution Manager Installation Guide 13
Registering Certify as a Third-Party Test Tool
Process 2
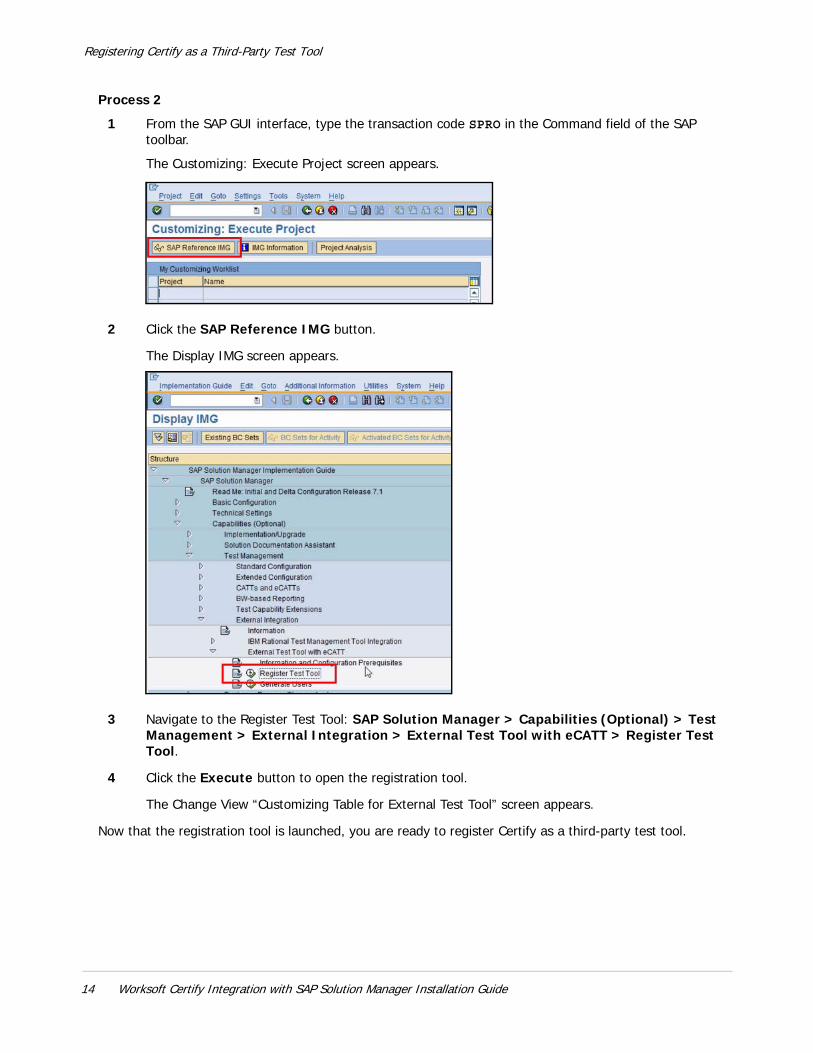
1 From the SAP GUI interface, type the transaction code SPRO in the Command field of the SAP toolbar.
The Customizing: Execute Project screen appears.
2 Click the SAP Reference IMG button.
The Display IMG screen appears.
3 Navigate to the Register Test Tool: SAP Solution Manager > Capabilities (Optional) > Test Management > External Integration > External Test Tool with eCATT > Register Test Tool.
4 Click the Execute button to open the registration tool.
The Change View “Customizing Table for External Test Tool” screen appears.
Now that the registration tool is launched, you are ready to register Certify as a third-party test tool.
14 Worksoft Certify Integration with SAP Solution Manager Installation Guide
Registering Certify as a Third-Party Test Tool
To register Worksoft Certify as a third-party test tool:
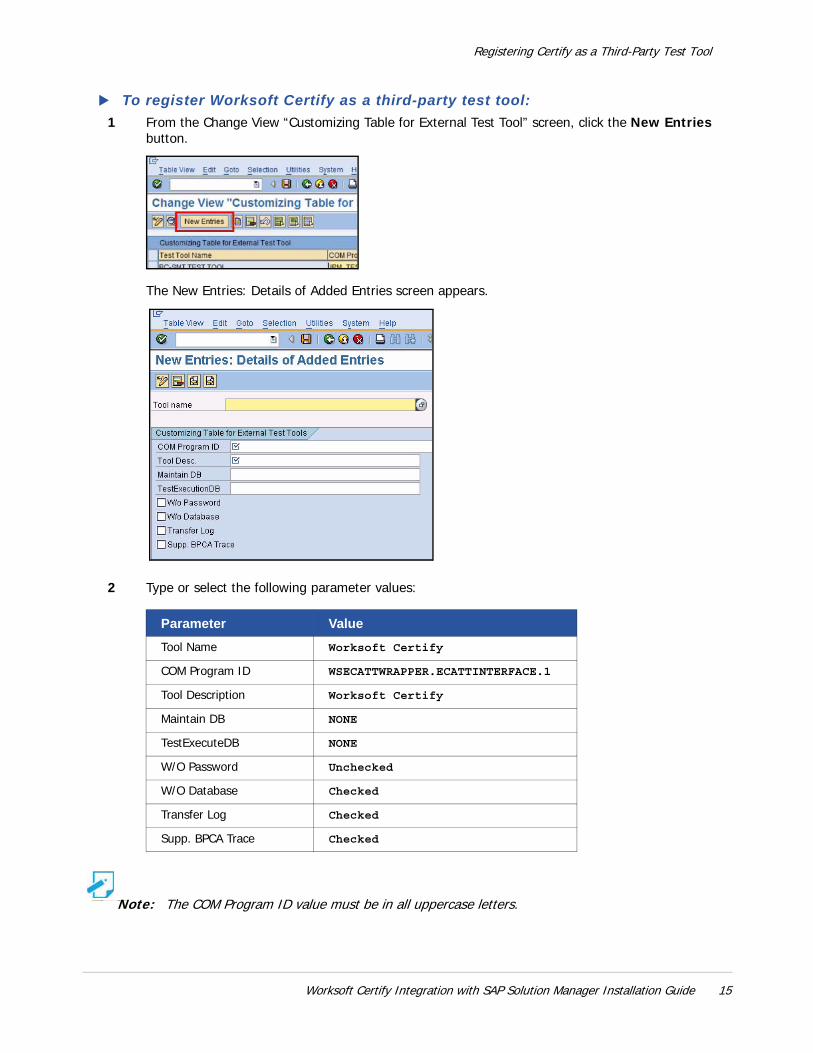
1 From the Change View “Customizing Table for External Test Tool” screen, click the New Entries button.
The New Entries: Details of Added Entries screen appears.
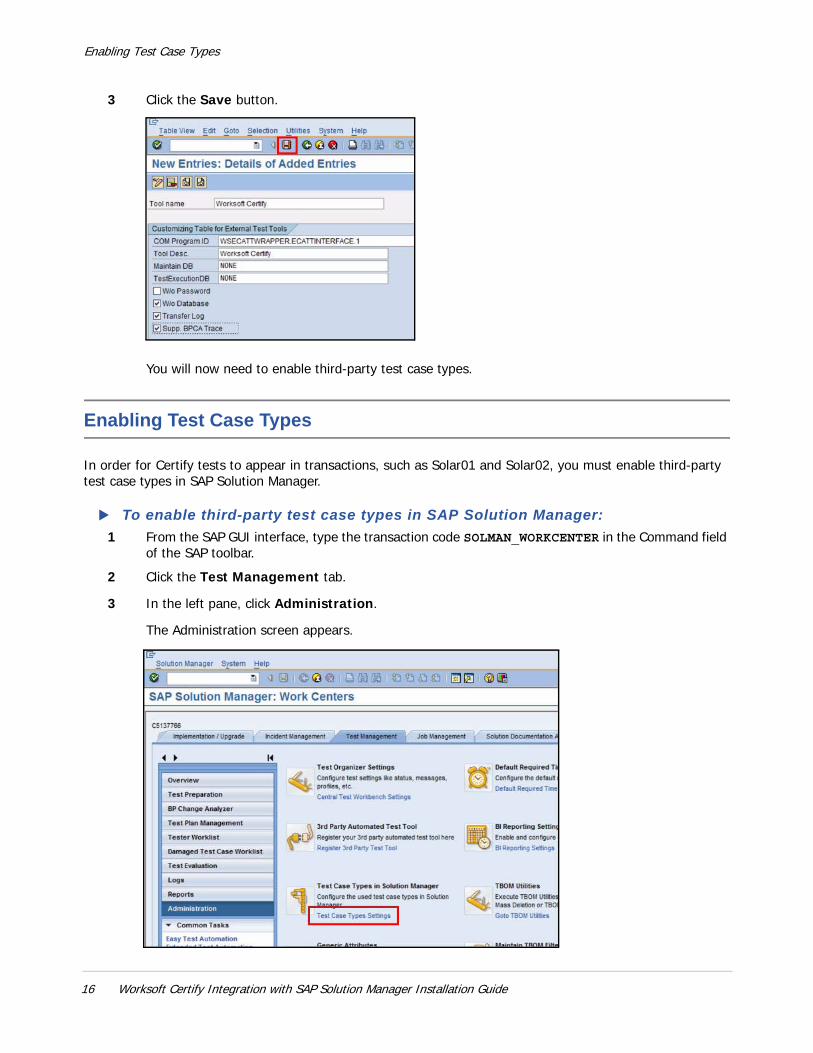
2 Type or select the following parameter values:
Note: The COM Program ID value must be in all uppercase letters.
Parameter Value
Tool Name Worksoft Certify
COM Program ID WSECATTWRAPPER.ECATTINTERFACE.1
Tool Description Worksoft Certify
Maintain DB NONE
TestExecuteDB NONE
W/O Password Unchecked
W/O Database Checked
Transfer Log Checked
Supp. BPCA Trace Checked
Worksoft Certify Integration with SAP Solution Manager Installation Guide 15
Enabling Test Case Types
3 Click the Save button.
You will now need to enable third-party test case types.
Enabling Test Case Types
In order for Certify tests to appear in transactions, such as Solar01 and Solar02, you must enable third-party test case types in SAP Solution Manager.
To enable third-party test case types in SAP Solution Manager:
1 From the SAP GUI interface, type the transaction code SOLMAN_WORKCENTER in the Command field of the SAP toolbar.
2 Click the Test Management tab.
3 In the left pane, click Administration.
The Administration screen appears.
16 Worksoft Certify Integration with SAP Solution Manager Installation Guide
Creating an eCATT Role and User Account
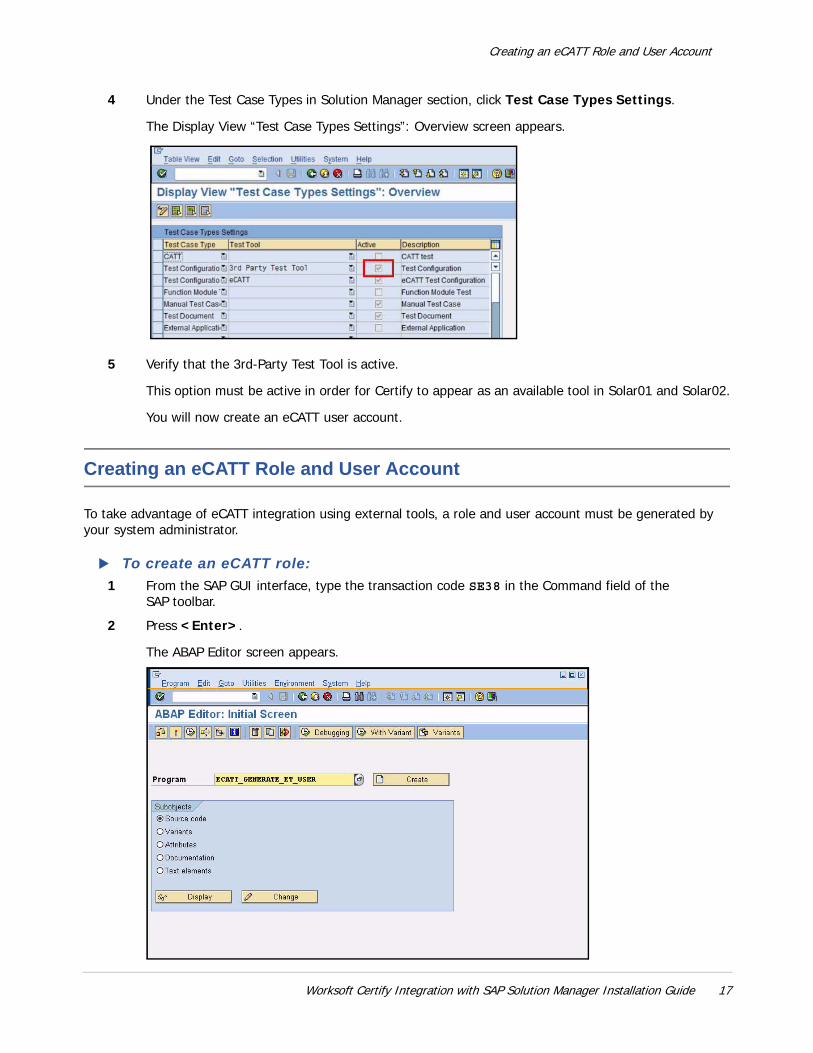
4 Under the Test Case Types in Solution Manager section, click Test Case Types Settings.
The Display View “Test Case Types Settings”: Overview screen appears.
5 Verify that the 3rd-Party Test Tool is active.
This option must be active in order for Certify to appear as an available tool in Solar01 and Solar02.
You will now create an eCATT user account.
Creating an eCATT Role and User Account
To take advantage of eCATT integration using external tools, a role and user account must be generated by your system administrator.
To create an eCATT role:
1 From the SAP GUI interface, type the transaction code SE38 in the Command field of the SAP toolbar.
2 Press <Enter>.
The ABAP Editor screen appears.
Worksoft Certify Integration with SAP Solution Manager Installation Guide 17
Creating an eCATT Role and User Account
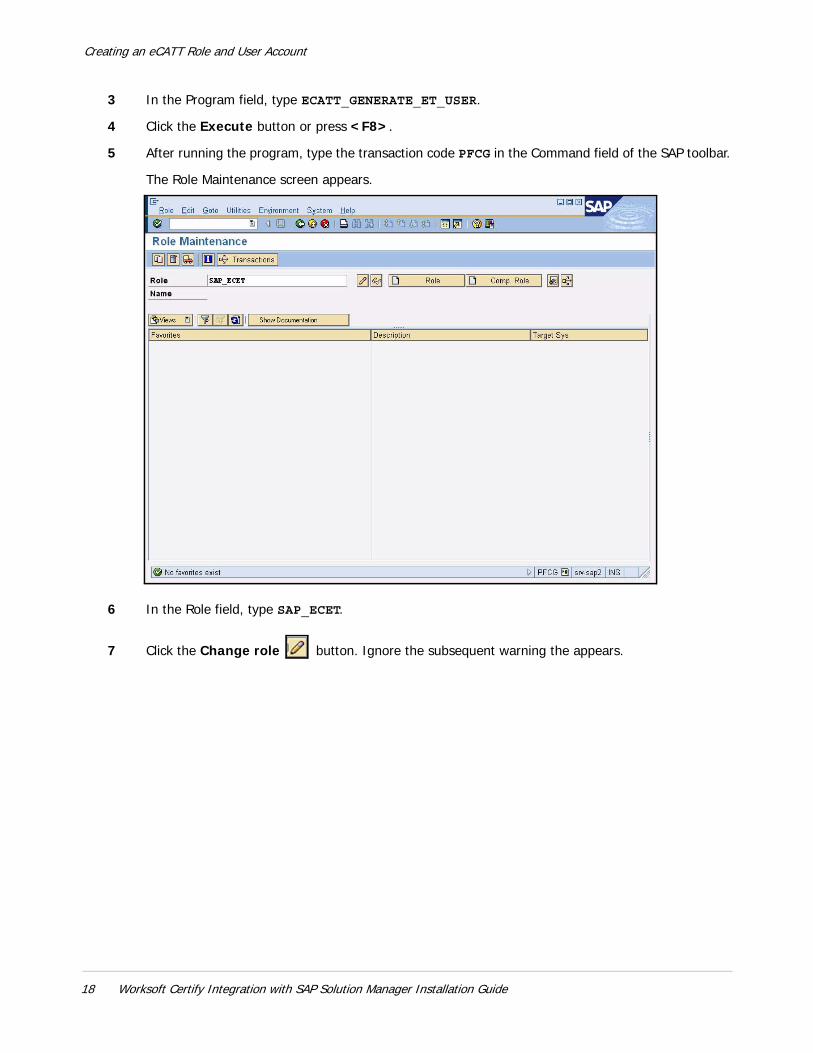
3 In the Program field, type ECATT_GENERATE_ET_USER.
4 Click the Execute button or press <F8>.
5 After running the program, type the transaction code PFCG in the Command field of the SAP toolbar.
The Role Maintenance screen appears.
6 In the Role field, type SAP_ECET.
7 Click the Change role button. Ignore the subsequent warning the appears.
18 Worksoft Certify Integration with SAP Solution Manager Installation Guide

Creating an eCATT Role and User Account
The Change Role screen appears.
8 Click the Authorizations tab.
The Save Role messages appears.
9 Click Yes to save the role.
The Authorizations tab opens.
10 Click the Change Authorization Data button.
Worksoft Certify Integration with SAP Solution Manager Installation Guide 19
Creating an eCATT Role and User Account
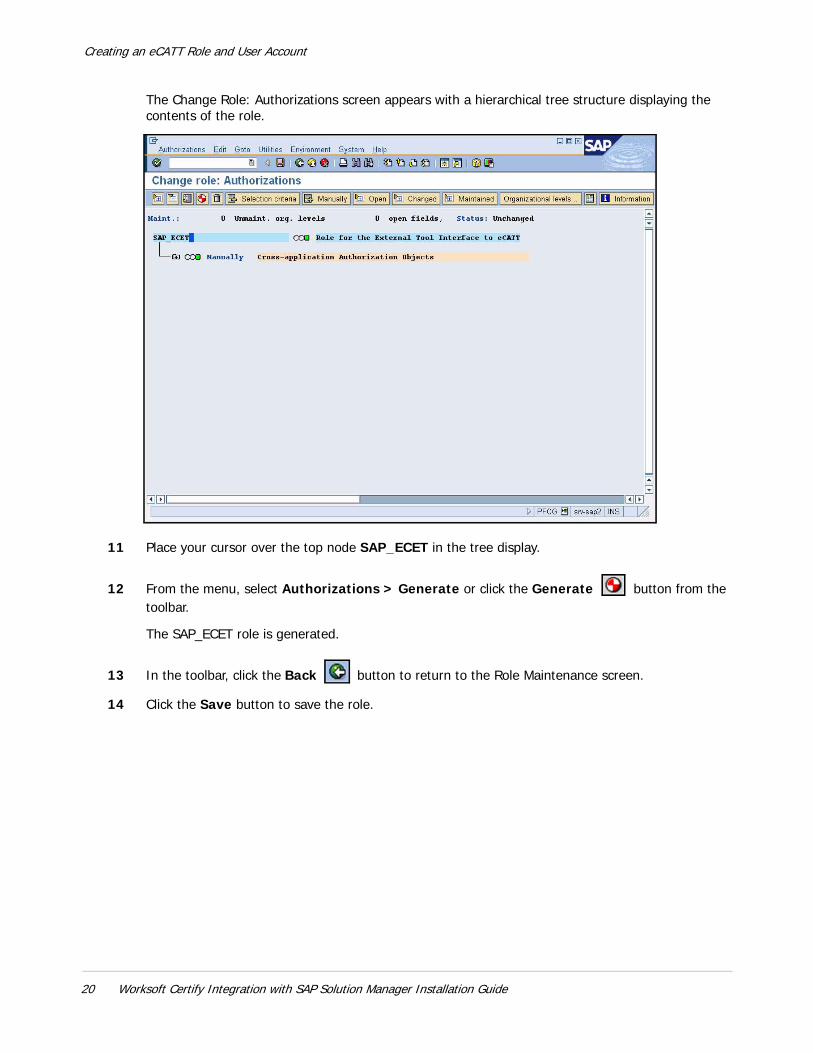
The Change Role: Authorizations screen appears with a hierarchical tree structure displaying the contents of the role.
11 Place your cursor over the top node SAP_ECET in the tree display.
12 From the menu, select Authorizations > Generate or click the Generate button from the toolbar.
The SAP_ECET role is generated.
13 In the toolbar, click the Back button to return to the Role Maintenance screen.
14 Click the Save button to save the role.
20 Worksoft Certify Integration with SAP Solution Manager Installation Guide

Creating an eCATT Role and User Account
To create an eCatt user account:
1 Type the transaction code SU01 in the Command field of the SAP toolbar.
2 Press <Enter>.
The User Maintenance screen appears.
3 In the User field, type ECATT_ET_USR.
4 Click the Change Password button.
The Change Password dialog box appears.
5 In the New Password and Repeat Password fields, type a secure password. Passwords are limited to 32 characters.
6 Press <Enter>.
7 Log off of SAP.
Your new user is now enabled to communicate between SAP eCATT and Certify.
Now that you have completed configuring Solution Manager, you will need to configure Certify.
Worksoft Certify Integration with SAP Solution Manager Installation Guide 21
Chapter 3 Configuring Worksoft Certify
In This Chapter
Creating a User Named ECATTUser in Certify ............................................................. 23
Configuring Global Settings for Solution Manager Integration ...................................... 24
Worksoft Certify Integration with SAP Solution Manager Installation Guide 22
Creating a User Named ECATTUser in Certify
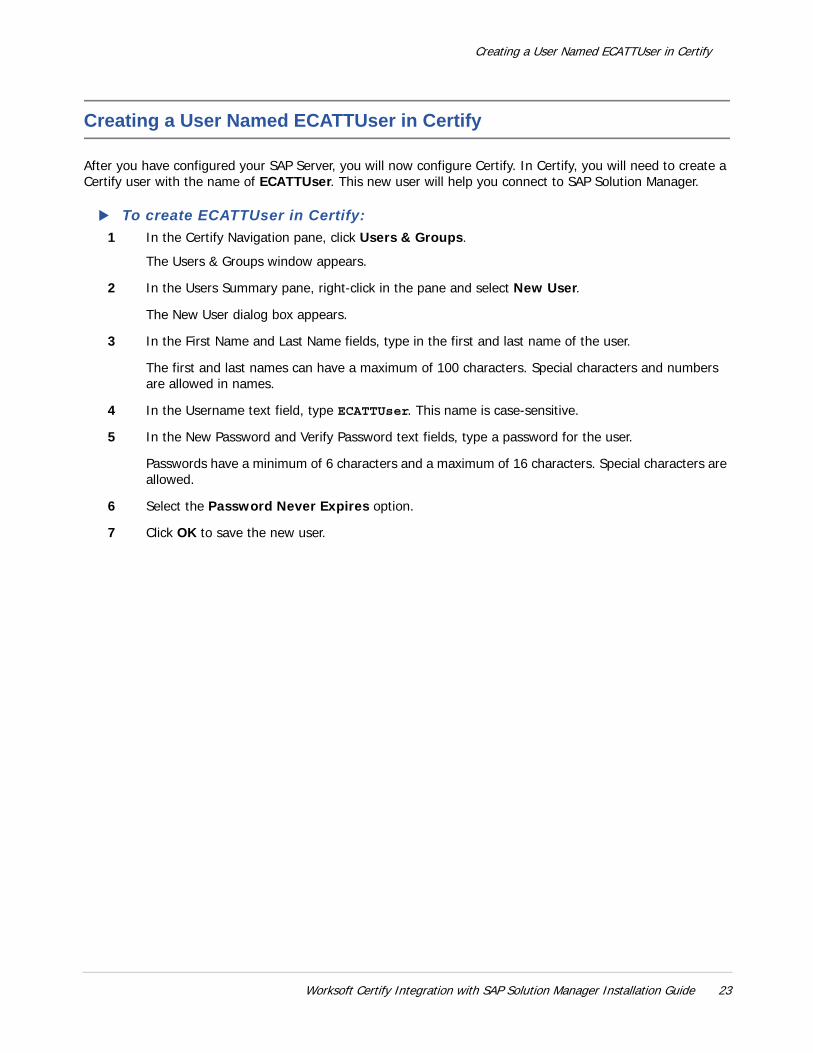
Creating a User Named ECATTUser in Certify
After you have configured your SAP Server, you will now configure Certify. In Certify, you will need to create a Certify user with the name of ECATTUser. This new user will help you connect to SAP Solution Manager.
To create ECATTUser in Certify:
1 In the Certify Navigation pane, click Users & Groups.
The Users & Groups window appears.
2 In the Users Summary pane, right-click in the pane and select New User.
The New User dialog box appears.
3 In the First Name and Last Name fields, type in the first and last name of the user.
The first and last names can have a maximum of 100 characters. Special characters and numbers are allowed in names.
4 In the Username text field, type ECATTUser. This name is case-sensitive.
5 In the New Password and Verify Password text fields, type a password for the user.
Passwords have a minimum of 6 characters and a maximum of 16 characters. Special characters are allowed.
6 Select the Password Never Expires option.
7 Click OK to save the new user.
Worksoft Certify Integration with SAP Solution Manager Installation Guide 23
Configuring Global Settings for Solution Manager Integration
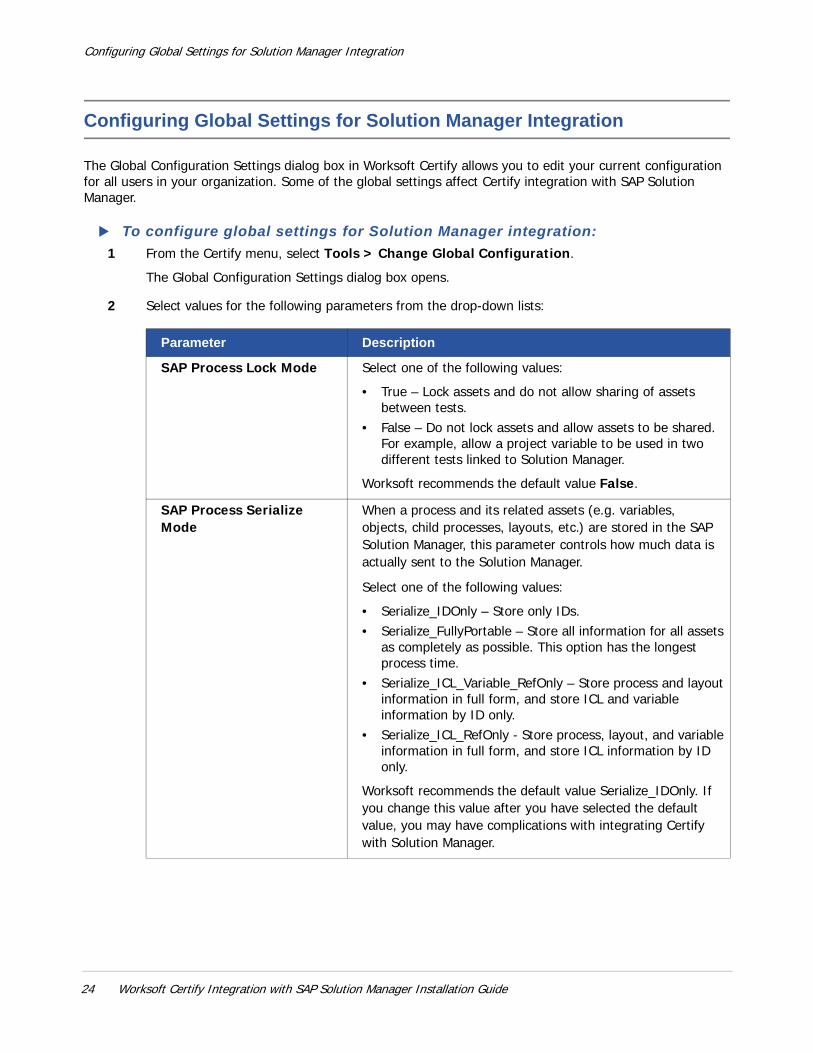
Configuring Global Settings for Solution Manager Integration
The Global Configuration Settings dialog box in Worksoft Certify allows you to edit your current configuration for all users in your organization. Some of the global settings affect Certify integration with SAP Solution Manager.
To configure global settings for Solution Manager integration:
1 From the Certify menu, select Tools > Change Global Configuration.
The Global Configuration Settings dialog box opens.
2 Select values for the following parameters from the drop-down lists:
Parameter Description
SAP Process Lock Mode Select one of the following values:
• True – Lock assets and do not allow sharing of assets between tests.
• False – Do not lock assets and allow assets to be shared. For example, allow a project variable to be used in two different tests linked to Solution Manager.
Worksoft recommends the default value False.
SAP Process Serialize Mode
When a process and its related assets (e.g. variables, objects, child processes, layouts, etc.) are stored in the SAP Solution Manager, this parameter controls how much data is actually sent to the Solution Manager.
Select one of the following values:
• Serialize_IDOnly – Store only IDs. • Serialize_FullyPortable – Store all information for all assets
as completely as possible. This option has the longest process time.
• Serialize_ICL_Variable_RefOnly – Store process and layout information in full form, and store ICL and variable information by ID only.
• Serialize_ICL_RefOnly - Store process, layout, and variable information in full form, and store ICL information by ID only.
Worksoft recommends the default value Serialize_IDOnly. If you change this value after you have selected the default value, you may have complications with integrating Certify with Solution Manager.
24 Worksoft Certify Integration with SAP Solution Manager Installation Guide
Configuring Global Settings for Solution Manager Integration
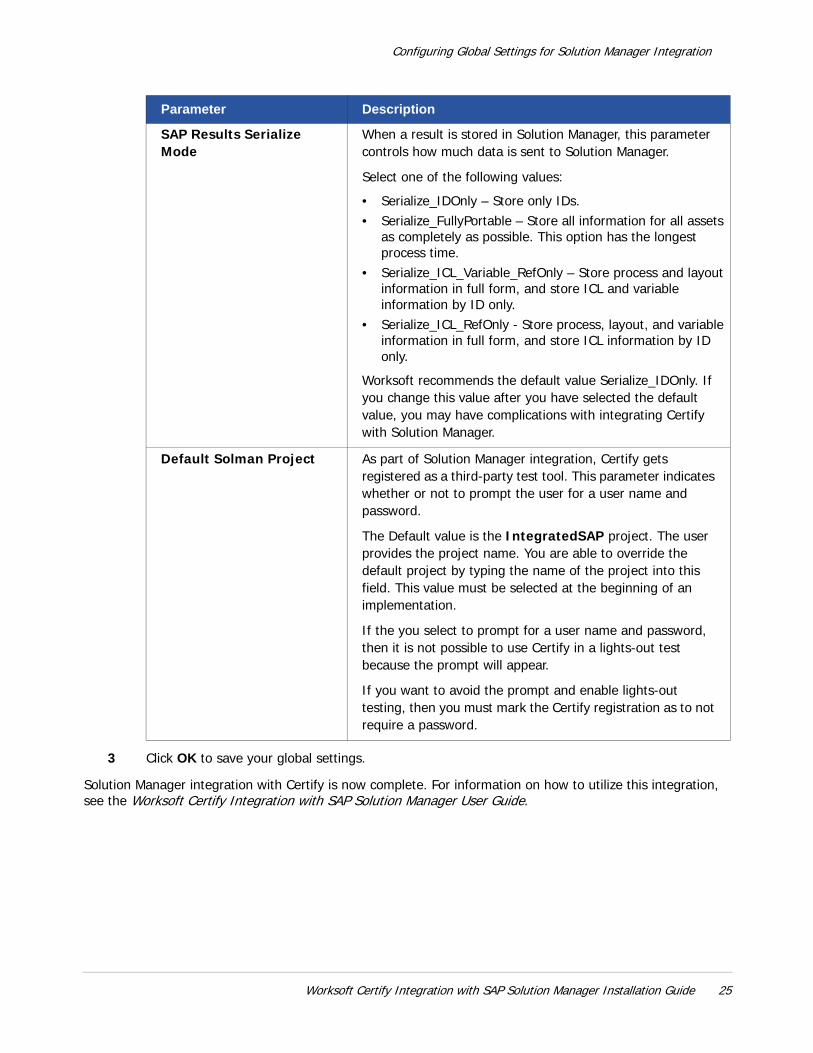
3 Click OK to save your global settings.
Solution Manager integration with Certify is now complete. For information on how to utilize this integration, see the Worksoft Certify Integration with SAP Solution Manager User Guide.
SAP Results Serialize Mode
When a result is stored in Solution Manager, this parameter controls how much data is sent to Solution Manager.
Select one of the following values:
• Serialize_IDOnly – Store only IDs. • Serialize_FullyPortable – Store all information for all assets
as completely as possible. This option has the longest process time.
• Serialize_ICL_Variable_RefOnly – Store process and layout information in full form, and store ICL and variable information by ID only.
• Serialize_ICL_RefOnly - Store process, layout, and variable information in full form, and store ICL information by ID only.
Worksoft recommends the default value Serialize_IDOnly. If you change this value after you have selected the default value, you may have complications with integrating Certify with Solution Manager.
Default Solman Project As part of Solution Manager integration, Certify gets registered as a third-party test tool. This parameter indicates whether or not to prompt the user for a user name and password.
The Default value is the IntegratedSAP project. The user provides the project name. You are able to override the default project by typing the name of the project into this field. This value must be selected at the beginning of an implementation.
If the you select to prompt for a user name and password, then it is not possible to use Certify in a lights-out test because the prompt will appear.
If you want to avoid the prompt and enable lights-out testing, then you must mark the Certify registration as to not require a password.
Parameter Description
Worksoft Certify Integration with SAP Solution Manager Installation Guide 25

Appendix A Troubleshooting
This appendix provides guidance on how to troubleshoot your integration between Worksoft Certify and SAP Solution Manager.
Verifying ECATT_ET_USR User is Not Locked
The ABAP code in Solution Manager uses a well-known user name and password. The well-known user name is ecatt_et_usr. User names are generally not case sensitive, so ecatt_et_usr and ECATT_ET_USR are treated the same.
This user name and password is sent from Solution Manager to Certify where Certify uses them to make Remote Functional Calls (RFC) back into Solution Manager. In order for calls to work, the user name ECATT_ET_URR must not be locked. If this user name is locked, you will need to unlock it.
To verify ECATT_ET_USR is not locked:
1 Log on to your Solution Manager.
The SAP Easy Access Solution Manager screen appears.
2 Type the transaction code su01 in the Command field.
3 Press <Enter>.
The User Maintenance screen appears.
4 Click the Lock/Unlock button.
Worksoft Certify Integration with SAP Solution Manager Installation Guide 26
Solution Manager Submits Wrong Password to Certify
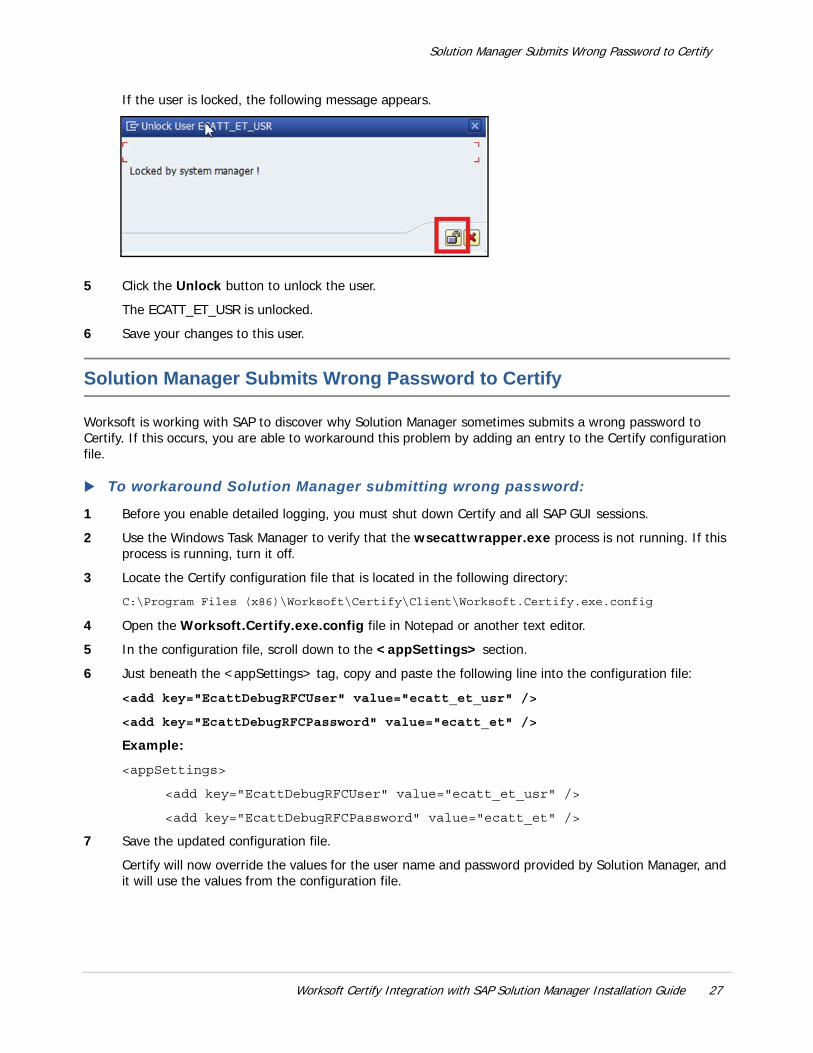
If the user is locked, the following message appears.
5 Click the Unlock button to unlock the user.
The ECATT_ET_USR is unlocked.
6 Save your changes to this user.
Solution Manager Submits Wrong Password to Certify
Worksoft is working with SAP to discover why Solution Manager sometimes submits a wrong password to Certify. If this occurs, you are able to workaround this problem by adding an entry to the Certify configuration file.
To workaround Solution Manager submitting wrong password:
1 Before you enable detailed logging, you must shut down Certify and all SAP GUI sessions.
2 Use the Windows Task Manager to verify that the wsecattwrapper.exe process is not running. If this process is running, turn it off.
3 Locate the Certify configuration file that is located in the following directory:
C:\Program Files (x86)\Worksoft\Certify\Client\Worksoft.Certify.exe.config
4 Open the Worksoft.Certify.exe.config file in Notepad or another text editor.
5 In the configuration file, scroll down to the <appSettings> section.
6 Just beneath the <appSettings> tag, copy and paste the following line into the configuration file:
<add key="EcattDebugRFCUser" value="ecatt_et_usr" />
<add key="EcattDebugRFCPassword" value="ecatt_et" />
Example:
<appSettings>
<add key="EcattDebugRFCUser" value="ecatt_et_usr" />
<add key="EcattDebugRFCPassword" value="ecatt_et" />
7 Save the updated configuration file.
Certify will now override the values for the user name and password provided by Solution Manager, and it will use the values from the configuration file.
Worksoft Certify Integration with SAP Solution Manager Installation Guide 27