Installation Guide - Lenelpartner.lenel.com/file/onguard/7.0/userguides/Installation.pdf · OnGuard...
124
7.0 Installation Guide
Transcript of Installation Guide - Lenelpartner.lenel.com/file/onguard/7.0/userguides/Installation.pdf · OnGuard...
7.0
Installation Guide

Lenel OnGuard® 7.0 Installation GuideThis guide is item number DOC-110, revision 4.077, August 2014Copyright © 1995-2014 Lenel Systems International, Inc. Information in this document is subject to change without notice. No part of this document may be reproduced or transmitted in any form or by any means, electronic or mechanical, for any purpose, without the express written permission of Lenel Systems International, Inc.Non-English versions of Lenel documents are offered as a service to our global audiences. We have attempted to provide an accurate translation of the text, but the official text is the English text, and any differences in the translation are not binding and have no legal effect.The software described in this document is furnished under a license agreement and may only be used in accordance with the terms of that agreement. Lenel and OnGuard are registered trademarks of Lenel Systems International, Inc.Microsoft, Windows, and Windows Server are either registered trademarks or trademarks of Microsoft Corporation in the United States and/or other countries. Integral and FlashPoint are trademarks of Integral Technologies, Inc. Crystal Reports for Windows is a trademark of Crystal Computer Services, Inc. Oracle is a registered trademark of Oracle Corporation. Other product names mentioned in this User Guide may be trademarks or registered trademarks of their respective companies and are hereby acknowledged. Portions of this product were created using LEADTOOLS © 1991-2014 LEAD Technologies, Inc. ALL RIGHTS RESERVED.OnGuard includes ImageStream® Graphic Filters. Copyright © 1991-2014 Inso Corporation. All rights reserved. ImageStream Graphic Filters and ImageStream are registered trademarks of Inso Corporation.

Table of Contents
CHAPTER 1 About This Guide . . . . . . . . . . . . . . . . . . . . . . . . . . . . . . . . . . . . . . . . .9Vocabulary Used . . . . . . . . . . . . . . . . . . . . . . . . . . . . . . . . . . . . . . . . . . . . . . . . . . . . . . . . . . . . . . . .9
CHAPTER 2 Introduction . . . . . . . . . . . . . . . . . . . . . . . . . . . . . . . . . . . . . . . . . . . . 11Required Installations . . . . . . . . . . . . . . . . . . . . . . . . . . . . . . . . . . . . . . . . . . . . . . . . . . . . . . . . . . .11Steps for Installing OnGuard . . . . . . . . . . . . . . . . . . . . . . . . . . . . . . . . . . . . . . . . . . . . . . . . . . . . .12
Installing OnGuard with SQL Server . . . . . . . . . . . . . . . . . . . . . . . . . . . . . . . . . . . . . . . . . . . . . . . . . . . . 12
CHAPTER 3 Database Backup and Restoration . . . . . . . . . . . . . . . . . . . . . . . . . .15Backing Up Your Database to File . . . . . . . . . . . . . . . . . . . . . . . . . . . . . . . . . . . . . . . . . . . . . . . . .15
Automatic Back Up to a File on SQL Server Database . . . . . . . . . . . . . . . . . . . . . . . . . . . . . . . . . . . . . . 15One-Time Back Up to a File with SQL Server Express Edition . . . . . . . . . . . . . . . . . . . . . . . . . . . . . . . . 17
Restoring Databases . . . . . . . . . . . . . . . . . . . . . . . . . . . . . . . . . . . . . . . . . . . . . . . . . . . . . . . . . . . .17Restore Microsoft SQL Server Database from a File . . . . . . . . . . . . . . . . . . . . . . . . . . . . . . . . . . . . . . . 17
CHAPTER 4 Transfer a SQL Server Desktop Engine Database . . . . . . . . . . . . . .19Steps to Transfer a SQL Server Express Database . . . . . . . . . . . . . . . . . . . . . . . . . . . . . . . . . . . . .19
Ensure Minimum Server Requirements are Met . . . . . . . . . . . . . . . . . . . . . . . . . . . . . . . . . . . . . . . . . . . 19Stop the SQL Server Service . . . . . . . . . . . . . . . . . . . . . . . . . . . . . . . . . . . . . . . . . . . . . . . . . . . . . . . . . . 19Copy Files from the Old Server to the New Server . . . . . . . . . . . . . . . . . . . . . . . . . . . . . . . . . . . . . . . . . 20Restart the SQL Server Service . . . . . . . . . . . . . . . . . . . . . . . . . . . . . . . . . . . . . . . . . . . . . . . . . . . . . . . . 20Attaching the AccessControl Database . . . . . . . . . . . . . . . . . . . . . . . . . . . . . . . . . . . . . . . . . . . . . . . . . . 20Change the Database Owner . . . . . . . . . . . . . . . . . . . . . . . . . . . . . . . . . . . . . . . . . . . . . . . . . . . . . . . . . . 20Verify the Database Transfer was Successful . . . . . . . . . . . . . . . . . . . . . . . . . . . . . . . . . . . . . . . . . . . . . . 21
Installation Guide 3
Table of Contents
CHAPTER 5 Microsoft SQL Server . . . . . . . . . . . . . . . . . . . . . . . . . . . . . . . . . . . . 23Prerequisites . . . . . . . . . . . . . . . . . . . . . . . . . . . . . . . . . . . . . . . . . . . . . . . . . . . . . . . . . . . . . . . . . . 23SQL Server Express Edition . . . . . . . . . . . . . . . . . . . . . . . . . . . . . . . . . . . . . . . . . . . . . . . . . . . . . 23
Installing or Upgrading SQL Server 2014 Express Edition . . . . . . . . . . . . . . . . . . . . . . . . . . . . . . . . . . 24Installing or Upgrading SQL Server 2012 Express Edition . . . . . . . . . . . . . . . . . . . . . . . . . . . . . . . . . . 25Installing SQL Server Management Tools . . . . . . . . . . . . . . . . . . . . . . . . . . . . . . . . . . . . . . . . . . . . . . . . 26
SQL Server Standard Edition . . . . . . . . . . . . . . . . . . . . . . . . . . . . . . . . . . . . . . . . . . . . . . . . . . . . . 26Installation Steps . . . . . . . . . . . . . . . . . . . . . . . . . . . . . . . . . . . . . . . . . . . . . . . . . . . . . . . . . . . . . . . . . . . 26Upgrade Steps . . . . . . . . . . . . . . . . . . . . . . . . . . . . . . . . . . . . . . . . . . . . . . . . . . . . . . . . . . . . . . . . . . . . . 26SQL Server . . . . . . . . . . . . . . . . . . . . . . . . . . . . . . . . . . . . . . . . . . . . . . . . . . . . . . . . . . . . . . . . . . . . . . . . 27Configuring SQL Server . . . . . . . . . . . . . . . . . . . . . . . . . . . . . . . . . . . . . . . . . . . . . . . . . . . . . . . . . . . . . 32
CHAPTER 6 Installing OnGuard 7.0 . . . . . . . . . . . . . . . . . . . . . . . . . . . . . . . . . . . 35OnGuard 7.0 Installation Prerequisites . . . . . . . . . . . . . . . . . . . . . . . . . . . . . . . . . . . . . . . . . . . . . 35Installation Procedures . . . . . . . . . . . . . . . . . . . . . . . . . . . . . . . . . . . . . . . . . . . . . . . . . . . . . . . . . . 36
Attach the Hardware Key (License Server Only) . . . . . . . . . . . . . . . . . . . . . . . . . . . . . . . . . . . . . . . . . . . 36Install the OnGuard 7.0 Software . . . . . . . . . . . . . . . . . . . . . . . . . . . . . . . . . . . . . . . . . . . . . . . . . . . . . . 37Setup Assistant . . . . . . . . . . . . . . . . . . . . . . . . . . . . . . . . . . . . . . . . . . . . . . . . . . . . . . . . . . . . . . . . . . . . . 38Security Utility . . . . . . . . . . . . . . . . . . . . . . . . . . . . . . . . . . . . . . . . . . . . . . . . . . . . . . . . . . . . . . . . . . . . . 39Configuration Editor . . . . . . . . . . . . . . . . . . . . . . . . . . . . . . . . . . . . . . . . . . . . . . . . . . . . . . . . . . . . . . . . 39System License . . . . . . . . . . . . . . . . . . . . . . . . . . . . . . . . . . . . . . . . . . . . . . . . . . . . . . . . . . . . . . . . . . . . . 40LS Platform Services . . . . . . . . . . . . . . . . . . . . . . . . . . . . . . . . . . . . . . . . . . . . . . . . . . . . . . . . . . . . . . . . 40Database Installation . . . . . . . . . . . . . . . . . . . . . . . . . . . . . . . . . . . . . . . . . . . . . . . . . . . . . . . . . . . . . . . . 40Database Backup . . . . . . . . . . . . . . . . . . . . . . . . . . . . . . . . . . . . . . . . . . . . . . . . . . . . . . . . . . . . . . . . . . . 40Database Backup (Archival) . . . . . . . . . . . . . . . . . . . . . . . . . . . . . . . . . . . . . . . . . . . . . . . . . . . . . . . . . . 41Database Setup . . . . . . . . . . . . . . . . . . . . . . . . . . . . . . . . . . . . . . . . . . . . . . . . . . . . . . . . . . . . . . . . . . . . 41Database Setup (Archival) . . . . . . . . . . . . . . . . . . . . . . . . . . . . . . . . . . . . . . . . . . . . . . . . . . . . . . . . . . . . 41Service Startup . . . . . . . . . . . . . . . . . . . . . . . . . . . . . . . . . . . . . . . . . . . . . . . . . . . . . . . . . . . . . . . . . . . . . 41Finished . . . . . . . . . . . . . . . . . . . . . . . . . . . . . . . . . . . . . . . . . . . . . . . . . . . . . . . . . . . . . . . . . . . . . . . . . . 42
Manually Running Security Utility . . . . . . . . . . . . . . . . . . . . . . . . . . . . . . . . . . . . . . . . . . . . . . . . 42Install Your OnGuard License . . . . . . . . . . . . . . . . . . . . . . . . . . . . . . . . . . . . . . . . . . . . . . . . . . . . 42
Log into License Administration . . . . . . . . . . . . . . . . . . . . . . . . . . . . . . . . . . . . . . . . . . . . . . . . . . . . . . . 43Changing Administrator Properties for License Administration . . . . . . . . . . . . . . . . . . . . . . . . . . . . . . . 44Install a New License . . . . . . . . . . . . . . . . . . . . . . . . . . . . . . . . . . . . . . . . . . . . . . . . . . . . . . . . . . . . . . . . 44Activate a Software License . . . . . . . . . . . . . . . . . . . . . . . . . . . . . . . . . . . . . . . . . . . . . . . . . . . . . . . . . . . 45Return a Software License . . . . . . . . . . . . . . . . . . . . . . . . . . . . . . . . . . . . . . . . . . . . . . . . . . . . . . . . . . . . 46Repair a Software License . . . . . . . . . . . . . . . . . . . . . . . . . . . . . . . . . . . . . . . . . . . . . . . . . . . . . . . . . . . . 46
Run Database Setup . . . . . . . . . . . . . . . . . . . . . . . . . . . . . . . . . . . . . . . . . . . . . . . . . . . . . . . . . . . . 46Configure the OnGuard Logs Folder . . . . . . . . . . . . . . . . . . . . . . . . . . . . . . . . . . . . . . . . . . . . . . . 47Remotely Hosted Databases . . . . . . . . . . . . . . . . . . . . . . . . . . . . . . . . . . . . . . . . . . . . . . . . . . . . . . 47
CHAPTER 7 Installing OnGuard on a Client Machine . . . . . . . . . . . . . . . . . . . . . 49
CHAPTER 8 Database Authentication for Web Applications . . . . . . . . . . . . . . . . 51Windows Authentication with SQL Server . . . . . . . . . . . . . . . . . . . . . . . . . . . . . . . . . . . . . . . . . . 51
Configure Windows Authentication with SQL Server . . . . . . . . . . . . . . . . . . . . . . . . . . . . . . . . . . . . . . . 51
4 Installation Guide

Table of Contents
Configure Authentication for Reports in Area Access Manager . . . . . . . . . . . . . . . . . . . . . . . . . . . . . . . 52
Windows Authentication with Oracle . . . . . . . . . . . . . . . . . . . . . . . . . . . . . . . . . . . . . . . . . . . . . . .54Create a new Windows user . . . . . . . . . . . . . . . . . . . . . . . . . . . . . . . . . . . . . . . . . . . . . . . . . . . . . . . . . . . 54Add the Windows user to Oracle . . . . . . . . . . . . . . . . . . . . . . . . . . . . . . . . . . . . . . . . . . . . . . . . . . . . . . . 54Verify the Integrated Security Setting . . . . . . . . . . . . . . . . . . . . . . . . . . . . . . . . . . . . . . . . . . . . . . . . . . . 55
Provide Credentials in the Protected File . . . . . . . . . . . . . . . . . . . . . . . . . . . . . . . . . . . . . . . . . . . .55Securing Files with the Access Control List . . . . . . . . . . . . . . . . . . . . . . . . . . . . . . . . . . . . . . . . . . . . . . 55Store the Lenel User Credentials . . . . . . . . . . . . . . . . . . . . . . . . . . . . . . . . . . . . . . . . . . . . . . . . . . . . . . . 56
CHAPTER 9 Configuring the LS Platform Services . . . . . . . . . . . . . . . . . . . . . . . .57Custom Install the LS Platform Services . . . . . . . . . . . . . . . . . . . . . . . . . . . . . . . . . . . . . . . . . . . .57Running Form Translator . . . . . . . . . . . . . . . . . . . . . . . . . . . . . . . . . . . . . . . . . . . . . . . . . . . . . . . .58Internet Information Services (IIS) for Windows Server . . . . . . . . . . . . . . . . . . . . . . . . . . . . . . . .58
Minimum IIS Requirements . . . . . . . . . . . . . . . . . . . . . . . . . . . . . . . . . . . . . . . . . . . . . . . . . . . . . . . . . . . 58Turning Off HTTP and Using DCOM Streaming . . . . . . . . . . . . . . . . . . . . . . . . . . . . . . . . . . . . . . . . . . 59Confirming the .NET Version with Windows Server . . . . . . . . . . . . . . . . . . . . . . . . . . . . . . . . . . . . . . . . 59Creating Virtual Directories . . . . . . . . . . . . . . . . . . . . . . . . . . . . . . . . . . . . . . . . . . . . . . . . . . . . . . . . . . 60Configure SSL . . . . . . . . . . . . . . . . . . . . . . . . . . . . . . . . . . . . . . . . . . . . . . . . . . . . . . . . . . . . . . . . . . . . . 60
Authentication . . . . . . . . . . . . . . . . . . . . . . . . . . . . . . . . . . . . . . . . . . . . . . . . . . . . . . . . . . . . . . . . .61Configure the LS Application Server Service Log On Account . . . . . . . . . . . . . . . . . . . . . . . . . . . . . . . . 61
Area Access Manager and VideoViewer Browser-based Clients . . . . . . . . . . . . . . . . . . . . . . . . . .61Updating the Preferences.js File for SSL . . . . . . . . . . . . . . . . . . . . . . . . . . . . . . . . . . . . . . . . . . . . . . . . . 61Setting Up Single Sign-On for Area Access Manager and VideoViewer . . . . . . . . . . . . . . . . . . . . . . . . . 61Browser-based Reports . . . . . . . . . . . . . . . . . . . . . . . . . . . . . . . . . . . . . . . . . . . . . . . . . . . . . . . . . . . . . . 62Configuration Download Service . . . . . . . . . . . . . . . . . . . . . . . . . . . . . . . . . . . . . . . . . . . . . . . . . . . . . . 62OnGuard User Permissions . . . . . . . . . . . . . . . . . . . . . . . . . . . . . . . . . . . . . . . . . . . . . . . . . . . . . . . . . . . 62
Client Configuration . . . . . . . . . . . . . . . . . . . . . . . . . . . . . . . . . . . . . . . . . . . . . . . . . . . . . . . . . . . .63Internet Browser Security Level . . . . . . . . . . . . . . . . . . . . . . . . . . . . . . . . . . . . . . . . . . . . . . . . . . . . . . . . 63Configure Single Sign-on for Browser-based Clients . . . . . . . . . . . . . . . . . . . . . . . . . . . . . . . . . . . . . . . 64Installing the Server Digital Certificate in Internet Explorer if Using SSL (HTTPS) . . . . . . . . . . . . . . . 64Accessing the Browser-based Applications . . . . . . . . . . . . . . . . . . . . . . . . . . . . . . . . . . . . . . . . . . . . . . . 65Create Bookmarks . . . . . . . . . . . . . . . . . . . . . . . . . . . . . . . . . . . . . . . . . . . . . . . . . . . . . . . . . . . . . . . . . . 65
CHAPTER 10 Visitor Management Installation . . . . . . . . . . . . . . . . . . . . . . . . . . . .67Using SSL . . . . . . . . . . . . . . . . . . . . . . . . . . . . . . . . . . . . . . . . . . . . . . . . . . . . . . . . . . . . . . . . . . . .67
Security and Authentication . . . . . . . . . . . . . . . . . . . . . . . . . . . . . . . . . . . . . . . . . . . . . . . . . . . . . . . . . . . 67
ClickOnce for Front Desk and Kiosk . . . . . . . . . . . . . . . . . . . . . . . . . . . . . . . . . . . . . . . . . . . . . . .68Prerequisites . . . . . . . . . . . . . . . . . . . . . . . . . . . . . . . . . . . . . . . . . . . . . . . . . . . . . . . . . . . . . . . . . . . . . . 68
ClickOnce Setup . . . . . . . . . . . . . . . . . . . . . . . . . . . . . . . . . . . . . . . . . . . . . . . . . . . . . . . . . . . . . . .69Methods of Deployment . . . . . . . . . . . . . . . . . . . . . . . . . . . . . . . . . . . . . . . . . . . . . . . . . . . . . . . . . . . . . . 69Server Name . . . . . . . . . . . . . . . . . . . . . . . . . . . . . . . . . . . . . . . . . . . . . . . . . . . . . . . . . . . . . . . . . . . . . . . 69Installation . . . . . . . . . . . . . . . . . . . . . . . . . . . . . . . . . . . . . . . . . . . . . . . . . . . . . . . . . . . . . . . . . . . . . . . . 70
Workaround for Security Policies . . . . . . . . . . . . . . . . . . . . . . . . . . . . . . . . . . . . . . . . . . . . . . . . . .70Support Two Security Policies . . . . . . . . . . . . . . . . . . . . . . . . . . . . . . . . . . . . . . . . . . . . . . . . . . . . . . . . . 70
Single Sign-On Configuration . . . . . . . . . . . . . . . . . . . . . . . . . . . . . . . . . . . . . . . . . . . . . . . . . . . .72Create a Directory for Single Sign-On . . . . . . . . . . . . . . . . . . . . . . . . . . . . . . . . . . . . . . . . . . . . . . . . . . 72Configure Single Sign-On . . . . . . . . . . . . . . . . . . . . . . . . . . . . . . . . . . . . . . . . . . . . . . . . . . . . . . . . . . . . 72
Installation Guide 5
Table of Contents
Test Single Sign-On . . . . . . . . . . . . . . . . . . . . . . . . . . . . . . . . . . . . . . . . . . . . . . . . . . . . . . . . . . . . . . . . . 72
CHAPTER 11 Logging Into the OnGuard System . . . . . . . . . . . . . . . . . . . . . . . . . . 73Windows User Permissions . . . . . . . . . . . . . . . . . . . . . . . . . . . . . . . . . . . . . . . . . . . . . . . . . . . . . . 73
Passwords . . . . . . . . . . . . . . . . . . . . . . . . . . . . . . . . . . . . . . . . . . . . . . . . . . . . . . . . . . . . . . . . . . . . . . . . 73Enable/Disable Strong Password Enforcement . . . . . . . . . . . . . . . . . . . . . . . . . . . . . . . . . . . . . . . . . . . . 74Error Messages . . . . . . . . . . . . . . . . . . . . . . . . . . . . . . . . . . . . . . . . . . . . . . . . . . . . . . . . . . . . . . . . . . . . 74Accounts . . . . . . . . . . . . . . . . . . . . . . . . . . . . . . . . . . . . . . . . . . . . . . . . . . . . . . . . . . . . . . . . . . . . . . . . . . 75Log In . . . . . . . . . . . . . . . . . . . . . . . . . . . . . . . . . . . . . . . . . . . . . . . . . . . . . . . . . . . . . . . . . . . . . . . . . . . . 75
Single Sign-On . . . . . . . . . . . . . . . . . . . . . . . . . . . . . . . . . . . . . . . . . . . . . . . . . . . . . . . . . . . . . . . . 76Directory Accounts . . . . . . . . . . . . . . . . . . . . . . . . . . . . . . . . . . . . . . . . . . . . . . . . . . . . . . . . . . . . . . . . . . 77Automatic and Manual Single Sign-On . . . . . . . . . . . . . . . . . . . . . . . . . . . . . . . . . . . . . . . . . . . . . . . . . . 77Configure Single Sign-On . . . . . . . . . . . . . . . . . . . . . . . . . . . . . . . . . . . . . . . . . . . . . . . . . . . . . . . . . . . . 77Log In Using Automatic Single Sign-On . . . . . . . . . . . . . . . . . . . . . . . . . . . . . . . . . . . . . . . . . . . . . . . . . 77Log In Using Manual Single Sign-On . . . . . . . . . . . . . . . . . . . . . . . . . . . . . . . . . . . . . . . . . . . . . . . . . . . 78
Troubleshoot Logging In . . . . . . . . . . . . . . . . . . . . . . . . . . . . . . . . . . . . . . . . . . . . . . . . . . . . . . . . 78Assigning Directory and Internal Accounts to the User . . . . . . . . . . . . . . . . . . . . . . . . . . . . . . . . . 79
. . . . . . . . . . . . . . . . . . . . . . . . . . . . . . . . . . . . . . . . . . . . . . . . . . . . . . . . . . . . . . . . . . . . . . . . . . . . . . . . . 79
CHAPTER 12 Accounts and Passwords . . . . . . . . . . . . . . . . . . . . . . . . . . . . . . . . . . 81Password Standards . . . . . . . . . . . . . . . . . . . . . . . . . . . . . . . . . . . . . . . . . . . . . . . . . . . . . . . . . . . . 82
Enable/Disable Strong Password Enforcement . . . . . . . . . . . . . . . . . . . . . . . . . . . . . . . . . . . . . . . . . . . . 82
Change the Database Password . . . . . . . . . . . . . . . . . . . . . . . . . . . . . . . . . . . . . . . . . . . . . . . . . . . 83Change the Lenel Account Password . . . . . . . . . . . . . . . . . . . . . . . . . . . . . . . . . . . . . . . . . . . . . . . . . . . . 83
About Accounts . . . . . . . . . . . . . . . . . . . . . . . . . . . . . . . . . . . . . . . . . . . . . . . . . . . . . . . . . . . . . . . 84Change the System Administrator Password for the Database . . . . . . . . . . . . . . . . . . . . . . . . . . . 84
Change the SYSTEM Account Password Using Database Setup . . . . . . . . . . . . . . . . . . . . . . . . . . . . . . . 84Write Down and Inform Administrators of the Password Change . . . . . . . . . . . . . . . . . . . . . . . . . . . . . 85
CHAPTER 13 Maintaining the OnGuard Installation . . . . . . . . . . . . . . . . . . . . . . . 87Modify OnGuard . . . . . . . . . . . . . . . . . . . . . . . . . . . . . . . . . . . . . . . . . . . . . . . . . . . . . . . . . . . . . . 87Repair OnGuard . . . . . . . . . . . . . . . . . . . . . . . . . . . . . . . . . . . . . . . . . . . . . . . . . . . . . . . . . . . . . . . 87Remove OnGuard . . . . . . . . . . . . . . . . . . . . . . . . . . . . . . . . . . . . . . . . . . . . . . . . . . . . . . . . . . . . . . 88OnGuard Fixes and Maintenance . . . . . . . . . . . . . . . . . . . . . . . . . . . . . . . . . . . . . . . . . . . . . . . . . . 88
Service Releases . . . . . . . . . . . . . . . . . . . . . . . . . . . . . . . . . . . . . . . . . . . . . . . . . . . . . . . . . . . . . . . . . . . . 88Third-Party Service Packs and Updates . . . . . . . . . . . . . . . . . . . . . . . . . . . . . . . . . . . . . . . . . . . . . . . . . 89Language Packs . . . . . . . . . . . . . . . . . . . . . . . . . . . . . . . . . . . . . . . . . . . . . . . . . . . . . . . . . . . . . . . . . . . . 89Log Files . . . . . . . . . . . . . . . . . . . . . . . . . . . . . . . . . . . . . . . . . . . . . . . . . . . . . . . . . . . . . . . . . . . . . . . . . 89Server Maintenance . . . . . . . . . . . . . . . . . . . . . . . . . . . . . . . . . . . . . . . . . . . . . . . . . . . . . . . . . . . . . . . . . 90
CHAPTER 14 Troubleshooting . . . . . . . . . . . . . . . . . . . . . . . . . . . . . . . . . . . . . . . . 91IIS Troubleshooting . . . . . . . . . . . . . . . . . . . . . . . . . . . . . . . . . . . . . . . . . . . . . . . . . . . . . . . . . . . . 91
Testing if IIS is installed and running . . . . . . . . . . . . . . . . . . . . . . . . . . . . . . . . . . . . . . . . . . . . . . . . . . . 91If IIS is installed to a non-default location . . . . . . . . . . . . . . . . . . . . . . . . . . . . . . . . . . . . . . . . . . . . . . . 91
6 Installation Guide
Table of Contents
Troubleshooting OnGuard with Web Applications . . . . . . . . . . . . . . . . . . . . . . . . . . . . . . . . . . . . .92The LS Application Server service starts and then stops . . . . . . . . . . . . . . . . . . . . . . . . . . . . . . . . . . . . . 92Page cannot be found . . . . . . . . . . . . . . . . . . . . . . . . . . . . . . . . . . . . . . . . . . . . . . . . . . . . . . . . . . . . . . . . 92Can Web Applications be configured with an automatic log-off option? . . . . . . . . . . . . . . . . . . . . . . . . 92Problems Opening Area Access Manager or VideoViewer . . . . . . . . . . . . . . . . . . . . . . . . . . . . . . . . . . . 92Troubleshooting Single Sign-On . . . . . . . . . . . . . . . . . . . . . . . . . . . . . . . . . . . . . . . . . . . . . . . . . . . . . . . 92Troubleshooting Area Access Manager (Browser-based Client) . . . . . . . . . . . . . . . . . . . . . . . . . . . . . . . 93
Visitor Management Troubleshooting . . . . . . . . . . . . . . . . . . . . . . . . . . . . . . . . . . . . . . . . . . . . . . .93General Visitor Management Troubleshooting . . . . . . . . . . . . . . . . . . . . . . . . . . . . . . . . . . . . . . . . . . . . 93Visitor Management Host Troubleshooting . . . . . . . . . . . . . . . . . . . . . . . . . . . . . . . . . . . . . . . . . . . . . . . 94Troubleshooting Visitor Management Administration . . . . . . . . . . . . . . . . . . . . . . . . . . . . . . . . . . . . . . . 94Troubleshooting Visitor Management Front Desk . . . . . . . . . . . . . . . . . . . . . . . . . . . . . . . . . . . . . . . . . . 95Troubleshooting Visitor Management Kiosk . . . . . . . . . . . . . . . . . . . . . . . . . . . . . . . . . . . . . . . . . . . . . . 95
Appendices . . . . . . . . . . . . . . . . . . . . . . . . . . . . . . . . . . . . . . . . . . . . . . . . . . . . .99
APPENDIX A Configuration Editor . . . . . . . . . . . . . . . . . . . . . . . . . . . . . . . . . . . .101When Configuration Editor Identifies an Issue . . . . . . . . . . . . . . . . . . . . . . . . . . . . . . . . . . . . . . .101Launching the Configuration Editor Stand-alone Application . . . . . . . . . . . . . . . . . . . . . . . . . . .101Standard Fields and Buttons . . . . . . . . . . . . . . . . . . . . . . . . . . . . . . . . . . . . . . . . . . . . . . . . . . . . .102
Database section . . . . . . . . . . . . . . . . . . . . . . . . . . . . . . . . . . . . . . . . . . . . . . . . . . . . . . . . . . . . . . . . . . 102License Server section . . . . . . . . . . . . . . . . . . . . . . . . . . . . . . . . . . . . . . . . . . . . . . . . . . . . . . . . . . . . . . 103
Advanced Settings Fields and Buttons . . . . . . . . . . . . . . . . . . . . . . . . . . . . . . . . . . . . . . . . . . . . .103Advanced Database section . . . . . . . . . . . . . . . . . . . . . . . . . . . . . . . . . . . . . . . . . . . . . . . . . . . . . . . . . . 103Advanced Verbose Logging section . . . . . . . . . . . . . . . . . . . . . . . . . . . . . . . . . . . . . . . . . . . . . . . . . . . . 103Advanced Area Access Manager (Browser-based Client) section . . . . . . . . . . . . . . . . . . . . . . . . . . . . . 104
Fixing Synchronization Issues . . . . . . . . . . . . . . . . . . . . . . . . . . . . . . . . . . . . . . . . . . . . . . . . . . .104
APPENDIX B Custom Installation of OnGuard . . . . . . . . . . . . . . . . . . . . . . . . . . .105Performing a Custom Installation . . . . . . . . . . . . . . . . . . . . . . . . . . . . . . . . . . . . . . . . . . . . . . . . .105
First Time and Existing OnGuard Installation . . . . . . . . . . . . . . . . . . . . . . . . . . . . . . . . . . . . . . . . . . . 105
Custom Features . . . . . . . . . . . . . . . . . . . . . . . . . . . . . . . . . . . . . . . . . . . . . . . . . . . . . . . . . . . . . .105LS Platform Services . . . . . . . . . . . . . . . . . . . . . . . . . . . . . . . . . . . . . . . . . . . . . . . . . . . . . . . . . . . . . . . 105Device Discovery Console . . . . . . . . . . . . . . . . . . . . . . . . . . . . . . . . . . . . . . . . . . . . . . . . . . . . . . . . . . . 106SkyPoint Integration - Advanced Features . . . . . . . . . . . . . . . . . . . . . . . . . . . . . . . . . . . . . . . . . . . . . . 106
APPENDIX C Network Video over HTTP via Proxy . . . . . . . . . . . . . . . . . . . . . . .107VideoViewer (Browser-based Client) . . . . . . . . . . . . . . . . . . . . . . . . . . . . . . . . . . . . . . . . . . . . . .107Network Requirements . . . . . . . . . . . . . . . . . . . . . . . . . . . . . . . . . . . . . . . . . . . . . . . . . . . . . . . . .107
APPENDIX D Using OnGuard on Supported Operating Systems . . . . . . . . . . . . .109Using OnGuard on Windows 7 . . . . . . . . . . . . . . . . . . . . . . . . . . . . . . . . . . . . . . . . . . . . . . . . . . .109
Installation Guide 7

Table of Contents
Locating OnGuard Applications and Services in Windows 7 . . . . . . . . . . . . . . . . . . . . . . . . . . . . . . . . 109Locating Operating System Applications in Windows 7 . . . . . . . . . . . . . . . . . . . . . . . . . . . . . . . . . . . . 111
Using OnGuard on Windows 8/Windows 8.1 . . . . . . . . . . . . . . . . . . . . . . . . . . . . . . . . . . . . . . . 113Locating OnGuard Applications and Services . . . . . . . . . . . . . . . . . . . . . . . . . . . . . . . . . . . . . . . . . . . . 113Locating Operating System Applications . . . . . . . . . . . . . . . . . . . . . . . . . . . . . . . . . . . . . . . . . . . . . . . . 114
Using OnGuard with Windows Server 2012 . . . . . . . . . . . . . . . . . . . . . . . . . . . . . . . . . . . . . . . . 116Locating OnGuard Applications and Services in Windows Server 2012 . . . . . . . . . . . . . . . . . . . . . . . . 116Locating Operating System Applications in Windows Server 2012 . . . . . . . . . . . . . . . . . . . . . . . . . . . . 117
8 Installation Guide
CHAPTER 1 About This Guide
The following table describes the different installation guides available.
Advanced Installation Topics. DOC-100. A guide that encompasses a variety of advanced topics including Oracle installation and configuration.
Installation Guide. DOC-110. A comprehensive guide that includes instructions for installing the OnGuard software. This guide also includes information on all supported SQL Server database systems and the browser-based client applications.
Upgrade Guide. DOC-120. A short and sequential guide on upgrading and configuring OnGuard to utilize SQL Server or SQL Server Express.
Enterprise Setup & Configuration User Guide. DOC-500. A guide that includes instructions for installing database software, the OnGuard Enterprise software, and how to setup complex Enterprise systems.
Vocabulary Used
Database SystemRefers to the database program that you are using. SQL Server databases can be found in this document. For Oracle installation procedures, refer to the Advanced Installation Topics guide.
ServerThe computer that your database is stored on. Commonly the most powerful computer on the network.
ClientRefers to the computer(s) that connect to the server.
WorkstationAny computer where OnGuard software is installed.
Installation Guide 9

About This Guide
10
Hardware KeyCommonly referred to as a “dongle.” It is used on the server as part of the license.
Software LicenseA license that works without the need for a hardware dongle. When using a software license you are able to use License Administration to activate, return, or repair your license.
Installation Guide
CHAPTER 2 Introduction
Installing OnGuard requires you to complete different steps depending on whether you are installing on a server or client machine.
If installing on a server, you must do four things: install your database system, install the OnGuard software, install your license, and set up your database.
If you are installing on a client, you only need to install the OnGuard software and verify that the license has been installed for the system.
Before beginning the installation process you must first check and see that your computer meets the minimum requirements. Specific hardware, operating system, database system, and Web browser requirements must be met prior to the OnGuard installation. Refer to the release notes for those requirements, which are located in the Program Files\OnGuard\doc\en-US directory of the OnGuard disc.
IMPORTANT: Lenel software requires certain security adjustments to the operating system to function more securely. If needed, the Security Utility runs during installation. Please review the Security Utility release notes provided prior to running this utility, which then makes these adjustments automatically. Upon agreeing to this disclaimer, the user is assuming responsibility for any security issues that may occur due to these adjustments.
Required InstallationsThe following must be installed before installing OnGuard:
• If using Windows 7, Windows 8, Windows 8.1, or Windows Server 2008 R2, the OnGuard setup requires that you have administrative privileges.
• All prerequisite software, on the Supplemental Materials disc, must be installed.• Each OnGuard computer must be configured for the TCP/IP network protocol prior to
installation of the OnGuard software.• Windows Service Packs are also required but are not provided on the Supplemental Materials
disc. See the OnGuard release notes on the Installation disc to see which service packs are
Installation Guide 11
Introduction
12
required for your operating system. Adobe Reader is not required but highly recommended as you need it to read the OnGuard documentation.
• All database systems must be upgraded to a supported version with the latest approved service pack and updates. Refer to the release notes for specific information.
• The latest approved drivers are required for any video capture devices and printers you have installed on workstations.
• If there is new firmware for the Lenel Digital Video recorders you should upgrade this firmware before upgrading the software. If there is an upgrade it can be found on the Supplemental Materials disc.
• Any third-party applications you are using, such as Crystal Reports, must be purchased and upgraded separately. Verify the most current version that is supported in OnGuard by referring to the release notes.
• OnGuard servers hosting Web applications must be running Windows Server 2008 R2 or Windows Server 2012.
• All servers must have Internet Information Services (IIS) installed.
Steps for Installing OnGuardThe following steps will take you through OnGuard installation process. Use the following list as a guide while working through the installation process. Installations can be performed by a member of the Administrators Group.
Installing OnGuard with SQL Server1. Make sure you have the proper hardware requirements. 2. Install IIS.
IIS is required in order to install OnGuard on a Platform Server or Custom Server, or to use the LS Platform Services component. For more information about Platform Servers and Custom Servers, refer to Install the OnGuard 7.0 Software on page 37. For more information about IIS, refer to Internet Information Services (IIS) for Windows Server on page 58.
3. Install and configure SQL Server or SQL Server Desktop Engine. For more information, refer to Chapter 5: Microsoft SQL Server on page 23.
4. Install prerequisites from the Supplemental Materials disc. For more information, refer to OnGuard 7.0 Installation Prerequisites on page 35.
5. If your installation will use a hardware license key, refer to Configure a USB Hardware Key on page 36.
6. Install the OnGuard software. For more information, refer to Install the OnGuard 7.0 Software on page 37.
7. Setup Assistant runs automatically. For more information, refer to Setup Assistant on page 38. Setup Assistant performs the following steps:a. Security Utility: For more information, refer to Security Utility on page 39.b. Configuration Editor: For more information, refer to Configuration Editor on page 39.c. System License (License Administration): For more information, refer to System License
on page 40.d. Application Server (only if using the OnGuard browser-based applications): For more
information, refer to LS Platform Services on page 40.
Installation Guide
Steps for Installing OnGuard
e. Database Installation (for new server installations with SQL Express): For more information, refer to Database Installation on page 40.
f. Database Backup (if upgrading an existing installation): For more information, refer to Database Backup on page 40.
g. Database Backup (Archival) (if upgrading an existing installation that archives to an Archival database instead of to text files): For more information, refer to Database Backup (Archival) on page 41.
h. Database Setup (for server installations): For more information, refer to Database Setup on page 41.
i. Database Setup (Archival): For more information, refer to Database Setup (Archival) on page 41.
j. Service Startup: For more information, refer to Service Startup on page 41.k. Universal Time Conversion Utility (if upgrading a server running a version of OnGuard
earlier than 6.3): For more information, refer to Finished on page 42.8. Configure the client (only if using the OnGuard browser-based applications). For more
information, refer to Client Configuration on page 63.To access the browser-based Area Access Manager, VideoViewer, or Visitor Management Host or Administration pages, the link syntax is as follows (where <machinename> is the location of the server running the LS Platform Services):
• http://<machinename>/lnl.og.web/lnl_og_aam.aspx• http://<machinename>/lnl.og.web/lnl_og_videoviewer.aspx• http://<machinename>/IdvmHost
Or, if you are using manual sign-on for the Visitor Management Host:http://<machinename>/idvmhost/?useAutomaticSSO=false
• http://<machinename>/AdminAppTo access the Visitor Management Front Desk or Kiosk ClickOnce pages, use the following URLs:
• http://<machinename>/FrontDeskClickOnce• http://<machinename>/KioskClickOnce
Installation Guide 13

Introduction
14
Installation Guide
CHAPTER 3 Database Backup and Restoration
You can back up your database using any of the following methods:
• Backing up to a file on a hard drive or network connection.• Backing up to a CD or DVD.The chapter also deals with how to restore the backup if needed. The procedures are broken into sections based on the backup option and the type of database you are using. Consult your Database Administrator for the preferred backup method.
Notes: Some of the procedures in this chapter require the use of SQL Server Management Studio. Beginning with Supplemental Materials disc revision 16, the SQL Server Management Tools are no longer included. SQL Server Management Tools for Microsoft SQL Server Express are included with Microsoft SQL Server Management Studio Express, and are available at www.microsoft.com. If using a full version of SQL Server, SQL Server Management Studio is included in the full version.
To back up a SQL database with Transparent Data Encryption, refer to the Backing up a TDE Protected Database section in the Advanced Installation Guide.
Backing Up Your Database to FileThis section includes information on how to:
• Automatic Back Up to a File on SQL Server Database on page 15 • One-Time Back Up to a File with SQL Server Express Edition on page 17
Automatic Back Up to a File on SQL Server DatabaseThe following section will show you how to back up your SQL Server database to a file.
Configure Microsoft SQL Server for Automatic Database Backup to a File1. From Windows, open the SQL Server Management Studio.2. Log into SQL Server Management Studio.
Installation Guide 15
Database Backup and Restoration
16
3. Navigate to the SQL Server Agent in the Object Explorer.a. Right-click the SQL Server Agent and select Start.b. You will be asked whether you are sure that you want to start the service, click [Yes].c. Right-click the SQL Server Agent and select Properties.
4. The SQL Server Agent Properties window is shown.a. Select the Auto restart SQL Server if it stops unexpectedly and Auto restart SQL Server
Agent if it stops unexpectedly check boxes.b. Click [OK].Expand the Management folder in the Object Explorer.
5. Right-click on the Maintenance Plans folder and select Maintenance Plan Wizard.6. The SQL Server Maintenance Plan Wizard is shown. Click [Next].7. On the Select Plan Properties window:
a. In the Name field, enter a name for the maintenance plan.b. Click [Change].
8. The New Job Schedule window is shown.a. For Name, enter a name for the schedule.b. Set the frequency for the backup to occur.c. Click [OK].d. Click [Next] in the Select Plan Properties window.
9. On the Select Maintenance Tasks window, select the Back Up Database (Full) check box. Click [Next].
10. On the Select Maintenance Task Order window, click [Next].11. In the Define Back Up Database (Full) Task window, click the Databases drop-down. 12. In the Databases drop-down popup:
a. Select the check box for the OnGuard database.b. Click [OK].
13. In the Define Back Up Database (Full) Task window:a. On the General tab, select the database you want to back up from the Database(s) drop-
down menu.b. On the Destination tab, select the Back up databases across one or more files radio button.c. From the If backup files exist drop-down, select “Overwrite”.d. Click [Add].
14. In the Select Backup Destination window, click [...].15. In the Locate Database Files window:
a. Enter a file location and name for the backup in the File name field. b. Click [OK] in the Select Backup Destination window.c. Click [Next] in the Define Back Up Database (Full) Task window.
16. On the Select Report Options window, click [Next].17. On the Complete the Wizard window, click [Finish].18. Once the Maintenance Plan Wizard Progress has completed, click [Close].19. In the Administrative Tools section of Control Panel, open Services. Right-click the SQL Server
Agent (MSSQLSERVER) service and select Properties.20. The SQL Server Agent (MSSQLSERVER) Properties window is displayed.
a. In the Startup type drop-down, select “Automatic.”
Installation Guide
Restoring Databases
b. Click [OK].
One-Time Back Up to a File with SQL Server Express EditionIf you did not already have SQL Server Management Studio when OnGuard was installed, then you can install the Express Edition from the Supplemental disc. Once you have installed Express Edition, perform the following steps to create a one-time back up of the SQL Server database file.
Note: SQL Server Management Studio Express Edition provides limited functionality when compared to the full version of Management Studio. For example, Express Edition does not allow automatic database backups.
1. From Windows, open the SQL Server Management Studio.2. Log into SQL Server Management Studio.3. Expand the Databases folder in the Object Explorer.4. Right-click on the OnGuard database and select Tasks > Back Up.5. On the General page of the Back Up Database window:
a. In the Backup type field, select Full.b. Under Backup component, make sure Database is selected.c. In the Name field, enter a name for the backup set.d. In the Description field, enter a description for the backup set.e. Under Destination, confirm that the path is as desired. If not, remove the default path and
add a new path.6. On the Options page of the Back Up Database window:
a. Select Back up to the existing backup set, and then select Overwrite all existing backup sets.
Restoring DatabasesTo restore a SQL Server database from a file on either a network connection, CD, or DVD, restore the file to the database via the SQL Server Management Studio. For more information, refer to Restore Microsoft SQL Server Database from a File on page 17.
Restore Microsoft SQL Server Database from a File1. From Windows, open SQL Server Management Studio.2. The SQL Server Management Studio window is shown.
a. Navigate to the OnGuard database.b. Right-click on the OnGuard database and select Tasks > Restore > Files and Filegroups.
3. The Restore Files and Filegroups window is shown. a. In the To database drop-down, select the OnGuard database.b. In the From database drop-down, select the OnGuard database.c. If the From database is from another file, specify the file location in the From device drop-
down, and select the desired backup set to restore.d. Click the Options page from the Select a page list view.
4. The Options page is shown.
Installation Guide 17

Database Backup and Restoration
18
a. Select the Overwrite the existing database check box.b. Click [OK].
5. A success message is displayed. Click [OK].
Installation Guide
CHAPTER 4 Transfer a SQL Server Desktop Engine Database
You may wish to transfer a SQL Server Desktop Engine database for any number of reasons, although the most common reason is to upgrade to a new server.
Steps to Transfer a SQL Server Express DatabaseTo transfer a SQL Server Desktop Engine database to a new server, complete the following procedures in the order listed:
• Back up the SQL Server Desktop Engine database. Refer to One-Time Back Up to a File with SQL Server Express Edition on page 17.
• Ensure Minimum Server Requirements are Met on page 19.• Stop the SQL Server Service on page 19.• Copy Files from the Old Server to the New Server on page 20.• Restart the SQL Server Service on page 20.• Attaching the AccessControl Database on page 20.• Verify the Database Transfer was Successful on page 21.
Ensure Minimum Server Requirements are MetMake sure that the new server meets the specifications that are listed in the current release notes. Although the server MUST meet the minimum specifications listed, your system will perform much better if the server also meets the recommended specifications.
Stop the SQL Server Service
Note: This procedure describes stopping the SQL Server service on a Windows machine.
The SQL Server (MSSQLSERVER) service must be stopped on both the old server and the new server before proceeding. To do this:
1. On the old server, click Start and then select Control Panel.
Installation Guide 19
Transfer a SQL Server Desktop Engine Database
20
2. Double-click Administrative Tools.3. Double-click Services.4. In the Services window, right-click on SQL Server (MSSQLSERVER) and select Stop.5. Repeat steps 1–4 on the new server as well.
Copy Files from the Old Server to the New ServerCopy the AccessControl.mdf and AccessControl_log.ldf files on the old server to the new server, making sure to replace the files that might already exist on the new server. These files are located on the old server in C:\Program Files\Microsoft SQL Server\MSSQL10.MSSQLSERVER\MSSQL\Data, and must be copied into the same location on the new server.
Restart the SQL Server ServiceThis procedure describes restarting the SQL Server service on a Windows machine.
1. On the new server, click Start and then select Control Panel. 2. Double-click “Administrative Tools.”3. Double-click “Services.”4. In the Services window, right-click on SQL Server (MSSQLSERVER) and select Start.
Attaching the AccessControl DatabaseSQL Server Desktop Engine provides a user interface for accessing the database engine via the SQL Express Management Studio application. You can install the application from the Supplemental Materials disc.
To attach the AccessControl database:
1. In the SQL Server Object Explorer pane, right-click on Databases.2. Select Attach.3. Click [Add].4. Browse to the location of the AccessControl.mdf file, select the file, and then click [OK].5. Click [OK] to close the Attach Databases window.
Change the Database OwnerChanging the database owner allows the lenel login to own the AccessControl database.
Note: You must already have a lenel login created. For more information, refer to Create a Login on page 32.
Change the Database Owner Using SQL Express Management Studio1. In the Object Explorer pane of the SQL Server Management Studio, right-click on the
AccessControl database and select New Query.2. The Query tab is displayed.
a. In the text window, type sp_changedbowner lenelb. Press <F5> to execute the command you typed.
Installation Guide
Steps to Transfer a SQL Server Express Database
c. The message “Command(s) completed successfully” is displayed in the Messages tab window.
3. Click the close (“X”) button to close the Query tab, then click [No] when prompted if you want to save the changes.
Verify the Database Transfer was SuccessfulLog into System Administration and verify that the database is indeed your old database.
Installation Guide 21

Transfer a SQL Server Desktop Engine Database
22
Installation Guide
CHAPTER 5 Microsoft SQL Server
OnGuard 7.0 supports Microsoft SQL Server 2008, 2012, and 2014. There are several editions of SQL Server; refer to the release notes for specific support information.
IMPORTANT: If you have SQL Server 2005 Express installed on your system, the database software will not be automatically upgraded during the OnGuard upgrade. If you want to upgrade your database software, instructions for upgrading from SQL Server 2005 Express to SQL Server 2012 Express or SQL Server 2014 Express are provided in this chapter.
The following sections will show you how to install and upgrade SQL Server.
• SQL Server Express Edition on page 23.– Installing SQL Server Management Tools on page 26.
• SQL Server Standard Edition on page 26.
PrerequisitesThe following prerequisites are required prior to installing SQL Server:
• Microsoft .NET Framework 4.5 (includes .NET 4.5 Framework)• Microsoft Windows Installer 4.0 or later• Microsoft Windows PowerShell
Note: Enable Windows PowerShell on supported operating systems, such as Windows Server 2008 R2.
SQL Server Express Edition
IMPORTANT: Some of the procedures in this chapter require the use of SQL Server Management Studio. Beginning with Supplemental Materials disc revision 16, the SQL Server Management Tools are no longer included. SQL Server
Installation Guide 23
Microsoft SQL Server
24
Management Tools for Microsoft SQL Server Express 2012 and Microsoft SQL Server Express 2014 are included with Microsoft SQL Server Management Studio Express, and are available at www.microsoft.com. If using a full version of SQL Server, SQL Server Management Studio is included in the full version.
Installing or Upgrading SQL Server 2014 Express EditionThis section describes the manual installation of SQL Server 2014 Express Edition, or the upgrade of SQL Server 2005 Express to SQL Server 2014 Express Edition. Other versions may have different steps.
IMPORTANT: Before upgrading SQL Server, be sure to back up your database.
Notes: When performing an upgrade, there should be nothing connected, that is, no clients logged on. There can be no software connections to the database when the upgrade is performed, so all OnGuard LS and LPS services including the LS Communication Server must be stopped. To perform the upgrade you must have the latest service pack approved for use with OnGuard applied.
If upgrading from SQL Server 2005 Express, install SQL Server 2005 Service Pack 4 or later before performing the upgrade.
1. Download Microsoft SQL Server Management Studio Express, which is available at www.microsoft.com.
2. Run the installer to install Microsoft SQL Server 2014 Express.3. Click the appropriate link to identify your installation or upgrade requirements.4. In the License Terms window:
a. If you agree with the license terms, select I accept the license terms.b. Click [Next].
5. In the Microsoft Update window, select Use Microsoft Update to check for updates (recommended), and then click [Next].
6. In the Product Updates window, the product update runs. You must resolve any failures before setup can continue. Once the check completes successfully, click [Next].
7. After the setup files have been installed in the Install Setup Files window, the Install Rules/Upgrade Rules will run again to identify potential issues. You must resolve any failures before setup can continue. Once the check completes successfully, click [Next].
8. In the Feature Selection/Select Feature window, click [Next].9. In the Instance Configuration/Select Instance window:
• For new installations, select Named instance, change SQLEXPRESS to MSSQLSERVER, and then click [Next].
• For upgrades, the Named instance should already be selected. Click [Next].10. The Feature Rules window identifies potential issues. You must resolve any failures before setup
can continue. Once the check completes successfully, click [Next].New installations only: In the Server Configuration window, set the SQL Server Database Engine startup type to Automatic, and set the SQL Server Browser startup type to Disabled. Click [Next].11. New installations only: In the Database Engine Configuration window, set the Authentication
Mode to Mixed Mode. In the Specify SQL Server administrators field, add an Administrator user. Click [Next].
Installation Guide

SQL Server Express Edition
12. Once the installation or upgrade is complete, click [Close] to close the Complete window.13. Close the SQL Server Installation Center.14. Reboot the computer, even if you are not prompted to do so. This completes the installation of
SQL Server Express. You can now go on to configure SQL Server Express. For more information, refer to Configuring SQL Server on page 32.
Installing or Upgrading SQL Server 2012 Express EditionThis section describes the manual installation of SQL Server 2012 Express Edition, or the upgrade of SQL Server 2005 Express to SQL Server 2012 Express Edition. Other versions may have different steps.
IMPORTANT: Before upgrading SQL Server, be sure to back up your database.
Note: When performing an upgrade, there should be nothing connected, that is, no clients logged on. There can be no software connections to the database when the upgrade is performed, so all OnGuard LS and LPS services including the LS Communication Server must be stopped. To perform the upgrade you must have the latest service pack approved for use with OnGuard applied.
1. Download Microsoft SQL Server Management Studio Express, which is available at www.microsoft.com.
2. Run the installer to install Microsoft SQL Server 2012 Express.3. Click the appropriate link to identify your installation or upgrade requirements.4. The Setup Support Rules window will identify potential problems that might occur during
installation. You must correct any failures before setup can continue. If no problems are identified, click [OK].
5. In the Product Key window, click [Next].6. In the License Terms window:
a. If you agree with the license terms, select I accept the license terms.b. Click [Next].
7. In the Product Updates window, select Include SQL Server product updates, and then click [Next].
8. In the Setup Support Files window, click [Install].9. After the setup files have been installed, the Setup Support Rules will run again to identify
potential issues. You must resolve any failures before setup can continue. Once the check has completed successfully, click [Next].
10. In the Select Features window, click [Next].11. In the Instance Configuration window:
• For new installations, select Named instance, change SQLEXPRESS to MSSQLSERVER, and then click [Next].
• For upgrades, the Named instance should already be selected. Click [Next].12. Review the Disk Space Requirements information and click [Next] if you have sufficient space.13. In the Server Configuration window, set the SQL Server Database Engine’s startup type to
Automatic, and set the SQL Server Browser’s startup type to Disabled. Click [Next].14. In the Database Engine Configuration window, set the Authentication Mode to Mixed Mode. In
the Specify SQL Server administrators field, add an Administrator user. Click [Next].15. In the Error and Usage Report Settings window, deselect the option. Click [Next].
Installation Guide 25
Microsoft SQL Server
26
16. The Installation Configuration Rules or Upgrade Rules window will determine if there are any barriers to the installation process. If there are no failures, click [Next].
17. In the Ready to Install or Ready to Upgrade window, click [Install] or [Upgrade] to begin the installation.
18. Once the installation or upgrade is complete, you will be notified that you need to restart your computer to complete the process. Click [OK] to close the message, then click [Next].
19. Close the SQL Server Installation Center.20. Reboot the computer, even if you are not prompted to do so. This completes the installation of
SQL Server Express. You can now go on to configure SQL Server Express. For more information, refer to Configuring SQL Server on page 32.
Installing SQL Server Management ToolsSQL Server Management Studio is required if the server intends to use Database Authentication or Windows single sign-on. The SQL Server Management Studio is available at www.microsoft.com.
Note: If using a full version of SQL Server, SQL Server Management Studio is already installed and should be used instead.
SQL Server Standard EditionThe instructions that follow are for the Standard edition. The installation and upgrade steps for SQL Server are very similar. Special considerations for upgrades are noted in the appropriate steps. When performing an upgrade, there should be nothing connected, that is: no clients logged on. There can be no software connections to the database when the upgrade is performed, so all OnGuard LS and LPS services including the LS Communication Server must be stopped.
Note: Before upgrading SQL Server, be sure to back up your database.
Installation StepsTo perform the installation, complete the following steps:
1. SQL Server on page 27.2. Configuring SQL Server on page 32.
a. Create the Database on page 32.b. Create a Login on page 32.c. Set Memory Usage on page 34.d. Truncate the Log File on page 34.e. Determine the Database Archive Plan on page 34.
Upgrade Steps• SQL Server on page 27.• Set Memory Usage on page 34.
Installation Guide

SQL Server Standard Edition
SQL Server
Installing or Upgrading SQL Server 2014
Note: SQL Server 2014 setup requires Microsoft .NET Framework 4.5 (includes .NET 4.5 Framework) and Windows Installer 4.0. If you do not have these prerequisites prior to installing SQL Server, the setup will prompt you before installing them.
1. Insert the SQL Server disc.• If autorun is enabled, the SQL Server Installation Center is automatically opened.• If the SQL Server Installation Center does not automatically appear, open the Windows Run
dialog and browse for setup.exe on the disc drive. Alternatively, you can run setup.exe from Windows Explorer.
2. The SQL Server Installation Center is shown. Click Installation from the left pane, then:• For new installations, click New SQL Server stand-alone installation or add features to
an existing installation.• For upgrades, click Upgrade from SQL Server 2005, SQL Server 2008, SQL Server
2008 R2 or SQL Server 2012.3. The Product Key window is shown. Enter your product key and click [Next].4. In the License Terms window:
a. If you agree with the license terms, select I accept the license terms.b. Click [Next].
5. The Microsoft Update window is shown. Select Use Microsoft Update to check for updates (recommended), and then click [Next].
6. The Install Setup Files window is displayed. If an error is shown, click [Next]. If no error is shown, the installation will proceed to the next step automatically.
7. After the setup files have been installed in the Install Setup Files window, the Install Rules/Upgrade Rules runs again to identify potential issues. You must resolve any failures before setup can continue. Once the check completes successfully, click [Next].
8. New installations only: The Setup Role step installs the SQL Server Feature configuration. Select SQL Server Feature Installation, and then click [Next].
9. Upgrade only: In the Select Instance window, select the Instance to upgrade from the drop-down and click [Next].
10. In the Select Features window:a. Under Instance Features, select Database Engine Services and Full-Text and Semantic
Extractions for Search.b. Under Shared Features, select Management Tools - Basic and Management Tools -
Complete.
Note: For upgrades these features may already be selected and it may not be possible to change the selections.
c. Click [Next].11. New installations only: In the Feature Rules window, click [Next] if an error is shown. If no error
is shown, the installation will proceed to the next step automatically.12. In the Instance Configuration window:
• For new installations, select Default instance, and then click [Next].• For upgrades, the Named instance should already be selected. Click [Next].
Installation Guide 27
Microsoft SQL Server
28
13. The Server Configuration window is displayed.• For new installations:
1) On the SQL Server Agent, click the drop-down menu under Account Name for the SQL Server Agent service.
2) Select Browse.3) Click [Advanced].4) Click [Find Now].5) Select SYSTEM from the search results.6) Click [OK].7) On the SQL Server Agent, SYSTEM appears in the Object Name field. Click [OK]. You
will see “NT AUTHORITY\SYSTEM” under Account Name.8) Repeat these steps for the SQL Server Database Engine service.9) Click [Next].
• For upgrades, click [Next].14. New installation only: In the Database Engine Configuration window:
a. Select the Mixed Mode radio button.b. Enter and confirm a password for the SQL Server system administrator account.c. Click [Add].d. In the Select Users or Groups window, click [Advanced].e. Change the From this location field to the local machine by clicking [Locations] and
selecting the local machine from the list.f. Click [Find Now], then select Administrators from the Search results listing window.g. Click [OK], then click [OK] again to close the Select Users or Groups window.h. The BUILTIN\Administrators group should now appear in the Specify SQL Server
administrators listing window. Click [Next].15. Upgrade only: In the Full-text Upgrade window, select Import, and then click [Next].16. In the Feature Configuration Rules/Feature Rules window, if any rules do no show a status of
Passed, correct the issue and then click [Re-run]. Once all rules pass, click [Next].17. In the Ready to Install or Ready to Upgrade window, click [Install] or [Upgrade] to begin the
installation.18. In the Complete window, click [Close].19. Close the SQL Server Installation Center.20. Reboot the computer, even if you are not prompted to do so. This completes the installation of
SQL Server. You can now configure SQL Server. For more information, refer to Configuring SQL Server on page 32.
Installing or Upgrading SQL Server 2012
Note: SQL Server 2012 setup requires Microsoft .NET Framework 4.5 (includes .NET 4.5 Framework) and Windows Installer 4.0. If you do not have these prerequisites prior to installing SQL Server, the setup will prompt you before installing them.
1. Insert the SQL Server disc.• If autorun is enabled, the SQL Server Installation Center is automatically opened.• If the SQL Server Installation Center does not automatically appear, open the Windows Run
dialog and browse for setup.exe on the disc drive. Alternatively, you can run setup.exe from Windows Explorer.
Installation Guide
SQL Server Standard Edition
2. The SQL Server Installation Center is displayed. Click Installation from the left pane, then:• For new installations, click New SQL Server stand-alone installation or add features to
an existing installation.• For upgrades, click Upgrade from SQL Server 2005, SQL Server 2008 or SQL Server
2008 R2.3. The Setup Support Rules window is displayed. You must correct any failures before setup can
continue. If no problems are identified, click [OK].4. The Product Key window is displayed. Enter your product key and click [Next]. 5. In the License Terms window:
a. If you agree with the license terms, select I accept the license terms.b. Click [Next].
6. The Product Updates step will update the listed SQL Server products. Click [Next].7. Upgrade only: The Install Setup Files window is displayed. Click [Next].8. The Setup Support Rules step will install any of the listed components that are missing from your
system. Click [Next].9. The Setup Role step installs the SQL Server Feature configuration. Select SQL Server Feature
Installation, and then click [Next].10. Upgrade only: In the Select Instance window, select the Instance to upgrade from the drop-
down and click [Next].11. In the Select Features window:
a. Under Instance Features, select Database Engine Services and Full-Text and Semantic Extractions for Search.
b. Under Shared Features, select Management Tools - Basic and Management Tools - Complete.
Note: For upgrades these features may already be selected and it may not be possible to change the selections.
c. Click [Next].12. New installations only: In the Installation Rules window, click [Next].13. In the Instance Configuration window:
• For new installations, select Default instance, and then click [Next].• For upgrades, the Named instance should already be selected. Click [Next].
14. Review the Disk Space Requirements information and click [Next] if you have sufficient space.15. The Server Configuration window is displayed.
• For new installations:1) On the SQL Server Agent, click the drop-down menu under Account Name for the SQL
Server Agent service.2) Select Browse.3) Click [Advanced].4) Click [Find Now].5) Select SYSTEM from the search results.6) Click [OK].7) On the SQL Server Agent, SYSTEM appears in the Object Name field. Click [OK]. You
will see “NT AUTHORITY\SYSTEM” under Account Name.8) Repeat these steps for the SQL Server Database Engine service.
Installation Guide 29
Microsoft SQL Server
30
9) Click [Next].• For upgrades, click [Next].
16. Upgrade only: In the Full-text Upgrade window, select the Import radio button and then click [Next].
17. New installation only: In the Database Engine Configuration window:a. Select the Mixed Mode radio button.b. Enter and confirm a password for the SQL Server system administrator account.c. Click [Add].d. In the Select Users or Groups window, click [Advanced].e. Change the From this location field to the local machine by clicking [Locations] and
selecting the local machine from the list.f. Click [Find Now], then select Administrators from the Search results listing window.g. Click [OK], then click [OK] again to close the Select Users or Groups window.h. The BUILTIN\Administrators group should now appear in the Specify SQL Server
administrators listing window. Click [Next].18. In the Error Reporting window, deselect the one check box. Click [Next].19. The Installation Configuration Rules or Upgrade Rules window will determine if there are any
barriers to the installation process. If there are no failures, click [Next].20. In the Ready to Install or Ready to Upgrade window, click [Install] or [Upgrade] to begin the
installation.21. In the Complete window, click [Close].22. Close the SQL Server Installation Center.23. Reboot the computer, even if you are not prompted to do so. This completes the installation of
SQL Server. You can now go on to configure SQL Server 2012. For more information, refer to Configuring SQL Server on page 32.
Installing or Upgrading SQL Server 2008 R2
Note: SQL Server 2008 R2 setup requires Microsoft .NET Framework 4.5 (includes .NET 4.5 Framework) and Windows Installer 4.5. If you do not have these prerequisites prior to installing SQL Server 2008, the setup will prompt you before installing them.
1. Insert the SQL Server 2008 R2 disc. • If autorun is enabled, the SQL Server Installation Center is automatically opened.• If the SQL Server Installation Center does not automatically appear, click the Windows Start
button, then select Run. In the Run window, browse for setup.exe on the disc drive. Alternatively, you can run setup.exe from Windows Explorer.
2. The SQL Server Installation Center is displayed. Click Installation from the left pane, then:• For new installations, click New SQL Server stand-alone installation or add features to
an existing installation.• For upgrades, click Upgrade from SQL Server 2000 or SQL Server 2005.
3. The Setup Support Rules window is displayed. You must correct any failures before setup can continue. If no problems are identified, click [OK].
4. The Product Key window is displayed. Enter your product key and click [Next]. 5. In the License Terms window:
a. If you agree with the license terms, select I accept the license terms.b. Click [Next].
Installation Guide
SQL Server Standard Edition
6. The Setup Support Files step will install any of the listed components that are missing from your system. a. Click [Install].b. Once the prerequisite installation is complete, click [Next].
7. Upgrade only: In the Select Instance window, select the Instance to upgrade from the drop-down and click [Next].
8. In the Feature Selection window:a. Under Instance Features, select Database Engine Services, SQL Server Replication, and
Full-Text Search.b. Under Shared Features, select Management Tools - Basic and Management Tools -
Complete.
Note: For upgrades these features may already be selected and it may not be possible to change the selections.
c. Click [Next].9. In the Instance Configuration window:
• For new installations, select Default instance, and then click [Next].• For upgrades, the Named instance should already be selected. Click [Next].
10. Review the Disk Space Requirements information and click [Next] if you have sufficient space.11. The Server Configuration window is displayed.
• For new installations, select “NT AUTHORITY\SYSTEM” from the Account Name column drop-down for SQL Server Agent and SQL Server Database Engine. Click [Next].
• For upgrades, click [Next].12. Upgrade only: In the Full-text Upgrade window, click [Next].13. Installation only: In the Database Engine Configuration window:
a. Select the Mixed Mode radio button.b. Enter and confirm a password for the SQL Server system administrator account.c. Click [Add].d. In the Select Users or Groups window, click [Advanced].e. Change the From this location field to the local machine by clicking [Locations] and
selecting the local machine from the list.f. Click [Find Now], then select Administrators from the Search results listing window.g. Click [OK], then click [OK] again to close the Select Users or Groups window.h. The BUILTIN\Administrators group should now appear in the Specify SQL Server
administrators listing window. Click [Next].14. In the Error and Usage Report Settings window, deselect both options. Click [Next].15. The Installation Rules or Upgrade Rules window will determine if there are any barriers to the
installation process. If there are no failures, click [Next].16. In the Ready to Install or Ready to Upgrade window, click [Install] or [Upgrade] to begin the
installation.17. After all installation progress has completed, click [Next].18. In the Complete window, click [Close].19. Reboot the computer, even if you are not prompted to do so. This completes the installation of
SQL Server 2008 R2. You can now go on to configure SQL Server 2008 R2.
Installation Guide 31

Microsoft SQL Server
32
Configuring SQL Server
Create the Database
Note: Unless otherwise indicated, the selections made during database creation are minimal options necessary for the operation of the OnGuard database. Your IT department might require that these selections are increased, but it is recommended they not be reduced. In particular, the SQL Server selection for Recovery Model should be selected based on the expectation of data recovery in the event of database failure:
Recovery Model Simple - The database can be restored to the point of the last backup. This provides simple but effective protection.Recovery Model Full - The database can be restored to last transaction prior to the failure. This requires more management, but also provides better protection than the Simple Recovery Model.
1. In Windows, open the SQL Server Management Studio.2. Select your method of authentication, provide credentials if required, and click [Connect].
Note: If using SQL authentication, use SA.
3. In the Object Explorer pane, expand the Databases folder. Right-click the Databases folder and select New Database.
4. The New Database window is displayed. On the General page:a. In the Database name field, type ACCESSCONTROL (this is case-insensitive).b. Set the Initial Size (MB) of the Data file to 50.c. Set the Initial Size (MB) of the Log file to 10.d. Scroll to the right in the Database files listing window and click the browse button in the
Autogrowth/Maxsize column of the log file row.e. Under Maximum File Size, select the Limited to (MB) radio button and set the maximum
log file size. The recommended maximum log file size is 2048.f. Click [OK].
5. Select the Options page from the Select a page pane.a. In the Recovery model drop-down, select “Simple”.b. Verify that the Compatibility level drop-down is set to “SQL Server 2014 (120)” for SQL
Server 2014, “SQL Server 2012 (110)” for SQL Server 2012, or “SQL SERVER 2008 (100)” for SQL Server 2008 R2.
c. In the Other options list view, set the Auto Create Statistics, Auto Shrink, Auto Update Statistics, and Recursive Triggers Enabled drop-downs to “True”.
d. Click [OK].
Create a Login1. In the Object Explorer pane of the SQL Server Management Studio, expand the Security folder.2. Right-click the Logins folder and select New Login.3. In the General page of the Login window:
a. In the Login name field, type LENEL.b. Select the SQL Server authentication radio button.
• For Password, type Secur1ty# (OnGuard 7.0 and later) or MULTIMEDIA (OnGuard 6.6 and earlier).
Installation Guide

SQL Server Standard Edition
• Retype the password in the text field to confirm it.
Note: The SQL Server password is case-sensitive.
c. Deselect the Enforce password policy, Enforce password expiration, and User must change password at next login check boxes.
Note: If you choose to select the Enforce password expiration check box, you will be required by SQL Server to select a new login password at regular intervals. When the login password is changed by SQL Server, it must also be updated with the Lenel Login Driver. Failure to update the Login driver will cause OnGuard not to function properly.
4. In the Server Roles page of the Login window:• Most users should select the dbcreator, public, and serveradmin check boxes.• Advanced users should only select the public check box.
5. In the User Mapping page of the Login window:a. Select the master and tempdb check boxes.b. Click [OK].
6. Recommended settings for lenel user:
Note: For advanced users who do not want the database owned by lenel, proceed to step 7.
a. In the Object Explorer pane of SQL Server Management Studio, right-click on the OnGuard database and select New Query. A query tab is shown.
b. In the text window, type sp_changedbowner lenel.c. Press <F5> to execute the command.d. The message Command(s) completed successfully is shown in the Messages tab.e. Click the close (“X”) button to close the query tab, then click [No] when prompted if you
want to save the changes.f. Proceed to Set Memory Usage on page 34.
7. For advanced users, the minimum required lenel user settings are:a. In the Object Explorer pane of SQL Server Management Studio, right-click on the OnGuard
database you just created and select New Query. A query tab is shown.b. In the text window, type:
• CREATE ROLE db_executor• GRANT EXECUTE TO db_executor
c. Press <F5> to execute the command.d. The message Command(s) completed successfully is displayed in the Messages tab.e. Click the close (“X”) button to close the query tab, then click [No] when prompted if you
want to save the changes.f. Select the Login - New dialog, which should already be open but might be hidden by
another window.g. Select User Mapping from the Select a page pane, and then select the ACCESSCONTROL
database.h. Select (check) the following roles:
• public• db_datareader• db_datawriter
Installation Guide 33
Microsoft SQL Server
34
• db_ddladmin• db_executor
i. Click [OK].j. The new login appears in the Logins folder.
Note: At this point the lenel user provides OnGuard functionality only. Any database level administration, such as backups and restores, must be performed by a different user with the appropriate permissions.
Set Memory Usage1. In the Object Explorer pane of the SQL Server Management Studio, right-click on the database
engine <ServerName> and select Properties.2. Select the Memory option on the Select a page pane.3. Set the Maximum server memory (in MB) option to be roughly one half of your system’s
actual memory. This will make sure that the database does not use your entire system’s memory, which would needlessly slow down your system.
4. Click [OK].
Truncate the Log File1. In the Object Explorer pane of the SQL Server Management Studio, right-click the OnGuard
database, then select Tasks > Shrink > Files.2. The Shrink File window is displayed.
a. In the File type drop-down, select “Log”.b. Select the Release unused space radio button.c. Click [OK].
Determine the Database Archive PlanIn addition to creating the required Live database, OnGuard provides two options for archiving Events, Events Video Location, Alarm acknowledgments, User Transactions, Visits Records, and specific event types from the Live database tables, as a way of keeping the database from growing so large over time that system performance is affected.
• Archive to text files• Archive to an Archival databaseIf you plan to archive the Live database to an Archival database, then create the Archival database by performing the following steps.
1. Perform all of the previous steps to create the Live database.2. Repeat the Create the Database on page 32 steps again to create the Archival database, changing
the Database name to ACCESSCONTROL_ARCHIVAL.3. Repeat step 1 from the Create a Login on page 32 procedure again.4. Double-click on the existing Lenel user.5. Select the User Mapping page.6. Repeat steps 6a through 6e, or steps 7a through 7i, from the Create a Login on page 32 procedure
again, depending on how you configured the Live database. The Archival database is now ready for use.
For detailed information about the Live and Archival databases, refer to the Archives Folder chapter in the System Administration User Guide.
Installation Guide
CHAPTER 6 Installing OnGuard 7.0
This chapter describes the prerequisites and procedure for installing OnGuard 7.0.
OnGuard 7.0 Installation PrerequisitesBefore you install OnGuard you must first install the third-party requirements from the OnGuard Supplemental Materials disc. Windows Service Packs are also required but are not provided on the Supplemental Materials disc. See the OnGuard release notes on the Installation disc to see which service packs are required for your operating system.
1. Insert the OnGuard Supplemental Materials disc into a disc drive on a computer running the Windows operating system.
2. Install the components that are needed from the prerequisites section:• Adobe Reader - required to read the OnGuard help documentation.• Microsoft .NET Framework 4.5 - Required for some applications to work correctly. While
installed automatically during the OnGuard installation, some systems have shown that installing it beforehand increases the speed of the OnGuard installation significantly.
3. Install your database system.4. Restart your computer.
Notes: Internet Information Services (IIS) is required for use of the web applications, but is not included on the Supplemental Materials disc. For more information, refer to Internet Information Services (IIS) for Windows Server on page 58.
Any workstation that will log into the Visitor Management Administration Tool must have Microsoft Silverlight installed. Install Silverlight from http://www.microsoft.com/silverlight/.
Installation Guide 35
Installing OnGuard 7.0
36
Installation Procedures
Attach the Hardware Key (License Server Only)
Note: If you are using a software license you do not need to configure a hardware key. For more information, refer to Install Your OnGuard License in the Installation Guide.
OnGuard software is protected by a hardware security key. USB hardware keys are available for use with the OnGuard software. Remember to physically attach the hardware key (“dongle” adapter) directly to the USB port on the computer that has License Server installed in order for the software to run properly.
A hardware key is only needed on the server running License Server. Each client computer running OnGuard 7.0 uses a software license instead of a hardware key.
Note: Parallel dongles are no longer supported. If you are using a parallel dongle, contact Lenel for a replacement USB dongle before installing the OnGuard software.
Configure a USB Hardware KeyIf you are using a hardware key that attaches to the USB port, then you must install a driver in order for Windows to recognize the device.
IMPORTANT: You must install the driver for the hardware key BEFORE attaching the USB hardware key to the computer.
To configure a USB hardware key:
1. Install the SafeNet USB hardware key driver by doing the following:a. Navigate to the SafeNet directory on the Supplemental disc and then double-click the .exe
file. This can be found by navigating through the following folders on the supplemental disc: /License Key Drivers/SafeNet.
b. The InstallShield Wizard starts. Click [Next].c. The wizard continues, and the License Agreement window opens. Select the I accept the
terms in the license agreement radio button, and then click [Next].d. The wizard continues, and the Setup Type window opens. Select the Custom radio button,
and then click [Next].e. The Custom Setup window opens. Make sure only the Parallel Driver and the USB System
Driver get installed. You do not need to install any of the Sentinel Servers or Sentinel Security Runtime. Click on Sentinel Protection Server, Sentinel Keys Server, and Sentinel Security Runtime and select, “This feature will not be available.” [Click Next].
f. Click [Install].g. The wizard completes. Click [Finish] to exit.
2. Install the USB hardware key by doing the following:a. Attach the USB hardware key to any available USB port.b. The Found New Hardware wizard starts. Click [Next].c. The hardware is detected, and the Found New Hardware wizard completes. Click [Finish].
The hardware key is now configured and ready to be used.3. Depending on your configuration, you may need to restart your computer so that License
Administration recognizes the hardware key. Otherwise, you may receive an error in License Administration saying that the necessary hardware device was not found.
Installation Guide

Installation Procedures
You are now ready to install the OnGuard software and license.
Install the OnGuard 7.0 Software1. Insert the OnGuard 7.0 disc into a disc drive on a computer running the Windows operating
system.2. If auto-run is enabled, simply click the [Install Now] button. If not, open the Run dialog box.
In the dialog box, browse to the disc and select setup.exe from the disc drive. Alternatively, you can navigate to the disc manually and then run setup.exe.
3. The Microsoft .NET Framework 4.5 installation wizard begins. Click [Install] to begin installation. Microsoft .NET Framework 4.5 must be installed for some OnGuard features to work correctly.
4. When prompted, read the Software License Agreement. If you agree to its terms:a. Select the I accept the terms in the license agreement radio button.b. Click [Next].
5. Next, you will be prompted to choose the System Configuration you want to install:• Server System• Client System• Monitoring Client• Badging and Credential Client
6. Depending on your System Configuration choice, you will have different system options to select:• If you selected Server System- configure the following options:
– Select either Platform Server or Custom Server.Platform Server: Use the Platform Server option if this will be a complete server that will install all server features, including the LS Platform Services. This feature is only available on servers running IIS. At least one server within a system is required to install the LS Platform Services. Platform Server is the default option.Custom Server: Use the Custom Server option if this server will only host certain server features. If you choose the Custom Server option, you must select the individual features that you want installed on this server. At least one server within a system is required to install the LS Platform Services.
– Select the appropriate database option for your installation.• If you selected Client System- configure the following options:
– Select either Typical System which includes the standard features of the system, or a Custom System where you can specify server locations and choose the features to install.
– Select the appropriate database option for your installation.• If you selected Monitoring Client- configure the database type information options.• If you selected Badging and Credential Client- configure the database type information
options.
Note: SQL Server 2012 Express Edition is available on the Supplemental Materials disc. If you wish to install SQL Server 2012 Express Edition, install it manually from the Supplemental Materials disc before performing the OnGuard installation.
7. Click [Next].8. The System Location Information window is shown.
Installation Guide 37

Installing OnGuard 7.0
38
• Either accept the default installation directory or click [Change] and specify a different destination folder.
• Accept the default location of the License Server or click [Browse] and specify a different location.
• In the Port field, enter the number of the port to be used for access control system communication. It is recommended that you accept the default value of 8189.
Notes: If you want to use a different port than the default port 8189, use the Configuration Editor to make this change. For more information, refer to Appendix A: Configuration Editor on page 101.
• In the Provide the location of your database field, accept the default location or click [Browse] and specify a different location.
• Click [Next].9. The Custom Setup window will be displayed. Select the access control system features you wish
to have installed.
Notes: Click the name of a feature on the left to display its description on the right.
Below the Feature Description, the disk space requirements of the selected feature are displayed.
10. Click the icon to the left of a feature to display a popup menu of installation choices for that feature. Click [Next].
11. Click [Install] to begin the installation.12. A check is performed behind-the-scenes to determine if a language pack is installed. If an old
language pack is installed, the following message is displayed:
• If you wish to cancel the installation and remove the language pack by yourself, click [Cancel].
• If you wish to remove the language pack and continue the installation, click [Remove & Continue].
13. After Windows configures OnGuard, the status and progress bar will be updated.14. Once the installation is complete, click [Finish].15. Depending on the components that you chose to install, you may need to reboot the computer. If
you are prompted to do so, reboot the computer.16. Setup Assistant launches automatically.
Setup AssistantTo simplify OnGuard installations and upgrades, Setup Assistant helps users with the configuration steps required before successfully logging into the OnGuard software. Setup Assistant launches automatically after the OnGuard installer finishes the installation or upgrade process.
Installation Guide

Installation Procedures
Notes: After the OnGuard installation or upgrade is complete, launch Setup Assistant.
Users must be logged into the workstation with Administrator rights to run Setup Assistant. Users not logged in with Administrator rights are shown a dialog asking them to enter an Administrator password.
The Setup Assistant dialog consists of three primary sections:
• The status pane on the left side of the window lists the tasks performed by the Setup Assistant.– A green check indicates that the task was performed successfully.– A yellow check indicates that the user either chose to skip the task, or there was a warning
that prevented the task from completing. Some Setup Assistant tasks can be skipped by the user, and then run manually at a later time.
– A red “X” indicates that the task failed, and that errors must be corrected before using the system.
– A blue arrow indicates that the task is running.– No icon indicates that the task has not run yet.
• The main pane provides additional data, status, fields, buttons, and so on related to the active task.
• The description pane provides a brief description of each task’s purpose.
Security UtilitySecurity Utility functionality is now embedded into Setup Assistant. You should run Security Utility again whenever a Windows Update or Service Pack is installed on the workstation. For more information, refer to Manually Running Security Utility on page 42.
IMPORTANT: Lenel software requires certain security adjustments to the operating system to function more securely. These security adjustments are listed when Setup Assistant runs. Click [Release Notes] to review a description of the changes made by the Security Utility. Upon agreeing to this disclaimer, the user assumes responsibility for any security issues that might occur due to these adjustments. The Security Utility then makes the changes automatically.
Configuration EditorConfiguration Editor functionality is now embedded into Setup Assistant. The Configuration Editor screen shows the current configuration of the:
• Database• License ServerIf there is a configuration issue with any of these items, the Configuration Editor highlights the issue, making it easy to correct the issue. There are three situations in which the Configuration Editor will identify an issue that must be resolved:
• The database and license configuration is not consistent between the application.config and ACS.INI files
• Setup Assistant cannot locate the database• Setup Assistant cannot locate the License Server
Installation Guide 39

Installing OnGuard 7.0
40
System LicenseSystem License (License Administration) is used to install a valid license, or to verify that a valid license is already installed. This functionality is now embedded into Setup Assistant.
Note: You must have a valid license before Setup Assistant will continue with the OnGuard configuration process. If License Administration finds a valid license, Setup Assistant passes the System License step automatically. If License Administration does not find a valid license, it prompts you to locate a valid license file.
Run License Administration manually whenever you purchase additional licensable OnGuard features and receive a new license from Lenel.
• For information on how to run License Administration manually, refer to Log into License Administration on page 43.
• For information on how to install a new license, refer to Install a New License on page 44.
LS Platform ServicesIf you selected to install a Platform Server or a Custom Server and you selected the LS Platform Services component in the Feature Selection dialog, then Setup Assistant will help you create and configure the Application Server service. Enter the Windows user name and password of the account that will run the Application Server, and then click [Create service]. This Windows user must have database access, and also have read/write access to the OnGuard directory for writing to the log files.
An authentication method with the database must be configured for browser-based applications to work properly. Create an account in both Windows and the database system for use with single sign-on authentication. For more information, refer to Database Authentication for Web Applications on page 51.
For more information, refer to Chapter 9: Configuring the LS Platform Services on page 57.
Database InstallationFor new OnGuard server installations using SQL Express, Setup Assistant provides an easy method for installing a new ACCESSCONTROL database for the OnGuard software.
1. If you do not want to use the default source database (.MDF) file, click the first [Browse] button and navigate to the alternate source file.
2. If you do not want the database stored at the default path, click the second [Browse] button and navigate to the alternate database location.
3. Click [Install database].
Database BackupIf updating an existing OnGuard installation, Setup Assistant provides an easy method for backing up a SQL Server or SQL Server Express database before it is upgraded during Database Setup. Lenel strongly recommends that you make a database backup, although you can skip this step if desired.
• To create a database backup with the default backup set name, description, and path, click [Backup].
• You can modify the backup set name, description, or path if desired.• The backup path cannot be a network drive. It must be a local drive.
Installation Guide

Installation Procedures
Notes: The backup set path is the path on the Database Server workstation. If running Setup Assistant on a workstation other than the Database Server and the default Server backup file path is C:\Program Files\Microsoft SQL Server\..., this refers to the Database Server’s C:\ drive, not the workstation’s C:\ drive.
The Browse button is available only if Setup Assistant is running on the database server. Click [Browse] to locate a backup path other than the default path.
If Setup Assistant is running on a workstation other than the database server, the Browse button is replaced with the Reset Path button. If your manually modified backup path does not function correctly, click [Reset Path] to return to the default backup path.
If the system is configured to archive to a SQL or SQL Express database, then Setup Assistant gives you the option of backing up the Archival database in addition to the Live database.
• If the backup fails for any reason, Setup Assistant shows a backup error. If possible, correct the error and then click [Backup] again.
• This database backup function only allows you to create the database backup. It does not allow you to restore from the backup. Use the standard SQL tools if you need to restore the database. For more information, refer to Restoring Databases on page 17.
Database Backup (Archival)If the system is configured to archive to a SQL or SQL Express database, then Setup Assistant gives you the option of backing up the Archival database in addition to the Live database. For more information on the fields and buttons shown on this Setup Assistant form, refer to Database Backup on page 40.
Database SetupFor server installations, Setup Assistant runs Database Setup automatically. The Database Setup program sets up the database and installs the reports needed.
Note: Form Translator runs automatically at the end of Database Setup, allowing you to use the OnGuard Web Applications, if desired. For more information, refer to Running Form Translator on page 58.
For more information, refer to Run Database Setup on page 46.
Database Setup (Archival)For server installations that are also configured to archive into an Archival database, Setup Assistant runs Database Setup on the Archival database in addition to the Live database. For more information about Database Setup, refer to Run Database Setup on page 46.
Service StartupThe last Setup Assistant task is to start all product services configured to start automatically. Setup Assistant lists all services that will be started, each service’s status, and provides a progress bar.
Installation Guide 41

Installing OnGuard 7.0
42
FinishedSetup Assistant notifies users when it is finished. When appropriate, the Finished page lists:
• Tasks that were skipped.• Warnings encountered during a task.• Errors that were found.If no tasks were skipped, warning were encountered, or errors were found, then the Finished page shows only that Setup Assistant is complete, and the software is ready for normal operations.
Setup Assistant notifies users upgrading a server with versions of OnGuard earlier than 6.3 that they should run the Universal Time Conversion Utility. To run the utility, click [Launch Universal Time Conversion Utility].
This utility converts local times stored in the database to Coordinated Universal Time for multi-time zone compatibility, and ensures accurate historical data reporting. The utility does not interfere with normal system operation, although the conversion can take a significant amount of time for large databases.
For more information, refer to the Universal Time Conversion Utility appendix in the Upgrade Guide or the Enterprise Setup & Configuration User Guide.
Manually Running Security UtilityYou should run Security Utility again whenever a Windows Update or Service Pack is installed on the workstation.
To run the Security Utility manually:
1. Launch the OnGuard Security Utility.2. Click [More Info] to review the Security Utility release notes.3. Click [Agree] if you agree with the disclaimer notice.4. Follow the on-screen instructions and click [Apply] when ready.
Install Your OnGuard LicenseYou must have a license to run the OnGuard software. The license comes to you from Lenel and has the extension *.xml, *.lic, or *.lic.xml. Licenses only need to be installed one per system and are usually installed on the server. To use License Administration, you may need to update your Internet browser security settings to allow pop-ups and add the license server to the list of trusted sites.
Information regarding your dongle or software license ID, referred to as your System ID, can be found in the Help > About section of the OnGuard applications.
Below are listed several license elements that should be noted.
Software Licenses: OnGuard now utilizes a software license, which works without the need for a hardware dongle. When using a software license you are able to use License Administration to activate, return, or repair your license.
IMPORTANT: Software licenses can only be used on a physical computer or in a VMware ESX virtual environment. In a VMware ESX virtual environment, only the License Server is supported. The License Server must be used with a software-
Installation Guide

Install Your OnGuard License
based license and not with a dongle-based license. For more information, refer to the OnGuard compatibility charts, located at https://customer.lenel.com/?q=support/compatibility-charts (you will need a Lenel login to gain access to this site).
It is important that access to licensing.lenel.com is allowed through your proxy if you wish to be able to activate and deactivate licenses. If it is not you will have to use activate by phone.
IMPORTANT: TCP Port 8888 is required for online activation and deactivation. While it does not need to be added as a firewall exception it should not be restricted or filtered.
Licenses for Hardware: Hardware licenses are based on the number of controllers for a given panel class. For example, instead of having different licenses for different types of panels in the same class (such as fire) a single license covers all the different panels that are in the same class.
Note: If you are installing non-Lenel HID access panels you must purchase a separate license. Lenel branded HID access panels, however, come with a built-in license. You can add any combination of HID access panels and other types of access panels up to the maximum capacity of your OnGuard system.
Expired Licenses: An alarm is generated when the system license is set to expire. This alarm is dependent on Linkage Server being configured and running on a host workstation. Although not required, it is advised that this alarm be configured to be e-mailed to the system administrator to ensure proper notification. For more information, see the Acknowledge Alarms chapter in the Alarm Monitoring User Guide.
IMPORTANT: In order for the alarm to be reported to monitoring stations there must be at least one panel configured and marked online. The panel does not need to exist or actually be online in Alarm Monitoring, it simply needs to exist in the System Status view.
Log into License Administration1. Make sure that the License Server is running. The License Server must run on the server
specified in the Configuration Editor. 2. Launch License Administration.
If your browser has JavaScript support enabled, a new window will open with the License Administration application in it. Otherwise, follow the directions in the browser’s window and click the hyperlink to continue. The License Administration application will then open in the same browser window. You must have cookie support enabled for this to work.
Note: The URL for License Administration is: http://LICENSESERVERHOST:9999/ Replace LICENSESERVERHOST with the name of the machine the License Server is running on. For example, if the machine running the License Server is named alpha, the License Administration URL will be: http://alpha:9999/
3. In the Username field, type a valid username. When logging in for the first time, the Username is admin.
4. In the Password field, type a valid password that corresponds to the username entered. When logging in for the first time, the password is admin.
5. Click [Log In]. The License Administration options will be displayed.6. The first time you log in you are strongly encouraged to change the password. To do this, click
the “Change Your Password” hyperlink.
Installation Guide 43

Installing OnGuard 7.0
44
7. The Administrator Properties page is displayed. You can change the user name, password, or both. This user name and password is only used for the License Administration application.a. To change the user name, enter a new value in the Username field.b. To change the password, enter a new value in the Password field.c. If you are changing the password, you must reenter the password in the Confirm Password
field.d. Click [Update]. A message will be displayed that indicates whether the administrator
properties were successfully updated.
Changing Administrator Properties for License AdministrationAfter logging in for the first time, you are strongly encouraged to modify the default user name and password as soon as possible to discourage unauthorized use. To change the user name and password, do the following:
1. Log into License Administration.2. Click [Administrator Properties]. The administrator properties are shown in the right half of the
window.3. You can change the user name, password, or both.4. To change the user name, enter a new value in the Username field.5. To change the password, enter a new value in the Password field.6. If you are changing the password, you must reenter the password in the Confirm Password
field.7. Click [Update]. A message will be displayed that indicates whether the administrator properties
were successfully updated.
Install a New License1. Obtain a new license file from Lenel. Be sure that you know where the license file is saved, as
you will need to know the location to successfully install the license.2. Make sure that the License Server is running.3. Log into License Administration.4. Click [Install New License].5. Click [Browse] to locate the license file, and then double-click to select the file and fill in the
License file field.6. Click [Next].7. View the license to verify that the software license is active, and confirm that it is the correct
license.8. Scroll down to the bottom of the window and click [Next], or if it is incorrect, click [Back] and
select another license file.9. Read the terms of the license agreement and select the Yes radio button if you agree with the
terms of the license. If you disagree, then you will not be able to install the license.10. If the license file is not software based or is already activated, click [Finish].
If the license file is software-based and is not active yet, you must activate it. For more information, refer to Activate a Software License on page 45.
The license installs and an entry is displayed in the Installed Licenses drop-down list box indicating the name of the product that the license controls.
Installation Guide
Install Your OnGuard License
Activate a Software LicenseYou must activate the software license to have a fully functioning system.
1. View the license you are installing or have installed.2. Click the Activate button or hyperlink, depending on which is available.3. Choose an activation method:
• Online - select this option to activate the license over the Internet. You may be prompted to provide proxy information to connect to the activation server.1) Click [Activate].2) The license is activated. Click [Finish].
• Phone - select this option if you do not have an Internet connection. Use this option to either activate by making a telephone call, or by sending a MobileActivate Text Message (SMS).
Notes: When entering the Confirmation Code in License Administration, use all capital letters and numbers.
If you activate by phone, you will be unable to return or repair the license online and must do so over the phone.
To activate by making a telephone call:
1) Click [Activate]. Follow the on-screen instructions. 2) You are given a phone number to call for activation. 3) Click [Close] once the license has activated.To activate using MobileActivate Text Message (SMS):1) Click [Activate].2) Send a text message to (585) 340-7648 from the US and Canada, or to +44 7937 947945
from everywhere else. Use the following format:[Activation ID or dongle number][optional space][Activation Code]Activation codes sent via text message (for example, 5A5B5C-5D5E5F-5G5H5I-5J5K5L) are case insensitive, and dashes are optional. Spaces are ignored, so a space between the Activation ID and activation code is not required.Examples of a text message with proper formatting include: 12345 5A5B5C-5D5E5F-5G5H5I-5J5K5L123455A5B5C-5D5E5F-5G5H5I-5J5K5L12345 5A5B5C5D5E5F5G5H5I5J5K5L123455a5b5c-5d5e5f-5g5h5i-5j5k5l12345 5a5b5c5d5e5f5g5h5i5j5k5l12345 5A5b5c5d5E5f-5g5h5i-5J5k5L123455A5b5c 5d5E5f 5g5h5i-5J5k5L
3) You will receive a confirmation code very quickly. Enter the confirmation code in License Administration exactly as presented in the text message. This code is case sensitive.
4) Click [Close] once the license has activated.
Installation Guide 45
Installing OnGuard 7.0
46
Return a Software LicenseYou may find it necessary to return a software license if, for example, you are moving the OnGuard installation from one computer to another. To do so:
1. View the license that you have installed. 2. Click the Return hyperlink.3. Choose a return method:
• Online - select this option to return the license over the internet. You may be prompted to provide proxy information to connect to the activation server.
• Phone - select this option if you do not have an internet connection. You are given a phone number to call to return the license.
4. Click [Return]. If you are returning by phone follow the on-screen instructions.5. Click [Close] once the license has been returned.
Repair a Software LicenseIf your software license has become corrupt or if you have made certain computer hardware changes you may have to repair the license. To do so:
1. View the license that you have installed. 2. Click the Repair hyperlink.3. Choose a repair method:
• Online - select this option to repair the license over the Internet. You may be prompted to provide proxy information to connect to the activation server.
• Phone - select this option if you do not have an Internet connection. You are given a phone number to call to repair the license.
4. Click [Repair]. If you are repairing by phone follow the on-screen instructions.5. Click [Close] once the license has been repaired.
Run Database SetupThe Database Setup program sets up the database and installs the reports needed. This only needs to be run on a server. This is also part of the Setup Assistant. For more information, refer to Setup Assistant on page 38.
When using Crystal Reports, the database name can begin only with a letter. The rest of the name can contain only numbers, letters, and underscores.
IMPORTANT: The installation and upgrade process assumes your OnGuard database is called “AccessControl.” If this is not the case, use the Configuration Editor to modify the application.config file to correct this. For more information, refer to Database section on page 102.
1. Launch Database Setup.2. If upgrading the database, the Choose Task window opens. Select the action you would like to
perform. Click [Continue]. The choices include:• Live or Archival - If upgrading a database, these allow you to choose if you want to upgrade
the Live database or the Archival database (if database archiving is enabled; for more information, refer to the Archives Folder chapter in the System Administration User Guide).
Installation Guide
Configure the OnGuard Logs Folder
Note: The ACS.INI and application.config files must always point to the Live database, not the Archival database.
• Add/remove missing system data for current build - If you feel that you are missing system data, selecting this will add information back into the build.
• Compare database schema [no data] - Checks to see if the schema has changed. This does not compare data. This would be useful to run before upgrading to see if any schema changes have occurred, though it is not necessary.
• Upgrade database - Select to upgrade your database.3. For new installations, the Database Setup Progress window opens telling you that you are about
to create a new database. Click [Execute].If upgrading a database, a warning message appears reminding you to back up your database. For more information, refer to Chapter 3: Database Backup and Restoration on page 15. If your database is backed up, click [Yes].
4. The database installs. If upgrading the database, the system will be checked for anomalies. Anomalies are database features that are unknown to OnGuard and can include custom tables, triggers, stored procedures, and so on. Not all users will encounter anomalies. When prompted to take action on anomalies, the items listed should be familiar to the person performing the upgrade. Select all items that you know should exist and click [Continue]. Failure to select known anomalies may result in the failure of custom functionality.
Note: Form Translator runs automatically at the end of Database Setup, allowing you to use the OnGuard Web Applications, if desired. This occurs only after Database Setup runs on the Live database. Form Translator does not run on the Archival database.
Configure the OnGuard Logs FolderSome OnGuard applications use the files located in the logs folder and if a user does not have the appropriate Windows permissions to access these files they may encounter errors.
1. Navigate to the OnGuard logs folder. Its default location for 32-bit workstations is C:\Program Files\OnGuard\logs or, for 64-bit workstations, C:\Program Files (x86)\OnGuard\Logs).
2. Right-click the folder and select Properties.3. Select the Security tab.4. In the Groups or user names listing window, select the group or user name that will be using the
OnGuard software.5. Select the Allow check boxes for the permissions: Read, Write, and List Folder Contents.6. Click [OK].
Remotely Hosted DatabasesIf you are using Windows Authentication in your application.config file and your Live database is hosted remotely from your server, the LS Site Publication Server (if Enterprise or Distributed ID) or the LS Client Update Server service might need to be configured to logon as a specific user with NT authentication access to the database. You will know that this configuration is required if either of these services refuses to start, and the error log shows unable to connect to database errors.
To configure a service to log on as a specific user:
Installation Guide 47

Installing OnGuard 7.0
48
1. Click [Start], and then select Control Panel > Administrative Tools.2. Double-click on Services.3. Double-click on the service you wish to configure.4. Select the Log On tab, and then select This account.5. Enter the username and password. The best method for this is to click [Browse], type the
username and then confirm it by clicking [Check Names]. Then enter the user’s password.6. Click [OK] to close the Select User dialog.7. Click [OK] to close the service’s Properties dialog.8. Restart the service.9. Close the Services window.This will start the service so that it is logged on as the user you specified. The service will then have the same network permissions as that user.
Installation Guide

CHAPTER 7 Installing OnGuard on a Client Machine
Installing OnGuard on a client machine has only two general steps: installing the software and verifying the system’s license has been installed.
The installation is the same as it is on the server except you do not need to install a database, run Database Setup, install a license, or install a hardware key (dongle).
There are two ways to install OnGuard on client machines. The first is to manually install OnGuard on each computer and the second is to install OnGuard remotely from the server. Installing OnGuard remotely saves time by having you not go to each client computer to install it manually. It also insures that the same options are selected on every client during the installation.
If you are manually installing OnGuard on the client machines, then go to each machine and refer to Chapter 6: Installing OnGuard 7.0 on page 35.
If installing OnGuard remotely then refer to the Advanced Installation Topics guide.
Installation Guide 49

Installing OnGuard on a Client Machine
50
Installation Guide
CHAPTER 8 Database Authentication for Web Applications
The following situations require the configuration of a method of authentication:
• Systems with Oracle databases. For Oracle installation instructions, refer to the Advanced Installation Topics guide.
• Systems using browser-based OnGuard applications.There are two methods of authentication available:
1. Authenticate Windows with the database.• Refer to Configure Windows Authentication with SQL Server on page 51, or• Windows Authentication with Oracle on page 54.
2. Provide Credentials in the Protected File on page 55
Note: When used in this chapter, Windows authentication refers to the use of a single log on to gain access to both Windows and the database.
Windows Authentication with SQL ServerSQL requires authentication configuration for browser-based applications to run successfully.
Configure Windows Authentication with SQL ServerThe following process will take you through the process of configuring Windows authentication.
Create a new Windows userCreate a new Windows user to run the LS Application Server according to your IT policy. You may also choose to utilize an existing Windows user for authentication.
Add the Windows user to SQL Server1. Launch the SQL Server Management Studio.2. In the Object Explorer pane of the SQL Server Management Studio, expand the Security folder.
Installation Guide 51
Database Authentication for Web Applications
52
3. Right-click the Logins folder and select New Login.4. In the General page of the Login window:
a. In the Login name field, type <server-name>\<username>, where <server-name> is the name of the server and <username> is the name of the Windows user.
b. Select the Windows authentication radio button.5. Click [Search] to launch the Select User or Group dialog. This dialog is used to verify that the
Login name is correct.a. In the Enter the object name to select text box, enter the user name.b. Click [Check Names]. If the user is found it will appear underlined.c. Click [OK].
6. Select User Mapping from the Select a page pane.a. Select (check) the <Server Name>lenel database from the Users mapped to this login
list.b. In the Database role membership for <Server Name>lenel, the recommended settings
are (check):• db_owner• publicFor advanced users who do not want the db_owner role assigned to the user, the minimum required settings are:• public• db_datareader• db_datawriter• db_ddladmin• db_executor
Note: If the db_executor role does not already exist, refer to step 7a through step 7e in the procedure, Create a Login on page 32.
c. Click [OK].The new login will appear in the Logins folder.
Verify the Integrated Security SettingUse the Configuration Editor to verify that the application.config file is configured for Windows authentication. For more information, refer to Advanced Database section on page 103.
Configure Authentication for Reports in Area Access ManagerIf you want to use reports with Area Access Manager (Browser-based Client), additional steps are required for Windows authentication.
Note: If you do not want to use Windows authentication you can also store the Lenel credentials in the application.config file. For more information, refer to Provide Credentials in the Protected File on page 55.
Disable Anonymous Access in Windows1. Right-click My Computer and select Manage.2. Expand Services and Applications > Internet Information Services.
Installation Guide
Windows Authentication with SQL Server
3. Right-click Web Sites and select Properties.4. Select the Directory Security tab.5. In the Authentication and access control section, click [Edit].
a. Deselect (uncheck) the Enable anonymous access check box.b. Select the Integrated Windows Authentication check box.c. Click [OK].d. Click [OK].
6. The Inheritance Overrides dialog is displayed.a. Click [Select All].b. Click [OK].
Edit the Machine.config File1. Browse to the following folder:
C:\WINDOWS\Microsoft.NET\Framework\v2.0.50727\CONFIG
Note: The version folder name may vary depending on the version of .NET you have installed.
2. Open machine.config for editing.3. Search for the following line:
<processModel autoConfig=“true”4. Add the following immediately following autoConfig=“true”:
userName=“system” password=“AutoGenerate”5. This should result in a string such as:
<processModel autoConfig=“true” userName=“system” password=“AutoGenerate”/>
6. Save and exit the file.
Configure Windows Delegation for Remote DatabasesIf the OnGuard database is located on a different computer than the LS Application Server, Windows delegation must be configured. The following instructions are for domain controllers running on Windows Server 2008 R2 or Windows Server 2012.
1. On the domain controller, open Active Directory Users and Computers.2. In the console tree, under the domain name, click Computers.3. Right-click the Web server, then click Properties.4. On the Delegation tab, select the Trust this computer for delegation to specified services only
radio button.
Note: If the Delegation tab is not available on a domain controller, you may need to raise the domain functional level. Consult your IT administrator for more information.
5. Select the Use Kerberos only radio button.6. Click [Add], and add the service running the database. For example, the mssqlserver service and
the computer name running the database server.7. Click [OK].
Installation Guide 53
Database Authentication for Web Applications
54
Restart IISAfter completing the above steps for configuring reports for Area Access Manager (Browser-based Client), restart IIS.
1. In Computer Management, expand Services and Applications.2. Right-click Internet Information Services and select All Tasks > Restart IIS.
Windows Authentication with OracleOracle requires authentication configuration for Database Setup and the browser-based applications to run successfully.
Create a new Windows userCreate a new Windows user to run the LS Application Server according to your IT policy. You may also choose to utilize an existing Windows user for authentication.
Add the Windows user to OracleTo configure Windows authentication with Oracle, a new Oracle user must be created with Windows authentication credentials.
1. Launch SQLPlus.2. Log in using the system account. Enter SYSTEM@<SID> for the username and password.
IMPORTANT: You must be logged in as SYSTEM to run the script.
3. Verify Oracle connects properly. You should see "Connected to" in the console.
IMPORTANT: We do not recommend granting the DBA role to a Windows Authenticated user. To restrict the users’ roles and system privileges, refer to step 4. If restricting the Windows Authenticated user, then the user provides OnGuard functionality only. Any database level administration, such as backups ad restores, must be performed by a different user with higher database roles and system privileges.
4. To create the Windows Authenticated user with the desired level of roles and system privileges, at the SQL prompt, run the following command(s):
IMPORTANT: If you are not using the LENEL_DATA and LENEL_TEMP data spaces, you must change the LENEL_DATA and LENEL_TEMP references in the CREATE USER line to the desired table spaces you want to use. Contact your database adminstrator for details. Update both references to OPS$DOMAIN\DOMAINUSER with the actual domain and user name of the Windows User you are creating.
a. @@<Path to OnGuard Install Disc>\program files\OnGuard\DBSetup\New\WindowsUser_Authentication.ora or
b. If the LENEL_RESTRICTEDUSER_ROLE has not been created, then enter commands described in “Create a Restricted User Role” in the Advanced Installation Topics guide. Then run the following commands, replacing both occurrences of "<OPS$DOMAIN>\<DOMAINUSER>" with the actual domain name and user.
Installation Guide
Provide Credentials in the Protected File
CREATE USER "<OPS$DOMAIN>\<DOMAINUSER>" PROFILE "DEFAULT" IDENTIFIED EXTERNALLY DEFAULT TABLESPACE "LENEL_DATA"TEMPORARY TABLESPACE "LENEL_TEMP" ACCOUNT UNLOCK;GRANT CONNECT, RESOURCE, LENEL_RESTRICTEDUSER_ROLE TO "OPS$DOMAIN\DOMAINUSER";COMMIT;
5. Verify there were no errors. You should see output similar to:“User created.”“Grant succeeded.”“Commit complete.”
6. Exit SQL Plus.7. Navigate to the sqlnet.ora file located at $ORACLE_HOME\Network\Admin and edit it to
verify authentication is set to “NTS” on the following line:SQLNET.AUTHENTICATION_SERVICES=(NTS)
Verify the Integrated Security SettingUse the Configuration Editor to verify that the application.config file is configured for Windows authentication. For more information, refer to Advanced Database section on page 103.
Provide Credentials in the Protected FileWindows authentication with the non-embedded application server is the recommended method of configuration. Another method is to store the authentication information in the application.config file. When this method is used, additional steps are necessary to secure the file with Access Control Lists (ACL). When ACL is used the information within the file is very secure.
This authentication method requires advanced knowledge of Windows security and is not recommended.
IMPORTANT: When providing credentials in a protected file, the ODBC authentication method must not be set to Windows authentication.
Securing Files with the Access Control ListThe Access Control List (ACL) is a highly secure method of protecting information stored within a file. OnGuard can be configured to store user credentials within a file which must be secured to protect the information. This configuration can be performed on the Security tab of the file properties dialog. Right-click on the file and select Properties.
The account that administers the system should have read and write access any file containing user credentials so that they can maintain the file information. In addition, certain other accounts must have access to the files.
• The application.config file is used by the services and applications to determine where the database is and how to authenticate (by indicating integrated authentication or providing credentials):– LS Application Service– LS Site Publication Server
Installation Guide 55
Database Authentication for Web Applications
56
– Database Setup– Form Translator– Setup Assistant– Universal Time Conversion Utility– Configuration Editor– Area Access Manager (browser-based client)– and more
Application.configThe application.config file can be used to store the Lenel user credentials for access to the database when Windows authentication is not used. This is not the recommended configuration, however, with ACL the login credentials can be secured. The user account that runs the LS Application Server service must have read permission for the file.
Store the Lenel User CredentialsYou can use the Configuration Editor to store the Lenel user credentials in the application.config file for authentication with the database. For more information, refer to Advanced Database section on page 103.
Note: For information on storing Lenel user credentials for Crystal Reports, see Browser-based Reports on page 62.
Oracle UsersOracle users must also edit the sqlnet.ora file to specify the authentication method.
1. Navigate to \oracle\product\10.1.0\Db_1\NETWORK\ADMIN and edit the sqlnet.ora file.2. Verify that authentication is set to “None” in the following line:
SQLNET.AUTHENTICATION_SERVICES=(None)
Installation Guide
CHAPTER 9 Configuring the LS Platform Services
IMPORTANT: The LS Platform Services feature is required on the server in order to use browser-based applications. If you choose the Platform Server option during when installing or upgrading OnGuard, the LS Platform Services feature is installed automatically. If you choose the Custom Server option, you must manually select the LS Platform Services feature. The LS Platform Services feature requires IIS running on Windows Server 2008 R2 or Windows Server 2012; the LS Platform Services feature is not recommended for use on Windows 7, Windows 8, or Windows 8.1 because the number of client connections to IIS is limited. At least one server within a system is required to install the LS Platform Services.
The LS Platform Services feature enables the use of browser-based applications on client machines that may not have OnGuard installed. The LS Platform Services feature deploys the minimal software needed for the Web applications on first use, communicates with the OnGuard database, and provides streaming help to the client. Additional configuration steps are necessary to provide the LS Platform Services feature with the credentials to access the OnGuard database.
When used in this chapter, single sign-on refers to the use of a single log on to gain access to both Windows and the database. The application service runs under this Windows account and uses the same credentials to access the OnGuard database.
Note: The OnGuard server must have port 80 open for client connections.
Custom Install the LS Platform ServicesAfter IIS has been installed, you must install the LS Platform Services feature. This step can be performed during the initial installation of OnGuard or as a modification to an existing system. The Platform Server option automatically installs the LS Platform Services feature. The Custom Server option requires a manual install of the LS Platform Services feature.
For more information, refer to Appendix B: Custom Installation of OnGuard on page 105.
Installation Guide 57
Configuring the LS Platform Services
58
Running Form TranslatorForm Translator runs automatically at the end of Database Setup, allowing you to use the OnGuard Web Applications, if desired. This occurs only after Database Setup runs on the Live database. Form Translator does not run on the Archival database.
Internet Information Services (IIS) for Windows Server
IMPORTANT: Managing an Internet Information Services (IIS) Server requires an advanced IT understanding of security and IIS Application management. The installation guidelines offered in this manual are the minimum steps required to utilize IIS with the OnGuard software. As such, Lenel is not responsible for IIS configuration and maintenance other than the steps outlined for OnGuard functionality. Technical Support assistance will be provided specific to the installation, enablement, and base functionality of IIS per OnGuard requirements. Additional support services should be managed by the customer's IT department, and it is recommended that they are involved early in the implementation process to ensure corporate standards are met.
Default IIS directories and permissions are used. Consult your system administrator to ensure that your security requirements are met. For more information, refer to Creating Virtual Directories on page 60.
Use of SSL to ensure security across the network when using browser-based applications is highly recommended. Refer to IIS documentation for additional IIS and SSL configuration if desired. Once SSL has been configured, several files must be updated with the new URL. For more information, refer to Configure SSL on page 60.
Minimum IIS RequirementsThe following IIS requirements are the minimum required by OnGuard, regardless of whether using a SQL Server or Oracle database:
Note: When installing IIS features, you might need to specify an alternate source path to the \Sources\SxS\ directory on the installation media.
Common HTTP Features• Default Document• Directory Browsing• HTTP Errors• Static Content• HTTP Redirection
Health and Diagnostics• HTTP Logging
Performance• Static Content Compression
Installation Guide

Internet Information Services (IIS) for Windows Server
Security• Request Filtering• Windows Authentication
Application Development• .NET Extensibility 3.5• .NET Extensibility 4.5• ASP .NET 3.5• ASP .NET 4.5• ISAPI Extensions• ISAPI Filters
Management Tools• IIS Management Console• IIS 6 Management Compatibility
– IIS 6 Metabase Compatibility– IIS 6 WMI Compatibility
• IIS Management Scripts and Tools• Management Service
Turning Off HTTP and Using DCOM StreamingBy default, HTTP is enabled for the Web Application Server. If you want to turn off HTTP and use DCOM, complete the following steps:
1. Launch Internet Information Services (IIS) Manager from Control Panel > Administrative Tools.
2. In the Connections Pane, expand Sites > Default Web Site.3. Right-click Lnl.OG.Web and select Explore.4. In the Lnl.OG.Web folder, open the Preferences.js file.5. Comment out (add “//” before) the following lines:
var g_lnl_use_http_ptz = true;var g_lnl_use_http_video = true;
Confirming the .NET Version with Windows ServerSystems running versions of OnGuard newer than 5.12.012 should update their .NET version. By default for Windows Server 2012, the ASP.NET version is already set to 4.0. To confirm the version:
If using Windows Server 2008 R2:1. Right-click My Computer and select Manage.2. In the Server Manager tree, expand Roles > Web Server (IIS) > Internet Information Services
(IIS) Manager.3. On The Internet Information Services (IIS) Manager window, expand Server Name > Sites >
Default Web Site and click lnl.og.web.4. Make sure that the ASP.NET version is set to 4.0 which it should be by default. To check:
Installation Guide 59
Configuring the LS Platform Services
60
a. Double-click .NET Compilation.b. Expand Assemblies. Confirm that the system version is 4.0.
If using Windows Server 2012:1. Right-click Computer and select Manage. The Server Manager opens.2. In the left pane, select IIS. Servers are shown in the right pane.3. Right-click on the proper server name.4. Select Internet Information Services (IIS) Manager.5. On The Internet Information Services (IIS) Manager window, select Server Name > Sites >
Default Web Site.6. Make sure that the ASP.NET version is set to 4.0 which it should be by default. To check:
a. Double-click .NET Compilation.b. Expand Assemblies. Confirm that the system version is 4.0.
If using Windows 8/Windows 8.1:1. Right-click Computer and select Manage.2. Select Computer Management > Services and Applications > Internet Information Services
(IIS) Manager.3. On The Internet Information Services (IIS) Manager window, expand Server Name > Sites >
Default Web Site and click lnl.og.web.4. Make sure that the ASP.NET version is set to 4.0 which it should be by default. To check:
a. Double-click .NET Compilation.b. Expand Assemblies. Confirm that the system version is 4.0.
Creating Virtual DirectoriesOnGuard browser-based applications are installed under the default IIS directory. This step is optional; some system users may require that they be located in an alternate directory and must follow this procedure. Refer to IIS documentation for instructions on how to create new virtual directories. The following information is provided for configuration of new virtual directories.
Two virtual directories should be created: Lnl.OG.WebService and Lnl.OG.Web.
• Lnl.OG.WebService maps to the Physical Path [Root-IIS-Path]\Lnl.OG.WebService\ and Lnl.OG.Web maps to the Physical Path [Root-IIS-Path]\Lnl.OG.Web\.
• Once the virtual directories is created, right-click the virtual directory in the tree and select Convert to Application and click [OK].
• Application pool should be LSAppPool.• On The Internet Information Services (IIS) Manager window, double-click Authentication and
make sure that the status of Anonymous Authentication and Integrated Windows authentication is set to “Enabled.”
Configure SSLRefer to IIS documentation for SSL configuration instructions. Once SSL has been configured with IIS, URLs need to be changed from http to https. Specifically, follow the procedures for updating the following files:
• Updating the Preferences.js File for SSL on page 61
Installation Guide

Authentication
• Configuring the Services.config File on page 67• Configuring the FlexApplicationConfiguration.xml File on page 68• Configuring the SilverlightApplicationConfiguration.xml File on page 68• Configuring the ClickOnce Files on page 68
AuthenticationAn authentication method with the database must be configured for browser-based applications to work properly. Create an account in both Windows and the database system for use with single sign-on authentication. For more information, refer to Database Authentication for Web Applications on page 51.
Configure the LS Application Server Service Log On AccountOnce the single sign-on account has been created in Windows and the database system, the Application Server service must be configured to run under the Windows account.This Windows user must also have read/write access to the OnGuard directory so that they can write to the log files. This is also part of the Setup Assistant.
1. Open the Windows services from Control Panel > Administrative Tools > Services.2. Locate the LS Application Server service in the list. Right-click the service and select
Properties.3. On the Log On tab, select This account and click [Browse].4. Type the user name of the Windows account in the Enter the object name to select text box and
click [Check Names].5. Click [OK] to exit the Select User dialog and [OK] to save the changes to the LS Application
Server properties.
Area Access Manager and VideoViewer Browser-based Clients
Updating the Preferences.js File for SSLFor Area Access Manager and VideoViewer browser-based clients, the preferences.js file needs to be changed to use SSL.
1. Navigate to C:\Inetpub\wwwroot\lnl.og.web\ and edit the Preferences.js file.2. Locate the line
var g_lnl_pfx_webservice_serverAddress and change http to https.
Setting Up Single Sign-On for Area Access Manager and VideoViewer1. Navigate to C:\Inetpub\wwwroot\Lnl.OG.Web.2. Open the preferences.js file for editing.3. Find the following line:
var g_lnl_useSingleSignOn = false;
Installation Guide 61

Configuring the LS Platform Services
62
4. Change the false to true. The value is case sensitive, so be sure to make true all lower case. The line should then look like this:var g_lnl_useSingleSignOn = true;
5. Restart IIS.6. Restart the LS Application Server service.
Browser-based ReportsArea Access Manager has the ability to generate reports with a browser-based client. Use the Configuration Editor to configure the database connection required to generate reports. For more information, refer to Advanced Area Access Manager (Browser-based Client) section on page 104.
Configuration Download ServiceThe “configuration download service” (LnlConfigDownloadService.exe) is used to send updates to the controllers when changes are made to access level assignments using the Area Access Manager (Browser-based Client) or when active badges are being used in Visitor Management Front Desk.
This service will check the database once a minute (the default setting) to see if there are any new changes to process and it will then send down these changes to the hardware. To change the default setting so the service checks the database at other time intervals, add the following lines to the ACS.INI file (the “LoopDelay” is in milliseconds):
[ConfigDownloadService]
LoopDelay=60000
This service needs to run if Area Access Manager (Browser-based Client) is being used or if active badges are being used in Visitor Management Front Desk.
Only one instance of the “configuration download service” can exist in a system.
IMPORTANT: To make changes in the ACS.INI file on a Windows 7, Windows 8, or Windows 8.1 computer, you must right-click on the ACS.INI file and run it as the Administrator.
Configure the Configuration Download Service Host1. In System Administration, navigate to Administration > System options.2. On the General System Options form, click [Modify].3. Select a workstation in the Configuration Download Service host drop-down box or browse for
one in the system.
OnGuard User PermissionsUser accounts must be configured with permissions to access to the browser-based client applications.
VideoViewer (Browser-based Client)The following user permissions must be configured for each user account that will access the VideoViewer:
• System Permission Groups > Video hardware > Video devices• System Permission Groups > Access control hardware > Alarm panels
Installation Guide
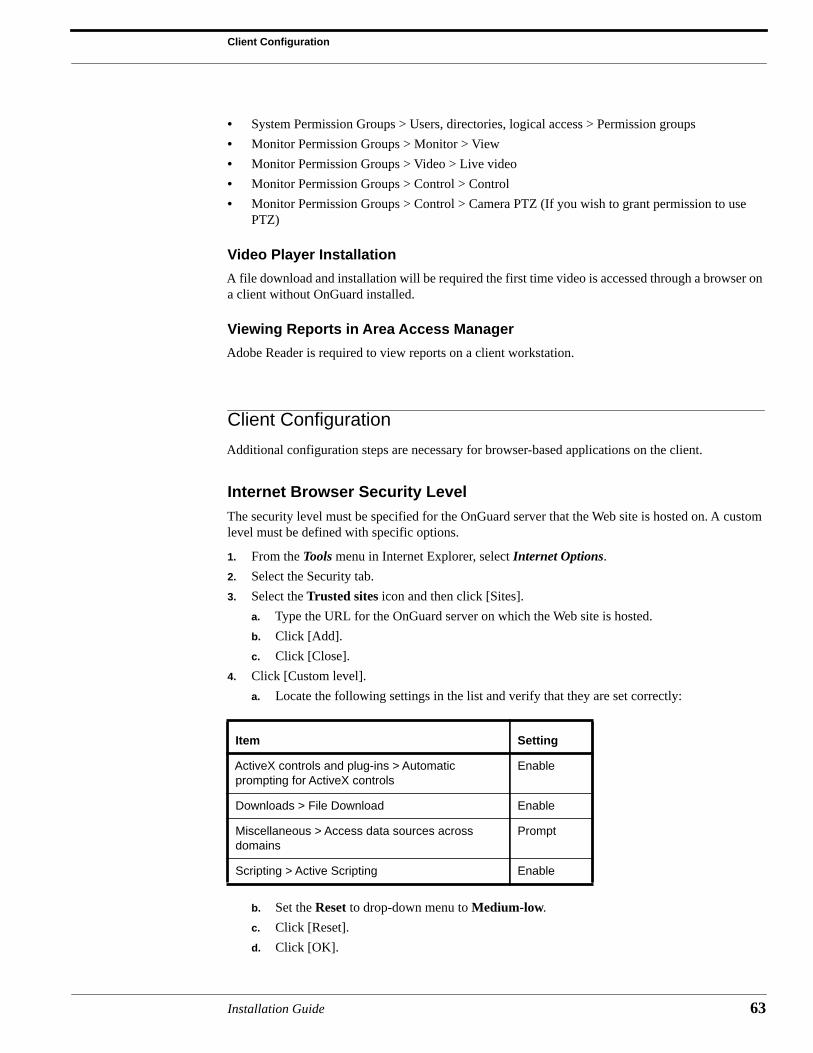
Client Configuration
• System Permission Groups > Users, directories, logical access > Permission groups• Monitor Permission Groups > Monitor > View• Monitor Permission Groups > Video > Live video• Monitor Permission Groups > Control > Control• Monitor Permission Groups > Control > Camera PTZ (If you wish to grant permission to use
PTZ)
Video Player InstallationA file download and installation will be required the first time video is accessed through a browser on a client without OnGuard installed.
Viewing Reports in Area Access ManagerAdobe Reader is required to view reports on a client workstation.
Client ConfigurationAdditional configuration steps are necessary for browser-based applications on the client.
Internet Browser Security LevelThe security level must be specified for the OnGuard server that the Web site is hosted on. A custom level must be defined with specific options.
1. From the Tools menu in Internet Explorer, select Internet Options.2. Select the Security tab.3. Select the Trusted sites icon and then click [Sites].
a. Type the URL for the OnGuard server on which the Web site is hosted.b. Click [Add].c. Click [Close].
4. Click [Custom level].a. Locate the following settings in the list and verify that they are set correctly:
b. Set the Reset to drop-down menu to Medium-low.c. Click [Reset].d. Click [OK].
Item Setting
ActiveX controls and plug-ins > Automatic prompting for ActiveX controls
Enable
Downloads > File Download Enable
Miscellaneous > Access data sources across domains
Prompt
Scripting > Active Scripting Enable
Installation Guide 63

Configuring the LS Platform Services
64
e. A warning dialog opens. Click [Yes].5. On the Advanced tab, select Multimedia > Play animations in web pages.6. Click [OK] to close the Internet Options dialog.
Configure Single Sign-on for Browser-based ClientsSingle sign-on can optionally be configured for browser-based clients. The following Internet Explorer settings must be configured on each client workstation that will use single sign-on authentication to connect to the browser-based applications. Additional steps must be performed on the server.
1. From the Tools menu in Internet Explorer, select Internet Options.2. On the Security tab, select the Trusted sites icon and click [Sites].3. The Trusted sites dialog opens.
a. In the Add this Web site to the zone field, enter the domain name of the server running the LS Platform Services.
b. Click [Add].c. Click [Close].
4. Click [Custom level]5. The Security Settings - Trusted Sites Zone dialog is displayed.
a. Set the User Authentication > Logon setting to Automatic logon with current user name and password.
Note: Using Windows to store a user name and password for the application will override the Automatic logon with current user name and password setting in Internet Explorer.
b. Click [OK].c. A warning dialog opens. Click [Yes].
6. Click [OK].
Installing the Server Digital Certificate in Internet Explorer if Using SSL (HTTPS)On the client and server workstations that will use web applications:
1. In Internet Explorer, open https://<server name>.2. Click [Continue to this website (not recommended)] to view the web page.3. At the Security Warning, click [Yes].4. In the Address Bar, click [Certificate Error].5. Click [View Certificate].6. Click [Install Certificate]. The Certificate Wizard opens.7. Click [Next].8. Select Automatically select the certificate store based on the type of certificate.9. Click [Next].10. Click [Finish].11. Click [OK].12. Click [OK].
Installation Guide
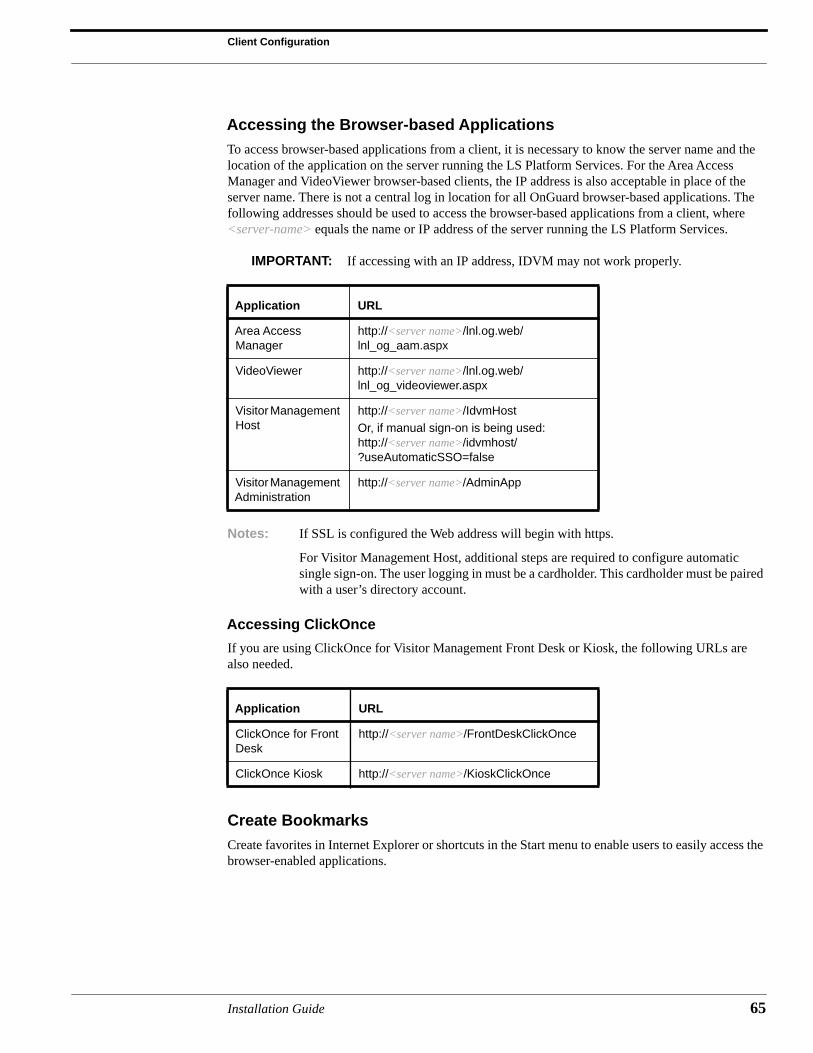
Client Configuration
Accessing the Browser-based ApplicationsTo access browser-based applications from a client, it is necessary to know the server name and the location of the application on the server running the LS Platform Services. For the Area Access Manager and VideoViewer browser-based clients, the IP address is also acceptable in place of the server name. There is not a central log in location for all OnGuard browser-based applications. The following addresses should be used to access the browser-based applications from a client, where <server-name> equals the name or IP address of the server running the LS Platform Services.
IMPORTANT: If accessing with an IP address, IDVM may not work properly.
Notes: If SSL is configured the Web address will begin with https.
For Visitor Management Host, additional steps are required to configure automatic single sign-on. The user logging in must be a cardholder. This cardholder must be paired with a user’s directory account.
Accessing ClickOnceIf you are using ClickOnce for Visitor Management Front Desk or Kiosk, the following URLs are also needed.
Create BookmarksCreate favorites in Internet Explorer or shortcuts in the Start menu to enable users to easily access the browser-enabled applications.
Application URL
Area Access Manager
http://<server name>/lnl.og.web/lnl_og_aam.aspx
VideoViewer http://<server name>/lnl.og.web/lnl_og_videoviewer.aspx
Visitor Management Host
http://<server name>/IdvmHostOr, if manual sign-on is being used:http://<server name>/idvmhost/?useAutomaticSSO=false
Visitor Management Administration
http://<server name>/AdminApp
Application URL
ClickOnce for Front Desk
http://<server name>/FrontDeskClickOnce
ClickOnce Kiosk http://<server name>/KioskClickOnce
Installation Guide 65

Configuring the LS Platform Services
66
Installation Guide
CHAPTER 10 Visitor Management Installation
Visitor Management Host, Administration, Front Desk, and Kiosk are installed with the LS Platform Services feature.
Using SSLAfter installing the LS Platform Services feature through a custom installation, additional configuration is needed to use SSL.
Security and AuthenticationFor Visitor Management Host, the services.config file needs to be changed to use SSL. The services.config file is the default configuration, which is HTTP with Windows authentication.
Configuring the Services.config FileIf you do not plan to use SSL, then you do not have to perform this procedure.
1. Navigate to C:\Inetpub\wwwroot\lnl.og.services\IdvmWebHost.2. There are four possible security policies, with corresponding files:
Security policy File
No transport security, Windows Authentication not required
HttpServices.config
Transport security, Windows Authentication not required
HttpsServices.config
Transport security, Windows Authentication required
HttpsWithWindowsAuthenticationServices.config
Installation Guide 67
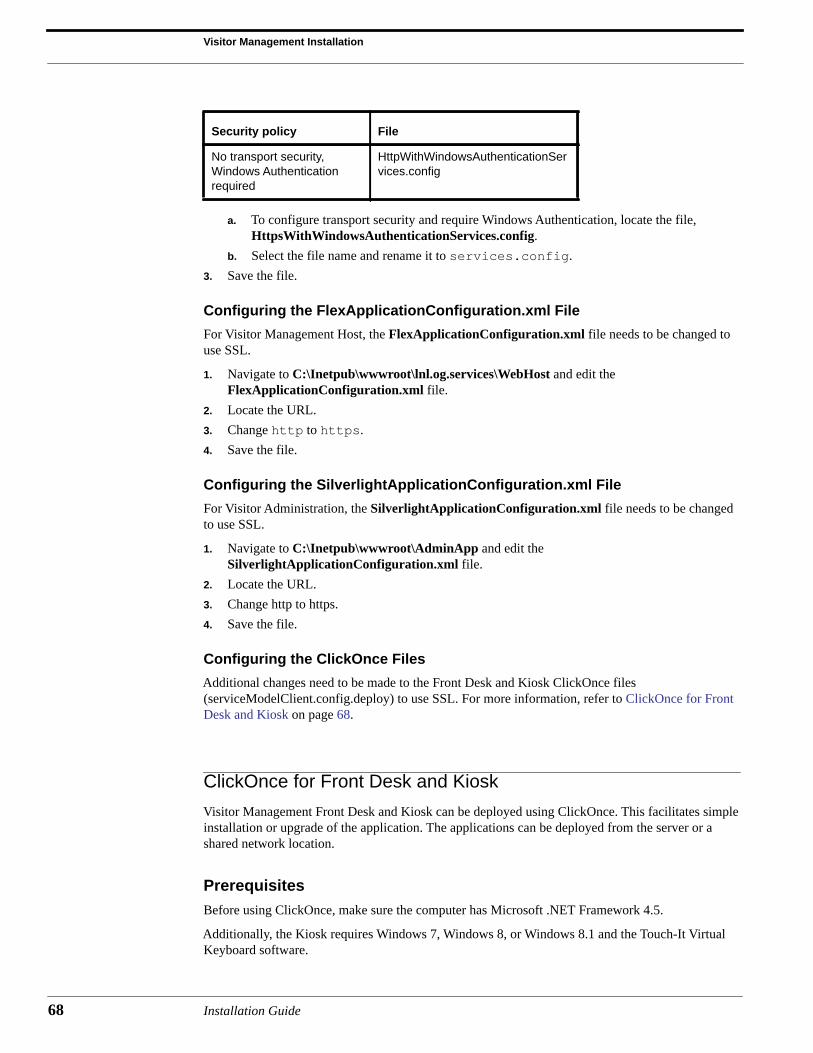
Visitor Management Installation
68
a. To configure transport security and require Windows Authentication, locate the file, HttpsWithWindowsAuthenticationServices.config.
b. Select the file name and rename it to services.config.3. Save the file.
Configuring the FlexApplicationConfiguration.xml FileFor Visitor Management Host, the FlexApplicationConfiguration.xml file needs to be changed to use SSL.
1. Navigate to C:\Inetpub\wwwroot\lnl.og.services\WebHost and edit the FlexApplicationConfiguration.xml file.
2. Locate the URL.3. Change http to https.4. Save the file.
Configuring the SilverlightApplicationConfiguration.xml FileFor Visitor Administration, the SilverlightApplicationConfiguration.xml file needs to be changed to use SSL.
1. Navigate to C:\Inetpub\wwwroot\AdminApp and edit the SilverlightApplicationConfiguration.xml file.
2. Locate the URL.3. Change http to https.4. Save the file.
Configuring the ClickOnce FilesAdditional changes need to be made to the Front Desk and Kiosk ClickOnce files (serviceModelClient.config.deploy) to use SSL. For more information, refer to ClickOnce for Front Desk and Kiosk on page 68.
ClickOnce for Front Desk and KioskVisitor Management Front Desk and Kiosk can be deployed using ClickOnce. This facilitates simple installation or upgrade of the application. The applications can be deployed from the server or a shared network location.
PrerequisitesBefore using ClickOnce, make sure the computer has Microsoft .NET Framework 4.5.
Additionally, the Kiosk requires Windows 7, Windows 8, or Windows 8.1 and the Touch-It Virtual Keyboard software.
No transport security, Windows Authentication required
HttpWithWindowsAuthenticationServices.config
Security policy File
Installation Guide

ClickOnce Setup
Note: For more information, refer to the Kiosk documentation in the Visitor Administration User Guide.
ClickOnce SetupTo utilize ClickOnce, OnGuard must first be installed on the server. Doing so will install a directory with the required files (FrontDeskClickOnce for Front Desk) (KioskClickOnce for the Kiosk). In most typical installations, the directory will be C:\Inetpub\wwwroot\<ClickOnce directory>.
The Touch-It Virtual Keyboard is not installed with Clickonce. It must be installed separately.
Methods of DeploymentOne option for deployment is to make it available through a shared network location. To do this, move the ClickOnce directory to the appropriate location on your network.
Another option is to deploy through the server. With this method, the application can be installed on the computer by accessing the files with a browser.
Server NameThe name of the server is usually configured during the installation process. However, if you wish to change it, this can be done in the serviceModelClient.config.deploy file. This is located in C:\inetpub\wwwroot\<ClickOnce directory>\config.
Using SSLThe configuration files will also need to be changed when using SSL.
1. Locate the following file:Navigate to C:\inetpub\wwwroot\FrontDeskClickOnce\config and edit the serviceModelClient.config.deploy file for Front Desk.Navigate to C:\inetpub\wwwroot\KioskClickOnce\config and edit the serviceModelClient.config.deploy file for Kiosk.
2. Locate the section that states<!-- Points to the endpoint that supports a security policy with HTTP and Windows Authentication enabled-->Comment markers <!-- and --> are used to indicate a portion of the code that will be ignored.
3. Comment out the endpoint address section of code for http by surrounding it with comment markers.a. Type <!-- at the beginning of the section, before <endpoint address="http...b. Type --> at the end of the section, after “BasicHttpBinding_IIdvmService”></
endpoint>.4. Locate the section that states
<!-- Points to the endpoint that supports a security policy with HTTPS and Windows Authentication enabled-->The code for https is commented out by default.
5. Remove the comment markers <!-- and --> surrounding that section to enable the code.6. For the address in that same section, change http to https.
Installation Guide 69
Visitor Management Installation
70
InstallationOnce the ClickOnce deployment site has been created and configured, it is possible to install the application.
Installing the Application via Network1. Obtain the location of the deployment site.2. Navigate to the directory, FrontDeskClickOnce for Front Desk. Navigate to the directory,
KioskClickOnce for Kiosk.3. To install Front Desk, run Lnl.OG.VM.FrontDesk.View.application. To install Kiosk, run
Lnl.OG.VM.Kiosk.View.application.4. Click [Install].
Installing the Application via Server
Note: To use this method of installation, JavaScript should be enabled for the browser. If it is not, contact your administrator for assistance.
1. Use a browser to go to the address,http://<server name>/FrontDeskClickOnce for Front Deskhttp://<server name>/KioskClickOnce for the Kioskwhere <server name> is the name of the OnGuard server. If SSL has been configured, the URL will start with https://...
2. Click [Install].The progress bar will indicate when installation is complete.
Workaround for Security PoliciesA Front Desk or Kiosk error may occur, stating, “The HTTP request is unauthorized with client authentication scheme ‘Negotiate’. The authentication header received from the server was ‘Negotiate, NTLM’” This error occurs because only one security policy is typically supported by the Windows Communication Foundation (WCF) service for Visitor Management, regardless of the IIS setting to support both anonymous and Windows Authentication.
Support Two Security PoliciesTwo security policies may be supported, requiring two web services, two virtual directories, and two copies of the service file.
Creating Two Copies of the Service File1. Navigate to C:\Inetpub\wwwroot\Lnl.OG.Services. Copy the directory, IdvmWebHost.2. Name the copied directory IdvmAnonWebHost.3. In the IdvmAnonWebHost directory, locate the HttpServices.config file and rename it to
Services.config.
Creating a New Virtual Directory1. In IIS, create a new virtual directory named Lnl.OG.AnonServices.
Installation Guide

Workaround for Security Policies
2. For the path, browse to and select the new directory, C:\Inetpub\wwwroot\Lnl.OG.Services\IdvmAnonWebHost.
Updating the ClickOnce Deployment1. Navigate to C:\Inetpub\wwwroot.2. Copy the directory, FrontDeskClickOnce for Front Desk. Copy the directory, KioskClickOnce
for Kiosk.3. Name the copied directory AnonFrontDeskClickOnce for Front Desk. Name the copied
directory AnonKioskClickOnce for Kiosk.4. Locate the following file:
Navigate to C:\inetpub\wwwroot\AnonFrontDeskClickOnce\config and edit the serviceModelClient.config.deploy file for Front Desk.Navigate to C:\inetpub\wwwroot\AnonKioskClickOnce\config and edit the serviceModelClient.config.deploy file for Kiosk.
5. Locate the section that states<!-- Points to the endpoint that supports a security policy with HTTP and Windows Authentication enabled-->Comment markers <!-- and --> are used to indicate a portion of the code that will be ignored.
6. Comment out the endpoint address section of code for http by surrounding it with comment markers.a. Type <!-- at the beginning of the section, before <endpoint address="http...b. Type --> at the end of the section, after “BasicHttpBinding_IIdvmService”></
endpoint>.7. Locate the section that states
<!-- Points to the endpoint that supports a security policy with HTTP and anonymous -->This code is commented out by default.
8. Remove the comment markers <!-- and --> surrounding that section to enable the code.9. In IIS, create a new virtual directory named AnonFrontDeskClickOnce for Front Desk. In IIS,
create a new virtual directory named AnonKioskClickOnce for Kiosk.10. For the path, browse to and select the new directory,
C:\Inetpub\wwwroot\AnonFrontDeskClickOnce for Front Desk C:\Inetpub\wwwroot\AnonKioskClickOnce forKiosk.
From a non-domain account, start Internet Explorer and go to:
• http://<server name>/AnonFrontDeskClickOnce for Front Desk• http://<server name>/AnonKioskClickOnce for KioskInstall the application. After doing so, you should be able to log in and use the application.
Note: For more information about configuring the system, refer to the Visitor Management Front Desk and Visitor Administration User Guides.
Installation Guide 71
Visitor Management Installation
72
Single Sign-On ConfigurationPerform the following procedures to use Single Sign-On for Web Applications.
Create a Directory for Single Sign-On1. Navigate to System Administration > Administration > Directories.2. Click [Add].3. Select the type of directory that you want to add. Most users select Microsoft Active Directory.4. Click [OK].5. Type the name of the domain in the Domain text box. This will automatically complete the Name
text box.6. Select the Authentication tab.7. Select the Current Windows account radio button.8. Click [OK].
Configure Single Sign-On1. Navigate to System Administration > Administration > Users.2. Find the User that you want to use Single Sign-On. This will also be the user that will sign into
IDVM.3. Click [Modify].4. Select the Directory Accounts tab.5. Click [Link].6. Select the directory that you created in Create a Directory for Single Sign-On on page 72 from
the drop down list.7. Click [Search]. This will return all Active Directory entries.8. Select the Active Directory user that will be linked to the OnGuard User.
To eliminate any confusion, when a person logs into a Windows machine with an Active Directory account, this user will be linked to an OnGuard User. Therefore, as soon as the user tries to open an OnGuard Application (in this case, IDVM), the user will be authenticated automatically.
9. Click [OK].10. Click [OK] at the bottom of the Users page to save all modifications.
Test Single Sign-On1. Log into Windows using the Active Directory account that you just added.2. Attempt to log into System Administration. You should log directly in without being asked for
credentials.If this is not working, then confirm the steps you performed in Configure Single Sign-On on page 72.
Installation Guide

CHAPTER 11 Logging Into the OnGuard System
The following chapter deals with everything you need to know about logging into the OnGuard system.
Windows User PermissionsThe Windows user logged in to the OnGuard applications must have read/write access to the OnGuard directory. This permission is required so that users can write to the log files.
PasswordsOnGuard includes strong password enforcement, which checks the user’s password against password standards. This functionality is designed to enhance password security if single sign-on is not used. If single sign-on is used (automatic or manual), OnGuard does not enforce password standards. For more information on single sign-on, refer to Single Sign-On on page 76.
The system’s strong password enforcement also checks the Lenel database user’s password when logging into applications. Database user passwords apply only to Oracle and SQL databases. For information on changing your database password, refer to the Accounts and Passwords chapter in the Installation Guide.
Password StandardsWhen creating a strong password keep the following guidelines in mind:
• Passwords cannot be blank.• Passwords cannot be the same as the user name (e.g. SA, SA).• Passwords cannot be Lenel keywords.• Although not required, your password should contain numbers, letters, and symbols. Spaces are
also acceptable. (e.g. August 18, 2002).• OnGuard user passwords are not case-sensitive.• Database passwords conform to the rules of the specific database being used; passwords in SQL
Server and Oracle 11g and later are case sensitive.
Installation Guide 73
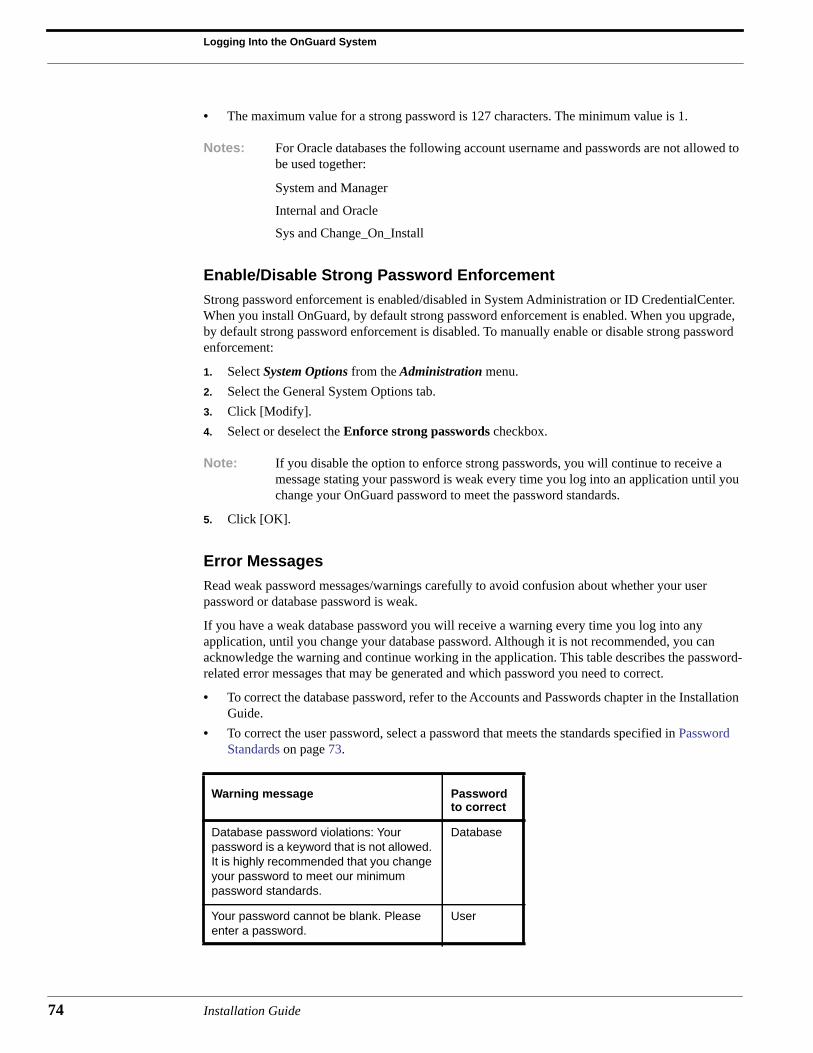
Logging Into the OnGuard System
74
• The maximum value for a strong password is 127 characters. The minimum value is 1.
Notes: For Oracle databases the following account username and passwords are not allowed to be used together:
System and Manager
Internal and Oracle
Sys and Change_On_Install
Enable/Disable Strong Password EnforcementStrong password enforcement is enabled/disabled in System Administration or ID CredentialCenter. When you install OnGuard, by default strong password enforcement is enabled. When you upgrade, by default strong password enforcement is disabled. To manually enable or disable strong password enforcement:
1. Select System Options from the Administration menu.2. Select the General System Options tab.3. Click [Modify].4. Select or deselect the Enforce strong passwords checkbox.
Note: If you disable the option to enforce strong passwords, you will continue to receive a message stating your password is weak every time you log into an application until you change your OnGuard password to meet the password standards.
5. Click [OK].
Error MessagesRead weak password messages/warnings carefully to avoid confusion about whether your user password or database password is weak.
If you have a weak database password you will receive a warning every time you log into any application, until you change your database password. Although it is not recommended, you can acknowledge the warning and continue working in the application. This table describes the password-related error messages that may be generated and which password you need to correct.
• To correct the database password, refer to the Accounts and Passwords chapter in the Installation Guide.
• To correct the user password, select a password that meets the standards specified in Password Standards on page 73.
Warning message Password to correct
Database password violations: Your password is a keyword that is not allowed. It is highly recommended that you change your password to meet our minimum password standards.
Database
Your password cannot be blank. Please enter a password.
User
Installation Guide
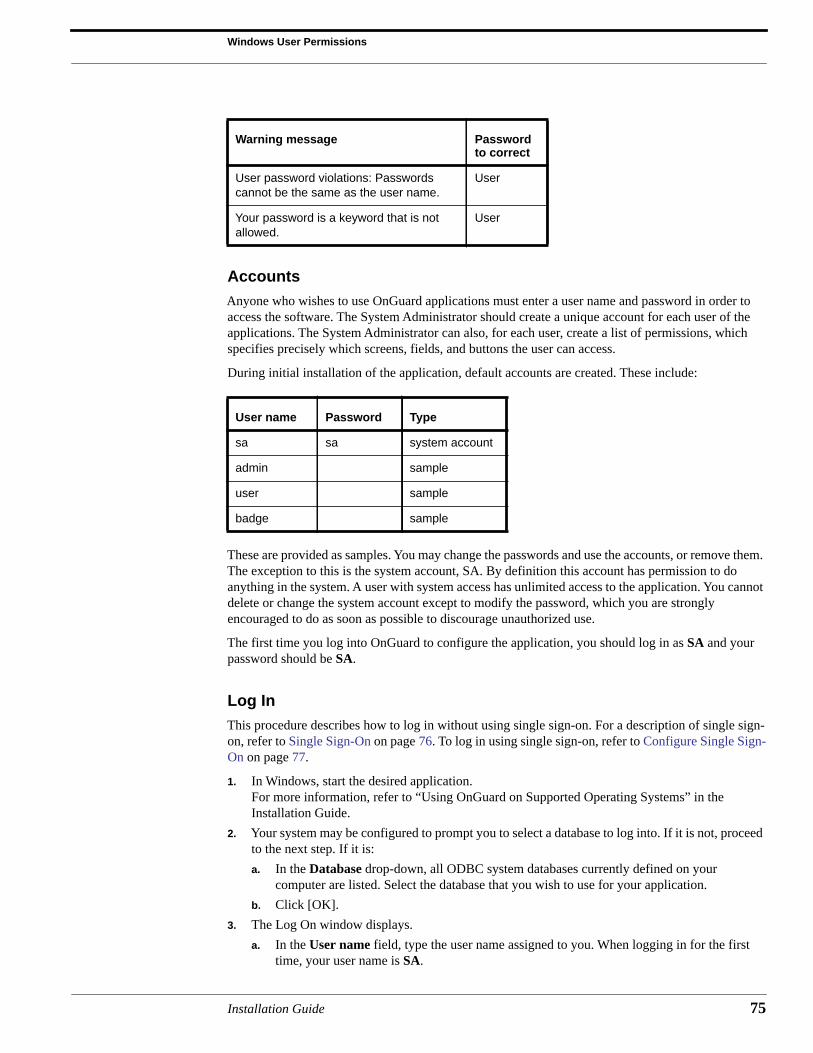
Windows User Permissions
AccountsAnyone who wishes to use OnGuard applications must enter a user name and password in order to access the software. The System Administrator should create a unique account for each user of the applications. The System Administrator can also, for each user, create a list of permissions, which specifies precisely which screens, fields, and buttons the user can access.
During initial installation of the application, default accounts are created. These include:
These are provided as samples. You may change the passwords and use the accounts, or remove them. The exception to this is the system account, SA. By definition this account has permission to do anything in the system. A user with system access has unlimited access to the application. You cannot delete or change the system account except to modify the password, which you are strongly encouraged to do as soon as possible to discourage unauthorized use.
The first time you log into OnGuard to configure the application, you should log in as SA and your password should be SA.
Log InThis procedure describes how to log in without using single sign-on. For a description of single sign-on, refer to Single Sign-On on page 76. To log in using single sign-on, refer to Configure Single Sign-On on page 77.
1. In Windows, start the desired application. For more information, refer to “Using OnGuard on Supported Operating Systems” in the Installation Guide.
2. Your system may be configured to prompt you to select a database to log into. If it is not, proceed to the next step. If it is:a. In the Database drop-down, all ODBC system databases currently defined on your
computer are listed. Select the database that you wish to use for your application.b. Click [OK].
3. The Log On window displays.a. In the User name field, type the user name assigned to you. When logging in for the first
time, your user name is SA.
User password violations: Passwords cannot be the same as the user name.
User
Your password is a keyword that is not allowed.
User
User name Password Type
sa sa system account
admin sample
user sample
badge sample
Warning message Password to correct
Installation Guide 75

Logging Into the OnGuard System
76
b. In the Password field, type the password assigned to you. When logging in for the first time, your password is SA. Note that the characters you type do not appear in the field. Instead, for each character you type, an “*” displays. This is intended to protect against unauthorized access in the event that someone else can see the screen while you type.
IMPORTANT: After logging in for the first time, you are strongly encouraged to modify the password for the system account as soon as possible to discourage unauthorized use.
c. In the Directory field, select the directory that you wish to log into. For user accounts not using single sign-on, the default is “<Internal>.”
d. Select the Remember user name and directory checkbox if you want the values you just entered in the User name and Directory fields to automatically be selected the next time that you log in.
e. Click [OK].4. Your system may be configured to prompt you to confirm that you are authorized to use the
application. To accept the terms of the authorization warning click [Yes].
Single Sign-OnSingle sign-on simply means logging into OnGuard with the same user name and password that you use to log into Windows or logging into OnGuard using an LDAP user name and password for authentication. LDAP (Lightweight Directory Access Protocol) is a software protocol that enables you to locate businesses, people, files, and devices without knowing the domain name (network address).
Notes: Windows Authentication should be used when single sign-on is desired. In other scenarios, use Anonymous Authentication. For more information, refer to:
http://support.microsoft.com/kb/258063
and
http://msdn.microsoft.com/en-us/library/aa292114%28VS.71%29.aspx.
Note: The use of the explicit username and password for directory authentication to Windows is strongly discouraged. It is recommended that you do not store Windows passwords in the OnGuard system, since OnGuard uses reversible encryption and Windows does not. If explicit authentication is required, you should use an account that has view only permission to the directory in question.
It is possible to assign both an internal account and one or more directory accounts to a single user. Assigning both types of accounts increases the flexibility of the system during the authentication process. If the directory service is down or cannot be found from the workstation where the user is logging on, that user can instead use the internal account. Using both types of accounts means that you need to manage the internal account user names and passwords in addition to managing the directory accounts.
IMPORTANT: Allowing a user to log on in multiple ways increases the probability that the user's access to the system could be compromised. It is recommended that you standardize on either internal or directory accounts, but not both.
Installation Guide

Single Sign-On
There are cases where assigning both an internal account and a directory account to a user may make sense. In a system where directory accounts are predominantly used, you may also assign an internal account to a user who needs to access the system from locations where the directory service is unavailable. If internal accounts are predominantly used, you may want to assign a directory account to a user so that the user does not need to enter in a password to log on.
Directory AccountsTo log into OnGuard using single sign-on, a user name, password, and directory are required. A directory is a database of network resources, such as printers, software applications, databases, and users. The following directories are supported by OnGuard: Microsoft Active Directory, Microsoft Windows NT 4 Domain, Microsoft Windows Local Accounts, and LDAP.
Automatic and Manual Single Sign-OnWhen a user account is configured for single sign-on, the user can log into OnGuard automatically or manually.
For example, with automatic single sign-on, users simply start OnGuard and they are automatically logged in under their Windows account and directory.
With manual single sign-on, users must manually enter their Windows or LDAP account information (user name and password). Users also have the option of selecting a different configured directory.
If single sign-on is not used, users manually enter a user name and a password that is different from their Windows or LDAP password. The directory is hard-coded to refer to the internal OnGuard user directory.
Notes: Manual single sign-on can be used with the following directories: Microsoft Active Directory, Microsoft Windows NT 4 Domain, and LDAP.
Automatic single sign-on can be used with every directory supported by OnGuard except LDAP because it doesn’t provide all the account information required.
Configure Single Sign-OnBy default, user accounts do not use sign-on. To configure single sign-on the System Administrator must add a directory and link a user account to the directory.
Log In Using Automatic Single Sign-OnAutomatic single sign-on is supported with Windows domain accounts.
1. In Windows, start the desired application. For more information, refer to “Using OnGuard on Supported Operating Systems” in the Installation Guide.
2. Your system may be configured to prompt you to select a database to log into. If it is not, proceed to step 3. If it is:a. In the Database drop-down, all ODBC system databases currently defined on your
computer are listed. Select the database that you wish to use for your application.b. Click [OK].
3. If your Windows account is linked to a user, a message will be displayed that says, “Attempting to automatically log you on using your Windows account. To bypass this, hold down SHIFT.” To automatically be logged in, do nothing.
Installation Guide 77

Logging Into the OnGuard System
78
4. Your system may be configured to prompt you to confirm that you are authorized to use the application. To accept the terms of the authorization warning, click [Yes].
Log In Using Manual Single Sign-OnBoth users who want to log into OnGuard using an LDAP user name and password for authentication and users who want to log in using a Windows domain account can do so using manual single sign-on.
1. In Windows, start the desired application. For more information, refer to “Using OnGuard on Supported Operating Systems” in the Installation Guide.
2. Your system may be configured to prompt you to select a database to log into. If it is not, proceed to step 3. If it is:a. In the Database drop-down, all ODBC system databases currently defined on your
computer are listed. Select the database that you wish to use for your application.b. Click [OK].
3. If your Windows account is linked to a user, a message will be displayed that says, “Attempting to automatically log you on using your Windows account. To bypass this, hold down SHIFT.” To manually login or to login using a different user name and password, hold down the <Shift> key. The Log On window opens.
a. In the Directory field, select the directory that you wish to log into. The default is “<Internal>.”
b. In the User name field, type the Windows user name assigned to you. Do not enter the domain\user name just enter your user name.
c. In the Password field, type the Windows password assigned to you.d. Select the Remember user name and directory checkbox if you want the values you just
entered in the User name and Directory fields to automatically be selected the next time that you log in.
e. Click [OK].4. Your system may be configured to prompt you to confirm that you are authorized to use the
application. To accept the terms of the authorization warning, click [Yes].
Troubleshoot Logging InIf you attempted to log in and were unable to do so, make sure that the following conditions have been met:
• You entered a correct user name/password and specified the correct directory.• If your system is configured to display an authorization warning, you accepted the terms.• A valid license is installed.• You have permission to use the application. • If you attempted to log in and were unable to do so, make sure the following conditions have
been met:– You entered the correct user name and password for the selected directory of a user with
permission to use the application.
Installation Guide
Assigning Directory and Internal Accounts to the User
– If the system is configured to display an authorization warning, then you accepted the terms.– Verify your License Server settings (refer to the Configuration Editor appendix in the
Installation Guide). The LS License Server service must be started on the specified Host.– Log into the License Administration application to verify a valid license is installed.– Software based licenses must be activated.– USB licenses must have License Key Drivers installed.– If using single sign-on, ensure the pc user you are logged in as is linked to an internal
OnGuard user through an operational directory.
Assigning Directory and Internal Accounts to the UserIt is possible to assign both an internal account and one or more directory accounts to a single user. Assigning both types of accounts increases the flexibility of the system during the authentication process. Meaning, if the directory service is down or cannot be found from the workstation where the user is logging on, then the user can use the internal account instead.
However, using both types of accounts means that you need to manage the internal account user names and passwords in addition to managing the directory accounts. Allowing a user to log on in multiple ways increases the probability that the user’s access could be compromised. For that reason, it is recommended that you standardize on either internal or directory accounts, but not both.
There are cases where assigning both an internal account and a directory account to a user may make sense. In a system where directory accounts are predominantly used, you may also assign an internal account to a user who needs to access the system from locations where the directory service is unavailable. If internal accounts are predominantly used, you may want to assign a directory account to a user for that user's convenience, so that the user does not need to enter in a password to log on.
Installation Guide 79

Logging Into the OnGuard System
80
Installation Guide
CHAPTER 12 Accounts and Passwords
OnGuardincludes strong password enforcement, which checks the user’s password against the OnGuard password standards. This functionality is designed to enhance password security as well as encourage users to implement single sign-on. If single sign-on is used (automatic or manual) OnGuard does not enforce password standards.
Note: The strong password enforcement feature in OnGuard also checks the Lenel database user’s password when logging into applications. Database user passwords apply to SQL Server Desktop Engine, SQL Server, and Oracle. For information on changing your database password refer to Change the Database Password on page 83.
The following table summarizes the OnGuard default accounts and passwords:
OnGuard Default Accounts and Passwords
DescriptionUser name Password
How to change the password
Default system administrator account. This is the account that is used initially to log into the main OnGuard applications, such as System Administration.
SA SA For more information, refer to About Accounts on page 84.
OnGuard database. This is the actual OnGuard SQL Server Desktop Engine, SQL Server, or Oracle database.
LENEL Secur1ty# (OnGuard 7.0 and later), orMULTIMEDIA (OnGuard 6.6 and earlier)
For more information, refer to Change the Database Password on page 83.
Installation Guide 81
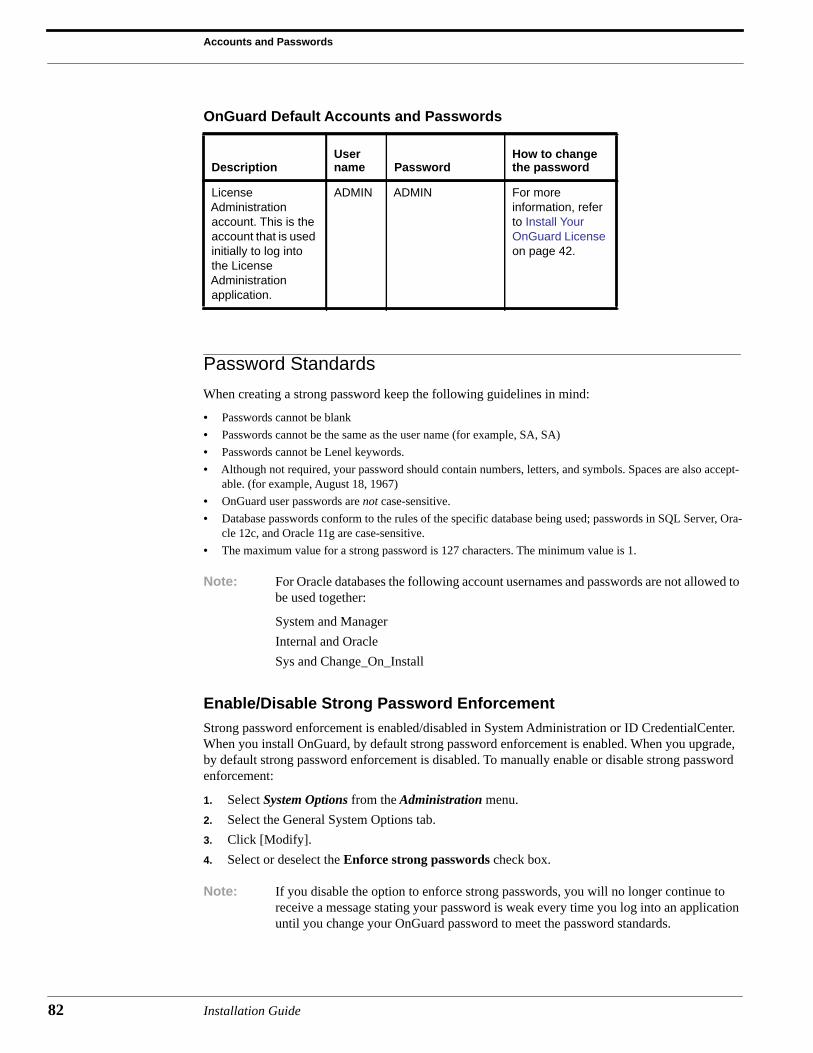
Accounts and Passwords
82
Password StandardsWhen creating a strong password keep the following guidelines in mind:
• Passwords cannot be blank• Passwords cannot be the same as the user name (for example, SA, SA)• Passwords cannot be Lenel keywords.• Although not required, your password should contain numbers, letters, and symbols. Spaces are also accept-
able. (for example, August 18, 1967)• OnGuard user passwords are not case-sensitive.• Database passwords conform to the rules of the specific database being used; passwords in SQL Server, Ora-
cle 12c, and Oracle 11g are case-sensitive.• The maximum value for a strong password is 127 characters. The minimum value is 1.
Note: For Oracle databases the following account usernames and passwords are not allowed to be used together:
System and ManagerInternal and OracleSys and Change_On_Install
Enable/Disable Strong Password EnforcementStrong password enforcement is enabled/disabled in System Administration or ID CredentialCenter. When you install OnGuard, by default strong password enforcement is enabled. When you upgrade, by default strong password enforcement is disabled. To manually enable or disable strong password enforcement:
1. Select System Options from the Administration menu.2. Select the General System Options tab.3. Click [Modify].4. Select or deselect the Enforce strong passwords check box.
Note: If you disable the option to enforce strong passwords, you will no longer continue to receive a message stating your password is weak every time you log into an application until you change your OnGuard password to meet the password standards.
License Administration account. This is the account that is used initially to log into the License Administration application.
ADMIN ADMIN For more information, refer to Install Your OnGuard License on page 42.
OnGuard Default Accounts and Passwords
DescriptionUser name Password
How to change the password
Installation Guide

Change the Database Password
Change the Database PasswordIn addition to user accounts and passwords, your OnGuard system has a database password. During installation, this password is set to Secur1ty# (OnGuard 7.0 and later) or MULTIMEDIA (OnGuard 6.6 and earlier). When you log on, the application checks your database server (SQL Server, Oracle, or SQL Server Desktop Engine) for this password before allowing you to use the database. This is done “behind the scenes.”
It is highly recommended that this password be changed. Although all the machines in an Enterprise or Distributed ID system start out using the same database password (Secur1ty# for OnGuard 7.0 and later, or MULTIMEDIA for OnGuard 6.6 and earlier), the database password does not need to be the same on all machines. The procedure for changing the database password varies depending on whether the Login Driver is running on the same computer that the database is located on, and which options you choose to use. The SQL Server, Oracle, or SQL Server Desktop Engine password and the password in the Login Driver must be the same or you will not be able to log into any OnGuard applications.
• If the Login Driver and the database are on different computers, you have two options:– Change the database password, and change the password in the Login Driver manually later– Change both the database password and the Login Driver password at once. If you choose
this option, the password will be sent over the network as plain text.
Change the Lenel Account Password1. To change the Lenel account password using the Login Driver:
a. Stop the LS Login Driver service, and then run it as an application.
b. The icon appears in the system tray. Right-click the icon, then select Open.c. The Login Driver window opens. From the Edit menu, select Change Password.
2. If the password is considered weak, the Database Server Account Passwords window is displayed. Refer to Password Standards on page 82 to determine a secure password.
3. Click [Continue]. If you wish to change the password for a database server account now, that is, “LENEL”, select the account from the list, then click [Change Password].a. The Change Password window is displayed. In the Old password field, type your current
password. For security reasons, your password is not displayed as you type it.b. In the New password field, type the new password.c. In the Confirm password field, type the new password again. Because the password can’t
be seen while you type, this gives you an extra assurance that you typed it correctly.d. When the password is changed, it must be changed in the Login Driver and on the database
server. If the Login Driver and the database server are running on the same machine, proceed to step e. If the Login Driver and the database server are not running on the same machine, the When I change this password on the Login Driver, do not change the password on the database server. I will change the password manually on the database server. check box appears in the Change Password window. (If they are on the same machine, this check box does not appear.)• If the check box is not selected (default), the password will be changed in both places.
However, the password is sent as plain text over the network. This is the only case where the password is passed across the network in plain text when changing the password.
Installation Guide 83
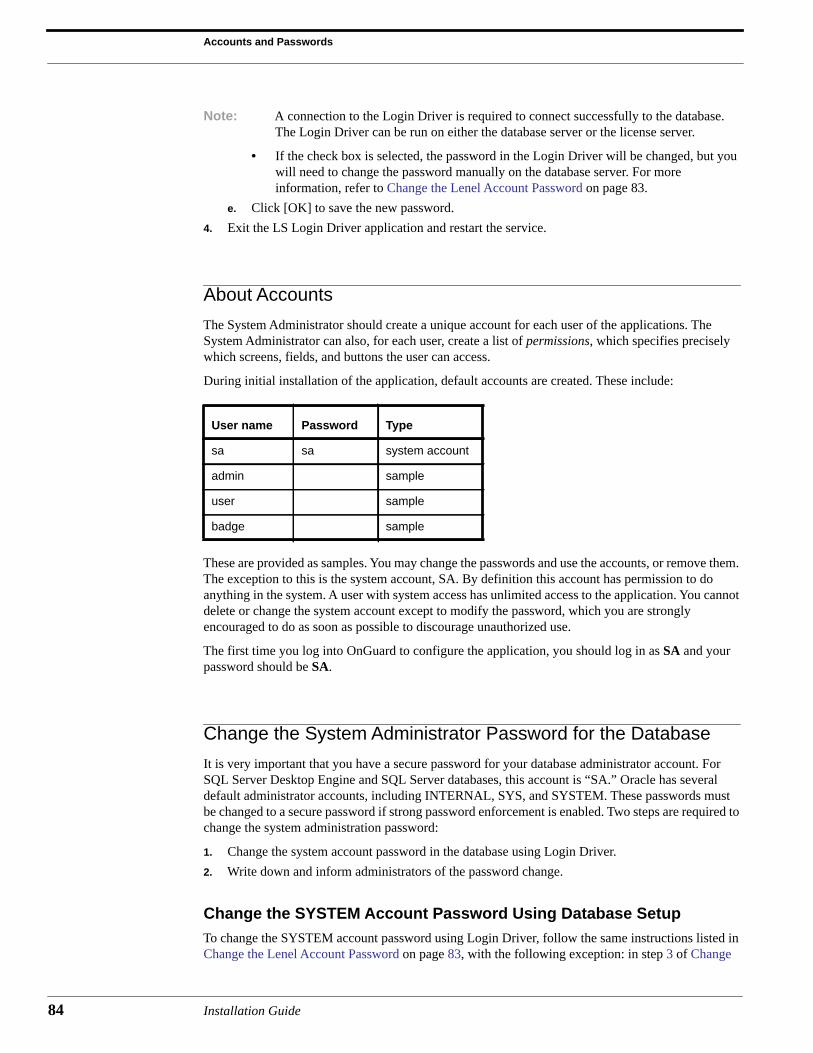
Accounts and Passwords
84
Note: A connection to the Login Driver is required to connect successfully to the database. The Login Driver can be run on either the database server or the license server.
• If the check box is selected, the password in the Login Driver will be changed, but you will need to change the password manually on the database server. For more information, refer to Change the Lenel Account Password on page 83.
e. Click [OK] to save the new password.4. Exit the LS Login Driver application and restart the service.
About AccountsThe System Administrator should create a unique account for each user of the applications. The System Administrator can also, for each user, create a list of permissions, which specifies precisely which screens, fields, and buttons the user can access.
During initial installation of the application, default accounts are created. These include:
These are provided as samples. You may change the passwords and use the accounts, or remove them. The exception to this is the system account, SA. By definition this account has permission to do anything in the system. A user with system access has unlimited access to the application. You cannot delete or change the system account except to modify the password, which you are strongly encouraged to do as soon as possible to discourage unauthorized use.
The first time you log into OnGuard to configure the application, you should log in as SA and your password should be SA.
Change the System Administrator Password for the DatabaseIt is very important that you have a secure password for your database administrator account. For SQL Server Desktop Engine and SQL Server databases, this account is “SA.” Oracle has several default administrator accounts, including INTERNAL, SYS, and SYSTEM. These passwords must be changed to a secure password if strong password enforcement is enabled. Two steps are required to change the system administration password:
1. Change the system account password in the database using Login Driver.2. Write down and inform administrators of the password change.
Change the SYSTEM Account Password Using Database SetupTo change the SYSTEM account password using Login Driver, follow the same instructions listed in Change the Lenel Account Password on page 83, with the following exception: in step 3 of Change
User name Password Type
sa sa system account
admin sample
user sample
badge sample
Installation Guide

Change the System Administrator Password for the Database
the Lenel Account Password on page 83, select the system account from the list (“SA” by default), then click [Change Password].
Write Down and Inform Administrators of the Password Change1. It is essential that you do NOT lose this password. If you do not have the system administration
password, you can potentially lose your entire database since no one may gain access to the information.
2. Write down the password and store in a secure place that won’t get lost.3. Inform other system administrators of the password. 4. BE SURE to inform the customer that you have changed the system password.5. Explain the importance of the password to the customer and recommend they keep it secure and
not allow it to be “common knowledge.”
Installation Guide 85

Accounts and Passwords
86
Installation Guide
CHAPTER 13 Maintaining the OnGuard Installation
This chapter will show you how to perform some simple maintenance to your installation.
Modify OnGuardOnGuard can be modified by following these steps:
1. Insert the OnGuard installation disc into the workstation.2. The installation application should launch automatically. If it doesn’t, browse the contents of the
disc and double-click setup.exe.3. The Welcome dialog opens. Click [Next].4. Select Modify, and then click [Next].
The installation application lists all features available for the OnGuard software. Select the feature(s) you want to modify, and then choose either:• This feature will be installed on local hard drive• This feature, and all subfeatures, will be installed on local hard drive• This feature will not be available.
5. After making your choices, click [Next] and then click [Install].
Repair OnGuardOnGuard can be repaired by following these steps:
1. Insert the OnGuard installation disc into the workstation.2. The installation wizard should launch automatically. If it doesn’t, browse the contents of the disc
and double-click setup.exe.3. The Welcome dialog opens. Click [Next].4. Select Repair, and then click [Next].
Installation Guide 87
Maintaining the OnGuard Installation
88
5. The installation wizard provides a workstation-specific list of files you should back up before continuing the repair. Back up these files.
6. Click [OK].7. Click [Install].8. When the installation wizard completes, click [Finish].9. Restore the backed-up files from step 5.
Remove OnGuardOnGuard can be removed by following these steps:
1. In Windows:a. Open the Programs and Features application.b. In the Currently installed programs list, select OnGuard 7.0.c. Click [Remove].
2. You are asked if you are sure you want to remove the OnGuard software. If you are, click [Yes].
OnGuard Fixes and Maintenance
Service ReleasesA Service Release refers in general to updates made to the OnGuard software in form of service packs or hot fixes.
– A service pack is a cumulative package with guided installation that resolves customer issues. A service pack may also include support for a technology refresh and new features.
– A hot fix is a cumulative package with guided installation that resolves critical customer issues. A hot fix may contain more than one fix.
IMPORTANT: Apply a service release to all servers and workstations running the OnGuard software. If the service release is not applied to all OnGuard computers, you cannot log into the OnGuard system until the service release is applied to all computers in the OnGuard system.
To obtain a service release:
1. Go to www.lenel.com and log in.2. Select Support > Downloads.3. Select your OnGuard version from the drop-down.4. Click the Hot Fixes tab.
Hot fixes are also available on the Supplemental Materials disc.
Service releases are not required. Carefully read the accompanying release notes before installing the service release.
Before installing any service release, stop all services with the prefix LS and LPS, and exit all applications.
Installation Guide
OnGuard Fixes and Maintenance
IMPORTANT: Service releases cannot be uninstalled. Before installing a service release, back up your system. For more information, refer to Chapter 3: Database Backup and Restoration on page 15.
Third-Party Service Packs and UpdatesThird-party service packs and updates should only be installed after they have been fully tested with the OnGuard system. Approved updates can be found on the Supplemental Materials disc. See the release notes or www.lenel.com to see what latest updates have been approved.
The components requiring updates are:
Operating system (operating system updates are not provided on the Supplemental Materials disc):
• Windows Server• Windows 7• Windows 8• Windows 8.1
Note: The Security Utility also needs to be run whenever any update to the operating system takes place.
Database:
• SQL Server Express• SQL Server• OracleMiscellaneous:
• Windows Internet Explorer• Adobe Reader
Language PacksIf you need a translated version of OnGuard you can request one by logging in to www.lenel.com and navigating to the Support > Downloads page. Select your OnGuard version from the drop-down and click the Language Packs tab. (You will need your Lenel login to gain access to this site.)
Log FilesOnGuard log files are created and stored in the OnGuard folder. The default path is C:\Program Files\OnGuard\logs.
When you upgrade OnGuard, your current log folder is renamed to “logs.old”. Only one “logs.old” folder will ever exist. It is overwritten at every upgrade.
Log files are not truncated and regular maintenance is suggested, as files may grow rather large.
The most frequently used log files are:
• LenelError.log• DataExchange.log• Replicator.Log• LnlLogError.log
Installation Guide 89
Maintaining the OnGuard Installation
90
Server Maintenance
Daily• Perform routine backups of databases• Monitor disk and database utilization• Monitor CPU and bandwidth utilization• Repair and maintain all failed transactions in a timely manner
Monthly• Perform routine event archive and backup of events• Perform routine database maintenance (that is, SQL Server Database Maintenance Plan)• Check all text file log sizes under the installation directory logs folder and purge as necessary
Installation Guide

CHAPTER 14 Troubleshooting
This chapter provides information for troubleshooting an OnGuard installation.
IIS Troubleshooting
Testing if IIS is installed and runningIf IIS is working properly, you will see the IIS start screen at the address http://<server name>.
If IIS is not installed, refer to Internet Information Services (IIS) for Windows Server on page 58.
If IIS is installed to a non-default locationIf IIS is installed to a non-default location, change the hard-codes path in the following two locations:
1. Navigate to the web.config file in the Lnl.OG.WebService folder.a. Find the line: <add key="baseConfigFilePath"
value="c:\inetpub\wwwroot\lnl.og.webservice\pfxwebservice\web.config"/>
b. Update the path with the correct location.2. The second file is the web.config file in the PFXWebService folder within the
Lnl.OG.WebService folder.a. Find the line: <add key="soapDispenserPath"
value="C:\Inetpub\wwwroot\Lnl.PFx.WebService\"></add>b. Update the path with the correct location.
Installation Guide 91
Troubleshooting
92
Troubleshooting OnGuard with Web Applications
The LS Application Server service starts and then stopsForm Translator must be run prior to using Web Applications. If Form Translator has not been run, the LS Application Server will not stay running. Instead, it shows a message about stopping because it has nothing to do.
Page cannot be foundIf everything appears to be configured correctly, but you get the Page cannot be found error when attempting to reach Area Access Manager (Browser-based Client) or VideoViewer (Browser-based Client), the issue is likely that ASP.NET is either not installed, or is not allowed. Install ASP.NET.
Can Web Applications be configured with an automatic log-off option?No, there is no way to set a log-off time for Web Applications. The system will remain logged in.
Problems Opening Area Access Manager or VideoViewer
Access Is Denied error messageIf the Error communicating with the web service: Access is denied error message is shown, the preferences.js file must be updated with the server name.
Note: The address does not contain the server name. The entry shows localhost because the preferences.js file contains the adddress as http://localhost. Change this to the proper server name, and use https if you are using SSL.
Directory not shown in the sign-on drop-down menuVerify that it is a domain directory. Workstations will not show up in the dropdown list.
Unable to view video from a recorder in a different domain or workgroup1. Verify that the client you are viewing from has Use Simple File Sharing disabled in folder
options.2. Create a shared folder with full access to everyone on the LNVR with the problem.3. If this is a workgroup, be sure the same user name and password combinations are on all of the
machines in the workgroup.
Troubleshooting Single Sign-On
“Error: ‘firstChild’ is null or not an object”, or “Error: ‘True’ is undefined”The issue is that a capital “T” was used in the line var g_lnl_useSingleSignOn = true;. This must be lower case, as the line is case sensitive. Correct the line using the steps described in Configure Single Sign-on for Browser-based Clients on page 64.
The sign-in box opens immediatelyThis could be the result of the IIS configuration or Internet Explorer configuration.
Installation Guide
Visitor Management Troubleshooting
• For more information, refer to Internet Information Services (IIS) for Windows Server on page 58.
• For more information, refer to Internet Browser Security Level on page 63.
Troubleshooting Area Access Manager (Browser-based Client)
The [Report] button is not shownThe preferences.js file must be modified. For more information, refer to Area Access Manager and VideoViewer Browser-based Clients on page 61.
Window does not open when you click [Run Reports]Try clicking [Run Reports] again. If the window still does not open, it may be blocked by Internet Explorer. Verify that the pop-up blocker is disabled.
Error message that Crystal.NET engine cannot be found when you try to run a reportCrystal.NET must be installed on the workstation running the LS Application Server.
Unable to Load Report Template error messageThe proper temporary path for the reports has not been created. The default location is C:\Temp\LnlWebServiceReports.
If you get write errors or permission problems on execution of a report to grant full access to the Inetpub folder for the IIS user, you might need to create the temporary path for the reports. This should only be necessary if the directory security is set to anonymous for Lnl.OG.Web or Lnl.OG.WebService.
1. Right-click on the Inetpub folder and select Properties.2. Select the Security tab and then click [Add] under Group or user names.3. Add the IIS user that is listed in the Anonymous Access section of the Directory Security for
Lnl.OG.Web and Lnl.OG.WebService.4. Give the user Full Control in order to make all temporary file locations available to the user.The same steps as above might be necessary for the temporary path created for reports.
Visitor Management Troubleshooting
General Visitor Management Troubleshooting
Unable to link cardholders to directory accounts1. Verify that you have the necessary license.
• Check for the following license in License Administration: Maximum Number of Cardholders with Directory Accounts (SWG-ALXXX) STD. Verify that this count has not been exceeded.
2. Verify that the user logged in has the correct permissions.
Installation Guide 93

Troubleshooting
94
• Cardholder Permission Groups > Cardholders: Directory accounts and Link/unlink must be selected.
Visit types do not show in Visitor ManagementEnter the visit types in List Builder.
1. Open System Administration > Administration > List Builder.2. Select Visit Type and add entries.
Error message “Could not sign out visit event. The badge status for sign out must be configured.”1. Select System Administration > Administration > Cardholder Options > Visits.2. Click [Modify] and configure an option under Badge status for sign out.3. Click [OK].
Visitor Management Host Troubleshooting
Error that Javascript must be enabled for page to display1. Go to Internet Options > Trusted Sites > Custom Level.2. Under Scripting, enable Scripting of Java applets.3. Click [OK].4. Click [OK] again to close the Internet Options window.
Negotiate NTLM ErrorIf you receive an error stating that “The HTTP request is unauthorized with client authentication scheme ‘Negotiate’. The authentication header received from the server was ‘Negotiate, NTLM’.
1. Go to Internet Options > Intranet Sites > Sites.2. Click [Add].3. Set all security settings under Custom Level to match the standard settings for the Trusted Sites
zone. For more information, refer to Internet Browser Security Level on page 63.
Unable to add the visit key to the systemYou may need to get the full version of FormsDesigner. If you are using Forms Designer Lite, you cannot add the key. This can be verified by checking the title bar of the FormsDesigner application to see if it says FormsDesigner or FormsDesigner Lite.
Troubleshooting Visitor Management Administration1. Verify that the Visitor Management host application loads. For more information, refer to Visitor
Management Host Troubleshooting on page 94.2. Any workstation that will log into the Visitor Management Administration Tool must have
Microsoft Silverlight installed. Install Silverlight from http://www.microsoft.com/silverlight/.
Installation Guide
Visitor Management Troubleshooting
Troubleshooting Visitor Management Front Desk
When starting the Front Desk application, the error “There was no endpoint listening at http://localhost/Lnl.OG.Service.svc that could accept the message” is shown1. Uninstall Visitor Management Front Desk on the client by using Add/Remove Programs.2. Navigate to C:\Inetpub\wwwroot\FrontDeskClickOnce\config on the server.3. Edit the serviceModelClient.config.deploy file.4. Find all three instances of localhost and change to the server name.5. Install Visitor Management Front Desk again.
Sign-in locations not showing in Front Desk applicationVerify cardholder permissions in System Administration for the user that will log into Front Desk.
1. Go to System Administration > Users > Cardholder Permission Groups > Visitor Management.• Ensure that the Sign-in Location is selected, as well as Add, Modify, and Delete.
2. After making the changes to Cardholder Permissions:a. Run Forms Translator.b. Restart IIS.c. Restart the LS Application service.
Changing default printer in Visitor Management Front Desk1. Log into the Front Desk application.2. Choose My Account.3. Set the Default Printer by clicking [Make Default] next to the desired printer.4. Save changes.
Troubleshooting Visitor Management Kiosk
No Endpoint Listening error when starting Kiosk application1. Un-install the Visitor Management Kiosk application.2. Locate and open the KioskClickOnce\config\serviceModelClient.config.deploy file.3. Find all three instances of localhost and change them to the server name.4. Install the Kiosk application again.
Wrong printer is shown as the default printerUn-install and re-install the Kiosk application so that it shows the printer selection box again, as this is only available during installation.
Printed badges look different in Visitor Management than in the stand-alone Visitor ManagementPrinting choices made in the web environment cause all boxes designed on the badges to not print on web badges. Also, the application can only print True Type/Open Type fonts. These are fonts that are listed in C:\Windows\Fonts.
Installation Guide 95
Troubleshooting
96
When creating the badge in Badge Designer, make all text box fields extremely large. There has been a change in how word wrapping and the new fonts work. If the text is too large for the text box, then the system will shrink the size of the text. By making all text fields large, you will eliminate this possibility.
When this is done, the text will be the same size, but will look bolded. There are no other changes that can be made at this point to get both web applications and the desktop application to print exactly the same.
Certain fields cannot be viewed, or can be viewed when they should not be viewable, in Kiosk under cardholder informationChange the View/Edit Field Page permissions. All settings for User Defined Visitor can be modified to affect what users can see in the Kiosk application.
Items that cannot be changed on the Kiosk• Disabling Camera• Disable Auto Print on Sign In• Badge Type for Printing• Adding a custom logo to the splash screen
Items that can be changed on the Kiosk• What cardholder information can be viewed/edited
Determining if the Visitor Management web service (service.config) is HTTP or HTTPS1. Navigate to http://<server name>/Lnl.OG.Services/IdvmService.svc?wsdl. You should see a
page named IdvmService Service.2. Search for the TransportToken element under the Policy node.
If the element is present, the web service endpoint is using HTTPS.If the element is not present, the web service endpoint is using HTTP.
Determining which Windows Authentication is used1. From the previous check, go to the following link using HTTP or HTTPS:
http(s)://<server name>/Lnl.OG.Services/IdvmService.svc?wsdl2. If you see a page named IdvmService Service, you have entered the wrong http or https.
On one of the first lines, check if <http:NegotiateAuthentication> is present.If it is present, you are using Windows Authentication.If it is not present, you are not using Windows Authentication.
Error “LS Application Service: Service cannot be started” is shownService cannot be started. System.Runtime.Remoting.RemotingException: .Config file 'C:\WINDOWS\Microsoft.NET\Framework\v2.0.50727\config\machine.config' cannot be read successfully due to exception 'System.ApplicationException: Invalid XML in file
1. Open C:\WINDOWS\Microsoft.NET\Framework\v2.0.50727\config\machine.config.
2. Look for <system.web>. It should read:
Installation Guide

Visitor Management Troubleshooting
<system.web><processModel autoConfig="true" userName="system" password="AutoGenerate"/>
3. Verify that there are no parameters repeated. Also verify that the quotation marks are correct.
Installation Guide 97

Troubleshooting
98
Installation Guide
Appendices

APPENDIX A Configuration Editor
OnGuard database connection and license server configuration information is stored in two files:
• ACS.INI• application.configThe Configuration Editor provides a user interface that makes configuration and maintenance of these files fast and easy.
The stand-alone Configuration Editor application also provides advanced functions, such as Windows authentication, verbose logging, and browser-based client reporting configuration.
The Setup Assistant contains a Configuration Editor module that provides database and license server connection information, but does not allow the advanced configuration options found in the stand-alone application.
When Configuration Editor Identifies an IssueThere are three situations in which the Configuration Editor will identify an issue that must be resolved:
• The database and license configuration is not consistent between the application.config and ACS.INI files (stand-alone version of Configuration Editor and Setup Assistant module)
• Setup Assistant cannot locate the database (Setup Assistant module only)• Setup Assistant cannot locate the License Server (Setup Assistant module only)The ACS.INI and application.config files must always point to the Live database, not the Archival database. For more information, refer to the Archives Folder chapter in the System Administration User Guide.
Launching the Configuration Editor Stand-alone ApplicationLaunch the OnGuard Configuration Editor.
Installation Guide 101
Configuration Editor
102
Notes: To use the Configuration Editor, you must have write access to the registry, ACS.INI file, application.config file, and the Lnl.OG.WebService directory. If you installed the application server and do not have this level of access, the Configuration Editor identifies which files or directory require this access change.
The ACS.INI file is located in the C:\Windows\ directory.
The application.config file is located in the C:\Users\<user name>OnGuard\CommonAppData\Lnl\ directory.
The Lnl.OG.WebService directory is located in the C:\Inetpub\wwwroot\ directory.
The Configuration Editor application opens, and then checks the configuration of the ACS.INI and application.config files. If there is a configuration issue, the Configuration Editor highlights the discrepancy.
Standard Fields and ButtonsThe following sections describe the standard Configuration Editor fields and buttons.
Save ChangesClick [Save Changes] to save and synchronize your changes across the affected OnGuard configuration files.
Note: [Save Changes] only becomes active after the user completes all of the Database and License information, and provides a valid DSN name.
RevertClick [Revert] to return your changes to their previous values.
Show advanced settingsSelect Show advanced settings to show the advanced sections of the Configuration Editor user interface. For more information, refer to Advanced Settings Fields and Buttons on page 103.
Database section
Database typeIdentifies if the database type is SQL Server or Oracle. This information is view only.
DSN nameThe Lenel Data Source Name, as defined in the ODBC configuration.
Server nameThe name of the server hosting the database.
Database nameThe name of the database (default for a SQL Server database is AccessControl).
Installation Guide
Advanced Settings Fields and Buttons
License Server section
Server nameThe name of the server hosting the License Server.
Server portThe port the server is using to host the License Server.
Advanced Settings Fields and ButtonsThe following sections describe the advanced Configuration Editor fields and buttons.
Advanced Database section
Windows authenticationWhen selected, the application.config uses the user’s Windows user name and password when connecting to the database. This check box is selected by default.When deselected, the Configuration Editor provides the User name and Password fields into which you can enter the credential information required when connecting to the database. Select Show password if you want the password to be readable within the Configuration Editor user interface.
Notes: When the Windows authentication check box is deselected, the credential information is saved as plain text in the application.config file. Make sure the application.config file is secured. For more information, refer to Provide Credentials in the Protected File on page 55.
The ACS.INI file requires the LS Login Driver, and requires this credential information.
Advanced Verbose Logging sectionUse the following check boxes to enable enhanced logging when troubleshooting OnGuard issues.
Setup AssistantEnables verbose logging for Setup Assistant. Selecting this check box automatically selects the Form Translator and Database Setup check boxes because they are also Setup Assistant modules.Selecting the Setup Assistant check box will also automatically install the LS Application Server and the LS Site Publication Server.
Form TranslatorEnables verbose logging for Form Translator.
Database SetupEnables verbose logging for Database Setup. This check box is only available if Database Setup is installed.
Installation Guide 103

Configuration Editor
104
LS DataConduIT ServiceEnables verbose logging for DataConduIT. You must restart DataConduIT after selecting this check box. This check box is only available if DataConduIt is installed.
Advanced Area Access Manager (Browser-based Client) section
Enable reportsArea Access Manager has the ability to generate reports with a browser-based client. Use the Configuration Editor to configure the database connection required to generate reports. This is the same database connection information that the LS Application Server uses. If the LS Application Server is installed on a browser-based client and you want to use Area Access Manager reports, select the Enable reports check box to enable reports. If selected, the Configuration Editor shows the Temporary report file path that is configured to contain the reports. If you want a different path, create the new directory (if it does not already exist), and then type the new path into the Temporary report file path field.There are specific configuration requirements to enable reports in Internet Explorer. If reports do not function correctly after enabling them in the Configuration Editor, check the following:
– By default, the Reports option is hidden from the browser-based Area Access Manager. The Preferences.js file must be edited to show the Reports button.
– The IIS user must be able to access the temp folder (typically C:\Windows\temp).– The IIS user must have access to the Oracle root folder.– The IIS user must have access to the Report Temporary path folder.
Fixing Synchronization IssuesIf the Configuration Editor detects a synchronization issue between the application.config and ACS.INI files, it highlights the issue.
1. Use the Correct file drop-down menu to select which file is correct.2. If necessary, click [Select] to select the correct DSN name.3. Click [Save Changes] to synchronize the application.config and ACS.INI files.
Installation Guide

APPENDIX B Custom Installation of OnGuard
Performing a custom installation allows you to install as few or as many OnGuard features and applications as you wish.
Performing a Custom Installation
First Time and Existing OnGuard Installation1. Begin installing the OnGuard software. For more information, refer to Chapter 6: Installing
OnGuard 7.0 on page 35.2. During the installation you are prompted to choose the system type. Select Custom.3. You will be prompted with the custom setup screen. Choose which features to install.4. Continue with the installation by following the installation steps.
Custom FeaturesThe following features are only available with a custom OnGuard installation.
LS Platform ServicesThis feature installs the LS Platform Services feature into your IIS Web server structure in order to serve Web versions of Area Access Manager, VideoViewer, Visitor Management, and Visitor Administration. This feature is only supported on systems running IIS.
During the installation or upgrade of the OnGuard software, the LS Platform Services feature is automatically installed when the Platform Server option is selected. Otherwise, it is manually installed when the Custom Server option is selected.
Additional steps are required for the configuration of the LS Platform Services. For more information, refer to Chapter 9: Configuring the LS Platform Services on page 57.
Installation Guide 105
Custom Installation of OnGuard
106
Device Discovery ConsoleThis feature enables the discovery and maintenance of devices on a network or system. For more information, refer to the Device Discovery Console User Guide.
If the Device Discovery Console is selected for installation, WinPcap will also be installed. This is a third-party utility that is needed for the discovery of cameras.
Note: By choosing to install the Device Discovery Console, you automatically accept the WinPcap license agreement.
SkyPoint Integration - Advanced FeaturesThis component installs a security certificate required for communication with the SkyPoint Base Server. The certificate will be installed to your system’s Trusted Root Certification Authorities store. This will result in this computer trusting the OnSSI self-issued certificate and any certificate derived from this certificate. Consult your IT Administrator before installing this certificate.
This component must be installed on all OnGuard servers and clients that will utilize the Send Video feature through the SkyPoint Base Server.
Installation Guide

APPENDIX C Network Video over HTTP via Proxy
This appendix describes the process by which video is displayed in the VideoViewer (Browser-based Client) and the network requirements for this setup.sw
VideoViewer (Browser-based Client)The VideoViewer (Browser-based Client) supports viewing video over HTTP for connections outside of the internal network. This method of viewing video allows you to permit outside entities to view video while keeping the system secure. Viewing video over HTTP still enforces OnGuard user permissions; anyone that connects to VideoViewer must be authorized to login and view video.
Network RequirementsVideoViewer (Browser-based Client) can connect directly to the LS Platform Services or via proxy. The following diagram illustrates the scenario by which VideoViewer (Browser-based Client) retrieves Lenel NVR video over HTTP via proxy.
In this diagram, the Lenel NVR is located in Corporation A’s internal network. VideoViewer can get video from the Lenel NVR via the Web service located in Corporate A’s demilitarized zone (DMZ). To support the VideoViewer through HTTP, Corporation A must expose the Web server’s IP address to the external Internet and have port 80 (HTTP) and/or port 443 (HTTPS) open. If the Web service is running on Windows 7, Windows 8, or Windows 8.1, the client can have up to 10 connections depending on the proxy and firewall policy.
Installation Guide 107
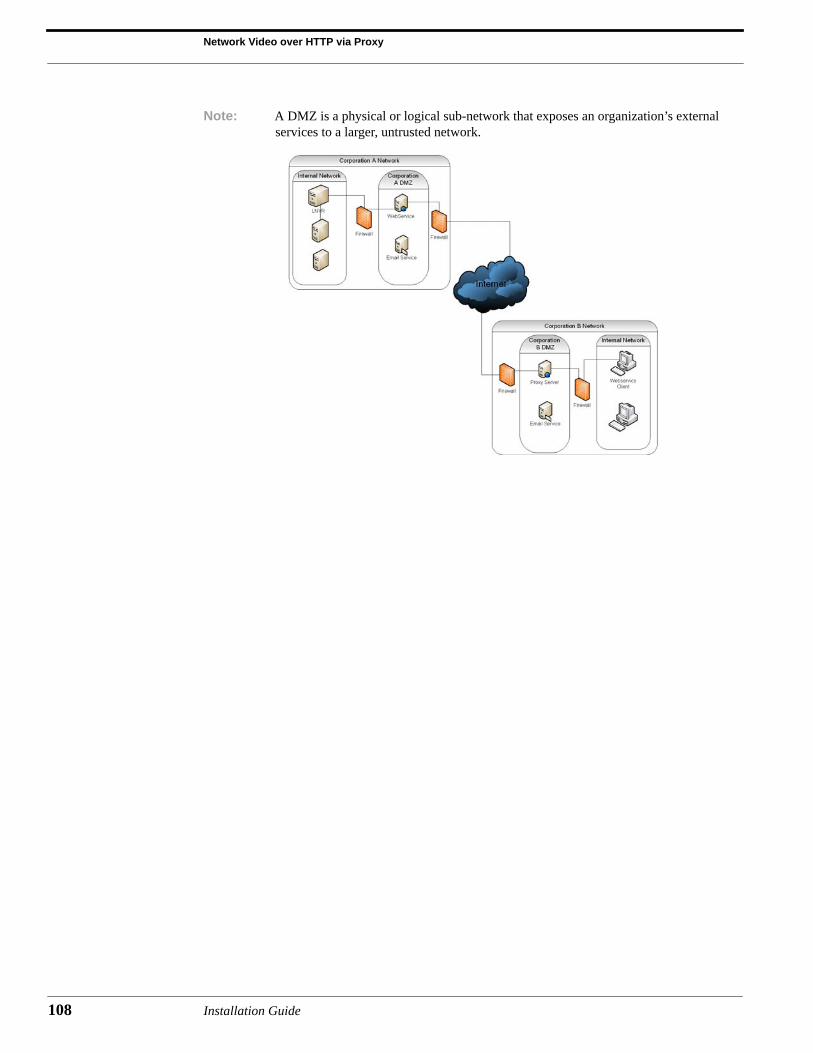
Network Video over HTTP via Proxy
108
Note: A DMZ is a physical or logical sub-network that exposes an organization’s external services to a larger, untrusted network.
Installation Guide

APPENDIX D Using OnGuard on Supported Operating Systems
This appendix contains procedures, paths to applications and services, and other items pertaining to OnGuard and its supported operating systems.
Using OnGuard on Windows 7This section contains procedures, paths to applications and services, and other items pertaining to OnGuard and Windows 7.
Locating OnGuard Applications and Services in Windows 7Refer to the following table to locate the desired OnGuard application or service in Windows 7.
Installation Guide 109

Using OnGuard on Supported Operating Systems
110
Application/Service Path
Communication Server Start > All Programs > OnGuard version > Service and Support > Communication Server
Configuration Editor Start > All Programs > OnGuard version > Service and Support > Configuration Editor
Database Setup Start > All Programs > OnGuard version > Service and Support > Database Setup
Database Translation Utility Start > All Programs > Database Translation Utility > Database Translation Utility
FormsDesigner Start > All Programs > OnGuard version > System Tools > FormsDesigner
Global Output Server Start > All Programs > OnGuard version > Service and Support > Global Output Server
Import Utility Start > Program Files > OnGuard version > Service and Support > Import
LDVR 3DM Utility Start > All Programs > 3DM > 3DM Web Interface
LDVR Drive Configuration Utility
Start > All Programs > LDVR > Drive Configuration Utility
Lenel Controller Encryption Configuration Utility
Start > All Programs > Lenel Controller Encryption Configuration Utility
Lenel Key Generator Utility Start > All Programs > Lenel Key Generator Utility (FIPS 140-2) > Lenel Key Generator Utility
Lenel Network Recorder Start > All Programs > Lenel Network Recorder
License Administration Start > All Programs > OnGuard version > System Tools > License Administration
License Server Start > All Programs > OnGuard version > Service and Support > License Server
Linkage Server Start > All Programs > OnGuard version > Service and Support > Linkage Server
Installation Guide
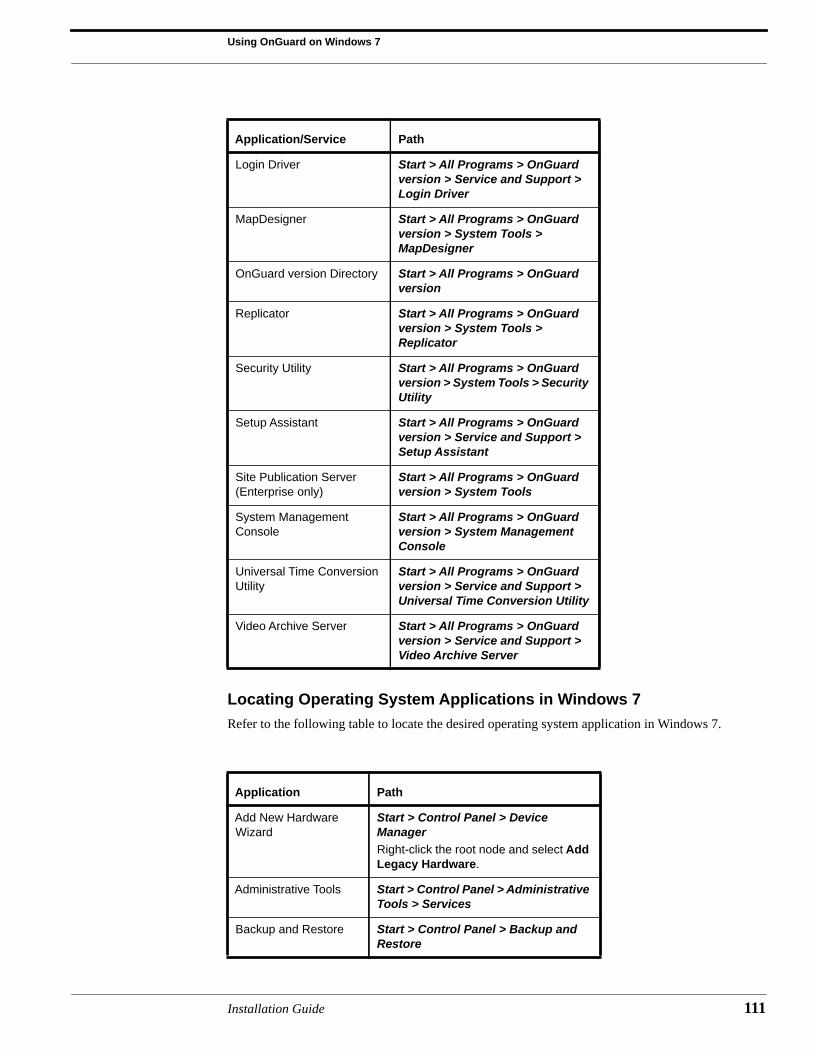
Using OnGuard on Windows 7
Locating Operating System Applications in Windows 7Refer to the following table to locate the desired operating system application in Windows 7.
Login Driver Start > All Programs > OnGuard version > Service and Support > Login Driver
MapDesigner Start > All Programs > OnGuard version > System Tools > MapDesigner
OnGuard version Directory Start > All Programs > OnGuard version
Replicator Start > All Programs > OnGuard version > System Tools > Replicator
Security Utility Start > All Programs > OnGuard version > System Tools > Security Utility
Setup Assistant Start > All Programs > OnGuard version > Service and Support > Setup Assistant
Site Publication Server (Enterprise only)
Start > All Programs > OnGuard version > System Tools
System Management Console
Start > All Programs > OnGuard version > System Management Console
Universal Time Conversion Utility
Start > All Programs > OnGuard version > Service and Support > Universal Time Conversion Utility
Video Archive Server Start > All Programs > OnGuard version > Service and Support > Video Archive Server
Application Path
Add New Hardware Wizard
Start > Control Panel > Device ManagerRight-click the root node and select Add Legacy Hardware.
Administrative Tools Start > Control Panel > Administrative Tools > Services
Backup and Restore Start > Control Panel > Backup and Restore
Application/Service Path
Installation Guide 111

Using OnGuard on Supported Operating Systems
112
Citrix AppCenter Start > All Programs > Administrative Tools > Citrix > Management Consoles > Citrix AppCenter
Citrix License Administration Console
Start > All Programs > Administrative Tools > Citrix > Management Consoles > License Administration Console
Citrix Licensing Service Start > All Programs > Administrative Tools > Services
Citrix XenApp Server Role Manager
Start > All Programs > Administrative Tools > Citrix > XenApp Server Role Manager
Command Prompt Start > All Programs > Accessories > Command Prompt
Component Services Start > Control Panel > Administrative Tools > Component Services
Computer Management MMC snap-in
Start > Control Panel > Administrative Tools
Control Panel Start > Control Panel
Devices and Printers Start > Control Panel > Devices and Printers
Failover Cluster Manager
Start > Control Panel > Administrative Tools > Failover Cluster Manager
License Manager Start > All Programs >NEC ExpressCluster Server > License Manager
NEC ExpressCluster Server
Start > All Programs > NEC ExpressCluster Server
Network and Sharing Center
Start > Control Panel > Network and Sharing Center
Oracle Database Configuration Assistant
Start > All Programs > Oracle - OraDB11g_home1> Configuration and Migration Tools > Database Configuration Assistant
Oracle Net Configuration Assistant
Start > All Programs > Oracle - OraDB11g_home1> Configuration and Migration Tools > Net Configuration Assistant
Phone and Modem Start > Control Panel > Phone and Modem
Programs and Features Start > Control Panel > Programs and Features
Application Path
Installation Guide

Using OnGuard on Windows 8/Windows 8.1
Using OnGuard on Windows 8/Windows 8.1This section contains procedures, paths to applications and services, and other items pertaining to OnGuard and Windows.
Locating OnGuard Applications and ServicesRefer to the following table to locate the desired OnGuard application or service in Windows 8/Windows 8.1.
Note: In the following table, “Start” refers to the Start screen in Windows. Some scrolling may be required to find the application icons on the Start screen.
Region and Language Start > Control Panel > Region and Language
Run Start > Run
Server Manager Start > Control Panel > Administrative Tools > Server Manager
SQLPlus Start > All Programs > Oracle - OraDB11g_home1 > Application Development > SQLPlus
SQL Server Management Studio
Start > All Programs > Microsoft SQL Server 2008 > SQL Server Management Studio
Task Scheduler Start > All Programs > Accessories > System Tools > Task Scheduler
Touch-It Virtual Keyboard
Start > All Programs > Touch-It Virtual Keyboard
Windows Media Player Start > All Programs > Windows Media Player
Application/Service Path
Communication Server Start > Communication Server
Configuration Editor Start > Configuration Editor
Database Setup Start > Database Setup
Database Translation Utility
Start > Database Translation Utility
FormsDesigner Start > FormsDesigner
Global Output Server Start > Global Output Server
Application Path
Installation Guide 113
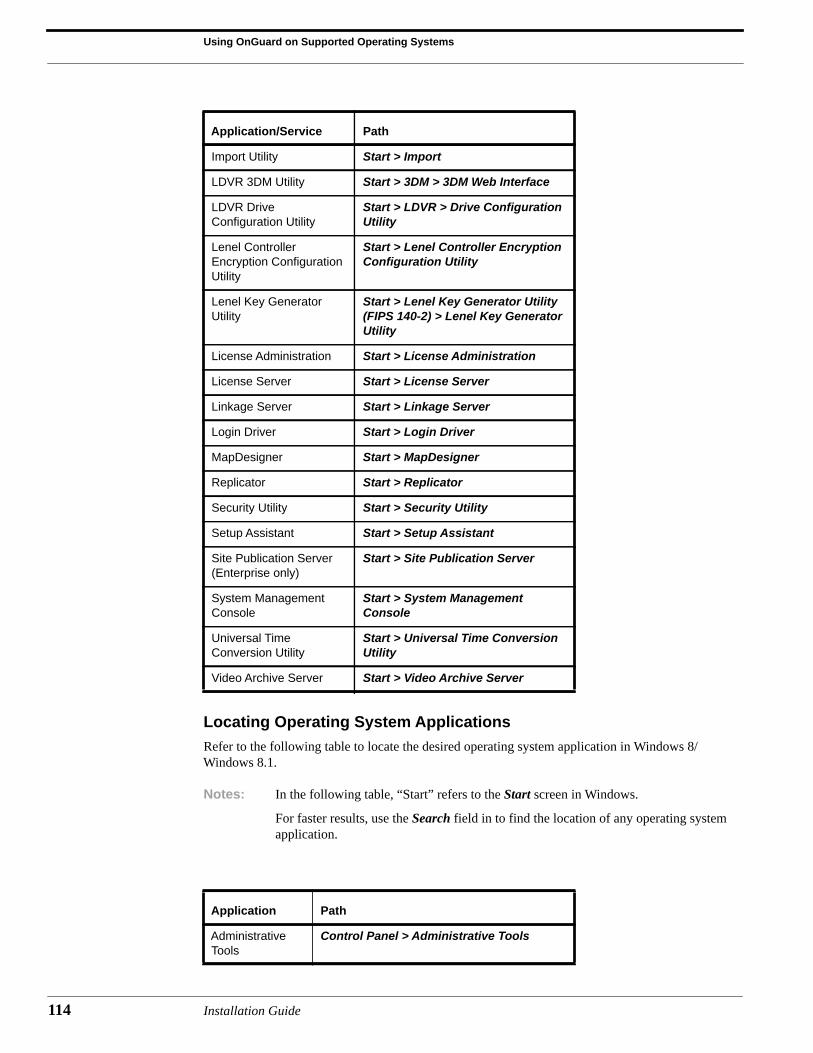
Using OnGuard on Supported Operating Systems
114
Locating Operating System ApplicationsRefer to the following table to locate the desired operating system application in Windows 8/Windows 8.1.
Notes: In the following table, “Start” refers to the Start screen in Windows.
For faster results, use the Search field in to find the location of any operating system application.
Import Utility Start > Import
LDVR 3DM Utility Start > 3DM > 3DM Web Interface
LDVR Drive Configuration Utility
Start > LDVR > Drive Configuration Utility
Lenel Controller Encryption Configuration Utility
Start > Lenel Controller Encryption Configuration Utility
Lenel Key Generator Utility
Start > Lenel Key Generator Utility (FIPS 140-2) > Lenel Key Generator Utility
License Administration Start > License Administration
License Server Start > License Server
Linkage Server Start > Linkage Server
Login Driver Start > Login Driver
MapDesigner Start > MapDesigner
Replicator Start > Replicator
Security Utility Start > Security Utility
Setup Assistant Start > Setup Assistant
Site Publication Server (Enterprise only)
Start > Site Publication Server
System Management Console
Start > System Management Console
Universal Time Conversion Utility
Start > Universal Time Conversion Utility
Video Archive Server Start > Video Archive Server
Application Path
Administrative Tools
Control Panel > Administrative Tools
Application/Service Path
Installation Guide

Using OnGuard on Windows 8/Windows 8.1
Citrix AppCenter Start > All apps > Citrix > Management Consoles > Citrix AppCenter
Citrix License Administration Console
Start > All apps > Citrix > Management Consoles > License Administration Console
Citrix Licensing Service
Start > All apps > Administrative Tools > Services
Citrix XenApp Server Role Manager
Start > All apps > Citrix > XenApp Server Role Manager
Command Prompt
Start > All apps > Windows System > Command Prompt
Component Services
Start > All apps > Control Panel > Administrative Tools > Component Services
Control Panel Windows Key + [X] Quick Link Menu > Control Panel
Devices and Printers
Start > All apps > Control Panel > Devices and Printers
Failover Cluster Manager
Start > All apps > Administrative Tools > Failover Cluster Manager
File History Start > All apps > Control Panel > System and Security > File History
License Manager Start > All apps >NEC ExpressCluster Server > License Manager
NEC ExpressCluster Server
Start > All apps > NEC ExpressCluster Server
Network and Sharing Center
Start > All apps > Control Panel > Network and Sharing Center
Oracle Database Configuration Assistant
Start > Oracle - OraDB11g_home1> Configuration and Migration Tools > Database Configuration Assistant
Oracle Net Configuration Assistant
Start > Oracle - OraDB11g_home1> Configuration and Migration Tools > Net Configuration Assistant
Phone and Modem
Start > All apps > Control Panel > Phone and Modem
Programs and Features
Start > All apps > Control Panel > Programs > Programs and Features
Region and Language
Start > All apps > Control Panel > Region and Language
Application Path
Installation Guide 115
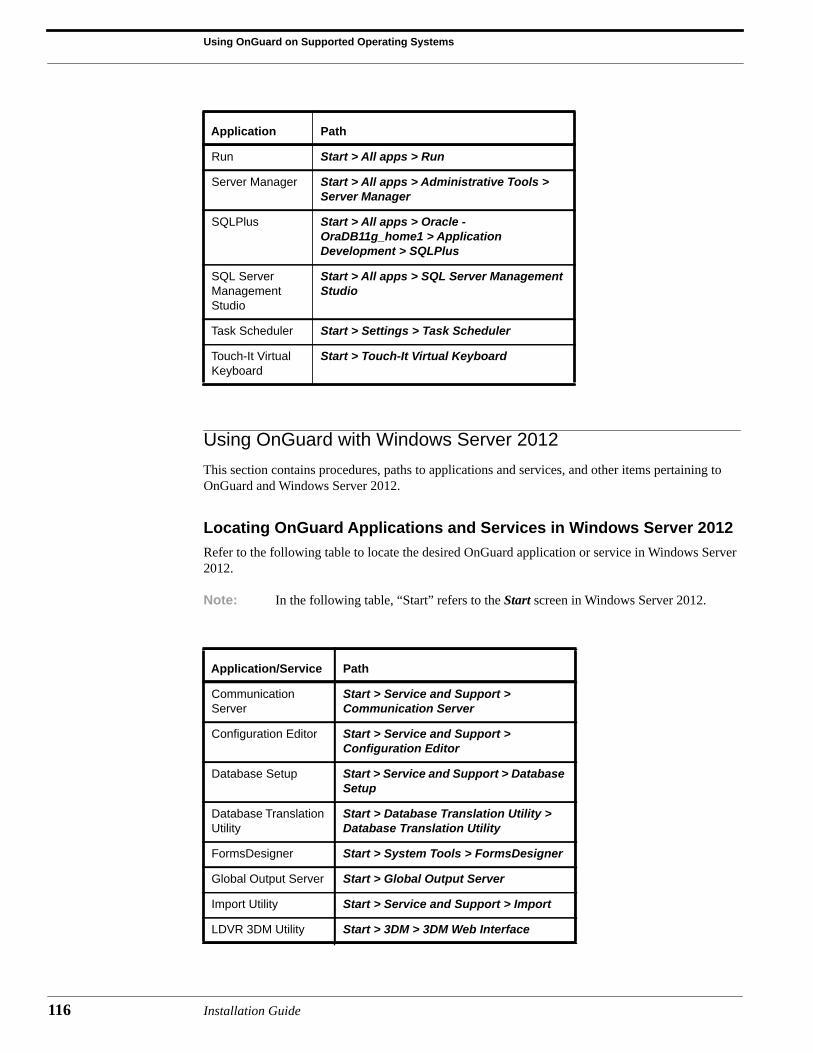
Using OnGuard on Supported Operating Systems
116
Using OnGuard with Windows Server 2012This section contains procedures, paths to applications and services, and other items pertaining to OnGuard and Windows Server 2012.
Locating OnGuard Applications and Services in Windows Server 2012Refer to the following table to locate the desired OnGuard application or service in Windows Server 2012.
Note: In the following table, “Start” refers to the Start screen in Windows Server 2012.
Run Start > All apps > Run
Server Manager Start > All apps > Administrative Tools > Server Manager
SQLPlus Start > All apps > Oracle - OraDB11g_home1 > Application Development > SQLPlus
SQL Server Management Studio
Start > All apps > SQL Server Management Studio
Task Scheduler Start > Settings > Task Scheduler
Touch-It Virtual Keyboard
Start > Touch-It Virtual Keyboard
Application/Service Path
Communication Server
Start > Service and Support > Communication Server
Configuration Editor Start > Service and Support > Configuration Editor
Database Setup Start > Service and Support > Database Setup
Database Translation Utility
Start > Database Translation Utility > Database Translation Utility
FormsDesigner Start > System Tools > FormsDesigner
Global Output Server Start > Global Output Server
Import Utility Start > Service and Support > Import
LDVR 3DM Utility Start > 3DM > 3DM Web Interface
Application Path
Installation Guide

Using OnGuard with Windows Server 2012
Locating Operating System Applications in Windows Server 2012Refer to the following table to locate the desired operating system application in Windows Server 2012.
Notes: To launch the Start screen in Windows Server 2012, press Ctrl+Esc.
For faster results, use the Search field in Windows Server 2012 to find the location of any operating system application.
LDVR Drive Configuration Utility
Start > LDVR > Drive Configuration Utility
Lenel Controller Encryption Configuration Utility
Start > Lenel Controller Encryption Configuration Utility
Lenel Key Generator Utility
Start > Lenel Key Generator Utility (FIPS 140-2) > Lenel Key Generator Utility
License Administration
Start > License Administration
License Server Start > Service and Support > License Server
Linkage Server Start > Linkage Server
Login Driver Start > Service and Support > Login Driver
MapDesigner Start > System Tools > MapDesigner
Replicator Start > System Tools > Replicator
Security Utility Start > System Tools > Security Utility
Setup Assistant Start > Service and Support > Setup Assistant
Site Publication Server (Enterprise only)
Start > Site Publication Server
System Management Console
Start > System Management Console
Universal Time Conversion Utility
Start > Service and Support > Universal Time Conversion Utility
Video Archive Server Start > Service and Support > Video Archive Server
Application/Service Path
Installation Guide 117
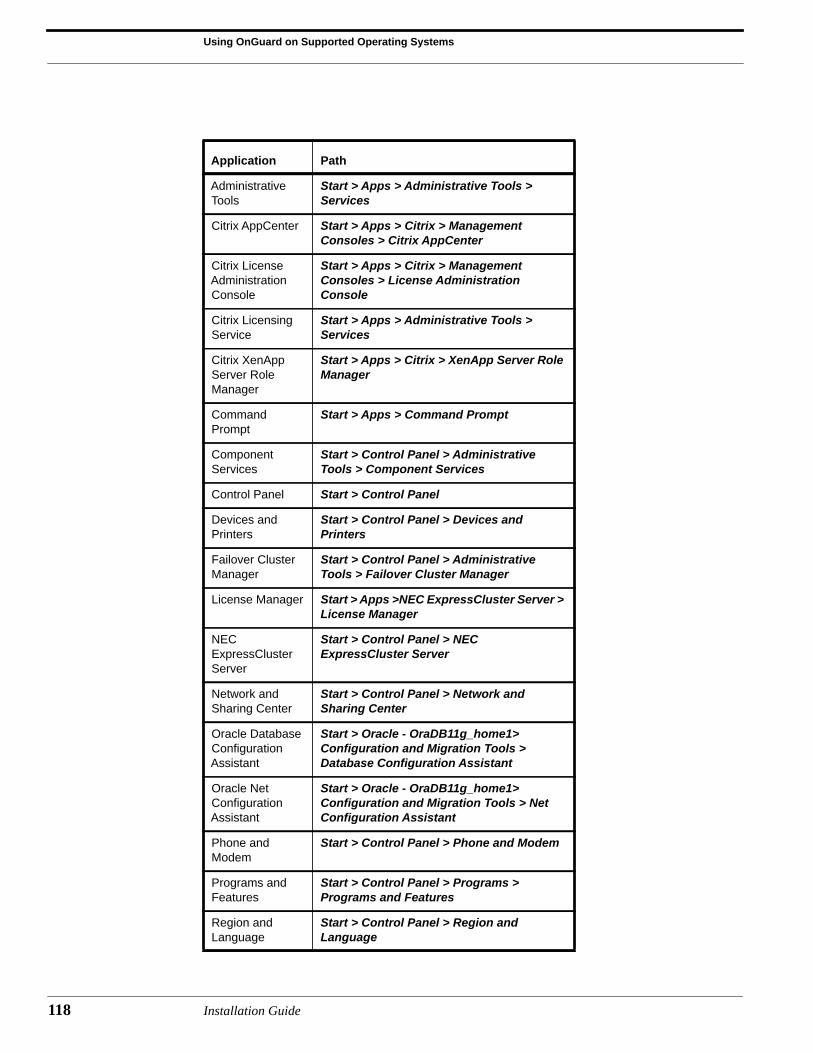
Using OnGuard on Supported Operating Systems
118
Application Path
Administrative Tools
Start > Apps > Administrative Tools > Services
Citrix AppCenter Start > Apps > Citrix > Management Consoles > Citrix AppCenter
Citrix License Administration Console
Start > Apps > Citrix > Management Consoles > License Administration Console
Citrix Licensing Service
Start > Apps > Administrative Tools > Services
Citrix XenApp Server Role Manager
Start > Apps > Citrix > XenApp Server Role Manager
Command Prompt
Start > Apps > Command Prompt
Component Services
Start > Control Panel > Administrative Tools > Component Services
Control Panel Start > Control Panel
Devices and Printers
Start > Control Panel > Devices and Printers
Failover Cluster Manager
Start > Control Panel > Administrative Tools > Failover Cluster Manager
License Manager Start > Apps >NEC ExpressCluster Server > License Manager
NEC ExpressCluster Server
Start > Control Panel > NEC ExpressCluster Server
Network and Sharing Center
Start > Control Panel > Network and Sharing Center
Oracle Database Configuration Assistant
Start > Oracle - OraDB11g_home1> Configuration and Migration Tools > Database Configuration Assistant
Oracle Net Configuration Assistant
Start > Oracle - OraDB11g_home1> Configuration and Migration Tools > Net Configuration Assistant
Phone and Modem
Start > Control Panel > Phone and Modem
Programs and Features
Start > Control Panel > Programs > Programs and Features
Region and Language
Start > Control Panel > Region and Language
Installation Guide
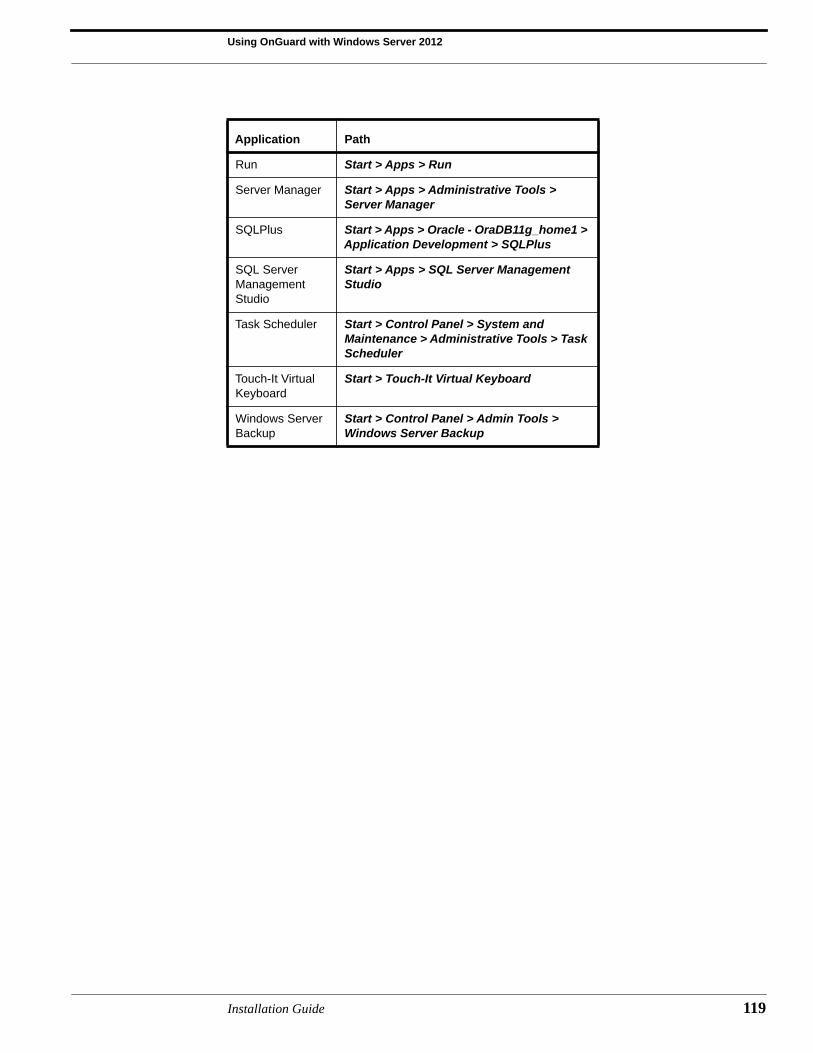
Using OnGuard with Windows Server 2012
Run Start > Apps > Run
Server Manager Start > Apps > Administrative Tools > Server Manager
SQLPlus Start > Apps > Oracle - OraDB11g_home1 > Application Development > SQLPlus
SQL Server Management Studio
Start > Apps > SQL Server Management Studio
Task Scheduler Start > Control Panel > System and Maintenance > Administrative Tools > Task Scheduler
Touch-It Virtual Keyboard
Start > Touch-It Virtual Keyboard
Windows Server Backup
Start > Control Panel > Admin Tools > Windows Server Backup
Application Path
Installation Guide 119

Using OnGuard on Supported Operating Systems
120
Installation Guide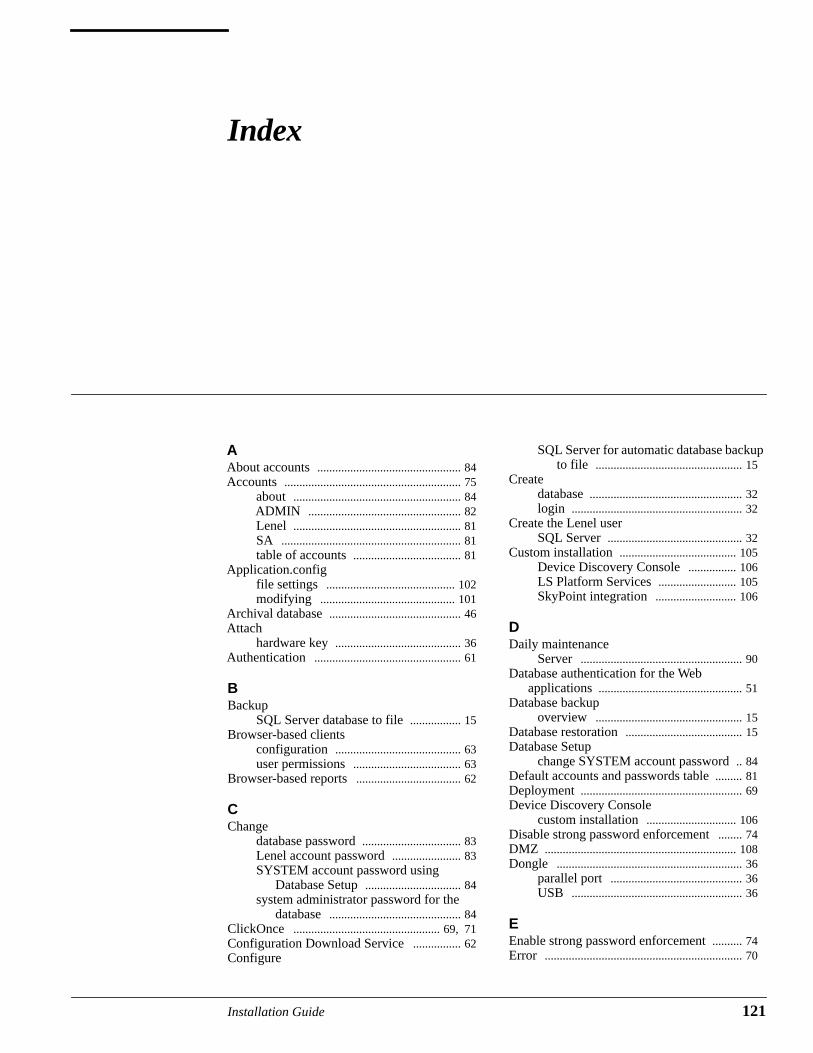
Index
AAbout accounts ................................................ 84Accounts ........................................................... 75
about ........................................................ 84ADMIN ................................................... 82Lenel ........................................................ 81SA ............................................................ 81table of accounts .................................... 81
Application.configfile settings ........................................... 102modifying ............................................. 101
Archival database ............................................ 46Attach
hardware key .......................................... 36Authentication ................................................. 61
BBackup
SQL Server database to file ................. 15Browser-based clients
configuration .......................................... 63user permissions .................................... 63
Browser-based reports ................................... 62
CChange
database password ................................. 83Lenel account password ....................... 83SYSTEM account password using
Database Setup ................................ 84system administrator password for the
database ............................................ 84ClickOnce ................................................. 69, 71Configuration Download Service ................ 62Configure
SQL Server for automatic database backup to file ................................................. 15
Createdatabase ................................................... 32login ......................................................... 32
Create the Lenel userSQL Server ............................................. 32
Custom installation ....................................... 105Device Discovery Console ................ 106LS Platform Services .......................... 105SkyPoint integration ........................... 106
DDaily maintenance
Server ...................................................... 90Database authentication for the Web
applications ................................................ 51Database backup
overview ................................................. 15Database restoration ....................................... 15Database Setup
change SYSTEM account password .. 84Default accounts and passwords table ......... 81Deployment ...................................................... 69Device Discovery Console
custom installation .............................. 106Disable strong password enforcement ........ 74DMZ ................................................................ 108Dongle .............................................................. 36
parallel port ............................................ 36USB ......................................................... 36
EEnable strong password enforcement .......... 74Error .................................................................. 70
Installation Guide 121
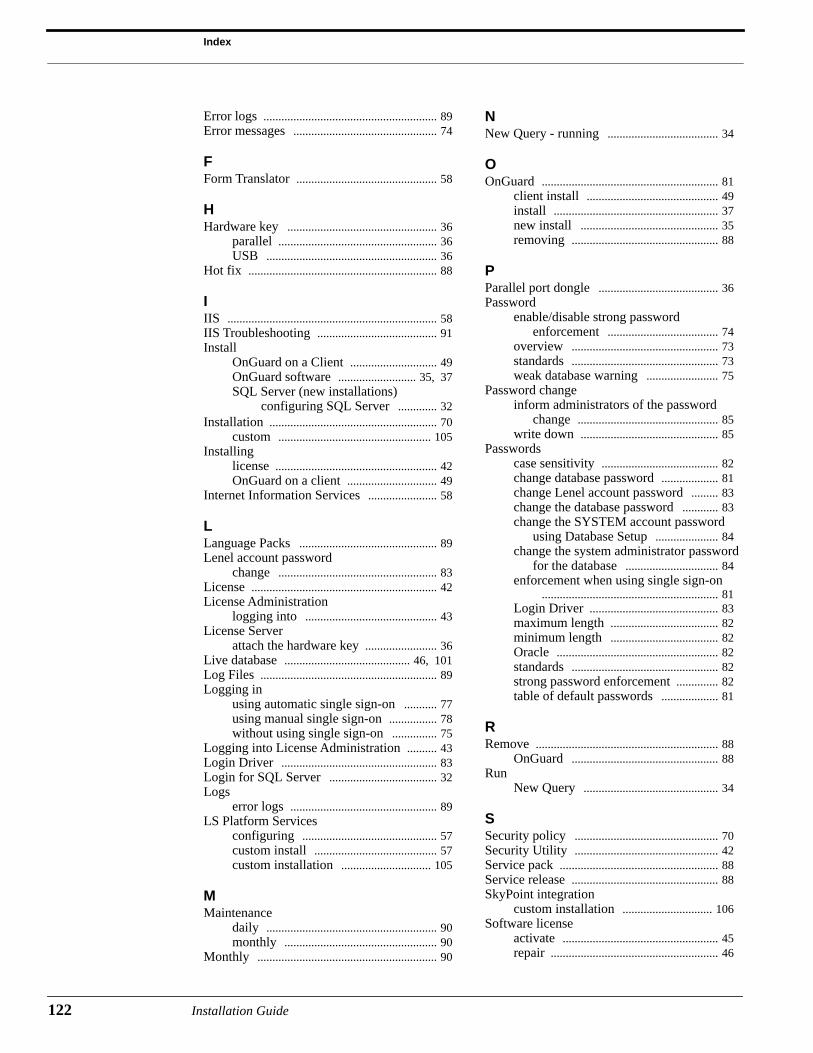
Index
122
Error logs .......................................................... 89Error messages ................................................ 74
FForm Translator ............................................... 58
HHardware key .................................................. 36
parallel ..................................................... 36USB ......................................................... 36
Hot fix ............................................................... 88
IIIS ...................................................................... 58IIS Troubleshooting ........................................ 91Install
OnGuard on a Client ............................. 49OnGuard software .......................... 35, 37SQL Server (new installations)
configuring SQL Server ............. 32Installation ........................................................ 70
custom ................................................... 105Installing
license ...................................................... 42OnGuard on a client .............................. 49
Internet Information Services ....................... 58
LLanguage Packs .............................................. 89Lenel account password
change ..................................................... 83License .............................................................. 42License Administration
logging into ............................................ 43License Server
attach the hardware key ........................ 36Live database .......................................... 46, 101Log Files ........................................................... 89Logging in
using automatic single sign-on ........... 77using manual single sign-on ................ 78without using single sign-on ............... 75
Logging into License Administration .......... 43Login Driver .................................................... 83Login for SQL Server .................................... 32Logs
error logs ................................................. 89LS Platform Services
configuring ............................................. 57custom install ......................................... 57custom installation .............................. 105
MMaintenance
daily ......................................................... 90monthly ................................................... 90
Monthly ............................................................ 90
NNew Query - running ..................................... 34
OOnGuard ........................................................... 81
client install ............................................ 49install ....................................................... 37new install .............................................. 35removing ................................................. 88
PParallel port dongle ........................................ 36Password
enable/disable strong password enforcement ..................................... 74
overview ................................................. 73standards ................................................. 73weak database warning ........................ 75
Password changeinform administrators of the password
change ............................................... 85write down .............................................. 85
Passwordscase sensitivity ....................................... 82change database password ................... 81change Lenel account password ......... 83change the database password ............ 83change the SYSTEM account password
using Database Setup ..................... 84change the system administrator password
for the database ............................... 84enforcement when using single sign-on
........................................................... 81Login Driver ........................................... 83maximum length .................................... 82minimum length .................................... 82Oracle ...................................................... 82standards ................................................. 82strong password enforcement .............. 82table of default passwords ................... 81
RRemove ............................................................. 88
OnGuard ................................................. 88Run
New Query ............................................. 34
SSecurity policy ................................................ 70Security Utility ................................................ 42Service pack ..................................................... 88Service release ................................................. 88SkyPoint integration
custom installation .............................. 106Software license
activate .................................................... 45repair ........................................................ 46
Installation Guide

Index
return ....................................................... 46Software Licenses ........................................... 42SQL Server
configure for automatic database backup to file ...................................................... 15
configure SQL Server ........................... 32create database ....................................... 32create login ............................................. 32create the Lenel user ............................. 32
SQL Server Expresstransfer database to new machine ....... 19transferring ............................................. 19
Strong password enforcement ...................... 82SYSTEM account password - change ......... 84
TTransfer a SQL Express database ................. 19Troubleshooting
Area Access Manager ........................... 93IIS ............................................................ 91OnGuard with Web Applications ........ 92Single Sign-On ...................................... 92Visitor Management .............................. 93Visitor Management Administration .. 94Visitor Management Front Desk ......... 95Visitor Management Kiosk .................. 95
UUniversal Time Conversion Utility .............. 42USB devices
hardware key .......................................... 36User permissions
browser-based clients ........................... 63
VVideoViewer (Browser-based client)
user permissions .................................... 62Visitor Management installation .................. 67Visitor Management Troubleshooting ......... 93VMware ............................................................ 42
WWeak database password warning ................ 75
Installation Guide 123

Lenel Systems International, Inc.1212 Pittsford-Victor RoadPittsford, New York 14534 USATel 866.788.5095 Fax [email protected]