Installation Guide Adaptive Server Enterprise Cluster...
174
Installation Guide Adaptive Server ® Enterprise Cluster Edition 15.7 HP-UX
Transcript of Installation Guide Adaptive Server Enterprise Cluster...
Installation Guide
Adaptive Server® EnterpriseCluster Edition 15.7
HP-UX

DOCUMENT ID: DC01083-01-1570-02LAST REVISED: June 2012Copyright © 2012 by Sybase, Inc. All rights reserved.This publication pertains to Sybase software and to any subsequent release until otherwise indicated in new editions ortechnical notes. Information in this document is subject to change without notice. The software described herein is furnishedunder a license agreement, and it may be used or copied only in accordance with the terms of that agreement.Upgrades are provided only at regularly scheduled software release dates. No part of this publication may be reproduced,transmitted, or translated in any form or by any means, electronic, mechanical, manual, optical, or otherwise, without the priorwritten permission of Sybase, Inc.Sybase trademarks can be viewed at the Sybase trademarks page at http://www.sybase.com/detail?id=1011207. Sybase andthe marks listed are trademarks of Sybase, Inc. ® indicates registration in the United States of America.SAP and other SAP products and services mentioned herein as well as their respective logos are trademarks or registeredtrademarks of SAP AG in Germany and in several other countries all over the world.Java and all Java-based marks are trademarks or registered trademarks of Oracle and/or its affiliates in the U.S. and othercountries.Unicode and the Unicode Logo are registered trademarks of Unicode, Inc.IBM and Tivoli are registered trademarks of International Business Machines Corporation in the United States, othercountries, or both.All other company and product names mentioned may be trademarks of the respective companies with which they areassociated.Use, duplication, or disclosure by the government is subject to the restrictions set forth in subparagraph (c)(1)(ii) of DFARS52.227-7013 for the DOD and as set forth in FAR 52.227-19(a)-(d) for civilian agencies.Sybase, Inc., One Sybase Drive, Dublin, CA 94568.

Contents
Conventions ...........................................................................1Installation Task Overview ....................................................3
Installation Workflows .....................................................3Adaptive Server Components ..............................................5
Adaptive Server Editions ................................................5Determining the Edition You Have .........................6
Adaptive Server Options .................................................7Managing Adaptive Server Enterprise with Sybase
Control Center ............................................................7Client Applications and Utilities .......................................8
Planning Your Adaptive Server Installation ......................11Adaptive Server Release Bulletin .................................11Obtaining a License ......................................................11
SySAM License Server ........................................13IPv6 Configuration ...............................................14SySAM Licensing Checkout .................................14
System Requirements ..................................................14Cluster Edition System Requirements for Using
Private Interconnect Technology .....................16System Requirements for Clients ........................16
Installation Directory Contents and Layout ...................17PC-Client Product Descriptions and Layout ........19
Performing Administrative Tasks ...................................21Creating the Sybase User Account ......................21
Preparing to Install Adaptive Server .............................22Adjusting the Operating System Shared
Memory Parameters ........................................25Managing Java in the Database During
Installations and Upgrades ..............................26Multipathing .........................................................26
Installing Adaptive Server ...................................................29
Installation Guide iii
Mounting the CD ...........................................................29Installing Adaptive Server with the GUI Wizard ............29Installing Adaptive Server in Console Mode .................32Installing Adaptive Server Using a Response File ........33
Creating a Response File ....................................33Installing in Silent Mode .......................................34Command Line Options .......................................34
Uninstalling Adaptive Server .........................................35Removing an Existing Adaptive Server ...............35
Installing Components from the PC-Client .......................37Creating a Response File .............................................38Installing the Client in Unattended, Silent Mode ...........38Uninstalling PC-Client ...................................................39
Creating and Starting the Cluster ......................................41Differences Between Private and Shared Installations
..................................................................................41Cluster Edition Preinstallation Checklist .......................42
Creating a Simulated Cluster on a Single Node.........................................................................43
Starting and Stopping Sybase Control Center Agent . . .43Before Creating a Cluster .............................................44
Creating a Cluster With Storage Foundation forSybase Cluster Edition ....................................44
Worksheet for Creating a Cluster .........................45Create a Cluster Using sybcluster .......................48
Starting the Cluster When the Operating SystemStarts ........................................................................53
Cleaning Up After a Failed Cluster Installation .............53Auxiliary Servers ...........................................................53
Configuring Backup Server Using sybcluster ......54Installing Job Scheduler .......................................55Configuring XP Server Using sybcluster ............57
Postinstallation Tasks .........................................................59Verifying That Servers are Running ..............................59Verifying Your Connection to the Servers .....................60
Contents
iv Adaptive Server Enterprise Cluster Edition
Testing the Installation and Network Connections ........60Creating a Testing Environment ...........................61Configuring libtcl.cfg for LDAP .............................61Adding a Server to the Directory Service ............ 62
Setting the System Administrator Password .................62Installing Sample Databases ........................................63
Default Devices for Sample Databases ...............63Running the Database Scripts .............................64Installing the interpubs Database ........................64Installing the jpubs Database ...............................65Maintaining Sample Databases ...........................66
I/O Fencing ...................................................................66Preparing to Set Up I/O Fencing ..........................67Enabling I/O Fencing ........................................... 67
Manual Cluster Setup and Management ......................68Setting the Environment ...................................... 68Raw Devices ........................................................68The Cluster Input File .......................................... 68Manually Configuring the Cluster .........................72Automatic Takeover of a Cluster ..........................75Starting the Cluster ..............................................76Postconfiguration Tasks .......................................77Shutting Down the Cluster or the Instance ..........77Reconfiguring the Cluster ....................................78Enabling sybcluster and Sybase Control Center
After a Manual Configuration ...........................78Adaptive Server Upgrades ..................................................87
Upgrading Adaptive Server ...........................................88Considerations for Component Integration Services ....90Preparing to Upgrade ................................................... 90Changes in Adaptive Server Directories .......................91Checking System and Upgrade Requirements .............92Performing Preupgrade Tasks ...................................... 92
Upgrade System Table and Stored Procedure .... 95The runserver File Location .................................95
Contents
Installation Guide v
Reserved Words ..................................................95Upgrading to a Private Installation .......................97The sybprocsdev device ....................................100
Upgrade to Adaptive Server 15.7 ...............................104Upgrading from One Version of Adaptive Server
Cluster Edition to Another .............................104Upgrade a Noncluster Version of Adaptive
Server to the Cluster Edition Using sybcluster.......................................................................107
Installation of Version 15.7 over an Existing 15.xAdaptive Server .............................................111
Postupgrade Tasks .....................................................112Updating JAR and XML Files .............................113Running the instmsgs.ebf Script ........................114Restoring Functionality in Adaptive Server After
Upgrading ......................................................115Reenabling Auditing ...........................................116Reenabling Replication Server After the
Dataserver Upgrade ......................................116Migrate ........................................................................118
Migrating Data Using a Dump-and-Load Method.......................................................................118
Migrating a Server Configured for HighAvailability ......................................................119
Adaptive Server Components and Related Products . 119Upgrading Job Scheduler ..................................119Upgrading High Availability and Cluster Support
.......................................................................124Upgrading Java in the Database ........................125Upgrading Backup Server ..................................126Upgrading Databases Using Dump and Load .. .126How Compiled Objects are Handled When
Upgrading Adaptive Server ...........................127Adaptive Server Downgrades ...........................................131
Preparing to Downgrade Adaptive Server ..................131
Contents
vi Adaptive Server Enterprise Cluster Edition
Downgrading from Adaptive Server 15.7 ....................132Additional Considerations for New Features Used .....134Downgrading Job Scheduler .......................................136Post-Downgrade Tasks for Adaptive Server ...............136
Troubleshoot SySAM .........................................................139Troubleshooting SySAM .............................................140If the Installation Program Cannot Find a Suitable
License ...................................................................143If Adaptive Server Cannot Check Out a License and
Starts Using a License Under a Grace Period .......144E-Mail Notifications .....................................................145Before You Contact Sybase Technical Support ..........145
Troubleshoot the Server ....................................................147Error Logs for Installation Utilities ...............................148Error Logs for Sybase Servers ...................................148Troubleshooting Common Installation Problems .........149
Stopping Adaptive Server After a Failure ...........151Recovering from a Failed Installation .................151
If Adaptive Server Fails the Preupgrade Eligibility Test................................................................................ 152
If the Cluster Edition Configuration Fails .....................152When an Upgrade Fails ..............................................152
If You Can Identify the Cause of the UpgradeFailure ............................................................152
Restoring Databases After a Failed Upgrade ....153Re-running the Cluster Edition Upgrade ............153If You Cannot Identify the Cause of an Upgrade
Failure ............................................................154If Lack of Space Prevents an Upgrade ..............154
Obtaining Help and Additional Information ....................157Technical Support .......................................................157Downloading Sybase EBFs and Maintenance Reports
................................................................................ 157Sybase Product and Component Certifications ..........158Creating a MySybase Profile ......................................158
Contents
Installation Guide vii
Accessibility Features .................................................158Index ................................................................................161
Contents
viii Adaptive Server Enterprise Cluster Edition

Conventions
These style and syntax conventions are used in Sybase® documentation.
• In a sample window display, commands to be entered exactly as shown appear in:this font
• In a sample window display, words that you should replace with the appropriate value foryour installation are shown in:this font
• In the regular text of this document, the names of files and directories appear in this font:/usr/u/sybase
• The names of programs, utilities, procedures, and commands appear in this font:sqlupgrade
• Commands for both the C shell and the Bourne shell are provided, when they differ. Theinitialization file for the C shell is called .cshrc. The initialization file for the Bourneshell is called .profile. If you are using a different shell, such as the Korn shell, refer toyour shell-specific documentation for the correct command syntax.
Table 1. SQL syntax conventions
Key Definition
command Command names, command option names, utility names, utility flags, and otherkeywords are in a bold san-serif font.
variable Variables, or words that stand for values that you fill in, are in italic.
{ } Curly braces indicate that you choose at least one of the enclosed options. Do notinclude braces in your option.
[ ] Brackets mean choosing one or more of the enclosed options is optional. Do notinclude brackets in your option.
( ) () are to be typed as part of the command.
| The vertical bar means you can select only one of the options shown.
, The comma means you can choose as many of the options shown as you like,separating your choices with commas, which are typed as part of the command.
Conventions
Installation Guide 1

Conventions
2 Adaptive Server Enterprise Cluster Edition

Installation Task Overview
To successfully install, configure, and use the Cluster Edition of Adaptive Server® Enterprise,use this installation guide, as well as the Cluster Users Guide.
The Adaptive Server installation guide explains how to unload the Adaptive Server softwarefrom the distribution media to your hard disk, and perform the minimal set of additional tasksso that you can start Adaptive Server on your machine.
The Cluster Users Guide provides descriptions of the features available in the Cluster Edition,as well as instructions for installing and configuring an Adaptive Server cluster system.
Installation WorkflowsThese workflows define a complete path for planning, installing, and upgrading.
Choose the workflow that best describes your scenario.
Tip: Print this topic and use it as a checklist.
Whether you plan to install or upgrade Adaptive Server:
1. Identify the components and options to install or upgrade.2. Obtain a license.
Installing Adaptive Server for the First Time
1. Plan your installation and review system requirements.2. Install Adaptive Server.3. Configure the cluster server.4. Perform postinstallation tasks.
Upgrading to a New Version
1. Determine your upgrade eligibility, plan your installation, and review systemrequirements.
2. Run the preupgrade utility to prepare Adaptive Server for upgrading.3. Upgrade Adaptive Server.4. Perform postinstallation tasks.
Uninstalling Adaptive ServerUninstall Adaptive Server. See Uninstalling Adaptive Server on page 35.
Installation Task Overview
Installation Guide 3
Installation Task Overview
4 Adaptive Server Enterprise Cluster Edition
Adaptive Server Components
Adaptive Server® Enterprise is based on a client/server model, communicating with its clientsover the network via the Tabular Data Stream™ (TDS) protocol. Each client process mayexecute on one machine and communicate with a database server on the same or a differentmachine.
Adaptive Server runs as an application on top of an operating system. The hardware that theoperating system runs on is completely transparent to Adaptive Server, which sees only theoperating system's user interfaces. To enhance performance on multiprocessor systems,configure multiple processes (engines).
Adaptive Server is divided into a DBMS component and a kernel component. The kernelcomponent uses the operating system services for process creation and manipulation, deviceand file processing, and interprocess communication. The DBMS component manages SQLstatement processing, accesses data in a database, and manages different types of serverresources.
Adaptive Server EditionsSybase® offers various editions of Adaptive Server Enterprise.
There is a change to the license quantity used by per-CPU and per-chip license types. AdaptiveServer version 15.7 and later checks out the same number of licenses as the number of cores onthe machine (or chips, depending on the license type) regardless of any configuration settings.This is a correction from earlier versions of the server, in which if Adaptive Server waslicensed per CPU or CPU chip, the requested license quantity was reduced if the max onlineengines configuration parameter was set to fewer than the number of CPUs on the machine.
The Adaptive Server installer automatically installs a SySAM license server if you choose thefull installation option or enter a served license when iprompted for the SySAM license key.You can also install the license server using the installer's custom installation option. See theSybase Software Asset Management Users Guide to generate licenses.
The Cluster Edition allows a single installation, a private-mode installation, and multipleinstallations of Adaptive Server to operate on multiple nodes as a shared-disk clusterenvironment with a single-system view. Each server runs on a separate node called a "serverinstance" or "instance." You can use a single configuration file to determine the configurationfor all instances (a shared installation), or each instance can use a separate configuration file (aprivate installation).
The Cluster Edition allows you to scale workloads using multiple physical and logicalclusters. If an instance in a cluster fails, one or more of the still-running instances take over theworkload of the failed instance. The cluster determines the instance to which each client
Adaptive Server Components
Installation Guide 5
connects. If one instance is overloaded, the cluster balances the load by shifting clients toother, more available instances.
The primary advantages of the Cluster Edition include:
• Improved availability – applications can continue to run as long as a single cluster memberremains viable, even after several others have failed.
• Simple management – data is shared by all instances and does not require datarepartitioning through cluster membership changes.
The Cluster Edition provides a distributed architecture. Internode communication takes placevia a network interconnects, rather than via shared memory. Applications that minimizeinternode messaging yield the best performance in the Cluster Edition environment.
Single-System PresentationThe Cluster Edition supports a single-system presentation. That is, multiple instances thatmake up the cluster appear to clients as a single system. New client technologies allow clientsto connect logically to a cluster while remaining physically connected to individual instances.This logical connection allows Adaptive Server to redirect clients to various instances in thecluster and to dynamically provide clients highly available failover data.
Workload ManagementThe Cluster Edition workload manager can customize workload management and failover foryour business applications so that each performs most efficiently. The logical cluster providesindividualized working environments.
Installation OptionsThe Cluster Edition offers one of these configurations:
• Shared installation – requires a shared file system created using a Network File System(NFS) or a cluster file system. A shared installation supports a single $SYBASEinstallation directory, Adaptive Server home directory, and server configuration file.
• Private installation – does not use a shared file system. A private installation supports aseparate $SYBASE installation directory, Adaptive Server home directory, and serverconfiguration file for each instance.
See the Cluster Users Guide for detailed information about the Cluster Edition.
Determining the Edition You HaveIf you already use Adaptive Server, use the sp_lmconfig system procedure to identify theversion.
Enter:sp_lmconfig 'edition'
Adaptive Server returns a value of EE, SE, DE, or CE based on the edition that is currentlyrunning. See the Reference Manual for more information about sp_lmconfig.
Adaptive Server Components
6 Adaptive Server Enterprise Cluster Edition
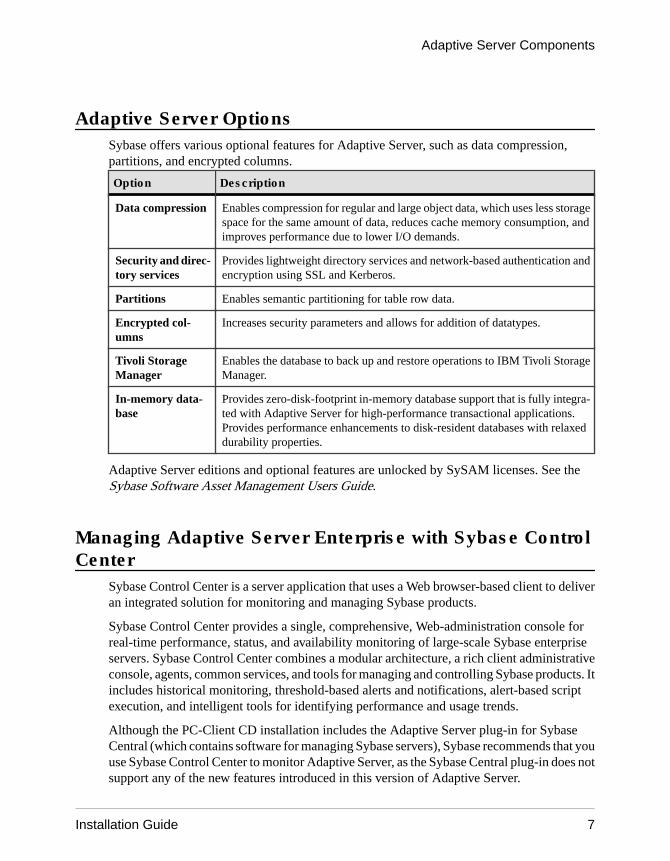
Adaptive Server OptionsSybase offers various optional features for Adaptive Server, such as data compression,partitions, and encrypted columns.
Option Description
Data compression Enables compression for regular and large object data, which uses less storagespace for the same amount of data, reduces cache memory consumption, andimproves performance due to lower I/O demands.
Security and direc-tory services
Provides lightweight directory services and network-based authentication andencryption using SSL and Kerberos.
Partitions Enables semantic partitioning for table row data.
Encrypted col-umns
Increases security parameters and allows for addition of datatypes.
Tivoli StorageManager
Enables the database to back up and restore operations to IBM Tivoli StorageManager.
In-memory data-base
Provides zero-disk-footprint in-memory database support that is fully integra-ted with Adaptive Server for high-performance transactional applications.Provides performance enhancements to disk-resident databases with relaxeddurability properties.
Adaptive Server editions and optional features are unlocked by SySAM licenses. See theSybase Software Asset Management Users Guide.
Managing Adaptive Server Enterprise with Sybase ControlCenter
Sybase Control Center is a server application that uses a Web browser-based client to deliveran integrated solution for monitoring and managing Sybase products.
Sybase Control Center provides a single, comprehensive, Web-administration console forreal-time performance, status, and availability monitoring of large-scale Sybase enterpriseservers. Sybase Control Center combines a modular architecture, a rich client administrativeconsole, agents, common services, and tools for managing and controlling Sybase products. Itincludes historical monitoring, threshold-based alerts and notifications, alert-based scriptexecution, and intelligent tools for identifying performance and usage trends.
Although the PC-Client CD installation includes the Adaptive Server plug-in for SybaseCentral (which contains software for managing Sybase servers), Sybase recommends that youuse Sybase Control Center to monitor Adaptive Server, as the Sybase Central plug-in does notsupport any of the new features introduced in this version of Adaptive Server.
Adaptive Server Components
Installation Guide 7
The Adaptive Server installer installs the Sybase Control Center remote command and controlagent with Adaptive Server, however, does not install the SCC management UI, whichmanages and monitors activities.
To install the SCC management UI, use the SCC installation disc or download it from http://downloads.sybase.com. In a production environment, Sybase recommends that you installthis SCC server on a machine other than the one you plan to run Adaptive Server on.
Note: In a cluster environment, install the SCC remote command and control agent on eachnode of a cluster. You need only install the SCC management UI, however, in one place.
Client Applications and UtilitiesThe PC-Client installer contains client applications and utilities you can use to access theAdaptive Server to execute queries or manage the server. It also contains the Sybase OpenClient/ Open Server™ Software Developers Kit, which you can use to develop applicationsthat access the server, and ODBC, OLE DB, and ADO.NET clients.
The Sybase PC-Client CD includes the Software Developer Kit (SDK) for Windowsplatforms, consisting of:
• Embedded SQL™
• Embedded SQL™/C (ESQL/C)• Embedded SQL/Cobol (ESQL/Cobol) – 32-bit only
• XA-Library™ – XA Interface Library for ASE Distributed Transaction Manager• Adaptive Server Enteprise extension module for Python – 64-bit only• Additional connectivity language modules• Open Client™ (CT-Library, DB-Library™)• Microsoft Cluster Server Resource Type for ASE – 64-bit only• Adaptive Server Enterprise database driver for Perl – 64-bit only• Adaptive Server Enterprise extension module for PHP – 64-bit only• Interactive SQL• Sybase Central™
• Adaptive Server plug-in for Sybase Central• ASE ADO.NET Data Provider• ASE OLE DB Provider by Sybase• ASE ODBC Driver by Sybase• ASE plug-in• QPTune• jConnect™ for JDBC™ 7.0• SySAM License Utilities• SDC Administration Utility
In addition to the SDK, the PC-Client CD includes products that install separately:
Adaptive Server Components
8 Adaptive Server Enterprise Cluster Edition

• InfoMaker – a tool for personal data access, management, and reporting, used by bothdevelopers and end users. InfoMaker allows you to create InfoMaker presentation-qualityreports and powerful queries. It complements client/server business applications anddevelopment tools as well as desktop productivity suites.
• PowerDesigner Physical Architect – a tool for data modeling, including database design,generation, maintenance, reverse engineering, and documentation for database architects.
Adaptive Server Components
Installation Guide 9

Adaptive Server Components
10 Adaptive Server Enterprise Cluster Edition
Planning Your Adaptive Server Installation
Before you install or upgrade, prepare your environment.
• Identify the components and options to install or upgrade• Obtain a license
Note: If you are using a served license, you must install the SySAM license server version2.1 or later.
• Make sure your system meets all requirements for your installation scenario and planneduse.
Adaptive Server Release BulletinObtain updated information from the release bulletin.
The release bulletin contains last-minute information about installing and upgrading AdaptiveServer software.
The latest release bulletins are available at the Product Documentation Web page at http://www.sybase.com/support/manuals.
Obtaining a LicenseBefore installing your product, choose a SySAM license model, determine the license serverinformation, and obtain license files.
When you purchase SySAM 2–enabled Sybase products, you must generate, download, anddeploy SySAM product licenses.
• If you purchased your product from Sybase or an authorized Sybase reseller, go to thesecure Sybase Product Download Center (SPDC) at https://sybase.subscribenet.com andlog in to generate license keys. The license generation process may vary slightly,depending on whether you ordered directly from Sybase or from a Sybase reseller
• If you ordered your product under an SAP® contract and were directed to download fromSAP Service Marketplace (SMP), you can use SMP at http://service.sap.com/licensekeysto generate license keys for Sybase products that use SySAM 2-based licenses.
1. Choose a SySAM license model:
Planning Your Adaptive Server Installation
Installation Guide 11
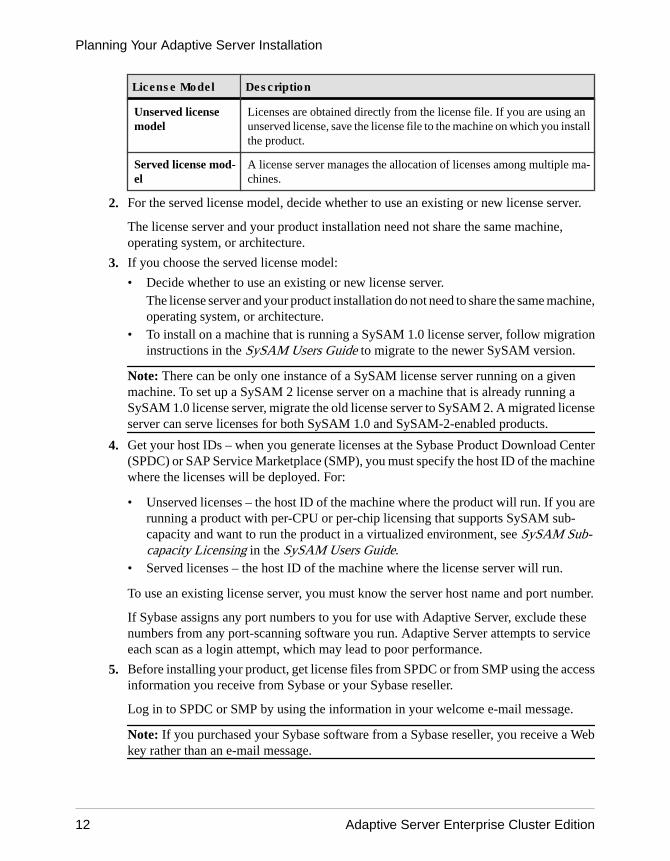
License Model Description
Unserved licensemodel
Licenses are obtained directly from the license file. If you are using anunserved license, save the license file to the machine on which you installthe product.
Served license mod-el
A license server manages the allocation of licenses among multiple ma-chines.
2. For the served license model, decide whether to use an existing or new license server.
The license server and your product installation need not share the same machine,operating system, or architecture.
3. If you choose the served license model:
• Decide whether to use an existing or new license server.The license server and your product installation do not need to share the same machine,operating system, or architecture.
• To install on a machine that is running a SySAM 1.0 license server, follow migrationinstructions in the SySAM Users Guide to migrate to the newer SySAM version.
Note: There can be only one instance of a SySAM license server running on a givenmachine. To set up a SySAM 2 license server on a machine that is already running aSySAM 1.0 license server, migrate the old license server to SySAM 2. A migrated licenseserver can serve licenses for both SySAM 1.0 and SySAM-2-enabled products.
4. Get your host IDs – when you generate licenses at the Sybase Product Download Center(SPDC) or SAP Service Marketplace (SMP), you must specify the host ID of the machinewhere the licenses will be deployed. For:
• Unserved licenses – the host ID of the machine where the product will run. If you arerunning a product with per-CPU or per-chip licensing that supports SySAM sub-capacity and want to run the product in a virtualized environment, see SySAM Sub-capacity Licensing in the SySAM Users Guide.
• Served licenses – the host ID of the machine where the license server will run.
To use an existing license server, you must know the server host name and port number.
If Sybase assigns any port numbers to you for use with Adaptive Server, exclude thesenumbers from any port-scanning software you run. Adaptive Server attempts to serviceeach scan as a login attempt, which may lead to poor performance.
5. Before installing your product, get license files from SPDC or from SMP using the accessinformation you receive from Sybase or your Sybase reseller.
Log in to SPDC or SMP by using the information in your welcome e-mail message.
Note: If you purchased your Sybase software from a Sybase reseller, you receive a Webkey rather than an e-mail message.
Planning Your Adaptive Server Installation
12 Adaptive Server Enterprise Cluster Edition
If you plan to use sub-capacity licensing, see the SySAM Users Guide for information onhow to configure using the sysamcap utility.
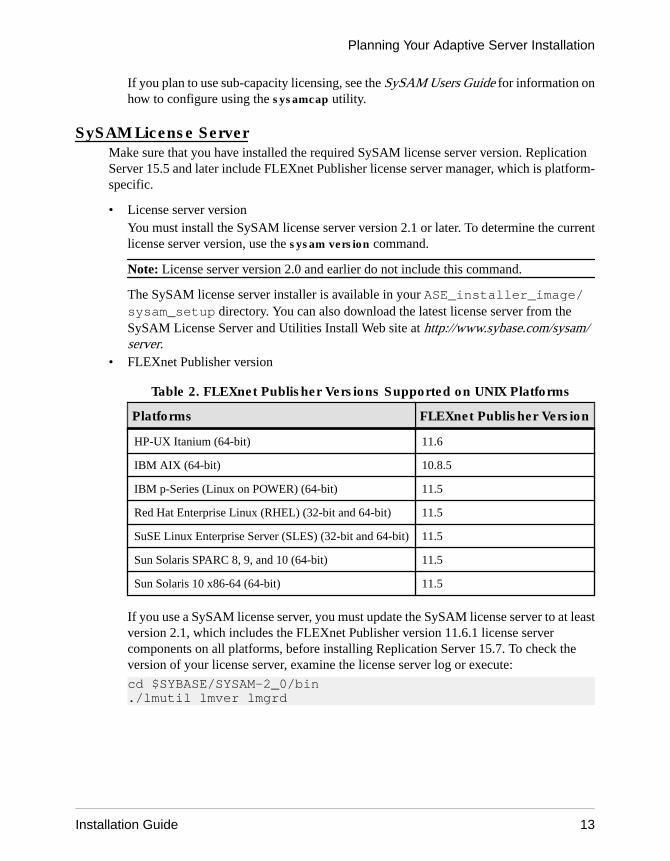
SySAM License ServerMake sure that you have installed the required SySAM license server version. ReplicationServer 15.5 and later include FLEXnet Publisher license server manager, which is platform-specific.
• License server versionYou must install the SySAM license server version 2.1 or later. To determine the currentlicense server version, use the sysam version command.
Note: License server version 2.0 and earlier do not include this command.
The SySAM license server installer is available in your ASE_installer_image/sysam_setup directory. You can also download the latest license server from theSySAM License Server and Utilities Install Web site at http://www.sybase.com/sysam/server.
• FLEXnet Publisher version
Table 2. FLEXnet Publisher Versions Supported on UNIX Platforms
Platforms FLEXnet Publisher Version
HP-UX Itanium (64-bit) 11.6
IBM AIX (64-bit) 10.8.5
IBM p-Series (Linux on POWER) (64-bit) 11.5
Red Hat Enterprise Linux (RHEL) (32-bit and 64-bit) 11.5
SuSE Linux Enterprise Server (SLES) (32-bit and 64-bit) 11.5
Sun Solaris SPARC 8, 9, and 10 (64-bit) 11.5
Sun Solaris 10 x86-64 (64-bit) 11.5
If you use a SySAM license server, you must update the SySAM license server to at leastversion 2.1, which includes the FLEXnet Publisher version 11.6.1 license servercomponents on all platforms, before installing Replication Server 15.7. To check theversion of your license server, examine the license server log or execute:
cd $SYBASE/SYSAM-2_0/bin ./lmutil lmver lmgrd
Planning Your Adaptive Server Installation
Installation Guide 13
IPv6 ConfigurationUse the sysam configure command to choose the version of the license server based on yourenvironment.
Adaptive Server includes IPv4 and IPv6 versions of the SySAM license server software. Bydefault, the installer configures SySAM for IPv4 support.
The IPv4 version of the license server cannot be used properly if you have enabled IPv6 on thelicense server host. If this is the case, you can:
• Disable IPv6 TCP/IP protocol on the license server host.• Use another Windows host that does not have IPv6 enabled.• Use a UNIX host for the license server. You can use the IPv4 version of the license even if
both IPv4 and IPv6 are enabled on UNIX.
If you are using the IPv6 version of the license server on a Windows host, you can access thislicense server only through the IPv6 protocol. Any host with an IPv4 only network stackcannot obtain licenses from this IPv6 license server. To resolve this issue:
• Use a UNIX host for the license server. License servers on UNIX can serve licenses to bothIPv4 and IPv6 client hosts.
• Use two separate Windows machines. Set up two license servers on two different hosts inthe network; one to serve the IPv4 network and the other one to serve the IPv6 network.
You can use the SySAM script to configure the appropriate version of the license server:
sysam configure [IPv6|IPv4]
For example, to configure use of the IPv4/IPv6 dual stack binaries, use:
sysam configure IPv6
SySAM Licensing CheckoutIf Adaptive Server was licensed using a per-processor license type in versions earlier than15.7, the license quantity was determined at start-up.
Adaptive Server periodically checks the number of processors it can use and attempts to checkout additional licenses for any increase. Replication Server shuts down after a 30-day graceperiod expires if additional licenses are not made available within this period.
See the SySAM Users Guide.
System RequirementsBefore installing Adaptive Server, ensure that your system is updated with the latest patchesand system requirements. Do not use a patch that is earlier than the version suggested for your
Planning Your Adaptive Server Installation
14 Adaptive Server Enterprise Cluster Edition
operating system. Use the patch recommended by the operating system vendor, even if itsupersedes the patch listed.
To list all currently installed patches and display the operating system version level, enter:swlist
Note: The Java Virtual Machine (JVM) and associated Adaptive Server support require atleast 250MB of virtual memory space to start, and may need more depending on therequirements of the individual Java executions. For this reason, you may need to adjust thememory parameters when running Java to ensure that it has enough virtual memory space tostart, and that both Adaptive Server and Java tasks can successfully coexist.
In particular, systems that have Adaptive Server total memory set to a value higher than 1.5GB(or 2.5GB on some Enterprise servers) may experience problems, and you may have to reduceAdaptive Server total memory.
HP-UX System Requirements for Cluster EditionAdaptive Server specifications for HP-UX:
• Processor 64-bit – Intel Architecture-64 Itanium• Minimum RAM required for Adaptive Server – 128MB• Default user stack size – 148KB• Minimum RAM per additional user – approximately 430KB
Operating system requirements for HP-UX:
• Hardware – Intel Itanium• Operating system – HP-UX B.11.31• Updates – PHSS_36352, PHKL_37802, PHKL_38102• Suggested minimum RAM – 1G
Minimum disk space requirements for HP-UX:
• Platform – HP-UX Itanium• Typical installation – 1,372MB• Default databases – 150MB• Management features – 25MB• Total disk space requirements – 1,547MB
Clustered file system for HP-UX:
• Operating system – HP-UX B.11.31• Product – Veritas Cluster File System 5.0
Before you can install a 64-bit Adaptive Server version 15.7 to a Red Hat Enterprise Linux 6.xx86_64, install the 32-bit GNU C Libraries package (glibc-2.xx-x.xx.el6.i686.rpm).
Planning Your Adaptive Server Installation
Installation Guide 15
Ensure that you have the required operating system patches for the Java Runtime Environment(JRE) version 6.
Information about the required operating system patches is available from the http://www.hp.com/java . You must also have gzip software installed on your HP machine to theAdaptive Server installer to decompress files during the installation process.
See the Clusters Users Guide for hardware requirements for using Infiniband, Interconnect ona production system. Sybase does not support file system devices when running on multiplenodes.
If you intend to run the cluster under Symantec Storage Foundation for Sybase ClusterEdition, see Chapter 11, “Using the Cluster Edition with the Veritas Cluster Server,” in theClusters Users Guide. Veritas Cluster Server for Sybase Cluster Edition is only supported onSolaris Sparc64 and Linux x86-64. It is not available for Solaris x86-64.
Database devices in the Cluster Edition must support SCSI-3 persistent group reservations(SCSI PGRs). Cluster Edition uses SCSI PGRs to guarantee data consistency during clustermembership changes. Sybase cannot guarantee data consistency on disk subsystems that donot support SCSI PGRs (such a configuration is supported for test and developmentenvironments that can tolerate the possibility of data corruption).
Cluster Edition System Requirements for Using Private InterconnectTechnology
The Cluster Edition supports only the UDP network protocol for private interconnects; Do notuse the TCP network protocol.
A private interconnect is a physical connection that allows internode communication, and is anessential component of a shared disk cluster installation. A private interconnect can be asimple crossover cable with Ethernet, or it can be a complex proprietary interconnect with aspecialized proprietary communications protocol. When you configure more than two nodes aswitch that enables high-speed communication between the nodes in the cluster is required.
To handle the amount of traffic created by contention, use scalable interconnect technology toconnect nodes. The amount of traffic is directly proportional to the amount of inter-instanceupdates and inter-instance transfers. Sybase recommends that you implement the highestbandwidth, lowest latency interconnect available.
The Cluster Edition supports the current standards for interconnects. Sybase recommends thatyou research the available interconnects to find the one that works best for your site.
System Requirements for ClientsCheck the system requirements for the machine on which you plan to install the PC-Client.
Type Requirement
Product PC-Client
Planning Your Adaptive Server Installation
16 Adaptive Server Enterprise Cluster Edition
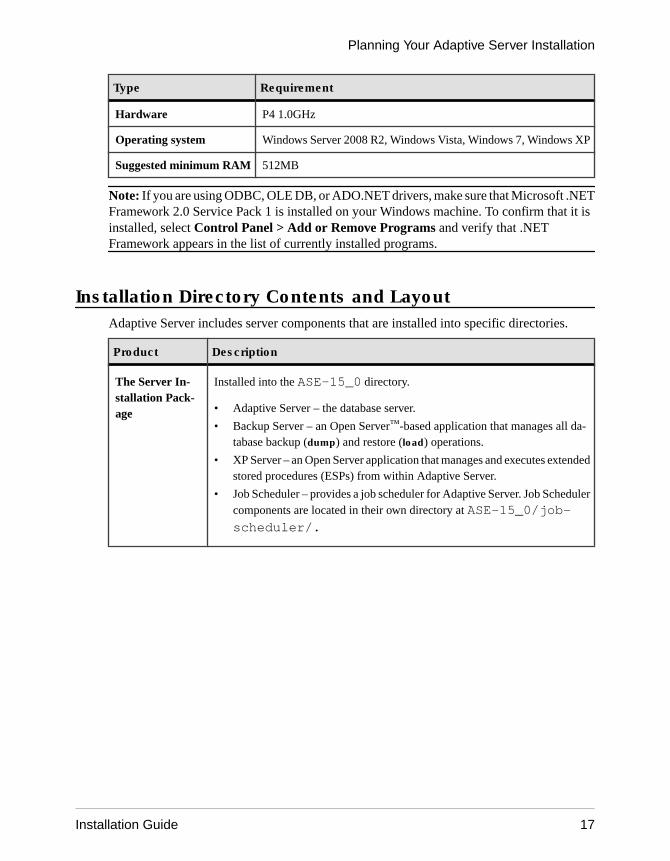
Type Requirement
Hardware P4 1.0GHz
Operating system Windows Server 2008 R2, Windows Vista, Windows 7, Windows XP
Suggested minimum RAM 512MB
Note: If you are using ODBC, OLE DB, or ADO.NET drivers, make sure that Microsoft .NETFramework 2.0 Service Pack 1 is installed on your Windows machine. To confirm that it isinstalled, select Control Panel > Add or Remove Programs and verify that .NETFramework appears in the list of currently installed programs.
Installation Directory Contents and LayoutAdaptive Server includes server components that are installed into specific directories.
Product Description
The Server In-stallation Pack-age
Installed into the ASE-15_0 directory.
• Adaptive Server – the database server.
• Backup Server – an Open Server™-based application that manages all da-tabase backup (dump) and restore (load) operations.
• XP Server – an Open Server application that manages and executes extendedstored procedures (ESPs) from within Adaptive Server.
• Job Scheduler – provides a job scheduler for Adaptive Server. Job Schedulercomponents are located in their own directory at ASE-15_0/job-scheduler/.
Planning Your Adaptive Server Installation
Installation Guide 17
Product Description
Shared DiskCluster Adminis-tration Tools
• Sybase Control Center logs and utilities – files related to the Web-based toolfor monitoring the status and availability of Adaptive Servers. They areinstalled into the $SYBASE/SCC-3_2 directory.
• sybcluster – interactive command line interface for configuring and man-aging the cluster installed in the $SYBASE/$SYBASE_ASE/bin di-
rectory.
• Job Scheduler templates and utilities – predefined templates from which thedatabase administrator can create and schedule useful, time-saving jobs.They are installed into the $SYBASE/$SYBASE_ASE/jobsched-uler directory.
• Interactive SQL– interactive command line interface for configuring andmanaging the cluster. It is installed into the SYBASE/DBISQL directory.
• JRE – the Java Runtime Environment (JRE) is a runtime Java virtual machineused to execute Java-based programs such as Sybase Control Center. Instal-led into the $SYBASE/shared/JRE-* directory.
• The Cluster Edition Administration Utility is installed to $SYBASE/SDCADMIN-15_0.
• Sybase Central 6.x is a Java-based framework used by the system manage-ment tools. Installed into the $SYBASE/shared/sybcentral600directory.
• Adaptive Server plug-in. Sybase Central plug-in that provides cluster con-figuration and complete administration functionality. Installed into the$SYBASE/ASEP directory.
Software Devel-oper Kit (SDK)
Connectivity:
• Open Client™ (Client-Library, dblib)
• Embedded SQL/COBOL 15.0
• XA interface for Adaptive Sever
Installed into the DataAccess directory:
• ODBC (Windows, Solaris SPARC, Solaris x64, Linux Power, HP-UX Ita-nium, IBM AIX) – a driver used to connect to Adaptive Server from ODBCbased applications.
Language mod-ules
Installed into the $SYBASE/locales and $SYBASE_ASE/lo-cales directories. Provides system messages and date/time formats.
Character sets Installed into the charsets directory. Provides character sets available for
use with Adaptive Server.
Planning Your Adaptive Server Installation
18 Adaptive Server Enterprise Cluster Edition
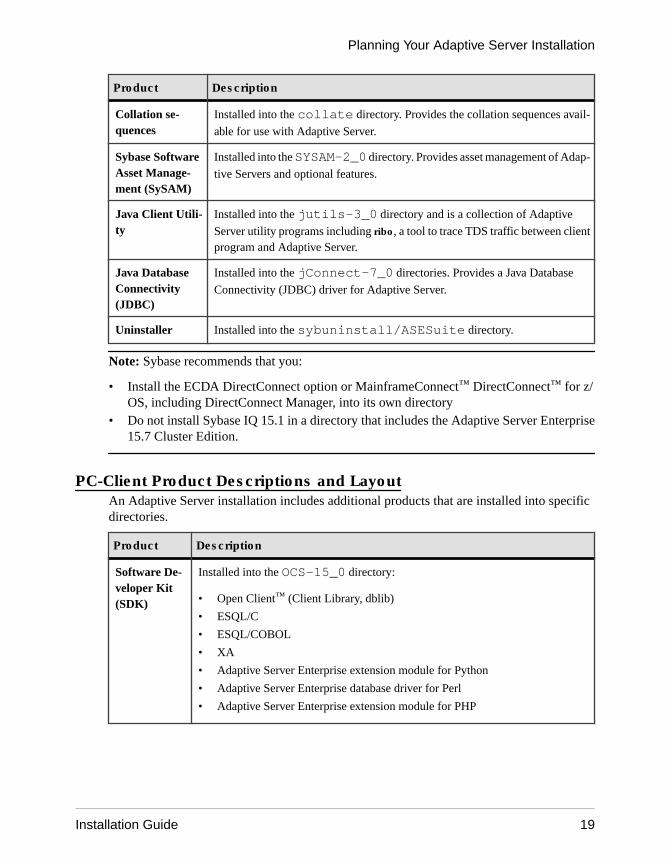
Product Description
Collation se-quences
Installed into the collate directory. Provides the collation sequences avail-
able for use with Adaptive Server.
Sybase SoftwareAsset Manage-ment (SySAM)
Installed into the SYSAM-2_0 directory. Provides asset management of Adap-
tive Servers and optional features.
Java Client Utili-ty
Installed into the jutils-3_0 directory and is a collection of Adaptive
Server utility programs including ribo, a tool to trace TDS traffic between clientprogram and Adaptive Server.
Java DatabaseConnectivity(JDBC)
Installed into the jConnect-7_0 directories. Provides a Java Database
Connectivity (JDBC) driver for Adaptive Server.
Uninstaller Installed into the sybuninstall/ASESuite directory.
Note: Sybase recommends that you:
• Install the ECDA DirectConnect option or MainframeConnect™ DirectConnect™ for z/OS, including DirectConnect Manager, into its own directory
• Do not install Sybase IQ 15.1 in a directory that includes the Adaptive Server Enterprise15.7 Cluster Edition.
PC-Client Product Descriptions and LayoutAn Adaptive Server installation includes additional products that are installed into specificdirectories.
Product Description
Software De-veloper Kit(SDK)
Installed into the OCS-15_0 directory:
• Open Client™ (Client Library, dblib)
• ESQL/C
• ESQL/COBOL
• XA
• Adaptive Server Enterprise extension module for Python
• Adaptive Server Enterprise database driver for Perl
• Adaptive Server Enterprise extension module for PHP
Planning Your Adaptive Server Installation
Installation Guide 19

Product Description
DataAc-cess
Installed into the DataAccess[64] directories:
• (Windows and Linux only) ODBC – a driver used to connect to Adaptive Serverfrom ODBC-based applications.
• (Windows only) OLEDB – a provider used to connect to Adaptive Server fromOLE DB-based applications.
• (Windows only) ADO.NET – a provider used to connect to Adaptive Serverfrom .NET-based applications.
WindowsCluster Serv-er Admin util-ities
Windows Cluster Administrator is a GUI tool for managing Microsoft ClusterServer (MSCS). Use it to create, modify and displays group, resource, and clusterinformation. There is also an alternative command line tool called Clus-ter.exe for cluster administration.
PC-ClientAdministra-tion Tools
• sybcluster – interactive command line interface for configuring and managingthe cluster installed in the %SYBASE%\SDCADMIN-15_0\bin directo-
ry.
• Interactive SQL – interactive command line interface for configuring and man-aging the cluster. It is installed into the %SYBASE%\DBISQL directory.
• Java Runtime Environment (JRE) – is a runtime Java virtual machine used toexecute Java-based programs such as Sybase Control Center. Installed into the%SYBASE%\Shared\JRE-6_0* directory.
• The Administration Utility is installed to %SYBASE%\SDCADMIN-15_0
• jutils-3_0 – a collection of Adaptive Server utility programs including ribo, atool to trace TDS traffic between client program and Adaptive Server.
• Sybase Central 6.x – is a Java-based framework used by the system managementtools. Installed into the Shared directory.
The ASEPlugin.jar file is located in ASEP\lib, while the scjview.exe
executable to start Sybase Central with the ASE plug-in is located in shared\Sybase Central 6.0.0\[win32,win64].
• Adaptive Server plug-in – Sybase Central plug-in that provides cluster config-uration and administration functionality up to Adaptive Server 15.5. Installedinto ASEP directory.
Note: Sybase Central and the Adaptive Server plug-in do not support the newfeatures and functionality introduced in Adaptive Server 15.7. For this reason,Sybase recommends that you instead use Sybase Control Center.
LanguageModules
Installed into the locales directory. Provides system messages and date/time
formats.
Planning Your Adaptive Server Installation
20 Adaptive Server Enterprise Cluster Edition

Product Description
CharacterSets
Installed into the charsets directory. Provides character sets available for use
with Adaptive Server.
jConnect Installed into the jConnect-7_0 directory. Provides a Java Database Connec-
tivity (JDBC) driver for Adaptive Server.
Uninstaller Installed into the sybuninstall/PCClient directory.
Performing Administrative TasksComplete the administrative tasks before you begin the installation process.
1. Back up your current system.
2. Create the “sybase” user account and make sure it has read, write, and executepermissions.
3. Verify that the directory location for the Sybase installation has sufficient space.
4. Verify that your network software is configured.
Sybase software uses network software, even if Adaptive Server and Sybase clientapplications are installed on a machine that is not connected to a network.
Creating the Sybase User AccountCreate a Sybase user account to ensure that Sybase product files and directories are createdwith consistent ownership and privileges.
One user—typically the Sybase system administrator, who has read, write, and executeprivileges—should perform all installation, configuration, and upgrade tasks.
1. To create a Sybase system administrator account, choose an existing account, or create anew account and assign a user ID, group ID, and password for it.
This account is sometimes called the “sybase” user account. See your operating systemdocumentation for instructions on creating a new user account.
If you have installed other Sybase software, the “sybase” user should already exist.
2. Verify that you can log in to the machine using this account.
Planning Your Adaptive Server Installation
Installation Guide 21
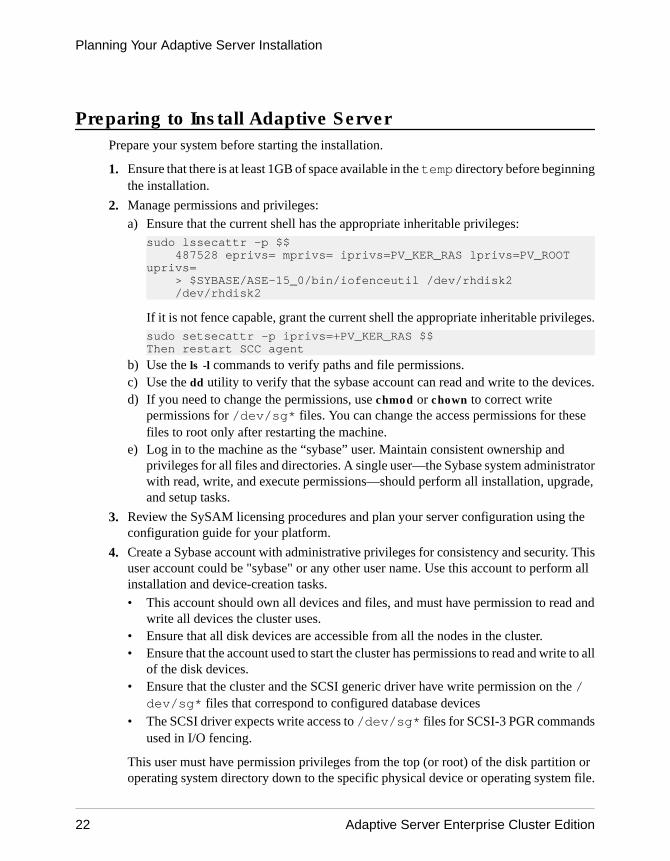
Preparing to Install Adaptive ServerPrepare your system before starting the installation.
1. Ensure that there is at least 1GB of space available in the temp directory before beginningthe installation.
2. Manage permissions and privileges:
a) Ensure that the current shell has the appropriate inheritable privileges:sudo lssecattr -p $$ 487528 eprivs= mprivs= iprivs=PV_KER_RAS lprivs=PV_ROOT uprivs= > $SYBASE/ASE-15_0/bin/iofenceutil /dev/rhdisk2 /dev/rhdisk2
If it is not fence capable, grant the current shell the appropriate inheritable privileges.sudo setsecattr -p iprivs=+PV_KER_RAS $$ Then restart SCC agent
b) Use the ls -l commands to verify paths and file permissions.c) Use the dd utility to verify that the sybase account can read and write to the devices.d) If you need to change the permissions, use chmod or chown to correct write
permissions for /dev/sg* files. You can change the access permissions for thesefiles to root only after restarting the machine.
e) Log in to the machine as the “sybase” user. Maintain consistent ownership andprivileges for all files and directories. A single user—the Sybase system administratorwith read, write, and execute permissions—should perform all installation, upgrade,and setup tasks.
3. Review the SySAM licensing procedures and plan your server configuration using theconfiguration guide for your platform.
4. Create a Sybase account with administrative privileges for consistency and security. Thisuser account could be "sybase" or any other user name. Use this account to perform allinstallation and device-creation tasks.
• This account should own all devices and files, and must have permission to read andwrite all devices the cluster uses.
• Ensure that all disk devices are accessible from all the nodes in the cluster.• Ensure that the account used to start the cluster has permissions to read and write to all
of the disk devices.• Ensure that the cluster and the SCSI generic driver have write permission on the /
dev/sg* files that correspond to configured database devices• The SCSI driver expects write access to /dev/sg* files for SCSI-3 PGR commands
used in I/O fencing.
This user must have permission privileges from the top (or root) of the disk partition oroperating system directory down to the specific physical device or operating system file.
Planning Your Adaptive Server Installation
22 Adaptive Server Enterprise Cluster Edition
Maintain consistent ownership and privileges for all files and directories. A single user—the Sybase system administrator with read, write, and execute permissions—shouldperform all installation, upgrade, and setup tasks.
If you are installing Adaptive Server on more than one computer, create the "sybase" useraccount on each machine.
5. Log in, as the "sybase" user, to the node on which you plan to install the first instance of theserver.
6. If you do not have open administrative privileges, create a destination directory beforerunning InstallAnywhere.
7. Decide where to install Adaptive Server:
• Make sure there is sufficient disk space and temporary directory space available.• Ensure that there are no spaces in the path name of the directory.• If this is a shared installation, the $SYBASE location must be on a shared file system,
accessible from all cluster nodes using the same path.• If this is a private installation, install the Adaptive Server software on each node of the
cluster.• Each instance in the cluster must have its own $SYBASE directory.
• The private installation mode does not use a Network File System (NFS) or cluster filesystem.
8. Decide whether you want licensing events to trigger e-mail alerts, and the severity of theevents that generate e-mail messages.
If you choose to have e-mail notifications for license events, know your:• SMTP server host name• Port number for an SMTP server
Note: If Sybase assigns any port numbers to you for use with Adaptive Server, makesure to exclude these numbers from any port-scanning software you run. AdaptiveServer attempts to service each scan as a login attempt, which may lead to poorperformance.
• E-mail return address• Recipients of the notifications• Severity level of an event that triggers mail. Your choices are:
• None• Informational• Warning• Error
9. Verify that your network software is configured.
Sybase software uses network software even if Adaptive Server and Sybase clientapplications are installed on a machine that is not connected to a network.
Planning Your Adaptive Server Installation
Installation Guide 23
The Cluster Edition requires your network to be configured for the nodes you plan toinclude in the cluster.
If you are having connection problems, or to verify your network configuration, ping thehost.
10. Create a $HOME directory on the node on which you will run the installer.
11. Ensure that all nodes are running on the same operating system version.
The number of processors and the amount of memory can vary from node to node but theoperating system version cannot.
12. Ensure that the quorum resides on its own device.
13. Create the local system temporary databases on a shared device using the Adaptive Serverplug-in or sybcluster. Do this for each instance during the initial start-up of the cluster andlater on whenever you add an instance to the cluster.
You can create or drop a local system temporary database from any instance, but you canaccess it only from the owning instance.
14. Ensure that all database devices, including quorum devices, are located on raw partitions.Do not use the Network File System (NFS).
Warning! Do not use file system devices for clusters. The Cluster Edition is not designedto run on a file system; mounting a nonclustered file system on multiple nodesimmediately causes a corruption, leading to a total loss of the cluster and all of itsdatabases. For this reason, Sybase does not support file system devices when running onmultiple nodes.
15. Ensure that the raw partitions are accessible from each node using the same access path.Sybase recommends storage area network (SAN) connected devices.
Note: Local user temporary databases do not require shared storage and can use local filesystems created as private devices—unlike local system temporary databases, which dorequire shared storage.
For test environments, use a single node or machine to run multiple instances of the ClusterEdition in a cluster configuration. When you do this, you must use the local file system (notNFS) or SAN Storage for the database devices.
16. Ensure that all hardware nodes use Network Time Protocol (NTP) or a similar mechanismto ensure that clocks are synchronized.
17. If you are using a shared installation, ensure that all Adaptive Server Enterprise softwareand configuration files (including the $SYBASE directory, the interfaces file) are installedon a Network File System (NFS) or a clustered file system (CFS or GFS) that is accessiblefrom each node in the cluster using the same access path. Supported versions of clusteredfile system are detailed in the next section.
If you are using a private installation, each node must have its own installation on a clusterfile system.
Planning Your Adaptive Server Installation
24 Adaptive Server Enterprise Cluster Edition
18. Ensure that you have a high-speed network interconnect (for example, a gigabit Ethernet)providing a local network that connects all hardware nodes participating in the cluster.
19. Sybase recommends that each node in the cluster have two physically separate networkinterfaces; a primary network and a secondary network, both for cluster interconnecttraffic.
The primary and secondary networks should be physically separated from each other, andare needed for security, fault-tolerance, and performance reasons. For fault-tolerance, thetwo network cards should be on different fabrics so that a cluster survives network failure.
20. Private interconnect fabrics should not contain links to any machines not participating inthe cluster (that is, all cluster nodes should have their primary interconnect connected tothe same switch, and that switch should not be connected to any other switches or routers).
21. Adjust the shared memory for your operating system.
Adjusting the Operating System Shared Memory ParametersAdjust shared memory segments if Adaptive Server cannot obtain large memory as a singlesegment or if Backup Server stripes fail due to insufficient segments.
Depending on the number and types of devices used for backup (dump) and recovery (load),you may need to adjust the shared memory segment parameter in the operating systemconfiguration file to accommodate concurrent Backup Server processes. There are six defaultshared memory segments available for process attachments.
If any reconfiguration through sp_configure requires additional memory, Adaptive Serverallocates shared memory segments after start-up. To account for these additional segments,allocate the maximum memory available to Adaptive Server by using the allocate max sharedmemory configuration parameter. See the System Administration Guide.
1. Adaptive Server version 15.5 and later require an additional 32MB of shared memory thanearlier versions of Adaptive Server. The default size of the max memory configurationparameter is 228MB. Increase this value if you need to accommodate any additionalmemory requirement.
To query the amount of shared memory:# kctune shmmax
To increase the amount of shared memory, for example:# kctune shmmax+=33554432
The default total logical memory parameter for HP is 45,056 2K pages (88MB) on the64-bit operating system.
2. To adjust the shared memory value of the operating system, use the System AdministrationManager (SAM). After you install Adaptive Server, change any configuration parameter,procedure cache, or data cache size. This may require you to increase the value of the maxmemory configuration parameter.
Planning Your Adaptive Server Installation
Installation Guide 25
Managing Java in the Database During Installations and UpgradesIf you have enabled the Java in the database feature, create the sybpcidb database beforeinstalling or upgrading to Adaptive Server version 15.7.
1. Create the sybpcidb database. The sybpcidb database stores configurationinformation for the pluggable component interface (PCI) and all pluggable componentadapter (PCA) components. This database is used by the installpcidb script. Forexample:1> disk init2> name = "sybpcidb_dev",3> physname = "${SYBASE}/data/sybpcidb_dev.dat",4> size = "24M"5> go1> create database sybpcidb on sybpcidb_dev = 242> go
The device and database sizes depend on the Adaptive Server page size:• 2K page size – 24MB• 4K page size – 48MB• 8K page size – 96MB• 16K page size – 192MB
Run the installpcidb script only on the first node and not on any other nodes in thecluster. In addition, create only the PCI device on the first node. A single instance of thePCI configuration is shared between the nodes of a cluster.
2. Disable the Java in the database feature:1> sp_configure 'enable java', 02> go
3. Reenable the feature after you have successfully installed or upgraded to Adaptive Server15.7:1> sp_configure 'enable java', 12> go
MultipathingMultipathing is the ability of a server to communicate with the same physical or logical blockstorage device across multiple physical paths between the host bus adapters (HBA) in theserver and the storage controllers for the device, typically in Fibre Channel (FC ) or iSCSISAN environments. You can also achieve multiple connections with direct attached storagewhen multiple channels are available.
Multipathing provides connection fault tolerance, failover, redundancy, high availability, loadbalancing, and increased bandwidth and throughput across the active connections. Whenmultipathing is configured and running, it automatically isolates and identifies deviceconnection failures, and reroutes I/O to alternate connections.
Planning Your Adaptive Server Installation
26 Adaptive Server Enterprise Cluster Edition
Typical connection problems involve faulty adapters, cables, or controllers. When youconfigure multipath for a device, the multipath driver monitors the active connection betweendevices. Because multipathing is managed at the device level, when the multipath driverdetects I/O errors for an active path, it fails over the traffic to the device’s designated secondarypath. When the preferred path becomes healthy again, control can be returned to the preferredpath. So multipathing prevents single points of failure in any highly available system.
A common example of multipath connectivity is a SAN connected storage device. Usuallyone or more Fibre Channel HBAs from the host will be connected to the fabric switch and thestorage controllers will be connected to the same switch. A simple example of multipathconnectivity could be: two HBAs connected to a switch to which the storage controllers areconnected. In this case the storage controller can be accessed from either of the HBAs andhence we have multipath connectivity.
All OS platforms provide their own solutions to support multipathing. In addition there anumerous other vendors that also provide multipathing applications for all availableplatforms, such as:
• AIX – Multiple Path I/O (MPIO)• HP-UX 11.31 - Native MultiPathing (nMP)• Linux - Device-Mapper Multipath (DM)• Solaris - Multiplexed I/O (MPxIO)• AntemetA Multipathing Software for HP EVA Disk Arrays• Bull StoreWay Multipath• NEC PathManager• EMC PowerPath• FalconStor IPStor DynaPath• Fujitsu Siemens MultiPath• Fujitsu ETERNUS Multipath Driver• Hitachi HiCommand Dynamic Link Manager (HDLM)• HP StorageWorks Secure Path• NCR UNIX MP-RAS EMPATH for EMC Disk Arrays• NCR UNIX MP-RAS RDAC for Engenio Disk Arrays• ONStor SDM multipath• IBM System Storage Multipath Subsystem Device Driver (SDD)• Accusys PathGuard• Infortrend EonPath• OpenVMS• FreeBSD - GEOM_MULTIPATH and GEOM_FOX modules• Novell NetWare• Sun StorEdge Traffic Manager Software• ATTO Technology multipath driver Fibreutils package for QLogic HBAs
Planning Your Adaptive Server Installation
Installation Guide 27
• RDAC package for LSI disk controllers• lpfcdriver package for Emulex HBAs• Veritas Dynamic Multi Pathing (DMP)• Pillar Data Systems• Axiom Path• iQstor MPA
Setting Up MultipathingIf you choose to use multipathing on your system, set it up before you install Adaptive Server.
HP-UX 11.31 IO stack offers the native MultiPathing (nMP) feature, which is embedded inthe I/O stack. Mulipathing is enabled by default using nMP, and automatically detects andconfigures multipathing for all devices.
To check if there are multipath devices, use the ioscan -m dsf command.
The /dev/rdisk/diskN devices are the persistent device special files. These are the devicenames that should be used to access the multipathed devices
Planning Your Adaptive Server Installation
28 Adaptive Server Enterprise Cluster Edition

Installing Adaptive Server
Install Adaptive Server using your chosen method.
PrerequisitesComplete installation planning tasks.
Task
1. Choose an installation method:
• GUI wizard (recommended)• Console mode• Response file
2. Follow the instructions for your chosen method.
3. Perform postinstallation steps.
Mounting the CDIf you are installing using the CD, mount the CD.
The location of the mount command is site-specific and may differ from the instructionsshown here. If you cannot mount the CD drive using the path shown, check your operatingsystem documentation or contact your system administrator.
Log out, log in as root, and issue:
mount -F cdfs -o ro device_name /mnt/cdrom
Log out as root and log in again as “sybase.”
Installing Adaptive Server with the GUI WizardUse GUI mode to install Adaptive Server and related products for use.
PrerequisitesShut down all programs before running the installer.
Task
Note: Adaptive Server Enterprise 15.7 includes new major versions of Adaptive Server andmany supporting components. Installing Adaptive Server version 15.7 into the same directorywith existing products should not impact the existing products. However, installing other
Installing Adaptive Server
Installation Guide 29
products on top of Adaptive Server version 15.7 may result in one or more products notworking correctly.
Sybase strongly recommends that you install Adaptive Server version 15.7 into its owndirectory if possible. If you must install other products into the same directory, installAdaptive Server version 15.7 last.
If you already have a working Adaptive Server on your system, do not install the ClusterEdition in the same $SYBASE directory. If you must install other products into the samedirectory, install the Cluster Edition last.
If you are installing the Cluster Edition in private installation mode, Sybase recommends thatyou install Adaptive Server on each node in the cluster in its own directory, and use theinstaller for each instance in the cluster. This ensures that environment variables, soft links,and so on are set correctly for each instance.
Sybase recommends installing products as a system administrator; however, root permissionsare not required to run the installer. The installer creates the target directory (if necessary) andinstalls the selected components into that directory. At the end of the installation, you canverify the product installation. You may need to perform additional configuration proceduresbefore you can use some products.
Warning! Adaptive Server version 15.5 and later uses InstallAnywhere for its installation,while versions of Adaptive Server earlier than 15.5 and other Sybase products useInstallShield Multiplatform. Do not use both installers to install products into the samedirectory, as this creates files to be installed incorrectly and be overwritten without warning.
If you install the Cluster Edition into the same directory as earlier versions of the samecomponents, the Cluster Edition overwrites the older versions. Installing other products on topof the Cluster Edition will likely result in one or more of the products not working correctly.
InstallAnywhere supports Section 508 functionality, with these limitations in the wizard:
• Choose Install Set – the installer does not support the use of a hot key to select the type ofinstallation. You must use Tab to change the focus and the spacebar to choose.
• Choose Product Features – does not allow you to choose an option using a keystroke.You must use a mouse to choose features.
At the end of the installation, you can verify the product installation. You may need to performadditional configuration procedures before using some products.
1. Insert the Adaptive Server installation media in the appropriate drive, or download andextract the Adaptive Server installation image from the Sybase Product Download Center(SPDC) or the SAP Service Marketplace (SMP).
2. Mount the disk:mount -F cdfs -o ro,rr <CDROM device> /cdrom
3. Launch the installer:
Installing Adaptive Server
30 Adaptive Server Enterprise Cluster Edition
/cdrom/setup.bin
4. Select the language.
5. On the Introduction screen, click Next.
6. Accept the default directory or enter a new path, then click Next.
If you see a Choose Update Installation pane, this means you have an earlier version ofthe server, and you need to perform an upgrade rather than a new installation. See AdaptiveServer Upgrades on page 87.
7. Select the type of installation:
Option Description
Typical (Default) Installs the default components. This is recommended for most users.
Full Installs every Adaptive Server component, including all the supported languagemodules.
Customize Lets you select the components to install. Some components are automaticallyinstalled if they are required to run your selected components.
8. Select the installation type for the Adaptive Server suite. If you are updating a preexistingserver, you do not see this step. The available types to be selected are different for differentplatforms.
• Licensed copy of Adaptive Server Enterprise Cluster Edition Suite – choose this if youhave a licensed copy of Adaptive Server.
• Evaluation Edition of Adaptive Server Enterprise Cluster Edition Suite – choose this ifyou would like to evaluate Adaptive Server. If you choose the Evaluation Edition, thesoftware will work for 30 days from the original installation date.
9. Choose the most appropriate region, read the license terms, then click I agree. ClickNext.
10. If you are installing a licensed copy of Adaptive Server Enterprise Cluster Edition, selectthe license type:
• CP – CPU license• SF – standby CPU license• DT – development and test license• AC – OEM application deployment CPU license• BC – application deployment standby CPU license• Unknown – without a license
11. Configuring your server for e-mail notification enables designated users to receiveinformation about license management events requiring attention. Provide the followinginformation:
• SMTP server host name• SMTP server port number
Installing Adaptive Server
Installation Guide 31
• E-mail return rddress• Recipient e-mail addresses• Message severity that triggers e-mail messages
12. In the pre-installation summary, verify the installation type and that you have enough diskspace for the installation. Click Next.The installation status window displays the result of the installation process.
13. Select enable or disable to remember the Adaptive Server password, then click Next tospecify whether to have the ASE plug-in remember passwords.
14. If you chose a typical installation or selected the Sybase Control Center remote commandand control agent for Adaptive Server in a custom installation, the installer asks if you wantto configure SCC. If you choose to configure SCC, you see a message about discoveryservices, and you can configure the UDP or JINI adapters.
If you select JINI adapter, enter the host name, port number, and heart beat period.
15. Enable and order the security login module.
16. Enter the RMI port.
17. Choose whether you want to enable SCC shared disk mode. If you do, enter the SCCinstance name.
18. Review the summary of selections you made for SCC, then click Next. The installerconfigures the SCC agent.
19. Source the environment variables needed for Adaptive Server products by running theSYBASE.csh script file after exiting the installer.
Next
You have installed Adaptive Server and its related products. See the Cluster Users Guide to setup your cluster, Sybase Control Center Installation Guide to install the SCC management UIon your server, and the System Administration Guide for more advanced topics.
Installing Adaptive Server in Console ModeChoose command line installation if you prefer a nonwindowing interface or for developingcustom installation scripts.
PrerequisitesLaunch the installer in console mode. If the installer launches automatically, click Cancel tocancel the GUI installation, then launch the setup program from a terminal or console.
TaskThe steps for installing components in an interactive text mode are the same as those describedin installing in GUI mode, except you use setup -i console to execute the installer from thecommand line, and you enter text to select installation options.
Installing Adaptive Server
32 Adaptive Server Enterprise Cluster Edition
1. At the command line, enter:setup.bin -i console
The installation program starts.
2. The flow of the installation is identical to a GUI installation, except output is written to aterminal window and responses are entered using the keyboard. Follow the remainingprompts to install Adaptive Server, then specify the basic settings for your installationin .
Installing Adaptive Server Using a Response FileUnattended or silent installations are typically used to update multiple systems across theenterprise.
To perform a silent, or "unattended" installation, run the installer and provide a response filethat contains your preferred installation configuration.
Creating a Response FileBy saving installation configuration information into a response file during the initial GUIinstallation, you can perform subsequent installations of Adaptive Server using a silent—orunattended—method.
To create a response file when installing in GUI or console mode, specify the -r command lineargument. The -r argument records your responses to the installation wizard prompts andcreates a response file when the InstallAnywhere wizard exits. The response file is a text filethat you can edit to change any responses prior to using it in any subsequent installations. Youcan find a sample response file at installer image/sample_response.txt.
Create a response file during GUI installation by specifying the -r command line argument,and, optionally, specifying the name of your response file:
setup.bin -r response_file_name
where:
• -r – specifies the command line argument.• (Optional) response_file_name – is the absolute path of the file into which the installation
information is stored, such as /tmp/responsefile.txt.
Note: The directory path you specify must already exist.
Installing Adaptive Server
Installation Guide 33
Installing in Silent ModeTo perform a silent, or unattended installation, run the installer and provide a response file thatcontains your preferred installation configuration.
PrerequisitesUse setup.bin -r responseFileName to generate a installation response file duringa console or GUI installation.
TaskRun the following, where responseFileName is the absolute path of the file name containingthe installation options you chose:setup.bin –f responseFileName -i silent-DAGREE_TO_SYBASE_LICENSE=true -DRUN_SILENT=true
Note: You must agree to the Sybase License Agreement when installing in silent mode. Youcan either:• Include the option -DAGREE_TO_SYBASE_LICENSE=true in the command line
argument, or,• Edit the response file to include the property AGREE_TO_SYBASE_LICENSE=true.
Except for the absence of the GUI screens, all actions of InstallAnywhere are the same, and theresult of an installation in silent mode is exactly the same as one done in GUI mode with thesame responses.
Command Line OptionsOptions for installing or uninstalling Adaptive Server in console mode.
Option Purpose
-i swing Uses GUI mode.
-i console Uses the console interface mode, where messages during installation appear on theJava console and the wizard is run in console mode.
-i silent Installs or uninstalls the product in silent mode, where the installation or uninstal-lation is performed with no user interaction.
-D Passes custom variables and properties. For example, to override the default in-stallation directory when you run the installer, enter:
install_launcher_name-DUSER_INSTALL_DIR=/sybase
-r Generates a response file and a reference.
-f References response files.
Installing Adaptive Server
34 Adaptive Server Enterprise Cluster Edition

Option Purpose
-l Sets the installer’s locales.
-\? Displays the installer help.
Uninstalling Adaptive ServerRun the uninstaller to remove Adaptive Server.
Prerequisites
Shut down all servers before uninstalling Adaptive Server.
Task
Note: The uninstallation process reverses only those actions originally performed by theinstaller, leaving intact any files or registry entries you created after the installation. Youremove these after you complete the uninstallation.
1. Execute the uninstall program:$SYBASE/sybuninstall/ASESuite/uninstall
2. Click Next in the Uninstall Welcome window.
3. Choose one of the following, then click Next:
• Complete Uninstall – uninstalls everything originally installed by the installer.• Uninstall Specific Features – displays a list of features. If any unselected products/
components are dependent on features selected for uninstall, you can still proceed withthe uninstall but dependent features are not uninstalled.
You see a window indicating that the uninstallation process is being performed. There is noprogress bar.
Note: You may need to confirm the deletion of some files that have been modified sinceinstallation.
4. When you see the final window, click Done to exit the uninstallation program.
Removing an Existing Adaptive ServerRemove an existing Adaptive Server.
1. From $SYBASE, enter:
rm servername.*
2. Change to $SYBASE/$SYBASE_ASE/install and run:
Installing Adaptive Server
Installation Guide 35
rm RUN_servername.*rm servername.*
3. Edit $SYBASE/interfaces, to remove all references to the Adaptive Server.
4. Remove any operating system files for existing database devices.
Installing Adaptive Server
36 Adaptive Server Enterprise Cluster Edition
Installing Components from the PC-Client
The PC-Client CD contains several components that are each packaged with their owninstaller. When you insert the PC-Client CD, a menu program launches automatically. Themenu program lists the components that can be installed from the CD and allows you to installthem one at a time. Before installing any products, review the readme.txt file, whichcontains a brief description of each of the products, any product or component dependencies,and last-minute instructions or changes.
The PC-Client CD contains 32-bit and 64-bit SDK. It installs 32-bit SDK on 32-bit OS; and64-bit SDK on 64-bit OS.
1. Verify that your computer has sufficient disk space for each product.
2. If you are unloading components, log in using an account with administrator privileges.
3. Close any open applications or utilities to free memory and system resources.
4. Go to Start > Run to start the installation program, and enter the following, where X is thedirectory into which you have copied the PC-Client installation files:X:\autorun.exe
5. Select Client Components 15.7. You see the Welcome window.
6. Select a country, and agree to the licensing terms.
7. Enter the directory path. If you specify a destination that contains an earlier version of theserver, you see Choose Update Installation, and you can select the features to update.
8. If you are installing a new server, choose the type of installation:
Typical Install Installs the default components that most users need.
Full Install Installs every component on the CD.
Custom Install Allows you to select the components to install. Certain componentsare automatically installed if they are required to run other selectedcomponents. Specify the components to install.
9. The Summary window displays every component to be installed by the installer, therequired disk space, and the available disk space.
10. If the target directory does not have enough free space, the available space appears in red.Click Previous to return to the previous window and change your selections, or Cancel toquit the installer.
Installing Components from the PC-Client
Installation Guide 37
Creating a Response FileBy saving installation configuration information into a response file during the initial GUIinstallation, you can perform subsequent installations of Adaptive Server using a silent—orunattended—method.
To create a response file when installing in GUI or console mode, specify the -r command lineargument. The -r argument records your responses to the installation wizard prompts andcreates a response file when the InstallAnywhere wizard exits. The response file is a text filethat you can edit to change any responses prior to using it in any subsequent installations. Youcan find a sample response file at installer image/sample_response.txt.
Create a response file during GUI installation by specifying the -r command line argument,and, optionally, specifying the name of your response file:
setup.bin -r response_file_name
where:
• -r – specifies the command line argument.• (Optional) response_file_name – is the absolute path of the file into which the installation
information is stored, such as /tmp/responsefile.txt.
Note: The directory path you specify must already exist.
Installing the Client in Unattended, Silent ModeAfter running the installer in GUI mode and recording the responses into a response file, editthe file to customize the responses.To install in unattended, silent mode, run:setupConsole.exe –f responseFileName -i silent-DAGREE_TO_SYBASE_LICENSE=true
where responseFileName is the absolute path of the file name containing the installationoptions you chose.
Agree to the Sybase License Agreement when installing in silent mode by either:• Including this text in the command-line argument -
DAGREE_TO_SYBASE_LICENSE=true, or,• Editing the response file to include the property
AGREE_TO_SYBASE_LICENSE=true.The only difference when you install the client in silent mode is the absence of the GUIscreens. All actions and responses are the same as using InstallAnywhere.
Warning! Sybase recommends that, when you run a silent installation, you use thesetupConsole.exe executable, which runs in the foreground. The normal setup.exe
Installing Components from the PC-Client
38 Adaptive Server Enterprise Cluster Edition
executable runs in the background, giving you the impression that the installation hasterminated, and results in additional installation attempts using the silent installation. Multipleinstallations at the same time may corrupt the Windows Registry and lead to a failure to restartthe operating system.
Uninstalling PC-ClientChoose one of two methods to remove PC-Client from a Windows machine.
Actions performed by the installer are removed during an uninstallation process. Files, orregistry entries created after installation are not removed and must be manually removed whenthe installation process has finished.To uninstall PC-Client from a Windows machine:
• Run the uninstall executable at:%SYBASE%\sybuninstall\PCClient\uninstall.exe
• Use Control Panel > Add or Remove Programs.
Installing Components from the PC-Client
Installation Guide 39
Installing Components from the PC-Client
40 Adaptive Server Enterprise Cluster Edition
Creating and Starting the Cluster
You can configure and start the cluster server after successfully installing Adaptive Server.
1. Read Before Creating a Cluster on page 44.2. Set the $SYBASE environment and start the Sybase Control Center remote command and
control agent on each node of the cluster.3. Configure the cluster using:
• The sybcluster utility• Sybase Control Center• The Adaptive Server plug-inSybase recommends that you use either option to create and manage your shared-diskcluster. However, you can also manually configure and manage the cluster.
4. (Optional) Configure the auxiliary servers: XP Server, Backup Server, and Job Scheduler.
If the installation or start-up fails, see Cleaning Up After a Failed Installation on page 53.
Differences Between Private and Shared InstallationsThe installation process differs between private and shared installations.
Regardless of installation type, each instance of Adaptive Server in the cluster shares:
• All databases and database devices (for example, all instances share the same masterdatabase).
• A quorum device, which coordinates instances with the cluster.
Shared Installation Private Installation
Each instance of Adaptive Server in the clustershares:
• A common $SYBASE directory
• The interfaces file, unless LDAP isused for server lookup
• All configuration files, including the clusterinput file
• All server binaries (for example, data-server) and all scripts (for example, in-stallmaster)
Each instance of Adaptive Server in the clustermaintains its own:
• $SYBASE directory
• Interfaces file, unless LDAP is used for serverlookup
• Server configuration file
See the Cluster Users Guide.
Creating and Starting the Cluster
Installation Guide 41
Cluster Edition Preinstallation ChecklistBefore you begin the installation process, identify your settings and determine how to set upyour environment.
Use this checklist to determine the configuration for an installation of Adaptive Server ClusterEdition.
Configuration Value
Will the cluster installation support a shared (NFS), or a private instal-lation?
Will the cluster use LDAP (recommended for private installations), orinterfaces files for server lookup information?
Will the cluster support Java in the database via a third-party JVM?
Will the cluster supports a Veritas Cluster Server (VCS) for managingapplication servers in the clustered environment?
Will the cluster use a single or multiple Backup Servers?
Where will the $SYBASE installation directory reside? (Private in-stallations require a separate $SYBASE installation directory for eachinstance.)
How many instances will be in the cluster?
What will the names of the clusters in the instance be?
What is the Domain Name Service for the network on which the clusterwill run? (The Sybase Control Center agent and the sybcluster utilitydo not function properly if the DNS entries are not entered correctly foreach node.)
How many raw devices will each database device use? (For the ClusterEdition, you must create all devices, database devices, and quorumdevices as raw devices on shared disks.)
How many agents will there be in the cluster? (Sybase recommends thatyou use one node for each of the instances in the cluster, with two ormore engines per instance.)
What raw devices will each database device use? (You must create alldevices, database devices, and quorum devices as raw devices on shareddisks.(
Creating and Starting the Cluster
42 Adaptive Server Enterprise Cluster Edition
Configuration Value
What is the range of port numbers each instance will use to exchangemessages with other instances via the private interconnect? (Chooseunique port numbers that are not in use by other applications.)
Local user temporary databases do not require shared storage and canuse local file systems created as private devices. However, local systemtemporary databases you create during the cluster configuration can useonly shared disks. See Using Temporary Databases in the Cluster UsersGuide.
Note: The Adaptive Server plug-in, Sybase Control Center, and syb-cluster supply default values if your system does not have an existingstandard.
What is the query or listening port number for each instance? (Chooseunique port numbers that are not in use by other applications.)
What are the IP addresses or network names of the private primary andsecondary network cards on each node? (The only network protocolcurrently supported is UDP.)
Creating a Simulated Cluster on a Single NodeTest the server configuration and installation.
Sybase recommends that you configure each instance on a different node, that is, one node foreach instance. However, for a testing environment, you can create a simulated cluster on asingle node with all instances running on that node.
1. For best performance make sure the number of engines in all instances running on a singlenode do not exceed the number of CPUs on that node.
2. Verify the value for runnable process search count. Sybase recommends that you use avalue of 3 (the default). You can set this using the sp_configure stored procedure.
Starting and Stopping Sybase Control Center AgentSybase Control Center agent for Adaptive Server Enterprise Cluster Edition enables thedistributed management of the cluster. Set the $SYBASE environment variables and start anSCC agent on each node to host instances in the cluster.
There are several ways to run SCC. You can:
• Run SCC from the command line in the foreground• Run SCC from the command line in the background• Set up a daemon to run it as a service
Creating and Starting the Cluster
Installation Guide 43
For instructions, see Get Started > Launching Sybase Control Center > Starting andStopping Sybase Control Center in UNIX in the SCC online help.
1. Source either the SYBASE.csh or SYBASE.sh environment script.
2. Start the SCC agent:$SYBASE/SCC-3_2/bin/scc.sh
The SCC agent creates and sends output to one of the following log files:• (Default) If SCC shared-disk mode is not enabled: $SYBASE/SCC-3_2/log/
agent.log
• If SCC shared-disk mode is enabled: $SYBASE/SCC-3_2/instances/<hostname>/log/agent.log
3. Verify that the SCC agent is running. After you run SCC script, the SCC console promptappears. At this prompt, enter the following:scc-console> status
You should see a status message similar to:Agent Home: /remote/perf_archive/olwen/Install_Testing/157CE_C3/SCC-3_2/instances/solstrs3Connection URL: service:jmx:rmi:///jndi/rmi://solstrs3:9999/agentStatus: RUNNING
From the SCC console, you can also shut down the agent:scc-console> shutdown
Before Creating a ClusterAfter you install Sybase Control Center, perform these tasks to so you can create a cluster.
The sybcluster utility does not create a run_server file when they create a cluster. Afteryou create a cluster, you must start this cluster and each instance using sybcluster or SybaseControl Center. You cannot start this cluster from the command line using run_serverfiles.
Creating a Cluster With Storage Foundation for Sybase ClusterEdition
There are steps you must perform for the Veritas Storage Foundation, and for your operatingsystem.
Before you create a cluster with Storage Foundation for Sybase Cluster Edition, review Usingthe Cluster Edition with the Veritas Cluster Server in the Cluster Users Guide.
Creating and Starting the Cluster
44 Adaptive Server Enterprise Cluster Edition

Worksheet for Creating a ClusterBefore creating a cluster, gather your cluster information.
Table 3. Configuration Values for Creating a Cluster
Parameter and description (defaultvalues)
Your Information
Cluster name:
• Number of instances (4)
• Number of agents (4)
Is the cluster to be configured using a private$SYBASE installation? (N)
The page size in kilobytes (2KB)
Full path and name for the master device:
• Size of master device (30MB)
• Size of master database (13MB)
Sybase system procedure device – full path andname for sybsystemprocs device:
• Size of sybsystemprocs device (152MB)
• Size of sybsystemprocs database (152MB;minimum 140MB)
System database device – full path and name ofsystem database device:
• Size of system database device (6MB)
• Size of system database (6MB)
• Does this cluster have a secondary network?(Y)
Quorom device:
• Full path and name for the quorum device
• Trace flags
Creating and Starting the Cluster
Installation Guide 45
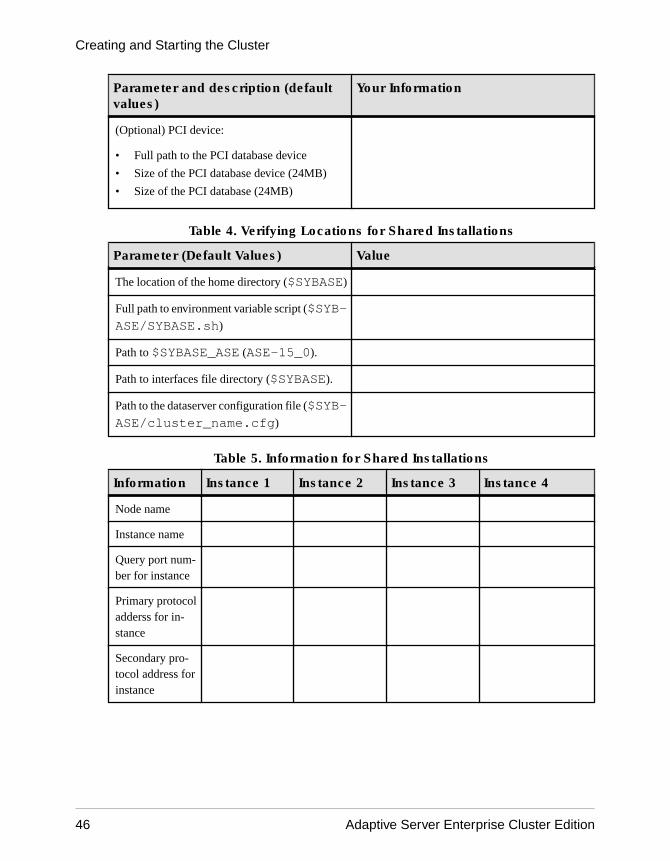
Parameter and description (defaultvalues)
Your Information
(Optional) PCI device:
• Full path to the PCI database device
• Size of the PCI database device (24MB)
• Size of the PCI database (24MB)
Table 4. Verifying Locations for Shared Installations
Parameter (Default Values) Value
The location of the home directory ($SYBASE)
Full path to environment variable script ($SYB-ASE/SYBASE.sh)
Path to $SYBASE_ASE (ASE-15_0).
Path to interfaces file directory ($SYBASE).
Path to the dataserver configuration file ($SYB-ASE/cluster_name.cfg)
Table 5. Information for Shared Installations
Information Instance 1 Instance 2 Instance 3 Instance 4
Node name
Instance name
Query port num-ber for instance
Primary protocoladderss for in-stance
Secondary pro-tocol address forinstance
Creating and Starting the Cluster
46 Adaptive Server Enterprise Cluster Edition
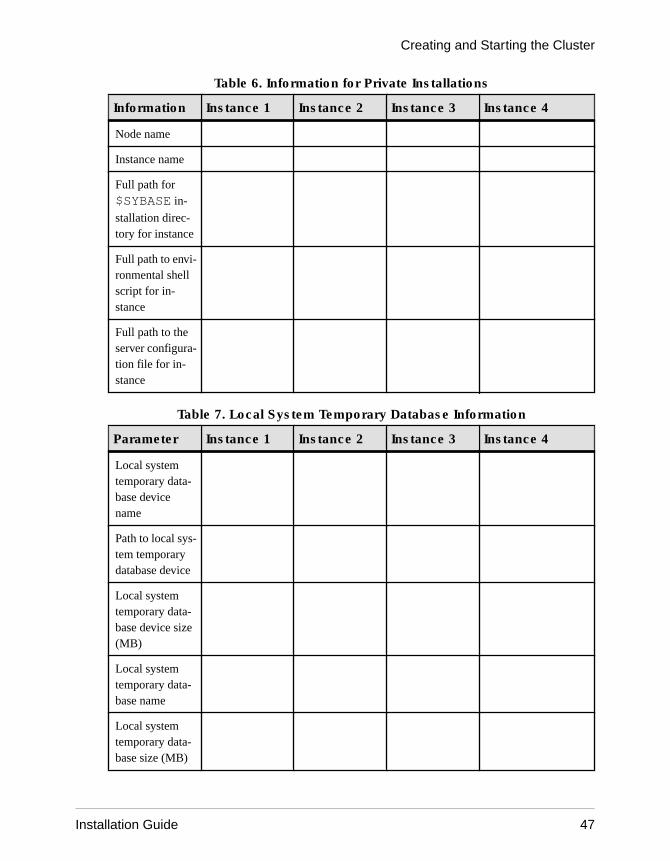
Table 6. Information for Private Installations
Information Instance 1 Instance 2 Instance 3 Instance 4
Node name
Instance name
Full path for$SYBASE in-
stallation direc-tory for instance
Full path to envi-ronmental shellscript for in-stance
Full path to theserver configura-tion file for in-stance
Table 7. Local System Temporary Database Information
Parameter Instance 1 Instance 2 Instance 3 Instance 4
Local systemtemporary data-base devicename
Path to local sys-tem temporarydatabase device
Local systemtemporary data-base device size(MB)
Local systemtemporary data-base name
Local systemtemporary data-base size (MB)
Creating and Starting the Cluster
Installation Guide 47
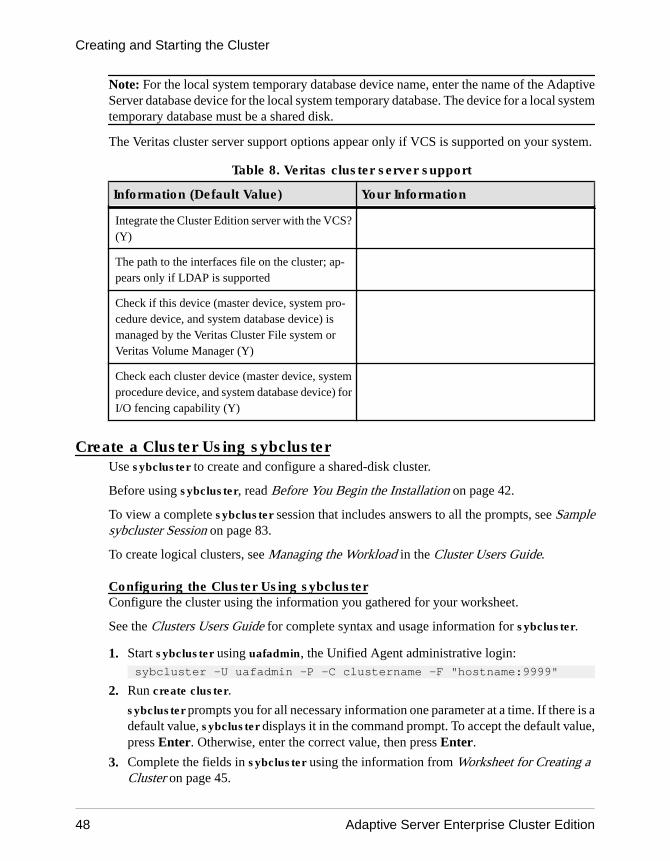
Note: For the local system temporary database device name, enter the name of the AdaptiveServer database device for the local system temporary database. The device for a local systemtemporary database must be a shared disk.
The Veritas cluster server support options appear only if VCS is supported on your system.
Table 8. Veritas cluster server support
Information (Default Value) Your Information
Integrate the Cluster Edition server with the VCS?(Y)
The path to the interfaces file on the cluster; ap-pears only if LDAP is supported
Check if this device (master device, system pro-cedure device, and system database device) ismanaged by the Veritas Cluster File system orVeritas Volume Manager (Y)
Check each cluster device (master device, systemprocedure device, and system database device) forI/O fencing capability (Y)
Create a Cluster Using sybclusterUse sybcluster to create and configure a shared-disk cluster.
Before using sybcluster, read Before You Begin the Installation on page 42.
To view a complete sybcluster session that includes answers to all the prompts, see Samplesybcluster Session on page 83.
To create logical clusters, see Managing the Workload in the Cluster Users Guide.
Configuring the Cluster Using sybclusterConfigure the cluster using the information you gathered for your worksheet.
See the Clusters Users Guide for complete syntax and usage information for sybcluster.
1. Start sybcluster using uafadmin, the Unified Agent administrative login: sybcluster -U uafadmin -P -C clustername -F "hostname:9999"
2. Run create cluster.
sybcluster prompts you for all necessary information one parameter at a time. If there is adefault value, sybcluster displays it in the command prompt. To accept the default value,press Enter. Otherwise, enter the correct value, then press Enter.
3. Complete the fields in sybcluster using the information from Worksheet for Creating aCluster on page 45.
Creating and Starting the Cluster
48 Adaptive Server Enterprise Cluster Edition
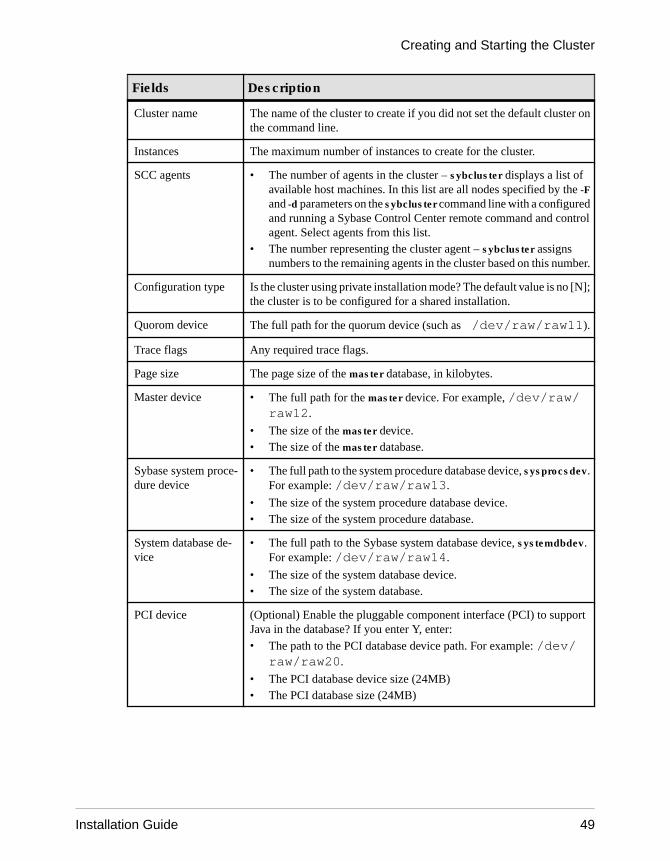
Fields Description
Cluster name The name of the cluster to create if you did not set the default cluster onthe command line.
Instances The maximum number of instances to create for the cluster.
SCC agents • The number of agents in the cluster – sybcluster displays a list ofavailable host machines. In this list are all nodes specified by the -Fand -d parameters on the sybcluster command line with a configuredand running a Sybase Control Center remote command and controlagent. Select agents from this list.
• The number representing the cluster agent – sybcluster assignsnumbers to the remaining agents in the cluster based on this number.
Configuration type Is the cluster using private installation mode? The default value is no [N];the cluster is to be configured for a shared installation.
Quorom device The full path for the quorum device (such as /dev/raw/raw11).
Trace flags Any required trace flags.
Page size The page size of the master database, in kilobytes.
Master device • The full path for the master device. For example, /dev/raw/raw12.
• The size of the master device.• The size of the master database.
Sybase system proce-dure device
• The full path to the system procedure database device, sysprocsdev.For example: /dev/raw/raw13.
• The size of the system procedure database device.• The size of the system procedure database.
System database de-vice
• The full path to the Sybase system database device, systemdbdev.For example: /dev/raw/raw14.
• The size of the system database device.• The size of the system database.
PCI device (Optional) Enable the pluggable component interface (PCI) to supportJava in the database? If you enter Y, enter:• The path to the PCI database device path. For example: /dev/
raw/raw20.
• The PCI database device size (24MB)• The PCI database size (24MB)
Creating and Starting the Cluster
Installation Guide 49

Fields Description
Secondary network Does this cluster have a secondary network? (Y).• If you enter Y to a secondary network, sybcluster uses the default
port number of 15100 as the starting port number for the range of portnumbers required so that the instances can exchange messages, andreserves that number of ports, starting with the default value.
Note: Adaptive Server uses several sockets for each interconnect.The number of ports required for each instance is 5, multiplied by themaximum number of instances.
• If you enter N to a secondary network, sybcluster asks for the be-ginning port number, and calculates the number of additional portsrequired and reserves that number of ports. The default value is15100.
4. Skip this step if the cluster uses a private installation. For shared installations, provide:
• The $SYBASE home directory (such as /remote/var/sybase).
• The full path to the “.sh” environment shell script (such as /remote/var/sybase/SYBASE.sh).
• The Adaptive Server home directory (such as /remote/var/sybase/ASE-15_0).
• The directory containing the interfaces file (such as /remote/var/sybase).sybcluster adds the correct cluster and instance information during configuration.
Note: Ensure that the interfaces file does not already contain the cluster or instanceinformation.
• The full path to the dataserver configuration file (such as /remote/var/sybase/mycluster.cfg). sybcluster must be able to find this file during configuration.
5. sybcluster displays the node name and prompts for values for each instance, one node at atime. If you are using:
• A shared configuration, provide:• Instance name• Query port number for the instance. Ensure that it is available and not in use by
other applications.• The primary protocol address for the instance. For example, 10.0.1.1.• The secondary protocol address for the instance (if you answered Y to a secondary
network). For example, 10.0.1.2.• A private configuration, provide:
• Instance name• The $SYBASE home directory
• The environmental shell script path• The Adaptive Server home directory
Creating and Starting the Cluster
50 Adaptive Server Enterprise Cluster Edition

• The full path to the server configuration file
Note: The path for the server configuration file can be the same or different for eachinstance.
• Interfaces files for server lookup, provide:• Instance name.• The interface file query port number• The primary protocol address• The secondary protocol address
• A local system temporary database device, provide:• The name of the Adaptive Server database device for the local system temporary
(LST) database.
Note: You must create local system temporary database on a shared disk.
• The LST device path. For example, /dev/raw/raw15.
• The LST device size.
Note: If you place all LST databases on the same device, the device size must belarge enough for all LST databases.
• The LST database name.• The LST database size.
Note: sybcluster asks if you want to add another instance. If you enter Y, sybclusterrepeats this step for the next instance.
6. sybcluster asks if you want to save the cluster configuration.
If you enter Y, sybcluster stores the configuration in an XML file that you can edit andreplay using the sybcluster command:create cluster cluster_name file file_name
7. sybcluster asks if you want to create the cluster.
If you enter Y, the configuration process begins, and sybcluster:
a) Checks to see if VCS is supported on your system. If so, sybcluster asks whether tointegrate the cluster database with VCS [Y]. If yes, sybcluster prompts for:
• The path to the interfaces file for each instance, unless LDAP is supported.• Whether to check if the master database, system procedure device, and system
database devices are managed by the VCS Volume Manager or Veritas Cluster FileSystem [Y]. If yes, sybcluster reports status for each device and asks if you want tocontinue.
b) If you answer no, sybcluster prompts for the path to the interfaces file for eachinstance, unless LDAP is supported.
c) sybcluster asks if you want to check if each cluster device supports I/O fencing. If youanswer yes, sybcluster checks all devices and reports the I/O fencing capability ofeach one.
Creating and Starting the Cluster
Installation Guide 51
Starting and Stopping a Cluster Using sybclusterThe sybcluster utility allows you to start and stop a cluster.
1. Start sybcluster if it is not already running:sybcluster -U uafadmin -P -C cluster_name -F "node_name[:port_num] [,node_name[:port_num]]..."
This statement identifies the default cluster and the Sybase Control Center agents on eachnode in the cluster. If you do not enter this information on the sybcluster command line,you can enter it in the following step. See the Clusters Users Guide.
This example starts “mycluster” on “blade1”, “blade2”, and “blade3”:sybcluster -U uafadmin -P -C mycluster -F "blade1,blade2,blade3"
2. Connect to the cluster:connect
3. Start the cluster:start cluster
NextTo stop a cluster, enter:shutdown cluster
Adaptive Server waits for all statements and transactions to complete before shutting down thecluster.
Verifying the Cluster ConfigurationOnce sybcluster is running, and you connect to and start the cluster, you can verify that boththe cluster and cluster configuration.
1. Verify that the cluster is running:show cluster status
lunch> show cluster statusINFO - Listening for the cluster heartbeat. This may take a minute. Please wait... (lunch::AseProbe:434)
Id Name Node State Heartbeat -- ------ ----------------- ----- --------- 1 burger tigger.sybase.com Up Yes 2 fries tigger.sybase.com Up Yes -- ------ ----------------- ----- ---------lunch>
2. Verify the cluster configuration:show cluster config
Creating and Starting the Cluster
52 Adaptive Server Enterprise Cluster Edition
Starting the Cluster When the Operating System StartsYou can configure the host system to start the Adaptive Server cluster automatically; theoperating system starts by running the Sybase Control Center agent on the host system andexecuting the sybcluster commands using a shell script.
1. Start Sybase Control Center, and verify that it started successfully.
2. Use sybcluster -i to pass a command file (with a name such as asece1_startup) thatprovides instructions to start the instances on your system, such as:connect to asece15start instance asece1quit
3. To start the cluster, use a sybcluster command such as:sybcluster -U uafadmin -P -F host1:9999,host2:9999 -i asece1_startup
Cleaning Up After a Failed Cluster InstallationIf your cluster installation is unsuccessful, remove any residual files or operating systemprocesses to prevent unexpected errors in subsequent installations.
1. Terminate srvbuildres or dataserver processes if either are left running.
2. Stop the SCC agents on all nodes.
3. Remove $SYBASE/SCC-3_2/instances/instance_name .
4. Remove any entries for the cluster or cluster instances from the interfaces file.
5. Remove the cluster name.cfg file if it exists after the last attempt.
6. Restart the Sybase Control Center agent.
Auxiliary ServersYou can configure the auxiliary servers such as Backup Server, XP Server, and Monitor Serverwith the sybcluster utility.
Cluster Edition version 15.5 and later allows a cluster to use multiple Backup Servers with oneof these methods:
• Dedicated method – each instance is assigned a specific Backup Server.• Round-robin method – at the time of the dump or load command, the Cluster Edition
assigns the instance a Backup Server from a group according to availability.• A single Backup Server named SYB_BACKUP
Creating and Starting the Cluster
Installation Guide 53
See Using Backup Server in a Clustered Environment in the Cluster Users Guide.
Backup Servers in a shared-disk cluster environment are available across all nodes of thecluster as a single Backup Server, or to operate on only one instance in the cluster. You canconfigure the Backup Server on any node of the cluster, and you can provide additional hostsand port numbers on which Backup Server can start if its current node goes down.
Execute the dump and load commands from any node in the cluster. Once issued, the localinstance services the dump and load commands and routes them to the cluster’s BackupServer. The instances attempt to connect to Backup Server using the order specified in theinterfaces file. If Backup Server is not running on any of the nodes in the cluster, the instanceon which you issued the dump or load command starts Backup Server, if Backup Server isconfigured to run on this node in the interfaces file. If multiple Backup Servers are configured,the Backup Server is assigned based on whether the configuration is in dedicated or round-robin mode.
You can install and start Backup Server using sybcluster, which prompts you for requiredinformation.
The Backup Server binary ($SYBASE/$SYBASE_ASE/bin/backupserver) isinstalled when you install Adaptive Server version 15.7 Cluster Edition.
Configuring Backup Server Using sybclusterYou can configure Backup Server with sybcluster.
1. Start sybcluster.For example, to start sybcluster and specify Sybase Control Center agents on the nodes"blade1," "blade2," and "blade3," enter:sybcluster -U uafadmin -P -F "blade1:1234,blade2:2345,blade3:3456"
Note: Sybase Control Center agents must be running on all nodes in the cluster to verifythat the selected ports are available.
2. Connect to the cluster. For example, to connect to "mycluster," enter:connect to mycluster
3. If the cluster is not running, start it. Enter:start cluster
4. To create one or multiple Backup Servers for the cluster, enter:create backupserver
5. sybcluster prompts you:Do you want to create multiple Backup Servers?
a) If you answer Y, sybcluster prompts for:
• A routing policy for the multiple Backup Servers. The choices are:• 1 – dedicated
Creating and Starting the Cluster
54 Adaptive Server Enterprise Cluster Edition

• 2 – round robin• Each Backup Server name. The default value is "cluster_name_BS." For example,
"mycluster_BS."• The path to each Backup Server log file.• The listening port for each Backup Server.
b) If you answer N, sybcluster prompts you to configure Backup Server on the hosts, oneby one.
• The Backup Server name. The default value is "cluster_name_BS." For example,"mycluster_BS."
• The backup server listening port for each node in the cluster.
Sybase recommends that you configure Backup Server on all nodes so that the BackupServer can be started on any node. In some cases where Backup Server is notconfigured on all nodes, Adaptive Server cannot start Backup Server when BackupServer is not running. This happens when the dump command is initiated on a nodethat does not have Backup Server configured.
You can add or remove Backup Server from nodes at a later stage.
Installing Job SchedulerAll instances in the cluster share a single Job Scheduler. Set up Job Scheduler so that, in theevent the instance on which it is running fails, Job Scheduler can fail over to another node.
1. Create a device called sybmgmtdev with a size of at least 90MB on a shared raw devicethat is accessible to all instances in the cluster.
2. Run the installjsdb script:
isql –Usa –Psa_password –Sservername –i $SYBASE/$SYBASE_ASE/scripts/installjsdb
Note: You must have the directory with the location of the isql executable ($SYBASE/$SYBASE_OCS/bin) in your path.
The installjsdb script looks for the sybmgmtdb database. If it exists, the scriptcreates Job Scheduler tables and stored procedures. If it does not exist, the script looks for asybmgmtdev device on which to create the sybmgmtdb database, tables, and storedprocedures.
Note: If the installjsdb script finds neither a sybmgmtdev device nor a sybmgmtdbdatabase, it creates a sybmgmtdb database on the master device. Sybase stronglyrecommends that you remove the sybmgmtdb database from the master device to makerecovery easier in the case of a disk failure.
3. Create a directory services entry for the JSAGENT in the interfaces file using dscp,dsedit, or a text editor as appropriate. Sybase suggests that you name the entry“clustername_JSAGENT”.
Creating and Starting the Cluster
Installation Guide 55
To enable high availability failover, the JSAGENT entry must contain master and queryrows for each node in the cluster. For example, to add a JSAGENT entry for the cluster“mycluster” with two nodes, the syntax might be:mycluster_JSAGENT master tcp /dev/tcp node_name1 17780 query tcp /dev/tcp node_name1 17780 master tcp /dev/tcp node_name2 16780 query tcp /dev/tcp node_name2 16780
The node name must match the name returned by the uname -n command executed at theUNIX prompt. For example, on host "myxml1," uname -n returns the value"myxml1.sybase.com," and on host "myxml2", uname -n returns the value“myxml2.sybase.com.” The correct entry for JSAGENT is:mycluster_JSAGENT master tcp /dev/tcp myxmll.sybase.com 17780 query tcp /dev/tcp myxmll.sybase.com 17780 master tcp /dev/tcp myxml2.sybase.com 16780 query tcp /dev/tcp myxml2.sybase.com 16780
mycluster_JSAGENT master tcp /dev/tcp hostname1 17780 query tcp /dev/tcp hostname1 17780 master tcp /dev/tcp hostname2 16780 query tcp /dev/tcp hostname2 16780
The host name for the JSAGENT entry must be identical to the host name of the instances.For example, instance 1 has an entry with "asekernel1.sybase.com" and instance 2 has"asekernel2":INSTANCE_1 master tcp /dev/tcp asekernel1.sybase.com 17700 query tcp /dev/tcp asekernel1.sybase.com 17700INSTANCE_2 master tcp /dev/tcp asekernel2 16700 query tcp /dev/tcp asekernel2 16700
The correct entry for JSAGENT should have:mycluster_JSAGENT master tcp /dev/tcp asekernel1.sybase.com 17780 query tcp /dev/tcp asekernel1.sybase.com 17780 master tcp /dev/tcp asekernel2 16780 query tcp /dev/tcp asekernel2 16780
Note: You must specify a port not currently in use.
See Directory Services in the System Administration Guide for more information ondirectory services.
4. Using sp_addserver, create an entry in the sysservers table for the cluster. Forexample:sp_addserver SYB_JSAGENT, null, mycluster_JSAGENT
Creating and Starting the Cluster
56 Adaptive Server Enterprise Cluster Edition

See the Reference Manual: Commands for more information on sp_addserver.
5. Enable Job Scheduler:sp_configure "enable job scheduler", 1
6. To start Job Scheduler, you can either restart the server, or execute:use sybmgmtdb�go�sp_js_wakeup "start_js", 1go�
7. To determine the instance on which Job Scheduler is running, query the global variable@@jsinstanceid:select @@jsinstanceidgo
Configuring XP Server Using sybclusterConfigure an XP Server for each instance in the cluster using the sybcluster create xpservercommand, which performs the configuration steps for you.
1. Start sybcluster.For example, to start sybcluster and specify Sybase Control Center agents on the nodes"blade1," "blade2," and "blade3," enter:sybcluster -U uafadmin -P -F "blade1:1234,blade2:2345,blade3:3456"
2. Connect to the cluster. For example, to connect to "mycluster," enter:connect to mycluster
3. Start the cluster. Enter:start cluster
4. To configure the XP Servers, enter:create xpserver
Adaptive Server prompts you for the XP Server port number for each instance. See theUtility Guide for more information about the xp server utility.
Creating and Starting the Cluster
Installation Guide 57

Creating and Starting the Cluster
58 Adaptive Server Enterprise Cluster Edition
Postinstallation Tasks
After you install the server, set it up.
The Adaptive Server installation includes directories containing sample client libraryapplications. These sample programs are included for training purposes only and are notintended to be installed in a production environment.
If you are setting up a production environment, remove these directories:
• $SYBASE/OCS-15_0/sample
• $SYBASE/DataAccess/ODBC/samples
• $SYBASE/jConnect-7_0/sample2
• $SYBASE/jConnect-7_0/classes/sample2
• $SYBASE/ASE-15_0/sample
• $SYBASE/WS-15_0/samples
Verifying That Servers are RunningVerify the servers are running.
PrerequisitesBefore starting the server, make sure you have stopped, then started the services related to theserver.
TaskIf you have already started the server, do not run the command a second time. Running it morethan once can cause problems.
1. From a UNIX command line, set the Sybase environment variables.
• In C-shell:source ASE_install_location/SYBASE.csh
• In Bourne shell:ASE_install_location/SYBASE.sh
2. Show all Adaptive Server-related processes that are on the system:$SYBASE/$SYBASE_ASE/install/showserver
Postinstallation Tasks
Installation Guide 59

Verifying Your Connection to the ServersVerify your connection to the servers.
Use isql to perform a quick test:
• At the command prompt, enter the following, where instance_name is the Adaptive Servername:isql -Usa -P<password or leave it blank> -Sinstance_name
You see the isql prompt if the login is successful.• At the isql prompt, enter:
1> select @@version2> go
The output should show Adaptive Server at version 15.7.If you encounter errors, see the Troubleshooting Guide.
Testing the Installation and Network ConnectionsAfter installing Adaptive Server, Sybase Central, and the Java Runtime Environment, test theinstallation and network connections. Adaptive Server communicates with other AdaptiveServers, Open Server applications (such as Backup Server), and client software on yournetwork. Clients can talk to one or more servers, and servers can communicate with otherservers by remote procedure calls.
For Sybase products to interact with one another, each product must know where the othersreside on the network. Sybase stores this information in the interfaces file on Windows orin a Lightweight Directory Access Protocol (LDAP) server.
1. Select Start > Programs > Sybase > Sybase Central 6.0.0.
2. Select Tools > Connect from the Sybase Central menu bar to activate an Adaptive Serverlogin window.
3. Log in using the default user ID, "sa," without a password. If you have changed thepassword, use the new password.
4. Select the Adaptive Server to which you want to connect.
5. To disconnect from a server, select Tools > Disconnect, or right-click the connected servericon and select Disconnect.
6. Exit Sybase Central.
Postinstallation Tasks
60 Adaptive Server Enterprise Cluster Edition
Creating a Testing EnvironmentTo create a testing environment, create a simulated cluster on a single node with all instancesrunning on that node.
Sybase recommends that you configure each instance on a different node, that is, one node foreach instance. However, for a testing environment, you can create a simulated cluster on asingle node with all instances running on that node. For best performance make sure thenumber of engines in all instances running on a single node does not exceed the number ofCPUs on that node.
The default setting for the runnable process search count parameter is 3. Sybaserecommends that you use this default setting, and can be set up using the sp_configure storedprocedure.
Configuring libtcl.cfg for LDAPUse the libtcl.cfg file to specify an LDAP server name, port number, DIT base, username, and password to connect to an LDAP server.
When you specify an LDAP server in the libtcl.cfg file, the server information becomesaccessible only from the LDAP server; the interfaces file is ignored. Open Client andOpen Server applications that use the -i option at start-up override the libtcl.cfg file anduse the interfaces file. See the Adaptive Server configuration guide for your platform formore information.
1. Configure the libtcl.cfg file to use directory services, using any standard ASCII texteditor:
• Remove the semicolon (;) comment markers from the beginning of the LDAP URLlines in the libtcl.cfg file under the [DIRECTORY] entry.
• Add the LDAP URL under the [DIRECTORY] entry. See the Configuration Guide forsupported LDAP URL values.
In its simplest form on 32-bit LDAP drivers, the libtcl.cfg file is in this format:
[DIRECTORY]ldap=libsybdldap.dll
Warning! Ensure that the LDAP URL is on a single line.
ldap=libsybdldap.dllldap://host:port/ditbase??scope??bindname=username?password
For example (entry shown on multiple lines only for readability):[DIRECTORY] ldap=libsybdldap.dllldap://huey:11389/dc=sybase,dc=com??one??bindname=cn=Manager,dc=sybase,dc=com?secret
Postinstallation Tasks
Installation Guide 61
Note: On Windows x64, the .dll file is called libsybdldap64.dll.
2. Verify that the appropriate environment variable points to the required third-partylibraries. The Netscape LDAP SDK libraries are in %SYBASE%\%SYBASE_OCS%\dll.
The Windows PATH environment variable must include this directory.
Adding a Server to the Directory ServiceUse dsedit utility to add a server to the directory service.
1. From Windows, select Start > Programs > Sybase > Connectivity > Open ClientDirectory Service Editor.
2. Select LDAP from the list of servers, and click OK.
3. Click Add New Server Entry, and enter:
• Server name• Security mechanism – (Optional) there is a list of security mechanism OIDs in
%SYBASE%\ini\objectid.dat.
4. Click Add New Network Transport, and:
• Select the transport type.• Enter the host name.• Enter the port number.
5. Click OK twice to exit the dsedit utility.
Setting the System Administrator PasswordWhen you install Sybase software, Sybase creates a system administrator account called "sa,"which can use any database on Adaptive Server, including master, with full privileges.
Immediately after a new installation; the initial default value for the "sa" password is NULL,allowing anyone to log in as "sa." For security purposes, make sure you assign a password to"sa" before using Adaptive Server in a production environment.The Sybase system administrator should log in to Adaptive Server as "sa" and set a password:$SYBASE/$SYBASE_OCS/bin/isql -Usa -P -Sserver_name1> sp_password null, new_password2> go
where:• null – is the default password.• new_password – is the password that you are assigning to the "sa" account.
For the greatest security, Sybase recommends that you create a password of at least sixcharacters, with a combination of letters and numbers.
Postinstallation Tasks
62 Adaptive Server Enterprise Cluster Edition
Installing Sample DatabasesThe sample databases, which contain fictitious information, are designed to help you learnhow to use Adaptive Server.
Note: The sample databases are intended for training purposes only. Do not install them in anAdaptive Server production environment.
Database Description
install-pubs2
Installs the pubs2 sample database. This database contains data that represents a
publishing operation. Use this database to test your server connections and to learnTransact-SQL. Most of the examples in the Adaptive Server documentation query thepubs2 database.
Note: The master device size should be at least 30MB to install the full pubs2database, including the image data.
install-pubs3
Installs the pubs3 sample database. This updated version of pubs2 uses refer-
ential integrity. In addition, its tables are slightly different than the tables used inpubs2. Where noted, the Adaptive Server documentation uses the pubs3 data-
base in its examples.
install-pix2
Installs the image data that is used with the pubs2 database.
Run the installpix2 script after you run installpubs2.
The image data requires 10MB—there are six pictures, two each in the PICT, TIFF,
and Sun raster file formats. Run installpix2 script only to use or test the
image datatype. Sybase does not supply any tools for displaying image data; you
must use appropriate window graphics tools to display the images after you haveextracted them from the database.
Default Devices for Sample DatabasesThe Adaptive Server installation includes scripts for installing the us_english sampledatabase, foreign language sample databases, and the image data associated with the USEnglish pubs2 sample database on a default device.
These scripts are located in $SYBASE/$SYBASE_ASE/scripts.
By default, these scripts install the sample databases on the master device. Because thedatabases use valuable space on the master device that is best reserved for system tables—each sample database requires 3MB on a 2K server, and multiples of 3MB on a 4K, 6K, 8K,
Postinstallation Tasks
Installation Guide 63
and 16K server on your database device—Sybase recommends that you change the default to adevice other than the master device.
To change the default location where the scripts install these databases, use sp_diskdefault.See sp_diskdefault in Reference Manual: Procedures. Alternatively, use a text editor to revisethe script directly.
Running the Database ScriptsAfter you determine your default device, run the scripts to install the sample databases.
Prerequisites
Determine the type (raw partition, logical volume, operating system file, and so on) andlocation of the device where you plan to store the pubs2 and pubs3 databases.
Back up the original installpubs2 and installpubs3 scripts, in case you haveproblems with the edited scripts.
Task
For more information about running these scripts, see the Configuration Guide.
1. Start the server instance.
2. Go to the Adaptive Server scripts directory at $SYBASE/$SYBASE_ASE/scripts.
3. Use isql to log in to the instance and run the script:isql -Usa -P*****-Sserver_name -iscript_name
where:• server_name – is the destination server for the database.• script_name – is the full path to and file name of the script to run.
For example, to install pubs2 on a server named VIOLIN, enter:
isql -Usa -P***** -SVIOLIN -i $SYBASE/$SYBASE_ASE/scripts/installpubs2
4. Install the image data associated with pubs2:
isql -Usa -Ppassword -Sservername -i$SYBASE/$SYBASE_ASE/scripts/installpix2
The pubs3 database does not use image data.
Installing the interpubs DatabaseThe interpubs database is similar to pubs2, and contains French and German data.
PrerequisitesBack up the original installintpubs script, in case you experience problems with theedited script.
Postinstallation Tasks
64 Adaptive Server Enterprise Cluster Edition
Task
1. Set your terminal to display 8-bit characters.
2. Verify that iso_1, iso_15, Roman8, Roman 9, or UTF-8 is installed as either the defaultcharacter set or as an additional character set.
The interpubs database contains 8-bit characters and is available for use at AdaptiveServer installations using the ISO 8859-1 (iso_1), ISO 8859-15 (iso_15), Roman 8, orRoman9 (for HP-UX) character set.
3. Determine the type (raw partition, logical volume, operating system file, and so on) andlocation of the device where you will be storing the interpubs database. You will needto provide this information later.
4. Execute the script, using the -J flag to ensure that the database is installed with the correctcharacter set:isql -Usa -Ppassword -Sservername -Jiso_1 \ -i $SYBASE/$SYBASE_ASE/scripts/iso_1/installintpubs
Installing the jpubs DatabaseIf you installed the Japanese Language Module with your server, you can run theinstalljpubs script to install jpubs, which is a database similar to pubs2 that containsJapanese data. installjpubs uses the EUC-JIS (eucjis), UTF-8 (utf8), or the Shift-JIS(sjis) character sets.
PrerequisitesCopy the original installjpubs script, in case you experience problems with the editedscript.
Task
1. Set your terminal to display 8-bit characters.
2. Verify that either the EUC-JIS, Shift-JIS, or the UTF-8 character set is installed as theAdaptive Server default character set or as an additional character set.
3. Determine the type (raw partition, logical volume, operating system file, and so on) andlocation of the device where you will be storing the jpubs database. You will need toprovide this information later.
4. Execute the installjpubs script, using the -J flag to ensure that the database isinstalled with the correct character set:isql -Usa -Ppassword -Sservername -Jeucjis \ -i $SYBASE/$SYBASE_ASE/scripts/eucjis/installjpubs
isql -Usa -Ppassword -Sservername -Jeucjis \ -i %SYBASE%\%SYBASE_ASE%\scripts\eucjis\installjpubs
or:
Postinstallation Tasks
Installation Guide 65
isql -Usa -Ppassword -Sservername -Jsjis \ -i $SYBASE/$SYBASE_ASE/scripts/sjis/installjpubs
isql -Usa -Ppassword -Sservername -Jsjis \ -i %SYBASE%\%SYBASE_ASE%\scripts\sjis\installjpubs
For more information on the -J option in isql, see the Utility Guide.
Maintaining Sample DatabasesThe sample databases contain a guest user option that allows authorized users to access thedatabase. Guest users have a wide range of privileges, including permissions to select, insert,update, and delete user tables.
Sybase recommends that you remove the guest user option from user databases in productionsystems. For more information about the guest user and a list of guest permissions, see theSystem Administration Guide.
1. If possible, and if space allows, give each new user a clean copy of the sample databases sothat each user is not confused by other users’ changes.
2. If space is a problem, instruct users to issue the begin transaction command beforeupdating a sample database.
3. After users have finished updating one of the sample databases, instruct them to issue therollback transaction command to undo the changes.
I/O FencingSybase cannot guarantee data integrity unless you enable I/O fencing. If you do not use I/Ofencing, data loss or other data corruption may occur in rare instances. Only test anddevelopment environments that can accept this risk should be deployed without I/O fencing.
The shared-disk cluster can detect the presence of a noncooperating instance and remove itfrom the cluster. In rare situations, however, the cluster cannot stop the noncooperatinginstance from writing to the shared disk, even though the instance is no longer part of thecluster. For example, if an instance has been removed from the cluster, but has not releasedresources and shut down, it may still be capable of writing to the shared disk. Use I/O fencingto prevent the noncooperating instance from making data writes.
In the Cluster Edition, Sybase supports the SCSI-3 Persistent Group Reservation (PGR)feature of SCSI-3 devices to provide I/O fencing. PGR is the SCSI-3 standard for managingdisk access in an environment where a single disk is shared by multiple hosts for read and writeaccess.
The I/O fencing provided by the SCSI-3 PGR feature operates only on devices, not onpartitions. For example, /dev/sda1 and /dev/sda2 are partitions of the device /dev/sda. A fencing operation targeted to a raw device bound to /dev/sda1 affects all partitionsof /dev/sda, so any file systems or other applications (including another Adaptive Server )
Postinstallation Tasks
66 Adaptive Server Enterprise Cluster Edition
using partitions on that device are also affected. For this reason, the device must be usedexclusively by the cluster instance.
Preparing to Set Up I/O FencingEnable I/O fencing.
Sybase recommends that your I/O fencing use persistent DSF on HP-UX 11.31.
Note: HPIA I/O fencing does not support the HP VM.
1. Run qrmutil to confirm that a disk is capable of I/O fencing. See System Changes, in theCluster Users Guide.
2. Make sure you have read and write permissions for all database and quorum devices. Usethe UNIX chown, chgrp, and chmod commands to correct the permissions if needed.
Enabling I/O FencingConfiguring I/O fencing affects all devices, system-wide, that have with I/O fencingcapability.
1. Each instance in the cluster must run on a separate node.
2. All storage devices (disks) that hold database devices must support the SCSI-3 standardand cannot be partitioned.
Note: SCSI-3 PGR functionality is available only for a physical SCSI disk device or avirtual disk device exported by a storage area network (SAN). Partitioning such a device atthe operating system level does not provide SCSI-3 PGR on each partition. Rather, theSCSI-3 PGR, and thus the fencing support, is shared among all partitions on the device.Adaptive Server cannot independently fence database devices.• The quorum must reside on its own device. Adaptive Server does not allow you to
create database devices on the quorum device.• In addition, if device partitions are used outside the cluster, any fencing performed by
the cluster denies access to those other partitions for the external applications or filesystems placed on them.
3. I/O fencing is based on a device driver API that is targeted to a specific device driver. Thedevice driver is typically called the fence device. Use operating system commands tocreate the fence device on each of the nodes running the cluster. To turn on the enable i/ofencing configuration parameter, enter:sp_configure "enable i/o fencing", 1
4. The SCSI-3 PGR feature is platform-dependent, and all devices used by the ClusterEdition should have this functionality. See your operating system documentation forcomplete syntax and setup information. As part of the cluster creation process, both theAdaptive Server plug-in and sybcluster let you check that each device is enabled for I/Ofencing. You can also run the qrmutil utility:
Postinstallation Tasks
Installation Guide 67

qrmutil -Qquorum path --fence-capable=device path
Manual Cluster Setup and ManagementIf you set up the cluster manually, you cannot use the Adaptive Server plug-in or sybcluster tomanage your cluster until you create and deploy the Sybase Control Center agent.
Setting the EnvironmentSet your Sybase environment. From the Sybase release directory, source the SYBASE.sh orSYBASE.csh file.From the $SYBASE directory where the environment variable scripts can be located, sourcethe environment variable. For example:. SYBASE.sh
or,source SYBASE.csh
Raw DevicesEach raw device must be accessible from each node using the same path. See your operatingsystem storage administrator or documentation for help in setting up raw devices.
The local system temporary database device and the quorum disk device are specific to theCluster Edition. The other required devices are the same as those required for all AdaptiveServers.
• Master database device• sybstemprocs database device• System database device• Local system temporary database device (you can create multiple devices to setup one
local system temporary database per device).
Note: Local system temporary database must use shared disks.• Quorum disk device (at least 4 MB)• All other database devices
The Cluster Input FileBefore configuring the cluster, create a cluster input file that specifies the name of the cluster,the number of instances in the cluster, the path to the directories containing the interfaces file,log files, quorum disk devices, and other required configuration information. Choose anyname for the cluster input file (for example, mycluster.inp).
When you configure the cluster, Adaptive Server reads the information from the cluster inputfile and stores it securely in the quorum device. Adaptive Server subsequently retrieves thecluster configuration information from the quorum device.
Postinstallation Tasks
68 Adaptive Server Enterprise Cluster Edition

See Reconfiguring the Cluster on page 78 for information about changing configurationinformation after the cluster has been initialized.
Note: You can configure one cluster with each cluster input file.
The cluster input file is distinct from the server configuration file, which stores AdaptiveServer configuration values associated with sp_configure.
The syntax for the cluster input file is:# all input files must begin with a comment[cluster]name = cluster_namemax instances = numbermaster device = path_to_the_master_deviceconfiguration file = common_path_to_all_server_configuration_filesprimary protocol = udp | tcp | othersecondary protocol = udp | tcp | otherinstallation mode = shared | privateconfiguration file = Adaptive_Server_configuration_file_nameinterfaces path = interfaces_file_path traceflags = trace_flag_number, trace_flag_number, . . . additional run parameters = any_additional_run_parameters
[management nodes] hostname = node_namehostname = node_namehostname = node_namehostname = node_name
[instance]id = instance_IDname = instance_namenode = name_of_node_on_which_this_instance_runsprimary address = primary_interconnect_addressprimary port start = port_numbersecondary address = secondary_interconnect_addresssecondary port start = port_numbererrorlog = file_nameinterfaces path = interfaces_file_pathconfig file = path_to_server_configuration_file_for_this_instancetraceflags = trace_flag_number, trace_flag_number, . . .additional run parameters = any_additional_run_parameters
[instance]id = instance_IDname = instance_namenode = name_of_node_on_which_this_instance_runsprimary address = primary_interconnect_addressprimary port start = port_numbersecondary address = secondary_interconnect_addresssecondary port start = port_numbererrorlog = file_nameinterfaces path = interfaces_file_pathconfiguration file =
Postinstallation Tasks
Installation Guide 69
path_to_server_configuration_file_for_this_instancetraceflags = trace_flag_number, trace_flag_number, . . .additional run parameters = any_additional_run_parameters
where:
• name = cluster_name – is the name of the cluster.• max instances = number – the maximum number of instances in the cluster that your
version of Adaptive Server supports. See the release bulletin for the maximum number ofinstances your version of Adaptive Server supports.
• master device = path – is the path to the master device.• configuration file = common_path – is the common path to all server configuration files.• primary protocol = udp | tcp | other– specifies the protocol used for the primary
interconnect.• secondary protocol= udp | tcp | other – specifies the protocol used for the secondary
interconnect.• installation mode = shared | private – specifies whether the installation mode is shared or
private.• config file = filename – is the path to the Adaptive Server configuration file. This file is
used by all instances in the cluster unless an individual instance overrides this setting.In a private installation where all configuration files share the same path name, this is thecommon path.
• interfaces path = file_path – is the path to the interfaces file. Omit this parameter if you areusing an LDAP environment. This interfaces file is used by all instances unless anindividual instance overrides this setting.
• traceflags = trace_flag_number, trace_flag_number, ... – is the comma-separated list oftrace flags used at instance start-up.
• additional run parameters = parameters – are the additional parameters passed toinstances during start-up.
• hostname = node_name – is the name of the node. This name should be the same asreturned by the host name command when run on this node. There is one host name fieldfor each node that must be registered. Specify this node only once in the management nodesection.
• ID = name – is the ID of the instance.• name = instance_name – is the name of the instance.• node = name – is the name of the node on which this instance runs.• primary address = address – is the address of this instance on the primary interconnect.• primary port start = number – is the starting port number on the primary interconnect.• secondary address = address – address of this instance on the secondary interconnect.
Required if a secondary is defined in the interconnect section or if a secondary protocol isspecified. Ignored if a secondary is not defined.
• secondary port start = port_number – is the starting port number on the secondaryinterconnect. Required if secondary address or a secondary protocol is specified.
Postinstallation Tasks
70 Adaptive Server Enterprise Cluster Edition
• error log = file_name – is the full path to the error log for this instance.• interfaces path = path – is the path to the server-side interfaces file. This file
overrides the interfaces file field in the cluster section of the cluster input file. Do notinclude the interfaces file name in the path. Omit this parameter is you are usingLDAP.
• config file = path – is the path to an Adaptive Server configuration file. This file overridesthe configuration file field specified in the cluster section of the cluster input file.In a private installation where path names to individual server configuration files are notthe same, this is the path to the current server configuration file.
• traceflags = trace_flag_number, trace_flag_number, ... – is the comma-separated list oftrace flags used at instance startup. These are used in addition to, not in place of, the traceflags specified in the cluster section of the cluster input file.
• additional run parameters = parameter_name – are the additional parameters passed toinstances during startup.The formula for finding the socket port range is:start_port_number + (max_instances * 5) – 1
Note: If you do not use an ADO.NET, ensure that the port numbers you choose are not inuse by any other process.
In this example, the cluster input file defines a cluster named "mycluster" with two instances,"ase1" on node "blade1," and "ase2" on node "blade2." The addresses on the privateinterconnects are 192.169.0.1 and 192.169.0.2. The name of the server configuration file ismycluster.cfg. The maximum instances is 2. "ase1" has a starting port range of 15015,and "ase2" has a starting port range of 16015.This adds additional information to themycluster cluster:#input for a 2 node / 2 instance cluster[cluster]name = myclustermax instances = 2master device = /opt/sybase/rawdevices/mycluster.masterconfig file = /opt/sybase/ASE-15_0/mycluster.configinterfaces path = /opt/sybaseprimary protocol = udpsecondary protocol = udp
[management nodes]hostname = blade1.sybase.comhostname = blade2.sybase.com
[instance]id = 1name = ase1node = blade1.sybase.comprimary address = 192.169.0.1primary port start = 15015secondary address = 192.169.1.1secondary port start = 15015
Postinstallation Tasks
Installation Guide 71
errorlog = /opt/sybase/ASE-15_0/install/ase1.logadditional run parameter = -M/opt/sybase/ASE-15_0
[instance]id = 2name = ase2node = blade2.sybase.comprimary address = 192.169.0.2primary port start = 16015secondary address = 192.169.1.2secondary port start = 16015errorlog = /opt/sybase/ASE-15_0/install/ase2.logadditional run parameter = -M/opt/sybase/ASE-15_0
For an example of cluster input file where all instances are located on a single node, see theClusters Users Guide.
Manually Configuring the ClusterSybase strongly recommends that the total number of engines in all instances does not exceedthe number of CPUs.
After setting the environment, and creating both raw devices and a cluster input file, you canbegin configuring the cluster. Manually configuring a cluster involves several sets of steps:
1. Configure theinterfaces file for the cluster server and all instances.
2. Create the quorum and master devices on raw devices on the shared-disk storage.
3. Use disk init to initialize and create the sybsystemprocs database.
4. Run InstallAnywhere to install the system stored procedures.
5. After creating the master and quorum devices, create a runserver file for each instance inthe cluster.
6. Set up a local system and temporary databases.
Configuring the Interfaces FileIf you use an interfaces file, it must include entries for the cluster server and all instances.
The syntax for the interfaces file is:instance_name: master network_protocol machine_name port_number query network_protocol machine_name port_number. . . cluster_server_name query network_protocol ether machine_name port_number
where:
• instance_name – is the instance for which you are making this interfaces file entry.• network_protocol – is the network protocol used for the instance.• machine_name – is the name of the machine on which the instance runs.
Postinstallation Tasks
72 Adaptive Server Enterprise Cluster Edition
• port_number – is the port number used to connect to this instance.• cluster_server_name – is the name of the cluster server.
This example includes the instances "ase1," "ase2," and "ase3," on machines"blade1," "blade2," and "blade3," running in the cluster "mycluster":ase1 master tcp ether blade1 19786 query tcp ether blade1 19786ase2 master tcp ether blade2 19786 query tcp ether blade2 19786ase3 master tcp ether blade3 19786 query tcp ether blade3 19786mycluster query tcp ether blade1 19786 query tcp ether blade2 19786 query tcp ether blade3 19786
Building the Master and Quorum DevicesCreate the quorum and master devices on raw devices on the shared-disk storage.
When creating the quorum device, use the same device name and major and minor numbers onall machines. Each raw device must be accessible from each node using the same path. Thisexample uses raw11 for the quorum disk.For example:dataserver...
--quorum-dev /dev/raw/raw11
The syntax for creating Cluster Edition master and quorum devices is:dataserver--cluster-input= cluster_input_filename_and_path--quorum-dev= quorum_device_and_path --master-device-size= master_device_size --logical-page-size= page_size --instance= instance_name--buildquorum
where:• --master-device-size=<size spec> – specifies the size of the master device.• --cluster-input=<cluster input file> – loads the cluster configuration specified in the input
file onto the quorum device.• --quorum-dev= path_to_quorum_device – specifies the full path to the quorum device.• --instance=instance_name – specifies the name of an instance.• --logical-page-size= page_size – specifies the page size.• --buildquorum – specifies that a new quorum device should be built.
Postinstallation Tasks
Installation Guide 73
Create the master and quorum devices using dataserver. This example creates an instancenamed “ase1” that is configured for 4K pages, a master device of 500MB, and a quorumdevice:/opt/sybase/ASE-15_0/bin/ dataserver\ --quorum-dev=/dev/raw/raw11\--instance=ase1--cluster-input=/opt/sybase/mycluster.inp --master-device-size=500M--logical-page-size=4k--buildquorum
See the Cluster Users Guide and Utility Guide for more information about the dataserverutility.
System Stored ProceduresRun InstallAnywhere from the $SYBASE/$SYBASE_ASE/scripts directory to installthe system stored procedures. You can run installmaster from any instance.
isql -U sa -P sa_password -S server_name -n -i $SYBASE/$SYBASE_ASE/scripts/installmaster -o output_file
Initializing and Creating sybsystemprocsUse disk init to initialize a device for sybsystemprocs and then create thesybsystemprocs database.
1. Initialize a raw device of at least 150MB for sybsystemprocs:disk init name = "sysprocsdev",physname = "/dev/raw/raw13",size = "150M"
2. Create the sybsystemprocs database:create database sybsystemprocs on sysprocsdev = 150
Creating Runserver FilesAfter creating the master and quorum devices, create a runserver file for each instance in thecluster. Later, you will use these files to start the instances.
1. Create a runserver file.
This example creates RUN_ase1for instance ase1. Enter the runserver file on a singleline. The “\” indicates that the line continues without a space.$SYBASE/ASE-15_0/bin/dataserver --quorum-dev=/dev/raw/raw11--instance=ase1
Note: Create all devices, database devices, and quorum devices as raw devices on shareddisks.
2. Make a copy of the runserver file for each of the Adaptive Servers in the cluster. Forexample, the three instances for the cluster named “mycluster” have runserver files named
Postinstallation Tasks
74 Adaptive Server Enterprise Cluster Edition
RUN_ase1, RUN_ase2, and RUN_ase3. Make sure you include the same quorumdevice for all instances. --instance should change in each file to point to the appropriateinstance name.
Setting Up Local System and Temporary DatabasesIn a shared-disk cluster, each instance must have a local system temporary database.
In the Cluster Edition, if an instance does not have a local system temporary database, it startsonly if it is the first instance to boot in the cluster to start.
1. Start Adaptive Server. For example:startserver -f $SYBASE/$SYBASE_ASE/install/RUN_ase1_coord
2. Log in to Adaptive Server.
3. If you are not using the master device for the temporary databases, create the devices forthe local system temporary databases. You can create local system temporary database onshared disks only. See Using Temporary Databases in the Cluster Users Guide.
Sybase recommends that you use separate devices for log and data for these databases. Forexample:disk init name="tempdbdev1",physname="/dev/raw/raw14", size="400M"
And for the log device:disk init name="temp_log_dev1",physname="/dev/raw/raw15", size="200M"
4. Create a local system temporary database for each instance in the cluster. For example, tocreate three local system temporary databases "ase1_tdb1," "ase2_tdb1," and "ase3_tdb1"for instances "ase1," "ase2," and "ase3," respectively, enter:create system temporary database ase1_tdb1 for instance ase1 on tempdbdev1 = 100 log on temp_log_dev1 = 50create system temporary database ase2_tdb1 for instance ase2 on tempdbdev1 = 100log on temp_log_dev2 = 50create system temporary database ase3_tdb1 for instance ase3 on tempdbdev1 = 100log on temp_log_dev3 = 50
5. Shut down the cluster using the shutdown cluster command.
Automatic Takeover of a ClusterConfigure the cluster to automatically recover from an abrupt total cluster failure.
Automatic cluster takeover is triggered if an instance attempts to connect to the cluster and:
• You have enabled automatic cluster takeover.
Postinstallation Tasks
Installation Guide 75

• The quorum device indicates the cluster is running, but the instance detects no heartbeat.
The automatic cluster takeover configuration parameter enables the instance attempting toconnect to the cluster to form a new cluster, starting the cluster coordinator and recovering thedatabases. The syntax for automatic cluster takeover is:sp_configure "automatic cluster takeover", [1 | 0]
Setting automatic cluster takeover to 1 enables the automatic cluster takeover (the default).Setting it to 0 disables automatic cluster takeover.
In environments that have I/O fencing enabled, automatic cluster takeover is guaranteed to bea safe operation. For environments that do not have I/O fencing, a malfunction of the algorithmmay introduce data corruption. This configuration parameter disables the algorithm if itmalfunctions. There is always a risk of data corruption in environments without I/O fencing,and disabling automatic cluster takeover does not mitigate all of those risks.
Starting the ClusterStart the cluster by starting all the instances associated with the cluster on each node in thecluster.
You can start a cluster:
• Normally, after a graceful shutdown.• After a system failure.
Note: Sybase recommends that you do not alter the runserver files used for normal clusterstartup.
1. Start each cluster instance from the node on which it runs:For example, start the "ase1" instance:startserver -f $SYBASE/$SYBASE_ASE/install/RUN_ase1
2. Log in to each node on which another instance will run, and execute startserver.For example, to start the "ase2" instance on "blade2":1. On "blade2," move to the $SYBASE directory.
2. Issue:startserver -f $SYBASE/$SYBASE_ASE/install/RUN_ase2
Starting the Cluster After a System FailureThe manner in which you start the server after a system failure depends on whether or not youenabled the automatic cluster takeover configuration parameter.
If the cluster fails because of a system failure and you:
• Enabled automatic cluster takeover – the instance attempting to connect to the clusterrestarts the cluster, acting as the cluster coordinator and recovering the databases.
Postinstallation Tasks
76 Adaptive Server Enterprise Cluster Edition
• Did not enable automatic cluster takeover – you must restart the cluster with thedataserver . . . --cluster-takeover parameter. For example, this example adds the -cluster-takeover parameter to the runserver file that originally started the cluster:$SYBASE/ASE-15_0/bin/dataserver \--quorum-dev=/dev/raw/raw11\--instance=ase1\--cluster-takeover
Once the cluster is running, restart all the instances normally.
Postconfiguration TasksPerform additional tasks after you determine that the configured instances are running.
To determine if the instances you configured are running, log in to the cluster and entersp_cluster show, and verify that you can connect to the instances:
1. Source SYBASE.sh.
2. Use isql to connect to servers. At the command prompt, enter:isql -Usa -P -Sserver_name
where server_name is the instance name. The command prompt displays if the login issuccessful.
3. To display the Adaptive Server version number, enter:1> select @@version2> go
If you encounter errors, see the Error Messages and Troubleshooting Guide.
Shutting Down the Cluster or the InstanceShutting down the cluster shuts down all the instances associated with the cluster.
1. Log in to any instance. For example:isql –Usa –P –Sase2 –I$SYBASE/interfaces
2. Issue:shutdown cluster
Shutting Down an InstanceUse the shutdown command to shut down an individual instance in the cluster. You can alsoshut down an instance from another instance in the cluster.
1. Log in to any instance. For example:isql –Usa –P –Smycluster –I$SYBASE/interfaces
2. Issue:shutdown ase2
Postinstallation Tasks
Installation Guide 77

Reconfiguring the ClusterYou can reconfigure a cluster to add instances, change trace flags, and so on. Edit the clusterinput file then create a new run file for the instance you intend to start first and that includes thedataserver with the cluster-input option. This option tells Adaptive Server to write the newconfiguration information to the quorum device.
Log in to any instance, and shut down the cluster.
Note: If you use sybcluster or the Adaptive Server plug-in, you do not need to shut down thecluster before reconfiguring it.
1. Extract the current configuration to a file using the -extract-config command to the qrmutilutility. See the Clusters Users Guide.
2. Edit the cluster input file.
3. Copy the run file for the instance you intend to boot and add the --cluster-input option tothe dataserver statement. For example, change RUN_ase1 in this way:
$SYBASE/$SYBASE_ASE/bin/dataserver\--cluster-input=/<input_file>\--quorum-dev=/dev/raw/raw11\--instance=ase1\
4. Start the cluster.
Enabling sybcluster and Sybase Control Center After a ManualConfiguration
To use sybcluster or Sybase Control Center to manage the cluster after a manualconfiguration, start Sybase Control Center remote command and control agent on each nodein the cluster, and then deploy the connection agent to each node.
1. Start Sybase Control Center on each node used by the cluster. From the $SYBASEdirectory, enter:
SCC-3_2/bin/scc.sh
2. Start sybcluster. For example, enter:sybcluster -U uafadmin -P -C mycluster -F "blade1,blade2,blade3"
3. Execute deploy plugin. For example:deploy plugin agent "blade1,blade2,blade3"
See the chapter titled sybcluster Utility in the Clusters Users Guide for complete syntaxand usage information for sybcluster and the Sybase Control Center for Adaptive Serverfor information on .
Postinstallation Tasks
78 Adaptive Server Enterprise Cluster Edition
A sybcluster Sample Session Configuration ValuesConfigure a typical shared-disk cluster using sybcluster.
This example assumes a primary and secondary network. If you do not specify a secondarynetwork, sybcluster asks for a beginning port number and calculates the number of portnumbers needed for communication among the instances. Ensure that the number youprovide, and the following required port numbers, are not in use by another application. Forinformation on about how sybcluster calculates the number of required ports, see the Creatingthe Cluster Server Using sybcluster topic.
Table 9. sybcluster Prompts and Configuration Values Entered for SampleSession
Parameter Value
Cluster name mycluster
Number of instances
Number of agents
Cluster node ID 1
Configuration type
Is the cluster to be configured using a private $SYBASEinstallation?
N
Quorum Device
Full path and name for the quorum device /dev/rhdisk11
Page Size
The page size in kilobytes 2kB
Master device
Full path and name for the master device /dev/rhdisk12
Size of master device (MB) 30MB
Size of master database (MB) 13MB
PCI device (optional)
Full path to the PCI database device /dev/raw/raw20
Size of the PCI database device (MB) 24MB
Postinstallation Tasks
Installation Guide 79

Parameter Value
Size of the PCI database (MB) 24MB
Sybase system procedure device
Full path and name for sybsystemprocs device /dev/rhdisk13
Size of sybsystemprocs device (MB) 160MB
Size of sybsystemprocs database (MB) 152MB
System database device
Full path and name of system database device /dev/rhdisk14
Size of system database device (MB) 6MB
Size of system database (MB) 6MB
----------
Does this cluster have a secondary network (Y) Yes
Verify file locations
The location of the SYBASE home directory /remote/var/sybase/
Full path to environment variable script /remote/var/sybase/SYBASE.sh
Path to $SYBASE_ASE /remote/var/sybase/ASE-15_0
Path to interfaces file directory /remote/var/sybase
Path to the dataserver configuration file /remote/var/sybase/mycluster.cfg
Instance information
Node name blade1
sybcluster displays: Cluster: mycluster - Node: blade1 - Agentblade1:9999
Instance name ase1
Query port number for ase1 19786
Primary protocol address for ase1 000.000.001.001
Postinstallation Tasks
80 Adaptive Server Enterprise Cluster Edition
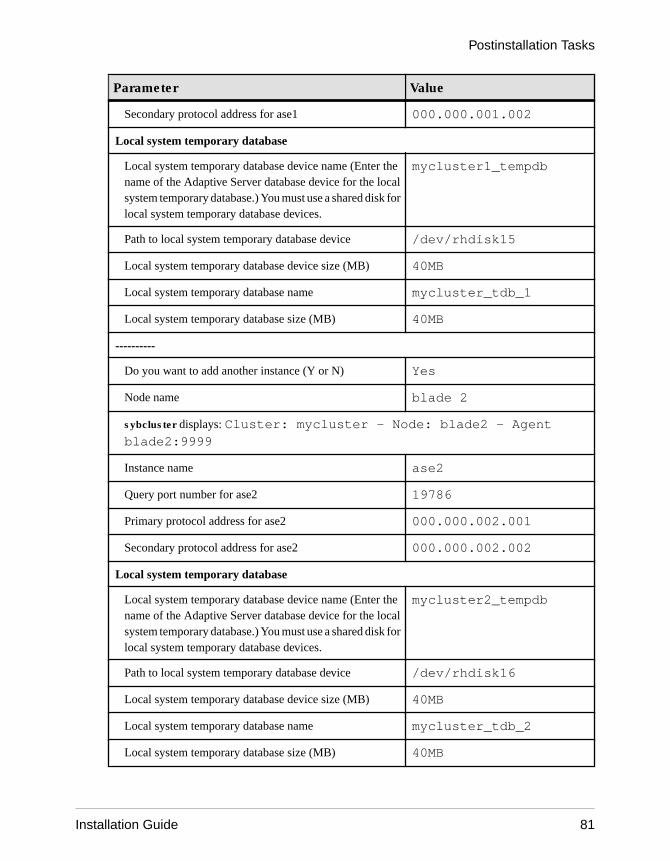
Parameter Value
Secondary protocol address for ase1 000.000.001.002
Local system temporary database
Local system temporary database device name (Enter thename of the Adaptive Server database device for the localsystem temporary database.) You must use a shared disk forlocal system temporary database devices.
mycluster1_tempdb
Path to local system temporary database device /dev/rhdisk15
Local system temporary database device size (MB) 40MB
Local system temporary database name mycluster_tdb_1
Local system temporary database size (MB) 40MB
----------
Do you want to add another instance (Y or N) Yes
Node name blade 2
sybcluster displays: Cluster: mycluster - Node: blade2 - Agentblade2:9999
Instance name ase2
Query port number for ase2 19786
Primary protocol address for ase2 000.000.002.001
Secondary protocol address for ase2 000.000.002.002
Local system temporary database
Local system temporary database device name (Enter thename of the Adaptive Server database device for the localsystem temporary database.) You must use a shared disk forlocal system temporary database devices.
mycluster2_tempdb
Path to local system temporary database device /dev/rhdisk16
Local system temporary database device size (MB) 40MB
Local system temporary database name mycluster_tdb_2
Local system temporary database size (MB) 40MB
Postinstallation Tasks
Installation Guide 81

Parameter Value
----------
Do you want to add another instance (Y or N) Yes
Node name blade3
sybcluster displays: Cluster: mycluster - Node: blade3 - Agentblade3:9999
Instance name ase3
Query port number 19786
Primary protocol address for ase3 000.000.003.001
Secondary protocol address for ase3 000.000.003.002
Local system temporary database
Local system temporary database device name (Enter thename of the Adaptive Server database device for the localsystem temporary database.) You must use a shared disk forlocal system temporary database devices.
mycluster3_tempdb
Path to local system temporary database device /dev/rhdisk17
Local system temporary database device size (MB) 40MB
Local system temporary database name mycluster_tdb_3
Local system temporary database size (MB) 40MB
----------
Do you want to add another instance (Y or N) N
Save configuration information in a file (Y( Yes
Full path for configuration file /remote/var/sybase/mycluster.xml
Create the cluster now (Y) Yes
Veritas Cluster Server support (optional – appears only if VCS is supported on your system)
Integrate the Cluster Edition server with VCS? (Y) N
Check whether each cluster device has I/O fencing capa-bility? (Y)
Postinstallation Tasks
82 Adaptive Server Enterprise Cluster Edition
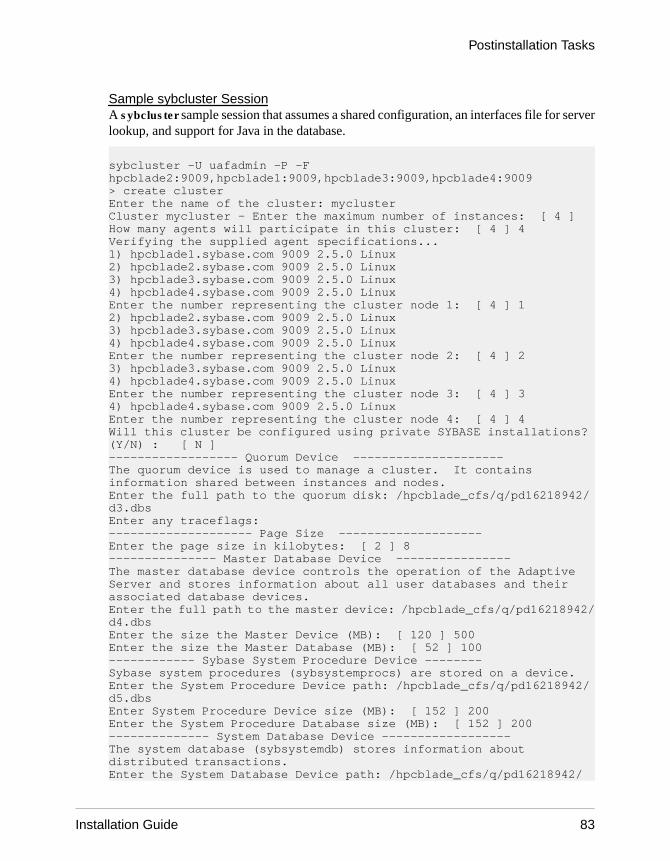
Sample sybcluster SessionA sybcluster sample session that assumes a shared configuration, an interfaces file for serverlookup, and support for Java in the database.
sybcluster -U uafadmin -P -F hpcblade2:9009,hpcblade1:9009,hpcblade3:9009,hpcblade4:9009> create clusterEnter the name of the cluster: myclusterCluster mycluster - Enter the maximum number of instances: [ 4 ] How many agents will participate in this cluster: [ 4 ] 4Verifying the supplied agent specifications...1) hpcblade1.sybase.com 9009 2.5.0 Linux2) hpcblade2.sybase.com 9009 2.5.0 Linux3) hpcblade3.sybase.com 9009 2.5.0 Linux4) hpcblade4.sybase.com 9009 2.5.0 LinuxEnter the number representing the cluster node 1: [ 4 ] 12) hpcblade2.sybase.com 9009 2.5.0 Linux3) hpcblade3.sybase.com 9009 2.5.0 Linux4) hpcblade4.sybase.com 9009 2.5.0 LinuxEnter the number representing the cluster node 2: [ 4 ] 23) hpcblade3.sybase.com 9009 2.5.0 Linux4) hpcblade4.sybase.com 9009 2.5.0 LinuxEnter the number representing the cluster node 3: [ 4 ] 34) hpcblade4.sybase.com 9009 2.5.0 LinuxEnter the number representing the cluster node 4: [ 4 ] 4Will this cluster be configured using private SYBASE installations? (Y/N) : [ N ] ------------------ Quorum Device ---------------------The quorum device is used to manage a cluster. It contains information shared between instances and nodes.Enter the full path to the quorum disk: /hpcblade_cfs/q/pd16218942/d3.dbsEnter any traceflags: -------------------- Page Size --------------------Enter the page size in kilobytes: [ 2 ] 8--------------- Master Database Device ----------------The master database device controls the operation of the Adaptive Server and stores information about all user databases and their associated database devices.Enter the full path to the master device: /hpcblade_cfs/q/pd16218942/d4.dbsEnter the size the Master Device (MB): [ 120 ] 500Enter the size the Master Database (MB): [ 52 ] 100------------ Sybase System Procedure Device --------Sybase system procedures (sybsystemprocs) are stored on a device.Enter the System Procedure Device path: /hpcblade_cfs/q/pd16218942/d5.dbsEnter System Procedure Device size (MB): [ 152 ] 200Enter the System Procedure Database size (MB): [ 152 ] 200-------------- System Database Device ------------------The system database (sybsystemdb) stores information about distributed transactions.Enter the System Database Device path: /hpcblade_cfs/q/pd16218942/
Postinstallation Tasks
Installation Guide 83
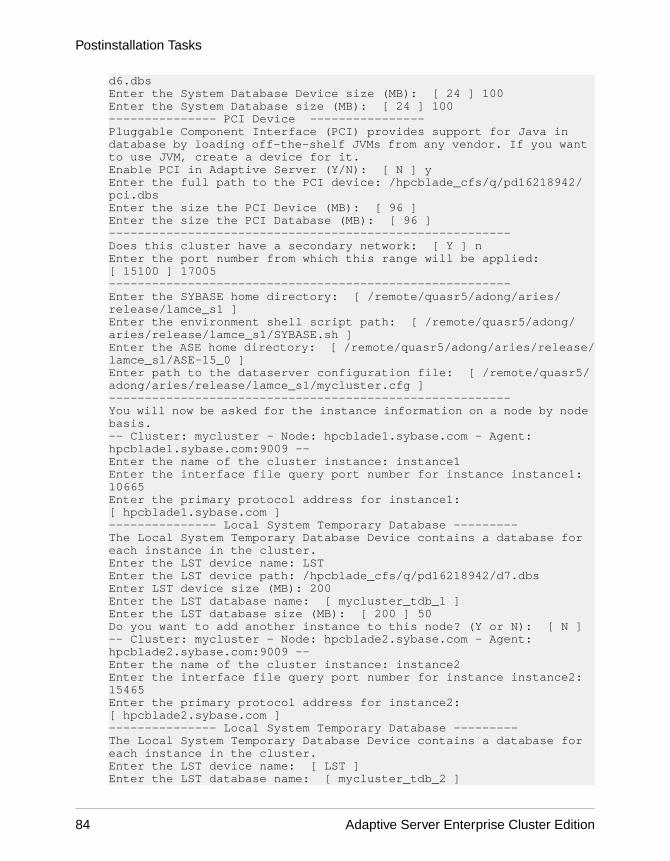
d6.dbsEnter the System Database Device size (MB): [ 24 ] 100Enter the System Database size (MB): [ 24 ] 100--------------- PCI Device ----------------Pluggable Component Interface (PCI) provides support for Java in database by loading off-the-shelf JVMs from any vendor. If you want to use JVM, create a device for it.Enable PCI in Adaptive Server (Y/N): [ N ] yEnter the full path to the PCI device: /hpcblade_cfs/q/pd16218942/pci.dbsEnter the size the PCI Device (MB): [ 96 ] Enter the size the PCI Database (MB): [ 96 ] --------------------------------------------------------Does this cluster have a secondary network: [ Y ] nEnter the port number from which this range will be applied: [ 15100 ] 17005--------------------------------------------------------Enter the SYBASE home directory: [ /remote/quasr5/adong/aries/release/lamce_s1 ] Enter the environment shell script path: [ /remote/quasr5/adong/aries/release/lamce_s1/SYBASE.sh ] Enter the ASE home directory: [ /remote/quasr5/adong/aries/release/lamce_s1/ASE-15_0 ] Enter path to the dataserver configuration file: [ /remote/quasr5/adong/aries/release/lamce_s1/mycluster.cfg ] --------------------------------------------------------You will now be asked for the instance information on a node by node basis.-- Cluster: mycluster - Node: hpcblade1.sybase.com - Agent: hpcblade1.sybase.com:9009 --Enter the name of the cluster instance: instance1Enter the interface file query port number for instance instance1: 10665Enter the primary protocol address for instance1: [ hpcblade1.sybase.com ] --------------- Local System Temporary Database ---------The Local System Temporary Database Device contains a database for each instance in the cluster.Enter the LST device name: LSTEnter the LST device path: /hpcblade_cfs/q/pd16218942/d7.dbsEnter LST device size (MB): 200Enter the LST database name: [ mycluster_tdb_1 ] Enter the LST database size (MB): [ 200 ] 50Do you want to add another instance to this node? (Y or N): [ N ]-- Cluster: mycluster - Node: hpcblade2.sybase.com - Agent: hpcblade2.sybase.com:9009 --Enter the name of the cluster instance: instance2Enter the interface file query port number for instance instance2: 15465Enter the primary protocol address for instance2: [ hpcblade2.sybase.com ] --------------- Local System Temporary Database ---------The Local System Temporary Database Device contains a database for each instance in the cluster.Enter the LST device name: [ LST ] Enter the LST database name: [ mycluster_tdb_2 ]
Postinstallation Tasks
84 Adaptive Server Enterprise Cluster Edition
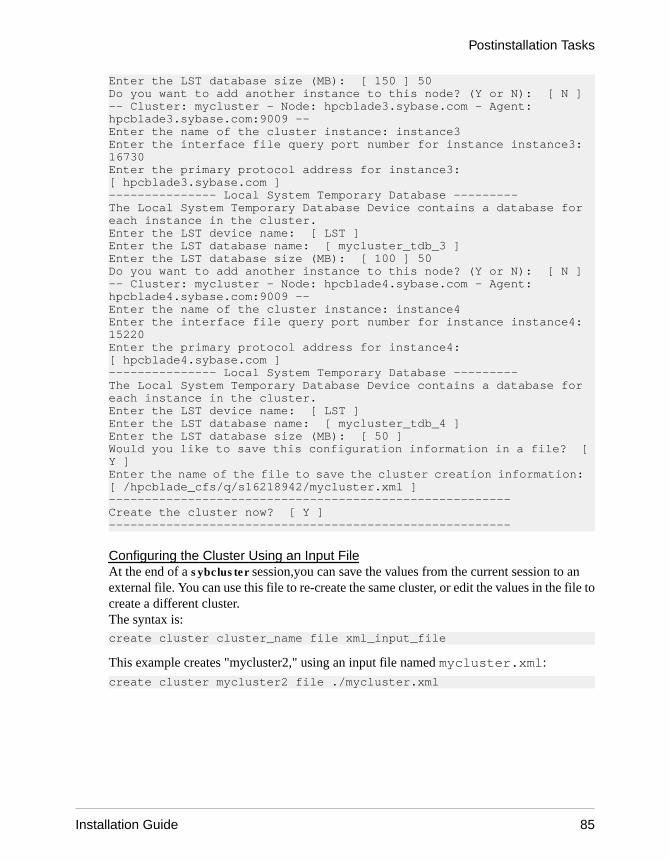
Enter the LST database size (MB): [ 150 ] 50Do you want to add another instance to this node? (Y or N): [ N ]-- Cluster: mycluster - Node: hpcblade3.sybase.com - Agent: hpcblade3.sybase.com:9009 --Enter the name of the cluster instance: instance3Enter the interface file query port number for instance instance3: 16730Enter the primary protocol address for instance3: [ hpcblade3.sybase.com ] --------------- Local System Temporary Database ---------The Local System Temporary Database Device contains a database for each instance in the cluster.Enter the LST device name: [ LST ] Enter the LST database name: [ mycluster_tdb_3 ] Enter the LST database size (MB): [ 100 ] 50Do you want to add another instance to this node? (Y or N): [ N ]-- Cluster: mycluster - Node: hpcblade4.sybase.com - Agent: hpcblade4.sybase.com:9009 --Enter the name of the cluster instance: instance4Enter the interface file query port number for instance instance4: 15220Enter the primary protocol address for instance4: [ hpcblade4.sybase.com ] --------------- Local System Temporary Database ---------The Local System Temporary Database Device contains a database for each instance in the cluster.Enter the LST device name: [ LST ] Enter the LST database name: [ mycluster_tdb_4 ] Enter the LST database size (MB): [ 50 ] Would you like to save this configuration information in a file? [ Y ] Enter the name of the file to save the cluster creation information: [ /hpcblade_cfs/q/s16218942/mycluster.xml ] --------------------------------------------------------Create the cluster now? [ Y ] --------------------------------------------------------
Configuring the Cluster Using an Input FileAt the end of a sybcluster session,you can save the values from the current session to anexternal file. You can use this file to re-create the same cluster, or edit the values in the file tocreate a different cluster.The syntax is:create cluster cluster_name file xml_input_file
This example creates "mycluster2," using an input file named mycluster.xml:
create cluster mycluster2 file ./mycluster.xml
Postinstallation Tasks
Installation Guide 85

Postinstallation Tasks
86 Adaptive Server Enterprise Cluster Edition

Adaptive Server Upgrades
You can upgrade from version 15.5 and later of a nonclustered Adaptive Server to version 15.7of the Cluster Edition.
You can upgrade to the Cluster Edition from these noncluster versions of Adaptive Server:
• 15.0 through 15.5• 12.5 through 12.5.4 ESD #10
You can upgrade to the current Cluster Edition from these earlier Cluster Editions:
• 15.0.3 Cluster Edition• 15.0.1 Cluster Edition through 15.0.1 Cluster Edition ESD #4
Once you have upgraded to the 15.5 or later Cluster Edition, you cannot downgrade to anonclustered 15.x or earlier server. You can, however, downgrade to 15.0.1 Cluster Editionthrough 15.0.1 Cluster Edition ESD #4, Cluster Edition 15.0.3, and Cluster Edition 15.5.
Note: The sybcluster utility does not have a built-in tool to perform an upgrade or downgradebetween two versions of Adaptive Server Cluster Edition.
Upgrade Adaptive Server using the Adaptive Server plug-in or sybcluster, or manually.
If your server has replicated databases, consult the Replication Server Configuration Guidebefore starting the preupgrade tasks.
Only upgrades to and from the same page size are supported. Use sybmigrate to re-create theschema and load data from one page size to another. See the Utility Guide.
To upgrade from a shared-installation mode to a private-installation mode in Adaptive Server15.5 Cluster Edition, see to the Release Bulletin for special upgrade instructions.
Adaptive Server version 15.7 includes both new and changed system catalogs that may affectyour existing applications. See the Adaptive Server Enterprise New Feature Guide for acomplete list. Sybase recommends that you do not use the new features until you arecommitted to staying with 15.7.
Note: When upgrading a 12.5.4 or earlier database to the Cluster Edition, make sure youexecute all steps in the upgrade sequence from the same node. That is, you must load thedatabase and execute online database on the same node.
Adaptive Server Upgrades
Installation Guide 87
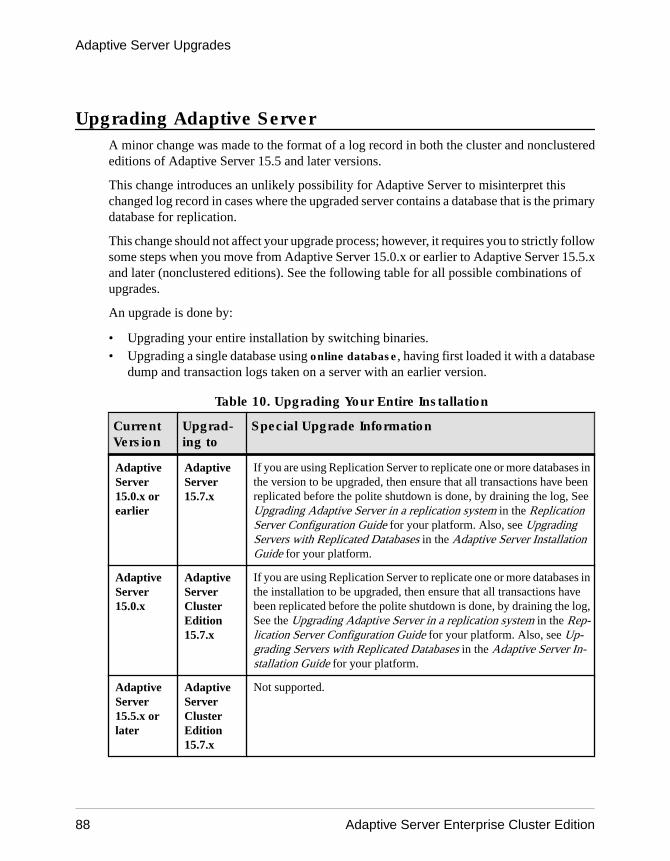
Upgrading Adaptive ServerA minor change was made to the format of a log record in both the cluster and nonclusterededitions of Adaptive Server 15.5 and later versions.
This change introduces an unlikely possibility for Adaptive Server to misinterpret thischanged log record in cases where the upgraded server contains a database that is the primarydatabase for replication.
This change should not affect your upgrade process; however, it requires you to strictly followsome steps when you move from Adaptive Server 15.0.x or earlier to Adaptive Server 15.5.xand later (nonclustered editions). See the following table for all possible combinations ofupgrades.
An upgrade is done by:
• Upgrading your entire installation by switching binaries.• Upgrading a single database using online database, having first loaded it with a database
dump and transaction logs taken on a server with an earlier version.
Table 10. Upgrading Your Entire Installation
CurrentVersion
Upgrad-ing to
Special Upgrade Information
AdaptiveServer15.0.x orearlier
AdaptiveServer15.7.x
If you are using Replication Server to replicate one or more databases inthe version to be upgraded, then ensure that all transactions have beenreplicated before the polite shutdown is done, by draining the log, SeeUpgrading Adaptive Server in a replication system in the ReplicationServer Configuration Guide for your platform. Also, see UpgradingServers with Replicated Databases in the Adaptive Server InstallationGuide for your platform.
AdaptiveServer15.0.x
AdaptiveServerClusterEdition15.7.x
If you are using Replication Server to replicate one or more databases inthe installation to be upgraded, then ensure that all transactions havebeen replicated before the polite shutdown is done, by draining the log,See the Upgrading Adaptive Server in a replication system in the Rep-lication Server Configuration Guide for your platform. Also, see Up-grading Servers with Replicated Databases in the Adaptive Server In-stallation Guide for your platform.
AdaptiveServer15.5.x orlater
AdaptiveServerClusterEdition15.7.x
Not supported.
Adaptive Server Upgrades
88 Adaptive Server Enterprise Cluster Edition
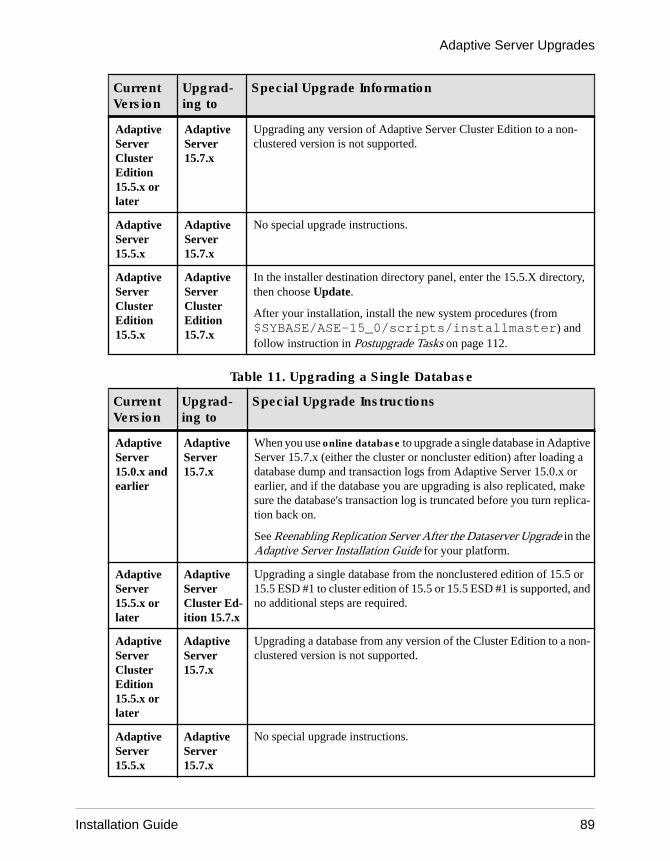
CurrentVersion
Upgrad-ing to
Special Upgrade Information
AdaptiveServerClusterEdition15.5.x orlater
AdaptiveServer15.7.x
Upgrading any version of Adaptive Server Cluster Edition to a non-clustered version is not supported.
AdaptiveServer15.5.x
AdaptiveServer15.7.x
No special upgrade instructions.
AdaptiveServerClusterEdition15.5.x
AdaptiveServerClusterEdition15.7.x
In the installer destination directory panel, enter the 15.5.X directory,then choose Update.
After your installation, install the new system procedures (from$SYBASE/ASE-15_0/scripts/installmaster) andfollow instruction in Postupgrade Tasks on page 112.
Table 11. Upgrading a Single Database
CurrentVersion
Upgrad-ing to
Special Upgrade Instructions
AdaptiveServer15.0.x andearlier
AdaptiveServer15.7.x
When you use online database to upgrade a single database in AdaptiveServer 15.7.x (either the cluster or noncluster edition) after loading adatabase dump and transaction logs from Adaptive Server 15.0.x orearlier, and if the database you are upgrading is also replicated, makesure the database's transaction log is truncated before you turn replica-tion back on.
See Reenabling Replication Server After the Dataserver Upgrade in theAdaptive Server Installation Guide for your platform.
AdaptiveServer15.5.x orlater
AdaptiveServerCluster Ed-ition 15.7.x
Upgrading a single database from the nonclustered edition of 15.5 or15.5 ESD #1 to cluster edition of 15.5 or 15.5 ESD #1 is supported, andno additional steps are required.
AdaptiveServerClusterEdition15.5.x orlater
AdaptiveServer15.7.x
Upgrading a database from any version of the Cluster Edition to a non-clustered version is not supported.
AdaptiveServer15.5.x
AdaptiveServer15.7.x
No special upgrade instructions.
Adaptive Server Upgrades
Installation Guide 89
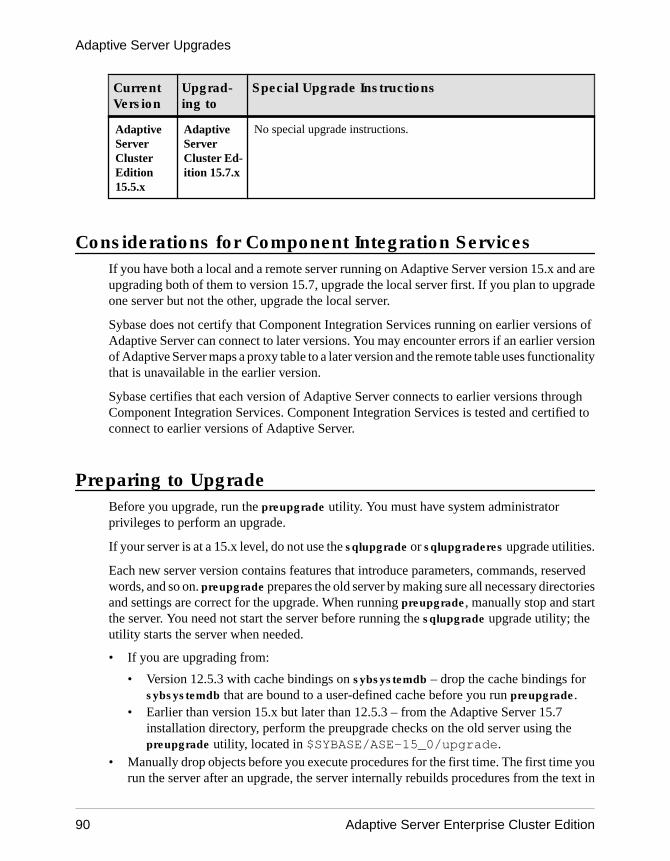
CurrentVersion
Upgrad-ing to
Special Upgrade Instructions
AdaptiveServerClusterEdition15.5.x
AdaptiveServerCluster Ed-ition 15.7.x
No special upgrade instructions.
Considerations for Component Integration ServicesIf you have both a local and a remote server running on Adaptive Server version 15.x and areupgrading both of them to version 15.7, upgrade the local server first. If you plan to upgradeone server but not the other, upgrade the local server.
Sybase does not certify that Component Integration Services running on earlier versions ofAdaptive Server can connect to later versions. You may encounter errors if an earlier versionof Adaptive Server maps a proxy table to a later version and the remote table uses functionalitythat is unavailable in the earlier version.
Sybase certifies that each version of Adaptive Server connects to earlier versions throughComponent Integration Services. Component Integration Services is tested and certified toconnect to earlier versions of Adaptive Server.
Preparing to UpgradeBefore you upgrade, run the preupgrade utility. You must have system administratorprivileges to perform an upgrade.
If your server is at a 15.x level, do not use the sqlupgrade or sqlupgraderes upgrade utilities.
Each new server version contains features that introduce parameters, commands, reservedwords, and so on. preupgrade prepares the old server by making sure all necessary directoriesand settings are correct for the upgrade. When running preupgrade, manually stop and startthe server. You need not start the server before running the sqlupgrade upgrade utility; theutility starts the server when needed.
• If you are upgrading from:
• Version 12.5.3 with cache bindings on sybsystemdb – drop the cache bindings forsybsystemdb that are bound to a user-defined cache before you run preupgrade.
• Earlier than version 15.x but later than 12.5.3 – from the Adaptive Server 15.7installation directory, perform the preupgrade checks on the old server using thepreupgrade utility, located in $SYBASE/ASE-15_0/upgrade.
• Manually drop objects before you execute procedures for the first time. The first time yourun the server after an upgrade, the server internally rebuilds procedures from the text in
Adaptive Server Upgrades
90 Adaptive Server Enterprise Cluster Edition
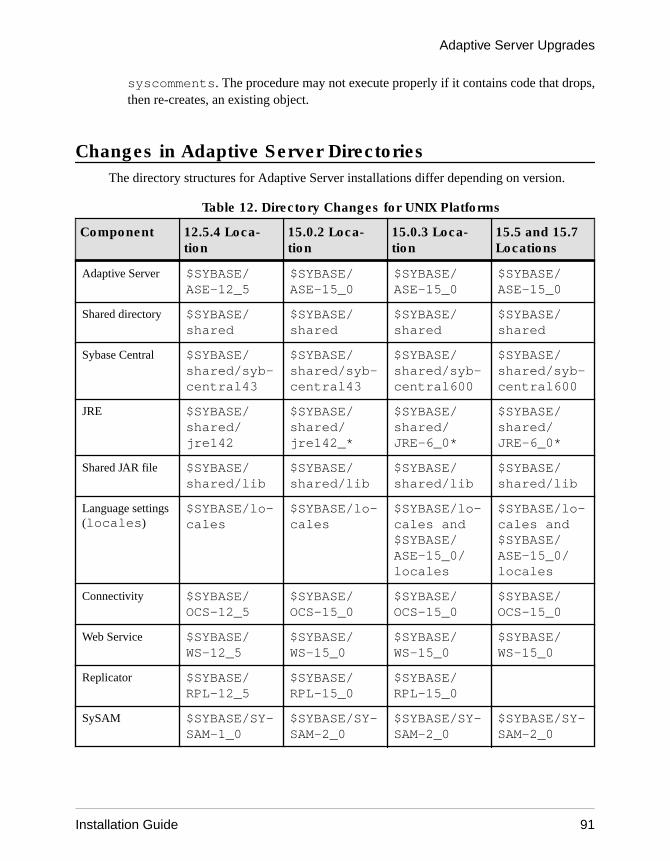
syscomments. The procedure may not execute properly if it contains code that drops,then re-creates, an existing object.
Changes in Adaptive Server DirectoriesThe directory structures for Adaptive Server installations differ depending on version.
Table 12. Directory Changes for UNIX Platforms
Component 12.5.4 Loca-tion
15.0.2 Loca-tion
15.0.3 Loca-tion
15.5 and 15.7Locations
Adaptive Server $SYBASE/ASE-12_5
$SYBASE/ASE-15_0
$SYBASE/ASE-15_0
$SYBASE/ASE-15_0
Shared directory $SYBASE/shared
$SYBASE/shared
$SYBASE/shared
$SYBASE/shared
Sybase Central $SYBASE/shared/syb-central43
$SYBASE/shared/syb-central43
$SYBASE/shared/syb-central600
$SYBASE/shared/syb-central600
JRE $SYBASE/shared/jre142
$SYBASE/shared/jre142_*
$SYBASE/shared/JRE-6_0*
$SYBASE/shared/JRE-6_0*
Shared JAR file $SYBASE/shared/lib
$SYBASE/shared/lib
$SYBASE/shared/lib
$SYBASE/shared/lib
Language settings(locales)
$SYBASE/lo-cales
$SYBASE/lo-cales
$SYBASE/lo-cales and$SYBASE/ASE-15_0/locales
$SYBASE/lo-cales and$SYBASE/ASE-15_0/locales
Connectivity $SYBASE/OCS-12_5
$SYBASE/OCS-15_0
$SYBASE/OCS-15_0
$SYBASE/OCS-15_0
Web Service $SYBASE/WS-12_5
$SYBASE/WS-15_0
$SYBASE/WS-15_0
$SYBASE/WS-15_0
Replicator $SYBASE/RPL-12_5
$SYBASE/RPL-15_0
$SYBASE/RPL-15_0
SySAM $SYBASE/SY-SAM-1_0
$SYBASE/SY-SAM-2_0
$SYBASE/SY-SAM-2_0
$SYBASE/SY-SAM-2_0
Adaptive Server Upgrades
Installation Guide 91
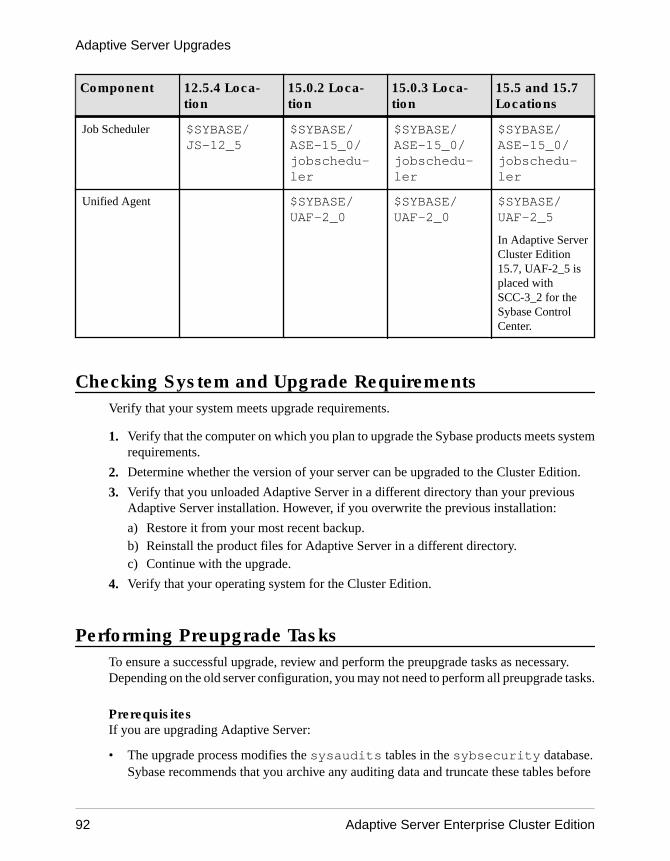
Component 12.5.4 Loca-tion
15.0.2 Loca-tion
15.0.3 Loca-tion
15.5 and 15.7Locations
Job Scheduler $SYBASE/JS-12_5
$SYBASE/ASE-15_0/jobschedu-ler
$SYBASE/ASE-15_0/jobschedu-ler
$SYBASE/ASE-15_0/jobschedu-ler
Unified Agent $SYBASE/UAF-2_0
$SYBASE/UAF-2_0
$SYBASE/UAF-2_5
In Adaptive ServerCluster Edition15.7, UAF-2_5 isplaced withSCC-3_2 for theSybase ControlCenter.
Checking System and Upgrade RequirementsVerify that your system meets upgrade requirements.
1. Verify that the computer on which you plan to upgrade the Sybase products meets systemrequirements.
2. Determine whether the version of your server can be upgraded to the Cluster Edition.
3. Verify that you unloaded Adaptive Server in a different directory than your previousAdaptive Server installation. However, if you overwrite the previous installation:
a) Restore it from your most recent backup.b) Reinstall the product files for Adaptive Server in a different directory.c) Continue with the upgrade.
4. Verify that your operating system for the Cluster Edition.
Performing Preupgrade TasksTo ensure a successful upgrade, review and perform the preupgrade tasks as necessary.Depending on the old server configuration, you may not need to perform all preupgrade tasks.
PrerequisitesIf you are upgrading Adaptive Server:
• The upgrade process modifies the sysaudits tables in the sybsecurity database.Sybase recommends that you archive any auditing data and truncate these tables before
Adaptive Server Upgrades
92 Adaptive Server Enterprise Cluster Edition
you upgrade. This reduces the chances of a failed upgrade due to lack of space in thesybsecurity database.
• Stored procedure text in the syscomments table is required for upgrade.• To a private installation, see Upgrading to a Private Installation on page 97.
Task
1. Shut down the clusters that use an earlier version of the Cluster Edition.
2. Install the Cluster Edition onto your system in a new location.
3. Check system and upgrade requirements.
4. Verify the name and location of the runserver file, as well as that you renamed it toRUN_servername, where servername is the name of the old server, as it appears in theinterfaces file.
The default RUN_servername file for a server SYBASE is called RUN_SYBASE. If theRUN_servername file for your current server is named differently, use the actual nameof your server during the upgrade process.
5. While the upgrade process for Adaptive Server requires that the previously installedversion of the server is running, the upgrade process for Backup Server, Historical Server,and XP Server, requires those servers to be shut down.
6. Verify that the text of all stored procedures you upgrade is available in syscomments byeither:
• Reinstalling the procedures with text, or,• Removing and reinstalling the procedures after the upgrade.
This step can allow you to inspect the stored procedures for any hidden or unwanted text.
7. Make sure reserved words use quoted identifiers.
8. Verify that users are logged off.
9. Use dbcc to check for database integrity.
10. Back up databases.
11. Dump the transaction log.
12. Verify that master is the default database for the "sa" user.
13. Prepare the database and devices for upgrade using the preupgrade utility:
a) Create a sybsystemdb database if it does not already exist.
b) Disable auditing by running sp_configure 'auditing', 0.c) Disable Job Scheduler.d) Obtain the current audit settings for the pre-15.7 Adaptive Server using
sp_displayaudit; you use this saved information to reenable auditing after youcomplete the installation. See Reenabling Auditing on page 116.
e) Disable disk mirroring.
Adaptive Server Upgrades
Installation Guide 93
Note: Cluster Edition version 15.7 does not support disk mirroring.
f) Verify that your SYBASE environment variable points to the location of the new serversoftware files you just installed.
Fix any problems that preupgrade utility reports.
You can safely ignore any warnings Adaptive Server issues about configurationparameters not being set to the default, as these are only for your information.
14. If you are upgrading from a nonclustered 12.5.4, 15.0.2, or 15.5 server, and archivedatabase access has been applied in the lower version server, disable the relatedfunctionality before upgrade.
15. If you are upgrading from a 12.5.3 installation with cache bindings on sybsystemdb,drop the cache bindings for sybsystemdb that are bound to user-defined caches beforerunning preupgrade.
If you do not do this, you see this error:Current process... infected with 11
If you do receive this error, re-run preupgrade after you have dropped the cache bindings.
16. Ensure that the procedure cache size is at least 150 percent of the default procedure cachesize, or between 53,248 and 2,147,483,647 2K pages.
17. Copy these files from earlier versions of the server to their corresponding Adaptive Server15.x installation locations:
• $SYBASE/interfaces
• $SYBASE/$SYBASE_ASE/servername.cfg – where servername is yourserver name.
• $SYBASE/$SYBASE_OCS/config/libtcl.cfg
• $SYBASE/SYSAM-2_0/licenses/license.lic
18. If you have enabled the Java in the database feature, create the sybpcidb database anddisable the feature during the installation.
19. Set the OLDSYBASE_ASE variable to the SYBASE_ASE appropriate to your olderserver. If you are upgrading from 12.5 for example, it should be ASE-12_5.
20. When you upgrade a server to the Cluster Edition, index and table-level statistics becomeinaccurate, and must be updated. Execute update index statistics on these tables:
• sysobjects
• sysindexes
• syscolumns
• systypes
• syslogins
• sysusers
Adaptive Server Upgrades
94 Adaptive Server Enterprise Cluster Edition
Upgrade System Table and Stored ProcedureWhen you upgrade Adaptive Server, drop and re-create syscomments to include the newand changed tables.
When you upgrade the Cluster Edition, system tables are also updated, which may affect yourexisting application. See System Changes in the Clusters Users Guide for a complete list ofcatalogs that are affected.
If you deleted text from the syscomments system table, drop and re-create the storedprocedures to again add the text. Sybase recommends that you use the sp_hidetext storedprocedure to hide text, rather than deleting text.
If you modified any system stored procedures without altering their names, back them upbefore you upgrade Adaptive Server. The upgrade process overwrites these modifiedprocedures with default versions.
The runserver File LocationBe sure the runserver file for your current server is located in $SYBASE/$SYBASE_ASE/install/RUN_servername.
Verify that the file is still named RUN_servername, where servername is the name of theold server. The servername must appear exactly as it appears in the interfaces file. TheRUN_servername file for a server SYBASE is called RUN_SYBASE. If theRUN_servername file for your current Adaptive Server is named, you must change thename during the upgrade process.
Reserved WordsReserved words are pieces of SQL syntax that have special meaning when used as part of acommand.
Transact-SQL does not allow words that are part of command syntax to be used as identifiersunless they are enclosed in quotation marks. If you are upgrading Adaptive Server, you seeerrors when you run queries, stored procedures, or applications that use these identifiers inyour user databases.
Note: Before upgrading, use sp_renamedb to change the name of any user database that is areserved word.
If you change an object name, also change applications and stored procedures that refer to thatobject. Conflicts between object names do not prevent the upgrade process from completing.However, applications that refer to conflicting object names may not work after the upgrade.Rename all objects that use reserved words.
See theReference Manual: Building Blocks for a complete list of reserved words.
Adaptive Server Upgrades
Installation Guide 95
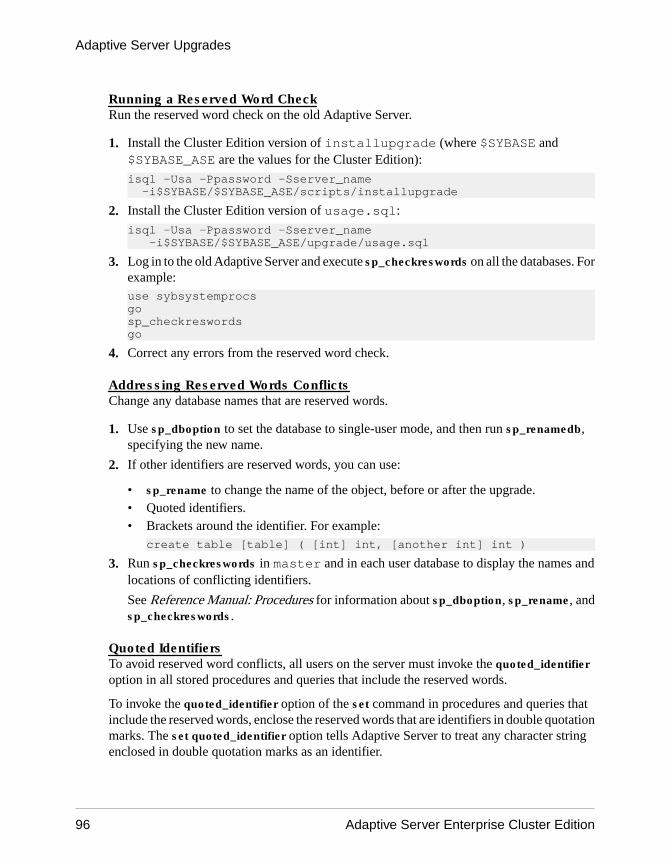
Running a Reserved Word CheckRun the reserved word check on the old Adaptive Server.
1. Install the Cluster Edition version of installupgrade (where $SYBASE and$SYBASE_ASE are the values for the Cluster Edition):
isql -Usa -Ppassword -Sserver_name -i$SYBASE/$SYBASE_ASE/scripts/installupgrade
2. Install the Cluster Edition version of usage.sql:
isql -Usa -Ppassword -Sserver_name -i$SYBASE/$SYBASE_ASE/upgrade/usage.sql
3. Log in to the old Adaptive Server and execute sp_checkreswords on all the databases. Forexample:use sybsystemprocsgosp_checkreswordsgo
4. Correct any errors from the reserved word check.
Addressing Reserved Words ConflictsChange any database names that are reserved words.
1. Use sp_dboption to set the database to single-user mode, and then run sp_renamedb,specifying the new name.
2. If other identifiers are reserved words, you can use:
• sp_rename to change the name of the object, before or after the upgrade.• Quoted identifiers.• Brackets around the identifier. For example:
create table [table] ( [int] int, [another int] int )
3. Run sp_checkreswords in master and in each user database to display the names andlocations of conflicting identifiers.
See Reference Manual: Procedures for information about sp_dboption, sp_rename, andsp_checkreswords.
Quoted IdentifiersTo avoid reserved word conflicts, all users on the server must invoke the quoted_identifieroption in all stored procedures and queries that include the reserved words.
To invoke the quoted_identifier option of the set command in procedures and queries thatinclude the reserved words, enclose the reserved words that are identifiers in double quotationmarks. The set quoted_identifier option tells Adaptive Server to treat any character stringenclosed in double quotation marks as an identifier.
Adaptive Server Upgrades
96 Adaptive Server Enterprise Cluster Edition
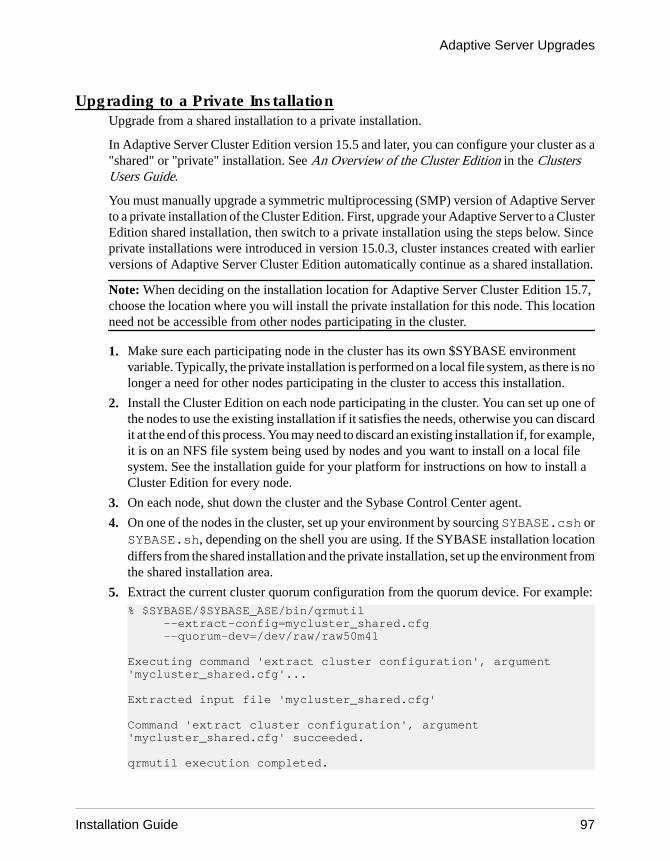
Upgrading to a Private InstallationUpgrade from a shared installation to a private installation.
In Adaptive Server Cluster Edition version 15.5 and later, you can configure your cluster as a"shared" or "private" installation. See An Overview of the Cluster Edition in the ClustersUsers Guide.
You must manually upgrade a symmetric multiprocessing (SMP) version of Adaptive Serverto a private installation of the Cluster Edition. First, upgrade your Adaptive Server to a ClusterEdition shared installation, then switch to a private installation using the steps below. Sinceprivate installations were introduced in version 15.0.3, cluster instances created with earlierversions of Adaptive Server Cluster Edition automatically continue as a shared installation.
Note: When deciding on the installation location for Adaptive Server Cluster Edition 15.7,choose the location where you will install the private installation for this node. This locationneed not be accessible from other nodes participating in the cluster.
1. Make sure each participating node in the cluster has its own $SYBASE environmentvariable. Typically, the private installation is performed on a local file system, as there is nolonger a need for other nodes participating in the cluster to access this installation.
2. Install the Cluster Edition on each node participating in the cluster. You can set up one ofthe nodes to use the existing installation if it satisfies the needs, otherwise you can discardit at the end of this process. You may need to discard an existing installation if, for example,it is on an NFS file system being used by nodes and you want to install on a local filesystem. See the installation guide for your platform for instructions on how to install aCluster Edition for every node.
3. On each node, shut down the cluster and the Sybase Control Center agent.
4. On one of the nodes in the cluster, set up your environment by sourcing SYBASE.csh orSYBASE.sh, depending on the shell you are using. If the SYBASE installation locationdiffers from the shared installation and the private installation, set up the environment fromthe shared installation area.
5. Extract the current cluster quorum configuration from the quorum device. For example:% $SYBASE/$SYBASE_ASE/bin/qrmutil --extract-config=mycluster_shared.cfg --quorum-dev=/dev/raw/raw50m41
Executing command 'extract cluster configuration', argument 'mycluster_shared.cfg'...
Extracted input file 'mycluster_shared.cfg'
Command 'extract cluster configuration', argument 'mycluster_shared.cfg' succeeded.
qrmutil execution completed.
Adaptive Server Upgrades
Installation Guide 97
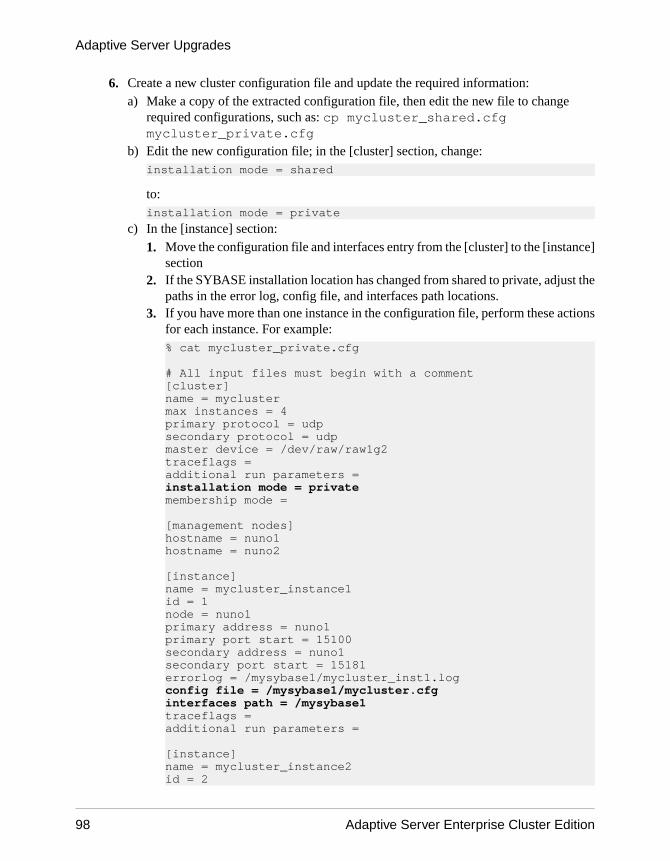
6. Create a new cluster configuration file and update the required information:a) Make a copy of the extracted configuration file, then edit the new file to change
required configurations, such as: cp mycluster_shared.cfgmycluster_private.cfg
b) Edit the new configuration file; in the [cluster] section, change:installation mode = shared
to:installation mode = private
c) In the [instance] section:1. Move the configuration file and interfaces entry from the [cluster] to the [instance]
section2. If the SYBASE installation location has changed from shared to private, adjust the
paths in the error log, config file, and interfaces path locations.3. If you have more than one instance in the configuration file, perform these actions
for each instance. For example:% cat mycluster_private.cfg
# All input files must begin with a comment[cluster]name = myclustermax instances = 4primary protocol = udpsecondary protocol = udpmaster device = /dev/raw/raw1g2traceflags =additional run parameters =installation mode = privatemembership mode =
[management nodes]hostname = nuno1hostname = nuno2
[instance]name = mycluster_instance1id = 1node = nuno1primary address = nuno1primary port start = 15100secondary address = nuno1secondary port start = 15181errorlog = /mysybase1/mycluster_inst1.logconfig file = /mysybase1/mycluster.cfginterfaces path = /mysybase1traceflags =additional run parameters =
[instance]name = mycluster_instance2id = 2
Adaptive Server Upgrades
98 Adaptive Server Enterprise Cluster Edition
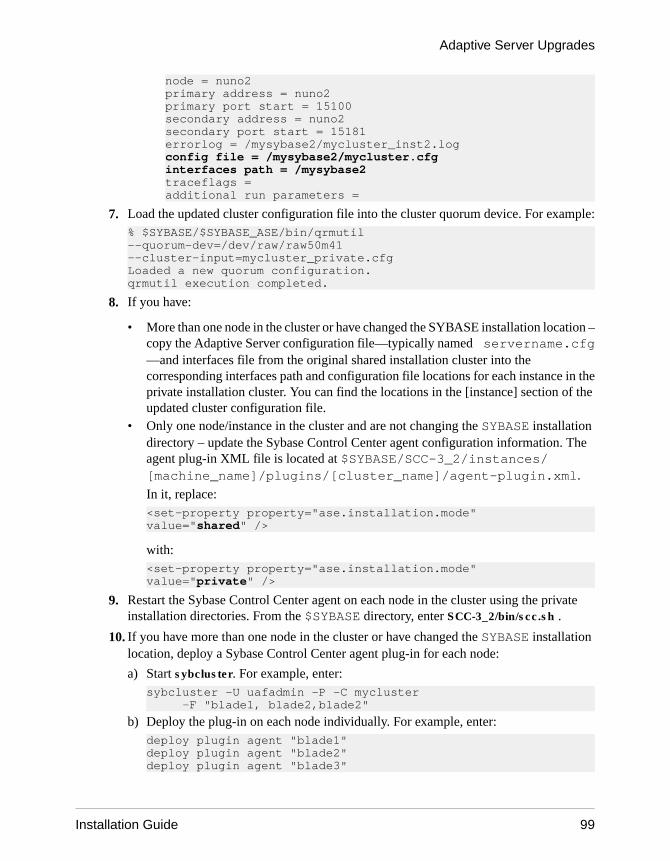
node = nuno2primary address = nuno2primary port start = 15100secondary address = nuno2secondary port start = 15181errorlog = /mysybase2/mycluster_inst2.logconfig file = /mysybase2/mycluster.cfginterfaces path = /mysybase2traceflags =additional run parameters =
7. Load the updated cluster configuration file into the cluster quorum device. For example:% $SYBASE/$SYBASE_ASE/bin/qrmutil--quorum-dev=/dev/raw/raw50m41--cluster-input=mycluster_private.cfgLoaded a new quorum configuration.qrmutil execution completed.
8. If you have:
• More than one node in the cluster or have changed the SYBASE installation location –copy the Adaptive Server configuration file—typically named servername.cfg—and interfaces file from the original shared installation cluster into thecorresponding interfaces path and configuration file locations for each instance in theprivate installation cluster. You can find the locations in the [instance] section of theupdated cluster configuration file.
• Only one node/instance in the cluster and are not changing the SYBASE installationdirectory – update the Sybase Control Center agent configuration information. Theagent plug-in XML file is located at $SYBASE/SCC-3_2/instances/[machine_name]/plugins/[cluster_name]/agent-plugin.xml.
In it, replace:<set-property property="ase.installation.mode" value="shared" />
with:<set-property property="ase.installation.mode" value="private" />
9. Restart the Sybase Control Center agent on each node in the cluster using the privateinstallation directories. From the $SYBASE directory, enter SCC-3_2/bin/scc.sh .
10. If you have more than one node in the cluster or have changed the SYBASE installationlocation, deploy a Sybase Control Center agent plug-in for each node:
a) Start sybcluster. For example, enter:sybcluster -U uafadmin -P -C mycluster -F "blade1, blade2,blade2"
b) Deploy the plug-in on each node individually. For example, enter:deploy plugin agent "blade1"deploy plugin agent "blade2"deploy plugin agent "blade3"
Adaptive Server Upgrades
Installation Guide 99
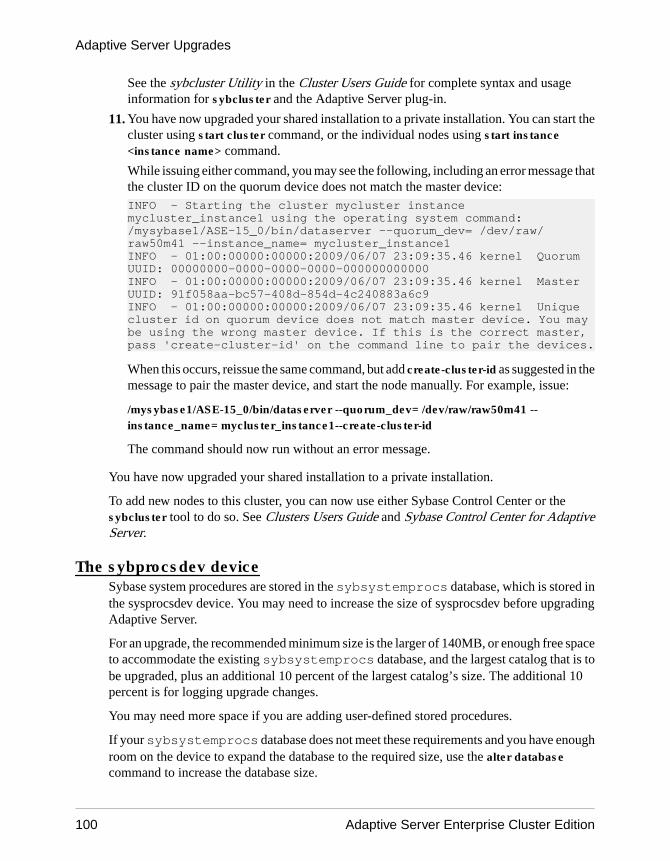
See the sybcluster Utility in the Cluster Users Guide for complete syntax and usageinformation for sybcluster and the Adaptive Server plug-in.
11. You have now upgraded your shared installation to a private installation. You can start thecluster using start cluster command, or the individual nodes using start instance<instance name> command.
While issuing either command, you may see the following, including an error message thatthe cluster ID on the quorum device does not match the master device:INFO - Starting the cluster mycluster instance mycluster_instance1 using the operating system command:/mysybase1/ASE-15_0/bin/dataserver --quorum_dev= /dev/raw/raw50m41 --instance_name= mycluster_instance1INFO - 01:00:00000:00000:2009/06/07 23:09:35.46 kernel Quorum UUID: 00000000-0000-0000-0000-000000000000INFO - 01:00:00000:00000:2009/06/07 23:09:35.46 kernel Master UUID: 91f058aa-bc57-408d-854d-4c240883a6c9INFO - 01:00:00000:00000:2009/06/07 23:09:35.46 kernel Unique cluster id on quorum device does not match master device. You may be using the wrong master device. If this is the correct master, pass 'create-cluster-id' on the command line to pair the devices.
When this occurs, reissue the same command, but add create-cluster-id as suggested in themessage to pair the master device, and start the node manually. For example, issue:
/mysybase1/ASE-15_0/bin/dataserver --quorum_dev= /dev/raw/raw50m41 --instance_name= mycluster_instance1--create-cluster-id
The command should now run without an error message.
You have now upgraded your shared installation to a private installation.
To add new nodes to this cluster, you can now use either Sybase Control Center or thesybcluster tool to do so. See Clusters Users Guide and Sybase Control Center for AdaptiveServer.
The sybprocsdev deviceSybase system procedures are stored in the sybsystemprocs database, which is stored inthe sysprocsdev device. You may need to increase the size of sysprocsdev before upgradingAdaptive Server.
For an upgrade, the recommended minimum size is the larger of 140MB, or enough free spaceto accommodate the existing sybsystemprocs database, and the largest catalog that is tobe upgraded, plus an additional 10 percent of the largest catalog’s size. The additional 10percent is for logging upgrade changes.
You may need more space if you are adding user-defined stored procedures.
If your sybsystemprocs database does not meet these requirements and you have enoughroom on the device to expand the database to the required size, use the alter databasecommand to increase the database size.
Adaptive Server Upgrades
100 Adaptive Server Enterprise Cluster Edition
Use sp_helpdb to determine the size of the sybsystemprocs database:
1> sp_helpdb sybsystemprocs2> go
Use sp_helpdevice to determine the size of the sysprocsdev device:1> sp_helpdevice sysprocdev2> go
If the db_size setting is less than the required minimum, increase the size of sysprocdev.
Increasing the Size of the sybsystemprocs DatabaseCreate a new database with sufficient space if your current sybsystemprocs databasedoes not have the minimum space required for an upgrade.
PrerequisitesIf you do not have a current backup of your old database, create one now.
TaskAlthough you can drop the old database and device and create a new sysprocsdev device,Sybase recommends that you leave the old database and device alone and add a new devicelarge enough to hold the additional memory, and alter the sybsystemprocs onto the newdevice.
1. In isql, use alter database to increase the size of the sybsystemprocs database. Forexample:1> use master2> go1> alter database sybsystemprocs on sysprocsdev=402> go
In this example, "sysprocsdev" is the logical name of the existing system proceduresdevice, and 40 is the number of megabytes of space to add. If the system procedures deviceis too small, you may receive a message when you try to increase the size of thesybsystemprocs database.
If there is space available on another device, expand sybsystemprocs to a seconddevice, or initialize another device that is large enough.
2. Verify that Adaptive Server has allocated more space to sybsystemprocs:
1> sp_helpdb sybsystemprocs2> go
When the database is large enough to accommodate the inceased size of sybsystemprocs,continue with the other preupgrade tasks.
Adaptive Server Upgrades
Installation Guide 101
Increasing Device and Database Capacity for System ProceduresIf you cannot fit the enlarged sybsystemprocs database on the system procedures device,increase the size of the device and create a new database.
PrerequisitesThis procedure removes all stored procedures you have created at your site. Before you begin,save your local stored procedures using the defncopy utility. See the Utility Guide.
TaskThis procedure involves dropping the database. For more information on drop database, seethe Reference Manual.
1. Determine which device you must remove:select d.name, d.phyname from sysdevices d, sysusages u where u.vstart between d.low and d.high and u.dbid = db_id("sybsystemprocs") and d.status & 2 = 2 and not exists (select vstart from sysusages u2 where u2.dbid != u.dbid and u2.vstart between d.low and d.high)
where:• d.name – is the list of devices to remove from sysdevices.
• d.phyname – is the list of files to remove from your computer.
The not exists clause in this query excludes devices that are used by sybsystemprocsand other databases.
Make a note of the names of the devices to use in subsequent steps.
Warning! Do not remove any device that is in use by a database other thansybsystemprocs, or you will destroy that database.
2. Drop sybsystemprocs:
1> use master2> go1> drop database sybsystemprocs2> go
Note: In versions of Adaptive Server Enterprise earlier than 15.x, use sysdevices todetermine which device has a low through high virtual page range that includes thevstart from step 2.
In version 15.x, select the vdevno from sysusages matching the dbid retrieved in step1.
Adaptive Server Upgrades
102 Adaptive Server Enterprise Cluster Edition
3. Remove the device:1> sp_configure "allow updates", 12> go1> delete sysdevices where name in ("devname1", "devname2", ...)2> go1> sp_configure "allow updates", 02> go
The where clause contains the list of device names returned by the query in step 1.
Note: Each device name must have quotes. For example, "devname1", "devname2",and so on.
If any of the named devices are OS files rather than raw partitions, use the appropriate OScommands to remove those files.
4. Remove all files that were returned in the d.phyname list.
Note: File names cannot be complete path names. If you use relative paths, they arerelative to the directory from which your server was started.
5. Find another existing device that meets the requirements for additional free space, or use adisk init command similar to the following to create an additional device forsybsystemprocs, where /sybase/work/ is the full, absolute path to your systemprocedures device:1> use master2> go1> disk init2> name = "sysprocsdev",3> physname = "/sybase/work/sysproc.dat",4> size = 50M5> go
Note: Server versions 12.0.x and later accept, but do not require "vdevno=number".For information about determining whether vdevno is available, see the SystemAdministration Guide.
The size you provide should be the number of megabytes of space needed for the device,multiplied by 512. disk init requires the size to be specified in 2K pages. In this example,the size is 112MB (112 x 512 = 57344). For more information on disk init, see theReference Manual: Commands.
6. Create a sybsystemprocs database of the appropriate size on that device, forexample:1> create database sybsystemprocs on sysprocsdev = 1122> go
7. Run the installmaster script in the old server installation directory. Enter:isql -Usa -Ppassword -Sserver_name -i$SYBASE/ASE-15_0/scripts/installmaster
Adaptive Server Upgrades
Installation Guide 103
Upgrade to Adaptive Server 15.7After you successfully run the preupgrade utility, you are ready to upgrade Adaptive Server.
To upgrade from a noncluster version of Adaptive Server to Adaptive Server Cluster Edition,use the sybcluster utility.
From an earlier version of Adaptive Server Cluster Edition, to Adaptive Server Cluster Editionversion 15.7, upgrade manually.
Upgrading from One Version of Adaptive Server Cluster Edition toAnother
Use this manual method if you are upgrading from an earlier version of Adaptive ServerCluster Edition to version 15.7 Cluster Edition. Start the Cluster Edition with only oneinstance until the upgrade is complete.
1. Perform preupgrade tasks.
2. Back up all old databases.
3. Verify that you have the old installation, then install the new server into its own installationdirectory:
a) Start the earlier version of Adaptive Server:
Move to the old $SYBASE directory:
cd $SYBASE
b) Run the source command on the SYBASE script file:
• Bourne shell – source SYBASE.sh
• C shell – source SYBASE.csh
c) Execute the runserver file:
$SYBASE/$SYBASE_ASE/install/RUN_server_name
You can also use sybcluster to bring up an earlier version of an Adaptive Server cluster.For example:1. Enter $SYBASE_UA/bin/uafstartup.sh
2. Start sybcluster:sybcluster -U uafadmin -P -C testcluster -F "ibmpoc01-p3:8888"> start cluster
d) In another window, change to the new $SYBASE directory and source SYBASE.sh(Bourne shell) or SYBASE.csh (C shell).
4. Run the reserved word check on the old Adaptive Server:
a) Install the Cluster Edition version of installupgrade:
Adaptive Server Upgrades
104 Adaptive Server Enterprise Cluster Edition
isql -Usa -Ppassword -Sserver_name -i$SYBASE/$SYBASE_ASE/scripts/installupgrade
b) Install the Cluster Edition version of usage.sql:isql -Usa -Ppassword -Sserver_name -i$SYBASE/$SYBASE_ASE/upgrade/usage.sql
c) Log in to the old Adaptive Server and execute sp_checkreswords on all databases:1> use sybsystemprocs2> go1> sp_checkreswords2> go
d) Correct any errors the reserved word check reveals.
5. Shut down the old Adaptive Server. Alternatively, you can bring down the old AdaptiveServer cluster using sybcluster, such as:sybcluster -U uafadmin -P -C testcluster -F "ibmpoc01-p3:8888"> shutdown cluster
6. Copy the old Adaptive Server mycluster.cfg configuration file from the old$SYBASE directory to the new $SYBASE directory.
7. (Required only if you are upgrading from a nonclustered server) Create the cluster inputfile. For example mycluster.inp:
#all input files must begin with a comment
[cluster]name = myclustermax instances = 2master device = /dev/raw/raw101config file = /sybase/server_name.cfginterfaces path = /sybase/traceflags =primary protocol = udpsecondary protocol = udp
[management nodes]hostname = blade1hostname = blade2
[instance]id = 1name = server_namenode = blade1primary address = blade1primary port start = 38456secondary address = blade1secondary port start = 38466errorlog = /sybase/install/server_name.logconfig file = /sybase/server_name.cfginterfaces path = /sybase/traceflags =additional run parameters =
[instance]id = 2
Adaptive Server Upgrades
Installation Guide 105
name = server_name_ns2node = blade2primary address = blade2primary port start = 38556secondary address = blade2secondary port start = 38566errorlog = /sybase/install/server_name_ns2.logconfig file = /sybase/server_name.cfginterfaces path = /sybase/traceflags =additional run parameters =
For an example of what this input file must contain, see The Cluster Input File on page68.
Note: The first instance’s server_name should be the name of the old server from whichyou are upgrading.
8. Create the quorum device and start the new instance with the old master device.
$SYBASE/$SYBASE_ASE/bin/dataserver\--instance=server_name\--cluster-input=mycluster.inp\--quorum-dev=/dev/raw/raw102--buildquorum-M$SYBASE
Note: The server_name you indicate with the --instance parameter must be the name ofthe server from which you are upgrading, and the interfaces file must contain an entry forthis instance. Any additional options such as -M must be present in the RUN_FILE as thedataserver does not read them from the quorum. For complete dataserver documentation,see the Clusters Users Guide.
If you are upgrading from a 15.0.1 or a 15.0.3 Cluster Edition to a Cluster Edition serverversion 15.5 or later, use the original quorum device and cluster input file, and specify --buildquorum=force to rebuild the quorum and to override the existing one. Determine theraw device used for the quorum device. For the version of the Cluster Edition, use a rawdevice on shared disks. Do not use a file-system device.
9. Run the upgrade utility, where instance_name is the first instance in your cluster that hasthe same name as the server from which you are upgrading:$SYBASE/$SYBASE_ASE/upgrade/upgrade -S instance_name -Ppassword
10. (Skip this step if you are upgrading from a 15.0.1, 15.0.3, or 15.5 Cluster Edition to a 15.7Cluster Edition server) Log in to the instance. Create the local system temporary databasedevices and local system temporary databases for each of the instances in your cluster. Thesyntax is:create system temporary database database_name for instance instance_name on device_name = size
11. Shut down the instance. Log in to the instance with isql and issue:
Adaptive Server Upgrades
106 Adaptive Server Enterprise Cluster Edition
shutdown instance_name
12. Restart the cluster.$SYBASE/$SYBASE_ASE/bin/dataserver \--instance=server_name\--quorum-dev=/dev/raw/raw102\-M$SYBASE
13. Log in to the Cluster Edition and execute sp_checkreswords on all of databases. Forexample, log in to the instance and execute:1> use sybsystemprocs2> go1> sp_checkreswords2> go
14. Correct any errors from the reserved word check.
15. Copy and modify the old run_server file to new directory. You must edit it to point tobinaries in the correct $SYBASE directories:a) Add this argument to the run_server file: --quorum-dev=<path to the
quorum device>b) Remove these options, as the information is now stored in the quorum device.
• -c• -i• -e
16. Start each instance in the cluster:cd $SYBASE/$SYBASE_ASE/installstartserver -fRUN_server_name
17. Install the system procedures:isql -Usa -Ppassword -Sserver_name -i$SYBASE/$SYBASE_ASE/scripts/installmaster
18. If Adaptive Server includes auditing, run installsecurity:
isql -Usa -P password -S server_name -i$SYBASE/$SYBASE_ASE/scripts/installsecurity
19. Run installcommit:
isql -Usa -Ppassword -Sserver_name -i$SYBASE/$SYBASE_ASE/scripts/installcommit
Upgrade a Noncluster Version of Adaptive Server to the ClusterEdition Using sybcluster
To upgrade from a noncluster Adaptive Server to the Cluster Edition, perform preupgradetasks, then upgrade using the sybcluster utility. If you already have a clustered AdaptiveServer, upgrade manually.
The command line-based sybcluster utility allows you to create and manage a cluster. Theutility uses the SCC Agent Framework to "plug in" to the Sybase Control Center remotecommand and control agent on each node in the cluster. The SCC agent processes thesybcluster commands that let you manage the cluster. See the Users Guide to Clusters for
Adaptive Server Upgrades
Installation Guide 107
detailed information about sybcluster, and the Sybase Control Center for Adaptive Server forthe SCC Agent Framework.
Before you start the upgrade:
• Back up old databases.• Install the Cluster Edition. Make sure that the nonclustered Adaptive Server that is to be
upgraded and the Adaptive Server Cluster Edition version 15.7 installation directories arelocated on the same machine. This is the upgrade machine.
• Review how to create and start a cluster, and prepare your worksheet for a list of theinformation you need for the upgrade.
Complete these tasks before you upgrade:
1. Make sure that your server is ready for upgrade.2. Upgrade the server to Adaptive Server Cluster Edition version 15.7.3. Perform the postupgrade tasks after the upgrade, whether you upgrade the server manually
or use sybcluster.
Verifying the Cluster Edition Server for UpgradeTest to make sure the server is ready for the upgrade process.
1. Start sybcluster. For example, enter:sybcluster -U uafadmin -P -F "mynode:8999"
where:• -U – is the login name for the Sybase Control Center agent. "uafadmin" is the default
value.• -P – is the SCC agent password. The default password for "uafadmin" is null or blank.• -F – specifies the node on which the Adaptive Server is running and the listening port
for the SCC agent. The default value is 9999.In this example, the node name is "mynode" and the SCC Agent Framework listeningport is 8999.
Note: You must specify the node on which the upgrade is to take place.
2. Start the verification. From the sybcluster command line, enter:upgrade server server_name checkonly
For example:upgrade server myserver checkonly
3. Respond to the upgrade server checkonly prompts.
If the verification process succeeds, you can upgrade the server.
If sybcluster displays error messages, resolve all error messages resulting from the checkbefore upgrading the server.
Adaptive Server Upgrades
108 Adaptive Server Enterprise Cluster Edition
Upgrading the Cluster Edition Server Using an Input FileAfter successfully completing the verification procedure, you can upgrade the server using aninput file.
1. Start sybcluster. For example, enter:sybcluster -U uafadmin -P -F "mynode:8999"
2. Start the upgrade. For example, enter:upgrade server myserver file "/data/myserver_ce.xml"
In this example, /data/myserver_ce.xml is the configuration file created duringthe validation procedure.
Note: The configuration file is similar to that used by sybcluster to create a cluster.
3. sybcluster displays these prompts:
a) Enter the name of an sa login on server server_name [sa] – press Enter to accept thedefault, or enter the name of another user with sa privileges on the target server.
b) Enter a password for the sa login.
sybcluster begins the upgrade procedure, displays informational messages as the upgradeproceeds, and confirms the success of the upgrade.
Upgrading the Cluster Edition Server InteractivelyUpgrade the old server interactively.
1. Start sybcluster. Enter:sybcluster -U uafadmin -P -F "node_name:port_number"
2. Start the upgrade. Enter:upgrade server server_name
3. Respond to the upgrade server prompts.
If sybcluster displays error messages, resolve all error messages resulting from the checkbefore upgrading the server.
Responding to upgrade server PromptsRun the upgrade server command to upgrade Adaptive Server, as well as to test its readinessfor upgrading.
Respond to the upgrade server prompts. Default values are displayed in square brackets. Theprompts are:
1. Enter the name of the cluster. [ server_name]: Enter the existing Sybase installationdirectory for server server_name.
2. Enter the existing Sybase installation directory for server server_name using the completepath to the Sybase installation directory, such as /myserver/sybase15.
Adaptive Server Upgrades
Installation Guide 109

3. Enter the name of the subdirectory containing the ASE installation for server server_name,such as ASE-15_0.
4. Enter the name of the subdirectory containing the OCS installation for serverserver_name. For example, enter “OCS-15_0”.
5. Enter the name of an sa login on server server_name, such as "sa."
6. Enter the password for the sa login.
7. Enter the maximum number of instances. [4]
8. Enter the number of nodes (hardware hosts) that will participate in this cluster. [1]
9. Enter the number representing the cluster node 1. [1]
10. Enter the full path to the quorum disk.
11. Enter any trace flags.
12. Enter the full path to the existing master device.
13. Indicate whether this cluster will have a secondary network. [Y]
14. Enter the port number from which this range will apply. [15100]
15. Enter the SYBASE home directory. [Your default location.]
16. Enter the environment shell script path. [Your default location.]
17. Enter the ASE home directory. [Your default location.]
18. Enter the interfaces directory. [Your default location.]
19. Enter path to the dataserver configuration file. [Your default location.]
20. Enter the name of the first instance in this cluster:
Note: The upgrade process creates a cluster with a single instance; add instances later onusing the add instance command.
21. Enter the interface file query port number for instance_name, making sure that the instancequery port number is the same as the query port number for the old nonclustered server.
22. Enter the local system temporary database device name.
23. Enter the local system temporary database device path.
24. Enter local system temporary database device size (MB).[100]
25. Enter the local system temporary database name, for example, [cluster_name_tdb_1 ]
26. Enter the local system temporary database size (MB).[100]
27. Specify whether you want save this configuration information in a file? [ Y ]
Note: If you are running upgrade server to verify that the server is ready for the upgradeprocess, you can use this file as input to upgrade the server. You can also use it as input tovalidate the server for numerous subsequent upgrades. For example:upgrade server server_name file "/data/myserver_ce.xml" checkonly
28. Enter the name of the file to save the cluster creation information.
Adaptive Server Upgrades
110 Adaptive Server Enterprise Cluster Edition
29. Create the cluster now? [Y]
If you enter Y and you are running upgrade server to:• Test the server to verify that it can be upgraded, upgrade server begins the verification
process and displays informational messages as the process proceeds, but does notperform an actual upgrade.
• Upgrade Adaptive Server, sybcluster begins upgrading the server, displayinginformational messages as the process proceeds.
Installation of Version 15.7 over an Existing 15.x Adaptive ServerUse a binary overlay to install Adaptive Server 15.7 over an existing version 15.x installationdirectory.
If you have enabled the Java in the database feature, create the sybpcidb database anddisable the feature during the installation.
Determining the Adaptive Server VersionVerify that your current version of Adaptive Server is not earlier than 15.x before using thebinary overlay.
If your server is at a 15.x version level, you can begin installing Adaptive Server 15.7.
1. Verify that your version of Adaptive Server you have is version 15.x:
• If your server is running:1> select @@version2> go
• If your server is not running: $SYBASE/$SYBASE_ASE/bin/dataserver -v
2. Source environment variables before executing dataserver -v.
If the result shows that the Adaptive Server is lower than version 15.x, you cannot use thebinary overlay, but use an upgrade method instead. See Adaptive Server Upgrades on page87.
Backing Up Adaptive ServerInstalling Adaptive Server version 15.7 overwrites the current Adaptive Server software.Before installing, verify that your databases are error free, and back up the Sybase directory.
1. To ensure that your database is error free, run dbcc checkdb, dbcc checkcatalog and dbcccheckstorage before loading any new Adaptive Server binaries, including the masterdatabase. If the dbcc commands reveal problems, check the Error Messages andTroubleshooting Guide for actions necessary to fix the problem. If the error is not listed inthe manual, call Sybase Technical Support.
Adaptive Server Upgrades
Installation Guide 111
2. After you have verified that your database is error free, back up your $SYBASE directoryin case you need to roll back to the original version of the software.
3. Adaptive Server provides the uninstmsgs.ebf script for backing up sysmessagesbefore upgrading to 15.7. Use it to back up sysmessages before runninginstmsgs.ebf.
Installing Adaptive Server Using Binary OverlayUse the installer to install Adaptive Server version 15.7 on top of an Adaptive Server that is noearlier than version 15.x.
1. From your SYBASE directory, shut down the servers that are using the binaries.
2. Use the installer to load the new software from the CD or DVD.
Navigate to the CD or DVD drive and enter ./setup.bin.
3. Install Adaptive Server 15.7 into the existing $SYBASE installation path.
Note: Once files are loaded into your $SYBASE directory, select not to configure the newserver, and click Continue to finish the installation.
4. Restart Adaptive Server.$SYBASE/$SYBASE_ASE/install/startserver [-f RUN_server_name file]
5. Run select @@version. The server should now be at version 15.7.
6. In Adaptive Server version 15.7, several changes have been made to the system storedprocedures and many new error messages have been added. After performing a binaryoverlay, you must perform the postinstallation tasks before running installmaster orinstmsgs.ebf.
7. Once the server has been brought up on the new binary and and you have completed theupgrade of system tables, shut down then restart Adaptive Server. This prevents incorrecttable statistics from being stored in memory, and which may lead to poorly optimizedquery plans.
Postupgrade TasksAfter you have upgraded, make sure your new Adaptive Server is up and running.
The upgrade process does not cause any changes in existing statistics, so you need not runupdate statistics on any tables after the upgrade. If you are upgrading from Adaptive Serverversion 15.x, however, restart the server to make the statistics available.
Warning! Running installpcidb drops and re-creates the sybpcidb database and all of thetables and data. The configuration returns to a default state. If you have made any changes tothe pluggable component interface (PCI) configuration, you must make the same changesagain after running installpcidb.
Adaptive Server Upgrades
112 Adaptive Server Enterprise Cluster Edition
1. After upgrading from Adaptive Server Cluster Edition version 15.0.1 to 15.5 ClusterEdition, you must a one-time procedure for each of your user-created nodes to update theJAR and XML files.
2. If you upgraded from Adaptive Server version 12.5.2 or earlier, run dbcc checkcatalogwith the fix option to ensure there are no issues with OAM pages:dbcc checkcatalog (database_name, fix)
3. Install new system stored procedures before starting any application activities:isql -Usa -Psa_password -Sserver_name -i$SYBASE/$SYBASE_ASE/scripts/script_name -ooutput_file
The output of the script is saved in output_file. See How Compiled Objects areHandled When Upgrading Adaptive Server on page 127 if you are using dbccupgrade_object to upgrade compiled objects such as check constraints, rules, triggers,and views.
4. Run the scripts for different options or licensed features:
• installcommit – if you use two-phase commit or distributed transactions, re-runinstallcommit to restore:• sp_start_xact
• sp_abort_xact
• sp_remove_xact
• sp_stat_xact
• sp_scan_xact
• sp_probe_xact
• installsecurity – if you used auditing in your earlier installation.• installhasvss – if you enabled high availability, and are using this feature in this
installation.• installmsgsvss – if you enabled real-time messaging, and you are using this feature in
this installation.• installpcidb – if you enabled the Java in the database feature in your earlier installation.• installjsdb – if you enabled Job Scheduler in your earlier installation.
5. If you have any system stored procedures that you had saved from before the upgrade(because you had modified them without altering their names), reload them now.
6. Restore functionality in Adaptive Server.
7. Reenable auditing.
Updating JAR and XML FilesAfter the upgrade process completes, Sybase recommends that you configure the SybaseControl Center agent by updating its associated JAR and XML files to manage your cluster.
Adaptive Server Upgrades
Installation Guide 113

This allows you to use the sybcluster utility and the Adaptive Server plug-in to manage thecluster.
1. Start the SCC agent.
2. Run the sybcluster utility.
3. Use the sybcluster deploy plugin command to configure the SCC agent for your cluster.
If your XML files are from the $LOWVERSION_SYBASE, then refer to the lower-version installation location. If they are from the higher version number,$HIGHVERSION_SYBASE refer to the higher-version installation location.
4. Compare the versions, then add the lower version agent-plugin.xml uniqueproperties to the higher version agent-plugin.xml properties.
$LOWVERSION_SYBASE/SCC-3_2/nodes/Host Name/plugins/Cluster OR InstanceName/agent-plugin.xml with $HIGHVERSION_SYBASE/SCC-3_2/nodes/Host Name/plugins/Cluster OR InstanceName/agent-plugin.xml,
For example, copy this property from the lower-version XML file to the higher-versionXML file. <set-property property="ase.database.devices" value="[1,sysprocsdev,/work/river/ase1501ce/data/sybsystemprocs.dat,150,135;0,master,/work/river/ase1501ce/data/master.dat,80,60;2,systemdbdev,/work/river/ase1501ce/data/sybsystemdb.dat,12,12;3,lstdb1,/work/river/ase1501ce/data/lstdb1.dat,50,50]" />
5. Repeat this procedure for all of the nodes in the cluster.
6. Shut down the SCC agent.
Running the instmsgs.ebf ScriptRun message-related scripts after upgrading from an Adaptive Server version 15.0.x toversion 15.7.
1. If you upgraded from Adaptive Server version 15.0.x, run uninstmsgs.ebf:isql -Usa -Ppassword -w1000 -iuninstmsgs.ebf -orestoremsgs.ebf
This safeguards your modified messages in the master database before you install thedefault version 15.7 messages.
2. Regardless of the Adaptive Server version you upgraded from, run the instmsgs.ebf:isql -Usa -Ppassword -iinstmsgs.ebf
Note: To undo instmsgs.ebf changes, run this script once you have downgraded to theversion from which you upgraded:isql -S -Usa -P restore_msgs.ebf
3. If you use localized files, install any localized language using langinstall, sqlloc, orsyconfig.
Adaptive Server Upgrades
114 Adaptive Server Enterprise Cluster Edition
If you run instmsgs.ebf after installing the 15.7 localized message, this script may deletesome new messages.
Restoring Functionality in Adaptive Server After UpgradingRestore functionality in the server after an upgrade.
1. If you changed any configuration parameters before upgrading, use sp_configure to setthem back to their earlier values.
2. Use sp_dboption to reset any database options you disabled before upgrading.
3. Before you use the upgraded server, verify that all scripts developed at your site point toAdaptive Server 15.7.
4. Verify procedure cache allocation. The size should be the same as before upgrading, unlessthe original size was smaller than the default value.
5. Check the procedure cache requirements. Stored procedures, triggers, and other compiledobjects require much more memory to run in Adaptive Server 15.7.
Use sp_configure to increase the procedure cache size during runtime, andsp_configure verify to verify any changes you make to the configuration file withouthaving to restart Adaptive Server:sp_configure "configuration file", 0, "verify", "full_path_to_file"
See Reference Manual: Procedures and the Performance and Tuning Guide for detailsabout sp_configure and sp_sysmon, and the System Administration Guide forinformation on configuring memory.
6. Verify data cache allocation.
The server ensures that all data cache sizes remain the same after upgrading. AdaptiveServer treats this size as an absolute value of 8MB and sets it in the config file..
During the upgrade process, the server ensures that the default data cache size remains thesame. Therefore, during the preupgrade process, the size of the default data cache isobtained and written to the configuration file as an absolute value, not as a default. Thisenables the server to have the same default data cache size as before the upgrade. If this sizeis less than the default size of 8MB, the server allocates a default data cache of 8MB.
7. If you unmirrored devices, remirror them using the disk remirror command.
8. If you used compiled objects, see How Compiled Objects are Handled When UpgradingAdaptive Server on page 127.
9. If you used two-phase commit in the earlier version of Adaptive Server, run the script toinstall the two-phase commit tables:isql -Usa -Psa_password -Sserver_name -i$SYBASE/$SYBASE_ASE/scripts/installcommit
Adaptive Server Upgrades
Installation Guide 115
Reenabling AuditingIf the server you upgraded from was configured for auditing, reenable auditing in the upgradedserver.
1. Enter:
sp_configure 'auditing', 1
2. Reenable auditing for all system stored procedures for which auditing was enabled beforethe upgrade.
a) Use the output of sp_displayaudit recorded during preupgrade to help determine thesystem stored procedures for which auditing was enabled.
b) Reenter the audit options using sp_audit. For example, if you had enabled storedprocedure auditing for sp_addlogin stored procedure in your server before upgrade,run:sp_audit "exec_procedure", "all", "sp_addlogin", "on"
Updating Threshold Procedures for Audit SegmentsAn update is required for threshold procedures used to archive audit segments.
If your installation used a threshold procedure, similar to this, to archive the sysaudits table:INSERT MyPre15SysAuditHistoryTable SELECT * FROMsysaudits_0n
where n corresponds to the sysaudits table number 1–8 andMyPre15SysAuditHistoryTable is a table defined prior to Adaptive Server version15.7, then you must alter MyPre15SysAuditHistoryTable to add a nodeid columnusing:alter table MyPre15SysAuditHistoryTable add nodeid tinyint NULL
See the Reference Manual: Tables for system tables for details about the sysaudits tables.
Reenabling Replication Server After the Dataserver UpgradeIf you disabled replication before the upgrade, you must reenable replication.
1. Remove older formatted log records from your database.
2. Use the dump tran command to dump the database and transaction logs to remove theolder format log records from your database. This prevents Replication Agent™ and otherlog readers from accessing the preupgrade portion of the transaction logs.
1> use master2> go1> dump database sales to dumpdev2> go1> dump transaction sales with truncate_only2> go
Adaptive Server Upgrades
116 Adaptive Server Enterprise Cluster Edition
3. Reenable replication.
Restoring Replication on Replicate DatabasesRestore replication if you have upgraded a destination-only dataserver in a replication system.
Perform these steps for each replicate database and Replication Server System Database(RSSD).
1. Start Adaptive Server if it is not already running.
2. Log in to the Adaptive Server.
3. If you have zeroed out the locator for the database, go to step 4. Otherwise, stopReplication Server, then run:1> use RSSD2> go1> rs_zeroltm dataserver, database2> go
4. Restart the Replication Servers.
5. Resume the DSI connections that were suspended before the upgrade by executing thefollowing Replication Server command for each suspended database:1> resume connection to dataserver.database2> go
The replication system is now ready for Adaptive Server 15.7, and applications can resume.
If you installed any Sybase client products, such as Open Client, use the dsedit utility to edityour interfaces file and to specify the servers to which you want to connect.
For more information about establishing client/server connections, see the Open ClientConfiguration Guide.
Restoring Replication on Primary DatabasesRestore replication if you have upgraded a source database, or primary database, in aReplication Server system, or the destination database is also a source for other ReplicationServers.
1. If you have zeroed out the locator for the database, go to the next step. Otherwise, stopReplication Server, then run:
1> use RSSD_name2> go1> rs_zeroltm dataserver, database2> go
2. Log in to each replicated primary, and replicated RSSD and issue:1> use database2> go
1> dbcc settrunc ('ltm', 'valid')2> go
Adaptive Server Upgrades
Installation Guide 117

3. Restart the Replication Server.
4. If the database is also used as an RSSD, resume the Replication Server connection to theRSSD by issuing the following command to the Replication Server specifying the samestring that was specified during the 'hibernate_on' command:1> sysadmin hibernate_off, 'Replication Server'2> go
5. Log in to the Replication Server, and resume the log transfer connection for each replicatedprimary and each replicated RSSD:1> resume log transfer from server.database2> go
If this is a replicated RSSD, you must log in to the replicate Replication Server.
6. If you are using Rep Agent, log in to the Adaptive Server and restart the Rep Agent:1> use database2> go1> sp_start_rep_agent database2> go
7. If you are using the Log Transaction Manager, restart it.
MigrateYou can migrate from a nonclustered to the Cluster Edition of Adaptive Server.
To migrate, you can:
• Use dump and load.• Use the bcp bulk copy utility.
Migrating Data Using a Dump-and-Load MethodTo perform migrations, back up and restore databases using the dump and load commands.
1. Run dbcc checks on all databases in your original server and make sure they run cleanly.
2. Create a Cluster Edition server in a new directory.
3. Create devices and databases to match those in the Cluster Edition server. Make sure thatthe sysusages mapping is correct.
Note: Allow 10 percent additional space for the sybsystemprocs database.
4. Dump the databases from the original server.
5. Load the databases to the Cluster Edition server.
6. If you have partitioned tables, update partition statistics.
7. Run dbcc checks on the Cluster Edition server and make sure they run cleanly.
For information on upgrading compiled objects, see Finding Compiled Object ErrorsBefore Production on page 128.
Adaptive Server Upgrades
118 Adaptive Server Enterprise Cluster Edition
Migrating a Server Configured for High AvailabilityIf you use high availability, migrate from an Adaptive Server configured with Sybase active-active or active-passive high availability, before upgrading to the Cluster Edition:
See Using Sybase Failover in a High Availability System for more information about AdaptiveServer for high availability.
1. Use the appropriate cluster subsystem command to stop monitoring resources associatedwith Adaptive Server on each node.
2. If Adaptive Server is configured for active-active high availability, drop the high-availability companionship:
a) For an asymmetric configuration, issue this command on the secondary companion:sp_companion primary_companion_name, "drop"
b) For a symmetric configuration, issue this command on the primary and the secondarycompanion:
sp_companion companion_name, "drop"
3. (If you are running an active-active configuration) Issue this command on bothcompanions to verify that both are in single-server mode:sp_companion
Each companion issues this message if it is in single-server mode:Server 'server_name' is currently in 'Symmetric normal' mode.
4. Remove the resources in the cluster subsystem created for high availability such asresource groups. These are not necessary in the Cluster Edition.
5. Disable the configuration option enable HA on the companion server. Log in to thecompanion and issue:sp_configure "enable HA", 0
In an active-active configuration, you must do this on both companions.
6. Follow the steps described in the following sections to upgrade Adaptive Server to theCluster Edition.
Adaptive Server Components and Related ProductsAfter you finish upgrading Adaptive Server, upgrade its components and related products.
Upgrading Job SchedulerAfter upgrading to a new Adaptive Server, upgrade Job Scheduler.
Note: You must have $SYBASE/$SYBASE_OCS/bin directory in $PATH so the isqlexecutable is accessible. Use isql to perform all the steps in this task.
Adaptive Server Upgrades
Installation Guide 119
1. Copy the directory services entry for JSAGENT (or jsagent) from the old server to the newserver.
2. Make sure the new server is running.
3. Stop the Job Scheduler:1> sybmgmtdb..sp_sjobcontrol @name=NULL, @option="stop_js"2> go
4. Ensure that at least 9000 locks are configured. If the number of locks on the server is fewerthan 9000, increase the number of locks:1> sp_configure "number of locks", 90002> go
5. Upgrade the internal Job Scheduler SQL code using:1> use sybmgmtdb2> go1> dbcc upgrade_object2> go
6. Restart Adaptive Server.
7. (Optional) Add more log space. Some 64-bit platforms require additional space for thesybmgmtdb log:
1> use master2> go1> alter database sybmgmtdb LOG on sybmgmtdev=202> go
8. To upgrade sybmgmtdb, run the installjsdb script that is included and save theoutput to a file:isql -Usa -Psa_password -Sservername -n -i$SYBASE/$SYBASE_ASE/scripts/installjsdb-ooutput_file
Note: When upgrading from Adaptive Server version 12.5.x to 15.5 and later, increase thesize of sybmgmtdb from 50MB to 90MB.
9. Enable Job Scheduler to start when Adaptive Server starts:sp_configure "enable job scheduler", 1
10. To start Job Scheduler from isql, enter:sybmgmtdb..sp_sjobcontrol @name=NULL, @option="start_js"go
Upgrading Job Scheduler TemplatesAfter upgrading to the new server, upgrade the templates and jobs created by Job Scheduler.
Note: Several changes impact the Job Scheduler templates. These changes make sometemplates incompatible with earlier versions of the server. The current templates are version3.0 in the XML files.
1. Disable Job Scheduler.
Adaptive Server Upgrades
120 Adaptive Server Enterprise Cluster Edition
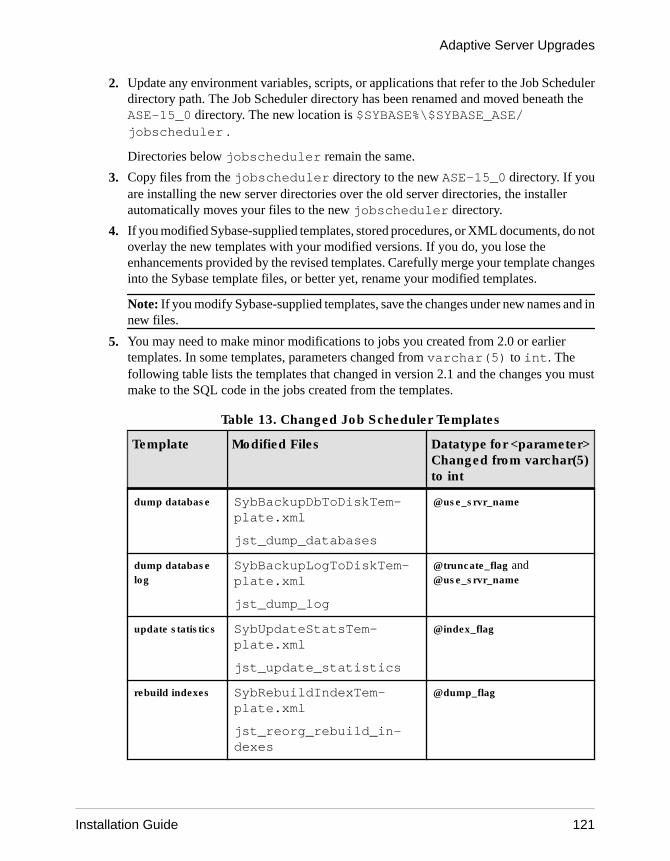
2. Update any environment variables, scripts, or applications that refer to the Job Schedulerdirectory path. The Job Scheduler directory has been renamed and moved beneath theASE-15_0 directory. The new location is $SYBASE%\$SYBASE_ASE/jobscheduler .
Directories below jobscheduler remain the same.
3. Copy files from the jobscheduler directory to the new ASE-15_0 directory. If youare installing the new server directories over the old server directories, the installerautomatically moves your files to the new jobscheduler directory.
4. If you modified Sybase-supplied templates, stored procedures, or XML documents, do notoverlay the new templates with your modified versions. If you do, you lose theenhancements provided by the revised templates. Carefully merge your template changesinto the Sybase template files, or better yet, rename your modified templates.
Note: If you modify Sybase-supplied templates, save the changes under new names and innew files.
5. You may need to make minor modifications to jobs you created from 2.0 or earliertemplates. In some templates, parameters changed from varchar(5) to int. Thefollowing table lists the templates that changed in version 2.1 and the changes you mustmake to the SQL code in the jobs created from the templates.
Table 13. Changed Job Scheduler Templates
Template Modified Files Datatype for <parameter>Changed from varchar(5)to int
dump database SybBackupDbToDiskTem-plate.xml
jst_dump_databases
@use_srvr_name
dump databaselog
SybBackupLogToDiskTem-plate.xml
jst_dump_log
@truncate_flag and@use_srvr_name
update statistics SybUpdateStatsTem-plate.xml
jst_update_statistics
@index_flag
rebuild indexes SybRebuildIndexTem-plate.xml
jst_reorg_rebuild_in-dexes
@dump_flag
Adaptive Server Upgrades
Installation Guide 121
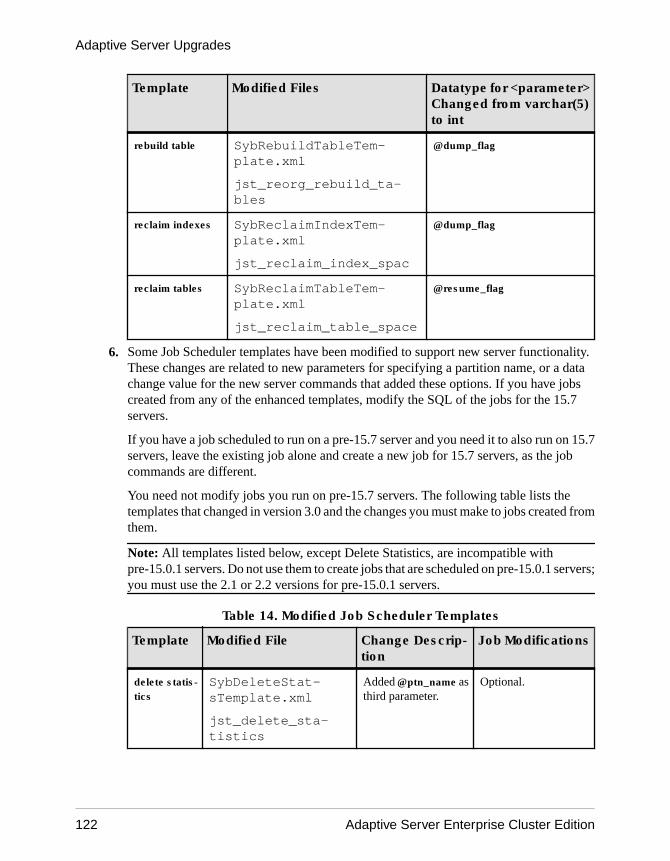
Template Modified Files Datatype for <parameter>Changed from varchar(5)to int
rebuild table SybRebuildTableTem-plate.xml
jst_reorg_rebuild_ta-bles
@dump_flag
reclaim indexes SybReclaimIndexTem-plate.xml
jst_reclaim_index_spac
@dump_flag
reclaim tables SybReclaimTableTem-plate.xml
jst_reclaim_table_space
@resume_flag
6. Some Job Scheduler templates have been modified to support new server functionality.These changes are related to new parameters for specifying a partition name, or a datachange value for the new server commands that added these options. If you have jobscreated from any of the enhanced templates, modify the SQL of the jobs for the 15.7servers.
If you have a job scheduled to run on a pre-15.7 server and you need it to also run on 15.7servers, leave the existing job alone and create a new job for 15.7 servers, as the jobcommands are different.
You need not modify jobs you run on pre-15.7 servers. The following table lists thetemplates that changed in version 3.0 and the changes you must make to jobs created fromthem.
Note: All templates listed below, except Delete Statistics, are incompatible withpre-15.0.1 servers. Do not use them to create jobs that are scheduled on pre-15.0.1 servers;you must use the 2.1 or 2.2 versions for pre-15.0.1 servers.
Table 14. Modified Job Scheduler Templates
Template Modified File Change Descrip-tion
Job Modifications
delete statis-tics
SybDeleteStat-sTemplate.xml
jst_delete_sta-tistics
Added @ptn_name asthird parameter.
Optional.
Adaptive Server Upgrades
122 Adaptive Server Enterprise Cluster Edition
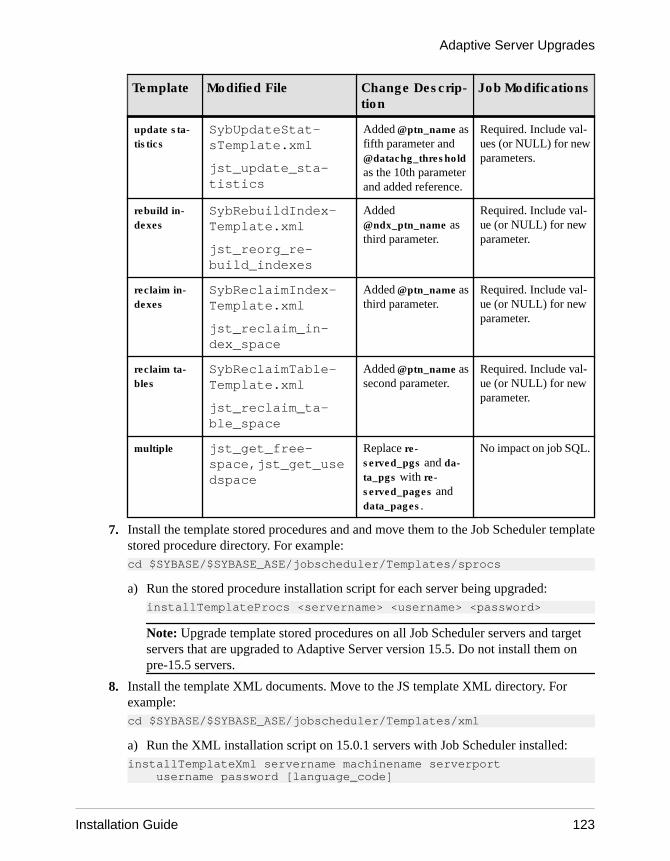
Template Modified File Change Descrip-tion
Job Modifications
update sta-tistics
SybUpdateStat-sTemplate.xml
jst_update_sta-tistics
Added @ptn_name asfifth parameter and@datachg_thresholdas the 10th parameterand added reference.
Required. Include val-ues (or NULL) for newparameters.
rebuild in-dexes
SybRebuildIndex-Template.xml
jst_reorg_re-build_indexes
Added@ndx_ptn_name asthird parameter.
Required. Include val-ue (or NULL) for newparameter.
reclaim in-dexes
SybReclaimIndex-Template.xml
jst_reclaim_in-dex_space
Added @ptn_name asthird parameter.
Required. Include val-ue (or NULL) for newparameter.
reclaim ta-bles
SybReclaimTable-Template.xml
jst_reclaim_ta-ble_space
Added @ptn_name assecond parameter.
Required. Include val-ue (or NULL) for newparameter.
multiple jst_get_free-space,jst_get_usedspace
Replace re-served_pgs and da-ta_pgs with re-served_pages anddata_pages.
No impact on job SQL.
7. Install the template stored procedures and and move them to the Job Scheduler templatestored procedure directory. For example:cd $SYBASE/$SYBASE_ASE/jobscheduler/Templates/sprocs
a) Run the stored procedure installation script for each server being upgraded:installTemplateProcs <servername> <username> <password>
Note: Upgrade template stored procedures on all Job Scheduler servers and targetservers that are upgraded to Adaptive Server version 15.5. Do not install them onpre-15.5 servers.
8. Install the template XML documents. Move to the JS template XML directory. Forexample:cd $SYBASE/$SYBASE_ASE/jobscheduler/Templates/xml
a) Run the XML installation script on 15.0.1 servers with Job Scheduler installed:installTemplateXml servername machinename serverport username password [language_code]
Adaptive Server Upgrades
Installation Guide 123
Use "en" for the language_code or omit the parameter completely, as "en" is the default.
Note: Upgrade template XML on all Job Scheduler servers upgraded to Adaptive Serverversion 15.0.1. Do not install them on pre-15.0.1 servers or servers where Job Scheduler isnot installed.
Upgrading High Availability and Cluster SupportUpgrade the cluster subsystem.
Adaptive Server 15.7 supports these cluster platforms for high availability:
• HP-UX – MCSG 11.17• HPIA – MCSG 11.18• IBM AIX – HACMP 5.4• Sun Solaris – VCS4.0, SunCluster 3.2• Linux-AMD – VCS4.1• Win2003 – Cluster Manager 5.2
There are two ways to upgrade a cluster subsystem:
• Perform a major upgrade, which involves cluster downtime, then shutt down and restart allservers. You must:
a) Run sp_companion suspend, as described in Using Sybase Failover in a HighAvailability System.
b) Take offline the resource groups of primary and secondary companions on both nodes.Ensure that the companion server and corresponding resource groups are notautomatically brought online until the cluster system upgrade is complete.
c) Upgrade the cluster subsystem following the instructions from the cluster systemvendor. You may find options to migrate the current resource groups to the new clusterversion. If such an option is not available (or if the resource groups get deleted orcorrupted), re-create the resource groups and configure them appropriately after youhave upgraded the cluster system.
d) Bring the resource groups online. This should bring primary and secondarycompanions online on their respective nodes.
e) Run sp_companion resume as described in Using Sybase Failover in a HighAvailability System.
• Perform a minor upgrade, to avoid cluster downtime. Nodes are failed over to other nodesand upgraded one at a time. For example, assuming ASE1 is the primary companion onnode N1, and ASE2 is secondary companion running on node N2:
a) Upgrade the primary companion:
1. Relocate the primary resource group to N2 or shut down ASE1. This causes ASE1to fail over from N1 to N2.
Adaptive Server Upgrades
124 Adaptive Server Enterprise Cluster Edition

2. Upgrade the cluster subsystem on N1 following the upgrade instructions providedby the vendor.
3. Fail back ASE1 from N2 to N1. See the appropriate cluster chapter in Using SybaseFailover in a High Availability System for more details on Adaptive Serverfailback.
b) Upgrade the secondary companion. If you are using a symmetric configuration, followthe steps in "upgrade the primary companion," above, for ASE2.If you are using an asymmetric configuration:1. Take the secondary resource group offline and verify ASE2 is shut down. ASE2 is
unavailable during this upgrade.2. Upgrade the cluster subsystem on N2 following the upgrade instructions from the
vendor.3. Start ASE2 by bringing the secondary resource group online to N2.
Upgrading Java in the DatabaseThe pluggable component interface (PCI) configuration values are used by all of the nodes in acluster. To share files between nodes, using working directories, you need shared directorylocations in the file system that are visible to all nodes using the same path.
Each node has its own separate and local temporary directory usually /tmp on UNIX, tmp onWindows.
1. Run the installpci script only on the first node, not on any other nodes in the cluster. Asingle instance of the PCI configuration is shared between the nodes of a cluster.
2. Create the sybpcidb database before running the installpcidb script. You can choose thelocation and size of this database. As long as the database is named sybpcidb theinstallpcidb script works correctly. For example:1> disk init2> name = "sybpcidb_dev",3> physname = "/dev/raw/raw20",4> size = '24MB'5> go1> create database sybpcidb on sybpcidb_dev = 242> go
3. Once the sybpcidb database has been created, run the installpcidb script to create andpopulate the tables that hold the PCI and pluggable component adapter (PCA)configuration properties. Stored procedures and tables are created in the sybpcidbdatabase. Use isql to run the installpcidb script that is included with the release. Save theoutput to an operating system file. For example:isql -Usa -P<sa_password> -S<server_name> -i$SYBASE/$SYBASE_ASE/scripts/installpcidb -o<output_file>
4. Enable the Java in the database functionality:1> sp_configure 'enable pci', 12> go
Adaptive Server Upgrades
Installation Guide 125

1> sp_configure 'enable java', 12> go
You may need to increase 'max memory' to enable these parameters. Restart the server forchanges to take effect. You can configure the maximum size of the PCI Bridge memorypool through the 'pci memory size' configuration parameter. For more information, seeJava in Adaptive Server Enterprise for 15.7.
Enabling Java in the Database in a High-Availability SystemYou can use the Java in the database feature on a system that also uses high availability.
Drop high availability companionship before installing the sybpcidb, and reestablishcompanionship afterwards.
Java in the database feature must be either enabled or disabled on both nodes of the highavailability system.
Upgrading Backup ServerYou can upgrade Backup Server at any point after you upgrade Adaptive Server using similarsteps. XP Server does not have a formal upgrade process.
1. If you are upgrading during the initial server installation, select:
• Upgrade Existing Servers from the drop-down menu when the installer promptsBuild
• Upgrade Adaptive Server and Backup Servers.
This launches the sqlupgrade utility. Click OK.
2. If you are upgrading after the initial installation, start the sqlupgrade utility from thecommand line. Enter:$SYBASE/$SYBASE_ASE/bin/sqlupgrade
3. Perform the upgrade steps as prompted.
Upgrading Databases Using Dump and LoadWhen you upgrade Adaptive Server, you can also upgrade databases and transaction logs fromversions of Adaptive Server as early as 12.5 using the dump and load commands.
Some issues of which you should be aware:
• The upgrade process requires space for copying data and logging changes to the systemtables. If the source database in the dump was full, the upgrade process might fail. You canuse alter database to extend the free space in the event of insufficient-space errors.
• After reloading an older dump, run sp_checkreswords from the new installation on theloaded database to check for reserved words.
Adaptive Server Upgrades
126 Adaptive Server Enterprise Cluster Edition

How Compiled Objects are Handled When Upgrading Adaptive ServerAdaptive Server upgrades compiled objects based on their source text.
Compiled objects include:
• Check constraints• Defaults• Rules• Stored procedures (including extended stored procedures)• Triggers• Views
The source text for each compiled object is stored in the syscomments table, unless it hasbeen manually deleted. The upgrade process verifies the existence of the source text insyscomments. However, compiled objects are not actually upgraded until they are invoked.
For example, if you have a user-defined stored procedure named list_proc, the presence of itssource text is verified when you upgrade. The first time list_proc is invoked after the upgrade,Adaptive Server detects that the list_proc compiled object has not been upgraded. AdaptiveServer recompiles list_proc, based on the source text in syscomments. The newly compiledobject is then executed.
Upgraded objects retain the same object ID and permissions.
You do not receive any notification if the compiled objects in your database dump are missingsource text. After loading a database dump, run sp_checksource to verify the existence of thesource text for all compiled objects in the database. Then, you can allow the compiled objectsto be upgraded as they are executed, or you can run dbcc upgrade_object to find potentialproblems and upgrade objects manually.
Compiled objects for which the source text was hidden using sp_hidetext are upgraded in thesame manner as objects for which the source text is not hidden.
For information on sp_checksource and sp_hidetext, see Reference Manual: Procedures.
Note: If you are upgrading from a 32-bit to a 64-bit Adaptive Server, the size of each 64-bitcompiled object in the sysprocedures table in each database increases by approximately55 percent when the object is upgraded. The pre-upgrade process calculates the exact size;increase your upgraded database size accordingly.
To determine whether a compiled object has been upgraded, and you are upgrading to a 64-bitpointer size in the same version, look at the sysprocedures.status column. It contains ahexadecimal bit setting of 0x2 to indicate that the object uses 64-bit pointers. If this bit is notset, the object is a 32-bit object, which means the object has not been upgraded.
To determine whether a compiled object has been upgraded, look at the sysprocedures.versioncolumn. If the object was upgraded, this column contains the number 12500.
Adaptive Server Upgrades
Installation Guide 127
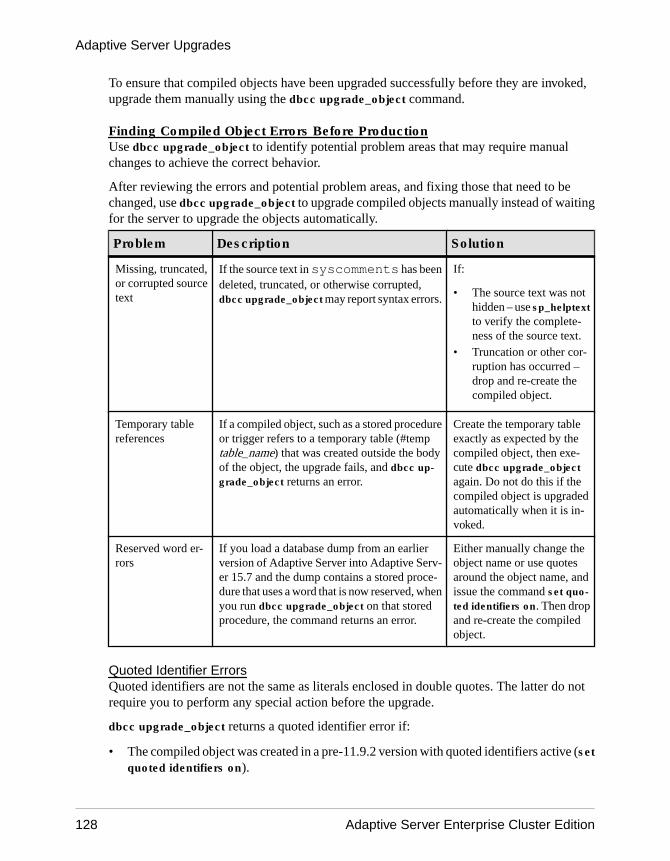
To ensure that compiled objects have been upgraded successfully before they are invoked,upgrade them manually using the dbcc upgrade_object command.
Finding Compiled Object Errors Before ProductionUse dbcc upgrade_object to identify potential problem areas that may require manualchanges to achieve the correct behavior.
After reviewing the errors and potential problem areas, and fixing those that need to bechanged, use dbcc upgrade_object to upgrade compiled objects manually instead of waitingfor the server to upgrade the objects automatically.
Problem Description Solution
Missing, truncated,or corrupted sourcetext
If the source text in syscomments has beendeleted, truncated, or otherwise corrupted,dbcc upgrade_object may report syntax errors.
If:
• The source text was nothidden – use sp_helptextto verify the complete-ness of the source text.
• Truncation or other cor-ruption has occurred –drop and re-create thecompiled object.
Temporary tablereferences
If a compiled object, such as a stored procedureor trigger refers to a temporary table (#temptable_name) that was created outside the bodyof the object, the upgrade fails, and dbcc up-grade_object returns an error.
Create the temporary tableexactly as expected by thecompiled object, then exe-cute dbcc upgrade_objectagain. Do not do this if thecompiled object is upgradedautomatically when it is in-voked.
Reserved word er-rors
If you load a database dump from an earlierversion of Adaptive Server into Adaptive Serv-er 15.7 and the dump contains a stored proce-dure that uses a word that is now reserved, whenyou run dbcc upgrade_object on that storedprocedure, the command returns an error.
Either manually change theobject name or use quotesaround the object name, andissue the command set quo-ted identifiers on. Then dropand re-create the compiledobject.
Quoted Identifier ErrorsQuoted identifiers are not the same as literals enclosed in double quotes. The latter do notrequire you to perform any special action before the upgrade.
dbcc upgrade_object returns a quoted identifier error if:
• The compiled object was created in a pre-11.9.2 version with quoted identifiers active (setquoted identifiers on).
Adaptive Server Upgrades
128 Adaptive Server Enterprise Cluster Edition
• Quoted identifiers are not active (set quoted identifiers off) in the current session.
For compiled objects created in version 11.9.2 or later, the upgrade process automaticallyactivates or deactivates quoted identifiers as appropriate.
1. Activate quoted identifiers before running dbcc upgrade_object.
When quoted identifiers are active, use single quotes instead of double quotes aroundquoted dbcc upgrade_object keywords.
2. If quoted identifier errors occur, use the set command to activate quoted identifiers, andthen run dbcc upgrade_object to upgrade the object.
Determining Whether to Change select * in ViewsDetermine whether columns have been added to or deleted from the table since the view wascreated.
Perform these queries when dbcc upgrade_object reports the existence of select * in a view.
1. Compare the output of syscolumns for the original view to the output of the table.
In this example, you have the following statement:create view all_emps as select * from employees
Warning! Do not execute a select * statement from the view. Doing so upgrades the viewand overwrites the information about the original column information in syscolumns.
2. Before upgrading the all_emps view, use these queries to determine the number ofcolumns in the original view and the number of columns in the updated table:select name from syscolumns where id = object_id("all_emps")select name from syscolumns where id = object_id("employees")
3. Compare the output of the two queries by running sp_help on both the view and the tablesthat comprise the view.
This comparison works only for views, not for other compiled objects. To determinewhether select * statements in other compiled objects need to be revised, review the sourcetext of each compiled object.
If the table contains more columns than the view, retain the pre-upgrade results of theselect * statement. Change the select * statement to a select statement with specificcolumn names.
4. If the view was created from multiple tables, check the columns in all tables that comprisethe view and rewrite the select statement if necessary.
Adaptive Server Upgrades
Installation Guide 129

Adaptive Server Upgrades
130 Adaptive Server Enterprise Cluster Edition
Adaptive Server Downgrades
An Adaptive Server that has been upgraded to 15.7 requires specifics tasks before it can bedowngraded.
Even if you have not used any of the new features in Adaptive Server 15.7, the upgraded serveradds columns to system tables. This means you must use sp_downgrade to perform thedowngrade.
The sp_downgrade procedure requires sybase_ts_ role, and you must have sa_role orsso_role permissions. See sp_downgrade in Reference Manual: Procedures.
There are additional steps to perform if you are using encryption or replicated databases.
Note: You cannot downgrade a single database through dump and load directly fromAdaptive Server 15.7 to an earlier version.
Preparing to Downgrade Adaptive ServerPrepare your system before starting the downgrade.
Before you begin downgrading Adaptive Server, perform these steps for the features orconfigurations you enabled in Adaptive Server 15.7.
• If the logical page size for your Adaptive Server is larger than 8192 bytes and you haveconfigured any databases to allow wide data-only-locked (DOL) rows, turn the option off:sp_dboption @dbname, 'allow wide dol rows', false
Before you downgrade Adaptive Server, verify that no wide DOL rows exist in any table inthese databases. Adaptive Server cannot find them, and thus does not warn you about theirexistence. When you then downgrade to a version earlier than 15.7, Adaptive Server treatsthese as corrupt.
This does not occur if your logical page size is 8192 bytes or smaller.• If you have configured any database to use either row or page compression, turn it off:
alter database @dbname set compression none
• If any database has nonzero, in-row large object (LOB) lengths, set it to zero:alter database @dbname set inrow_lob_length = 0
• If any table is configured to use compression, turn it off:alter table @tablename set compression = nonereorg rebuild @tablename
• If any table uses LOB compression or in-row LOBs:
a) Copy the data from that table to a new table.
Adaptive Server Downgrades
Installation Guide 131
b) Drop the original table.• If any table was altered to include nonmaterialized columns, convert those columns to
standard columns:reorg rebuild @tablename
• If there are any holes in the log from previous alter database log off commands, removethe holes by using alter database log on to extend the log.
If you do not perform this before the downgrade, sp_downgrade displays an errormessage similar to:Error: Database 'dbname' contains num hidden pages that have to be filled. Please, use ALTER DATABASE LOG ON command to extend the log num pages.
You can extend the log on any device, as long as you specify the number of indicated pagesas being at least as large as the num value.
Downgrading from Adaptive Server 15.7Use sp_downgrade to downgrade Adaptive Server 15.7 to an earlier version.
Prerequisites
1. Save the current auditing settings for the 15.7 Adaptive Server by saving the output of thesp_displayaudit system procedure in all system and user databases where any auditingoptions have been turned on:1> sp_displayaudit2> go
2. Back up all of your databases and the $SYBASE release area.
Task
Downgrade from Adaptive Server 15.7 Cluster Edition to Adaptive Server Cluster Editionversions 15.5, 15.0.3, and 15.0.1.5. Downgrading to earlier versions of Adaptive Server is notsupported.
Note: The sybcluster utility does not have a built-in tool to perform an upgrade or downgradebetween two versions of Adaptive Server Cluster Edition.
1. If you have used pluggable component interface (PCI) functionality, and are downgradingto a version of the15.0.1 Cluster Edition or a 15.0.1 Cluster Edition ESD, drop thesybpcidb and restart the old server binary.
2. If you are downgrading to version 15.0.3 Cluster Edition, re-run installpcidb and restartthe old server binary.
3. Start the 15.7 Cluster Edition server in single-user mode, with only one instance running,using dataserver -m option to guarantee that no other user can access Adaptive Server
Adaptive Server Downgrades
132 Adaptive Server Enterprise Cluster Edition
while you are performing the downgrade. See Utility Guide for more details on starting theserver in single-user mode.
4. Make sure Adaptive Server 15.7 is prepared for downgrade by executing this commandfrom the master database:
sp_downgrade 'prepare', @toversion='version'
For downgrade purposes, Cluster Edition is differentiated from a nonclustered AdaptiveServer by a "5" at the end of the version string regardless of the version to which you wantto downgrade. If you are downgrading to Adaptive Server Cluster Edition version 15.5, forexample, specify your target version as "15.5.0.5". You may omit the periods and use"15505", but the number must still end with a 5. Otherwise, the procedure assumes '0' asthe final digit, indicating a nonclustered Adaptive Server. This produces an error, as youcannot downgrade from Cluster Edition to any nonclustered server.
sp_downgrade 'prepare' validates the readiness of Adaptive Server 15.7 for downgrade. Itmay print messages regarding manual changes required before the downgrade can becompleted. Repeat this step, correcting any errors reported, and make sure you understandthe implications of all warnings before proceeding.
5. Make sure Adaptive Server 15.7 Cluster Edition is prepared for downgrade by executingsp_downgrade from the master database:sp_downgrade 'prepare', @toversion=<'version'>, @override = 1
Write the value of "version" as "15.0.1.5", "15015", "15.0.3.5", or "15035". The versionyou enter is the version to which you are downgrading.
sp_downgrade 'prepare' validates the readiness of Adaptive Server 15.7 for downgrade. Itmay print messages regarding manual changes required before the downgrade can becompleted. Repeat this step, correcting any errors reported, and make sure you understandthe implications of all warnings before proceeding.
6. Execute the following, where version is the same number you used in the previous step:
sp_downgrade 'downgrade', @toversion='version', @override=1
Once this procedure completes successfully, there can be no more activity on the 15.7server. Run checkpoint and immediately shut down the 15.7 server by issuing theshutdown command to shut down the cluster.
Note: Since Adaptive Server 15.7 transaction logs may contain data that older serverversions cannot interpret correctly, all transactions in all databases must be completed toprevent the older server from recovering any transactions. To ensure that all transactionsare completed, issue the normal shutdown command, and not the shutdown with nowaitcommand, after running sp_downgrade.
7. Copy the RUN_SERVER file to the release area of the version to which you aredowngrading. Modify the RUN_SERVER file to use the dataserver binary from the release
Adaptive Server Downgrades
Installation Guide 133
area of the version to which you are downgrading. Remove the -m option when you modifythe RUN_SERVER file or ensure the server is not running in single-user mode.
8. Extract the quorum device using:qrmutil --quorum-dev=<dev> --extract-config=quorum.out
If you are downgrading to Cluster Edition version 15.0.1 or a 15.0.1 ESD, comment outthese two lines in quorum.out:
#installation mode=shared#membership mode=
9. Rebuild the new quorum device with the old quorum device backup you created by addingthis to the dataserver parameters:--buildquorum=force --cluster-input=quorum.out
10. Restart the old server using the modified RUN_SERVER file. Ensure that the environmentvariable points to the old server release such as $SYBASE, $SYBASE_ASE, or$SYBASE_OCS.
Note: If you restart a downgraded server using the 15.7 configuration file, the new optionscause the message Unknown parameter. This message is reported only the first timethe server is started. When downgrading to a 15.0.1 Cluster Edition server, user passwordsmay be reset and printed on the console. Save the output of sp_downgrade 'downgrade',<version> into a file so that the passwords are not lost. The old passwords do not work.Otherwise, you must restart the downgraded server with -psa to regenerate the sapassword.
11. Depending upon whether you are starting from a fresh installation or from a previouslyupgraded 15.x installation, run previously saved restore_msgs.ebf orinstmsgs.ebf from 15.0.1 Cluster Edition or 15.0.3 Cluster Edition if none weresaved, before running installmaster for the Cluster Edition.
12. Restart all instances of the cluster.
13. To restore the original messages for the earlier version of Adaptive Server, run this scriptafter downgrading the server:isql -Usa -Psa_password -irestoremsgs.ebf
If you have not used any 15.7 functionality, this completes the primary downgrade process.
Additional Considerations for New Features UsedAdditional downgrade steps may be necessary due to Adaptive Server 15.7 features that areunavailable in the Adaptive Server version to which you are downgrading.
In general, no additional steps are required when you are returning to an Adaptive Serverversion in which the feature was already available.
Adaptive Server Downgrades
134 Adaptive Server Enterprise Cluster Edition
Feature Considerations
Wide, varia-ble-length da-ta-only-locked (DOL)rows
You cannot downgrade versions that contain wide, variable-length DOL rows toversions that do not support the feature.
Use the dol_downgrade_check function to determine if a database includes tableswith wide, variable-length DOL rows. See Reference Manual: Building Blocks.
If you:
1. Disable the allow wide dol rows database option before performing a databaseor transaction log dump, then
2. Load these database dumps onto an earlier version of Adaptive Server
Data returned from queries on the wide rows may be incorrect, or queries might failbecause the earlier version of Adaptive Server perceives the data rows as corrupt.
Java in Adap-tive Server
• User classes compiled by a Java version later than 1.2 do not work in pre-15.0.3Adaptive Server versions.
• Earlier versions of Adaptive Server ignore the enable pci parameter; you canremove it.
• sybpcidb is not used by Adaptive Server versions earlier than 15.0.3, and maybe dropped.
sp_addserverwith filter pa-rameter
If you have any entries in sysservers.srvnetname column that are longerthan 32 bytes, delete these entries before downgrading, and add them back afterdowngrading.
Unicode non-characters
If you used sp_configure to enable functionality group or permissive Unicode inAdaptive Server 15.7, and also stored Unicode noncharacters (that is, u+FFFF oru+FFFE) in a database, you may see a conversion error after you downgrade to aversion earlier 15.7 when Adaptive Server retrieves the data and triggers a characterset conversion.
To avoid such errors, search for and remove those characters from the system.
Disabled var-binary trun-cation
If you used sp_configure to turn on the disable varbinary truncation config-uration in Adaptive Server 15.7, the varbinary data stored in the system mayhave trailing zeros. When you downgrade to a version earlier than 15.7, these trailingzeros are not removed and become part of the select output. This does not affectquery results involving comparisons.
Sharable in-line default
If you used sp_configure to enable the sharable inline default setting in AdaptiveServer 15.7 and downgrade to a version earlier than 15.7, running the ddlgen utilityto generate data definition language can cause Adaptive Server to generate extracreate default statements. You can remove such statements before using the outputto create new schema.
Adaptive Server Downgrades
Installation Guide 135
Downgrading Job SchedulerIf you are downgrading to Adaptive Server versions 15.0.1 Cluster Edition, 15.0.1 ClusterEdition ESD, or 15.0.3 Cluster Edition, run installjsdb script from the earlier version.
1. Disable Job Scheduler:1> sp_configure "enable job scheduler", 02> go1> sybmgmtdb..sp_sjobcontrol @name=NULL, @option="stop_js"2> go
2. Follow the downgrade steps for your platform.
3. After downgrading, enter this command from the earlier version of Adaptive Server:isql –Usa –Psa_password –Sservername–i$SYBASE/$SYBASE_ASE/scripts/installjsdb
Note: The directory with the isql executable ($SYBASE_OCS/bin) must be in yourpath.
4. Enable Job Scheduler:sp_configure "enable job scheduler", 1
5. To start Job Scheduler, either restart the server, or enter:1> use sybmgmtdb2> go1> sp_sjobcontrol @name=NULL, @option="start_js"2> go
Post-Downgrade Tasks for Adaptive ServerAfter you perform the basic downgrade steps, finish the process by handling residual tasks.
Sybase certifies that each version of Adaptive Server can connect to earlier releases throughComponent Integration Services. Component Integration Services is tested and certified toconnect to earlier versions of Adaptive Server.
Sybase does not certify that Component Integration Services running on earlier versions ofAdaptive Server can connect to later versions. You may encounter errors if an earlier versionof Adaptive Server maps a proxy table to a later version and the remote table uses functionalitynot available in the earlier release.
For example, if you have a local and a remote server, both running Adaptive Server version15.7 Cluster Edition, upgrade the local server first, if you are performing an upgrade on each ofthem. If one is to be upgraded but not the other, the local server should be upgraded first.
1. After you run installmaster, installcommit, installsecurity,installhasvss, and installmsgsvss on your downgraded server, any changed
Adaptive Server Downgrades
136 Adaptive Server Enterprise Cluster Edition

system stored procedures are returned to their earlier form. Any new stored proceduresintroduced to Adaptive Server are not removed. Attempts to execute such storedprocedures against an older binary may generate unpredictable results.
2. During the upgrade to Adaptive Server 15.7 you should have created arestore_msgs.ebf file. Run this script now to restore your messages back to theversion from which you upgraded:isql -Usa -P <sa_password> -S <server_name> -i <restore_msgs.ebf>
Note: If you upgraded from a version 15.0 or 15.0.1 and are reverting back to 15.0 or15.0.1, run instmsgs.ebf file only from the relevant release.
3. The on-disk structures of stored procedures, triggers, and views may contain statementidentity tokens, datatypes, and object references that are not understood by the earlierAdaptive Server versions. You must drop all compiled objects that use features introducedinto Adaptive Server subsequent to the version to which you are downgrading.
4. If during the upgrade process you ran update all statistics on syslogins, you mustdelete statistics for syslogins and re-create them.
spt_values are dropped and re-created when you run installmaster from the release areayou downgraded to. Any new types are eliminated from this table.
5. Run installmaster from the release area of the server to which you downgraded to removeconfiguration parameters that belong to 15.7, by deleting sysconfigures rows forconfiguration parameters that do not exist in syscurconfigs. After runninginstallmaster, the error messages no longer appear when you start the server.
If you start a downgraded server using the 15.7 configuration file, the new options generatean Unknown parameter message. The unknown options are reported the first timeyou restart the server. You can ignore these messages; the configuration file is rewrittenwithout the unknown options.
Note: Keywords decrypt_default, xmltable, and path were added in Adaptive Server 15.5Cluster Edition, making it impossible to create identifiers using these names. You mustchange applications if you used these names.
Adaptive Server Downgrades
Installation Guide 137
Adaptive Server Downgrades
138 Adaptive Server Enterprise Cluster Edition
Troubleshoot SySAM
If SySAM errors are not addressed in a timely fashion, Adaptive Server may cease to function.
There may be more recent information published in the SySAM Asset Management UsersGuide online at the SySAM FAQ. If your Sybase product cannot find a required license, itcontinues to operate in grace mode, if a grace period is available. Determine the license statusof your product using the output from sp_lmconfig command. The Status column showsgraced for any license that is operating within a grace period.
Typically, you have 30 days during which to resolve any SySAM-related issues. When alicense is awarded in grace mode, the Sybase product error log entry and optional e-mailmessage include the date and time when the grace period expires. In addition, you can executesp_lmconfig to determine the expiration date.
All SySAM-related errors are printed in your Sybase product error log and are prefixed with"kernel SySAM." For example:
<timestamp> kernel SySAM: Failed to obtain 1 license(s)for ASE_CORE feature from license file(s) or server(s).
If e-mail alerts are configured, recipients receive an e-mail whenever a SySAM event occurs.
You can always check the current state of SySAM licenses in your Sybase product using thesp_lmconfig command. The output shows the current SySAM configuration and the status ofeach license.
If you are using a served license model, the license server’s debug log, located in the logdirectory, provides information about any license checkout issues.
The Sybase product log includes information about licenses awarded under grace mode. Ife-mail notifications are set up for a severity of "warning," e-mail messages are sent for thisevent. Warnings in the Adaptive Server error log and e-mail messages are repeated while thelicense is in grace mode.
Troubleshoot SySAM
Installation Guide 139

Troubleshooting SySAMIdentify and troubleshoot SySAM issues.
Description Action
Cannot find licensetype during theAdaptive Server in-stallation.
The Adaptive Server installation program displays only the most commonlyused license types. If you are using a legacy license or a new license type, yourlicense may not be listed.
If you do not find the license type you need, select Unknown and complete theinstallation. After the installation is complete, use sp_lmconfig to change thelicense type. See the Reference Manual:Procedures for sp_lmconfig usageinformation.
Note: If you set the license type value to Unknown, Adaptive Server uses thefirst available license. If you have licenses for more than one type, AdaptiveServer may pick the incorrect license. Set the correct license type.
See If the Installation Program Cannot Find a Suitable License on page 143 ifyou select a served license model that the program cannot find.
The license serverexecutables andscripts are not in-stalled.
The sysam wrapper script and the executables for the license server (lmgrd
and SYBASE) are not installed or found in the SYSAM-2_0 bin directory.
By default, the license server component is not selected for installation. Toinstall the license server, choose the custom installation option and select thelicense server component.
Alternatively, download a standalone SySAM license server installation pro-gram from http://www.sybase.com/products/allproductsa-z/sysam.
Troubleshoot SySAM
140 Adaptive Server Enterprise Cluster Edition
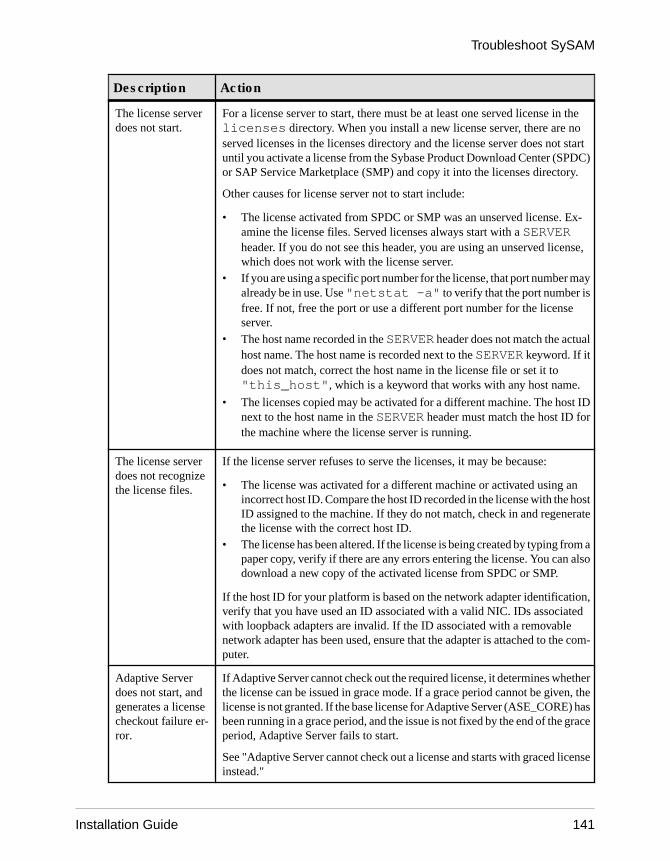
Description Action
The license serverdoes not start.
For a license server to start, there must be at least one served license in thelicenses directory. When you install a new license server, there are noserved licenses in the licenses directory and the license server does not startuntil you activate a license from the Sybase Product Download Center (SPDC)or SAP Service Marketplace (SMP) and copy it into the licenses directory.
Other causes for license server not to start include:
• The license activated from SPDC or SMP was an unserved license. Ex-amine the license files. Served licenses always start with a SERVERheader. If you do not see this header, you are using an unserved license,which does not work with the license server.
• If you are using a specific port number for the license, that port number mayalready be in use. Use "netstat -a" to verify that the port number isfree. If not, free the port or use a different port number for the licenseserver.
• The host name recorded in the SERVER header does not match the actualhost name. The host name is recorded next to the SERVER keyword. If itdoes not match, correct the host name in the license file or set it to"this_host", which is a keyword that works with any host name.
• The licenses copied may be activated for a different machine. The host IDnext to the host name in the SERVER header must match the host ID forthe machine where the license server is running.
The license serverdoes not recognizethe license files.
If the license server refuses to serve the licenses, it may be because:
• The license was activated for a different machine or activated using anincorrect host ID. Compare the host ID recorded in the license with the hostID assigned to the machine. If they do not match, check in and regeneratethe license with the correct host ID.
• The license has been altered. If the license is being created by typing from apaper copy, verify if there are any errors entering the license. You can alsodownload a new copy of the activated license from SPDC or SMP.
If the host ID for your platform is based on the network adapter identification,verify that you have used an ID associated with a valid NIC. IDs associatedwith loopback adapters are invalid. If the ID associated with a removablenetwork adapter has been used, ensure that the adapter is attached to the com-puter.
Adaptive Serverdoes not start, andgenerates a licensecheckout failure er-ror.
If Adaptive Server cannot check out the required license, it determines whetherthe license can be issued in grace mode. If a grace period cannot be given, thelicense is not granted. If the base license for Adaptive Server (ASE_CORE) hasbeen running in a grace period, and the issue is not fixed by the end of the graceperiod, Adaptive Server fails to start.
See "Adaptive Server cannot check out a license and starts with graced licenseinstead."
Troubleshoot SySAM
Installation Guide 141
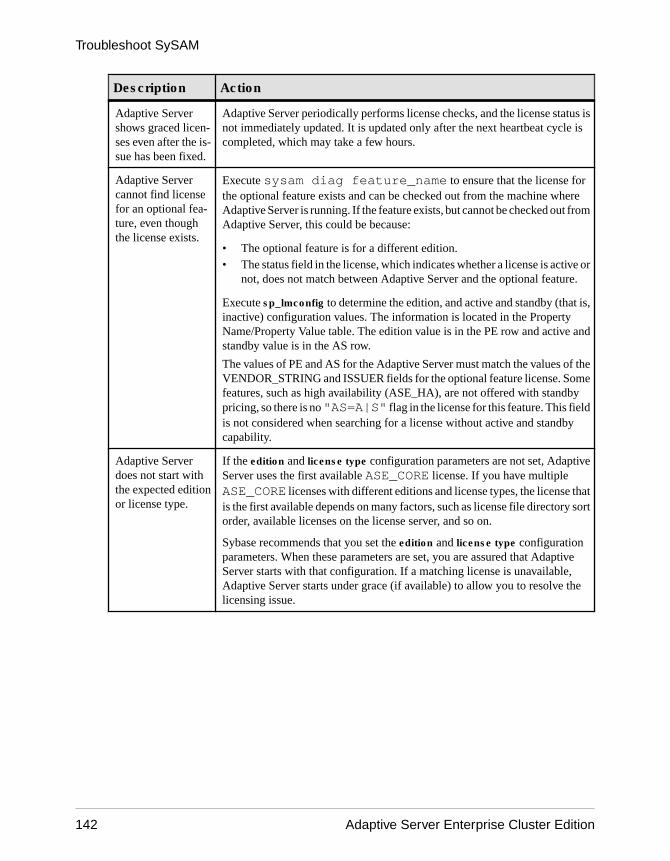
Description Action
Adaptive Servershows graced licen-ses even after the is-sue has been fixed.
Adaptive Server periodically performs license checks, and the license status isnot immediately updated. It is updated only after the next heartbeat cycle iscompleted, which may take a few hours.
Adaptive Servercannot find licensefor an optional fea-ture, even thoughthe license exists.
Execute sysam diag feature_name to ensure that the license forthe optional feature exists and can be checked out from the machine whereAdaptive Server is running. If the feature exists, but cannot be checked out fromAdaptive Server, this could be because:
• The optional feature is for a different edition.• The status field in the license, which indicates whether a license is active or
not, does not match between Adaptive Server and the optional feature.
Execute sp_lmconfig to determine the edition, and active and standby (that is,inactive) configuration values. The information is located in the PropertyName/Property Value table. The edition value is in the PE row and active andstandby value is in the AS row.
The values of PE and AS for the Adaptive Server must match the values of theVENDOR_STRING and ISSUER fields for the optional feature license. Somefeatures, such as high availability (ASE_HA), are not offered with standbypricing, so there is no "AS=A|S" flag in the license for this feature. This fieldis not considered when searching for a license without active and standbycapability.
Adaptive Serverdoes not start withthe expected editionor license type.
If the edition and license type configuration parameters are not set, AdaptiveServer uses the first available ASE_CORE license. If you have multipleASE_CORE licenses with different editions and license types, the license thatis the first available depends on many factors, such as license file directory sortorder, available licenses on the license server, and so on.
Sybase recommends that you set the edition and license type configurationparameters. When these parameters are set, you are assured that AdaptiveServer starts with that configuration. If a matching license is unavailable,Adaptive Server starts under grace (if available) to allow you to resolve thelicensing issue.
Troubleshoot SySAM
142 Adaptive Server Enterprise Cluster Edition

Description Action
Adaptive Serverpicks an incorrectlicense.
Adaptive Server looks for licenses in these locations:
• Any saved values in the registry on Windows platforms, orthe .flexlmrc file on UNIX platforms. Use "lmpath -sta-tus" to view the saved values.
• The values set for SYBASE_LICENSE_FILE and LM_LICENSE_FILEenvironment variables.
• All license files (any file with a .lic extension) in the licenses directoryunder the SYSAM-2_0 directory.
All of the above locations are searched in the order specified until a suitablelicense is found. When a directory is specified, license files in that directory areloaded in the directory sort order.
The first license that matches the feature name, version, edition, and licensetype filter is used. This license may not be what you were expecting to use.Adjust the above locations to control this.
If the Installation Program Cannot Find a Suitable LicenseIf you select a served license model, the installer checks for a license with the selected editionand license type. You see a warning message if no suitable license is available.
If you are performing a new Adaptive Server installation or upgrading an existing AdaptiveServer version 12.5.x or earlier, proceed with the installation. Adaptive Server provides a 30-day grace period to resolve licensing issues. Once the installation is complete, debug thelicense checkout failure. See "Adaptive Server cannot check out a license and starts withgraced license instead" in Troubleshooting SySAM on page 140.
If you are upgrading an existing Adaptive Server version 15.0 or later, Adaptive Server maynot start after the upgrade if you do not have a suitable license. Exit the installation programand see if the existing Adaptive Server can check out licenses. If it cannot, troubleshoot thisissue and then proceed with the upgrade.
If the existing Adaptive Server can check out licenses, verify that the license you are usingauthorizes the update you are applying. This can be determined using the date-based versionof your license file and the date this update was released. You must have a license with a date-based version that is later than or equal to the date the update was released. Adaptive Serverprovides a grace period for updating the licenses after support is renewed.
Determine the date-based version of the license from the Version column of the output fromsp_lmconfig, by looking at the license checkout message in the Adaptive Server error log, orby examining the license itself. See Anatomy of a License in the Sybase Software AssetManagement Users Guide.
Troubleshoot SySAM
Installation Guide 143

Determine the Adaptive Server release date by looking at the version string, cover letter, ordownload link for the Sybase Product Download Center (SPDC) or SAP Service Marketplace(SMP). The release date is also posted in the error message.
You can download an updated license from SPDC or SMP, if your support has been paid for thedate the update was released. If your support has not been paid, you are not authorized toinstall an update.
See Working with Date-Based Versioning and Getting and Using your Licenses in the SybaseSoftware Asset Management Users Guide.
If Adaptive Server Cannot Check Out a License and StartsUsing a License Under a Grace Period
There are several reasons why Adaptive Server cannot check out a license.
PrerequisitesExecute the sysam diag feature_name command from the SYSAM-2_0 bindirectory, where feature_name is the SySAM feature name for Adaptive Server or the optionalfeature that is in grace mode. The feature name is printed in the Adaptive Server error log andin the optional e-mail notifications.
• If you are using a served model and diag shows no license available to check out:
• Verify that the license server is running and can be reached from the machine you areusing. Use "sysam status" to verify that you can access the license server. If youcannot access the license server, verify that the license server is running.
• If the license server is running, use "sysam status -f feature_name" todetermine whether the license server is serving a license for the given feature. If not,obtain the correct licenses from the Sybase Product Download Center (SPDC) or SAPService Marketplace (SMP).
• All licenses on the license server may be in use. If "sysam status -ffeature_name" indicates that no licenses are available, obtain additional licensesor shut down existing instances of Adaptive Server.
• If you are using an unserved model and diag shows no license available to check out:
• The license for the given feature may not be copied in the local licenses directory.Obtain the correct licenses from SPDC or SMP, and copy them to the local licensesdirectory.
• The license may have been activated for a different machine or activated with incorrecthost ID. Check in and reactivate the license with the correct host ID.
• The available licenses are for a different operating system or architecture. Obtain licensefor the correct platform from SPDC or SMP.
Troubleshoot SySAM
144 Adaptive Server Enterprise Cluster Edition
• If you are running in a terminal server environment, you cannot use unserved licenses. Setup served licenses for a terminal server environment.
• The available license may not authorize this version of Adaptive Server. For informationabout date-based versioning, see the SySAM Users Guide.
• If the diag command shows the license for the given feature is available for checkout, thismay be because the product edition or license type does not match the requirement. If theedition and license type configuration parameters are set, Adaptive Server uses only thelicense that matches these settings:
a) Run sp_lmconfig to see the configured values.b) Check the VENDOR_STRING attribute of the licenses to verify that a matching license
exists.
If a matching license does not exist, obtain a suitable license from SPDC or SMP, oradjust the Adaptive Server configuration.
If Adaptive Server cannot start because the grace period expired, examine theservername.properties file located in the ASE-15_0/sysam directoryunder your SYBASE directory for values. These values are stored in two lines that startwith PE= and LT=. These lines are present only if the configuration is set.
E-Mail NotificationsUse sp_lmconfig to configure e-mail notification. To view the current notification status andconfiguration, execute sp_lmconfig without any parameters.
To enable e-mail notifications, set the smtp host, smtp port, email sender, email recipients,and email severity properties.
To change the severity that triggers e-mail notification, set the email severity property to:"ERROR", "WARNING", "INFORMATIONAL", or "NONE".
To change the list of e-mail recipients, set the email recipients property to a comma-separatedlist of e-mail addresses. E-mail addresses can include anything that is capable of receivingSMTP messages.
Before You Contact Sybase Technical SupportGet information about your situation before you call Sybase Technical Support aboutSySAM-related issues.
• The Adaptive Server error log.• $SYBASE/ASE-15_0/install/<servername>.log
• If Adaptive Server does not start, the server’s properties file:• $SYBASE/ASE-15_0/sysam/<servername>.properties
Troubleshoot SySAM
Installation Guide 145

servername must correspond to the name of the Adaptive Server that does not start.• The license files saved in the SYSAM-2_0 licenses directory on the machine running
Adaptive Server.• The value of SYBASE_LICENSE_FILE and LM_LICENSE_FILE environment
variables.• Output from lmutil lmpath -status command. lmutil is located in the bin directory
under the SYSAM-2_0/bin folder.
• If you are using a served license model:• The licenses saved in the $SYBASE/SYSAM-2_0/licenses directory of the
license server.• The license server log file in the $SYBASE/SYSAM-2_0/log directory.
Troubleshoot SySAM
146 Adaptive Server Enterprise Cluster Edition
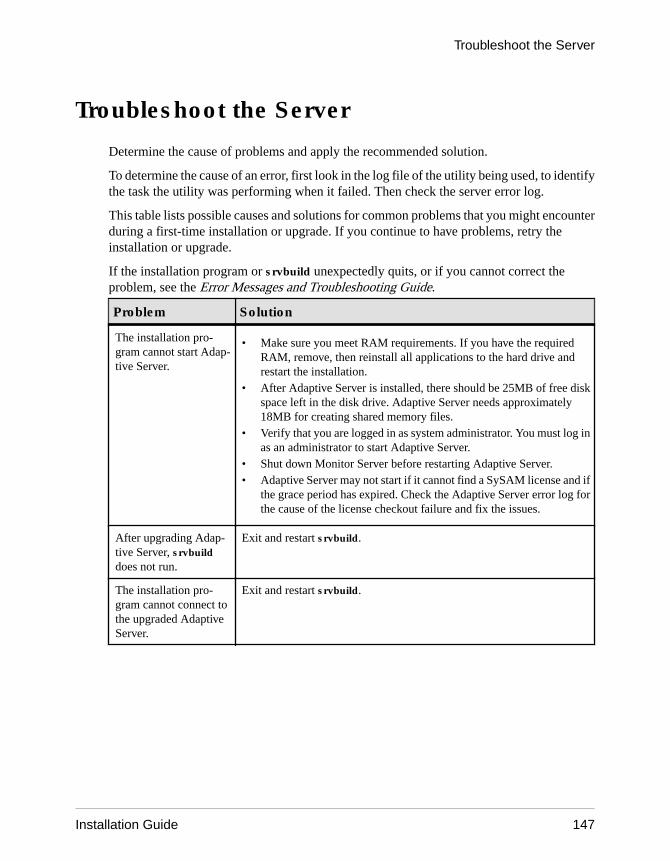
Troubleshoot the Server
Determine the cause of problems and apply the recommended solution.
To determine the cause of an error, first look in the log file of the utility being used, to identifythe task the utility was performing when it failed. Then check the server error log.
This table lists possible causes and solutions for common problems that you might encounterduring a first-time installation or upgrade. If you continue to have problems, retry theinstallation or upgrade.
If the installation program or srvbuild unexpectedly quits, or if you cannot correct theproblem, see the Error Messages and Troubleshooting Guide.
Problem Solution
The installation pro-gram cannot start Adap-tive Server.
• Make sure you meet RAM requirements. If you have the requiredRAM, remove, then reinstall all applications to the hard drive andrestart the installation.
• After Adaptive Server is installed, there should be 25MB of free diskspace left in the disk drive. Adaptive Server needs approximately18MB for creating shared memory files.
• Verify that you are logged in as system administrator. You must log inas an administrator to start Adaptive Server.
• Shut down Monitor Server before restarting Adaptive Server.• Adaptive Server may not start if it cannot find a SySAM license and if
the grace period has expired. Check the Adaptive Server error log forthe cause of the license checkout failure and fix the issues.
After upgrading Adap-tive Server, srvbuilddoes not run.
Exit and restart srvbuild.
The installation pro-gram cannot connect tothe upgraded AdaptiveServer.
Exit and restart srvbuild.
Troubleshoot the Server
Installation Guide 147
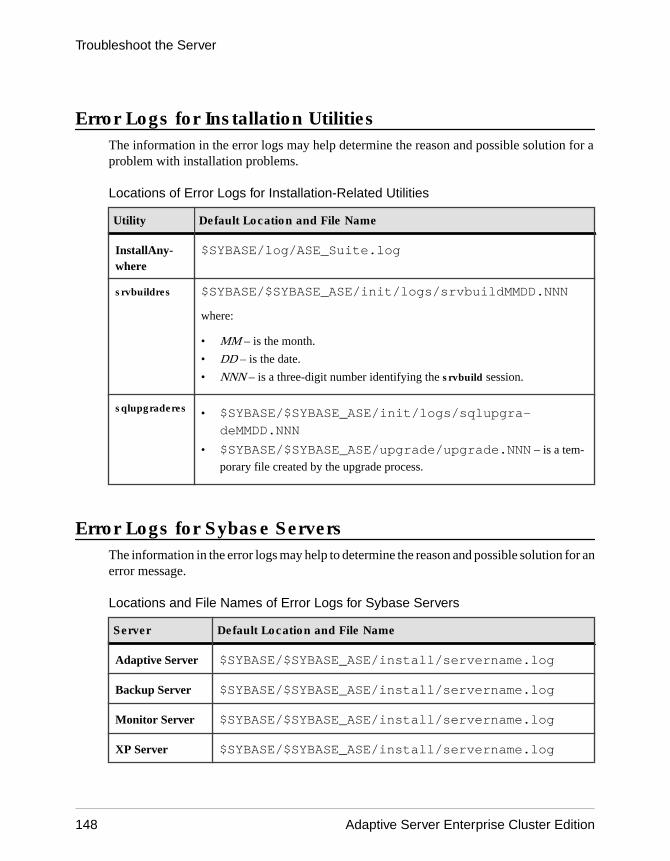
Error Logs for Installation UtilitiesThe information in the error logs may help determine the reason and possible solution for aproblem with installation problems.
Locations of Error Logs for Installation-Related Utilities
Utility Default Location and File Name
InstallAny-where
$SYBASE/log/ASE_Suite.log
srvbuildres $SYBASE/$SYBASE_ASE/init/logs/srvbuildMMDD.NNN
where:
• MM – is the month.
• DD – is the date.
• NNN – is a three-digit number identifying the srvbuild session.
sqlupgraderes • $SYBASE/$SYBASE_ASE/init/logs/sqlupgra-deMMDD.NNN
• $SYBASE/$SYBASE_ASE/upgrade/upgrade.NNN – is a tem-
porary file created by the upgrade process.
Error Logs for Sybase ServersThe information in the error logs may help to determine the reason and possible solution for anerror message.
Locations and File Names of Error Logs for Sybase Servers
Server Default Location and File Name
Adaptive Server $SYBASE/$SYBASE_ASE/install/servername.log
Backup Server $SYBASE/$SYBASE_ASE/install/servername.log
Monitor Server $SYBASE/$SYBASE_ASE/install/servername.log
XP Server $SYBASE/$SYBASE_ASE/install/servername.log
Troubleshoot the Server
148 Adaptive Server Enterprise Cluster Edition
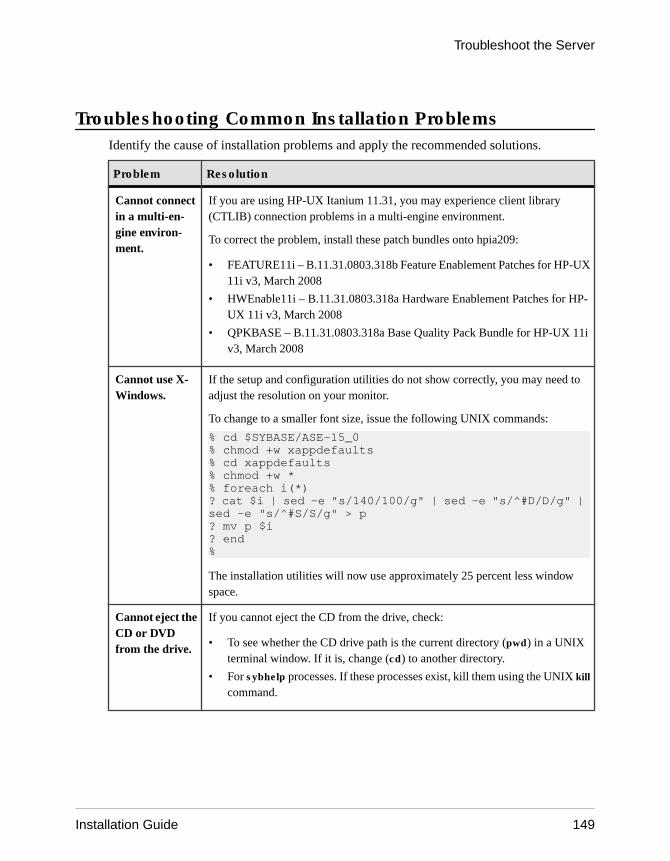
Troubleshooting Common Installation ProblemsIdentify the cause of installation problems and apply the recommended solutions.
Problem Resolution
Cannot connectin a multi-en-gine environ-ment.
If you are using HP-UX Itanium 11.31, you may experience client library(CTLIB) connection problems in a multi-engine environment.
To correct the problem, install these patch bundles onto hpia209:
• FEATURE11i – B.11.31.0803.318b Feature Enablement Patches for HP-UX11i v3, March 2008
• HWEnable11i – B.11.31.0803.318a Hardware Enablement Patches for HP-UX 11i v3, March 2008
• QPKBASE – B.11.31.0803.318a Base Quality Pack Bundle for HP-UX 11iv3, March 2008
Cannot use X-Windows.
If the setup and configuration utilities do not show correctly, you may need toadjust the resolution on your monitor.
To change to a smaller font size, issue the following UNIX commands:
% cd $SYBASE/ASE-15_0% chmod +w xappdefaults% cd xappdefaults% chmod +w *% foreach i(*) ? cat $i | sed -e "s/140/100/g" | sed -e "s/^#D/D/g" | sed -e "s/^#S/S/g" > p? mv p $i? end%
The installation utilities will now use approximately 25 percent less windowspace.
Cannot eject theCD or DVDfrom the drive.
If you cannot eject the CD from the drive, check:
• To see whether the CD drive path is the current directory (pwd) in a UNIXterminal window. If it is, change (cd) to another directory.
• For sybhelp processes. If these processes exist, kill them using the UNIX kill
command.
Troubleshoot the Server
Installation Guide 149
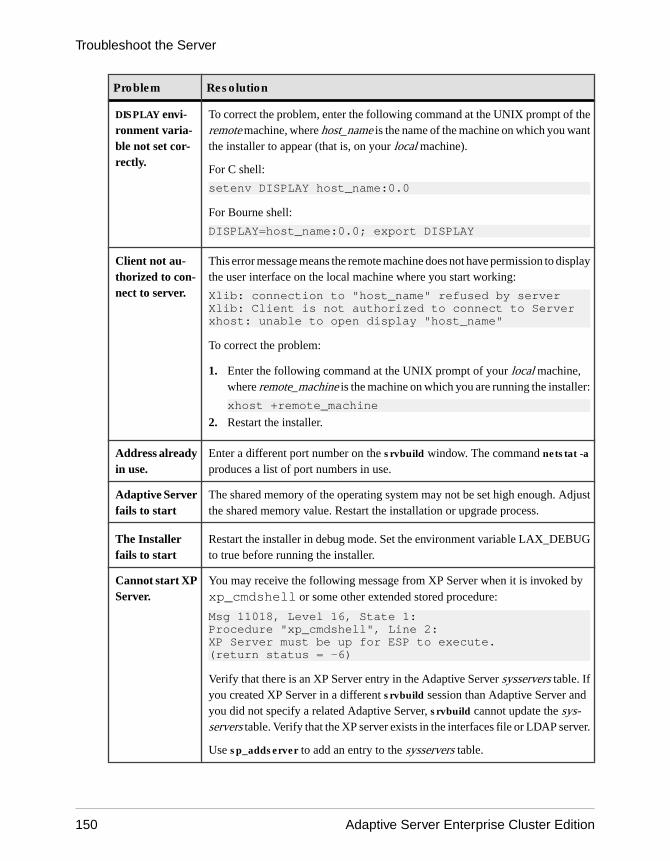
Problem Resolution
DISPLAY envi-ronment varia-ble not set cor-rectly.
To correct the problem, enter the following command at the UNIX prompt of theremote machine, where host_name is the name of the machine on which you wantthe installer to appear (that is, on your local machine).
For C shell:
setenv DISPLAY host_name:0.0
For Bourne shell:
DISPLAY=host_name:0.0; export DISPLAY
Client not au-thorized to con-nect to server.
This error message means the remote machine does not have permission to displaythe user interface on the local machine where you start working:
Xlib: connection to "host_name" refused by serverXlib: Client is not authorized to connect to Serverxhost: unable to open display "host_name"
To correct the problem:
1. Enter the following command at the UNIX prompt of your local machine,where remote_machine is the machine on which you are running the installer:
xhost +remote_machine
2. Restart the installer.
Address alreadyin use.
Enter a different port number on the srvbuild window. The command netstat -a
produces a list of port numbers in use.
Adaptive Serverfails to start
The shared memory of the operating system may not be set high enough. Adjustthe shared memory value. Restart the installation or upgrade process.
The Installerfails to start
Restart the installer in debug mode. Set the environment variable LAX_DEBUGto true before running the installer.
Cannot start XPServer.
You may receive the following message from XP Server when it is invoked byxp_cmdshell or some other extended stored procedure:
Msg 11018, Level 16, State 1:Procedure "xp_cmdshell", Line 2:XP Server must be up for ESP to execute.(return status = -6)
Verify that there is an XP Server entry in the Adaptive Server sysservers table. Ifyou created XP Server in a different srvbuild session than Adaptive Server andyou did not specify a related Adaptive Server, srvbuild cannot update the sys-servers table. Verify that the XP server exists in the interfaces file or LDAP server.
Use sp_addserver to add an entry to the sysservers table.
Troubleshoot the Server
150 Adaptive Server Enterprise Cluster Edition

Problem Resolution
Troubleshoot-ing resource fileinstallations.
If you encounter problems during the build, configuration, or upgrade processwhile using the srvbuild[res], sqlloc[res], or sqlupgrade[res], it may be that theseutilities did not allow enough time for Adaptive Server to shut down properly. Setthe SYBSHUTWAIT environment variable to force the utilities to wait for Adap-tive Server to shut down. For example, this command forces the utility to wait fortwo minutes to allow Adaptive Server to shut down before proceeding with thenext task:
% setenv SYBSHUTWAIT 120
Stopping Adaptive Server After a FailureIf the installation or upgrade session fails after you start Adaptive Server for any reason, usethe shutdown command.
1. Log on as "sa".
2. Shut down Adaptive Server using the shutdown with nowait command. Using with nowaitstops the Adaptive Server immediately, without waiting for currently executing SQLstatements to finish:1> shutdown with nowait2> go
3. If the installation or upgrade session fails after you start Adaptive Server, try using SybaseControl Center to shut down the server. If Sybase Control Center cannot shut down theserver, use the shutdown command.
Recovering from a Failed InstallationIf the installation fails, you see error messages. Review the error messages and your AdaptiveServer error log to determine the cause of the installation failure.
If the Installation Quits While You Are Configuring Adaptive ServerPerform speficic steps if the installation suddenly quits.
1. View the contents of the log file generated by Adaptive Server.
2. Take any suggested actions to correct the problem.
3. If the installation fails after the installation program:
• Created any operating system files, such as the master device or system proceduresdevice files, delete those files.
• Starts the Adaptive Server that you are attempting to install, shut down that server.
4. If the installation fails after the installation program starts the Adaptive Server that you areattempting to install, shut down that server.
Troubleshoot the Server
Installation Guide 151
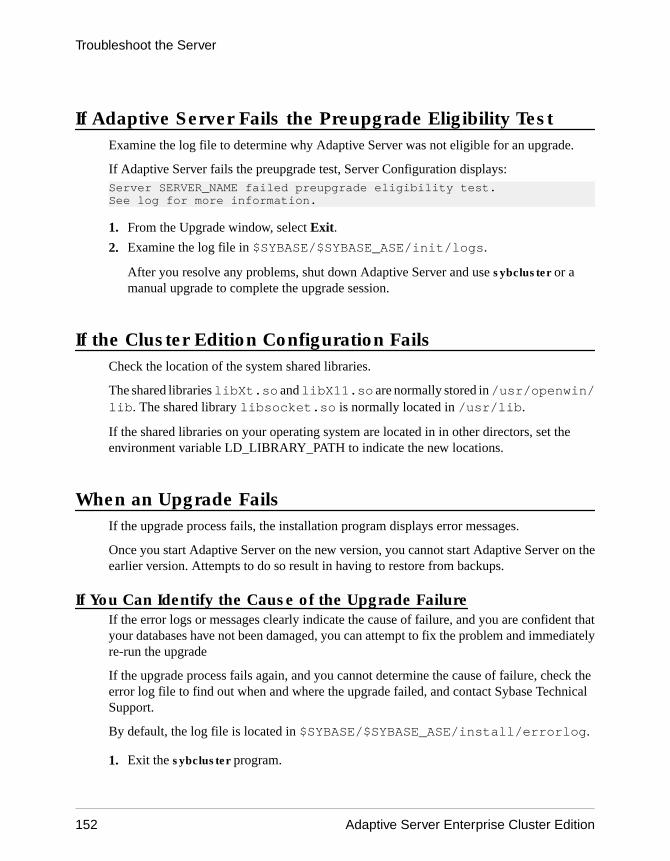
If Adaptive Server Fails the Preupgrade Eligibility TestExamine the log file to determine why Adaptive Server was not eligible for an upgrade.
If Adaptive Server fails the preupgrade test, Server Configuration displays:Server SERVER_NAME failed preupgrade eligibility test.See log for more information.
1. From the Upgrade window, select Exit.
2. Examine the log file in $SYBASE/$SYBASE_ASE/init/logs.
After you resolve any problems, shut down Adaptive Server and use sybcluster or amanual upgrade to complete the upgrade session.
If the Cluster Edition Configuration FailsCheck the location of the system shared libraries.
The shared libraries libXt.so and libX11.so are normally stored in /usr/openwin/lib. The shared library libsocket.so is normally located in /usr/lib.
If the shared libraries on your operating system are located in in other directors, set theenvironment variable LD_LIBRARY_PATH to indicate the new locations.
When an Upgrade FailsIf the upgrade process fails, the installation program displays error messages.
Once you start Adaptive Server on the new version, you cannot start Adaptive Server on theearlier version. Attempts to do so result in having to restore from backups.
If You Can Identify the Cause of the Upgrade FailureIf the error logs or messages clearly indicate the cause of failure, and you are confident thatyour databases have not been damaged, you can attempt to fix the problem and immediatelyre-run the upgrade
If the upgrade process fails again, and you cannot determine the cause of failure, check theerror log file to find out when and where the upgrade failed, and contact Sybase TechnicalSupport.
By default, the log file is located in $SYBASE/$SYBASE_ASE/install/errorlog.
1. Exit the sybcluster program.
Troubleshoot the Server
152 Adaptive Server Enterprise Cluster Edition
2. Perform the necessary actions to fix the problem.
For example, if the error log indicates that the upgrade failed because your existingdatabases do not contain enough space, use the alter database command to increase theavailable space.
3. If needed, shut down Adaptive Server.
Shutting down the server enables the installation program to start the server and re-run theupgrade session.
Restoring Databases After a Failed UpgradeYou may need to restore your databases due to a failed upgrade.
• If you think the upgrade failure or its cause may have damaged your databases, restore thedatabases from backups. For information on restoring databases, see the SystemAdministration Guide.
• If you are concerned about the possible corruption of your databases, exit Server Config,but do not attempt to restart the upgrade session until you have restored the databases frombackup. After restoration is complete, retry the upgrade.
Re-running the Cluster Edition UpgradeFailures while upgrading a server installation fall into one of two categories: failure to upgradean individual database, or failure to complete configuration changes after all databases havebeen upgraded.
1. If an individual database fails to upgrade, retry that upgrade manually. Begin by correctingthe problem that caused the failure. Output from the upgrade utility should identify theproblem. The most common cause of failure is running out of some resource: space (eitherdata or log), locks, auxiliary scan descriptors. You can add space to the database using thealter database command. Other resource failures may be correctable by changing theserver’s configuration via the sp_configure stored procedure.Having set this trace flag, user “sa” can now use the offline database and make thenecessary changes to correct the upgrade failure.
2. If an upgrade failure leaves a database offline, and the failure can be corrected only bymaking data changes in the database, you can gain access to the failed database by usingisql or a similar program to connect to the affected server as user “sa” and issuing: dbcc traceon(990)
Note: This trace flag grants access only to user “sa”. It is not sufficient to use an accounthaving “sa_role”. If you have disabled the “sa” login, you must reenable it to get accessusing this method.
3. To restart a failed upgrade, use the online database command: online database <failed_db_name>
Troubleshoot the Server
Installation Guide 153
The server restarts that database’s upgrade from the point of failure.
4. If the failure occurs after all databases have been upgraded or if a failure somehow causesthe upgrade utility to stop responding, you can re-run the utility manually. First diagnoseand correct the failure, then run the upgrade utility: $SYBASE/$SYBASE_ASE/upgrade/upgrade
When restarted in this way, the upgrade process says it is “verifying” the upgrade ratherthan “starting” it, but it makes all the same checks as for the original upgrade.
5. To verify that a database has upgraded successfully, you can check any database’s upgradestatus using the online database command. If any upgrade is required for a database, thiscommand performs it. You may also use a procedure such as this to check all databases at agiven installation:declare @dbname varchar(255) select @dbname = min(name) from master..sysdatabases while @dbname is not null begin online database @dbname select @dbname = min(name) from master..sysdatabases where name > @dbname end
Note: There are certain upgrade failures from which the server cannot recover. Forexample, attempts to upgrade system tables to version 15.0 format are quite sensitive tofailures at certain points during the required changes. If you encounter such a failure,restore the failed database from backup. To prevent the upgrade from failing again, correctthe problem that caused the original failure before issuing the online database commandfor that database. These catastrophic failures are nearly always caused by running out ofresources, as described above, which then causes a failure to undo the aborted transaction.
If You Cannot Identify the Cause of an Upgrade FailureYour attempts to upgrade may continue to fail.
1. If attempts to upgrade continue to fail, check the error log file to identify where and wherethe upgrade failed.
By default, the log file is located in $SYBASE/$SYBASE_ASE/install/<servername>.log.
2. Contact Sybase Technical Support with the information.
If Lack of Space Prevents an UpgradeDuring the upgrade process, the transaction log may fill due to system table changes. A fulltransaction log may prevent a successful Adaptive Server upgrade.
If you cannot continue with the upgrade process because the transaction log becomes full, login to the new server and in isql, issue:
Troubleshoot the Server
154 Adaptive Server Enterprise Cluster Edition
dump tran dbname with no_log
This frees the log space, and allows the upgrade process to continue.
In some cases, preupgrade space estimations are insufficient for the data copy phase of theupgrade process. In this case, an error is generated letting you know there is insufficient spacein the system segment for the upgrade. The upgrade process stops and waits for space to beprovided. Log in to the new server using isql, and increase the size of the database:alter database dbname on device_name = "2m"
Note: Specify the size to alter the database with the unit specifier "m", or "M".
Troubleshoot the Server
Installation Guide 155

Troubleshoot the Server
156 Adaptive Server Enterprise Cluster Edition
Obtaining Help and Additional Information
Use the Sybase Getting Started CD, Product Documentation site, and online help to learnmore about this product release.
• The Getting Started CD (or download) – contains release bulletins and installation guidesin PDF format, and may contain other documents or updated information.
• Product Documentation at http://sybooks.sybase.com/ – is an online version of Sybasedocumentation that you can access using a standard Web browser. You can browsedocuments online, or download them as PDFs. In addition to product documentation, theWeb site also has links to EBFs/Maintenance, Technical Documents, Case Management,Solved Cases, Community Forums/Newsgroups, and other resources.
• Online help in the product, if available.
To read or print PDF documents, you need Adobe Acrobat Reader, which is available as a freedownload from the Adobe Web site.
Note: A more recent release bulletin, with critical product or document information addedafter the product release, may be available from the Product Documentation Web site.
Technical SupportGet support for Sybase products.
If your organization has purchased a support contract for this product, then one or more ofyour colleagues is designated as an authorized support contact. If you have any questions, or ifyou need assistance during the installation process, ask a designated person to contact SybaseTechnical Support or the Sybase subsidiary in your area.
Downloading Sybase EBFs and Maintenance ReportsGet EBFs and maintenance reports from the Sybase Web site or the SAP® ServiceMarketplace (SMP). The location you use depends on how you purchased the product.
• If you purchased the product directly from Sybase or from an authorized Sybasereseller:
a) Point your Web browser to http://www.sybase.com/support.b) Select Support > EBFs/Maintenance.c) If prompted, enter your MySybase user name and password.d) (Optional) Select a filter, a time frame, or both, and click Go.e) Select a product.
Obtaining Help and Additional Information
Installation Guide 157

Padlock icons indicate that you do not have download authorization for certain EBF/Maintenance releases because you are not registered as an authorized support contact.If you have not registered, but have valid information provided by your Sybaserepresentative or through your support contract, click My Account to add the“Technical Support Contact” role to your MySybase profile.
f) Click the Info icon to display the EBF/Maintenance report, or click the productdescription to download the software.
• If you ordered your Sybase product under an SAP contract:
a) Point your browser to http://service.sap.com/swdc.b) Select Search for Software Downloads and enter the name of your product. Click
Search.
Sybase Product and Component CertificationsCertification reports verify Sybase product performance on a particular platform.
To find the latest information about certifications:
• For partner product certifications, go to http://www.sybase.com/detail_list?id=9784• For platform certifications, go to http://certification.sybase.com/ucr/search.do
Creating a MySybase ProfileMySybase is a free service that allows you to create a personalized view of Sybase Web pages.
1. Go to http://www.sybase.com/mysybase.
2. Click Register Now.
Accessibility FeaturesAccessibility ensures access to electronic information for all users, including those withdisabilities.
Documentation for Sybase products is available in an HTML version that is designed foraccessibility.
Vision impaired users can navigate through the online document with an adaptive technologysuch as a screen reader, or view it with a screen enlarger.
Sybase HTML documentation has been tested for compliance with accessibility requirementsof Section 508 of the U.S Rehabilitation Act. Documents that comply with Section 508generally also meet non-U.S. accessibility guidelines, such as the World Wide WebConsortium (W3C) guidelines for Web sites.
Obtaining Help and Additional Information
158 Adaptive Server Enterprise Cluster Edition

Note: You may need to configure your accessibility tool for optimal use. Some screen readerspronounce text based on its case; for example, they pronounce ALL UPPERCASE TEXT asinitials, and MixedCase Text as words. You might find it helpful to configure your tool toannounce syntax conventions. Consult the documentation for your tool.
For information about how Sybase supports accessibility, see the Sybase Accessibility site: http://www.sybase.com/products/accessibility. The site includes links to information aboutSection 508 and W3C standards.
You may find additional information about accessibility features in the productdocumentation.
Obtaining Help and Additional Information
Installation Guide 159

Obtaining Help and Additional Information
160 Adaptive Server Enterprise Cluster Edition

IndexA
accounts, creating sybase user 21Adaptive Server
installing in command line mode 34installing in silent mode, unattended 34
Adaptive Server components 119Adaptive Server editions
determining which edition you have 6Adaptive Server Enterprise Cluster Edition Cluster
Users Guide 3Adaptive Server plug-in for Sybase Central 7additional steps for downgrading new features 134adjusting
shared memory parameters in operating system25
administration tasks 21applications
changing after renaming objects 95auxiliary servers
configuring 53
B
Backing up the server 111Backup Server
configuring 54configuring with sybcluster 53
basic downgrade steps using sp_downgrade 132
C
checklist before installing Cluster Edition 42client applications 8cluster
preinstallation checklist 42command line installation
Replication Server 34command line options 34commands
showserver 59Component Integration Services
upgrading local and remote servers 90configuration
manual 72
configuration parameters 136configure
XP server using sybcluster 57configuring
Backup Server 54master device 73quorum device 73
configuring the cluster 48conflicting object names 96creating
sybase user accounts 21creating a cluster with sybcluster 48creating the cluster
starting the cluster 41
D
data compressiondescribed 7
databasesimage data for sample 64optional 63
determining installation process 3determining the current edition 6determining whether select* should be changed in
views 129directory changes 91directory locations 19directory services
described 7downgrading
Adaptive Server 131, 132handling new features 134steps to prepare beforehand 131
downgrading job scheduler 136dsedit utility 117
E
Enabling the Java in the database in a highavailability system 126
encrypted columnsdescribed 7
error log filestroubleshooting and 151
Index
Installation Guide 161

Ffailed installation
cleaning up 53failed upgrade
recovery 154fails preupgrade eligibility 152file descriptors 22finding compiled object errors before production
128
GGUI installation 29
II/O Fencing
data integrity 66enabling 67setting up 67
identifiersconflicting with reserved words 95
in-memory databasedescribed 7
increasingdevice and database capacity 102
infiniband 16input file
create 68installation
Adaptive Server CD, mounting 29determining process via workflow 3overview 3
installation steps for PC-Client 37installer suddenly quits 151installing
command line 32with response file 33
installing Adaptive ServerGUI mode 29
installpix script 64installpubs2 script 64installpubs3 script 64interfaces file 117
JJava in the database
preparing before installing Adaptive Server26
upgrading 125Job Scheduler
installing 55
K
keywords 136
L
LDAP librariesenvironment variables 61location of 61
license model 11licenses
check number of processors 14licensing software
obtaining 11
M
manual configuration 72enabling SCC 78enabling sybcluster 78
methods of installationAdaptive Server 29
migratingdump and load method 118high availability 119methods 118
Monitor Serverconfiguring with sybcluster 53
mount commands by platform 29mounting the Replication Server installation media
29multipathing
described 26setting up before installation 28
N
network protocol 16new features
reverting to earlier version 134
Index
162 Adaptive Server Enterprise Cluster Edition

O
objectsconflicting names of 96renaming 96
obtainingSySAM license 11
optional databases 63optional features
described 7options for server editions
packages 7overview
installation 3overview of the upgrade process 87
P
partitionsdescribed 7
PC-clientCD 8
PC-Clientdirectory layout 19product description 19system requirements for 16
planning the installation 11platform
mount commands 29post downgrade 136preinstallation tasks 22preupgrade tasls
before upgrade 92
Q
quoted identifier errors 128quoted identifiers 96
R
reconfiguring the cluster 78recovering from a failed installation 151reenable Replication Server 116related products 119release bulletin 11renaming objects 96replicated databases
restoring 117
Replication Server 116draining logs for Adaptive Server 117
reserved words 95conflicts 96
response file 33, 38restoring from backup 153runserver file 95
Ssample databases 63SCC
starting 43scripts
installpix 64installpubs2 64installpubs3 64location 63
security servicesdescribed 7
serveradvantages to the cluster edition 5component descriptions 17directory layout 17installation options 5overview 5single-system presentation 5workload management 5
setting upcluster manually 68
shared disk clusterprivate interconnect 16
shared installation 41shared memory parameters
adjusting 25showserver command 59silent installation 38simulated cluster on a single node 43source environment variables 29sp_checkreswords system procedure 96sp_lmconfig
determining current edition 6starting
cluster using sybcluster 52cluster when operating system starts 53Sybase Control Center 43
stoppingAdaptive Server after a failure 151cluster using sybcluster 52servers 151
Index
Installation Guide 163
Sybase Control Center 43Storage Foundation
creating a cluster 44stored procedures
changing after renaming objects 95style conventions
fonts 1Sybase Central 7Sybase Control Center 7
starting 43stopping 43
SYBASE directory 29sybase user
creating accounts 21sybcluster
configure XP Server 57configuring auxiliary servers 53configuring the cluster 48creating a cluster 48starting a cluster 52stopping a cluster 52upgrading a noncluster to cluster Adaptive
Server 107sybsytemprocs database
increasing the size of 101SySAM
configure IPv6 14FLEXnet Publisher 13grace period 139license checkout 14license server version 13obtaining a license 11sub-capacity licensing 13
SySAM license server 13sysmessages 136system administrator password
setting 62system requirements 92
HP 14PC-Client 16private interconnect technology 16
system stored procedures 136system tables 136
changes due to upgrade 95
Ttasks, administration 21technical support
calling 145
Tivoli Storage Managerdescribed 7
troubleshootingby using error log files 151
U
uninstallingexisting server 35PC-Client 39registry entries 35server 35the old server 35
unknown cause of failure 152, 154unrecognized tokens or objects 136updating JAR files 113updating XML files 113upgrade requirements 92upgrading
Adaptive Server 88entire installations 88failure 152input file 109interactively 109Java in the database 125single databases 88sybcluster, with 107tasks after you upgrade 112using upgrade server command 109
upgrading a noncluster to cluster Adaptive Serversybcluster 107
upgrading Adaptive ServerCluster Edition to Cluster Edition 104
upgrading Cluster Editionshared to private installation 97
upgrading compatibilityversions 87
upgrading compiled objectsdbcc upgrade_object 127
upgrading high availability and cluster support 124upgrading Job Scheduler templates 120utilities 8
dsedit 117
V
verifying connection to the server 60verifying readiness for upgrade 108
Index
164 Adaptive Server Enterprise Cluster Edition

XXP Server
configure with sybcluster 57
configuring with sybcluster 53
Index
Installation Guide 165

Index
166 Adaptive Server Enterprise Cluster Edition