Installation Gas Tank and Sending Unit · Did December fly by and you forgot to pick up your...
8
Worlds Largest Manufacturer of 1955-56-57 Chevrolet Restoration 1 From the General Manager... In this issue: • Parts Specials • Show Trailer Schedule • Readers’ Ride Feature • Cruise Days coming soon! Continued on page 3 Gas Tank and Sending Unit Installation In this month’s issue of the “Danchuk Update” we thought we would do our installation article on the removal and replacement of the gas tank and sending unit. For the most part this article is right out of the shop manual. We have tried to simplify it even further and add some helpful hints and answer common ques- tions where possible. The older these cars get, the more necessary it is going to be- come to replace the original tank. Most cars 45+ years old are going to have their fair share of contaminants come in contact and collect in the tank. This type of contamination can cause severe problems for the smooth running of your motor and can even cause permanent damage. If you are doing a full blown restoration or investing the money to rebuild or replace your motor, then a new tank is a must. Also, if your fuel gauge stops working we recommend you give the sending unit a try before investing the time and money in a new gauge. Tools Needed 5/32” Clutch Head Screwdriver (#1795) 9/16” Flare Wrench 1/2” Wrench 3/8” Wrench 7/16” Wrench Standard Grease Sending Unit Only Replacement If you have a malfunctioning gas gauge or fuel flow problem it may just be the send- ing unit located in the gas tank. Installing a new sending unit is a relatively quick and inexpensive way to trouble shoot and rule a couple of things out. The sending unit is located in the front of the tank. Here’s how it is removed and replaced. 1.) Start by draining the fuel tank below the point of the sending unit. There is a drain plug located on the bottom of the tank (see illust. 1 above). Make sure you first place a decent size chemical resistant pan under the plug. Using a 7/16” wrench remove the plug and drain the gas until it is below the sending unit. These tanks do hold 16 gallons of gas so unless your pan is quite large you may not want to leave the job unattended during this process. 2.) After that is done jack the car up enough to allow for a comfortable work- ing space and always support the car with jack stands for safety. 3.) Using a 9/16” wrench and a 1/2” flare wrench dis- connect the gas feed line from the send- ing unit. 4.) Using a 3/8” wrench remove the gauge wire from the sending unit. 5.) Using a 5/32” clutch head screwdriver (Danchuk part #1795) remove the five screws securing the sending unit. 6.) Now remove the sending unit being careful not to dislodge the pick-up filter (Danchuk part #1543 or #1544). 6.) If your filter is in good shape and you are going to reuse it then use com- pressed air to blow it out. If not then just simply remove the Greetings from Danchuk. We’re through the first quarter of the year and things are looking great. We’ve had quite the wet winter after all, but we haven’t let that slow us down. A lot of projects we’ve been working on have finally been coming through and we have a ton left to go. Easter is right around the corner with Mother’s Day closing in as well. With all that is going on it is amaz- ing we still have such a good time working at Danchuk. I guess that’s just how it goes when you have a team that is as enthusiastic about what they do as we all are. I hope you really enjoy the parts specials, installation article and Reader’s Ride this month. As always, thank you so much for mak- ing all of our jobs here such a fan- tastic thing to come to each day. Happy Restoring,
Transcript of Installation Gas Tank and Sending Unit · Did December fly by and you forgot to pick up your...
Worlds Largest Manufacturer of 1955-56-57 Chevrolet Restoration 1
From the General Manager...
In this issue:
• Parts Specials• Show Trailer Schedule• Readers’ Ride Feature• Cruise Days coming soon!
Continued on page 3
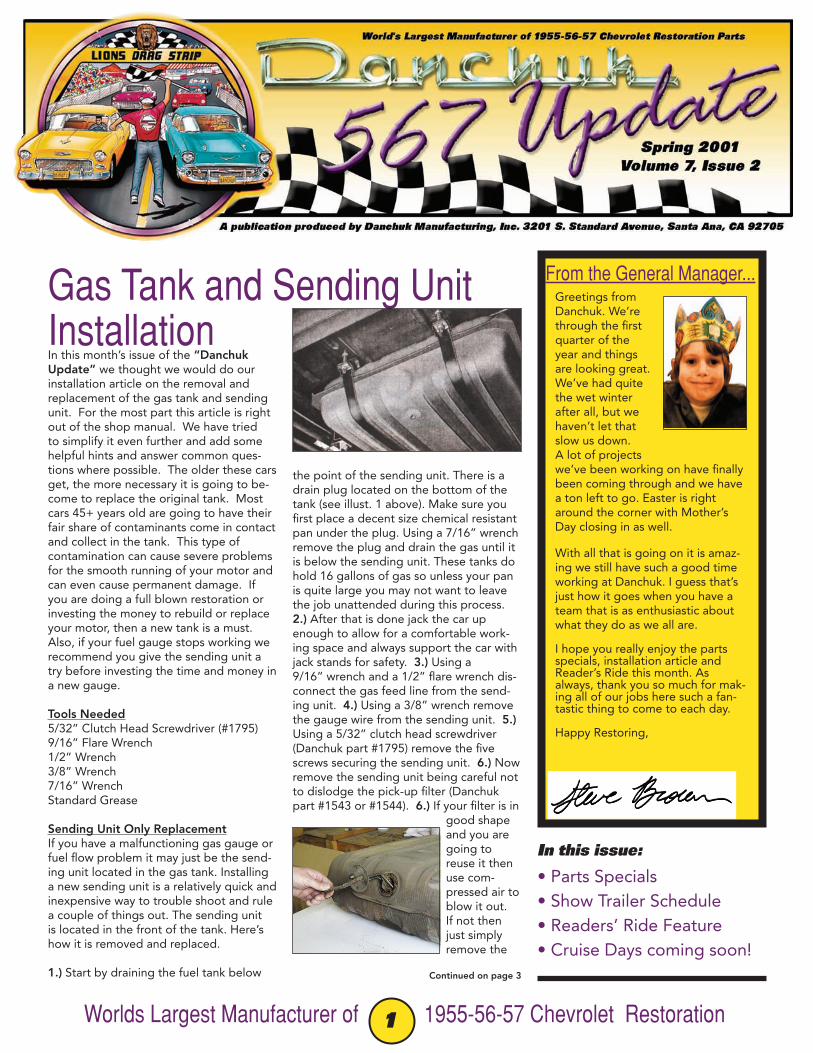
Gas Tank and Sending Unit InstallationIn this month’s issue of the “Danchuk Update” we thought we would do our installation article on the removal and replacement of the gas tank and sending unit. For the most part this article is right out of the shop manual. We have tried to simplify it even further and add some helpful hints and answer common ques-tions where possible. The older these cars get, the more necessary it is going to be-come to replace the original tank. Most cars 45+ years old are going to have their fair share of contaminants come in contact and collect in the tank. This type of contamination can cause severe problems for the smooth running of your motor and can even cause permanent damage. If you are doing a full blown restoration or investing the money to rebuild or replace your motor, then a new tank is a must. Also, if your fuel gauge stops working we recommend you give the sending unit a try before investing the time and money in a new gauge.
Tools Needed5/32” Clutch Head Screwdriver (#1795)9/16” Flare Wrench1/2” Wrench3/8” Wrench7/16” WrenchStandard Grease
Sending Unit Only ReplacementIf you have a malfunctioning gas gauge or fuel flow problem it may just be the send-ing unit located in the gas tank. Installing a new sending unit is a relatively quick and inexpensive way to trouble shoot and rule a couple of things out. The sending unit is located in the front of the tank. Here’s how it is removed and replaced.
1.) Start by draining the fuel tank below
the point of the sending unit. There is a drain plug located on the bottom of the tank (see illust. 1 above). Make sure you first place a decent size chemical resistant pan under the plug. Using a 7/16” wrench remove the plug and drain the gas until it is below the sending unit. These tanks do hold 16 gallons of gas so unless your pan is quite large you may not want to leave the job unattended during this process. 2.) After that is done jack the car up enough to allow for a comfortable work-ing space and always support the car with jack stands for safety. 3.) Using a 9/16” wrench and a 1/2” flare wrench dis-connect the gas feed line from the send-ing unit. 4.) Using a 3/8” wrench remove the gauge wire from the sending unit. 5.) Using a 5/32” clutch head screwdriver (Danchuk part #1795) remove the five screws securing the sending unit. 6.) Now remove the sending unit being careful not to dislodge the pick-up filter (Danchuk part #1543 or #1544). 6.) If your filter is in
good shape and you are going to reuse it then use com-pressed air to blow it out. If not then just simply remove the
Greetings from Danchuk. We’re through the first quarter of the year and things are looking great. We’ve had quite the wet winter after all, but we haven’t let that slow us down. A lot of projects we’ve been working on have finally been coming through and we have a ton left to go. Easter is right around the corner with Mother’s Day closing in as well.
With all that is going on it is amaz-ing we still have such a good time working at Danchuk. I guess that’s just how it goes when you have a team that is as enthusiastic about what they do as we all are.
I hope you really enjoy the parts specials, installation article and Reader’s Ride this month. As always, thank you so much for mak-ing all of our jobs here such a fan-tastic thing to come to each day.
Happy Restoring,

Danchuk Manufacturing, Inc. (800) 854-6911 • www.danchuk.com2
Readers Ride
Rick Martin of Lawsonville, North Carolina (not to be confused with the “Livin’ la Vida Loca” singer) has been very busy. Rick came across a ‘57 210 Station Wagon that had been stripped and sitting outside for almost a decade. “It was very rusty and the floor pan was in bad shape,” explains Martin.
Six years and five parts cars later, this black beauty weighs 4000 lbs. and clocks an 1/8 mile in 7.20 at 97 mph. Pretty impressive from such meager beginnings! The station wagon features a GM 355 CI Small Block engine with cast iron Chevrolet heads, aluminum intake single 4 barrel and flat tappet camshaft.
As owner of Fats Automo-tive, Rick was able to do the frameoff resto on his own. He begin the project by sandblast-ing the body, polishing original
From Rust Rod to Classic Hot RodSaturday, April 14th marks the next Danchuk Cruise Day featuring “For-ever Classic Chevys.” The weather has been favor-able, and we are excited to see all our local customers and their cars.
We offer coffee and dough-nuts, 50’s music, raffle various prizes like Danchuk T-shirts and hats, free hot dogs and 50¢ sodas, and guests can vote on cars for Club Favorite and People’s Choice Awards. We are partial to 5-6-7’s but like to welcome all classics. So if you’re looking for a great venue to show off your classic, 567 or otherwise, pack up the car and the kids and meet at Danchuk for a fun way to spend a spring morning!
CRUISE DAY COMING!
stainless, cutting the original frame to narrow the rear, cut-ting the front shock towers off and repositioning for better alignment and steering. Rick primed the body with DP90 epoxy primer and then cut out all bad metal and recoated. “The only work not completed at my shop was the roll cage and spraying the top coat of black,” says Martin.
This classic has a 4 speed manual shift with Richmond Pro gears and Jerico 650 rear gears, Barry Grant 400 fuel system, Hol-ley 930 CFM carbs, and Jaz Fuel cell, all
braided lines, US Body Source fiberglass hood and Harwood Scoup.
What does the future hold? Rick explains “I’d like to switch to A302 CI engine, move Su-per Stock P/G to IHRA Super Stock Class P/I so I can race every week, as well as at-tend Super Chevy and charity shows.”
“I want to commend everyone at Danchuk for helping me with this project from start to finish,” he says. “This car would still be a pile of rust without your help!”
Spring Spooner Shirt Sale!
DanchukExclusive
$47.95
$51.95
A
B
C
F
E
D
Reyn Spooner© is considered to be one of the finest brand names among Hawaiian shirt aficionado. Danchuk is proud to make these available at below retail cost. And just in time for the warm Spring weather we’ve discounted them even further! All styles and patterns are limited edition and once they are gone...they’re gone. Do you know a “true” Elvis fan? How about a “Blue Hawaii”, “Greatest Hits” or “Elvis in Memphis” shirt? Our Danchuk Exclusive “Tri-Power” shirt has been a big hit, as well as our ‘57 Limited Edition Spooner. Did December fly by and you forgot to pick up your Holiday Chevy shirt? Now is the time! Call for size and color availability.
A. Tri-Power/Danchuk Exclusive - blue only (#10231-10234)B. ‘57 Limited Edition - natural, blue, black (#10403-10417)C. Blue Hawaii - orange, red, blue (#10899-10916)D. Elvis in Memphis - blue, red, black (#10857-10874)E. 2000 Chevy Holiday - blue only (#10935-10939) F. Elvis Greatest Hits - tan, blue, mint (#10875-10897)G. See the USA - teal, blue (#10418-10427)
Medium - XX-Large $59.95
3X-Large - 4X-Large $64.95
Special!
G
Worlds Largest Manufacturer of 1955-56-57 Chevrolet Restoration 3
Installation Article Continued
old one and press on the new one. 7.) To reinstall simply re-verse the above steps with one exception. Leave the mount-ing screws loose until you have hooked up the feed pipe.
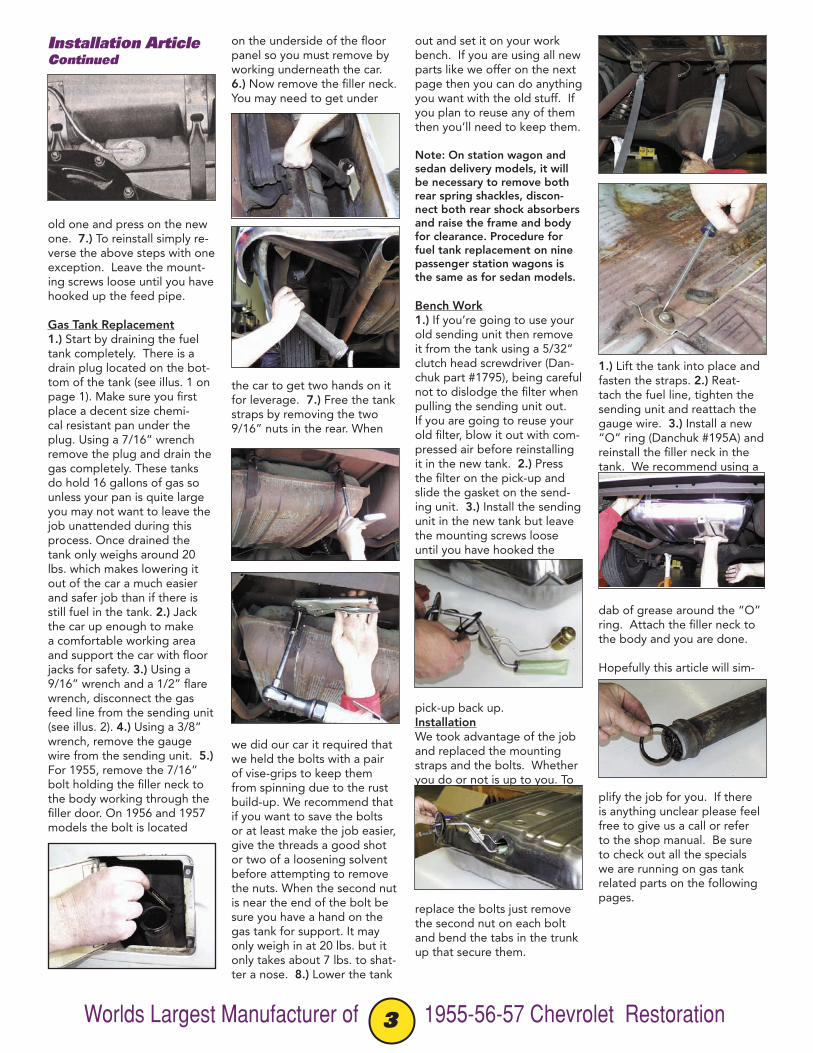
Gas Tank Replacement1.) Start by draining the fuel tank completely. There is a drain plug located on the bot-tom of the tank (see illus. 1 on page 1). Make sure you first place a decent size chemi-cal resistant pan under the plug. Using a 7/16” wrench remove the plug and drain the gas completely. These tanks do hold 16 gallons of gas so unless your pan is quite large you may not want to leave the job unattended during this process. Once drained the tank only weighs around 20 lbs. which makes lowering it out of the car a much easier and safer job than if there is still fuel in the tank. 2.) Jack the car up enough to make a comfortable working area and support the car with floor jacks for safety. 3.) Using a 9/16” wrench and a 1/2” flare wrench, disconnect the gas feed line from the sending unit (see illus. 2). 4.) Using a 3/8” wrench, remove the gauge wire from the sending unit. 5.) For 1955, remove the 7/16” bolt holding the filler neck to the body working through the filler door. On 1956 and 1957 models the bolt is located
on the underside of the floor panel so you must remove by working underneath the car. 6.) Now remove the filler neck. You may need to get under
the car to get two hands on it for leverage. 7.) Free the tank straps by removing the two 9/16” nuts in the rear. When
we did our car it required that we held the bolts with a pair of vise-grips to keep them from spinning due to the rust build-up. We recommend that if you want to save the bolts or at least make the job easier, give the threads a good shot or two of a loosening solvent before attempting to remove the nuts. When the second nut is near the end of the bolt be sure you have a hand on the gas tank for support. It may only weigh in at 20 lbs. but it only takes about 7 lbs. to shat-ter a nose. 8.) Lower the tank
out and set it on your work bench. If you are using all new parts like we offer on the next page then you can do anything you want with the old stuff. If you plan to reuse any of them then you’ll need to keep them.
Note: On station wagon and sedan delivery models, it will be necessary to remove both rear spring shackles, discon-nect both rear shock absorbers and raise the frame and body for clearance. Procedure for fuel tank replacement on nine passenger station wagons is the same as for sedan models.
Bench Work1.) If you’re going to use your old sending unit then remove it from the tank using a 5/32” clutch head screwdriver (Dan-chuk part #1795), being careful not to dislodge the filter when pulling the sending unit out. If you are going to reuse your old filter, blow it out with com-pressed air before reinstalling it in the new tank. 2.) Press the filter on the pick-up and slide the gasket on the send-ing unit. 3.) Install the sending unit in the new tank but leave the mounting screws loose until you have hooked the
pick-up back up.InstallationWe took advantage of the job and replaced the mounting straps and the bolts. Whether you do or not is up to you. To
replace the bolts just remove the second nut on each bolt and bend the tabs in the trunk up that secure them.
1.) Lift the tank into place and fasten the straps. 2.) Reat-tach the fuel line, tighten the sending unit and reattach the gauge wire. 3.) Install a new “O” ring (Danchuk #195A) and reinstall the filler neck in the tank. We recommend using a
dab of grease around the “O” ring. Attach the filler neck to the body and you are done.
Hopefully this article will sim-
plify the job for you. If there is anything unclear please feel free to give us a call or refer to the shop manual. Be sure to check out all the specials we are running on gas tank related parts on the following pages.
Danchuk Manufacturing, Inc. (800) 854-6911 • www.danchuk.com4
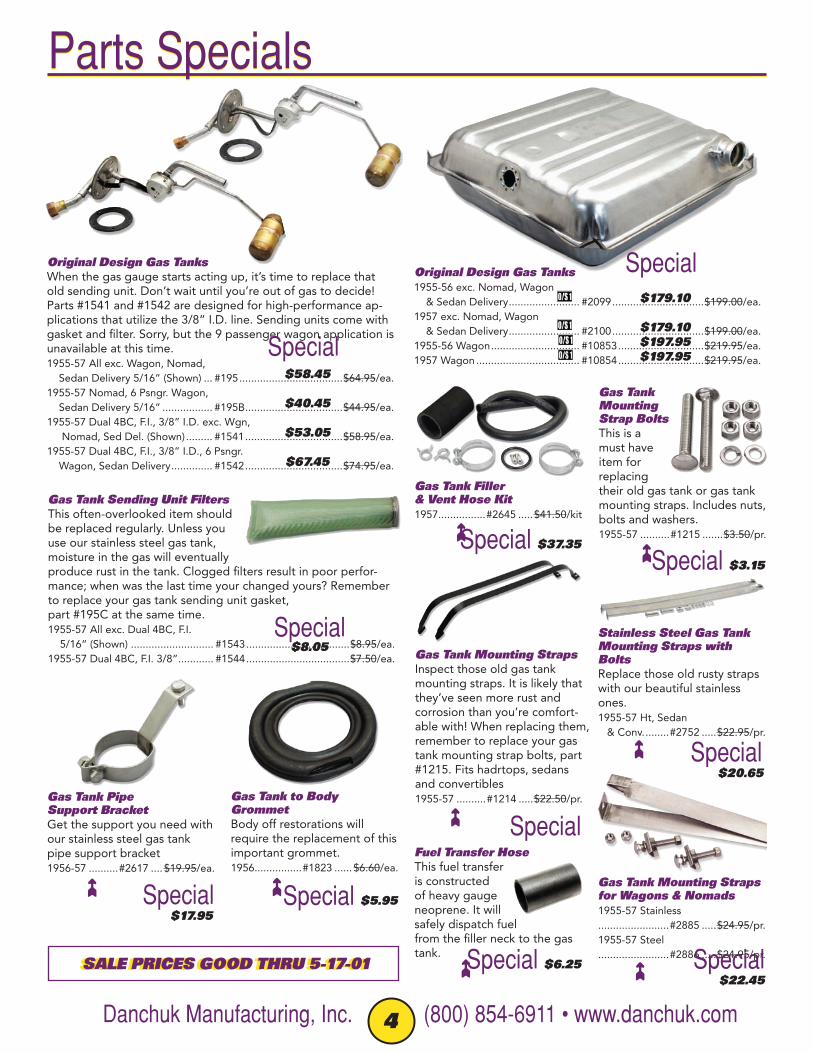
Parts SpecialsParts Specials
Original Design Gas Tanks1955-56 exc. Nomad, Wagon
& Sedan Delivery ........................ #2099 ...............................$199.00/ea.1957 exc. Nomad, Wagon
& Sedan Delivery ........................ #2100 ...............................$199.00/ea.1955-56 Wagon .............................. #10853 .............................$219.95/ea.1957 Wagon ................................... #10854 .............................$219.95/ea.
$179.10
$179.10$197.95$197.95
Gas Tank Mounting Strap BoltsThis is a must have item for replacing their old gas tank or gas tank mounting straps. Includes nuts, bolts and washers.1955-57 ..........#1215 .......$3.50/pr.
Stainless Steel Gas Tank Mounting Straps with BoltsReplace those old rusty straps with our beautiful stainless ones.1955-57 Ht, Sedan & Conv. ........#2752 .....$22.95/pr.
Gas Tank Mounting StrapsInspect those old gas tank mounting straps. It is likely that they’ve seen more rust and corrosion than you’re comfort-able with! When replacing them, remember to replace your gas tank mounting strap bolts, part #1215. Fits hadrtops, sedans and convertibles1955-57 ..........#1214 .....$22.50/pr.
Gas Tank Mounting Straps for Wagons & Nomads1955-57 Stainless........................#2885 .....$24.95/pr.1955-57 Steel........................#2886 .....$24.95/pr.
Gas Tank to Body GrommetBody off restorations will require the replacement of this important grommet.1956................#1823 ...... $6.60/ea.
Gas Tank Pipe Support BracketGet the support you need with our stainless steel gas tank pipe support bracket1956-57 ..........#2617 .... $19.95/ea.
Original Design Gas TanksWhen the gas gauge starts acting up, it’s time to replace that old sending unit. Don’t wait until you’re out of gas to decide! Parts #1541 and #1542 are designed for high-performance ap-plications that utilize the 3/8” I.D. line. Sending units come with gasket and filter. Sorry, but the 9 passenger wagon application is unavailable at this time. 1955-57 All exc. Wagon, Nomad,
Sedan Delivery 5/16” (Shown) ... #195 ...................................$64.95/ea.1955-57 Nomad, 6 Psngr. Wagon,
Sedan Delivery 5/16” ................. #195B .................................$44.95/ea.1955-57 Dual 4BC, F.I., 3/8” I.D. exc. Wgn,
Nomad, Sed Del. (Shown) ......... #1541 .................................$58.95/ea.1955-57 Dual 4BC, F.I., 3/8” I.D., 6 Psngr.
Wagon, Sedan Delivery .............. #1542 .................................$74.95/ea.
$58.45
$40.45
$53.05
$67.45
Gas Tank Sending Unit FiltersThis often-overlooked item should be replaced regularly. Unless you use our stainless steel gas tank, moisture in the gas will eventually produce rust in the tank. Clogged filters result in poor perfor-mance; when was the last time your changed yours? Remember to replace your gas tank sending unit gasket,part #195C at the same time.1955-57 All exc. Dual 4BC, F.I.
5/16” (Shown) ............................ #1543 ...................................$8.95/ea.1955-57 Dual 4BC, F.I. 3/8” ............ #1544 ...................................$7.50/ea.
Special$8.05
Fuel Transfer HoseThis fuel transfer is constructed of heavy gauge neoprene. It will safely dispatch fuel from the filler neck to the gas tank.
Special
Gas Tank Filler & Vent Hose Kit1957................#2645 .....$41.50/kit
Special $37.35➼
Special $17.95
➼ Special $5.95➼
Special $22.45➼
Special
Special $6.25➼SALE PRICES GOOD THRU 5-17-01SALE PRICES GOOD THRU 5-17-01
Special $3.15➼
Special ➼
Special $20.65
➼
Worlds Largest Manufacturer of 1955-56-57 Chevrolet Restoration 5
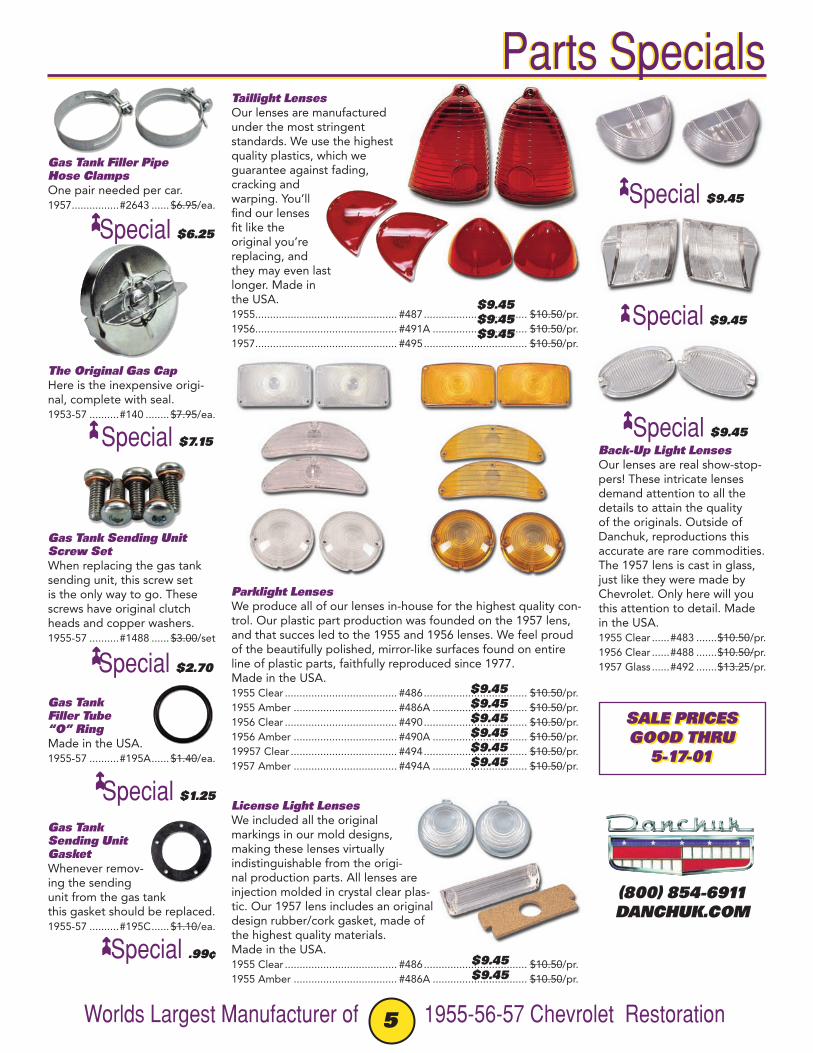
Taillight LensesOur lenses are manufactured under the most stringent standards. We use the highest quality plastics, which we guarantee against fading, cracking and warping. You’ll find our lenses fit like the original you’re replacing, and they may even last longer. Made in the USA. 1955................................................ #487 ................................... $10.50/pr.1956................................................ #491A ................................ $10.50/pr.1957................................................ #495 ................................... $10.50/pr.
Gas Tank Filler Pipe Hose ClampsOne pair needed per car.1957................#2643 ...... $6.95/ea.
The Original Gas CapHere is the inexpensive origi-nal, complete with seal.1953-57 ..........#140 ........ $7.95/ea.
Gas Tank Sending Unit Screw SetWhen replacing the gas tank sending unit, this screw set is the only way to go. These screws have original clutch heads and copper washers.1955-57 ..........#1488 ...... $3.00/set
Gas TankFiller Tube“O” RingMade in the USA.1955-57 ..........#195A ...... $1.40/ea.
Gas TankSending Unit GasketWhenever remov-ing the sending unit from the gas tank this gasket should be replaced. 1955-57 ..........#195C ...... $1.10/ea.
$9.45$9.45$9.45
Parklight LensesWe produce all of our lenses in-house for the highest quality con-trol. Our plastic part production was founded on the 1957 lens, and that succes led to the 1955 and 1956 lenses. We feel proud of the beautifully polished, mirror-like surfaces found on entire line of plastic parts, faithfully reproduced since 1977.Made in the USA.1955 Clear ...................................... #486 ................................... $10.50/pr.1955 Amber ................................... #486A ................................ $10.50/pr.1956 Clear ...................................... #490 ................................... $10.50/pr.1956 Amber ................................... #490A ................................ $10.50/pr.19957 Clear .................................... #494 ................................... $10.50/pr.1957 Amber ................................... #494A ................................ $10.50/pr.
Back-Up Light LensesOur lenses are real show-stop-pers! These intricate lenses demand attention to all the details to attain the quality of the originals. Outside of Danchuk, reproductions this accurate are rare commodities. The 1957 lens is cast in glass, just like they were made by Chevrolet. Only here will you this attention to detail. Made in the USA.1955 Clear ......#483 .......$10.50/pr.1956 Clear ......#488 .......$10.50/pr.1957 Glass ......#492 .......$13.25/pr.
$9.45$9.45$9.45$9.45$9.45$9.45
License Light LensesWe included all the original markings in our mold designs, making these lenses virtually indistinguishable from the origi-nal production parts. All lenses are injection molded in crystal clear plas-tic. Our 1957 lens includes an original design rubber/cork gasket, made of the highest quality materials.Made in the USA.1955 Clear ...................................... #486 ................................... $10.50/pr.1955 Amber ................................... #486A ................................ $10.50/pr.
$9.45$9.45
Parts SpecialsParts Specials
Special $7.15➼
Special $2.70➼
Special $1.25➼
Special $9.45➼
Special $9.45➼
Special $9.45➼
Special .99¢➼
SALE PRICES GOOD THRU
5-17-01
SALE PRICES GOOD THRU
5-17-01
Special $6.25➼
(800) 854-6911DANCHUK.COM
Danchuk Manufacturing, Inc. (800) 854-6911 • www.danchuk.com6
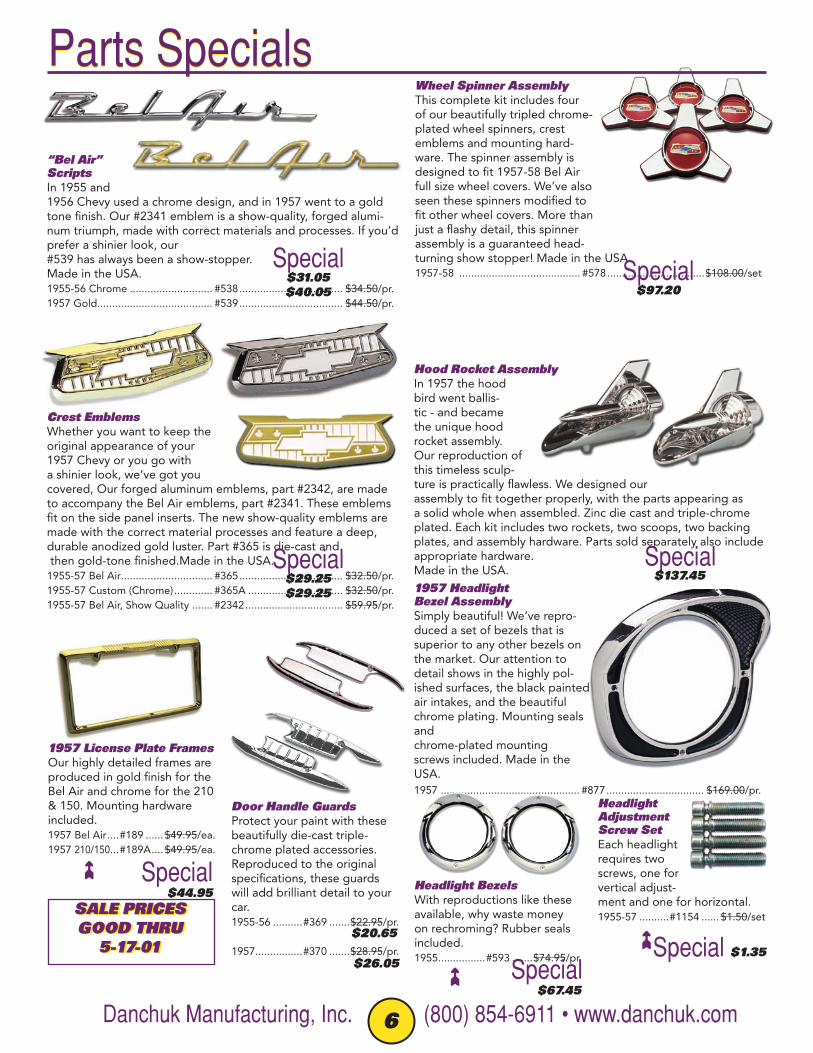
“Bel Air” ScriptsIn 1955 and 1956 Chevy used a chrome design, and in 1957 went to a gold tone finish. Our #2341 emblem is a show-quality, forged alumi-num triumph, made with correct materials and processes. If you’d prefer a shinier look, our #539 has always been a show-stopper. Made in the USA.1955-56 Chrome ............................ #538 ................................... $34.50/pr.1957 Gold ....................................... #539 ................................... $44.50/pr.
Special$31.05$40.05
Crest EmblemsWhether you want to keep the original appearance of your 1957 Chevy or you go with a shinier look, we’ve got you covered, Our forged aluminum emblems, part #2342, are made to accompany the Bel Air emblems, part #2341. These emblems fit on the side panel inserts. The new show-quality emblems are made with the correct material processes and feature a deep, durable anodized gold luster. Part #365 is die-cast and then gold-tone finished.Made in the USA.1955-57 Bel Air ............................... #365 ................................... $32.50/pr.1955-57 Custom (Chrome) ............. #365A ................................ $32.50/pr.1955-57 Bel Air, Show Quality ....... #2342 ................................. $59.95/pr.
Special$29.25$29.25
1957 License Plate FramesOur highly detailed frames are produced in gold finish for the Bel Air and chrome for the 210 & 150. Mounting hardware included. 1957 Bel Air ....#189 ...... $49.95/ea.1957 210/150 ...#189A .... $49.95/ea.
Wheel Spinner AssemblyThis complete kit includes four of our beautifully tripled chrome-plated wheel spinners, crest emblems and mounting hard-ware. The spinner assembly is designed to fit 1957-58 Bel Air full size wheel covers. We’ve also seen these spinners modified to fit other wheel covers. More than just a flashy detail, this spinner assembly is a guaranteed head-turning show stopper! Made in the USA.1957-58 ......................................... #578 .................................$108.00/set
Hood Rocket AssemblyIn 1957 the hood bird went ballis-tic - and became the unique hood rocket assembly. Our reproduction of this timeless sculp-ture is practically flawless. We designed our assembly to fit together properly, with the parts appearing as a solid whole when assembled. Zinc die cast and triple-chrome plated. Each kit includes two rockets, two scoops, two backing plates, and assembly hardware. Parts sold separately also include appropriate hardware.Made in the USA.
1957 Headlight Bezel AssemblySimply beautiful! We’ve repro-duced a set of bezels that is superior to any other bezels on the market. Our attention to detail shows in the highly pol-ished surfaces, the black painted air intakes, and the beautiful chrome plating. Mounting seals and chrome-plated mounting screws included. Made in the USA.1957 ............................................... #877 ................................. $169.00/pr.
Headlight Adjustment Screw SetEach headlight requires two screws, one for vertical adjust-ment and one for horizontal.1955-57 ..........#1154 ...... $1.50/set
Headlight BezelsWith reproductions like these available, why waste money on rechroming? Rubber seals included.1955................#593 .......$74.95/pr.
Door Handle GuardsProtect your paint with these beautifully die-cast triple-chrome plated accessories. Reproduced to the original specifications, these guards will add brilliant detail to your car.1955-56 ..........#369 .......$22.95/pr.
1957................#370 .......$28.95/pr.
Special$97.20
Special$137.45
Parts SpecialsParts Specials
Special $44.95
➼
$20.65
Special $67.45
➼
Special $1.35➼
SALE PRICES GOOD THRU
5-17-01
SALE PRICES GOOD THRU
5-17-01$26.05
Worlds Largest Manufacturer of 1955-56-57 Chevrolet Restoration 7
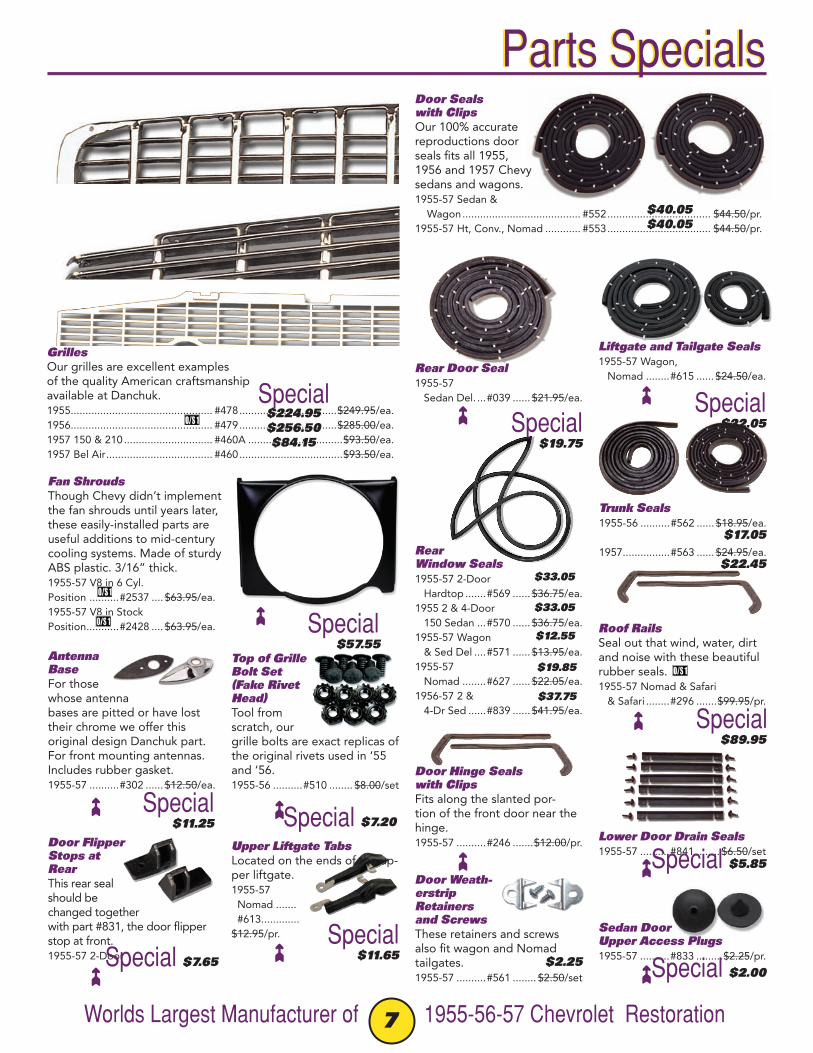
Antenna BaseFor those whose antenna bases are pitted or have lost their chrome we offer this original design Danchuk part. For front mounting antennas. Includes rubber gasket.1955-57 ..........#302 ...... $12.50/ea.
GrillesOur grilles are excellent examples of the quality American craftsmanship available at Danchuk.1955................................................ #478 .................................$249.95/ea.1956................................................ #479 .................................$285.00/ea.1957 150 & 210 .............................. #460A ................................$93.50/ea.1957 Bel Air .................................... #460 ...................................$93.50/ea.
Fan ShroudsThough Chevy didn’t implement the fan shrouds until years later, these easily-installed parts are useful additions to mid-century cooling systems. Made of sturdy ABS plastic. 3/16” thick.1955-57 V8 in 6 Cyl. Position ..........#2537 .... $63.95/ea.1955-57 V8 in Stock Position ...........#2428 .... $63.95/ea.
Special$224.95$256.50$84.15
Top of Grille Bolt Set(Fake Rivet Head)Tool from scratch, our grille bolts are exact replicas of the original rivets used in ‘55 and ‘56. 1955-56 ..........#510 ........ $8.00/set
Door Seals with ClipsOur 100% accurate reproductions door seals fits all 1955, 1956 and 1957 Chevy sedans and wagons.1955-57 Sedan &
Wagon ........................................ #552 ................................... $44.50/pr.1955-57 Ht, Conv., Nomad ............ #553 ................................... $44.50/pr.
Rear Door Seal1955-57 Sedan Del. ...#039 ...... $21.95/ea.
Door Hinge Sealswith ClipsFits along the slanted por-tion of the front door near the hinge.1955-57 ..........#246 .......$12.00/pr.
Door Weath-erstripRetainers and ScrewsThese retainers and screws also fit wagon and Nomad tailgates.1955-57 ..........#561 ........ $2.50/set
Roof RailsSeal out that wind, water, dirt and noise with these beautiful rubber seals.1955-57 Nomad & Safari & Safari ........#296 .......$99.95/pr.
Lower Door Drain Seals1955-57 ..........#841 ........ $6.50/set
Sedan Door Upper Access Plugs1955-57 ..........#833 .........$2.25/pr.
Upper Liftgate TabsLocated on the ends of the up-per liftgate. 1955-57 Nomad ....... #613.............$12.95/pr.
Door Flipper Stops at RearThis rear seal should be changed together with part #831, the door flipper stop at front.1955-57 2-Door
Liftgate and Tailgate Seals1955-57 Wagon, Nomad ........#615 ...... $24.50/ea.
Rear Window Seals1955-57 2-Door Hardtop .......#569 ...... $36.75/ea.1955 2 & 4-Door 150 Sedan ...#570 ...... $36.75/ea.1955-57 Wagon & Sed Del ....#571 ...... $13.95/ea.1955-57 Nomad ........#627 ...... $22.05/ea.1956-57 2 & 4-Dr Sed ......#839 ...... $41.95/ea.
Trunk Seals1955-56 ..........#562 ...... $18.95/ea.
1957................#563 ...... $24.95/ea.
Parts SpecialsParts Specials
Special $7.65
➼
Special $11.65➼
➼
Special $7.20➼Special
$11.25➼
Special $57.55
➼
$2.25
Special $22.05
➼
Special $19.75
➼
$40.05$40.05
$17.05
Special $89.95
➼
Special $5.85➼
Special $2.00➼
$33.05
$33.05
$12.55
$19.85
$37.75
$22.45
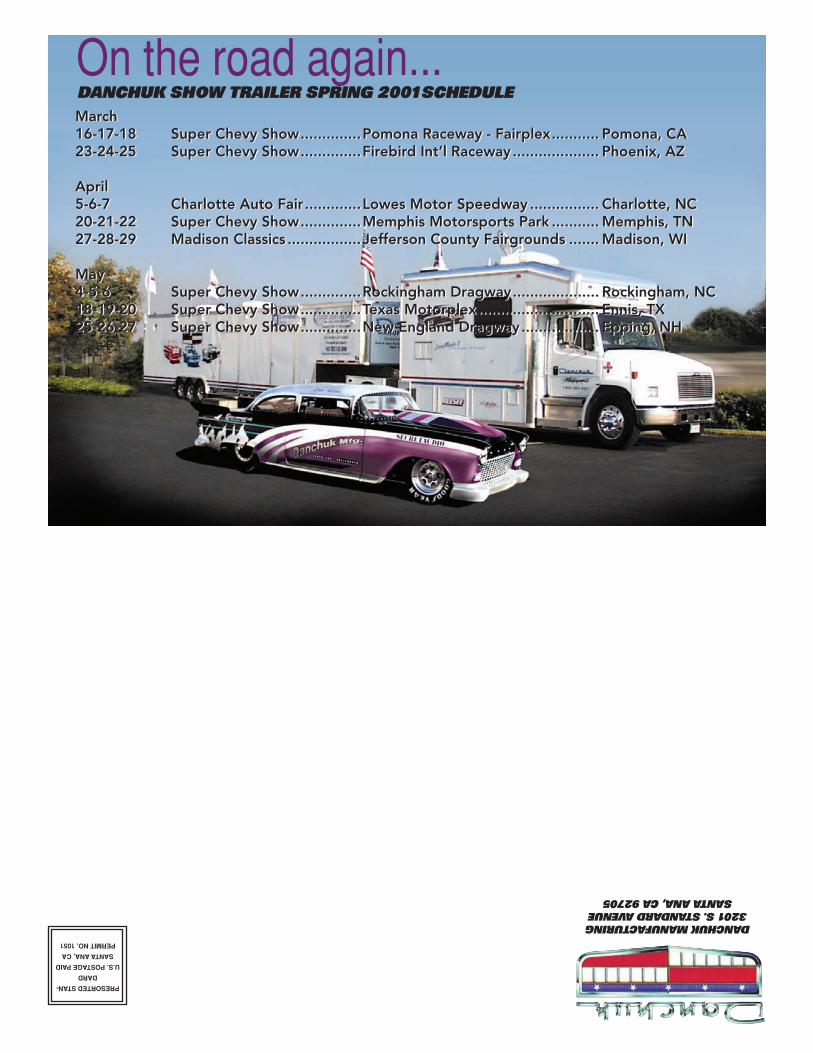
March16-17-18 Super Chevy Show ..............Pomona Raceway - Fairplex ........... Pomona, CA23-24-25 Super Chevy Show ..............Firebird Int’l Raceway .................... Phoenix, AZ
April5-6-7 Charlotte Auto Fair .............Lowes Motor Speedway ................ Charlotte, NC20-21-22 Super Chevy Show ..............Memphis Motorsports Park ........... Memphis, TN27-28-29 Madison Classics .................Jefferson County Fairgrounds ....... Madison, WI
May4-5-6 Super Chevy Show ..............Rockingham Dragway .................... Rockingham, NC18-19-20 Super Chevy Show ..............Texas Motorplex ............................ Ennis, TX25-26-27 Super Chevy Show ..............New England Dragway .................. Epping, NH
On the road again...DANCHUK SHOW TRAILER SPRING 2001SCHEDULE
March16-17-18 Super Chevy Show ..............Pomona Raceway - Fairplex ........... Pomona, CA23-24-25 Super Chevy Show ..............Firebird Int’l Raceway .................... Phoenix, AZ
April5-6-7 Charlotte Auto Fair .............Lowes Motor Speedway ................ Charlotte, NC20-21-22 Super Chevy Show ..............Memphis Motorsports Park ........... Memphis, TN27-28-29 Madison Classics .................Jefferson County Fairgrounds ....... Madison, WI
May4-5-6 Super Chevy Show ..............Rockingham Dragway .................... Rockingham, NC18-19-20 Super Chevy Show ..............Texas Motorplex ............................ Ennis, TX25-26-27 Super Chevy Show ..............New England Dragway .................. Epping, NH
DANCHUK MANUFACTURING 3201 S. STANDARD AVENUE
SANTA ANA, CA 92705
PRESORTED STAN-
DARD
U.S. POSTAGE PAID
SANTA ANA, CA
PERMIT NO. 1051