INSTALLATION AND USER’S MANUAL COOKER HOOD RS … · installation and user’s manual cooker hood...
5
INSTALLATION AND USER’S MANUAL COOKER HOOD RS-600/A-S RS-600 (CHS60SS)-GB-05.indd 1 6/8/2010 9:30:59 AM
Transcript of INSTALLATION AND USER’S MANUAL COOKER HOOD RS … · installation and user’s manual cooker hood...

INSTALLATION AND USER’S MANUALCOOKER HOODRS-600/A-S
RS-600 (CHS60SS)-GB-05.indd 1 6/8/2010 9:30:59 AM

2
TABLE OF CONTENTS
1. Introduction 2 2. Safety precaution 2 3. Intended use 3 4. Parts supplied 3 5. Installation 3 6. Operation 5 7. Maintenance 5 8. Troubleshooting 5 9. Technical data 610. Environmental protection 6
1. INTRODUCTION
Thank you for choosing this cooker hood. This installation and user’s manual is designed to provide you with all required instructions related to the installation, use and maintenance of the appliance. In order to operate the appliance correctly and safety, please read this installation and user’s manual carefully before installation and usage.Keep this installation and user’s manual for future use. Should this appliance be passed on to a third party, then this installation and user’s manual must be included.No liability will be accepted for damage resulting from improper use or non-compliance with these instructions.
2. SAFETY PRECAUTION
Important! Always switch off the electricity supply at the mains during installation and maintenance such as for light bulb replacement.
General• Thecookerhoodissuitablefordomesticuseonly.
Children• Please dispose of the packaging material carefully.
Packaging material can be dangerous to children. Danger of suffocation!
• Children should be supervised to ensure that they do notplay with the appliance.
Installation• The cookerhoodmustbe installed in accordancewith the
installation instructions and all measurements must be followed.
• All installation work must be carried out by a competentperson or qualified electrician.
• Wheninstallingthecookerhood,makesurethatthefollowingrecommended distances between the top of cooker and the lowest part of the cooker hood are observed:
Gas cookers: 70cm Electric cookers: 66cm Coaloroilcookers: 80cm
• Donotinstallaboveacookerwithahighlevelgrill.• Makesuretheductinghasnobendssharperthan90degrees
as this will reduce the efficiency of the cooker hood. • Pay attention to the sharp edges inside the cooker hood
during installation.
Electrical safety• Regularly check the power cord for damage. If the supply
cord is damaged, it must be replaced by the manufacturer, its service agent or similarly qualified persons in order to avoid a hazard.
• Theappliancemustbeplacedinsuchaway,thatthepowersupply is accessible at all times.
• Beforeconnectingtheappliancetothepowersupply,checkthat the power supply voltage and current rating corresponds with the power supply details shown on the appliance rating label.
• Neveruse adamagedappliance!Disconnect the appliancefrom the wall outlet and contact your supplier if it is damaged.
• Danger of electric shock! Do not attempt to repair theappliance yourself. In case of malfunction, repairs are to be conducted by qualified personnel only.
• Toavoiddamagingthecord,donotsqueeze,bendorchafeit on sharp edges. Keep it away from hot surfaces and open flames as well.
• Layoutthecordinsuchawaythatnounintentionalpullingor tripping over it is possible.
• Donotopentheappliancecasingunderanycircumstances.Do not insert any foreign objects into the inside of thecasing.
• Never use accessorieswhich are not recommendedby themanufacturer. They could pose a safety risk to the user and might damage the appliance. Only use original parts and accessories.
• Keep the appliance away from any hot surfaces and openflames. Always operate the appliance on a level, stable, clean and dry surface. Protect the appliance against heat, dust, direct sunlight, moisture, dripping and splashing water.
• Donotplaceheavyobjectsontopoftheappliance.Donotplace objects with open flames, e.g. candles, on top of orbesidetheappliance.Donotplaceobjectsfilledwithwater,e.g. vases on or near the appliance.
• Thisapplianceisnotintendedforusebypersons(includingchildren) with reduced physical, sensory, or mental capabilities, or by those who lack experience and knowledge, unless they have been given supervision and instruction concerning the use of the appliance by a person responsible for their safety.
Gas safety• Always put lids on pots and pans when cooking on a gas
cooker.
Operation
Danger of fire! • Donotflambéunderthecookerhood.• Donotleavefryingpansunattendedduringuse
because overheated fats or oils might catch fire. • Never leave naked flames under the cooker
hood. • Only fryunderneaththecookerhoodwhenyou
are in the kitchen.• Do not use the cooker hoodwithout the grease
filters,orifthefiltersareexcessivelygreasy!
Caution! Accessible parts may become hot when used with cooking appliances.
Exhaust operationDanger!• Duringexhaustoperation,thecookerhoodremovesairfrom
a room. If other fire sources that require the surrounding air for combustionarebeingoperated in the same room, (e.g.gas, oil or coal heaters), the oxygen they require is taken away. Thus flames could be suffocated and gas could leak out or the fumes could be drawn back into the room.
• In order to guarantee a safe operation, there should be non-closable openings in doors, windows or in an air intake wall box to ensure a fresh supply of combustion air. This will prevent the combustion fumes from being drawn back into the room.
RS-600 (CHS60SS)-GB-05.indd 2 6/8/2010 9:31:00 AM

3
• When assessing the measures necessary, always take theentire ventilation system of the house into consideration. In case of doubt, ask your local chimney sweeper for help.
• Neversecurethecookerhoodtoaventilationduct,oraroomorexhaustgaschimney!Donotlettheairthatisremovedfromthe room be drawn into a duct where warm air is circulating. The extracted air should only be drawn outdoors through a separate ventilating duct that is only for the extractor hood.
• Wheninextractionmode,airintheroomisbeingremovedby the cooker hood. Please make sure that proper ventilation measures are being observed. The cooker hood removes odours from room but not steam.
• There shall be adequate ventilation of the roomwhen therange hood is used at the same time as appliances burning gas or other fuels (not applicable to appliances that onlydischarge the air back into the room).
• The airmust not bedischarged into a flue that is used forremoving fumes from appliances burning gas or other fuels (notapplicabletoappliancesthatonlydischargetheairbackinto the room).
Cleaning• Thereisafireriskifcleaningisnotcarriedoutinaccordance
with the instructions.• Pay attention to the sharp edges inside the cooker hood,
especially during cleaning.• Always disconnect the power supply prior to cleaning the
cooker hood. If the switched fused connection unit is difficult to reach, shut off the power supply by using the corresponding circuit breaker at the distribution board.
• Keepthecookerhoodclean.Fatdepositscouldcatchonfirewhen exposed to high temperatures.
3. INTENDED USE
• Your cooker hood can be operated in recirculated-airoperation or in exhaust operation.
• Recirculated-air: Kitchen fumes are removed and after purification are fed back into the room through the upper air outlet openings. The purification takes place via the grease filters.
4. PARTS SUPPLIED
No. Part Qty.
1 Cookerhood 1
2 Upper and lower chimney 1+1
3 Upper bracket
1
4 Lowerbracket
1
5 Collar
1
No. Part Qty.
6 Lightbulb(E14) 2
7
Longscrew(4mmx32mm) 8
8
Wallplug 8
9
Shortscrew(3.8mmx12mm) 4
5. INSTALLATION
• Important! We recommend that two people carry out theinstallation. Pay attention to the procedure described in the assembly instructions.
Preparation• Exhaust operation:Thewallbreakthrough (coredrill hole,
min. 125mm) must be carried out by a professional prior to installing the extractor hood.
Pay attention to the length of the exhaust hose when planning the wall breakthrough. The exhaust hose must reach the outer edge of the wall without any kinks.
Important! If the exhaust hose leads through an outer wall, the air outlet on the outside must be equipped with a cover thathasself-openingslits(notsupplied).Thiscanbeinstalledby the company that performs the wall breakthrough.
If open fireplaces are operated in the same room, ask your local chimney sweeper about the local regulations prior to installation.
If you are renting, then approval must be obtained from the owner of the property.
• Attention! In order for the cooker hood to reach optimal performance, mount it over the middle of the cooking area.
• Plan the power connection prior to installation so that adisturbing cable will not be visible afterwards.
• Thefollowingaccessoriesarerequiredtomountthecookerhood(notincludedwiththedelivery):
Exhaust duct Power drill Screwdriver Waterlevel Cabledetector
Electrical connection• All fittings must be installed by a qualified electrician in
accordancewithcurrentIEEWiringRegulations(BS7671)andlocal building regulations.
• Important! Always switch off the electricity supply at the mainsduringinstallationandmaintenance.Werecommendthat the fuse is withdrawn or circuit breaker switched off at the distribution board whilst work is in progress.
• Priortodrillingholestosecureittothewall,makesurethatnocablesorpipeswillbecomedamaged(electric,gas,water,etc.; test the areas in question with a cable detector).
• Thisunitisdoubleinsulatedandmustnotbeearthed.Ifthereareanyincomingearthcables,theymustbejoinedandwellinsulated with good quality insulation tape. This is to ensure earth continuity throughout your property.
• Means fordisconnectionmustbe incorporated in thefixedwiring in accordance with the wiring rules. To achieve this install appropriate switched fused connection unit.
RS-600 (CHS60SS)-GB-05.indd 3 6/8/2010 9:31:01 AM
4
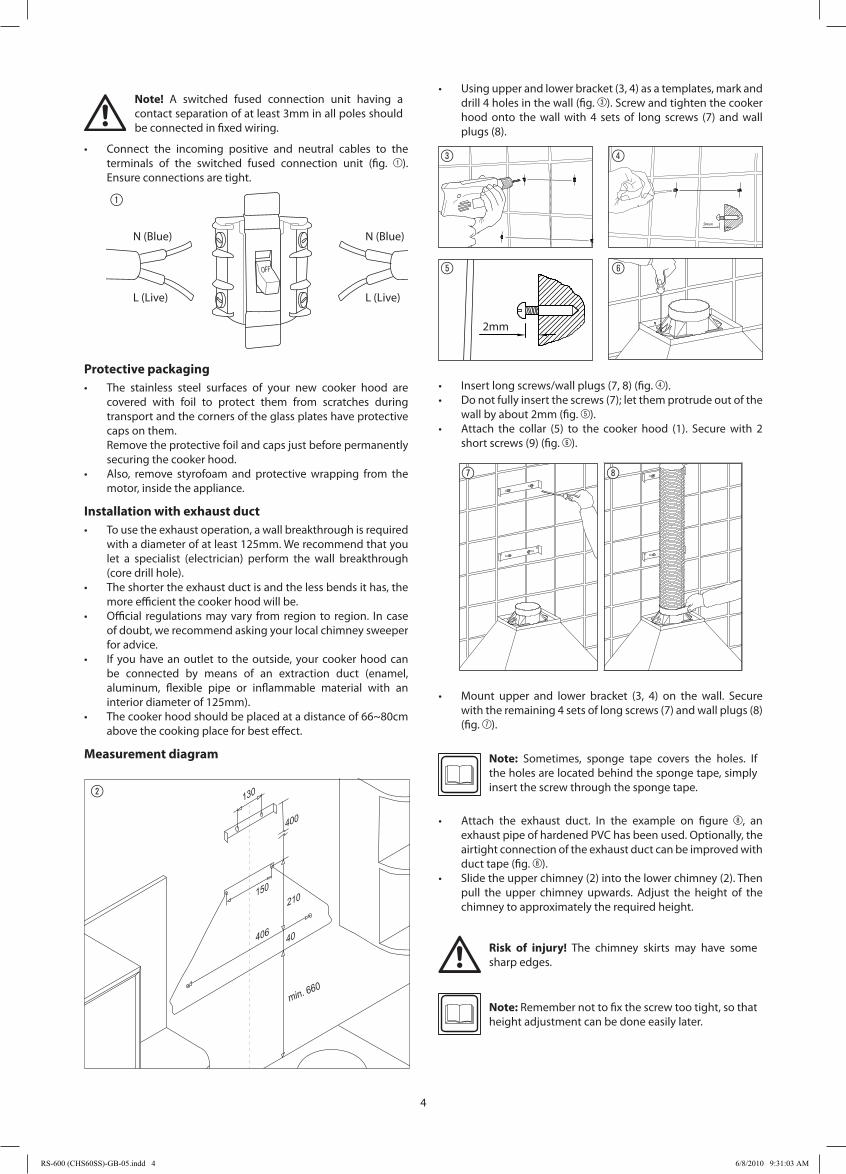
Note! A switched fused connection unit having a contact separation of at least 3mm in all poles should be connected in fixed wiring.
• Connect the incoming positive and neutral cables to theterminals of the switched fused connection unit (fig. ). Ensure connections are tight.
Protective packaging• The stainless steel surfaces of your new cooker hood are
covered with foil to protect them from scratches during transport and the corners of the glass plates have protective caps on them.
Removetheprotectivefoilandcapsjustbeforepermanentlysecuring the cooker hood.
• Also, remove styrofoam and protectivewrapping from themotor, inside the appliance.
Installation with exhaust duct• Tousetheexhaustoperation,awallbreakthroughisrequired
withadiameterofatleast125mm.Werecommendthatyoulet a specialist (electrician) perform the wall breakthrough(coredrillhole).
• Theshortertheexhaustductisandthelessbendsithas,themore efficient the cooker hood will be.
• Official regulationsmayvary fromregion to region. Incaseof doubt, we recommend asking your local chimney sweeper for advice.
• If youhaveanoutlet to theoutside,yourcookerhoodcanbe connected by means of an extraction duct (enamel,aluminum, flexible pipe or inflammable material with an interior diameter of 125mm).
• Thecookerhoodshouldbeplacedatadistanceof66~80cmabove the cooking place for best effect.
Measurement diagram
min. 660
210
40
150
400
130
406
• Usingupperandlowerbracket(3,4)asatemplates,markanddrill4holesinthewall(fig. ). Screw and tighten the cooker hoodonto thewallwith4 setsof long screws (7) andwallplugs (8).
2mm
• Insertlongscrews/wallplugs(7,8)(fig. ).• Donotfullyinsertthescrews(7);letthemprotrudeoutofthe
wallbyabout2mm(fig. ).• Attach the collar (5) to the cooker hood (1). Securewith 2
shortscrews(9)(fig. ).
• Mount upper and lower bracket (3, 4) on the wall. Securewiththeremaining4setsoflongscrews(7)andwallplugs (8) (fig. ).
Note: Sometimes, sponge tape covers the holes. If the holes are located behind the sponge tape, simply insert the screw through the sponge tape.
• Attach the exhaust duct. In the example on figure , an exhaustpipeofhardenedPVChasbeenused.Optionally,theairtight connection of the exhaust duct can be improved with ducttape(fig. ).
• Slidetheupperchimney(2)intothelowerchimney(2).Thenpull the upper chimney upwards. Adjust the height of thechimney to approximately the required height.
Risk of injury! The chimney skirts may have some sharp edges.
Note:Remembernottofixthescrewtootight,sothatheightadjustmentcanbedoneeasilylater.
RS-600 (CHS60SS)-GB-05.indd 4 6/8/2010 9:31:03 AM

5
• Hangthechimney(2)onthelowerbracket(4)(fig. ).Fixtheupperchimney (2)on theupperbracket (3),andsecureonbothsideswiththe2remainingshortscrews(9)(fig. ).
• Finetunethechimneyheight,andtightenallscrews.Checktight fit of all parts.
Bridging larger distances• Bridginglargerdistancestotheoutdoorscanbeachievedby
installing an external motor inside the exhaust duct. To do this, consult an electrician.
Installation without exhaust duct• Ifyoudonothaveanoutlettotheoutside,theexhaustpipe
is not required and the installation is similar to the one shown in the Installation with exhaust duct section.
6. OPERATION
• Switch on the appliance at the switched fused connectionunit. The appliance is ready for operation.
Functions
Switch Function
0 Appliance off
1 Lowspeed(pilotlamplit)
2 Mediumspeed(pilotlamplit)
3 Highspeed(pilotlamplit)
Switchinglighton/off
7. MAINTENANCE
• Beforecleaning,switchtheapplianceoffanddisconnectthecooker hood from power supply.
• Cleantheapplianceinthefollowingintervals:
Regu
larl
y Use a soft cloth moistened with hand-warm mildly soapy water or household cleaning detergent. Never use metal pads, chemical, abrasive material or stiff brush to clean the appliance.
Mon
thly
Metallic anti-grease filter: The filter collects grease, smoke and dust so the filter is directly affecting the efficiency of the cooker hood. If not cleaned, the greaseresidue(potentialflammable)willsaturateonthefilter.Cleanitwithhouseholdcleaningdetergent.
Important:Cleanthefiltereverymonthtoprevent risk of fire.
Light bulb replacement
The lighting system fitted to the hood is just asupportive light. In any case, it can not substitute for the main lighting in the kitchen.
• Switchtheapplianceoffanddisconnectthepowersupply.• In order to replace light bulbs, both metallic anti-grease filters
should be detached first.• Press the locks and pull the filters downward.• Screw one or both of the light bulbs from the holder and
replace by new light bulb(s) of the same type, max. 40W(E14).
• Replace themetallic anti-grease filters andmake sure theylock in place.
8. TROUBLESHOOTING
Fault Cause Solution
Excessive vibration.
The appliance is not hung properly on the brackets.
Take down the appliance and check it is properly fixed.
The fan blade is damaged.
Switch off the appliance.Repairto be carried out by qualified service personnel only.
The fan motor is not fixed tightly.
Lighton,butfandoes not work.
The fan blade is jammed.
The motor is damaged.
Bothlightandfando not work.
Lightbulbbroken.Replacewithabulb with correct rating.
Power connection loose.
Checkpowersupply.
Suction performance not good.
Distancebetweenthe appliance and the cooking place too large.
Readjustthedistance to: Gas cookers: 70cm Electric cookers: 66cmCoal/oilcookers:80cm
Metallic anti-grease filter is dirty.
Cleanfilters(seeMaintenance chapter).
9. TECHNICAL DATA
Powersupply : 220-240V~50HzPowerconsumption–Fan : 140WPowerconsumption–Luminary : 2x40WPowerconsumption–Total : 220W
Protection class : II
Lightbulb : Max.40W(E14)
10. ENVIRONMENTAL PROTECTION
Waste electrical products should not bedisposedofwith household waste. Please recycle where facilities exist. Checkwith your Local Authority or retailer forrecycling advice.
RS-600 (CHS60SS)-GB-05.indd 5 6/8/2010 9:31:04 AM