
INSTALLATION AND OPERATION MANUAL -...
20
INSTALLATION AND OPERATION MANUAL Daikin Configurator v2.*.*
Transcript of INSTALLATION AND OPERATION MANUAL -...

INSTALLATION ANDOPERATION MANUAL
Daikin Configurator v2.*.*

Contents Page
1. Definitions.................................................................................. 11.1. Meaning of warnings and symbols ................................... 11.2. Meaning of used terms ..................................................... 1
2. General safety precautions........................................................ 2
3. Introduction................................................................................ 23.1. General information .......................................................... 23.2. Features without connection to the unit (offline) ............... 23.3. Features when connected to the unit ............................... 23.4. History .............................................................................. 3
Summary of features forDaikin Altherma low temperature split units ("Heating\01\") ...... 4
Summary of features forDaikin Altherma Hybrid and Groundsource ("Heating\02\")....... 6
Summary of features for VRV IV outdoor units ("Air Conditioning\01\")............................ 8
Summary of features forVRV IV heat recovery outdoor units ("Air Conditioning\02\") ..... 9
4. Minimum requirements ............................................................ 104.1. Connection cable............................................................ 104.2. PC requirements............................................................. 10
5. Software installation ................................................................ 10
6. Connecting the EKPCCAB* USB cable to the unit ...................11
7. Operation procedure.................................................................117.1. First startup of the Daikin Configurator ............................117.2. Overview of the Daikin Configurator screen
(example for heating)...................................................... 137.3. Quick guide how to create and upload a settings file ..... 147.4. Quick guide how to download a settings file
and copy to another unit ................................................. 14
8. Details of operations................................................................ 158.1. Application category/autodetect selection ...................... 158.2. Select appliance ............................................................. 158.3. Create/edit settings (offline)............................................ 158.4. Uploading/downloading languages and settings ............ 16
9. Troubleshooting....................................................................... 179.1. Manual EKPCCAB* driver installation ............................ 189.2. Uninstalling the Daikin Configurator ............................... 18
Thank you for purchasing this Daikin product.
The original instructions are written in English. All other languagesare translations of the original instructions.
1. Definitions
1.1. Meaning of warnings and symbols
Warnings in this manual are classified according to their severity andprobability of occurrence.
1.2. Meaning of used terms
Installation manual:
Instruction manual specified for a certain product or application,explaining how to install, configure and maintain it.
Operation manual:
Instruction manual specified for a certain product or application,explaining how to operate it.
Dealer:
Sales distributor for products as per the subject of this manual.
Installer:
Technical skilled person who is qualified to install products as per thesubject of this manual.
Daikin Configurator v2.*.*Installation and
operation manual
CAREFULLY READ THESE INSTRUCTIONS BEFOREINSTALLATION. THEY WILL TELL YOU HOW TOINSTALL AND USE THE DAIKIN CONFIGURATORPROPERLY. KEEP THIS MANUAL IN A HANDY PLACEFOR FUTURE REFERENCE.
THIS IS AN OPTION TO BE USED IN COMBINATIONWITH DAIKIN UNITS. REFER TO THE INSTALLATIONAND OPERATION MANUAL OF THE UNITS FORINSTALLATION AND OPERATION INSTRUCTIONS.
This appliance is not intended for use by persons,including children, with reduced physical, sensory ormental capabilities, or lack of experience and knowledge,unless they have been given supervision or instructionconcerning use of the appliance by a person responsiblefor their safety. Children shall be supervised to ensure thatthey do not play with the appliance.
WARNING
Before operating the Daikin Configurator, be sure theinstallation has been carried out correctly by an installer. Ifyou feel unsure about operation, contact your installer foradvice and information.
DANGER
Indicates an imminently hazardous situation which, if notavoided, will result in death or serious injury.
WARNING
Indicates a potentially hazardous situation which, if notavoided, could result in death or serious injury.
CAUTION
Indicates a potentially hazardous situation which, if notavoided, may result in minor or moderate injury. It may alsobe used to alert against unsafe practices.
NOTICE
Indicates situations that may result in equipment orproperty-damage accidents only.
INFORMATION
This symbol identifies useful tips or additional information.Some types of danger are represented by special symbols:
Electric current.
Danger of burning and scalding.
Installation and operation manual
1Daikin Configurator v2.*.*
4P328530-1F – 2014.09

User:
Person who is owner of the product and/or operates the product.
Accessories:
Equipment which is delivered with the unit and which needs to beinstalled according to instructions in the documentation.
Optional equipment:
Equipment which can optionally be combined to the products as perthe subject of this manual.
2. General safety precautions
The precautions listed here are divided into the following four types.They all cover very important topics, so be sure to follow themcarefully.
3. Introduction
The Daikin Configurator software is intended to be used incombination with the EKPCCAB* USB cable.
3.1. General information
This manual concerns the Daikin Configurator v.2.*.* for configuratingfollowing appliance:
the Daikin Altherma low temperature split units
the VRV IV outdoor units.
See next pages for an overview of the posibilities.
3.2. Features without connection to the unit (offline)
Depending on an appliance selection, settings files can becreated.
For each setting a help text description is available. Thedescription is available in different languages.
The settings can be exported to a csv-file (csv = comma-separated values). A csv-file can be opened in Microsoft Excel.
3.3. Features when connected to the unit
Auto-detect of unit type is possible.
By uploading, it is possible to modify settings and user interfacelanguages of the unit (availability depending on unit type).
By downloading, it is possible to download the settings from theunit and consult all settings on the PC screen. These settingswill include editable and read-only settings. Once the settingsare downloaded it is possible to copy the editable settings (theread-only settings are not copied) to another unit (within thesame unit type).
DANGER: ELECTRICAL SHOCK
Switch off all power supply before removing the switchboxservice panel or before making any connections ortouching electrical parts.
Do not touch any switch with wet fingers. Touching aswitch with wet fingers can cause electrical shock. Beforetouching electrical parts, turn off all applicable powersupply.
To avoid electric shock, be sure to disconnect the powersupply 1 minute or more before servicing the electricalparts. Even after 1 minute, always measure the voltage atthe terminals of main circuit capacitors or electrical partsand, before touching, be sure that those voltages are50 V DC or less.
When service panels are removed, live parts can easily betouched by accident. Never leave the unit unattendedduring installation or servicing when the service panel isremoved.
DANGER: DO NOT TOUCH PIPING AND INTERNALPARTS
Do not touch the refrigerant piping, water piping or internalparts during and immediately after operation. The pipingand internal parts may be hot or cold depending on theworking condition of the unit.
Your hand may suffer burns or frostbite if you touch thepiping or internal parts. To avoid injury, give the piping andinternal parts time to return to normal temperature or, if youmust touch them, be sure to wear protective gloves.
INFORMATION
The latest available Daikin Configurator software can bedownloaded from the website:http://www.daikineurope.com/support-and-manuals/software-downloads/
As the functionality of the Daikin Configurator relies onan up to date internal database, ensure to upgrade to thelatest Daikin Configurator software before making actualconnection to the unit.
Daikin Configurator v2.*.*4P328530-1F – 2014.09
Installation and operation manual
2
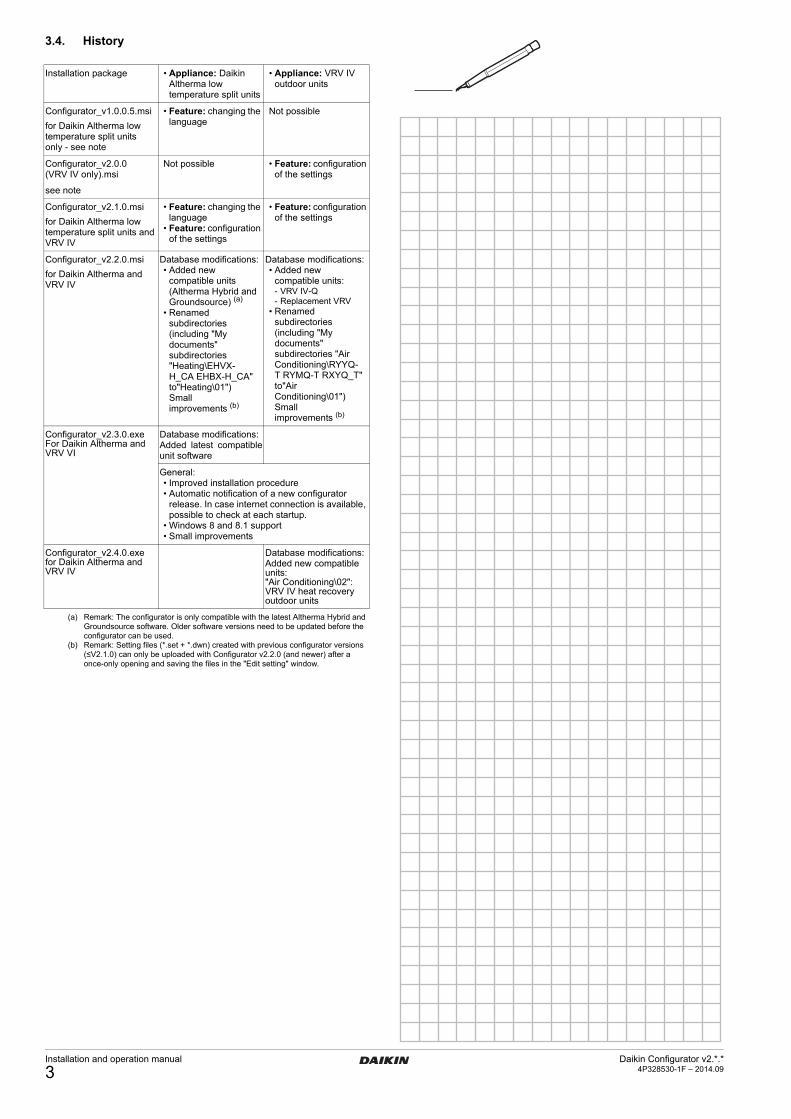
3.4. History
Installation package • Appliance: Daikin Altherma low temperature split units
• Appliance: VRV IV outdoor units
Configurator_v1.0.0.5.msi
for Daikin Altherma low temperature split units only - see note
• Feature: changing the language
Not possible
Configurator_v2.0.0 (VRV IV only).msi
see note
Not possible • Feature: configuration of the settings
Configurator_v2.1.0.msi
for Daikin Altherma low temperature split units and VRV IV
• Feature: changing the language
• Feature: configuration of the settings
• Feature: configuration of the settings
Configurator_v2.2.0.msi
for Daikin Altherma and VRV IV
Database modifications:• Added new
compatible units (Altherma Hybrid and Groundsource) (a)
• Renamed subdirectories (including "My documents" subdirectories "Heating\EHVX-H_CA EHBX-H_CA" to"Heating\01")Smallimprovements (b)
(a) Remark: The configurator is only compatible with the latest Altherma Hybrid and Groundsource software. Older software versions need to be updated before the configurator can be used.
(b) Remark: Setting files (*.set + *.dwn) created with previous configurator versions (≤V2.1.0) can only be uploaded with Configurator v2.2.0 (and newer) after a once-only opening and saving the files in the "Edit setting" window.
Database modifications:• Added new
compatible units:- VRV IV-Q- Replacement VRV
• Renamed subdirectories (including "My documents" subdirectories "Air Conditioning\RYYQ-T RYMQ-T RXYQ_T" to"Air Conditioning\01")Smallimprovements (b)
Configurator_v2.3.0.exeFor Daikin Altherma and VRV VI
Database modifications:Added latest compatibleunit software
General:• Improved installation procedure• Automatic notification of a new configurator
release. In case internet connection is available, possible to check at each startup.
• Windows 8 and 8.1 support• Small improvements
Configurator_v2.4.0.exefor Daikin Altherma and VRV IV
Database modifications:Added new compatible units:"Air Conditioning\02":VRV IV heat recovery outdoor units
Installation and operation manual
3Daikin Configurator v2.*.*
4P328530-1F – 2014.09

Summary of features for Daikin
Altherma low temperature split
units ("Heating\01\")
A. Models
EHV(X/H)*CA*
EHB(X/H)*CA*
B. Daikin Configurator functions
Configuration of the settings. For each setting a help textdescription is available. This description is available in differentlanguages.
Available settings:
Changing the language on the user interface.
The user interfaces are already preloaded with 6 languages:
Language 1 is fixed to English and can only be upgraded to a newversion of English.
Languages 2 to 6 can be modified by means of the DaikinConfigurator to another language.
These languages are provided with the Daikin Configurator v.2.x.xsoftware.
Menu
Menu settings
implemented Details
Home screen settings (e.g., desired temperature, ...)
No —
"1. Set time/date" menu
Yes
Not implemented: Date and Time settings.Implemented: Daylight saving time and clock type.
"2. Holiday" menu No —
"3. Quiet mode" setting
Yes —
"4. Operation mode" setting
No —
"5. Select schedules" menu
Yes —
"6. Information" menu
NoExcept: Contact/Helpdesk number setting.
"7. User settings" menu
Yes Including schedule timers, ...
"A. Installer settings" menu
Yes
• All settings are implemented except:- A.2.1.B User interface location: Not
implemented.- A.7 Commissioning menu: All
submenus not implemented. Only A.7.2 Set dryout schedule settings implemented.
- A.8 Overview settings menu: All settings implemented. Only [A-xx] and [B-xx] outdoor codes not implemented.
• Quick Wizard startup screen can be disabled/enabled.
user interface EKRUCAL1 (supplied with unit) user interface EKRUCAL2
Language 1 English (fixed) English (fixed)
Language 2 Deutsch Português
Language 3 Français Türkçe
Language 4 Nederlands Svenska
Language 5 Español Norsk
Language 6 Italiano Čeština
INFORMATION
User interface EKRUCAL1 is the standard interfacesupplied with the unit. As 2nd optional user interface,EKRUCAL1 or EKRUCAL2 can be used.
INFORMATION
For Daikin Altherma low temperature split units, languagesand settings will be uploaded to both user interfaces incase of a 2 user interface setup. For more details, see"8.4. Uploading/downloading languages and settings" onpage 16.
Language Filename
English fw_wording_English_v1.00.bin
Deutsch fw_wording_German_v1.00.bin
Français fw_wording_French_v1.00.bin
Nederlands fw_wording_Dutch_v1.00.bin
Español fw_wording_Spanish_v1.00.bin
Italiano fw_wording_Italian_v1.00.bin
Português fw_wording_Portuguese_v1.00.bin
Türkçe fw_wording_Turkish_v1.00.bin
Svenska fw_wording_Swedish_v1.00.bin
Norsk fw_wording_Norwegian_v1.00.bin
Čeština fw_wording_Czech_v1.00.bin
Ελληνικά fw_wording_Greek_v1.00.bin
Pyccĸий fw_wording_Russian_v1.00.bin
Dansk fw_wording_Danish_v1.00.bin
Suomi fw_wording_Finnish_v1.00.bin
Hrvatski fw_wording_Croatian_v1.00.bin
Magyar fw_wording_Hungarian_v1.00.bin
Polski fw_wording_Polish_v1.00.bin
Română fw_wording_Romanian_v1.00.bin
Slovenščina fw_wording_Slovenian_v1.00.bin
Български fw_wording_Bulgarian_v1.00.bin
Slovenčina fw_wording_Slovak_v1.00.bin
Daikin Configurator v2.*.*4P328530-1F – 2014.09
Installation and operation manual
4

C. Daikin Configurator files
*.set-file: settings file
*.dwn-file: downloaded file with settings
*.bin-file: language file
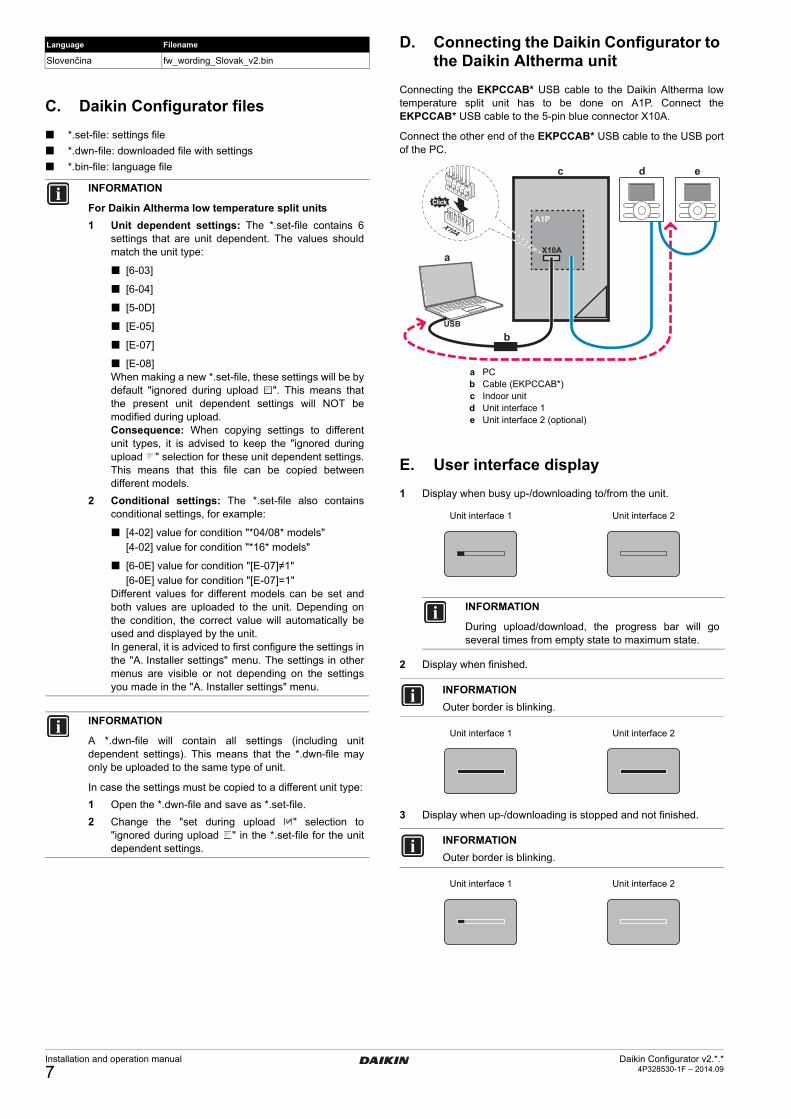
D. Connecting the Daikin Configurator to the Daikin Altherma low temperature split unit
Connecting the EKPCCAB* USB cable to the Daikin Altherma lowtemperature split unit has to be done on A1P. Connect theEKPCCAB* USB cable to the 5-pin blue connector X10A.
Connect the other end of the EKPCCAB* USB cable to the USB portof the PC.
a PCb Cable (EKPCCAB*)c Indoor unitd Unit interface 1e Unit interface 2 (optional)
E. User interface display
1 Display when busy up-/downloading to/from the unit.
2 Display when finished.
3 Display when up-/downloading is stopped and not finished.
INFORMATION
For Daikin Altherma low temperature split units
1 Unit dependent settings: The *.set-file contains 6settings that are unit dependent. The values shouldmatch the unit type:
[6-03]
[6-04]
[5-0D]
[E-05]
[E-07]
[E-08]When making a new *.set-file, these settings will be bydefault "ignored during upload ". This means thatthe present unit dependent settings will NOT bemodified during upload.Consequence: When copying settings to differentunit types, it is advised to keep the "ignored duringupload " selection for these unit dependent settings.This means that this file can be copied betweendifferent models.
2 Conditional settings: The *.set-file also containsconditional settings, for example:
[4-02] value for condition "*04/08* models"[4-02] value for condition "*16* models"
[6-0E] value for condition "[E-07]=0"[6-0E] value for condition "[E-07]=1"
Different values for different models can be set andboth values are uploaded to the unit. Depending onthe condition, the correct value will automatically beused and displayed by the unit.In general, it is adviced to first configure the settings inthe "A. Installer settings" menu. The settings in othermenus are visible or not depending on the settingsyou made in the "A. Installer settings" menu.
INFORMATION
A *.dwn-file will contain all settings (including unitdependent settings). This means that the *.dwn-file mayonly be uploaded to the same type of unit.
In case the settings must be copied to a different unit type:
1 Open the *.dwn-file and save as *.set-file.
2 Change the "set during upload " selection to"ignored during upload " in the *.set-file for the unitdependent settings.
Unit interface 1 Unit interface 2
INFORMATION
During upload/download, the progress bar will goseveral times from empty state to maximum state.
INFORMATION
Outer border is blinking.
Unit interface 1 Unit interface 2
INFORMATION
Outer border is blinking.
Unit interface 1 Unit interface 2
A1P
USB
a
b
X10A
c d e2
34
5
H JS
T
X10A
Installation and operation manual
5Daikin Configurator v2.*.*
4P328530-1F – 2014.09

Summary of features for Daikin
Altherma Hybrid and
Groundsource ("Heating\02\")
(new in release v2.2.0)
A. Models
EHYHBX-H AA: Daikin Altherma hybrid heat pump
EGSQH AA: Daikin Alltherma groundsource heat pump
B. Daikin Configurator functions
Configuration of the settings. For each setting a help textdescription is available. This description is available in differentlanguages.
Available settings:
Changing the language on the user interface.
The user interfaces are already preloaded with 4 languages:
All languages can be modified by means of the Daikin Configurator toanother language.
These languages are provided with the Daikin Configurator v.2.x.xsoftware.
Menu
Menu settings
implemented Details
Home screen settings (e.g., desired temperature, ...)
No —
"1. Set time/date" menu
Yes
Not implemented: Date and Time settings.Implemented: Daylight saving time and clock type.
"2. Holiday" menu No —
"3. Quiet mode" setting
Yes —
"4. Operation mode" setting
No —
"5. Select schedules" menu
Yes —
"6. Information" menu
NoExcept: Contact/Helpdesk number setting.
"7. User settings" menu
Yes Including schedule timers, ...
"A. Installer settings" menu
Yes
• All settings are implemented except:- A.2.1.B User interface location: Not
implemented.- A.6.9 Brine freezeup temp.: Not
implemented- A.7 Commissioning menu: All
submenus not implemented. Only A.7.2 Set dryout schedule settings implemented.
- A.8 Overview settings menu: All settings implemented. Only [A-xx] and [B-xx] outdoor codes not implemented.
• Quick Wizard startup screen can be disabled/enabled.
Language
EKRUCBL*
1 2 3 4 5 6 7
English ● ● ● ● ●
Deutsch ● ● ●
Français ●
Nederlands ●
Español ●
Italiano ●
Português ●
Türkçe ●
Svenska ●
Norsk ●
Čeština ●
Ελληνικά ●
Pyccĸий ●
Dansk ●
Suomi ●
Hrvatski ●
Magyar ●
Polski ●
Română ●
Slovenščina ●
Български ●
Slovenčina ●
●= This language is preloaded in EKRUCBL*
INFORMATION
For Daikin Altherma units, languages and settings will beuploaded to both user interfaces in case of a 2 userinterface setup. For more details, see"8.4. Uploading/downloading languages and settings" onpage 16.
Language Filename
English fw_wording_English_v2.bin
Deutsch fw_wording_German_v2.bin
Français fw_wording_French_v2.bin
Nederlands fw_wording_Dutch_v2.bin
Español fw_wording_Spanish_v2.bin
Italiano fw_wording_Italian_v2.bin
Português fw_wording_Portuguese_v2.bin
Türkçe fw_wording_Turkish_v2.bin
Svenska fw_wording_Swedish_v2.bin
Norsk fw_wording_Norwegian_v2.bin
Čeština fw_wording_Czech_v2.bin
Ελληνικά fw_wording_Greek_v2.bin
Pyccĸий fw_wording_Russian_v2.bin
Dansk fw_wording_Danish_v2.bin
Suomi fw_wording_Finnish_v2.bin
Hrvatski fw_wording_Croatian_v2.bin
Magyar fw_wording_Hungarian_v2.bin
Polski fw_wording_Polish_v2.bin
Română fw_wording_Romanian_v2.bin
Slovenščina fw_wording_Slovenian_v2.bin
Български fw_wording_Bulgarian_V2.bin
Daikin Configurator v2.*.*4P328530-1F – 2014.09
Installation and operation manual
6
C. Daikin Configurator files
*.set-file: settings file
*.dwn-file: downloaded file with settings
*.bin-file: language file
D. Connecting the Daikin Configurator to the Daikin Altherma unit
Connecting the EKPCCAB* USB cable to the Daikin Altherma lowtemperature split unit has to be done on A1P. Connect theEKPCCAB* USB cable to the 5-pin blue connector X10A.
Connect the other end of the EKPCCAB* USB cable to the USB portof the PC.
a PCb Cable (EKPCCAB*)c Indoor unitd Unit interface 1e Unit interface 2 (optional)
E. User interface display
1 Display when busy up-/downloading to/from the unit.
2 Display when finished.
3 Display when up-/downloading is stopped and not finished.
Slovenčina fw_wording_Slovak_v2.bin
INFORMATION
For Daikin Altherma low temperature split units
1 Unit dependent settings: The *.set-file contains 6settings that are unit dependent. The values shouldmatch the unit type:
[6-03]
[6-04]
[5-0D]
[E-05]
[E-07]
[E-08]When making a new *.set-file, these settings will be bydefault "ignored during upload ". This means thatthe present unit dependent settings will NOT bemodified during upload.Consequence: When copying settings to differentunit types, it is advised to keep the "ignored duringupload " selection for these unit dependent settings.This means that this file can be copied betweendifferent models.
2 Conditional settings: The *.set-file also containsconditional settings, for example:
[4-02] value for condition "*04/08* models"[4-02] value for condition "*16* models"
[6-0E] value for condition "[E-07]≠1"[6-0E] value for condition "[E-07]=1"
Different values for different models can be set andboth values are uploaded to the unit. Depending onthe condition, the correct value will automatically beused and displayed by the unit.In general, it is adviced to first configure the settings inthe "A. Installer settings" menu. The settings in othermenus are visible or not depending on the settingsyou made in the "A. Installer settings" menu.
INFORMATION
A *.dwn-file will contain all settings (including unitdependent settings). This means that the *.dwn-file mayonly be uploaded to the same type of unit.
In case the settings must be copied to a different unit type:
1 Open the *.dwn-file and save as *.set-file.
2 Change the "set during upload " selection to"ignored during upload " in the *.set-file for the unitdependent settings.
Language Filename
Unit interface 1 Unit interface 2
INFORMATION
During upload/download, the progress bar will goseveral times from empty state to maximum state.
INFORMATION
Outer border is blinking.
Unit interface 1 Unit interface 2
INFORMATION
Outer border is blinking.
Unit interface 1 Unit interface 2
A1P
USB
a
b
X10A
c d e2
34
5
H JS
T
X10A
Installation and operation manual
7Daikin Configurator v2.*.*
4P328530-1F – 2014.09
Summary of features for VRV IV
outdoor units ("Air
Conditioning\01\")
A. Models
RYYQ*T*
RYMQ*T*
RXYQ*T*
RXYQQ*T* (new in release v2.2.0)
B. Daikin Configurator functions
Configuration of the settings. For each setting a help textdescription is available. The description is available in differentlanguages.
The configurated settings are available in following languages:
Available settings: The main settings that are used duringcommissioning of mode 1 (Read only) and mode 2 (Read/Write),are implemented.
C. Daikin Configurator files
*.set-file: settings file
*.dwn-file: downloaded file with settings
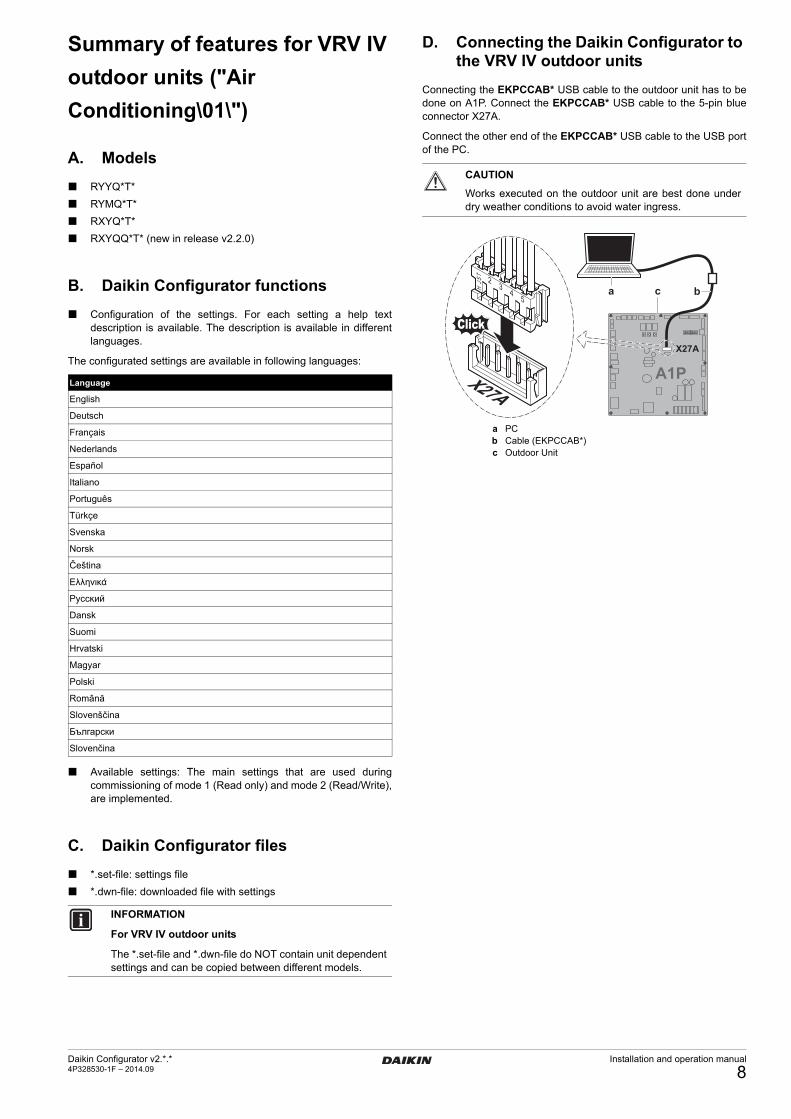
D. Connecting the Daikin Configurator to the VRV IV outdoor units
Connecting the EKPCCAB* USB cable to the outdoor unit has to bedone on A1P. Connect the EKPCCAB* USB cable to the 5-pin blueconnector X27A.
Connect the other end of the EKPCCAB* USB cable to the USB portof the PC.
a PCb Cable (EKPCCAB*)c Outdoor Unit
Language
English
Deutsch
Français
Nederlands
Español
Italiano
Português
Türkçe
Svenska
Norsk
Čeština
Ελληνικά
Pyccĸий
Dansk
Suomi
Hrvatski
Magyar
Polski
Română
Slovenščina
Български
Slovenčina
INFORMATION
For VRV IV outdoor units
The *.set-file and *.dwn-file do NOT contain unit dependentsettings and can be copied between different models.
CAUTION
Works executed on the outdoor unit are best done underdry weather conditions to avoid water ingress.
X27A
a bc2
34
5
H JS
T
X27A
A1P
Daikin Configurator v2.*.*4P328530-1F – 2014.09
Installation and operation manual
8

Summary of features for VRV IV
heat recovery outdoor units
("Air Conditioning\02\")
(new in release v2.4.0)
A. Models
REYQ*T*
REMQ*T*
B. Daikin Configurator functions
Configuration of the settings. For each setting a help textdescription is available. The description is available in differentlanguages.
The configurated settings are available in following languages:
Available settings: The main settings that are used duringcommissioning of mode 1 (Read only) and mode 2 (Read/Write),are implemented.
C. Daikin Configurator files
*.set-file: settings file
*.dwn-file: downloaded file with settings
D. Connecting the Daikin Configurator to the VRV IV heat recovery outdoor units
Connecting the EKPCCAB* USB cable to the outdoor unit has to bedone on A1P. Connect the EKPCCAB* USB cable to the 5-pin blueconnector X27A.
Connect the other end of the EKPCCAB* USB cable to the USB portof the PC.
a PCb Cable (EKPCCAB*)c Outdoor Unit
Language
English
Deutsch
Français
Nederlands
Español
Italiano
Português
Türkçe
Svenska
Norsk
Čeština
Ελληνικά
Pyccĸий
Dansk
Suomi
Hrvatski
Magyar
Polski
Română
Slovenščina
Български
Slovenčina
INFORMATION
For VRV IV heat recovery outdoor units
The *.set-file and *.dwn-file do NOT contain unit dependentsettings and can be copied between different models.
CAUTION
Works executed on the outdoor unit are best done underdry weather conditions to avoid water ingress.
X27A
a bc2
34
5
H JS
T
X27A
A1P
Installation and operation manual
9Daikin Configurator v2.*.*
4P328530-1F – 2014.09

4. Minimum requirements
4.1. Connection cable
The Daikin Configurator software can only be used in combinationwith EKPCCAB* USB cable. This hardware product is designed andcertified for following conditions:
IP class: IPX0,
altitude up to 2000 m,
ambient temperature range (when electrified): –25°C to 65°C
ambient temperature range (when not electrified): –25°C to65°C,
maximum relative humidity of 95% at 40°C,
mains supply fluctuation up to ±10% of the nominal voltage,
transient overvoltages typically present on the mains supply -overvoltage category II,
temporary overvoltages occurring on the mains supply,
applicable environment rated pollution degree 2.
4.2. PC requirements
Windows XP (SP2), Windows Vista (SP2), Windows 7 orWindows 8/8.1
Microsoft .NET FrameWork 2.0 and 4.0
Pentium III 400 MHz or faster
Free USB 2.0 port, capable of supplying 50 mA current
Minimum display resolution 1024×768
5. Software installation
1 Go to http://www.daikineurope.com/support-and-manuals/software-downloads/ and click the link "Download Software"under Configurator Software. Unzip/unpack the downloadedpackage and start by double clicking on the *.exe file. This willstart the installation program. Click "Install".
2 Select "I accept the terms in the License Agreement" afterreading and agreeing with the license agreement and click"Install".
CAUTION• Do not clean the equipment with solvents or other
cleaning agents.• Do not soak the equipment in water or other fluid• Use of a damp cloth for cleaning is permitted, avoid
water ingress
INFORMATION
When another version of the Daikin Configurator is alreadyinstalled on your PC, the new version will first uninstall theprevious version.
INFORMATION
By default the installation location is in the user directory: Example: C:\Users\Me\AppData\Local\Daikin EuropeNV\Daikin Configurator
Daikin Configurator v2.*.*4P328530-1F – 2014.09
Installation and operation manual
10

3 Click "Finish".
4 Click "Close".
The installation has been completed. The program is now available inStart/Programs/Daikin/Daikin Configurator.
6. Connecting the EKPCCAB* USB cable to the unit
Refer to the installation and operation manual of the unit andinstallation manual of the EKPCCAB* USB cable for correctconnection.
For more information see the model types described in "Summary offeatures for Daikin Altherma low temperature split units("Heating\01\")" on page 4 and "Summary of features for VRV IVoutdoor units ("Air Conditioning\01\")" on page 8.
7. Operation procedure
7.1. First startup of the Daikin Configurator
1 Navigate to Start/Programs/Daikin/Daikin Configurator and click"Daikin Configurator" to start the Daikin Configurator.
2 Daikin Update Checker:
Select your language.
In case an internet connection is available, click "Check forupdates" and follow the instructions.
To startup the configurator click "Launch Daikin Configuratorv2.x.x".
3 Setup Wizard (step 1): it is possible to select the language.Click "Next".
4 Setup Wizard (Step 2): Click "Browse" and choose the locationwhere you want to store the Configurator directories with userfiles.Click "Next".
NOTICE
Check that the EKPCCAB* USB cable is correctlyconnected to the PC and the unit.
Installation and operation manual
11Daikin Configurator v2.*.*
4P328530-1F – 2014.09

5 Setup Wizard (Step 3): By default the "Auto select COM portwith [USB Serial Port] description" box is automatically selected.
In case an USB driver is already installed.
Click "Next".
6 Setup wizard is finished and the "Category" main screen isdisplayed.
INFORMATION
In case no USB driver is found, it is possible to "Close andstart USB driver installation". After this the driverinstallation program will start. Please follow theinstructions.
Please note that to install the driver, admin rights arerequired. After installation the USB cable can be pluggedinto the PC. After this please restart the configurator.
INFORMATION
In case manual selection is required, it is possible touncheck the "Auto select COM port with [USB Serial Port]description" box.
Daikin Configurator v2.*.*4P328530-1F – 2014.09
Installation and operation manual
12

7.2. Overview of the Daikin Configurator screen (example for heating)
Installation and operation manual
13Daikin Configurator v2.*.*
4P328530-1F – 2014.09
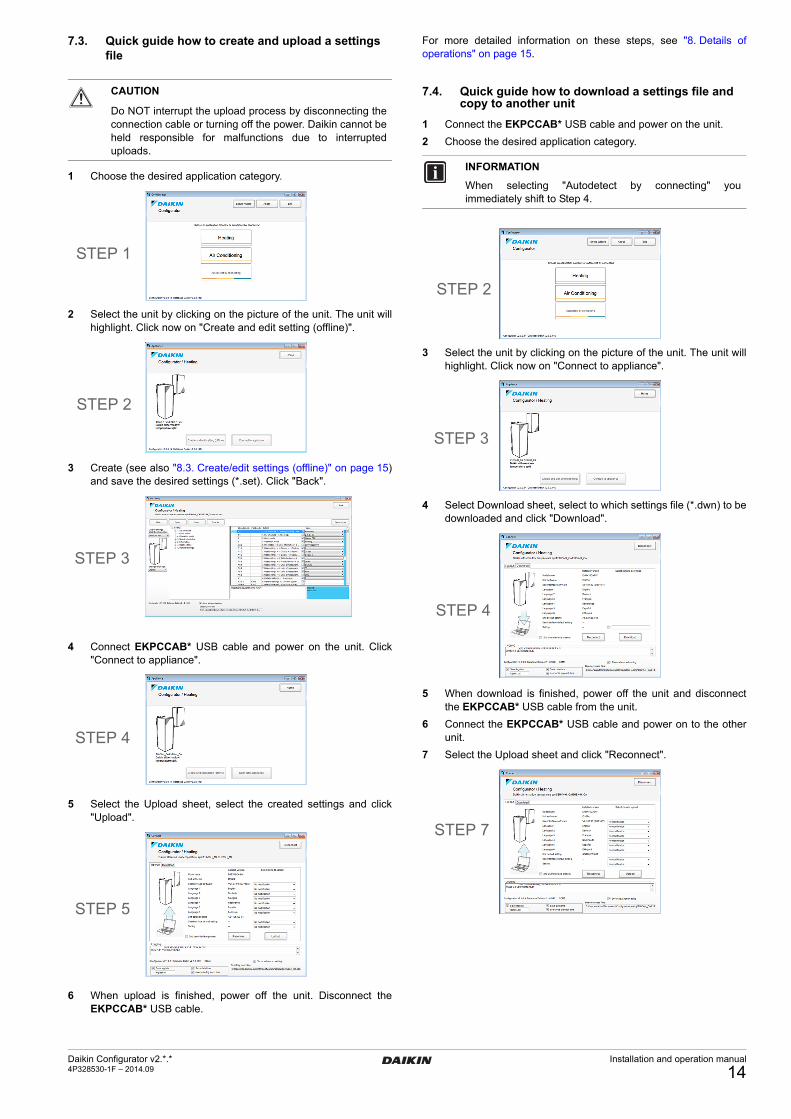
7.3. Quick guide how to create and upload a settings file
1 Choose the desired application category.
2 Select the unit by clicking on the picture of the unit. The unit willhighlight. Click now on "Create and edit setting (offline)".
3 Create (see also "8.3. Create/edit settings (offline)" on page 15)and save the desired settings (*.set). Click "Back".
4 Connect EKPCCAB* USB cable and power on the unit. Click"Connect to appliance".
5 Select the Upload sheet, select the created settings and click"Upload".
6 When upload is finished, power off the unit. Disconnect theEKPCCAB* USB cable.
For more detailed information on these steps, see "8. Details ofoperations" on page 15.
7.4. Quick guide how to download a settings file and copy to another unit
1 Connect the EKPCCAB* USB cable and power on the unit.
2 Choose the desired application category.
3 Select the unit by clicking on the picture of the unit. The unit willhighlight. Click now on "Connect to appliance".
4 Select Download sheet, select to which settings file (*.dwn) to bedownloaded and click "Download".
5 When download is finished, power off the unit and disconnectthe EKPCCAB* USB cable from the unit.
6 Connect the EKPCCAB* USB cable and power on to the otherunit.
7 Select the Upload sheet and click "Reconnect".
CAUTION
Do NOT interrupt the upload process by disconnecting theconnection cable or turning off the power. Daikin cannot beheld responsible for malfunctions due to interrupteduploads.
STEP 1
STEP 2
STEP 3
STEP 4
STEP 5
INFORMATION
When selecting "Autodetect by connecting" youimmediately shift to Step 4.
STEP 2
STEP 3
STEP 4
STEP 7
Daikin Configurator v2.*.*4P328530-1F – 2014.09
Installation and operation manual
14

8 Select the downloaded settings (*.dwn) and click "Upload".
9 When download is finished, power off the unit. Disconnect theEKPCCAB* USB cable.
For more detailed information on these steps, see "8. Details ofoperations" on page 15.
8. Details of operations
8.1. Application category/autodetect selection
Click the desired application category ("Heating" or "Airconditioning") to manually select the unit.
By clicking "Autodetect by connecting" the unit is automaticallydetected and the Daikin Configurator automatically shifts to theupload/download display (see "8.4.1. Upload" on page 16).
8.2. Select appliance
1 Select the desired appliance.
2 Click "Create and edit settings (offline)" to create or edit settingsor "Connect to appliance" to upload/download settings.
8.3. Create/edit settings (offline)
1 Click "New" to create new settings or "Open" to edit existingsettings.
2 Select the different setting parameters and fill in the informationto create the desired settings.
STEP 8
INFORMATION
When clicking "Open", a dialog box will appear. Select thesettings file you want to edit.
INFORMATION
When opening downloaded settings (*.dwn), someparameters are read-only.
INFORMATION
By selecting the "Show advanced settings" checkbox, it ispossible to read out the directory of the user files.
INFORMATION
Selection field: "Display settings according to applianceand unit type" for conditional settings (only for a *.set-file).
See Conditional settings on page 5.
For Daikin Altherma low temperature split units, thesettings file (*.set) contains different conditional settings.Only the applicable conditional settings for the selectedunit type will be shown.
Example:
[4-02] with condition *04/08* models
[4-02] with condition *16* models
Only 1 of the 2 settings above is shown on the screen,depending on the selection.
The values for both conditional settings are saved in thesame file.
Remark: "Display settings according to appliance and unittype" is not available when opening a *.dwn-file. Theconditional settings are displayed according to the unittype from which the settings were downloaded.
Remark: "Display settings according to appliance and unittype" is only to show or hide conditional settings on thescreen. It does NOT change the settings. This is similar toan actual user interface.
INFORMATION
For each setting:
Setting will be ignored during upload.
Setting will be set during upload.
Installation and operation manual
15Daikin Configurator v2.*.*
4P328530-1F – 2014.09
3 Click "Save" or "Save As" to save the settings.
8.4. Uploading/downloading languages and settings
1 Connect the EKPCCAB* USB cable.
2 Power on the unit.
8.4.1. Upload
1 Select the tab "Upload".
2 Installed versions will be displayed. Reconnect in case failed.
3 Select the languages/settings you want to upload for the slots.
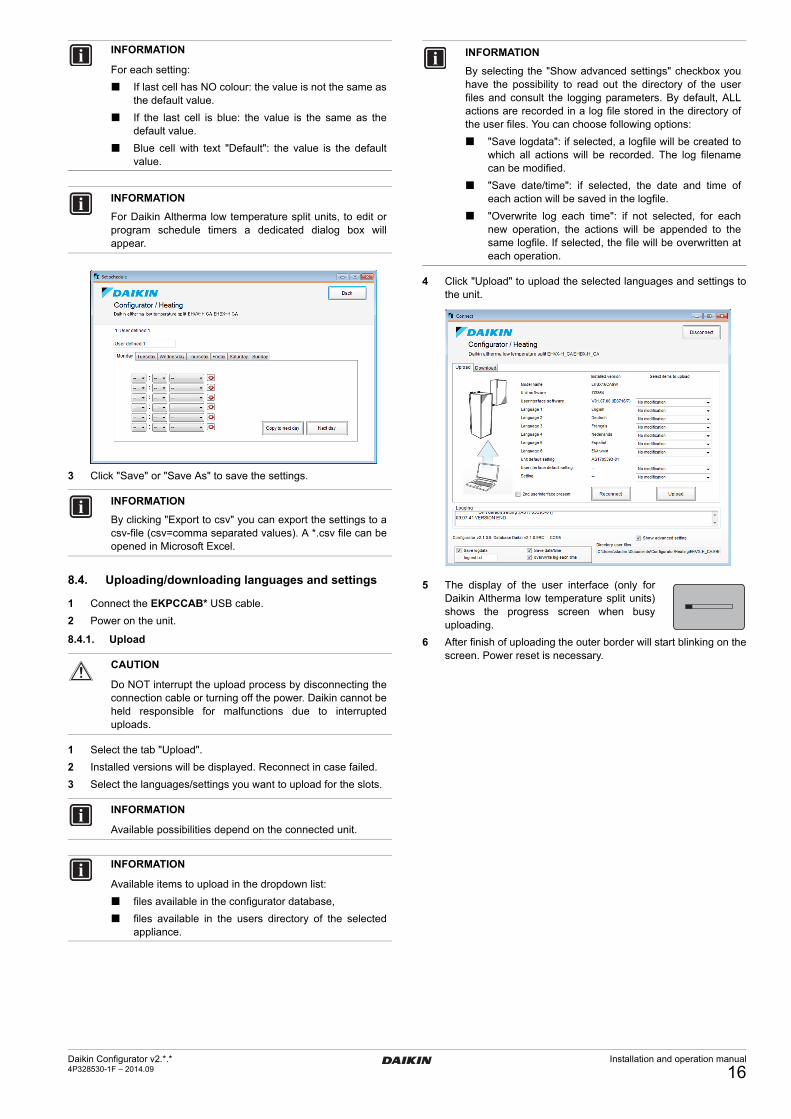
4 Click "Upload" to upload the selected languages and settings tothe unit.
5 The display of the user interface (only forDaikin Altherma low temperature split units)shows the progress screen when busyuploading.
6 After finish of uploading the outer border will start blinking on thescreen. Power reset is necessary.
INFORMATION
For each setting:
If last cell has NO colour: the value is not the same asthe default value.
If the last cell is blue: the value is the same as thedefault value.
Blue cell with text "Default": the value is the defaultvalue.
INFORMATION
For Daikin Altherma low temperature split units, to edit orprogram schedule timers a dedicated dialog box willappear.
INFORMATION
By clicking "Export to csv" you can export the settings to acsv-file (csv=comma separated values). A *.csv file can beopened in Microsoft Excel.
CAUTION
Do NOT interrupt the upload process by disconnecting theconnection cable or turning off the power. Daikin cannot beheld responsible for malfunctions due to interrupteduploads.
INFORMATION
Available possibilities depend on the connected unit.
INFORMATION
Available items to upload in the dropdown list:
files available in the configurator database,
files available in the users directory of the selectedappliance.
INFORMATION
By selecting the "Show advanced settings" checkbox youhave the possibility to read out the directory of the userfiles and consult the logging parameters. By default, ALLactions are recorded in a log file stored in the directory ofthe user files. You can choose following options:
"Save logdata": if selected, a logfile will be created towhich all actions will be recorded. The log filenamecan be modified.
"Save date/time": if selected, the date and time ofeach action will be saved in the logfile.
"Overwrite log each time": if not selected, for eachnew operation, the actions will be appended to thesame logfile. If selected, the file will be overwritten ateach operation.
Daikin Configurator v2.*.*4P328530-1F – 2014.09
Installation and operation manual
16

8.4.2. Download
1 Select the tab "Download".
2 Select the "Settings" checkbox if you want to download thesettings from the unit.
3 Click "Download" to download the selected languages andsettings from the unit.
4 The display of the user interface (only forDaikin Altherma low temperature split units)shows the progress screen when busydownloading.
5 After finish of uploading the outer border will start blinking on thescreen. Power reset is necessary.
9. Troubleshooting
Problem:
The COM port [USB Serial Port] is not available in the COM portsettings window.
Solution:
1 Check if the EKPCCAB* USB cable is connected correctly to afree USB port of the PC.
2 If the EKPCCAB* USB cable is connected correctly and theCOM port is still not available, then the driver is not installedcorrectly. Follow procedure "9.1. Manual EKPCCAB* driverinstallation" on page 18.
Problem:
The uploading/downloading is not started. The log file mentions:<<<ERROR>>>.
Solution:
1 Check if the COM port settings are OK.
2 Check if the EKPCCAB* USB cable is connected correctly to theUSB port of PC and the connector on the PCB of the unit asinstructed in the installation manual of the applicable unit.
3 Check if the unit is electrically powered.
Problem:
Running the Daikin configurator on windows 7 results in some text onthe screen that is only partly visible.
Solution:
Check the selected size of text (Control panel/Display). Size of text125% should be modified to 100% or 150%.
Problem:
Opening the exported csv-file in Excel results in strange characterson the screen.
Solution:
1 Open Excel
2 Open file
3 Set "file of type" to csv
4 Open selected csv-file
5 Make sure import setting "(UTF) Unicode" is selected (withdelimited "Semicolon").
Problem:
Uploading a setting file results in the following logging error message:<<<ERROR - Product information in the file is different from thetarget appliance.>>>.
Solution:
In case the target appliance is correct but you need to upload settingfiles (*.set + *.dwn) created with previous configurator versions(≤v2.1.0), you can only proceed uploading with Configurator v2.2.0(or newer) after a once-only opening and saving the files in the "Editsetting" window of Configurator v2.2.0 (or newer).
INFORMATION
For advanced settings, see "8.4.1. Upload" on page 16.
INFORMATION
Only for Daikin Altherma low temperature split units.
In case of a 2 user interface set-up, select "2nd userinterface present".
Installation and operation manual
17Daikin Configurator v2.*.*
4P328530-1F – 2014.09

9.1. Manual EKPCCAB* driver installation
Only in case normal installation procedure has failed, manual driverinstallation can be done as follows:
1 Disconnect the USB cable. Close the Daikin Configuratorsoftware.
2 Navigate to the application folder. In this example:C:\Program Files\Daikin Europe NV\Daikin Configurator\EKPCCAB* driver\
3 Start "CDM v2.08.30 WHQL Certified.exe" and follow theinstructions.
4 When finished connect the EKPCCAB* USB cable.
5 Start the Daikin Configurator software. The COM port shouldnow be available.
9.2. Uninstalling the Daikin Configurator
9.2.1. For Windows XP
1 Open Add/Remove Programs by clicking the Start button,clicking Settings, clicking Control Panel and select"Add/Remove Programs".
2 Select the Daikin Configurator in the list and click "Remove".
3 The Daikin Configurator software will be removed from your PC.
9.2.2. For Windows Vista or Windows 7
1 Open Programs and Features by clicking the Start button,clicking Control Panel, clicking Programs, and then clickingPrograms and Features.
2 Select the Daikin Configurator in the list and click "Uninstall".
3 The Daikin Configurator software will be removed from your PC.
INFORMATION
The application folder depends on the chosen installationlocation (see "5. Software installation" on page 10).
Daikin Configurator v2.*.*4P328530-1F – 2014.09
Installation and operation manual
18

4P328530-1F 2014.09
Cop
yrig
ht 2
013
Dai
kin


