INSTALLATION AND OPERATING INSTRUCTIONS DÜRR VISTASCAN - AU SOL/DURR DENTAL... · or proper...
38
INSTALLATION AND OPERATING INSTRUCTIONS DÜRR VISTASCAN 2004/12
Transcript of INSTALLATION AND OPERATING INSTRUCTIONS DÜRR VISTASCAN - AU SOL/DURR DENTAL... · or proper...

INSTALLATION AND OPERATING INSTRUCTIONSDÜRR VISTASCAN
2004/12

2
CONTENT
Important Information
1. Notes ......................................................... 41.1 Conformity ......................................... 41.2 General Notes .................................... 41.3 General Safety Notes ........................ 41.4 Notes concerning Medical
Appliances ......................................... 51.5 Software ............................................. 51.6 Peripheral Appliances ....................... 51.7 Image Plates ...................................... 51.8 Electrical Safety Notes ...................... 51.9 Warnings and Symbols ..................... 6
2. Product Information ................................ 72.1 Correct Usage ................................... 72.2 Incorrect Usage ................................. 72.3 Product Description ........................... 7
3. Contents ................................................... 8Dürr VistaScan Combi 2130-50 ................. 8Dürr VistaScan Ceph 2130-51 .................. 8Dürr VistaScan Omni 2130-52 ................... 8Dürr VistaScan Intra 2130-61 .................... 83.1 Accessories ....................................... 93.2 Disposable materials ......................... 9
4. System requirements ............................ 104.1 X-ray Film Foil cassettes .................. 104.2 Monitor ............................................. 104.3 PC-configuration .............................. 10
5. Technical Data ....................................... 115.1 VistaScan ......................................... 115.2 Image Plates .................................... 11
6. Functional overview .............................. 127. Functional description .......................... 13
7.1 Function of individual elements ....... 137.2 Description ...................................... 14

3
Assembly
8. Transporting the VistaScan .................. 159. Carrying the VistaScan ......................... 15
10. Set up ...................................................... 1610.1 Operating Room .............................. 1610.2 Set-up Alternatives .......................... 1610.3Installing the light protection cover .. 17
11. Electrical connections .......................... 1812. Before commissioning .......................... 18
12.1 Installation of VistaScanConfiguration Software .................... 18
12.2 Connecting VistaScan to the PC ..... 1813. Commissioning ..................................... 19
13.1 Configuration and Test ..................... 1913.2 Define X-ray Settings ....................... 19
Use
14. Using image plates ................................ 2015. Erasing images ...................................... 2116. Intraoral X-rays ...................................... 22
16.1 Health Protection ............................. 2216.2 Light protection covers .................... 2216.3 X-rays ............................................... 2316.4 Preparing to Scan Image Data ........ 2416.5 Scanning the Image Plate ............... 25
17. Extraoral X-rays ..................................... 2717.1 X-rays ............................................... 2717.2 Scanning the Image Plate ............... 28
18. Cleaning and Disinfecting .................... 2918.1 Light protection covers .................... 2918.2 Image Plates .................................... 2918.3 Intraoral Foil cassettes ..................... 2918.4 Cleaning flexible foil cassettes ........ 3018.5 VistaScan ......................................... 30
19. Maintenance ........................................... 31
Disposal
20. Appliance disposal ................................ 3121. Image plate disposal ............................. 31
Troubleshooting
22. Tips for operators and Technicians ..... 32
Appendix
Image Timing ................................................. 36File sizes (non-compressed) ......................... 37Exposure times for intraoral X-raymachines in seconds ..................................... 38

4
IMPORTANTINFORMATION
1. NOTES1.1 ConformityThis product has been tested in accordancewith the European Union directive 93/42/EWGand satisfies all criteria contained in these gui-delines.
1.2 General Notes• These Installation and Operating Instructions
form an integral part of the unit. They mustbe kept close to the unit and in readinesswhenever required. Precise observance ofthese instructions is a pre-condition for useof the unit for the intended purpose and forits correct operation.These Installation and Operating Instructionsshould be passed on to any future purcha-ser or operator.
• Safety for the operator as well as trouble-free operation of the unit are only ensured ifuse is made of original equipment parts. Mo-reover, use may only be made of those ac-cessories that are specified in the technicaldocumentation or that have been expresslyapproved and released by Dürr Dental forthe intended purpose.
Dürr Dental cannot guarantee for the safetyor proper functioning of this unit in the casewhere parts or accessories are used whichare not supplied by Dürr Dental.
• Dürr Dental only regard themselves as beingresponsible for the equipment with regard tosafety, reliability and proper functioning ifassembly, resettings, changes or modificati-ons, extensions and repairs have been car-ried out by Dürr Dental or an agency authori-zed by Dürr Dental and if the equipment isused in conformity with the Installation andOperating Instructions.
• The installation and operating instructionscorrespond with the model of appliance andconform to the current state of technology attime of first use. All switches, processes, tra-de marks, software programs and ap-pliances named in this document are regi-stered names.
• Any reprinting of the technical documentati-on, in whole or in part, is subject to prior ap-proval of Dürr Dental being given in writing.
• As condensation can collect if the scanner isbrought into a warm room from a cold envi-ronment, please wait a few minutes after un-packing before connecting to any powersupply so that it can reach room tempera-ture and until it is thoroughly dry.
1.3 General Safety NotesThis appliance has been so designed andconstructed by Dürr Dental that any dangerarising from the use of this product is virtuallyexcluded provided it is fitted according to theinstructions. However, in order to avoid anypossible damage or injury we are obliged topoint out the following safety measures.
• When operating this appliance observe alllocal rules and regulations!
• Conversion or alteration of the appliance isprohibited and any warranty becomes inva-lid. Operation of such appliances can havelegal consequences for the operator.
• In the interests of ensuring problem-free run-ning the owner and operator are responsiblefor observing all rules and regulations.
• Retain all packing material in case the de-vice must be returned to the manufacturers.Take care that it does not fall into the handsof children. Only the original packing gua-rantees optimal safety of the appliance du-ring transport. Should it be necessary to re-turn the product to the manufacturer duringthe guarantee period, Dürr Dental will notaccept claims for damage arising from usingincorrect packing materials!

5
• This product is a technical medical deviceand may only be operated by trained per-sonnel or someone who can handle the de-vice safely.
• Before every use the operator must checkthe functional safety and the condition of theappliance.
• The operator must be knowledgeable in theoperation of the appliance.
• The product is not designed to be used inmedical treatment areas where there existsthe danger of explosion. Areas where explo-sions could occur are those where flamma-ble anesthetic material, skin cleansers, oxy-gen and skin disinfectants are used. Thisappliance is not to be used in areas wherethe atmosphere could cause fire.
1.4 Notes concerning MedicalAppliances
• This product is a technical medical ap-pliance and, as such, may only be operatedby trained personnel, or persons who, as aresult of specialist knowledge, are familiarwith this type of appliance.
• Do not lie multi-socket units on the floor.
• Other systems should not be plugged intothe same multi-socket unit.
1.5 SoftwareOnly software authorized by Dürr Dental maybe used with this appliance. We recommendthe use of Dürr Dental's DBSWIN from V 3.1.The use of any other software must be clearedwith Dürr Dental first.
1.6 Peripheral Appliances• All peripherals (PC, monitor, printer) connec-
ted to the system must conform to standardIEC 60950 (EN 60950).
• Any peripherals must not be positioned inthe vicinity of the patient (i.e. minimum 1.5 mfrom patient).
1.7 Image Plates• The VistaScan may only be used in combi-
nation with Dürr Dental image plates.
See also section 14. Using Image Plates
1.8 Electrical Safety Notes• VistaScan may only be used with a correctly
installed plug and socket.
• Before switching on the appliance, checkthat the voltage and frequency of the ap-pliance correspond with the local supply.
• Before switching on the appliance, checkthat the connections are in order. Damagedcables and plugs etc. must be replaced be-fore using the appliance.
Switch off all power before opening theappliance

6
1.9 Warnings and SymbolsThese installation and operating instructionsuse the following terms and symbols for im-portant information:
Instructions or restrictions desi-gned for the protection of personneland safety of the device
High voltage
Remove power
Disposable: use once only
Instructions concerning economicaluse of the appliance
CE-labeling
Observe installation and operating in-structions
When placing the image plate in thepatient's mouth protective gloves mustbe worn
Attention: Laser
Safety class 1
Safety class 2
Date of manufacture
Observe accompanying documentati-on
REF Order number
SN Serial number

7
2. PRODUCT INFORMATION2.1 Correct Usage• VistaScan is only to be used in conjunction
with optical examination and processing ofimages using image plates.
• The appliance is not suitable for longer peri-ods of patient observation.
• Correct usage involves observation of the in-stallation and operating instructions as wellas complying with set-up, maintenance andoperating instructions.
• Any actions deviating from what is deemedto be correct usage will lead to the guaran-tee becoming null and void.
• The operator is liable for all damage occur-ring as a result of incorrect usage of the ap-pliance.
• Correct usage also involves the observationof all local rules and regulations concerningsafety at work and safety from radiation.
2.2 Incorrect UsageAny other use or use beyond what is specifiedis deemed to be not for the intended purpose.The manufacturer accepts no liability for da-mage resulting therefrom. All risk is borne so-lely by the user.
2.3 Product DescriptionVistaScan is a scanner using image plates ofvarious sizes. The image plate is an exposuremedium for x-rays whereby the conventional x-ray film is replaced. This storage film is availa-ble in all standard dental formats and storesthe image information similarly to x-ray films.VistaScan changes the image information, byscanning using a laser, into a digital image si-gnal. By this means digital image archivingand processing on a PC as well as fast imageavailablity are achieved. The image informati-on on the storage medium is erased by expos-ure to light and, on careful use of the medium,it may be used several hundreds of times.
8
3. CONTENTSDürr VistaScan Combi 2130-50VistaScan ...................................... 2130-000-50
Mains cable .................................. 9000-118-71
Power supply unit ......................... 2130-470-00
Wall mounting ............................... 2130-001-00
Data cable (EPP 3m) .................. 9000-119-016
Data cable (USB 5m) ................. 9000-119-027
Software VistaScan ...................... 2130-520-00
2 Dürr image plates-Size 0- 2x3 (22x35 mm) .............. 2130-040-00
4 Dürr image plates-Size 2- 3x4 (31x41 mm) .............. 2130-042-00
2 Foil cassettes-Size 0- 2x3 ................................... 2130-010-00
4 Foil cassettes-Size 2- 3x4 ................................... 2130-012-00
2 Foil cassette Boxes-Size 0-4- ...................................... 2130-030-00
Light light protection covers-Size 0- 2x3 (100 St.) .................... 2130-070-00
Light light protection covers-Size 2- 3x4 (300 St.) .................... 2130-072-00
Installation andOperating Instructions ............ 9000-618-24/30
ReSetter ........................................ 2130-510-00
Dürr VistaScan Ceph 2130-51VistaScan ...................................... 2130-000-50
Mains cable .................................. 9000-118-71
Power supply unit ......................... 2130-470-00
Wall mounting ............................... 2130-001-00
Data cable (EPP 3m) .................. 9000-119-016
Data cable (USB 5m) ................. 9000-119-027
Software VistaScan ...................... 2130-520-00
1 Dürr Image plate *-Ceph- 18x24 (178x227 mm) ....... 2130-052-00
Installation andOperating Instructions ............ 9000-618-24/30
ReSetter ........................................ 2130-510-00
Dürr VistaScan Omni 2130-52VistaScan ...................................... 2130-000-52
Mains cable .................................. 9000-118-71
Power supply unit ......................... 2130-470-00
Wall mounting ............................... 2130-001-00
Data cable (EPP 3m) .................. 9000-119-016
Data cable (USB 5m) ................. 9000-119-027
Software VistaScan ...................... 2130-520-00
Installation andOperating Instructions ............ 9000-618-24/30
ReSetter ........................................ 2130-510-00
Dürr VistaScan Intra 2130-61VistaScan ...................................... 2130-000-61
Mains cable .................................. 9000-118-71
Power supply unit ......................... 2130-470-00
Wall mounting ............................... 2130-001-00
Data cable (EPP 3m) .................. 9000-119-016
Data cable (USB 5m) ................. 9000-119-027
Software VistaScan ...................... 2130-520-00
2 Dürr image plates-Size 0- 2x3 (22x35 mm) .............. 2130-040-00
4 Dürr image plates-Size 2- 3x4 (31x41 mm) .............. 2130-042-00
2 Foil cassettes-Size 0- 2x3 ................................... 2130-010-00
4 Foil cassettes-Size 2- 3x4 ................................... 2130-012-00
2 Foil cassette Boxes-Size 0-4- ...................................... 2130-030-00
Light protection covers-Size 0- 2x3 (100 St.) .................... 2130-070-00
Light protection covers-Size 2- 3x4 (300 St.) .................... 2130-072-00
Installation andOperating Instructions ............ 9000-618-24/30
ReSetter ........................................ 2130-510-00

9
3.1 AccessoriesThe folowing optional accessories are notincluded with the appliance.Please order separately as required!
DBSWIN X-ray- Module .......... 2100-725-04FC
Test mask ..................................... 2121-060-51
Test-Set DIN 6868 Part 5(copper filter and test mask) ....... 2130-991-00
Copper filter Cu08 for OPG andCEPH-testing according toDIN 6868- Part 5 ........................... 2130-991-01
Supplementary filter Cu006/Al05for OPG and CEPH (increasesfilter efficiency) ............................. 2130-991-02
Cleaningset for Image Plates andFoil cassettes ............................... 2130-008-50
2 Dürr Image plates-Size 0- 2x3 (22x35 mm) .............. 2130-040-00
2 Dürr Image plates-Size 1- 2x4 (24x40mm) ............... 2130-041-00
4 Dürr Image plates-Size 2- 3x4 (31x41 mm) .............. 2130-042-00
2 Dürr Image plates-Size 3- 2.7x5.4 mm) .................... 2130-043-00
1 Dürr Image plate-Size 4- 5,7x7,6 mm) .................... 2130-044-00
1 Dürr Image plate *-OPG- 12.7x29 (125x286 mm) ..... 2130-050-00
1 Dürr Image plate*-OPG- 15x30 (148x298 mm) ........ 2130-051-00
1 Dürr Image plate *-Ceph- 18x24 (178x227 mm) ....... 2130-052-00
1 Dürr Image plate *-Ceph- 24x30 (238x298 mm) ....... 2130-053-00
1 Dürr Image plate *-Ceph- 20x248x10 Inch (202x241 mm) ............. 2130-054-00
1 Dürr Image plate *-Ceph- 13x18 (127x177 mm) ....... 2130-055-00
2 Foil cassette Boxes-Size 0-4- ...................................... 2130-030-00
1 Foil cassette-Size 0- 2x3 ................................... 2130-010-00
1 Foil cassette
-Size 1- 2x4 ................................... 2130-011-00
1 Foil cassette-Size 2- 3x4 ................................... 2130-012-00
1 Foil cassette-Size 3- 2.7x5.4 ............................ 2130-013-00
1 Foil cassette-Size 4- 5.7x7.6 ............................ 2130-014-00
1 Foil cassette-OPG- 12.7x29 (125x286 mm) ..... 2130-021-00
1 Foil cassette-OPG- 15x30 (148x298 mm) ........ 2130-022-00
1 Foil cassette-Ceph- 18x24 (178x227 mm) ...... 2130-023-00
1 Foil cassette-Ceph- 24x30 ................................ 2130-024-00
1 Foil cassette-Ceph- 20x24 ................................ 2130-025-00
1 Foil cassette-Ceph- 13x18 ................................ 2130-026-00
Light protection cover set ............ 2130-004-00
Film cassette w/o strengthening foil, straight-OPG- 15x30................................. 2130-993-02-Ceph- 18x24 ................................ 2130-993-03
Data cable (EPP 5m) .................. 9000-119-028
* incl. one Foil cassette
3.2 Disposable materialsDisinfectant wipes FD 350 ....... CDF350C0140
Disinfectant spray FD 333 ....... CDF333C6150
Disinfectant spray FD 322 ....... CDF322C6150
Light protection covers-Size 0- 2x3 (100 pcs) .................. 2130-070-00
Light protection covers-Size 1- 2x4 (100 pcs) .................. 2130-071-00
Light protection covers-Size 2- 3x4 (300 pcs) .................. 2130-072-00
Light protection covers-Size 3- 2.7x5.4 (100 pcs) ............ 2130-073-00
Light protection covers-Size 4- 5.7x7.6 (100 pcs) ............ 2130-074-00

10
4. SYSTEM REQUIREMENTSWhen operating the VistaScan the followingcomponents are required which are not inclu-ded with the appliance. A list of currently re-commended parts can be found on the inter-net under www.duerr.de
4.1 X-ray Film Foil cassettesFor extraoral images Foil cassettes without in-tensifying screen are necessary. These areavailable as accessories. The foil can be re-moved from cassettes already available.
4.2 MonitorOnly monitors designed for digital X-rays ha-ving a higher light intensity and greater con-trast as recommended by Dürr Dental shouldbe used. Strong room lighting, direct sunlightand reflected light reduce the diagnostic qua-lity of the x-ray images.
4.3 PC-configurationThe minimum system requirements depends to a great extent on the software employed and canvary from the configuration described below.
CPU-speed ............................................................................................................ 1,4 GHz, Pentium IIIRecommended ............................................................................ Pentium IV, Athlon or faster> 1.4 GHzOperating system ...................................................................................................... Windows 2000,XPRAM ............................................................................................................................................. 512 MBRecommended ................................................................................................................................. 1 GBHard disk (freely available) ......................................................................................................... 40 GBRecommended ............................................................................................................................... 80 GBCD-ROM ........................................................................................................................................... 24x+Monitor ....................... According to X-ray guidelines SVGA 17" with 1024x768 Pixel, 24/32 bit colorGraphics Not on board ......................................................................................................... 16MB RAMRecommended ...................................................................................................................... 32 MB RAMKeyboard, mouse .................................................................................................................... StandardBack-up medium ........................................ Tape drive with daily back-up is strongly recommendedVoltage regulator and overload protection ................................................................ RecommendedUPS (uninterrupted power supply) ............................................................................. RecommendedParallel port .............................................................................................. EPP-according to IEEE 1284USB 1.1 .................................................................................................................................... from 2004Long term archive ................................................................................................................ MOD-drive

11
5. TECHNICAL DATA5.1 VistaScan
Electrical ratings & connectionsPower supply
Voltage(V) .......................................... 100 - 240Frequency (Hz) ..................................... 50 - 60Current consumption (A) ....................... max. 2Power output (W) ........................................ <70Fusing ........................................................ IP20Safety class ..................................................... II
Electrical ratings & connectionsVistaScan
Voltage (V) ...................................... 24 +/- 10%Frequency ................................................... DCCurrent consumption (A) ....................max. 2.5Power output (W) ........................................ <60
Dimensions
VistaScan CombiD = 38cm, L = 38cm, H = 61cmVistaScan CephD = 38cm, L = 38cm, H = 61cmVistaScan OmniD = 38cm, L = 38cm, H = 72cmVistaScan IntraD = 38cm, L = 38cm, H = 54cm
Feed slot widthfor storage plates (cm) ........................ max. 30
Temperature range
Operational (C°) ............................ +10 bis +35Storage and transport (C°) ............ -20 bis +60
Relative humidity
Operational (%) .................................... 20 - 90Storage and transport (%) .................... 10 - 95
Air pressure
Operational (hPa) ........................... 700 - 1060Sea level (m) ........................................... <2000Storage and transport (hPa) ........... 700 - 1060Sea level (m) ............................................ 16000
Weight
VistaScan Combi ................................ aprox. 21VistaScan Ceph .................................. aprox. 21VistaScan Omni .................................. aprox. 22VistaScan Intra ................................ aprox. 22,5
5.2 Image Plates
Storage and transport
Temperature (C°) ....................................... <33Rel. humidity (%) ........................................ <80
Operational
Temperature (C°) .................................. 18 - 45Rel. humidity (%) ........................................ <80
General values
Medical appliance class ................................. 1Laser safety class ..................... 1 (EN60825-1)
wavelength 635 nm10 mW1) or 15 mW1)
EN 60825-1:1994-03 +A1:2002-07+A2:2001-03
1) According to the performance of the laseractually installed
Max. loudness (db(A)) ............................... <60Heat output (W) .......................................... <70
Pixel size
Can be set ............................ 12.5µm to 130µm
Resolution depends on image plate size,max. ca. 40 Line pairs/mm (Lp/ mm).
12
6. FUNCTIONAL OVERVIEW
3
4
7
1
2
8
9
65 10
11
12
1316
17
15
14

13
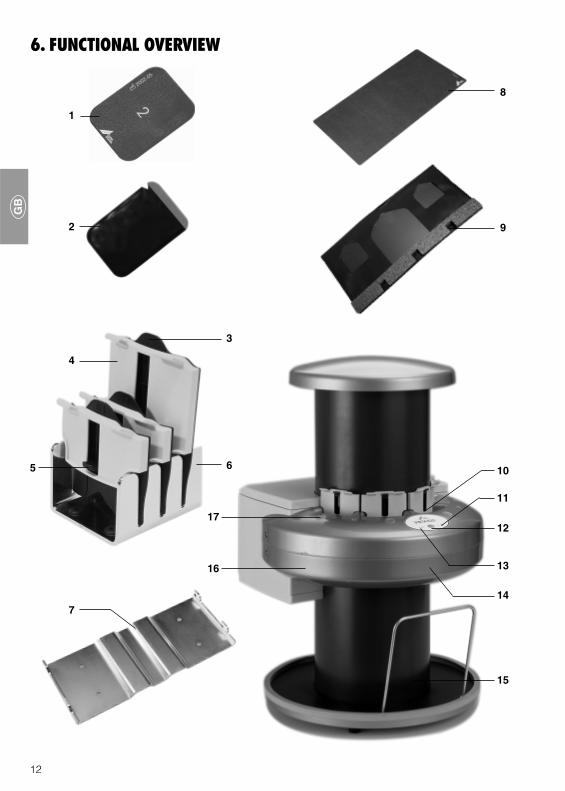
7. FUNCTIONAL DESCRIPTION7.1 Function of individual elements
1. Intraoral Image Plate:The image plate serves the same functionas an x-ray film for x-ray exposures.
2. Intraoral Light protection cover:The image plate is placed inside this pro-tective light protection cover for intraoral x-rays. This prevents any mechanical dama-ge when placing the image plate into thepatient's mouth, and avoids any directcontact with the patient.This cover is also protection against roomlighting which would erase the exposure.
3. Foil cassette Sizes:"S2" represents the size of the image platewhich must be used with this particularsize of foil cassette.
4. Foil cassette Sizes - Intraoral:The intraoral image plate is put in to thefoil cassette and then placed in the inletslot of the plate transfer box.This prevents erasure of the exposurewhen working in room lighting.
5. Lever:The intraoral image plate is lifted out of thefoil cassette by operating the small lever.
6. Foil cassette BoxFoil cassettes not being used can bestored in the cassette box.
7. Wall mounting:The VistaScan can be stored by hangingon the wall mounting.
8. Extraoral Image Plate:not for VistaScan Intra 2130-61(as 1 above)
9. Extraoral Foil cassette:not for VistaScan Intra 2130-61(as 4 above)
10. Input slot:When an image plate from the foil cassetteis placed in the input slot of the platetransfer box, a transport mechanism auto-matically pulls the image plate in.
11. Yellow LED:
If the yellow LED lights up, then the VistaS-can is switched on but not yet activated.
If the yellow LED blinks then there is noconnection to the PC, or the data storageis full.
12. On/Off switch:
The VistaScan is switched on (or off) bypressing for 2 seconds.
13. Green LED:
The green LED shows whether the VistaS-can is ready for operation.
14. Optical Scanner:
An optical scanner inside the unit readsthe x-ray image using a laser device andconverts this into a digitalised signal. Theimage plate is then expelled through theoutput slot of the transfer box.
15. Collecting tray:The image plate falls from the output slotonto the tray below the plate transfer box.
16. Plate transfer box:Inside the plate transfer box there is atransport mechanism.
17. Status LED:For each of the slots for foil cassettes thereis a status LED. This LED shows whetherone of the image plates can be insertedfor scanning.
Green LED image plate can be in-serted.
Yellow LED image platecannot be inserted.

14
7.2 DescriptionVistaScan is a modern, high-resolution scan-ner for image plates. It transforms the x-rayimage information stored on the image plateinto a digital image signal.
The image plate is exposed to x-rays exactlyas a normal x-ray film. This is carried out forpanorama formats* in the appropriate foil cas-sette and for intraoral formats in the (light) lightprotection cover.
After exposure the intraoral image plate isejected from the light protection cover and intothe appropriate sized foil cassette.
The appropriate VistaScan scanning mode isnow selected using the image processing andarchival software, e.g. DBSWIN V 3.1 or high-er.Then the foil cassette containing the panoramaimage plate or, alternatively, the intraoralimage plate is placed in the input slot of theplate transfer box and clicked into correct po-sition.
If the green LED on the plate transfer box dis-plays then the image plate can manually bepushed into the input slot. When using panora-ma formats this is carried out by pushing thethumb through an access slot in the foil cas-sette; for intraoral formats by pushing down onthe lever.
As soon as the image plate has been pushedinto correct position it will be fed into the platetransfer box. Inside the plate transfer boxscanning of the image plate takes place, whe-reby a laser scans the image information andtransmits this to the PC. Scanning progress isdisplayed in a small window on the monitor. Ifa number of intraoral image plates are beingscanned simultaneously, this will be at thesame resolution and sensitivity settings.During the scanning of the image plate, theimage details will be stored in the memory ofthe PC. After scanning the image plate itselffalls into the collecting tray. It can now be re-moved.
Careful handling of this image storage mediummeans that this image plate can be used se-veral hundreds of times. However, any remai-ning image information present must be era-sed by using a light source of a higher densi-ty.Complete erasure is carried out using the DürrReSetter.
After complete erasure the image plate cannow be prepared for use in another exposure.Firstly, check that the image plate is neitherdirty nor damaged. Damaged plates must ne-ver be reused. If the plate is in good conditionit is either put into the special foil cassette foruse in panorama format or, for intraoral format,placed in a new light protection cover andsealed. The image plate can now be used in apanorama film unit, or alternatively placed inthe patient, and a new exposure carried out.
* not for VistaScan Intra 2130-61
Image plate
Parabolic mirror
Photomultiplier
Laser source40m/s
Reflectionlayer
Pentaprism
Flywheel disk

15
ASSEMBLY
Set-up, installation and commisiion-ing may only be carried out by sui-tably qualified personnel.
8. TRANSPORTING THEVISTASCAN
Empty the carton completely and store in acool dry place. Check that all components arepresent.Before transporting the VistaScan please notethe following:• Do not expose the VistaScan to any knocks
or jolts, as these can damage the appliance.
• Only use the original packaging during anytransport.
9. CARRYING THE VISTASCANAlways hold the VistaScan by itshousing from the rear (see fig. 1).
Never take hold of the VistaScan bythe plate transfer box or by the lid,otherwise sensitive parts of the Vi-staScan may become damaged.(Figs 2 and 3)
1
2
3

16
5
10. SET UP10.1 Operating Room• The VistaScan may only be set up in closed,
dry and well-ventilated rooms.
• Room temperature in the winter may not fallbelow + 10°C and in summer must not ex-ceed + 35°C.
• As condensation can collect if the scanner isbrought into a warm room from a cold envi-ronment, please wait a few minutes after un-packing before connecting to any powersupply so that it can reach room tempera-ture and until it is thoroughly dry.
• Installation in purpose-built rooms, such aswet rooms or heating rooms, is not permit-ted.
• Do not set up the VistaScan in direct sun-light. If possible, room lighting should becontrolled by means of a dimmer.
The VistaScan is sensitive to stray lightduring the scanning phase of imageprocessing. Therefore, the VistaScanshould be set up in a dark room, andfree from direct sunlight (maximum li-ght intensity 1000 Lux). If this value isexceeded the software will detect it(see section 22. Troubleshooting).
• The set up room should not be affected byany interference (e.g. strong magneticfields), this can lead to problems with theVistaScan.
• Peripheral appliances must be kept out ofpatient's reach (1.5 m from patient treatmentarea). (See section 1.6)
10.2 Set-up Alternatives• VistaScan can be used wall-mounted or set
up on a table. In order to avoid errors in thescanning of image detail, the VistaScanmust be protected from knocking orshaking.
• The wall mounting is supplied with neitherscrews nor plugs. Correct installation shouldbe carried out by qualified personnel. Thefixtures must be able to support a weightfour times that of the VistaScan.
The 4 drill holes for mounting in thewall mounting are Ø 7 mm .
4
6

17
7
10.3 Installing the light protectioncover
The light barrier plate reduces theamount of ambient and stray light thatis allowed to fall at thefilm feed slotsof the VistaScan fällt.(See 3.1 Special Accessories)
• Remove the two screws at the upper coverplate.
• Place the light cover in place and screwtightly..

18
11. ELECTRICAL CONNECTIONSConnect power cable to both power unit andsocket. Connect power unit to VistaScan.
The VistaScancan be used withvoltages from 100 V to 240 V and50 -60 Hz.Before connecting the unit to the po-wer supply, the voltage must bechecked, otherwise the appliancecould be damaged. Use Dürr powercable supplied, order no.9000-118-71.
12. BEFORE COMMISSIONING12.1 Installation of VistaScan
Configuration Software• Install the PC and monitor according to
manufacturer's instructions.
• Place the installation CD in the CD/DVD-drive. If the installation program does notstart automatically open the file "setup.exe"on the Installation CD.
The system supports the followingoperating systems:Windows 2000 and XP
• Follow the installation instructions, end Win-dows and switch off the PC.
12.2 Connecting VistaScan to the PCConnection LPT-Port
• Use the interface cable supplied to connectthe parallel port of the PC with the parallelport of the VistaScan.
The paralell interface must be set toEPP-Mode according to IEEE 1284(BIOS-Setup)
• If a printer with parallel interface is beingused, this should be connected to the freeparallel port of the VistaScan.
Printing tasks will be interrupted whenthe VistaScan is operating.
8

19
13. COMMISSIONING13.1 Configuration and Test• Turn VistaScan on at ON/OFF switch
• Switch on PC
• Start software VScanConfig
• Carry out configuration and system test ac-cording to instructions described in leaflet,order no. 9000-618-27/01
13.2 Define X-ray Settings• Erase the image plate supplied, as descri-
bed in section 15. before use.
• Standard X-ray settings for intraoral radio-graphy are listed in the Appendix. Theseshould be checked carefully to ensure theycomply with local and national regulations.
• Extraoral X-ray appliances can usually usethe same settings as are employed for ana-log films.
Before using the VistaScan a test pro-cedure of the X-ray equipment mustbe carried out according to nationalregulations. The test mask 2121-060-51 is necessary for this testing. The re-sults should be entered in the equip-ment log book.
Information concering recommendedX-ray appliances and their settingscan be found on the Internet underwww.duerr.de.
Connection USB-Port
• Use the USB cable provided to connect thePC and the Vistascan using two USB slots.
Informationen concerning the installati-on of the necessary USB-drivers canbe found in the operating instructionsunder configuration and system test -9000-618-27/01. See alsowww.duerr.de/td

20
active side
USE
14. USING IMAGE PLATES• The VistaScan may only be used in combi-
nation with image plates as supplied by DürrDental.
• The active side (blue or white) of the intraor-al image plate has been labeled with a asan aid to positioning.The active side (blue or white) of the extra-oral image plate has been labeled with "DürrDental Imaging" as an aid to positioning.
The passive side of each image plate bearsthe size and manufacturer's information.
• The image plates are flexible like X-ray film.However, take care when handling them. Donot bend, apply pressure, scratch or allowthem to get dirty. Do not store the image pla-tes in a warm or wet environment.
• Protect the plates from direct sunlight andultraviolet radiation.
• If storing the plates in the X-ray room be ca-reful not to allow the plates to be exposed toany light from the equipment before use.
• Do not put image plates in the autoclave.
• Damaged image plates (e.g. if the protectivesurface is damaged or there are visiblescratches which are likely to affect imaging)must be replaced.
• See also section 18. Cleaning and Disinfec-ting
The image plates are toxic.Always put the image plate in a lightprotection cover before placing inthe mouth of a patient.
9
passive side
10
passive side
active side

21
15. ERASING IMAGESAny information on the image plate must beerased before x-raying using the Dürr ReSettersupplied. See also Operating Instructions DürrReSetter order no. 9000-618-56/30
• Check the image plate for any signs of da-mage. Damaged image plates (e.g. if theprotective surface is damaged or visiblescratches are likely to affect imaging) mustbe replaced.
• Store image plates in a dark place. Intraoralimage plates should be stored in a light pro-tection cover of the correct size.Extraoral image plates are stored in their foilcassettes.
The image plates may also be storedin the Dürr ReSetter after erasure.
If storing the plates in the X-rayroom be careful not to allow the pla-tes to be exposed to any light fromthe equipment before use.
Use the image plates within 24 hours.If the image plates are to be storedlonger than 24 hours, they should beerased again prior to use.
The image plates are flexible like X-ray film. However, take care whenhandling them. Do not bend, applypressure, scratch or allow them toget dirty.
12
11

22
16. INTRAORAL X-RAYS16.1 Health Protection
The image plates are toxic.Always put the image plate in a lightprotection cover before placing inthe mouth of a patient.If a patient swallows an image plateor part of a plate then a specialistdoctor should be consulted imme-diately. The image plate must be re-moved. If a patient damages the li-ght protection cover, e.g. throughbiting, the mouth should be rinsedthoroughly with large amounts ofwater.
16.2 Light protection coversThe light protection covers have thefollowing functions:- to protect the patient from any conta-mination from an image plate.- to protect the image plate from anycontamination or dirt.- to protect the image plate from anylight.
• The light protection covers, like the imageplates, are available in different sizes. Al-ways choose the appropriate size.
• Slide the image plate completely into the li-ght protection cover. The passive (printed)side of the image plate must be visiblethrough the transparent side of the light pro-tection cover.
• Remove the white protective strip from theadhesive band and close the opening of thelight protection cover by pressing tightly.
The light protection cover is a dis-posable material and may not bereused.
14
13

23
16.3 X-rays• Before placing the light protection cover into
the patient's mouth it must be cleaned usinga disinfectant wipe (e.g. Dürr FD 350). Alter-natively, spray disinfection agent (e.g. DürrFD 322, FD 333) can be sprayed onto a soft,lint-free cotton gauze.
The image plate is marked with a .This symbol is visible in the x-ray andaids orientation and diagnosis.The image plate must be put into thepatient's mouth so that the symboldoes not affect the usefulness of thefinished radiograph.
• Place the image plate in its light protectioncover in the patient's mouth as normal.
Only use film holders which will notdamage the light protection covercontaing the image plate.
The active side of the image platemust be facing the radiograph tube.
Wear protective gloves when placingthe image plate into the patient'smouth.
• Set exposure time and necessary settingson the x-ray equipment.
• Produce an x-ray as usual.
The image data on the image platemust be scanned into theVistaScan within half an hour.
17
15
16
24
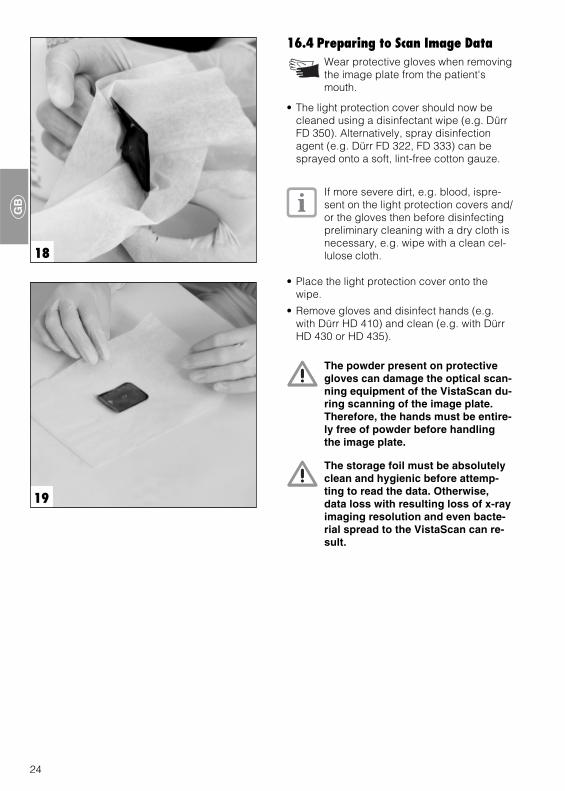
16.4 Preparing to Scan Image DataWear protective gloves when removingthe image plate from the patient'smouth.
• The light protection cover should now becleaned using a disinfectant wipe (e.g. DürrFD 350). Alternatively, spray disinfectionagent (e.g. Dürr FD 322, FD 333) can besprayed onto a soft, lint-free cotton gauze.
If more severe dirt, e.g. blood, ispre-sent on the light protection covers and/or the gloves then before disinfectingpreliminary cleaning with a dry cloth isnecessary, e.g. wipe with a clean cel-lulose cloth.
• Place the light protection cover onto thewipe.
• Remove gloves and disinfect hands (e.g.with Dürr HD 410) and clean (e.g. with DürrHD 430 or HD 435).
The powder present on protectivegloves can damage the optical scan-ning equipment of the VistaScan du-ring scanning of the image plate.Therefore, the hands must be entire-ly free of powder before handlingthe image plate.
The storage foil must be absolutelyclean and hygienic before attemp-ting to read the data. Otherwise,data loss with resulting loss of x-rayimaging resolution and even bacte-rial spread to the VistaScan can re-sult.
18
19

25
22
16.5 Scanning the Image Plate• Turn on VistaScan at On/Off switch. The ope-
ration display is out and the error lamp isyellow.
• Switch on PC and monitor.
• Start image processing software (e.g. DürrDBSWIN V 3.1 or higher).
• Call up the patient's record from the databank.
• Activate VistaScan via software under DürrDBSWIN via the menu "X-ray"). The operati-on lamp displays green.
• Set resolution and format using the software.
21
20
• Tear the light protection cover apart at theadhesive edge (begin at V-notch).
• Have a Foil cassette of the correct size tohand.
•The image plate is removed from the lightprotection cover and put into the film guideuntil it catches. The active side must be tothe rear, and the passive side towards thefront (visible).
The exposure data on the image pla-te will be erased by light. After x-raying never handle the image platewithout either a light protection co-ver or a foil cassette.

26
23
24
• Set up the software to prepare for scanning.(yellow error lamp of VistaScan no longer ac-tive)
Further details concerning the scan-ning time and file size can be found inthe Appendix.
• Slide the foil cassette with its image plateinto a free slot on the plate transfer box untilit clicks into place.
In order to avoid exposure due to straylight ALL foil cassettes must be clo-sed.
• When the status LED at input slot is green,then the lever can be pressed down untilsuch time as the image plate is automaticallydrawn into the transport box. During scan-ning of the image data the status LED at theinput slot is yellow.
A foil cassette cannot be removed untilall status LEDs are green.
• The scanning progress can be checked onthe monitor.
• Images are automatically transmitted to thesoftware.
• The image plate will fall into the collectingtray. The appropriate LED on the plate trans-fer box will now light green.
• Store the x-ray image using the software.
With the VistaScan it is possible toread up to four intraoral storage filmssimultaneously and where the sameexposure parameters were used.Place all image plates into correctly si-zed foil cassettes. Press the foil cas-settes into position until they click,then use the levers to feed the imageplates into the plate transfer box untilthe box's transport mechanism takesover.
Information concerning recording,storing and processing can be foundin the instruction leaflet of the imageprocessing software.

27
17. EXTRAORAL X-RAYSData extrapolation for extraoral stora-ge film is not possible with the Vista-Scan Intra 2030-000-61
17.1 X-raysOnly use foil cassettes without inten-sifying screen. Where a foil cassettehas extra intensifying screen, thismust be completely removed. The useof a foil cassette with intensifyingscreen will lead to a loss of picturequality.
• Place the erased image plate into the flexi-ble foil cassette. The active side must be tothe rear. The passive side will be facing (i.e.visible).
When sliding the image plate into thefoil cassette the label "Dürr Dental" willbe visible lower right in the foil casset-te. (See fig. 25)
• Place the foil cassette into the film cassetteof the x-ray device.
The active side of the image platemust be facing the closed side of thefilm cassette. (See fig. 26)
• Place the film cassette into the panorama /x-ray machine.
The closed side of the film cassettemust be facing the x-ray tube.(See fig. 27)
• Set exposure time and settings on the radio-graphic equipment.
• Expose the image plate.
The image data on the image platemust be scanned into the VistaScanwithin half an hour.
27
26 active side
passive side
25

28
17.2 Scanning the Image Plate• Call up the patient's record using image pro-
cessing software on the PC.
• Select VistaScan processing option for x-rays.
• Select scanning.
• Place the foil cassette with the image plateat the input slot on the image transfer box.The LEDs must be green.
• Select scanning mode.
• Press down on the image plate using boththumbs together until the image plate isdrawn in by the VistaScan.
• Scan image data.
The VistaScan draws the image plateautomatically into the scanner. Scan-ning takes place automatically. Duringscanning of the image plate all 4 sta-tus LEDs will be yellow.The foil cassette may only be removedfrom the image transfer box when all 4status LEDs are green and the imageplate has fallen into the receiving tray.
• Remove the image plate from the receivingtray.
28
29
29
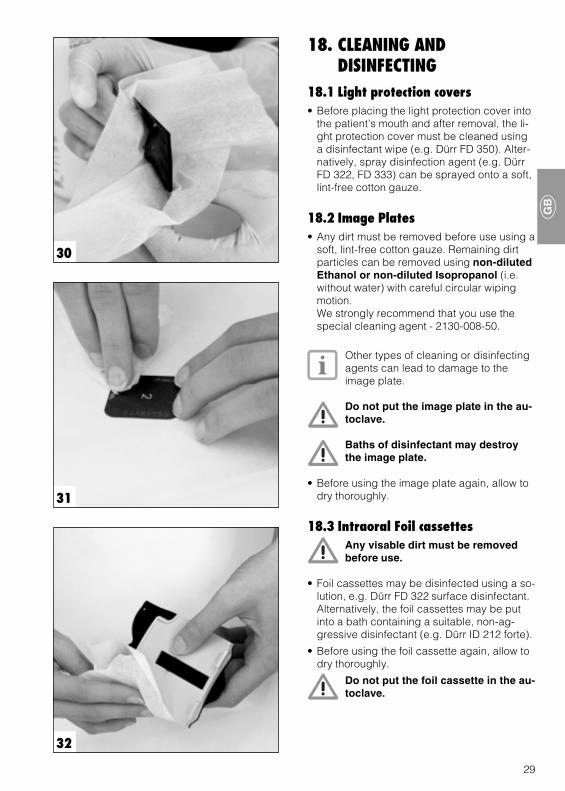
18. CLEANING ANDDISINFECTING
18.1 Light protection covers• Before placing the light protection cover into
the patient's mouth and after removal, the li-ght protection cover must be cleaned usinga disinfectant wipe (e.g. Dürr FD 350). Alter-natively, spray disinfection agent (e.g. DürrFD 322, FD 333) can be sprayed onto a soft,lint-free cotton gauze.
18.2 Image Plates• Any dirt must be removed before use using a
soft, lint-free cotton gauze. Remaining dirtparticles can be removed using non-dilutedEthanol or non-diluted Isopropanol (i.e.without water) with careful circular wipingmotion.We strongly recommend that you use thespecial cleaning agent - 2130-008-50.
Other types of cleaning or disinfectingagents can lead to damage to theimage plate.
Do not put the image plate in the au-toclave.
Baths of disinfectant may destroythe image plate.
• Before using the image plate again, allow todry thoroughly.
18.3 Intraoral Foil cassettesAny visable dirt must be removedbefore use.
• Foil cassettes may be disinfected using a so-lution, e.g. Dürr FD 322 surface disinfectant.Alternatively, the foil cassettes may be putinto a bath containing a suitable, non-ag-gressive disinfectant (e.g. Dürr ID 212 forte).
• Before using the foil cassette again, allow todry thoroughly.
Do not put the foil cassette in the au-toclave.
32
30
31

30
34
18.418.418.418.418.4 Cleaning flexible foil cassettesCleaning flexible foil cassettesCleaning flexible foil cassettesCleaning flexible foil cassettesCleaning flexible foil cassettesAny visable dirt must be removedbefore use.
• A cleaning agent should be used, e.g. theDurr disinfectant agent FD 322, sprayedonto a soft, fluff-free cloth.
• Dirt particles can be removed with carefulcircular wiping motion.
• Before using the foil cassette again, allow todry thoroughly.
Do not put the foil cassette in theautoclave.
33
18.5 VistaScan• The housing of the VistaScan can be clea-
ned using a moist cloth and disinfectedusing a mild disinfection cloth, e.g. Dürr FD350.
• Any dirt or grime at the input or output slotsmust be removed before scanning.
Do not use a disinfectant spray onthe VistaScan. No fluids should beallowed to enter the interior of theappliance. This could damage thedevice.

31
DISPOSAL
20. APPLIANCE DISPOSALPlease return the unit to your supplier for dis-posal. Your supplier will return the applianceto the manufacturer for correct recycling.
21. IMAGE PLATE DISPOSALPlease observe local and national regulationswhen disposing of the image plates.
19. MAINTENANCEAfter scanning 10,000 intraoral or extraoralimage plates the image transfer box should beserviced.After 3 years' operation the complete unitshould be checked and serviced.Constant use of the unit can lead to wear andtear of the transport belt.

32
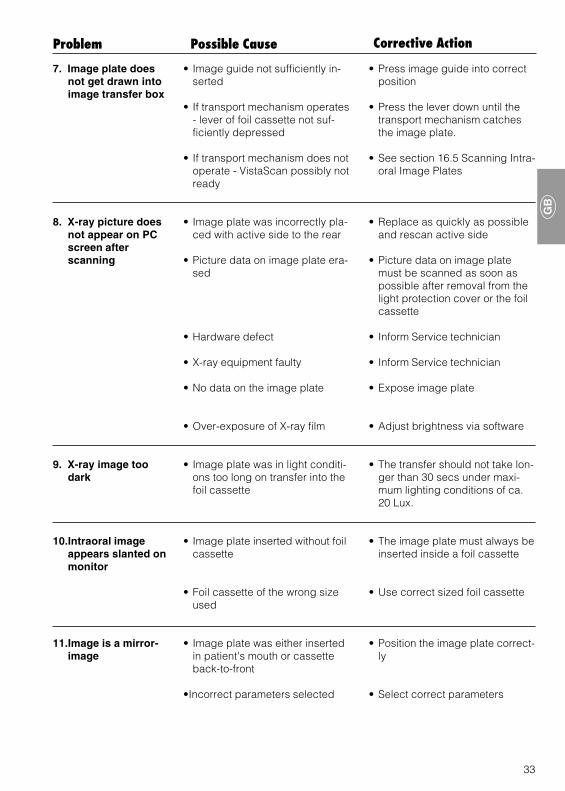
22. TIPS FOR OPERATORS AND TECHNICIANSAny repairs above and beyond what can be considered as normal maintenance may only becarried out by suitably qualified personnel or our service technicians.
• Check power cable, plugs andsockets
• Check fuses• Check power supply, whether
green LED lights up
• Inform Service technician
• Check power cable, plugs andsockets
• Inform Service technician
• Check power supply voltage
• Inform Service technician
• Inform Service technician
• Switch on VistaScan
• Check connecting cable
• Check LPT interface is EPP-ca-pable according to IEEE 1284
• Bios must be set to EPP
• Inform Service technician
• Only use original "Dürr Cable".Order no. 9000-119-016
• Do not use a selector box forprinter connection
• No power
• Main power switch defective
• Power cable or plug not connec-ted properly
• Hardware defect
• Voltage too low
• LED defect
• If noises persist longer than 30secs then beam diverter defect
• VistaScan not switched on
• Cable loose between VistaScanand PC
• PC cannot find connection to Vi-staScan
• Hardware defect at VistaScan
• Incorrect or too long a connec-tion cable used
• A printer selector box has beenused
Possible CauseProblem Corrective Action
1. VistaScan does notswitch on
2. VistaScan switchesoff after short period
3. Status Error oroperation LED doesnot show
4. Loud noises afterswitching on
5. Image processingsoftware does notrecognise VistaScan
6. Error whentransmitting databetween VistaScanand PC. Errormessage: "CRCError" "Timeout"
TROUBLESHOOTING
33
Possible CauseProblem Corrective Action
• Press image guide into correctposition
• Press the lever down until thetransport mechanism catchesthe image plate.
• See section 16.5 Scanning Intra-oral Image Plates
• Replace as quickly as possibleand rescan active side
• Picture data on image platemust be scanned as soon aspossible after removal from thelight protection cover or the foilcassette
• Inform Service technician
• Inform Service technician
• Expose image plate
• Adjust brightness via software
• The transfer should not take lon-ger than 30 secs under maxi-mum lighting conditions of ca.20 Lux.
• The image plate must always beinserted inside a foil cassette
• Use correct sized foil cassette
• Position the image plate correct-ly
• Select correct parameters
• Image guide not sufficiently in-serted
• If transport mechanism operates- lever of foil cassette not suf-ficiently depressed
• If transport mechanism does notoperate - VistaScan possibly notready
• Image plate was incorrectly pla-ced with active side to the rear
• Picture data on image plate era-sed
• Hardware defect
• X-ray equipment faulty
• No data on the image plate
• Over-exposure of X-ray film
• Image plate was in light conditi-ons too long on transfer into thefoil cassette
• Image plate inserted without foilcassette
• Foil cassette of the wrong sizeused
• Image plate was either insertedin patient's mouth or cassetteback-to-front
•Incorrect parameters selected
7. Image plate doesnot get drawn intoimage transfer box
8. X-ray picture doesnot appear on PCscreen afterscanning
9. X-ray image toodark
10.Intraoral imageappears slanted onmonitor
11.Image is a mirror-image

34
Possible CauseProblem Corrective Action
• Observe recommended erasu-re times
• Check light intensity and era-sure time
• See section 15. Erasing ImagePlates
• Increase radiation dose
• Increase amplification (HV-va-lue)
• Select suitable scanning mode
• reduce setting
• Use the image plate within 24hours after erasure.
• Do not expose the image plateto bright light. Exposure andscanning should be carried outwithin half an hour of eachother.
• Clean the image plate withnon-diluted Ethanol or Isopro-panol and careful wiping.Scratched image plates mustbe replaced
• Remove intraoral image plateby hand
• Insert all foil cassettes• Darken the room• Turn the VistaScan so that no
light falls on the insertion slots
• The previous image was not suf-ficiently erased before use
• The radiation dose on the imageplate too low
• Amplification set too low (HV-va-lue)
• Inappropriate scan mode selec-ted
• Threshold level set too high
• Image plate has been exposed
• Exposure to light during hand-ling
• Image plate dirty or scratched
• Intraoral image plate is preven-ted from falling from imagetransfer box due to static
• Light intensity in vicinity of Vi-staScan too high
12.X-ray imagepresents shadowsor ghost images
13.Image in scanwindow isincomplete Softwarecan not compose animage from the data
14.X-ray image hasstripes
15.Intraoral image platedoes not fall into thereceiving tray
16.Warning: "Too muchambient light"

35
Possible CauseProblem Corrective Action
• Insert all foil cassettes• Darken the room• Turn the VistaScan so that no
light falls on the insertion slots
• Insert all foil cassettes• Darken the room• Turn the VistaScan so that no
light falls on the insertion slots
• Insert all foil cassettes• Only remove foil cassettes after
complete scanning process• Darken the room• Turn the VistaScan so that no
light falls on the insertion slots
• Too much ambient light duringscanning
• Too much ambient light duringscanning
• Too much stray light entered sy-stem after scanning, recognizedby software as belonging toimage being processed.
17.Bright stripes inscanning window
18.Second imageappears with thinlight and darkstripes
19.Broad white band attop edge of image
36
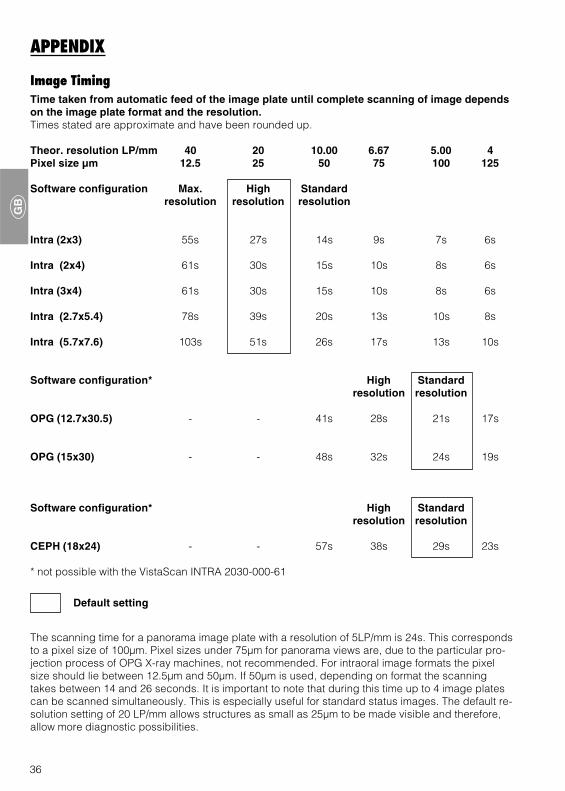
Image TimingTime taken from automatic feed of the image plate until complete scanning of image dependson the image plate format and the resolution.Times stated are approximate and have been rounded up.
Theor. resolution LP/mm 40 20 10.00 6.67 5.00 4Pixel size µm 12.5 25 50 75 100 125
Software configuration Max. High Standardresolution resolution resolution
Intra (2x3) 55s 27s 14s 9s 7s 6s
Intra (2x4) 61s 30s 15s 10s 8s 6s
Intra (3x4) 61s 30s 15s 10s 8s 6s
Intra (2.7x5.4) 78s 39s 20s 13s 10s 8s
Intra (5.7x7.6) 103s 51s 26s 17s 13s 10s
Software configuration* High Standardresolution resolution
OPG (12.7x30.5) - - 41s 28s 21s 17s
OPG (15x30) - - 48s 32s 24s 19s
Software configuration* High Standardresolution resolution
CEPH (18x24) - - 57s 38s 29s 23s
* not possible with the VistaScan INTRA 2030-000-61
The scanning time for a panorama image plate with a resolution of 5LP/mm is 24s. This correspondsto a pixel size of 100µm. Pixel sizes under 75µm for panorama views are, due to the particular pro-jection process of OPG X-ray machines, not recommended. For intraoral image formats the pixelsize should lie between 12.5µm and 50µm. If 50µm is used, depending on format the scanningtakes between 14 and 26 seconds. It is important to note that during this time up to 4 image platescan be scanned simultaneously. This is especially useful for standard status images. The default re-solution setting of 20 LP/mm allows structures as small as 25µm to be made visible and therefore,allow more diagnostic possibilities.
Default setting
APPENDIX

37
File sizes (non-compressed)The size of the data files (in MB) depends on the image plate format and the resolution.File sizes stated are approximate and have been rounded up. The file sizes can be appreciably de-creased by using compression software without affecting the quality of the image.
Theor. resolution LP/mm 40 20 10,00 6,67 5,00 4Pixel size µm 12.5 25 50 75 100 125
Software configuration Max. High Standardresolution resolution resolution
Intra (2x3) 9.3 2.3 0.6 0.26 0.15 0.09
Intra (2x4) 11.6 2.9 0.8 0.32 0.18 0.11
Intra (3x4) 15.4 3.8 1.0 0.42 0.24 0.15
Intra (2.7x5.4) 17.6 4.4 1.1 0.5 0.27 0.18
Intra (5.7x7.6) 51.6 12.9 3.3 1.5 0.8 0.5
Software configuration* High Standardresolution resolution
OPG (12.7x30.5) - - 27 12 6.8 4.3
OPG (15x30) - - 33.3 14.8 8.3 5.3
Software configuration* High Standardresolution resolution
CEPH (18x24) - - 30.5 13.6 7.6 4.8
* not possible with the VistaScan INTRA 2030-000-61
Default setting
38
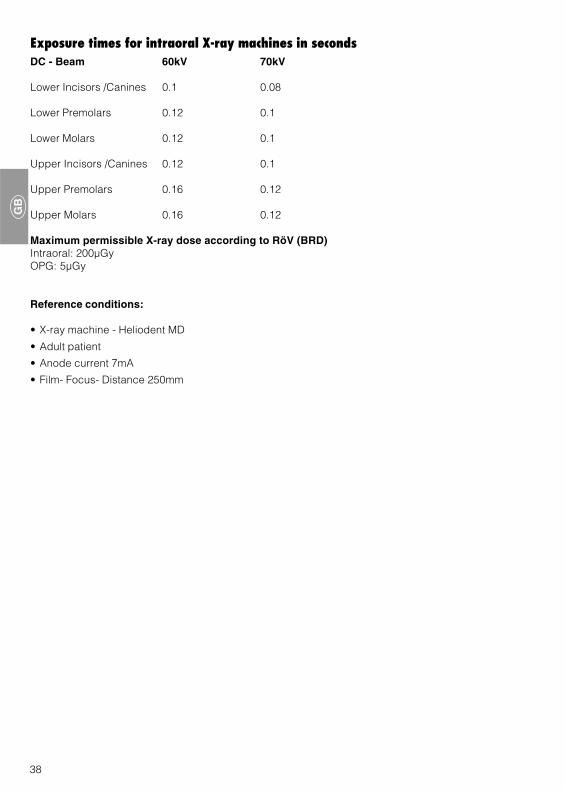
Exposure times for intraoral X-ray machines in secondsDC - Beam 60kV 70kV
Lower Incisors /Canines 0.1 0.08
Lower Premolars 0.12 0.1
Lower Molars 0.12 0.1
Upper Incisors /Canines 0.12 0.1
Upper Premolars 0.16 0.12
Upper Molars 0.16 0.12
Maximum permissible X-ray dose according to RöV (BRD)Intraoral: 200µGyOPG: 5µGy
Reference conditions:
• X-ray machine - Heliodent MD
• Adult patient
• Anode current 7mA
• Film- Focus- Distance 250mm