Installation and Configuration - v19ftp.onepoint-projects.com/...server-installation.pdf · How to...
54
Installation and Configuration - v19
Transcript of Installation and Configuration - v19ftp.onepoint-projects.com/...server-installation.pdf · How to...

Installation and Configuration - v19
Copyright 2020 ONEPOINT Projects GmbH. All rights reserved.
ONEPOINT Projects Server, Version 19
ONEPOINT Informationslosungen and the ONEPOINT Logo are registered trademarks, ONEPOINT Projects is a trademark of ONEPOINT Projects GmbH.
All company and product names mentioned are trademarks of their respective owners as far as registered.
This document describes the whole installation- or upgrade-process for a "ONEPOINT Projects"-server, including all current configuration options.
Contents
1. System Requirements1.1. System Requirements for the Server1.2. System Requirements for Clients
2. How to Install Java3. How to Install Tomcat
3.1. Tomcat on Windows3.2. Tomcat on Linux3.3. Tomcat on Mac OS X3.4. Tomcat Configuration
4. Database Setup4.1. PostgreSQL4.2. Microsoft SQL Server4.3. Oracle
5. ONEPOINT Projects - Installation or Upgrade5.1. ONEPOINT Projects - Installation
5.1.1. Configuration Wizard5.1.2. Manual Installation
5.2. ONEPOINT Projects - Upgrade5.2.1. Upgrading from ONEPOINT Projects 18.0.1.1 or earlier to Release 19 or later5.2.2. Upgrading from ONEPOINT Projects 11.0, 12.0, 13.0 or later5.2.3. Upgrading from ONEPOINT Projects Server 10.x to 12.0 or later
6. ONEPOINT Projects - Configuration6.1. Enabling the Notification System6.2. Notification Trigger6.3. Starting ONEPOINT Projects automatically6.4. Session Timeout Configuration6.5. CMIS Session Timeout6.6. Backup Folder Location6.7. Altering the name of the log-file6.8. Force "Debug" logging-level6.9. LDAP Authentication
6.9.1. LDAP Connection Parameters ("<connection>")6.9.2. Update Scheduler settings ("<update-schedule>")6.9.3. User Configuration ("<users>")6.9.4. Group Configuration ("<groups>")
6.10. Atlassian CROWD Integration6.10.1. Crowd Authentication6.10.2. Crowd Connection Parameters ("<connection>")6.10.3. Update Scheduler settings ("<update-schedule>")6.10.4. User Configuration ("<users>")6.10.5. Group Configuration ("<groups>")
7. APPENDIX7.1. PostgreSQL Connection String7.2. MS SQL Server Connection String7.3. Oracle Connection Strings
1. System Requirements
1.1. System Requirements for the Server
For setting up a "ONEPOINT Projects"-server you will need the following components:
A supported operating systemThe Java SE Runtime EnvironmentThe application-server "Tomcat"A compatible database
The following tables show in detail which versions of the components above you can use:
Operating System Microsoft Windows Server 2012, 2016, 2019
Linux 2.4 or laterApple Mac OS X Snow Leopard (v10.6) or later
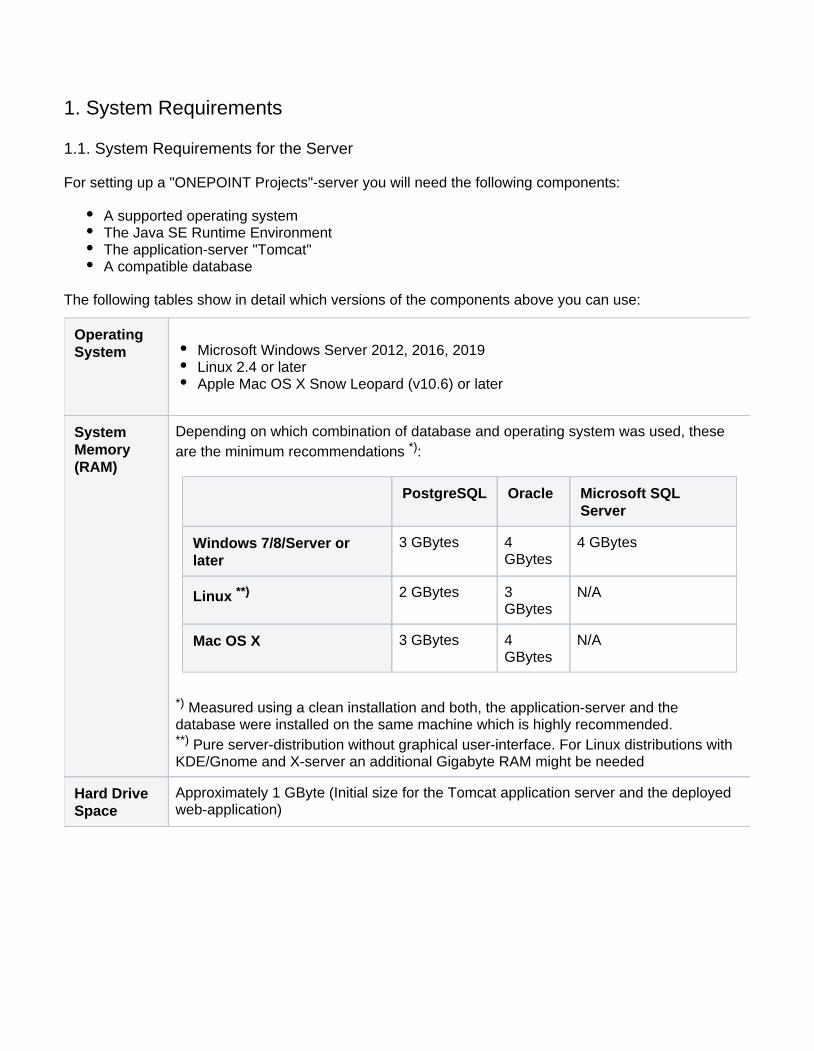
System Memory (RAM)
Depending on which combination of database and operating system was used, these are the minimum recommendations :*)
PostgreSQL Oracle Microsoft SQL Server
Windows 7/8/Server or later
3 GBytes 4 GBytes
4 GBytes
Linux **) 2 GBytes 3 GBytes
N/A
Mac OS X 3 GBytes 4 GBytes
N/A
*) Measured using a clean installation and both, the application-server and the database were installed on the same machine which is highly recommended.
Pure server-distribution without graphical user-interface. For Linux distributions with **)
KDE/Gnome and X-server an additional Gigabyte RAM might be needed
Hard Drive Space
Approximately 1 GByte (Initial size for the Tomcat application server and the deployed web-application)
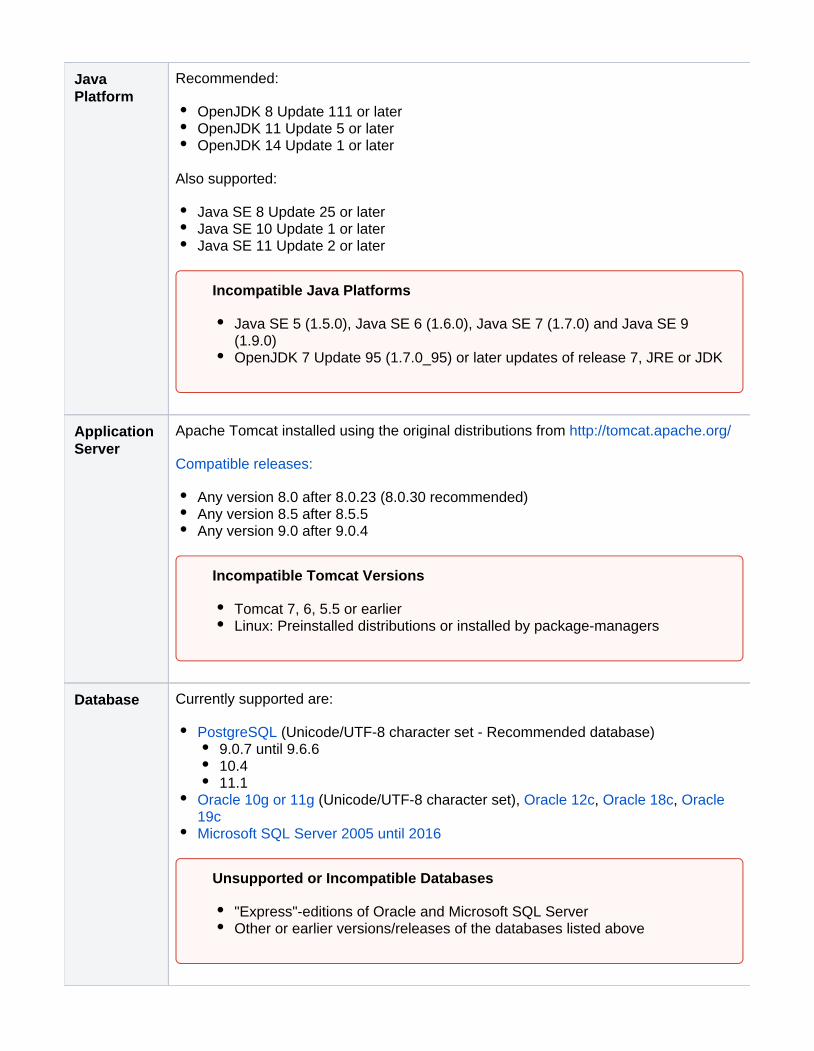
Java Platform
Recommended:
OpenJDK 8 Update 111 or laterOpenJDK 11 Update 5 or laterOpenJDK 14 Update 1 or later
Also supported:
Java SE 8 Update 25 or laterJava SE 10 Update 1 or laterJava SE 11 Update 2 or later
Application Server
Apache Tomcat installed using the original distributions from http://tomcat.apache.org/
Compatible releases:
Any version 8.0 after 8.0.23 (8.0.30 recommended)Any version 8.5 after 8.5.5Any version 9.0 after 9.0.4
Database Currently supported are:
PostgreSQL (Unicode/UTF-8 character set - Recommended database)9.0.7 until 9.6.610.411.1
Oracle 10g or 11g (Unicode/UTF-8 character set), , , Oracle 12c Oracle 18c Oracle 19cMicrosoft SQL Server 2005 until 2016
Incompatible Java Platforms
Java SE 5 (1.5.0), Java SE 6 (1.6.0), Java SE 7 (1.7.0) and Java SE 9 (1.9.0)OpenJDK 7 Update 95 (1.7.0_95) or later updates of release 7, JRE or JDK
Incompatible Tomcat Versions
Tomcat 7, 6, 5.5 or earlierLinux: Preinstalled distributions or installed by package-managers
Unsupported or Incompatible Databases
"Express"-editions of Oracle and Microsoft SQL ServerOther or earlier versions/releases of the databases listed above
1.2. System Requirements for Clients
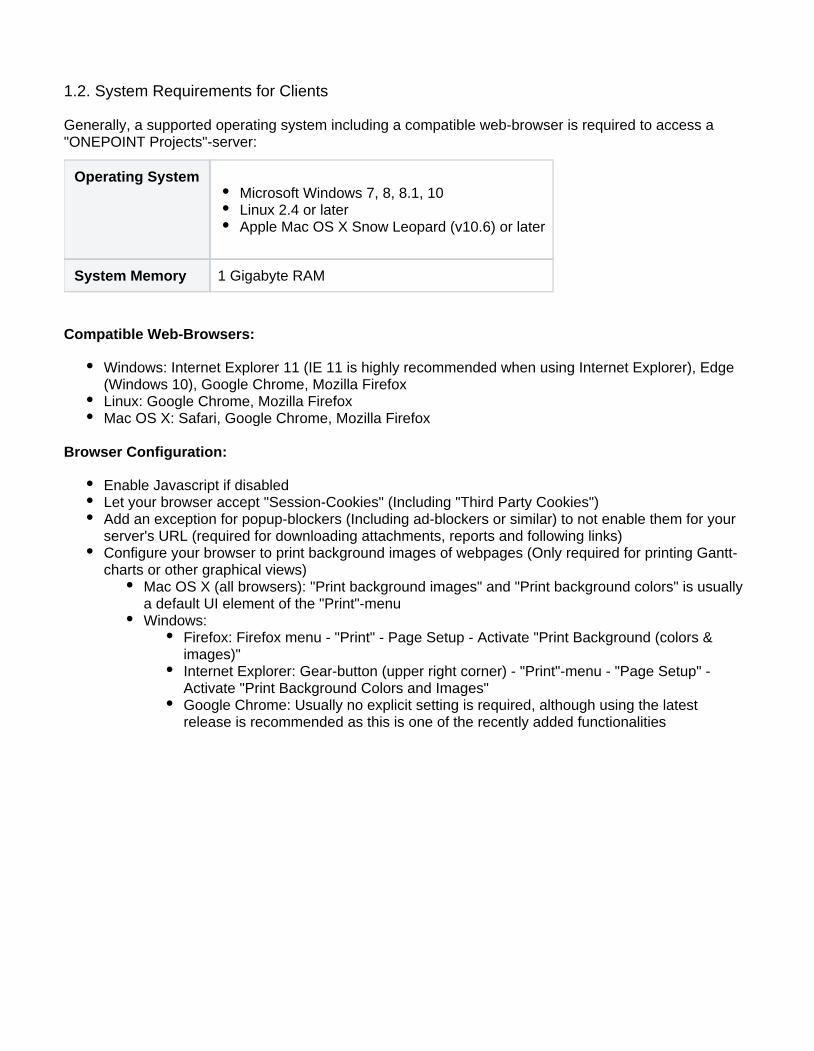
Generally, a supported operating system including a compatible web-browser is required to access a "ONEPOINT Projects"-server:
Operating SystemMicrosoft Windows 7, 8, 8.1, 10Linux 2.4 or laterApple Mac OS X Snow Leopard (v10.6) or later
System Memory 1 Gigabyte RAM
Compatible Web-Browsers:
Windows: Internet Explorer 11 (IE 11 is highly recommended when using Internet Explorer), Edge (Windows 10), Google Chrome, Mozilla FirefoxLinux: Google Chrome, Mozilla FirefoxMac OS X: Safari, Google Chrome, Mozilla Firefox
Browser Configuration:
Enable Javascript if disabledLet your browser accept "Session-Cookies" (Including "Third Party Cookies")Add an exception for popup-blockers (Including ad-blockers or similar) to not enable them for your server's URL (required for downloading attachments, reports and following links)Configure your browser to print background images of webpages (Only required for printing Gantt-charts or other graphical views)
Mac OS X (all browsers): "Print background images" and "Print background colors" is usually a default UI element of the "Print"-menuWindows:
Firefox: Firefox menu - "Print" - Page Setup - Activate "Print Background (colors & images)"Internet Explorer: Gear-button (upper right corner) - "Print"-menu - "Page Setup" - Activate "Print Background Colors and Images"Google Chrome: Usually no explicit setting is required, although using the latest release is recommended as this is one of the recently added functionalities
2. How to Install Java
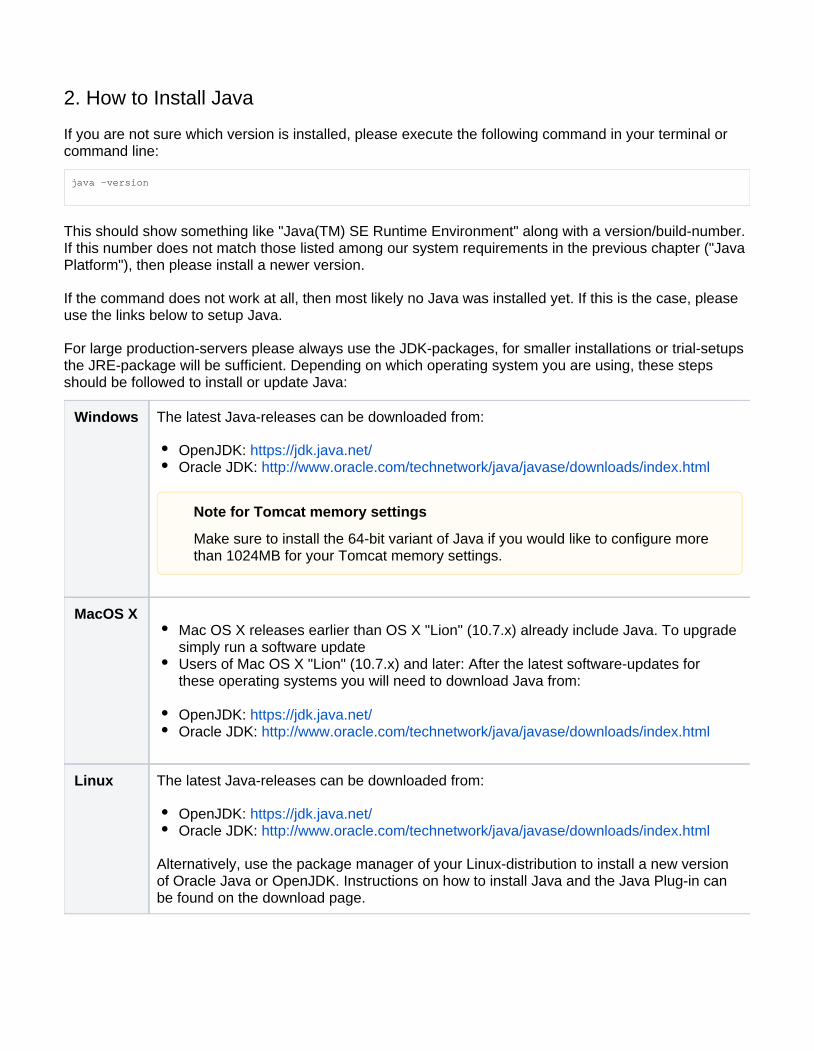
If you are not sure which version is installed, please execute the following command in your terminal or command line:
java -version
This should show something like "Java(TM) SE Runtime Environment" along with a version/build-number. If this number does not match those listed among our system requirements in the previous chapter ("Java Platform"), then please install a newer version.
If the command does not work at all, then most likely no Java was installed yet. If this is the case, please use the links below to setup Java.
For large production-servers please always use the JDK-packages, for smaller installations or trial-setups the JRE-package will be sufficient. Depending on which operating system you are using, these steps should be followed to install or update Java:
Windows The latest Java-releases can be downloaded from:
OpenJDK: https://jdk.java.net/Oracle JDK: http://www.oracle.com/technetwork/java/javase/downloads/index.html
MacOS XMac OS X releases earlier than OS X "Lion" (10.7.x) already include Java. To upgrade simply run a software updateUsers of Mac OS X "Lion" (10.7.x) and later: After the latest software-updates for these operating systems you will need to download Java from:
OpenJDK: https://jdk.java.net/Oracle JDK: http://www.oracle.com/technetwork/java/javase/downloads/index.html
Linux The latest Java-releases can be downloaded from:
OpenJDK: https://jdk.java.net/Oracle JDK: http://www.oracle.com/technetwork/java/javase/downloads/index.html
Alternatively, use the package manager of your Linux-distribution to install a new version of Oracle Java or OpenJDK. Instructions on how to install Java and the Java Plug-in can be found on the download page.
Note for Tomcat memory settings
Make sure to install the 64-bit variant of Java if you would like to configure more than 1024MB for your Tomcat memory settings.
1. 2.
3. 4.
5.
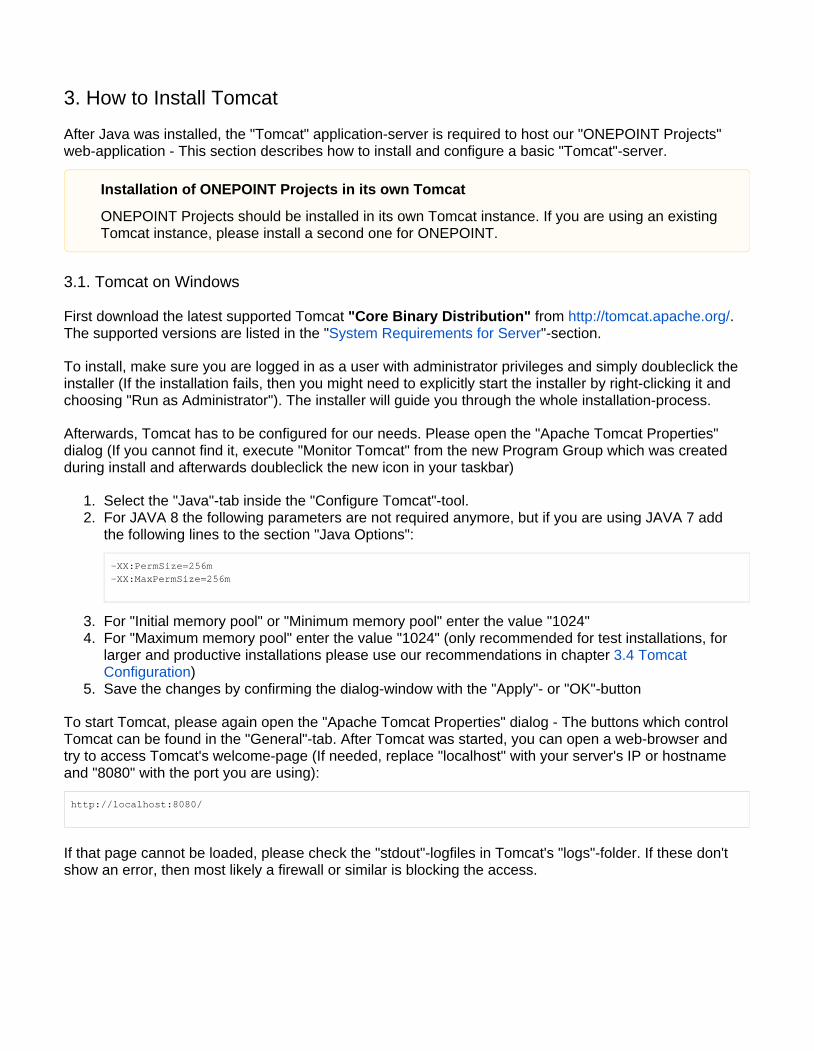
3. How to Install Tomcat
After Java was installed, the "Tomcat" application-server is required to host our "ONEPOINT Projects" web-application - This section describes how to install and configure a basic "Tomcat"-server.
3.1. Tomcat on Windows
First download the latest supported Tomcat from . "Core Binary Distribution" http://tomcat.apache.org/The supported versions are listed in the " "-section.System Requirements for Server
To install, make sure you are logged in as a user with administrator privileges and simply doubleclick the installer (If the installation fails, then you might need to explicitly start the installer by right-clicking it and choosing "Run as Administrator"). The installer will guide you through the whole installation-process.
Afterwards, Tomcat has to be configured for our needs. Please open the "Apache Tomcat Properties" dialog (If you cannot find it, execute "Monitor Tomcat" from the new Program Group which was created during install and afterwards doubleclick the new icon in your taskbar)
Select the "Java"-tab inside the "Configure Tomcat"-tool.For JAVA 8 the following parameters are not required anymore, but if you are using JAVA 7 add the following lines to the section "Java Options":
-XX:PermSize=256m-XX:MaxPermSize=256m
For "Initial memory pool" or "Minimum memory pool" enter the value "1024"For "Maximum memory pool" enter the value "1024" (only recommended for test installations, for larger and productive installations please use our recommendations in chapter 3.4 Tomcat
)ConfigurationSave the changes by confirming the dialog-window with the "Apply"- or "OK"-button
To start Tomcat, please again open the "Apache Tomcat Properties" dialog - The buttons which control Tomcat can be found in the "General"-tab. After Tomcat was started, you can open a web-browser and try to access Tomcat's welcome-page (If needed, replace "localhost" with your server's IP or hostname and "8080" with the port you are using):
http://localhost:8080/
If that page cannot be loaded, please check the "stdout"-logfiles in Tomcat's "logs"-folder. If these don't show an error, then most likely a firewall or similar is blocking the access.
Installation of ONEPOINT Projects in its own Tomcat
ONEPOINT Projects should be installed in its own Tomcat instance. If you are using an existing Tomcat instance, please install a second one for ONEPOINT.
1.
2.
3.
4.
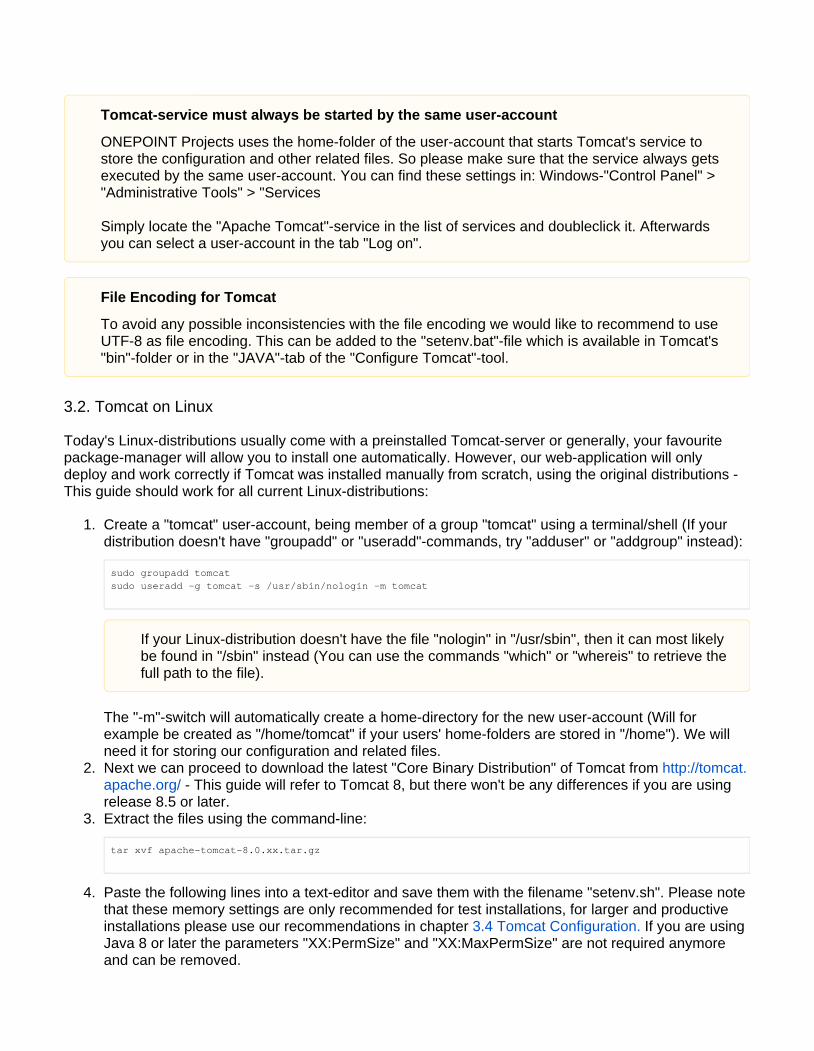
3.2. Tomcat on Linux
Today's Linux-distributions usually come with a preinstalled Tomcat-server or generally, your favourite package-manager will allow you to install one automatically. However, our web-application will only deploy and work correctly if Tomcat was installed manually from scratch, using the original distributions - This guide should work for all current Linux-distributions:
Create a "tomcat" user-account, being member of a group "tomcat" using a terminal/shell (If your distribution doesn't have "groupadd" or "useradd"-commands, try "adduser" or "addgroup" instead):
sudo groupadd tomcatsudo useradd -g tomcat -s /usr/sbin/nologin -m tomcat
The "-m"-switch will automatically create a home-directory for the new user-account (Will for example be created as "/home/tomcat" if your users' home-folders are stored in "/home"). We will need it for storing our configuration and related files.Next we can proceed to download the latest "Core Binary Distribution" of Tomcat from http://tomcat.
- This guide will refer to Tomcat 8, but there won't be any differences if you are using apache.org/release 8.5 or later.Extract the files using the command-line:
tar xvf apache-tomcat-8.0.xx.tar.gz
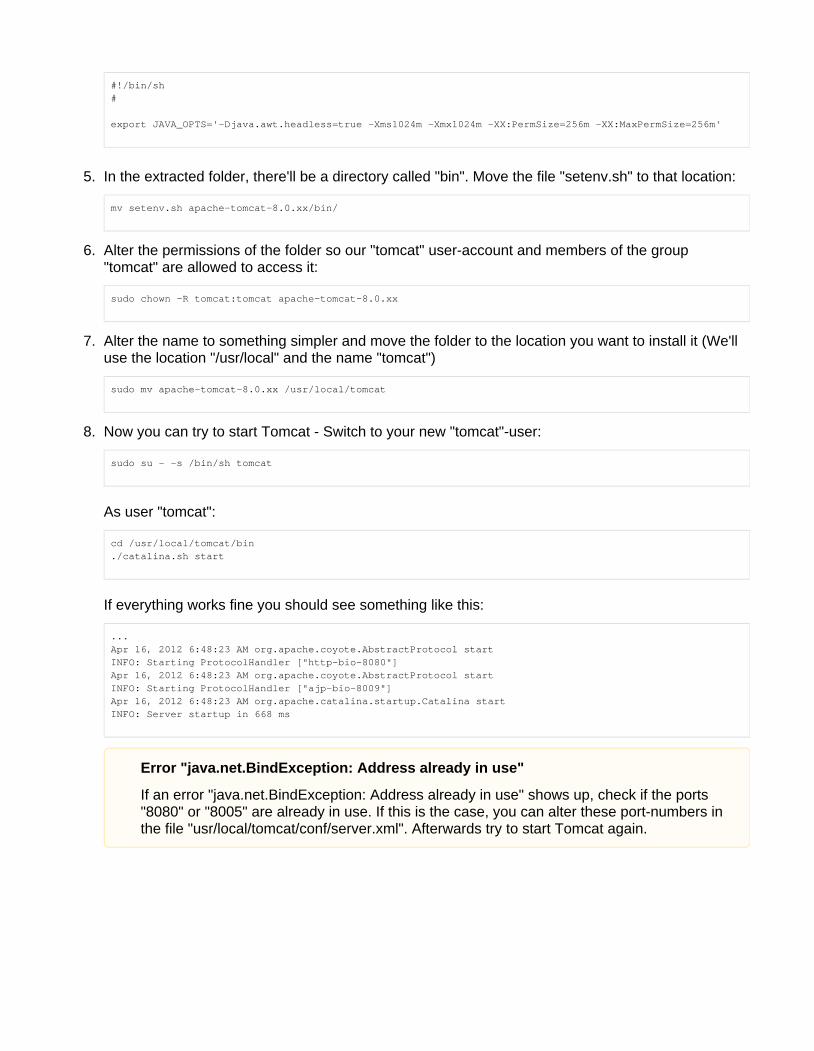
Paste the following lines into a text-editor and save them with the filename "setenv.sh". Please note that these memory settings are only recommended for test installations, for larger and productive installations please use our recommendations in chapter If you are using 3.4 Tomcat Configuration.Java 8 or later the parameters "XX:PermSize" and "XX:MaxPermSize" are not required anymore and can be removed.
Tomcat-service must always be started by the same user-account
ONEPOINT Projects uses the home-folder of the user-account that starts Tomcat's service to store the configuration and other related files. So please make sure that the service always gets executed by the same user-account. You can find these settings in: Windows-"Control Panel" > "Administrative Tools" > "Services
Simply locate the "Apache Tomcat"-service in the list of services and doubleclick it. Afterwards you can select a user-account in the tab "Log on".
File Encoding for Tomcat
To avoid any possible inconsistencies with the file encoding we would like to recommend to use UTF-8 as file encoding. This can be added to the "setenv.bat"-file which is available in Tomcat's "bin"-folder or in the "JAVA"-tab of the "Configure Tomcat"-tool.
If your Linux-distribution doesn't have the file "nologin" in "/usr/sbin", then it can most likely be found in "/sbin" instead (You can use the commands "which" or "whereis" to retrieve the full path to the file).
4.
5.
6.
7.
8.
#!/bin/sh#
export JAVA_OPTS='-Djava.awt.headless=true -Xms1024m -Xmx1024m -XX:PermSize=256m -XX:MaxPermSize=256m'
In the extracted folder, there'll be a directory called "bin". Move the file "setenv.sh" to that location:
mv setenv.sh apache-tomcat-8.0.xx/bin/
Alter the permissions of the folder so our "tomcat" user-account and members of the group "tomcat" are allowed to access it:
sudo chown -R tomcat:tomcat apache-tomcat-8.0.xx
Alter the name to something simpler and move the folder to the location you want to install it (We'll use the location "/usr/local" and the name "tomcat")
sudo mv apache-tomcat-8.0.xx /usr/local/tomcat
Now you can try to start Tomcat - Switch to your new "tomcat"-user:
sudo su - -s /bin/sh tomcat
As user "tomcat":
cd /usr/local/tomcat/bin./catalina.sh start
If everything works fine you should see something like this:
...Apr 16, 2012 6:48:23 AM org.apache.coyote.AbstractProtocol startINFO: Starting ProtocolHandler ["http-bio-8080"]Apr 16, 2012 6:48:23 AM org.apache.coyote.AbstractProtocol startINFO: Starting ProtocolHandler ["ajp-bio-8009"]Apr 16, 2012 6:48:23 AM org.apache.catalina.startup.Catalina startINFO: Server startup in 668 ms
Error "java.net.BindException: Address already in use"
If an error "java.net.BindException: Address already in use" shows up, check if the ports "8080" or "8005" are already in use. If this is the case, you can alter these port-numbers in the file "usr/local/tomcat/conf/server.xml". Afterwards try to start Tomcat again.
8.
1.
2.
3.
Now you can open a web-browser and try to access Tomcat's welcome-page (Replace "localhost" with your server's IP or hostname and "8080" with the port you are using):
http://localhost:8080/
Afterwards you should see Tomcat's welcome page, otherwise check if your firewall or similar (For example "iptables" or "SELinux") is blocking the port. To stop the server, press the keys <CTRL> and <C> together. And if you need to switch back to your regular user-account:
exit
To start and stop Tomcat later on, you could directly execute the scripts/commands "startup.sh" and "shutdown.sh" in Tomcat's "bin"-folder.
3.3. Tomcat on Mac OS X
If Tomcat is not preinstalled on your operating system, please download the latest supported Tomcat "Cor from . The supported versions are listed in the "e Binary Distribution" http://tomcat.apache.org/ System
"-section. Afterwards follow these steps:Requirements for Server
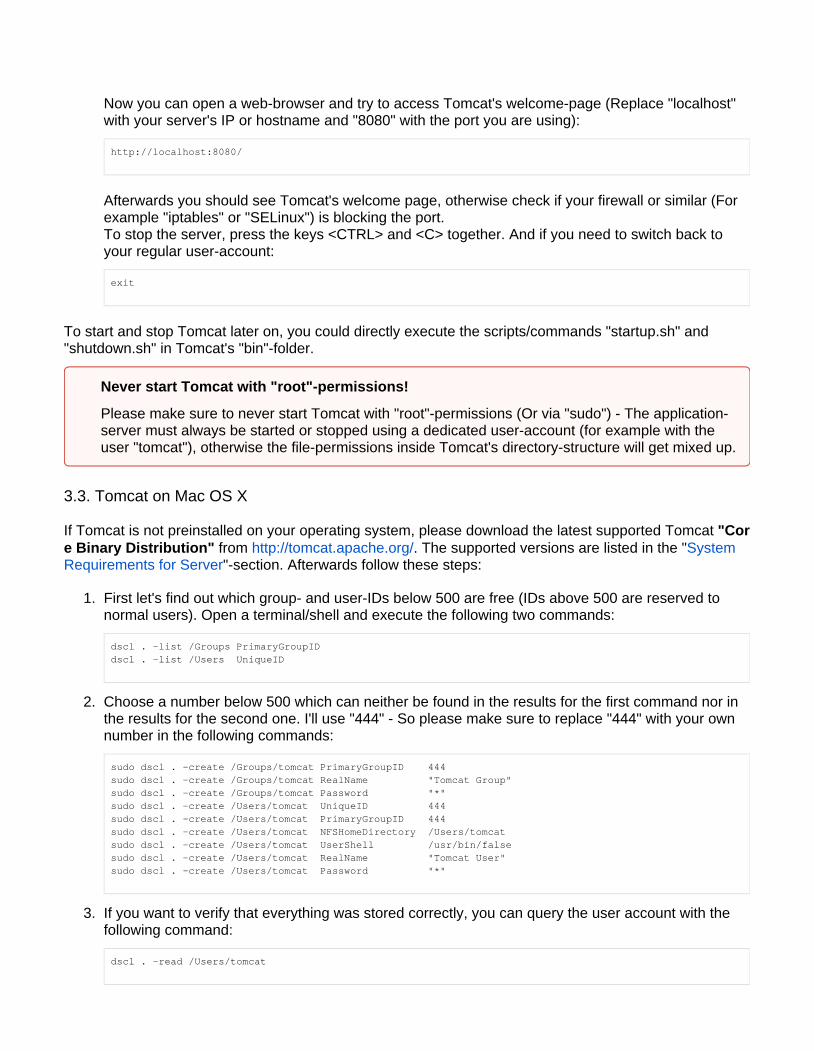
First let's find out which group- and user-IDs below 500 are free (IDs above 500 are reserved to normal users). Open a terminal/shell and execute the following two commands:
dscl . -list /Groups PrimaryGroupIDdscl . -list /Users UniqueID
Choose a number below 500 which can neither be found in the results for the first command nor in the results for the second one. I'll use "444" - So please make sure to replace "444" with your own number in the following commands:
sudo dscl . -create /Groups/tomcat PrimaryGroupID 444sudo dscl . -create /Groups/tomcat RealName "Tomcat Group"sudo dscl . -create /Groups/tomcat Password "*"sudo dscl . -create /Users/tomcat UniqueID 444sudo dscl . -create /Users/tomcat PrimaryGroupID 444sudo dscl . -create /Users/tomcat NFSHomeDirectory /Users/tomcatsudo dscl . -create /Users/tomcat UserShell /usr/bin/falsesudo dscl . -create /Users/tomcat RealName "Tomcat User"sudo dscl . -create /Users/tomcat Password "*"
If you want to verify that everything was stored correctly, you can query the user account with the following command:
dscl . -read /Users/tomcat
Never start Tomcat with "root"-permissions!
Please make sure to never start Tomcat with "root"-permissions (Or via "sudo") - The application-server must always be started or stopped using a dedicated user-account (for example with the user "tomcat"), otherwise the file-permissions inside Tomcat's directory-structure will get mixed up.
3.
4.
5.
6.
7.
8.
9.
10.
Next create the home-folder for our user-account and grant permissions to the Tomcat-user and group:
sudo mkdir /Users/tomcatsudo chown tomcat:tomcat /Users/tomcat
Next we can proceed to download the latest "Core Binary Distribution" of Tomcat from http://tomcat. - This guide will refer to Tomcat 8, but there won't be any differences if you are using apache.org/
release 8.5 or later.
Extract the files using the command-line
tar xvf apache-tomcat-8.0.xx.tar.gz
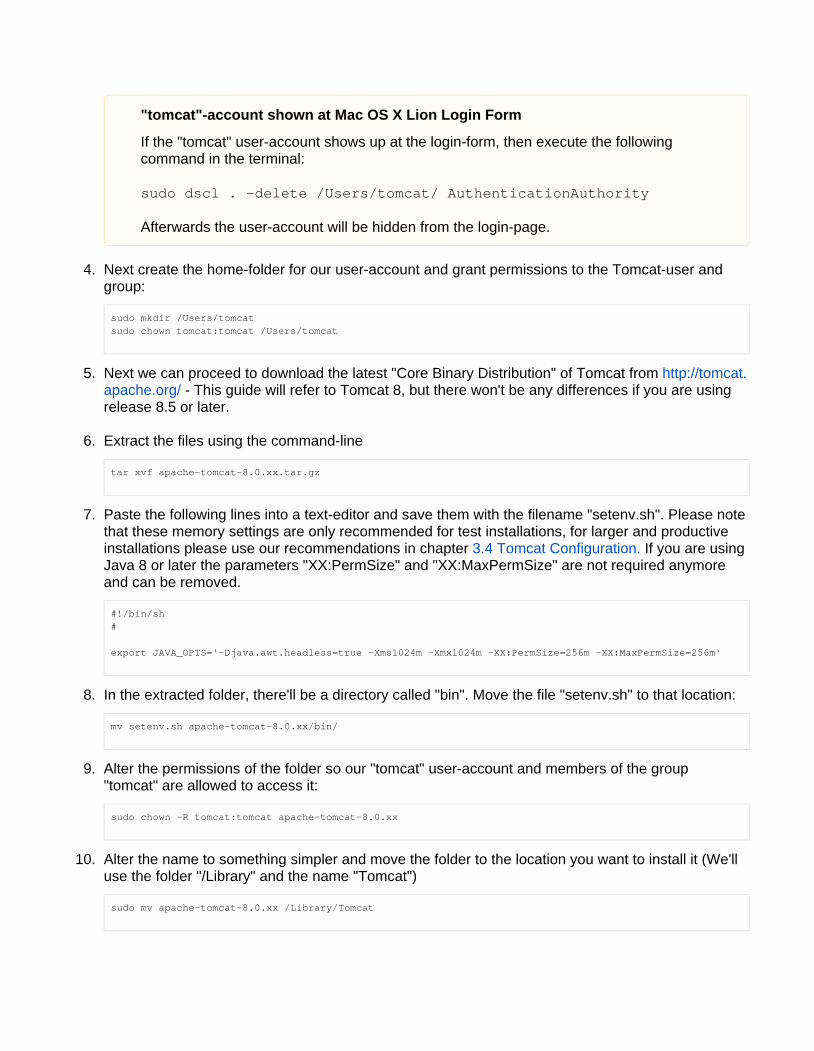
Paste the following lines into a text-editor and save them with the filename "setenv.sh". Please note that these memory settings are only recommended for test installations, for larger and productive installations please use our recommendations in chapter If you are using 3.4 Tomcat Configuration.Java 8 or later the parameters "XX:PermSize" and "XX:MaxPermSize" are not required anymore and can be removed.
#!/bin/sh#
export JAVA_OPTS='-Djava.awt.headless=true -Xms1024m -Xmx1024m -XX:PermSize=256m -XX:MaxPermSize=256m'
In the extracted folder, there'll be a directory called "bin". Move the file "setenv.sh" to that location:
mv setenv.sh apache-tomcat-8.0.xx/bin/
Alter the permissions of the folder so our "tomcat" user-account and members of the group "tomcat" are allowed to access it:
sudo chown -R tomcat:tomcat apache-tomcat-8.0.xx
Alter the name to something simpler and move the folder to the location you want to install it (We'll use the folder "/Library" and the name "Tomcat")
sudo mv apache-tomcat-8.0.xx /Library/Tomcat
"tomcat"-account shown at Mac OS X Lion Login Form
If the "tomcat" user-account shows up at the login-form, then execute the following command in the terminal:
sudo dscl . -delete /Users/tomcat/ AuthenticationAuthority
Afterwards the user-account will be hidden from the login-page.
10.
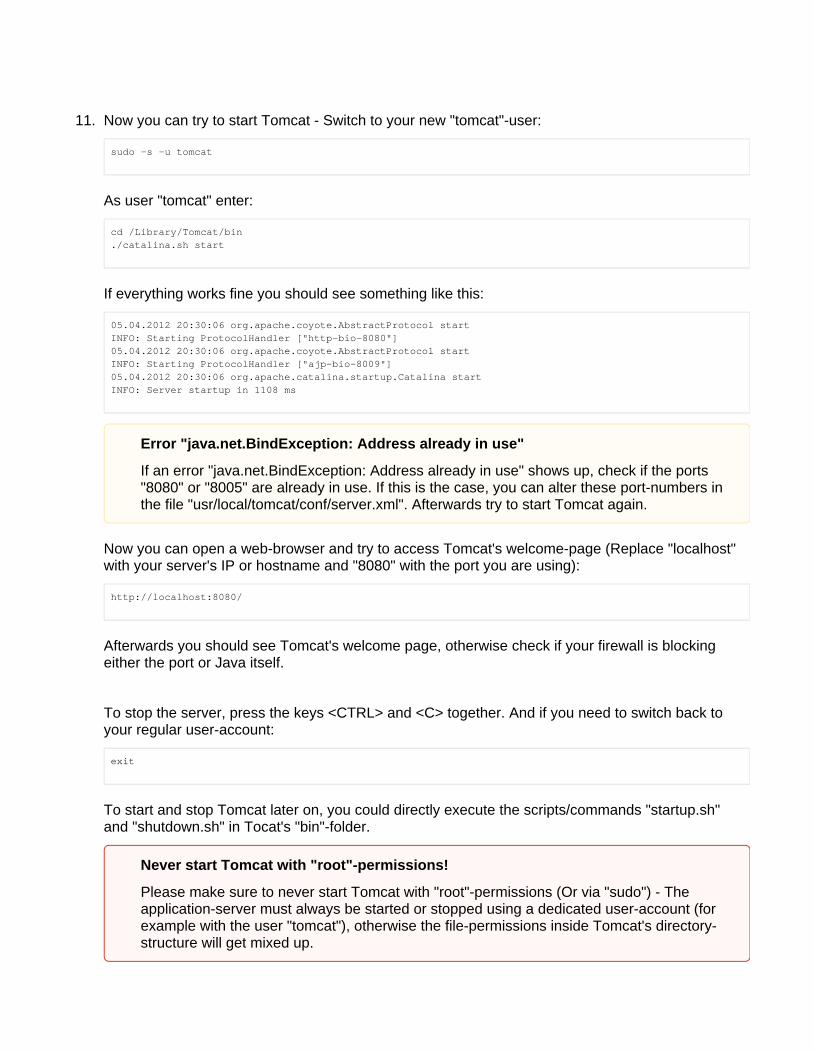
11. Now you can try to start Tomcat - Switch to your new "tomcat"-user:
sudo -s -u tomcat
As user "tomcat" enter:
cd /Library/Tomcat/bin./catalina.sh start
If everything works fine you should see something like this:
05.04.2012 20:30:06 org.apache.coyote.AbstractProtocol startINFO: Starting ProtocolHandler ["http-bio-8080"]05.04.2012 20:30:06 org.apache.coyote.AbstractProtocol startINFO: Starting ProtocolHandler ["ajp-bio-8009"]05.04.2012 20:30:06 org.apache.catalina.startup.Catalina startINFO: Server startup in 1108 ms
Now you can open a web-browser and try to access Tomcat's welcome-page (Replace "localhost" with your server's IP or hostname and "8080" with the port you are using):
http://localhost:8080/
Afterwards you should see Tomcat's welcome page, otherwise check if your firewall is blocking either the port or Java itself.
To stop the server, press the keys <CTRL> and <C> together. And if you need to switch back to your regular user-account:
exit
To start and stop Tomcat later on, you could directly execute the scripts/commands "startup.sh" and "shutdown.sh" in Tocat's "bin"-folder.
Error "java.net.BindException: Address already in use"
If an error "java.net.BindException: Address already in use" shows up, check if the ports "8080" or "8005" are already in use. If this is the case, you can alter these port-numbers in the file "usr/local/tomcat/conf/server.xml". Afterwards try to start Tomcat again.
Never start Tomcat with "root"-permissions!
Please make sure to never start Tomcat with "root"-permissions (Or via "sudo") - The application-server must always be started or stopped using a dedicated user-account (for example with the user "tomcat"), otherwise the file-permissions inside Tomcat's directory-structure will get mixed up.
3.4. Tomcat Configuration
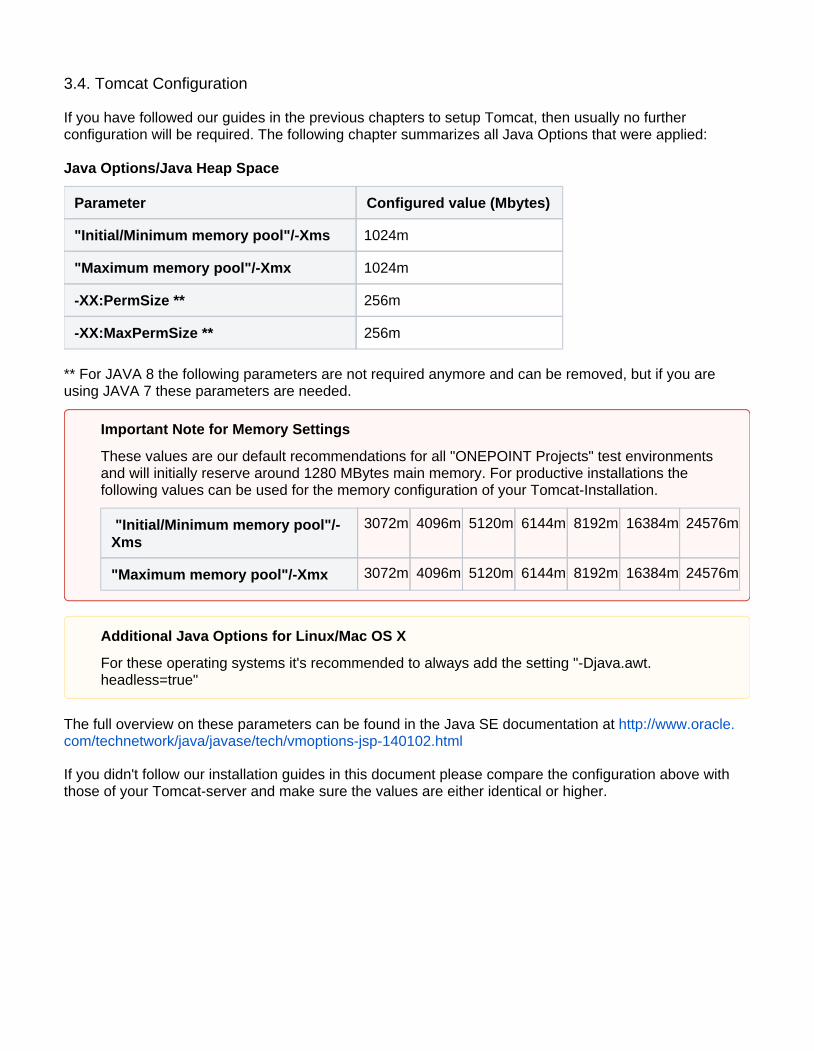
If you have followed our guides in the previous chapters to setup Tomcat, then usually no further configuration will be required. The following chapter summarizes all Java Options that were applied:
Java Options/Java Heap Space
Parameter Configured value (Mbytes)
"Initial/Minimum memory pool"/-Xms 1024m
"Maximum memory pool"/-Xmx 1024m
-XX:PermSize ** 256m
-XX:MaxPermSize ** 256m
** For JAVA 8 the following parameters are not required anymore and can be removed, but if you are using JAVA 7 these parameters are needed.
The full overview on these parameters can be found in the Java SE documentation at http://www.oracle.com/technetwork/java/javase/tech/vmoptions-jsp-140102.html
If you didn't follow our installation guides in this document please compare the configuration above with those of your Tomcat-server and make sure the values are either identical or higher.
Important Note for Memory Settings
These values are our default recommendations for all "ONEPOINT Projects" test environments and will initially reserve around 1280 MBytes main memory. For productive installations the following values can be used for the memory configuration of your Tomcat-Installation.
"Initial/Minimum memory pool"/-Xms
3072m 4096m 5120m 6144m 8192m 16384m 24576m
"Maximum memory pool"/-Xmx 3072m 4096m 5120m 6144m 8192m 16384m 24576m
Additional Java Options for Linux/Mac OS X
For these operating systems it's recommended to always add the setting "-Djava.awt.headless=true"
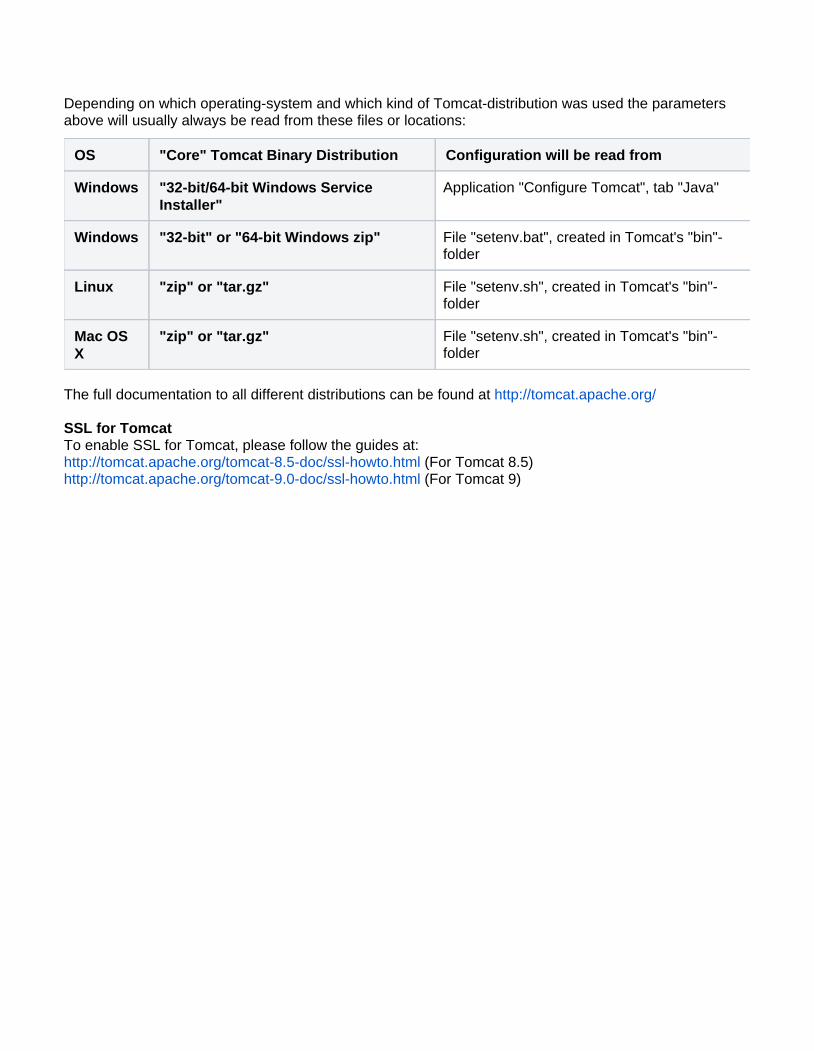
Depending on which operating-system and which kind of Tomcat-distribution was used the parameters above will usually always be read from these files or locations:
OS "Core" Tomcat Binary Distribution Configuration will be read from
Windows "32-bit/64-bit Windows Service Installer"
Application "Configure Tomcat", tab "Java"
Windows "32-bit" or "64-bit Windows zip" File "setenv.bat", created in Tomcat's "bin"-folder
Linux "zip" or "tar.gz" File "setenv.sh", created in Tomcat's "bin"-folder
Mac OS X
"zip" or "tar.gz" File "setenv.sh", created in Tomcat's "bin"-folder
The full documentation to all different distributions can be found at http://tomcat.apache.org/
SSL for TomcatTo enable SSL for Tomcat, please follow the guides at:
(For Tomcat 8.5)http://tomcat.apache.org/tomcat-8.5-doc/ssl-howto.html (For Tomcat 9)http://tomcat.apache.org/tomcat-9.0-doc/ssl-howto.html
1. 2. 3.
4.
5.
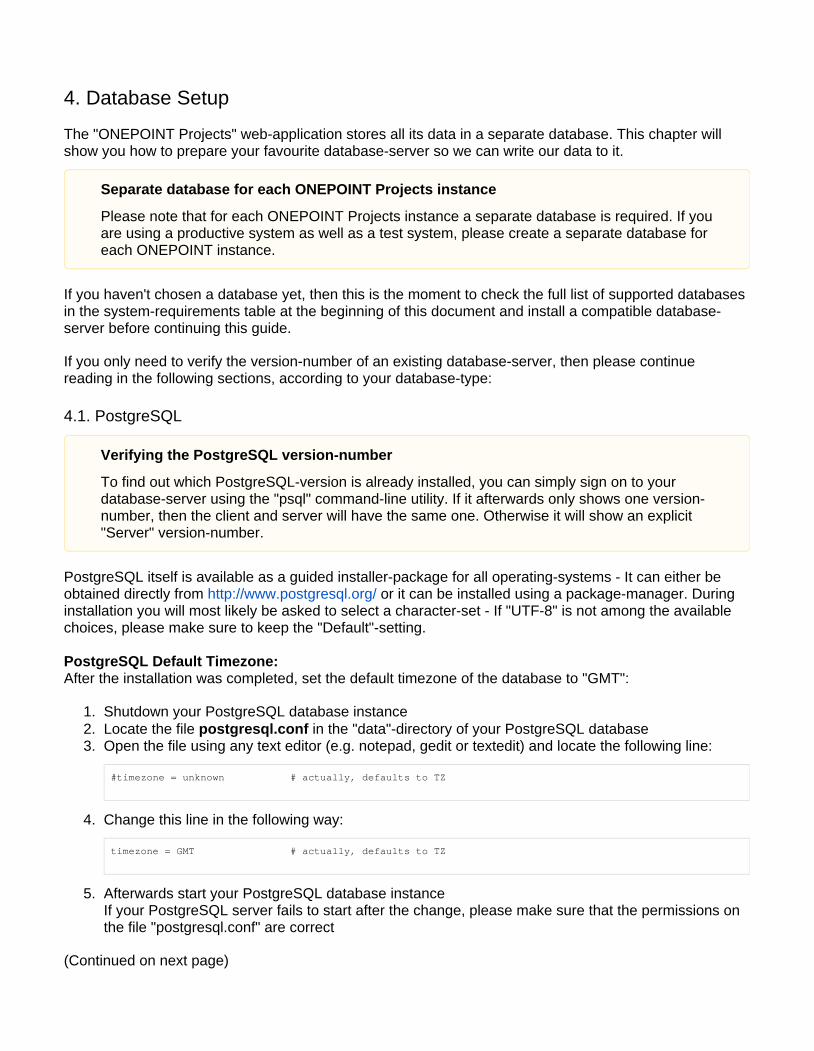
4. Database Setup
The "ONEPOINT Projects" web-application stores all its data in a separate database. This chapter will show you how to prepare your favourite database-server so we can write our data to it.
If you haven't chosen a database yet, then this is the moment to check the full list of supported databases in the system-requirements table at the beginning of this document and install a compatible database-server before continuing this guide.
If you only need to verify the version-number of an existing database-server, then please continue reading in the following sections, according to your database-type:
4.1. PostgreSQL
PostgreSQL itself is available as a guided installer-package for all operating-systems - It can either be obtained directly from or it can be installed using a package-manager. During http://www.postgresql.org/installation you will most likely be asked to select a character-set - If "UTF-8" is not among the available choices, please make sure to keep the "Default"-setting.
PostgreSQL Default Timezone:After the installation was completed, set the default timezone of the database to "GMT":
Shutdown your PostgreSQL database instanceLocate the file in the "data"-directory of your PostgreSQL databasepostgresql.confOpen the file using any text editor (e.g. notepad, gedit or textedit) and locate the following line:
#timezone = unknown # actually, defaults to TZ
Change this line in the following way:
timezone = GMT # actually, defaults to TZ
Afterwards start your PostgreSQL database instance If your PostgreSQL server fails to start after the change, please make sure that the permissions on the file "postgresql.conf" are correct
(Continued on next page)
Separate database for each ONEPOINT Projects instance
Please note that for each ONEPOINT Projects instance a separate database is required. If you are using a productive system as well as a test system, please create a separate database for each ONEPOINT instance.
Verifying the PostgreSQL version-number
To find out which PostgreSQL-version is already installed, you can simply sign on to your database-server using the "psql" command-line utility. If it afterwards only shows one version-number, then the client and server will have the same one. Otherwise it will show an explicit "Server" version-number.
1.
2.
1.
2.
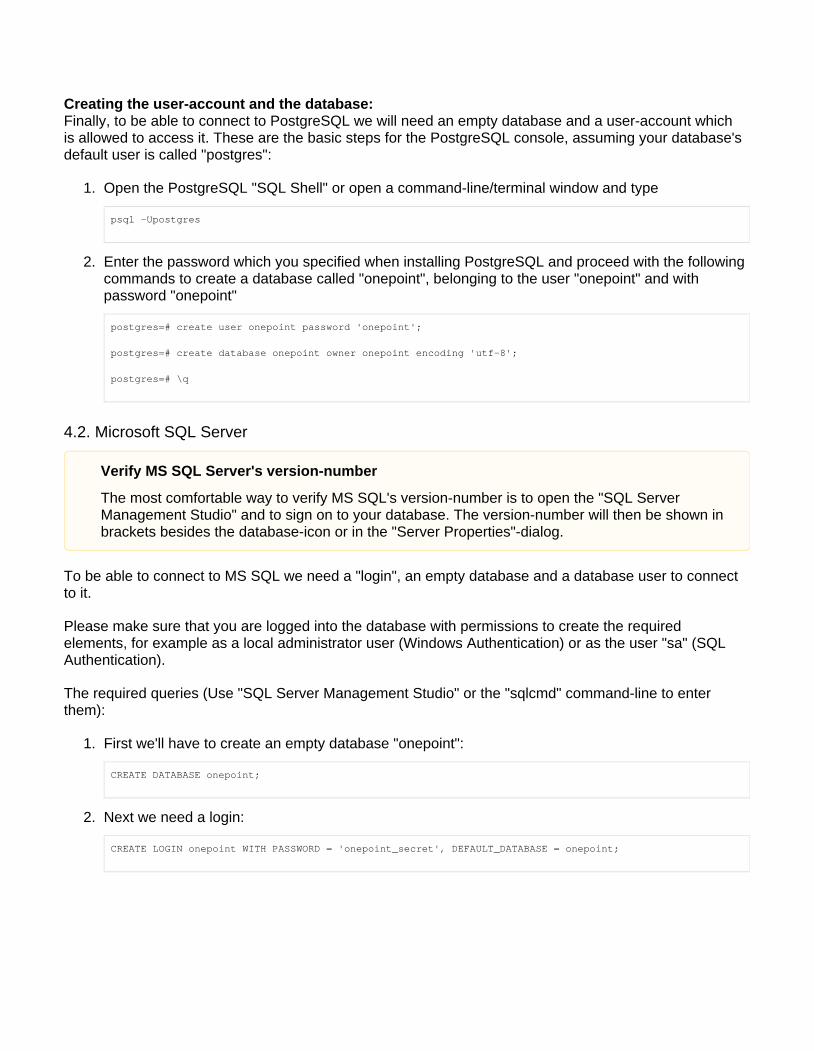
Creating the user-account and the database:Finally, to be able to connect to PostgreSQL we will need an empty database and a user-account which is allowed to access it. These are the basic steps for the PostgreSQL console, assuming your database's default user is called "postgres":
Open the PostgreSQL "SQL Shell" or open a command-line/terminal window and type
psql -Upostgres
Enter the password which you specified when installing PostgreSQL and proceed with the following commands to create a database called "onepoint", belonging to the user "onepoint" and with password "onepoint"
postgres=# create user onepoint password 'onepoint';
postgres=# create database onepoint owner onepoint encoding 'utf-8';
postgres=# \q
4.2. Microsoft SQL Server
To be able to connect to MS SQL we need a "login", an empty database and a database user to connect to it.
Please make sure that you are logged into the database with permissions to create the required elements, for example as a local administrator user (Windows Authentication) or as the user "sa" (SQL Authentication).
The required queries (Use "SQL Server Management Studio" or the "sqlcmd" command-line to enter them):
First we'll have to create an empty database "onepoint":
CREATE DATABASE onepoint;
Next we need a login:
CREATE LOGIN onepoint WITH PASSWORD = 'onepoint_secret', DEFAULT_DATABASE = onepoint;
Verify MS SQL Server's version-number
The most comfortable way to verify MS SQL's version-number is to open the "SQL Server Management Studio" and to sign on to your database. The version-number will then be shown in brackets besides the database-icon or in the "Server Properties"-dialog.
2.
3.
4.
1.
2.
And the following command changes to our new database and creates a database-user "op_user" which will be linked to the login "onepoint"
USE onepoint;CREATE USER op_user FOR LOGIN onepoint;
And finally we'll need to grant the role "db_owner" to the user "op_user":
EXEC sp_addrolemember 'db_owner', 'op_user';
4.3. Oracle
There are two general requirements to be able to connect to an Oracle database-server:
The correct "JDBC Thin" database-driver according to your database- and Java-version must be copied to Tomcat's "/lib" folder (This driver-file can always be found in )Oracle's download-areaA user-account must be created in Oracle, allowing to sign on to your database, with the following roles (Only "Standard"-roles are needed, not "Admin"):
CONNECTRESOURCE
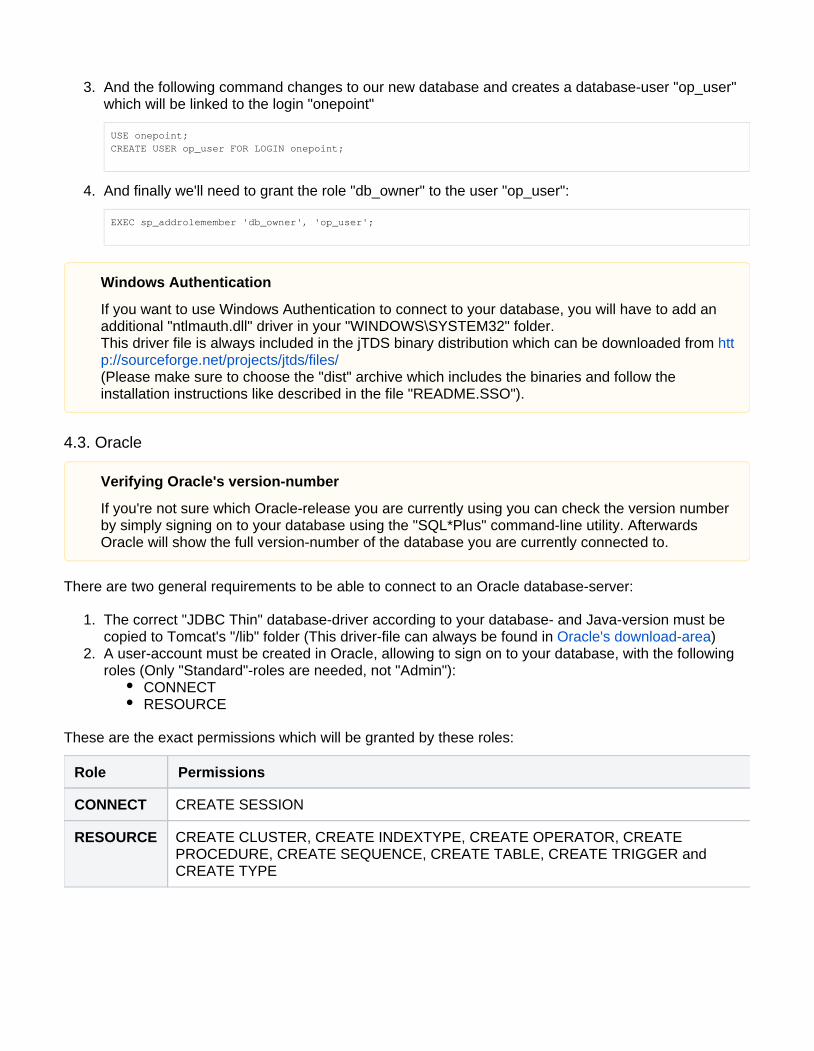
These are the exact permissions which will be granted by these roles:
Role Permissions
CONNECT CREATE SESSION
RESOURCE CREATE CLUSTER, CREATE INDEXTYPE, CREATE OPERATOR, CREATE PROCEDURE, CREATE SEQUENCE, CREATE TABLE, CREATE TRIGGER and CREATE TYPE
Windows Authentication
If you want to use Windows Authentication to connect to your database, you will have to add an additional "ntlmauth.dll" driver in your "WINDOWS\SYSTEM32" folder. This driver file is always included in the jTDS binary distribution which can be downloaded from http://sourceforge.net/projects/jtds/files/(Please make sure to choose the "dist" archive which includes the binaries and follow the installation instructions like described in the file "README.SSO").
Verifying Oracle's version-number
If you're not sure which Oracle-release you are currently using you can check the version number by simply signing on to your database using the "SQL*Plus" command-line utility. Afterwards Oracle will show the full version-number of the database you are currently connected to.
1.
2.
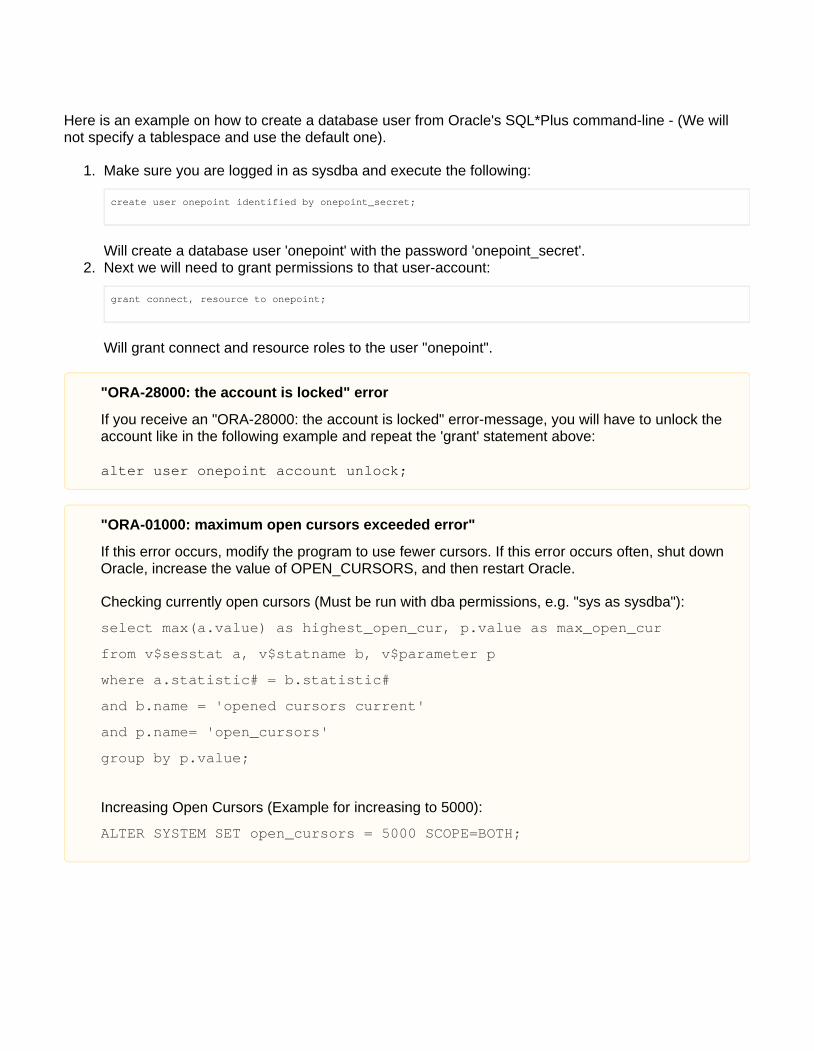
Here is an example on how to create a database user from Oracle's SQL*Plus command-line - (We will not specify a tablespace and use the default one).
Make sure you are logged in as sysdba and execute the following:
create user onepoint identified by onepoint_secret;
Will create a database user 'onepoint' with the password 'onepoint_secret'.Next we will need to grant permissions to that user-account:
grant connect, resource to onepoint;
Will grant connect and resource roles to the user "onepoint".
"ORA-28000: the account is locked" error
If you receive an "ORA-28000: the account is locked" error-message, you will have to unlock the account like in the following example and repeat the 'grant' statement above:
alter user onepoint account unlock;
"ORA-01000: maximum open cursors exceeded error"
If this error occurs, modify the program to use fewer cursors. If this error occurs often, shut down Oracle, increase the value of OPEN_CURSORS, and then restart Oracle.
Checking currently open cursors (Must be run with dba permissions, e.g. "sys as sysdba"):
select max(a.value) as highest_open_cur, p.value as max_open_cur
from v$sesstat a, v$statname b, v$parameter p
where a.statistic# = b.statistic#
and b.name = 'opened cursors current'
and p.name= 'open_cursors'
group by p.value;
Increasing Open Cursors (Example for increasing to 5000):
ALTER SYSTEM SET open_cursors = 5000 SCOPE=BOTH;
1. 2. 3.
5. ONEPOINT Projects - Installation or Upgrade
5.1. ONEPOINT Projects - Installation
There are currently two possibilities to configure all required settings to start your "ONEPOINT Projects"-installation.
5.1.1. Configuration Wizard
Before starting the installation, please make sure that Tomcat is not running, then:
Copy the file "onepoint.war" inside the downloaded ZIP-archive to Tomcat's "webapps"-folderStart TomcatConnect to the new web-application using your browser (For example, if your Tomcat-server was running locally on port 8080, the URL would be " " - Otherwise please http://localhost:8080/onepoint/replace 8080 with your Tomcat's port and use the correct IP-address or host name instead of "localhost")
When connecting to ONEPOINT Projects for the first time, the Configuration Wizard will be shown which is the easiest way to configure all required parameters for starting your "ONEPOINT Projects"-installation. The Configuration Wizard consists of the following three steps:
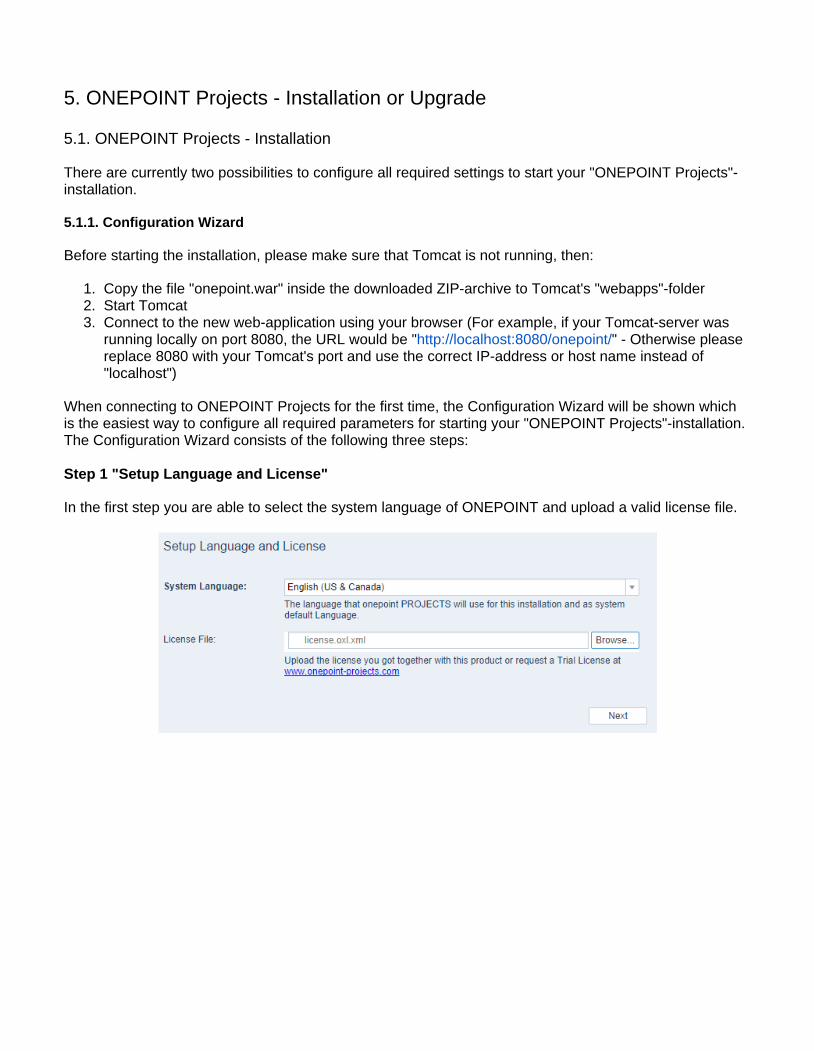
Step 1 "Setup Language and License"
In the first step you are able to select the system language of ONEPOINT and upload a valid license file.
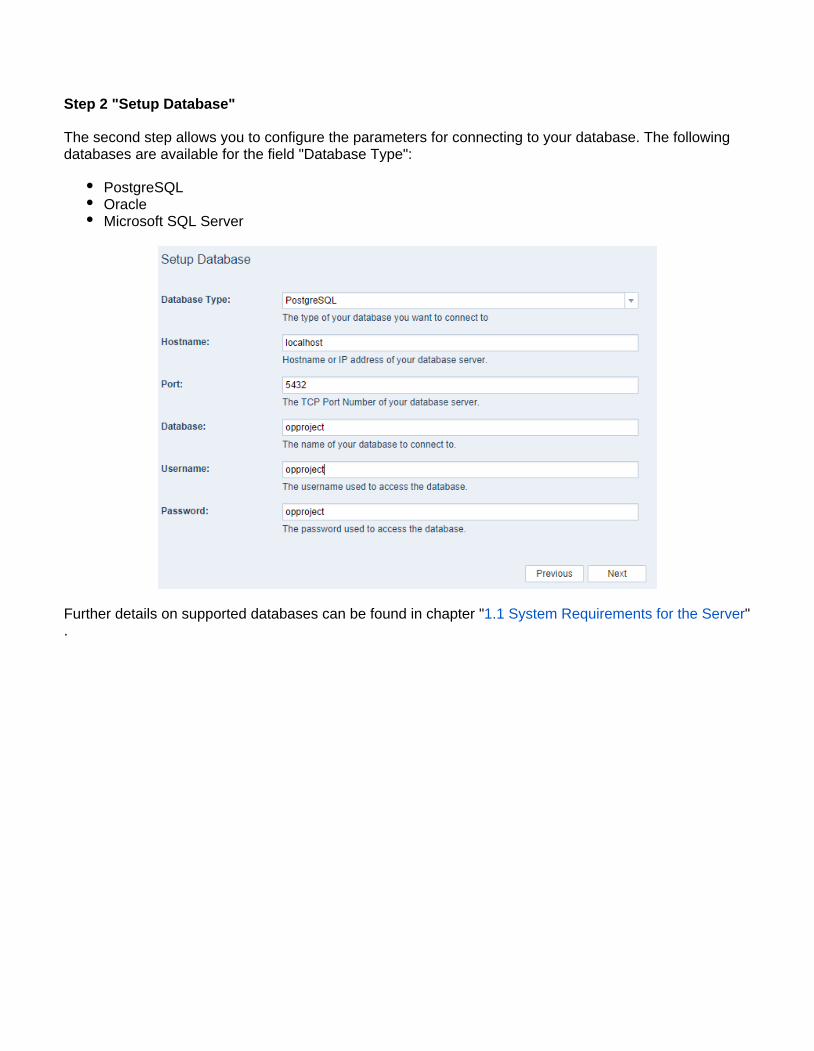
Step 2 "Setup Database"
The second step allows you to configure the parameters for connecting to your database. The following databases are available for the field "Database Type":
PostgreSQLOracleMicrosoft SQL Server
Further details on supported databases can be found in chapter " "1.1 System Requirements for the Server.
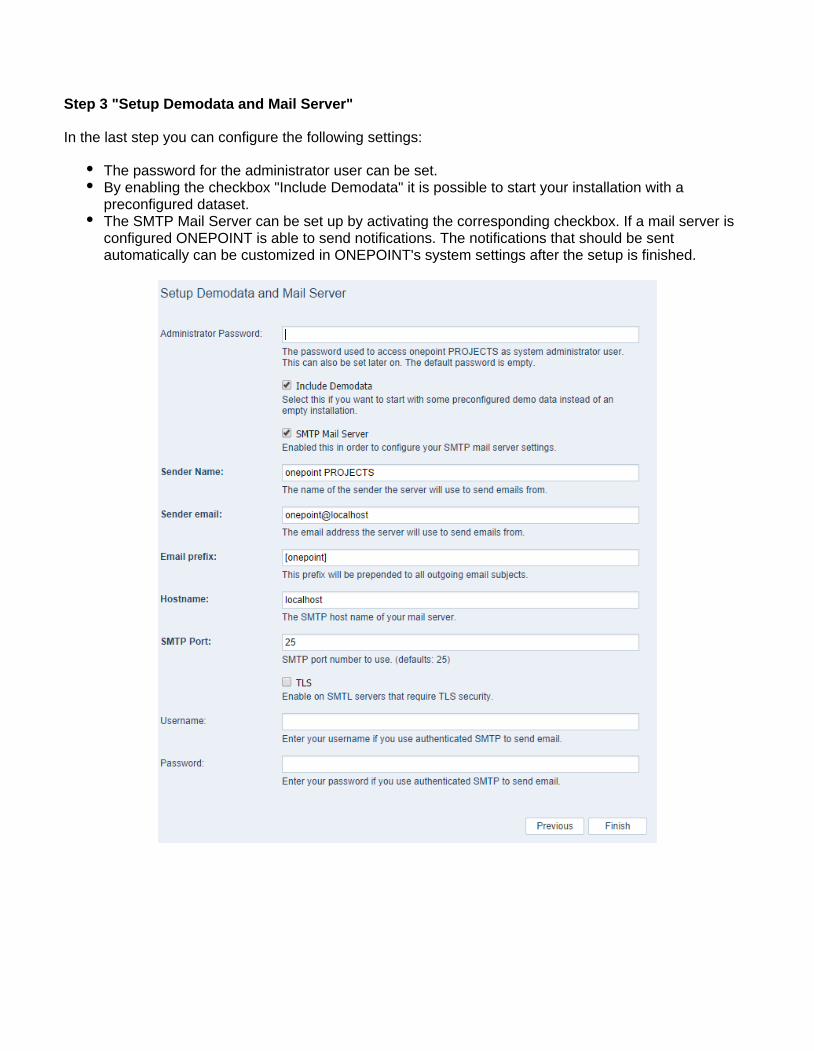
Step 3 "Setup Demodata and Mail Server"
In the last step you can configure the following settings:
The password for the administrator user can be set.By enabling the checkbox "Include Demodata" it is possible to start your installation with a preconfigured dataset.The SMTP Mail Server can be set up by activating the corresponding checkbox. If a mail server is configured ONEPOINT is able to send notifications. The notifications that should be sent automatically can be customized in ONEPOINT's system settings after the setup is finished.
1. 2. 3.
4.
5.
6.
5.1.2. Manual Installation
Preparing the Folder "onepoint" for configuration files and more
Before proceeding please make sure that Tomcat was stopped, then:
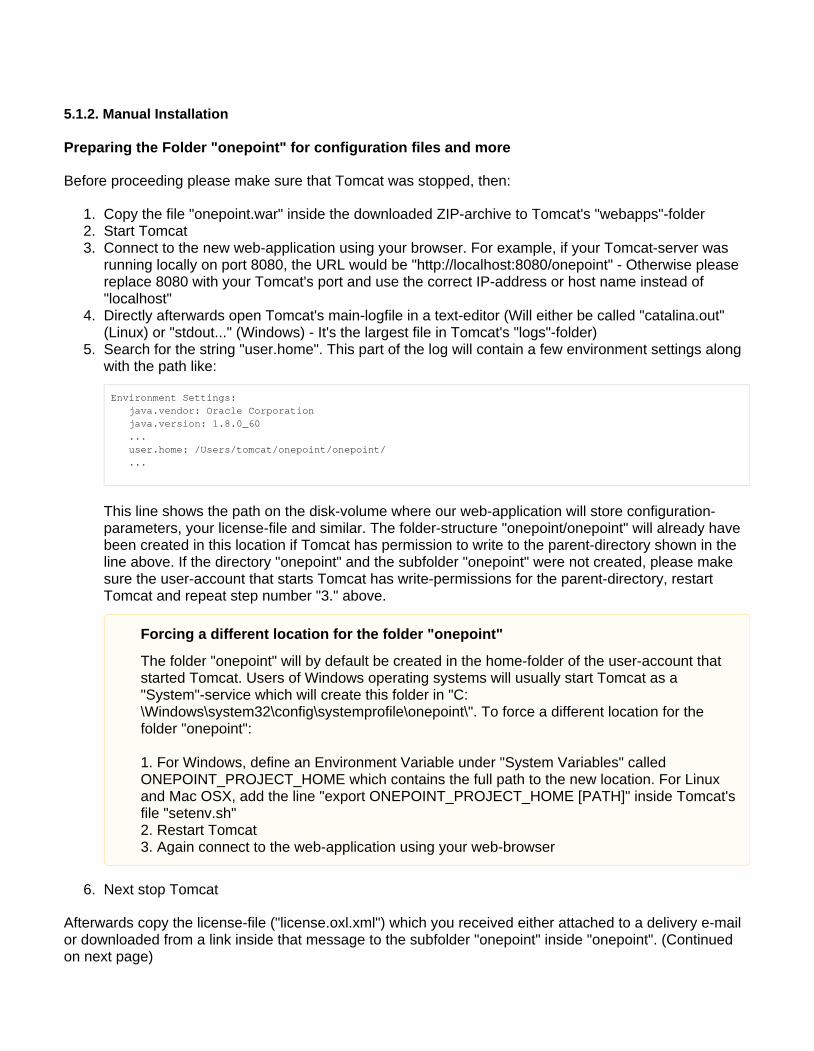
Copy the file "onepoint.war" inside the downloaded ZIP-archive to Tomcat's "webapps"-folderStart TomcatConnect to the new web-application using your browser. For example, if your Tomcat-server was running locally on port 8080, the URL would be "http://localhost:8080/onepoint" - Otherwise please replace 8080 with your Tomcat's port and use the correct IP-address or host name instead of "localhost"Directly afterwards open Tomcat's main-logfile in a text-editor (Will either be called "catalina.out" (Linux) or "stdout..." (Windows) - It's the largest file in Tomcat's "logs"-folder)Search for the string "user.home". This part of the log will contain a few environment settings along with the path like:
Environment Settings: java.vendor: Oracle Corporation java.version: 1.8.0_60 ... user.home: /Users/tomcat/onepoint/onepoint/ ...
This line shows the path on the disk-volume where our web-application will store configuration-parameters, your license-file and similar. The folder-structure "onepoint/onepoint" will already have been created in this location if Tomcat has permission to write to the parent-directory shown in the line above. If the directory "onepoint" and the subfolder "onepoint" were not created, please make sure the user-account that starts Tomcat has write-permissions for the parent-directory, restart Tomcat and repeat step number "3." above.
Next stop Tomcat
Afterwards copy the license-file ("license.oxl.xml") which you received either attached to a delivery e-mail or downloaded from a link inside that message to the subfolder "onepoint" inside "onepoint". (Continued on next page)
Forcing a different location for the folder "onepoint"
The folder "onepoint" will by default be created in the home-folder of the user-account that started Tomcat. Users of Windows operating systems will usually start Tomcat as a "System"-service which will create this folder in "C:
To force a different location for the \Windows\system32\config\systemprofile\onepoint\". folder "onepoint":
1. For Windows, define an Environment Variable under "System Variables" called ONEPOINT_PROJECT_HOME which contains the full path to the new location. For Linux and Mac OSX, add the line "export ONEPOINT_PROJECT_HOME [PATH]" inside Tomcat's file "setenv.sh"2. Restart Tomcat3. Again connect to the web-application using your web-browser
Preparing the Configuration File
Inside the downloaded "ONEPOINT Projects" zip-archive you will find a folder "dbconfigs", containing three subfolders "postgresql", "mssql" and "oracle". Each one of these contains a configuration file called "configuration.oxc.xml".
Please pick the one according to the database-type you are using and copy it to the subfolder "onepoint" inside "onepoint" (Where you copied the license-file to).
If you were using default-values during database-installation and when preparing the database ilke described in the chapter "Database Setup", then the configuration-file should work right out of the box for your server.
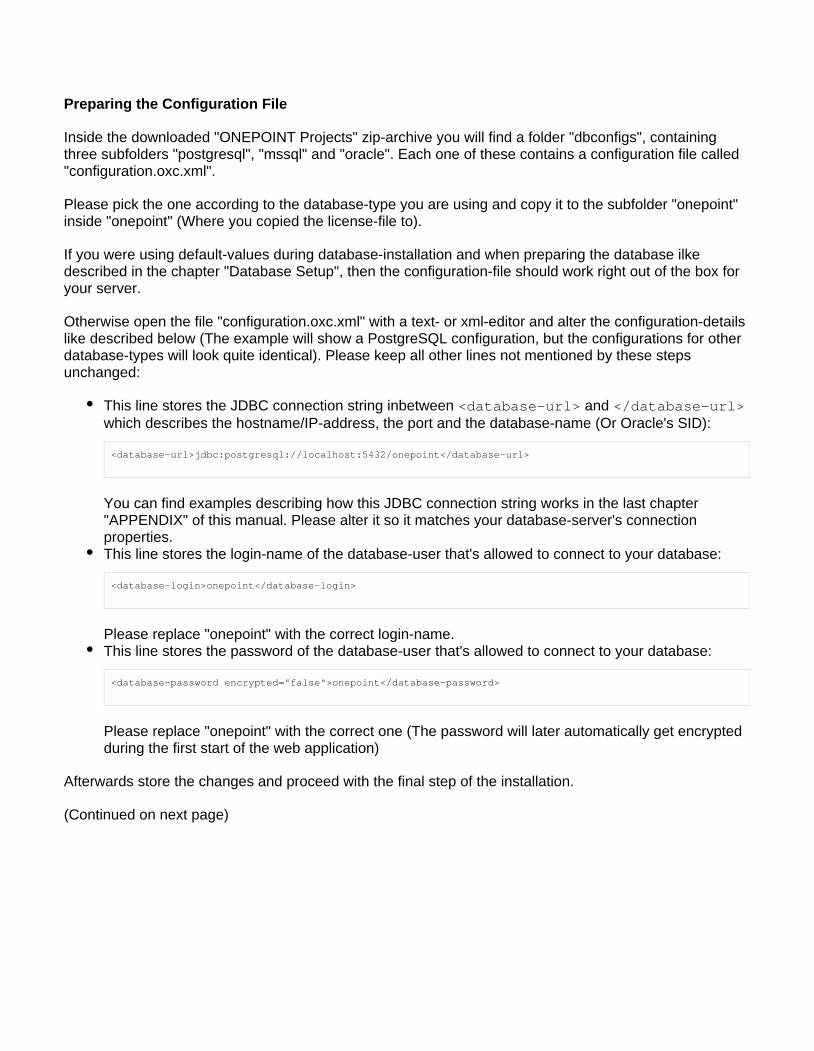
Otherwise open the file "configuration.oxc.xml" with a text- or xml-editor and alter the configuration-details like described below (The example will show a PostgreSQL configuration, but the configurations for other database-types will look quite identical). Please keep all other lines not mentioned by these steps unchanged:
This line stores the JDBC connection string inbetween and <database-url> </database-url>which describes the hostname/IP-address, the port and the database-name (Or Oracle's SID):
<database-url>jdbc:postgresql://localhost:5432/onepoint</database-url>
You can find examples describing how this JDBC connection string works in the last chapter "APPENDIX" of this manual. Please alter it so it matches your database-server's connection properties.This line stores the login-name of the database-user that's allowed to connect to your database:
<database-login>onepoint</database-login>
Please replace "onepoint" with the correct login-name.This line stores the password of the database-user that's allowed to connect to your database:
<database-password encrypted="false">onepoint</database-password>
Please replace "onepoint" with the correct one (The password will later automatically get encrypted during the first start of the web application)
Afterwards store the changes and proceed with the final step of the installation.
(Continued on next page)
1. 2.
1. 2. 3.
4.
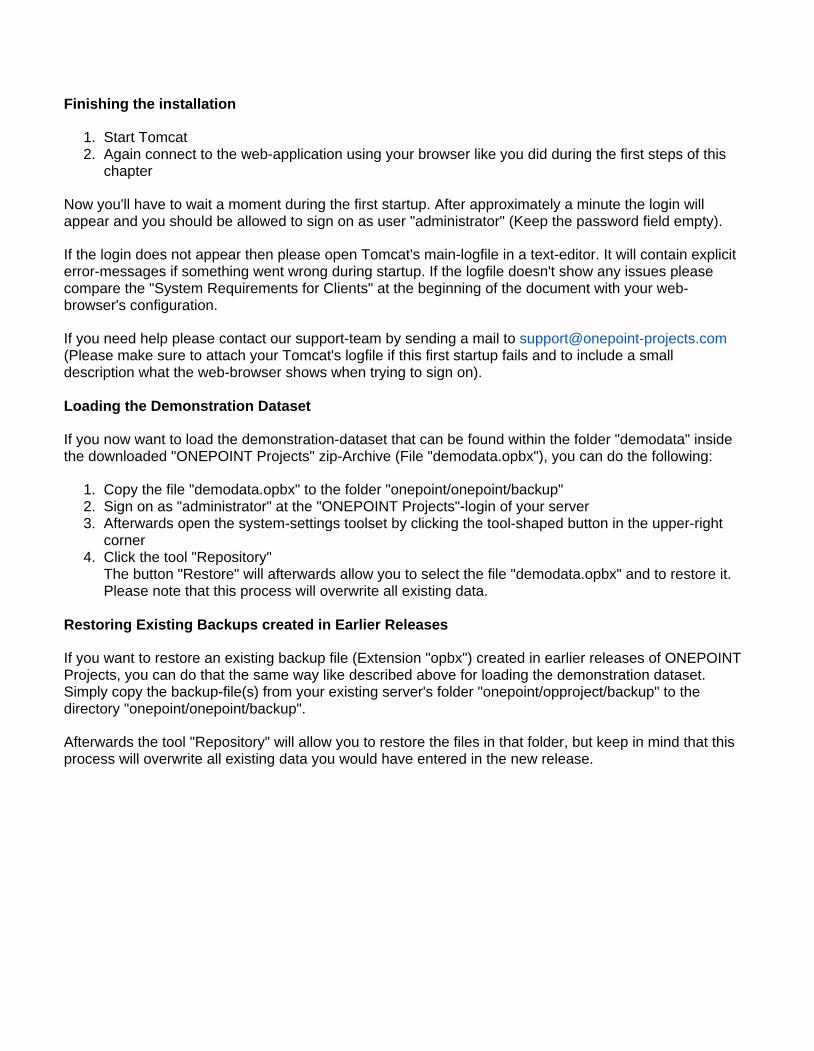
Finishing the installation
Start TomcatAgain connect to the web-application using your browser like you did during the first steps of this chapter
Now you'll have to wait a moment during the first startup. After approximately a minute the login will appear and you should be allowed to sign on as user "administrator" (Keep the password field empty).
If the login does not appear then please open Tomcat's main-logfile in a text-editor. It will contain explicit error-messages if something went wrong during startup. If the logfile doesn't show any issues please compare the "System Requirements for Clients" at the beginning of the document with your web-browser's configuration.
If you need help please contact our support-team by sending a mail to [email protected](Please make sure to attach your Tomcat's logfile if this first startup fails and to include a small description what the web-browser shows when trying to sign on).
Loading the Demonstration Dataset
If you now want to load the demonstration-dataset that can be found within the folder "demodata" inside the downloaded "ONEPOINT Projects" zip-Archive (File "demodata.opbx"), you can do the following:
Copy the file "demodata.opbx" to the folder "onepoint/onepoint/backup"Sign on as "administrator" at the "ONEPOINT Projects"-login of your serverAfterwards open the system-settings toolset by clicking the tool-shaped button in the upper-right cornerClick the tool "Repository"The button "Restore" will afterwards allow you to select the file "demodata.opbx" and to restore it. Please note that this process will overwrite all existing data.
Restoring Existing Backups created in Earlier Releases
If you want to restore an existing backup file (Extension "opbx") created in earlier releases of ONEPOINT Projects, you can do that the same way like described above for loading the demonstration dataset. Simply copy the backup-file(s) from your existing server's folder "onepoint/opproject/backup" to the directory "onepoint/onepoint/backup".
Afterwards the tool "Repository" will allow you to restore the files in that folder, but keep in mind that this process will overwrite all existing data you would have entered in the new release.
1. 2.
3.
4. 5. 6. 7. 8.
9. 10.
5.2. ONEPOINT Projects - Upgrade
The upgrade-process will be different, depending on which release of the ONEPOINT Projects web-application you are currently using. To find out which version is currently installed please sign on to your ONEPOINT Projects-server and click the question-mark shaped button in the upper right corner to open the "About ONEPOINT Projects"-dialog. This dialog will show the exact software-version including the software's build-date.
5.2.1. Upgrading from ONEPOINT Projects 18.0.1.1 or earlier to Release 19 or later
Stop the Tomcat application serverCreate a backup of the database
Delete the existing file and the deployed folder inside the "onepoint.war" "onepoint"directory of the Tomcat-installation"webapps"Delete all files in Tomcat's -folder"temp"Download a version of release 18.0.2 or 18.0.3Copy the new file into the directory of your Tomcat-server"onepoint.war" "webapps"Start Tomcat and connect with your web-browser as usualNow it can take a few minutes until the login appears, as at this point, the database schema will be updatedAfterwards stop the Tomcat application serverRepeat steps 2-8, but with the " "-file of release 19 or later insteadonepoint.war
If the login does not appear then please open Tomcat's main-logfile in a text-editor (This logfile will either be called "catalina.out" or "stdout..." - It's the largest file in Tomcat's "logs"-folder). It will contain explicit error-messages if something went wrong during startup. If the logfile doesn't show any errors please compare the "System Requirements for Clients" at the beginning of the document with your web-browser's configuration.
If you need help please contact our support-team by sending a mail to [email protected](Please make sure to attach your Tomcat's logfile if this first startup fails and to include a small description what the web-browser shows when trying to sign on).
Database Backup
Please make sure to have created a full backup of the database before proceeding with the upgrade-process. The fastest and safest way to do this will be to use your database-server's toolset:
PostgreSQL: Tool "pg_dump"Oracle: Tools "exp" or "expdp"MS SQL Server: Application "SQL Server Management Studio"
1. 2.
3.
4. 5. 6.
7.
5.2.2. Upgrading from ONEPOINT Projects 11.0, 12.0, 13.0 or later
Stop the Tomcat application serverCreate a backup of the database
Delete the existing file and the deployed folder inside the "onepoint.war" "onepoint"directory of the Tomcat-installation"webapps"Delete all files in Tomcat's -folder"temp"Copy the new file into the directory of your Tomcat-server"onepoint.war" "webapps"If you are updating from release 11.x or earlier to 12.0 or later, you will already have received an updated license-file from our support-team ("license.oxl.xml") - Please replace the existing license-file in the folder "Onepoint Project Home/onepoint" with the new one (Not required when installing an update or hotfix for release 12.0 or later).Start Tomcat and connect with your web-browser as usual
After the last step it can take a few minutes until the login appears (At this point, the database schema will be updated)
If the login does not appear then please open Tomcat's main-logfile in a text-editor (This logfile will either be called "catalina.out" or "stdout..." - It's the largest file in Tomcat's "logs"-folder). It will contain explicit error-messages if something went wrong during startup. If the logfile doesn't show any errors please compare the "System Requirements for Clients" at the beginning of the document with your web-browser's configuration.
If you need help please contact our support-team by sending a mail to [email protected](Please make sure to attach your Tomcat's logfile if this first startup fails and to include a small description what the web-browser shows when trying to sign on).
Database Backup
Please make sure to have created a full backup of the database before proceeding with the upgrade-process. The fastest and safest way to do this will be to use your database-server's toolset:
PostgreSQL: Tool "pg_dump"Oracle: Tools "exp" or "expdp"MS SQL Server: Application "SQL Server Management Studio"
1. 2.
3.
4.
5.
6.
7.
8.
9.
10. 11.
5.2.3. Upgrading from ONEPOINT Projects Server 10.x to 12.0 or later
Stop the Tomcat application serverCreate a backup of your existing "ONEPOINT Projects"-server's database
Next check if your system meets the updated system-requirements for release 11.0. If your database, Java or the Tomcat application-server need to be updated, too, then these changes should be applied nowMove the files and the folder out of Tomcat's "opproject.war" "opproject" "webapps"directory or delete themCopy the file from within the downloaded release 11.0 software-distribution into "onepoint.war"Tomcat's "webapps"-folderRename the subfolder inside the directory to "opproject" "Onepoint Project Home" "onep
(So the folder-structure will afterwards be )oint" "Onepoint Project Home/onepoint"If you want to keep a copy of your existing release 10.x license-file (Can be found in the location "O
), then please make sure to either nepoint Project Home/onepoint/license.oxl.xml"rename it now or to move it out of this folderAfterwards copy the new license-file required for release 11.0 (File which "license.oxl.xml"you will have received either attached to the release 11.0 delivery e-mail or downloaded from a link inside that message) to the subfolder inside the directory "onepoint" "Onepoint Project
.Home"Empty Tomcat's and -folders (This is only temporary data - Everything in these "temp" "work"two folders will be safe to delete, including subfolders)Start TomcatNext connect with your web-browser as usual, but in the URL replace with "opproject" "onepoint"(For example: You would use instead of http://localhost:8080/onepoint/service http:
) //localhost:8080/opproject/service
After the last step it can take a few minutes until the login appears (At this point, the database schema will be updated)
If the login does not appear then please open Tomcat's main-logfile in a text-editor (This logfile will either be called "catalina.out" or "stdout..." - It's the largest file in Tomcat's "logs"-folder). It will contain explicit error-messages if something went wrong during startup. If the logfile doesn't show any errors please compare the "System Requirements for Clients" at the beginning of the document with your web-browser's configuration.
If you need help please contact our support-team by sending a mail to [email protected](Please make sure to attach your Tomcat's logfile if this first startup fails and to include a small description what the web-browser shows when trying to sign on).
Database Backup
A database-downgrade won't be possible after this new release was deployed. So please make sure to have created a full backup of the database before proceeding with the upgrade-process. The fastest and safest way to do this will be to use your database-server's toolset:
PostgreSQL: Tool "pg_dump"Oracle: Tools "exp" or "expdp"MS SQL Server: Application "SQL Server Management Studio"

6. ONEPOINT Projects - Configuration
When starting the software for the first time, all database connection parameters are stored in a file called . It can be found in your The " ""configuration.oxc.xml" "onepoint/onepoint" folder. onepoint
folder was previously also named " ", in case there is no " " folder Onepoint Project Home onepointon your system. This chapter sums up how to configure or add other configuration options in this file.
If you make changes to this file which are not allowed or will not work, then Tomcat's logfiles ("stdout" for Windows or "catalina.out" for Linux/Unix) and the log file of ONEPOINT Projects in "onepoint/onepoint
will give a hint on what went wrong./logs"
This is an example how the configuration file will initially look like:
<?xml version="1.0" encoding="UTF-8"?><configuration> <database name="Default"> <database-type>PostgreSQL</database-type> <database-driver>org.postgresql.Driver</database-driver> <database-url>jdbc:postgresql://localhost:5432/onepoint</database-url> <database-login>onepoint</database-login> <database-password encrypted="true">dGNlam9ycHBvZXJlbmltZWVhcnA=</database-password> </database></configuration>
Everything between and describes your working <database name="Default"> </database>database connection and should remain unchanged.
To add other configuration options to this file which are not automatically written to it, please open it with a texteditor or xml editor and insert the additional settings between the closing and </database> <
entries. For example:/configuration>
</database> <smtp-server>192.168.1.10</smtp-server> <max-attachment-size>40</max-attachment-size></configuration>
6.1. Enabling the Notification System
<smtp-from>ONEPOINT Projects</smtp-from> <smtp-from-email>onepoint@localhost</smtp-from-email> <smtp-prefix>[ONEPOINT]</smtp-prefix> <smtp-server>localhost</smtp-server> <smtp-port>25</smtp-port> <smtp-tls>true</smtp-tls> <smtp-username>test-user</smtp-username> <smtp-password encrypted="false">pass</smtp-password>
If the SMTP-Server is running on a different system, please replace "localhost" with the hostname or IP of your SMTP Server and save the file. After restarting Tomcat, the notification system will be enabled (Of course, you will need to enter E-mail addresses for all your user-accounts in the "Users" tool - and afterwards enable the needed notifications in the "Notifications"-tool inside the ONEPOINT Projects user-interface)
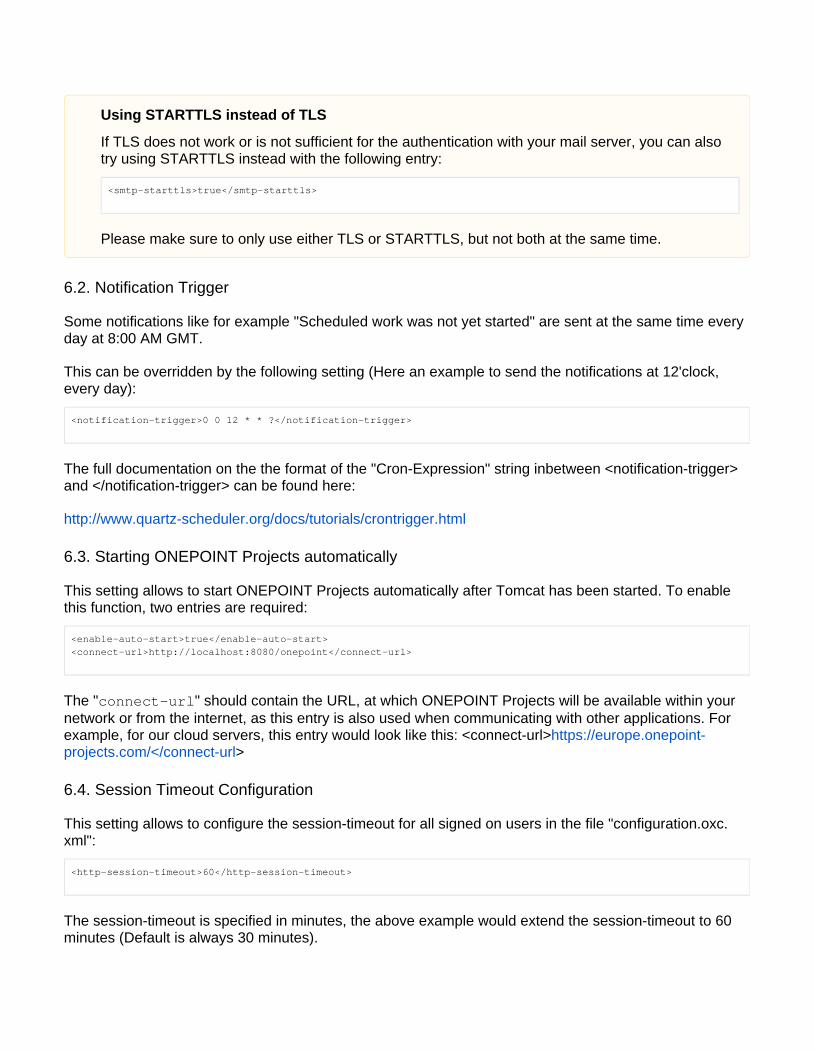
6.2. Notification Trigger
Some notifications like for example "Scheduled work was not yet started" are sent at the same time every day at 8:00 AM GMT.
This can be overridden by the following setting (Here an example to send the notifications at 12'clock, every day):
<notification-trigger>0 0 12 * * ?</notification-trigger>
The full documentation on the the format of the "Cron-Expression" string inbetween <notification-trigger> and </notification-trigger> can be found here:
http://www.quartz-scheduler.org/docs/tutorials/crontrigger.html
6.3. Starting ONEPOINT Projects automatically
This setting allows to start ONEPOINT Projects automatically after Tomcat has been started. To enable this function, two entries are required:
<enable-auto-start>true</enable-auto-start><connect-url>http://localhost:8080/onepoint</connect-url>
The " " should contain the URL, at which ONEPOINT Projects will be available within your connect-urlnetwork or from the internet, as this entry is also used when communicating with other applications. For example, for our cloud servers, this entry would look like this: <connect-url>https://europe.onepoint-
>projects.com/</connect-url
6.4. Session Timeout Configuration
This setting allows to configure the session-timeout for all signed on users in the file "configuration.oxc.xml":
<http-session-timeout>60</http-session-timeout>
The session-timeout is specified in minutes, the above example would extend the session-timeout to 60 minutes (Default is always 30 minutes).
Using STARTTLS instead of TLS
If TLS does not work or is not sufficient for the authentication with your mail server, you can also try using STARTTLS instead with the following entry:
<smtp-starttls>true</smtp-starttls>
Please make sure to only use either TLS or STARTTLS, but not both at the same time.
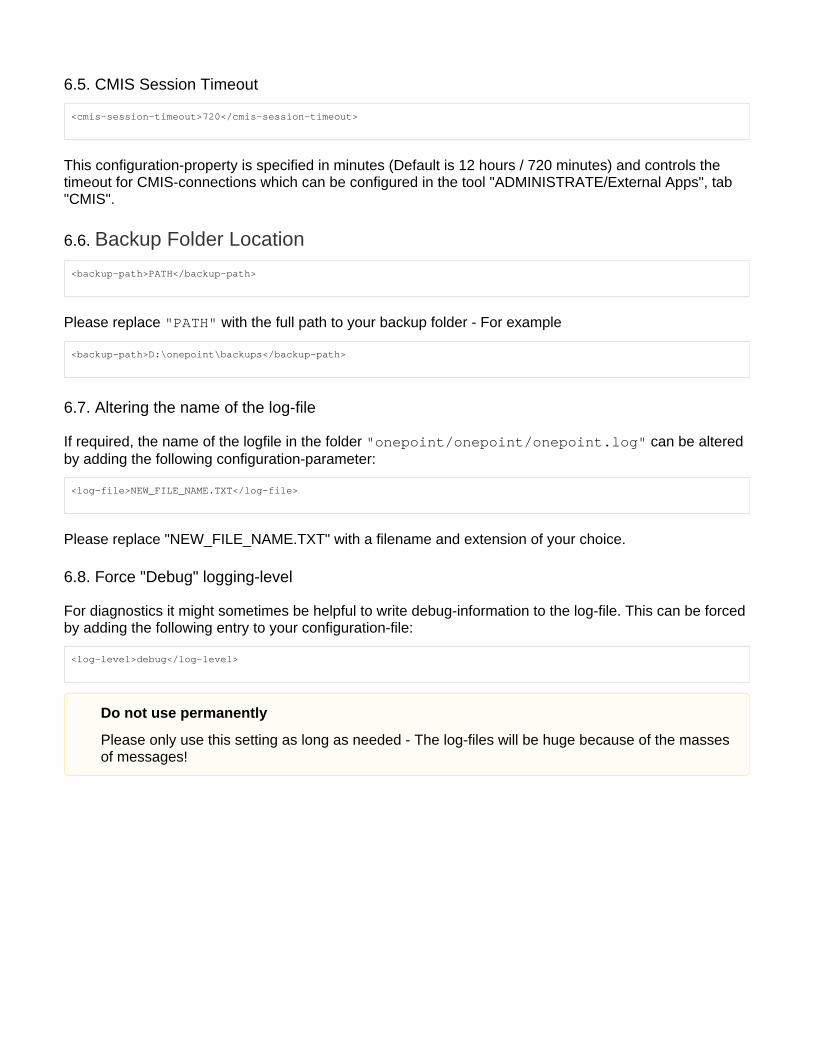
6.5. CMIS Session Timeout
<cmis-session-timeout>720</cmis-session-timeout>
This configuration-property is specified in minutes (Default is 12 hours / 720 minutes) and controls the timeout for CMIS-connections which can be configured in the tool "ADMINISTRATE/External Apps", tab "CMIS".
6.6. Backup Folder Location
<backup-path>PATH</backup-path>
Please replace with the full path to your backup folder - For example"PATH"
<backup-path>D:\onepoint\backups</backup-path>
6.7. Altering the name of the log-file
If required, the name of the logfile in the folder can be altered "onepoint/onepoint/onepoint.log"by adding the following configuration-parameter:
<log-file>NEW_FILE_NAME.TXT</log-file>
Please replace "NEW_FILE_NAME.TXT" with a filename and extension of your choice.
6.8. Force "Debug" logging-level
For diagnostics it might sometimes be helpful to write debug-information to the log-file. This can be forced by adding the following entry to your configuration-file:
<log-level>debug</log-level>
Do not use permanently
Please only use this setting as long as needed - The log-files will be huge because of the masses of messages!
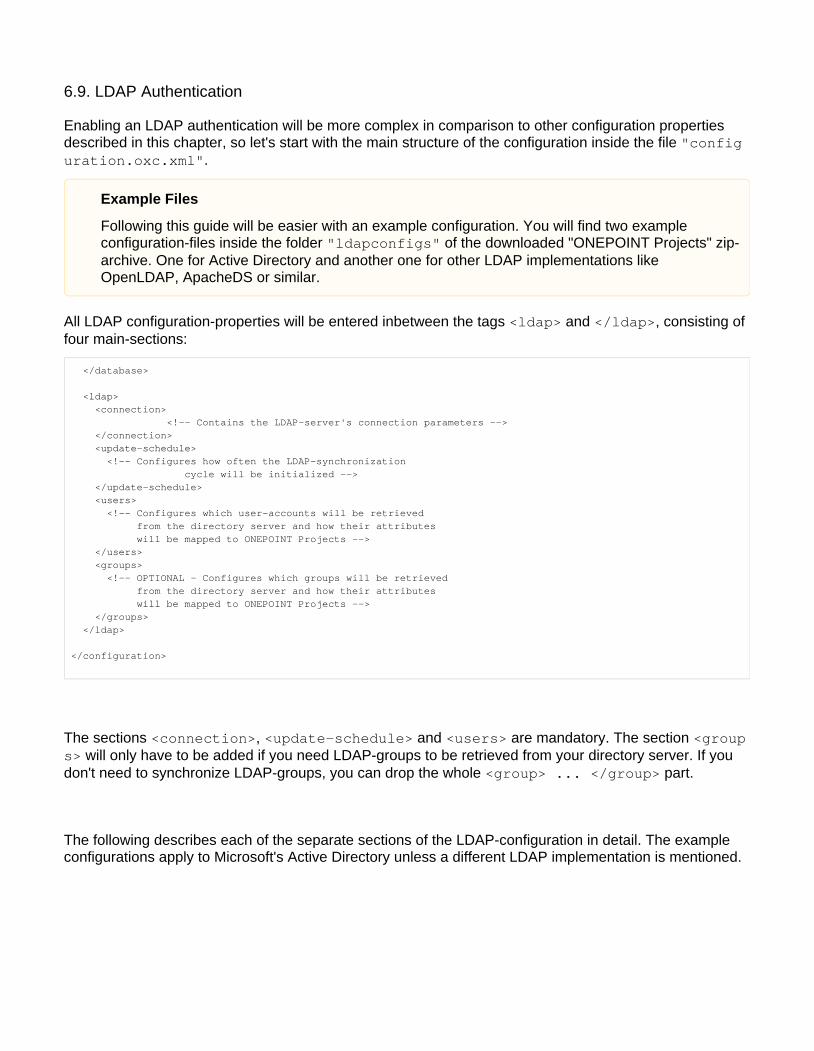
6.9. LDAP Authentication
Enabling an LDAP authentication will be more complex in comparison to other configuration properties described in this chapter, so let's start with the main structure of the configuration inside the file "config
. uration.oxc.xml"
All LDAP configuration-properties will be entered inbetween the tags and , consisting of <ldap> </ldap>four main-sections:
</database>
<ldap> <connection> <!-- Contains the LDAP-server's connection parameters --> </connection> <update-schedule> <!-- Configures how often the LDAP-synchronization cycle will be initialized --> </update-schedule> <users> <!-- Configures which user-accounts will be retrieved from the directory server and how their attributes will be mapped to ONEPOINT Projects --> </users> <groups> <!-- OPTIONAL - Configures which groups will be retrieved from the directory server and how their attributes will be mapped to ONEPOINT Projects --> </groups> </ldap>
</configuration>
The sections , and are mandatory. The section <connection> <update-schedule> <users> <group will only have to be added if you need LDAP-groups to be retrieved from your directory server. If you s>
don't need to synchronize LDAP-groups, you can drop the whole part.<group> ... </group>
The following describes each of the separate sections of the LDAP-configuration in detail. The example configurations apply to Microsoft's Active Directory unless a different LDAP implementation is mentioned.
Example Files
Following this guide will be easier with an example configuration. You will find two example configuration-files inside the folder of the downloaded "ONEPOINT Projects" zip-"ldapconfigs"archive. One for Active Directory and another one for other LDAP implementations like OpenLDAP, ApacheDS or similar.
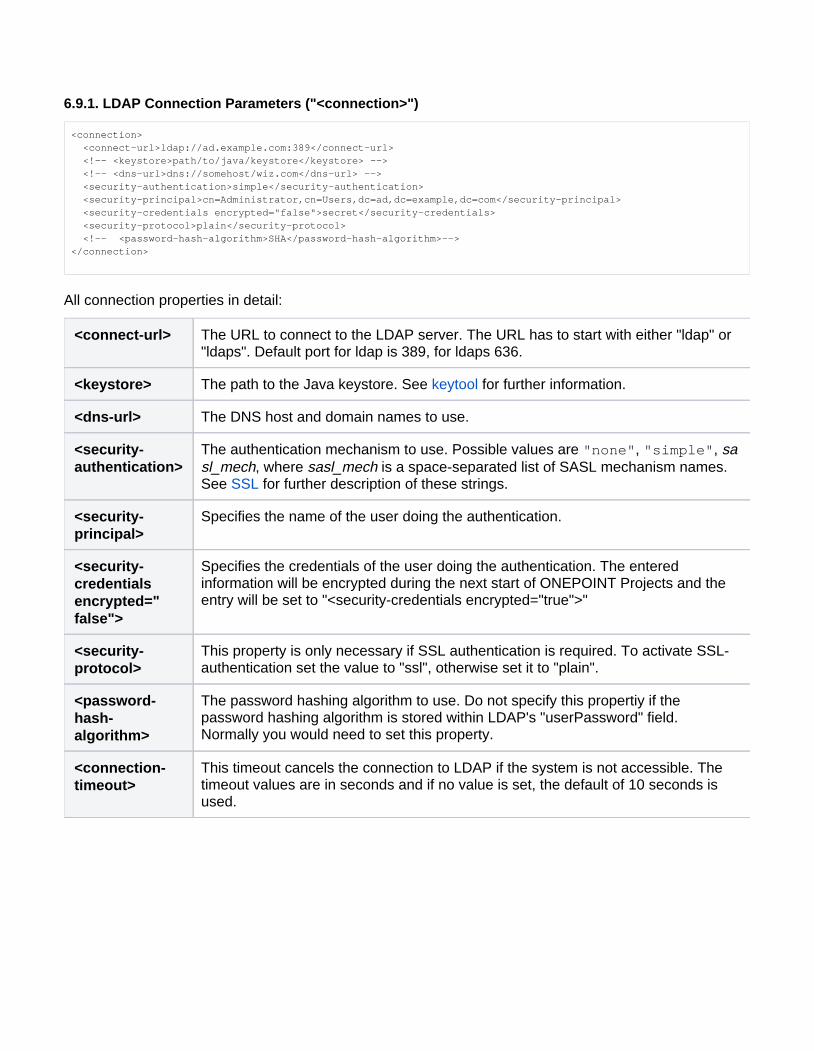
6.9.1. LDAP Connection Parameters ("<connection>")
<connection> <connect-url>ldap://ad.example.com:389</connect-url> <!-- <keystore>path/to/java/keystore</keystore> --> <!-- <dns-url>dns://somehost/wiz.com</dns-url> --> <security-authentication>simple</security-authentication> <security-principal>cn=Administrator,cn=Users,dc=ad,dc=example,dc=com</security-principal> <security-credentials encrypted="false">secret</security-credentials> <security-protocol>plain</security-protocol> <!-- <password-hash-algorithm>SHA</password-hash-algorithm>--></connection>
All connection properties in detail:
<connect-url> The URL to connect to the LDAP server. The URL has to start with either "ldap" or "ldaps". Default port for ldap is 389, for ldaps 636.
<keystore> The path to the Java keystore. See for further information.keytool
<dns-url> The DNS host and domain names to use.
<security-authentication>
The authentication mechanism to use. Possible values are , , "none" "simple" sa, where is a space-separated list of SASL mechanism names. sl_mech sasl_mech
See for further description of these strings.SSL
<security-principal>
Specifies the name of the user doing the authentication.
<security-credentials encrypted="false">
Specifies the credentials of the user doing the authentication. The entered information will be encrypted during the next start of ONEPOINT Projects and the entry will be set to "<security-credentials encrypted="true">"
<security-protocol>
This property is only necessary if SSL authentication is required. To activate SSL-authentication set the value to "ssl", otherwise set it to "plain".
<password-hash-algorithm>
The password hashing algorithm to use. Do not specify this propertiy if the password hashing algorithm is stored within LDAP's "userPassword" field. Normally you would need to set this property.
<connection-timeout>
This timeout cancels the connection to LDAP if the system is not accessible. The timeout values are in seconds and if no value is set, the default of 10 seconds is used.
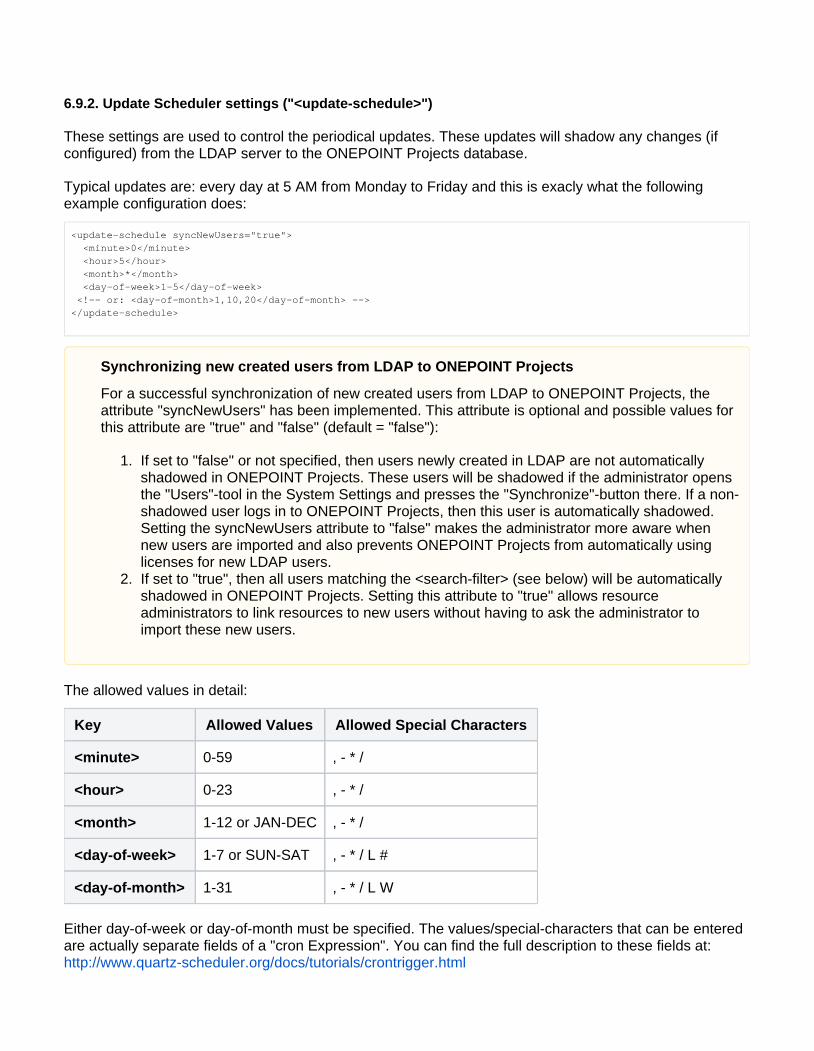
6.9.2. Update Scheduler settings ("<update-schedule>")
These settings are used to control the periodical updates. These updates will shadow any changes (if configured) from the LDAP server to the ONEPOINT Projects database.
Typical updates are: every day at 5 AM from Monday to Friday and this is exacly what the following example configuration does:
<update-schedule syncNewUsers="true"> <minute>0</minute> <hour>5</hour> <month>*</month> <day-of-week>1-5</day-of-week> <!-- or: <day-of-month>1,10,20</day-of-month> --></update-schedule>
The allowed values in detail:
Key Allowed Values Allowed Special Characters
<minute> 0-59 , - * /
<hour> 0-23 , - * /
<month> 1-12 or JAN-DEC , - * /
<day-of-week> 1-7 or SUN-SAT , - * / L #
<day-of-month> 1-31 , - * / L W
Either day-of-week or day-of-month must be specified. The values/special-characters that can be entered are actually separate fields of a "cron Expression". You can find the full description to these fields at:http://www.quartz-scheduler.org/docs/tutorials/crontrigger.html
1.
2.
Synchronizing new created users from LDAP to ONEPOINT Projects
For a successful synchronization of new created users from LDAP to ONEPOINT Projects, the attribute "syncNewUsers" has been implemented. This attribute is optional and possible values for this attribute are "true" and "false" (default = "false"):
If set to "false" or not specified, then users newly created in LDAP are not automatically shadowed in ONEPOINT Projects. These users will be shadowed if the administrator opens the "Users"-tool in the System Settings and presses the "Synchronize"-button there. If a non-shadowed user logs in to ONEPOINT Projects, then this user is automatically shadowed. Setting the syncNewUsers attribute to "false" makes the administrator more aware when new users are imported and also prevents ONEPOINT Projects from automatically using licenses for new LDAP users.If set to "true", then all users matching the <search-filter> (see below) will be automatically shadowed in ONEPOINT Projects. Setting this attribute to "true" allows resource administrators to link resources to new users without having to ask the administrator to import these new users.
1. 2. 3.
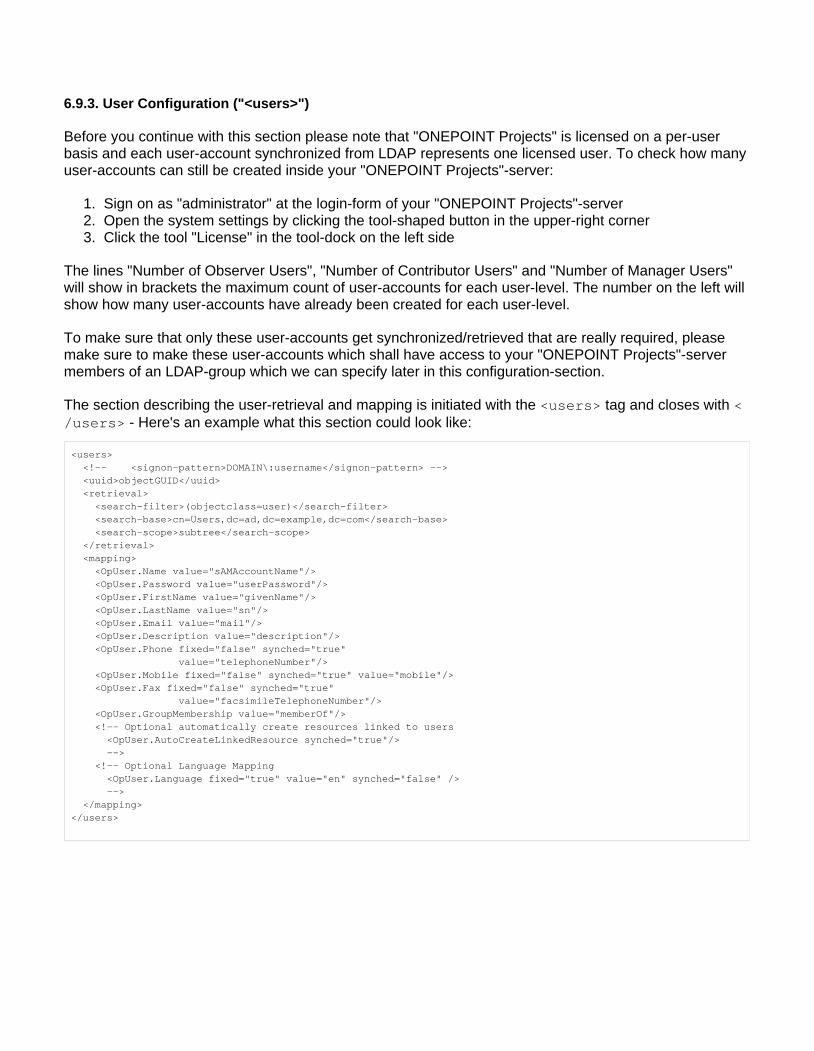
6.9.3. User Configuration ("<users>")
Before you continue with this section please note that "ONEPOINT Projects" is licensed on a per-user basis and each user-account synchronized from LDAP represents one licensed user. To check how many user-accounts can still be created inside your "ONEPOINT Projects"-server:
Sign on as "administrator" at the login-form of your "ONEPOINT Projects"-serverOpen the system settings by clicking the tool-shaped button in the upper-right cornerClick the tool "License" in the tool-dock on the left side
The lines "Number of Observer Users", "Number of Contributor Users" and "Number of Manager Users" will show in brackets the maximum count of user-accounts for each user-level. The number on the left will show how many user-accounts have already been created for each user-level.
To make sure that only these user-accounts get synchronized/retrieved that are really required, please make sure to make these user-accounts which shall have access to your "ONEPOINT Projects"-server members of an LDAP-group which we can specify later in this configuration-section.
The section describing the user-retrieval and mapping is initiated with the tag and closes with <users> < - Here's an example what this section could look like:/users>
<users> <!-- <signon-pattern>DOMAIN\:username</signon-pattern> --> <uuid>objectGUID</uuid> <retrieval> <search-filter>(objectclass=user)</search-filter> <search-base>cn=Users,dc=ad,dc=example,dc=com</search-base> <search-scope>subtree</search-scope> </retrieval> <mapping> <OpUser.Name value="sAMAccountName"/> <OpUser.Password value="userPassword"/> <OpUser.FirstName value="givenName"/> <OpUser.LastName value="sn"/> <OpUser.Email value="mail"/> <OpUser.Description value="description"/> <OpUser.Phone fixed="false" synched="true" value="telephoneNumber"/> <OpUser.Mobile fixed="false" synched="true" value="mobile"/> <OpUser.Fax fixed="false" synched="true" value="facsimileTelephoneNumber"/> <OpUser.GroupMembership value="memberOf"/> <!-- Optional automatically create resources linked to users <OpUser.AutoCreateLinkedResource synched="true"/> --> <!-- Optional Language Mapping <OpUser.Language fixed="true" value="en" synched="false" /> --> </mapping></users>
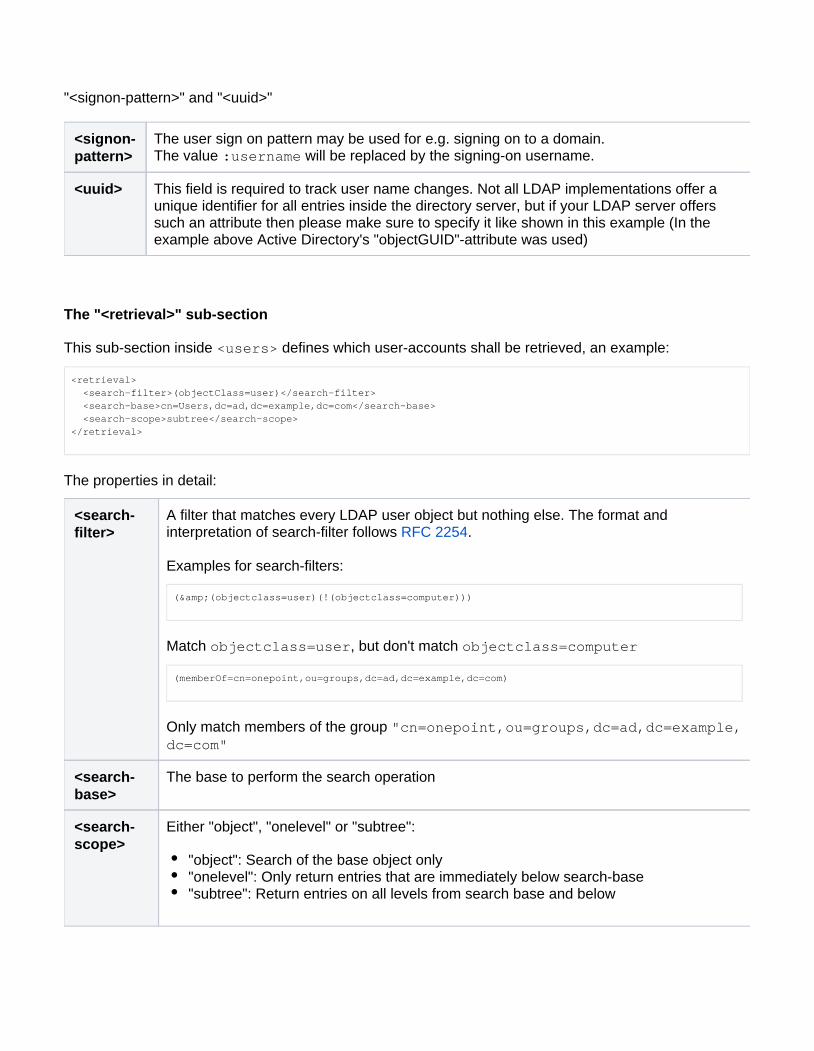
"<signon-pattern>" and "<uuid>"
<signon-pattern>
The user sign on pattern may be used for e.g. signing on to a domain. The value will be replaced by the signing-on username.:username
<uuid> This field is required to track user name changes. Not all LDAP implementations offer a unique identifier for all entries inside the directory server, but if your LDAP server offers such an attribute then please make sure to specify it like shown in this example (In the example above Active Directory's "objectGUID"-attribute was used)
The "<retrieval>" sub-section
This sub-section inside defines which user-accounts shall be retrieved, an example:<users>
<retrieval> <search-filter>(objectClass=user)</search-filter> <search-base>cn=Users,dc=ad,dc=example,dc=com</search-base> <search-scope>subtree</search-scope></retrieval>
The properties in detail:
<search-filter>
A filter that matches every LDAP user object but nothing else. The format and interpretation of search-filter follows . RFC 2254
Examples for search-filters:
(&(objectclass=user)(!(objectclass=computer)))
Match , but don't match objectclass=user objectclass=computer
(memberOf=cn=onepoint,ou=groups,dc=ad,dc=example,dc=com)
Only match members of the group "cn=onepoint,ou=groups,dc=ad,dc=example,dc=com"
<search-base>
The base to perform the search operation
<search-scope>
Either "object", "onelevel" or "subtree":
"object": Search of the base object only"onelevel": Only return entries that are immediately below search-base"subtree": Return entries on all levels from search base and below
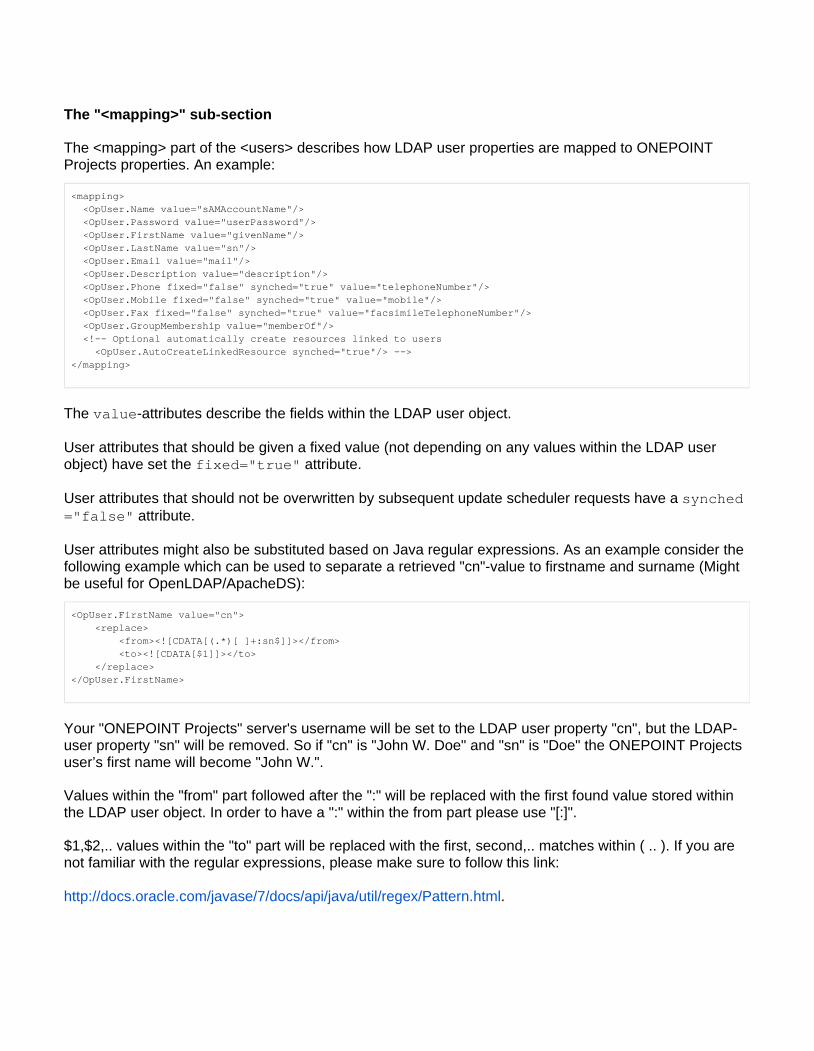
The "<mapping>" sub-section
The <mapping> part of the <users> describes how LDAP user properties are mapped to ONEPOINT Projects properties. An example:
<mapping> <OpUser.Name value="sAMAccountName"/> <OpUser.Password value="userPassword"/> <OpUser.FirstName value="givenName"/> <OpUser.LastName value="sn"/> <OpUser.Email value="mail"/> <OpUser.Description value="description"/> <OpUser.Phone fixed="false" synched="true" value="telephoneNumber"/> <OpUser.Mobile fixed="false" synched="true" value="mobile"/> <OpUser.Fax fixed="false" synched="true" value="facsimileTelephoneNumber"/> <OpUser.GroupMembership value="memberOf"/> <!-- Optional automatically create resources linked to users <OpUser.AutoCreateLinkedResource synched="true"/> --></mapping>
The -attributes describe the fields within the LDAP user object.value
User attributes that should be given a fixed value (not depending on any values within the LDAP user object) have set the attribute.fixed="true"
User attributes that should not be overwritten by subsequent update scheduler requests have a synched attribute.="false"
User attributes might also be substituted based on Java regular expressions. As an example consider the following example which can be used to separate a retrieved "cn"-value to firstname and surname (Might be useful for OpenLDAP/ApacheDS):
<OpUser.FirstName value="cn"> <replace> <from><![CDATA[(.*)[ ]+:sn$]]></from> <to><![CDATA[$1]]></to> </replace></OpUser.FirstName>
Your "ONEPOINT Projects" server's username will be set to the LDAP user property "cn", but the LDAP-user property "sn" will be removed. So if "cn" is "John W. Doe" and "sn" is "Doe" the ONEPOINT Projects user’s first name will become "John W.".
Values within the "from" part followed after the ":" will be replaced with the first found value stored within the LDAP user object. In order to have a ":" within the from part please use "[:]".
$1,$2,.. values within the "to" part will be replaced with the first, second,.. matches within ( .. ). If you are not familiar with the regular expressions, please make sure to follow this link:
http://docs.oracle.com/javase/7/docs/api/java/util/regex/Pattern.html.
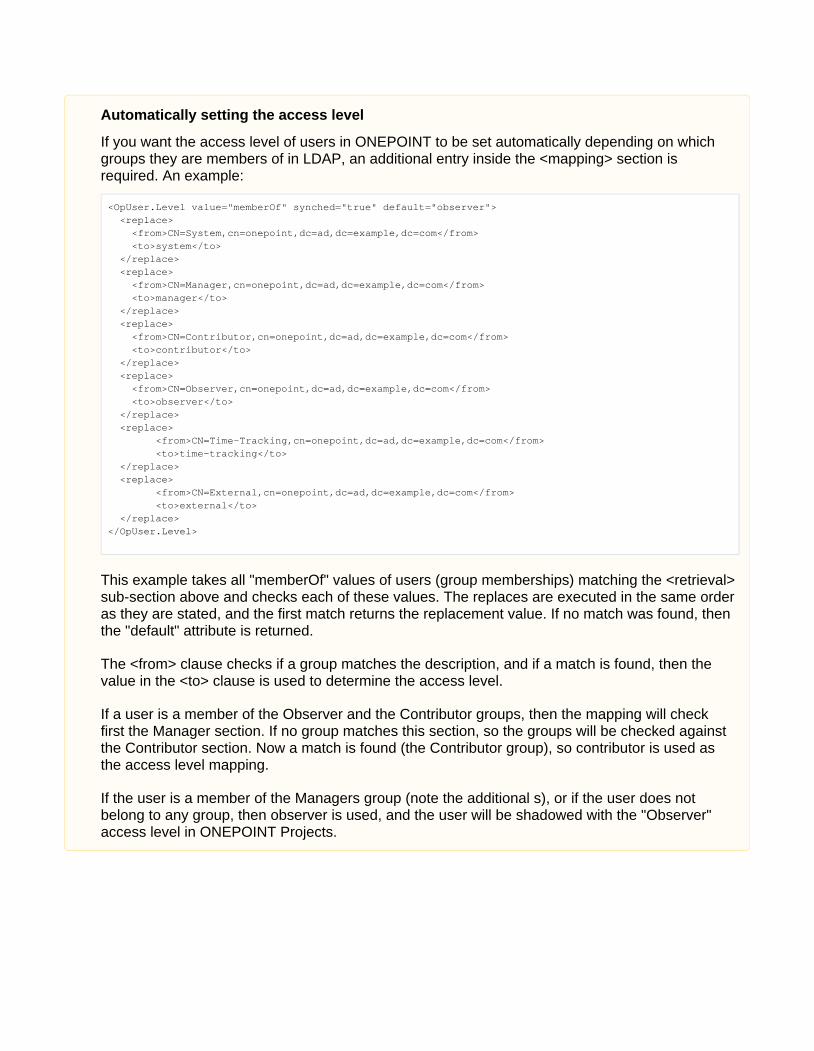
Automatically setting the access level
If you want the access level of users in ONEPOINT to be set automatically depending on which groups they are members of in LDAP, an additional entry inside the <mapping> section is required. An example:
<OpUser.Level value="memberOf" synched="true" default="observer"> <replace> <from>CN=System,cn=onepoint,dc=ad,dc=example,dc=com</from> <to>system</to> </replace> <replace> <from>CN=Manager,cn=onepoint,dc=ad,dc=example,dc=com</from> <to>manager</to> </replace> <replace> <from>CN=Contributor,cn=onepoint,dc=ad,dc=example,dc=com</from> <to>contributor</to> </replace> <replace> <from>CN=Observer,cn=onepoint,dc=ad,dc=example,dc=com</from> <to>observer</to> </replace> <replace> <from>CN=Time-Tracking,cn=onepoint,dc=ad,dc=example,dc=com</from> <to>time-tracking</to> </replace> <replace> <from>CN=External,cn=onepoint,dc=ad,dc=example,dc=com</from> <to>external</to> </replace></OpUser.Level>
This example takes all "memberOf" values of users (group memberships) matching the <retrieval> sub-section above and checks each of these values. The replaces are executed in the same order as they are stated, and the first match returns the replacement value. If no match was found, then the "default" attribute is returned.
The <from> clause checks if a group matches the description, and if a match is found, then the value in the <to> clause is used to determine the access level.
If a user is a member of the Observer and the Contributor groups, then the mapping will check first the Manager section. If no group matches this section, so the groups will be checked against the Contributor section. Now a match is found (the Contributor group), so contributor is used as the access level mapping.
If the user is a member of the Managers group (note the additional s), or if the user does not belong to any group, then observer is used, and the user will be shadowed with the "Observer" access level in ONEPOINT Projects.
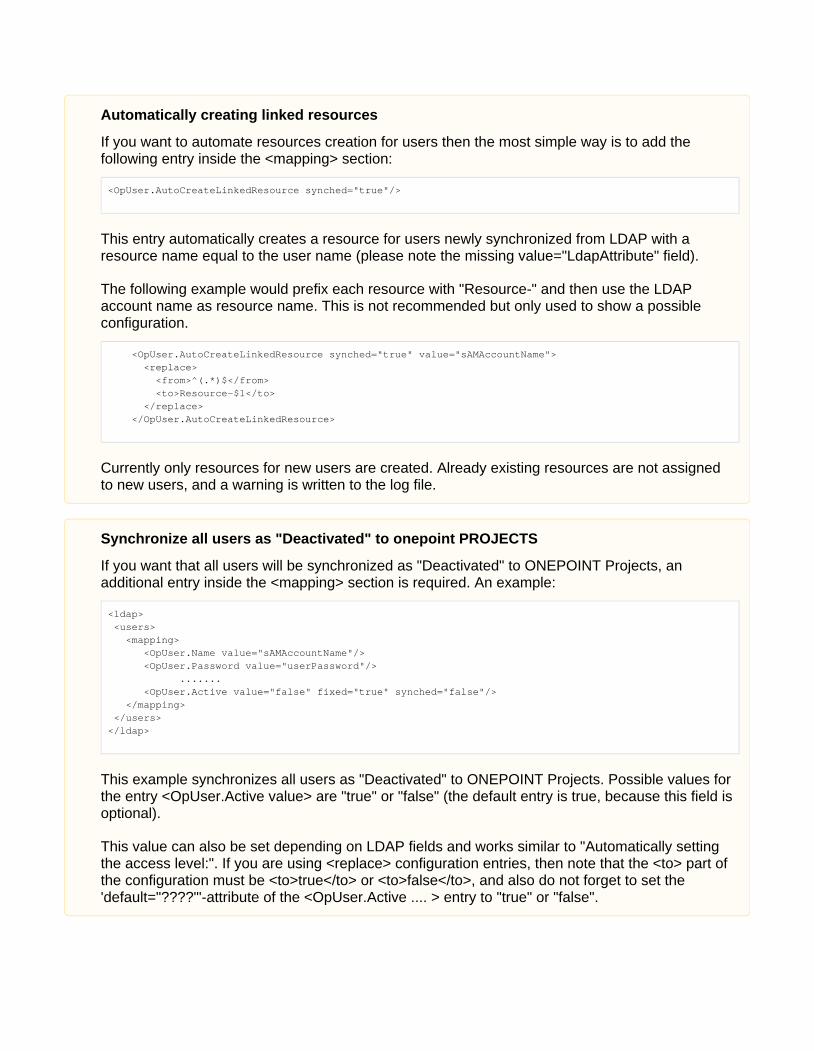
Automatically creating linked resources
If you want to automate resources creation for users then the most simple way is to add the following entry inside the <mapping> section:
<OpUser.AutoCreateLinkedResource synched="true"/>
This entry automatically creates a resource for users newly synchronized from LDAP with a resource name equal to the user name (please note the missing value="LdapAttribute" field).
The following example would prefix each resource with "Resource-" and then use the LDAP account name as resource name. This is not recommended but only used to show a possible configuration.
<OpUser.AutoCreateLinkedResource synched="true" value="sAMAccountName"> <replace> <from>^(.*)$</from> <to>Resource-$1</to> </replace> </OpUser.AutoCreateLinkedResource>
Currently only resources for new users are created. Already existing resources are not assigned to new users, and a warning is written to the log file.
Synchronize all users as "Deactivated" to onepoint PROJECTS
If you want that all users will be synchronized as "Deactivated" to ONEPOINT Projects, an additional entry inside the <mapping> section is required. An example:
<ldap> <users> <mapping> <OpUser.Name value="sAMAccountName"/> <OpUser.Password value="userPassword"/> ....... <OpUser.Active value="false" fixed="true" synched="false"/> </mapping> </users></ldap>
This example synchronizes all users as "Deactivated" to ONEPOINT Projects. Possible values for the entry <OpUser.Active value> are "true" or "false" (the default entry is true, because this field is optional).
This value can also be set depending on LDAP fields and works similar to "Automatically setting the access level:". If you are using <replace> configuration entries, then note that the <to> part of the configuration must be <to>true</to> or <to>false</to>, and also do not forget to set the 'default="????"'-attribute of the <OpUser.Active .... > entry to "true" or "false".
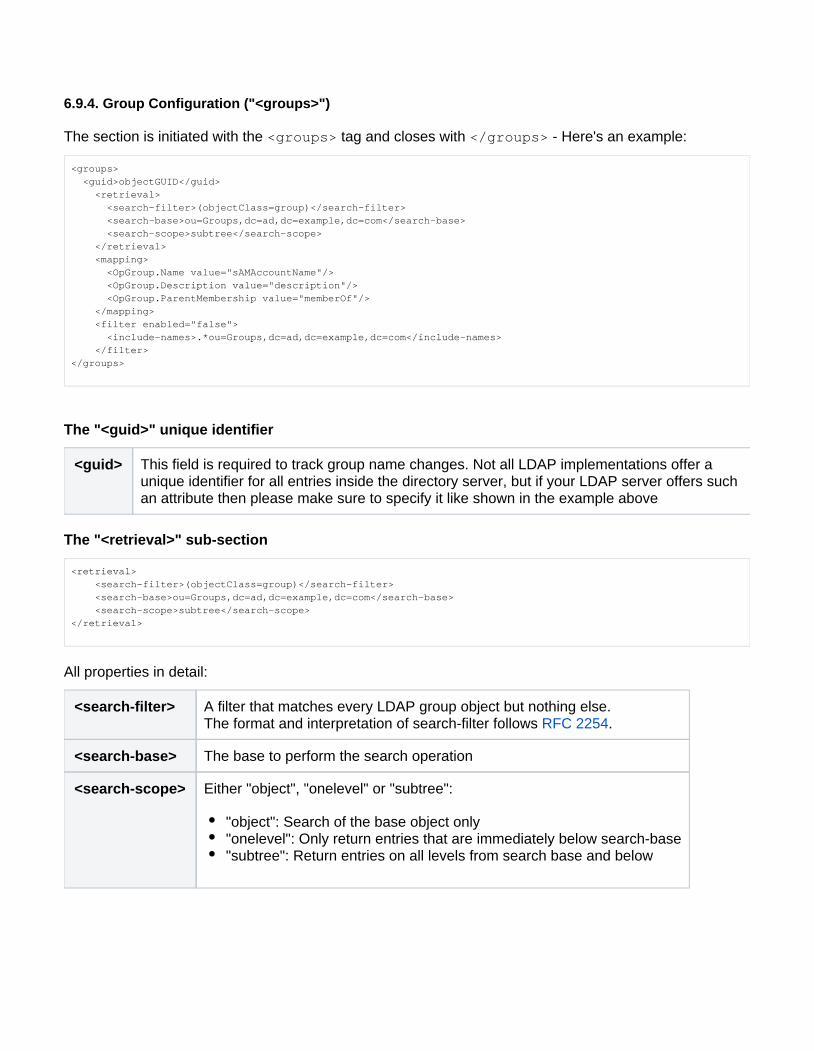
6.9.4. Group Configuration ("<groups>")
The section is initiated with the tag and closes with - Here's an example:<groups> </groups>
<groups> <guid>objectGUID</guid> <retrieval> <search-filter>(objectClass=group)</search-filter> <search-base>ou=Groups,dc=ad,dc=example,dc=com</search-base> <search-scope>subtree</search-scope> </retrieval> <mapping> <OpGroup.Name value="sAMAccountName"/> <OpGroup.Description value="description"/> <OpGroup.ParentMembership value="memberOf"/> </mapping> <filter enabled="false"> <include-names>.*ou=Groups,dc=ad,dc=example,dc=com</include-names> </filter></groups>
The "<guid>" unique identifier
<guid> This field is required to track group name changes. Not all LDAP implementations offer a unique identifier for all entries inside the directory server, but if your LDAP server offers such an attribute then please make sure to specify it like shown in the example above
The "<retrieval>" sub-section
<retrieval> <search-filter>(objectClass=group)</search-filter> <search-base>ou=Groups,dc=ad,dc=example,dc=com</search-base> <search-scope>subtree</search-scope></retrieval>
All properties in detail:
<search-filter> A filter that matches every LDAP group object but nothing else. The format and interpretation of search-filter follows .RFC 2254
<search-base> The base to perform the search operation
<search-scope> Either "object", "onelevel" or "subtree":
"object": Search of the base object only"onelevel": Only return entries that are immediately below search-base"subtree": Return entries on all levels from search base and below
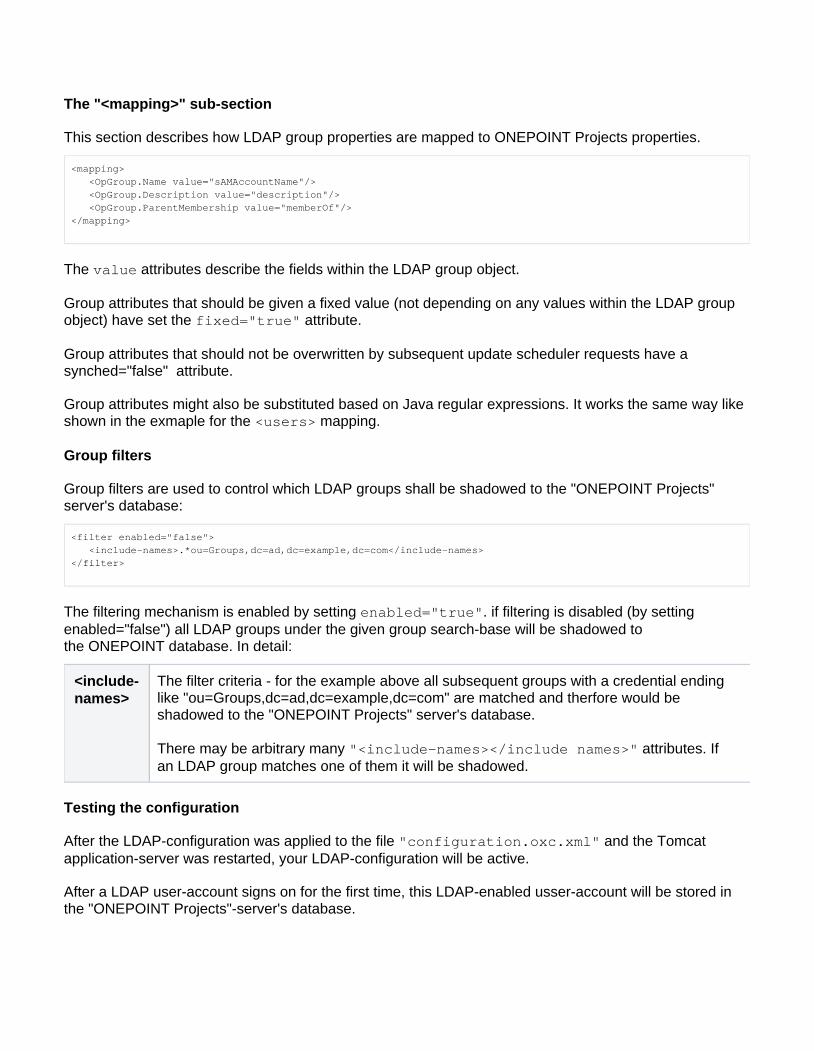
The "<mapping>" sub-section
This section describes how LDAP group properties are mapped to ONEPOINT Projects properties.
<mapping> <OpGroup.Name value="sAMAccountName"/> <OpGroup.Description value="description"/> <OpGroup.ParentMembership value="memberOf"/></mapping>
The attributes describe the fields within the LDAP group object.value
Group attributes that should be given a fixed value (not depending on any values within the LDAP group object) have set the attribute.fixed="true"
Group attributes that should not be overwritten by subsequent update scheduler requests have a synched="false" attribute.
Group attributes might also be substituted based on Java regular expressions. It works the same way like shown in the exmaple for the mapping.<users>
Group filters
Group filters are used to control which LDAP groups shall be shadowed to the "ONEPOINT Projects" server's database:
<filter enabled="false"> <include-names>.*ou=Groups,dc=ad,dc=example,dc=com</include-names></filter>
The filtering mechanism is enabled by setting . if filtering is disabled (by setting enabled="true"enabled="false") all LDAP groups under the given group search-base will be shadowed to the ONEPOINT database. In detail:
<include-names>
The filter criteria - for the example above all subsequent groups with a credential ending like "ou=Groups,dc=ad,dc=example,dc=com" are matched and therfore would be shadowed to the "ONEPOINT Projects" server's database.
There may be arbitrary many attributes. If "<include-names></include names>"an LDAP group matches one of them it will be shadowed.
Testing the configuration
After the LDAP-configuration was applied to the file and the Tomcat "configuration.oxc.xml"application-server was restarted, your LDAP-configuration will be active.
After a LDAP user-account signs on for the first time, this LDAP-enabled usser-account will be stored in the "ONEPOINT Projects"-server's database.

1. 2. 3. 4.
If you want to manually force a full sychronization-cycle to retrieve all LDAP-objects that can be reached by your configuration:
Sign on as "administrator" at the login-form of your "ONEPOINT Projects"-serverOpen the system settings by clicking the tool-shaped button in the upper-right cornerClick the tool "Users" in the tool-dock on the left sideClick the button "Synchronize"
LDAP Troubleshooting
If your LDAP-configuration doesn't seem to work:
Check Tomcat's main-logfile for warnings or error-messagesTest the configuration-properties you have entered in the LDAP-configuration's <conn
section with an LDAP-browserection>
Anonymous Binds
After an LDAP-connection was activated please make sure to check if you are allowed to sign on to your ONEPOINT Projects-server without specifying a password (Or with a wrong password) - If this is the case then most likely is allowed by your LDAP-Anonymous Bindserver and !must be disabled
1.
2.
3.
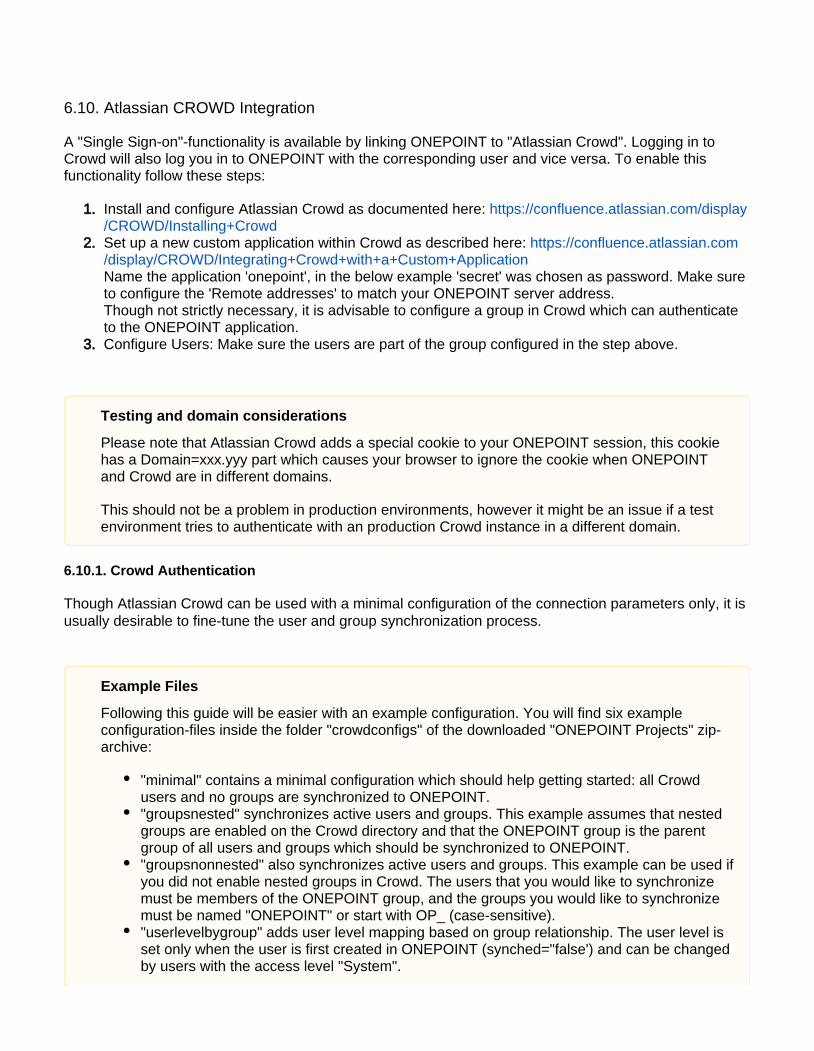
6.10. Atlassian CROWD Integration
A "Single Sign-on"-functionality is available by linking ONEPOINT to "Atlassian Crowd". Logging in to Crowd will also log you in to ONEPOINT with the corresponding user and vice versa. To enable this functionality follow these steps:
Install and configure Atlassian Crowd as documented here: https://confluence.atlassian.com/display/CROWD/Installing+CrowdSet up a new custom application within Crowd as described here: https://confluence.atlassian.com/display/CROWD/Integrating+Crowd+with+a+Custom+ApplicationName the application 'onepoint', in the below example 'secret' was chosen as password. Make sure to configure the 'Remote addresses' to match your ONEPOINT server address.Though not strictly necessary, it is advisable to configure a group in Crowd which can authenticate to the ONEPOINT application.Configure Users: Make sure the users are part of the group configured in the step above.
6.10.1. Crowd Authentication
Though Atlassian Crowd can be used with a minimal configuration of the connection parameters only, it is usually desirable to fine-tune the user and group synchronization process.
Testing and domain considerations
Please note that Atlassian Crowd adds a special cookie to your ONEPOINT session, this cookie has a Domain=xxx.yyy part which causes your browser to ignore the cookie when ONEPOINT and Crowd are in different domains.
This should not be a problem in production environments, however it might be an issue if a test environment tries to authenticate with an production Crowd instance in a different domain.
Example Files
Following this guide will be easier with an example configuration. You will find six example configuration-files inside the folder "crowdconfigs" of the downloaded "ONEPOINT Projects" zip-archive:
"minimal" contains a minimal configuration which should help getting started: all Crowd users and no groups are synchronized to ONEPOINT."groupsnested" synchronizes active users and groups. This example assumes that nested groups are enabled on the Crowd directory and that the ONEPOINT group is the parent group of all users and groups which should be synchronized to ONEPOINT."groupsnonnested" also synchronizes active users and groups. This example can be used if you did not enable nested groups in Crowd. The users that you would like to synchronize must be members of the ONEPOINT group, and the groups you would like to synchronize must be named "ONEPOINT" or start with OP_ (case-sensitive)."userlevelbygroup" adds user level mapping based on group relationship. The user level is set only when the user is first created in ONEPOINT (synched="false') and can be changed by users with the access level "System".

All Crowd configuration-properties will be entered inbetween the tags and , <crowd> </ >crowdconsisting of four main-sections:
</database> <crowd> <connection> <!-- Contains the Crowd-server's connection parameters --> </connection> <update-schedule> <!-- OPTIONAL - Configures how often the Crowd-synchronization cycle will be initialized --> </update-schedule> <users> <!-- OPTIONAL - Configures which user-accounts will be retrieved and how their access level will be mapped to ONEPOINT --> </users> <groups> <!-- OPTIONAL - Configures which groups will be retrieved from the directory server and how their attributes will be mapped to ONEPOINT Projects --> </groups> </crowd> </configuration>
The section is mandatory, the other sections have the following default behavior:<connection>
Leaving out <users> will synchronize all Crowd users to ONEPOINT (normally used for testing purposes only)Omitting <schedule> will disable periodic synchronization (users are updated whenever they log in to ONEPOINT)Leaving out the section will prevent Crowd groups from being created in ONEPOINT.<groups>
The following sections describe the Crowd-configuration in detail.
"userlevelbyattribute" performs user level mapping based on the custom attribute "opUserLevel". The user level is maintained by the Crowd attribute (synched="true) and cannot be modified in ONEPOINT."extended": a not really practical example showing mainly what configuration parameters would be possible.
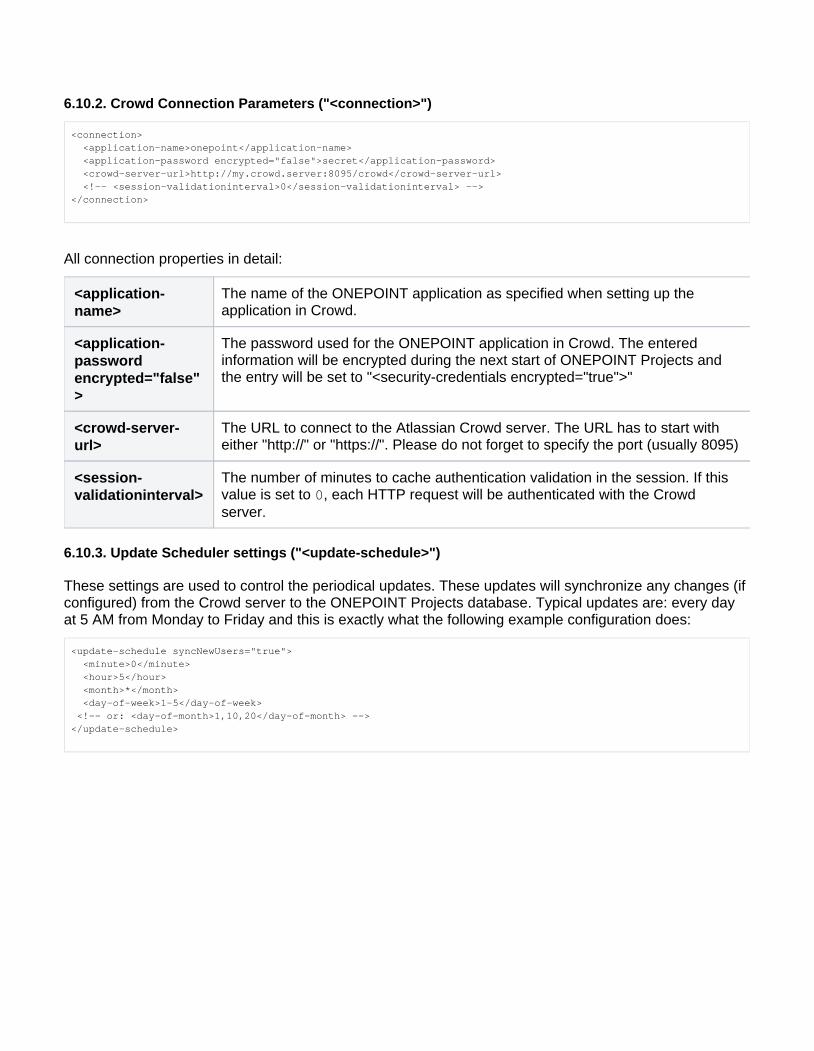
6.10.2. Crowd Connection Parameters ("<connection>")
<connection> <application-name>onepoint</application-name> <application-password encrypted="false">secret</application-password> <crowd-server-url>http://my.crowd.server:8095/crowd</crowd-server-url> <!-- <session-validationinterval>0</session-validationinterval> --></connection>
All connection properties in detail:
<application-name>
The name of the ONEPOINT application as specified when setting up the application in Crowd.
<application-password encrypted="false">
The password used for the ONEPOINT application in Crowd. The entered information will be encrypted during the next start of ONEPOINT Projects and the entry will be set to "<security-credentials encrypted="true">"
<crowd-server-url>
The URL to connect to the Atlassian Crowd server. The URL has to start with either "http://" or "https://". Please do not forget to specify the port (usually 8095)
<session-validationinterval>
The number of minutes to cache authentication validation in the session. If this value is set to , each HTTP request will be authenticated with the Crowd 0server.
6.10.3. Update Scheduler settings ("<update-schedule>")
These settings are used to control the periodical updates. These updates will synchronize any changes (if configured) from the Crowd server to the ONEPOINT Projects database. Typical updates are: every day at 5 AM from Monday to Friday and this is exactly what the following example configuration does:
<update-schedule syncNewUsers="true"> <minute>0</minute> <hour>5</hour> <month>*</month> <day-of-week>1-5</day-of-week> <!-- or: <day-of-month>1,10,20</day-of-month> --></update-schedule>

1. 2. 3.
The allowed values in detail:
<minute> 0-59 , - * /
<hour> 0-23 , - * /
<month> 1-12 or JAN-DEC , - * /
<day-of-week> 1-7 or SUN-SAT , - * / L #
<day-of-month> 1-31 , - * / L W
Either day-of-week or day-of-month must be specified. The values/special-characters that can be entered are actually separate fields of a "cron Expression". You can find the full description to these fields at:http://www.quartz-scheduler.org/docs/tutorials/crontrigger.html
6.10.4. User Configuration ("<users>")
Before you continue with this section please note that "ONEPOINT Projects" is licensed on a per-user basis and each user-account synchronized from Crowd represents one licensed user. To check how many user-accounts can still be created inside your "ONEPOINT Projects"-server:
Sign on as "administrator" at the login-form of your "ONEPOINT Projects"-serverOpen the system settings by clicking the tool-shaped button in the upper-right cornerClick the tool "License" in the tool-dock on the left side
The lines "Number of Observer Users", "Number of Contributor Users" and "Number of Manager Users" will show in brackets the maximum count of user-accounts for each user-level. The number on the left will show how many user-accounts have already been created for each user-level.
1.
2.
Synchronizing new created users from Crowd to ONEPOINT Projects
For a successful synchronization of new created users from Crowd to ONEPOINT Projects, the attribute "syncNewUsers" has been implemented. This attribute is optional and possible values for this attribute are "true" and "false" (default = "false"):
If set to "false" or not specified, then users newly created in Crowd are not automatically synchronized to ONEPOINT Projects. These users will be synchronized if the administrator opens the "Users"-tool in the System Settings and presses the "Synchronize"-button there. If a non-synchronized user logs in to ONEPOINT Projects, then this user is automatically synchronized. Setting the syncNewUsers attribute to "false" makes the administrator more aware when new users are imported and also prevents ONEPOINT Projects from automatically using licenses for new LDAP users.If set to "true", then all users matching the <users><filter> section (see below) will be automatically synchronized to ONEPOINT Projects. Setting this attribute to "true" allows resource managers to link resources to new users without having to ask the administrator to import these new users.
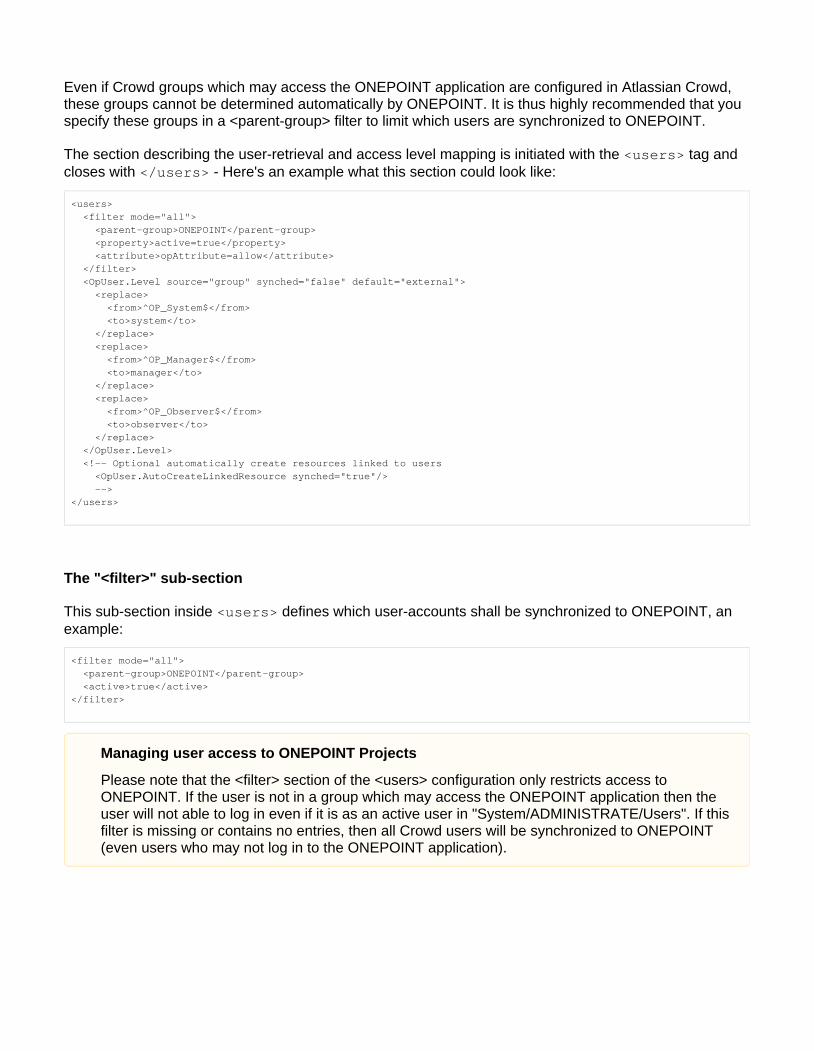
Even if Crowd groups which may access the ONEPOINT application are configured in Atlassian Crowd, these groups cannot be determined automatically by ONEPOINT. It is thus highly recommended that you specify these groups in a <parent-group> filter to limit which users are synchronized to ONEPOINT.
The section describing the user-retrieval and access level mapping is initiated with the tag and <users>closes with - Here's an example what this section could look like:</users>
<users> <filter mode="all"> <parent-group>ONEPOINT</parent-group> <property>active=true</property> <attribute>opAttribute=allow</attribute> </filter> <OpUser.Level source="group" synched="false" default="external"> <replace> <from>^OP_System$</from> <to>system</to> </replace> <replace> <from>^OP_Manager$</from> <to>manager</to> </replace> <replace> <from>^OP_Observer$</from> <to>observer</to> </replace> </OpUser.Level> <!-- Optional automatically create resources linked to users <OpUser.AutoCreateLinkedResource synched="true"/> --></users>
The "<filter>" sub-section
This sub-section inside defines which user-accounts shall be synchronized to ONEPOINT, an <users>example:
<filter mode="all"> <parent-group>ONEPOINT</parent-group> <active>true</active></filter>
Managing user access to ONEPOINT Projects
Please note that the <filter> section of the <users> configuration only restricts access to ONEPOINT. If the user is not in a group which may access the ONEPOINT application then the user will not able to log in even if it is as an active user in "System/ADMINISTRATE/Users". If this filter is missing or contains no entries, then all Crowd users will be synchronized to ONEPOINT (even users who may not log in to the ONEPOINT application).
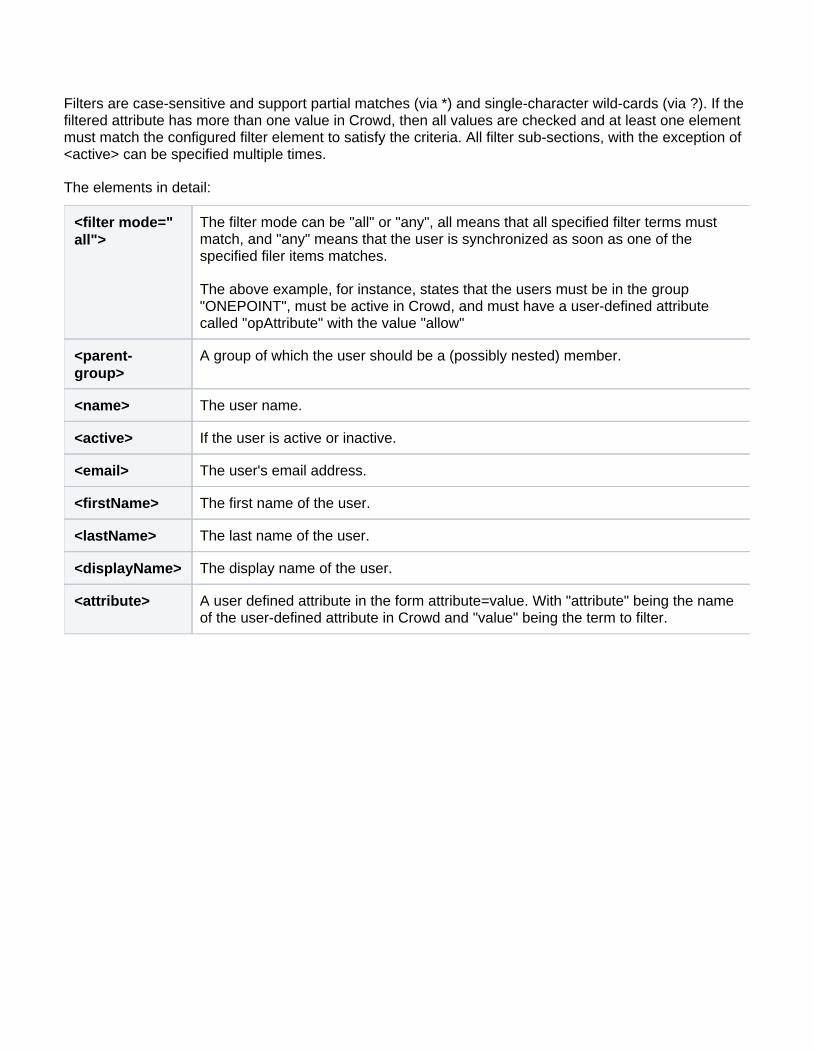
Filters are case-sensitive and support partial matches (via *) and single-character wild-cards (via ?). If the filtered attribute has more than one value in Crowd, then all values are checked and at least one element must match the configured filter element to satisfy the criteria. All filter sub-sections, with the exception of <active> can be specified multiple times.
The elements in detail:
<filter mode="all">
The filter mode can be "all" or "any", all means that all specified filter terms must match, and "any" means that the user is synchronized as soon as one of the specified filer items matches.
The above example, for instance, states that the users must be in the group "ONEPOINT", must be active in Crowd, and must have a user-defined attribute called "opAttribute" with the value "allow"
<parent-group>
A group of which the user should be a (possibly nested) member.
<name> The user name.
<active> If the user is active or inactive.
<email> The user's email address.
<firstName> The first name of the user.
<lastName> The last name of the user.
<displayName> The display name of the user.
<attribute> A user defined attribute in the form attribute=value. With "attribute" being the name of the user-defined attribute in Crowd and "value" being the term to filter.
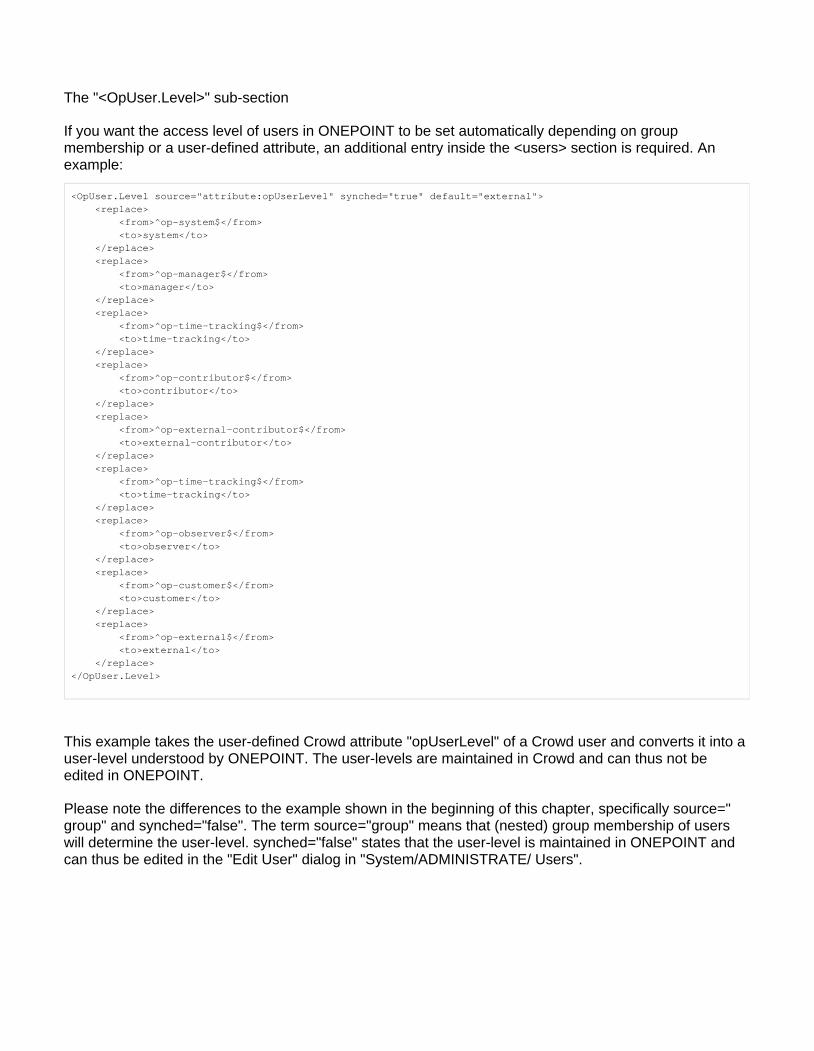
The "<OpUser.Level>" sub-section
If you want the access level of users in ONEPOINT to be set automatically depending on group membership or a user-defined attribute, an additional entry inside the <users> section is required. An example:
<OpUser.Level source="attribute:opUserLevel" synched="true" default="external"> <replace> <from>^op-system$</from> <to>system</to> </replace> <replace> <from>^op-manager$</from> <to>manager</to> </replace> <replace> <from>^op-time-tracking$</from> <to>time-tracking</to> </replace> <replace> <from>^op-contributor$</from> <to>contributor</to> </replace> <replace> <from>^op-external-contributor$</from> <to>external-contributor</to> </replace> <replace> <from>^op-time-tracking$</from> <to>time-tracking</to> </replace> <replace> <from>^op-observer$</from> <to>observer</to> </replace> <replace> <from>^op-customer$</from> <to>customer</to> </replace> <replace> <from>^op-external$</from> <to>external</to> </replace></OpUser.Level>
This example takes the user-defined Crowd attribute "opUserLevel" of a Crowd user and converts it into a user-level understood by ONEPOINT. The user-levels are maintained in Crowd and can thus not be edited in ONEPOINT.
Please note the differences to the example shown in the beginning of this chapter, specifically source="group" and synched="false". The term source="group" means that (nested) group membership of users will determine the user-level. synched="false" states that the user-level is maintained in ONEPOINT and can thus be edited in the "Edit User" dialog in "System/ADMINISTRATE/ Users".
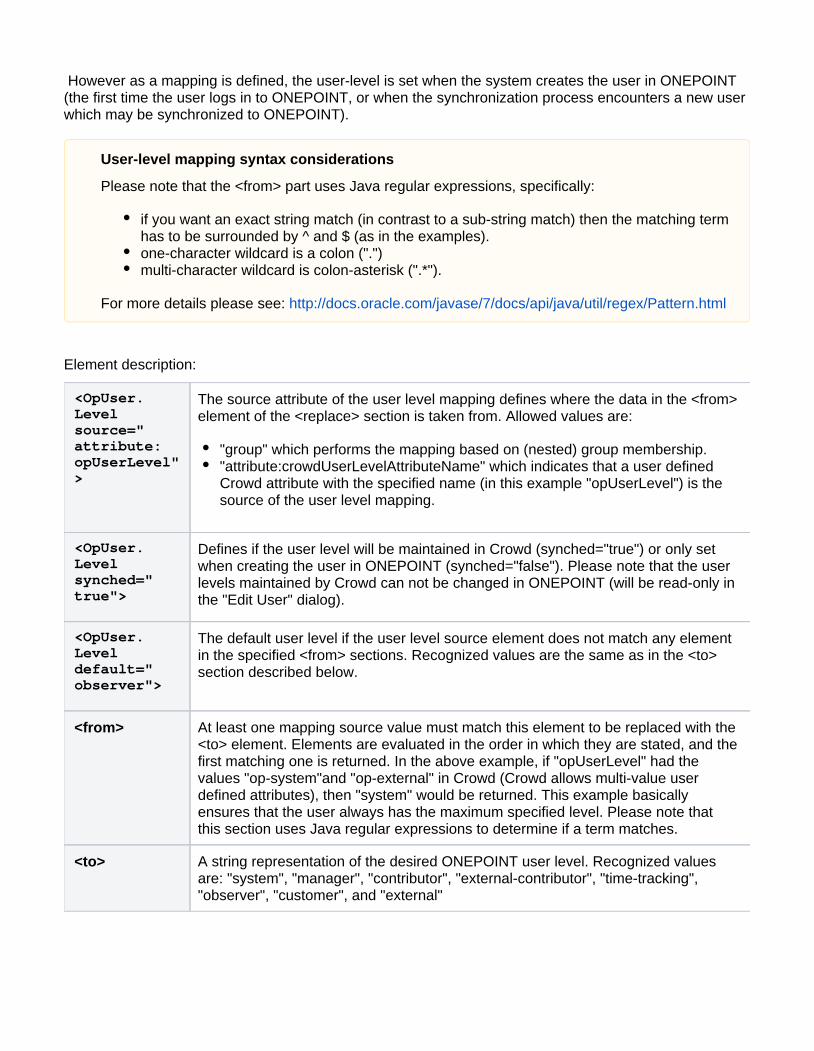
However as a mapping is defined, the user-level is set when the system creates the user in ONEPOINT (the first time the user logs in to ONEPOINT, or when the synchronization process encounters a new user which may be synchronized to ONEPOINT).
Element description:
<OpUser.Level source="attribute:opUserLevel">
The source attribute of the user level mapping defines where the data in the <from> element of the <replace> section is taken from. Allowed values are:
"group" which performs the mapping based on (nested) group membership."attribute:crowdUserLevelAttributeName" which indicates that a user defined Crowd attribute with the specified name (in this example "opUserLevel") is the source of the user level mapping.
<OpUser.Level synched="true">
Defines if the user level will be maintained in Crowd (synched="true") or only set when creating the user in ONEPOINT (synched="false"). Please note that the user levels maintained by Crowd can not be changed in ONEPOINT (will be read-only in the "Edit User" dialog).
<OpUser.Level default="observer">
The default user level if the user level source element does not match any element in the specified <from> sections. Recognized values are the same as in the <to> section described below.
<from> At least one mapping source value must match this element to be replaced with the <to> element. Elements are evaluated in the order in which they are stated, and the first matching one is returned. In the above example, if "opUserLevel" had the values "op-system"and "op-external" in Crowd (Crowd allows multi-value user defined attributes), then "system" would be returned. This example basically ensures that the user always has the maximum specified level. Please note that this section uses Java regular expressions to determine if a term matches.
<to> A string representation of the desired ONEPOINT user level. Recognized values are: "system", "manager", "contributor", "external-contributor", "time-tracking", "observer", "customer", and "external"
User-level mapping syntax considerations
Please note that the <from> part uses Java regular expressions, specifically:
if you want an exact string match (in contrast to a sub-string match) then the matching term has to be surrounded by ^ and $ (as in the examples).one-character wildcard is a colon (".")multi-character wildcard is colon-asterisk (".*").
For more details please see: http://docs.oracle.com/javase/7/docs/api/java/util/regex/Pattern.html
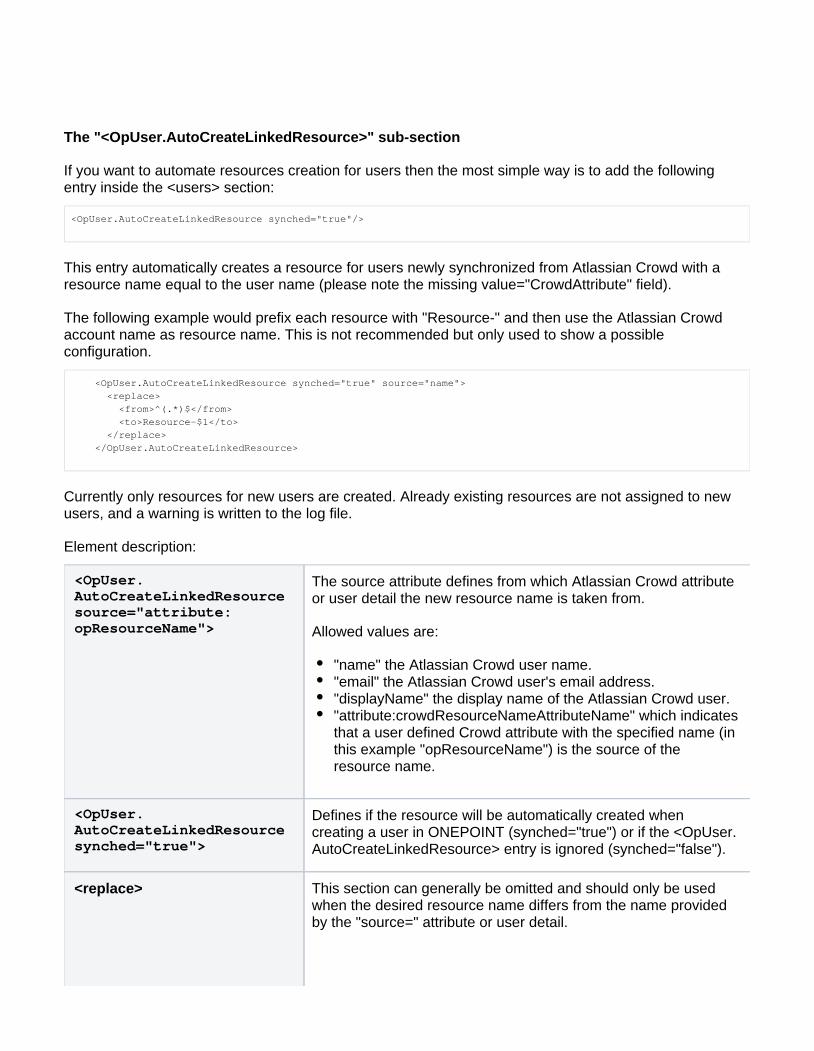
The "<OpUser.AutoCreateLinkedResource>" sub-section
If you want to automate resources creation for users then the most simple way is to add the following entry inside the <users> section:
<OpUser.AutoCreateLinkedResource synched="true"/>
This entry automatically creates a resource for users newly synchronized from Atlassian Crowd with a resource name equal to the user name (please note the missing value="CrowdAttribute" field).
The following example would prefix each resource with "Resource-" and then use the Atlassian Crowd account name as resource name. This is not recommended but only used to show a possible configuration.
<OpUser.AutoCreateLinkedResource synched="true" source="name"> <replace> <from>^(.*)$</from> <to>Resource-$1</to> </replace> </OpUser.AutoCreateLinkedResource>
Currently only resources for new users are created. Already existing resources are not assigned to new users, and a warning is written to the log file.
Element description:
<OpUser.AutoCreateLinkedResource source="attribute:opResourceName">
The source attribute defines from which Atlassian Crowd attribute or user detail the new resource name is taken from.
Allowed values are:
"name" the Atlassian Crowd user name."email" the Atlassian Crowd user's email address."displayName" the display name of the Atlassian Crowd user."attribute:crowdResourceNameAttributeName" which indicates that a user defined Crowd attribute with the specified name (in this example "opResourceName") is the source of the resource name.
<OpUser.AutoCreateLinkedResource synched="true">
Defines if the resource will be automatically created when creating a user in ONEPOINT (synched="true") or if the <OpUser.AutoCreateLinkedResource> entry is ignored (synched="false").
<replace> This section can generally be omitted and should only be used when the desired resource name differs from the name provided by the "source=" attribute or user detail.
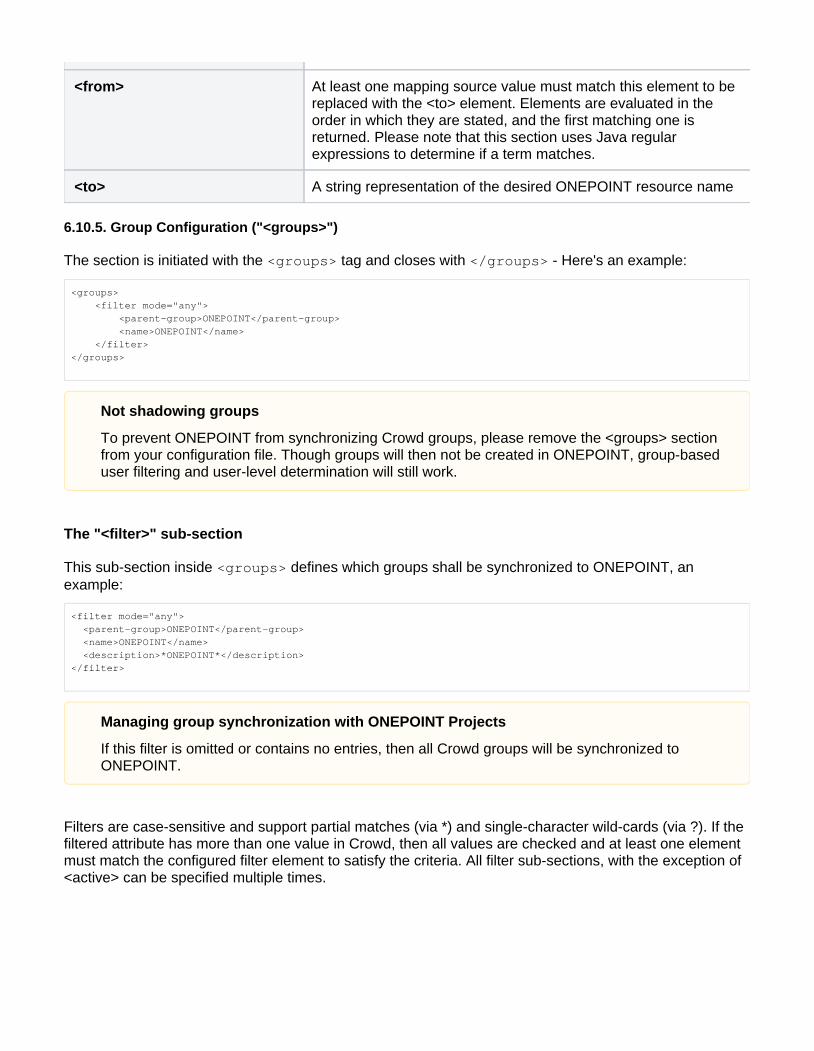
<from> At least one mapping source value must match this element to be replaced with the <to> element. Elements are evaluated in the order in which they are stated, and the first matching one is returned. Please note that this section uses Java regular expressions to determine if a term matches.
<to> A string representation of the desired ONEPOINT resource name
6.10.5. Group Configuration ("<groups>")
The section is initiated with the tag and closes with - Here's an example:<groups> </groups>
<groups> <filter mode="any"> <parent-group>ONEPOINT</parent-group> <name>ONEPOINT</name> </filter></groups>
The "<filter>" sub-section
This sub-section inside defines which groups shall be synchronized to ONEPOINT, an <groups>example:
<filter mode="any"> <parent-group>ONEPOINT</parent-group> <name>ONEPOINT</name> <description>*ONEPOINT*</description></filter>
Filters are case-sensitive and support partial matches (via *) and single-character wild-cards (via ?). If the filtered attribute has more than one value in Crowd, then all values are checked and at least one element must match the configured filter element to satisfy the criteria. All filter sub-sections, with the exception of <active> can be specified multiple times.
Not shadowing groups
To prevent ONEPOINT from synchronizing Crowd groups, please remove the <groups> section from your configuration file. Though groups will then not be created in ONEPOINT, group-based user filtering and user-level determination will still work.
Managing group synchronization with ONEPOINT Projects
If this filter is omitted or contains no entries, then all Crowd groups will be synchronized to ONEPOINT.
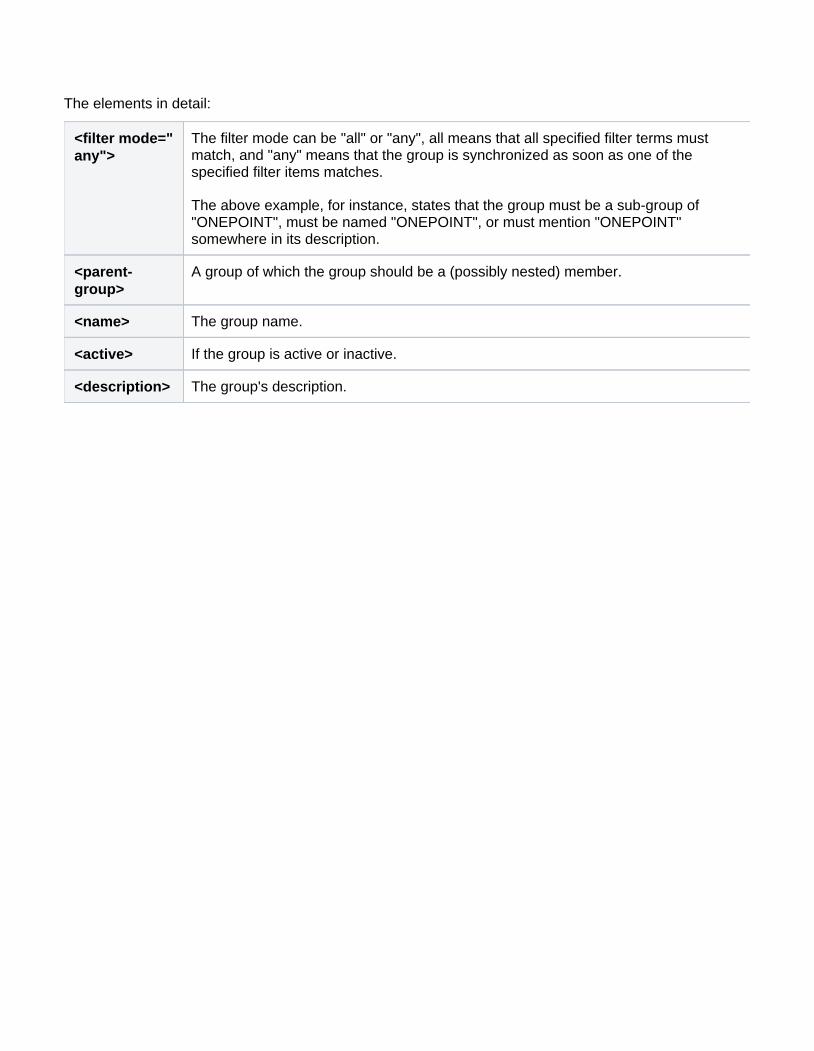
The elements in detail:
<filter mode="any">
The filter mode can be "all" or "any", all means that all specified filter terms must match, and "any" means that the group is synchronized as soon as one of the specified filter items matches.
The above example, for instance, states that the group must be a sub-group of "ONEPOINT", must be named "ONEPOINT", or must mention "ONEPOINT" somewhere in its description.
<parent-group>
A group of which the group should be a (possibly nested) member.
<name> The group name.
<active> If the group is active or inactive.
<description> The group's description.
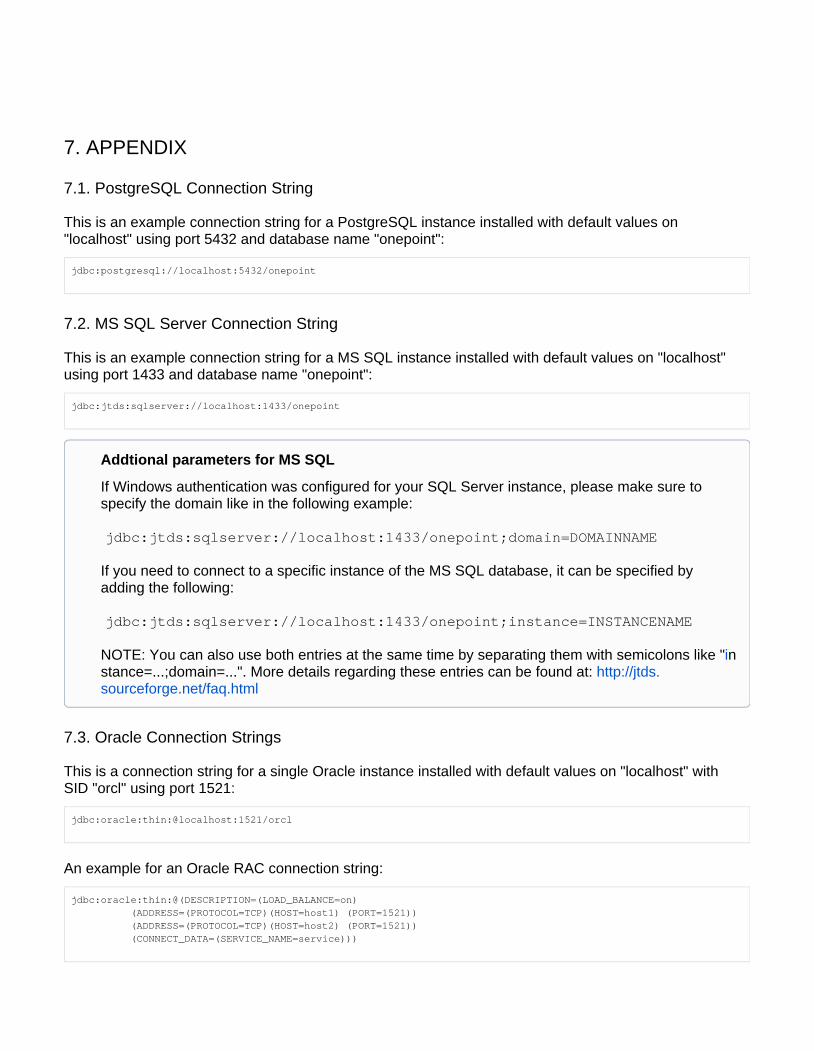
7. APPENDIX
7.1. PostgreSQL Connection String
This is an example connection string for a PostgreSQL instance installed with default values on "localhost" using port 5432 and database name "onepoint":
jdbc:postgresql://localhost:5432/onepoint
7.2. MS SQL Server Connection String
This is an example connection string for a MS SQL instance installed with default values on "localhost" using port 1433 and database name "onepoint":
jdbc:jtds:sqlserver://localhost:1433/onepoint
7.3. Oracle Connection Strings
This is a connection string for a single Oracle instance installed with default values on "localhost" with SID "orcl" using port 1521:
jdbc:oracle:thin:@localhost:1521/orcl
An example for an Oracle RAC connection string:
jdbc:oracle:thin:@(DESCRIPTION=(LOAD_BALANCE=on) (ADDRESS=(PROTOCOL=TCP)(HOST=host1) (PORT=1521)) (ADDRESS=(PROTOCOL=TCP)(HOST=host2) (PORT=1521)) (CONNECT_DATA=(SERVICE_NAME=service)))
Addtional parameters for MS SQL
If Windows authentication was configured for your SQL Server instance, please make sure to specify the domain like in the following example:
jdbc:jtds:sqlserver://localhost:1433/onepoint;domain=DOMAINNAME
If you need to connect to a specific instance of the MS SQL database, it can be specified by adding the following:
jdbc:jtds:sqlserver://localhost:1433/onepoint;instance=INSTANCENAME
NOTE: You can also use both entries at the same time by separating them with semicolons like "instance=...;domain=...". More details regarding these entries can be found at: http://jtds.sourceforge.net/faq.html