
InPrint 3 - Widgit SoftwareOverview of InPrint 3 InPrint 3 is a desktop publisher for creating...
212
Transcript of InPrint 3 - Widgit SoftwareOverview of InPrint 3 InPrint 3 is a desktop publisher for creating...


567
15
252627313334373839
4041434445
4747484951
5354565860636970
Contents
InPrint 3Overview of InPrint 3
New Features of InPrint 3Tips for InPrint 2 Users
Starting InPrint 3LauncherSaving and LoadingTemplatesResource PacksSettingsSupport and TrainingUpdatesTrial Versions
Interface OverviewThe Tab BarHide/Show Tab ControlsPage SpreadsKeyboard Shortcuts
Creating ObjectsFrame and Table Symbol ModesSymbol ModesSizing TypesClipboard Actions
FramesCreating FramesSpeech BubblesFrame SelectionFrame Moving and ResizingFrame StylingFrame Margins and AlignmentFrame Size and Locking
Page 2 of 212 © Widgit Software 2018

7172747677798183858688
93949597
99100108110113115
118119128130
144145147149
152153154155156
TablesCreating TablesTable and Cell SelectionTable MovingTable SizeRow / Column SizeCell SizeAdd and Remove Rows / ColumnsTable SpacingCell Margins and AlignmentTable and Cell Styling
LinesCreating a LineLine AppearanceLine Controls and Size
ImagesAdding ImagesImages in Frames and Table CellsImage HandlingModifying ImagesImage Styling
Writing ContentWriting in SymbolsWriting in TextFormatting Content
StylesColour PaletteCustom ColoursPinned Styles
Arranging ObjectsOrderAlignDistributeGrouping
© Widgit Software 2018 Page 3 of 212

157158159161162164165167
169170171172173174
175175176176176
177178184185
191192193194195212
PagesNavigationPage Status BarDocument LayoutBook ModePage ManagerPage PropertiesHeader and Footer
ViewZoomingPanelsShowing Rulers, Grid and GuidesWorking with GuidesSnapping
PrintingNavigation ControlsView OptionsPrintExport to PDF
Symbols and VocabularyWordlists OverviewChanging LanguageSpelling
Technical SupportHelp MenuFinding your Serial NumberRemote SupportInstallationDefault Paths to File Locations
Page 4 of 212 © Widgit Software 2018

InPrint 3Make books, activities and accessible documents with Widgit SymbolsThis manual will guide you through all of the features of InPrint 3.
SupportYou can also find a growing range of support materials on our website:
www.widgit.com/support/inprint3
If you have any questions, you can contact out friendly support team for assistance:
T: 01926 333680E: [email protected]
CopyrightCopyright © Widgit Software Ltd 2018. All rights reserved.
VersionThis manual is for version 3.2.
© Widgit Software 2018 Page 5 of 212

Overview of InPrint 3InPrint 3 is a desktop publisher for creating symbol materials to print, such as symbol books, flashcards, worksheetsand accessible documents.
InPrint 3 uses Widgit’s smart symbolising technology and is supplied with more than 15,000 Widgit Symbols, whichhave been developed to support communication, access to information and many school curriculum subjects.
New powerful features Easy to use tools for creating tables and frames make it asimple process to achieve a huge range of layouts. New styleand layout features help to give your resources a professionallook.
Easy to use templates Quickly create resources from more than 140 templates forbooks, vocabulary, comprehension, flashcards, games, rewardsand much, much more.
Personalise your documents Customise your documents by replacing the symbols for a wordor phrase with your own photographs and pictures, or choosefrom over 4,000 Widgit Media graphics.
Page 6 of 212 © Widgit Software 2018

New Features of InPrint 3InPrint 3 has been redeveloped from the ground up. You can do everything that you could in InPrint 2, but in muchfaster and simpler ways.
Quick Start Create ToolbarCreate frames, speech bubbles and tables. Access images fromyour computer or the new Widgit Media library. All from onehandy Create toolbar.
New Table ControlsCreating and editing tables is now much easier and moreintuitive.
Use the visual table creation toolsSplit and merge cellsDistribute rows and columns evenlyChange table spacing to make flashcardsAdvanced controls for precise table and cell sizesTab between cells when filling in content.
© Widgit Software 2018 Page 7 of 212

Add Images in Many WaysYou can add images to your InPrint 3 documents from a number ofsources, either as replacement symbols or as paragraph graphics. Fromthe Create toolbar, you can choose to add your own images from yourMy Pictures folder, browse for pictures saved elsewhere on your machine/ network or choose from over 4000 Widgit Media files pre-installed withInPrint 3.
You can also copy images from the web and paste them directly intoyour documents.
When you select an image, the Image tab will appear at the top of the screen. Fromhere you can flip, rotate and resize the selected image. You can add a border orbackground colour. For symbols and Widgit Media graphics, you can edit the colours.
Intuitive Interface
InPrint 3 has an all-new intuitive interface, giving you full access to all the features of the program.
The tab bar, which runs along the top of the screen, contains multiple tabs with controls for different aspects of theprogram.
There are two types of tab:
Static tabs are always visibleDynamic Tabs only appear when you have certain items selected. These tabs are coloured.
Page 8 of 212 © Widgit Software 2018

Brand New Widgit Media
InPrint 3 gives you access to more than 4000 Widgit Media graphics as well as over 15,000 Widgit Symbols. WidgitMedia graphics are beautifully drawn and cover a wide range of subjects. They can be used as illustrations in yourresource or combined to build up scenes.
Visual Page Management
The Page Manager provides quick access to browse and manage your document.
See thumbnails of all pagesAdd, delete and duplicate pagesDrag and drop to reorder pagesChange from single page to book mode
© Widgit Software 2018 Page 9 of 212

Pinned Styles
If you need to create frames, tables, or lines with the same appearance again and again, you can 'pin' the style tosave you from having to make the same changes each time. Simply right-click on a frame, table or line and select 'Pinthis Style'.
New Symbolisation ControlsSmart Symbolising recognises the part of speech for each word as you type,helping you to pick the correct symbol in moments.
Combine words and combine symbols to make sentences clearer.
Templates
InPrint 3 comes with a wide variety of ready-made templates that you can use as starting points for your resources.Templates are a big time-saver when resources you are creating on a daily basis have the same structure and format.
Page 10 of 212 © Widgit Software 2018

Resource Packs
Widgit publish a range of symbol-supported learning materials and symbol stories, including extensive topic-basedpacks 'ready to go' for special and mainstream education, health care, and home use.
InPrint 3 comes with a number of pre-installed resources packs that you can print out or customise.
Quick Access to Files
The File tab uses thumbnails to give you quick and easy access to:
Templates - Ready-made templates that you can use as starting points for your resourcesResource Packs - Ready-made symbol supported learning materialsRecent Files - Quickly find and open your recent documents
© Widgit Software 2018 Page 11 of 212

The Symbol Chooser
As you type, the Symbol Chooser displays the available symbols for your content.
You can use the symbol chooser to set defaults for your favourite symbols, or to search for symbols to add yourdocument as images.
The Resource LibraryThe Resource Library provides you with quick access to theimages on your machine or network as well as over 4,000Widgit Media files.
By default, the resource library contains links to your 'My Pictures'folder, 'My Computer' and the Widgit Media files, but you canpersonalise the Resource Library by adding shortcuts to yourmost commonly used images and folders.
If you have a lot of different folders that you like to use imagesfrom, you can create a list of favourites.
Page 12 of 212 © Widgit Software 2018

Symbol Spell CheckerSimple Spell CheckerSee suggestions for a spelling error by right-clicking on it.
Full Spell CheckerThe full spell checker shows you suggestions in context and gives you theoption to update every occurrence, throughout the document.
The dictionary is fully customisable with your own vocabulary and commonmistakes.
Enhanced Layout Tools
The Arrange tab includes a number of tools to help you organise objects on the page.
You can use the Arrange tab to:
Order objects i.e. move items to the foreground, middle ground, and backgroundAlign objects along a specified axis, horizontally or verticallyDistribute items evenly, horizontally or verticallyCombine several items into a group so that they are treated as a single unit
© Widgit Software 2018 Page 13 of 212

Right-Click Context MenuYou can access the most common features of the programby right-clicking on an object to open the context menu.
The available options in the context menu will changedepending on the type of object that is selected.
Sizing Types
InPrint 3 has new Sizing Types for frames, tables and speech bubbles to give you greater control over how theircontent behaves:
The content shrinks and grows whenever an object is resized with Contents Fills FrameThe content tries to remain at your preferred size with Content ShrinksThe object grows as you type with Frame grows with Content (not available for tables)Content that does not fit in the object is hidden with Frame is Fixed
Page 14 of 212 © Widgit Software 2018

Tips for InPrint 2 UsersInPrint 3 can be used to make all of the same resources as InPrint 2 but in much faster and simpler ways. Below is alist of common features found in both versions with an explanation of what's new.
Creating a TableInPrint 2To make a table with InPrint 2, you had to create a frame, then select the option to turn it into a table from the'Frames and Pictures' menu. From there, you could specify the number of rows and columns and other properties ofthe table.
© Widgit Software 2018 Page 15 of 212

InPrint 3With InPrint 3, creating tables is far simpler and much quicker.
To create a table, click the Table button on the Create toolbar onthe left of the screen.
From the Table menu that appears, you can:
Choose the content mode, Symbols and Text, TextOnly or Symbols Only
Choose a flashcard or table layoutCreate a table using a pinned style
When you have selected the type of table that you would like tocreate, the table creator will appear under your mouse pointer,showing you the number of rows and columns and the totalnumber of cells that will be created.
Drag the table creator to the dimensions you require and clickonce to confirm your choice. A preview of the table will beattached to your mouse pointer so that you can see exactlywhere it will be when you click to place it in on the page.
Page 16 of 212 © Widgit Software 2018
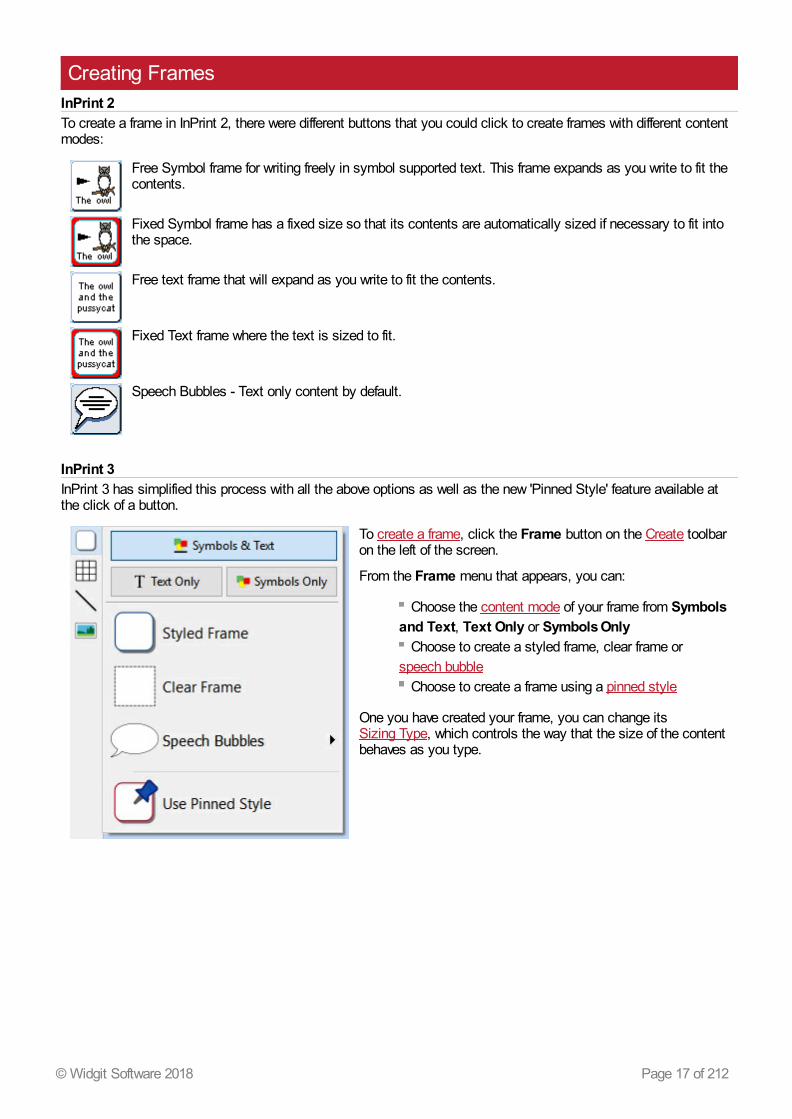
Creating FramesInPrint 2To create a frame in InPrint 2, there were different buttons that you could click to create frames with different contentmodes:
Free Symbol frame for writing freely in symbol supported text. This frame expands as you write to fit thecontents.
Fixed Symbol frame has a fixed size so that its contents are automatically sized if necessary to fit intothe space.
Free text frame that will expand as you write to fit the contents.
Fixed Text frame where the text is sized to fit.
Speech Bubbles - Text only content by default.
InPrint 3InPrint 3 has simplified this process with all the above options as well as the new 'Pinned Style' feature available atthe click of a button.
To create a frame, click the Frame button on the Create toolbaron the left of the screen.
From the Frame menu that appears, you can:
Choose the content mode of your frame from Symbolsand Text, Text Only or Symbols Only
Choose to create a styled frame, clear frame orspeech bubble
Choose to create a frame using a pinned style
One you have created your frame, you can change itsSizing Type, which controls the way that the size of the contentbehaves as you type.
© Widgit Software 2018 Page 17 of 212

Grow to FitInPrint 2
With InPrint 2, users had the option to use the 'Expand to fit' button to make the text and symbols they had used aslarge as possible in the frame. This was a useful feature if one of the fixed writing frames had been resized and itscontent looked relatively small.
InPrint 3
InPrint 3 includes new Sizing Types for frames, tables and speech bubbles to give you greater control over how theircontent behaves:
The content shrinks and grows whenever an object is resized with Contents Fills FrameThe content tries to remain at your preferred size with Content ShrinksThe object grows as you type with Frame grows with Content (not available for tables)Content that does not fit in the object is hidden with Frame is Fixed
Changing Between Symbols and Text and Text Only ModeInPrint 2With InPrint 2, the content mode of a frame or table could be changed at any time by clicking the toggle button on theright-hand toolbar:
Indicated the paragraph was in Symbols and Text mode.
Indicated the paragraph was in Text Only mode.
Alternatively, users could use the F10 key to toggle between the two modes when an object was selected.
Page 18 of 212 © Widgit Software 2018

InPrint 3With InPrint 3, users can switch between the two modes using theoptions on the dynamic tab associated with the selected object. Forexample, if you have a Frame selected; the Contents option will be onthe Frames tab. If you have a speech bubble selected, they will be on theSpeech Bubble tab.
InPrint 3 also has a new contents style, Symbols Only. In this mode youcan type in text, but when you click out, you will just see the symbols.
Users can still use the F10 key to toggle between the different modeswhen an object is selected.
Changing the Word for a SymbolInPrint 2To use an existing symbol, but change the text that appears beneath it:
Type the word(s) for the symbol(s) you require.
Click on the text you would like to change, then click the'Cat - Sam' button on the top toolbar.
The text that was displayed beneath the symbol will beremoved, you can now enter replacement text.
After writing your replacement text, you needed to press theright arrow key to exit the re-text tool.
© Widgit Software 2018 Page 19 of 212

InPrint 3The process is very similar in InPrint 3:
Type the word(s) for the symbol(s) you require.
Click the Change Symbol Text button on the Edit tab orpress the F11 Key.
The text that was displayed beneath the symbol will beremoved and replaced with a green box, you can now enterreplacement text.
Press the right arrow key or click 'OK' in the process barthat appears at the top of the page to confirm your changes,or press Escape to cancel.
Search for a SymbolInPrint 2
InPrint 2 gave users the option to search for symbols on the Uselist tab at the top of the graphic resources section.
Page 20 of 212 © Widgit Software 2018

InPrint 3InPrint 3 lets you search directly from theSymbol Chooser on the right of the screen.
When you've found the symbol that you want touse, click on it to select it and then click on thepage to add it to your document.
Copying and Pasting to a New PageIn InPrint 2, if you copied an object and pasted it on a new page, itwas added in the same position.
In InPrint 3, you can right-click anywhere on the new page andselect the ‘Paste in place’ option from the context menu.
If you select the 'Paste' option from the context menu in InPrint 3,the object will be attached to your mouse pointer so that you canchoose exactly where to place it on the page.
Headers and FootersInPrint 2InPrint 2 used a feature called 'master items' to allow you display the same object on multiple pages.
To make an object a 'master item', you had to select it, then go to the 'Frames and Pictures' menu and select the'Make master item' option. You could then choose if the object was going to be editable, which page it would start toappear from, and whether or not it appeared on odd or even pages.
© Widgit Software 2018 Page 21 of 212

InPrint 3In InPrint 3, you can use Headers and Footers to make objects appear on every page, on odd or even pages, or on aspecific group of pages. If you want an object to appear on every page outside of the header and footer, you can add itto a template.
You can show the header and footer during editing by clicking Edit Header and Footer on the Pages tab.
Adding Page NumbersInPrint 2InPrint 2 used a feature called 'master items' to allow you display page numbers.
To add page numbers to InPrint 2 documents, you had to create a frame and type the “¬” symbol (top-left on yourkeyboard) to act as a special placeholder for the number of the current page. To make an object a 'master item', youhad to select it, then go to the 'Frames and Pictures' menu and select the 'Make master item' option.
InPrint 3With InPrint 3, you can add page numbers to any frame using the options on thePages tab.
Press the Page Number button to add the number of the current page.
Press the Page Count button to add the total number of pages. For example“Page 1 of 5”.
Note: To display page numbers on all pages, add them to a frame in theHeader or Footer.
Page 22 of 212 © Widgit Software 2018

Select AllTo make changes to multiple objects at the same time with InPrint 2, users first had to drag around all objects toselect them.
In InPrint 3, you can use the Select tools on the Page Status Bar toselect objects throughout the whole document. This can be particularlyuseful for changing the style properties of all items at once. You canselect:
All items on every pageAll items on the current PageAll FramesAll TablesAll LinesAll Images
Note: When you select objects over multiple pages, you cannot move or resize them.
Smart Symbolising and WordlistsInPrint 2 used wordlists to link the words you typed with a symbol. The symbols displayed when you type would varyaccording to the loaded wordlist(s) in InPrint 2.
By default, InPrint 3 uses a new smart symbolising system. When you type with symbols, the ‘smart symboliser’analyses the words in the sentences and picks the correct symbol accordingly.
For example, if you type “drink your drink”, the symboliser will pick the verb form for the first “drink” and the noun formfor the second.
With each software update, more Widgit Symbols and vocabulary will be added, ensuring that you always have thelargest and most up-to-date vocabulary.
InPrint 3 still uses wordlists for resource packs, special vocabulary and third partysymbols.
Topic WordlistsAlongside the smart symboliser, you can choose to load a topic wordlist for specific or personalised vocabulary.
Symbol Set WordlistIf you have purchased a third party symbol set such as Makaton to use with InPrint 3, it will be available as asymbol set wordlist
© Widgit Software 2018 Page 23 of 212

Opening InPrint 2 Documents
InPrint 3 will open any of your old InPrint 2 documents (.cip files) and give you the option to save them in the latestfile format (.ipdoc).
To open an existing document, click the Open button on the File tab. From here you can choose to open .ipdoc filesor .cip files. Double-clicking on a .cip file will import your old resource into InPrint 3 and allow you to edit it as youwould any other file.
You can also open .ipdoc files or .cip files by dragging them into InPrint 3 from Windows Explorer.
Select Save As from the File tab to save the document as a .ipdoc file.
Opening InPrint 2 Resource PacksInPrint 3 will open any of your InPrint 2 resource packs.
Click the File tab and click the Resource Packs button. To view the InPrint 2 resource packs installed on yourmachine, click the View Legacy Resources button at the bottom of the screen.
Double-clicking on a .cip file will import your old resource into InPrint 3 and allow you to edit it as you would any otherfile.
Select Save As from the File tab to save the document as a .ipdoc (InPrint 3 file). Please note that you cannot open.ipdoc files in InPrint 2.
If you have any problems opening your InPrint 2 files, please contact technical support:T: 01926 333686E: [email protected]
Page 24 of 212 © Widgit Software 2018

Starting InPrint 3To open InPrint 3, go to the Start menu and select:
“All programs > Widgit > InPrint 3 > InPrint 3”
If you chose to create a desktop shortcut during installation, you can also click on the InPrint3 shortcut on your desktop.
When the program opens you will be presented with the launcher screen, which you can use to open yourexisting documents, ready-made resource packs or choose from a range of ready-made templates.
Note: The application will open automatically if you double-click on an InPrint 3 file inWindows Explorer.
© Widgit Software 2018 Page 25 of 212

Launcher
When you start the program, you will be presented with the Launcher screen. The launcher can also be accessed atanytime be clicking on the File tab.
The File tab contains a number of options you can select by clicking the buttons around the edge of the screen.A dynamic panel (12) in the centre of the screen will display further options after you've clicked a button.
From the File tab/Launcher you can:
1. Save a document or template2. Create a new document3. Open an existing document4. View a print preview of a document in the dynamic panel5. View and open ready-made templates from the dynamic panel6. View and open your recent files from the dynamic panel7. View and open resource packs from the dynamic panel8. Access support and training9. Open the application settings
10. Close the application11. Print your document
Page 26 of 212 © Widgit Software 2018

Saving and LoadingCreate a New Document
To create a new, blank document, click the New button on the File tab.
You can also create a new document using one of the wide variety of templates included with InPrint 3.Click the Templates button on the File tab to view, open and edit any of the ready-made templates.
Opening DocumentsTo open an existing document, click the Open button on the File tab.From here you can navigate to the file that you want to open.
The default path for opening InPrint 3 documents is:
C:\Users\%username%\Documents\Widgit\InPrint
Note: %username% is a variable that Windows will substitute.
Your most recently opened documents are listed in the Recent section on the File tab.
Saving DocumentsYou can save your document at any time by clicking on the File tab and choosing one of the 'Save'options.
The default path for saving InPrint 3 documents is:\\C:\Users\%username%\Documents\Widgit\InPrint
Note: %username% is a variable that Windows will substitute.
Once your document is saved, clicking save again will save over your file. If you want to make a separatecopy of your document with a different name, select Save As > Save Document as.
Saving TemplatesIn InPrint 3, you can save your documents as templates.
Templates are a big time-saver when resources you are creating on a daily basis have the same structure andformat. A template is something you create once but can use over and over again.
The default path for saving InPrint 3 templates is:
C:\Users\Public\Documents\Widgit\InPrint\Templates
Once your template is saved, you can open it from the Templates section on the File tab.
© Widgit Software 2018 Page 27 of 212

Auto SaveYou can choose to enable auto save for your documents. With auto save enabled, if the program closesunexpectedly or your computer shuts down, you can recover your work when you next open InPrint 3.
A red bar will appear at the top of the File tab where you can choose to Recover your work or Delete any temporaryfiles.
Enabling Auto SaveTo configure your auto save settings, click the File tab, then click Settings, then clickon the System tab in the window that appears. Here, you can enable or disable autosave as well as choosing how often the current document is saved.
Page 28 of 212 © Widgit Software 2018

Recent Files
InPrint 3 features a list of recently used files and folders that enables you to quickly find and open documents thatwere recently closed.
To access recently closed documents, click on the File tab. The 3 most recently opened files are shown immediatelybeneath the Recent button. Click the Recent button to see a list of up to 30 recent documents in the dynamic panelthat appears, as well as the mostly recently accessed folders. Clicking on any of the files will open them for editingwithin InPrint 3. Clicking on any of the folders will open them so that you can select a file.
To clear the list of recently used files:1.) Click the Settings button on the File tab.2.) Select the System tab and click the Clear Recent button in the Recent Listssection.
© Widgit Software 2018 Page 29 of 212

Opening InPrint 2 files
InPrint 3 will open any of your old InPrint 2 documents (.cip files) and give you the option to save them in the latestfile format (.ipdoc).
To open an existing document, select the Open option in the File tab. From here you can choose to open .ipdoc filesor .cip files. Double clicking on a .cip file will import your old resource into InPrint 3 and allow you to edit it as youwould any other file.
You can also open .ipdoc files or .cip files by dragging them into InPrint 3 from Windows Explorer.
Clicking Save As on the File tab will give you the option to save the document as a .ipdoc file.
Opening InPrint 2 Resource PacksInPrint 3 will open any of your InPrint 2 resource packs.
To access your resources, click Resource Packs on the File tab. To view the InPrint 2 resource packs installed onyour machine, click the View Legacy Resources button at the bottom of the screen.
Double-clicking on a .cip file will import your old resource into InPrint 3 and allow you to edit it as you would any otherfile.
Click Save As on the File tab to save the document as an .ipdoc (InPrint 3 file). Please note that you cannot open.ipdoc files in InPrint 2.
If you have any problems opening your InPrint 2 files, please contact technical support:T: 01926 333686E: [email protected]
Page 30 of 212 © Widgit Software 2018

Templates
InPrint 3 comes with a wide variety of ready-made templates that you can use as starting points for your resources.Templates are a big time-saver when resources you are creating on a daily basis have the same structure and format.
Opening TemplatesTo access the templates, click the File tab, then click the Templates button. You will then be shown anumber of folders, sorted by topic, containing ready-made templates. Double-click to open the template ofyour choice.
Using TemplatesAfter opening a ready-made template, you can edit the content and appearance as you would with any other file.
A template is basically the same as any other document, but objects on the first page of a template are copied toevery new page that's created in the document. This can be useful if you want to use the same layout across multiplepages.
If you do not want to use the same layout on a new page then you can edit or remove the template content on thatpage without affecting other pages in the document.
For each template there is a corresponding example Resource File that will show you how the filled-in templatemight look.
Saving TemplatesIn InPrint 3, you have the option to save your documents as templates. If you need to create resources withthe same layout over and over again, you can use a template to save time.
Simply create the resource with the layout that you require, click on the File tab, then click Save As → SaveTemplate As.
The default path for saving InPrint 3 templates is:
C:\Users\Public\Documents\Widgit\InPrint\Templates
Once your template is saved, you can open it from the Templates section of the File tab.
Remember: It's the first page of your file that will be the template page. This is copiedto all new pages that are created.
© Widgit Software 2018 Page 31 of 212

Get More TemplatesYou can download more templates from the Widgit website. To access more templates, click Templates on the Filetab, then click the Get More Templates button at the bottom of the screen.
Page 32 of 212 © Widgit Software 2018

Resource Packs
Widgit produce a wide range of symbol-supported learning materials and symbol stories, including extensive topic-based packs 'ready to go' for special and mainstream education, healthcare and home use. InPrint 3 comes with anumber of pre-installed resource packs that you can print out or customise.
Opening Resource PacksTo access the resource packs, open the File tab and click the Resource Packs button. You will then beshown a number of folders containing ready-made resource packs. Double-click to open the resource packof your choice.
Using Resource PacksAfter opening a file from a resource pack, you can choose to print it out or edit the content and appearance as youwould with any other file.
For many of the example resources there is a corresponding template that you can use to make resources with asimilar layout.
Note: Some resource packs downloaded from the Widgit website may include a newTopic Wordlist. Topic wordlists give access to specific vocabulary for a new topic. Youcan load these wordlists into new documents to have access to the same vocabulary.
Opening InPrint 2 Resource PacksInPrint 3 will open any of your InPrint 2 resource packs. On the File tab, click the Resource Packs button. To viewthe InPrint 2 resource packs installed on your machine, click the View Legacy Resources button at the bottom ofthe screen.
Double-clicking on a .cip file will import your old resource into InPrint 3 and allow you to edit it as you would any otherfile.
Clicking Save As on the File tab will give you the option to save the document as a .ipdoc file. Please note, youcannot open .ipdoc files in InPrint 2.
Get More Resource PacksYou can download a wide variety of ready-made resource packs from the Widgit website.
To access more resource packs, click the File tab, click the Resource Packs button on the left, then click the GetMore Resources button at the bottom of the screen.
© Widgit Software 2018 Page 33 of 212

SettingsThe Application Settings dialog can be used to customise the basic features of InPrint 3.
To access the application settings dialog, click the File tab, then click the Settings button.
The application settings are divided into 3 tabs:
Documents
On the Documents tab, you can adjust settings for:
Measurements and Rulers. Choose between Metric (mm/cm), Metric (mm only) and Imperial (Inches)units. You can also enable or disable rulers from being visible when the program opens.
Grids and Guides. Enable or disable the background grid and configure the appearance and frequency of itslines. You can also choose the colour of your page and document guides. Snapping to the background grid andsnapping to content can also be enabled or disabled in this section.
Spelling. Choose whether or not spelling errors are marked as you type.
Page 34 of 212 © Widgit Software 2018

System
On the System tab, you can adjust settings for:
Undo. Set how many times you can undo. Note: Larger numbers increase the memory usage of theapplication.
Auto Save. Toggle the Auto Save feature on or off. If you want to use the auto save feature, you can selecthow often your work is backed up using the drop-down menu.
Recent Lists. Clear your lists of recently used files.User Interface. Choose whether or not to use colour on the user interface.Mouse Wheel Support. Set the number of lines you wish to scroll each time the mouse wheel is rotated.Image Cache Size. Set the image cache size for the program.Settings and Defaults. Reset the program to its default settings.
© Widgit Software 2018 Page 35 of 212

Online
On the Online tab, you can adjust settings for:
Reporting. Choose to allow the program to report usage statistics. This will permit InPrint 3 to reportanonymous information back to Widgit Software on commonly used features and functions and allow us toimprove the software over time.
Proxy Settings. If your network uses a proxy server then you can enter the details here. Doing so will giveyou access to automatic updates and notifications of new versions.
Page 36 of 212 © Widgit Software 2018

Support and Training
To help get you up and running with InPrint 3, there are a variety of support and training materials that you can accessfrom the File tab.
Click the Support and Training button on the File tab to view the content in the dynamic panel. The content thatappears in this panel will vary depending on whether or not you are connected to the Internet.
If you are connected to the Internet then you will see a live webpage with links to videos, help sheets, onlinetraining sessions, FAQs, updates and much more.
If you are not connected to the Internet then you will see a static page with links to some basic support materialsand information on how to contact Widgit Support.
© Widgit Software 2018 Page 37 of 212

UpdatesThe latest version of InPrint 3 will always be available to download from https://download.widgit.com/.
InPrint 3 will automatically check for updates every time it is launched. When a major update has been released, ared bar will be displayed along the top of the launcher screen, giving you the option to download.
It is recommended that you update whenever you have the opportunity. In addition to improving the software, updatesalways include the latest version of the Widgit Symbols - ensuring that you have the largest and most up-to-datevocabulary.
Page 38 of 212 © Widgit Software 2018

Trial VersionsIf you would like to try InPrint 3, you can install a 21-day trial version of the program. The trial version has all thesame features as the purchased version, and you can request a trial key during the installation process.
The status of your trial will be displayed every time you open the program. A red notification bar along the top of thelauncher screen will show you how many days remain of your trial, it will also give you the option to activate with afull serial key if you have purchased the program.
© Widgit Software 2018 Page 39 of 212

Interface Overview
1. Create Toolbar - For creating frames, tables, lines and images2. Tab Bar - These tabs contain all the editing controls3. Dynamic Tabs - Different dynamic tabs appear, depending on what type of object you have selected4. Page Spread - This is the current page. You can scroll up and down to navigate through pages5. Scratch Area - Each Page Spread has its own area that is non-printable where you can place objects whilst
working.6. Symbol Chooser - For picking the appropriate symbols for text7. Resource Library - For adding your own images to the document8. Page Status Bar - For accessing the Page Manager, zoom, and object measurements9. Page Manager - For reordering, adding and deleting pages
Page 40 of 212 © Widgit Software 2018

The Tab BarThe tab bar runs along the top of the screen. Each tab contains controls for different features of the program. Thereare two types of tab:
Static tabs are always availableDynamic Tabs only appear when certain objects are selected.
Dynamic tabs have a coloured background.
List of TabsStatic TabsFile - Saving, loading, printing and settings. You can also access Templates, Recent files, Resource Packs, Supportand Training and Settings
Edit- Change the appearance of symbol and text content
View- Snapping, zooming and showing rulers, guides and grids
Pages- Add and delete pages, set up your document and add a document Header and Footer
Symbols- Choose wordlists, languages and check the spelling of the document
© Widgit Software 2018 Page 41 of 212

Dynamic TabsFrame (when a frame is selected) - Frame appearance controls
Speech Bubbles (when a Speech Bubble is selected) - Speech Bubble appearance controls
Table (when a table is selected) - Controls rows, columns, spacing and merging cells
Cells (when a table is selected) - Cell appearance controls
Line (when a line is selected) - Line appearance and measurement controls
Image (when an image is selected) - Flip, rotate, aspect ratio, edit colours and border appearance
Image Frame (when an image in a frame is selected) - Flip, rotate, clear image, edit colours and border appearance
Image Cell (when a table cell containing an image is selected) - Flip, rotate, clear image, edit colours and borderappearance
Arrange (when any object is selected) - Order, align, distribute and group objects
Header and Footer (when working in Header and Footer mode) - Page numbers and header and footer settings
Page 42 of 212 © Widgit Software 2018

Hide/Show Tab ControlsYou can hide and show any controls on a tab by collapsing different sections into a button. This can be useful if youare working on a small monitor or in a low resolution.
To Hide a control section, right-click on the Title and select Show as a button.
When a section is collapsed, pressing the button will show a pop out for the available controls.
To Show a section, right-click on the Title in the pop out and uncheck Show as a button.
© Widgit Software 2018 Page 43 of 212

Page SpreadsEach document is made up of a series of Page Spreads. These contain one or two pages depending if you are inBook Mode or Single Page Mode.
Scratch AreaEach spread has its own Scratch Area, thecoloured area that surrounds the page(s).
You can use the scratch area as a place to putobjects you don't currently want on any page.
Items in the scratch area will not be printed.
Moving itemsYou can move objects anywhere on the current Page Spread, but you cannot drag them over the Page Boundary.
If you want to move an object from one page to another, you can Cut (Ctrl+X) it from the first page and then Paste(Ctrl+V) it onto the other.
Page 44 of 212 © Widgit Software 2018

Keyboard ShortcutsFile Commands
Save Document Ctrl + SPrint Ctrl + P
Edit CommandsCut Ctrl + XCopy Ctrl + CCopy as Image Ctrl + Alt + C
Paste Ctrl + VPaste in Place Ctrl + Shift + V
Group Ctrl + GUngroup Ctrl + Shift + G
Undo Ctrl + ZRedo Ctrl + Y
Resize Keeping Aspect Ratio Shift + resize dragResize Keeping Centre Fixed Ctrl + resize drag
Text CommandsBold Ctrl + BItalic Ctrl + IUnderline Ctrl + U
Align Left Ctrl + LAlign Centre Ctrl + EAlign Right Ctrl + R
Symbol CommandsCycle Available Symbols F9Turn Symbol Off Shift + F9Toggle Symbols, Text and Symbols Only Modes F10Change Symbol Text F11
© Widgit Software 2018 Page 45 of 212

Select CommandsSelect Page Ctrl + ASelect All Text Ctrl + A (in a frame or cell)Select Paragraph Ctrl + H
Select Multiple Cells Ctrl + mouse clickDeselect Multiple Cells Ctrl + mouse click
Select Multiple Objects Ctrl or Shift + mouse clickDeselect Multiple Objects Ctrl or Shift + mouse click
Page Manager CommandsSelect Multiple Pages Ctrl + mouse clickSelect Contiguous Pages Shift + mouse click
Arrange CommandsSend to the Back Ctrl + Shift + [Send Backwards Ctrl + [Bring to the Front Ctrl + Shift + ]Bring Forwards Ctrl + ]
View CommandsZoom In Ctrl + Numpad+Zoom Out Ctrl + Numpad-
ToolsCheck Spelling F7Online Help F1
Page 46 of 212 © Widgit Software 2018

Creating ObjectsYou can create objects using the buttons on the Create toolbaron the left side of the screen. Each of these buttons has a fly outmenu with more options. You can create:
Frames - More on creating frames
Tables - More on creating tables
Lines - More on creating lines
Images - More on creating images
Frame and Table Symbol ModesWhen you create a frame or a table, you can decide whether it will be created in Symbol and Text, Text Only orSymbols Only mode.
More on Symbol Modes
© Widgit Software 2018 Page 47 of 212

Symbol ModesWhen you create a frame or a table, you can set which Symbol Mode it is set to.
Symbol and Text mode
Text Only mode
Symbols Only mode
The default size for objects created in Symbol and Text mode is taller than Text Only objects. They are both thesame default width. You can change the size of an object once it has been created.
Symbol and Text Frame Text Only Frame Symbols Only Mode
Changing Symbol ModesYou can change the symbol mode of a frame or table by using the buttons on the Frame or Cells tab, depending onwhat you have selected.
The Symbol and Text button will change mode and automatically add symbols to any text in the frame orcell.
The Text Only button will change mode and hide all the symbols with any text in the frame or cell.Changing to Text Only mode will keep any symbol choices you have made, so if you change the modelater then the symbols will appear as they were.
The Symbols Only button will change mode and hide all of the text within the frame or cell, leaving onlythe symbol. When you click on a Symbols Only frame, the text associated with the symbol will bedisplayed in grey, reducing the size of the symbol to fit. Clicking away from a Symbols Only frame will hidethe text, the size of the symbol will then increase to fill the frame or cell. Changing to Symbols Only modewill keep any text changes you have made, so if you change mode later the same text will appear.
Replace with Image opens a dialog that allows you to fill the selected object with an image. Please notethat when you do this, any previous content in the object will be removed.
When you change the mode of a frame or table, its size may change, depending on theSizing Type the object is set to. More on Sizing Types
Page 48 of 212 © Widgit Software 2018

Sizing TypesThe Sizing Type of a frame or table affects the way the size of the content and object change as you add content.
Contents Fills FrameIn this mode the content will expand to fill the frame or cell.
If the object is made smaller or larger then the content will resize to always be as big as possible.
Content ShrinksIn this mode, the content will try to be at the specified symbol and text size.
If the object is made smaller then the content will shrink to fit. If the object is made larger then the content will getbigger, but only to the specified size.
Frame Grows with ContentIn this mode, the frame will get larger as more content is added into it. The content will be at its specifiedtext and symbol size.
Please note: This mode is not available for table cells.
Frame is FixedIn this mode, the text and symbol size is fixed and will not change as you change the size of the frame.
If the frame or cell is made smaller than the content, the content willoverflow. When a frame has too much content, it will be indicated bythe Overflow Warning indicator. To see all the content, the objectshould be made bigger, or the sizing type changed.
© Widgit Software 2018 Page 49 of 212

Default Sizing TypesClear and Styled FramesClear and styled frames are created in Frame Grows with Content mode, so they will expand ascontent is typed into the frame.
Flashcard TablesFlashcard style tables are created in Content Fills Frame mode. This is because you usually wantcontent in cells to be as large as possible.
You can use Tidy Sizes on the Edit tab if you want all the content to be the same size.
Thin line TablesThin line tables are created in Content Shrinks mode. This is so you can resize your tabular data so it willstay at the set symbol and text size, unless the cell is too small.
Page 50 of 212 © Widgit Software 2018

Clipboard ActionsYou can control the clipboard from the Edit tab.
Basic ActionsCut or Ctrl + X copies the selected object or content to your clipboard and then removes the original
Copy or Ctrl + C copies the selected object or content to your clipboard
Paste or Ctrl + V places the copied object or content into your document
Copy Symbols into Other ProgramsYou can copy content from InPrint and paste it into other programs, such as MicrosoftWord or PowerPoint.
Select the frame or table then press Ctrl + Alt + C or click the Copy as Image button.The Copy as Image button is available on the Copy drop-down menu on the Edit tab.
© Widgit Software 2018 Page 51 of 212

Paste in PlaceWhen you do a basic paste, the copied object will be attached to your mouse pointer foryou to place wherever you want on the page.
You may want to paste something from one page to another but keep the object inexactly the same place for a consistent layout.
Do do this, press Ctrl + Shift + V or click the Paste in Place button available on thePaste drop-down menu on the Edit tab.
Note: you can also Duplicate whole pages from the Page Manager.
Page 52 of 212 © Widgit Software 2018

FramesFrames are containers that can be placed anywhere on a page, they can contain:
Symbols and Text contentText Only ContentSymbol Only ContentImages
Frames can be clear, so their content appears without a border or background, or they can be styled in a number ofways. You can also create 'Speech Bubble' frames.
© Widgit Software 2018 Page 53 of 212

Creating Frames
To create a frame:
Click the Frame button on the Create toolbar on the left of the screen.
Select the content mode, choosing from Symbols and Text, Text Only or SymbolsOnly.
Select the type of frame, choosing from Styled Frame, Clear Frame or Speech Bubble .
You can also create a frame with your Pinned Style.
Note: You can change the appearance of the frame later.
When you have selected which type of frame tocreate, a preview of the frame will be attachedto your mouse pointer so that you can seeexactly where it will be when you place it in yourdocument.
Click on the page with the left mouse button toplace the frame. If you want to cancel the framecreation, you can click the right mouse buttonor press the Esc key on your keyboard.
Page 54 of 212 © Widgit Software 2018

When the frame has been placed, you can move it by clicking on anyedge of the frame and dragging, and you can resize it with the sizinghandles.
When creating, moving or resizing a frame, if you have Snappingturned on, your framewill snap to line up with other items or the page boundary. Snapping points are indicatedwith pale grey lines.
Once you have created your frame, you can click in the frame to start typing.
More on writing in textMore on Writing in symbols
You can also add an image to the frame with the Replace with Image button on the Frames tab.
More in images in cells
© Widgit Software 2018 Page 55 of 212

Speech BubblesTo create a speech bubble, click the Frame button in the Create toolbar on the left of the screen to open the SpeechBubble menu. Here, you can choose from:
Three types of Speech BubbleThree types of Thought BubbleThree types of Action Bubble
You can also set the Corner Direction for the bubble.
When you have selected the speech bubble you require, you can place it in your document.
Selecting, moving, resizing and measurement controls all work in the same way asregular frames.
Page 56 of 212 © Widgit Software 2018

Styling Speech BubblesWhen you have placed your speech bubble, you can change its appearance.
Change the type of bubble and direction from the Bubble Options button on theSpeech Bubble tab.
You can also change the Line Colour and Background Colour of the bubble.
© Widgit Software 2018 Page 57 of 212

Frame SelectionSelecting a frame to write
To select a frame and start writing in it, click anywhere in the frame.
When the frame is selected for writing, you will see a dashed linearound it and a text cursor will appear in the frame.
Selecting a frame to moveTo select a frame to move or resize it, right-click anywhere in the frame and choose Select Frame from the contextmenu.
If the frame is currently selected for writing, you can select it for moving by clicking on the edge of the frame.
When the frame is selected for moving or resizing, you will see a solid line around it and 'handles' will appear thatyou can use to control moving and resizing the frame.
Selecting multiple framesTo select multiple frames you can either click and drag around the frames, or click on the frames while holding downthe Ctrl key.
You can change the properties of all the selected frames at the same time. This can be really useful for:
setting the frame stylingchanging font style and sizechanging the symbol colour mode and skin tonearranging the frames
If you want to resize the selected frames as if they were one object then you can group them. More on grouping
Page 58 of 212 © Widgit Software 2018

Selecting all frames on all pagesYou can select all of the frames in the entire document at the same time.This can be particularly useful if you want to change the styling properties ofevery frame all at once.
From the Page Status Bar at the bottom of the screen, click Select thenSelect Frames.
Note: When you select objects over multiple pages, you cannot move orresize them.
© Widgit Software 2018 Page 59 of 212

Frame Moving and ResizingMoving a Frame
Select the frame(s) you want to move, then click and drag them by theedge of the frame between the resizing handles.
You can nudge a selected frame to move it a small amount by pressingthe arrow keys on your keyboard.
If Snapping is turned on, the frame will 'snap' into position to line up with other objectsas it is moved.You can align frames with other objects using the options on the Arrange tab.
Moving a Frame to a precise locationTo move a frame to a precise location:
Select the frame.Click the Measurement and Locking button on the Page Status
Bar at the bottom of the screen.On the dialog that appears, you can set the X and Y coordinates
of the top left corner of the frame.
Note: You can also open the Measurement and Locking dialog by clicking'Measurement…' on the 'Frame' tab.
Moving a Frame between pagesYou cannot drag a frame from one page spread to another. To move a frame, select it and use the toolbarbuttons on the Edit tab or shortcut keys to cut the frame (Ctrl+X) and paste (Ctrl+V) it onto the desiredpage.
Page 60 of 212 © Widgit Software 2018

Resizing a FrameYou can resize a selected frame by dragging the resizing handles at theedges of the frame. If snapping is on, the frame will 'snap' to align itself withother objects as it is resized.
If you want to resize multiple frames as if they were one object then you cangroup them.
How the content of a frame behaves when a frame is resized will depend on the frame'ssizing type.
Making a Frame a precise sizeYou can set a frame to be an exact size by selecting the frame and specifying the Widthand Height on the Frame tab.
© Widgit Software 2018 Page 61 of 212

Rotating a Frame
Frames can be rotated both clockwise and anti-clockwise using the Rotate buttons located on the Frame tab.
To rotate a frame:
Select the frame.Click on the rotate button of your choice from the frame tab.Each click of the rotate button will rotate the selected frame 90º clockwise or anti clockwise depending on
the button you use.
Rotate Anti-clockwise
Rotate Clockwise
The text and symbol content of the frame can be edited as normal after rotation.
Page 62 of 212 © Widgit Software 2018

Frame StylingYou can edit the properties and appearance of the selected frame(s) on the Frame tab.
ColoursClick the Line Colour or Background Colour buttons to choose analternative line colour from a basic colour palette. If you click the MoreColours option then you can select a custom colour.
More about the Colour Palette.
© Widgit Software 2018 Page 63 of 212

Line ThicknessTo change the line thickness, either type in the box or click in the box once and click the up and down arrows. Linethickness is set in mm. A line thickness of 0mm will hide the line completely.
You can set the line to be drawn Inside or Outside the frame boundaries. To change this setting, click the MoreOptions button in the Styling section of the Frame tab to open the Frame Style dialog. On the Frame Styledialog, select Draw Line Inside Frame.
Corner RadiusTo change the corner radius of a frame, type in the box, click the up and down arrows or click in the box and pressthe up and down keys on your keyboard. Corner radius is set in mm. A corner radius of 0mm will mean that the framehas square corners.
You can also set the corner radius as a Percentage.
To set the corner radius as a percentage, click the More Options button in the Styling section of the Frame tabto open the Frame Style dialog. Tick Use Percentage Corner Radius.
Page 64 of 212 © Widgit Software 2018

Line StyleTo change the appearance of the frame line style, click the More Options button in the Styling section of theFrame tab to open the Frame Style dialog.
There are 5 line styles to choose from.
Solid LineDashed LineDotted LineDot-Dash LineDot-Dot-Dash Line
© Widgit Software 2018 Page 65 of 212

Drop Shadow and EffectsYou can add a drop shadow and various other effects to a frame.
To add a drop shadow, click the Drop Shadow button.
To change the appearance of the drop shadow or to access different effects, click the More Options button at thebottom of the Styling section of the Frame tab to open the Frame Style dialog.
Page 66 of 212 © Widgit Software 2018

Choosing Frame EffectsIn the Frame Effect section of the Frame Style dialog, you can choose from:
Drop Shadow
Curved Glow
Solid Border
For each of these, you can set the effect:
ColourColour transparencyThickness
To set the transparency of a drop shadow, curved or solid border, click the Effect Colour button to open the colourpalette and adjust the transparency slider on the right of the palette.
© Widgit Software 2018 Page 67 of 212

Pinned Styles
When you have styled your frame, you can 'pin' its style sothat you can create more frames with the same style. To dothis, right-click on the frame and select Pin this Style.
To create a new frame using the pinned style, select UsePinned Style from the new frame drop-down on the Createtoolbar.
InPrint 3 will remember the frame style that you have pinneduntil you pin a new one, even if the program is restarted.
More on Pinned Styles
Page 68 of 212 © Widgit Software 2018

Frame Margins and AlignmentYou can change the position of text and symbol content in a frame from the Margins and Alignment options on theFrame tab.
AlignmentUse the alignment buttons to set where the content ispositioned within a frame:
Top leftTop centreTop right
Middle leftMiddle centreMiddle right
Bottom leftBottom centreBottom right
MarginsYou can change the frame margins to set how far the content is positioned away from the edge of the frame.
Use the Increase Margins button to make the margins bigger.
Use the Decrease Margins button to make the margins smaller.
You can set specific margins by clicking the More Options button.
From here, you can set specific margins in mm, and set whether theframe has uniform margins, or different values for the top, bottom, leftand right.
© Widgit Software 2018 Page 69 of 212

Frame Size and LockingNOTE: The way a frame behaves when it has content added orresized depends on the Sizing Type of the frame. This can be setfrom the Frame tab.
More on Sizing Types.
Setting the Size of a FrameYou can change the size of a frame by dragging the resizing handles.
You can also set the Width and Height to precise measurements by typing into theboxes, clicking the up and down arrows or pressing the up and down keys on yourkeyboard.
Click on Measurement… for more options.
From this dialog, you can:
set X and Y co-ordinates of the top left corner of the frameset Width and Heightlock the Size and Positionlock the Contents
Related SizesYou can set whether the Width and Height are linked or not. If the width and height are linked then the object willkeep its original aspect ratio.
Width and height linked
Width and height not linked
LockingLocking Size and Position means that you cannot resize or move the frame. You can still edit the contentand change the styling.
Locking Contents means that you cannot edit the content and styling. You can still move and resize theframe.
A frame that is locked will show one of the lock indicators when selected.
Page 70 of 212 © Widgit Software 2018

Tables
You can use tables in your InPrint 3 documents to help with the layout of your content.
Flashcards, labels, vocabulary grids, timetables, name badges, word searches, communication boards and muchmore can be created by adding a table from the Create toolbar.
Your table's appearance and size can be altered at any time using the Table Layout and Cells tabs.
© Widgit Software 2018 Page 71 of 212

Creating Tables
To create a table:
Click the Table icon in the Create toolbar to the left of the screen.
Select the content mode, choosing from Symbols and Text, Text Only or SymbolsOnly.
Select the type of table, choosing from Flashcards or Table.
You can also create a table with your Pinned Style .
Note: You can edit either type of table later if you want to changeits appearance or add or delete rows and columns.
When you select the type of table that you would like to create,the table creator will appear under your mouse pointer. The tablecreator shows you the number of rows and columns and the totalnumber of cells that will be created.
Drag the table creator to the dimensions you require, click onceto confirm your choice and create the table. A preview of thetable will be attached to your mouse pointer so that you can seeexactly where it will be when you place it in your document.
Page 72 of 212 © Widgit Software 2018

Left-click on the page to place the table. Right-click tocancel creating the table, you can also press the Esc keyon your keyboard to cancel creating the table.
When the table has been placed, you can move it bydragging the edges and resize it with the sizinghandles.
When the table has been placed, you can click in a cellto start typing.
When creating, moving or resizing a table, if you have Snappingturned on, your tablewill snap to line up with other items or the page boundary. Snapping points are indicatedwith pale grey lines.
Tab between cellsTo quickly fill your table with content, you can tab between cells.
More on writing in textMore on writing in symbols
You can also add an image to the table cell by clicking the Replace with Image button on the Cells tab.
More in images in cells
© Widgit Software 2018 Page 73 of 212

Table and Cell SelectionSelecting a cell to write
To select a cell and start writing in it, click anywhere inthe cell.
When the cell is selected for writing, you will see adashed line around the table and a text cursor willappear in the cell.
Note: You can use the Tab key to movethe cursor between table cells.
Selecting a table to moveTo select a table to move or resize it, right-click anywhere in the table and choose Select Table from the contextmenu.
If a cell in the table is currently selected for writing, you can select the table for moving and resizing with the contextmenu option, or by clicking on the edge of the table.
When the table is selected for moving or resizing, you will see a solid line around it and 'handles' will appear that youcan use to control moving and resizing the table.
Selecting cellsTo select a cell in a table:
Click anywhere on the table to select itClick on the cell you want to select.
To select multiple cells:
Click anywhere on the table to select itHold down the Ctrl key and click on the cells
that you want to select. Selected cells will have ashaded background.
Or
Left click and drag across the table to select multiplecells.
Page 74 of 212 © Widgit Software 2018

Selecting multiple tablesTo select multiple tables you can left-click and drag around the tables, or click on each of the tables whilst holdingdown the Ctrl key.
You can change the properties of all the selected tables at the same time. This can be really useful for:
setting the table stylingchanging font style and size modechanging the symbol colour mode and skin tonearranging the tables
If you want to resize the selected tables as if they were one object then you can group them. More on grouping
Selecting all tables on all pagesYou can select all of the tables in the entire document at the same time.This can be particularly useful if you want to change the styling properties ofevery table cell all at once.
From the Page Status Bar at the bottom of the screen, click Select thenSelect Tables.
Note: When you objects selected over multiple pages, you cannot move orresize them.
© Widgit Software 2018 Page 75 of 212

Table MovingTo move a table, Select the table(s) that you want tomove, then drag them by the edge of the tablebetween the resizing handles.
You can nudge a selected table to move it a smallamount by pressing the arrow keys on your keyboard.
If Snapping is turned on, the table will 'snap' into position to line up with other items asit is moved.You can align tables with other items using the options on the Arrange tab.
Moving a Table to a precise locationTo move a table to a precise location:
Select the table.Click the Measurement and Locking button on the Page Status
Bar at the bottom of the screen.On the dialog that appears, you can set the X and Y coordinates
of the top left corner of the table.
Note: You can also open the Measurement and Locking dialog by clicking 'Edit Table Measurements…' on the'Table Layout' tab or 'Measurement…' on the 'Cells' tab.
Moving a Table between pagesYou cannot drag a table from one page spread to another. To move a table, select it and use the toolbarbuttons on the Edit tab or shortcut keys to cut the table (Ctrl+X) and paste (Ctrl+V) it onto the desiredpage.
Page 76 of 212 © Widgit Software 2018

Table SizeYou can resize tables in different ways:
Resize the whole tableResize rows and columnsResize individual cells
NOTE: The way a table behaves when it has content added or resizeddepends on the Sizing Type of the cells in the table. This can be setfrom the Cells tab.
Different cells in a table can have different Sizing Types.
Resizing a Table
You can resize a selected table by dragging the resizing handles at the edges of the table. If Snapping is on, thetable will 'snap' to align itself with other objects as it is resized.
If you want to resize multiple tables as if they were one object then you can group them.
How the contents of a table cell behave when the table is resized will depend on thecell's sizing type.
© Widgit Software 2018 Page 77 of 212

Making a Table a precise sizeTo make a table a precise size:
Select the table.Click 'Edit Table Measurements' on the 'Table Layout' tab to open the
Measurement and Locking dialog.Specifying the Width and Height on the left of the Measurement and Locking
dialog.
Note: You can also open the Measurement and Locking dialog by clicking 'Measurement…' onthe 'Cells' tab or by clicking the Measurement and Locking button on the Page Status Bar atthe bottom of the screen.
Advanced Table MeasurementsYou can use the advanced Table Controls to gain more precise control over the whole table.
Click on the Edit Table Measurements button on the Table Layout tab to open the Measurement and Lockingdialog. If only the Basic Controls are displayed, click the Table Controls button to expand the dialog.
Select Change Table Size to edit the whole table. You can see how your changes affect the row, column and cellsizes. You can click in an individual cell to see its measurements.
From this dialog you can also:
Lock the table size and positionLock the table contentsPosition the top left of the table relative to the page.
Page 78 of 212 © Widgit Software 2018

Row / Column SizeYou can resize a row or column by dragging the row/column boundary with your mouse.
Making a Row / Column a Precise SizeYou can set an exact size for a row or column by changing the Row Height or Column Width on the Table Layouttab.
Reset Row / Column SizesYou can reset the row or column sizes to be all the same byselecting Distribute Rows Evenly or Distribute ColumnsEvenly on the Table Layout tab.
Distribute Rows Evenly
Distribute Columns Evenly
© Widgit Software 2018 Page 79 of 212

Advanced Row / Column SizeYou can use the advanced Table Controls to gain more precise control over the whole table.
Click the Edit Table Measurements button on the Table Layout tab to open the Measurement and Lockingdialog. If only the Basic Controls are displayed, click the Table Controls button to expand the dialog.
Select Change Row and Column Sizes to edit the rows and columns rather than the table.
If you click in a cell on the table, your changes will only affect the row and column that the cell belongs to.If you have the whole table selected, your changes will affect all rows and columns.
Edit the values for Column Width and Row Height. The table will change as you edit, so that you can see how yourchanges affect the measurements, table and cell sizes.
Note: You can also open the Measurement and Locking dialog by clicking 'Measurement…' on the 'Cells' tab or byclicking the Measurement and Locking button on the Page Status Bar at the bottom of the screen.
Page 80 of 212 © Widgit Software 2018

Cell SizeYou can change the size of individual cells in a table by splitting and merging cells and by creating irregular cellswith the cell margins.
Irregular cellsYou can change the Cell External Margin to make a cell smaller than other cells. This can be particularly useful forcreating tick and answer boxes.
Click on the Irregular Cells button on the Table Layout tab
Select the cell you want to change, or select multiple cells using the Ctrl key.
You can set the specific Cell Size you require, or change the Cell External Margin.
Merging cellsTo merge cells, select the cells that you want to combine and click Merge Cells on the Table Layouttab.
© Widgit Software 2018 Page 81 of 212

Splitting cellsSelect the cell you want to change, then click Split Cells on the Table Layout tab. You can choose to:
Split Cells horizontally
Slip Cells vertically
Page 82 of 212 © Widgit Software 2018

Add and Remove Rows / ColumnsYou can add rows and columns to a table. You can remove rows and columns from a table.
Add RowsTo add a row to your table, click in a cell on the row next to where you want to add a new row, then clickInsert Row on the Table Layout tab. On the sub-menu that appears, you can choose if the new row willappear above or below the current row:
Add Row Above
Add Row Below
Remove RowsSelect a row by clicking in one of its cells. You can select more than one row by holding the Ctrl key andclicking in a cell on every row that you want to remove.
Click the Remove Row button on the Table Layout tab. This will remove all rows containing selected cells.
Add ColumnsTo add a column to your table, click in a cell in the column next to where you want to add a new column,then click Insert Column on the Table Layout tab. On the sub-menu that appears, you can choose if thenew column will appear on the left or the right of the current column:
Add Column Left
Add Column Right
Remove ColumnSelect a column by clicking in one of its cells. You can select more than one column by holding the Ctrlkey and clicking in a cell in every column that you want to remove.
Click the Remove Column button on the Table Layout tab. This will remove all columns containing selected cells.
© Widgit Software 2018 Page 83 of 212

Locking Table SizeWhen you add rows and columns to an unlocked table, the table will get bigger. If you want your table to remain thesame size when you add rows and columns then you can lock it first.
To lock the size of a table:
Select the table.Click the Measurement and Locking button on the Page Status Bar at the bottom of the screen.
On the dialog that appears, tick Size and Position.
Unlocked table:
Locked table:
Note: You can also open the Measurement and Locking dialog by clicking 'Edit Table Measurements…' on the'Table Layout' tab or 'Measurement…' on the 'Cells' tab.
Page 84 of 212 © Widgit Software 2018

Table SpacingYou can change the amount of space between cells in a table. This can be useful for creating tables containingtabular data or flash cards for cutting out.
Click in a cell, then click the Increase or Decrease buttons on the Table Layout tab to change the spacing for thewhole table.
Row / Column SpacingYou can change the spacing for individual rows and columns from the advanced Table Controls.
Click the Edit Table Measurements button on the Table Layout tab to open the Measurement and Lockingdialog. If only the Basic Controls are displayed, click the Table Controls button to expand the dialog.
Select Change Row and Column Sizes to edit the rows and columns rather than the whole table.
If you click in a cell on the table, your changes will only affect the row and column that the cell belongs to.If you have the whole table selected, your changes will affect all rows and columns.
Edit the values for Column Spacing and Row Spacing. The table will change as you edit, so that you can see howyour changes affect the measurements, table and cell sizes.
© Widgit Software 2018 Page 85 of 212

Cell Margins and AlignmentYou can change the position of text and symbol content in table cells with the Margins and Alignment options onthe Cells tab.
AlignmentClick the alignment buttons to set where the content ispositioned in a table cell:
Top leftTop centreTop right
Middle leftMiddle centreMiddle right
Bottom leftBottom centreBottom right
MarginsYou can change the cell margins to set how far the content is positioned away from the edge of the cell.
Use the Decrease Margins button to make the margins smaller.
Use the Increase Margins button to make the margins bigger.
You can set specific margins by clicking the More Options button.
From here you can set specific margins in mm, and set whether thecell has uniform margins or different values for the top, bottom, leftand right.
Page 86 of 212 © Widgit Software 2018

Rotating a Cell
Cells can be rotated both clockwise and anti-clockwise using the Rotate buttons located on the Cells tab.
To rotate a table cell:
Select the cell.Click on the rotate button of your choice from the Cells tab.Each click of the rotate button will rotate the selected cell 90º clockwise or anti clockwise depending on the
button you use.
Rotate Anti-clockwise
Rotate Clockwise
The text and symbol content of the cell can be edited as normal after rotation.
© Widgit Software 2018 Page 87 of 212

Table and Cell StylingYou can edit the properties of a selected table cell and change its appearance on the Cells tab.
Selecting what to styleYou can select different parts of the table:
One cell - click in the cellMultiple cells - hold down Ctrl and click in each cellWhole table - click on the table boundariesMultiple tables - hold down Ctrl and click in each table
ColoursClick the Line Colour or Background Colour buttons to choose analternative colour from the basic colour palette. Click theMore Colours option to select a custom colour. Drag thetransparency slider to make the colour solid or transparent.
More about the Colour Palette.
Page 88 of 212 © Widgit Software 2018

Line ThicknessTo change the line thickness, type in the box, click the up and down arrows or click in the box and press the up anddown keys on your keyboard. Line thickness is set in mm.
You can set the line to be drawn Inside or Outside the cell boundaries. By default, the line is drawn outside the cellboundary. To change this, click the More Options button in the Styling section of the Cells tab to open theFrame Style dialog. Then tick Draw Line Inside Frame.
Corner RadiusTo change the corner radius of a cell, type in the box, click the up and down arrows or click in the box and press theup and down keys on your keyboard. Corner radius is set in mm. A corner radius of 0mm will mean that the cell hassquare corners.
You can also set the corner radius as a Percentage. You can use this to create a round cell by setting the cornerradius to 100%.
To set the corner radius as a percentage, click the More Options button in the Styling section of the Cells tab toopen the Frame Style dialog. Tick Use Percentage Corner Radius.
© Widgit Software 2018 Page 89 of 212

Line StyleTo change the appearance of the table line style, click the More Options button in the Styling section of theCells tab to open the Frame Style dialog.
There are 5 Line Styles to choose from.
Solid LineDashed LineDotted LineDot-Dash LineDot-Dot-Dash Line
Page 90 of 212 © Widgit Software 2018

Drop Shadow and EffectsYou can add a drop shadow and various other effects to a table cell.
To add a drop shadow, click the Drop Shadow button.
To change the appearance of the drop shadow or access different effects, click the More Options button in theStyling section of the Cells to open the Frame Style dialog.
Setting Frame effects
In the frame effects dialog you can set:
Drop ShadowCurved GlowSolid Border
For each of these you can set the effect:
ColourColour transparencyThickness
Drop Shadow
Curved Glow
Solid Border
© Widgit Software 2018 Page 91 of 212

Pinned Styles
When you have styled your table, you can 'pin' itsstyle so that you can create more tables with thesame style. To do this, right-click on the table andselect Pin this Style.
To create a new table using the pinned style, selectUse Pinned Style from the new table drop-down onthe Create toolbar.
InPrint 3 will remember the table style that you havepinned until you pin a new one, even if the program isrestarted.
More on Pinned Styles
Page 92 of 212 © Widgit Software 2018

Lines
You can add lines and arrows to your work to help create a wide variety of resources. Lines can be used to labeldiagrams, explain the order and flow of processes, provide space for writing or simply provide decoration for items onyour page.
A line's size and appearance can be altered at any time with the options on the Line tab.
© Widgit Software 2018 Page 93 of 212

Creating a Line
Lines can be created using the Create Toolbar. Clicking the Line button gives you the option to add two types ofline to your document.
A single Line will be created.
Use Continuous Line to create a line with multiple points.
You can also create a line with your Pinned style.
Single LineTo create a single line, click the Line button on the ObjectCreation toolbar and select Line from the drop-down. Your cursorwill change to a crosshair.
Click once on the page to start drawing a line, a dashed line willappear to show you where the line will be drawn.
Click again to finish drawing and create the line. You can also clickand drag to create a line.
Continuous LineTo create a line with multiple points, select Continuous Line from the Line drop-down on the Create toolbar. Yourcursor will change to a crosshair.
Click once on the page to set the start point, a dashed line will appear to show you where the line will be drawn. Moveyour mouse to the position for the next point and click to add a new point, creating a starting position for the nextsection of your line. Repeat these steps as many times as you need to create a continuous line in the style yourequire. Double-click to finish drawing and create the last section of the line.
Page 94 of 212 © Widgit Software 2018

Line AppearanceThe appearance of single or continuous lines can be altered in a number of ways using the Line tab.
Line StyleThere are 5 Line Styles to choose from in the drop-down menu:
Solid Line
Dashed Line
Dotted Line
Dot-Dash Line
Dot-Dot-Dash Line
ThicknessTo change the line's thickness, type in the box, click the up and down arrows or click in the box and press the up anddown keys on your keyboard.
Line ColourClick the Line Colour or Background Colour buttons to choose analternative colour from the basic colour palette.
Click the More Colours option to select a custom colour. Drag thetransparency slider to make the line colour solid or transparent.
More about the Colour Palette.
© Widgit Software 2018 Page 95 of 212

Line Start and EndThere are 4 end styles available in the drop-down for the Line Start and Line End:
No Arrow
Open Arrow
Solid Arrow
Circle
Pinned StylesWhen you have styled your line, you can 'pin' its style so thatyou can create more lines with the same style. To do this, right-click on the line and select Pin this Style.
To create a new line using the pinned style, select Use PinnedStyle from the new line drop-down on the Create toolbar.
InPrint 3 will remember the table style that you have pinned untilyou pin a new one, even if the program is restarted.
More on Pinned Styles
Page 96 of 212 © Widgit Software 2018

Line Controls and SizeYou can use the options on the Line tab to make lines a specific lengthor position them on a specific angle.
Line HandlingYou can move a line by dragging from the middle of the line.
You can change a line by dragging the handles at the ends of the line.
If you have Snap to Content turned on, the handles of the line will snap to otherobjects, making it easy to create diagrams and flow charts.
Snap to 45°If you have Snap to 45° turned on, when you move the handles of a line, the line willsnap to all the 45° points.
LengthYou can change the length of a line manually by selecting and dragging it to alarger or smaller size.
You can also use the Length box on the Line tab. Click on the line to select it,then type in the Length box, click the up and down arrows or click in the box andpress the up and down keys on your keyboard. Line length is specified in cm/mm.
Angle From VerticalYou can change the angle of a line manually by selecting and dragging one of thehandles to a different position.
You can also use the Angle from Vertical box in the Line tab to change theangle. Click on the line to select it, then click the up and down arrows in theAngle from Vertical box to increase or decrease the angle of your line fromvertical. Alternatively you can type the angle value directly into the box.
© Widgit Software 2018 Page 97 of 212

LockingYou can lock the size and position of a line by clicking theMeasurement and Locking button on the Page StatusBar at the bottom of the screen.
Selecting all lines on all pagesYou can select all of the lines in the entire document. This can beparticularly useful for changing the appearance of all lines at once.
On the Page Status Bar at the bottom of the screen, click Select thenSelect Lines.
Note: When you select objects over multiple pages, you cannot move orresize them, only change their appearance.
Page 98 of 212 © Widgit Software 2018

Images
You can add Images to your InPrint 3 documents from a number of sources, using them to replace symbols or asparagraph graphics.
From the Create toolbar, you can add images from your My Pictures folder, Browse for Pictures saved elsewhereon your computer or choose from over 4000 Widgit Media files which come pre-installed with InPrint 3.
You can also copy images from the web and paste them directly into your documents.
© Widgit Software 2018 Page 99 of 212

Adding ImagesYou can add images to your document from a range of sources.
You can add images straight onto the page, or into a Frame or Table Cell.
Adding a Widgit Media ImageWidgit Media is a large collection of graphics, included with InPrint 3.They cover a wide range of subjects and can be used for building upscenes and decorating pages.
You can access Widgit Media from the Resource Library on the right,or by selecting Widgit Media from the image option in the Createtoolbar.
When you have found the image you want to use, you can click once toselect it and again to drop it onto the page, or click and drag it onto thepage.
Adding a Widgit Symbol as an ImageAs well as writing with symbols, you can add them as graphics to yourdocument.
Type the word for a symbol in the box at the bottom of the SymbolChooser on the right and click Find Symbol. When you have foundthe symbol you want to use, you can click once to select it and againto drop it onto the page, or click and drag it onto the page.
You can also add a Widgit Symbol without displaying text underneathusing Symbols Only mode.
Page 100 of 212 © Widgit Software 2018

Black and White / Monochrome SymbolsAll Widgit Symbols can be displayed in colour or monochrome (where you can choose the line colour).
Click the Show in Colour button on the symbol chooser to toggle symbol colour on and off.
Adding Your Own ImageUse the Resource Library to browse your computer or network to findyour own images.
You can also navigate your images by selecting Browse for Picturefrom the image drop-down on the Create toolbar.
You can also drag images directly from WindowsExplorer into your document.
Adding an Image from a WebsiteYou can add an image from a website to your document.
Right-click on the image in your browser and select Copy Image. Then press Ctrl + V in InPrint to paste the image.
© Widgit Software 2018 Page 101 of 212

Resource LibraryThe Resource Library, on the right of the screen, provides you withquick access to images on your machine or network as well asover 4,000 Widgit Media files.
By default, the resource library contains links to your personal MyPictures folder, My Computer, and Widgit Media. Files in thesefolders will be displayed as thumbnails that you can click on toadd the image to your document, either as images orreplacement symbols.
Navigating the Resource LibraryClicking on a disk or folder in the resource library will display itscontents and subfolders as thumbnails.
Use the Navigation buttons and address bar at the top of theresource library to help you move back and forth through your filesand folders.
Click the Home button to return to the top level of the library.
Page 102 of 212 © Widgit Software 2018

Using an Image from the Resource LibraryWhen you have found the image you want to use, you can click onceto select it and again to drop it onto the page, or click and drag itonto the page. The image will remain attached to your cursor until youput it on the page.
You can right-click to cancel your selection.
Dock and Undock the Resource LibraryBy default the Resource library is docked underneath the symbolchooser on the right of the program.
The on-screen position of the resource library can be changed ifyou click the dock / undock option. When this option is clicked,the resource library window will become free-floating, allowing youto drag and position it in an different location.
Click the dock / undock option to move the window back to thetoolbar or manually drag it back to the bottom right corner to snapit into place.
© Widgit Software 2018 Page 103 of 212

Personalising the Resource LibraryYou can add your own shortcuts to the Resource Library to make it easier to access your favourite graphics.
Creating shortcutsTo create a shortcut to a file or folder, right-click on it in theResource Library and select Add shortcut to library from thecontext menu.
The shortcut will be created at the top level of the ResourceLibrary, click the Home button to return to the top level.
Note: You can create shortcuts to images that you use all the time, like photographs oryour organisation's logo.
Page 104 of 212 © Widgit Software 2018

Favourites
If you have lots of different folders you like to take images from to use in your resources you can set up a list offavourite locations to navigate to at the click of a button.
In the address bar next to the folder path you will notice a grey star, click this to make the selected folder a favouriteand turn the star yellow.
Your full list of favourites can be viewed byclicking on the Favourites button at the top ofthe resource library. Click on an option in the listto be taken to its corresponding location.
Folders can be setup to help you manage andstore your favourites.
Legacy Widgit Pictures
InPrint 3 comes with over 4000 new Widgit Media graphics you can view through the resource library. You can alsouse the resource library to view the old Widgit Pictures graphics which were installed with older versions of InPrint.
To access these select the Show Legacy Widgit Pictures option at the top of the resource library. Once selected ashortcut to the Widgit Pictures will be created at the top level of the resource library.
© Widgit Software 2018 Page 105 of 212

Widgit Media
InPrint 3 gives you access to 4000+ Widgit Media graphics as well as over 15,000 Widgit Symbols. These beautifullydrawn Widgit Media files cover a wide range of subjects and can be used as illustrations in your resource or combinedto build up scenes.
Widgit Media includes images for:
BooksEarly LanguageGeographyHistoryLanguage PicturesNumber
Patterns and BordersPeoplePhotosScenesScienceSeasonal
Page 106 of 212 © Widgit Software 2018

To access Widgit Media, click on the Widgit Media folder in the Resource Library.
© Widgit Software 2018 Page 107 of 212

Images in Frames and Table CellsImages can be added straight onto the page, or into a Frame or Table Cell.
Images added into frames and cells have slightly different properties to regular images.
Dynamic TabsSelecting frames or cells containing images open a slightly different dynamic tab to regular images. They are calledImage Frame and Image Cells.
From these tabs you can access all the controls for both the image and the frame or cell.
Select an ImageTo select an image located within a frame or cell,simply left click anywhere on it. Once selectedthe image will be highlighted with a blue box.
Remove ImageOnce a frame or cell contains an image you cannot add symbol and text content to it.
To clear the frame or cell, click the Remove Image button. This will convert the frame or cell back to itsoriginal state. You can also click on the image and press delete to clear the frame or cell.
Size and Aspect RatioImages added to frames and table cells keep their original aspect ratio. This means they cannot be stretched outof proportion.
Page 108 of 212 © Widgit Software 2018

Image Frame SizeYou can change the size of a frame by moving its resizing handles.
You can set the Width and Height to precise measurements by typing into the boxes orclicking the up and down arrows.
Click on Measurement and Locking for more options, including locking the frame andits contents.
Image Cell SizeYou can change the size of a whole table by moving its resizing handles.
Read more on resizing tables
Image frame/Cell StylingYou can change the visual properties of an Image frame andImage Cell In the same way as you do for regular frames,cells and images.
You can change:
Line colourLine thicknessBackground colourCorner radiusAdd effects and drop shadow
© Widgit Software 2018 Page 109 of 212

Image HandlingSelecting Images
Click on an image to select it.
To select multiple images you can either drag around the images, or click on theimages whilst holding down the Ctrl key.
Selecting all images on all pagesYou can select all the images within the entire document. This can beparticularly useful for changing the styling properties of all images at once.
From the Page Status Bar at the bottom of the screen, click on Selectthen choose Select Images.
Note: When you select objects over multiple pages, you cannot move orresize them.
Moving an ImageSelect the image or multiple frames you wish to move then drag them from the edge of the frame.
You can nudge an image to move it a small amount by pressing the arrow keys.
If snapping is turned on the the image will line up with other objects as it is movedabout.More on SnappingYou can line up images with other objects using to options on the Arrange tab.More on Arranging
Page 110 of 212 © Widgit Software 2018

Moving an image to a precise placeTo move an image to a precise location, open theMeasurement and Locking dialog from the Page StatusBar at the bottom of the screen.From the dialog that appears you can set the X and Ycoordinates of the top left corner of the image.
Resizing an ImageYou can resize a selected image by dragging the resizing handles.
If snapping is turned on the the image will snap with other objects as it isresized. More on Snapping
If you wish to resize the multiples images as one object then you can groupthem. More on grouping
Making an Image a precise sizeYou can set an image to be en exact size by setting the Width and Height on theImage tab.
© Widgit Software 2018 Page 111 of 212

Restoring ProportionsIf an image becomes stretched you can reset its aspect ratio.
Restore the proportions by:
Changing the height - keep the width the same.
Changing the width - keep the height the same.
You can also right-click on an image and use the context menu toRestore Aspect Ratio. This always changes the width of theimage back to its original.
Page 112 of 212 © Widgit Software 2018

Modifying ImagesFlipping Images
You can flip images both horizontally and vertically using the Flip and Rotate buttons on the Image tab.
Flip horizontally - left to right
Flip vertically - top to bottom
Rotating ImagesYou can rotate images both clockwise and anti-clockwise.
Rotate Anti-clockwise
Rotate Clockwise
© Widgit Software 2018 Page 113 of 212

Recolouring ImagesWidgit Symbols, Widgit Media Images and .svg vector graphics can be recoloured which is very useful if you aretrying to customise an image to make it more specific.
Select the image you wish to recolour and click the Edit Colours button on the Image tab. A recolourdialog will appear.
Note: If this button is greyed out then the image format does not support recolouring, such as photographs and other.jpg and .png images.
Click on a colour in the palette to recolour it. You can also click on the image and this will select the appropriatecolour.
Pick a new colour from the palette or select More colours to define a new colour.
When you have finished, click OK.
Page 114 of 212 © Widgit Software 2018

Image StylingYou can change various properties of an image to change its appearance from the Image tab.
Border ColoursClick the Line Colour or Background Colour buttonsto choose an alternative line colour from a basic colourpalette. If you click the More Colours option you canselect a custom colour. Read more about theColour Palette.
Border Line ThicknessTo change the line thickness of the border, type in the box, click the up and down arrows or click in the box and pressthe up and down keys on your keyboard. Line thickness is set in mm.
Corner RadiusTo change the corner radius of a image, type in the box, click the up and down arrows or click in the box and pressthe up and down keys on your keyboard. Corner radius is set in mm. A corner radius of 0mm will mean that the imagehas square corners.
You can also set the corner radius as a Percentage. You can use this to create a round image by setting the cornerradius to 100%.
To set the corner radius as a percentage, click the More Options button in the Frame section of the Image tabto open the Frame Style dialog. Tick Use Percentage Corner Radius.
© Widgit Software 2018 Page 115 of 212

Drop Shadow and EffectsYou can add a drop shadow and various other effects to an Image.
To add a drop shadow, click the Drop Shadow button. To change the appearance of the drop shadow or accessdifferent effects, click the small triangle next to the Drop Shadow button.
Configuring Frame effects
In the frame effects dialog you can set:
Drop ShadowCurved GlowSolid Border
For each of these you can set the effect:
ColourColour transparencyThickness
Page 116 of 212 © Widgit Software 2018

MarginsYou can change the margins for an image. This isparticuly useful if you have a visible border andwould like the image to have some extra space.
Select the Margins button on the Image tab tobring up the margins dialog.
© Widgit Software 2018 Page 117 of 212

Writing Content
InPrint3 comes with over 15,000 Widgit Symbols to allow you create a wide variety of symbol supported documents.Based on the student you are working with or the type of resource you are creating you can choose toWrite in Symbols, write in text and illustrate text with symbols.
Our revolutionary Smart Symboliser system will analyse the text you type to help select the correct symbols whileusing the Symbol Chooser ensures you are in complete control of how each word is symbolised.
Page 118 of 212 © Widgit Software 2018

Writing in Symbols
You can write and add symbol content to you resources by creating a frame or table in Symbols and Text mode.
As you type text into these frames your content will automatically be symbolised with symbols appearing above thetext.
Our revolutionary Smart Symboliser system will analyse the text you type to help select the correct symbols.
With over 15,000 symbols in the Widgit Symbol Set, more often than not multiple symbols will be available for acertain word. You can choose between these symbols using the Symbol Chooser, which can also be used to turn offsymbols for selected words.
Guide to SymbolsThere are a number of different methods you can use to provide symbol supportfor your content. The methods that you choose will depend on the level ofsymbol support that your content requires.
These methods are discussed in detail in our Guide to Symbols booklet whichoffers a useful insight in to supporting text with symbols.
Click here to view this booklet: Guide to Symbols.pdf
© Widgit Software 2018 Page 119 of 212

Using the Smart SymboliserWhen you type in symbols, the ‘smart symboliser’ analyses the parts of speech in the sentences and picks thecorrect symbol accordingly.
For example if you type “drink your drink”, the symboliser will pick the verb form for the first “drink” and the noun formfor the second.
You can change the symbol in the Symbol Chooser.
Page 120 of 212 © Widgit Software 2018

The Symbol ChooserThe Symbol Chooser displays the available symbols for words and phrases as you type.
You can toggle through the available symbols for the current word by pressing the F9 key. You can also select asymbol by clicking on it in the symbol chooser. To remove the symbol for a word, click the No Symbol icon at theend of the list of available symbols in the symbol chooser.
When you have selected a symbol for a word or phrase, it will be used by default for the current document.
© Widgit Software 2018 Page 121 of 212

Setting the Default SymbolYou can change which symbol is used for a word of phrase by default for every document you create.
To change the default symbol, right-click on your preferred symbol in the Symbol Chooser and select Set this asthe Default Symbol.
In this example we have changed the default symbol for ‘drink’ to the noun form of drink (a drink). If you type the verbform (to drink), the smart symboliser will still choose the correct symbol showing the action for the verb.
Defaulting a Symbol OffNot all symbols are necessary, especially for people who are new to symbols. Abstract concepts like ‘a’, ‘the’, ‘if’,‘but’ and ‘so’ can be removed. For readers unfamiliar with symbols, only the main concepts should be symbolised.
Some abstract symbols are already defaulted off. You can set a symbol to not show by setting SymbolOff as the default.
Page 122 of 212 © Widgit Software 2018

Changing the Words for a SymbolYou may wish to use an existing symbol, but change the text used below.
Type the words for the symbols you require.
Then click the Change Symbol Text Button on the Edit tab or the F11 Key.
Now type the new word, followed by either the right arrow key or click OK in the process bar at the top of the page.
The word “Lyla” is now automatically depicted as a labrador and will continue to be throughout the rest of thedocument (the symbol for labrador will also remain associated with the word labrador).
To save your vocabulary changes to use in other documents see Saving your Wordlist Changes.
© Widgit Software 2018 Page 123 of 212

Changing the Image for WordYou can change the image used with a particular word or phrase.
Add a new symbolSearch for the symbol in the Symbol Chooser.
Select Pick up Symbol, then click on the symbol you require and drop it onto the word. Youwill see a grey drop indicator showing where the symbol will be placed.
Add a photo or graphicNavigate to the image you require in the Resource Library.
Select the image to pick it up, then drop it on the word. You will see a grey drop indicatorshowing where the image will be placed.
Add an image from the internetYou can drag images from some internet browsers straight from the page they are on, directlyinto your document. You will see a grey drop indicator showing where the image will beplaced.
Page 124 of 212 © Widgit Software 2018

Combining SymbolsYou can combine multiple symbols together over a single word or phrase. To do this type the symbols you require.
Then highlight both words and click the Change Symbol Button on the Edit tab or the F11 Key.
Now type the new word to appear below both symbols, followed by either the right arrow key or click OK in theprocess bar at the top of the page.
© Widgit Software 2018 Page 125 of 212

Combining WordsYou can combine words under a single symbol or image in two ways.
Settings a Symbol for Selected TextType the words you require. Highlight the words you want to change the symbol for and then right-click on thesymbol you wish to be displayed for both words. From here select Set this symbol for selected text.
This will change the entire selection to have one symbol - The symbol you selected.
Page 126 of 212 © Widgit Software 2018

Dropping a Symbol Over Multiple WordsHighlighting more than one word, allows you to add an image onto the entire highlighted selection.
You can add an image from:
The Resource LibrarySearching the Symbol ChooserDragging direct from a web page
You will see a grey drop indicator showing where the image will be placed.
© Widgit Software 2018 Page 127 of 212

Writing in Text
You can choose to write without symbol support by creating a frame or table in Text Only Mode. This can allowusers to check the meaning of words after they have been typed by watching what appears in the Symbol Chooser(rather than having a symbol automatically appear above each typed word).
This could be particularly beneficial to a more confident writer.
Seeing the Word Meaning in the Symbol Chooser
Students who do not need full symbol support may benefit from seeing the meanings of words illustrated either asthey write, or later, simply by clicking on a word. The Symbol Chooser can provide this function.
In some cases there will only be one symbol to choose from, however; the Symbol Chooser will always present youwith all possible symbols for any selected word.
Note: if you click on a symbol in the Symbol Chooser, that symbol will be inserted intothe document for the selected word.
Page 128 of 212 © Widgit Software 2018

Using the Simple Spell Checker to correct mistakes
Any spelling errors made will be highlighted in red. Students can use the Simple Spell Checker by right-clicking onthe highlighted word to display a list of suggested words illustrated by symbols.
© Widgit Software 2018 Page 129 of 212

Formatting ContentFrom the Edit tab you can format both symbol and text content. The Edit tab contains various options ranging fromfont selection, font size, symbol size, symbol colour as well as standard word processing features like bold andunderline.
Page 130 of 212 © Widgit Software 2018

Formatting TextThe text is most easily changed using the Edit tab. Highlight the section of text that you want to change and then usethe options on the tab.
Change the font - Select the font from the drop-down box
Font Colour - Select this to bring out the pallete. The icons shows you the current colour
Bold
Italic
Underline
You can also access the full Text and Symbol Formatting dialog by clicking the More Options button in theFont section of the Edit tab.
Notes on the Colour PaletteYou can change the colour of text by selecting from the colour palette.
You can define your own colours and use them to style any object in yourdocument. You can also save colours to My Colours so that they areavailable whenever you use the program.
Notes on FontsThe default and recommended font supplied is the highly accessible FS Me font. This font has been designed to aidlegibility for those with learning disabilities by Fontsmith and Mencap. You can find out more about FS Me at:
http://www.fontsmith.com/projects/portfolio/mencap-fs-me.cfm
NOTE: Although this font is included with some Widgit products, you will not be able toaccess it from other Windows programs unless you purchase a license for the font.
© Widgit Software 2018 Page 131 of 212

Boxed Words
Boxed Words is a formatting property that allows symbolised content to be displayed with a simple box drawnaround the text and symbol, or just around the symbol.
This concept was introduced by Dr. Antonella Costantino in Italy, and is a required feature for AAC software in thatcountry. Traditionally, content would be displayed in monochrome with text above the symbols, but a visible boundingbox is required for both colour and where text is underneath the symbols.
Turning Boxed Words Controls On/Off
To display the controls for Boxed Words formatting:
1. Click on Settings from the Launcher screen.2. On the Documents tab, click the box labeled Controls for Boxed Words formatting in the Special
Formatting Controls section. To remove the controls, remove the tick from the box.3. Click OK to confirm the change.
If turned on, the Boxed Words controls will be found in the symbols section of the Edit toolbar.
Page 132 of 212 © Widgit Software 2018

Using Boxed Words
To apply Boxed words formatting to a frame(s), click on the frame to select it; then click on the Boxed Words iconlocated in the Symbols section of the Edit tab.
From here you can choose three different formatting modes:
Box Around Everything - In this mode a box is drawn around the entire text and symbol of the word.
Box Around Symbols - In this mode a box is drawn around just the symbol for each word.
No Box - In this mode no box is used in the formatting.
Boxed Words Formatting
The colour, thickness, and padding of the box used in Boxed Words formatting can be changed if you click the MoreOptions icon on the Boxed Words dialog.
You can choose a different Box Colour and Background Colour from a basic or advanced colour palette. Thethickness of the box can be changed using the up and down arrows in the Line Thickness box or by typing in a valuemanually. The Padding can be adjusted from the drop-down menu, which contains three options: small, medium andlarge.
You can then save your changes as the default by clicking the Save as Default button.
To restore the default settings, click the Restore to Defaults button.
© Widgit Software 2018 Page 133 of 212

Changing the Size of Symbols and TextNotes: The sizes of symbols and text are designed to work together. A symbol size of 14 is agood match for text sized at 14.
When using Symbol Only Mode the text size controls will be greyed out andunavailable.
You can change the size of symbols and text independently or together.
You can change the size of symbols or text using the corresponding size drop-down box.
You can change the size of the symbols and text together using the Symbol and Text Sizebuttons.
Tidy SizesYou can make the content in multiple table cells or multiple frames a consistent symbol and text size.
To do this select the table, or multiple objects you wish to change, and press the Tidy Sizes button on theEdit tab. This will make all the sizes the same as the smallest object.
Selecting Content to Change the SizeTo change the size of a symbol or text, highlight the content you wish to change and use the options on the Edit tab.
Alternatively you can select the entire object that contains the content such as a frame or table. This will change all ofthe content for that object.
> Please note: the outcome of any size change can depend on what Sizing Type the containing object is on.More on Sizing Types
Page 134 of 212 © Widgit Software 2018

Symbol ColoursYou can change the colours of symbols to personalise your vocabulary and make the document most appropriate forthe end user. You can change:
Symbols from colour to monochromeChange the line colourChange the skin colourRecolour individual symbols
Switching Between Colour and Monochrome SymbolsAll Widgit Symbols can be displayed either in colour or monochrome.
Select the content you wish to change and click the Show in Colour button on the Edit tab to togglesymbol colour on and off.
Changing the Line Colour of SymbolsThe line colour of all Widgit Symbols can be edited in much the same way text colour can. This is most useful toassist with visual impairment. When you change the line colour of a symbol the program will change the symbol tomonochrome.
To edit the line colour, select the content that you want to edit and click the More Options button in the Font sectionof the Edit tab to show the Text and Symbol Formatting dialog.
Choose the Symbols Line Colour you would like to set as the line colour.
You may want to change the frame background colour to give a good contrast with thesymbol line colour. This can be especially useful for readers with a visual difficulty.
© Widgit Software 2018 Page 135 of 212

Skin TonesYou can change the skin tone for any of the person symbols.
Select the content you wish to change and press the the skin tone button on the Edittab.
This will bring up a small box featuring all the possible skin tone options. To changethe skin tone, click on the desired tone.
Page 136 of 212 © Widgit Software 2018
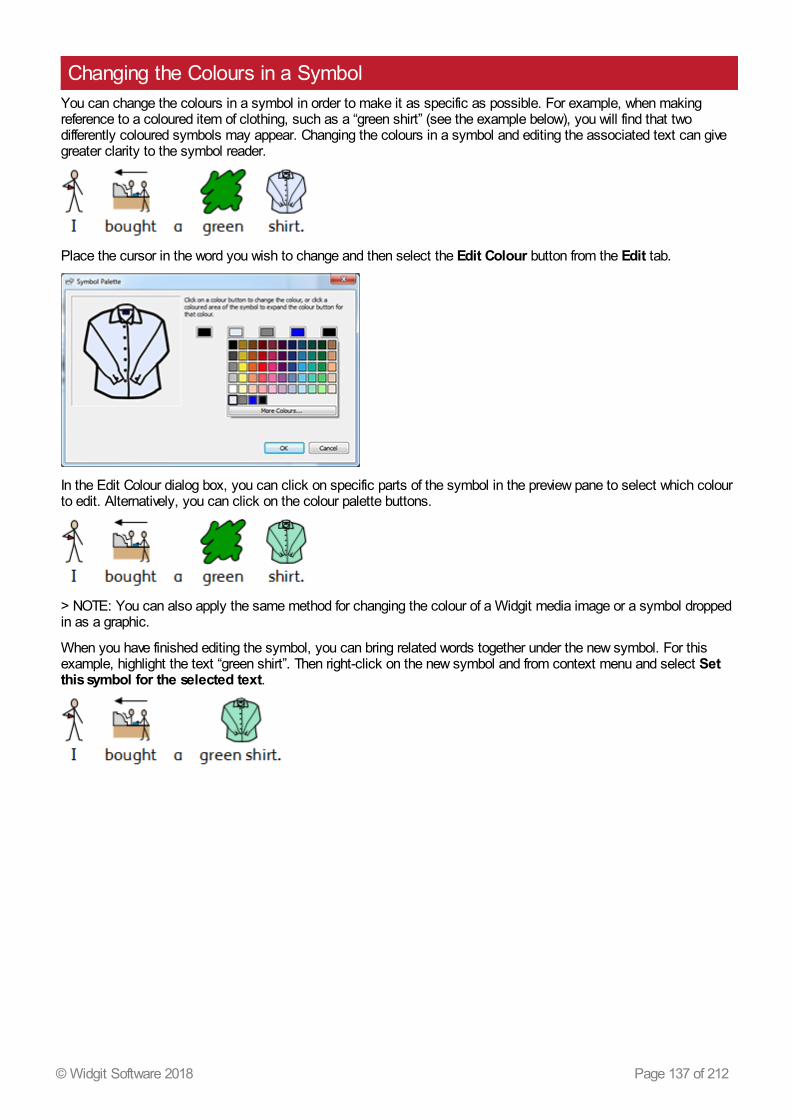
Changing the Colours in a SymbolYou can change the colours in a symbol in order to make it as specific as possible. For example, when makingreference to a coloured item of clothing, such as a “green shirt” (see the example below), you will find that twodifferently coloured symbols may appear. Changing the colours in a symbol and editing the associated text can givegreater clarity to the symbol reader.
Place the cursor in the word you wish to change and then select the Edit Colour button from the Edit tab.
In the Edit Colour dialog box, you can click on specific parts of the symbol in the preview pane to select which colourto edit. Alternatively, you can click on the colour palette buttons.
> NOTE: You can also apply the same method for changing the colour of a Widgit media image or a symbol droppedin as a graphic.
When you have finished editing the symbol, you can bring related words together under the new symbol. For thisexample, highlight the text “green shirt”. Then right-click on the new symbol and from context menu and select Setthis symbol for the selected text.
© Widgit Software 2018 Page 137 of 212

Changing the Colours for the whole documentYou can change the symbol colour mode, skin tones and line colour forall content within the document.
Click Select on the Page Status Bar at the bottom of the screen, thenchoose Select All, Select Frames or Select Tables to focus theobjects you want to change.
Note: When you select objects over multiple pages, you cannot move orresize them.
Page 138 of 212 © Widgit Software 2018

Qualifiers: Grammatical MarkersA symbol may have a qualifier to indicate whether it is plural, a past tense, a comparative or superlative.
1. Plural2. Comparative3. Past tense4. Superlative
Qualifiers can be switched on or off for either individual symbols, or for the whole document.
Changing Individual SymbolsTo turn qualifiers on or off for an individual word, click on the word and then use the Qualifier buttons on the Edit tab.
Plural Qualifiers – for adding or removing plural qualifiers
Tense Qualifiers – for adding or removing tense qualifiers
‘Er/Est’ Qualifiers – for adding or removing comparative and superlative qualifiers
Changing the Qualifiers for the whole documentYou can change the qualifiers for all content within the document.
Click Select in the Page Status Bar at the bottom of the screen, thenchoose Select All, Select Frames or Select Tables to focus theobjects you wish to change.
Then use the Qualifier buttons on the Edit tab.
Note: When you objects selected over multiple pages, you cannot moveor resize them.
© Widgit Software 2018 Page 139 of 212

Paragraph FormattingText Align
Text in frames and tables can be aligned left, centre or right using the Align buttons on the Edit tab.
Text SpacingYou can increase and decrease the space between lines of content within a frame or cell.
Increase the space between lines.
Decrease the space between lines.
IndentsYou can indent selected paragraphs of text. You can change a single paragraph by clicking in it, or you can selectmultiple paragraphs in a frame.
Indents will be at a standard increment of 15mm, or you can create your own Tab Stops for custom indentation.
To insert a paragraph indent, or increase the size of an existing indent, click on the Increase Indentbutton on the Edit tab.
To decrease the size of an indent, click on the Decrease Indent button on the Edit tab.
BulletsTo apply bullets to any paragraph (or selected set of paragraphs), simply click the Bullet button on theEdit tab to switch the bullets on and off.
Spacing and PositionIn spacing and position settings you can change the line and character Spacing and Symbol Position.
To access the Spacing and Position dialog, click the More Options button in the Paragraph section of theEdit tab.
Page 140 of 212 © Widgit Software 2018

SpacingYou can choose to alter the horizontal spacing between words or symbols. You can also alter the spacing betweenlines, and add extra space between paragraphs.
Horizontal spacing affects the space between wordsLine spacing affects the space between wrapping linesExtra space between paragraphs affects the amount of space between paragraphsSpacing between letters affects the amount of space between individual letters
Symbol PositionIn your document, you can choose whether you would like to see text above or below symbols. To change this selectSymbols Above Text or Text Above Symbols in Paragraph Settings .
Text Above Symbols:
Symbols Above Text:
© Widgit Software 2018 Page 141 of 212

Tab Stops
Tab Stops can be used to enable InPrint 3 users to align text by pressing the tab key. Tab Stops can be added toparagraphs in document frames or table cells.
By default, paragraphs in new frames and cells have tab stops every 1.5cm.
Adding a Tab StopTo add a Tab Stop you first need to select theframe or cell you want it to apply to. Then clickon the Horizontal Ruler at the top of yourdocument.
When a Tab Stop is added, it is represented onthe Horizontal Ruler with a blue Tab Stopindicator.
Note: A Tab Stop will only be applied to the selected frame or cell.
Page 142 of 212 © Widgit Software 2018

Moving a Tab StopTo move a Tab Stop click and hold on the blueTab Stop indicator on the Horizontal Ruler.This will show a temporary guide line acrossyour document, indicating the position of theTab Stop.
Drag the indicator left or right to move theposition of the Tab Stop, release the mousebutton when it is in your desired position.
Remove or Edit a Tab StopTo remove a Tab Stop click and hold on the blueTab Stop indicator on the Horizontal Ruler,then drag downwards.
Alternatively you can double-click on the blueTab Stop indicator to display the Edit TabStops dialog box which can be used to removeor change the position of the Tab Stop(s).
© Widgit Software 2018 Page 143 of 212

Styles
InPrint 3 provides you with a range of features which allow you to customise the visual styling of objects in yourresources.
Colour palettes available on the tab bar can be used to change the colour of objects within your resource. You canchoose from a basic colour palette or specify a custom colour which is particularly useful if you want to create aresource in the colours and branding of you organisation. These custom colours can then be saved for future use onthe document colours palette or the my colours palette which appears each time you open the program.
If you find yourself creating objects with the same appearance over and over again the Pinned Styles feature will saveyou time and prevent you making the same visual changes each time. You can 'Pin' different styles for frames, tablesand lines. These styles will be available each time you open the software and will remain until you pin a new style.
Page 144 of 212 © Widgit Software 2018

Colour PaletteInPrint 3 lets you customise the colour of objects in your resources. On the tab bar, you will find colour palettes whichyou can use to change the colour of text, frames, tables, lines, speech bubbles, symbols etc.
Basic Colour PaletteWhen you click on a colour palette you will be shown a selection ofcolours you can click on to edit the appearance of the object you haveselected.
TransparencyAs well as selecting from a range of colours, the colour palette can also be used to make an objectcompletely transparent or partly opaque.
Select the Transparent option on the right of the colour palette to make the selected object completelytransparent.
Use the slide bar on the right of the colour palette to set a level of opacity for the selected object.
© Widgit Software 2018 Page 145 of 212

More Colours
At the bottom of the basic colour palette you have an option to view More Colours. If you click this you will be showna dialog you can use select a custom colour using any of the values below:
Web Colour #HSB (Hue, Saturation, and Brightness)RGB (Red, Green, and Blue)CMYK (Cyan, Magenta, Yellow, and Black)
This is particularly useful if you want to use a colour related to your organisation logo or branding.
The Create Variations button will create 3 lighter shades and 3 darker shades of the currently selected colour, givingyou a range of matching colours to use in your resources.
The Add to My Colours button can be used to add a selected colour to your custom My Colours palette which can beused throughout the program.
Page 146 of 212 © Widgit Software 2018

Custom ColoursInPrint 3 gives you the option to customise the appearance of objects in your resources by selecting alternativecolours for them from a standard colour palette. It also gives you the option to use custom colours which isparticularly useful if you want to use a colour related to your organisation logo or branding.
There are 3 colour palettes available to use within InPrint 3:
Basic PaletteDocument ColoursMy Colours
Document Colours Palette
Using the same set of colours throughout your document is a great way to make a professional looking resource.
The document colours palette keeps track of custom colours you have used in a particular document and makesthem available when choosing the colour of other objects.
For example, If you use a custom colour for a frame the same colour will be available when you choose a colour foryour text or the colour for a line you have created.
Once a custom colour has been used in your document it will appear at the bottom of the standard palette.
Note: If a colleague opens a document you have created they will still have access tothe documents colours palette.
© Widgit Software 2018 Page 147 of 212

My Colours Palette
If you want to use the same set of custom colours in every document you create you can add them to your MyColours palette.
To add a colour to My Colours Palette select More Colours from the palette drop-down. From this dialog, you canset your custom colour, then click the Add to My Colours button.
The My Colours Palette is available underneath the basic colour palette and the document colours palette (if any havebeen used) and is available every time you open the software.
Deleting My ColoursTo delete a colour from the My Colours Palette, right click on it and select Remove from My Colours.
Note: If a colleague opens a document you have created using colours from your MyColours palette, these colours will be available to them on the document colours palette.
Page 148 of 212 © Widgit Software 2018

Pinned StylesA Pinned Style is a collection of visual style settings that have been “pinned” by the user for later re-use.
If you find yourself creating frames, tables, or lines with the same appearance over and over again it can be useful to'Pin' the style to save you making the same visual changes each time.
You can 'Pin' different styles for frames, tables, and lines. These styles will be available each time you open thesoftware and will remain until you pin a new style.
© Widgit Software 2018 Page 149 of 212

Pinning a Style
After making changes to the appearance of your selected object you can right-click and select the Pin This Styleoption from the drop-down.
Pinned styles will remember the following visual settings:
Tables
Line colour and thicknessWhether the line is drawn inside the frame or notCorner radiusWhether this is an absolute value or a %Background colourFrame effectIncluding style, colour and thicknessMarginsText AlignmentRow and Column SpacingCell External MarginSizing Type
Frames
Line colour and thicknessWhether the line is drawn inside the frame or notCorner radiusWhether this is an absolute value or a %Background colourFrame effectIncluding style, colour and thicknessMarginsText AlignmentSizing Type
Lines
Line colour and thicknessLine dash styleLine end style
Page 150 of 212 © Widgit Software 2018

Using a Pinned Style
Click on the Create toolbar on the left side of the screen to create an object using your Pinned Style.
© Widgit Software 2018 Page 151 of 212

Arranging Objects
The Arrange tab contains a number of tools to help you with the organisation of the various objects you have used tocreate your resource.
You can use the Arrange tab to:
Order objects i.e. move items to the foreground, middle ground, and backgroundAlign objects along a specified axis (horizontal or vertical)Distribute objects evenly either horizontally or verticallyCombine several objects into a Group so that they are treated as a single unit
Page 152 of 212 © Widgit Software 2018

OrderYou can change the stacking order of objects to move them in front of or behind each other.
Select an object and use the buttons in the Order section on the Arrange tab, or right-click on the object to open thecontext menu and choose from the Order sub-menu.
Send to Back or Ctrl + Shift + [
Send Backward or Ctrl + [
Bring Forward or Ctrl + Shift + ]
Bring to Front or Ctrl + ]
© Widgit Software 2018 Page 153 of 212

AlignYou can align objects along the axis you specify (horizontal or vertical). You can align either the edges of the items orthe centre.
To align objects select them, by dragging over them or using Ctrl + click, and click the Align buttons on theArrange tab.
Align Left
Align Vertical
Align Right
Align Top
Align Horizontal
Align Bottom
Page 154 of 212 © Widgit Software 2018

DistributeYou can distribute objects evenly either horizontally or vertically. You can distribute either the centre points of theobjects or between the edges.
To distribute objects select them, by dragging over them or using Ctrl + click, and click the Distribute buttons onthe Arrange Tab.
Distribute Centres Horizontally
Distribute Centres Vertically
Distribute Edges Horizontally
Distribute Edges Vertically
Distribute Centres Horizontally:
Distribute Edges Horizontally:
© Widgit Software 2018 Page 155 of 212

Grouping
You can combine several objects into a group so that they are treated as a single unit. You can then move or re-sizethis as one object rather than making individual changes. For example, you may have created a resource whichcontains many frames, arrows, and images. Moving all of these objects individually to make space for additionalcontent could take some time, however grouping them all together means you would only need to move one object.
To group objects, select them by dragging over them or using Ctrl + click, and press the Create Groupbutton on the Arrange Tab.
You can remove objects from the group by selecting the group and then clicking on the Ungroup button onthe Arrange Tab.
You can also *Ungroup* by clicking on the icon in the top left corner of the group.
Resizing groups and ungrouped objectsWhen you resize a group, the whole group is resized as one object.
When you resize multiply selected object, each object is resized individually but in proportion to each other.
Resizing a group
Resizing multiply selected objects
Page 156 of 212 © Widgit Software 2018

Pages
InPrint 3 will allow you to create a wide variety of resources across single or multiple pages.
Using the Pages tab and Page Manager you can:
Adjust your Document Layout by adding, removing, duplicating and ordering pagesView your documents in Book Mode or as single sheets in Page ModeEdit Page Properties such as orientation, paper size and marginsAdd Headers and Footers to your resourcesUse the Page Status Bar to create locked items
© Widgit Software 2018 Page 157 of 212

NavigationYou can navigate around your document in a number of ways:
ScrollingYou can use your mouse scroll wheel or the scrollbar at the side of the page to move up and down through yourdocument.
You can also use the Previous and Next page buttons on the scrollbar to jump between pages. Usingthese buttons will take you to the previous or next page spread, but keep the current zoom and viewport position.
Navigation ButtonsYou can use the Navigation buttons on the Pages tab.
Go to the First Page
Go to the Previous Page
Go to the Next Page
Go to the Last Page
You can also define which page to jump to by using the spin box then clicking Go to Page.
Page ManagerClick on Open Page Manager in the Page Status Bar at the bottom of the screen.
This will show you a preview of all the pages in your document. Click on a page to navigate to it.
Page 158 of 212 © Widgit Software 2018

Page Status BarThe Page Status Bar runs along the bottom of the screen.
From this bar you can:
Open the Page ManagerSelect different objects across the whole documentOpen the Measurement and Locking dialogFit to height to makes a page size fit entirelyFit to width ensures that the width of the document fills the available spaceSet the zoom level
SelectYou can use the Select tools to select objects across the wholedocument. This can be particularly useful for changing the styleproperties of all objects at once. You can select:
All items on every pageAll items in the current PageAll FramesAll TablesAll LinesAll Images
Note: When you select objects over multiple pages, you cannot move or resize them.
Measurement and LockingWhen you have an object selected, its current top left X and Y co-ordinates are displayed in cmon the status bar.
Clicking on these numbers opens and closes the Measurement and Lockingdialog.
From this dialog, you can set for the selected object:
X and Y co-ordinates of the top left cornerWidth and HeightLock the Size and PositionLock the Contents
© Widgit Software 2018 Page 159 of 212

LockingLocking Size and Position means you cannot resize or move the object, but you can still edit the content andchange the styling.Locking Contents means you cannot edit the content and styling, but you can still move and resize it.
An object that is locked will show one of the lock indicators when selected.
Related SizesYou can set whether the Width and Height and linked or not. When the width and height are linked the object willkeep its original aspect ratio.
Width and height linkedWidth and height not linked
Page 160 of 212 © Widgit Software 2018

Document LayoutAdding Pages
You can add single pages by clicking the Add Page button on the Pages tab.
Insert Page Before the current page
Insert Page After the current page
You can add multiple pages by using the Page Manager
Deleting PagesYou can delete a single page by navigating to that page then clicking the Delete Page button on thePages tab.
You can delete multiple pages with the Page Manager.
Click the Page Manager button on the Page Status Bar at the bottom of the screen to open the PageManager. Select the pages that you want to delete with Ctrl + click to select individual pages, or Shift +click at each end of a group of consecutive pages, then click the Delete button.
Ordering PagesYou can change the order of pages in your document from the Page Manager accessed from the Page Status Barat the bottom of the screen.
To move a page, click on it once then drag it to the desired position. If you wish to move more than one page, pressCtrl + click on the individual pages you wish to move.
Duplicating a PageYou can duplicate any page in your document from the Page Manager accessed from the Page Status Bar at thebottom of the screen.
Select the page you wish copy and click the Duplicate button. You can then set how many copies of thispage you wish to create.
© Widgit Software 2018 Page 161 of 212

Book ModeYou can view your document in two modes:
Page Mode for documents intended to be printed as separate pages. One page is displayed at a time.Book Mode for documents intended to be printed as a folded book. Two Pages are displayed at time (a
Page Spread).
In Book Mode the the first page appears as a single page as this is the Cover.
Page Mode:
Book Mode:
Changing ModesTo change between modes select Book Mode from the Pages tab or the Page Manager.
Page 162 of 212 © Widgit Software 2018

Working in Book ModeYou can rearrange Page Spreads using the Page Manager. To move a spread, click on it once then drag it to thedesired position. If you wish to move individual pages, rather than a spread, press Ctrl + click on the individual pagesyou wish to move.
When you are working in Book mode you can place images and frames over both pages in the Page Spread.
Note: If you reorder a single page in a spread that contains an object that was acrosstwo pages, the object will be left on the original page.
Page Manager:
© Widgit Software 2018 Page 163 of 212

Page ManagerYou can use the Page manager to manipulate your document as a whole.
The Page manager is accessed from the Page Status Bar at the bottom of the screen.
Add PagesYou can add multiple pages by clicking the Add button. You can choose the number of pages to add and ifthey are positioned before or after the currently selected page.
Delete PagesYou can remove the selected page by pressing the Delete button. You can remove multiple pages byselecting them using Ctrl + clicking on the pages you require, then click the Delete button.
Duplicate PageSelect the page you want to copy and click the Duplicate button. You can then choose how many copiesof the page you want to create.
Ordering PagesYou can use the Page Manager to change the order of pages in your document.
To move a page, click on it once and drag it to the desired position. If you want to move more than one page, Ctrl +click on the individual pages you want to move, then drag them to the new position.
Changing ModesYou can change your document into Book Mode or single pages by pressing the Book Mode button.
Page 164 of 212 © Widgit Software 2018

Page PropertiesMargins
The Page Margins are the border of the page that items will snap to.
The Page Margins can be set to different widths from the Margins button on the Pages tab.
None - No page margins
Narrow - 10mm margin
Normal - 18mm margin
Wide - 28mm margin
You can also set your own Custom Margins.
OrientationYou can set the rotation of your document from the Orientation button on the Pages tab. Pages can be:
Portrait
Landscape
Paper SizeYou can change the size of your document by selecting Paper Size from the Pages tab. The standardsizes are:
A3A4A5US LetterUS LegalUS Executive
You can also set up your own paper size in Custom.
© Widgit Software 2018 Page 165 of 212

Paper NumbersYou can add page numbers to any frame or cell.
You can set which page the numbering starts at by clicking the More Options button.
Click the Page Number button to add the number of the current page.
Click the Page Count button to add the total number of pages. For example “Page 2 of 6”
Page 166 of 212 © Widgit Software 2018

Header and FooterObjects added to the Header and footer appear on all pages in the document. Objects in the Header and Footer willbe positioned behind the other page content.
When you are editing the Header and Footer, all regular page content will be visible but not selectable.
You can place objects anywhere on the page. You can also use the guides to define an area for your Header andFooter.
Adding a Header and FooterYou can turn on the Header and Footer by selecting Edit Header and Footer on the Pages tab.
Turning on the Header and Footer will display the Header and Footer Guides and add two clear frames whichwill be added at the top of the page and bottom of the page, in Text-only mode.
The Header and Footer tab will also be visible.
Changing Edit ModesYou can enter Edit mode by double-clicking on a Header Footer object, or by selecting Edit Header andFooter on the Pages tab.
You can exit Edit mode by double clicking on an object of regular page content, or by selecting Close onthe Header and Footer tab.
NavigatingYou can jump to to the bottom or top of the page by selecting the Navigation buttons from the Header and FooterTab.
Go to the Header
Go To the Footer
© Widgit Software 2018 Page 167 of 212

Page NumbersYou can add page numbers to your header or footer.
Click the Page Number button to add the number of the current page.
Click the Page Count button to add the total number of pages. For example “Page 2 of 6”.
You can set which page the numbering starts at by clicking the More Options button.
Remove Header and FooterYou can delete all of objects by selecting Remove Header and Footer.
Header and Footer OptionsYou can choose to not have the Header and Footer appear on all pages. You can set the Number of First pages andNumber of Last pages that don't contain the Header and Footer. This can be useful when creating books and wish tohave different content on the cover pages.
You can also choose to have a different Header and Footer on Odd and Even Pages. This can be useful if you arecreating a book and wish the page numbers to be on the outside edge of the book.
Header and Footer GuidesYou can use the Header and Footer guides as a reference to layout your header andfooter. objects will snap to the guides.
You can set Header Height and Footer Height on the Header and Footer tab.
Page 168 of 212 © Widgit Software 2018

ViewThe View tab allows you to:
ZoomHide and display panelsManage rulers, guides, grids and snapping
© Widgit Software 2018 Page 169 of 212

ZoomingChoose the level of zoom that suits your document.
You can change the zoom level (10% to 400%) from both the View tab and the Page Status Bar.
Fit to Width makes width of the document fill the available space.
Fit to Height makes a page size fit entirely.
Page 170 of 212 © Widgit Software 2018

PanelsYou can choose whether or not to display the Symbol Chooser and Resource Librarypanels.
By default, the panels are 'pinned' to the toolbar on the right of the document. You canunpin the panels and move them to wherever you want on the screen.
The panels can also be positioned one above the other, so that you see them both at the same time, or on top ofeach other, where you can switch between them using the tabs at the top of the toolbar.
Symbol Chooser Image Library
© Widgit Software 2018 Page 171 of 212

Showing Rulers, Grid and GuidesSelect Show Rulers to toggle whether the rulers are visible or not.
Select Show Grid to toggle whether the grid is visible or not.
Select Show Guides to toggle whether the guides are visible or not.
Page 172 of 212 © Widgit Software 2018

Working with GuidesAdding Guides
You can add guides in 2 ways:
1. Dragging a guide from the ruler, either vertically or horizontally.2. Selecting the Create Guide button from the View tab. This gives you greater control of the position of the
guide.
When you create a guide you can set the distance from thetop left of the page, either horizontally or vertically. You canset which page the guide appears on. And if it is a PageGuide or Document Guide.
Page Guides just appear on one pageDocument Guides appear on all pages
Editing GuidesYou can drag a guide to move it, unless it is locked.
To edit an individual guide right-click on it to bring up the context menu. From here you can:
Convert the line into a Document Guide or Page GuideLock and Unlock the GuideDelete the guideDelete All Guides in the documentAccess the Guide Properties to position the guide in a precise way
Grid and Guide SettingsThe Grid and Guide Settings allow you:
to set the measurements and linecolour for the Grid
to set the colours for the Guides
© Widgit Software 2018 Page 173 of 212

SnappingWhen you move items around a page they will snap to the Page Margins and the centre points of the page. Youcan also set items to snap to other things:
Snap to Grid makes objects snap to the background grid, even if it's not currently visible.
Snap to Content makes objects snap to other objects. This is particularly useful when you want to line updifferent objects on the page.
Snap to Indicators makes objects snap to the guides and page margin.
Page 174 of 212 © Widgit Software 2018

Printing
You can print documents from the Print Preview screen, or by pressing Ctrl+P while editing a document.
On the Print Preview screen, you can view a document as single pages or as a book. You can toggle betweenpages and see what the document will look like when printed.
You can also choose to Export your document as a PDF file from the Print Preview screen.
To open the Print Preview screen, click the File tab.
Navigation Controls
Use the navigation controls at the bottom of the Print Preview screen to move forwards or backwards through thedocument, or jump directly to a specific page.
If the preview is displaying Page Spreads, typing a page number into the spin box will navigate to the spread whichcontains that page.
© Widgit Software 2018 Page 175 of 212

View Options
Print Preview allows you to view your document in two modes:
As Single Pages. One page is displayed at a time.As a Book. Two Pages are displayed at time (a Page Spread).
Note: If you select to view the preview as a book and the number of pages in thedocument is not currently a multiple of four, a warning will be shown, advising how manypages the user needs to add or remove to make the document printable and able to bebound as a book.
To Print your document click the Print button in the bottom right corner of the Print Preview screen.
You will then be shown a print dialog which will allow you to select options for that particular print job. For example,you can select the printer you want to use, the range of pages to print, and the number of copies to print.
Export to PDF
InPrint 3 can export open documents to PDF (Portable Document Format) from the Print Preview screen.
After clicking the export button on the Print Preview screen you will be able to choose the location your PDF filewill be created, You can also choose to export all pages in your documents or a selection.
Page 176 of 212 © Widgit Software 2018

Symbols and Vocabulary
The Symbols tab allows you to manage your vocabulary by:
Setting the language for your documentEnabling and disabling wordlistsEnabling and disabling restricted and sex education symbolsSpell checking your document and managing your dictionary
© Widgit Software 2018 Page 177 of 212

Wordlists OverviewA Wordlist is a file that links words with graphics. If you type 'cat' in Symbol Mode while using InPrint 3, the loadedWordlist will automatically display the symbol associated with the word 'cat'. The symbols displayed when you typewill vary according to the loaded Wordlist(s) in InPrint 3.
You can choose to enable or disable different types of Wordlists in InPrint 3 depending on how you want to use theprogram. You can also use InPrint 3 to create your own Wordlist.
Types of WordlistThe Widgit Symbols(Smart Symbolising) Wordlist is linked to the entire Widgit Symbol Database and is the only Wordlist that can havethe Smart Symbolising function active. With each software update, the Widgit Database will also be updated -ensuring that you have the largest and most up-to-date vocabulary.
Note: You cannot edit the Widgit Symbol Database, but you can select your defaultsymbol choices.
User WordlistThis Wordlist file is associated with your Windows Profile, therefore any changes that you make to this Wordlist willonly be accessible by you unless you share log-on details. There is only one user wordlist per user.
NOTE: The user Wordlist is always active
Topic WordlistsThese Wordlist files are generally reserved for short Wordlists for small sets of topic-specific words. These files arealso easily shared amongst different users. When a document that is using a Topic Wordlist is saved, the Wordlistand all of its entries will be integrated with the file. If you load this file on another computer, the Wordlist, along withthe document content will be accessible. Most resource packs are likely to have a Topic Wordlist included, such asan 'Ancient Egyptian History' Wordlist for example.
Symbol Set WordlistsThis Wordlist file is the largest kind of Wordlist and is usually comprised of alternative symbol sets that are oftenmade by third-party companies like Makaton. This Wordlist is not easily shared like a Topic Wordlist because it is notintegrated with InPrint 3 documents although it is recognised by it.
Starting DefaultWhen you first launch InPrint 3, the default active Wordlist will be your User Wordlist in conjunction with the WidgitSymbols Database (Smart Symbolising).
Page 178 of 212 © Widgit Software 2018

Loading WordlistsTo manage the Wordlists currently active and available to InPrint 3, you can use the Symbols tab and select SymbolSettings.
Using this dialog, you can configure how symbols will function according to your Wordlist preferences.
In the Symbols section, you can choose between Use Widgit Symbols, that will enable both Smart Symbolising andaccess to the Widgit Symbol Database (as well as any enabled Topic Wordlists) and Use Wordlists Only, that willonly symbolise according to enabled Wordlists in the In-use Wordlists panel below.
Wordlist Section
The panel on the left will display all of the available Wordlists that you can Enable.
The panel on the right will display all of the ‘enabled’ Wordlists for your current document.
The Wordlist at the highest position will automatically be given symbol preference over the other Wordlists. You canuse the Up and Down arrows to the right of this panel to change the order of the Wordlists.
Advice on Opening Multiple WordlistsMixing different symbol sets can confuse the reader, as different symbols sets visualise concepts differently.
If you choose Use Widgit Symbols and enable a Symbol Set Wordlist you will receive a warning message. You willbe able to proceed but it is not recommended.
If you know the sets and their structure then it is OK to mix sets, for example mixing an additional Photo Library withthe Widgit Symbols. If you do not, it is best to avoid mixing as they may represent concepts in different ways.
NOTE: Enabling the Widgit Symbols and a Symbol Set Wordlists may also result in theprogram running more slowly.
© Widgit Software 2018 Page 179 of 212

Saving Wordlist ChangesWhile you are writing a document, you may add your own vocabulary by:
Changing the Words for a SymbolChanging the Image for a WordChanging the Colours in a Symbol
Such changes will be saved to the current document.
You may also decide that you would like to save your changes to use on other documents. You may also wish tosimply remove wordlists entries from the document.
You can save and manage your Symbol Changes, and create new Wordlists by selecting the Symbols Tab andclicking Save Symbol Changes.
Wordlist Entries PanelIn the panel on the left, titled Wordlist Entries, you will find the new symbols that have been created in yourdocument. What you can see in this panel is dependent on the Filter drop-down box underneath.
When All entries has been selected, you will see all of the entries that you have made.
When Entries in use has been selected, you will see all of the entries that you have made that are currently in yourdocument.
When Entries not in use has been selected, you will see all of the entries that you have made but are not currently inyour document.
Page 180 of 212 © Widgit Software 2018

Wordlists panelIn the panel on the right, titled Wordlists, you will see a list of all of your Topic Wordlists. The User Wordlist willalways be loaded. When a Wordlist is grey, it means that the Wordlist is not currently loaded. You can load aWordlist from this dialog by clicking the Select Wordlists button that will take you to the Symbols and Wordlistsdialog.
Create New WordlistYou can also create a new Wordlist using this dialog. To create a new Wordlist, type a name for the new Wordlist intothe space underneath New Wordlist Name and then click Make new wordlist button.
This new Wordlist will automatically be loaded, and added to the Wordlists panel.
Adding Wordlist EntriesYou can add your Wordlist Entries to loaded Wordlists. To add an entry to a Wordlist, first select the Wordlist in theWordlists panel that you want to add to and make sure it is loaded. Then select the Entry that you want to copy andclick the Add button. If you want to add all of your Wordlist entries, click the Add All button.
Deleting Wordlist EntriesYou can delete Wordlist Entries by selecting them in the Wordlist Entries panel and then clicking Delete entry. Ifthe entry you are trying to delete is in use, you will not be able to delete it until it has been deleted from yourdocument.
© Widgit Software 2018 Page 181 of 212

Using InPrint 2 WordlistsInPrint 2 uses Wordlists with the file extension .cwl and they are saved by default in:
C:\Users\Public\Documents\Widgit\Communicate Files\Wordlist
InPrint 3 uses Wordlists with the file extension .cfwl and they are saved by default in:
C:\ProgramData\Widgit\Common Files\Topic WordlistsC:\ProgramData\Widgit\Common Files\Symbol Set Wordlists
When you open an InPrint 2 document into InPrint 3, the custom and resource pack wordlists used in the documentwill be converted and copied to the relevant InPrint 3 folders.
These converted wordlists will be placed into a folder called 'Lists from InPrint 2'.
Manually converting InPrint 2 wordlistsYou can use the Wordlist Manager application to convert InPrint 2 wordlists for use with InPrint 3.
To open the Wordlist Manager go to the start menu, then choose:
“All programs > Widgit > Common > Wordlist Manager”
In the Wordlist Manager application, click Open, then choose InPrint 2 (*.cwl). Then select the wordlist you wish toconvert.
Click Copy, then choose either Topic Wordlist or Symbol Set Wordlist.
Note: Symbol set wordlists are for long lists or ones containing third party images suchas Makaton or BSL graphics.
Then open InPrint 3 and go to the Symbols tab and select Symbol Settings to load the new list.
Page 182 of 212 © Widgit Software 2018

Restricted SymbolsSome symbols in the Widgit Database could be upsetting or not suitable for some users. Restricted symbols are notdisplayed by default when you first launch InPrint 3.
To change access to restricted symbols, you can use the Symbols Tab and select Symbol Settings. Click theradio button next to More Options… to reveal the Show Restricted Symbols radio button.
Click the Show Restricted Symbols radio button to view the categories of restricted symbols.
Click the radio button next to the category of restricted symbols that you want to be displayed to enable thesymbolisation of those terms.
Drug and substance misuseHuman reproduction (sex education)
© Widgit Software 2018 Page 183 of 212

Changing LanguageYour default language will be based on the version of InPrint 3 you have purchased. You may have additionallanguages available.
Changing the language will alter the symbolisation of words and sentences and the spell check.
Changing the language does not change the interface.
To change the language a document, select the Symbols tab and choose Set Language.
You can also set which language you would like to use for all future documents by selecting Save as Defaults. ClickRestore Defaults to restore the original default settings.
Page 184 of 212 © Widgit Software 2018
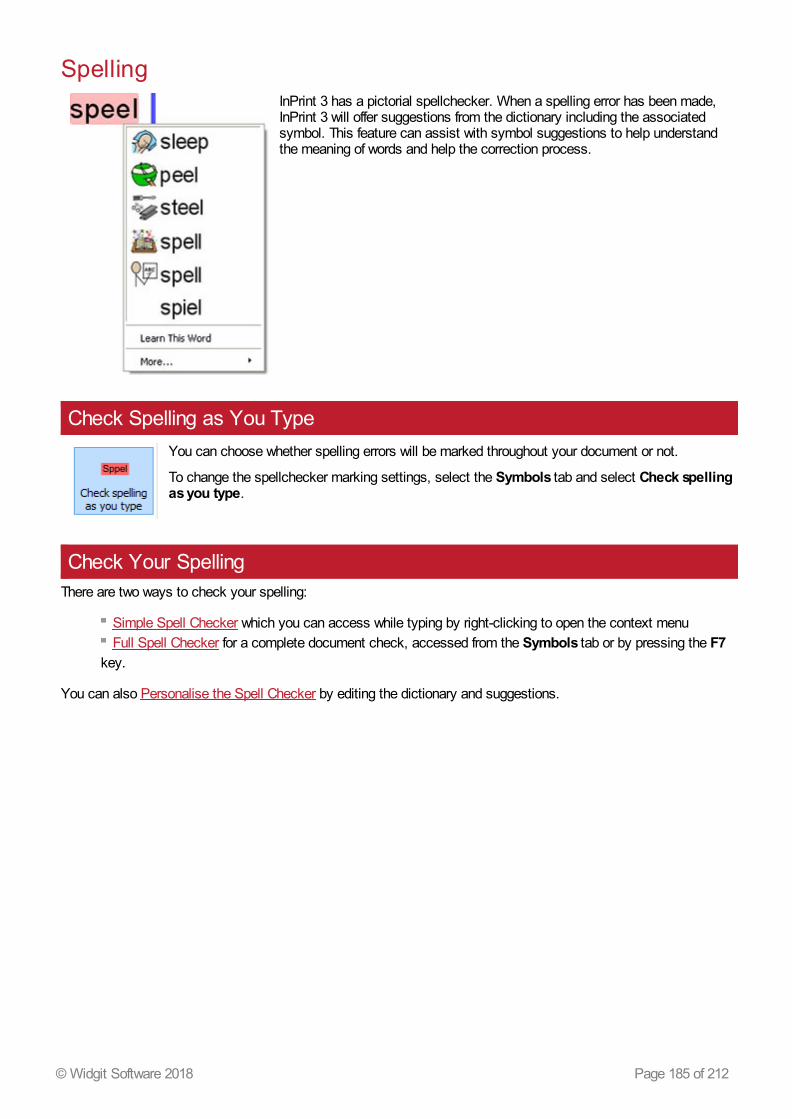
SpellingInPrint 3 has a pictorial spellchecker. When a spelling error has been made,InPrint 3 will offer suggestions from the dictionary including the associatedsymbol. This feature can assist with symbol suggestions to help understandthe meaning of words and help the correction process.
Check Spelling as You TypeYou can choose whether spelling errors will be marked throughout your document or not.
To change the spellchecker marking settings, select the Symbols tab and select Check spellingas you type.
Check Your SpellingThere are two ways to check your spelling:
Simple Spell Checker which you can access while typing by right-clicking to open the context menuFull Spell Checker for a complete document check, accessed from the Symbols tab or by pressing the F7
key.
You can also Personalise the Spell Checker by editing the dictionary and suggestions.
© Widgit Software 2018 Page 185 of 212

Using the Simple Spell CheckerTo see suggestions for a spelling error, click with the right mouse button on thehighlighted word. This will display a list of suggested words illustrated bysymbols where possible.
If you do not want InPrint 3 to mark this word as a mistake, click Learn ThisWord.
Page 186 of 212 © Widgit Software 2018

Full Spell CheckerYou can open the full spell checker from the Symbols tab, or by pressing F7.
The current misspelling will be highlighted in blue and show in context in the top box. The second box containssuggestions for the correct spelling along with symbols.
Correcting the Spelling MistakeIf the correct spelling appears in the suggestions, select the Correct button to update the document. You can alsoselect Correct All to changes all instances of that spelling error in the document.
If the suggestions do not contain the word you are looking for, you can search by typing into the Custom spellingbox and clicking Try this. This will populate new suggestions based on the searched phrase.
© Widgit Software 2018 Page 187 of 212

Other OptionsIf the marked error isn't a spelling mistake, for example a surname the dictionary doesn't know about, you haveadditional options.
Ignore Once - Ignores this instance of the spelling mistakeIgnore All - Ignores all instances of this mistakeAdd to Dictionary - Adds the typed word to the dictionary as a correct spellingSkip - Moves on to the next mistake
Page 188 of 212 © Widgit Software 2018

Personalise the Spell Checker
Edit Your Custom DictionaryTo edit your dictionary go to the Symbols tab and select Edit Dictionary.
You can edit your custom dictionary by adding in correct words the spell checker doesn't know about. This mayinclude place names and surnames.
You can also delete spelling corrections that have been added by mistake.
If there are lots of entries, you can use the Find box to search more easily.
© Widgit Software 2018 Page 189 of 212

Edit the Spell Checker SuggestionsIt is possible for you to create your own suggestions for spelling errors.
Some spelling errors could be due to a phonetic approach of writing, for example 'muvver' could be written instead of'mother'. The spell checker can only analyse letters, sometimes the suggested corrections will not be accurate for theactual intended word.
To edit the suggestions go to the Symbols tab and select Edit Suggestions.
Use the Add a New Entry section to add a new error, and subsequently enter any suggestions for this wordseparated by a comma.
You can also update existing entries by selecting them from the Existing Entries section and entering newsuggestions. When you click on an existing entry, the Add button will be replaced by an Update button.
Click Delete Entry to remove a selected/highlighted entry.
Page 190 of 212 © Widgit Software 2018

Technical Support
To help you get the most out of InPrint 3, we have provided a number of materials you can either accessdirectly through the program or via http://www.widgit.com/support. These materials include videos, helpsheets, FAQs,manuals, installation guides and links to online training sessions.
If you have a problem with InPrint 3 or would like some help using the software, our support team are on hand:
T: 01926 333686 E: [email protected]
If you require a little extra assistance while talking to us on the phone, InPrint 3 has a built in remote support featurethat you can use to enable one of our team to access your machine remotely and help you resolve the problem.
© Widgit Software 2018 Page 191 of 212

Help MenuThe link to the Help Menu can be found in the top right of theapplication.
From here you can:
View the Online manualView Help SheetsRequest Remote SupportView the About box
The About BoxTo look up information such as your Release Version Number, Serial Number, Licensing Information and Publisher,choose About… from the Help Menu.
Page 192 of 212 © Widgit Software 2018

Finding your Serial NumberYou can find your Serial Number by select About… from the Help Menu in the top right of the screen.
© Widgit Software 2018 Page 193 of 212

Remote Support
If you are having a problem with InPrint 3 or you require a little extra assistance, you can ask our technical supportteam to temporarily take control of your machine and help you through the problems you are having.
The first point of contact with our technical support team should be a phone call or email. If the problem remains afteryour initial communication then our technicians may ask you if you would like to start a remote support session.
On the Help Menu, in the top right corner of the screen, you will find a Request Remote Support button, click thiswhen advised to do so by our support team. This will open Teamviewer (https://www.teamviewer.com) which comespre-installed with InPrint 3, our support team will be notified that you are ready and will be able to take control andresolve your issues.
To contact technical support:
T: 01926 333686
Page 194 of 212 © Widgit Software 2018

Installation
InPrint 3 can be installed in a number of ways, either from an installation DVD sent by Widgit or with the latestinstallation files which can be downloaded from https://download.widgit.com/.
The installation files are available in two formats:
.exe files for standalone installations
.msi files for network installations
Once Installed, InPrint 3 needs to be activated via the internet. This process can be automated during the networkinstallation process.
If your computer does not have a working internet connection, you can still activate your copy of InPrint 3 via ManualActivation methods detailed in the activation guide.
It is not recommended to use exe bundle installers for network installations, as they donot support automatic activation during installation, and cannot be wrapped in an msi.
© Widgit Software 2018 Page 195 of 212

Standalone InstallationSystem Requirements
Minimum System Requirements:
Operating System: Windows Vista or aboveProcessor: 1 gigahertz (GHz) or faster processorMemory (RAM): 512MBHard disk space: 3GBResolution: 1024×768
Recommended System Requirements
Operating System: Windows 7 or aboveProcessor: Dual core processorMemory (RAM): 2GBHard disk space: 3GBResolution: 1920×1080 (1080p HD display)
Before InstallingMake sure you are an administrator for the computerYou need administrative privileges to install new software. Almost all home users are administrators of their computerby default, but on a school network you may need to ask your technician to install software for you.
Install Windows Installer 4.5The installer requires Windows Installer 4.5 in order to run. A copy of Windows Installer 4.5 is included with InPrint 3.If your computer is not already running Windows Installer 4.5, the InPrint 3 installation wizard will install it for youbefore proceeding with the rest of the installation.
Installing1. Log on to the computer with Administrator privileges and insert the InPrint 3 DVD.
The installation should begin automatically. If it does not, browse to the DVD and click on ‘Autorun.exe’ which is inthe ‘Autorun’ folder.
2. The InPrint 3 installation wizard will then open (this may take a few minutes on older setups).
3. On the first screen you can choose whether ornot:
The program will send anonymous usagestatistics to Widgit.*
The program will automatically check forupdates.
Desktop shortcuts will be created.
Page 196 of 212 © Widgit Software 2018

There is also a 'Customise' option which will allow you to change the installationlocation of the main Program Files.
Custom installations are supported for the benefit of network administrators and forusers who wish to specify non-standard locations for the Program Files.
The majority of users will not need to perform a custom installation. If you wish tocustomise the installation further, you may prefer to follow the network installation guideand perform an administrative installation.
4. After clicking to confirm that you agree to theterms and conditions, you can click 'Install' tobegin.
Clicking 'Close' will cancel the installation.
The setup progress will appear on screen.
Clicking 'Cancel' at any point will stop theInstallation.
* Anonymous usage statistics are to help us with future developments of the software. Only menu clicks are recorded,no document content or information can be recorded and all statistics are completely anonymous.
ActivatingBefore installation completes, you may be shown the Widgit Activation Wizard. You will need the licence key providedwith your copy of InPrint3 in order to activate the program.
For help with activation, refer to ‘Activating InPrint3’.
Once InPrint3 has completed installing, click on the ‘Finish’ button to exit.
Contact UsFor more help with any installation issues, contact our technical support team:
Website: www.widgit.com/support
Telephone: 01926 333680
Email: [email protected]
© Widgit Software 2018 Page 197 of 212

Network Installation
Installing Widgit ProductsThis guide explains how to install Widgit products onto a network. The products covered by this guide are listed below(you may not have licences to install all of these):
InPrint 3 or laterSymWriter 2 or laterFirst Keys 3.3.18 or laterWordlist ManagerLanguage add-on packs
Widgit provide both exe bundle installers, and MSI packages for the above products. It is recommended that you usethe exe bundle installers for standalone installations, and the MSI packages for network installations.
It is not recommended to use exe bundle installers for network installations, as they do not support automaticactivation during installation, and cannot be wrapped in an MSI. The latest MSI packages can be downloaded fromhttp://download.widgit.com/network/
Page 198 of 212 © Widgit Software 2018

Deploying via MSI PackagesProducts are split up into multiple MSI packages:
Core.msi - The core shared components (symbols and language databases).InPrint.msi - InPrint specific program files.InPrint_resources_uk.msi - InPrint language specific resources (such as example files, templates and
exercises)WordlistManager.msi - Free tool to help create and edit Wordlists
The Core components must be installed first. You can create an admin image from the Core package to configurehow you want the suite of products set up. You can then select which additional packages you wish to install anddeploy them without any additional configuration. They will inherit their configuration from the Core package.
The sequence of events for a successful deployment should be:
© Widgit Software 2018 Page 199 of 212

Things the Installer Needs to KnowIn order to perform a successful deployment, the installer requires three sets of information:
1. Folder locations
The installation allows you to configure the locations of certain application folders. These are:
Program files
The main program files, speech engines, and language databases. These are normally installed in the main “ProgramFiles” folder unless you specify an alternate location. We strongly recommended that these files are installed on alocal disk, not a network location.
Shared files
Shared files are split into two categories.
“Shared Application Data” includes shared wordlists and spelling dictionaries which you may want to configurenetwork-wide and enable for all users.
“Shared Documents” include templates, exercises, and example files that you may wish certain users to be able toedit but provide to all users. It is recommended that you store these on a network location.
User files
User files include user-specific wordlists and the user's own documents. It is strongly recommended that you storethese files in the user’s profile (the default behaviour) and use roaming profiles if you wish to enable access frommultiple machines.
2. Settings
Create desktop shortcuts
When enabled, this will create desktop shortcuts for all users.
Allow anonymous usage statistics to be sent to Widgit
When enabled, the program will occasionally send information on how it is used to Widgit. This information is forstatistical purposes only and will be used to improve the quality of future versions of the software. It contains nopersonally identifying information.
Check for updates (default: off)
When enabled, the program will check for updates on startup and prompt if a later version is available. This is disabledby default for network installations as most users will not have access to install the newer version.
Show licence key in about box (default: off)
When enabled, the program will show the licence key in the about box. This can assist with technical support, but isdisabled by default for network installations.
3. Activation Settings
Several Widgit products require online activation before they can be used. Licence keys can be provided for individualproducts, product bundles, and language add-ons. You should provide all licence keys you wish to be activated ontarget machines as part of the admin install, and they will be activated when the package is deployed. You may alsoneed to provide proxy server details in order for activation to work successfully, depending on your network.
Page 200 of 212 © Widgit Software 2018

Creating an Admin Image1. Insert the application CD.
Go to 'Run' and enter: msiexec /ad:\installer\netinst\core.msi
(If your CD-Rom drive has a different drive letter thanD, make sure you type this instead.)
2. The administrative installation will then begin.
Click ‘Next’ on this screen to continue.
3. You will first be asked where you would like tocreate the admin package.
The default location for this is in your ‘MyDocuments’ area. Note that if you would like youradmin package available on a network location, it canbe very slow if you enter a network path here. It willbe much faster to create the admin package in thedefault location and then copy the files manuallyafterwards.
Click ‘Next’ to continue
© Widgit Software 2018 Page 201 of 212

4. You will now be asked where you would like toinstall the Shared Files.
These are files such as Wordlists, Templates, andResource Packs which can be shared between allusers.
You have two options:
Install in the ‘All Users’ Profile Area (Default) - This will install the Shared Files locally on the targetmachine in the ‘All Users’ area.
Install in a specific location, such as a network share - This option allows you to specify where you wantthe various shared files installed on your network.
5. If you select the second option, you will be askedto specify locations for:
Shared data files such as wordlists.Shared document files such as templates
and resource packs.
After selecting where you would like the Shared Filesto be installed, click ‘Next’ to continue.
Page 202 of 212 © Widgit Software 2018

6. You can now choose where you would like theapplication program files installed.
You have two options:
Install in the default ‘Program Files’area (Default) - This will install the applicationprogram files locally on the target machine inthe ‘Program Files’ area.
Install in a specific location on the targetcomputer - This option allows you to specifya non-standard install location for theapplication program files on the targetmachine.
After selecting where you would like the applicationprogram files to be installed, click ‘Next’ to continue.
7. You can now select the following installationpreferences:
Create desktop shortcutsAllow anonymous usage statistics to be
sent to WidgitCheck for updatesShow licence key in about box
After making your selections, click ‘Next’ tocontinue.
8. An internet connection will be required forautomatic activation of some Widgit products.
You may need to provide proxy server details in orderfor activation to work successfully, you have theopportunity to do so on this screen.
After entering the information required, click ‘Next’ tocontinue.
© Widgit Software 2018 Page 203 of 212

9. You can now enter the licence key of any productyou wish to activate.
The products associated with each licence key willbe activated automatically when installed.
After entering all licence keys, click ‘Next’ tocontinue.
You have now entered all the information required to create an admin image. Click ‘Next’ to continue and begin thecreation of the admin image, or click ‘back’ to make any changes.
An admin package will be created including an MSI and a large number of files. Note that if you want to copy ormove these files to another location, you must copy the MSI and the additional folders together, keeping the relativepaths the same.
You only need to create an admin package for the Core component. Other MSIs, such as inprint.msi, can bedeployed as they are.
Page 204 of 212 © Widgit Software 2018

Deploying to Your NetworkThe most important thing to ensure is that the Core package is deployed before the additional packages. After theCore package is deployed, you can deploy the additional packages in any order, however we have included belowsome examples of the deployment process depending on what software you want to use.
Note: These installers require Windows Installer 4.5 in order to run. Deploying this onyour network is outside the scope of this document, but should be done first.
© Widgit Software 2018 Page 205 of 212

Client Machine Recommended Running SpecificationsMinimum System Requirements:
Operating System: Windows Vista or aboveProcessor: 1 gigahertz (GHz) or faster processorMemory (RAM): 512MBHard disk space: 3GBResolution: 1024×768
Recommended System Requirements:
Operating System: Windows 7 or aboveProcessor: Dual core processorMemory (RAM): 2GBHard disk space: 3GBResolution: 1920×1080 (1080p HD display)
If you are using Group Policy for deployment and would like help installing the software, please view the ‘Group PolicyDeployment Guide’ in the documentation folder on the installation CD or download it fromhttp://download.widgit.com/network/
Page 206 of 212 © Widgit Software 2018

Activation Guide
If your computer has a working Internet connection then the quickest andmost convenient method of activating is via the Internet.
If you are trying to activate the software from inside a school or worknetwork you may need to provide proxy server details in order foractivation to work successfully. The product activator will give you theopportunity to enter these details during the activation process.
If your computer does not have a workingInternet connection, you can still activateyour Widgit Products via either of theManual Activation methods below:
Using another Computer If you have access to a computer that hasan internet connection, go tohttp://activation.widgit.com on thatcomputer and select Activate YourInstallation.
Over the Telephone Widgit Technical Support will be happy tohelp you perform a manual activation overthe phone during business hours.
Just call +44 (0) 1926 333680 and statethat you wish to manually activate yourproducts.
Widgit Product ActivatorThe Widgit Product Activator will allow you to activate and manage the licenses for your Widgit products.
You can open the Widgit Product Activator through the Start menu or from the following location:
C:\Program Files\Widgit\Common Files\Activator
Before ActivatingMake sure you are an administrator for the computer You need administrative privileges to activate new software. Almost all home users are administrators of theircomputer by default, but on a school or work network you may need to ask your technician to activate software foryou.
© Widgit Software 2018 Page 207 of 212

Instructions to Activate1. Open the Widgit Product Activator
With the Widgit Product Activator you can:
See the current license status of your Widgitproducts.
View the licence key of any activatedproducts on the machine.
Request a Free Trial key be emailed to youif you do not currently have a licence for thesoftware.
Enter and activate a licence key for anypurchased or trial products.
2. Enter a Licence Key for Activation
You can enter a key for any product and it will bechecked and verified automatically.
A green tick or a red cross will indicate whether ornot you have entered a valid licence key.
Once you have entered your key correctly, click'Activate'.
3. Activate
On the next screen you will be able to choose your activation method.
Page 208 of 212 © Widgit Software 2018

Activation via the internetAs detailed above, the quickest and most convenientmethod of activating is via the Internet.
If you have a working Internet connection, select thefirst option.
If you are trying to activate the software from inside aschool or work network then you may need to provideproxy server details in order for activation to worksuccessfully, click Proxy Server Settings to enterthese.
When you are ready to proceed click 'Next'.
Your activation results will then be displayed.
If your activation is successful, click Next. You willthen be returned to the Activator home screen whereyou can choose to activate another key or to finishthe activation process.
If your activation is unsuccessful then there may be aproblem with your internet connection. You can clickback to perform a Manual Activation.
© Widgit Software 2018 Page 209 of 212

Manual ActivationIf you do not have a connection to the Internet fromthe machine you are trying to activate on, select thesecond option to perform a Manual Activation.
When you are ready to proceed, click Next
You can now choose to manually activate usinganother computer or over the telephone.
For either method you will need your Licence Keyand unique Machine ID, both of which will bedisplayed on screen.
Using either method will result in you being given anActivation Code which is unique to your machineand licence key. You must enter this into theActivation Code box as soon as possible.
A valid code will produce a green tick after beingverified. When the green tick has appeared, clickNext to activate.
Page 210 of 212 © Widgit Software 2018

Your activation results will then be displayed.
If your activation is successful, click Next. You willthen be returned to the Activator home screen whereyou can choose to activate another key or to finishthe activation process.
© Widgit Software 2018 Page 211 of 212

Default Paths to File LocationsBelow is a list of default file locations used by InPrint 3, please note some of this may change if you have chosen acustom or network installation option.
Shared Documents:C:\Users\Public\Documents\Widgit\InPrint
Personal Documents:C:\Users\%username%\Documents\Widgit\InPrint(where %username% is a variable that Windows will substitute.)
Resource Packs:C:\Users\Public\Documents\Widgit\InPrint\Resource Packs
Templates:C:\Users\Public\Documents\Widgit\InPrint\Templates
Topic Wordlists:C:\ProgramData\Widgit\Common Files\Topic Wordlists
Symbol Set Wordlists:C:\ProgramData\Widgit\Common Files\Symbol Set Wordlists
InPrint 2 Wordlists:C:\Users\Public\Documents\Widgit\Communicate Files\Wordlist
Page 212 of 212 © Widgit Software 2018