Injury Prevention Exercises'
2
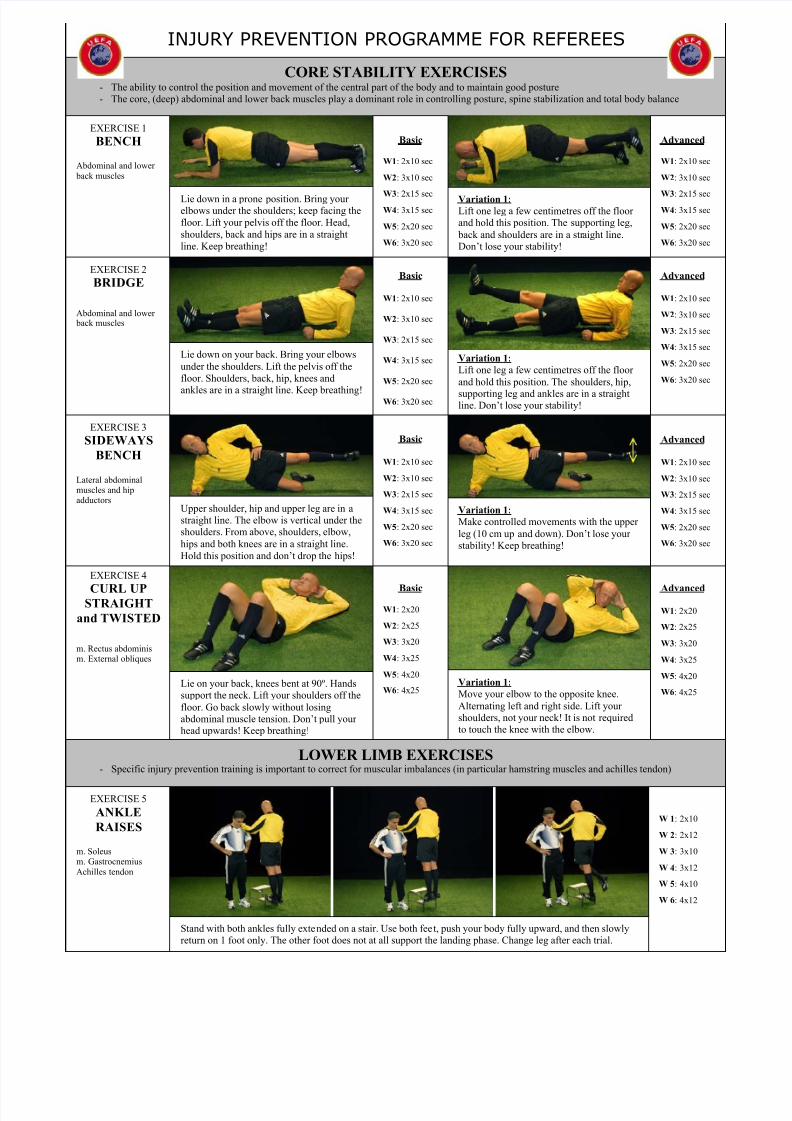
Variation 1: Move your elbow to the opposite knee. Alternating left and right side. Lift your shoulders, not your neck! It is not required to touch the knee with the elbow. Lie on your back, knees bent at 90º. Hands support the neck. Lift your shoulders off the floor. Go back slowly without losing abdominal muscle tension. Don’t pull your head upwards! Keep breathing! EXERCISE 4 CURL UP STRAIGHT and TWISTED m. Rectus abdominis m. External obliques Basic W1: 2x20 W2: 2x25 W3: 3x20 W4: 3x25 W5: 4x20 W6: 4x25 Advanced W1: 2x20 W2: 2x25 W3: 3x20 W4: 3x25 W5: 4x20 W6: 4x25 Stand with both ankles fully exte nded on a stair. Use both fee t, push your body fully upward, and then slowly return on 1 foot only. The other foot does not at all support the landing phase. Change leg after each trial. W 1: 2x10 W 2: 2x12 W 3: 3x10 W 4: 3x12 W 5: 4x10 W 6: 4x12 EXERCISE 5 ANKLE RAISES m. Soleus m. Gastrocnemius Achilles tendon LOWER LIMB EXERCISES - Specific injury prevention training is important to correct for muscular imbalances (in particular hamstring muscles and achilles tendon) CORE STABILITY EXERCISES - The ability to control the position and movement of the central part of the body and to maintain good posture - The core, (deep) abdominal and lower back muscles play a dominant role in controlling posture, spine stabilization and total body balance INJURY PREVENTION PROGRAMME FOR REFEREES Variation 1: Lift one leg a few centimetres off the floor and hold this position. The shoulders, hip, supporting leg and ankles are in a straight line. Don’t lose your stability! Advanced W1: 2x10 sec W2: 3x10 sec W3: 2x15 sec W4: 3x15 sec W5: 2x20 sec W6: 3x20 sec Basic W1: 2x10 sec W2: 3x10 sec W3: 2x15 sec W4: 3x15 sec W5: 2x20 sec W6: 3x20 sec Lie down on your back. Bring your elbows under the shoulders. Lift the pelvis off the floor. Shoulders, back, hip, knees and ankles are in a straight line. Keep breathing! EXERCISE 2 BRIDGE Abdominal and lower back muscles Lie down in a prone position. Bring your elbows under the shoulders; keep facing the floor. Lift your pelvis off the floor. Head, shoulders, back and hips are in a straight line. Keep breathing! Variation 1: Lift one leg a few centimetres off the floor and hold this position. The supporting leg, back and shoulders are in a str aight line. Don’t lose your stability! EXERCISE 1 BENCH Abdominal and lower back muscles Basic W1: 2x10 sec W2: 3x10 sec W3: 2x15 sec W4: 3x15 sec W5: 2x20 sec W6: 3x20 sec Advanced W1: 2x10 sec W2: 3x10 sec W3: 2x15 sec W4: 3x15 sec W5: 2x20 sec W6: 3x20 sec Upper shoulder, hip and upper leg are in a straight line. The elbow is vertical under the shoulders. From above, shoulders, elbow, hips and both knees are in a straight line. Hold this position and don’t drop the hips! Variation 1: Make controlled movements with the upper leg (10 cm up and down). Don’t lose your stability! Keep breathing! EXERCISE 3 SIDEWAYS BENCH Lateral abdominal muscles and hip adductors Basic W1: 2x10 sec W2: 3x10 sec W3: 2x15 sec W4: 3x15 sec W5: 2x20 sec W6: 3x20 sec Advanced W1: 2x10 sec W2: 3x10 sec W3: 2x15 sec W4: 3x15 sec W5: 2x20 sec W6: 3x20 sec
-
Upload
militaruandrei -
Category
Documents
-
view
226 -
download
0
Transcript of Injury Prevention Exercises'
8/12/2019 Injury Prevention Exercises'
http://slidepdf.com/reader/full/injury-prevention-exercises 1/2
Variation 1: Move your elbow to the opposite knee.
Alternating left and right side. Lift yourshoulders, not your neck! It is not requiredto touch the knee with the elbow.
Lie on your back, knees bent at 90º. Handssupport the neck. Lift your shoulders off the
floor. Go back slowly without losingabdominal muscle tension. Don’t pull yourhead upwards! Keep breathing!
EXERCISE 4
CURL UPSTRAIGHT
and TWISTED
m. Rectus abdominism. External obliques
Basic
W1: 2x20
W2: 2x25
W3: 3x20
W4: 3x25
W5: 4x20
W6: 4x25
Advanced
W1: 2x20
W2: 2x25
W3: 3x20
W4: 3x25
W5: 4x20
W6: 4x25
Stand with both ankles fully extended on a stair. Use both feet, push your body fully upward, and then slowlyreturn on 1 foot only. The other foot does not at all support the landing phase. Change leg after each trial.
W 1: 2x10
W 2: 2x12
W 3: 3x10
W 4: 3x12
W 5: 4x10
W 6: 4x12
EXERCISE 5
ANKLE
RAISES
m. Soleusm. Gastrocnemius
Achilles tendon
LOWER LIMB EXERCISES- Specific injury prevention training is important to correct for muscular imbalances (in particular hamstring muscles and achilles tendon)
CORE STABILITY EXERCISES- The ability to control the position and movement of the central part of the body and to maintain good posture- The core, (deep) abdominal and lower back muscles play a dominant role in controlling posture, spine stabilization and total body balance
INJURY PREVENTION PROGRAMME FOR REFEREES
Variation 1: Lift one leg a few centimetres off the floor
and hold this position. The shoulders, hip,
supporting leg and ankles are in a straightline. Don’t lose your stability!
Advanced
W1: 2x10 sec
W2: 3x10 sec
W3: 2x15 sec
W4: 3x15 sec
W5: 2x20 sec
W6: 3x20 sec
Basic
W1: 2x10 sec
W2: 3x10 sec
W3: 2x15 sec
W4: 3x15 sec
W5: 2x20 sec
W6: 3x20 sec
Lie down on your back. Bring your elbows
under the shoulders. Lift the pelvis off the
floor. Shoulders, back, hip, knees and
ankles are in a straight line. Keep breathing!
EXERCISE 2
BRIDGE
Abdominal and lower back muscles
Lie down in a prone position. Bring yourelbows under the shoulders; keep facing the
floor. Lift your pelvis off the floor. Head,
shoulders, back and hips are in a straight
line. Keep breathing!
Variation 1: Lift one leg a few centimetres off the floorand hold this position. The supporting leg,
back and shoulders are in a straight line.Don’t lose your stability!
EXERCISE 1
BENCH
Abdominal and lower
back muscles
Basic
W1: 2x10 sec
W2: 3x10 sec
W3: 2x15 secW4: 3x15 sec
W5: 2x20 sec
W6: 3x20 sec
Advanced
W1: 2x10 sec
W2: 3x10 sec
W3: 2x15 secW4: 3x15 sec
W5: 2x20 sec
W6: 3x20 sec
Upper shoulder, hip and upper leg are in astraight line. The elbow is vertical under theshoulders. From above, shoulders, elbow,
hips and both knees are in a straight line.
Hold this position and don’t drop the hips!
Variation 1: Make controlled movements with the upper
leg (10 cm up and down). Don’t lose yourstability! Keep breathing!
EXERCISE 3
SIDEWAYS
BENCH
Lateral abdominalmuscles and hipadductors
Basic
W1: 2x10 sec
W2: 3x10 sec
W3: 2x15 sec
W4: 3x15 sec
W5: 2x20 sec
W6: 3x20 sec
Advanced
W1: 2x10 sec
W2: 3x10 sec
W3: 2x15 sec
W4: 3x15 sec
W5: 2x20 sec
W6: 3x20 sec

8/12/2019 Injury Prevention Exercises'
http://slidepdf.com/reader/full/injury-prevention-exercises 2/2
Start from a straight upward position, both hands on the hips. Using one leg, make a big step forward, brakethe movement and push the same leg back to the starting position. Change leg after each trial. Don’t let the
knee buckle inwards! Use your core stability to keep your spine in a neutral position!
EXERCISE 8LUNGES
m. Iliopsoas
m. Quadriceps
m. Gluteus maximus
W 1: 2x10
W 2: 2x12
W 3: 3x10
W 4: 3x12
W 5: 4x10
W 6: 4x12
EXERCISE 7 HAMSTRING
EXERCISE
Hamstring muscles and
moderate load of
stabilizing muscles ofthe lower back
W 1: 2x4
W 2: 2x6
W 3: 2x8
VAR. 1:
W 4: 2x4
W 5: 2x6
W 6: 2x8 Ankles are pinned firmly to the ground by a partner. Slowly lean forward keeping your upper body and hipsstraight. Thighs, hip and upper body stay in a straight line. Try to hold this straight body alignment using the
hamstrings as long as possible, then use both hands to control the fall.Var. 1: same exercise but instead of falling, return to the starting position with a straight body alignment
Stand on one foot with the leg extended (on a stair). Bent the knee slowly and control the movement whilekeeping the standing foot flat on the ground. Then return to the starting position. The other leg simply follows
the movement up and down. Change leg after each trial. Don’t let the knee buckle inwards!
EXERCISE 6
SQUAT DIPS
m. Quadriceps
W 1: 2x10
W 2: 2x12
W 3: 3x10
W 4: 3x12
W 5: 4x10
W 6: 4x12
EXERCISE 11
FIGURE-8 BEFORE PASSING
After catching the ball, first hand the ball in a figure-8 form
around the swinging leg first and the standing leg, while
maintaining your balance and then pass the ball back.Each leg 10 times.
EXERCISE 10
PASS and TOUCH the GROUND
After catching the ball, bring the ball tothe ground while maintaining your balanceand then pass the ball back.Each leg 10 times.
EXERCISE 9
ONE-HAND BALL PASS
Pass the ball to each other using one
hand while maintaining your balance.
Each leg 10 times.
PROPRIOCEPTION EXERCISES
- Proprioception refers to all the mechanoreceptors that are located around the joints, in particular of the knees and the ankles.
- Balancing exercises strengthen not only the joint-stabilizing muscles, but also the core muscles.
Starting position: Stand in an ‘active’ single leg stance. Keep the knee and hip slightly bent with weight on the ball of thefoot. From the front, keep hip, knee and foot of the supporting leg in a straight line. Don’t let the knee buckle inwards oroutwards (see picture on the right).
Variation: Perform the exercises on a soft surface, using a towel under the foot or on a mat. Also specially designed
balancing boards can be used to further increase the difficulty of these exercises.Exercises: W 1 and 2: perform exercises 9, 10 and 11 as described below
W 3 and 4: perform exercises 9, 10 and 11 with the heel lifted off the floorW 5 and 6: perform exercises 10 and 11 with the eyes closed (eyes open when catching the ball!)