
Infinity SuperZoom 330 Instructions EN · Macro photography Use macro mode to take pictures at...
66
INSTRUCTIONS
Transcript of Infinity SuperZoom 330 Instructions EN · Macro photography Use macro mode to take pictures at...

INSTRUCTIONS

When using the mode button,each mode will be displayed onthe LCD panel. However, spotmetering will be displayed inthe viewfinder.
SPOT SELFREMOTE
C. D. E. F.DRIVE + / — SUBJECT FLASH
G. MACRO
B. Selftimer/remote control (p. 31)G. Macro (p. 29)C. Single-frame advanceE. Auto zoom (p. 40)C. Continuous - frame advance (p. 48)E. Infinity mode (p. 43)E. Servo AF (p. 44)Battery remaining indicator
C. Double exposure (p. 50)F. Auto flash (p. 21)F. Auto-S flash (p. 23)F. Flash OFF (p. 35)F. Fill-in Hash (p. 36)F. Slow-synchro fill-in flash (p. 38)D. Exposure compensation (p. 46)Exposure counter
LCD panel indicators
Viewfinder indicators
LCD panel/Mode button
Mode button
Flash indicator
Autofocusindicator
Autofocus frame
Spot metering
— 1 —

Description of controls (1)
LCD panel
Shutter release button
Viewfinder window
Grip / shoulder strap
Flash reflector
Autofocus windows
AF illuminator
Macro button
Power switch
Selftimer remotecontrol button
Zoom buttons
Spot meteringbutton
Back cover release
— 2 —

Description of controls (2)
Mode coverViewfinder
Exposure compensation mode button
Drive mode button
Functions listed below will not be cancelled when the power switch has been turnedOFF.—Auto-S flash mode—The first frame in double exposure mode
Flash mode button
Subject mode button
Battery coverTripod socket
Rewind button
Film window
— 3 —

Table of contentsDescription of controls ........................... 2Before you begin................................... 6Loading the batteries.............................. 6Attaching the strap ................................ 8Holding the camera ............................... 9Loading the film.................................. 10Unloading the film............................... 13Simple point & shoot photography............. 15How to take pictures............................. 15Auto flash photography......................... 21Auto-S flash photography...................... 23Camera functions and controls................ 25Focus lock.......................................... 25Spot metering...................................... 27Macro photography.............................. 29Selftimer/Remote control ...................... 31Flash OFF.......................................... 35
Fill-in flash........................................... 36Slow-synchro fill-in flash......................... 38Auto zoom mode.................................... 40Infinity mode......................................... 43Servo AF mode ...................................... 44Special effects . . . . . . . . . . . . . . . . . . . . . . . . . . . . . . . . . . . . . . . . 46Exposure compensation............................ 46Continuous mode.................................... 48Double exposure mode ............................ 50How to use the soft case . . . . . . . . . . . . . . . . . . . . . . . . . . 52Troubleshooting . . . . . . . . . . . . . . . . . . . . . . . . . . . . . . . . . . . . . . 53To take better photographs........................ 55Zoom lens............................................. 55Autofocus (AF) ...................................... 57Exposure............................................... 59Care and storage . . . . . . . . . . . . . . . . . . . . . . . . . . . . . . . . . . . . . 62Specifications . . . . . . . . . . . . . . . . . . . . . . . . . . . . . . . . . . . . . . . . . 63
— 4 —

Thank you for purchasing the OLYMPUS Infinity Super Zoom 330. Please read thisinstruction manual carefully before using the camera. We also recommend that youshoot at least one roll of film just to familiarize yourself with the camera's features.
Symbols used in this manual
Correct Incorrect operation Order of operation Automatic operation
Lamp blinkingLamp onPress lightlyAttention
— 5 —

Before you begin...
Loading the batteries
Be sure power switch is OFF.Remove battery cover on the side of thegrip.
Insert two 3V lithium batteries as shown andreplace cover.Use Panasonic CR 123A, Duracell DL123A, or equivalent.
WARNING: Do not mix different types ofbatteries or new and oldbatteries at the same time.
— 6 —

Switch power ON and check battery powerlevel on the LCD panel.
NOTE: LCD panel display switches off auto-matically after 90 seconds if no controlsare used.
When is displayed, batteries are OK.If flashes, batteries are low, have spareshandy.If is displayed continuously, batteries shouldbe replaced immediately.
Remove batteries if you do not plan to use thecamera for an extended period of time.
— 7 —

Attaching the strap
— 8 —

Holding the camera
Hold the camera correctly. Keep fingers and camera strap away from the lens,viewfinder and flash reflector.
NOTE: It is particularly important to hold thecamera steady when shooting at longerfocal lengths (telephoto); use bothhands for maximum stability. — 9 —

*Open the back cover by sliding the backcover release toward the top of thecamera.
NOTE: Avoid direct light when loading thefilm.
This camera is designed to use DX-coded 35mmfilm. DX coding is used by virtually all major filmmanufacturers. DX coding allows the camera toidentify and set the film speed automatically.If DX-coded film is unavailable, use ISO100 film.
Loading the film
— 10 —

Insert the film cartridge. Do not touchthe lens with your finger or the filmleader when loading.
Align the film leader with the filmloading indicator.
— 11 —

* Close the back cover.
—The film will advance automatically andthe exposure counter on the LCD panel willdisplay the number "1" indicating the firstpicture on the roll.
—The LCD panel will also display an "S"—toindicate single frame advance and either"AUTO or "AUTO S"—to indicate flashmode. Either flash mode may be used forpoint-and-shoot photography.
—Use the window in the camera back to checktype of film loaded.
—If film is improperly loaded, the LCD panelwill display a blinking "E". In this case, openthe back cover, and realign the film leader.
NOTE: Auto-S will be displayed if the camerawas in Auto-S mode prior to beingswitched OFF. In all other flashmode, the camera reverts to AUTOwhen it is switched OFF. (For detailson Auto and Auto-S flash mode,see pgs. 21 or 23)
— 12 —

Unloading the film
* The camera automatically rewinds the filmwhen you reach the end of the roll.
NOTE: If you want to rewind the film beforethe end of the roll, press the rewindbutton with the tip of a ballpoint pen.Do not use any device with a sharp tip.
—The exposure counter on the LCD panelcounts down as the film is rewinding.
The final reading of exposure counter beforerewinding may be more than the number ofexposure specified for the film.
— 13 —

—Once the film has been rewound, a blinking"E" will be displayed on the LCD panel.Further operations are not possible until therewound film cartridge is removed.
*Open the back cover, and remove thefilm cartridge from the camera.
— 14 —

Simple point & shoot photography
How to take pictures
*Set power switch ON.* Remove lens cap.To remove the lens cap, press part A.
Switch power OFF, when removing lens cap.
— 15 —

*Adjust viewfinder.A dioptric correction ring on the view-finder eyepiece allows photographers whowear eyeglasses to adjust the focus of theviewfinder. Adjustable range is — 2 to +1diopters.
*While looking through the viewfinder,aim the camera at the subject.
*Use the zoom button to adjust the sizeof your subject in the frame. (telephotoor wide angle)
— 16 —

—Press the "T" (Telephoto) on the zoombutton to zoom in. (The maximum focallength in the "T" position is 105mm.)
—Press the "W" (Wide-angle) on the zoombutton to zoom out. (The minimum focallength in the "W" position is 38mm.)
— 17 —

*Position your subject within theautofocus frame in the center of theviewfinder.
—When correct focus has been achieved, the"AF" light will appear in the viewfinder.
—If the "AF" light is blinking, correct focuswas not achieved. If this occurs, let go of theshutter release button. Make sure yoursubject is within the autofocus frame in thecenter of the viewfinder and press the shutterrelease button half-way again.
*Press the shutter release button half-wayto focus.
— 18 —

*When correct focus has been achieved(the "AF" light has appeared), press theshutter release button fully. As soon asthe shutter is released, film will automati-cally advance to the next frame.
* Switch power OFF when camera is not inuse.
— 19 —

Shooting Range
The autofocus system is designed to handlesubjects that are among of below chart. If thesubjects are out of this shooting range, the "AF"light in the viewfinder will blink, and the shutterwill not release.However, the shutter may sometimes be releasederroneously when the subject is extremely close tothe camera.
When shooting in extremely dim light, the AFilluminator on the front of the camera will emit abeam of infrared light to measure the distance tothe subject. The AF illuminator has a range ofapproximately 4 m (13.1 ft).
— 20 —
Auto flash photography
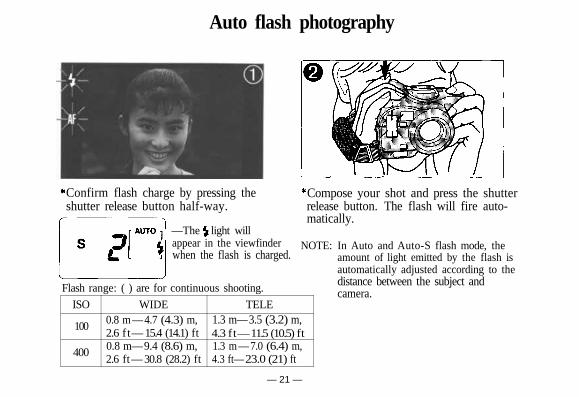
Confirm flash charge by pressing theshutter release button half-way.
Compose your shot and press the shutterrelease button. The flash will fire auto-matically.
NOTE: In Auto and Auto-S flash mode, theamount of light emitted by the flash isautomatically adjusted according to thedistance between the subject andcamera.
—The light willappear in the viewfinderwhen the flash is charged.
Flash range: ( ) are for continuous shooting.
ISO
100
400
WIDE0.8 m — 4.7 (4.3) m,2.6 ft— 15.4 (14.1) ft0.8 m— 9.4 (8.6) m,2.6 ft — 30.8 (28.2) ft
TELE1.3 m— 3.5 (3.2) m,4.3 ft— 11.5 (10.5) ft1.3 m — 7.0 (6.4) m,4.3 ft— 23.0 (21) ft
— 21 —

NOTE: The flash may not fire if the shutter isreleased while the flash is still charging.It takes about 3.5 seconds after the filmis advanced to recharge the flash.
— 22 —

Auto-S flash photography
Auto-S flash significantly reduces "red-eye" phenomenon (when a subject's eyesappear red) in flash portraits and group photos. Red-eye phenomenon is most likely tooccur in very low light, and at longer focal lengths (telephoto). Auto-S flash can also beset in the standard operating mode.
* Activate Auto-S mode by pressing theFLASH mode button located under themode cover.
—"AUTO-S" will be displayed on the LCDpanel.
— 23 —

* Compose your shot and press the shutterrelease button.—the flash will emit arapid series of pre-flashes, followeddirectly by the main flash.
*Hold the camera firmly while pressingthe shutter release button.
*To cancel Auto-S mode, press the Flash modebutton located under the mode cover.
NOTE: Auto-S mode will not be cancelledwhen power is switched OFF.
ISO
100
400
WIDE0.8 m— 4.1 (3.8) m,2.6ft — 13.5 (12.5) ft0.8 m — 8.2 (7.6) m,2.6 ft— 26.9 (24.9) ft
TELE1.3 m— 3.1 (2.8) m,4.3 ft — 10.2 (9.2) ft1.3 m — 6.2 (5.6) m,4.3 ft— 20.3 (18.4) ft
Flash Auto-S mode shooting range
— 24 —

Camera functions and controls
Focus lock
Use focus lock when you want to position your subject outside the autofocus framelocated in the center of the viewfinder.
*Position your subject in the autofocusframe and press the shutter release buttonhalf-way.
—When correct focus has been achieved, the"AF" light will appear in the viewfinder.
*While keeping the shutter release buttonpressed half-way, change the position ofyour subject in the viewfinder to achievethe desired composition.
— 25 —

* Press the shutter release button fully totake the picture.
NOTE: When focus is locked, exposure settingsare also locked (AE lock).
— 26 —

Spot metering
Use spot metering when you want to limit light metering to a particular area of thecomposition. It is particularly useful when lighting is uneven, or when there is strongbacklight or sidelight.
*Position the subject for spot meteringwithin the autofocus frame in the centerof the viewfinder.
* Press the spot button.
(green) will appear in the viewfinder, and theautomatic spot metering exposure will belocked.
— 27 —

*Press the shutter release button half-wayto focus.
* Press the shutter release button fully totake the picture.
NOTE: It is not necessary to continue pressingthe spot button while the shutterrelease button is pressed half-way.
— 28 —

Macro photography
Use macro mode to take pictures at extremely close range. (0.8 ~ , 2.6 ft ~ infinity)
—The lens will automatically extend totelephoto and will be displayed on theLCD panel.
NOTE: Zooming is not possible in Macro mode.
*Press Macro button.
— 29 —

*Press the shutter release button half-way to focus.*To cancel macro mode, press the macrobutton again or switch the camera OFF.
*If the distance between the subject and thecamera is less than 1.3 m (4.3 ft) the viewfinderimage will automatically shift to correct forparallax. At distances greater than 1.3 m(4.3 ft) the lens will function as a normal105 mm lens; at distances less than0.8 meters, the AF light in the viewfinderwill blink and the shutter will not release.
Shooting Range:Macro photography is possible when the subjectis at a distance of 0.8 m (2.6 ft) to infinity ( ).If the distance between the subject and thecamera is less than 1.3 m (4.3 ft), and when au-tofocus shooting is difficult (see page 57), pressthe shutter release button half-way to confirmfocus. The camera will automatically correct forparallax. Then press the shutter release buttonfully.
— 30 —

Selftimer/Remote control (Optional)
Selftimer photography
*Set the camera firmly in position.*Press the /REMOTE (Selftimer/Remote control) button until
is displayed on the LCD panel.
*Press the shutter release button half-wayto focus.
—When correct focus has been achieved, the"AF" light will appear in the viewfinder.
— 31 —

*Press the shutter release button fully tostart the Selftimer. The shutter will bereleased 12 seconds later.
—The red AF illuminator on the front of thecamera will light up for the first 10 seconds,then blink rapidly for 2 seconds until theshutter is released.
*To cancel the Selftimer, press the/REMOTE button or switch the
camera OFF.
NOTE: To prevent light from entering theviewfinder when setting the focus andexposure, do not remove your eye fromthe viewfinder until the Selftimer hasbeen activated.
— 32 —

Remote control (Optional) shooting
*Press the /REMOTE (Selftimer/Remote control) button untilis displayed on the LCD panel.
*While looking through the viewfinder,aim the camera at the subject.
*With the remote control lens cap unit inyour hand, position yourself in front ofthe camera and press the release buttonon the unit's side.
— 33 —
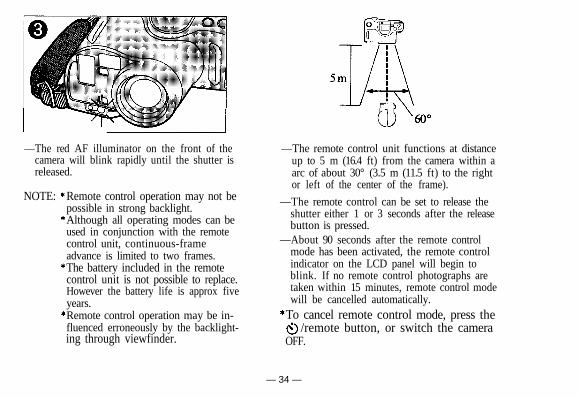
—The red AF illuminator on the front of thecamera will blink rapidly until the shutter isreleased.
NOTE: Remote control operation may not bepossible in strong backlight.Although all operating modes can beused in conjunction with the remotecontrol unit, continuous-frameadvance is limited to two frames.The battery included in the remotecontrol unit is not possible to replace.However the battery life is approx fiveyears.Remote control operation may be in-fluenced erroneously by the backlight-ing through viewfinder.
—The remote control unit functions at distanceup to 5 m (16.4 ft) from the camera within aarc of about 30° (3.5 m (11.5 ft) to the rightor left of the center of the frame).
—The remote control can be set to release theshutter either 1 or 3 seconds after the releasebutton is pressed.
—About 90 seconds after the remote controlmode has been activated, the remote controlindicator on the LCD panel will begin toblink. If no remote control photographs aretaken within 15 minutes, remote control modewill be cancelled automatically.
To cancel remote control mode, press the/remote button, or switch the camera
OFF.
— 34 —

Flash OFF
This mode is to be used in situations where a flash is prohibited (as in a museum) orwhen not desired (for special effect).
Press the shutter release button half-wayto focus.Press the shutter release button fully totake the picture.To cancel flash OFF mode, press theFLASH button, or switch the camera OFF.
*Activate Flash OFF mode by pressing theFLASH button located under the modecover.
—"OFF" will be displayed on the LCD panel.
NOTE: The necessary shutter speed may bevery slow (up to 2 seconds) to attainproper exposure. To prevent blurredpictures resulting from camera shake,the camera should be set firmly inposition (with a tripod for example).
— 35 —

Fill-in Flash
In this mode, the flash always fires regardless of available light. Use this mode fordaylight shooting with backlit conditions to compensate for backlighting which maymake the subject appear too dark.
* Activate Flash fill-in mode by pressingthe FLASH button located under themode cover.
*Press the shutter release button half-wayto focus.
—"FILL-IN" will be displayed on the LCDpanel.
— 36 —

*Press the shutter release button fully totake the picture.
*To cancel Fill-in flash mode, press theFLASH button again, or switch thecamera OFF.
— 37 —

Slow-synchro fill-in flash
Use slow-synchro fill-in flash to capture dimly lit backgrounds, such as the sky at dusk,while properly lighting the foreground with flash.
* Activate slow-synchro fill-in flash modeby pressing the FLASH button locatedunder the mode cover until "SLOW" isdisplayed on the LCD panel.
NOTE: The shutter speed may be very slow (upto 2 seconds) to attain proper exposure.To prevent blurring, the camera shouldbe set firmly in position (with a tripodfor example).
— 38 —

* Press the shutter release button half-wayto focus.
* Press the shutter release button fully totake the picture.
*To cancel slow-synchro fill-in mode,press the FLASH button, or turn thecamera OFF.
— 39 —
Auto zoom mode
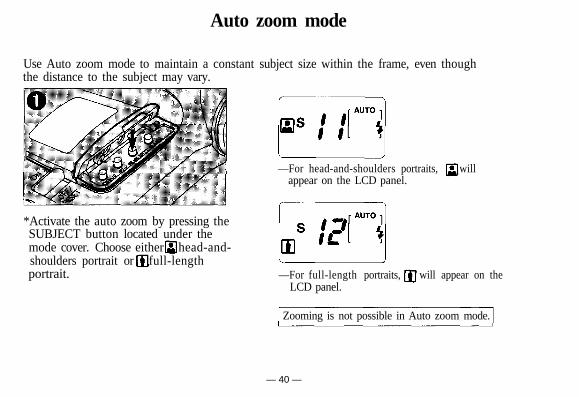
Use Auto zoom mode to maintain a constant subject size within the frame, even thoughthe distance to the subject may vary.
—For head-and-shoulders portraits, willappear on the LCD panel.
—For full-length portraits, will appear on theLCD panel.
*Activate the auto zoom by pressing theSUBJECT button located under themode cover. Choose either head-and-shoulders portrait or full-lengthportrait.
Zooming is not possible in Auto zoom mode.
— 40 —

*Position your subject in the center of theviewfinder and press the shutter releasebutton half-way.
—The zoom will operate automatically to attainthe desired shot (head-and-shoulders orfull-length).
To cancel Auto zoom mode, press theSUBJECT button again, or switch thecamera OFF.*Press the shutter release button fully to
take the picture.
*
— 41 —

NOTE: Outside the designated shooting range,constant subject size cannot bemaintained.
Shooting Range
— 42 —

Infinity mode—for distant subjects
Use Infinity mode to photograph extremely distant subjects.
Activate Infinity mode by pressing theSUBJECT button located under themode cover until is displayed on theLCD panel.
Press the shutter release button fully totake the picture.To cancel Infinity mode, press theSUBJECT button again, or switch thecamera OFF.
—When using infinity mode, the "AF" light willnot appear in the viewfinder because thecamera is already focused for distant subjects.
— 43 —

Servo AF mode—for moving subjects
Use Servo AF mode to maintain constant focus on a moving subject.
Activate Servo AF mode by pressing theSUBJECT button located under themode cover until "SERVO AF" isdisplayed on the LCD panel.
Press the shutter release button half-wayto focus.
—The focus will adjust at one-second intervalsas long as you continue to press half-way onthe shutter release button.
—If you remove your finger from the shutterrelease button after pressing half-way tofocus, the focus will remain locked until theshutter is released or Servo AF is cancelled.
— 44 —

Press the shutter release button fully totake the picture.
To cancel Servo AF mode, press theSUBJECT button again, or switch thecamera OFF.
— 45 —

Special effects
Exposure compensation
Use Exposure compensation to manually adjust the level of exposure to compensate foroverall brightness or darkness, and to create special effects.
—The compensation rate is adjusted at 0.5 EVincrements to + / - 1.5 EV.
*Adjust exposure compensation by press-ing the + / - button located under themode cover.
*To cancel Exposure compensation mode,press the + / - button again, or switchthe camera OFF.
— 46 —

-1.5 EV ±0 EV + 1.5 EV
— 47 —

Continuous mode
Use Continuous mode to shoot a continuous series of pictures at 1.3 frames per second.(One frame per 3.5 seconds with flash; for details see pg. 21)
*Activate continuous mode by pressing theDRIVE button located under the modecover until "C" is displayed on the LCDpanel.
* Press the shutter release button half-wayto focus.
— 48 —

* Press the shutter release button fully totake the picture.
*While the shutter release button is fullypressed, the shutter will continuously releaseat a rate of 1.3 frames per second.
*To cancel Continuous mode, press theDRIVE button again, or switch thecamera OFF.
NOTE: The focus and exposure will remainlocked after the first frame regardless ofany change in distance between thecamera and subject.
— 49 —

Double exposure mode
Use Double exposure mode to combine two images on a single frame.
*Press the shutter release button half-wayto focus.
*Press the shutter release button fully.*The film will not advance after the shutter is
released the first time.
—The "DOUBLE EXP" display will blink.
*Activate double exposure mode by press-ing the DRIVE button located under themode cover until "DOUBLE EXP" isdisplayed on the LCD panel.
— 50 —

*Press the shutter release button half-wayto focus the second exposure.
*Press the shutter release button fully totake the picture.
—When the shutter release button is fullypressed a second time, the double exposure iscomplete. The film advances and DOUBLEEXP mode is cancelled.
*To cancel Double exposure mode, pressthe DRIVE button again, or turn thecamera OFF.
—Turning the camera OFF will not cancel theDOUBLE EXP mode if the first frame hasbeen exposed.
— 51 —

How to use the soft case
Shoulder strap attachment ring
*The shoulder strap can be attached to the soft case.
— 52 —

Trouble shooting
Battery powerAbout 30 rolls (24-exposure, half withflash) can be taken. However, flash andzoom operations consume more batterypower.
The camera does not workMake sure the power switch is ON. If thepower switch is between the ON and OFFposition, the camera does not work.Check to make sure that the batteries areloaded and inserted correctly.If a completed roll of rewound film hasnot been removed, the camera will notwork.
The camera does not focus correctlyWhen the subject moves too fast or is notpositioned within the autofocus frame inthe center of the viewfinder (refer p. 57),the camera may not focus properly.For fast moving subjects try the focus lockwith Servo AF mode (refer p. 44).
Even though the AF Illuminator lights, thecamera is still not focusing correctly.
It is sometimes difficult to attain anaccurate distance measurement of subjectsthat have a low reflection ratio such asnavy blue or black.
The shutter will not release.Press the shutter release button half-wayand make sure the "AF" light appears inthe viewfinder.
Flash does not emit.Make sure the camera is on Flash mode.When continuous flash shooting, there issometimes a delay in the time required torecharge the battery. Shoot after the flashindicator appears in the viewfinder.
— 53 —

When flash shooting, peoples' eyes come outred.
* Red-eye phenomenon is a commonproblem in flash photography. Thephenomenon occurs because the retinabehind the pupil of an eye reflects flashlight. Shooting conditions such as brightnessand darkness of surroundings also affectred-eye phenomenon. Intensity of red eyephenomenon will differ from person toperson as it depends on dilation of thepupil. Generally, when the distance betweenthe camera and the subject increases sodoes the occurence of red eyes. To reducethis phenomenon use Flash Auto-S mode(refer to p. 23).
The camera does not work in extremely coldweather.
*In low temperature conditions, batteriestemporarily lose performance. Try to keepthe camera warm.
— 54 —

Zoom Lens
Zoom LensThe Infinity Super Zoom 330 is equipped with a 38 —105 mm zom lens. A zoom is a lens with a focal lengththat changes when part of the lens moves. In the case of the Infinity Super Zoom 330, any focal length between38 mm and 105 mm can be selected. The user, without moving, can change the composition of the photographby zooming in for a close-up or out for a wide angle shot. In this way, the Infinity Super Zoom 330 makesextremely flexible photography possible that's equivalent to a camera with a number of interchangeable lenses.In practice, zooming can add immense pleasure to photography.The zoom operation is performed using the zoom button on the top of the camera body. "W" stands forwide-angle and "T" for telephoto. When the "T" is pressed, the lens moves forward towards the maximumlength of 105 mm. When the "W" is pressed, it moves back towards the widest angle of 38 mm. On the top ofthe zoom lens, there are 38, 50, 70, 105 and MACRO indications; use these as a guide when zooming.38 mm:This is a wide-angle shot which means that the lens is shorter. With this setting, because the angle of view iswide and the depth of field is greatest, sharp photographs with clear perspective and contrast can be obtained.50 mm:The image is almost the same as that seen with the naked eye. At 50 mm, you can take a great portrait of2 people or other subjects that would not look natural in a wide angle shot. With this focal length, manyphotographs can be taken over a wide range of applications, from snapshots and portraits to landscapes.
(1) 38 mm 59° (2) 70 mm 34° (3) 105 mm 23°
— 55 —

85 mm or more:When the lens is set to the maximum focal length of 105 mm, magnification is approximately three timesgreater than at 38 mm and you will be able to obtain genuine telephoto photographs. In contrast to wide-angleshots, the perspective is narrow, and the depth of the field becomes more shallow. Because the depth of field isnot so great, objects in front of or behind the subject being photographed will be out of focus; make use ofthis in composing your photographs. Try taking close-ups with the telephoto setting. The telephoto lens isespecially useful for sports photography and taking photographs of animals without disturbing them. Telephotocan make snapshots and portraits more interesting by using its shallow depth of field. When taking telephotoshots, be sure to hold the camera securely so that it does not shake.*The three pictures ((1), (2) and (3)) on the left are examples taken with the photographer zooming whilestanding still and the pictures clearly illustrate the differences obtained with different settings. The threepictures on the right are examples of when the dimensions of the subject are not changed. From these examples,you can easily see the difference in the relation between the subject and the background.
Angle of view:This is the shooting and viewing angle of the lens, you zoom to adjust the composition, in your photograph.When the angle of the view is greater (W), the wide angle view is seen. When the angle is narrower, you haveshifted towards the telephoto (T).Depth of field:This is the range within which objects will be in focus. Outside this range, nearer to the camera or further fromit, objects will be out of focus. The shorter the focal length of the lens and or the larger the "f" number, thegreater the depth of field.(4) 38 mm (5) 70 mm (6) 105 mm
— 56 —

Autofocus (AF)The Autofocus (AF) mechanism automatically adjusts focus. With it, the camera measures the distance to asubject and adjusts the lens so that the subject is in focus. In the Infinity Super Zoom 330, focusing is done bya newly - developed "Phase-Difference" detection system. In this system, light from the subject is picked up by aspecial sensor and any inconsistencies (phase differences) in the image are used by a microprocessor chip to cal-culate the best focus setting. Since the lens used in the Infinity Super Zoom 330 is very accurate, correct focusingis even more accurate and accomplished by just aiming the lens at the subject. When there is no light reflectedfrom the subject, for example in a dark room, focusing is performed using a beam of light from the camera(the AF-Illuminator).Autofocus is designed so that the object in the center of the picture frame is correctly focused. However,sometimes you may want a subject that is not in the center of the frame to be in focus; for such cases, theInfinity Super Zoom 330 is also equipped with a focus lock mechanism.For example, when your subject is at the edge of the picture frame, not in the center, first move the cameraslightly so that the subject is in the center of the autofocus frame, then press the shutter release button halfwayto focus. While keeping the button pressed, recompose the picture, and press the button fully. (See "TakingPhotographs II" on p. 33).By doing this, photographs with any required composition can be taken. In addition, at the time the focus islocked, the exposure is also determined automatically and locked (AE lock).(1) Subject that does not include (2) Subject with low contrast (3) A rapidly moving subject
horizontal lines
— 57 —

Although the Infinity Super Zoom 330 can focus in almost any situation, there are certain conditions, such asthose illustrated below (on the left), in which it may not be possible to obtain the correct focus. The AF in theviewfinder will usually blink to warn you during these conditions; however, in situations (4), (5) and (6), thegreen AF in the viewfinder may light even though the lens is incorrectly focused. In any of these situations, youcan try focusing on a subject at a similar distance and then, using the focus lock.
(4) Two subjects within thefocusing frame, at differentdistances
(5) Excessively bright light in thecenter of the focusing frame
(6) A subject with a repeatedpattern
— 58 —

Exposure
Programmed exposure
One of the basics of photography is exposure. Exposure refers to the amount of the light which strikes the film.The correct amount of the light, or correct exposure is controlled according to the film speed (indicated on thefilm package, such as ISO 100 or ISO 200), the shutter speed and aperture. Many cameras are now equippedwith a programmed exposure function so that the correct exposure can be obtained easily without anyguess-work or previous photography experience.With programmed auto exposure, the camera automatically sets the most suitable combination of "f" stopand shutter speed for subjects at any brightness level. As a result, the correct exposure will be obtained almostimmediately. It's an automatic exposure system that means you'll never miss the opportunity to take aphotograph. All the photographer has to do when holding the camera is to concentrate on aiming it correctlyand press the shutter release button. For example, when you change from a dark to bright subject, the cameraadjusts itself to maintain the correct exposure. Anyone can take photographs without worrying about makinga mistake.
Program chart
The chart shown here is a program chart when the focal length is 38 mm and 105 mm. When the subject isbrighter than EV 11 for wide-angle shots and EV 12 for telephoto shots, the aperture and shutter speed changesimultaneously. When the subject is darker, the aperture opens fully and the shutter speed changes. Naturallythe program takes any zoom setting into consideration and sets the aperture and shutter speed which are mostappropriate for every shot. So that camera shake is less of a problem, the shutter speed will not be slower than1 740 sec. for wide-angle shots and 1/80 sec. for telephoto shots.When the subject is darker and requires a slower shutter speed,the flash fires automatically; in the slow-synchro fill-in or flash-offmode, stays open for as long as needed-up to a long 2 sec.automatically. (Broken line section)
— 59 —

Spot metering
Among methods for measuring the amount of light, the most widely used is the "center - weighted average lightmetering system" (Fig. A). This system gives excellent results when taking ordinary shots; however, when thereis an extremely bright or dark area in the frame, a center - weighted average light metering system may notautomatically set the best exposure. When taking a portrait for example, if the background is too bright, thesubject will be dark, and vice versa. The sophisticated light metering system used in the Infinity Super Zoom330 which is used to obtain proper exposure in this situation is called "spot metering". Spot metering (Fig. B)measures and calculates the correct exposure only from the brightness in the central section of the frame.This makes spot metering very convenient when the subject is back lit, side lit, or spot lit. Even when thesubject looks dark and does not stand out from the background, your photographs will be exposed properly.To make white objects look very white, use spot metering and then operate exposure compensation button tothe (+) direction, to make black objects look very black, use spot metering and then operate exposurecompensation button to the (-) direction.
Double exposure
"Double exposure" refers to a technique in which images are superimposed by releasing the shutter twicewithout advancing the film.In the case of the Infinity Super Zoom 330, you can easily take double exposures by pressing the DRIVE buttoninside the mode cover.By doing this, even when the shutter is released, the film won't advance to the next frame until the shutter hasbeen released for the second exposure. Used together with the spot metering function, you can take extraspecial - effects photographs, with the same face but with different expressions appearing twice in the samephotograph, for example. We recommend combined use of exposure compensation and the flash forapplications of this type.
— 60 —
With the Infinity Super Zoom 330, the exposure can be compensated from -1.5 EV to +1.5 EV in 0.5 EVsteps, by simply pressing the exposure compensation button marked + / - inside the mode cover. For instance,when shooting a back lit subject that's too far away for the flash to be effective, the exposure should be com-pensated to the positive side (more light) so the subject doesn't look too dark in the photograph. When thebackground is dark and details can't be seen and only the subject is bright, the exposure should be compensat-ed to the negative side. (less light)
— 61 —

Care and storage
*Do not expose the camera to extreme heat or strong magnetic fields.*Do not apply excessive force to the camera or its controls.*Do not rotate the camera once it is mounted on a tripod.*Do not touch the contact points inside the camera.*Do not use organic solvents, thinner or benzine to clean the camera.*Avoid high impact from bumping or dropping the camera.*Never disassemble the camera; it contains a high-voltage circuit.*Do not disassemble or expose batteries to excessive heat.*Do not expose the camera to rain shower and water.*Avoid sudden temperature change.*Do not put the camera in the extreme heat (over 40°C or 104°F) or in the extremecold (below -10°C or 14°F).
*In case of malfunction, consult your nearest Olympus dealer, or nearest Olympusservice center.
— 62 —

Specifications
Type: Full-automatic 35 mm autofocus lens-shutter camera with built-in 38 —105 mmZoom lens
Film format: 35 mm standard DX coded film(24 x 36 mm)
Lens: Olympus 38—105mm F4.5-6 lens with12 elements in 11 groups
Shutter: Programmed electronic shutterViewfinder: Kepler type 0.46-1.2x bright frame
zoom-finder (with autofocus frame, AFindicator, flash indicator, spot meteringindicator)Parallax compensation system in macrophotographyFinder view-field: 85% of actual picturefield
Focusing: Passive autofocus system with focuslockFocusing range: 0.8 m (2.6 ft)— (infinity)(at 38 mm)1.3 m (4.3 ft)— (a (at 105 mm)0.8 m (2.6 ft)— (infinity) (at macro mode)
Exposure control: Automatic exposure controlwith programmed electronic shutter(Center-weighted average light metering,switchable to spot metering)Auto exposure range: WIDE:EV3.4 (F4.5, 2 sec.) —EV17 (F16, 1/500 sec.)TELE: EV4.4 (F6, 2 sec.) —EV17(F18.4, 1/400 sec.)
Exposure compensation: ± 1.5EV Compensationpossible (1/2 step)
Exposure counter: Progressive type, displayed inLCD panel
Selftimer: Electronic Selftimer with 12 sec.delay
Film-speed range: Automatic setting with DXcoded film ISO 25 — 3200 with colornegative film (Actual setting at 25, 50,100, 200, 400, 800, 1600, 3200. For otherintermediate film speeds, the camera isautomatically set to the lower speed.For ISO 32 film, it is set to ISO 100.)
Film loading: Automatic loading (automaticallyadvances to first frame when camera back isclosed)
— 63 —

Film advance: Automatic film windingFilm rewind: Automatic film rewind (automatic
rewind activated at the end of film, auto-matic rewind stop), rewind possible at anypoint with rewind button.
AF illuminator: Automatic actuation in low lightFlash: Built-in flash
Recycling time: SINGLE MODE: approx.3.5 sec. (at normal temperature)Flash working range: at Auto Mode,WIDE: 0.8 m (2.6 ft) —4.7 m (15.4 ft)TELE: 1.3 m (4.3 ft) —3.5 m (11.5 ft) withISO 100 negative color filmWIDE: 0.8 m (2.6 ft) —9.4 m (30.8 ft)TELE: 1.3 m (4.3 ft) —7.0 m (23.0 ft) withISO 400 negative color film
Flash modes: AUTO (automatic flash activationin low light and backlight), AUTO-S(Red-eye reducing, in low light andbacklight) FILL-IN (forced activation),SLOW (slow-synchro possible with longestshutter speed of 2 sec.)OFF (activation stop)
Battery check: Displayed in LCD panelPower source: Two 3V lithium batteries
(CR 123A/DL 123A) (replaceable)Dimensions: 137 (W) mm x 80 (H) mm x
99 (D) mm (5.4" x 3.1" x 3.9")(excluding protrusions)
Weight: 610 g (21.5 oz) (without batteries)
— 64 —

OLYMPUS OPTICAL CO., LTD.San-Ei Building. 22-2. Nlshl Shinjuku 1-chome, Shinjuku-ku. Tokyo. Japan Tel 03-340-2211
OLYMPUS CORPORATIONCrossways Park. Woodbury. New York 11797, U.S.A. Tel. 516*364-3000
OLYMPUS OPTICAL CO. (EUROPA) GMBHPosttech 104908. Wenoenstrasse 14-16, 2 Hamburg 1. West Germany Tel: 040-23773-0
OLYMPUS OPTICAL CO. (U.K.) LTD.2-B Honduras Street. London EC1Y OTX, England Tel. 01-253-2772
PRINTED IN JAPAN 1289. 9MM