Indents and Tabs - dan.ct.upt.ro
71
Indents and Tabs Indenting text adds structure to your document by allowing you to separate information. Whether you'd like to move a single line or an entire paragraph, you can use the tab selector and the horizontal ruler to set tabs and indents Indenting text In many types of documents, you may want to indent only the first line of each paragraph. This helps to visually separate paragraphs from one another. It's also possible to indent every line except for the first line, which is known as a hanging indent. To indent using the Tab key: A quick way to indent is to use the Tab key. This will create a first-line indent of 1/2 inch. 1. Place the insertion point at the very beginning of the paragraph you want to indent.
Transcript of Indents and Tabs - dan.ct.upt.ro
Indents and Tabs
Indenting text adds structure to your document by allowing you to separate information. Whether you'd like
to move a single line or an entire paragraph, you can use the tab selector and the horizontal ruler to
set tabs and indents
Indenting text
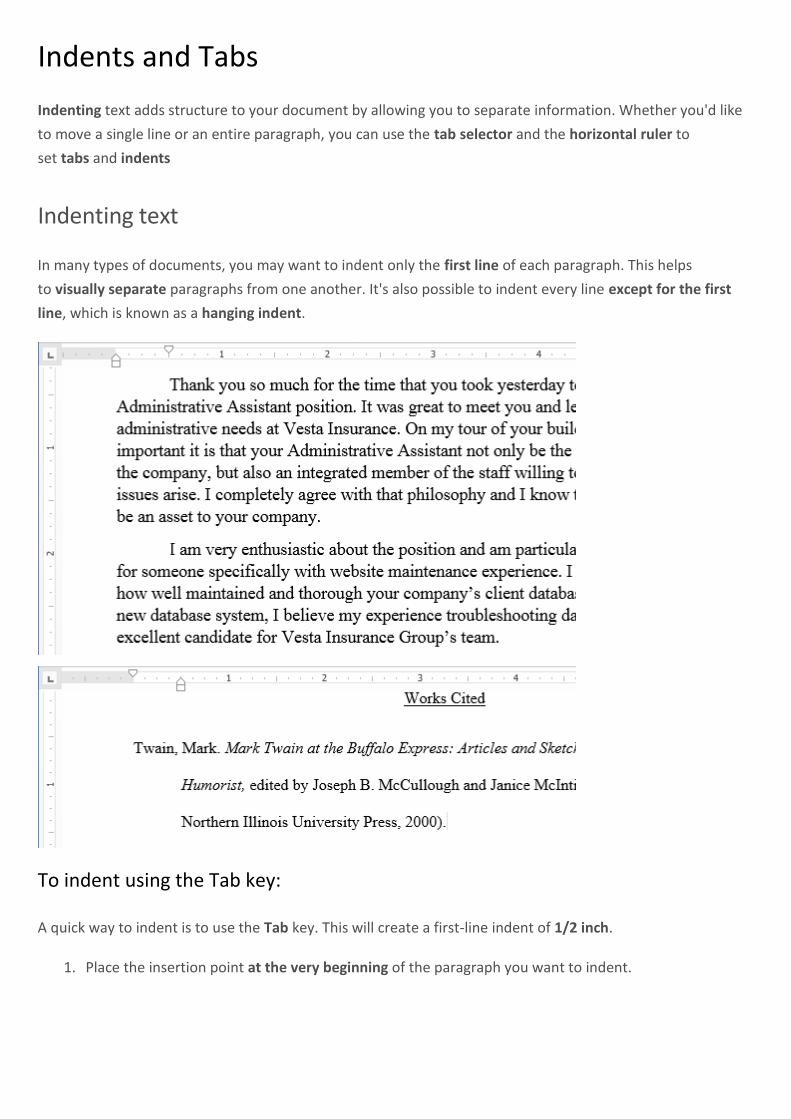
In many types of documents, you may want to indent only the first line of each paragraph. This helps
to visually separate paragraphs from one another. It's also possible to indent every line except for the first
line, which is known as a hanging indent.
To indent using the Tab key:
A quick way to indent is to use the Tab key. This will create a first-line indent of 1/2 inch.
1. Place the insertion point at the very beginning of the paragraph you want to indent.
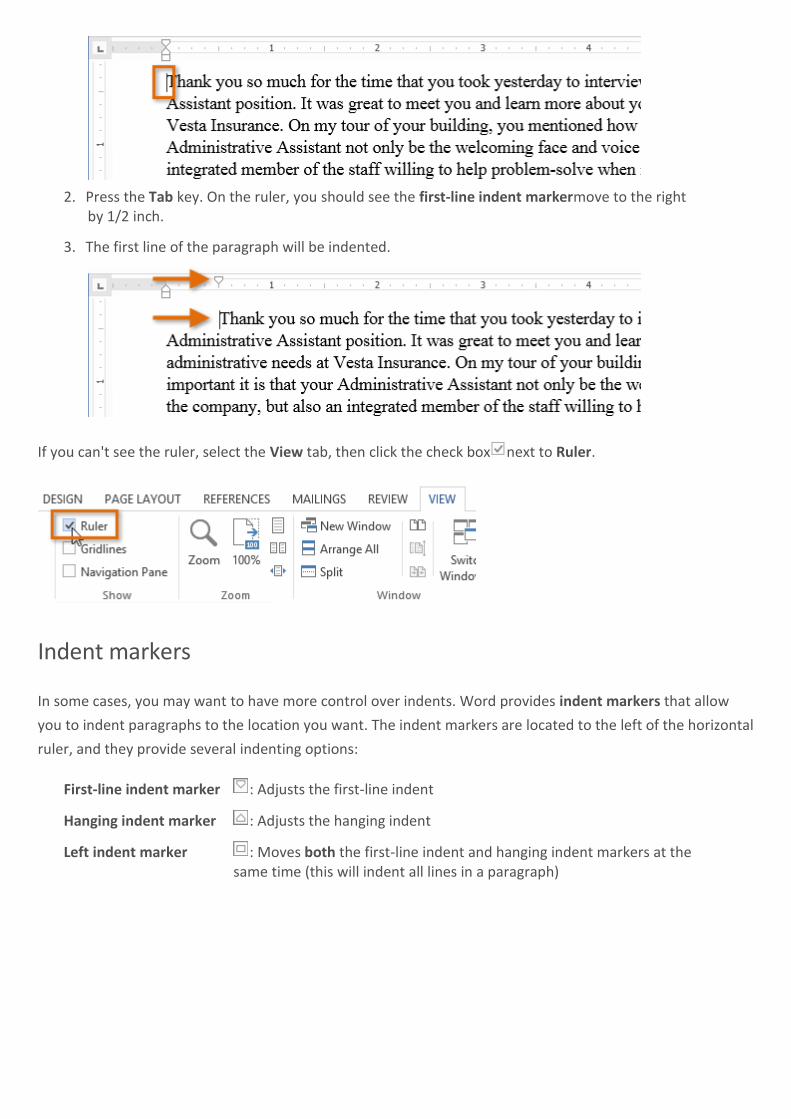
2. Press the Tab key. On the ruler, you should see the first-line indent markermove to the right by 1/2 inch.
3. The first line of the paragraph will be indented.
If you can't see the ruler, select the View tab, then click the check box next to Ruler.
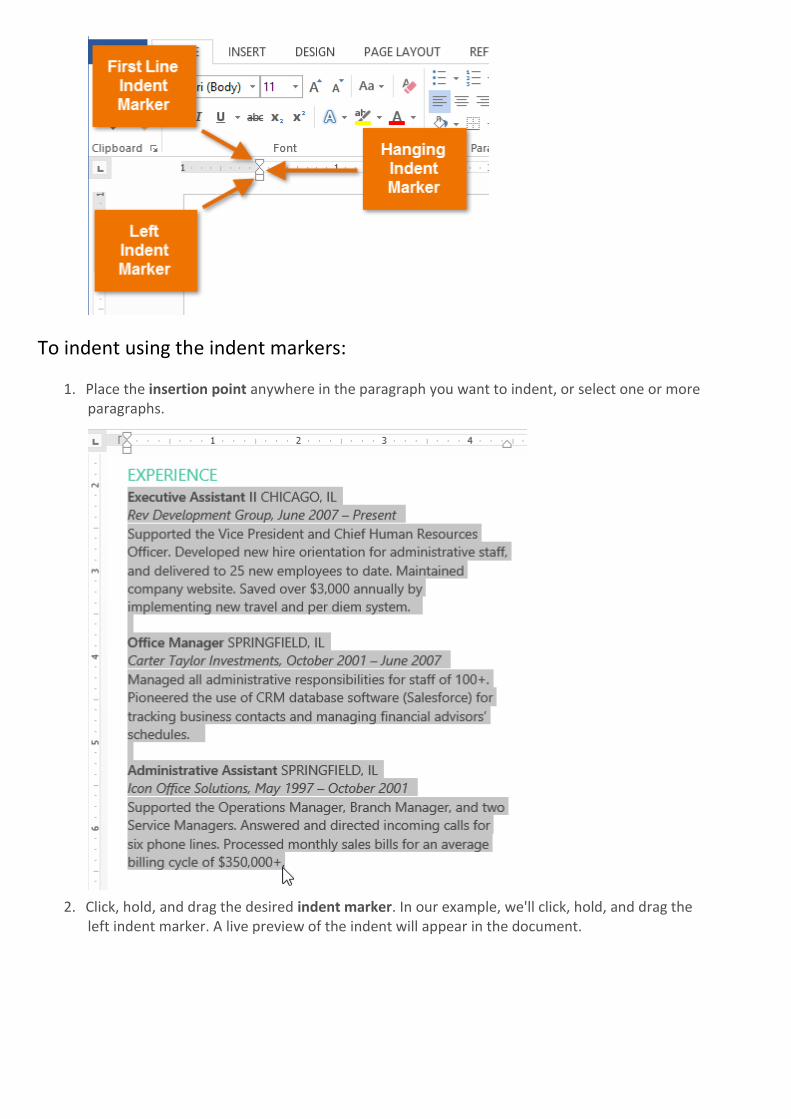
Indent markers
In some cases, you may want to have more control over indents. Word provides indent markers that allow
you to indent paragraphs to the location you want. The indent markers are located to the left of the horizontal
ruler, and they provide several indenting options:
First-line indent marker : Adjusts the first-line indent
Hanging indent marker : Adjusts the hanging indent
Left indent marker : Moves both the first-line indent and hanging indent markers at the same time (this will indent all lines in a paragraph)
To indent using the indent markers:
1. Place the insertion point anywhere in the paragraph you want to indent, or select one or more paragraphs.
2. Click, hold, and drag the desired indent marker. In our example, we'll click, hold, and drag the left indent marker. A live preview of the indent will appear in the document.

3. Release the mouse. The paragraphs will be indented.
To indent using the Indent commands:
If you want to indent multiple lines of text or all lines of a paragraph, you can use the Indent commands.
1. Select the text you want to indent.
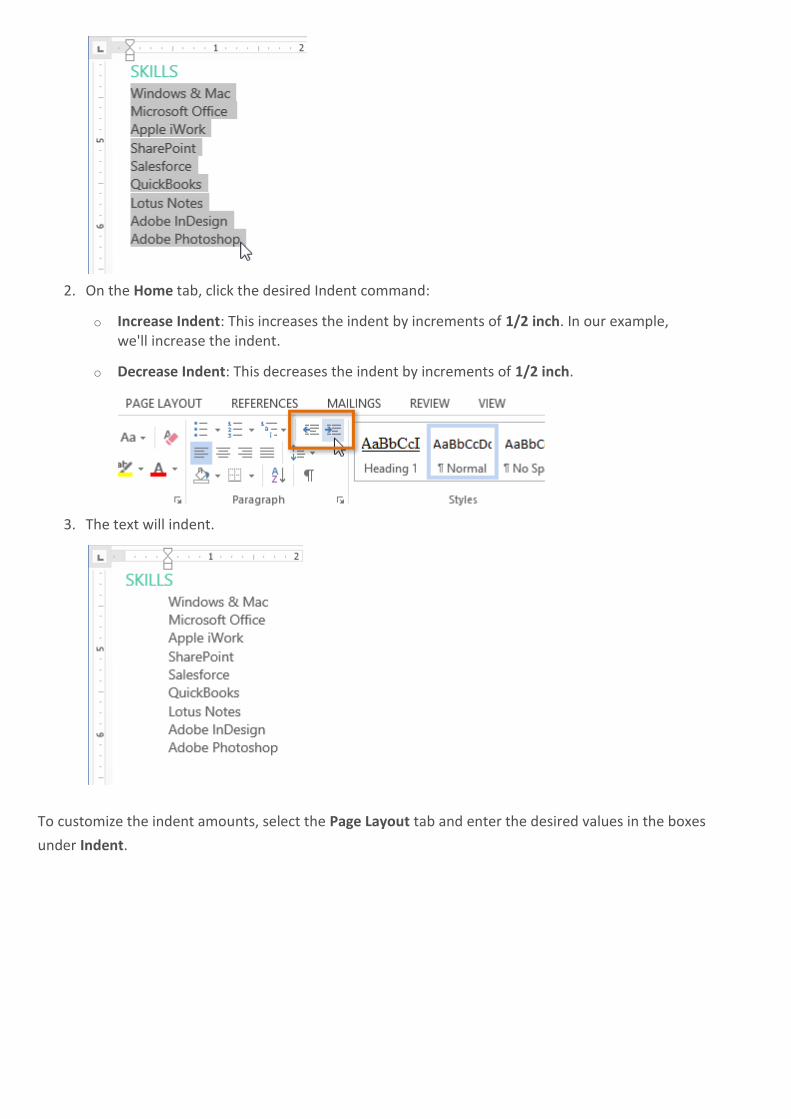
2. On the Home tab, click the desired Indent command:
o Increase Indent: This increases the indent by increments of 1/2 inch. In our example, we'll increase the indent.
o Decrease Indent: This decreases the indent by increments of 1/2 inch.
3. The text will indent.
To customize the indent amounts, select the Page Layout tab and enter the desired values in the boxes
under Indent.
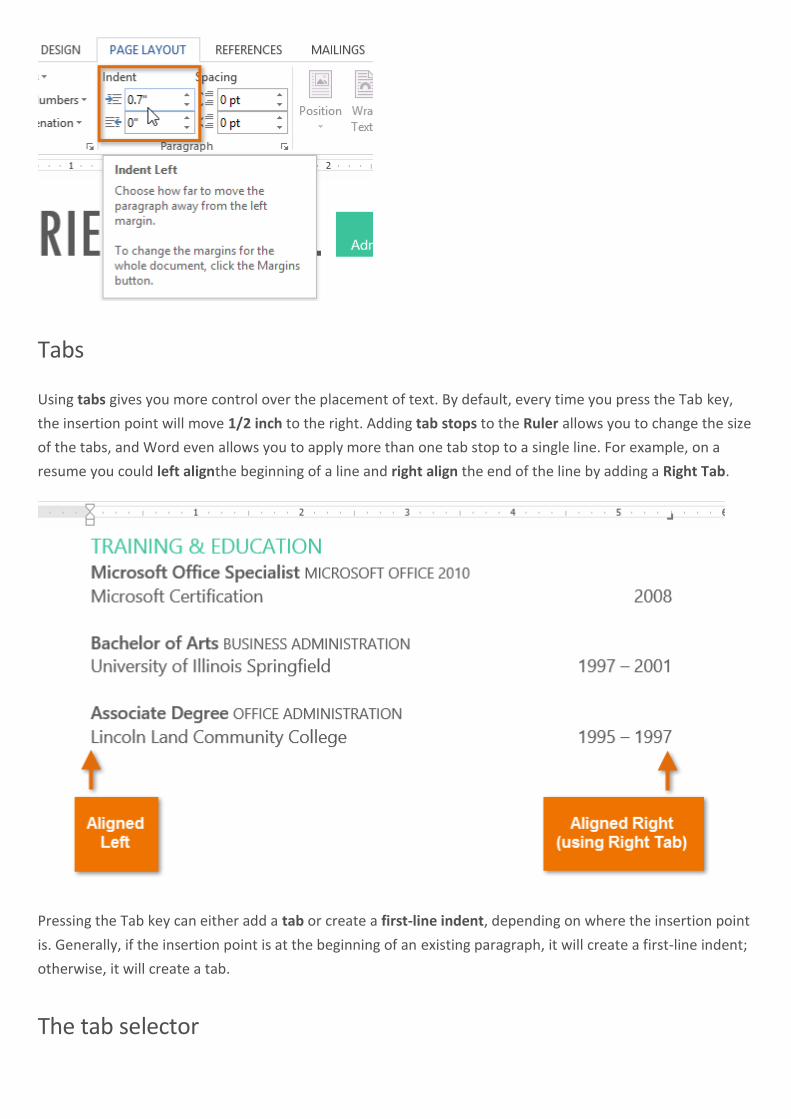
Tabs
Using tabs gives you more control over the placement of text. By default, every time you press the Tab key,
the insertion point will move 1/2 inch to the right. Adding tab stops to the Ruler allows you to change the size
of the tabs, and Word even allows you to apply more than one tab stop to a single line. For example, on a
resume you could left alignthe beginning of a line and right align the end of the line by adding a Right Tab.
Pressing the Tab key can either add a tab or create a first-line indent, depending on where the insertion point
is. Generally, if the insertion point is at the beginning of an existing paragraph, it will create a first-line indent;
otherwise, it will create a tab.
The tab selector
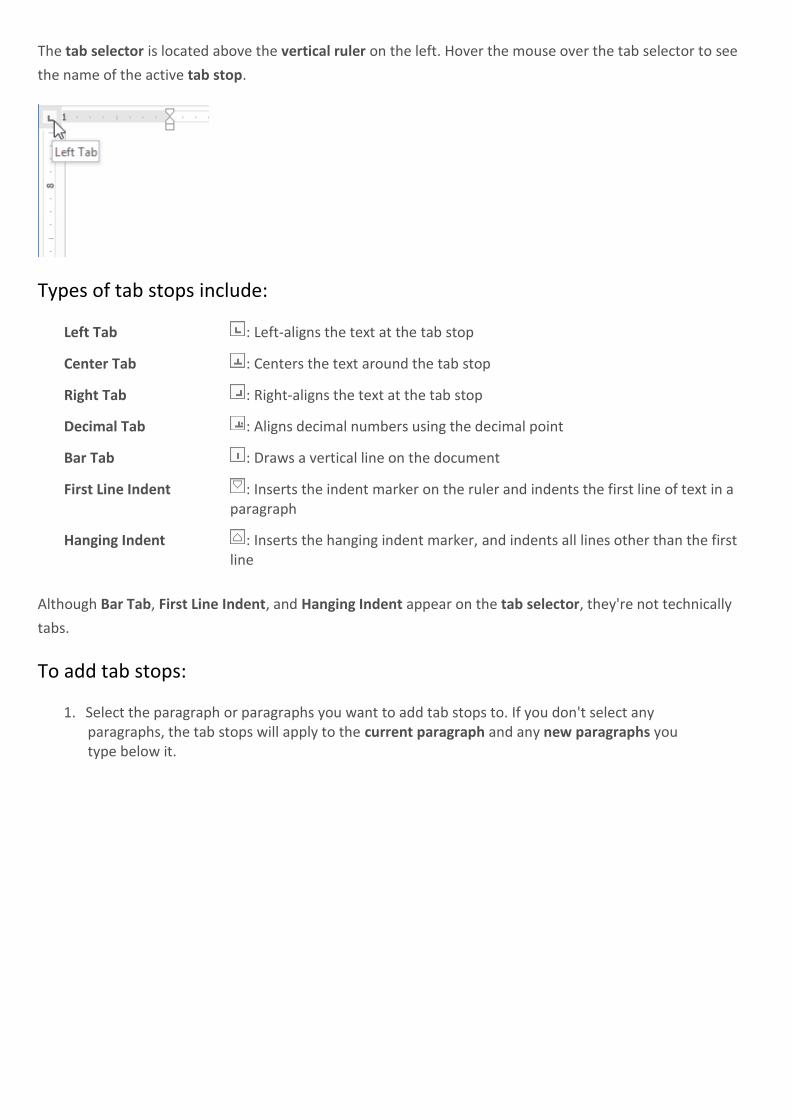
The tab selector is located above the vertical ruler on the left. Hover the mouse over the tab selector to see
the name of the active tab stop.
Types of tab stops include:
Left Tab : Left-aligns the text at the tab stop
Center Tab : Centers the text around the tab stop
Right Tab : Right-aligns the text at the tab stop
Decimal Tab : Aligns decimal numbers using the decimal point
Bar Tab : Draws a vertical line on the document
First Line Indent : Inserts the indent marker on the ruler and indents the first line of text in a paragraph
Hanging Indent : Inserts the hanging indent marker, and indents all lines other than the first line
Although Bar Tab, First Line Indent, and Hanging Indent appear on the tab selector, they're not technically
tabs.
To add tab stops:
1. Select the paragraph or paragraphs you want to add tab stops to. If you don't select any paragraphs, the tab stops will apply to the current paragraph and any new paragraphs you type below it.
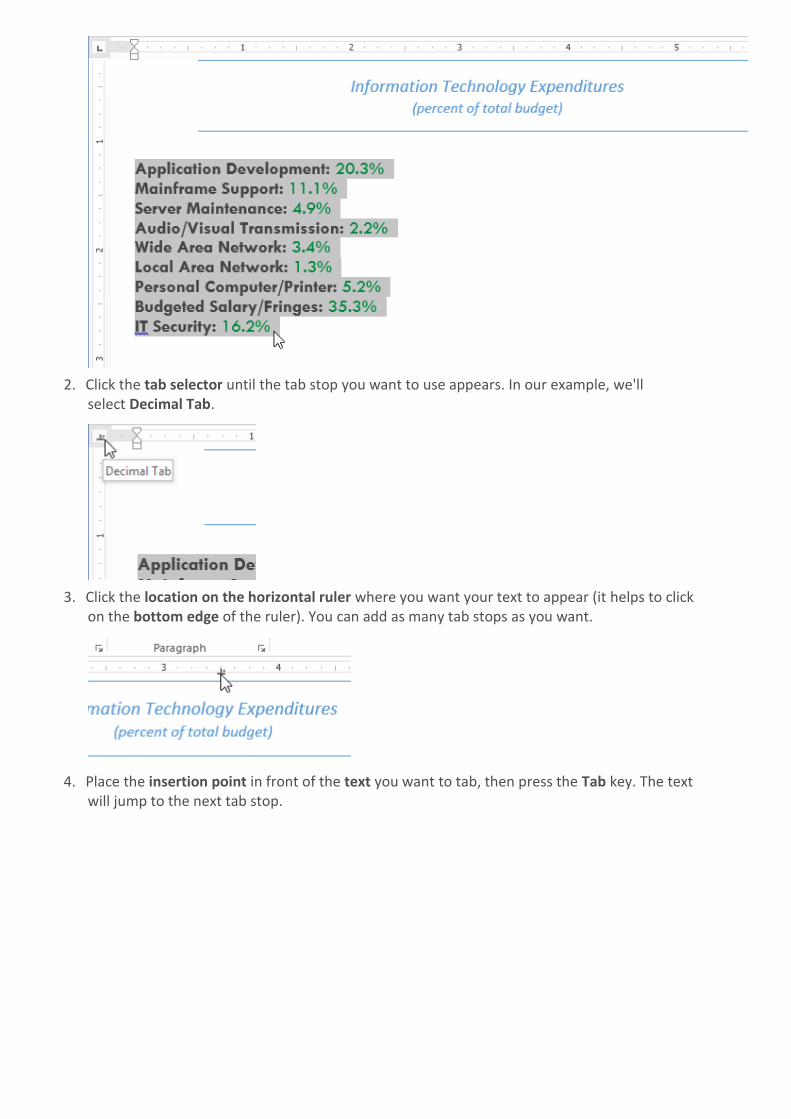
2. Click the tab selector until the tab stop you want to use appears. In our example, we'll select Decimal Tab.
3. Click the location on the horizontal ruler where you want your text to appear (it helps to click on the bottom edge of the ruler). You can add as many tab stops as you want.
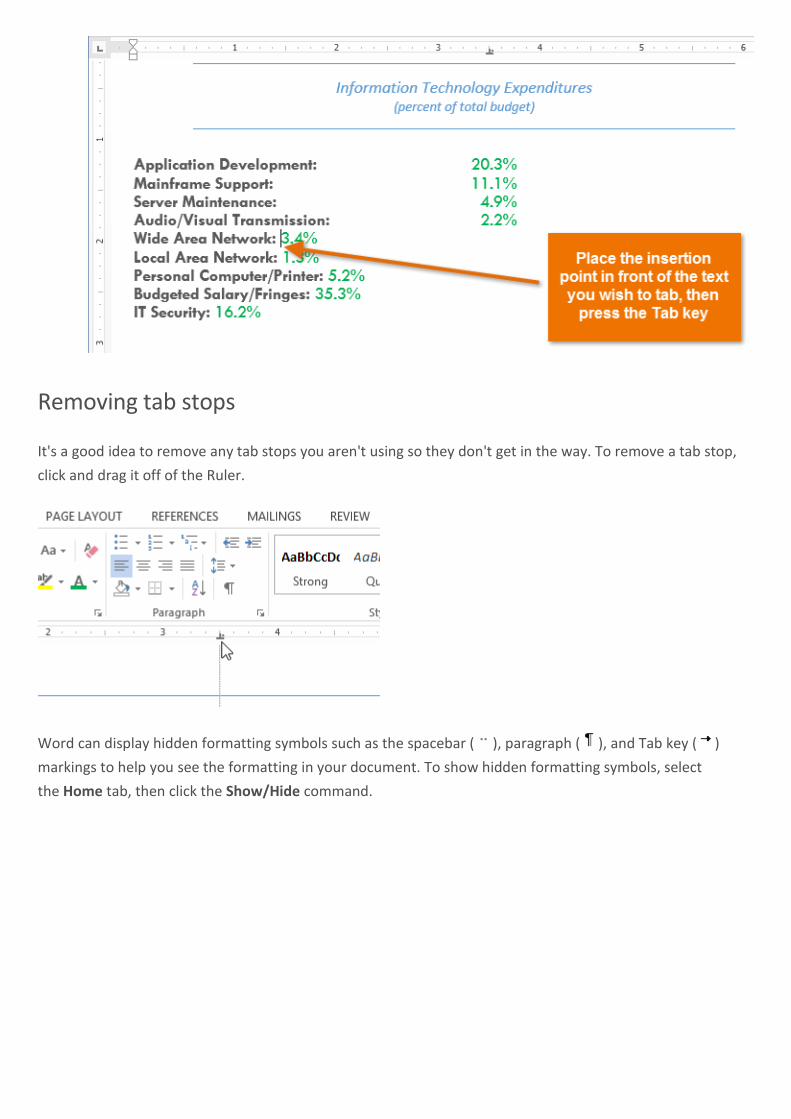
4. Place the insertion point in front of the text you want to tab, then press the Tab key. The text will jump to the next tab stop.
Removing tab stops
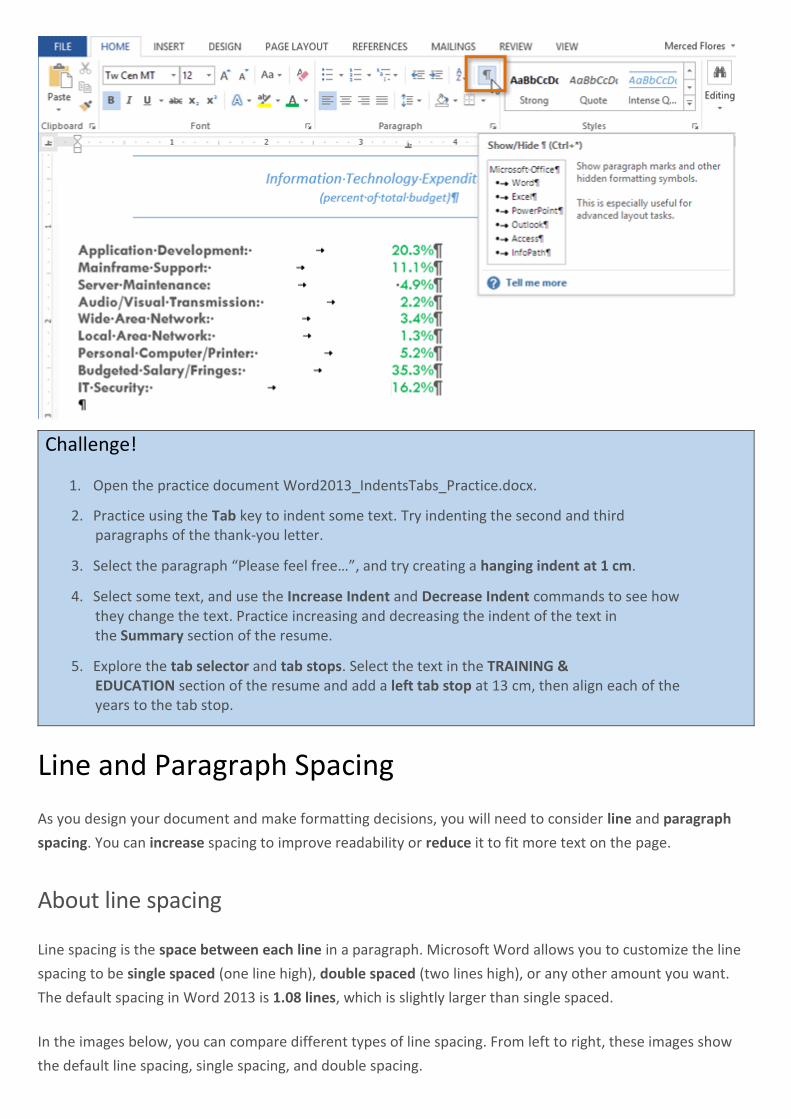
It's a good idea to remove any tab stops you aren't using so they don't get in the way. To remove a tab stop,
click and drag it off of the Ruler.
Word can display hidden formatting symbols such as the spacebar ( ), paragraph ( ), and Tab key ( )
markings to help you see the formatting in your document. To show hidden formatting symbols, select
the Home tab, then click the Show/Hide command.
Challenge!
1. Open the practice document Word2013_IndentsTabs_Practice.docx.
2. Practice using the Tab key to indent some text. Try indenting the second and third paragraphs of the thank-you letter.
3. Select the paragraph “Please feel free…”, and try creating a hanging indent at 1 cm.
4. Select some text, and use the Increase Indent and Decrease Indent commands to see how they change the text. Practice increasing and decreasing the indent of the text in the Summary section of the resume.
5. Explore the tab selector and tab stops. Select the text in the TRAINING & EDUCATION section of the resume and add a left tab stop at 13 cm, then align each of the years to the tab stop.
Line and Paragraph Spacing
As you design your document and make formatting decisions, you will need to consider line and paragraph
spacing. You can increase spacing to improve readability or reduce it to fit more text on the page.
About line spacing
Line spacing is the space between each line in a paragraph. Microsoft Word allows you to customize the line
spacing to be single spaced (one line high), double spaced (two lines high), or any other amount you want.
The default spacing in Word 2013 is 1.08 lines, which is slightly larger than single spaced.
In the images below, you can compare different types of line spacing. From left to right, these images show
the default line spacing, single spacing, and double spacing.
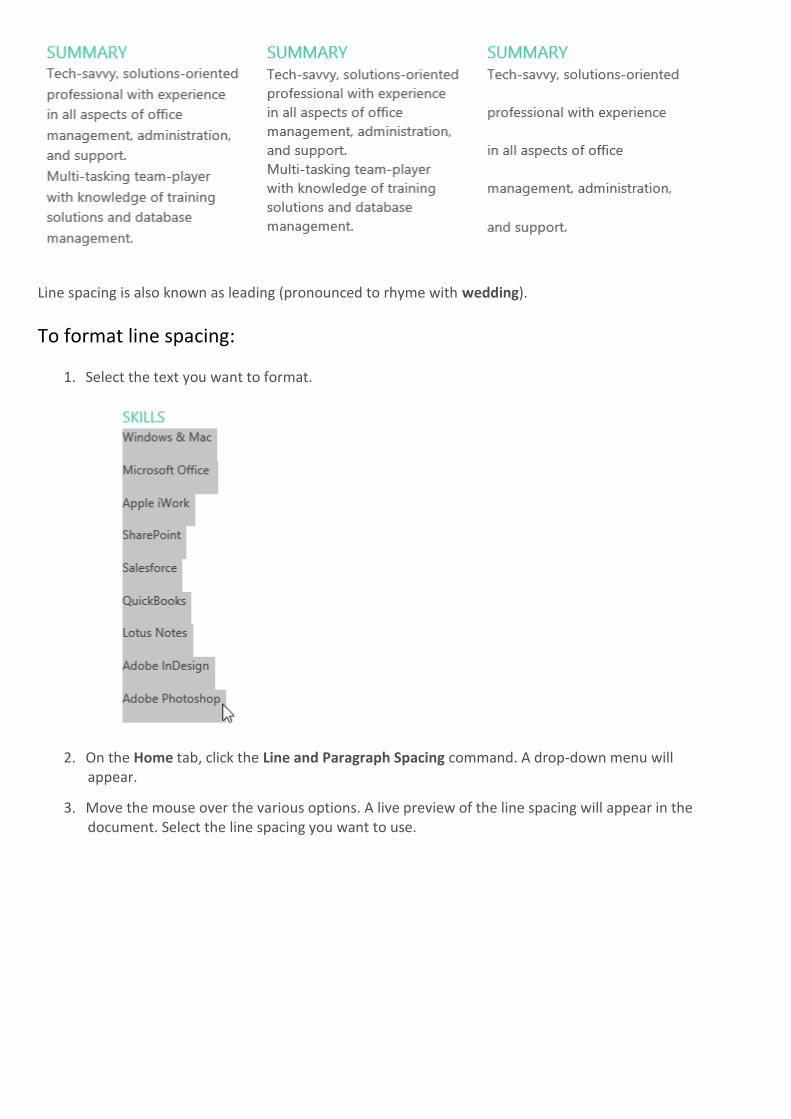
Line spacing is also known as leading (pronounced to rhyme with wedding).
To format line spacing:
1. Select the text you want to format.
2. On the Home tab, click the Line and Paragraph Spacing command. A drop-down menu will appear.
3. Move the mouse over the various options. A live preview of the line spacing will appear in the document. Select the line spacing you want to use.

4. The line spacing will change in the document.
Fine tuning line spacing
Your line spacing options aren't limited to the ones in the Line and Paragraph Spacing menu. To adjust
spacing with more precision, select Line Spacing Options from the menu to access the Paragraph dialog box.
You'll then have a few additional options you can use to customize spacing:
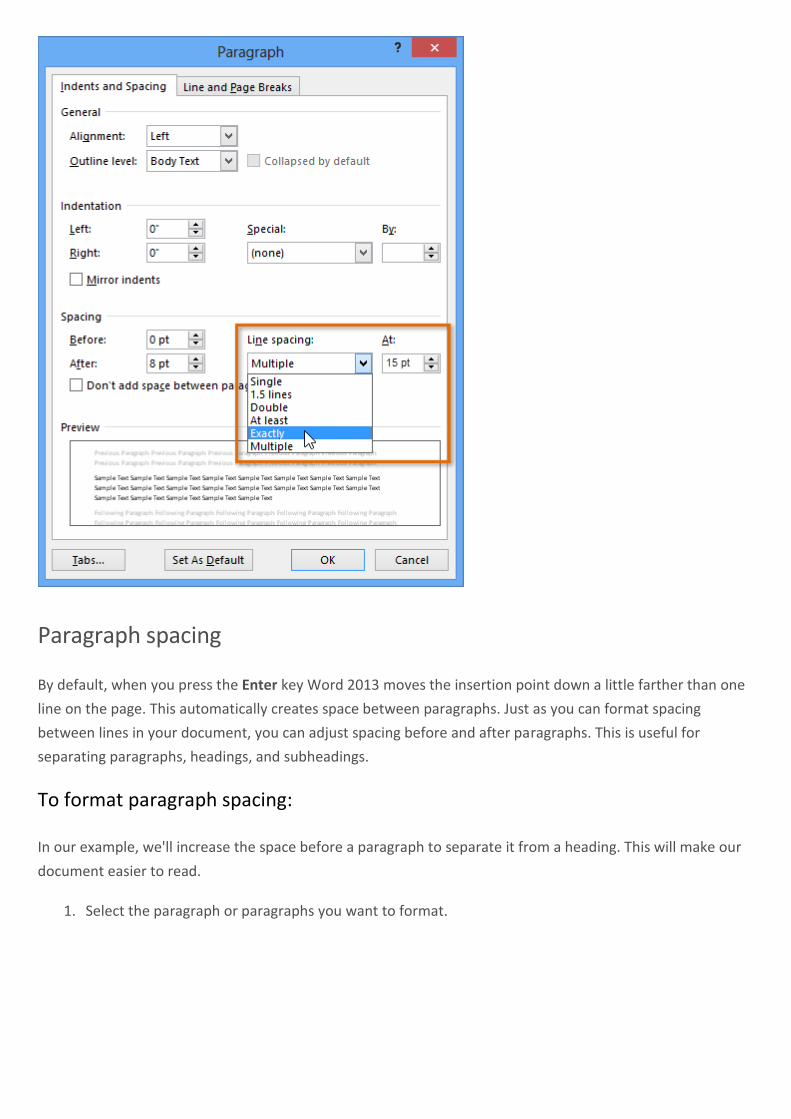
Exactly: When you choose this option, the line spacing is measured in points, just like font sizes. Generally, the spacing should be slightly larger than the font size. For example, if you're using 12-point text, you could use 15-point spacing.
At least: Like the Exactly option, this option lets you choose how many points of spacing you want. However, if you have different sizes of text on the same line, the spacing will expand to fit the larger text.
Multiple: This option lets you type the number of lines of spacing you want. For example, choosing Multiple and changing the spacing to 1.2 will make the text slightly more spread out than single-spaced text. If you want the lines to be closer together, you can choose a smaller value like 0.9.
Paragraph spacing
By default, when you press the Enter key Word 2013 moves the insertion point down a little farther than one
line on the page. This automatically creates space between paragraphs. Just as you can format spacing
between lines in your document, you can adjust spacing before and after paragraphs. This is useful for
separating paragraphs, headings, and subheadings.
To format paragraph spacing:
In our example, we'll increase the space before a paragraph to separate it from a heading. This will make our
document easier to read.
1. Select the paragraph or paragraphs you want to format.
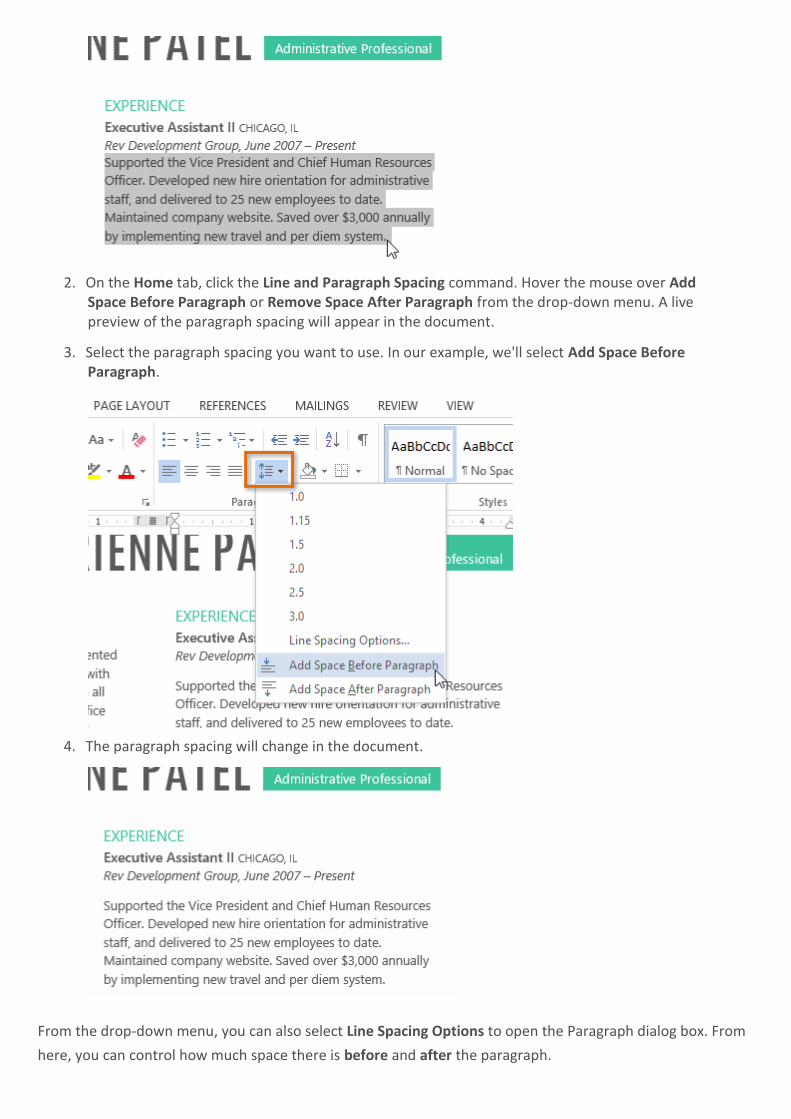
2. On the Home tab, click the Line and Paragraph Spacing command. Hover the mouse over Add Space Before Paragraph or Remove Space After Paragraph from the drop-down menu. A live preview of the paragraph spacing will appear in the document.
3. Select the paragraph spacing you want to use. In our example, we'll select Add Space Before Paragraph.
4. The paragraph spacing will change in the document.
From the drop-down menu, you can also select Line Spacing Options to open the Paragraph dialog box. From
here, you can control how much space there is before and after the paragraph.
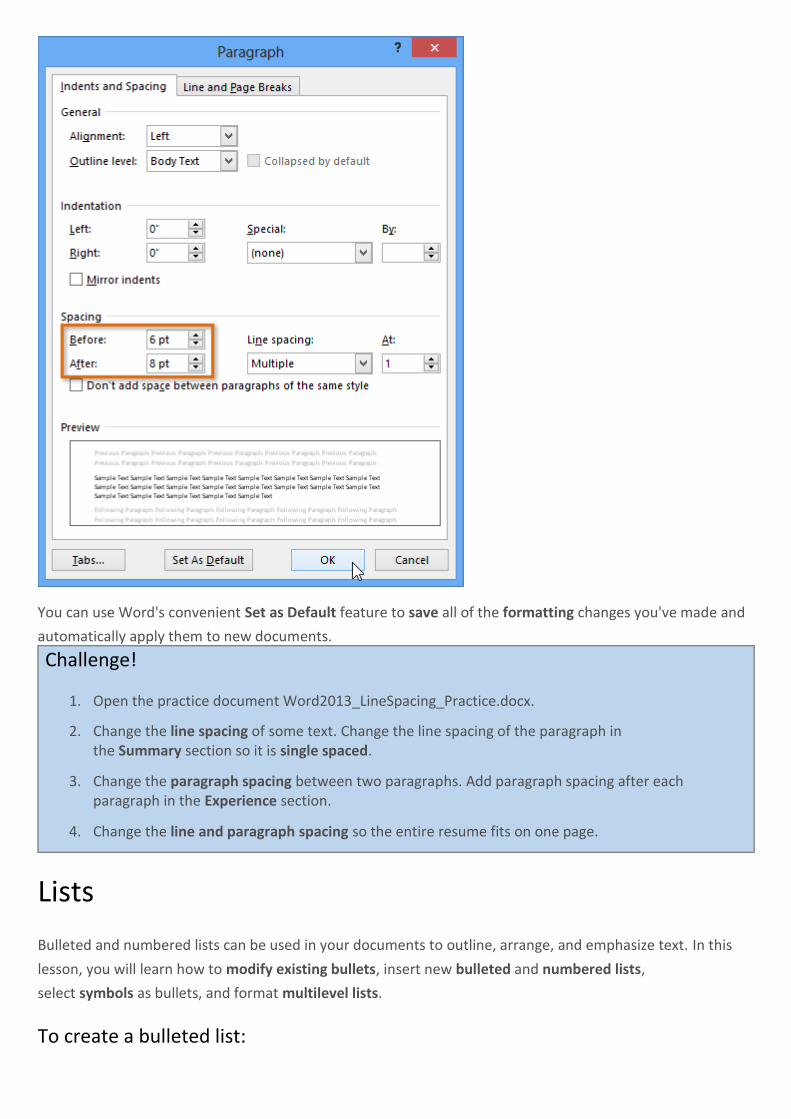
You can use Word's convenient Set as Default feature to save all of the formatting changes you've made and
automatically apply them to new documents.
Challenge!
1. Open the practice document Word2013_LineSpacing_Practice.docx.
2. Change the line spacing of some text. Change the line spacing of the paragraph in the Summary section so it is single spaced.
3. Change the paragraph spacing between two paragraphs. Add paragraph spacing after each paragraph in the Experience section.
4. Change the line and paragraph spacing so the entire resume fits on one page.
Lists
Bulleted and numbered lists can be used in your documents to outline, arrange, and emphasize text. In this
lesson, you will learn how to modify existing bullets, insert new bulleted and numbered lists,
select symbols as bullets, and format multilevel lists.
To create a bulleted list:
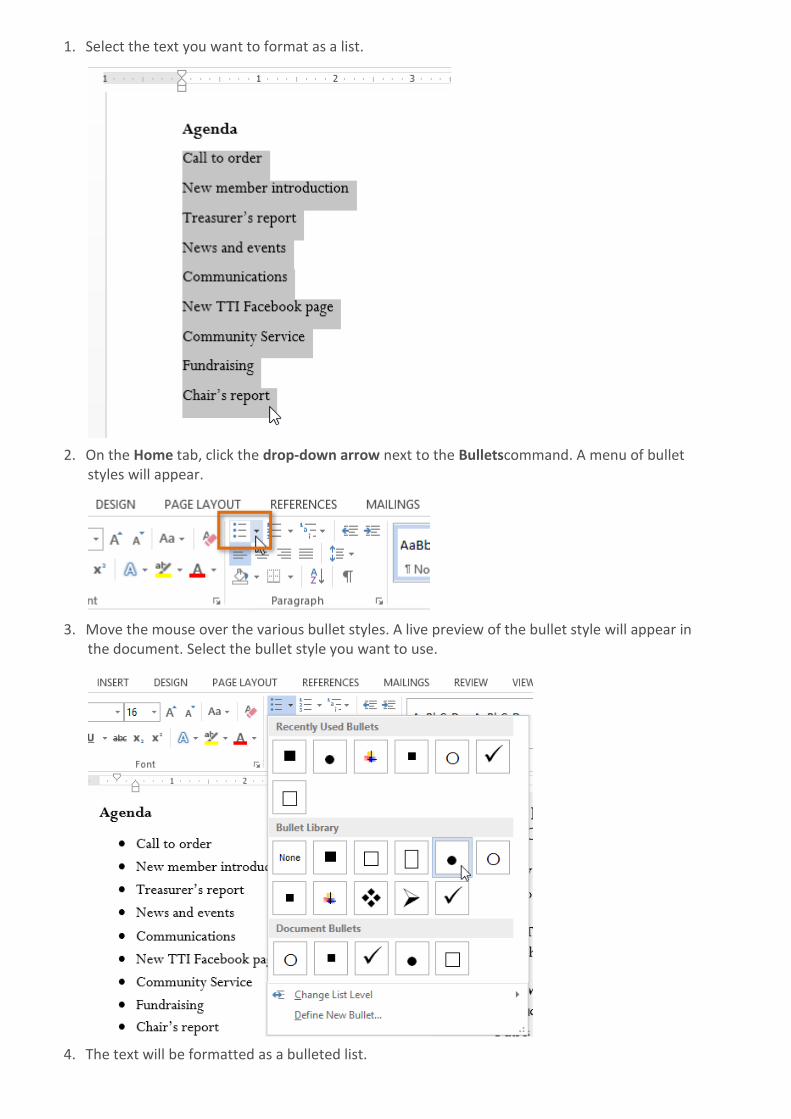
1. Select the text you want to format as a list.
2. On the Home tab, click the drop-down arrow next to the Bulletscommand. A menu of bullet styles will appear.
3. Move the mouse over the various bullet styles. A live preview of the bullet style will appear in the document. Select the bullet style you want to use.
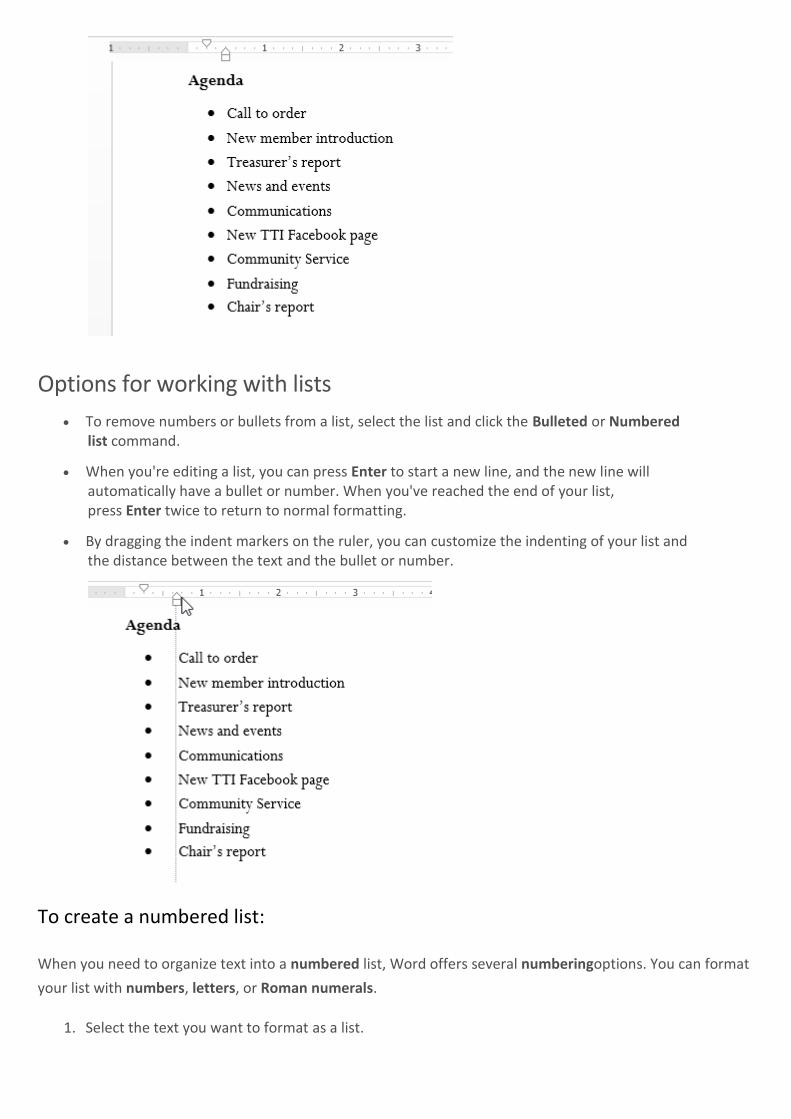
4. The text will be formatted as a bulleted list.
Options for working with lists
To remove numbers or bullets from a list, select the list and click the Bulleted or Numbered list command.
When you're editing a list, you can press Enter to start a new line, and the new line will automatically have a bullet or number. When you've reached the end of your list, press Enter twice to return to normal formatting.
By dragging the indent markers on the ruler, you can customize the indenting of your list and the distance between the text and the bullet or number.
To create a numbered list:
When you need to organize text into a numbered list, Word offers several numberingoptions. You can format
your list with numbers, letters, or Roman numerals.
1. Select the text you want to format as a list.
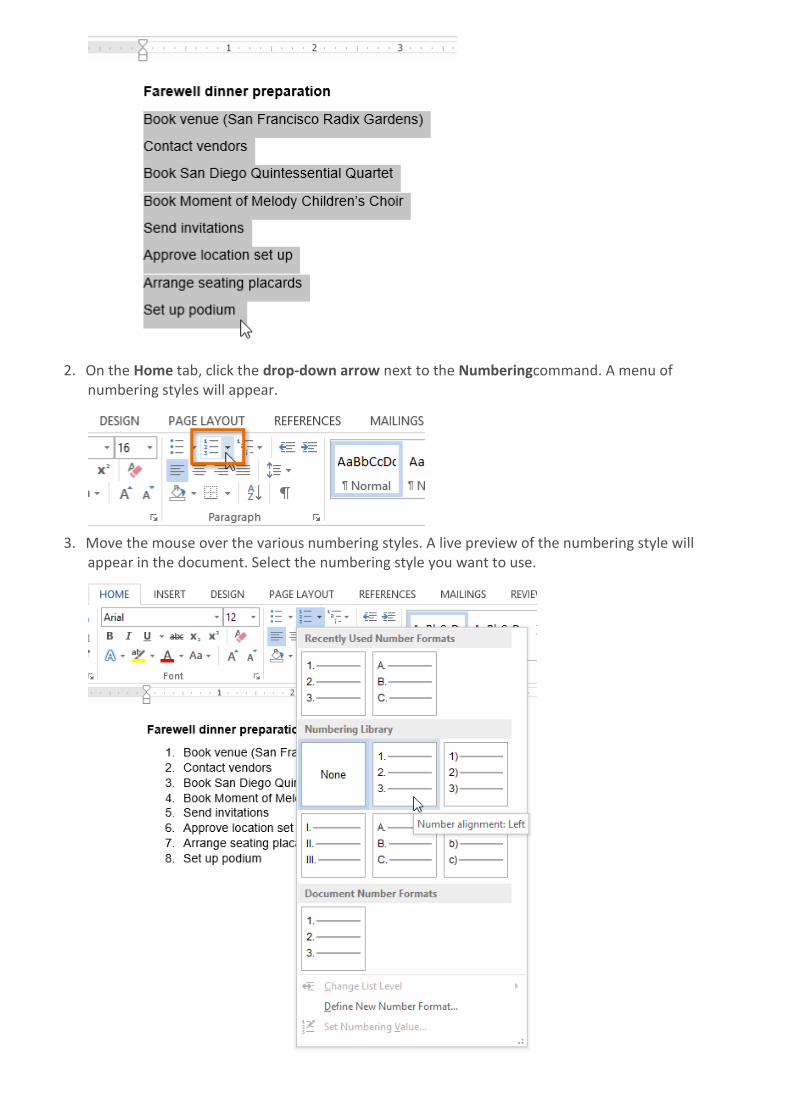
2. On the Home tab, click the drop-down arrow next to the Numberingcommand. A menu of numbering styles will appear.
3. Move the mouse over the various numbering styles. A live preview of the numbering style will appear in the document. Select the numbering style you want to use.
4. The text will format as a numbered list.
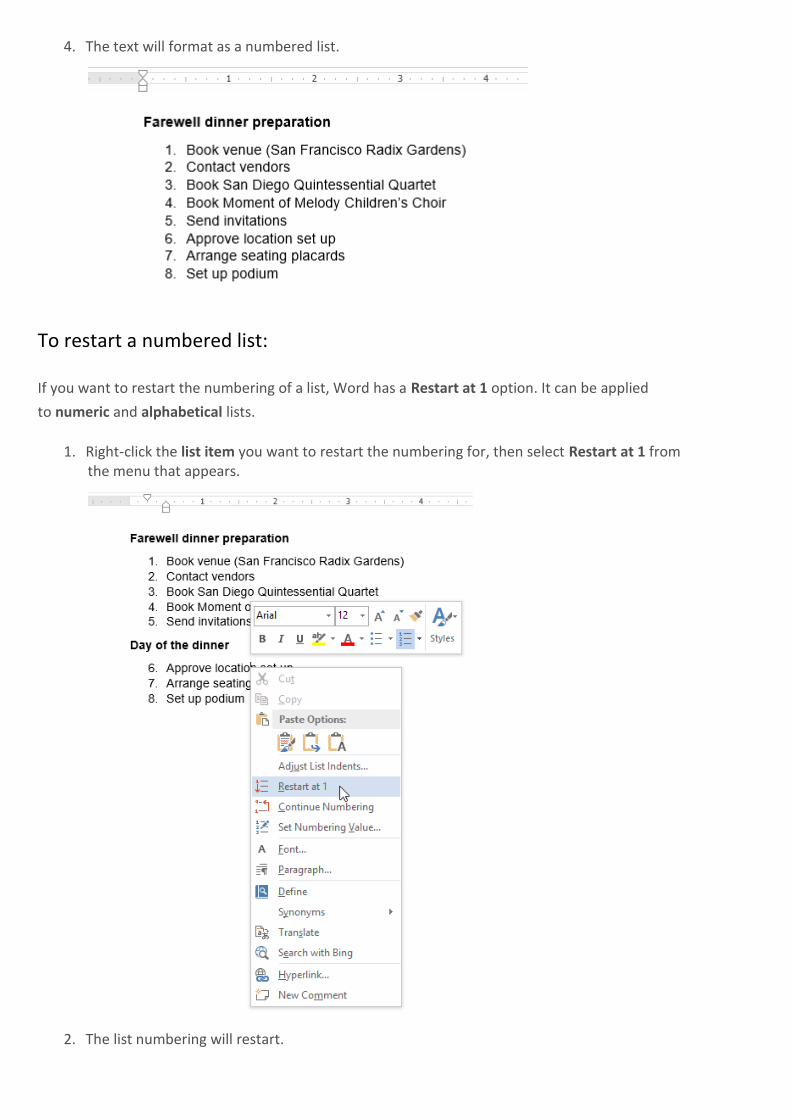
To restart a numbered list:
If you want to restart the numbering of a list, Word has a Restart at 1 option. It can be applied
to numeric and alphabetical lists.
1. Right-click the list item you want to restart the numbering for, then select Restart at 1 from the menu that appears.
2. The list numbering will restart.
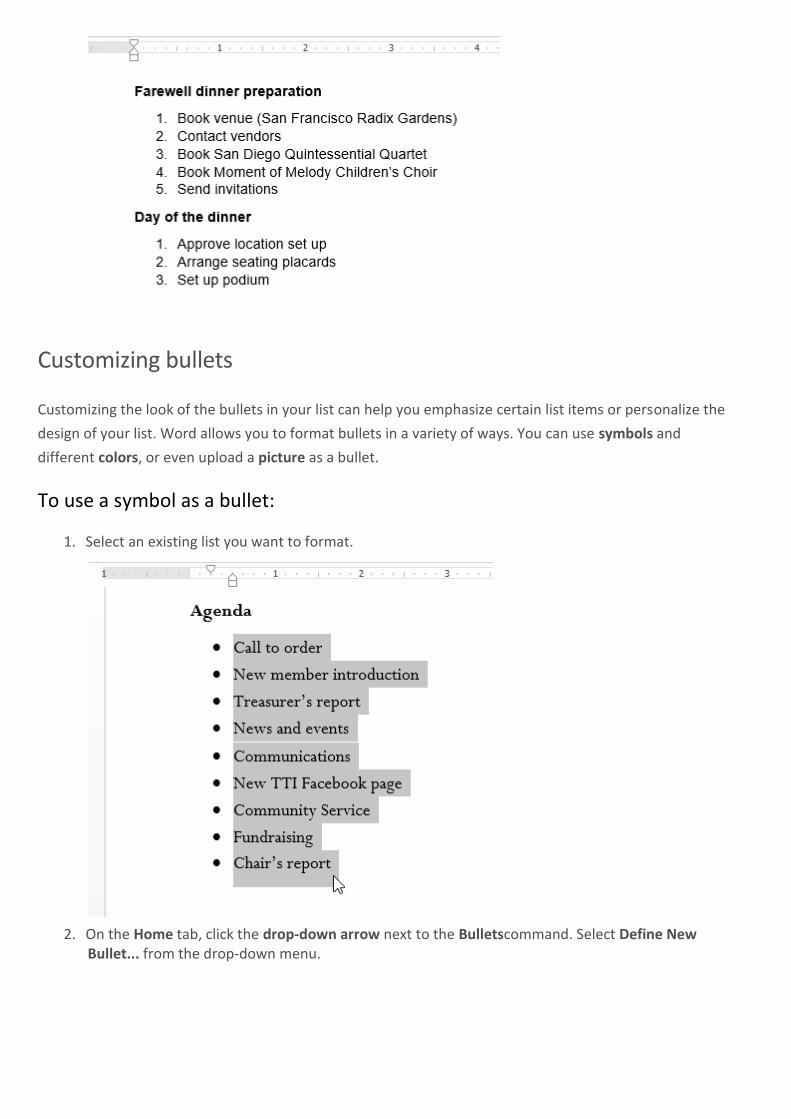
Customizing bullets
Customizing the look of the bullets in your list can help you emphasize certain list items or personalize the
design of your list. Word allows you to format bullets in a variety of ways. You can use symbols and
different colors, or even upload a picture as a bullet.
To use a symbol as a bullet:
1. Select an existing list you want to format.
2. On the Home tab, click the drop-down arrow next to the Bulletscommand. Select Define New Bullet... from the drop-down menu.
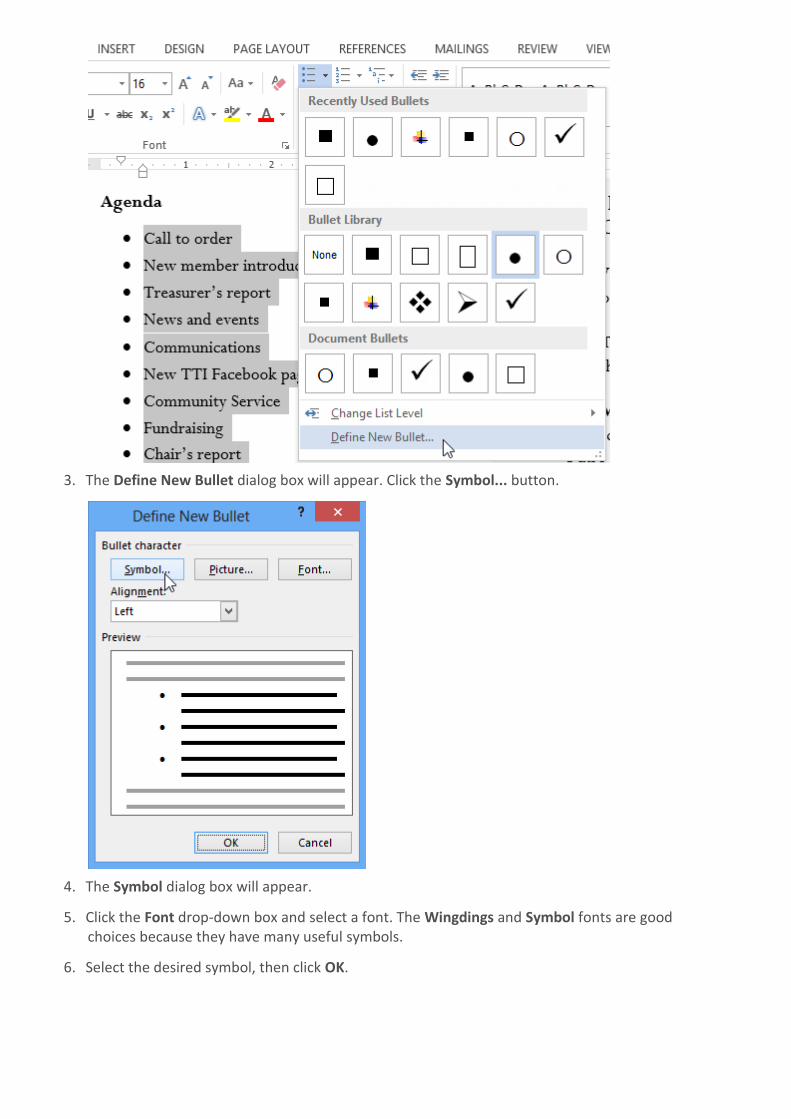
3. The Define New Bullet dialog box will appear. Click the Symbol... button.
4. The Symbol dialog box will appear.
5. Click the Font drop-down box and select a font. The Wingdings and Symbol fonts are good choices because they have many useful symbols.
6. Select the desired symbol, then click OK.
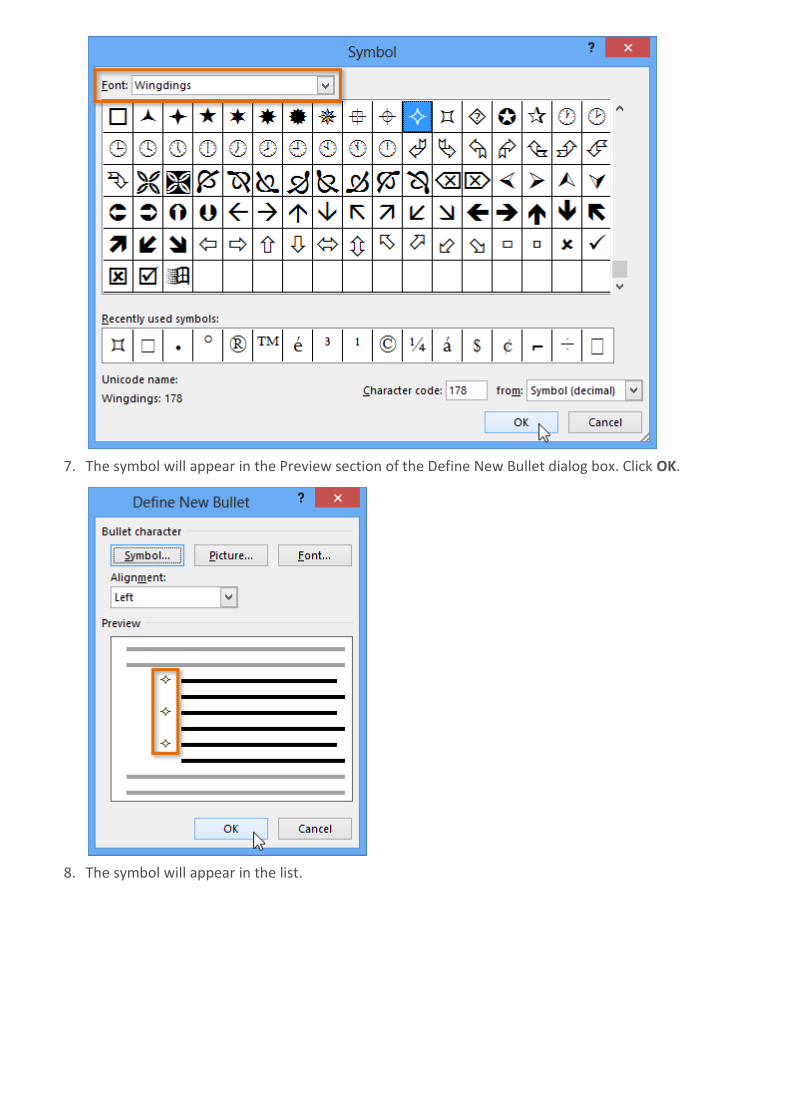
7. The symbol will appear in the Preview section of the Define New Bullet dialog box. Click OK.
8. The symbol will appear in the list.
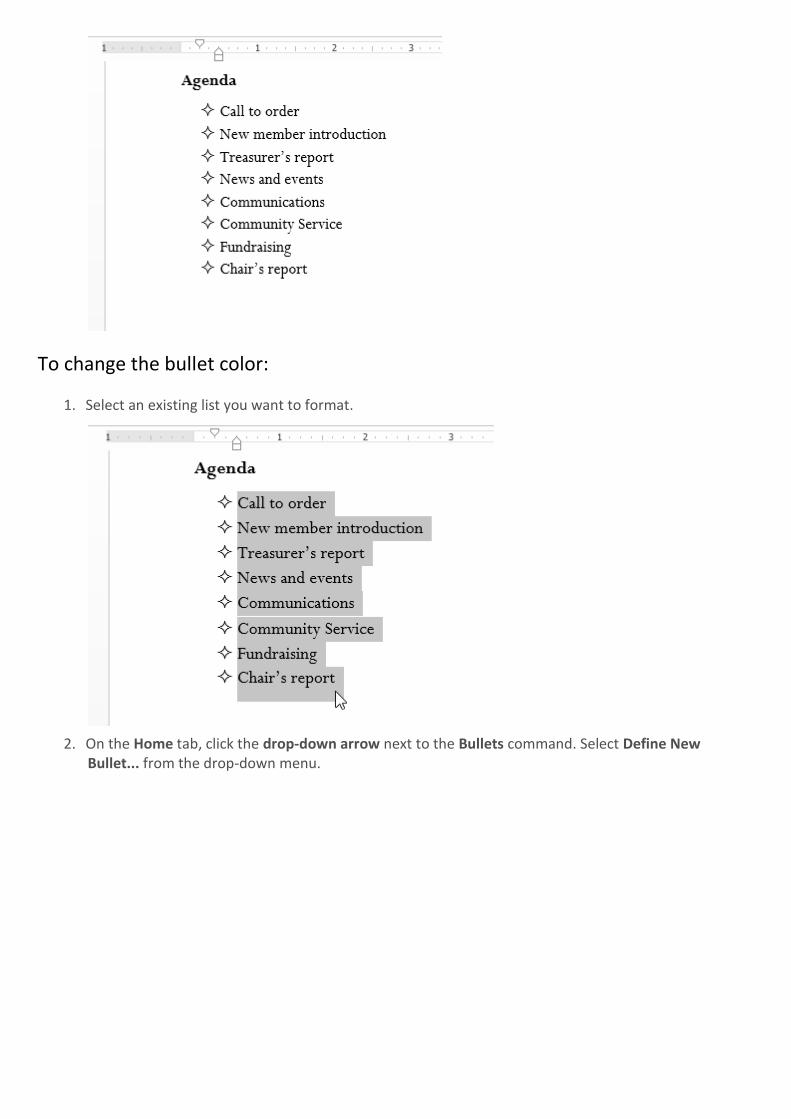
To change the bullet color:
1. Select an existing list you want to format.
2. On the Home tab, click the drop-down arrow next to the Bullets command. Select Define New Bullet... from the drop-down menu.

3. The Define New Bullet dialog box will appear. Click the Font button.
4. The Font dialog box will appear. Click the Font Color drop-down box. A menu of font colors will appear.
5. Select the desired color, then click OK.
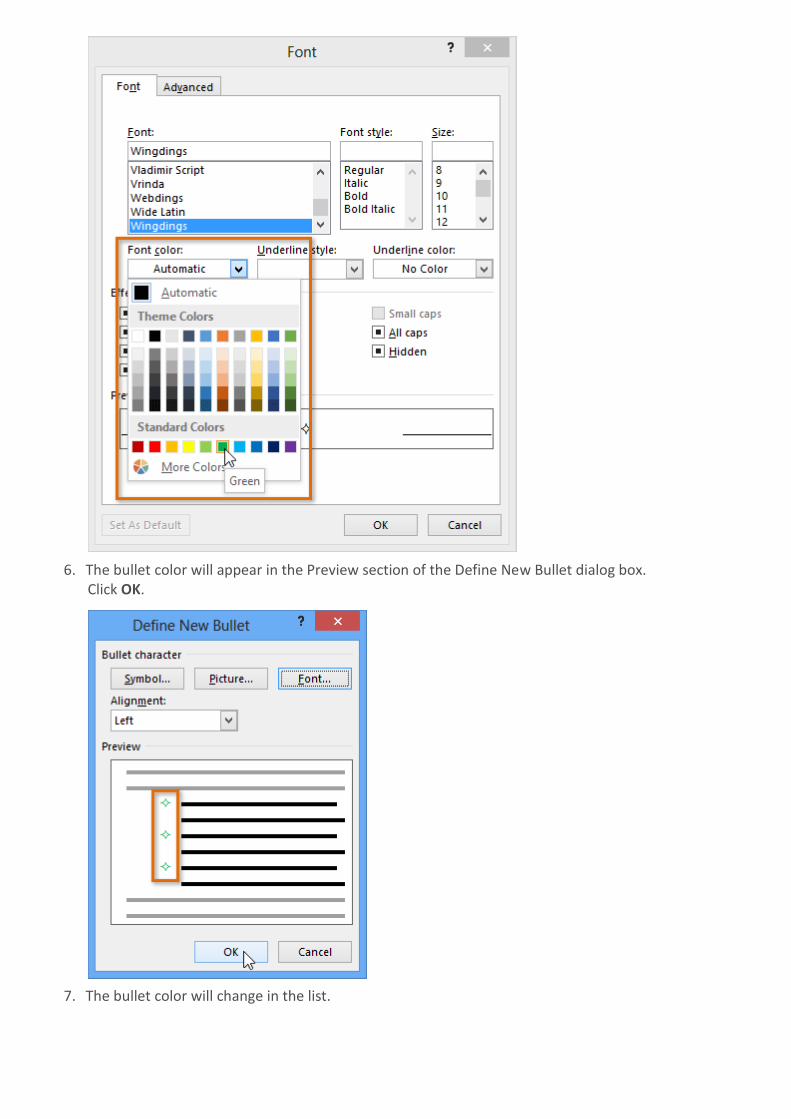
6. The bullet color will appear in the Preview section of the Define New Bullet dialog box. Click OK.
7. The bullet color will change in the list.
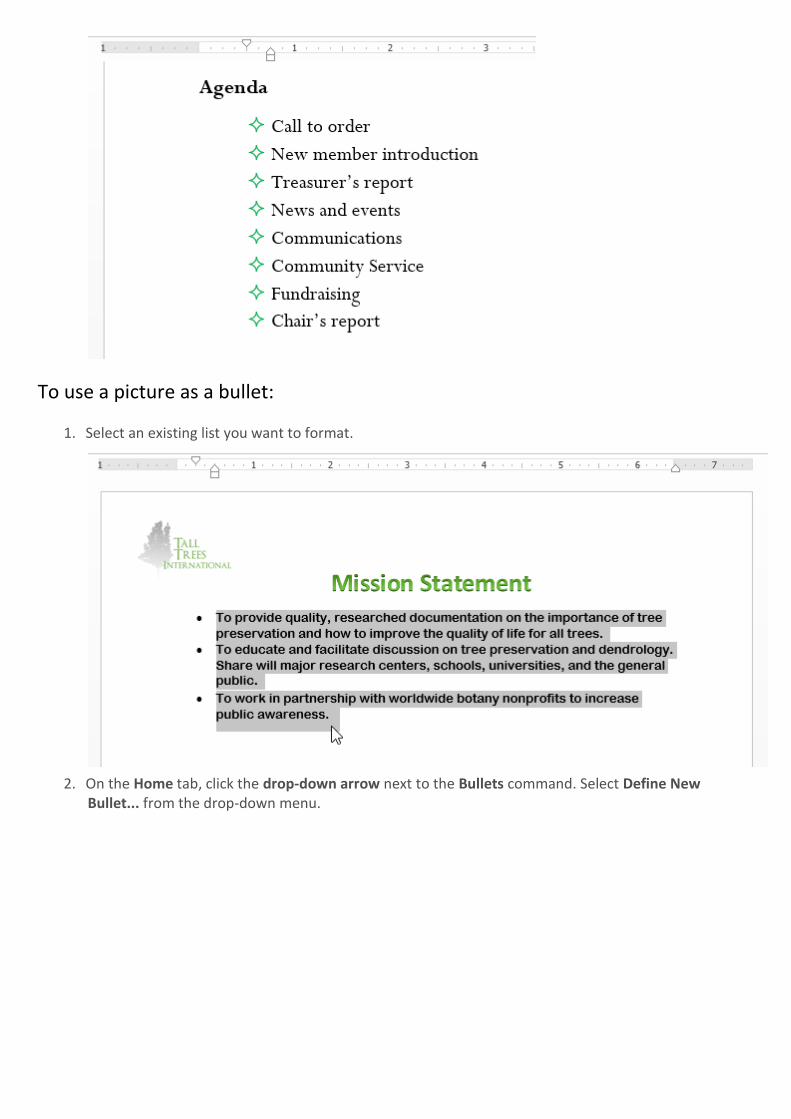
To use a picture as a bullet:
1. Select an existing list you want to format.
2. On the Home tab, click the drop-down arrow next to the Bullets command. Select Define New Bullet... from the drop-down menu.

3. The Define New Bullet dialog box will appear. Click the Picture button.
4. The Insert Pictures dialog box will appear. From here, you can locate an image file stored on your computer or in your OneDrive (previously called SkyDrive), or you can use the search fields to search for an image online.
5. In our example, we'll click Browse to locate a picture stored on our computer.
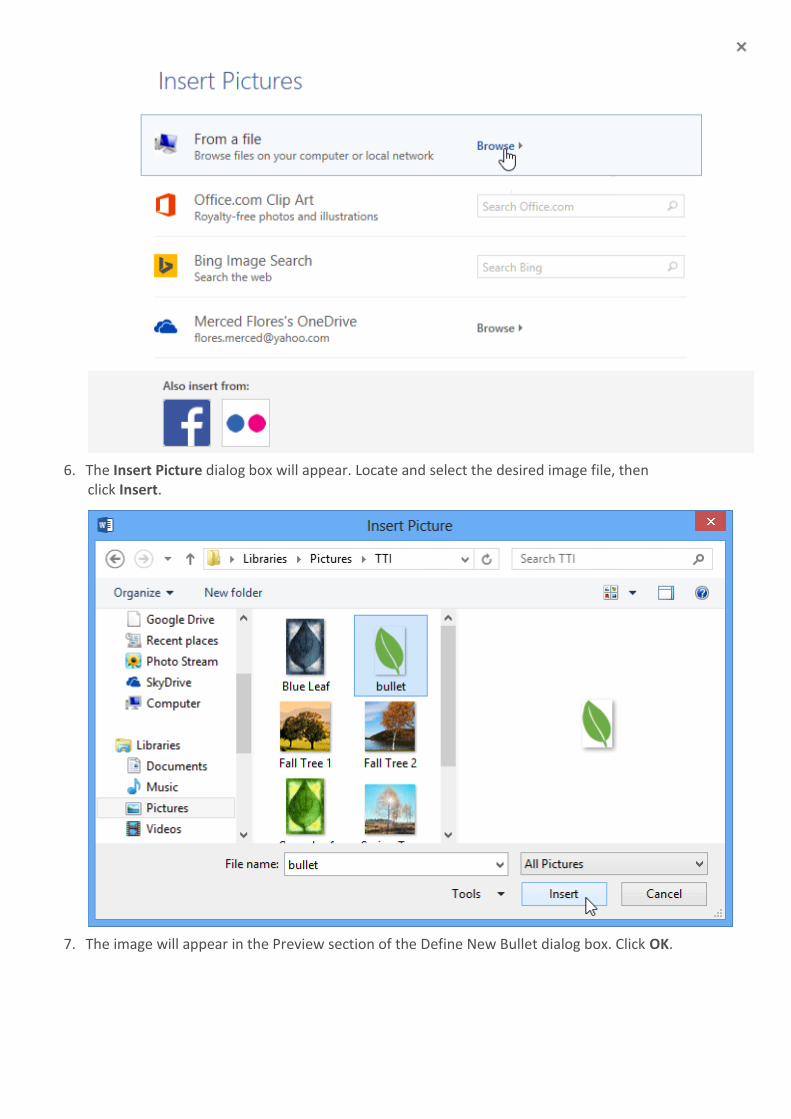
6. The Insert Picture dialog box will appear. Locate and select the desired image file, then click Insert.
7. The image will appear in the Preview section of the Define New Bullet dialog box. Click OK.
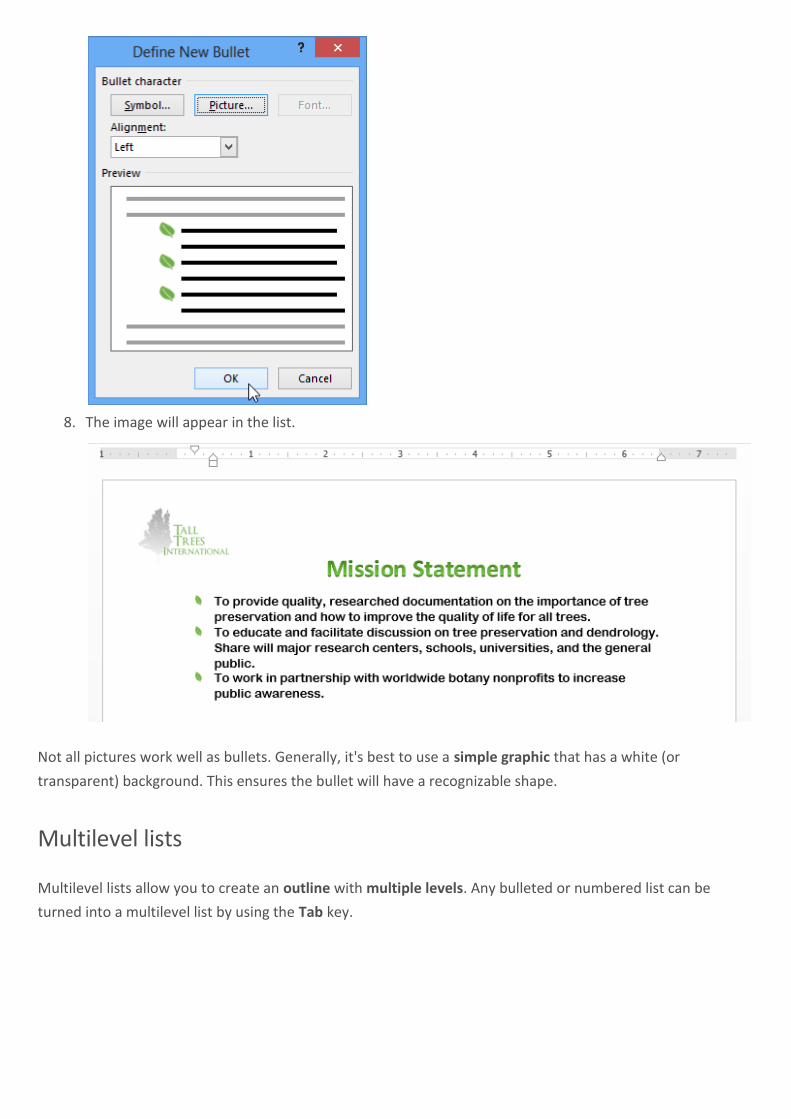
8. The image will appear in the list.
Not all pictures work well as bullets. Generally, it's best to use a simple graphic that has a white (or
transparent) background. This ensures the bullet will have a recognizable shape.
Multilevel lists
Multilevel lists allow you to create an outline with multiple levels. Any bulleted or numbered list can be
turned into a multilevel list by using the Tab key.
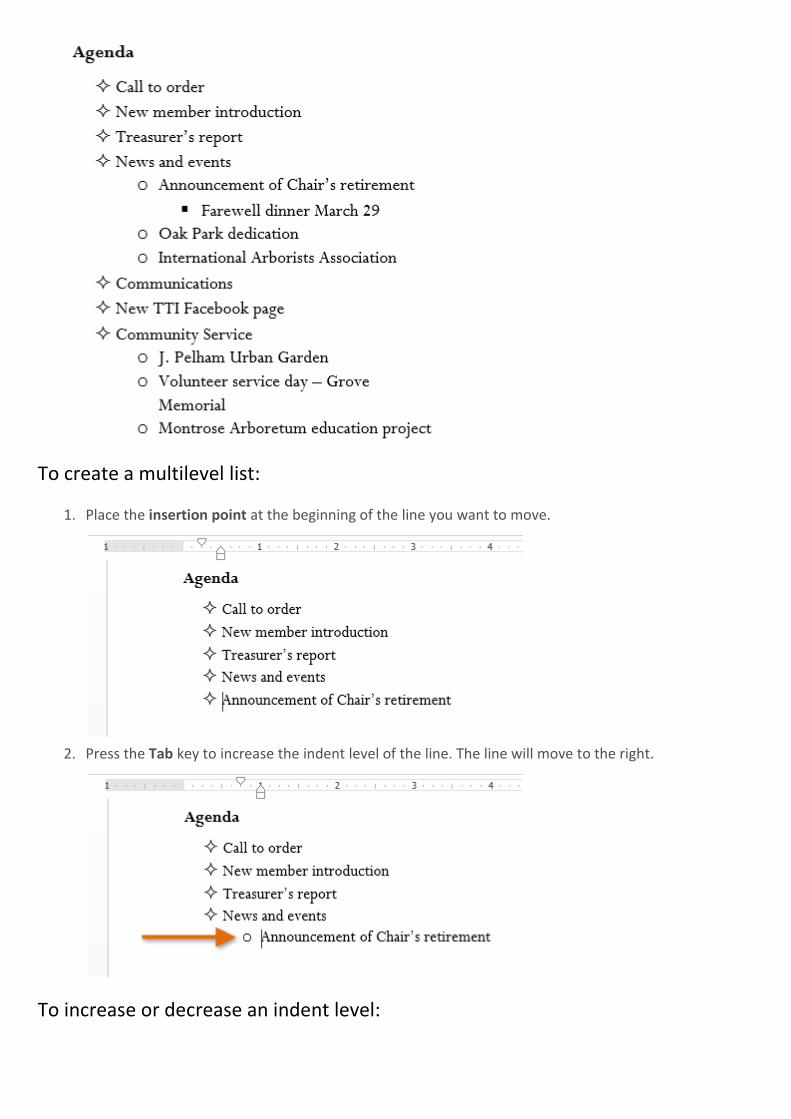
To create a multilevel list:
1. Place the insertion point at the beginning of the line you want to move.
2. Press the Tab key to increase the indent level of the line. The line will move to the right.
To increase or decrease an indent level:
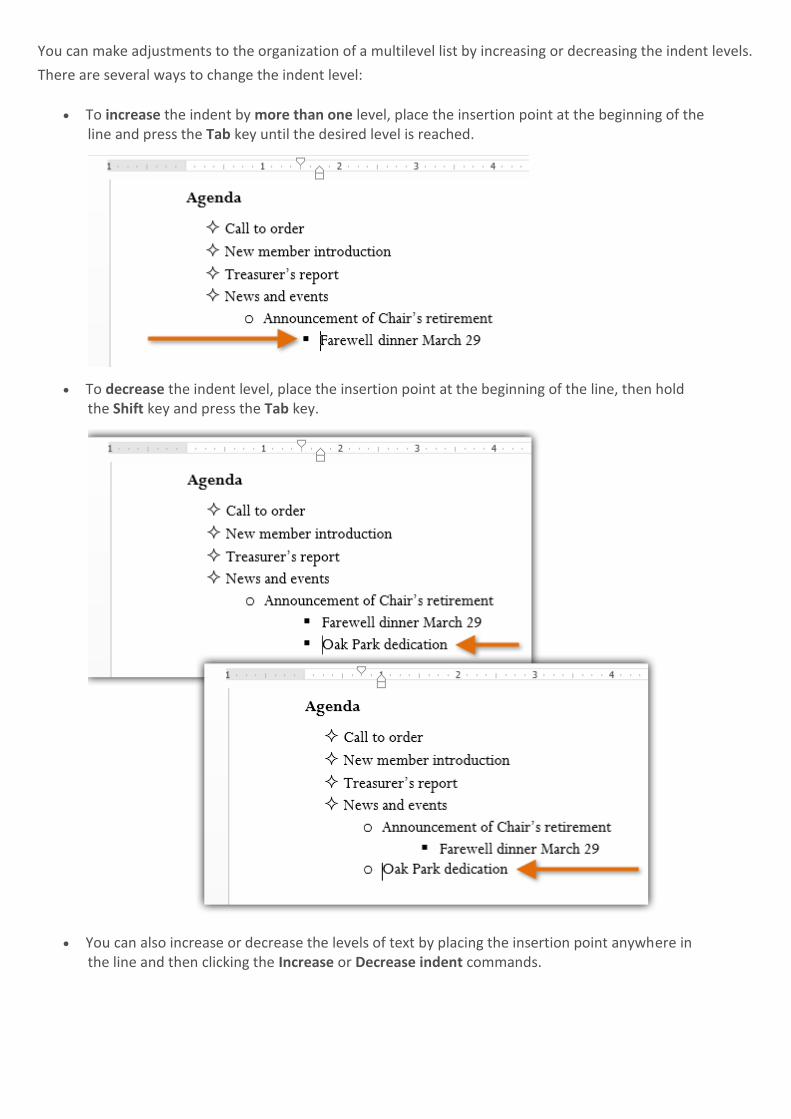
You can make adjustments to the organization of a multilevel list by increasing or decreasing the indent levels.
There are several ways to change the indent level:
To increase the indent by more than one level, place the insertion point at the beginning of the line and press the Tab key until the desired level is reached.
To decrease the indent level, place the insertion point at the beginning of the line, then hold the Shift key and press the Tab key.
You can also increase or decrease the levels of text by placing the insertion point anywhere in the line and then clicking the Increase or Decrease indent commands.
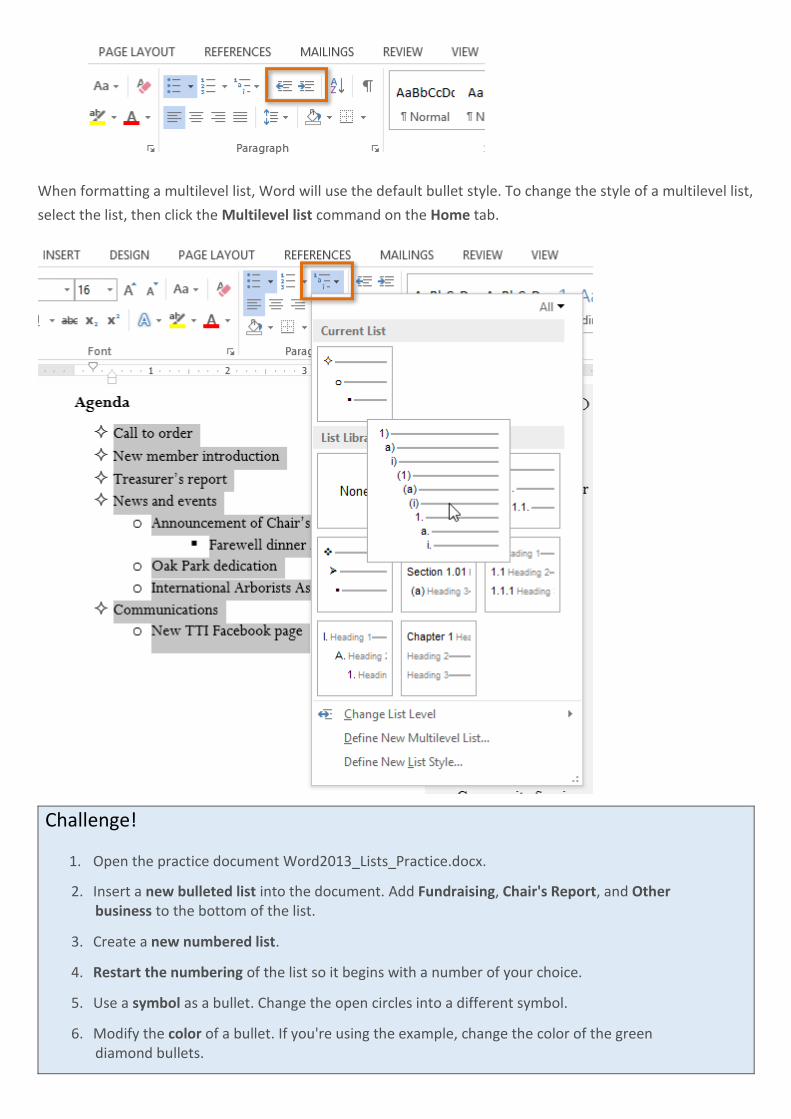
When formatting a multilevel list, Word will use the default bullet style. To change the style of a multilevel list,
select the list, then click the Multilevel list command on the Home tab.
Challenge!
1. Open the practice document Word2013_Lists_Practice.docx.
2. Insert a new bulleted list into the document. Add Fundraising, Chair's Report, and Other business to the bottom of the list.
3. Create a new numbered list.
4. Restart the numbering of the list so it begins with a number of your choice.
5. Use a symbol as a bullet. Change the open circles into a different symbol.
6. Modify the color of a bullet. If you're using the example, change the color of the green diamond bullets.
7. Change the style of the list. Change the bulleted list into a numbered list.
8. Use the Tab key to change the levels of some of the lines. Increase the level of the two bullets under the list item International Arborists Association.
Header and Footer
The header is a section of the document that appears in the top margin, while the footer is a section of the
document that appears in the bottom margin. Headers and footers generally contain additional information
such as page numbers, dates, anauthor's name, and footnotes, which can help keep longer documents
organized and make them easier to read. Text entered in the header or footer will appear on each pageof the
document.
To create a header or footer:
In our example, we want to display the author's name at the top of each page, so we'll place it in the header.
1. Double-click anywhere on the top or bottom margin of your document. In our example, we'll double-click the top margin.
2. The header or footer will open, and a Design tab will appear on the right side of the Ribbon. The insertion point will appear in the header or footer.
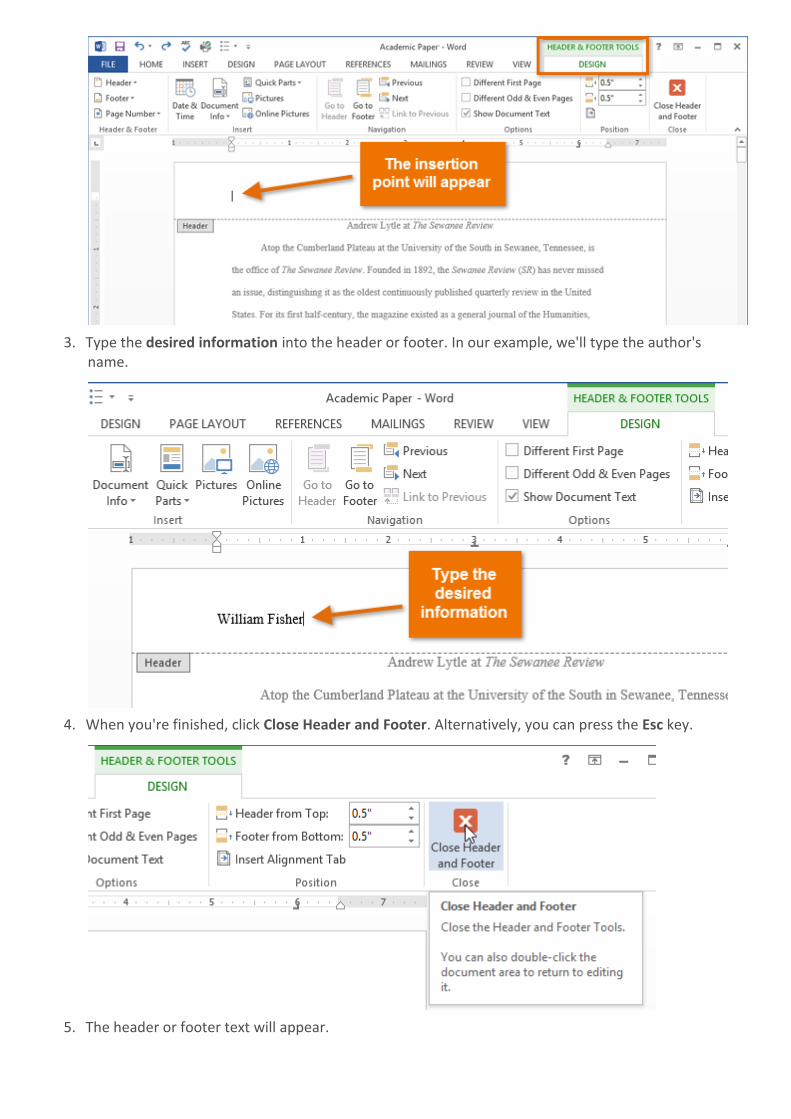
3. Type the desired information into the header or footer. In our example, we'll type the author's name.
4. When you're finished, click Close Header and Footer. Alternatively, you can press the Esc key.
5. The header or footer text will appear.
To insert a preset header or footer:
Word has a variety of preset headers and footers you can use to enhance your document's design and layout.
In our example, we'll add a preset header to our document.
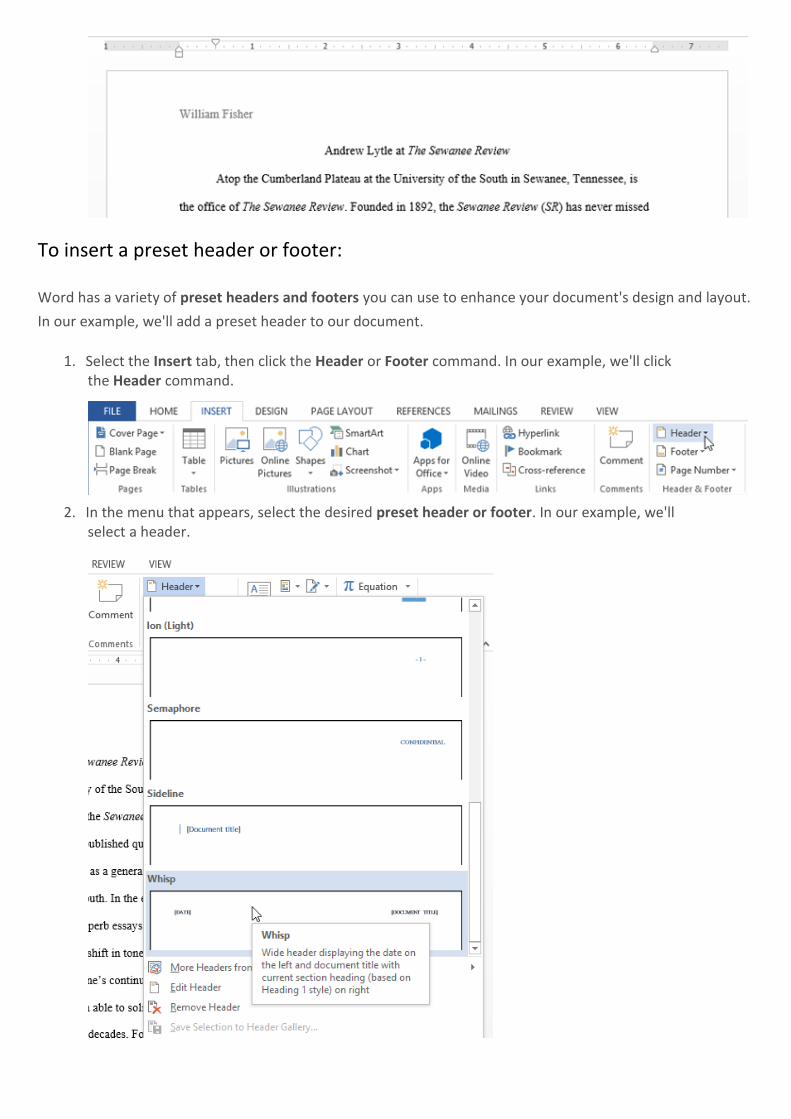
1. Select the Insert tab, then click the Header or Footer command. In our example, we'll click the Header command.
2. In the menu that appears, select the desired preset header or footer. In our example, we'll select a header.
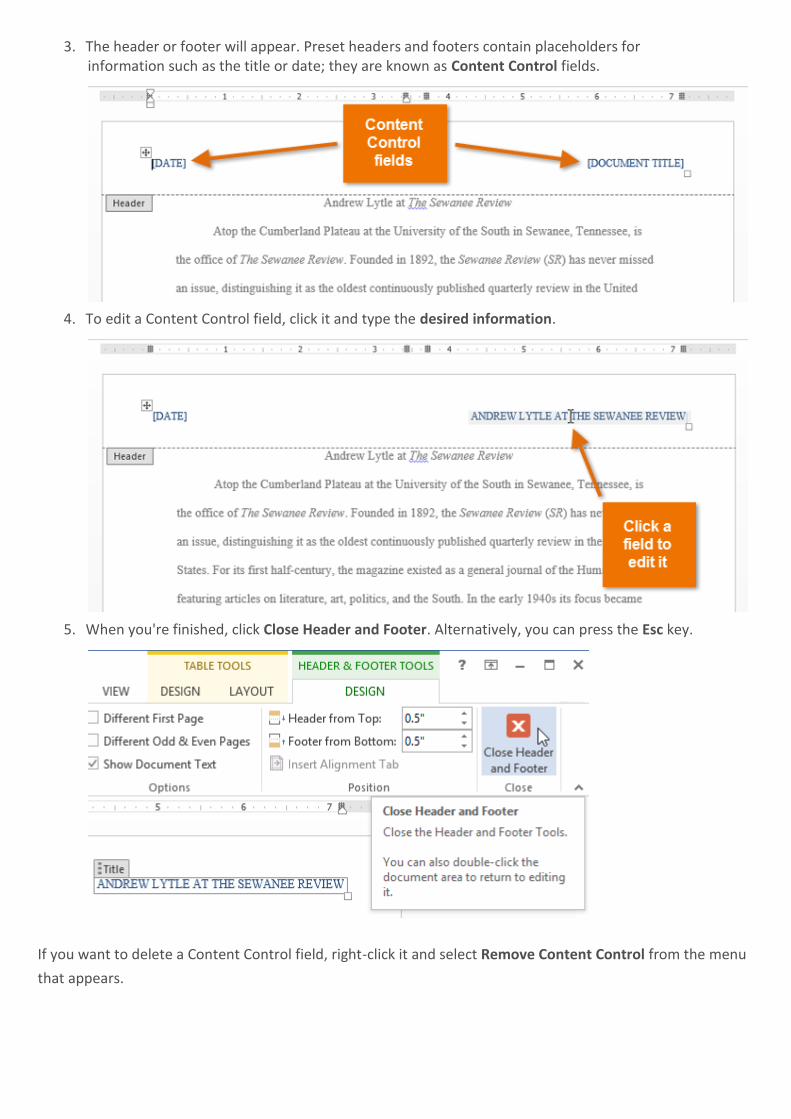
3. The header or footer will appear. Preset headers and footers contain placeholders for information such as the title or date; they are known as Content Control fields.
4. To edit a Content Control field, click it and type the desired information.
5. When you're finished, click Close Header and Footer. Alternatively, you can press the Esc key.
If you want to delete a Content Control field, right-click it and select Remove Content Control from the menu
that appears.
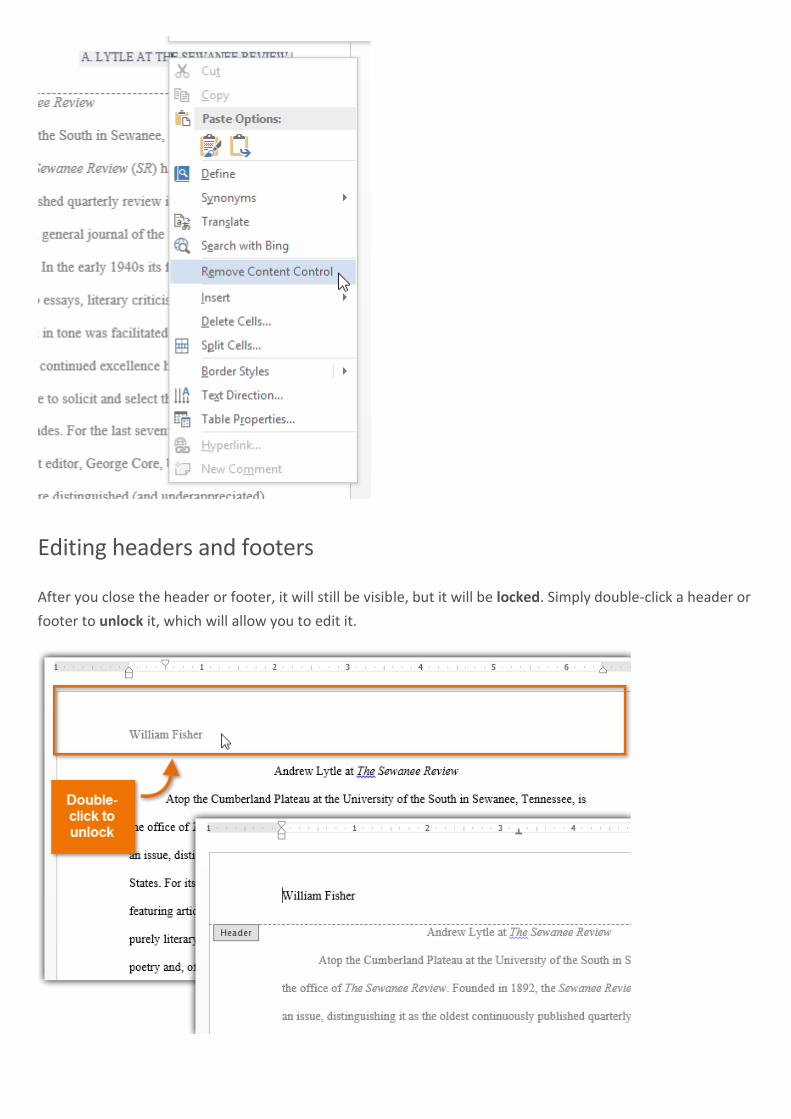
Editing headers and footers
After you close the header or footer, it will still be visible, but it will be locked. Simply double-click a header or
footer to unlock it, which will allow you to edit it.
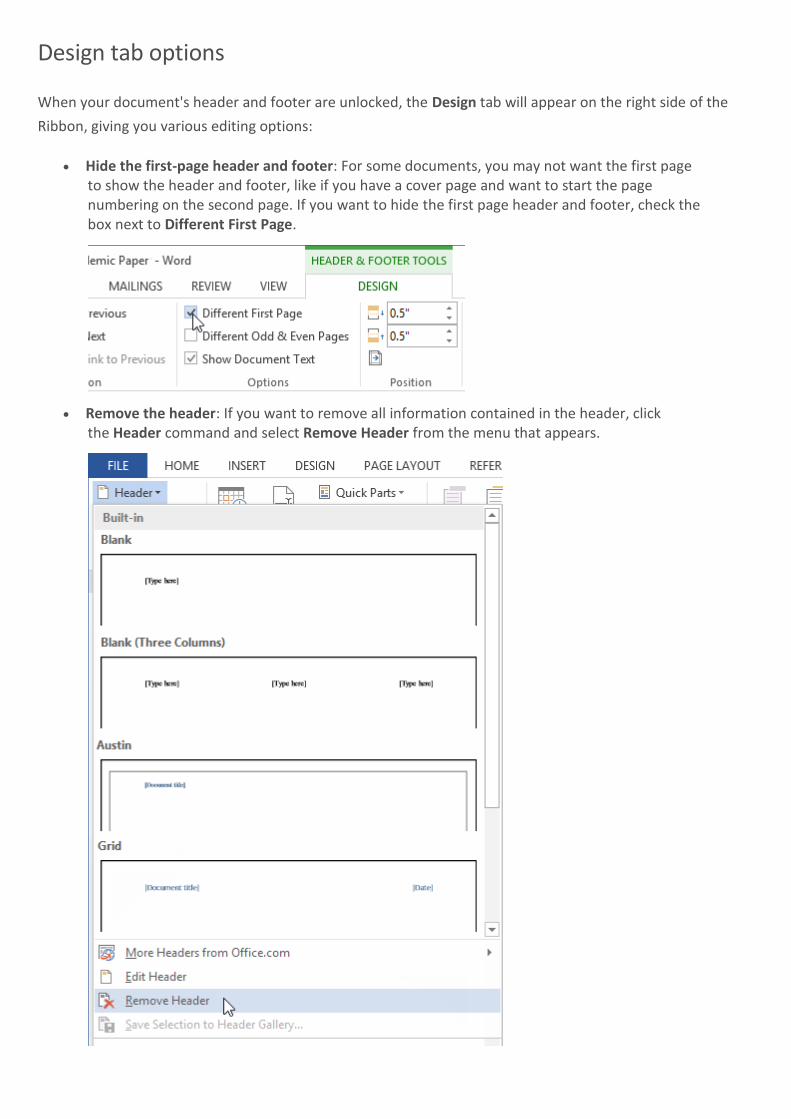
Design tab options
When your document's header and footer are unlocked, the Design tab will appear on the right side of the
Ribbon, giving you various editing options:
Hide the first-page header and footer: For some documents, you may not want the first page to show the header and footer, like if you have a cover page and want to start the page numbering on the second page. If you want to hide the first page header and footer, check the box next to Different First Page.
Remove the header: If you want to remove all information contained in the header, click the Header command and select Remove Header from the menu that appears.
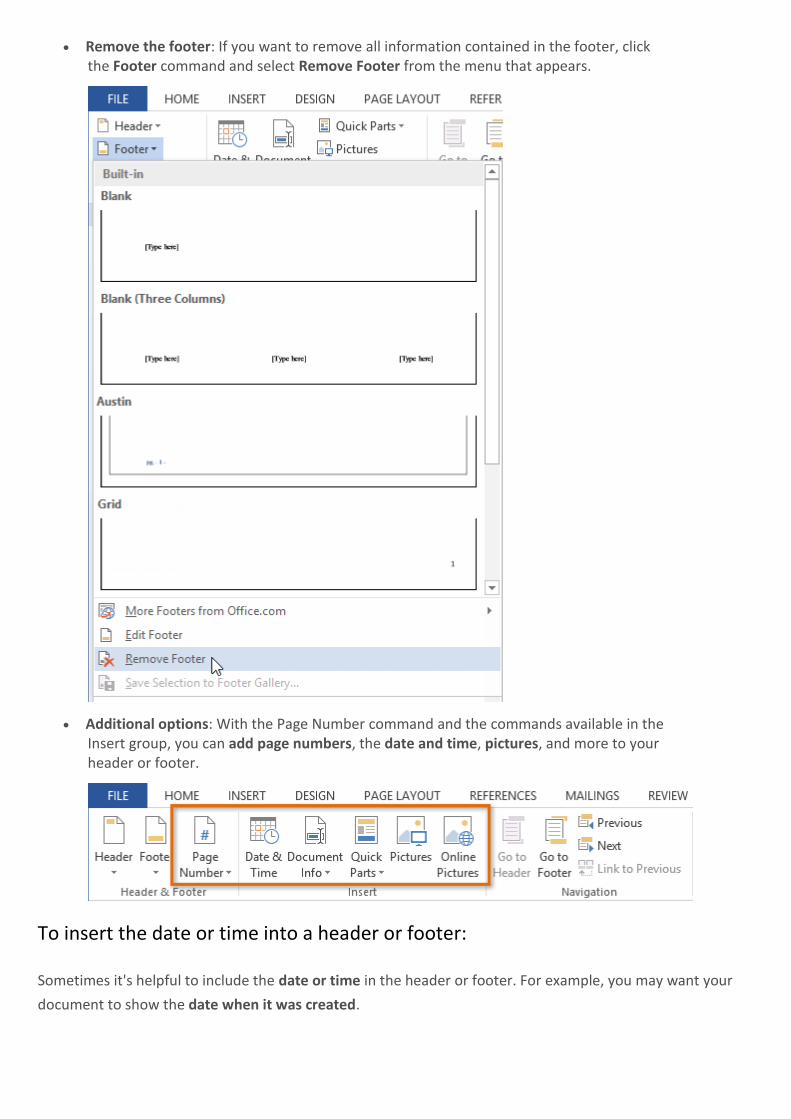
Remove the footer: If you want to remove all information contained in the footer, click the Footer command and select Remove Footer from the menu that appears.
Additional options: With the Page Number command and the commands available in the Insert group, you can add page numbers, the date and time, pictures, and more to your header or footer.
To insert the date or time into a header or footer:
Sometimes it's helpful to include the date or time in the header or footer. For example, you may want your
document to show the date when it was created.
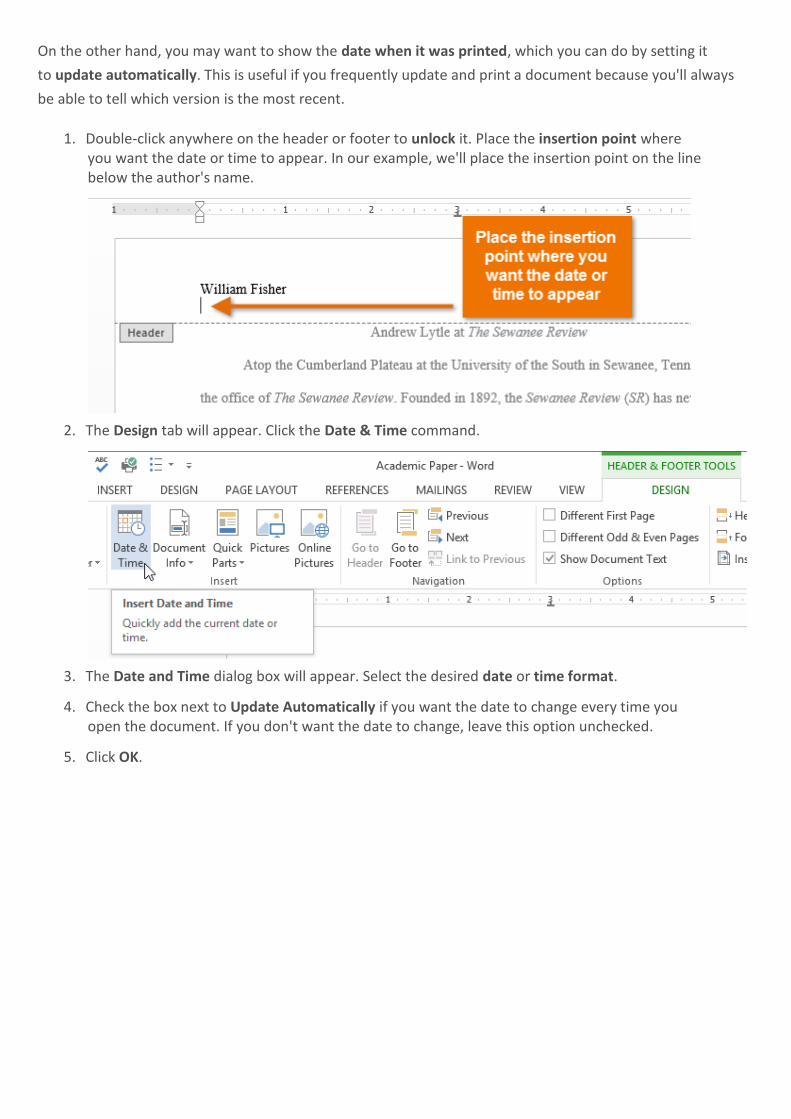
On the other hand, you may want to show the date when it was printed, which you can do by setting it
to update automatically. This is useful if you frequently update and print a document because you'll always
be able to tell which version is the most recent.
1. Double-click anywhere on the header or footer to unlock it. Place the insertion point where you want the date or time to appear. In our example, we'll place the insertion point on the line below the author's name.
2. The Design tab will appear. Click the Date & Time command.
3. The Date and Time dialog box will appear. Select the desired date or time format.
4. Check the box next to Update Automatically if you want the date to change every time you open the document. If you don't want the date to change, leave this option unchecked.
5. Click OK.

6. The date will appear in the header.
Adding page numbers
Word can automatically label each page with a page number and place it in a header, footer, or side margin.
When you need to number some pages differently, Word allows you to restart page numbering.
To add page numbers to a document:
In our example, we'll add page numbering to our document's footer.
1. Double-click anywhere on the header or footer to unlock it. If you don't already have a header or footer, you can double-click near the top or bottom of the page. The Design tab will appear on the right side of the Ribbon.
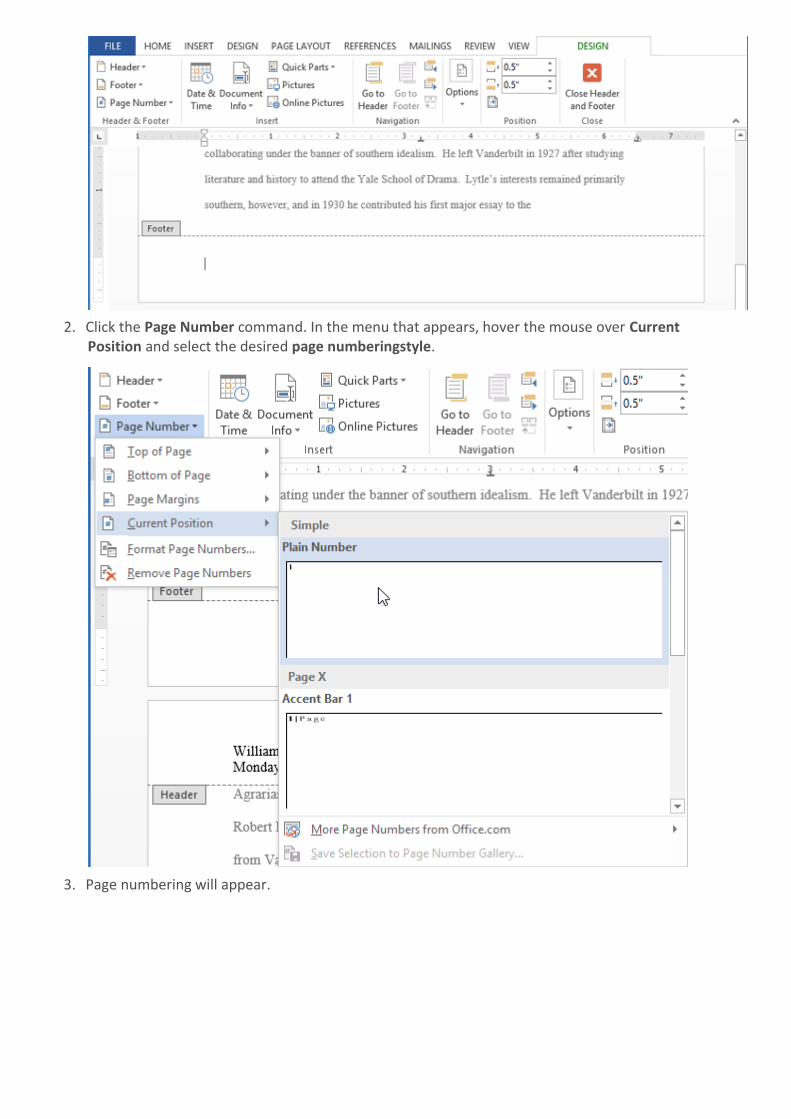
2. Click the Page Number command. In the menu that appears, hover the mouse over Current Position and select the desired page numberingstyle.
3. Page numbering will appear.
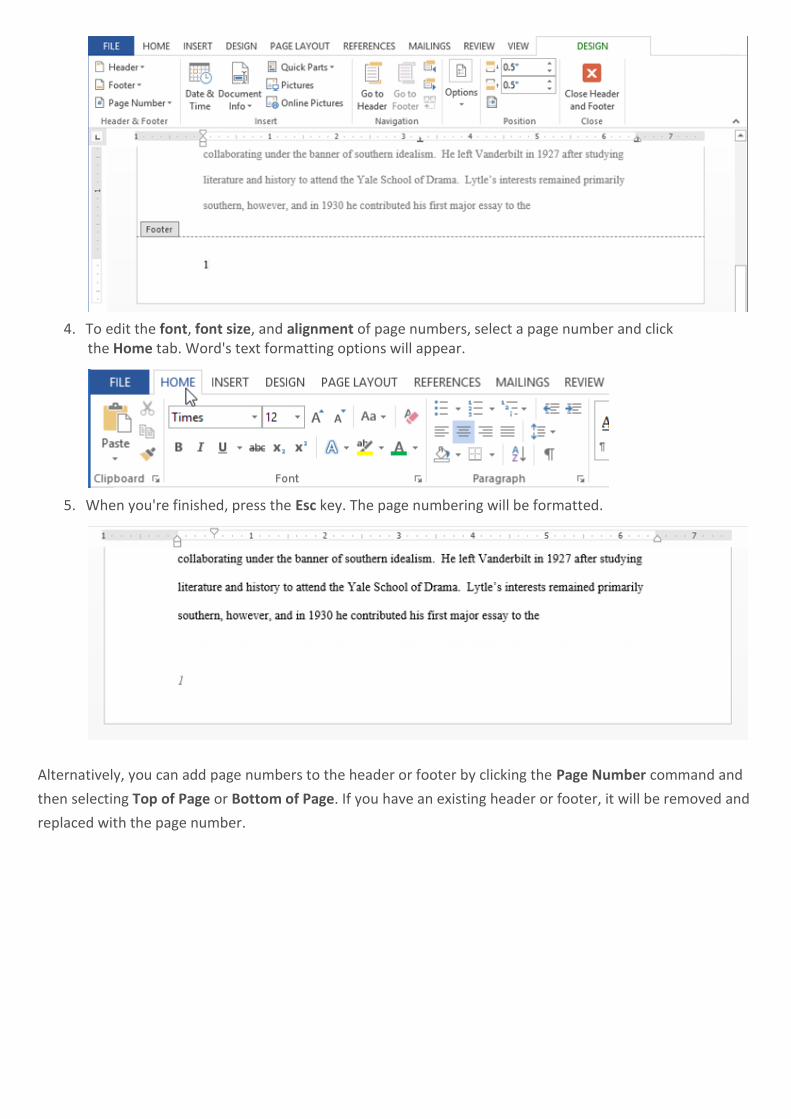
4. To edit the font, font size, and alignment of page numbers, select a page number and click the Home tab. Word's text formatting options will appear.
5. When you're finished, press the Esc key. The page numbering will be formatted.
Alternatively, you can add page numbers to the header or footer by clicking the Page Number command and
then selecting Top of Page or Bottom of Page. If you have an existing header or footer, it will be removed and
replaced with the page number.
To restart page numbering:
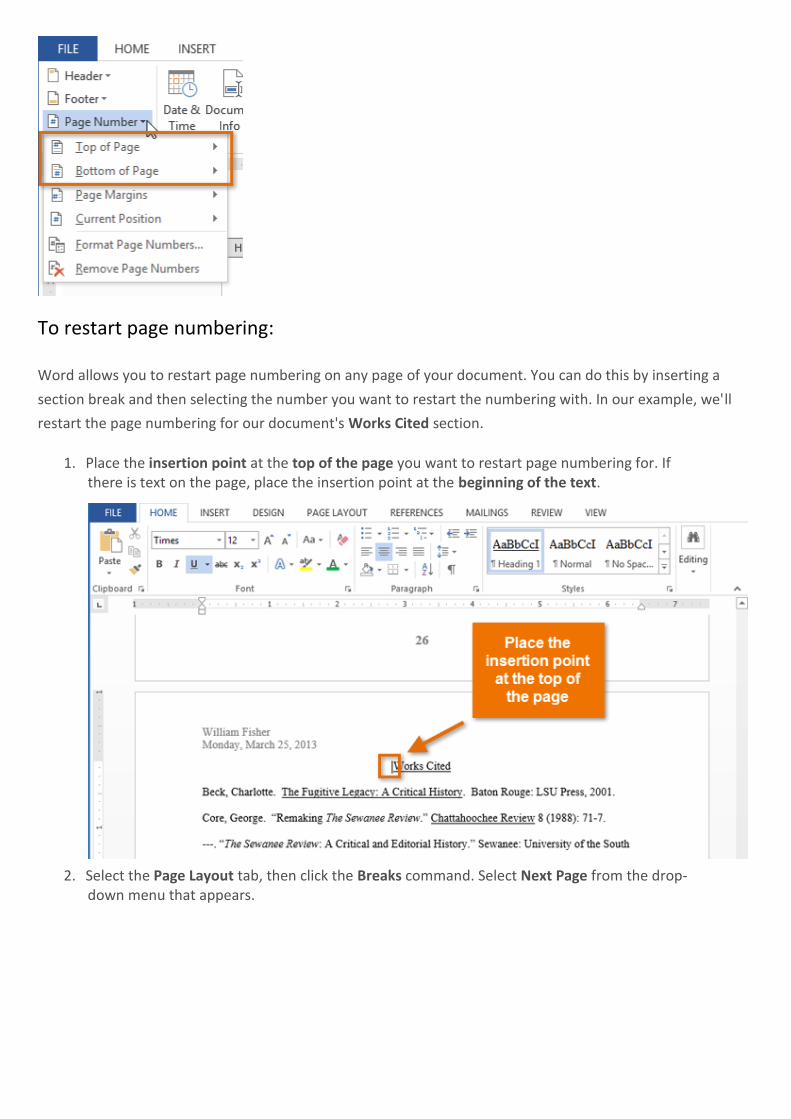
Word allows you to restart page numbering on any page of your document. You can do this by inserting a
section break and then selecting the number you want to restart the numbering with. In our example, we'll
restart the page numbering for our document's Works Cited section.
1. Place the insertion point at the top of the page you want to restart page numbering for. If there is text on the page, place the insertion point at the beginning of the text.
2. Select the Page Layout tab, then click the Breaks command. Select Next Page from the drop-down menu that appears.
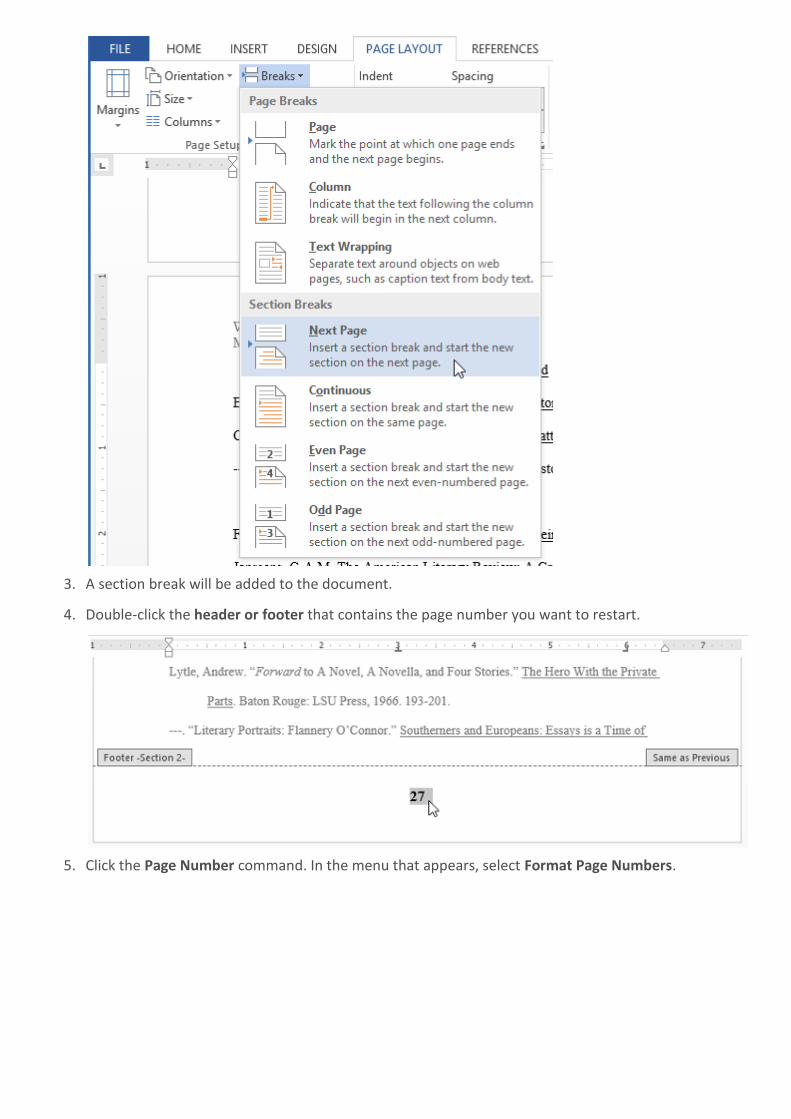
3. A section break will be added to the document.
4. Double-click the header or footer that contains the page number you want to restart.
5. Click the Page Number command. In the menu that appears, select Format Page Numbers.
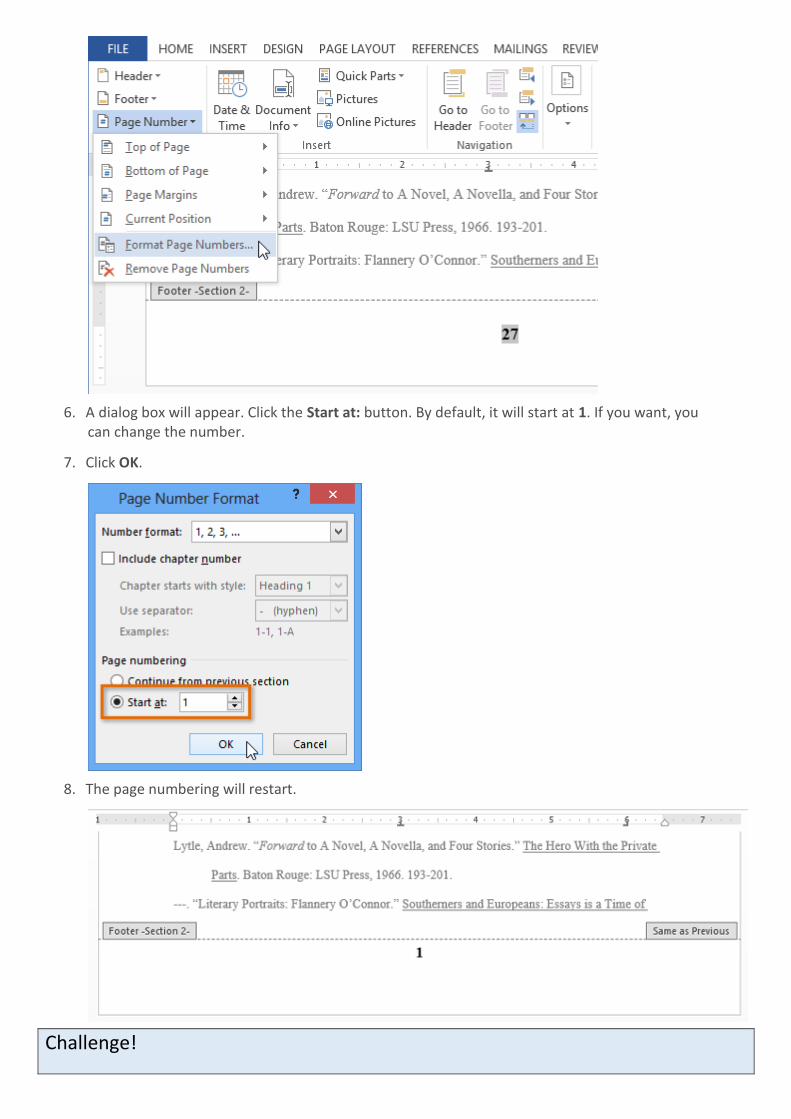
6. A dialog box will appear. Click the Start at: button. By default, it will start at 1. If you want, you can change the number.
7. Click OK.
8. The page numbering will restart.
Challenge!
1. Open the practice document Word2013_HeaderFooter_Practice.docx.
2. Create a blank header. Unlock the header.
3. Add a name to the header. Type the name Tom Shelby after Professor.
4. Try inserting a preset header or footer.
5. Add today's date to the header. Add today's date below Professor Tom Shelby.
6. Try adding a page number to the footer. Add a page number to the bottom of the page.
7. Try restarting the page numbering.
Tables
A table is a grid of cells arranged in rows and columns. Tables are useful for various tasks such as presenting
text information and numerical data. In Word, you can create a blank table, convert text to a table, and apply
a variety of styles and formats to existing tables.
To insert a blank table:
1. Place your insertion point where you want the table to appear, then select the Insert tab.
2. Click the Table command.
3. A drop-down menu containing a grid of squares will appear. Hover the mouse over the grid to select the number of columns and rows in the table.
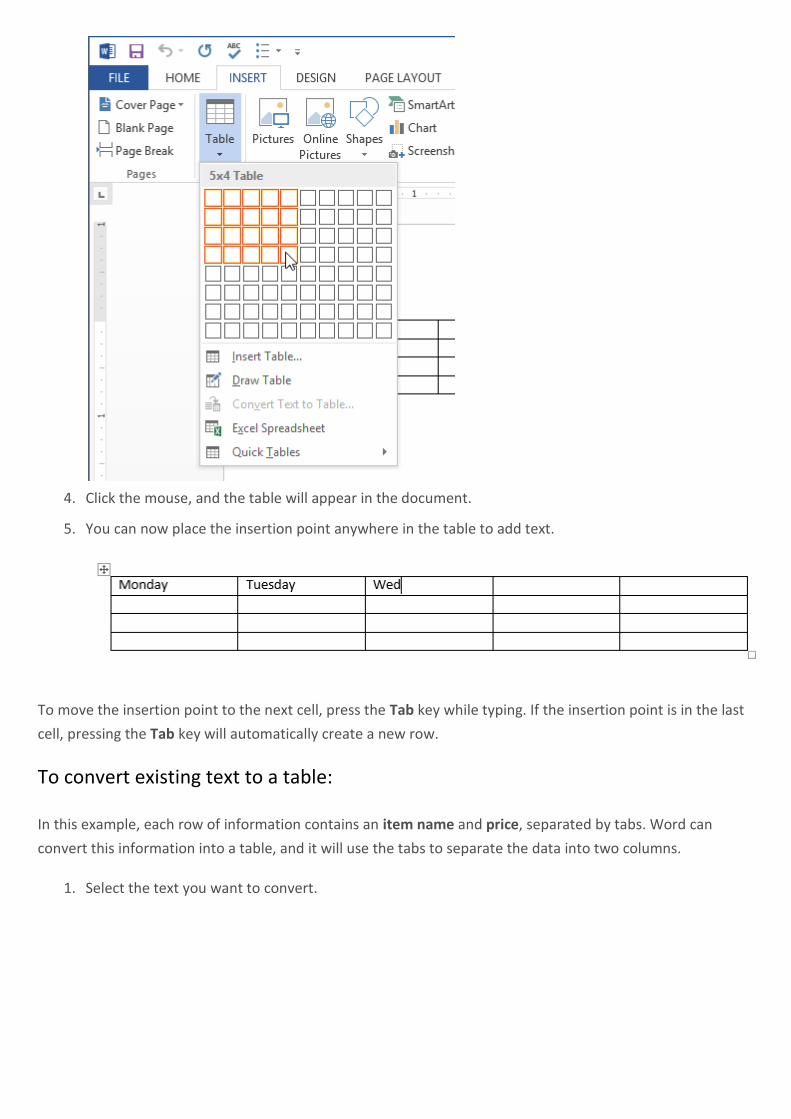
4. Click the mouse, and the table will appear in the document.
5. You can now place the insertion point anywhere in the table to add text.
To move the insertion point to the next cell, press the Tab key while typing. If the insertion point is in the last
cell, pressing the Tab key will automatically create a new row.
To convert existing text to a table:
In this example, each row of information contains an item name and price, separated by tabs. Word can
convert this information into a table, and it will use the tabs to separate the data into two columns.
1. Select the text you want to convert.
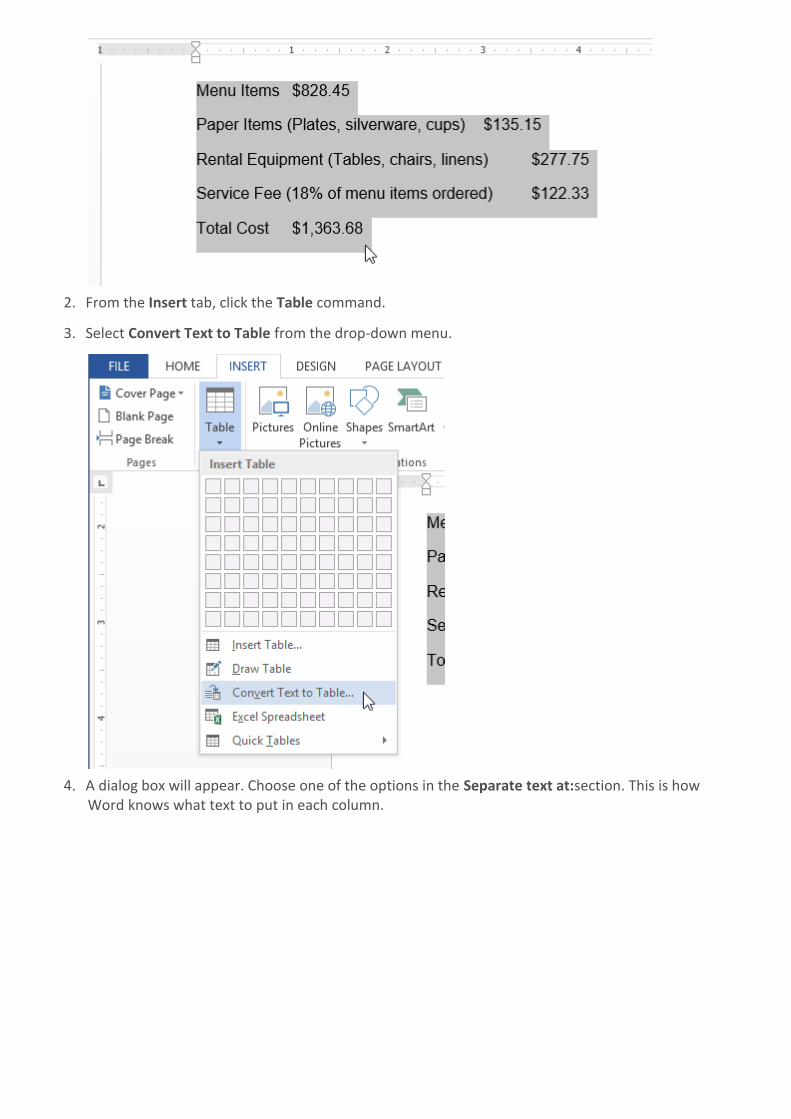
2. From the Insert tab, click the Table command.
3. Select Convert Text to Table from the drop-down menu.
4. A dialog box will appear. Choose one of the options in the Separate text at:section. This is how Word knows what text to put in each column.
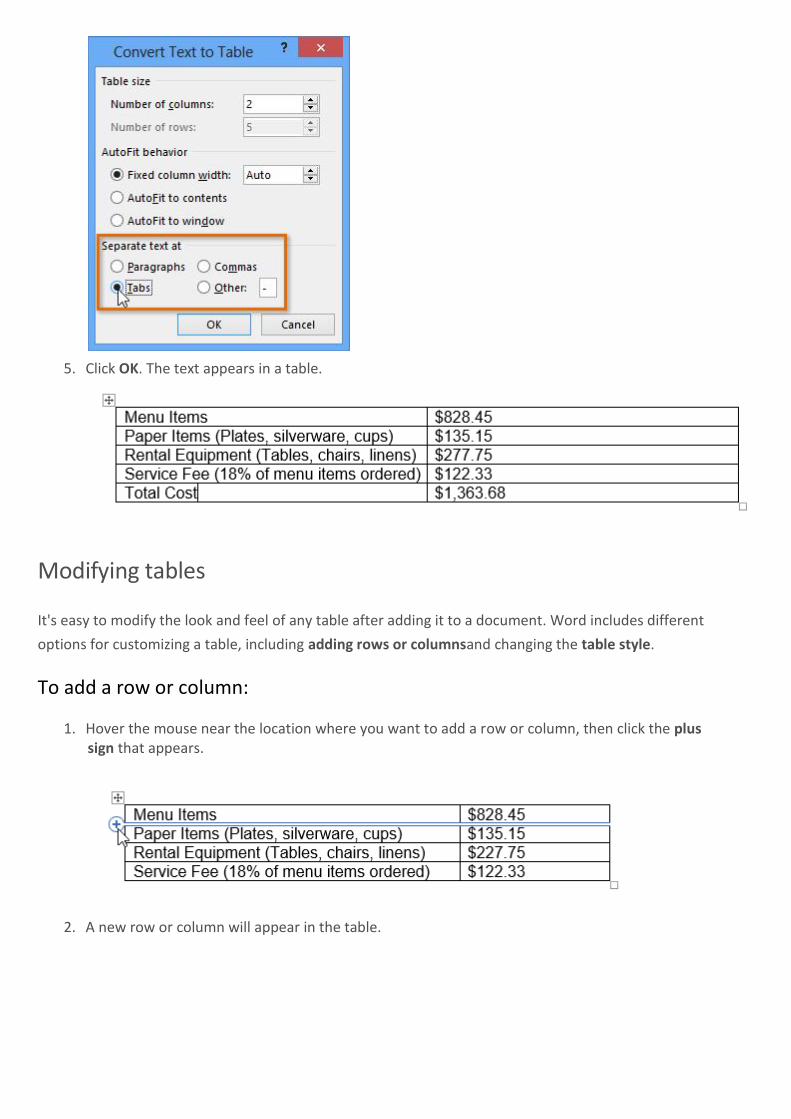
5. Click OK. The text appears in a table.
Modifying tables
It's easy to modify the look and feel of any table after adding it to a document. Word includes different
options for customizing a table, including adding rows or columnsand changing the table style.
To add a row or column:
1. Hover the mouse near the location where you want to add a row or column, then click the plus sign that appears.
2. A new row or column will appear in the table.
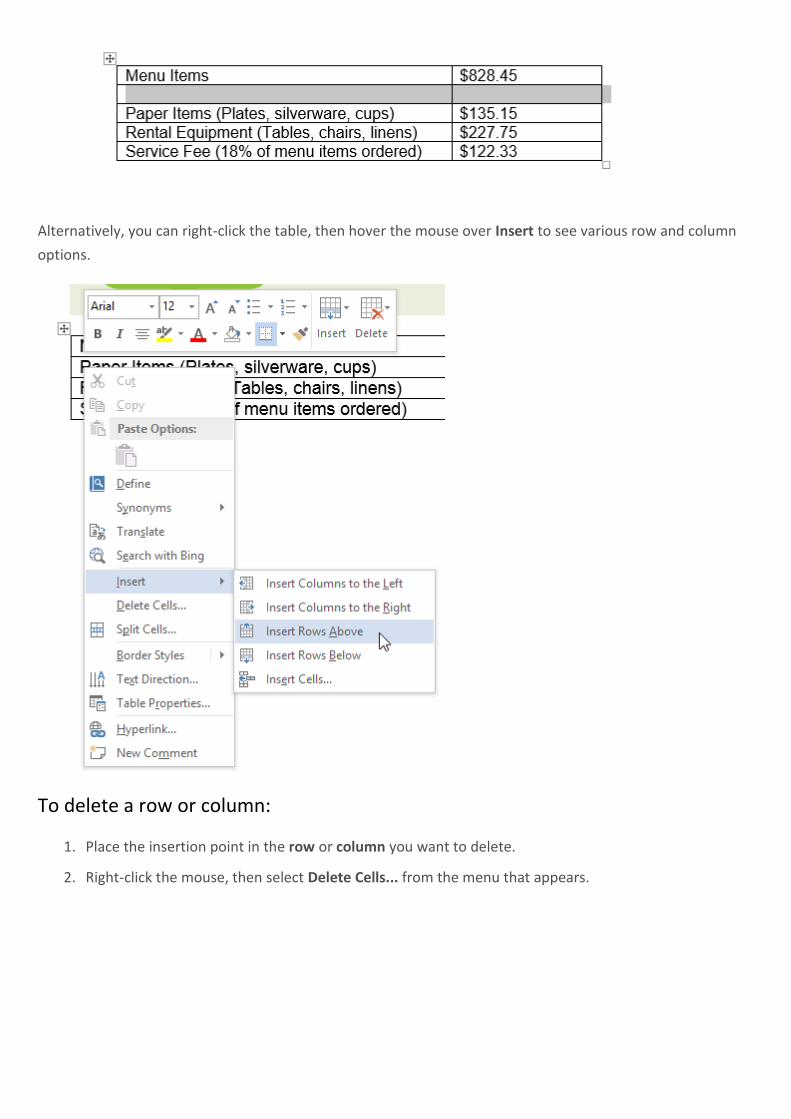
Alternatively, you can right-click the table, then hover the mouse over Insert to see various row and column
options.
To delete a row or column:
1. Place the insertion point in the row or column you want to delete.
2. Right-click the mouse, then select Delete Cells... from the menu that appears.
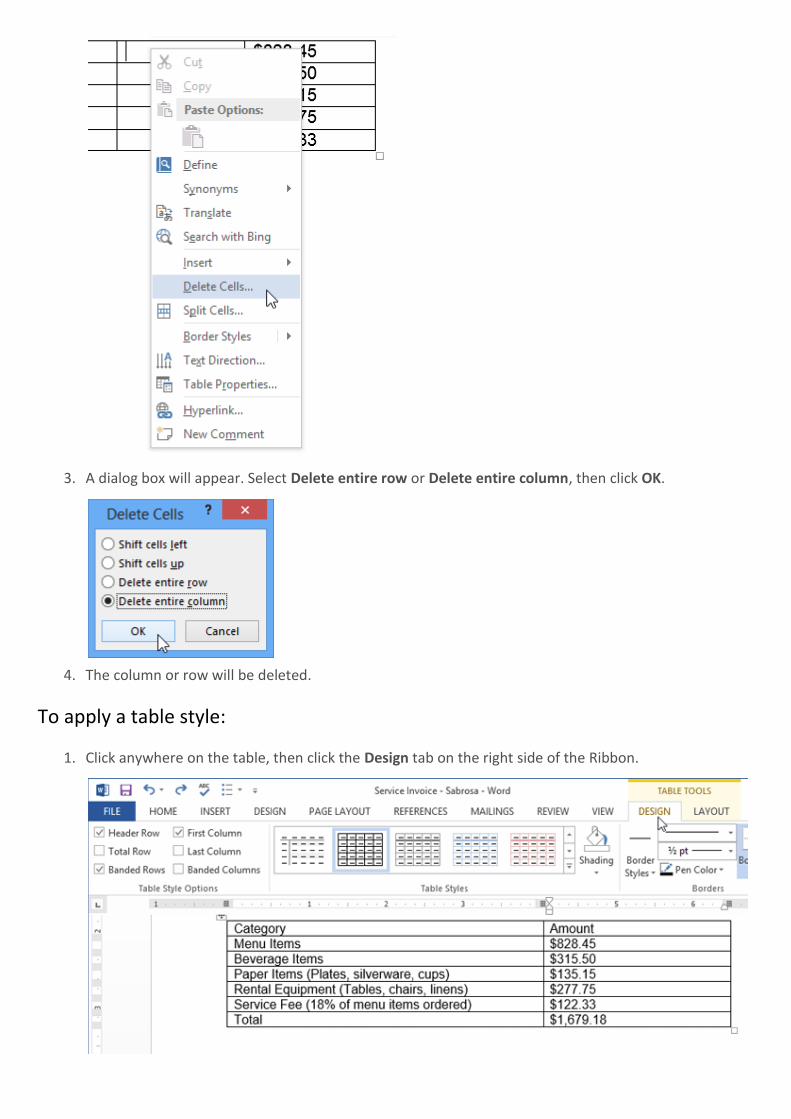
3. A dialog box will appear. Select Delete entire row or Delete entire column, then click OK.
4. The column or row will be deleted.
To apply a table style:
1. Click anywhere on the table, then click the Design tab on the right side of the Ribbon.
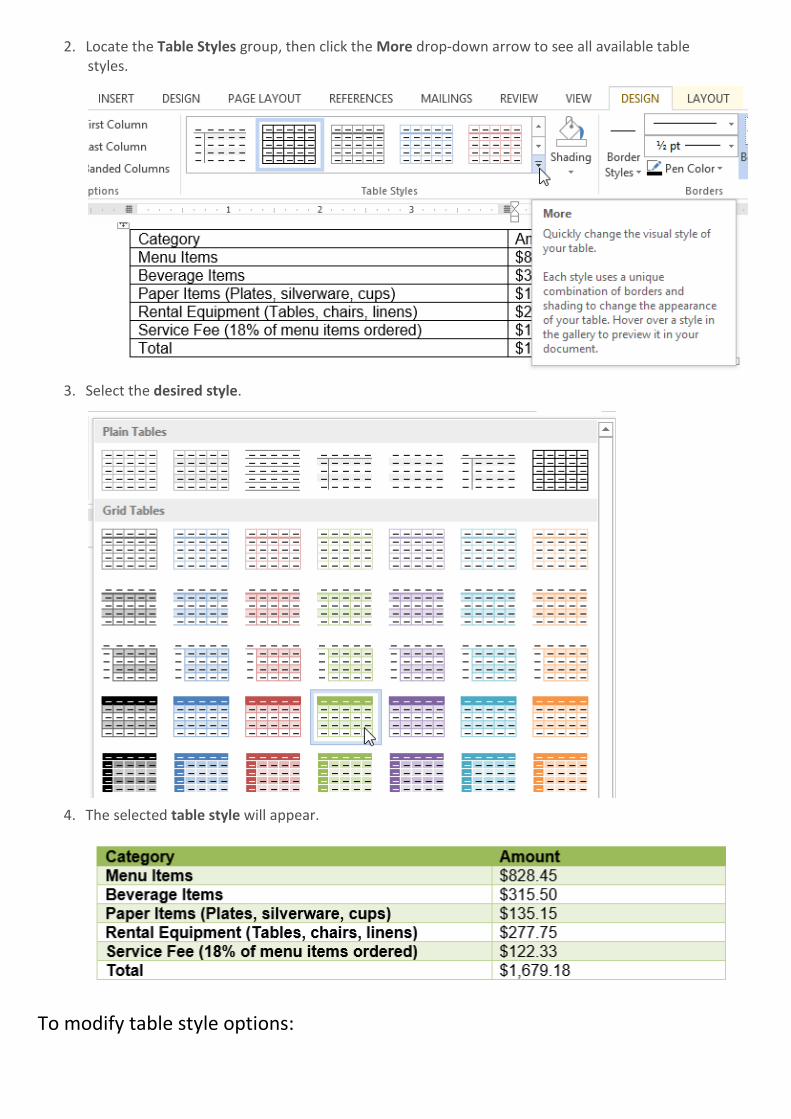
2. Locate the Table Styles group, then click the More drop-down arrow to see all available table styles.
3. Select the desired style.
4. The selected table style will appear.
To modify table style options:
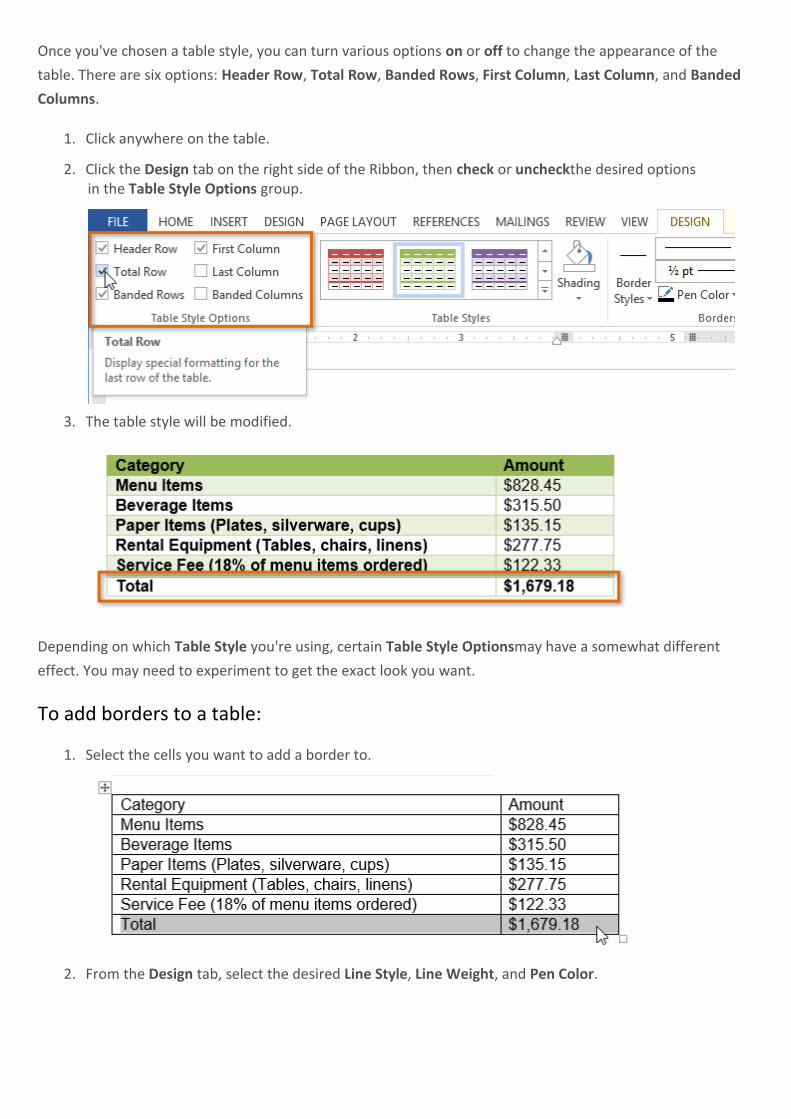
Once you've chosen a table style, you can turn various options on or off to change the appearance of the
table. There are six options: Header Row, Total Row, Banded Rows, First Column, Last Column, and Banded
Columns.
1. Click anywhere on the table.
2. Click the Design tab on the right side of the Ribbon, then check or uncheckthe desired options in the Table Style Options group.
3. The table style will be modified.
Depending on which Table Style you're using, certain Table Style Optionsmay have a somewhat different
effect. You may need to experiment to get the exact look you want.
To add borders to a table:
1. Select the cells you want to add a border to.
2. From the Design tab, select the desired Line Style, Line Weight, and Pen Color.
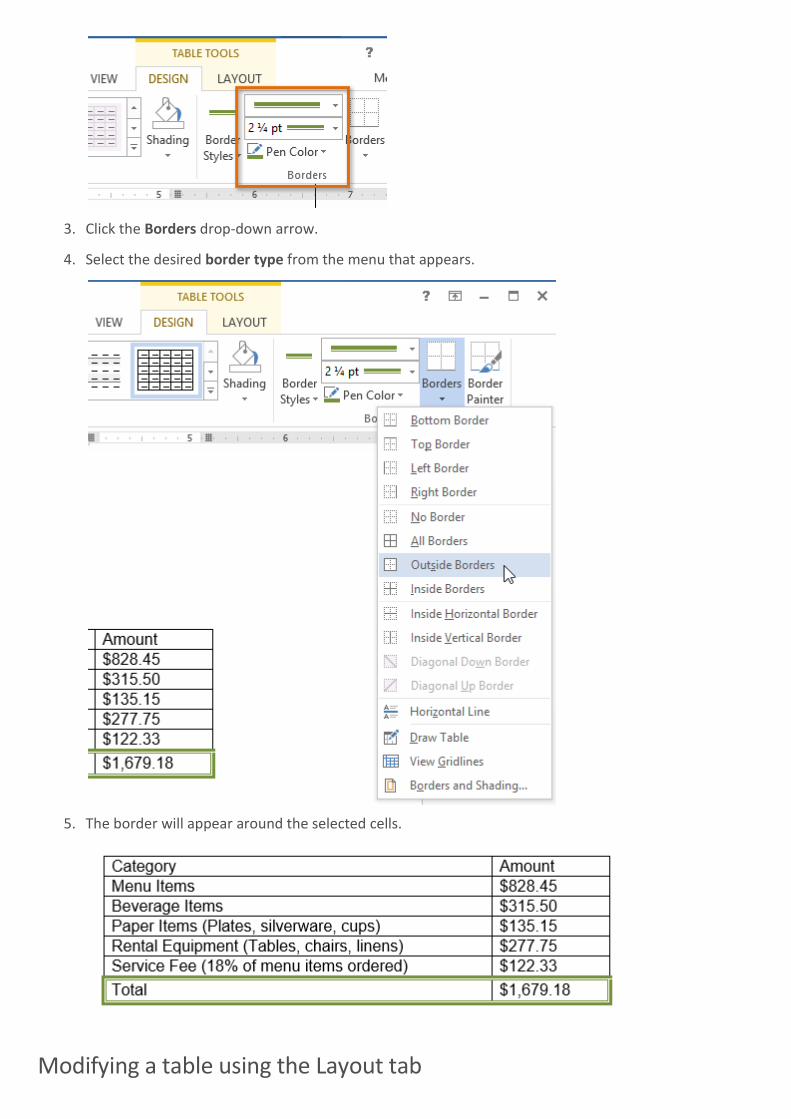
3. Click the Borders drop-down arrow.
4. Select the desired border type from the menu that appears.
5. The border will appear around the selected cells.
Modifying a table using the Layout tab
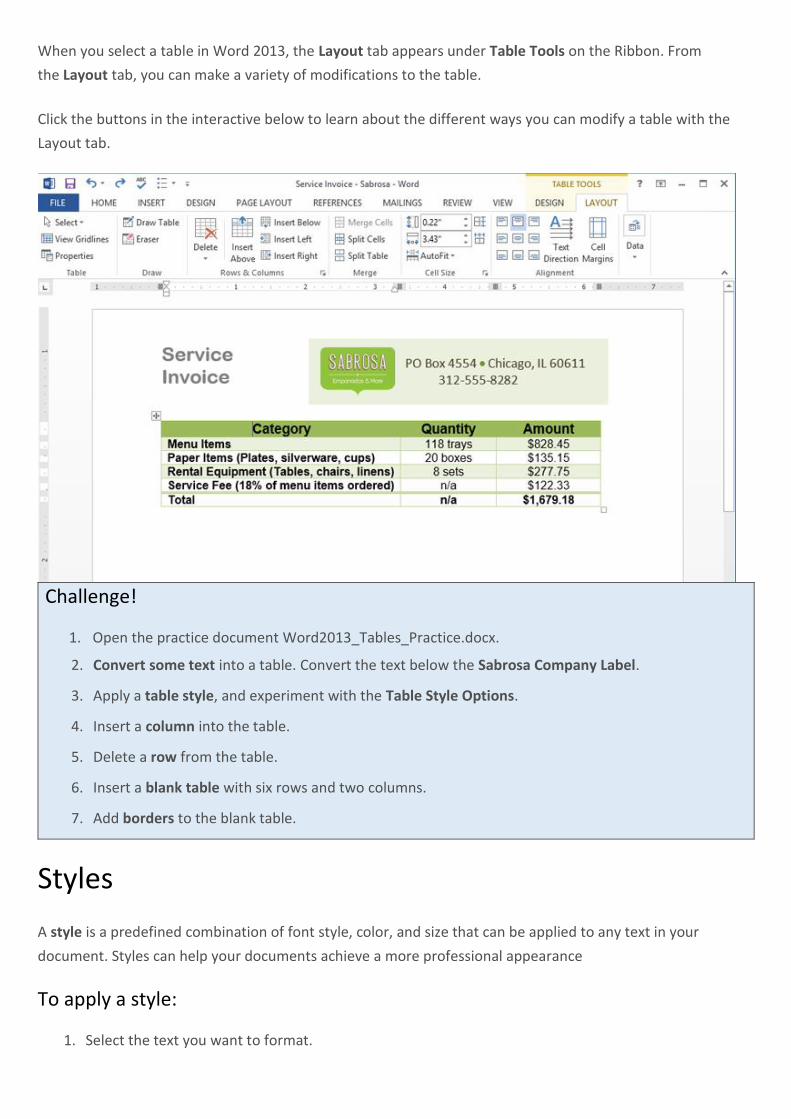
When you select a table in Word 2013, the Layout tab appears under Table Tools on the Ribbon. From
the Layout tab, you can make a variety of modifications to the table.
Click the buttons in the interactive below to learn about the different ways you can modify a table with the
Layout tab.
Challenge!
1. Open the practice document Word2013_Tables_Practice.docx.
2. Convert some text into a table. Convert the text below the Sabrosa Company Label.
3. Apply a table style, and experiment with the Table Style Options.
4. Insert a column into the table.
5. Delete a row from the table.
6. Insert a blank table with six rows and two columns.
7. Add borders to the blank table.
Styles
A style is a predefined combination of font style, color, and size that can be applied to any text in your
document. Styles can help your documents achieve a more professional appearance
To apply a style:
1. Select the text you want to format.
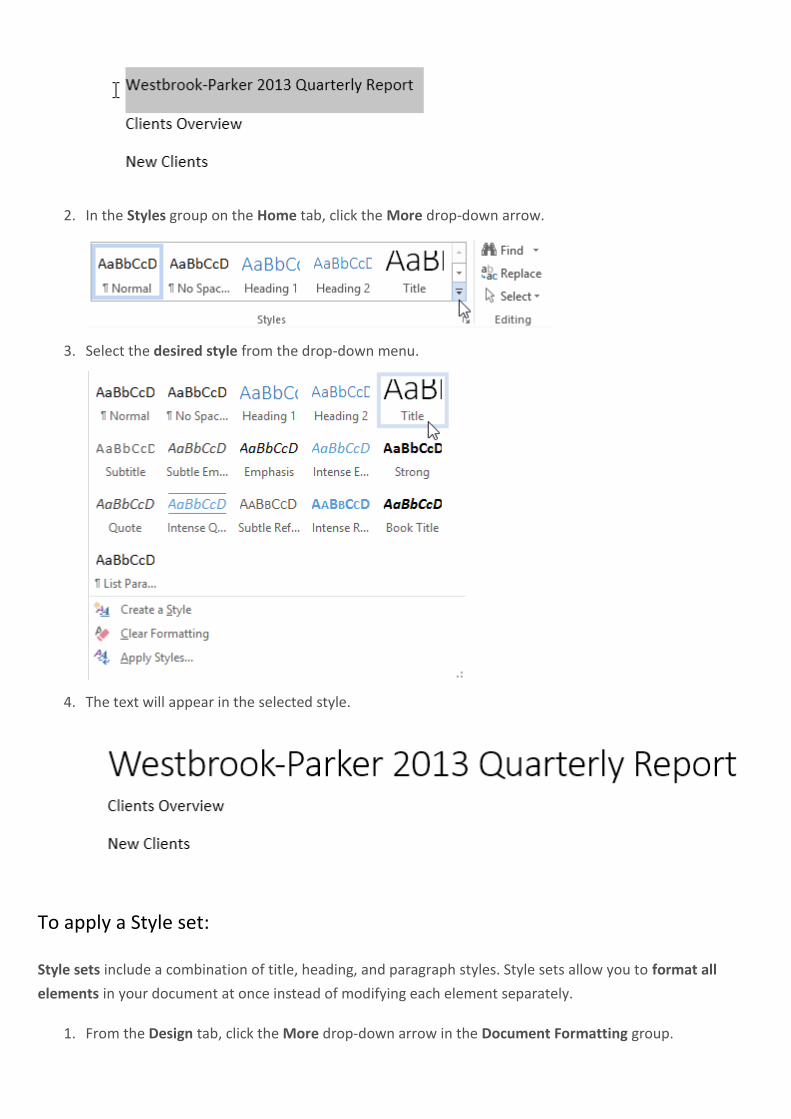
2. In the Styles group on the Home tab, click the More drop-down arrow.
3. Select the desired style from the drop-down menu.
4. The text will appear in the selected style.
To apply a Style set:
Style sets include a combination of title, heading, and paragraph styles. Style sets allow you to format all
elements in your document at once instead of modifying each element separately.
1. From the Design tab, click the More drop-down arrow in the Document Formatting group.
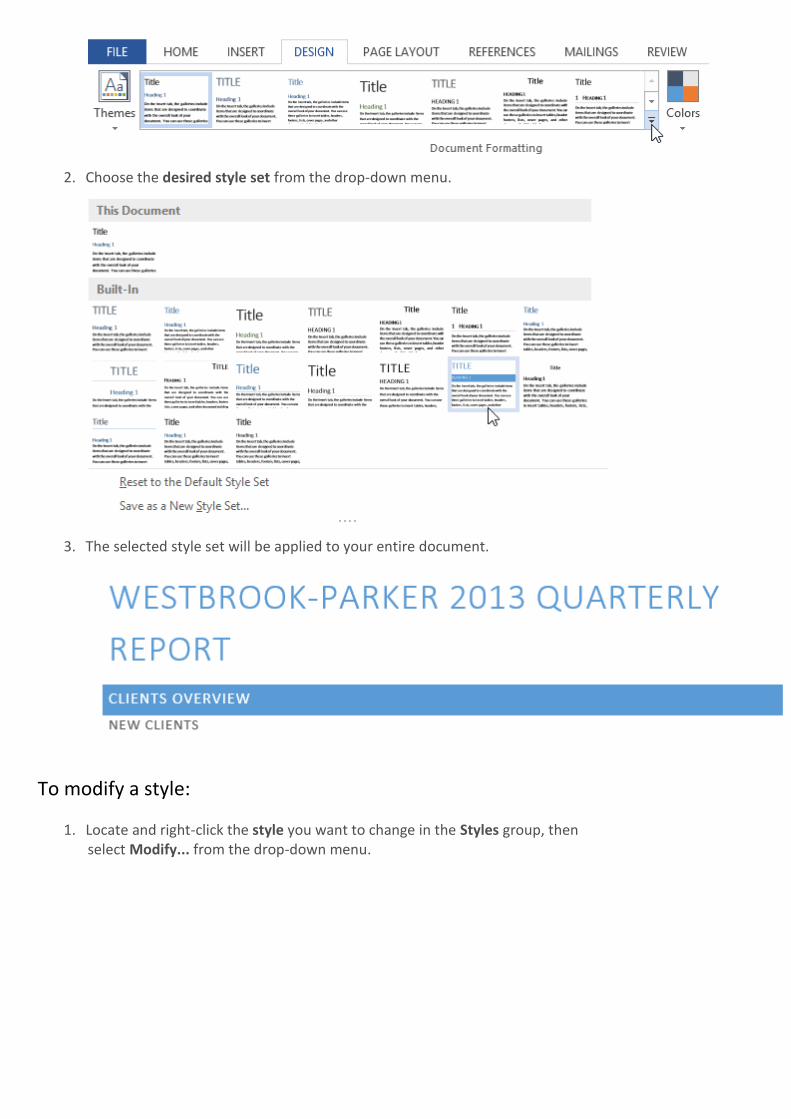
2. Choose the desired style set from the drop-down menu.
3. The selected style set will be applied to your entire document.
To modify a style:
1. Locate and right-click the style you want to change in the Styles group, then select Modify... from the drop-down menu.
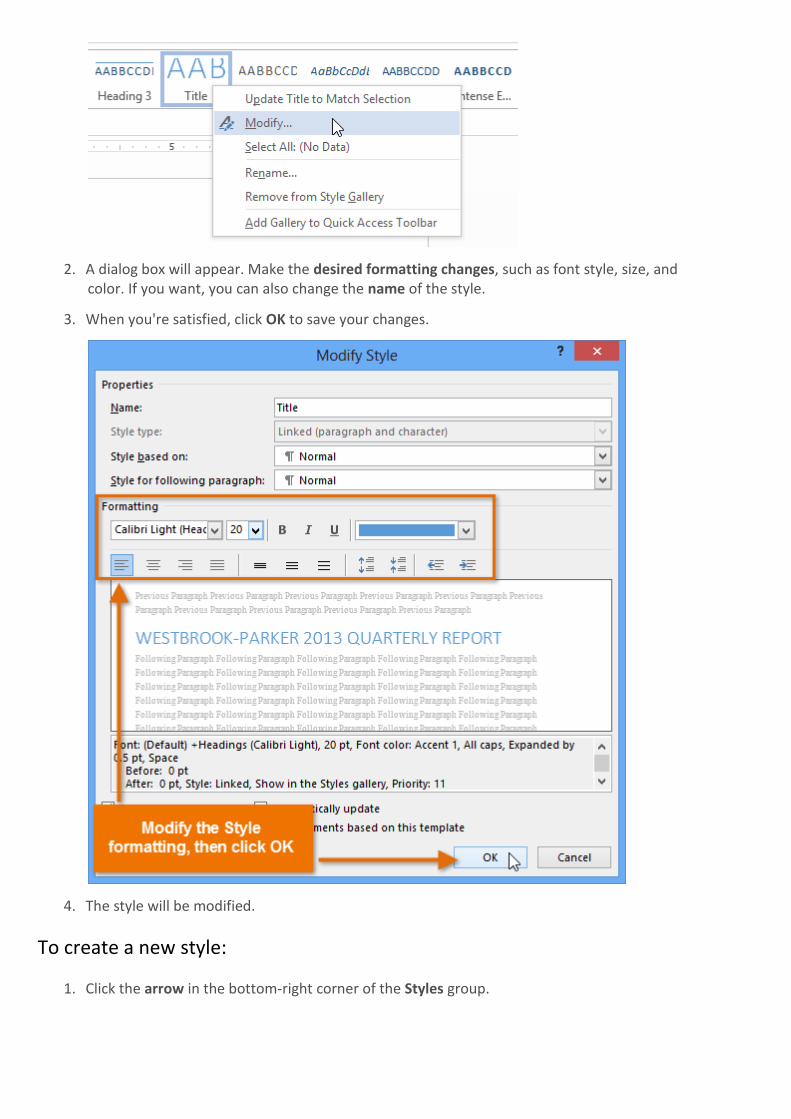
2. A dialog box will appear. Make the desired formatting changes, such as font style, size, and color. If you want, you can also change the name of the style.
3. When you're satisfied, click OK to save your changes.
4. The style will be modified.
To create a new style:
1. Click the arrow in the bottom-right corner of the Styles group.
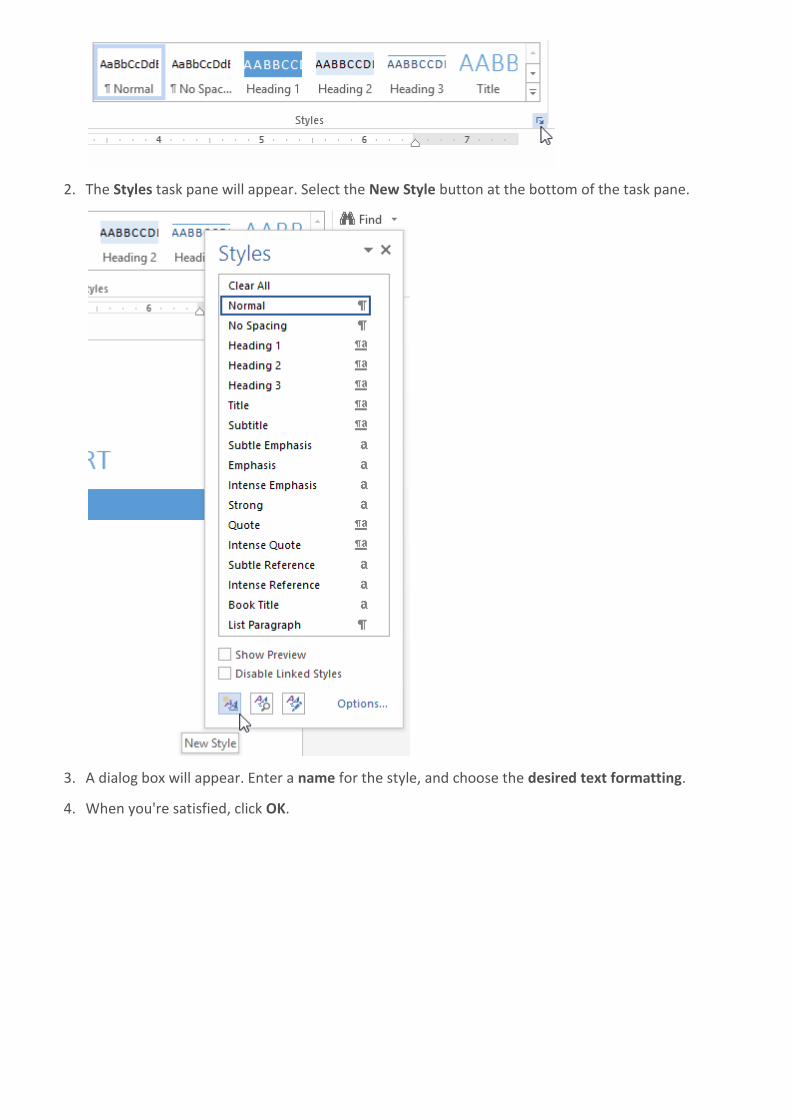
2. The Styles task pane will appear. Select the New Style button at the bottom of the task pane.
3. A dialog box will appear. Enter a name for the style, and choose the desired text formatting.
4. When you're satisfied, click OK.
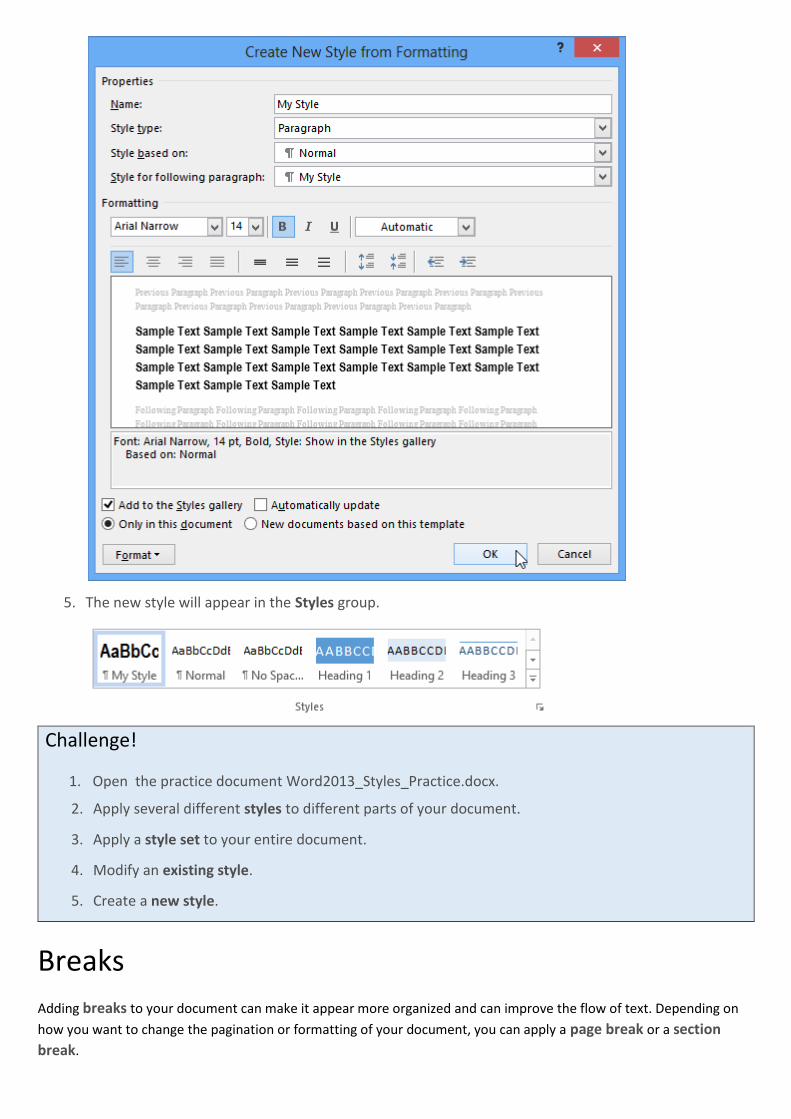
5. The new style will appear in the Styles group.
Challenge!
1. Open the practice document Word2013_Styles_Practice.docx.
2. Apply several different styles to different parts of your document.
3. Apply a style set to your entire document.
4. Modify an existing style.
5. Create a new style.
Breaks
Adding breaks to your document can make it appear more organized and can improve the flow of text. Depending on
how you want to change the pagination or formatting of your document, you can apply a page break or a section
break.
To insert a page break:
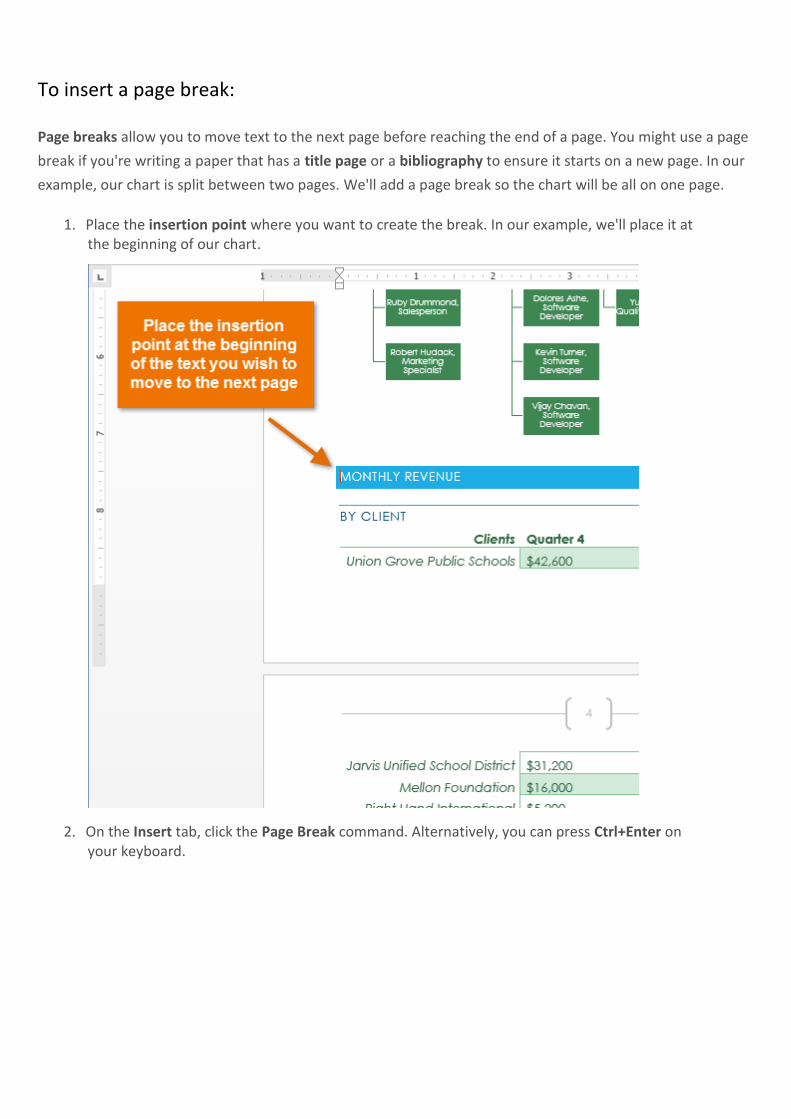
Page breaks allow you to move text to the next page before reaching the end of a page. You might use a page
break if you're writing a paper that has a title page or a bibliography to ensure it starts on a new page. In our
example, our chart is split between two pages. We'll add a page break so the chart will be all on one page.
1. Place the insertion point where you want to create the break. In our example, we'll place it at the beginning of our chart.
2. On the Insert tab, click the Page Break command. Alternatively, you can press Ctrl+Enter on your keyboard.

3. The page break will be applied to the document, and the text will move to the next page. In our example, the chart moved to the next page.
By default, breaks are hidden. If you want to show the breaks in your document, click
the Show/Hide command.
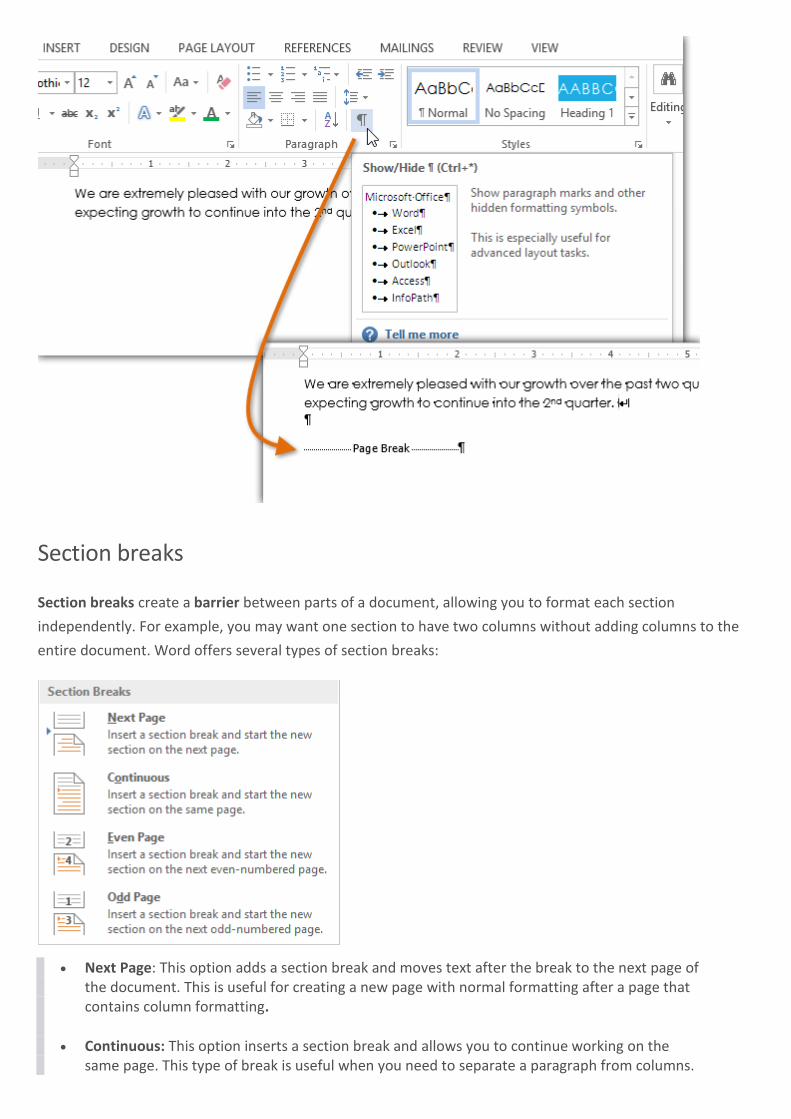
Section breaks
Section breaks create a barrier between parts of a document, allowing you to format each section
independently. For example, you may want one section to have two columns without adding columns to the
entire document. Word offers several types of section breaks:
Next Page: This option adds a section break and moves text after the break to the next page of the document. This is useful for creating a new page with normal formatting after a page that contains column formatting.
Continuous: This option inserts a section break and allows you to continue working on the same page. This type of break is useful when you need to separate a paragraph from columns.
Even Page and Odd Page: These options add a section break and move the text after the break to the next even or odd page. These options may be useful when you need to begin a new section on an even or odd page (for example, a new chapter of a book).
To insert a section break:
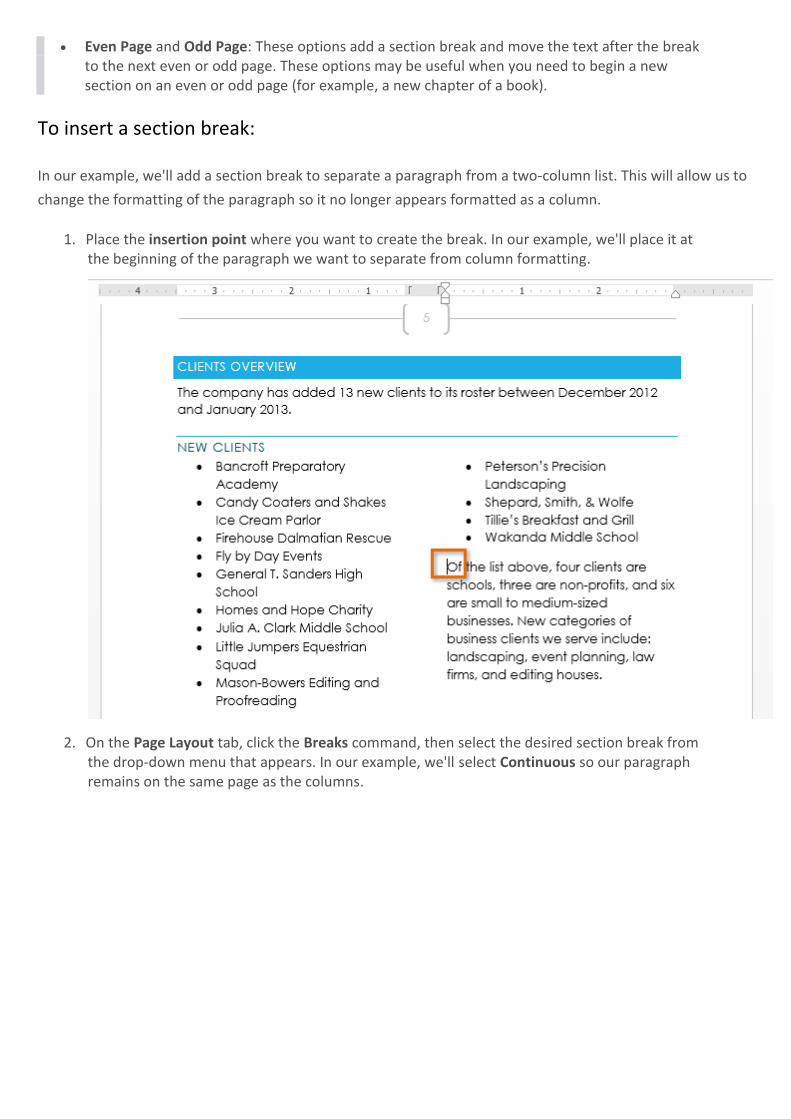
In our example, we'll add a section break to separate a paragraph from a two-column list. This will allow us to
change the formatting of the paragraph so it no longer appears formatted as a column.
1. Place the insertion point where you want to create the break. In our example, we'll place it at the beginning of the paragraph we want to separate from column formatting.
2. On the Page Layout tab, click the Breaks command, then select the desired section break from the drop-down menu that appears. In our example, we'll select Continuous so our paragraph remains on the same page as the columns.
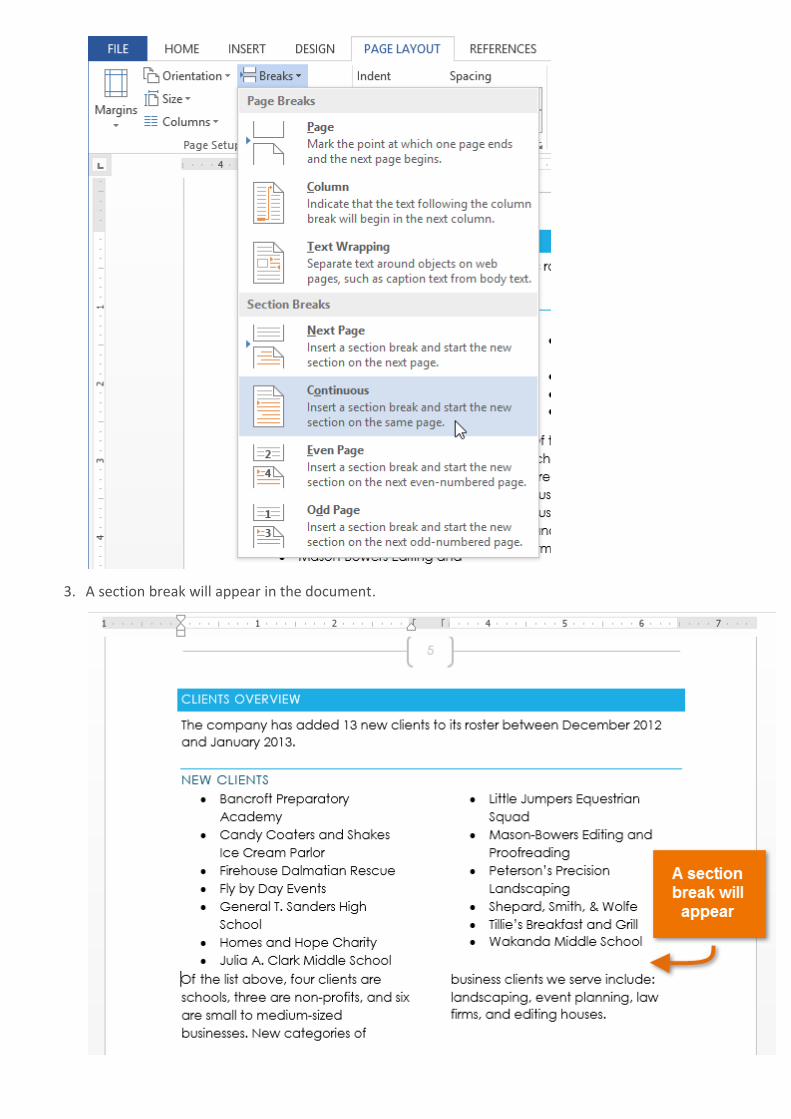
3. A section break will appear in the document.
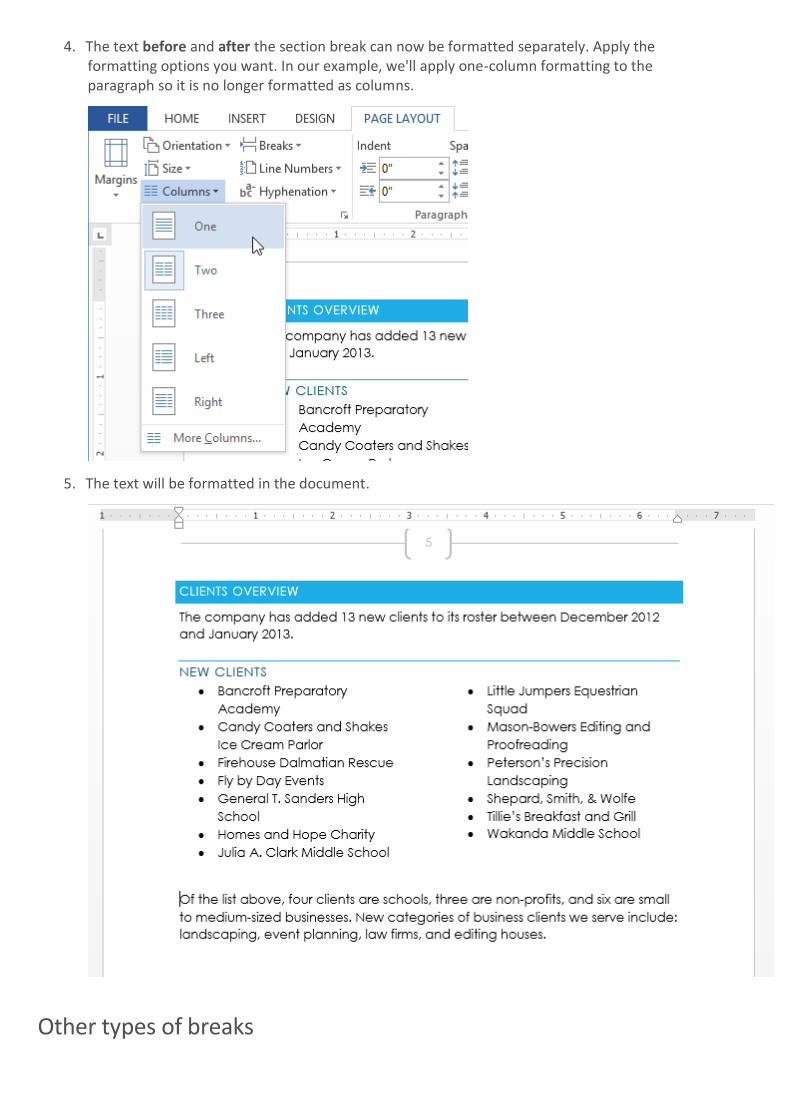
4. The text before and after the section break can now be formatted separately. Apply the formatting options you want. In our example, we'll apply one-column formatting to the paragraph so it is no longer formatted as columns.
5. The text will be formatted in the document.
Other types of breaks
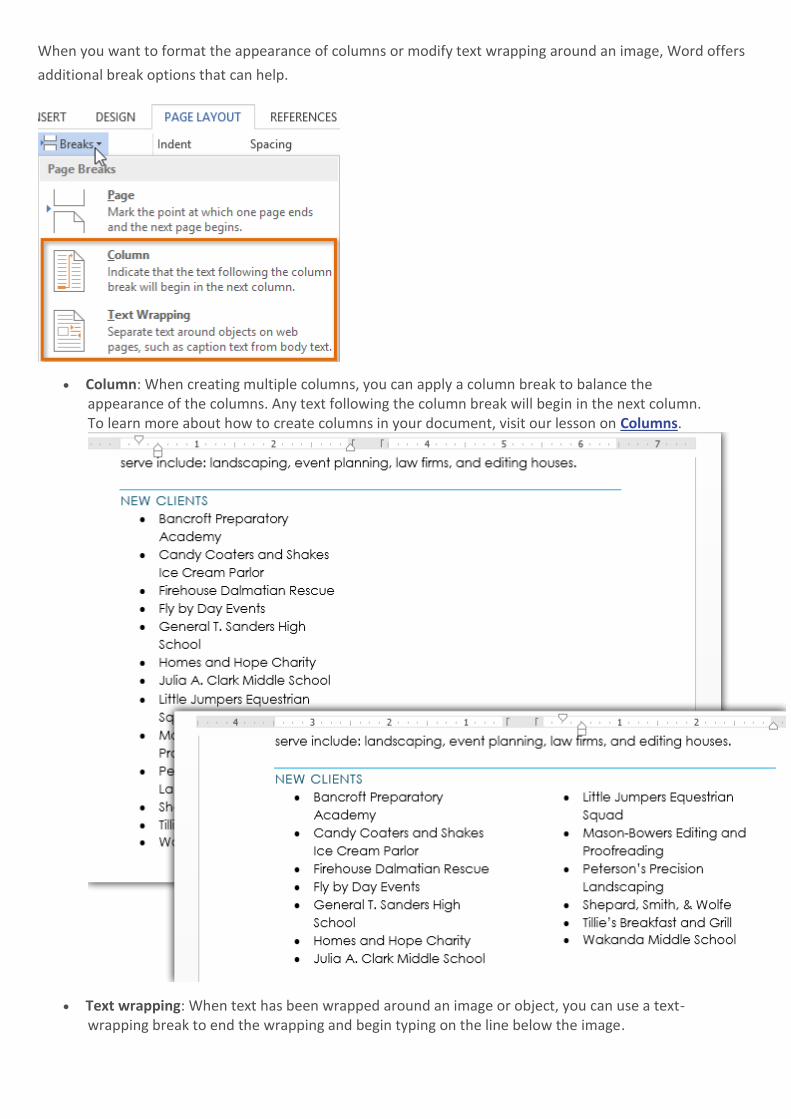
When you want to format the appearance of columns or modify text wrapping around an image, Word offers
additional break options that can help.
Column: When creating multiple columns, you can apply a column break to balance the appearance of the columns. Any text following the column break will begin in the next column. To learn more about how to create columns in your document, visit our lesson on Columns.
Text wrapping: When text has been wrapped around an image or object, you can use a text-wrapping break to end the wrapping and begin typing on the line below the image.
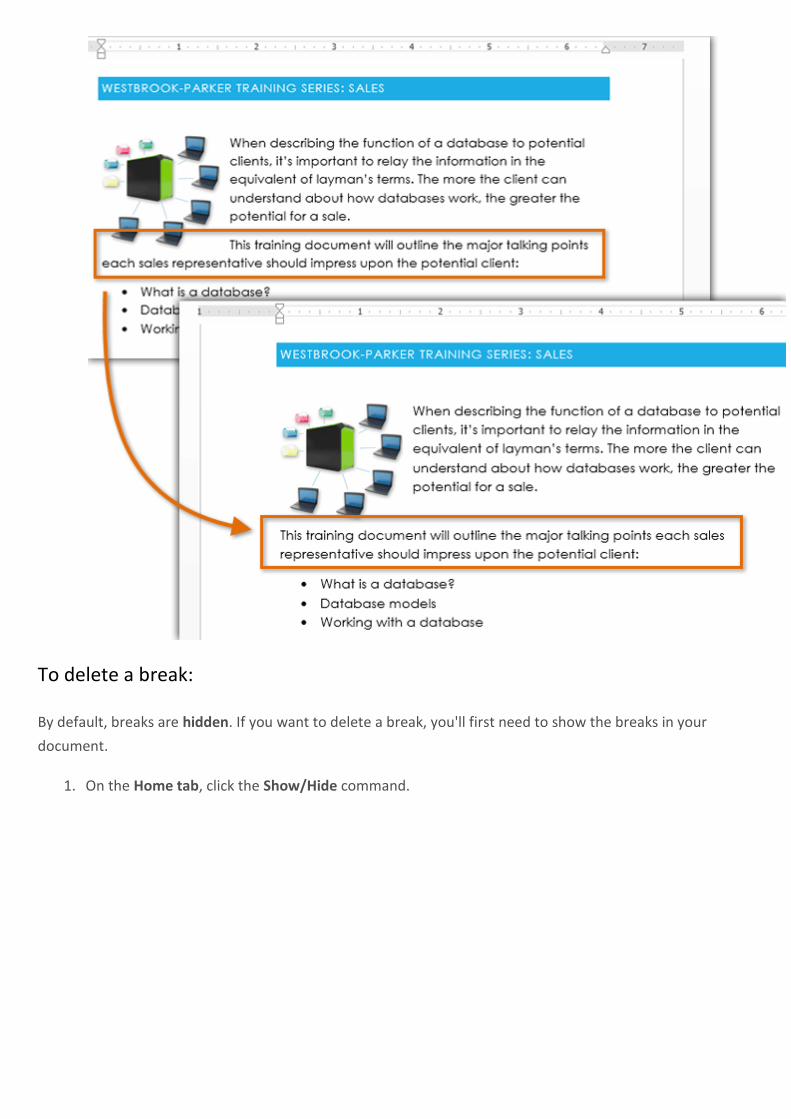
To delete a break:
By default, breaks are hidden. If you want to delete a break, you'll first need to show the breaks in your
document.
1. On the Home tab, click the Show/Hide command.
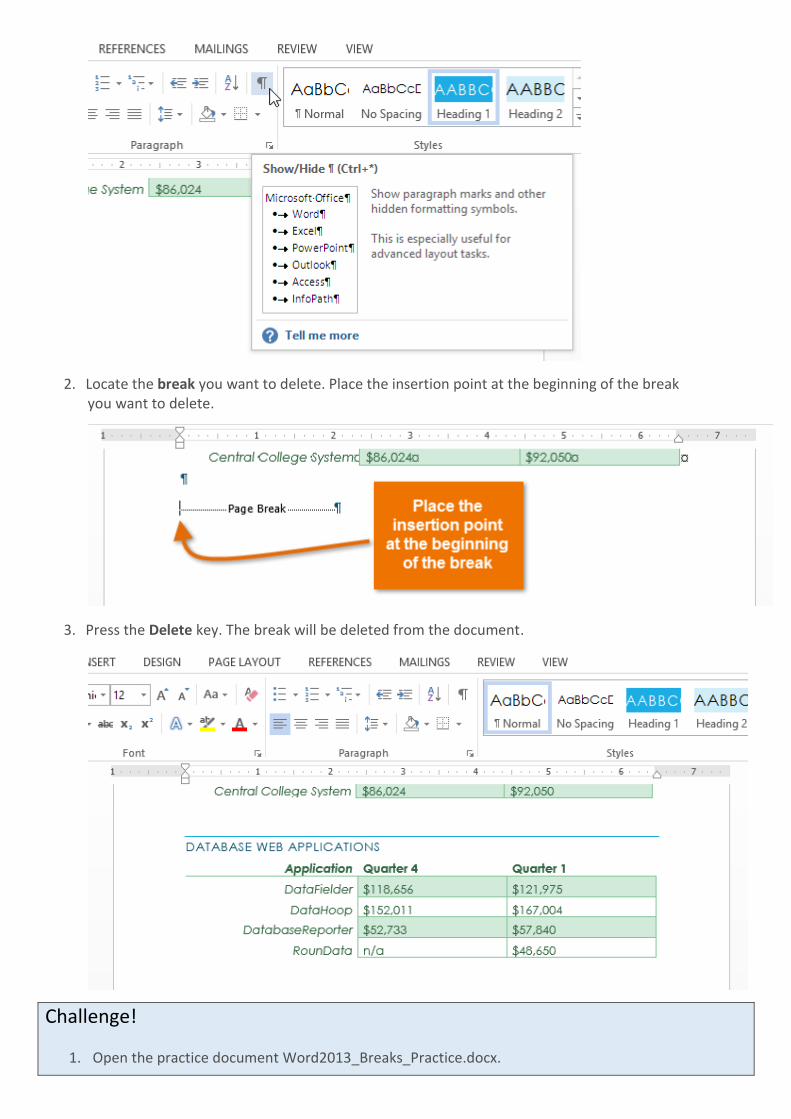
2. Locate the break you want to delete. Place the insertion point at the beginning of the break you want to delete.
3. Press the Delete key. The break will be deleted from the document.
Challenge!
1. Open the practice document Word2013_Breaks_Practice.docx.

2. Insert a page break. Insert a page break to move the Clients Overview section to the next page.
3. Insert a section break in the document. Insert a Next Page section break to move the Updated Chain of Command section to the next page. Try changing the formatting of paragraph in that section.
4. Show the breaks using the Show/Hide command.
5. Delete a break. Delete the page break after the fourth paragraph on page 1 of the document to move the two paragraphs on page 2 onto page 1.