Incident Management User Training Guide - York · PDF fileRemedy Incident Management –...
63
Remedy Incident Management – User Training Guide York University BMC Remedy Incident Management User Training Guide Version 2.0
Transcript of Incident Management User Training Guide - York · PDF fileRemedy Incident Management –...

Remedy Incident Management – User Training Guide York University
BMC Remedy
Incident Management
User Training Guide Version 2.0

Remedy Incident Management – User Training Guide York University
Page 1 of 63
Table of Contents 1. GETTING READY ..................................................................................................................................................................... 3
HOW TO LOG IN ..................................................................................................................................................................................... 3 HOW TO SET UP YOUR PROFILE .................................................................................................................................................................. 4 HOW TO SET UP YOUR PREFERENCES .......................................................................................................................................................... 8
2. HOW TO CREATE AN INCIDENT ............................................................................................................................................. 12
STEP 1 (MANDATORY): ‘CUSTOMER’ TAB ................................................................................................................................................. 14 STEP 2 (OPTIONAL): ‘CONTACT’ TAB ....................................................................................................................................................... 18 STEP 3 (MANDATORY): SUMMARY FIELD .................................................................................................................................................. 19 STEP 4 (MANDATORY): ASSIGNING STATUS/PRIORITIES ............................................................................................................................... 19 STEP 5 (MANDATORY): ‘CLASSIFICATION’ TAB: .......................................................................................................................................... 20
How do I change the ‘Assigned Group*+’ field ............................................................................................................................ 25 How to take an incident .............................................................................................................................................................. 26
3. HOW TO ASSIGN AN INCIDENT TO MY TEAM MEMBER ......................................................................................................... 27
Time Management within a specific Incident Ticket ................................................................................................................... 28 Work Info Tab .............................................................................................................................................................................. 29
4. TASKS TAB (OPTIONAL) ........................................................................................................................................................ 30
GENERAL TAB ...................................................................................................................................................................................... 31 REQUESTER TAB ................................................................................................................................................................................... 32 CLASSIFICATION TAB .............................................................................................................................................................................. 33 ASSIGNMENT/DATES TABS ..................................................................................................................................................................... 34 RELATIONSHIPS TAB .............................................................................................................................................................................. 36 TASKS - FREQUENTLY ASK QUESTIONS ...................................................................................................................................................... 37
How to I view Tasks? ................................................................................................................................................................... 37 Time Management within a Task ................................................................................................................................................ 38 How to start recording time on a task ......................................................................................................................................... 38 When you have finished the Task ................................................................................................................................................ 39 How to cancel a task ................................................................................................................................................................... 40
5. NOTIFYING CLIENTS (OPTIONAL): ......................................................................................................................................... 41
HOW DO I SEND AN E-MAIL WITHIN AN INCIDENT? ...................................................................................................................................... 41 SENDING A REMINDER TO AN INDIVIDUAL .................................................................................................................................................. 44
6. HOW TO RESOLVE AN INCIDENT ........................................................................................................................................... 46
RESOLUTION TAB .................................................................................................................................................................................. 46 DATE/SYSTEM TAB ............................................................................................................................................................................... 47
7. SEARCH REMEDY INCIDENTS METHODS ................................................................................................................................ 48
HOW TO LOOK AT YOUR INCIDENTS .......................................................................................................................................................... 48 HOW TO LOOK AT YOUR GROUP’S INCIDENTS ............................................................................................................................................ 48 IF YOU HAVE MULTIPLE QUEUES IN YOUR AREA ......................................................................................................................................... 48 HOW TO SEARCH FOR INCIDENTS ............................................................................................................................................................. 49 SEARCHING FOR AN INCIDENT USING THE INCIDENT ID ................................................................................................................................. 50 SEARCHING FOR A GROUP INCIDENTS ........................................................................................................................................................ 51 HOW DO I CREATE MY OWN ‘SEARCHES’ BY THE ‘STATUS’ OF INCIDENT? .......................................................................................................... 52

Remedy Incident Management – User Training Guide York University
Page 2 of 63
HOW DO I CREATE MY OWN ‘SEARCHES’ BY THE ‘ASSIGNED GROUP’ OF THE INCIDENT? ...................................................................................... 54
8. HOW TO LOGOUT ................................................................................................................................................................ 55
FREQUENTLY ASK QUESTIONS (FAQS) ...................................................................................................................................... 56
HOW DO I FILL IN A SURVEY ..................................................................................................................................................................... 56 REQUESTER CONSOLE ............................................................................................................................................................................ 56
GLOSSARY ............................................................................................................................................................................... 57

Remedy Incident Management – User Training Guide York University
Page 3 of 63
1. Getting Ready
How to Log In 1. Start your web browser and type the following the URL in your browser’s address field:
http://itservicedesk.yorku.ca
2. The IT Service Desk login window appears.
3. In the ‘User Name’ field type your Passport York User Name. 4. In the ‘Password’ field type your Passport York password. 5. Click on the ‘Log In’ button. 6. The Remedy Service Desk ‘Default Home Page’ is the ‘Overview Console’.

Remedy Incident Management – User Training Guide York University
Page 4 of 63
How to set up your Profile 1. Expand the menu section
‘Functions’
2. Continue to ‘My Profile’
The ‘People Information’ form will appear.

Remedy Incident Management – User Training Guide York University
Page 5 of 63
3. Under the ‘General’ tab (on tab bar displayed across middle of screen), edit the following information to add or correct your displayed information:
a. Organization Information
b. Contact Information
c. Location Information fields

Remedy Incident Management – User Training Guide York University
Page 6 of 63
4. Under the ‘More Details’ tab (OPTIONAL)
• Add alternative contact information ‘Mobile Phone’, ‘Fax Number’ or ‘Pager Number’.
5. Under the ‘Notifications’ tab
• Verify ‘Notification Availability’ is set to ‘Yes’
• Why? To ensure that you will receive e-mail notification when a task becomes assigned to you.

Remedy Incident Management – User Training Guide York University
Page 7 of 63
6. Under ‘People Information’,
• Verify ‘Assignment Availability’ is set to ‘Yes’.
7. Click on ‘Save’ then ‘Close’.

Remedy Incident Management – User Training Guide York University
Page 8 of 63
How to set up your Preferences 1. Click on ‘Functions’ (left-hand panel) and then click on ‘Application Preferences’.
The ‘Application Preferences’ form will appear.

Remedy Incident Management – User Training Guide York University
Page 9 of 63
2. Under ‘Application Preferences’, we suggest the following settings:
• ‘Default Home Page’ field: Select ‘Incident Management Console’. • ‘Company*’ field: Select ‘York University’. • ‘Console View’ field: Select ‘All My Groups’.
3. Under the ‘Incident Management’ tab and ‘Overview Console’ make the following changes:
• ‘Show Incidents’ field: Select ‘Yes’. • ‘Role’ field: Select ‘Assigned Group’.
Note: If this value is not available click on ‘Save’, then ‘Close’ the window and log out and log back in.

Remedy Incident Management – User Training Guide York University
Page 10 of 63
4. Under the ‘Incident Management’ tab - make the following changes on the “Form” section:
• ‘After New Save’ field: Select ‘Reopen In Current’ • ‘Show Date System’ field: Select ‘Yes’

Remedy Incident Management – User Training Guide York University
Page 11 of 63
5. Under the ‘Task Management’ tab:
• ‘Show Task’ field: Select ‘Yes’ by clicking on the drop-down button. • Click on ‘Save’ and then click on ‘Close’.
6. Click on ‘Logout’ (top left) and log back in to use your new ‘Profile’ and ‘Application Preferences’.

Remedy Incident Management – User Training Guide York University
Page 12 of 63
2. How to Create an Incident
1. In the ‘Incident Console’ under ‘Functions’ (left-hand panel)
• Click on ‘New Incident’ OR click on ‘Create’ under ‘Incidents’.

Remedy Incident Management – User Training Guide York University
Page 13 of 63
Note: The ‘Status*’ field will be automatically say ‘New’.

Remedy Incident Management – User Training Guide York University
Page 14 of 63
STEP 1 (mandatory): ‘Customer’ Tab From the ‘Customer’ tab:
1. Click on the ‘Search’ button the ‘People Search’ window will appear.

Remedy Incident Management – User Training Guide York University
Page 15 of 63
2. Under ‘People Search’ window look up user information using below search options:
• ‘Corporate ID+’ field: If you know the student or employee number, type the 9 digit number and press ENTER.
• ‘First Name+’ and ‘Last Name+’ fields: If you have the person’s name, you can type part of their first and last name and press ENTER.
• ‘Email Address+’ and ‘Phone Number+’ fields: Type an email address or phone number or combination of both and press ENTER.

Remedy Incident Management – User Training Guide York University
Page 16 of 63
If multiple matches are listed, use the following items to identify your customer:
• ‘Profile Status’ – Status is ‘Enabled’ • ‘Internet E-mail’ – Address is correct • ‘Corporate ID’ – Is the correct employee or student number.
3. Double-click on the correct person’s name in the list.
Note: If client cannot be found in the system, use the generic user-name ‘system’ in the ‘Last Name+’ field.
Important Note:
When using ‘system’ (not in system) account profile, complete the ‘Contact’ tab.
• Enter client current information in the ‘Internet E-Mail’ and ‘Other Information’ sections.
Remedy Incident Management – User Training Guide York University
Page 17 of 63
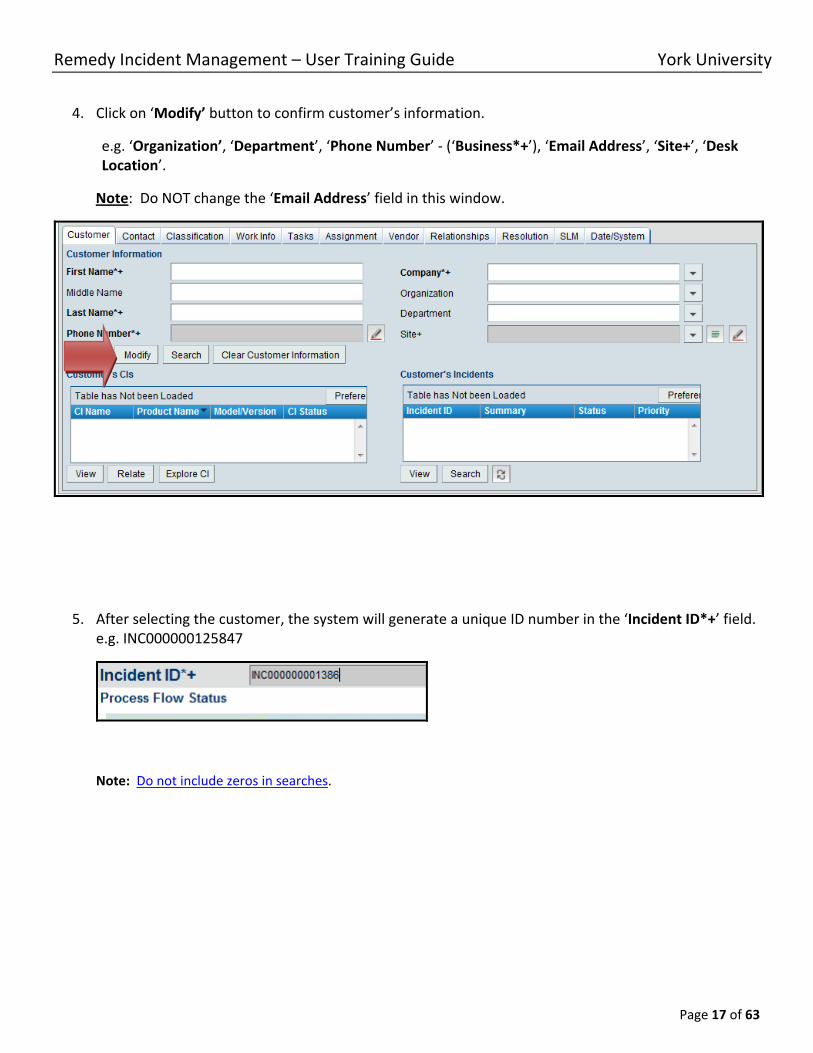
4. Click on ‘Modify’ button to confirm customer’s information.
e.g. ‘Organization’, ‘Department’, ‘Phone Number’ - (‘Business*+’), ‘Email Address’, ‘Site+’, ‘Desk Location’.
Note: Do NOT change the ‘Email Address’ field in this window.
5. After selecting the customer, the system will generate a unique ID number in the ‘Incident ID*+’ field. e.g. INC000000125847
Note: Do not include zeros in searches.

Remedy Incident Management – User Training Guide York University
Page 18 of 63
STEP 2 (Optional): ‘Contact’ tab
The ‘Contact’ tab is used to enter the information of the person reporting the incident on behalf of the customer. e.g. An admin person calling on behalf of the director.
• Or the ‘Contact’ tab can be used as alternate contact information for the customer using the ‘Internet E-Mail’ and ‘Other Information’ fields.
1. Click on the ‘Contact’ tab.
2. Click on ‘Search’, the ‘People Search’ form will open. Search and select the contact person.
3. ‘Other Information’ field - This field can be used to enter an alternate email address for the contact person or other information regarding the customer. e.g. [email protected]
Note: Do not click on ‘Create’ button.
4. If contact information was entered, click on the ‘Save’ button at the bottom of the window.

Remedy Incident Management – User Training Guide York University
Page 19 of 63
STEP 3 (mandatory): Summary Field
1. Summary*’ field - Type in a brief but meaningful description of the issue or request because the ‘Summary*’ field is used as the subject line for email notifications.
2. ‘Notes’ field - This field can be used to enter a more detailed description of the issue or request.
STEP 4 (mandatory): Assigning status/priorities
1. In the ‘Impact*’ field – Select the impact that the incident has on the user.
2. In the ‘Urgency*’ field – Indicate how urgent the user needs to have a resolution.
3. ‘Priority*’ and ‘Weight*’ fields – Automatically set according to the ‘Impact’ and ‘Urgency’ fields values.

Remedy Incident Management – User Training Guide York University
Page 20 of 63
STEP 5 (mandatory): ‘Classification’ Tab:
1. Under ‘Incident Service Type’ the following fields are located:
• ‘Company*+’ field: Select ‘York University’.
• ‘Incident Type*’ field: The default setting is ‘User Service Request’. Use the drop-down menu to select an alternate incident type.
• Incident Types
2. Under ‘Reporting Information’ the following fields are located:
• ‘Reported Source’ field: Is used to indicate how the client contacted you. Click on the drop-down menu button to make your selection. e.g. over the phone or by Direct Input.
• The ‘Reported Date+’ field is automatically populated when you started to create the incident.
Note: If you need to change the reported date, click on the calendar icon to select the date and time.
1
2
Remedy Incident Management – User Training Guide York University
Page 21 of 63
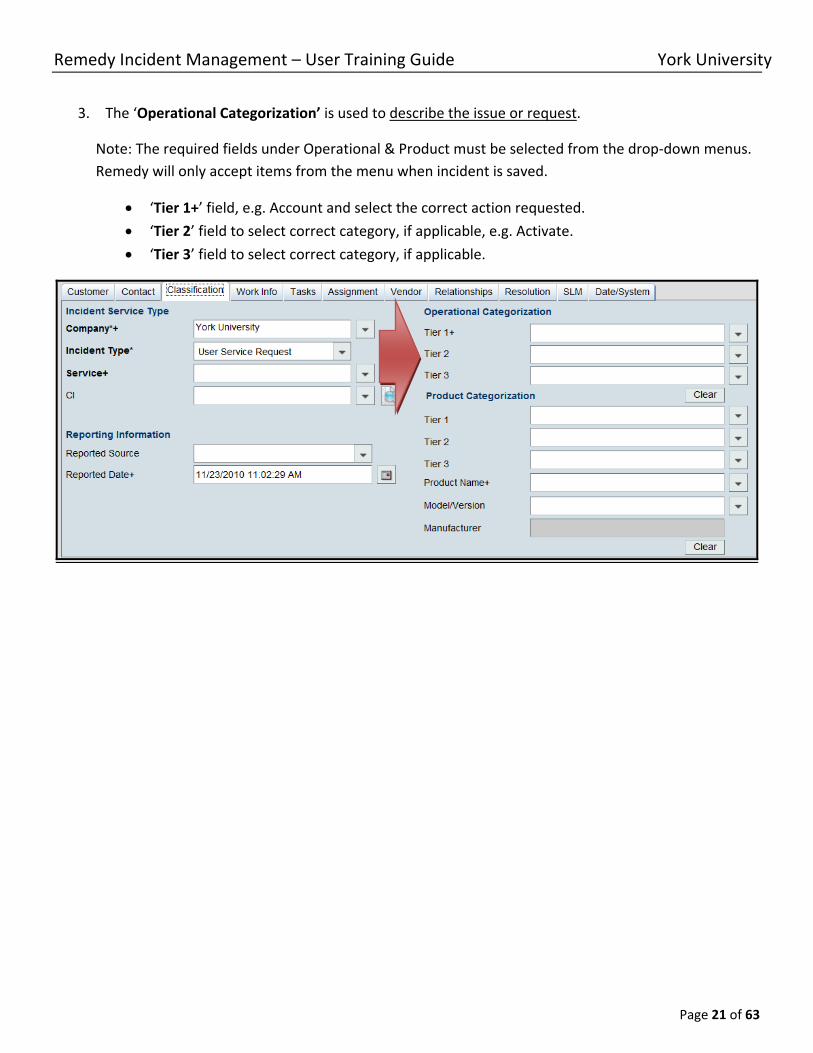
3. The ‘Operational Categorization’ is used to describe the issue or request.
Note: The required fields under Operational & Product must be selected from the drop-down menus. Remedy will only accept items from the menu when incident is saved.
• ‘Tier 1+’ field, e.g. Account and select the correct action requested.
• ‘Tier 2’ field to select correct category, if applicable, e.g. Activate.
• ‘Tier 3’ field to select correct category, if applicable.

Remedy Incident Management – User Training Guide York University
Page 22 of 63
4. The ‘Product Categorization’ is used to describe the product affected by the issue or request.
There are two methods to complete the ‘Product Categorization’ fields.
METHOD 1:
Under ‘Product Name+’ field type in a value, e.g. Microsoft and press ENTER.
• Select the correct product categorization and press ENTER.
METHOD 2:
Under ‘Product Categorization’ complete the tiers by using the drop-down menus.
• ‘Tier 1’ field to select the correct category, e.g. Service.
• ‘Tier 2’ field to select the correct category, if applicable, e.g. Blog.
• ‘Tier 3’ field to select the correct category, if applicable, e.g. Alternate Exams.
• ‘Product Name+’ field, if applicable, select appropriate item, e.g. Alternate Exams.
NO MANUAL INPUT - MUST SELECT FROM SYSTEM CHOICES
1
2

Remedy Incident Management – User Training Guide York University
Page 23 of 63
5. ‘Auto Assignment’ - To check the automated assignment before you submit your incident, click on
‘Functions’ and then ‘Auto Assign’.
Note: Remedy assigns the incident based on predefined mapping. Automated assignment to the appropriate support team is based on the customer organization, location, operational categorization and product categorization.

Remedy Incident Management – User Training Guide York University
Page 24 of 63
6. If a Required Resolution Date is required, this date can be entered on the ‘Resolution’ tab in the
‘Required Resolution Date+’ field.
7. Click on ‘Functions’ - click Auto Assign to see if incident will be assigned correctly 8. If incorrect, click on OK and then click on the ‘Assignment’ tab and use pull-down menus from
‘Support Company’, ‘Support Organization’ and ‘Assigned Group’ to select applicable values 9. Click on ‘Save’ 10. If correct, click on ‘OK’ and click on ‘Save’

Remedy Incident Management – User Training Guide York University
Page 25 of 63
How do I change the ‘Assigned Group*+’ field 1. Click on the ‘Assignment’ tab.
2. If an incident was incorrectly assigned, the ‘Incident Assignee’ field values can be modified. 3. Under ‘Incident Assignee’ select the ‘Support Organization*’ and ‘Assigned Group*+’ using the
drop-down menus. 4. Click on ‘Save’
Note: Your changes will be displayed in an italic font. Click on ‘Refresh’ button (top right-hand corner) to update your view.
Note: If the Auto-Assign feature (located in Functions | Auto Assign) does not contain correct support choices, use manual option in ‘Assignment’ tab

Remedy Incident Management – User Training Guide York University
Page 26 of 63
How to take an incident
1. On the Incident Console window 2. Select the incident you want to take from the incident list and click on ‘Quick Actions’ and select
‘Assign to Me’.
Note: Click on the ‘Refresh’ arrows icon (top right corner) to refresh the incidents list.
OR
1. On the Incident Console window 2. Double click on the incident you want to take. 3. Click on ‘Assignment’ tab. 4. Use the drop-down menu on the ‘Assignee+’ field to select your name and click on ‘Save’.
Note: If you do not see the incident in your list you may have to click on ‘View By’ and using the drop-down menu select the appropriate group of incidents.

Remedy Incident Management – User Training Guide York University
Page 27 of 63
3. How to assign an incident to my team member
Go to Incident Request window.
• Click on ‘Assignment’ tab.
• Use drop-down menu on ‘Assignee+’ field to select correct team member.
• Click on ‘Save’.

Remedy Incident Management – User Training Guide York University
Page 28 of 63
Time Management within a specific Incident Ticket
1. While viewing a ticket, click on the Assignment tab 2. Within the Assignment tab, under the Current Assignee Effort Time area, there is a button that
works like a stop watch: o Initially the button will be a Stopped button o Click on the Stopped button and it will change to a Started button - this means that the stop
watch has started and if 5 minutes pass and the Started button is clicked again, the Effort Time Spent Minutes field will populate with the number 5 (to indicate 5 minutes)
If the Stopped and Started button are clicked repeatedly e.g. if work is done, then stopped, then started and stopped over and over again, the total time is tracked in the Total Time Spent Minutes field
The Effort Time Spent Minutes field can also be edited by typing in a number or using the up/down arrows in the that field
3. Click the Update Assignment Log button and a pop-up will appear 4. In the pop-up, it will populate with the user information of the person that is logged into Remedy and
there will be a table with the various time tracking entries 5. The team (Assigned Group) and the person (Assignee) can be changed if necessary 6. Fill in the Effort Time Spent (Minutes) field and click the Add button and it will add to the table along
with the various time entries 7. Click the Close button to close the pop-up
Note: You can also use this option to add time for yourself if you spent time working on an incident.

Remedy Incident Management – User Training Guide York University
Page 29 of 63
Work Info Tab
Work Info is used to explain and document all the work you have done on an incident request. Note: Information in this tab will not show on the Requester Console.
1. In ‘Work Info Type’ field, from drop-down menu, select applicable value 2. ‘Date’ field – leave it blank and the system will auto fill 3. Use the drop-down menu beside the ‘Source’ field to indicate how this incident was created 4. In the ‘Summary’ field add informative comment that will be the ‘Subject’ line in the ‘Work Info
History’ list 5. In the ‘Notes’ field you may type in additional information 6. You may add an attachment to your ‘Work Info’. Click on ‘Add’ then ‘Browse’, select file and click on
‘OK’. 7. In the ‘Locked’ field the default setting is ‘No’. If you change the setting to ‘Yes’, you will not be able
to modify this ‘Work Info’. We recommend that you do not change this setting. 8. The ‘View Access’ field has two options ‘Internal’ and ‘Public’.
• ‘Internal’ – Only Remedy technical within York can see the entry.
• ‘Public’ – All Remedy users can see the entry. 9. This item will now display under ‘Work Info History’. 10. If there was prior ‘Work Info’ added it will be displayed in the ‘Work Info History’ list. 11. Click on ‘Save’.

Remedy Incident Management – User Training Guide York University
Page 30 of 63
4. Tasks Tab (Optional) A task is a unit of work that needs to be completed as a step in resolving an incident request’. If the resolution to an incident request involves multiple steps or actions, tasks can be used to separate the procedures or processes.
Note: ‘Summary*’ field must be typed in before you can use this tab successfully.
Remedy Incident Management – User Training Guide York University
Page 31 of 63
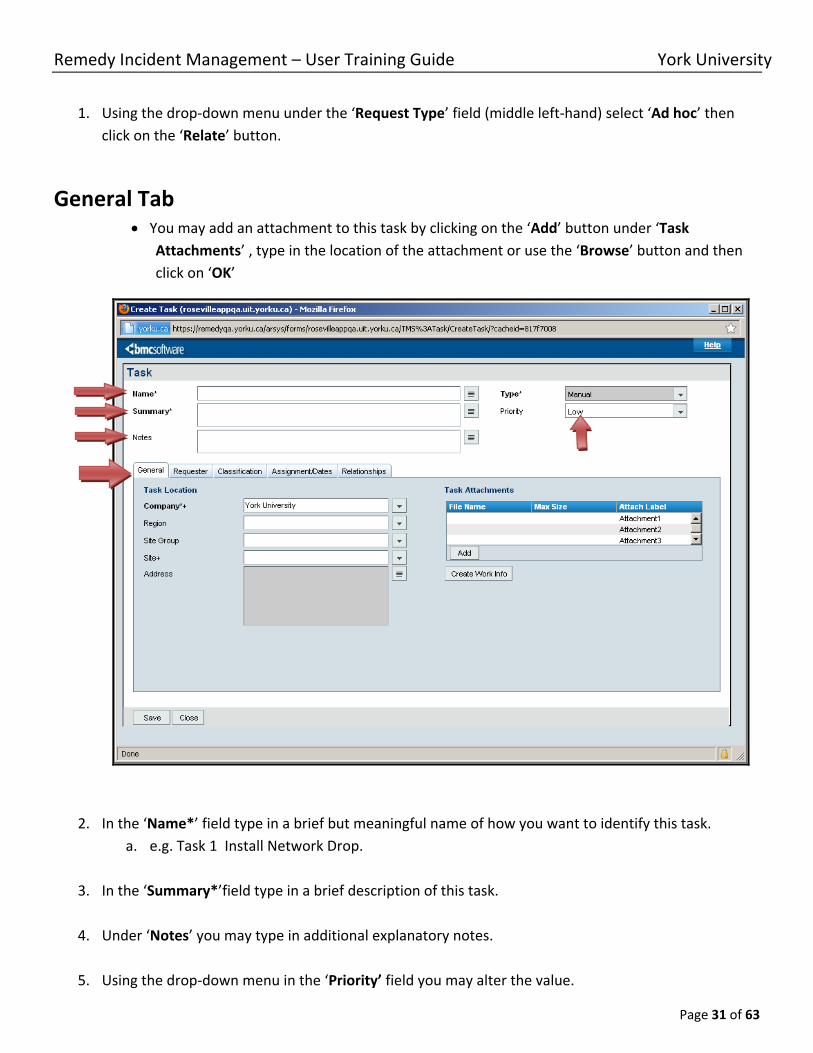
1. Using the drop-down menu under the ‘Request Type’ field (middle left-hand) select ‘Ad hoc’ then
click on the ‘Relate’ button.
General Tab • You may add an attachment to this task by clicking on the ‘Add’ button under ‘Task
Attachments’ , type in the location of the attachment or use the ‘Browse’ button and then click on ‘OK’
2. In the ‘Name*’ field type in a brief but meaningful name of how you want to identify this task. a. e.g. Task 1 Install Network Drop.
3. In the ‘Summary*’field type in a brief description of this task.
4. Under ‘Notes’ you may type in additional explanatory notes.
5. Using the drop-down menu in the ‘Priority’ field you may alter the value.
Remedy Incident Management – User Training Guide York University
Page 32 of 63
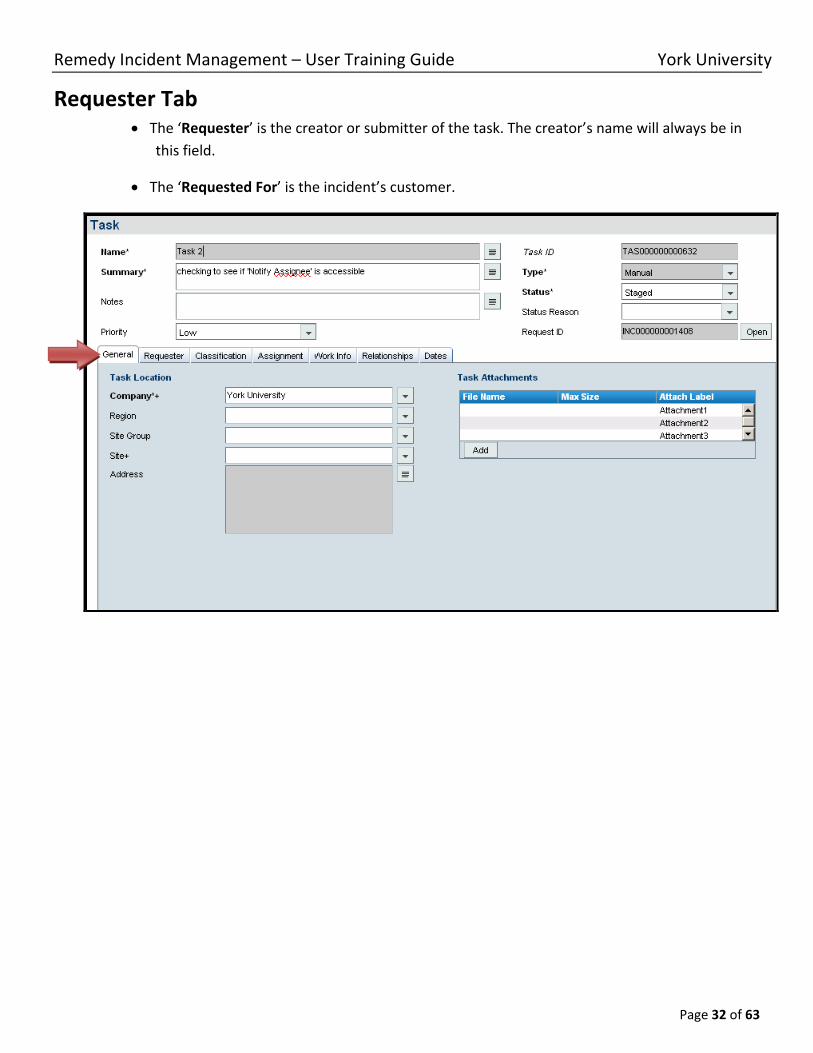
Requester Tab • The ‘Requester’ is the creator or submitter of the task. The creator’s name will always be in
this field.
• The ‘Requested For’ is the incident’s customer.

Remedy Incident Management – User Training Guide York University
Page 33 of 63
Classification Tab • Assign ‘Operational Categorization’ and ‘Product Categorization’ values to this task.

Remedy Incident Management – User Training Guide York University
Page 34 of 63
Assignment/Dates Tabs
Under ‘Task Assignment’
• ‘Assignee Company’ field - use the drop-down menu to select ‘York University’.
• ‘Assignee Organization’ field - use drop-down menu to select applicable department.
• ‘Assignee Group+’ field - use the drop-down menu to select applicable area.
• ‘Assignee+’ field – We recommend only select an assignee within your own group. If you are assigning a task to another group leave it blank.

Remedy Incident Management – User Training Guide York University
Page 35 of 63
Under ‘Date/Time’
• ‘Scheduled Start Date+’ field - use the calendar icon to select date and time you want this
task started.
• ‘Scheduled End Date+’ field - use the calendar icon to select date and time when task is to be completed.
• ‘Actual Start Date+’ field – The task assignee would enter this information. When the assignee starts the task he would enter the actual start date/time using the calendar icon.
• ‘Actual End Date+’ field - The task assignee would enter this information. When the assignee completes the task he would enter the actual end date/time using the calendar icon.
• Use the calendar icon to select date and time when task is to be completed.

Remedy Incident Management – User Training Guide York University
Page 36 of 63
Relationships Tab
• Click on ‘Save’ to add your task. Note: A TASxxxxxxxxxxxx number will be created for each task. Note: The Task ‘Status*’ will be ‘Staged’. Note: You must change the ‘Status’ of the Incident from ‘Assigned’ to ‘In Progress’ for system to automatically assign the tasks and send out e-mail notifications to Assignees or Assigned Group. Note: When the Task becomes active, all members of the Assigned group, if no Assignee will receive an email notification.
Remedy Incident Management – User Training Guide York University
Page 37 of 63
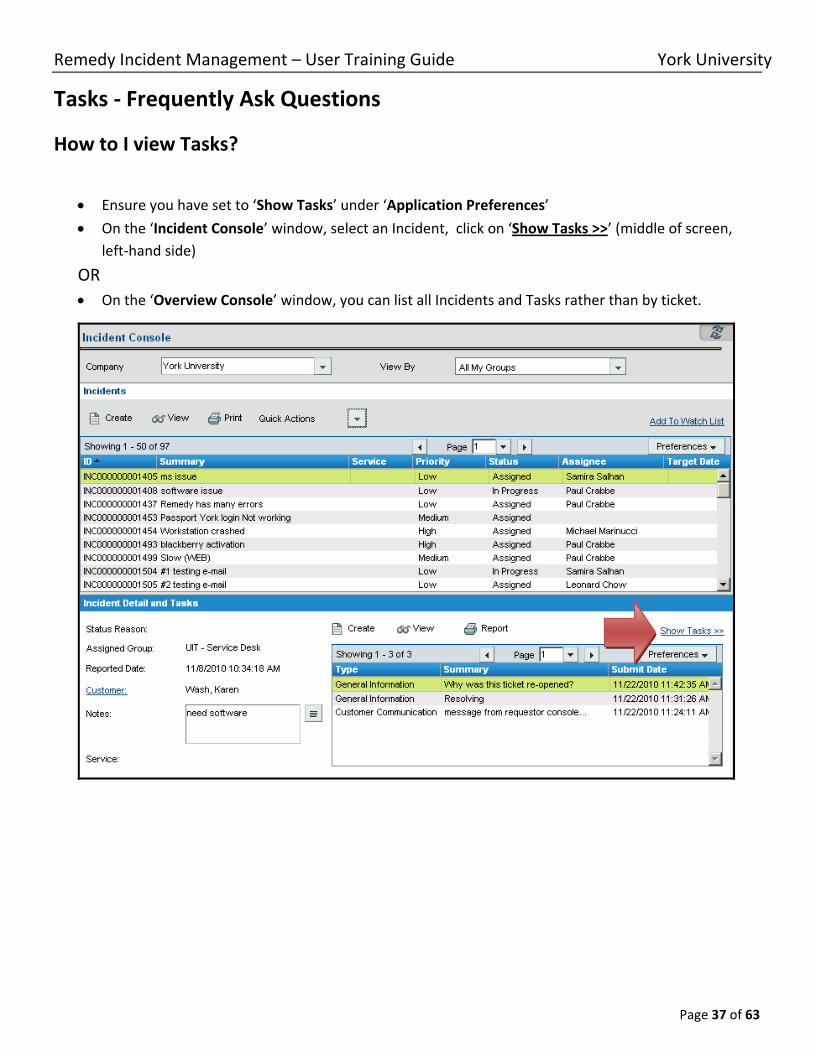
Tasks - Frequently Ask Questions
How to I view Tasks?
• Ensure you have set to ‘Show Tasks’ under ‘Application Preferences’
• On the ‘Incident Console’ window, select an Incident, click on ‘Show Tasks >>’ (middle of screen, left-hand side)
OR • On the ‘Overview Console’ window, you can list all Incidents and Tasks rather than by ticket.

Remedy Incident Management – User Training Guide York University
Page 38 of 63
Time Management within a Task
How to start recording time on a task Note: Once you have received an e-mail stating that you have been assigned a task you can click on the link contained in the e-mail.
To track time spent on doing work for a task:
On the Incident Console window
1. Double click on an incident. 2. Make sure incident ‘Status*’ is ‘In Progress’. 3. Click on the ‘Task’ tab, select and double click on a task.
• Click on ‘Assignment’ tab.
• Using the ‘Start/Stop Clock’ column click on ‘Start Clock’ button.
• Click on ‘Save’.

Remedy Incident Management – User Training Guide York University
Page 39 of 63
When you have finished the Task
1. Click on ‘Assignment’ tab 2. Click on ‘Stop Clock’ 3. Click on ‘Save’ 4. Next click on the ‘Dates’ tab and update ‘Actual End Date+’ and change date and time fields – Click
‘OK’ 5. Click ‘Save’

Remedy Incident Management – User Training Guide York University
Page 40 of 63
How to cancel a task
1. On the ‘Incident Console’ window double click on the incident that contains the task you want to cancel
2. Click on ‘Tasks’ tab 3. Select the task you want to cancel 4. Click ‘Cancel’
Note: The status of the task is automatically set to ‘Closed’. 5. Click on ‘Save’

Remedy Incident Management – User Training Guide York University
Page 41 of 63
5. Notifying clients (Optional):
How do I send an e-mail within an incident? 1. Open an existing Incident Request.
• The Incident Request can be selected by doing an Incident search or from the Incident Management Console (click Home) incidents list or the Overview Console (Click Consoles and Overview) request list.
2. Expand the menu section ‘Functions’ (located on the left panel)
• Click ‘Email System’.

Remedy Incident Management – User Training Guide York University
Page 42 of 63
3. Ensure the following fields contain the correct information:
• Internet E-Mail* – This field will be automatically populated with the customer’s email address
• Email Subject Line* – This field will be automatically populated with the Incident ID number when
Important Note: DO NOT alter the beginning of the ‘Email Subject Line*’ e.g. INC000000251493. You can add onto the subject line after the ID. If the Incident ID is removed customer
Note: To e-mail someone other than the customer, use the ‘People Search Criteria’ fields to search and select from results list.
Note: For multiple e-mail addresses use a semicolon between addresses or click on the text box button and enter addresses separated by a carriage return/ENTER.
• ‘Email Message Body*’ field – Type your correspondence to the customer. o ‘Status’, ‘Summary’, ‘Details’ or ‘Resolution’ buttons – Click these buttons to add current
field values to the ‘Email Message Body*’ field.
3
4
3
5

Remedy Incident Management – User Training Guide York University
Page 43 of 63
4. Email Attachments (OPTIONAL) o Click on ‘Add’, ‘Browse’ and from your folder list, drill down to find and select file.
5. Click on ‘Send Email Now’ 6. An ‘Email has been sent’ confirmation window appears, click OK to close window.
Note: When an E-mail is sent while viewing an Incident, the e-mail is listed under the Incident’s
‘Work Info’ tab in the ‘Work Info History’ list.

Remedy Incident Management – User Training Guide York University
Page 44 of 63
Sending a reminder to an individual 1. On the ‘Incident Console’ window select the incident you want an individual to receive 2. Click on ‘Functions’ (left-hand panel) and then click on ‘Reminders’

Remedy Incident Management – User Training Guide York University
Page 45 of 63
3. Click on ‘Create Reminder’ tab
4. ‘Notify*’ - using drop-down memo to select ‘Individual’ or your entire assigned ‘Group’ of people you belong to
5. ‘Recipient*+’ - type in full name as listed in the Service Desk (SD) database (not e-mail address) 6. In the ‘Subject’ line you may type in a title 7. Using the ‘Message*’ field type in your message 8. Click on ‘Save’.

Remedy Incident Management – User Training Guide York University
Page 46 of 63
6. How to Resolve an Incident
Resolution Tab
1. In the ‘Status*’ field use the drop-down menu to select ‘Resolved’.
• You do not close an incident.
• After 10 business days the system will automatically close incidents with a ‘Resolved’ status.
• Closed incidents cannot be re-opened nor any data entered into the incident.
• If necessary, a new incident is created. 2. In the ‘Status Reason’ field use the drop-down menu to select the applicable reason. 3. Click on the ‘Resolution Detail’ tab. 4. ‘Resolution’ field: Type details of how the incident was resolved. 5. ‘Resolution Method’ field: Use the drop-down menu to select how the incident was resolved. 6. ‘Cause’ field: Use the drop-down menu to select what caused the incident. 7. ‘Closure Source’ field: Not used at this time. 8. ‘Satisfaction Rating’ field: Not used at this time. 9. ‘Required Resolution Date+’ field: May have been entered during creation. Not used at resolution
time. 10. ‘Target Date’ field: Not used at this time.
Note: Do not use the ‘Resolution Categorization’ field.

Remedy Incident Management – User Training Guide York University
Page 47 of 63
11. ‘Resolution Product Categorization’ field: Use the drop-down menu to select Tier 1/2/3 under ‘Resolution Product Categorization’.
12. Click on ‘Save’
Date/System Tab • ‘Reported Date’ / ‘Responded Date+’ / ‘Submitter*’ / ‘Last Modified By’ / ‘Submit Date’ / ‘Last
Modified Date’ fields are automatically filled in when you ‘Save’ an incident.
• All other fields will be filled in by using tabs.

Remedy Incident Management – User Training Guide York University
Page 48 of 63
7. Search Remedy Incidents Methods
How to Look at Your Incidents On Incident Console window
• Click on ‘View By’ and using the drop-down menu select ‘Personal’.
How to Look at Your Group’s Incidents On Incident Console window
• Click on ‘View By’ and using the drop-down menu select ‘All My Groups’
If You have Multiple Queues in Your Area On Incident Console window
• Click on ‘View By’ and using the drop-down menu select ‘Selected Groups’
• you can select which queues you want to see by putting a checkmark beside the ‘Yes’ box or uncheck
mark this box
• Click on ‘OK’

Remedy Incident Management – User Training Guide York University
Page 49 of 63
How to Search for Incidents
1. On the incident Console window click on ‘Functions’ (bottom left-hand panel) then click on ‘Search
Incident’ 2. In any of the bolded fields, type your search terms, or select an option from the drop-down menus. 3. Click on ‘Search’ (bottom of screen).

Remedy Incident Management – User Training Guide York University
Page 50 of 63
Searching for an incident using the Incident ID
1. On the Incident Console window click on ‘Functions’ (bottom left-hand panel) and then click on
‘Search Incident’. 2. In ‘Incident ID*+’ field type in only the last numbers of incident and not the zeros.
a. e.g. 613 for INC000000000613 3. Click on ‘Search’ (bottom of screen) or press Enter key.

Remedy Incident Management – User Training Guide York University
Page 51 of 63
Searching for a Group Incidents
1. On the incident Console window click on ‘Functions’ (bottom left-hand panel) then click on ‘Search Incident’.
2. Click on the ‘Assignment’ tab and complete the ‘Support Company*’, ‘Support Organization*’ and the ‘Assignee Group*+’ fields using the drop-down menu buttons.
3. Click on ‘Search’ (bottom of screen)

Remedy Incident Management – User Training Guide York University
Page 52 of 63
How do I create my own ‘Searches’ by the ‘Status’ of incident?
1. On the Incident Console window click on ‘Defined Searches’ (left-hand panel) 2. Click on ‘Manage My Searches’
3. Click on ‘New’ 4. ‘Type’ – will always be ‘Incident’ 5. In the ‘Search Name’ field type in a descriptive name 6. Click on ‘Build Search Qualification’ button 7. Type in the ‘Qualification’ box ‘Status’ = “Resolved” 8. Click on ‘Select’ 9. Click on ‘Close’

Remedy Incident Management – User Training Guide York University
Page 53 of 63
Note: by clicking on ‘My Searches’ (left-hand panel) and then on the Search Name, you can now use your newly created search tool.
Remedy Incident Management – User Training Guide York University
Page 54 of 63
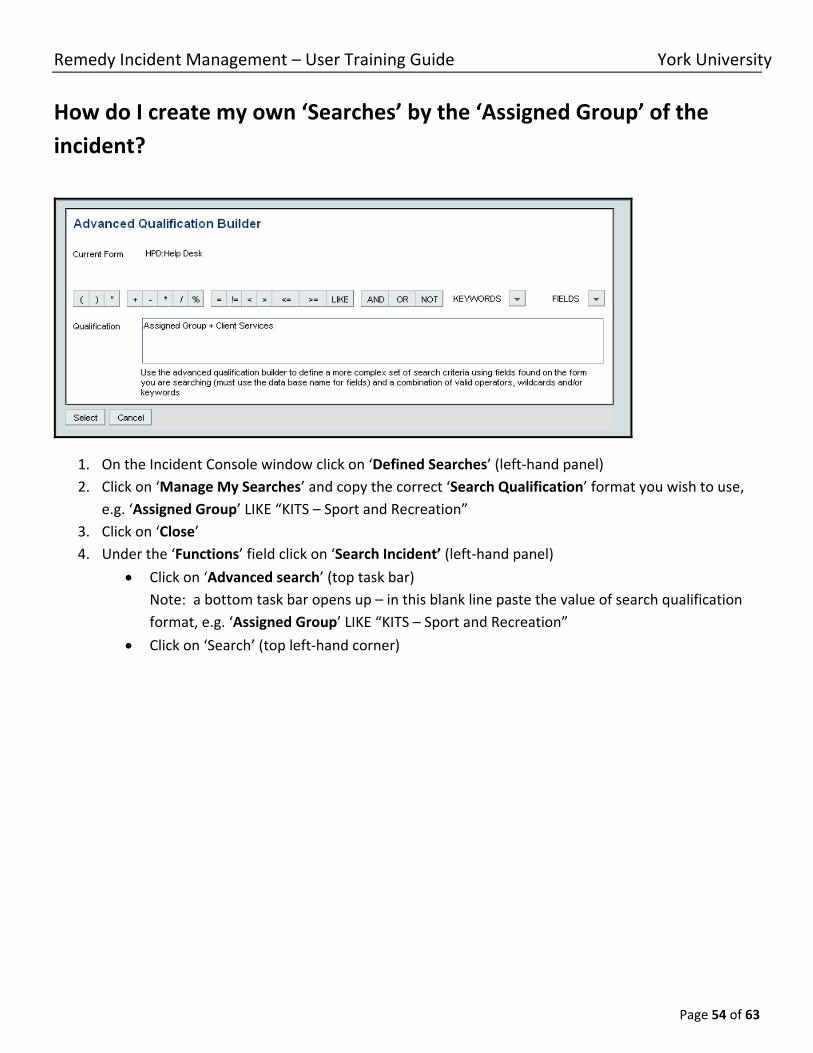
How do I create my own ‘Searches’ by the ‘Assigned Group’ of the incident?
1. On the Incident Console window click on ‘Defined Searches’ (left-hand panel) 2. Click on ‘Manage My Searches’ and copy the correct ‘Search Qualification’ format you wish to use,
e.g. ‘Assigned Group’ LIKE “KITS – Sport and Recreation” 3. Click on ‘Close’ 4. Under the ‘Functions’ field click on ‘Search Incident’ (left-hand panel)
• Click on ‘Advanced search’ (top task bar) Note: a bottom task bar opens up – in this blank line paste the value of search qualification format, e.g. ‘Assigned Group’ LIKE “KITS – Sport and Recreation”
• Click on ‘Search’ (top left-hand corner)

Remedy Incident Management – User Training Guide York University
Page 55 of 63
8. How to logout
• Click on top left or right-hand corner ‘Logout’
Remedy Incident Management – User Training Guide York University
Page 56 of 63
Frequently Ask Questions (FAQs)
How do I fill in a survey Note: Can be used only if you are the customer.
1. Click on ‘Consoles’ (bottom left-hand corner) 2. Click on ‘IT Home page’ 3. Click on ‘Requester Console’ 4. Select incident you would like to complete a survey on. 5. Click on ‘Functions’ (left-hand panel) then click on ‘View Survey’ 6. Click on ‘Respond’ 7. Type in ‘Comment’ fields if applicable and chose ‘Rating (1-10)’ filed if applicable
Note: No minus values are allowed. 8. Click ‘Save’ Note: Email sent to [email protected] (goes into Remedy)
Requester Console How do students, faculty and staff of the University submit and view Incidents
1. Links to access the ‘Requester Console’. (Links not yet active)
• http://itservicedesk.yorku.ca
2. Links will be on our Web site to look at and submit requests through the ‘Requester Console’
3. Self-serve

Remedy Incident Management – User Training Guide York University
Page 57 of 63
Glossary
Field Description
Incident Service Type
Company*+ This field shows the name of the company selected on the customer tab. This can be set to another company if it is also affected by the incident.
Service Type* Use this field to select the service type. Note: Automated Alert is new. Options include:
The available options are:
• User Incident • User Service Request • Infrastructure Incident • Automated Alert
Note: the default value is User Incident
Reporting Information
Reported Source This field is empty by default, and although it is not enforced, it is a best practice to adjust it as necessary. It may be a required field in future.
Use this field to select the source of the incident record. Options include:
• Direct input • Email • External Escalation • Fax • Systems Management • Phone • Voice Mail • Walk In • Web • Etc…..
Reported Date+ This field is used to specify the date and time at which the incident record was reported. If this field is left empty, it is automatically set to the date and time the ticket is saved for the first time. It is considered mandatory to verify this data when the ticket is being created; this field is crucial for reporting purposes.
Operational Categorization (used to describe the issue)
Tier 1+ This field is used to select the first tier of the operational categorization that is most relevant for the incident. This field could already be filled out because if the Product Category was selected first then it pre-fills this field. This field will

Remedy Incident Management – User Training Guide York University
Page 58 of 63
Field Description
auto fill if partially completed and the [Enter] key is pressed.
Tier 2 This field is used to select the second tier of the operational categorization that is most relevant for the incident record.
Tier 3 This field is used to select the third tier of the operational categorization that is most relevant for the incident.
Product Categorization (used to describe the product affected by the issue)
Tier 1 This field is used to select the first tier of the product categorization that is most relevant for the incident record. This field could already be filled out because if the Operational Category was selected first then it pre-fills this field. This field will auto fill if partially completed and the [Enter] key is pressed.
The selections include:
• Service • Security • Network • Hardware • Software
Tier 2 This field is used to select the second tier of the resolution product categorization that is most relevant for the incident record.
Tier 3+ Use this field to select the third tier of the resolution product categorization that is most relevant for the incident record.
Product Name+ Full Product Name
Model/Version
Manufacturer
Vendor ID This field is made visible when Tier 2 of Product Categorization is selected
Vendor Company This field is made visible when Tier 2 of Product Categorization is selected

Remedy Incident Management – User Training Guide York University
Page 59 of 63
Field Description
Incident ID*+ Previously known as Incident Number.
This field displays a unique identifier after the new incident record has been saved.
Summary* Also known as Description.
Use this field to provide a concise summary that describes the incident.
Notes Also known as Detailed Description.
Use this field to provide additional relevant information.
Escalated? This field is used to indicate whether an incident has been sent up a level for further work.
Status* Use this field to select the status of the incident. For more information on status and lifecycle, see Module 5: Managing Incidents.
Status selections include:
• New • Assigned • In Progress • Pending • Resolved • Closed • Cancelled
Impact* Use this field to select the impact that the incident has on the user. The field defaults to 4-Minor/Localized.
The available options are:
• 1-Extensive/Widespread • 2-Significant/Large • 3-Moderate/Limited • 4-Minor/Localized
Urgency* Use this field to provide an indication of how urgently the user needs to have a resolution. The field defaults to 4-Low.
The available options are:
• 1-Critical • 2-High • 3-Medium • 4-Low

Remedy Incident Management – User Training Guide York University
Page 60 of 63
Field Description
Status Reason Use this field to select the reason behind the status.
Only use this field if the Status* field is set to "Pending", "Resolved" and “Closed”.
The available options for the status "Pending" are:
• Buyer Action Required • Client Action Required • Third Party Vendor Action Reqd
The available options for the status "Resolved" are:
• Automated Resolution Reported • Customer Follow-Up Required • Temporary Corrective Action • Enhancement Request • Monitoring Incident • No Further Action Required
The available options for status “Closed: are:
• Infrastructure Change Created • Automated Resolution Reported • Spam
Priority This field is automatically set to the appropriate option based on the combination of the Impact and Urgency field values.
The available options are:
• Critical • High • Medium • Low

Remedy Incident Management – User Training Guide York University
Page 61 of 63
The following table describes at a high level what each selection is used for:
Field Description
New Incident Opens the Incident form in New mode
Search Incident Opens the Incident form in Search mode
My Profile Allows you to view or modify your profile
Application Preferences Allows you to set your application preferences and options
Reminders Opens the Reminders dialog box
Reports Opens the Report Console
Flashboard Opens Incident Management Flashboard
Process Overview Opens the Process Overview window
Field Description
Add Work Info
Work Info Type This field is used to select the type of information that is to be added as Work Info. The available options are:
• Customer Communication • Customer Follow-Up • Customer Status Update • Closure Follow-Up • Detail Clarification • General Information • Resolution communications • Satisfaction Survey • Status Update • Incident Task/Action • Problem Script • Working Log • Email System • Paging System
Note: the default setting is Working Log

Remedy Incident Management – User Training Guide York University
Page 62 of 63
Field Description
Date This used to be featured on the Work Log tab.
This field is used to specify the date and time the work was performed.
Source This field is used to select the source of the information. The available options are:
• Email • Fax • Phone • Voice Mail • Walk In • Web
Summary This field is used to provide a brief summary of the work performed.
Notes This field is used to provide a detailed description of the actions performed. The information entered in this field is stored as a separate entry when the incident is saved. The saved entries can be found in the Work Info History table.
Attachments Use this table to attach any documents that are relevant to the work performed (up to three at a time)
Locked This field is used to indicate whether this entry in the Work Info History table can be modified. According to the intended process, this checkbox should be set to “Yes”. The available options are:
• Yes • No
View Access This field is used to indicate whether this entry in the Work Info History table can be viewed by the public. The available options are:
• Internal • Public
Work Info History
Work Info table Previously known as Work Log Action.
This table shows the work entries for the incident.