Important Information -...
25
Before attempting to connect or operate this product, please read these instructions carefully and save this manual for future use. The model number is abbreviated in some descriptions in this manual. Important Information Network Disk Recorder Model No. WJ-NX300K WJ-NX300K/G Network Disk Recorder WJ-NX300
Transcript of Important Information -...

Before attempting to connect or operate this product, please read these instructions carefully and save this manual for future use.
The model number is abbreviated in some descriptions in this manual.
Important Information Network Disk Recorder
Model No. WJ-NX300KWJ-NX300K/G
Network Disk Recorder WJ-NX300

2
The lightning flash with arrowhead symbol, within an equilateral triangle, is intended to alert the user to the presence of uninsulat-ed "dangerous voltage" within the prod-uct's enclosure that may be of sufficient magnitude to constitute a risk of electric shock to persons.
CAUTION: TO REDUCE THE RISK OF ELECTRIC SHOCK,
DO NOT REMOVE COVER (OR BACK).
NO USER-SERVICEABLE PARTS INSIDE.
REFER SERVICING TO QUALIFIED SERVICE PERSONNEL.
CAUTIONRISK OF ELECTRIC SHOCK
DO NOT OPEN
CAUTION:Before attempting to connect or operate this product, please read the label on the bottom.
The exclamation point within an equilateral triangle is intended to alert the user to the presence of important operating and maintenance (servicing) instructions in the literature accompanying the appliance.
Power disconnection. Unit with or without ON-OFF switches have power supplied to the unit whenever the power cord is inserted into the power source; however, the unit is opera-tional only when the ON-OFF switch is in the ON position. Unplug the power cord to disconnect the main power for all units.
WARNING:• This apparatus must be earthed.• Apparatus shall be connected to a main socket outlet with a
protective earthing connection.• The mains plug or an appliance coupler shall remain readily
operable.• To prevent fire or electric shock hazard, do not expose this
apparatus to rain or moisture.• The apparatus should not be exposed to dripping or splash-
ing and that no objects filled with liquids, such as vases, should be placed on the apparatus.
• All work related to the installation of this product should be made by qualified service personnel or system installers.
• For PERMANENTLY CONNECTED APPARATUS provided nei-ther with an all-pole MAINS SWITCH nor an all-all pole circuit breaker, the installation shall be carried out in accordance with all applicable installation rules.
• The connections should comply with local electrical code.
Safety Information
In English: “The equipment must be connected to an earthed mains socket-outlet”.In Danish: “Apparatets stikprop skal tilsluttes en stikkontakt med jord, som giver forbindelse til stikproppens jord”.In Finnish: “Laite on liitettävä suojakoskettimilla varustettuun pistorasiaan”.In Norwegian: “Apparatet må tilkoples jordet stikkontakt”.In Swedish: “Apparaten skall anslutas till jordat uttag”.
For Denmark, Finland, Norway, Sweden
: Alternating current symbol
: Frame or chassis symbol
CAN ICES-3(A)/NMB-3(A)
For Canada
The model number and serial number of this product may be found on the surface of the unit.You should note the model number and serial number of this unit in the space provided and retain this book as a permanent record of your purchase to aid identification in the event of theft.
Model No.
Serial No.
For U.S.A.
NOTE: This equipment has been tested and found to com-ply with the limits for a Class A digital device, pursuant to Part 15 of the FCC Rules. These limits are designed to provide reasonable protection against harmful interference when the equipment is operated in a commercial environ-ment. This equipment generates, uses, and can radiate radio frequency energy and, if not installed and used in accordance with the instruction manual, may cause harm-ful interference to radio communications.Operation of this equipment in a residential area is likely to cause harmful interference in which case the user will be required to correct the interference at his own expense.
FCC Caution: To assure continued compliance, (example - use only shielded interface cables when connecting to computer or peripheral devices). Any changes or modifi-cations not expressly approved by the party responsible for compliance could void the user's authority to operate this equipment.
For U.S.A.
UL listed model No.:WJ-NX300K
For U.S. and Canada:WJ-NX300KFor Europe and other countries:WJ-NX300K/G
3
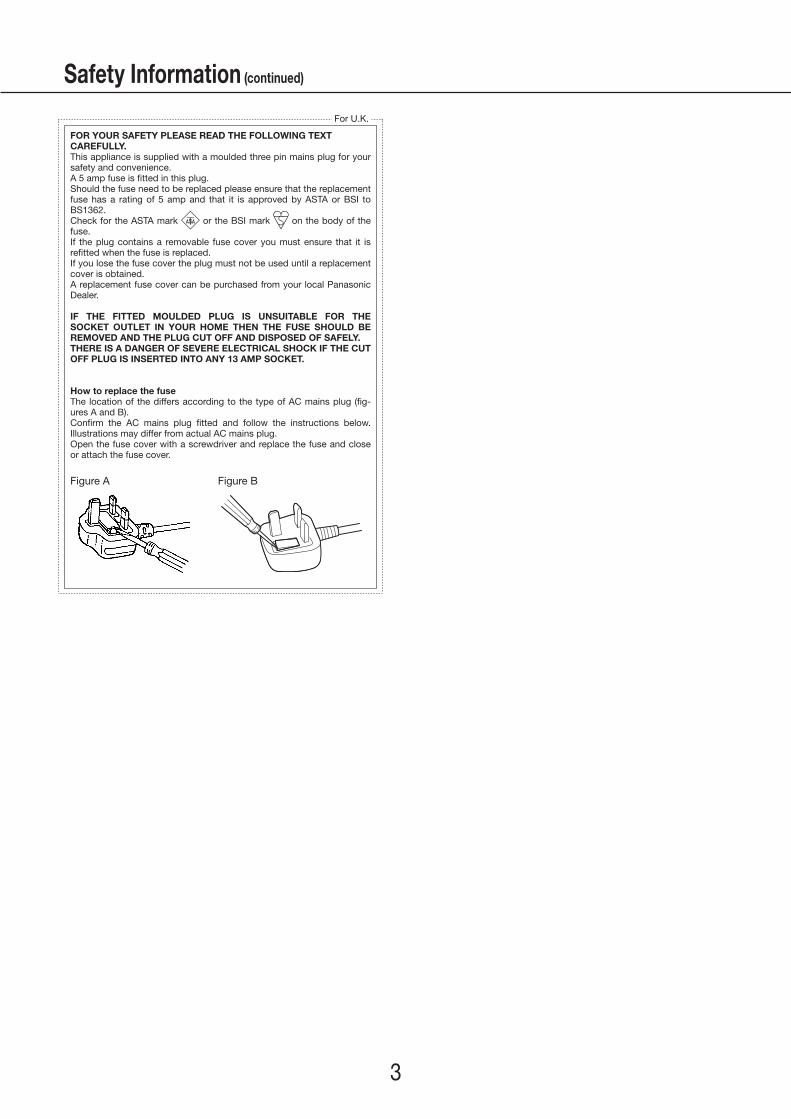
FOR YOUR SAFETY PLEASE READ THE FOLLOWING TEXT CAREFULLY.This appliance is supplied with a moulded three pin mains plug for your safety and convenience.A 5 amp fuse is fitted in this plug.Should the fuse need to be replaced please ensure that the replacement fuse has a rating of 5 amp and that it is approved by ASTA or BSI to BS1362.Check for the ASTA mark or the BSI mark on the body of the fuse.If the plug contains a removable fuse cover you must ensure that it is refitted when the fuse is replaced.If you lose the fuse cover the plug must not be used until a replacement cover is obtained.A replacement fuse cover can be purchased from your local Panasonic Dealer.
IF THE FITTED MOULDED PLUG IS UNSUITABLE FOR THE SOCKET OUTLET IN YOUR HOME THEN THE FUSE SHOULD BE REMOVED AND THE PLUG CUT OFF AND DISPOSED OF SAFELY.THERE IS A DANGER OF SEVERE ELECTRICAL SHOCK IF THE CUT OFF PLUG IS INSERTED INTO ANY 13 AMP SOCKET.
How to replace the fuseThe location of the differs according to the type of AC mains plug (fig-ures A and B).Confirm the AC mains plug fitted and follow the instructions below. Illustrations may differ from actual AC mains plug.Open the fuse cover with a screwdriver and replace the fuse and close or attach the fuse cover.
Figure A Figure B
For U.K.
Safety Information (continued)

4
Important safety instructions
1) Read these instructions.
2) Keep these instructions.
3) Heed all warnings.
4) Follow all instructions.
5) Do not use this apparatus near water.
6) Clean only with dry cloth.
7) Do not block any ventilation holes. Install in accordance with the manufacturer’s instructions.
8) Do not install near any heat sources such as radiators, heat registers, stoves, or other apparatus (including amplifiers) that produce heat.
9) Do not defeat the safety purpose of the polarized or grounding-type plug. A polarized plug has two blades with one wider than the other. A grounding type plug has two blades and a third grounding prong. The wide blade or the third prong are provided for your safety. If the provided plug does not fit into your outlet, consult an electrician for replacement of the obso-lete outlet.
10) Protect the power cord from being walked on or pinched particularly at plugs, convenience receptacles, and the point where they exit from the apparatus.
11) Only use attachments/accessories specified by the manufacturer.
12) Use only with the cart, stand, tripod, bracket, or table specified by the manufacturer, or sold with the apparatus. When a cart is used, use caution when moving the cart/apparatus combination to avoid injury from tip-over.
13) Unplug this apparatus during lightning storms or when unused for long periods of time.
14) Refer all servicing to qualified service personnel. Servicing is required when the apparatus has been damaged in any way, such as power-supply cord or plug is damaged, liquid has been spilled or objects have fallen into the apparatus, the appara-tus has been exposed to rain or moisture, does not operate normally, or has been dropped.
S3125A
Safety Information (continued)

5
ContentsSafety Information ................................................................................................................... 2
Important safety instructions ....................................................................................................................................................4
Introduction .............................................................................................................................. 6Preface ......................................................................................................................................................................................6Features ....................................................................................................................................................................................6Standard accessories ...............................................................................................................................................................8About the user manuals ............................................................................................................................................................8System requirements for a PC ..................................................................................................................................................9Trademarks and registered trademarks ....................................................................................................................................9GPL/LGPL ...............................................................................................................................................................................10Copyright ................................................................................................................................................................................10Disclaimer of warranty ............................................................................................................................................................10Network security .....................................................................................................................................................................11Limitation of liability ................................................................................................................................................................11About Additional Camera Kit (option) .....................................................................................................................................11About Secure Communication Kit (option)..............................................................................................................................11About the business intelligence function (option) ...................................................................................................................12About the RAID function (option) ............................................................................................................................................12
Precautions ............................................................................................................................ 13Major operating controls and their functions ..................................................................... 16
Front view ................................................................................................................................................................................16Inside the front cover ..............................................................................................................................................................17Rear view ................................................................................................................................................................................18
User/Host management ........................................................................................................ 20When operating from a PC via a network ...............................................................................................................................20
Troubleshooting ..................................................................................................................... 21Specifications ........................................................................................................................ 23

6
Preface
Features
The network disk recorders WJ-NX300K and WJ-NX300K/G (hereinafter, recorders) equipped H.265 CODEC and are designed for use within a H.265 surveillance system, and record images/audio from up to 32 network cameras (hereinafter, cameras) on the hard disk drives (HDDs). Number of cameras to be used in the system (16 cameras in basic system) can be increased to 32 (maximum) by purchasing the Additional Camera Kit (WJ-NXE30, WJ-NXE30W).
The additional RAID kit (option) enables operation of Mirroring (RAID 1, hereinafter RAID 1)/RAID 5/RAID 6 with one recorder.This recorder can connect the extension unit WJ-HXE400 (option) up to two and support up to 22 HDDs.
This recorder supports connection with a monitor equipped with the HDMI (High-Definition Multimedia Interface) connector.Connection using an HDMI cable (optional) offers display of playback/live images with superior quality.It is possible to display images from multiple cameras, switch those images and perform basic operation of the camera.
High-definition image monitoring is availableImages from up to 32 cameras with the image capture size of 4K (3840 × 2160) can be saved as video data.This recorder also supports the HDMI output to 2 monitors that can display recorded images and live images from the cameras in high definition.
Quick setup and operationsBy connecting the mouse (accessory) to this recorder, quick operations are available while viewing a monitor.By using "Easy Start" which realizes quick setup, the cameras are automatically recognized and settings can be configured without operations from a PC*1.Recorded images can easily be searched using calender or time line.*1 A PC will be necessary for some of the camera settings and to use the user manual and to view the setting version.
RAID functionThe additional RAID kit (option) enables operation of RAID 1/RAID 5/RAID 6 with one recorder.
Connection of extension unitsThis recorder can connect the extension unit WJ-HXE400 (option) up to two units.
The copy port equippedYou can copy the images recorded on the camera with an external hard disk drive and USB memory in less than half the time of the previous model*2.The copied images can be played, printed or saved using the dedicated viewer software.*2 Comparison with WJ-NV300 series
Introduction

7
Introduction (continued)
System ConfigurationMain monitor (HDMI)
Powered speaker
Sub monitor (HDMI) Sub monitor (BNC)
The sub monitor only displays live images.
Network camera (× 32 max.)
Network
PC

8
About the user manuals
There are 4 manuals provided for the WJ-NX300K, WJ-NX300K/G as follows.
Installation Guide (Printed): Contains procedures how to install/connect this product, and descriptions of easy configurations.
Important Information (this document): Contains preface, precautions, and major operating controls and their functions and specifications.
Operating Instructions (PDF): Contains descriptions of how to operate this product with a PC. Refer to the Panasonic support website (https://security.panasonic.com/download/).
Quick Reference Guide: Contains descriptions of how to operate functions frequently used.
Adobe® Reader® is required to read the PDF files on the provided CD-ROM. When Adobe® Reader® is not installed on the PC, download the latest Adobe® Reader® from the Adobe web site and install it.
"NX300" shown in the instructions and illustrations used in these operating instructions indicate the WJ-NX300K, WJ-NX300K/G. Refer to "readme.txt" on the provided CD-ROM for further information about the dedicated software (option) that receives and displays the event and error information, compatible cameras and their versions. Refer to the Panasonic support website (https://security.panasonic.com/support) for latest information about the compatible cameras and functions to be added or changed by firmware upgrade.The external appearance in the document may differ from the actual product within no influence range on operation due to improvement of the product.
Introduction (continued)
Standard accessories
CD-ROM*1 .................................................................................................1 pc.Mouse ........................................................................................................1 pc.Installation Guide ........................................................................................1 pc.Quick Reference Guide ...............................................................................1 pc.Warranty (provided with WJ-NX300K) .........................................................1 pc.Activation Key Card ....................................................................................1 pc.Label*3 .......................................................................................................1 pc.Terminal Plug (10 pin) .................................................................................1 pc.Terminal Plug (11 pin) .................................................................................1 pc.Cable Clamp (for fixing the terminal block cables) .......................................1 pc.Power cord clamp ......................................................................................1 pc.Dust caps for the front USBs*2 ...................................................................2 pcs.Power cord (WJ-NX300K) ..........................................................................1 pc.Power cord (WJ-NX300K/G) .......................................................................2 pcs.HDD fixing screw ........................................................................................16 pcs.
*1 The CD-ROM contains the operating instructions (PDFs). Make sure to read them when installing or setting the recorder.*2 Put the dust caps for the front USBs on the front copy port and mouse connection port to prevent dust brought by fan's
intake while you are not using a mouse or an external storage device.*3 This label is the same one found on the surface of this product. Keep it in view when installing this product in the rack.

9
Trademarks and registered trademarks
• Adobe, Acrobat Reader and Reader are either registered trademarks or trademarks of Adobe Systems Incorporated in the United States and/or other countries.
• Microsoft, Windows, Internet Explorer, ActiveX, and DirectX are either registered trademarks or trademarks of Microsoft Corporation in the United States and/or other countries.
• Microsoft product screen shot(s) reprinted with permission from Microsoft Corporation.• Intel and Intel Core are trademarks or registered trademarks of Intel Corporation in the United States and other countries.• HDMI, the HDMI logo and High-Definition Multimedia Interface are trademarks or registered trademarks of HDMI Licensing
LLC in the United States and other countries.• All other trademarks identified herein are the property of their respective owners.
Introduction (continued)
System requirements for a PC
It is recommended to operate this unit using a PC that meets the following system requirements.OS: Microsoft® Windows® 7*1, Microsoft® Windows® 8.1, Microsoft® Windows® 10Web browser: Windows® Internet Explorer® 11 (32-bit)CPU: Intel® CoreTM i7-860Memory: 4 GB or moreMonitor: 1024 × 768 pixels or more, 24-bit True color or betterNetwork interface: 10BASE-T/100BASE-TX/1000BASE-T 1 portAudio: Sound card (When using the audio function)Others: CD-ROM drive: It is necessary to refer to the operating instructions on the provided
CD-ROM. DirectX® 9.0c or later Adobe® Reader® : CD-ROM drive: It is necessary to refer to the operating instruc-
tions on the provided CD-ROM.*1 Windows® XP compatibility mode is unavailable.
Important:• Refer to the Panasonic support website (https://security.panasonic.com/support) for information about the latest operation
verification of the supported operating systems and web browsers.• If using a PC that does not meet the above system requirements, it may cause problems such as slow imaging or the
browser becomes inoperable. Microsoft® Windows® RT, Microsoft® Windows® 7 Starter and Microsoft Edge are not supported.
• When using Microsoft® Windows® 8.1, use it in the desktop. The software cannot be used in the Modern UI design.
Note:• Refer to "Notes about versions of Windows®/Internet Explorer®" (PDF) on the provided CD-ROM for further information about
system requirements for a PC and precautions when using Microsoft® Windows® or Windows® Internet Explorer®.

10
Copyright
Except for open source software licensed under GPL/LGPL and so on, distributing, copying, disassembling, reverse compiling and reverse engineering of the software provided with this product are all expressly prohibited. In addition, exporting any soft-ware provided with this product violating export laws is prohibited.
GPL/LGPL
• This product contains software licensed under GPL (GNU General Public License), LGPL (GNU Lesser General Public License), etc.
• Customers can duplicate, distribute and modify the source code of the software under license of GPL and/or LGPL.• Refer to the "readme.txt" file on the provided CD-ROM for further information about the source code of the software con-
tained in this product and copyright notice comprised in the GPL/LGPL software.• Please note that Panasonic shall not respond to any inquiries regarding the source code.
Disclaimer of warranty
IN NO EVENT SHALL Panasonic Corporation BE LIABLE TO ANY PARTY OR ANY PERSON, EXCEPT FOR REPLACEMENT OR REASONABLE MAINTENANCE OF THE PRODUCT, FOR THE CASES, INCLUDING BUT NOT LIMITED TO BELOW:
(1) ANY LOSS OR DAMAGE, INCLUDING WITHOUT LIMITATION, DIRECT OR INDIRECT, SPECIAL, CONSEQUENTIAL OR EXEMPLARY, ARISING OUT OF OR RELATING TO THE PRODUCT;
(2) ANY INCONVENIENCE, LOSS, OR DAMAGE CAUSED BY INAPPROPRIATE USE OR NEGLIGENT OPERATION OF THE USER;
(3) ALL MALFUNCTIONS OR TROUBLES FROM UNAUTHORIZED DISASSEMBLE, REPAIR OR MODIFICATION OF THE PRODUCT BY THE USER, REGARDLESS OF THE CAUSE OF THE MALFUNCTION OR TROUBLE;
(4) INCONVENIENCE OR ANY LOSS ARISING WHEN IMAGES ARE NOT DISPLAYED, DUE TO ANY REASON OR CAUSE INCLUDING ANY FAILURE OR PROBLEM OF THE PRODUCT;
(5) ANY PROBLEM, CONSEQUENTIAL INCONVENIENCE, OR LOSS OR DAMAGE, ARISING OUT OF THE SYSTEM COMBINED BY THE DEVICES OF THIRD PARTY;
(6) ANY CLAIM OR ACTION FOR DAMAGES BROUGHT BY ANY PERSON OR ORGANIZATIO AS A PHOTOGRAPHED SUBJECT DUE TO VIOLATION OF PRIVACY CONCERNING A SURVEILLANCE CAMERA'S PICTURE OR SAVED DATA, FOR SOME REASON (INCLUDING USE WHEN USER AUTHENTICATION ON THE AUTHENTICATION SETTING SCREEN IS SET TO OFF), BECOMING PUBLIC OR BEING USED FOR ANY PURPOSE;
(7) LOSS OF REGISTERED DATA CAUSED BY ANY FAILURE (INCLUDING INITIALIZATION OF THE PRODUCT DUE TO FORGOTTEN AUTHENTICATION INFORMATION SUCH AS A USER NAME AND PASSWORD).
Introduction (continued)

11
About Additional Camera Kit (option)
Number of cameras to be used in the system (16 cameras in basic system) can be increased to 24, 32 (maximum) by purchasing the Additional Camera Kit (WJ-NXE30, WJ-NXE30W: option). Refer to following table regarding camera numbers.
Additional Camera KitWJ-NXE30, WJ-NXE30W
NX300 only(No additional license)
one Additional Camera Kit(one additional license)
two Additional Camera Kit(two additional licenses)
up to 16 cameras up to 24 cameras up to 32 cameras
Limitation of liability
THIS PUBLICATION IS PROVIDED "AS IS" WITHOUT WARRANTY OF ANY KIND, EITHER EXPRESS OR IMPLIED, INCLUDING BUT NOT LIMITED TO, THE IMPLIED WARRANTIES OF MERCHANTABILITY, FITNESS FOR ANY PARTICULAR PURPOSE, OR NON-INFRINGEMENT OF THE THIRD PARTY’S RIGHT.THIS PUBLICATION COULD INCLUDE TECHNICAL INACCURACIES OR TYPOGRAPHICAL ERRORS.CHANGES ARE ADDED TO THE INFORMATION HEREIN, AT ANY TIME, FOR THE IMPROVEMENTS OF THIS PUBLICATION AND/OR THE CORRESPONDING PRODUCT (S).
Introduction (continued)
Network security
As you will use this unit connected to a network, your attention is called to the following security risks.① Leakage or theft of information through this unit② Use of this unit for illegal operations by persons with malicious intent③ Interference with or stoppage of this unit by persons with malicious intentIt is your responsibility to take precautions such as those described below to protect yourself against the above network security risks.
• Use this unit in a network secured by a firewall, etc.• If this unit is connected to a network that includes PCs, make sure that the system is not infected by computer viruses or
other malicious entities (using a regularly updated anti-virus program, anti-spyware program, etc.).• Protect your network against unauthorized access by restricting users to those who log in with an authorized user name and
password set by using user authentication.• Apply measures such as user authentication to protect your network against leakage or theft of information, including image
data, authentication information (user names and passwords), alarm mail information, FTP server information and DDNS server information.
• After the unit is accessed by the administrator, make sure to close the browser.• Change the administrator password periodically. Keep the authentication information (your user name and password) in a
safe place free from public view.• Do not install the camera in locations where the camera or the cables can be destroyed or damaged by persons with malicious intent.
Registering a license of a secure communication kit (option) to the recorder enables secure communication* with cameras. Each secure communication kit differs in the number of cameras that can be registered as shown in the table below. Use several licenses as necessary.* Encrypted communication using an electronic certificate.
WJ-NXS01, WJ-NXS01W WJ-NXS04, WJ-NXS04W WJ-NXS16, WJ-NXS16W WJ-NXS32, WJ-NXS32W
1 camera 4 cameras 16 cameras 32 cameras
About Secure Communication Kit (option)

12
Introduction (continued)
Registering the license of the additional business intelligence kit WJ-NXF02, WJ-NXF02W (option) allows the recorder to detect faces whose features are similar to the registered faces by comparing face images in live image with the registered face images (face matching function). The statistical processing for the results of the face matching will also become available and it displays the result on the main monitor connected with the recorder.
About the business intelligence function (option)
Registering the license of the additional RAID kit WJ-NXR30, WJ-NXR30W (option) into the recorder, enables operation of RAID 1/RAID 5/RAID 6 mode.
About the RAID function (option)

13
Refer installation work to the dealer.Installation work requires technique and experiences. Failure to observe this may cause fire, electric shock, injury, or dam-age to the product.
• Be sure to consult the dealer.
Do not disassemble nor alter this product.Failure to observe this may cause fire or electric shock.
• Ask your dealer for inspection and repair.
Do not insert any foreign objects.Do not allow any foreign object or liquid such as water, a metallic part, etc. to enter since it may cause fire or electric shock.
• If it happens, disconnect the power plug from the elec-tric outlet immediately and contact your dealer.
Stop the operation immediately when something is wrong with this product.When smoke goes up from the product or the smell of smoke comes from the product, continued use will result in fire, injury, or damage to the product.
• Turn off the power of this product immediately, and then contact your dealer.
Avoid placing receptacles that contain liquids such as water on/near this product.If liquid spills onto this product, it may cause fire or an elec-tric shock.
• If it happens, disconnect the power plug from the elec-tric outlet immediately and contact your dealer.
Clean the power plug periodically to keep it dust free.Dust can cause the insulation to be damaged and cause a fire.
• When cleaning, disconnect the power plug and wipe with a clean dry cloth.
Do not install this product in an unstable location.Selecting an inappropriate installation surface may cause the product to fall down or topple over, resulting in injury.
Do not touch this product, power cord and connected cables when thunder is heard.Failure to observe this may cause electric shock.
Do not connect/disconnect the power plug with wet hands.Failure to observe this may cause electric shock.
Avoid doing anything that can damage the power cord/plug.Do not damage, modify, forcefully bend, twist, stretch or bundle the power cord, and do not put a heavy thing on the power cord.Using a damaged power cord can cause electric shock, short circuit, fire, etc.
• Contact your dealer for repair of the power cord and plug.
GroundingThe power plug of this product is 2-prong plug equipped with a grounding terminal. Use this product after confirming that grounding is properly installed.If grounding is not installed properly, it may cause ground leakage or damage the product resulting in electric shock.
• Contact the dealer for details. (The grounding installation cost is not included in the price of this product.)
Do not engage in work related to the installation and wiring during the power is on.Failure to observe this may cause fire or electric shock.
Hold the power plug to disconnect the power cord.Do not pull the power cord since it can cause fire, electric shock, etc.
Connect the power plug firmly.If the power plug is not connected firmly, it can cause fire, electric shock, etc.
• Do not use the damaged power cord and loose electric outlets.
Do not connect to outlets or wiring device if their ratings are beyond the specified rating.If the rating goes over the specified rating such by putting many loads on one electric outlet, it can cause generation of heat resulting in fire.
Do not strike or give a strong shock to this productFailure to observe this may cause fire or electric shock.
Avoid placing this product in locations which are subject to humidity and dust.Failure to observe this may cause fire or electric shock.
Do not block the ventilation holes.Doing so can cause fire since it can raise the temperature inside this product high.
Precautions

14
When the product is accessible from the InternetTo prevent unauthorized access, note the following.
• Leave user authentication turned on.• Periodically change passwords that are used to access
the product. Refer to the Operating Instructions (PDF) on the Panasonic support website for information about how to change pass-words.
Power sourceThe input power source for this product is 120 V AC 60 Hz (WJ-NX300K), 220 V - 240 V AC 50 Hz/ 60 Hz (WJ-NX300K/G).Do not connect to the outlet that provides the power to equipment that requires a measurable amount of power (such as a copy machine, air conditioner, etc.). Avoid placing this product in locations where is subject to water.* The provided power cord(s) is (are) dedicated to the use
with this product. Do not use with any other device. Also, do not use any other power cord with this product.
Ambient operating temperatureUse this product at temperatures between +5 °C to +45 °C {41 °F to 113 °F}. Failure to do so may damage the internal parts or cause malfunction.* Performance and lifetime of hard disk drives are easily
affected by heat (used at high temperature). It is recom-mended to use this product at a temperature of approx. +25 °C {77 °F}.
To cut the power supplyThis product has no power switch. To cut the power supply, unplug the power plug of the product from the AC outlet. Install the AC outlet near the recorder to make it easy to plug in and unplug the power cord. If the power cord cannot be unplugged easily due to installation condition, connect the power cord to an AC outlet via a distribution board circuit breaker with a cut-off capacity.
Built-in backup battery• Do not expose the built-in battery to excessive heat such
as sunlight, fire, etc.
Hard disk drive (HDD)• Hard disk drives are precision devices. Handle them with
care. It is possible to damage them if they are moved while their motors are still running.
• Please be forewarned that any loss of information on the HDD is not guaranteed under any circumstances.
• Do not move or install this product just after turning the power on or off (for around 30 seconds.) The hard disk drives are running.
• The HDD is consumable and the lifetime differs depending on the operational environment. Write errors may occur frequently after around 20000 hours of each HDD operation and head and motor deterioration may occur after around 30000 hours of operation. They will reach
the end of their lifetime after 30000 hours of operation if they have been used at the recommended ambient temperature (approx. +25 °C {77 °F}).
• To prevent data loss from disk crashes, it is recom-mended to keep the ambient operating temperature at approx. +25 °C {77 °F} and to replace them after around 18000 hours of operation. You can check the operating time of each HDD in "Operation" of the "HDD information" tab under "Maintenance" under "Advanced" from the setup menu.
• When hard disk drive trouble occurs, replace it immedi-ately. Contact your dealer about servicing.
About external storage devices (External HDD and USB memory)
• An external hard disk drive or a USB memory that is compatible with USB3.0 can be connected to the copy port to use as the external storage device.
• Use external storage devices formatted in exFAT, FAT (FAT16) or FAT32.
• USB media recognizable by the recorder can be format-ted by the recorder. Refer to Operating Instructions (PDF) for the format procedure.
• External storage devices requiring password authentica-tion or a special driver or using an encryption function cannot be used.
Prevent condensation from formingIf this happens, it can cause malfunction.Leave it switched off for around 2 hours in the following cases.
• When this product is placed in an extremely humid place.
• When this product is placed in a room where a heater has just been turned on.
• When this product is moved from an air-conditioned room to a humid and high-temperature room.
About the monitorWhen displaying the same image on the PC monitor for a long time, it may cause image burn-in on the PC monitor.
Cleaning• Turn the power off, and then use a soft cloth to clean
this product.• Do not use strong or abrasive detergents when cleaning
the body.• When using a chemical cloth for cleaning, read the cau-
tion provided with the chemical cloth product.
Product disposal/transferImages saved on the storage device used with this product may lead to personal information leakage. When it is neces-sary to dispose or give this product to someone, even when for repair, make sure that there is no data on the hard disk drives.
Precautions for use
Precautions (continued)

15
Indication labelRefer to the indication label placed on the surface of this product for the equipment classification and power source, etc.
AVC Patent Portfolio LicenseTHIS PRODUCT IS LICENSED UNDER THE AVC PATENT PORTFOLIO LICENSE FOR THE PERSONAL USE OF A CONSUMER OR OTHER USES IN WHICH IT DOES NOT RECEIVE REMUNERATION TO (i) ENCODE VIDEO IN COMPLIANCE WITH THE AVC STANDARD ("AVC VIDEO") AND/OR (ii) DECODE AVC VIDEO THAT WAS ENCODED BY A CONSUMER ENGAGED IN A PERSONAL ACTIVITY AND/OR WAS OBTAINED FROM A VIDEO PROVIDER LICENSED TO PROVIDE AVC VIDEO.ADDITIONAL INFORMATION MAY BE OBTAINED FROM MPEG LA, L.L.C. SEE HTTP://WWW.MPEGLA.COM
About reboot of this productIn the following cases, this product will automatically reboot to continue recording.
• When the software of this product has detected the internal error and reboot becomes necessary.
Disclaimer of warranty on recoded dataPanasonic assumes no responsibility or liability, directly or indirectly, for failure of recording or editing including loss of data due to any reason or cause which does not exclude repair or maintenance of this product regardless whether the subject is hard disk or other parts.
Precautions (continued)

16
Front view
① Operation indicator [OPERATE] Lights when the power is on.
② Error indicator [ERROR] Blinks when an error that can become a problem for the
recorder to run the system occurs.Blinks red: System errorBlinks orange: Thermal error, cooling fan malfunction, etc.Shows a solid light when automatically reset from an error status.
③ [HDD1] [HDD2] [HDD3] [HDD4] HDD status indicator [STS]
Indicates the operational status of the respective hard disk drive.Lights green: Indicates that the power of the (formatted)
hard disk is on.Blinks green: Indicates that the respective hard disk
drive is for playback use only. (Recording is unavailable using the respective hard
disk drive.)Blinks orange: Indicates that the respective hard disk
drive is currently being formatted, added, removed or during the recognition process.
Blinks red: Indicates that formatting of the hard disk drive has failed.
Off: Indicates that the power of the hard disk drive is off, Indicates that the hard disk drive is not connected/recognized.
HDD access/failure indicator (A/F) Indicates the status (access/failure) of the respective
hard disk drive. When an HDD failure (error) occurs during operation in
the RAID 1/RAID 5/RAID 6 mode, the indicator will light/blink red.Blinks green: Indicates that the respective hard disk
drive is being accessed.Off: Indicates that the respective hard disk drive is not
being accessed. Lights red: Indicates that the respective hard disk drive
is faulty (which can be recovered by replacing the hard disk drive)
In the RAID 5 mode, it indicates that the respective hard disk drive is the first faulty drive.
In the RAID 6 mode, it indicates that the respective hard disk drives are the first and second faulty drive.
Blinks red: Indicates that the respective hard disk drive is faulty (which cannot be recovered even by replac-ing the hard disk drive)
In the RAID 1/RAID 5 mode, it indicates that the respective hard disk drive is the second faulty drive.
In the RAID 6 mode, it indicates that the respective hard disk drive is the third faulty drive.
Blinks orange: Indicates the drive in data recovery in RAID 1/RAID 5/RAID 6 mode (it may appear that the indicator lights orange when recovery is being pro-cessed at high speed)
④ Recording indicator [REC] Lights orange when recording is being performed.
⑤ Alarm indicator [ALARM] Blinks when an alarm occurs, and lights when the alarm
output stops. This indicator will go off when the [Reset] button (☞ Operating Instructions (PDF)) is clicked.
⑥ Front cover
⑦ Copy port (USB3.0) [COPY] Connect an external storage device (external Hard disk
drive, USB memory) to this port and copy images and audio recorded on the hard disk drive. An external storage device can also be connected to the copy port on the rear. Use either of them.
* Mouse connection is also available.
⑧ Mouse connection port (USB2.0) [MOUSE] The provided mouse is connected to this port. A mouse
can be connected to the mouse connection port on the rear. Use either of them.
Major operating controls and their functions
①② ⑤
⑦⑧
③ ④
⑨⑩ ⑪
⑥

17
Major operating controls and their functions (continued)
⑨ Buzzer stop button [BUZZER STOP] Press this button to stop the buzzer that started sound-
ing at an alarm/error occurrence. Refer to the Operating Instructions (PDF) for further information about alarms and errors.
⑩ Restart switch [RESTART] Restarts the recorder. Insert a fine stick, like a paper clip
and keep pressing for more than 5 seconds.
⑪ Decorative cover
Inside the front cover
① ③②
① HDD bracket screw These are screws to fix the HDD bracket. The screws do
not detach from the bracket.
② HDD bracket Install the HDD. Refer to "Installation of the hard disk
drive" in the operating instructions for the installation of the HDD.
③ Screw hole for front cover screw This is a screw hole to fix the front cover with a screw
attached after installing the front cover.

18
Rear view
① Alarm/Control connector B [B]It is used when connecting an alarm, such as a buzzer or a lamp, to external equipment. The provided terminal plug (10 pin) is attached.
② Alarm/Control connector A [A] It is used when connecting with an external device such
as a sensor or anti-theft door switch that output alarm signals.
The provided terminal plug (11 pin) is attached.
③ Security wire hole Mount the lock device for the anti-theft security wire.
④ Cable clamp fixing hole (for fixing the terminal block cables)
This is a fitting hole for the cable clamp(provided) to tie and fix the terminal block cables. Refer to ☞ page 19 for fitting.
⑤ Copy port (USB3.0) [COPY]Connect an external storage device (external Hard disk drive, USB memory) to this port and copy images and audio recorded on the hard disk drive. An external storage device can also be connected to the copy port on the front. Use either of them.* Mouse connection is also available.
⑥ Mouse connection port (USB2.0) [MOUSE] The provided mouse is connected to this port. The
mouse can be connected to the mouse connection ports on the front. Use either of them.
⑦ Network port (PC port) [PC] Connect the recorder with a PC via a network compati-
ble with 10BASE-T, 100BASE-TX or 1000BASE-T. Use this port when the cameras and the PC are connected to different network.
⑧ Network port (Camera/PC port) [CAMERA/PC] Connect the recorder with a PC and cameras via a
network compatible with 10BASE-T, 100BASE-TX or 1000BASE-T. When the port is being accessed, the access indicator (green) blinks. When the port is being linked, the link indicator (orange) lights.
Camera/PC
Access indicator Link indicator
PCLAN (10/100/1000 BASE-T)
⑨ Audio output connector (RCA pin jack) [AUDIO OUT]
Connect such device as a powered speaker. Same audio output to the main monitor will be output from this connector.
⑩ Video output connector (BNC) [VIDEO OUT] Connect a sub monitor (BNC) to this connector. Same
images output from the sub monitor output connector (HDMI) will be output from this connector. The default is NTSC output for WJ-NX300K and PAL output for WJ-NX300K/G. The setup menu will not be displayed.
⑪ Main monitor output connector (HDMI) [A/V OUT MAIN]
This connector is used to connect to an HDMI-ready monitor (the main monitor). It displays live images, recorded images, or the setup menu of the recorder.
⑫ Sub monitor output connecter (HDMI) [VIDEO OUT SUB]
This connector is used to connect to an HDMI-ready moni-tor (sub monitor). Only the live images will be displayed.
⑬ Cable clamps fixing holes Fit the cable clamp (provided with the extension unit) to fix
the connection cable. Refer to the operating instructions of the extension unit WJ-HXE400 for further information.
⑭ External storage connector [EXT STORAGE (5 V 50 mA)] Connect the optional extension unit (WJ-HXE400) to this
connector using the dedicated connection cable provided with the extension unit.
Make sure to connect the extension units in order from external storage connector number 1.
Major operating controls and their functions (continued)
① ②
⑤
⑦ ⑧
③
④
⑨ ⑩ ⑪ ⑫ ⑬ ⑭ ⑮ ⑯
⑰
⑥

19
⑮ Power cord clamp mount
⑯ SIGNAL GND terminal [SIGNAL GND] Connect this terminal with the SIGNAL GND terminals of
the devices in the system for signal ground. When operating the recorder and the devices in the system without signal ground, noise may be produced.
⑰ Power cord inlet [AC IN] Connect the provided power cord to this inlet. The
power plug of the recorder is 2-prong plug equipped with a grounding terminal.
How to prevent power cord disconnectionFix the power cord at 15 cm to 20 cm {5-7/8 to 7-7/8 inches} from the connector with the provided power cord clamp passed through the clamp mount.
①
Clamp mount
Power cord clamp
① Pass the power cord clamp (accessory) through the clamp mount.
15 cm ~ 20 cm {5-7/8 ~ 7-7/8 inches}
②
② Tighten the power cord at 15 cm to 20 cm {5-7/8 to 7-7/8 inches} from the connector and fix it to the clamp mount. Cut the unnecessary part of the power cord clamp as necessary.
How to use the cable clamp (for fixing the terminal block cables)
①
①Insert the cable clamp (accessory) in the cable clamp fixing hole.
② ②
③
②Insert the terminal plugs into the Alarm/Control connector A and B.
③Bundle the cables of the terminal plugs, tighten them with the cable tie of the cable clamp (accessory) and fix them.
Major operating controls and their functions (continued)

20
It is necessary to register users who operate the recorder and hosts (PC) that accesses the recorder via a network such as a LAN. Up to 32 users can be registered.It is possible to register the following for the user information.
Item Description
User name User name is to be registered to log in to the recorder. The user name will be entered at the time of login.
Password Password is to be registered to log in to the recorder together with the user name. The pass-word will be entered at the time of login.
Level Users are classified into the following levels depending on the available operations.Administrator/Manager/Operator/Viewer/Logged out The administrators can perform all the configurations and operations. It is possible to select in advance the functions that can be controlled by users at other levels. (☞ Operating Instructions (PDF))
Priority level Priority level indicates the operational priority. Users at each level are assigned the fixed priorities ranging from "0" (Highest) to "4" (Low). Administrator 0 Highest Manager 1 High Operator 2 Viewer 3 Logged out 4 LowWhen the two or more users at the same level perform the same operation, the recorder will be controlled in accordance with the latest operation.
Default screen Select a startup screen to be displayed on the main monitor or a PC screen after login from the following.
When operating from a PC via a networkOperation of the recorder can be made using a PC via a network. Up to 16 hosts (PCs) can access the recorder at the same time.When another host (PC) tries to log in to the recorder after 16 hosts (PCs) have already logged in, the user with the lowest priority will be logged out. When the user who is trying to log in has the same priority as the users who have already logged in, the user whose login is the earlier is logged out.
When accessing the recorder from a PC via a network, the log-in authentication method is different as follows depending on the "User authentication" settings of the "Basic" tab under "User management" under "Advanced" from the setup menu. (☞ Operating Instructions (PDF))
User authentication setting User/Host to log in Remarks
Off Log in as an administrator.
On (default) Log in as a registered user. The login window will be displayed.
User/Host management
21
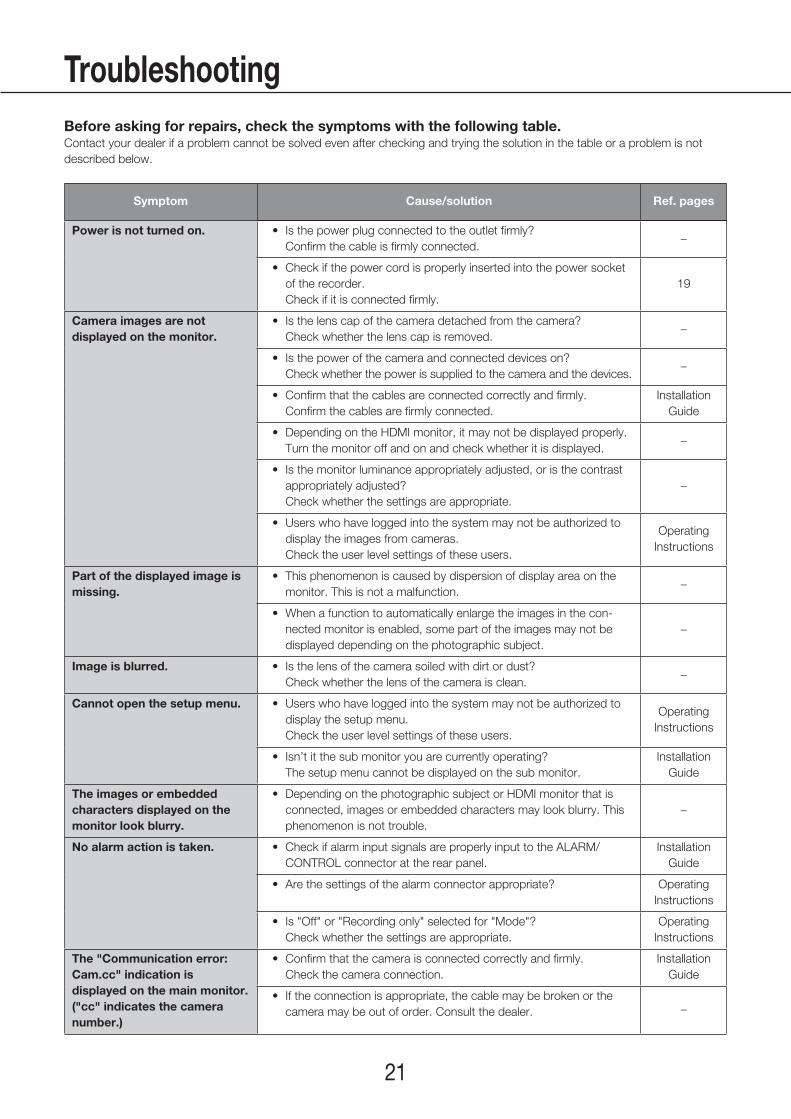
Before asking for repairs, check the symptoms with the following table.Contact your dealer if a problem cannot be solved even after checking and trying the solution in the table or a problem is not described below.
Symptom Cause/solution Ref. pages
Power is not turned on. • Is the power plug connected to the outlet firmly? Confirm the cable is firmly connected.
−
• Check if the power cord is properly inserted into the power socket of the recorder.
Check if it is connected firmly.19
Camera images are not displayed on the monitor.
• Is the lens cap of the camera detached from the camera? Check whether the lens cap is removed.
−
• Is the power of the camera and connected devices on? Check whether the power is supplied to the camera and the devices.
−
• Confirm that the cables are connected correctly and firmly. Confirm the cables are firmly connected.
Installation Guide
• Depending on the HDMI monitor, it may not be displayed properly. Turn the monitor off and on and check whether it is displayed.
−
• Is the monitor luminance appropriately adjusted, or is the contrast appropriately adjusted?
Check whether the settings are appropriate.−
• Users who have logged into the system may not be authorized to display the images from cameras.
Check the user level settings of these users.
Operating Instructions
Part of the displayed image is missing.
• This phenomenon is caused by dispersion of display area on the monitor. This is not a malfunction.
−
• When a function to automatically enlarge the images in the con-nected monitor is enabled, some part of the images may not be displayed depending on the photographic subject.
−
Image is blurred. • Is the lens of the camera soiled with dirt or dust? Check whether the lens of the camera is clean.
−
Cannot open the setup menu. • Users who have logged into the system may not be authorized to display the setup menu.
Check the user level settings of these users.
Operating Instructions
• Isn’t it the sub monitor you are currently operating? The setup menu cannot be displayed on the sub monitor.
Installation Guide
The images or embedded characters displayed on the monitor look blurry.
• Depending on the photographic subject or HDMI monitor that is connected, images or embedded characters may look blurry. This phenomenon is not trouble.
−
No alarm action is taken. • Check if alarm input signals are properly input to the ALARM/CONTROL connector at the rear panel.
Installation Guide
• Are the settings of the alarm connector appropriate? Operating Instructions
• Is "Off" or "Recording only" selected for "Mode"? Check whether the settings are appropriate.
Operating Instructions
The "Communication error: Cam.cc" indication is displayed on the main monitor. ("cc" indicates the camera number.)
• Confirm that the camera is connected correctly and firmly. Check the camera connection.
Installation Guide
• If the connection is appropriate, the cable may be broken or the camera may be out of order. Consult the dealer. −
Troubleshooting

22
Symptom Cause/solution Ref. pages
The "Thermal error" indication is displayed on the main monitor.
• Check if the fan is malfunctioning. Operating Instructions
• Check if the recorder ventilation holes or cooling fan are blocked, and also check for dust collected around the ventilation holes.
Installation Guide
• The ambient operating temperature is +5 °C to +45 °C {41 °F to 113 °F}. The "Thermal error" is displayed based on the internal thermal information of the HDD. If the "Thermal error" indication is displayed, it is recommended to change the installation environ-ment so that the ambient temperature is maintained at approx. +25 °C {77 °F}. When the "Thermal error" indication is displayed frequently, contact your dealer.
14
The clock of the recorder may keep bad time.
• The clock function of the recorder is accurate within ±30 seconds per month. To keep the correct recording, set the time periodically, or enable the auto time adjustment function on the rear panel terminal, or configure the system using the NTP function so as to keep the cor-rect current time.
–
[HDD] indicator lights/blinks red.
• The hard disk drive is faulty. Contact your dealer. Installation Guide
The error indicator blinks red. • A system error occurred. Contact your dealer. 16
"Authentication error" of the camera is displayed.
• Initialize the camera and retry the camera registration upon referring to the operating instructions of the camera.
Installation Guide
Inspect the power cord, power plug and connectors periodically.
Symptom Cause/solution Ref. pages
The power cord insulation is damaged. • The power cord, connector, or power plug is damaged. This may result in electric shock or a fire. Unplug the power plug from the AC outlet immediately, and
refer to qualified service personnel.−
The power cord, plug and connectors get hot during use.
The power cord gets hot when bent or stretched.
Troubleshooting (continued)

23
• GeneralPower source: WJ-NX300K: 120 V AC, 60 Hz WJ-NX300K/G: 220 V to 240 V AC, 50 Hz/60 HzPower consumption: WJ-NX300K: 72 W (144 VA) WJ-NX300K/G: 72 W (144 VA)Ambient operating temperature: Main body: +5 °C - +45 °C {41 °F - 113 °F} Mouse (accessory): +5 °C - +40 °C {41 °F - 104 °F}Ambient operating humidity: 5 % to 90 % (non condensing)Maximum operating altitude: 2000 m {6562 feet} above sea levelRecording compression method: H.265, H.264, JPEGDimensions: 420 mm (W) × 88 mm (H) × 370 mm (D) (from rack mount bracket 350 mm)
{16-9/16 inches (W) × 3-7/16 inches (H) × 14-9/16 inches (D)} (excluding rubber feet and projections)
Mass: Approx. 7.0 kg {15.5 lbs} When four hard disk drives are installed: Approx. 9.5 kg {21.0 lbs}Finish: Front view: Solid metallic coating, Resin Top cover: Solid metallic coating, Zinc-coated steel Rear view: Zinc-coated steel
• Hard disk drive (Contact your dealer about purchasing hard disk drives.)Hard disk drive: 3.5-inch hard disk drive (Up to 4 hard disk drives can be installed.)
RAID 1 (Available only when 2 or more hard disk drives are installed.) RAID 5 (Available only when 3 or more hard disk drives are installed.) RAID 6 (Available only when 4 hard disk drives are installed.)
• Input/OutputVideo: Video output connector: 1 V [p-p]/75 Ω, ×1 (BNC) Monitor (HDMI) connector: HDMI, ×2 (19 pin, type A)
Main monitor3840 × 2160 (4K) p/30 Hz3840 × 2160 (4K) p/25 Hz1920 × 1080 p/60 Hz1920 × 1080 i /60 Hz1920 × 1080 p/50 Hz1920 × 1080 i /50 Hz
Sub monitor1920 × 1080 p/60 Hz1920 × 1080 i /60 Hz1920 × 1080 p/50 Hz1920 × 1080 i /50 Hz
Audio: Audio output connector: −10 dBv, 600 Ω, unbalanced ×1 (RCA pin jack)Mouse connection port: High-speed serial interface, 480 Mbps (theoretical value), USB2.0, ×2Copy port: High-speed serial interface, 5 Gbps (theoretical value), USB3.0, ×2Alarm/Control connector A: Alarm input 1-9*1, Alarm output*2 (Terminal plug (11 pin) ×1)Alarm/Control connector B: Network error output*2, Alarm reset input*1, Emergency recording input*1, HDD error/Recording
error output*2, Camera error output*2, Recorder error output*2, Face matching output*2, Time adjustment I/O*1*2, +5 V output*3 (Terminal plug (10 pin) ×1)
Network port (Camera/PC): 10BASE-T/100BASE-TX/1000BASE-T (RJ-45) ×1Network port (PC): 10BASE-T/100BASE-TX/1000BASE-T (RJ-45) ×1Support protocols: HTTP, HTTPS, RTP, RTSP, TCP/IP, UDP/IP, FTP (Server), SMTP, NTP (Server, Client), DNS,
SNMP, POP3
*1 Non-voltage make contact input +3.3 V pull-up Approx. 23 kΩ*2 Open collector output 24 V DC max., –200 mA max.*3 +5 V ±0.5 V 200 mA max.
Specifications

24
• OptionAdditional Camera Kit WJ-NXE30, WJ-NXE30WSecure Communication Kit (license for 1 camera) WJ-NXS01, WJ-NXS01WSecure Communication Kit (license for 4 cameras) WJ-NXS04, WJ-NXS04WSecure Communication Kit (license for 16 cameras) WJ-NXS16, WJ-NXS16WSecure Communication Kit (license for 32 cameras) WJ-NXS32, WJ-NXS32WAdditional Business Intelligence Kit WJ-NXF02, WJ-NXF02WAdditional RAID kit WJ-NXR30, WJ-NXR30WExtension Unit WJ-HXE400 (for WJ-NX300K) WJ-HXE400/G (for WJ-NX300K/G)Rack mount bracket WV-Q202
Specifications (continued)

© Panasonic Corporation 2017 L1017-1127 PGQP2560YA
For U.S. and Canada:
Panasonic System Communications Company of North America,Unit of Panasonic Corporation of North Americawww.panasonic.com/business/For customer support, call 1.800.528.6747Two Riverfront Plaza, Newark, NJ 07102-5490
Panasonic Canada Inc.5770 Ambler Drive, Mississauga, Ontario, L4W 2T3 Canada (905)624-5010www.panasonic.ca
For Europe and other countries:
Panasonic Corporationhttp://www.panasonic.com
Panasonic Corporation Osaka, Japan
Authorised Representative in EU:
Panasonic Testing CentrePanasonic Marketing Europe GmbHWinsbergring 15, 22525 Hamburg, Germany


![WV-S4550L - ssbu-t.psn-web.netssbu-t.psn-web.net/Products/IP_camera/WV-S4550L/Manual/PGQP2532YAC... · * Este documento explica los métodos de instalación para el [Tipo 1], [Tipo](https://static.fdocuments.net/doc/165x107/5bcb63f309d3f2e1348bd8e9/wv-s4550l-ssbu-tpsn-webnetssbu-tpsn-webnetproductsipcamerawv-s4550lmanualpgqp2532yac.jpg)