
ImageQuest 11.0 Supplement Guide - QLS Supplement Guide 11.0 Page 6 of 25 Installation Installation...
25
Supplement Guide Version 11.0
Transcript of ImageQuest 11.0 Supplement Guide - QLS Supplement Guide 11.0 Page 6 of 25 Installation Installation...

SupplementGuide
Version 11.0
amy
Placed Image

ImageQuest Supplement Guide 11.0
Page 2 of 25

ImageQuest Supplement Guide 11.0
Page 3 of 25
TableofContents
Requirements ................................................................................................................................................ 4
Server Requirements ................................................................................................................................ 4
Client Requirements ................................................................................................................................. 4
OXPd Requirements (Required for HP MFP Integration) .......................................................................... 4
HP OXPd supported devices ...................................................................................................................... 5
Installation .................................................................................................................................................... 6
Installation Notes ...................................................................................................................................... 6
Server Installation ..................................................................................................................................... 6
Upgrading to 11.0 ..................................................................................................................................... 7
Client Installation ...................................................................................................................................... 7
Silent Client Installations ........................................................................................................................... 7
Administration .............................................................................................................................................. 8
New Action Permissions ........................................................................................................................... 8
Category\Subcategory List Attribute Type ............................................................................................... 9
Public Document Groups ........................................................................................................................ 10
New OCR Enhancements ........................................................................................................................ 11
Notification Rules .................................................................................................................................... 13
Report View ............................................................................................................................................ 15
IQ Client Applications .................................................................................................................................. 16
Enhanced Edit Document Box ................................................................................................................. 16
Scan to ImageQuest ................................................................................................................................ 17
Preview Pane........................................................................................................................................... 19
Enhanced File Import .............................................................................................................................. 20
PDF Annotation ....................................................................................................................................... 21
Work Queue ............................................................................................................................................ 23
Find Similar Documents .......................................................................................................................... 25

ImageQuest Supplement Guide 11.0
Page 4 of 25
Requirements
Server Requirements
• P4 CPU or higher (multi-core recommended)
• 2GB Memory (4GB Recommended)
• DVD Drive (if installing from disc)
• 300MB free hard drive space (for program files only)
• Windows Server 2003 R2 SP2, Windows Server 2008 SP2, Windows Server 2008 R2, Windows XP
SP3, Windows Vista SP2, or Windows 7. (32-bit and 64-bit OS versions are supported, but
ImageQuest runs in 32-bit mode on a 64-bit OS)
• If a software firewall product is running on the server, please ensure that TCP port 32751 and
UDP port 2112 are open.
• Microsoft .NET Framework version 4.0 (Full Framework)
• Microsoft SQL Server 2005 or 2008 is required to install ImageQuest. If you do not already have
a SQL server, SQL server 2008 R2 Express is included on the installation media.
• Internet Information Service (IIS) Server is required to configure WebIQ
• IIS must be installed and configured to install OXPd on an HP device which does not natively
support OXPd.
Client Requirements
• P4 CPU or higher (multi-core CPU recommended)
• 80MB free hard drive space (for program files only)
• Microsoft .Net Framework version 4.0 (Client Profile)
• Local administrative access is required to perform the initial client installation.
• Windows XP SP3, Windows Vista SP2, or Windows 7. (32-bit and 64-bit OS versions are
supported, but ImageQuest 10.3 runs in 32-bit mode on a 64-bit OS)
• Adobe Acrobat Reader 6.0 or higher
• Microsoft Office 2003, 2007 or 2010 (x86 only) is required for the ImageQuest Office Connector
• WebIQ Clients require Internet Explorer 7 or higher
OXPd Requirements (Required for HP MFP Integration)
• ImageQuest version 11.0 must be installed
• Supported HP device with the latest firmware
• IIS must be installed on the ImageQuest Server

ImageQuest Supplement Guide 11.0
Page 5 of 25
HP OXPd supported devices
MINIMUM MEMORY & FIRMWARE VERSIONS SUPPORTED:
---------------------------------------------------------------------------------
The devices covered in this release include the following models:
- LJ M3035mfp series: 256MB, 48.101.4
- CLJ CM3530mfp series: 512MB, 53.031.4
- LJ 4345mfp series: 256MB, 09.151.3
- LJ M4345mfp series: 256MB, 48.101.4
- LJ M4349mfp series: 256MB, 48.101.4
- CLJ 4730mfp series: 256MB, 46.231.3
- CLJ CM4730mfp series: 384MB, 50.081.3
- LJ M5035mfp series: 256MB, 48.101.4
- CLJ CM6030mfp series: 512MB, 52.051.3
- CLJ CM6040mfp series: 512MB, 52.051.3
- CLJ CM6049mfp series: 512MB, 52.051.3
- LJ 9040mfp series: 256MB, 08.141.3
- LJ 9050mfp series: 256MB, 08.141.3
- LJ M9040mfp series: 384MB, 51.051.4
- LJ M9050mfp series: 384MB, 51.051.4
- LJ M9059mfp series: 384MB, 51.051.4
- DS 9200C: 256MB, 09.151.3
- DS 9250C: 256MB, 48.091.3
- CLJ 9500mfp series: 512MB, 08.141.3
- SJ 7000n: Natively Supported
- M4500 series: Natively Supported

ImageQuest Supplement Guide 11.0
Page 6 of 25
Installation
Installation Notes
• ImageQuest 11.0 only supports upgrading from at least version 10.3. If you are running an older
version, you must first upgrade to 10.3 before moving to 11.0.
• It is recommended that you backup your existing ImageQuest images folder and SQL database
prior to performing an upgrade.
• The IQ Application Service must be "Started" before performing an upgrade.
• ImageQuest client machines must be upgraded to 11.0 after a server upgrade.
• SQL server is no longer installed by the ImageQuest installer. There is an option in the Autorun
program on the installation media to install SQL 2008 R2 Express if it's required.
Server Installation
To install or upgrade the ImageQuest server, run the autorun.exe program from the installation media.
The autorun menu has several different installation options:
• Install/Upgrade ImageQuest 10.3 to ImageQuest 11.0 using an existing SQL server in the
organization
• Install ImageQuest 11.0 and SQL 2008 R2 Express x86 edition
• Install ImageQuest 11.0 and SQL 2008 R2 Express x64 edition
These options can all be found under the “Install ImageQuest…” button on the autorun home screen. If
you opt to have the autorun install SQL 2008 R2 Express for you, please make sure the following
prerequisites are installed prior to beginning the installation:
• Windows Installer 4.5
• Windows Powershell
• Microsoft .NET Framework 3.5
The prerequisites are also included on the installation media under the “Prerequisites…” button on the
autorun home screen.
For advanced users, the prerequisites button also includes an option to install SQL 2008 R2 Express
server separately. This is the standalone SQL installer and needs to be setup manually. If you choose to
install SQL this way, please make sure to include the Full-Text Search option during the installation. Also
make sure that the SQL Full-text Filter Daemon Launcher service is started before proceeding to the
ImageQuest server installation.

ImageQuest Supplement Guide 11.0
Page 7 of 25
Note: Microsoft SQL Server 2008 R2 Express Edition is limited to using 1 processor, 1GB of RAM and a
10GB Database.
Alternatively, you may run the server.msi program in the root of the installation media which will work
for both new installs and for 10.3 upgrades.
Upgrading to 11.0
Version 11.0 can only upgrade from ImageQuest version 10.3. If you are running 10.2 or older, you will
first need to upgrade to ImageQuest 10.3 before applying the 11.0 update. Please contact Informa
Software support for assistance with obtaining an older version of the software.
To upgrade to version 11.0, click the “Install ImageQuest…” > “Install/Upgrade” buttons from the
autorun program or run the server.msi file from the root of the installation media. The installation
program will automatically detect that you are upgrading from an older version and will upgrade all of
the ImageQuest cabinets listed in the Warehouse.
Client Installation
To install or upgrade the ImageQuest client run the client.msi program from the installation media. The
client.msi file is also shared out on the ImageQuest server in a file share called ClientSetup.
Silent Client Installations
The command line options for silent installs have changed since the previous versions. Please refer to
the following example when configuring a silent installation scenario:
Msiexec /i client.msi /quiet
ADDLOCAL=IQDesktopFeature,IQAdminFeature,IQnotifyFeature,OfficeConnectorFeature,ExplorerConne
ctorFeature,IQPrinterFeature

ImageQuest Supplement Guide 11.0
Page 8 of 25
Administration
New Action Permissions
Three new action permissions have been introduced in version 11.0:
• Annotate Document Image
• View Only
• View Prior Revisions
The “Annotate Document Image” permission allows a user to add annotations to a PDF document from
IQdesktop. The newly annotated document becomes the current record when saved and the original
document is still available as a revision from the history pane. If this permission is Denied or Not Set,
the Annotate option will be grayed out in IQdesktop.
The “View Only” permission disables documents from launching in their native program and loads the
documents in a Read-Only viewer. In order to use this feature, a valid Windows preview handler must
be installed for the file types being viewed. Adobe Reader and Microsoft Office 2007 and 2010 both
install their own Windows preview handlers and allow viewing of their respective file types. IQdesktop
also has a built in preview handler for viewing .tif files. Allowing this permission also disables the
following menu items: Save Local Copy, Email Document and Export to Folder. This is the only
permission that removes access rights when it is set to Allow rather than Deny.
Note: WebIQ does not respect this permission and will still launch the files’ associated application.
Allowing the “View Prior Revisions” permission gives users the ability to view older versions of a
document by right-clicking the revision in the history pane and selecting “View Revision”. If this
permission is set to Deny or Not Set, the “View Revision” option will be grayed out.

ImageQuest Supplement Guide 11.0
Page 9 of 25
Category\Subcategory List Attribute Type
A new option has been introduced to the List attribute called Category\Subcategory. If this option is
enabled, list items will be shown in a hierarchical view where the subcategory changes based on the
chosen category. For this to function properly, category and subcategory items must be separated by
the backslash (\) character.

ImageQuest Supplement Guide 11.0
Page 10 of 25
Public Document Groups
Document groups can now be configured as public groups which gives everyone access to the
documents in that group (assuming the user has document type permissions). There is also a new
option to require a document group be selected when indexing a document. In order to use this
feature, a default public group must be specified first.

ImageQuest Supplement Guide 11.0
Page 11 of 25
New OCR Enhancements
The OCR service now benefits from multi-core, hyper-threaded and multi-CPU systems resulting in much
faster processing times.
There are also two new tabs under the OCR settings menu: OCR Queue and Fulltext/OCR Errors. The
OCR Queue shows the list of documents across all ImageQuest cabinets that are waiting to be both
Smart Indexed and Full-Text extracted with the document currently being processed highlighted in
yellow.
Double clicking on a row will launch the application associated with the file type allowing you to view
the image.

ImageQuest Supplement Guide 11.0
Page 12 of 25
The “Fulltext/OCR Errors” tab shows a list of documents that have failed the OCR process for one reason
or another. Records in this view can also be double-clicked on to view the failed document. There is an
option at the bottom of the window to reprocess the selected documents which may or may not re-OCR
successfully depending on what the original error message was.

ImageQuest Supplement Guide 11.0
Page 13 of 25
Notification Rules
Notification rules allow the ImageQuest administrator to setup an e-mail alert mechanism when a
specified date attribute falls between today and a fixed number of days in the future, with optional
recurrences. Documents that meet this criteria will be placed in the IQ user or role’s Work Queue in
IQdesktop and an e-mail will be sent to the user(s) with a link to the document in WebIQ.
ImageQuest Supplement Guide 11.0
Page 14 of 25
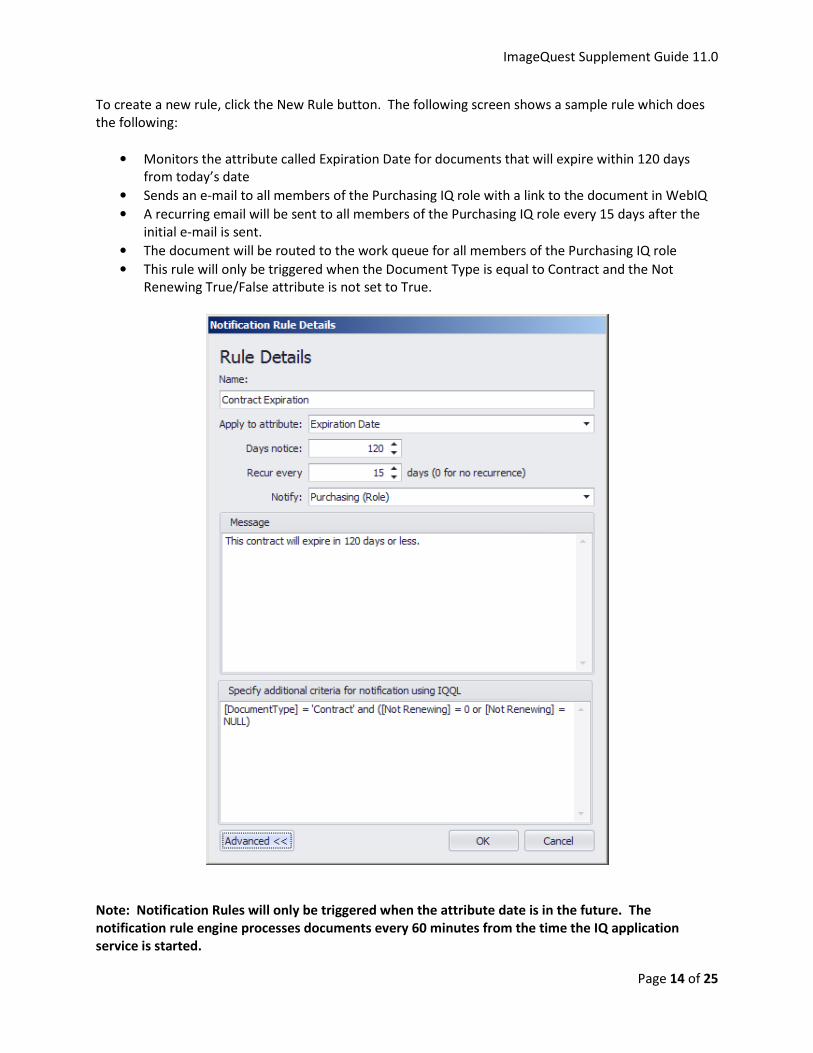
To create a new rule, click the New Rule button. The following screen shows a sample rule which does
the following:
• Monitors the attribute called Expiration Date for documents that will expire within 120 days
from today’s date
• Sends an e-mail to all members of the Purchasing IQ role with a link to the document in WebIQ
• A recurring email will be sent to all members of the Purchasing IQ role every 15 days after the
initial e-mail is sent.
• The document will be routed to the work queue for all members of the Purchasing IQ role
• This rule will only be triggered when the Document Type is equal to Contract and the Not
Renewing True/False attribute is not set to True.
Note: Notification Rules will only be triggered when the attribute date is in the future. The
notification rule engine processes documents every 60 minutes from the time the IQ application
service is started.

ImageQuest Supplement Guide 11.0
Page 15 of 25
Report View
Report View is a program that administrators can run from the ImageQuest server that creates a SQL
view called vwMetadata within the ImageQuest database that can be used for reporting purposes. The
program exposes the ImageQuest data in an easy to use format and must be run whenever attributes
are added or removed from the system. It creates views for all of the cabinets in the warehouse and can
be found in the ImageQuest client installation folder using Windows Explorer:
..\ImageQuest\ClientTools\Administrator\Informa.ImageQuest.ReportView.exe
Note: Report View can only be run from the ImageQuest server console and a valid reporting license
must be installed.

ImageQuest Supplement Guide 11.0
Page 16 of 25
IQClientApplications
Enhanced Edit Document Box
The Edit Document dialog box has been enhanced to include the “Notes” field rather than popping up a
“Notes” dialog box as in previous versions.

ImageQuest Supplement Guide 11.0
Page 17 of 25
Scan to ImageQuest
Scan to ImageQuest replaces the IQscan program that shipped with earlier versions of the ImageQuest
client and should now support any scanner that uses a TWAIN driver. If a user has the “Add Document”
permission, they will see a link to the scanning application in the “Tasks” pane of IQdesktop. Clicking the
link will launch the scanning interface.
There are two different ways to scan documents into ImageQuest. The default option is to save the scan
to the logged in user’s Indexing Queue. Use this option if you need to use batch processing or if you
want to use the Smart Indexing feature. You can also use this option to scan the documents into
another user or role’s Indexing Queue by changing the selection in the drop down menu.
The second option is to assign the index values up front and commit the scan directly to ImageQuest.
Use this method if you do not need to use Smart Indexing or if you need the ability for the document to
bypass the OCR process and remain a .Tif file (optional). Unlike the IQfolder, this method will not create
an “MFP Scan” document type.

ImageQuest Supplement Guide 11.0
Page 18 of 25
To start a new scan using the default TWAIN driver options, simply click the Scan button in the toolbar.
If you need to change the source scanner or to select different scanning options, click on the File menu
and select either Select Source or Scan with Advanced Options. After the scan is completed, you have
several options available on the toolbar. Clicking the scan button again will append pages to the end of
the current document. Clicking the icon will add a page before the current page and clicking the
icon will delete the current page. Click “Submit” to complete the scanning process or “Discard” to
cancel and exit the scanning application.
Note: The look and feel of the advanced scanning options is determined by the type of scanner you
have and the driver that is installed.

ImageQuest Supplement Guide 11.0
Page 19 of 25
Preview Pane
The IQdesktop client now has an additional image preview window that lets you see the document
within the client without launching the associated application. ImageQuest uses built in Windows
Preview Handlers, the same technology that Microsoft Windows Explorer and Microsoft Outlook use, in
order to render the preview pane. The following file types should preview in IQdesktop without the
need to install additional software: .bmp, .jpg, .rtf, .txt, .tif, and .htm. Additional preview handlers can
be installed as well in order to preview other file types. Installing Microsoft Office 2007 or 2010 will
activate previews for .doc, .docx, .xls, .xlsx, .ppt, and .pptx while installing Adobe Reader 9 or 10 will
activate .pdf files.
Note: Documents that are larger than 50MB will not show in the preview pane for performance
reasons and instead will display a message asking the user to launch the associated application
instead.

ImageQuest Supplement Guide 11.0
Page 20 of 25
Enhanced File Import
The same preview handler technology that is used to display the preview pane has also been used to
enhance the file import feature in IQdesktop. After clicking the import button in IQdesktop, you are
now presented with a preview of the document during indexing. An additional option has also been
added which allows the user to bypass the OCR process if need be.
ImageQuest Supplement Guide 11.0
Page 21 of 25
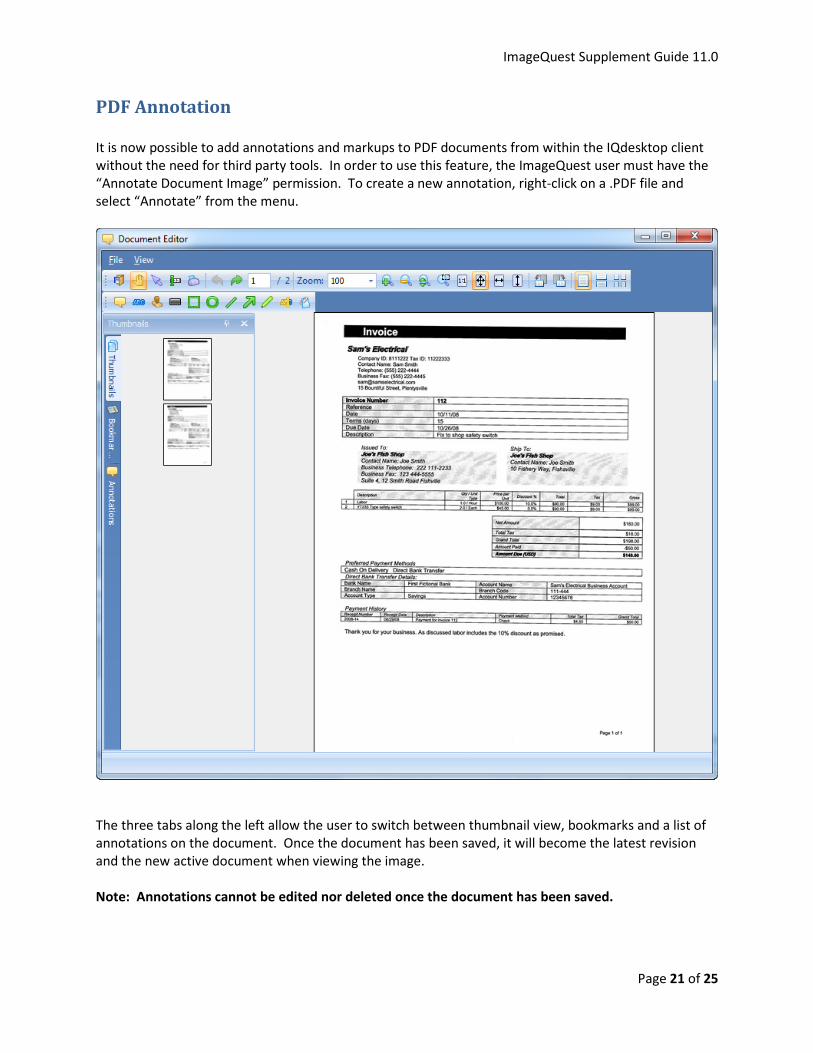
PDF Annotation
It is now possible to add annotations and markups to PDF documents from within the IQdesktop client
without the need for third party tools. In order to use this feature, the ImageQuest user must have the
“Annotate Document Image” permission. To create a new annotation, right-click on a .PDF file and
select “Annotate” from the menu.
The three tabs along the left allow the user to switch between thumbnail view, bookmarks and a list of
annotations on the document. Once the document has been saved, it will become the latest revision
and the new active document when viewing the image.
Note: Annotations cannot be edited nor deleted once the document has been saved.

ImageQuest Supplement Guide 11.0
Page 22 of 25
The following table describes the toolbar buttons that are used in the document editor:
Saves the annotations and closes the form
Pan document tool – click and hold the left mouse button to move the image
Select annotations – use this tool to select and edit annotations
Select text – click to select text on the page
Print – prints the document
Previous page
Next page
Zoom in – click the page to zoom in
Zoom out – click the page to zoom out
Dynamic zoom – click and drag up to zoom in, drag down to zoom out
Marquee zoom – draw a box to define the zoom area
Actual size – zoom to the actual size of the document
Fit entire page – zoom to fit the entire page to the viewer
Fit width – zoom to fit the document width in the viewer
Fit height – zoom to fit the document height in the viewer
Rotate left – rotates the page 90 degrees counter-clockwise
Rotate right – rotates the page 90 degrees clockwise
Single page layout – display a single page at a time in the viewer
Continuous page layout – display pages as a list in the viewer
Two columns – display the pages in two continuous columns
Comment – creates a comment annotation
Text box – creates a text box annotation
Stamp – creates a predefined rubber stamp annotation such as DRAFT or CONFIDENTIAL
Black box – creates a solid black box annotation
Rectangle – draws a rectangle annotation
Ellipse – draws an ellipse annotation
Line – draws a line annotation
Arrow – draws an arrow annotation
Ink pen – draw freehand ink pen markings on the page
Highlighter – draws a yellow opaque highlighter box annotation
File attachment – embed a file attachment annotation into the document

ImageQuest Supplement Guide 11.0
Page 23 of 25
Work Queue
Formally known as the route list, the Work Queue displays a list of documents that were either manually
routed from another IQ user or were automatically created by a notification rule that was setup by the
IQ administrator. Documents that were routed to a role will be visible to all members of that role. The
Work Queue can be used to process documents that require some type of intervention.
For example, a notification rule can be created which searches for invoices that need to be paid by the
invoice due date, and then sends the document to the Work Queue ten days before the due date
occurs. All documents in the Work Queue will stay there until the work item is manually completed by a
user. In this example, one of two things needs to be changed in order to process the document: Either
the Invoice due date needs to be extended beyond the 10 day notification period, or the Paid attribute
needs to be updated to true.

ImageQuest Supplement Guide 11.0
Page 24 of 25
To process a document in the work queue, right-click on the record and select “Complete Work Item”.
A window will open which looks exactly like the edit document screen. The main difference is that
saving these changes will cause the document to be removed from the work queue, even if nothing has
been modified.
Note: If you complete the work item and do not change any of the attributes, it could possibly
reappear again if it still meets the criteria of a notification rule.
There is a special column in the Work Queue called “Action” that shows how the document arrived. It
will either show the name of the notification rule that was responsible for routing the document, or it
will display a message that indicates it was manually routed to a specific user or role.
It is also worth noting that a single document can be displayed in the Work Queue multiple times for
different reasons and each instance needs to be processed separately. Also, users must have the
Update Document permission in order to complete work item requests.
Note: The delete function in the Work Queue functions the same as it does from the search grid. If
you delete a document from the Work Queue, it will be flagged as a deleted document and will no
longer show up in search results. The Complete Work Item option is the only way to remove the
document from the Work Queue properly.

ImageQuest Supplement Guide 11.0
Page 25 of 25
Find Similar Documents
Find Similar provides an easy way to perform searches based on the results of a previous search query.
For example, a search is performed which returns a list of paid invoices for the current month. What if a
user wants to search for all invoices from a particular vendor that are displayed in the search results? If
a user right-clicks on the “Vendor” attribute cell in the grid and selects “Find Similar”, a new dialog box
will pop up.
Notice that Vendor has been automatically checked. If the user had right-clicked on the “Invoice
Number” cell, that field would have been checked by default instead. Clicking the search button at this
point would do a new search where Vendor is equal to “Sam’s Electrical”. Additional attributes can also
be selected as well to “AND” the results together.
amy
Stamp