IMAGE TO COME...4 Zimmer ® xGen ial Extens Augment urgical echnique Zimmer ® xGen ial Extens...
9
Stem Extensions and Augments Zimmer ® NexGen ® Tibial Stem Extension & Augmentation Surgical Technique
Transcript of IMAGE TO COME...4 Zimmer ® xGen ial Extens Augment urgical echnique Zimmer ® xGen ial Extens...
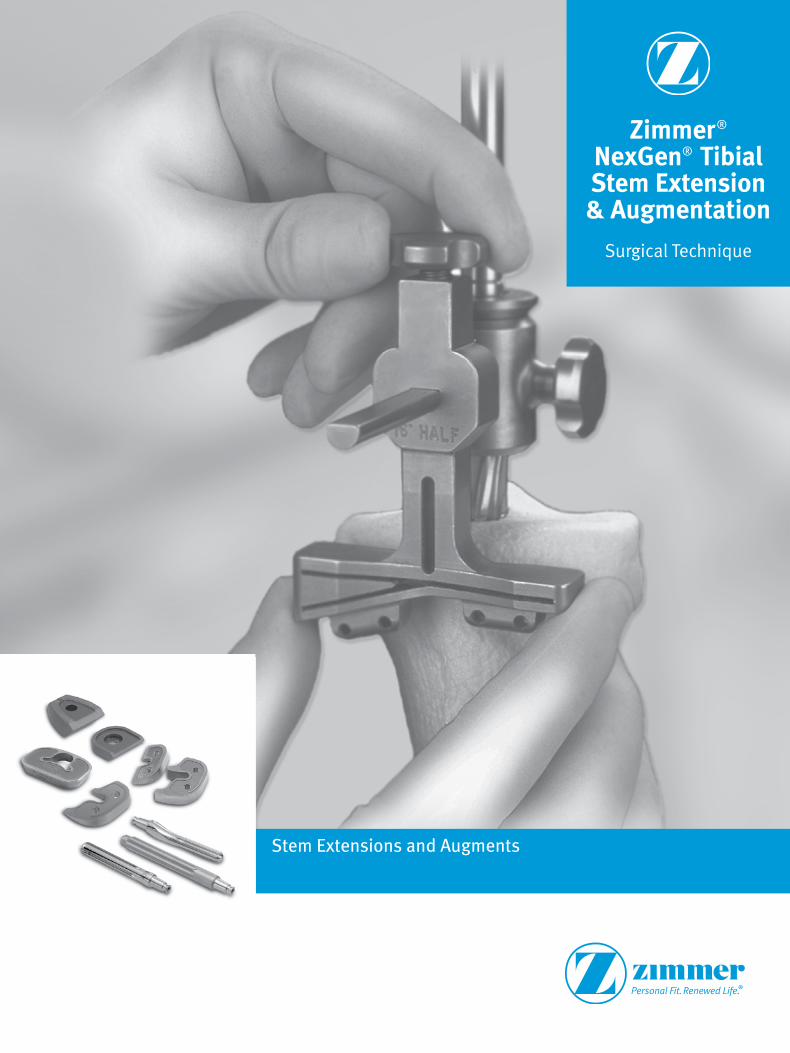
Stem Extensions and Augments
Zimmer® NexGen® Tibial Stem Extension & Augmentation
Surgical Technique
IMAGE TO COME

Zimmer® NexGen® Tibial Stem Extension & Augmentation Surgical Technique 1
Table of Contents
Introduction 2
Rationale 2
Preoperative Planning 2
Surgical Approach Technique 2Surgical Approach 2
Step One: Prepare the Tibial Canal 3
Step Two: Proximal Tibial Resection 4
Step Three: Finish the Tibia 5
Step Four: Trial Reduction 7
Step Five: Prosthesis Implantation and Fixation 7
Bone Grafting 7
Postoperative Care 8
Option 1: Technique for Severely Bowed Tibia 8
Option 2: Offset Stem Extension/Augments Technique 9
Zimmer NexGen
Tibial Stem Extension & Augmentation Surgical Technique

Zimmer® NexGen® Tibial Stem Extension & Augmentation Surgical Technique2 Zimmer® NexGen® Tibial Stem Extension & Augmentation Surgical Technique 3
Fig. 1
Introduction
The NexGen Complete Knee Solution Intramedullary Tibial Instruments have been designed to provide an accurate and reproducible surgical technique for application in cases where augments and/or a stem extension would be used. The instrument system allows for preparation of the proximal tibia to compensate for various defects which are found in complex cases. This technique describes the preparation of the proximal tibia for augments and stem extensions, as well as cementing and bone grafting procedures.
Rationale
Loss of bone in the proximal tibia requires special consideration in the selection of a prosthesis. Two specific issues need to be addressed regarding this decision. First, there must be a method to compensate for the missing bone. Appropriately designed augmentable components provide this method. Second, stable fixation must be restored. In patients with compromised bone quality or quantity, intramedullary stems have been found to improve fixation and help with alignment. The stem in this situation serves as a keel to resist tilting. In this function, it is best to use a longer stem that contacts the cortex. The NexGen System offers both a smooth fluted stem and a sharp fluted stem.
Successful implantation of a tibial component with a stem extension requires a different surgical approach than the implantation of a standard tibial prosthesis without a stem extension. If the stem of the tibial component contacts the tibial cortex, the position of the tibial fixation plate can be directly affected. Therefore, in cutting
the proximal tibia, one must consider the position of the stem.
This technique was designed to first establish the position and orientation of the tibial stem. Then, based on that position, the surface of the tibial plateau is prepared. By linking the preparation of the medullary canal and the tibial plateau, the bed for the prosthesis is accurately prepared.
Preoperative Planning
It is imperative that a preoperative x-ray of the knee and the entire tibia be available in both the A/P and lateral projections. It is necessary to see the whole area where the stem will interface with the bone, and to see how this will affect the final position-ing of the prosthesis and the orientation of the joint line. With these x-rays, templates can be used for preoperative planning to determine the approximate diameter and length of stem to be used. Furthermore, the surgeon can obtain a good idea of what type of augmentation will be necessary. Try either the wedge or block augment to see which compensates best for any anticipated bone loss.
Many tibias will have a significant bow. The surgeon must know this in advance as it may be difficult to insert the longest or largest diameter tibial stem. If this angular deformity is encountered, a shorter, smaller diameter, or offset stem may be required.
It is customary to select a stem which has adequate length and diameter to achieve a line-to-line fit in the diaphyseal bone. (Cement would normally be used on the upper surface of the tibia and keel.) This line-to-line fit better resists tilting forces and avoids the problem of cement deep in the tibia should revision be necessary.
It also allows the proximal tibial bone to resist axial loading and minimizes distal stress transfer and stress shielding.
Note: Care should be exercised when attempting to use a stem which is one size larger than the reamed canal. This practice could split the tibia and should never be attempted with smooth fluted stems.
Surgical Approach
Adequate exposure to the upper surface of the tibia is necessary for instrumentation and implantation. It is important that the extensor mechanism be adequately retracted and that the tibia be subluxed well in front of the femur. This can be accomplished by using the tibial retractors from the NexGen instrument set (Fig. 1).
Surgical Procedure
The tibia can be prepared either before or after the femur. However, it is recommended that the distal femur be prepared first because better exposure of the tibia can then be achieved.
Step One
Prepare the Tibial Canal In a revision situation, remove excessive cement and other debris after removing the tibial component.
The NexGen tibial augments can also be used in a primary total knee arthroplasty. They are very helpful in compensating for tibial defects that result from severe erosion or previous fractures. In these cases, expose the tibia and remove any osteophytes. Remove the anterior cruciate ligament to help facilitate exposure.
Note: Stem extensions should be used in all cases requiring augments.
Center the 8mm IM Drill mediolaterally. For primary arthroplasty, locate it just anterior to the insertion of the anterior cruciate ligament (Fig. 2). For revision arthroplasty, locate it approximately 15mm from the anterior cortex. In revision, the location of the medullary canal must be determined from preoperative radiographic planning and confirmed at the time of surgery by the location of the tibial crest. The entry point for the drill should be over the mid-point of the isthmus of the tibial canal, not neces-sarily the midpoint of the proximal tibial. This is particularly important if an offset stem is anticipated. With the drill properly positioned, drill the hole.
Prepare the tibial canal by using progres-sively larger Intramedullary Reamers begin-ning with the 9mm diameter reamer. The appropriate size of the final reamer should be estimated in the preoperative planning and is confirmed when cortical contact is encountered.
Each reamer is etched to indicate the depth of reaming necessary for the two stem length options available, (145mm & 200mm). This effective length takes into consideration the existing stem base on the tibial tray.
Note: The reamers are not end cutting but, instead, have a bullet tip lead that reduces the chance of perforating the cortex of the tibial bone. Insert the first size reamer that engages cortical bone deeper than the length of tibial stem to be used. This, in turn, will allow adequate room for the next larger diameter reamers to be inserted to the final depth without the bullet tip stop-ping progression of the reamer.
Continue reaming up to the diameter size that contacts the cortical bone. Ream to a depth of the second etching on the Intramedullary Reamer (Fig. 3). Be sure that the reamer is in line with the tibial shaft based on external tibial landmarks. Retained cement and/or sclerotic bone in this area will tend to deflect passage of the reamer. If so, remove the cement or the sclerotic bone. Leave the final reamer in place.
Note: A shorter, possibly larger diameter, stem may be desired. This is accomplished after the tibia is cut, by further reaming to the shorter depth with the required diam-eter reamers.
Fig. 2
Fig. 3

Zimmer® NexGen® Tibial Stem Extension & Augmentation Surgical Technique4 Zimmer® NexGen® Tibial Stem Extension & Augmentation Surgical Technique 5
Step Two
Proximal Tibial Resection Assemble the appropriate Tibial Boom to the reamer shank: 0°, 3°, or 7° (Fig. 4). Use the 0° boom when an A/P Wedged Tibial Plate is used, the 3° boom when a Fluted 3° Tibial Plate is used, or the 7° on all other stemmed tibial options.
Note: Tibial augments are not interchangeable. Use stemmed augments with stemmed tibial plates, and fluted augments with fluted tibial plates.
Fig. 4
Be sure to direct the Tibial Boom over the medial half of the tibial tubercle.
Note: Augment options can be found within Appendix A-Augment Compatibility
Select the Tibial Cutting Guide based on the type of augmentation needed. If no augmentation is required, the standard cutting slot of the augmented guides can be used. If an augmented prosthesis is desired, select the cutting guide corresponding to either the 16° or 26° half wedges, 22° third wedges, 7° full wedge, or all blocks. Note: The cutting guides for the 22° third wedges are specific to the tibial plate size. In this case it will be necessary to determine the plate size. Attach the selected Tibial Cutting Guide to the Tibial Boom (Fig. 5).
The rotation of the Tibial Cutting Guide is important. Orient the guide so that it cuts directly from the front to the back of the tibia. Varus/Valgus orientation is equally important. Check this by attaching the Tibial Boom Extension to the Tibial Boom. Then insert the Alignment Rod through the Tibial Boom Extension (Fig. 6). The Alignment Rod should follow the anterior tibial crest and is slightly closer to the medial malleolus than the lateral malleolus. This will ensure that the resected surface will be 90° to the mechanical axis.
Fig. 5
Fig. 6
After proper rotation and varus-valgus orientation has been achieved, determine the appropriate depth of resection by taking into consideration the depth of any defects which are present. Use the Tibial Depth Resection Guide to define where the saw cut will be made (Fig. 7). It is not necessary to resect below all defects. Some can be bone grafted and others filled with cement.
Note: When the A/P Wedged Tibial Component has been chosen, the measurement for depth of resection should be taken as far posterior on the tibia as possible. This should be performed to help reestablish the joint line because the posterior slope is built into the implant and not cut into the bone.
On primary tibias, measurement for depth of resection posteriorly may be difficult due to the existence of cartilaginous tissues. Therefore, if the measurement for depth of resection is taken from the center of the tibial plateau,an additional 2-4mm may need to be resected to help reestablish the joint line.
Fig. 7
2mm Tab
10mm Tab
Pin the Tibial Cutting Guide to the tibia securely and use a oscillating saw with a 0.050” blade to cut through the slots (Fig. 8). Initiate the resection with the reamer in place. Be sure the Tibial Cutting Guide is securely attached to the reamer during the initial cutting process. This adds further stability to the cutting guide.
After cutting the medial and lateral plateaus, remove the Tibial Bushing and Intramedullary Reamer, but leave the cutting guide in place, then finish the cut. If a CR or CRA femoral component will be used, be sure to leave an island of bone around the PCL insertion point at the posterior aspect of the tibia. This provides for optimal ligament integrity and postoperative function.
Remove the Tibial Cutting Guide.
Fig. 8
Step Three
Finish the Tibia Select the Stemmed Tibial Sizing Plate that provides the desired tibial coverage. Be sure to select the appropriate style – AP Wedged or Standard – which corresponds to the boom selected in Step One.
Note: The color code designation on the tibial sizing plate should be compared to the color code designations on the anterior flange of the selected femoral provisional. At least one of the colors listed on the femoral trial must match at least one color on the sizing plate to ensure that the com-ponents, in combination with the articular surface, will be kinematically matched. The colors must match exactly. For example, Yellow = Yellow. The striped colors are not the same as the standard colors (Yellow ≠ Striped Yellow) and should not be viewed as a match. If there is no match between the femoral provisional and sizing plate, adjust the size of the sizing plate being used to yield a match.
Attach the proper size and type of augment provisional to the sizing plate.
Straight Stem Extension Technique (see page 9 for Offset Stem Extension Technique Attach the Tibial Provisional/Drill Guide Holding Clamp to the selected sizing plate by depressing the button on the clamp and engaging the dovetail on the clamp with the dovetail on the sizing plate. Secure it by tightening the thumb screw (Fig. 9). Then use the Alignment Rod to aid in confirming varus/valgus alignment.
Re-insert the last Intramedullary Reamer. Place the sizing plate over the reamer and onto the prepared bone. Slide the Straight Stem Tibial Bushing over the reamer shaft until it seats into the circular step of the sizing plate. This will properly position the
sizing plate relative to the tibial stem location (Fig. 10). Pin the plate with two short head holding pins. Note that one of these pins can be inserted through the provisional augment. Remove the Straight Stem Bushing and reamer. Ensure that the sizing plate remains in the proper position when pinning.
Fig. 9
Fig. 10

Zimmer® NexGen® Tibial Stem Extension & Augmentation Surgical Technique6 Zimmer® NexGen® Tibial Stem Extension & Augmentation Surgical Technique 7
Fig. 13
Drill approx. 10mm past engraved line
Engraved Line
Place the Cemented Stem Drill Guide on the sizing plate and drill for the stem with the Cemented Stem Tibial Drill (Fig. 11a). Drill approximately 10mm deeper than the engraved line on the drill (Fig. 11b). This step ensures adequate clearance for the transition length of the proximal and distal diameters of the stem extension.
If using a 12.7mm x 30mm stem extension, place the Porous Stem Tibial Drill Guide on the sizing plate and drill for the stem with the Porous Stem Tibia Drill. Drill until the top of the drill is flush with the top of the drill guide (Fig. 12).
Failure to attain the correct drill depth may cause slight interference fit during implan-tation. Remove the drill and drill guide. If the tibia has already been reamed to a 17mm diameter or greater, this drilling step is not required.
Fig. 11a
Fig. 11b
Fig. 12
Attach the proper sized Tibial Broach to the Broach Impactor (Fig. 13). The broach can only be attached from the front. Seat the impactor on the sizing plate and impact the broach to the depth indicated by the etched groove on the shaft aligning with the impactor handle. The broach has a built-in stop so it cannot be overimpacted (Fig. 14).
Remove the Broach Impactor assembly and sizing plate.
Fig. 14
Step Four
Trial Reduction Perform the trial reduction by assembling the Stemmed Tibial Provisional, stem extension and augment(s) for which the bone has been prepared. With the final trial component assembled, insert it into the tibia. Be sure that the component is properly positioned rotationally. Check to see that the trial prosthesis fits the cut surfaces with appropriate apposition to bone. If any undesired gaps are present, remove the trial component and adjust the bone cuts until a good intimate fit is obtained. Perform a trial reduction (Fig. 15).
Fig. 15
Step Five
Prosthesis Implantation and Fixation Remove the taper plug from the appropriate stemmed tibial component by backing out the plug from the base of the stem. Place the Cemented Stem Drill Guide on the sizing plate and drill approximately 10mm deeper than the engraved line on the drill. This step ensures adequate clearance for the transition length of the proximal and distal diameters of the stem extension. If using a 12.7mm x 30mm stem extension, place the Porous Stem Tibial Drill Guide
on the sizing plate and drill for the stem with the Porous Stem Tibia Drill. Drill until the top of the drill is flush with the top of the drill guide. Failure to attain the correct drill depth may cause slight interference fit during implantation. Remove the drill and drill guide. If the tibia has already been reamed to a 17mm diameter or greater, this drilling step is not required.
Insert the stem extension implant into the base of the tibial plate implant. When using an Offset Stem Extension, use the stem location referenced earlier and line up that stem location number with the etched line on the posterior stem base housing. Wrap the tibial component in a cloth and place it on a surgical cart. While protecting the stem extension, strike it solidly on time with a two-pound mallet.
Note: Hitting the stem more than once may loosen the taper connection.
Insert and tighten the screw through the top of the tibial tray. The extension screw is packaged with the NexGen stem extension. This will further secure the stem extension. Tibial augments are designed to be secured to the tibial plate with screws or bone cement. Screws provide automatic alignment on the tibial tray and immediate attachment of the augment and, as with the stem extensions, are packaged with the augment. If cement is used to attach the augment, use the Augment Holding Clamp to stabilize the augment while the cement is curing. All augments are PMMA precoated to enhance fixation to the bone cement.
Pressurize the cement at the upper tibial surface in the routine manner. Apply additional cement to the bottom surface of the tibial component and keel. Implant the final prosthesis and hold it in position until cured. Remove all excess cement.
Fig. 16
Fig. 17
Drill to here
Bone Grafting Bone grafting can be a very important step in tibial reconstruction. If the defects are not extensive, grafting is not an involved process. However, if there are large defects, special techniques must be used.
Contained defects are those which are surrounded by a rim of bone (Fig. 16). They can be prepared by cleaning all the soft tissue out of the defect. The fresh bony base of the defect is then ready to accept morselized cancellous bone. Impact this bone into the defect. The prosthesis will hold the bone in place when it is set on top of the graft.
Uncontained defects are those located on the periphery of the tibia that have at least one edge which is not osseous (Fig. 17). They can be prepared by removing all soft tissue which is adjacent to the remaining bone. Then, fashion a block autograft or allograft to fit into the defect.

Zimmer® NexGen® Tibial Stem Extension & Augmentation Surgical Technique8 Zimmer® NexGen® Tibial Stem Extension & Augmentation Surgical Technique 9
This block of graft can either be keyed into the defect, or can be held with screws or pins (Fig. 18). Occasionally flat surfaces can be prepared on the defect and mated with flat surfaces on the graft. If a block graft is used, it is often helpful to position it into the defect prior to the final cutting of that area. This allows the graft to be cut flat when the rest of the tibia is prepared (Fig. 19).
Fig. 18
Fig. 19
Postoperative Care Monitor the patient’s rehabilitation postoperatively and advance it based on the type of fixation and the stability of the prosthesis. If a significant bone graft was used, a period of time with limited activity is advised to allow the graft to incorporate prior to full loading.
Optional Technique For A Severely Bowed Tibia On rare occasions, a tibia will be bowed severely and require a stemmed prosthesis. In some of these patients, the insertion of the stem of the tibial component will place the joint line at an unacceptably oblique angle (Fig. 20). In these patients, a shorter, thinner, or offset stem will be necessary. Pre operative templating will provide guidance in selecting the appropriate stem.
On these occassions, consider an extramedullary approach to the tibial resection. It may also be possible to initially ream to a minimal diameter, 9 or 10mm, and cut the tibia before reaming to the finished diameter and depth.
Fig. 20
Offset Stem Extension/Augments Technique Note: Augment options can be found within Appendix A-Augment Compatibility
If the patient’s medullary canal is offset from the center of the proximal tibia and an offset stem extension is desired, follow the previous technique up through Step Two, Proximal Tibial Resection.
Reinsert the last reamer and position the sizing plate and offset bushing over the reamer (Figure 21). Rotate the offset bushing until the sizing plate is in the desired location and pin the sizing plate with short pins. Make note of the engraved/numbered lines on the bushing in relation to the mark on the front of the sizing plate. This number will coincide with the lines and numbers on the offset stem extension provisionals and implants (Figure 22).
Fig. 21
Fig. 22
Place the correct offset tibial boom (7°, 0°, or 3°) over the offset bushing and seat onto the two pins on the proximal surface of the sizing plate (Figure 23). Lock the tibial boom to the offset bushing by tightening the knob.
Fig. 23
The appropriate tibial cutting guide is slipped onto the boom and pinned to the anterior tibia using at least two headless pins (Figure 24).
Fig. 24
The tibial cutting guide is then slipped off the boom over the headless pins. The tibial boom/bushing assembly and the sizing plate can then be removed from the reamer. The tibial boom/bushing assembly is reinserted over the reamer and is reattached to the resection guide after it has been inserted over the headless pins. Using the reamer’s attachment to the tibial cutting guide provides additional stability for the cutting guide during initial tibial resection. Additionally, headed pins can now be added to increase the stability of the cutting guide. The proximal tibial surface and augment wedge cuts are initiated (Figure 25). Remove the tibial boom assembly and reamer and complete the cuts.
Fig. 25

Zimmer® NexGen® Tibial Stem Extension & Augmentation Surgical Technique10 Zimmer® NexGen® Tibial Stem Extension & Augmentation Surgical Technique 11
Drill approx. 10mm past engraved line
Engraved Line
Attach the selected augment provisional to the sizing plate and re-position the sizing plate on the top of the tibia (Figure 26). A pin can be inserted down through the sizing plate and augment provisional to provide stability. Attach the cemented stem drill guide to the sizing plate and drill for the stem with the cemented stem tibial drill. Drill 10mm deeper than the engraved line on the drill. (Figure 27) This ensures adequate clearance for the offset transition length. Failure to attain the cor-rect drill depth may cause slight interfer-ence fit during implantation.
Fig. 26
Fig. 27
Attach the appropriate sized Tibial Broach to the Broach Impactor (Figure 28). The broach can only be attached from the front. Seat the impactor on the sizing plate and impact the broach to the depth indicated by the etched groove on the shaft aligning with the impactor handle. The broach has a built-in stop so it cannot be over impacted (Figure 29).
Remove the Broach Impactor assembly and sizing plate. A final trial reduction with offset stem and appropriate augment attached to the correct stemmed tibial provisional can now be performed.
Proceed to page 7, Step Four; Trial Reduction.
Fig. 28
Fig. 29
Appendix A-Augment Compatibility

Zimmer® NexGen® Tibial Stem Extension & Augmentation Surgical Technique12 Zimmer® NexGen® Tibial Stem Extension & Augmentation Surgical Technique 13
Appendix A-Augment Compatibility
NexGen Finned Precoat Tibial Augments
Full Block (10mm) Half Block (5mm) Half Block (10mm)Half Block Tapered (15mm)Right-Lateral / Left-Medial
Half Block Tapered (15mm)Left-Lateral / Right-Medial
Half Block Tapered (20mm)Right-Lateral / Left Medial
Half Block Tapered (20mm)Left-Lateral / Right-Medial
Half Wedge (16°) Half Wedge (26°) Third Wedge (22°) Full Wedge (7°)
Size 1 2 3 4 5 6 7 8 1 2 3 4 5 6 7 8 1 2 3 4 5 6 7 8 1 2 3 4 5 6 7 8 1 2 3 4 5 6 7 8 1 2 3 4 5 6 7 8 1 2 3 4 5 6 7 8 2 3 4 5 6 7 8 2 3 4 5 6 7 8 2 3 4 5 6 7 8 2 3 4 5 6 7 8 9
Nex
Gen
Tib
ial B
asep
late
s
Ste
mm
ed (P
reco
at)
1 C C C C C C C
2 CS CS CS CS CS CS CS CS CS CS CS
3 CS CS CS CS CS CS CS CS CS CS CS
4 CS CS CS CS CS CS CS CS CS CS CS
4+ CS CS CS CS CS CS CS CS CS CS CS
5 CS CS CS CS CS CS CS CS CS CS CS
6 CS CS CS CS CS CS CS CS CS CS CS
7 CS CS CS CS CS CS CS CS CS CS CS
8 CS CS CS CS CS CS CS CS CS CS CS
9 CS
10
A/P
Wed
ge S
tem
med
(Pre
coat
)
3 CS CS CS CS CS CS CS CS CS CS CS
4 CS CS CS CS CS CS CS CS CS CS CS
5 CS CS CS CS CS CS CS CS CS CS CS
6 CS CS CS CS CS CS CS CS CS CS CS
7 CS CS CS CS CS CS CS CS CS CS CS
8 CS CS CS CS CS CS CS CS CS CS CS
NexGen RH Knee Precoat Tibial Augments
Half Block (5mm) Half Block (10mm)Half Block Tapered (15mm) Right-Lateral/Left-Medial
Half Block Tapered (15mm)Left-Lateral/Right-Medial
Half Block Tapered (20mm) Right-Lateral/Left-Medial
Half Block Tapered (20mm)Left-Lateral/Right-Medial
Half Wedge (16°) Half Wedge (26°) Third Wedge (22°)RH Knee Full Block
(10mm)
Size 1 2 3 4 5 6 7 8 1 2 3 4 5 6 7 8 1 2 3 4 5 6 7 8 1 2 3 4 5 6 7 8 1 2 3 4 5 6 7 8 1 2 3 4 5 6 7 8 2 3 4 5 6 7 8 2 3 4 5 6 7 8 2 3 4 5 6 7 8 1 2 3 4 5 6
Nex
Gen
Tib
ial B
asep
late
s
RH
Kne
e Ti
bia
(Mod
ular
)
2 C C C C C C C C C C
3 C C C C C C C C C C
4 C C C C C C C C C C
5 C C C C C C C C C C
6 C C C C C C C C C C
RH
Kne
e Ti
bia
(Non
-Mod
ular
)
1 C C C C C C C C
2 C C C C C C C C C C
3 C C C C C C C C C C
C: Cement Attachment Only
CS: Cement or Screw Attachment C: Cement Attachment Only

97-5988-102-00 Rev. 4 MC141388 8-25-2015 Printed in USA ©2015 Zimmer, Inc.
Contact your Zimmer representative or visit us at www.zimmer.com
DISCLAIMER: This documentation is intended exclusively for physicians and is not intended for laypersons. Information on the products and procedures contained in this document is of a general nature and does not represent and does not constitute medical advice or recommendations. Because this information does not purport to constitute any diagnostic or therapeutic statement with regard to any individual medical case, each patient must be examined and advised individually, and this document does not replace the need for such examination and/or advise in whole or in part.
Please refer to the package inserts for important product information, including, but not limited to, indications, contraindications, warnings, precautions, and adverse effects.
The CE mark is valid only if it is also printed on the product label.


![Surgical echnique - Acumed › system › files › Acumed... · Acumed Polarus 3 Solution Surgical echnique System Features [continued] Low-Profile Screw 4.3 mm low-profile hexalobe](https://static.fdocuments.net/doc/165x107/5f21975916b34d48e73f191d/surgical-echnique-acumed-a-system-a-files-a-acumed-acumed-polarus-3.jpg)


![Draft 35 Ultimod XGen Xb28 FEB 2012[1] - dicel.fr](https://static.fdocuments.net/doc/165x107/62a08a41c9f7476c93094f64/draft-35-ultimod-xgen-xb28-feb-20121-dicelfr.jpg)