HTML (Advanced) -forms, iframe, audio, video. Outline – Forms – iFrames – Audio/Video.
Further Development 1
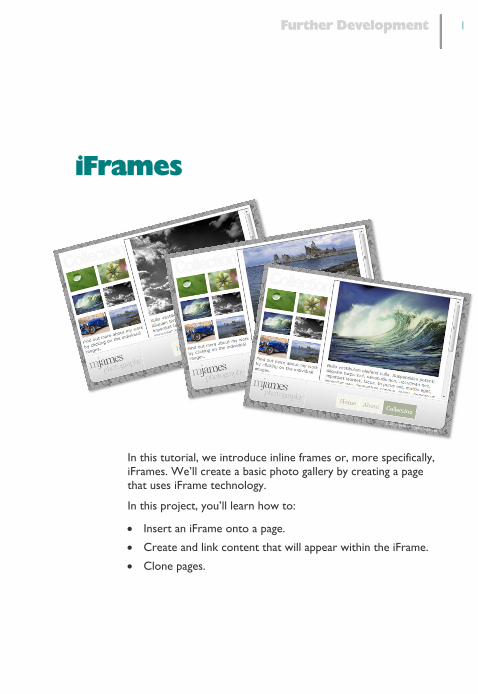
iFrames
In this tutorial, we introduce inline frames or, more specifically,iFrames. We’ll create a basic photo gallery by creating a pagethat uses iFrame technology.
In this project, you’ll learn how to:
· Insert an iFrame onto a page.
· Create and link content that will appear within the iFrame.
· Clone pages.

iFramesFurther Development2
IFramesAn inline frame, or iFrame, is a frame placed on your page and website.The content displayed within an iFrame can come from a separate page,document, or even an entire website! Because an iFrame worksindependently from the page that displays it, the iFrame can even have itsown navigation elements—any link clicked inside the frame only changesthe frame and not the page. This behaviour makes iFrames extremelyuseful for displaying large amounts of information in a small space, and ifused well, are an effective tool.
Collection page
iFrame pages
As site visitors clickthrough the thumbnailson the left, the iFrame onthe right updates withthe corresponding full-size image and text.
Image page preview

iFramesFurther Development 3
To demonstrate iFrames, we have created an example photographywebsite for you to work on. The project file, iframes.wpp, and its imagescan be found in the Workspace folder.
To open the project file
1 On the Standard toolbar, click Open.
2 Navigate to the Workspace folder and click to select theiframes.wpp project file. In a typical installation, this folder is foundin:
C:\Program Files\Serif\WebPlus\X4\Tutorials
3 Click Yes in the dialog to open as anew, untitled site.
4 Click File > Save As... and saveyour new file under a new name.
5 On the Site tab, double-click on theCollection page entry.
The page displays in the workspace.
Currently, the Collectionpage contains a set of smallthumbnails but no additionalcontent. We’re going to addan inline frame so that our sitevisitors can view a largerversion of the images and readthe additional information.
The content of the iFrame will be dynamically changed, depending onwhich thumbnail is clicked. Sound complicated? Don’t worry, it really isn’t.Let’s get started.
To create the thumbnails, we placed six empty frames on the page andsized them using the Transform tab. The frames were aligned using theAlign tab, before using the picture frame controls to replace and positionour images. For more information, see the Pictures tutorial.

iFramesFurther Development4
To insert an iFrame
1 On the Web Objects toolbar, click the Framed DocumentTool and then click and drag to create a large frame on the right ofyour Collection page.
2 In the Framed Document dialog, click OK to accept the defaultsettings—we’ll come back to this later when we have created thecontent.
3 On the Transform tab, click the Lock Aspect Ratio button to
allow unconstrained resizing (it willchange to ). Change the Width to405 pixels and the Height to 320pixels.
4 If necessary, drag theiFrame into position on thepage.
That’s all for now. Thenext step is to create acontent page.
To create iFrame content pages
1 On the Site tab, click Add toadd a new page.
2 In the New Page Properties dialog:
· On the Appearance tab, in thePlacement section, selectCollection from the drop-down list.
· Change the Width to 380 pixels.

iFramesFurther Development 5
· Click the Navigation tab.
· Change the Page name todroplet.
· Change the File name todroplet.html
· Clear Include in Navigation.
· Click the Background tab.
· Remove Master A.
· Clear Use ColourScheme DesignerSettings and change on-page colour to white.
· Click OK.
3 Working on the new page, on the Standard Objects toolbar, in the Picture flyout, click Empty Picture Frame.
4 Place the frame in the top centre of the page, with the top edge of theframe aligned to the top of the page.
5 On the Transform tab, set theWidth to 350 pixels and the Heightto 250 pixels.
6 With the frame stillselected, on the Align tab:
· Ensure that Relativeto: Page is selected.
· Click CentreHorizontally.

iFramesFurther Development6
7 Finally, click the Replace Picturebutton on the frame control bar.
8 Navigate to the Workspace folderand select droplet.png. Click Open.
9 If necessary,adjust thepicture in theframe using thetools on theframe controlbar.
Next we’ll pacean HTML textframe for thepictureinformation.
10 On the Standard Objects toolbar, click the HTML Text FrameTool.
11 Click and drag to place the HTML frame belowthe image. On the Transform tab, resize theframe to 330 pixels wide x 350 pixels high.
12 Right-click inside the HTML frame and clickInsert > Placeholder text.
13 Finally, select both objects and, on theAlign tab, click CentreHorizontally, Relative to: Page.
The first content page is complete.Luckily, we can quickly create theother five content pages withouthaving to repeat all of the steps.
To clone pages
1 In the Site tab, right-click the page entry for the droplet page andselect Clone Page.
iFramesFurther Development 7
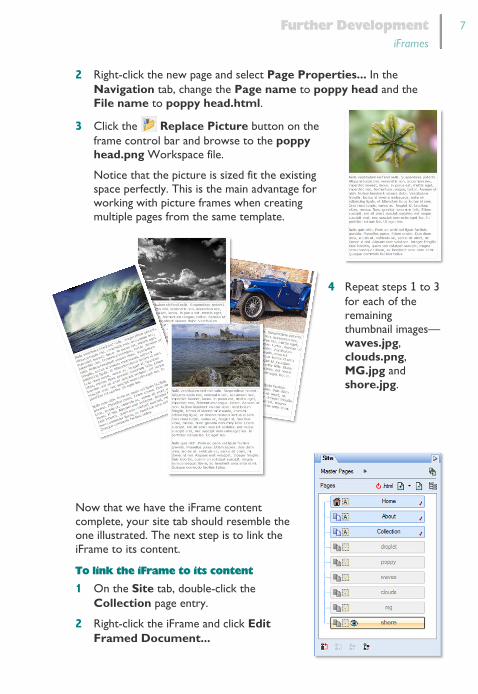
2 Right-click the new page and select Page Properties... In theNavigation tab, change the Page name to poppy head and theFile name to poppy head.html.
3 Click the Replace Picture button on theframe control bar and browse to the poppyhead.png Workspace file.
Notice that the picture is sized fit the existingspace perfectly. This is the main advantage forworking with picture frames when creatingmultiple pages from the same template.
4 Repeat steps 1 to 3for each of theremainingthumbnail images—waves.jpg,clouds.png,MG.jpg andshore.jpg.
Now that we have the iFrame contentcomplete, your site tab should resemble theone illustrated. The next step is to link theiFrame to its content.
To link the iFrame to its content
1 On the Site tab, double-click theCollection page entry.
2 Right-click the iFrame and click EditFramed Document...
iFramesFurther Development8
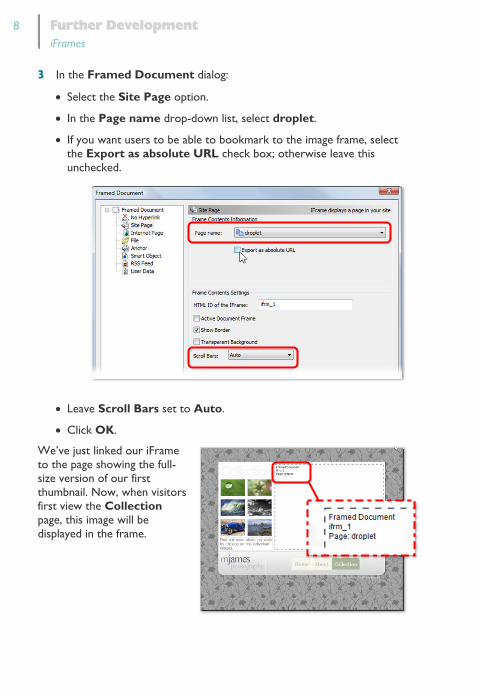
3 In the Framed Document dialog:
· Select the Site Page option.
· In the Page name drop-down list, select droplet.
· If you want users to be able to bookmark to the image frame, selectthe Export as absolute URL check box; otherwise leave thisunchecked.
· Leave Scroll Bars set to Auto.
· Click OK.
We’ve just linked our iFrameto the page showing the full-size version of our firstthumbnail. Now, when visitorsfirst view the Collectionpage, this image will bedisplayed in the frame.

iFramesFurther Development 9
Our final task is to link the image thumbnails to the content pages, so thatwhen visitors click on the thumbnail, the full-size image will display in theiFrame.
To link the thumbnails
1 On the Collection page, right-click the matching image thumbnail forthe droplet page and select Hyperlink.
2 In the Hyperlinks dialog:
· Select Site Page.
· In the Page name drop-down list, select droplet.
· In the Type drop-down list, select Document Frame, and checkthat ifrm_1 is selected in the corresponding list.
· Click OK.
The image will now display in the frame when the thumbnail is clicked.
Note: You won’t be able to see the effect of this step whenpreviewing your site until you’ve linked the other thumbnails!
3 Repeat steps 1 and 2 for each of the remaining thumbnails.
4 Finally, click Preview Site in {browser of choice}.
5 Click on each of the thumbnails to ensure that each page loadscorrectly inside the iFrame.

iFramesFurther Development10
That’s it! You have successfullycreated a site that uses iFrames! Bynow, you should have the knowledgeto use iFrames within your own site.The possibilities are virtually endless.Why not try using them in conjunctionwith some of the Serif WebResources smart objects?
Have fun!
When not to use iFrames
As a general rule of thumb, you should notuse iFrames to link to e-commerce contentas it can interfere with security certificates.